

Page 1
Page 2
READ THIS FIRST!
WARNING!
Grounding Instructions
This product must be grounded. If it should malfunction or break down. grounding provides a path of
:east resistance for electric current to reduce the risk of electric shock. This product is equipped with a
cord having an equipment-grounding conductor and a grou nding plug. The plug must be plugged into an
appropriate outlet that is properly installed and grounded in accordance with all local codes and ordinances.
DANGER: Improper connection of the equipment-grounding conductor can result in the risk of electric
shock. Check with a qualified electrician or service personnel if you are in doubt as to whether the
product is properly grounded. Do not modify the plug provided with this product — if it will not fit the
outlet. have a proper outlet installed by a qualified electrician.
This symbol is intended to alert the user to the
presence of uninsulated "dangerous voltage'
within the product's enclosure that may be of
sufficient magnitude to constitute_ a risk of
electronic shock to Persons.
This symbol is intended to alert the user to the
presence of important operat ng and maintenance (servicing) instructions in the literature
accompanying the appliance.
SEE IMPORTANT SAFETY INSTRUCTIONS ON BACK COVER!
Page 3
SQ-80
CROSS WAVE SYNTHESIZER AND SEQUENCER
Musician's Manual
Version 1.0
SQ80 Soft Copy Manual
Creation and Revision Information
OCR and PDF conversion by Mark Wynkoop http://www.markwynkoop.com/
Version 1 September 2007
1. OCR not 100% manually verified, commas sometimes recognized as periods.
Copyright and User License:
User License: This manual is FREE for the use of the ESQ/SQ80 community.
Sale of this softcopy manual is PROHIBITED. Sale of this information on eBay
is PROHIBITED. If you find this information bundled in any sort of for-pay
distribution, you have been cheated. Report the seller to eBay.
Page 4
SQ-80 — Musician's Manual
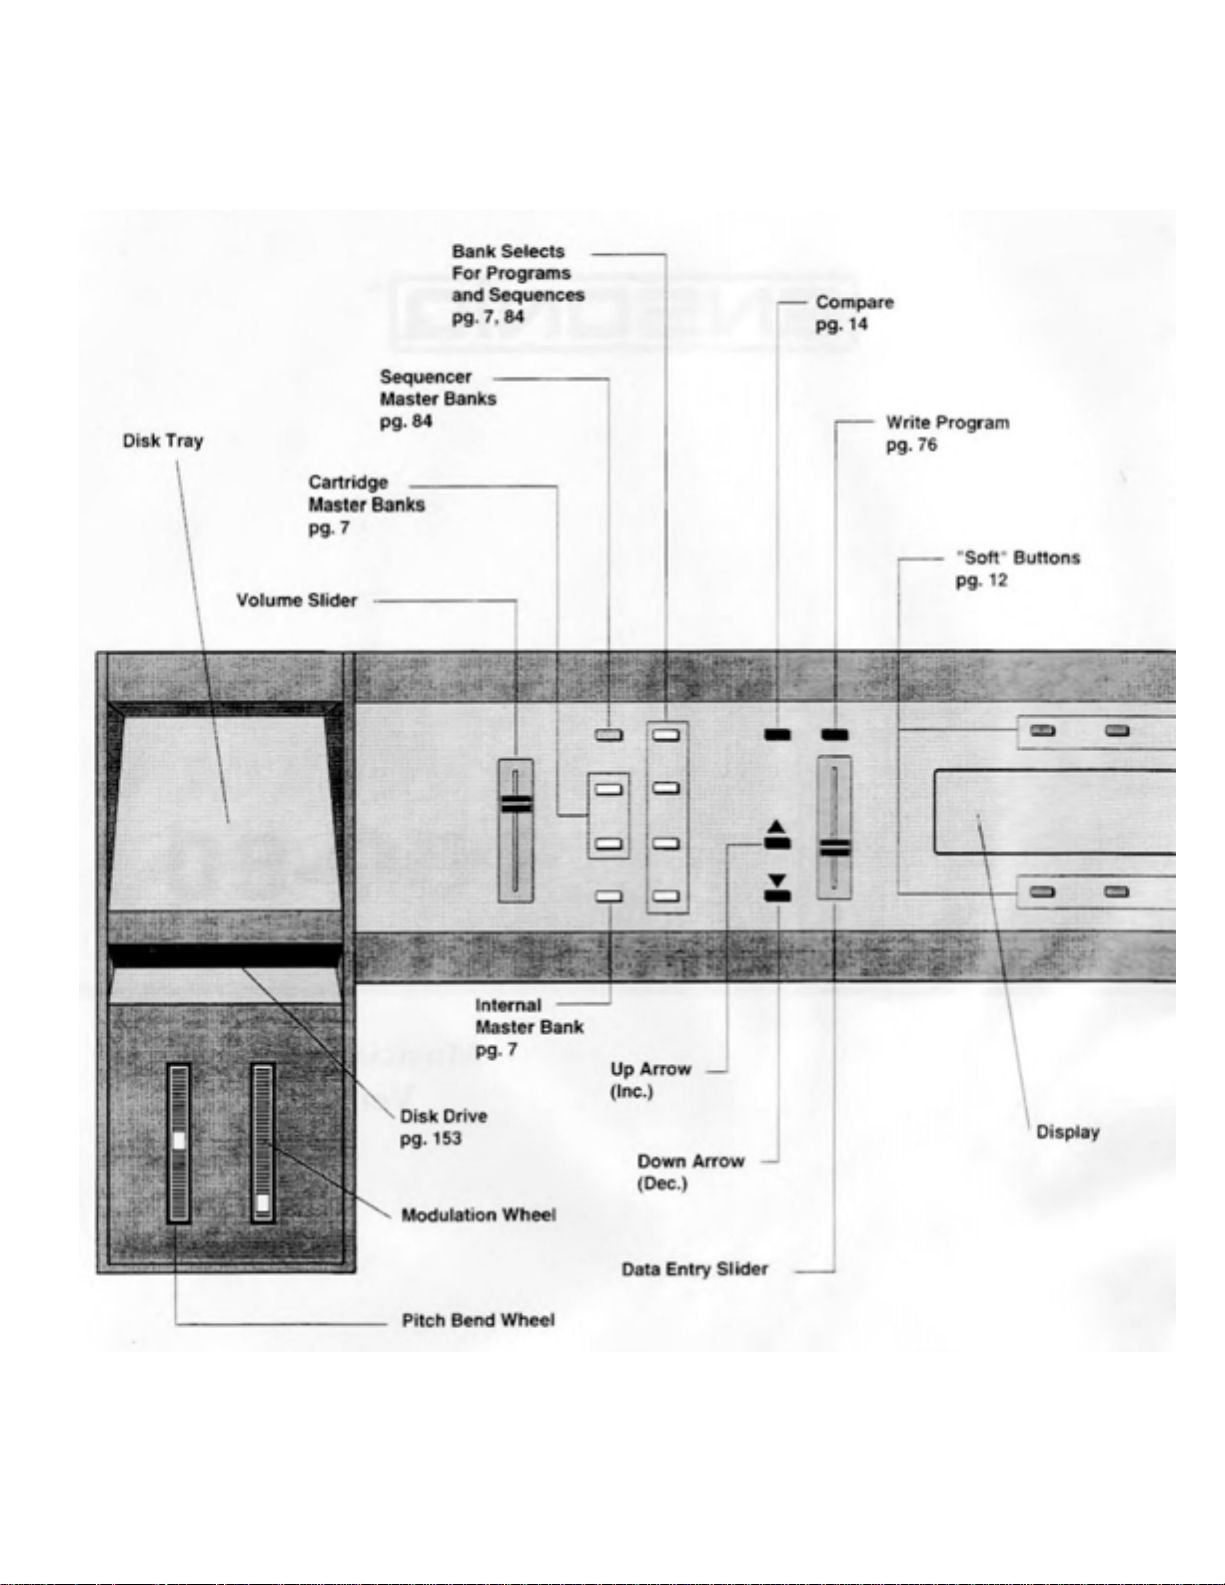
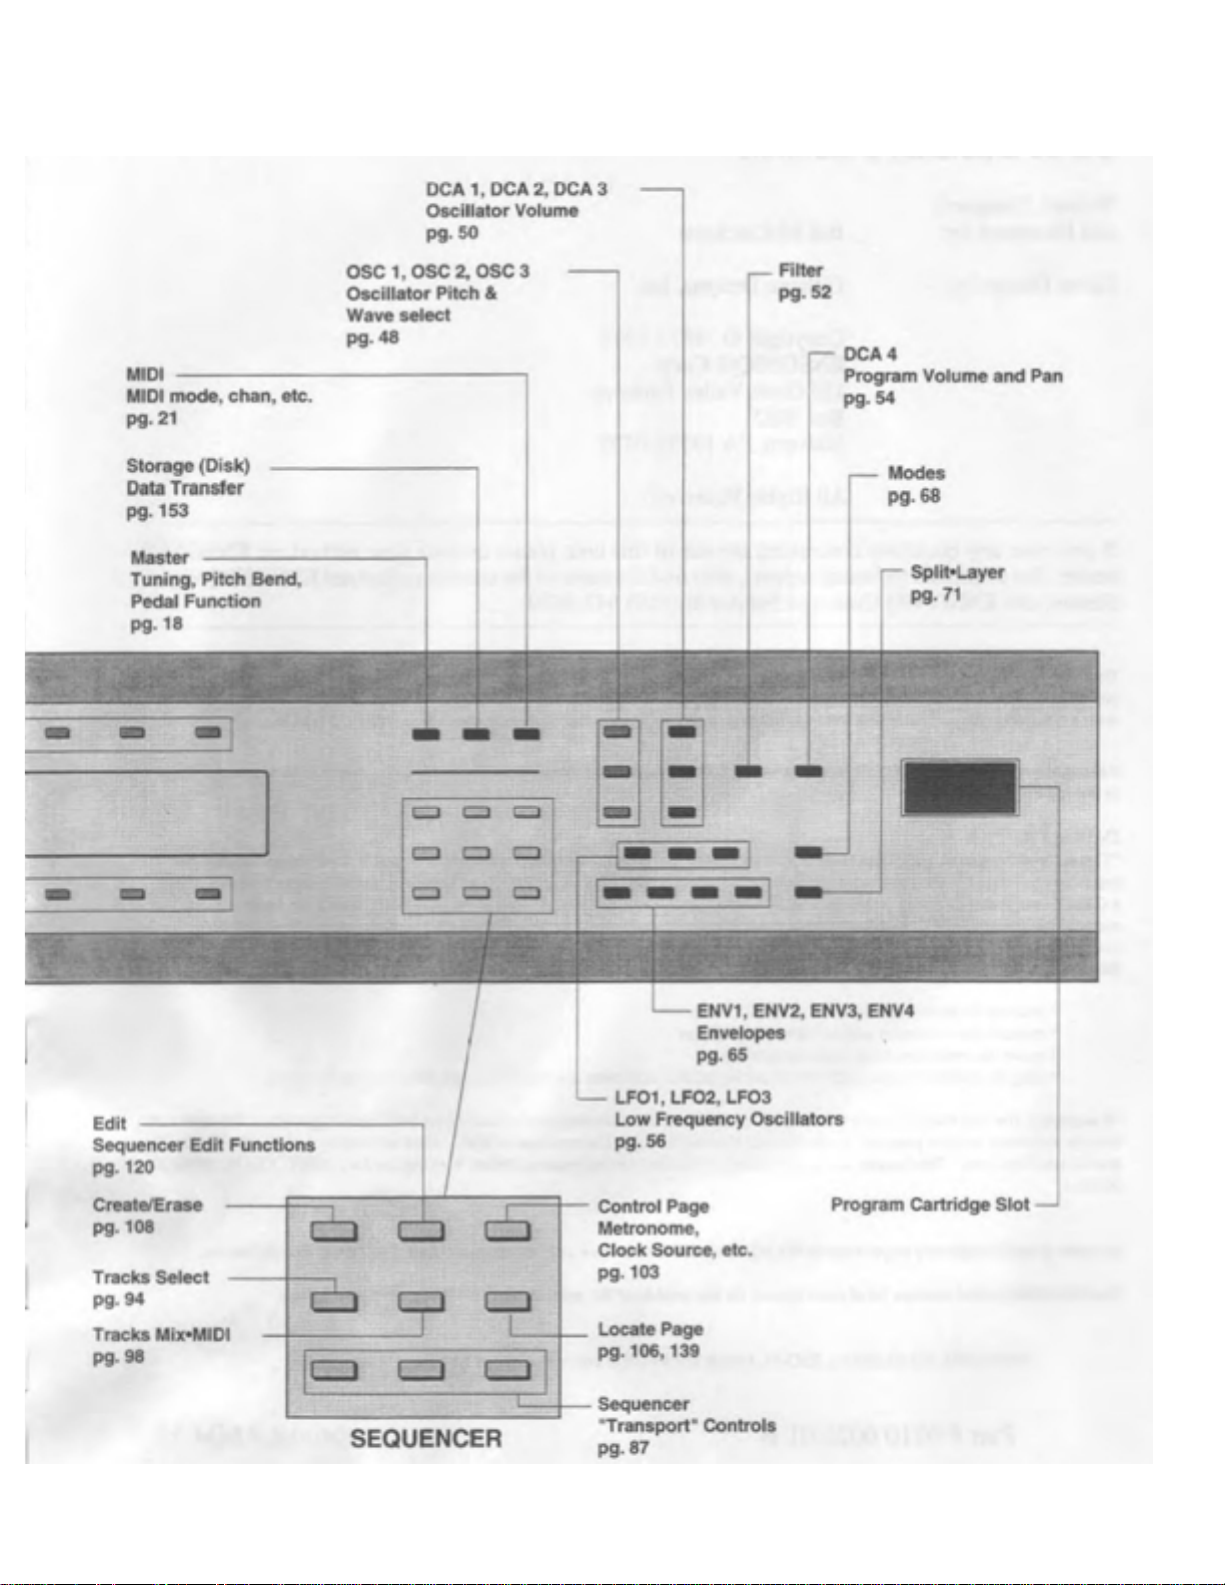
FRONT PANEL CONTROLS:
Front Panel Controls
Page 5
SQ-80 — Musician's Manual
Fr o n t P a n e l C o n t r o l s iii
Page 6

A
SQ-80 — Musician's Manual
SQ-80 Musician's Manual:
Written, Designed,
an d I l lu s t r a t e d by : Bill McCutcheon
Cover Design by: Gilligan Designs, Inc.
Copyright © 1987 - 1995
ENSONIQ ® Corp
155 Great Valley Parkway
Box 3035
Malvern, PA 19355-0735
All Rights Reserved
If you have any questions concerning, the use of this unit, please contact your authorized ENSONIQ
dealer. For additional technical support, or to find the name of the nearest authorized ENSONIQ Repair
Station, call ENSONIQ Customer Service at (610) 647-3930
This Manual is copyrighted and all rights are reserved by ENSONIQ Corp. This document may not, in whole or in part, be copied.
photocopied. reproduced. translated or reduced to any electronic medium or machine readable form without prior written consent from
ENSONIQ Corp. The SQ-80 software/firmware is copyrighted and all rights are reserved by ENSONIQ Corp.
lthough every effort has been made to ensure the accuracy of the text and illustrations in this Manual, no guarantee is made or implied in
this regard.
IMPORTANT:
"This equipment generates and uses radio frequency energy and if not installed and used properly. that is. in strict accordance with the
manufacturer's instructions. may cause interference to radio and television reception. It has been designed to comply with the
Class B computing device in accordance with the specifications in Subpart
reasonable protection against such interference in a residential installation. However, there is no guarantee that interference will not occur in
a particular installation. If this equipment does cause interference to radio or television reception. which can be determined by turning the
equipment off and on. the user is encouraged to try to correct the interference by one or more of the following measures."
reorient the receiving antenna
relocate the instrument with respect to the receiver
move the instrument away from the receiver
plug the instrument into a different outlet so that the instrument and receiver are on different branch circuits
"If necessary, the user should consult the dealer or an experienced radio/television technician for additional suggestions. The user may
find the following booklet prepared by the Federal Communic ations Commission helpful: 'How to Identify and Resolve Radio-TV
Interference Problems.' This booklet is available from the U.S. Government printing Office. Washington. D.C. 20402 Stock No. 004-00000345-4."
In order to fulfill warranty requirements the SQ-80 should be serviced only by an authorized ENSONIQ Repair Station .
.1 of Part 15 of FCC rules, which are designed to provide
limits for a
The ENSONIQ serial number label must appear on the outside of the unit or the ENSONIQ warranty is void.
*ENSONIQ, SQ-80, ESQ-l.
ESQ-M, Mirage and MASOS are trademarks of ENSONIQ Corp.
Part # 9310 0025 01-B Model # MM-15
iv
Page 7

SO-80 — Musician's Manual
TABLE OF CONTENTS
SECTION 1 — First Things First
2......................A Word About the SQ-80
2 ...........................A W o r d Abo u t t h e M a nual
3 ....................Getting Started
3 ...........................Power
3 ...........................AC L i n e C o n d i t i o n i n g
3 .......................... Amplification
4 ....................Rear Panel Connections
6......................Communicating With the SQ-80
7 ........................Selecting Sounds
7............................Master Banks
7 ........................... Internal Memory
7............................Cartridge Memory
7............................Bank Select Buttons
8 .......................... Se l e c t i n g a P r o gr a m — I n t e r n a l
9 .......................... S e l ec t i n g a P r og r a m — C a r t ri d g e
9 .......................... C a r t r i d g e I n s e r t i o n a nd R e m o v a l
9 .....................ESQ Compatibility - Sounds and Sequences
9 .....................Pressure (After-touch)
10 ...................Dynamic Voice Assignment Revealed
10 ..................The Disk Drive
11 ..................Battery Maintenance
11 ..................Available Options
11 ..................Why You Should
12 ...................PROGRAMMING
12 ........................ Pa r a m e t r i c p r o g r a m m i n g
12 ........................ Pages
12 ........................ "S o f t " B u t t o n s
13 .........................Ch a n g i ng a P a r a m e t e r
14 ........................ *C * — C h ange/Comp are
14 ........................ Ed i t B u f f e r
15 ........................ Bailing Out
15 ........................ Ac t i v e a n d I n a c t i v e Bu t t o n s
16 ..................Re-initializing the SQ-80
Fill Out and Mail Your Warranty Card
THE SQ-80
SECTION 2 — Global Functions and MIDI Configuration
18 ...................MASTER Page
19 .........................TU N E — M a s t er Tuning
19 ........................ KE Y B D — " S t r a i g h t S y n t h " K ey b o a r d S t a t u s
19 ........................VE L — V e l o c i t y S e n s i t i v i ty
Table of Contents
Page 8

SQ-80 — Musician's Manual
20 .........................PED A L — Foot Pedal Function Select
20 ........................ P i t c h Be n d R ange
20 ........................ P i t c h Be n d M ode
21 .................. MIDI Page
22 .........................CHA N — B a se M I D I C hannel
22 .........................OVF L — M ID I O v e r f l o w M o d e
22 .........................XCT R L — Se l e c t E x t e r na l C o n t r o l le r
23 .........................PRE S S — Pr e s s u r e ( A ft e r t o u c h ) Co n t r o l
24 .........................MOD E — S el e c t M I D I Mode
26 .........................ENA B L E — MI D I E n a b l es
SECTION 3 — Voice Programming
28 ...................Voice Diagram — an SQ-80 Voice
29 ...................About
CrossWaveTM
30 ...................WAVES
30 .........................D i g i t a l W a v e M e m o r y
30 .........................W a v e f o r m s , I n h a r m o n i c Loops and Transien t
32 ........................ S y n t h et i c , S a m p l ed a n d M u l t is a m p l e d W a v es
32 .........................Names
32 ........................Se l e c t i n g a Wa v e f o r E a ch O s c i l l a t or
33 ........................ Check Them Out
33 .........................The Waves
40 ...................MODULATORS
40 .........................A b o u t M o d u l a t i o n
40 ........................ Se l e c t i n g a Mo d u l a t o r
41 ........................ Modulation Depth
41 ........................ Modulation Sources
45 ........................ Using Modulators
47 ...................PROGRAMMING PAGES
48 .........................O S C 1 - 3 — O s c i l l a t o r P i t c h P a g es
50 .........................D C A 1 - 3 — O s c i l l a t o r V o l u m e P ag e s
52 ........................ FILTER Page
54 .........................D C A 4 — F i n a l V ol u m e P a g e
56 .........................L F O 1 - 3 — L o w F r e q u e n c y O s c i l la t o r s
59 ......................... U n d e r s t a n d i n g t h e E n v e l opes
65 .........................E N V 1- 4 — E n v e l op e P ages
68 .........................M O D E S P a g e
71 ........................ SPLIT/LAYER Page
75 ...................Programming Conventions
76 ...................WRITE Page
76 ........................ S a v i n g a N e w P r o g r a m i n t o M e m o ry
78 .........................C o p yi n g a n E x i s ti n g P r o g r a m t o A n o t h e r Lo c a t i o n
Synthesis
Attacks
vi Table of Contents
Page 9

SECTION 4 — The Sequencer
81 ..................The Sequencer
81 ........................The MIDI Connection
82 ........................ Digital Sequencing
83 ..................The "System"
84....................Sequences And Songs
84 ..........................W h a t i s a Se q u e n c e ?
84 ........................Sequencer Master Banks
84 ..........................S e q u e n c e r Ba n k s
85 ........................ S e le c t i n g a S e q u e n ce
86 ........................ S e le c t i n g a S o n g
86 ........................ Playing Sequences
86 ........................ Playing Songs
87...................."Transport" Controls
88....................Sequencer States
89 ..................Utility Pages
89 .......................... " K E E P F I R S T T R A C K "
89 .......................... P L A Y / K E E P P age
91 ........................" S A VE C H A N G E S T O O LD S E Q U E N C E "
91 ............................. Al t e r i n g a S e q u e n c e I n S o n g M o d e
93....................TRACKS
93 .......................... A b o u t T r a c k s
94....................SELECT — Tracks Select Page
94 ..........................S e l e c t i n g a Tr a c k
95 .......................... C h a n g i n g t h e P r o g r a m o n a T r a c k
96 .......................... " U nse l e c t i n g " a T ra c k — " S t r a i g h t Sy n t h " M o d e
96 ..........................T r a c k D i s pl a y s
98 ..................Mix•MIDI Page
98..........................Sub-pages
99 ..........................T r a c k S t a t us
100 ...................... Tra c k Pr o g r a m N u m b er
10 0 ............................ A N ot e A b o u t M I DI P r o g r a m N u mb e r s
101 ...................... T r a c k Mix
101 ........................... M u t i ng a T r a c k
102 ......................T r a c k M I D I Ch annel
103 .................CONTROL — Sequencer Control Page
106 .................LOCATE — Sequence Locate Page
10 7 .......................A u t o - L o c a t e C o n t r o l s
108 .................CREATE/ERASE Page
111 ................Recording a Sequence
111 ...................... S e q uencin g on the SQ-80 alone
111 ...................... R e c o r d i n g t h e F i r s t T r a c k
112 ...................... U s i n g t h e Foot Switch to define Sequence Length
112 ...................... R e c o r d i n g O t h e r T r a c k s
SQ-80 — Musician's Manual
Table of Contents vii
Page 10

SQ-80 — Musician's Manual
114 ..................... O v e r dub Mode — "Punching In"
115 ..................... " P u n c h i n g O u t "
115 ............... MI D I S e q u e n c i n g o n t h e S Q - 8 0
115 ..................... B a s i c M I D I C onnections
116 ..................... U s i n g a M I D I T h r u B o x
116 ..................... M I D I M ode and Channel — Destination Instruments
117 ..................... T r a c k C o n f i g u r a t i o n
118 ..................... R e c o r d i n g t h e F i r s t T r a c k
118 ..................... O t h e r T r a cks
120 ................ Sequencer EDIT Functions
120 ............... EDIT Page
121 .....................T R A C K — Ed i t i n g a Tr a c k
12 7 ...................... S T E P — T r a c k S t e p E d i t i n g
131 ..................... S E Q — E d i t i n g a S e quence
134 ...........................M a k i n g a S equence Template
135 ................ Song Mode
13 6 ...................... S O N G E d i t P age
138 ..................... M a k i n g a S ong
13 9 ...................... L O C A T E — Song Locate Page
SECTION 5 — Sequencer and Controller Applications
142 ............... Using the SQ-80 With a Drum Machine
143 ................ Song Position Pointers
143 ............... MIDI Song Selects
143 ................ Tape Sync
14 3 ...................... Re c o r d i n g a S y n c T r a c k
14 4 ...................... S y n c i n g t h e S Q - 8 0 t o a R e c o r ded Sync Track
144 ............... System Controller Tricks— Sending 8 Program Changes at Once
145 ................ Using the SQ-80 with a MIDI Guitar Controller
147 ................ Playing the SQ-80 from an External Sequencer
147 ...................... Connections
147 .....................T h e S Q - 8 0 a s O n e S y n t h e s i z e r
148 .....................T h e S Q - 8 0 a s N i n e S y n t h e s i z e r s
149 .....................S o m e I m p o r t a n t n o t e s about MULTI Mode
SECTION 6 — Data Storage
153 ................ STORAGE (Disk) — Storage Page
153 ................ CARTRIDGE— Bank Copy
154 .....................T r a n s f e r r i n g I n t e r n a l P r o g r a m s t o a C a r t r i dge
154 .....................T r a n s f e r r i n g C a r t r i dge Programs to the Internal Memory
155 ............... DISK STORAGE — Using the Disk Drive to Save and Load Data
155 ..................... D i s k C apacity
157 ................ DISK FUNCTIONS
viii Table of Contents
Page 11

SQ-80 — Musician's Manual
157.......................FO RMAT — Formatting a Blank Disk
1 5 7 ............................. FO R M A T Error Messages
158.......................SAVE — S aving Data to Disk
158.......................SAVE NEW FILE — Saving Ne w Files toDisk
159 ............................S a v i n g O n e S equence to Disk
159 ............................S a v i n g A l l S equences to Disk
160 ............................S a v i n g t h e 4 0 I n t e r n a l P r o g r a m s t o D i s k
161 ............................S a v i n g a S i n g l e P r o g r a m t o D i s k
161 ...................... U P D A T E O L D F I L E — U pdating an existing File
162 ............................SAVE Error Messages
16 3....................... L OA D — L oading Data from Disk
163.............................Loading One Sequence from Disk
164 ............................Loading The Entire Sequencer Memory from Disk
165 ............................Loading a Bank of 40 Programs from Disk
166 ............................Loading a Single Program from Disk
16 6.............................L O A D E r r o r M e s s ages
16 7....................... D EL E T E — D e l e t i n g F i l e s f o r m D i s k
167 ............................D e l e t i n g a O n e S equence File
168 ............................D e l e t i n g a n A l l S equence File
168 ............................D e l e t i n g a P r o g r a m B a n k F i l e
169 ............................D e l e t i n g a S i n g l e P r o g r a m F i l e
169 ............................D E L E T E E r r o r M e s s ages
17 0....................... C OPY — M a k i n g a B a c k u p C o p y o f a D i s k
171 ................STORING SYSTEM EXCLUSIVE MESSAGES TO DISK
171 ......................W h a t a r e S y s t e m E x c l u s i v e s ?
171 ...................... " G eneric" System Exclusive Storage
171 ...................... I t U s e s t h e S equencer Memory
172 ...................... SAVING System Exclusive Data from an External Device
174.............................Updating an Existing System Exclusive File
174.............................SAVE SYS-EX Error Messages
17 4....................... L OA D I N G S y s t e m E x c l u s i v e D a t a f r o m D i s k t o a n E x t e r n a l D e v i c e
17 6....................... D EL E T I N G S y s t e m E x c l u s i v e F i l e s f r o m t h e D i s k
177 ................MIDI TRANSFER OF SQ-80 DATA
177.......................Sending Programs via MIDI
178 ...................... S ending Sequencer Data via MIDI
180 ...................... Loading ESQ-1 Sequencer Data from
181 ................TAPE STORAGE
181 ......................A "Decent" Tape Deck
181 ......................Tape Connections
182.......................SAVE — Saving Programs & Se quences to Tape
182 ......................V E R I F Y — V e r i f y i n g P r o g r a m s & S equences Saved to Tape
183.......................LOAD— Loading Programs & Sequences from Tape
184.......................Tape Error Messages
185.................ESQ-1 Compatibility
a Mirage
Table of Conte nt s ix
Page 12

SQ-80 — Musician's Manual
SECTION 7 — Appendices
188 ................Appendix 1 — MIDI Program Numbers on the SQ-80
189 ................Appendix 2 — SQ-80 MIDI Implementation Specification
197 ................Appendix 3 — SQ-80 Parameter Number List
201 ...............Appendix 4 — SQ-80 MIDI Implementation Chart
202 ................Appendix 5 — Program Control Block Structure
204 ................Blank Track Sheet
205 ...............Blank Program Sheet
206 ................SQ-80 Specifications
x Table of Contents
Page 13

SECTION 1
First Things First
2......................A Word About the SQ-80
2............................A Word About the Manual
3......................Getting Started
3............................Power
3 ............................ A C L i n e C o n d i t i o n i n g
3............................Amplificat ion
4 .................Rear Panel Connections
6....................Communicating With the SQ-80
7......................Selecting Sounds
7 ............................ M a s t e r B a n k s
7 .......................... Internal Memory
7 ............................ C a r tr i d g e M e m o r y
7 ............................ B a n k S e l e c t B u t to n s
8 .......................... S e le c t i n g a P r o g r a m — I nt e r n a l
9 .......................... S e l e c t i ng a P r o g r a m — C a r t r i d g e
9 .......................... C ar t r i d g e I n s e r t i o n a nd R e m o v a l
9......................ESQ Compatability - Sounds and Sequences
9......................Pressure (After-touch)
10 ...................Dynamic Voice Assignment Revealed
10 .................. The Disk Drive
11 .................. Battery Maintenance
11 .................. Available Options
11 .................. Why You Should Fill Out and Mail Your Warranty Card
12 ...................PROGRAMMING THE SQ-80
12 ........................ P ar a m e t r i c p r o g r a m m i n g
12 ......................... P a g e s
12 ........................ " S o f t " B u t t o n s
13 ......................... C h a n g i n g a P a r a m e t e r
14 ........................ * C * — C h ange/Comp are
14 ........................ E d i t B u f f e r
15 ........................ Bailing Out
15 ........................ A ct i v e a n d I na c t i v e B u t t on s
16 ..................Re-initializing the SQ-80
SQ-80 — Musician's Manual
Section 1 — First Things First 1
Page 14

SQ-80 — Musician's Manual
A Word About the ENSONIQ SQ-80
Welcome to the
world of synthesizers, sequencers, MIDI controllers and MIDI disk drives, the SQ-80 is something
different. It is all of those things and more, in one easy-to-use device. Here's what you get:
• An eight-voice, polyphonic, poly-timbr al synthesizer, capable of playing eight different sounds at
once, with dynamic stereo panning for each voice.
• Voice section employing state-of-the-art CrossWave
attack and sustain segments to create a rich variety of complex, dynamic sounds.
• 256k bytes of synthetic, sampled and multi-sampled wavedata
• Dynamic Voice assignment — each Track/MIDI Channel has access to all eight voices.
• An integrated eight-track
to find on stand-alone or computer-based Sequencers.
• A full-featured MIDI controller keyboard capable of sending eight MIDI Program and Volu me
changes at once.
• Key (Poly) Pressure keyboard — Polyphonic Pressure (or After-touch) affects
you press down on, allowing a whole new level of expressiveness. Of course, for sending to
instruments which only recognize Mono (or "Channel") Pressure, the SQ-80 can send that too.
• A 3.5" disk drive for fast and reliable storage of up to 600 Sequences and up to 1,728 Programs on a
single disk.
• Disk storage for all your MIDI devices —the ability to receive and save to disk any System Exclusive
message of up to 64k bytes from any device.
• An eighty-character fluorescent Display and user-friendly "Page-driven" programming scheme to
help you keep track of it all.
• Stereo Headphone jack for private listening at home or in the studio.
• Program and Sequence formats which are upwardly compatible with the
sounds and sequences created for the ESQ-1 can be played on the SQ-80.
ENSONIQ SQ-80, the first studio synthesizer designed 'for live performance. In a
TM
synthesis techniques; combine different
in ROM — 75 different Waves.
MIDI sequencer with 20.000 note capacity and features you would expect
only the note or notes
ENSONIQ ESQ-1, so
By combining all of this in a single integrated unit, t he
for any MIDI rig. You'll find that you can take most of your other MIDI Instruments, run MIDI cables
to them and then stow them away in a closet somewhere — most of the time, you won't need to touch
them. You can control everything right from the
Whether you plan to use the
composing pop tunes or performing as a one-person orchestra. we suspect that you'll soon wonder what
you ever did without it.
A Word About the Manual
We realize that many people don't particularly care for reading manuals. You bought the
ability to make music, not for a graduate course in applied computer technology. Still, the fact remains
that you have in your possession an extremely sophisticated computer device (disguised as a keyboard
instrument) which is capable of performing an enormous number of tasks. It may be necessary. when
all else fails, to look in the book to find out how to do something. But because of the SQ-80's friendly
user interface and intuitive operation, you'll probably only have to look once.
The odds are that whatever you need to know to get the most out of y our
Musician's Manual. Every effort has been made to present the material in a way that is neither too
technical nor too pedestrian. Take some time to look through it. and you'll find lots of hints and
operational advice that will enhance both your enjoyment and your productivity. But enough of this
serious stuff. Fire up your new SQ-80 and have some fun.
SQ-80 by itself or as the master controller in yo ur MIDI set-up. for
SQ-80's front panel.
ENSONIQ SQ-80 makes the perfect nerve center
SQ-80 for its
SQ-80 is right here in the
2 Section 1 — First Things First
Page 15
A
A
g
p
y
SQ-80 — Musician's Manual
GETTING STARTED
Power
Insert the Power Cable into the receptacle on the back of the S Q-80, next to the On/Off switch. Plug the
other end of the cable into a grounded AC outlet. (The proper voltage for your SQ-80 is listed on the
Serial Number Label on the Rear Panel.) Turn on the SQ-80 and make sure the Display lights up. If not,
check your connections and power source.
C Line Conditioning
s is the case with any computer device, the SQ-80 is sensitive to abnormal peaks and drops in the AC
line voltage. Lightning strikes, power drops or sudden and erratic surges in the AC line voltage can
scramble the internal memory and, in some cases, damage the unit's hardware. How can you protect
yourself against such occurrences? There are a couple of options:
• A Surge/Spike Suppressor. The cheaper of the options, a surge/spike suppressor absorbs, and
protects your gear from, all but the most severe over-voltage conditions. You can get multi-outlet
power strips with built-in surge/spike suppressors for little more than the cost of unprotected
power strips, so using one is a good investment for all your electronic equipment.
• A Line Conditioner. This is a better, but far more expensive, way to protect your gear. In addition
to protecting against surges and spikes, a line conditioner guards the equipment against
exc es si ve l y hi gh or low line voltages. If you use the SQ-80 in lots of different loca tions with varyin
or unknown AC line conditions, you might consider investing in a line conditioner.
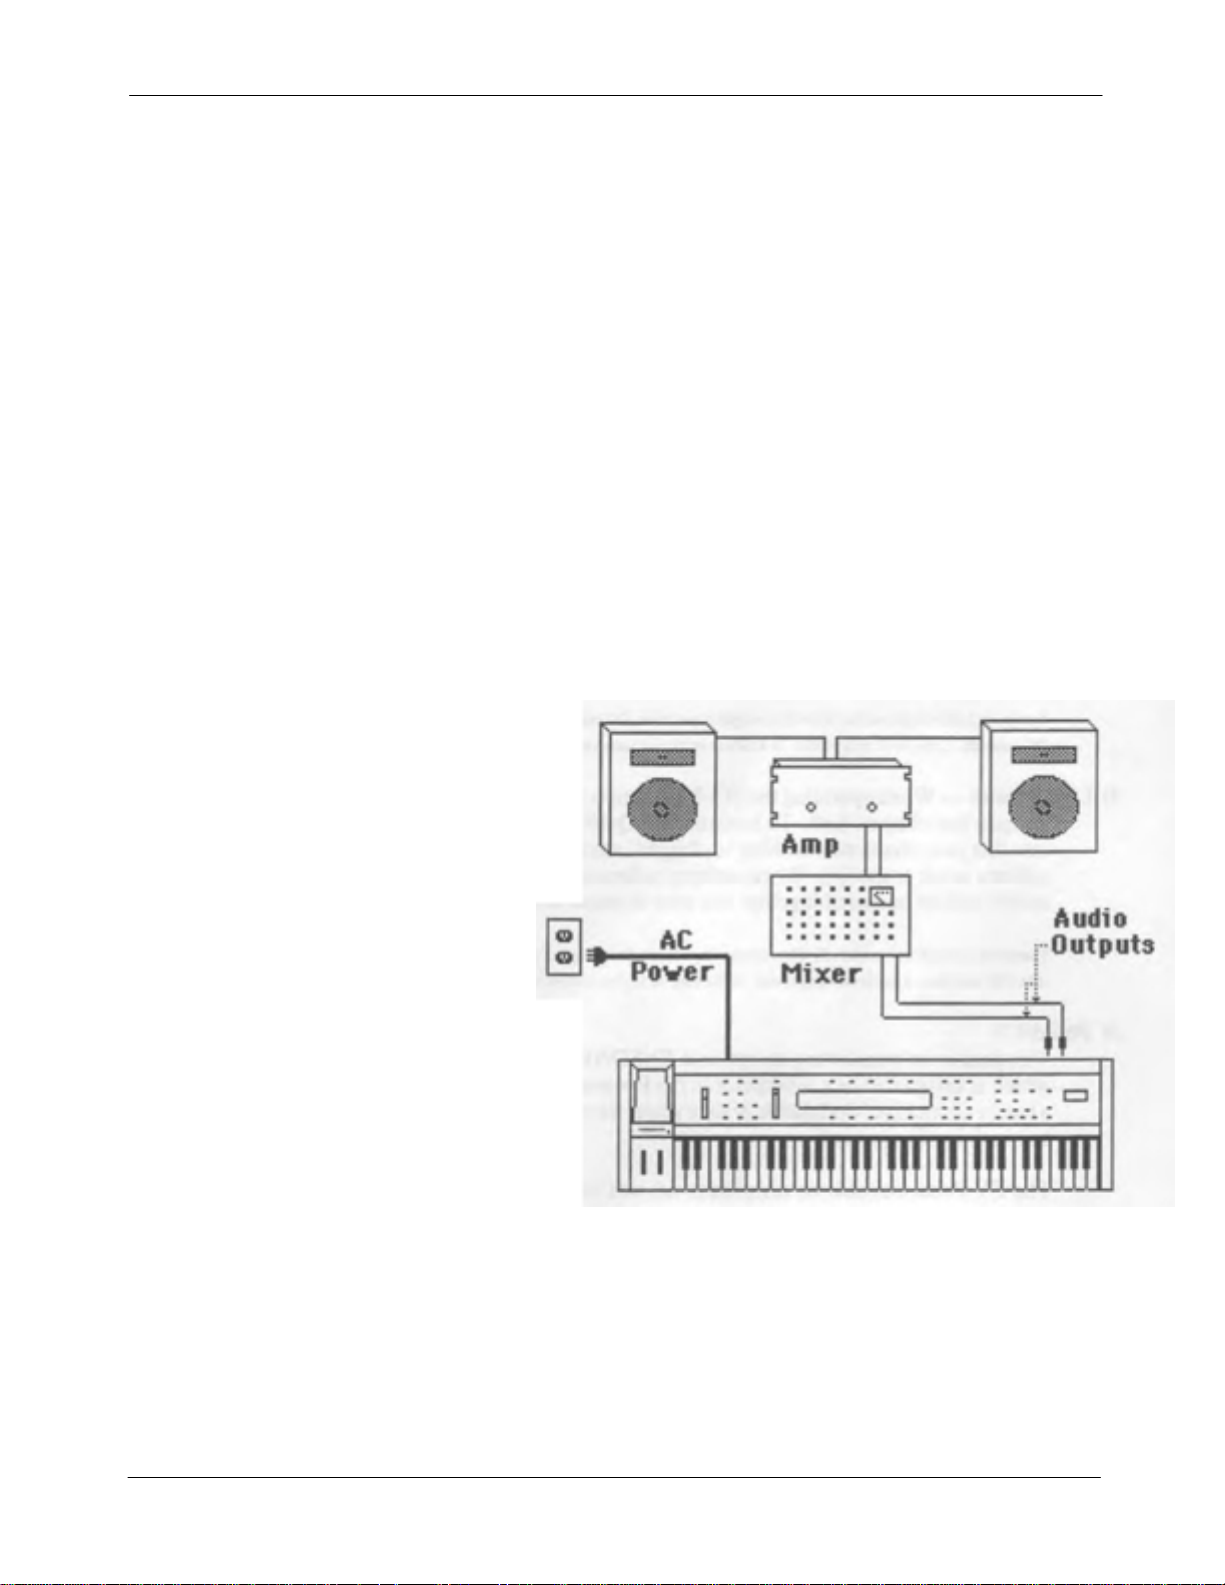
Amplification
Make sure your Audio system is turned off
(or down) when making connections. to
avoid damaging speakers or other com-
onents.
Connect the Audio Outputs of the SQ-80
to a mixer, instrument amplifier, stereo, or
any other sound system, using 1/4 inch
audio cables. If your system is stereo,
connect the Left and Right Outputs to two
channels of your mixer, stereo, etc. If not.
use the SQ-80' s Right/Mono Output only.
For listening through headphones. disconnect the Right/Mono jack and connect
the phones to the Left/Phones jack.
If you're running the SQ-80 through a mixer,
in stereo, be sure to pan the Left input full
left, and the Right input fully right.
Note: The SQ-80's outputs are line-level and are intended to be connected only to line-level inputs such
as those on a mixer, stereo pre-amp, keyboard amp. etc. Connecting the SQ-80's audio outputs to a
midlevel input. such as a guitar amp or the microphone jacks on a tape deck, is not recommended.
Move the Volume Fader of the SQ-80 up about half way. Switch the audio system On, and adjust the
amplifier volume for normal listening levels. If you hear no sound while playing the keyboard, switch
the audio system Off and check your connections.
Section 1 — First Things First 3
Page 16

SQ-80 — Musician's Manual
REAR PANEL CONNECTIONS
AUDIO OUTPUTS:
1) Right/Mono — To operate the SQ-80 in Mono, use this jack only. To operate the SQ-80 in Stereo.
connect this Output to a channel of your Mixer and pan that channel Right. If nothing is
connected to this jack, both channels of the
Phones Output for use with headphones.
SQ-80's output will be sent in stereo to the Left/
Specs: In Left&Right mode: 680 Ohm output impedance. DC coupled. In Mono (summed) mode: 340 Ohm output impedance. DC
coupled. Line level output into 10 KOhms or higher (one voice=1 Vp-p typical; all voices= 15 Vp-p)
2) Left/Phones —When operating the SQ-80 in Stereo, connect this Output to a channel of your
Mixer and pan that channel Left. To listen to the
phones into this jack (make sure nothing is plugged into the
output will not work properly). When nothing is connected to this jack, both channels of the
SQ-80 in stereo through headphones, plug the
Right/Mono jack, or the headphone
SQ-
80's output will be summed together and sent in mono to the Right/Mono Output.
Specs: In Left&Right mode: 51 Ohm output impedance. DC coupled. In Headphones mode: 51 Ohm output impedance. each
side. DC coupled. Line level output into 10 KOhms or higher (one voice=1 Vp-p typical; all voices= 15
Vp-p)
3) Pedal/CV
This jack is for connecting an optional ENSONIQ Model CVP-1 Control Voltage Foot Pedal,
which is assignable as a Modulator in the
handy alternative Modulation source when, for example, you would want to use the Mo d Wheel but
both hands are busy.
The CV Pedal can also be assigned to act as a Volume Pedal (see
Specs: 3-conductor (Tip=control voltage input, Ring=2KOhm resistor to +12 Volts, Sleeve= ground). 500 Kohm input
impedance. DC coupled. Input voltage range=0 to 10 volts DC. Scan rat
Hz). For use with an external control voltage, use a 2-conductor cable with the voltage on the tip and the sleeve grounded.
Program Section of the SQ-80. The Pedal gives you a
Master Page. p. 20).
e=5mS (maximum recommended modulation input= 25
4) Tape In
This jack can be connected to the output of an audio tape recorder and u sed for one of three
purposes:
> To Load and Verify Program or Sequencer Data which has been saved to Tape,
> To read an incoming Clock Signal (or sync track) which has been recorded to tape. for the purpose
4 Section 1 — First Things First
Page 17

r
SQ-80 — Musician's Manual
of synchronizing the Sequencer to an audio tape recording, or
> To read an incoming Clock Signal from another sequencing device (a drum machine, or other
sequencer) for the purpose of synchronizing the
connections. To do this simply connect th e Tape Out or Clock Out jack of the other device to
the Tape In jack of the
Page).
Specs: 10 Kohm input impedance. AC coupled. Triggers from 500 mVp-p up to 5 Vp-p. AC or DC coupled. 500 Hz maximum
response for sync.
SQ-80 and set the SQ-80's Clock Select for Tape Sync (see CONTROL
SQ-80 Sequencer to that device without MIDI
5) Tape Out
Connect this Jack to the Input of a Tape Recorder to:
> Save Program or Sequence Data to Audio Tape, or
> Send out a Clock Signal (or sync track) to be recorded on audio tape so that you can synchronize
the Sequencer to that track.
Or.
> Connect this Jack to the Tape In jack of another sequencing device. and set that device for Tape
Sync. to sync it to the SQ-80's clock without MIDI connections.
Specs: 22 Kohm output i impedance. AC coupled. Drives I Vp-p into 10 KOhms (line level) and down to 100 mVp-p into 1 KOhm
(mic level).
6) Sequencer Foot Switch
This jack is for use with an ENSONIQ Model SW-1 Foot Switch. A Foot Switch connected here
can be used to start and stop the Sequencer.
7) Sustain Foot Switch
This jack also takes an ENSONIQ Model SW-1 Foot Switch. This switch acts as a Sustain
Pedal. Holding it down will cause notes to continue to sustain after the key has been released.
Note: The ENSONIQ Model SW-1 Foot Switch is wired with the contact Normally Open. Some othe
manufacturers' footswitches are wired this way, and will work with the
the opposite way (Normally Closed) and will not work properly with the
SQ-80. Some are wired
SQ-80.
8) MIDI Out
Sends out MIDI (Musical Instrument Digital Interface) in formation to other instruments and
computers.
9) MIDI In Receives MIDI information from other MIDI instruments or
computers.
10) MIDI Thru
"Passes on" all MIDI information received by SQ-80 to other devices. Information generated
by the
MIDI In jack.
SQ-80 itself does not go to this jack — the Thru jack merely echoes what comes in at the
Section
1— First Things First
Page 18
SQ-80 — Musician's Manual
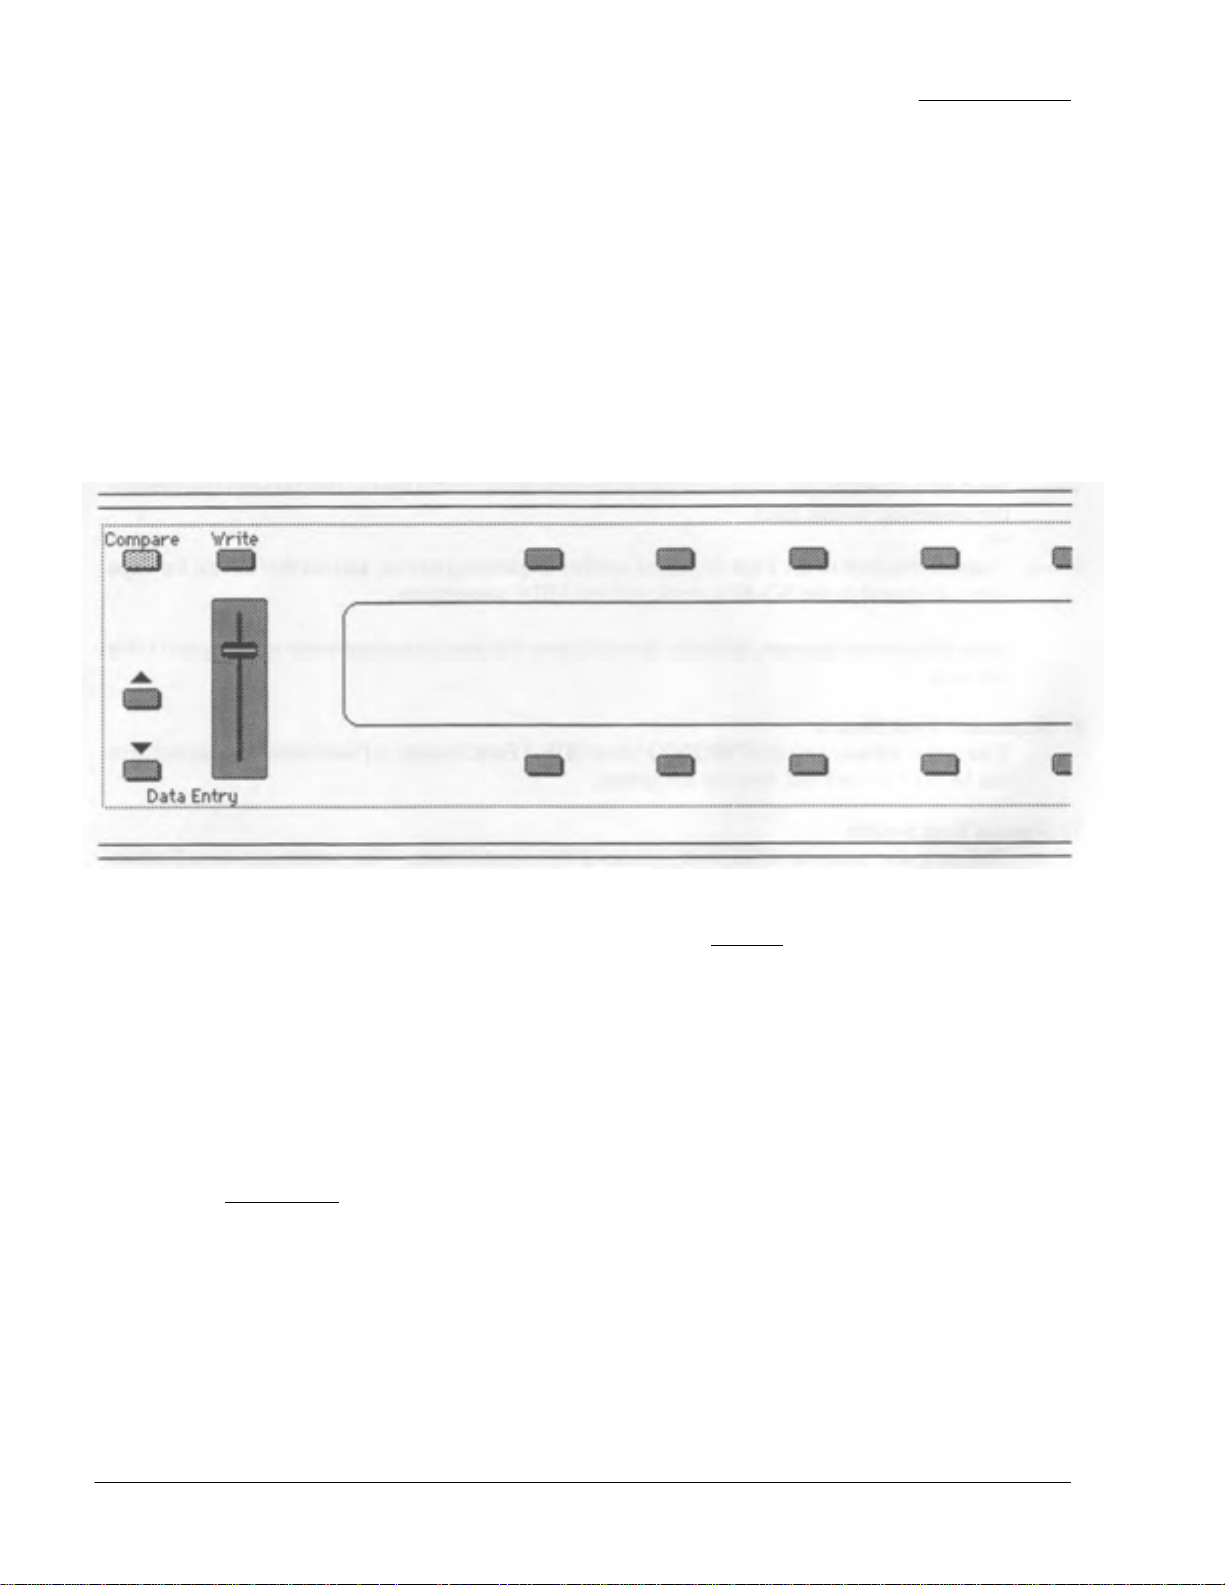
Communicating With the SQ-80
Almost everything you do on the SQ-80 — whether it's selecting a Sound, editing that Sound. adjusting
the Master Tuning, or operating the Sequencer — is controlled from the the Front Panel using the
following controls:
> The 80 character fluorescent Display,
>- The ten Buttons directly above and below the Display,
The Data Entry Slider to the left of the Display,
>- The Up and Down Arrow Buttons to the left of the Data Entry Slider,
− The Compare Button, and
− > The
Write Button.
The Display and the Data Entry Controls are primarily used to Select and modify things — So unds.
Program Parameters, Tuning, Sequencer Control functions. etc. — all depending on which Front Panel
Button you press. Try pressing a few of the other buttons —
for example — and watch the Display. Notice that for each button y ou press, the Display changes to show
you information related to that function. Each of these different Display configurations is called a
The ten Buttons above and below the Display have a new function each time you select a new Page —
that is. each time you press one of the buttons outside the Data Entry section. Each of these ten buttons
is used to select whatever is directly above or below it on the display. Whatever you select in this manner
is immediately
An in-depth description of the Data Entry functions of the SQ-80 follows in the Section entitled
underlined, telling you that it is the current Program, Parameter, or Sequence, etc.
MASTER. OSC 1, DCA 1, or FILTER.
Page.
PROGRAMMING THE SQ-80 (p. 12).
6 Section 1 — First Things First
Page 19
g
y
r
t
SQ-80 — Musician's Manual
SELECTING SOUNDS
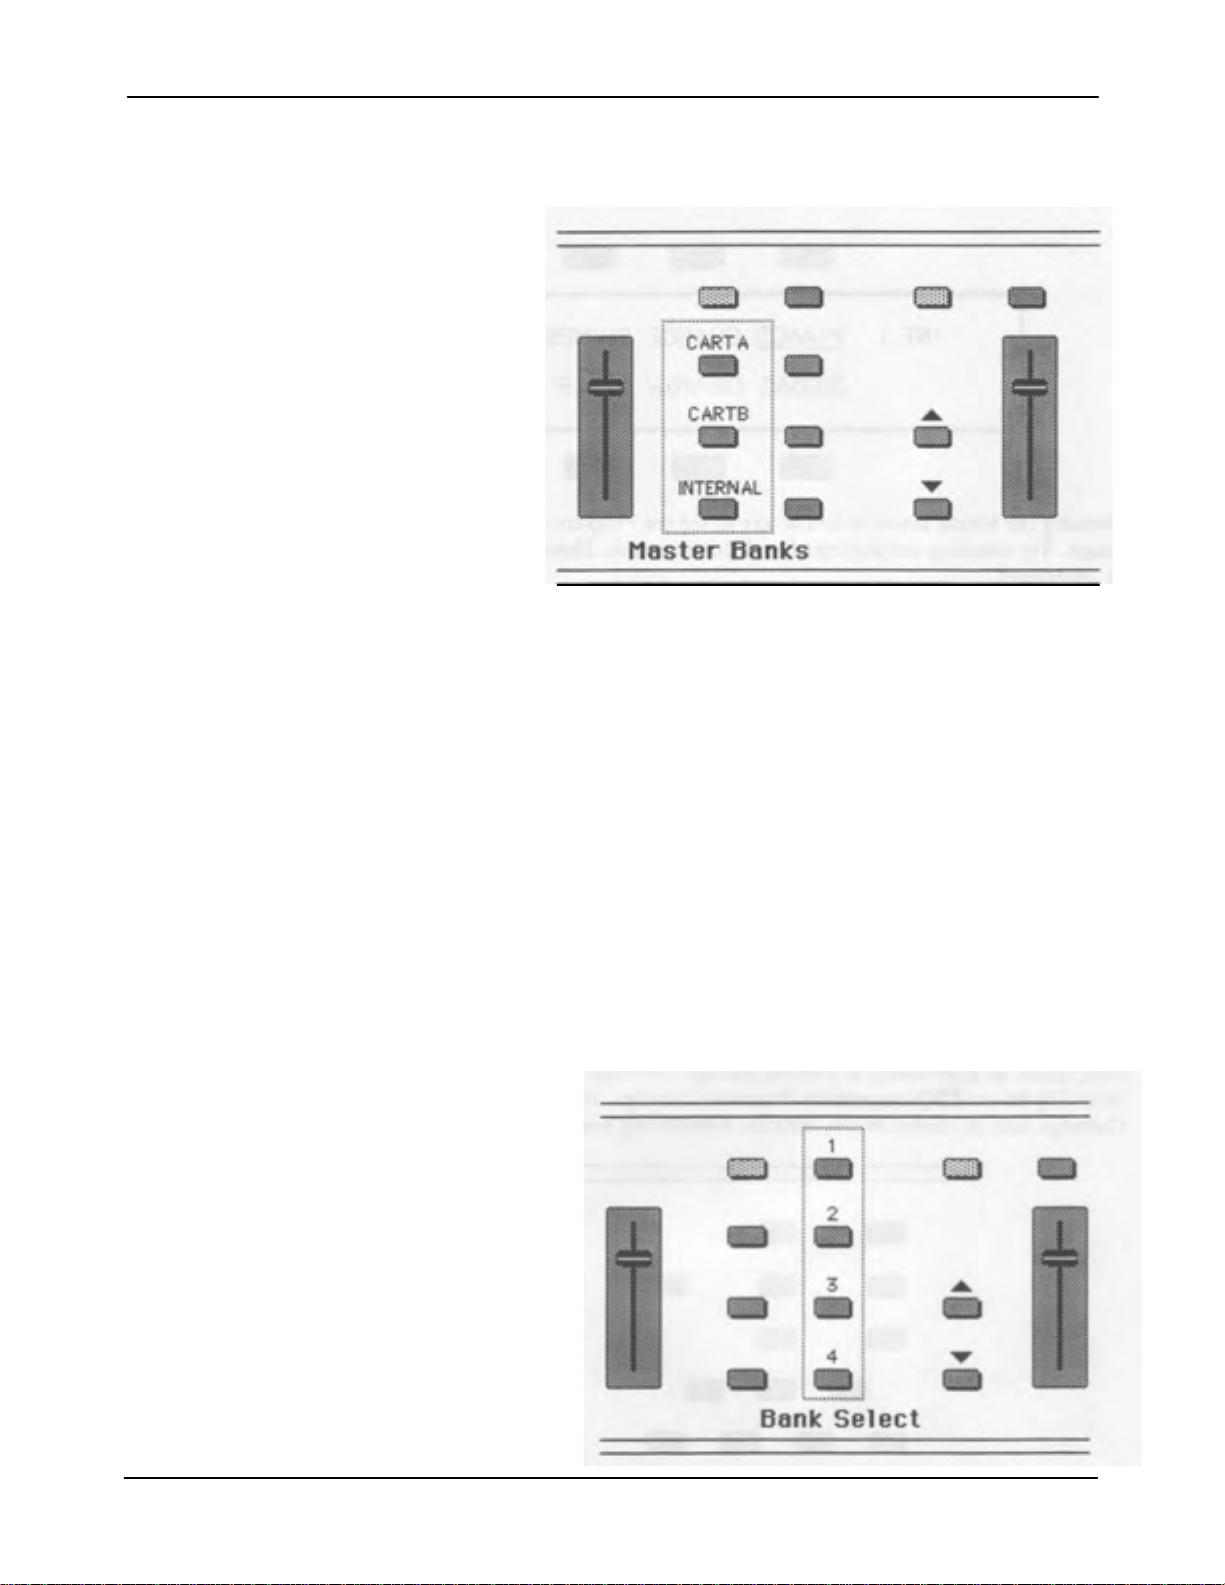
Master Banks
Each of the three Master Banks,
(INTERNAL, CART A and CART B)
designates a large area of memory which
contains forty Programs. To play the
Programs in the Internal Memory. press
the
INTERNAL Button.
Internal Memory
The SQ-80 holds 40 different Sounds, or "patches" in its Internal Memory. We refer to these Sounds
as Programs. Programs can be s elected using the Master Bank Button labeled INTERNAL, the four
Bank Select Buttons, and the ten Buttons located directly above and below the Display. The Internal
Memory retains its data even when the power is Off.
Cartridge Memory
Before you can select the other two Master Banks. CART A and CART B. an ENSONIQ EPROM
Storage Cartridge (or any other SQ-80- or ESQ-compatible Program cartridge) must be inserted in the
Cartridge slot. The procedures for playing, editing and saving Cartridge sounds are identical to those
for Internal sounds. When a Cartridge has been inserted, all three Master Banks are instantly available.
The E=PROM Cartridge also retains its data when the power is Off, whether or not it is plugged into the
SQ-80 Cartridge slot. When there is no Cartridge in the slot, pressing CART A or CART B will have
no effect.
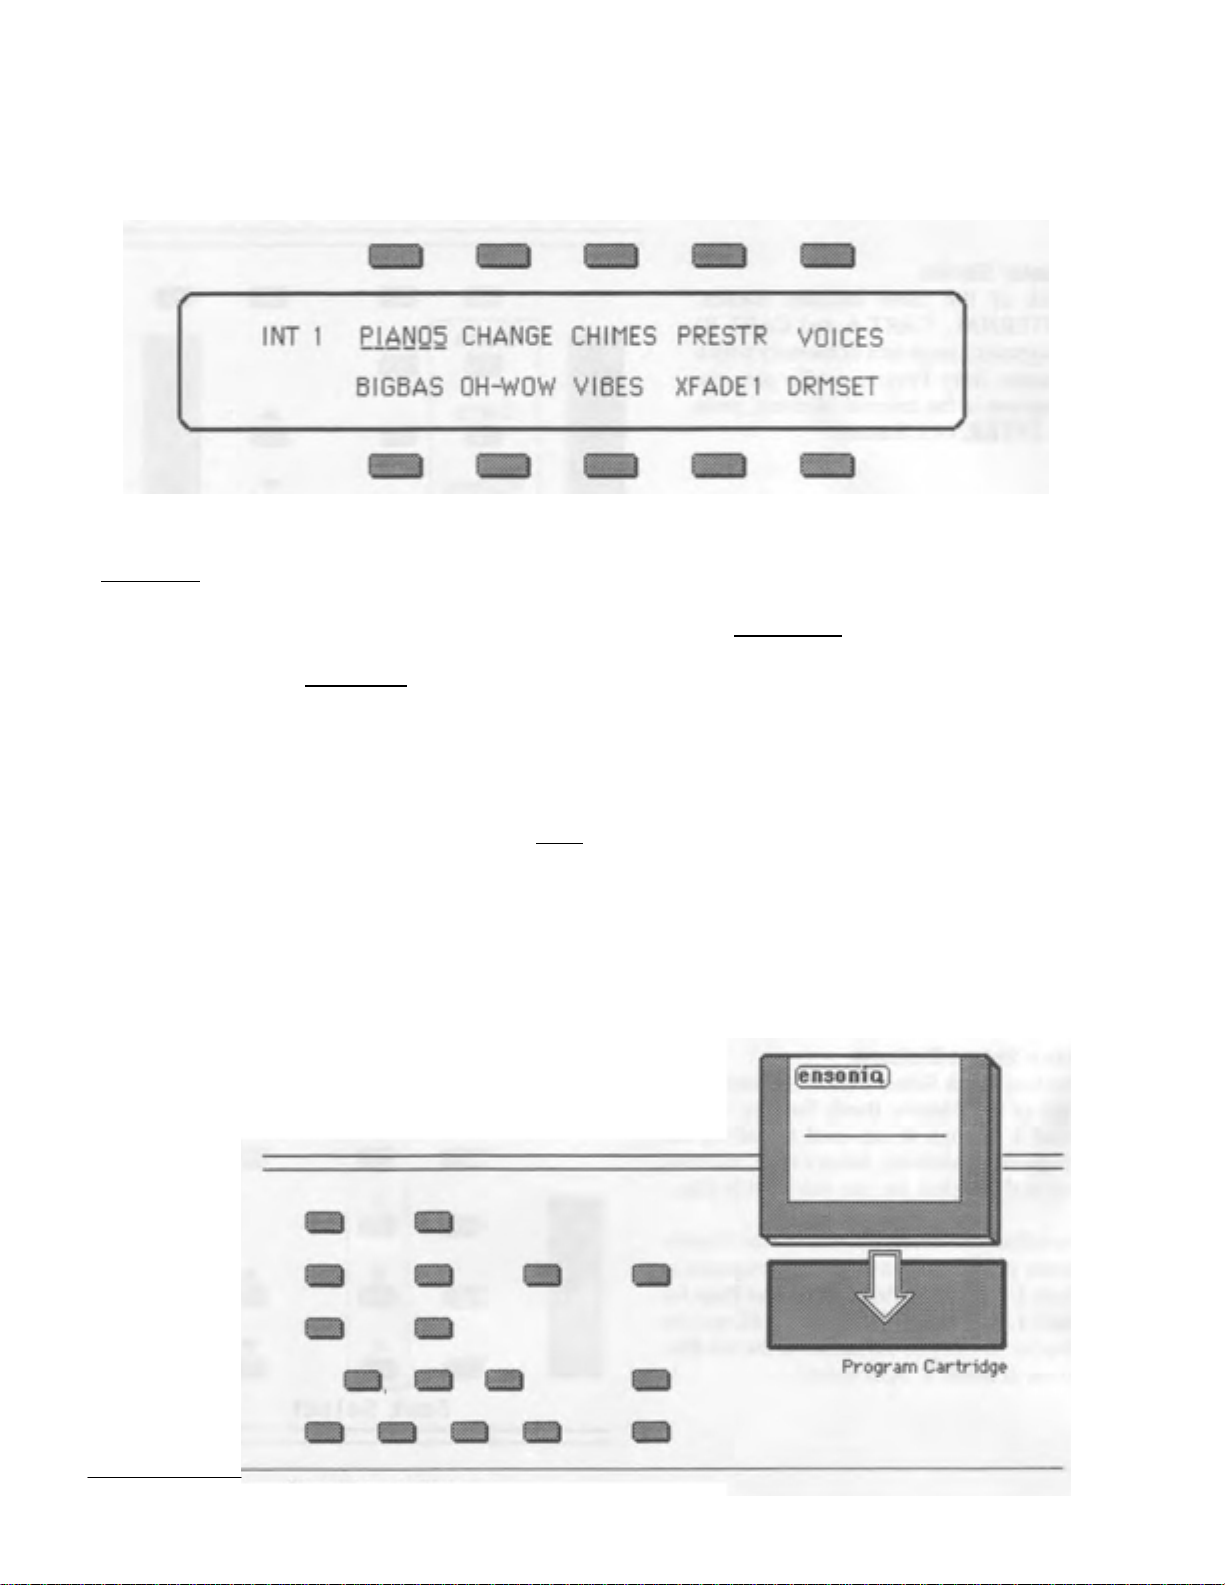
Bank Select Buttons
The four Bank Select Buttons, located to the
right of the Master Bank Buttons, and labeled 1 through 4, are used to call up the
Programs in Memory, ten at a time, allowin
you to then select the one you want to play.
Press Bank Select Button #1. and the Displa
shows you the names of the ten Programs in
Bank 1. This is the Program Select Page fo
Bank 1. Press Bank Select Button #2, and the
Display shows you the names of the ten Programs in Bank 2. And so on.
Section 1 —First Things Firs
7
Page 20
SQ-80 — Musician's Manual
Selecting a Program — Internal
Now that you've selected one of the four Banks, you can see the names of the ten
Say you selected
Pressing the button above or below any of the ten Program names selects that Program as the current
sound. Try selecting and playing a few different sounds. Notice that when you select a Program, its name
is underlined.
Bank 1. The Display should look something like this:
Programs in that Bank.
The currently selected Program is always underlined.
Notice also that in the upper-left corner of the Display you will always find the Page Name, which
corresponds to the name of the button (or buttons) you pressed to get to that Page. (In this case.
meaning INTERNAL Memory, Bank 1.)
Press the other three
Memory. and select them in the same way. Note that displaying a new Bank or Master Bank does not
affect the selected Program. A new Program can only
and below the Display.
Bank Select Buttons #2, 3 and 4 to get t o the other 30 Programs in the Internal
be selected by pressing one of the ten buttons above
INT 1,
To Select an Internal Sound:
− Press INTERNAL.
> Press
− > Select a Program by pressing the Button above or below a Program Name.
Selecting a Program — Cartridge
First, insert an
Bank Select #1, 2, 3, or 4 .
ENSONIQ E2 PROM Storage Cartridge, or other
SQ-80- or ESQ-compatible Program Cartridge, in the Cartridge Slot as
shown below, with the label facing towards you.
8 Section 1 — First Things First
Page 21

N
p
f
p
SQ-80 — Musician's Manual
ow follow the same procedure outlined earlier, except that instead of pressing INTERNAL, first press
CART A or CART B.
To Select a Cartridge Sound:
> Press CART A or CART B.
> Press
> Select a Program by pressing the Button above or below a Program Name.
Cartridge Insertion and Removal
The Program Cartridge can be inserted or removed at any time (except while you're Writing Programs
to it), even when the
Cartridge is removed while a Cartridge Program is selected. the Display instantly switches to Internal
Bank #1. The Cartridge Sound will disappear, and will be replaced by the first sound in Bank 1, which
becomes the selected Program.
ESQ Compatibility - Sounds and Sequences
The
SQ-80 will play Programs created for the ENSONIQ ESQ-1 or ESQ-M. The reverse, however.
is not always the case. The
that the
Bank Select #1, 2, 3, or 4 .
SQ-80's power is On. without doing any harm to the SQ-80 or the Cartridge. If the
SQ-80 has a great many Waves and a number of Program parameter values
ESQ-1 doesn't. Many Programs created on the SQ-80 will produce unpredictable results on the
ESQ-1 since it will not understand some of the parameters contained in them. Playing SQ-80 Prog rams
on an
ESQ-1 or ESQ-M will not harm the ESQ in any way. However, they probably won't sound right,
articularly those that use Waves other than the 32 Waveforms contained in the ESQ.
With Sequences it's a similar story. You can send
them into the
own format. Bear in mind that the proper Internal and/or Cartridge Programs must be in place for the
Sequences to play properly on the
Going the other way , you can send one Sequence (Current Seq) via MIDI or Tape from the
an
ESQ-1, but you cannot send the entire Sequencer memory (All Sequencer Data) from the SQ-80 to
an
ESQ-1. Thus if you have Sequences and Songs in the SQ-80 that you want to send to the ESQ-1, you
will have to transfer the Sequences one at a time, and then reconstruct any Songs on the
in mind that
the
ESQ-1, so y ou will have to either assign new Programs to such Tracks, or assign the Tracks MIDI
Status and play the
Pressure (After-touch)
One of the most exciting features of the
velocity with which you play. is capabl e of generating two types of Pressure —
SQ-80 from Tape or fro m a Mirage. The SQ-80 will convert the ESQ Sequences into its
SQ-80.
SQ-80 Programs that were used in any such Sequences will probably not play properly on
SQ-80 (if it's available) from the ESQ-1 Sequencer.
SQ-80 is its keyboard, which, in addition to responding to the
ESQ-1 Sequences to the SQ-80 via MIDI, or load
SQ-80 to
ESQ-1. Bear
Key Pressure and
Channel Pressure. Pressure (often called After-touch) is a modulator which allows you to change the
sound in various ways by pressing down harder on a key or keys after the initial keystrike.
Like the MOD Wheel or Foot Pedal. Pressure is a Modulator, and can be chosen wherever a Modulator
is selected in the Voice section of the
Oscillators, the Filter Cutoff frequency, LFO depth, Pan location. etc.
SQ-80. Pressure can be assigned to alter the pitch or volume o
There are two types of Pressure:
• CHANNEL P RESSURE, also called Mono Pressure, is "global." Channel Pres sure affects all notes
that are playing when you exert pressure on any of the keys. If, for example. you play a three-note chord.
ressing down harder on any of the three notes of the chord will modulate all three notes. This type of
Section 1 — First Things First 9
Page 22

t
w
w
t
t
V
Y
SQ-80 — Musician's Manual
Pressure is the more common of the two types. Most MIDI instruments which currently implemen
Pressure send and receive only Channel Pressure. If you are playing or sequencing such an instrument.
from the SQ-80, you should set the SQ-80 to send Channel Pressure.
• KEY PRESSURE, sometimes referred to as Polyphonic Pressure or Poly Pressure, is a
more sophisticated and expressive type of Pressure. Key Pressure affects each key
ind epe nden tly . I f, f or example, you play a three-note chord, pressing down harder on any of the
three notes of the chord will modulate only that note. The other two notes will remain unaffected.
There is a control on the MIDI Page (PRESS=—) which determines which type of Pressure the SQ-80
ill generate. This same control can be used to turn off Pressure entirely, which is particularly useful
hen sequencing, since Pressure eats up a lot of Sequencer memory and should not be enabled when i
is not needed for a particular Track. See Pressure Control, p. 23, for more details.
Dynamic Voice Assignment Revealed
The SQ-80 can play up to eight different sounds at once — each of its eight voices can play any Program
at any time, no matter what the other seven are up to. This is, for example, how the Sequencer is able
to play lots of different sounds at once. This is called Dynamic Voice Assignment. You can demonstrate
this concept for yourself:
> Select a Program, preferably one with infinite sustain, such as an organ or strings
− Play one note and hold it down
− While holding the note down, select a new Program
− Still holding down the original note, play a note with the new sound and hold it down
− > While holding down both notes, select a third Program and play a note with
it > You can keep this up until you run out of fingers or patience or both
Notice that when you selected new sounds, the old sounds kept right on playing. The SQ-80 doesn't shut
down all the voices when you select a new Program, nor does it force you to make arbitrary choices abo u
how many voices will be assigned to play each sound. Each Sequencer Track, as well as the Straight
Synthesizer section, has access to all eight voices at any given time. That is what is meant by Dynamic
oice Assignment, and it's what makes the SQ-80 a truly Multi-timbral instrument.
The Disk Drive
The SQ-80's built-in Disk Drive can be used to store SQ-80 sounds and Sequences, as well as MIDI
information from other devices, using the SQ-80's System Exclusive Storage function. Each DoubleSided 3.5" micro-floppy disk will hold:
• 40 Program Banks, plus
• 128 individual Programs. plus
• 10 Sequencer/Sys-Ex blocks of up to 64k bytes each.
The Disk Drive in the SQ-80 is a precision instrument, and it will give you years of reliable service if
cared for properly. Here are a few things to bear in mind when using the Disk Drive:
• Use only Double-Sided Double-Density (DSDD) 3.5" micro-floppy disks.
• Don't expose disks. or the drive, to temperature extremes or strong magnetic fields.
• Take care not to spill liquids or any other material into the drive.
• Don't subject the Disk Drive (or the SQ-80 itself) to excessive shock during handling.
• Never eject the disk while the drive is running (the drive light is on).
• Never put anything other than a disk into the Disk Drive.
ou will find a full discussion of the disk functions in the section Disk Storage. p. 155.
10 Section 1 — First Things First
Page 23

f
p
SQ-80 — Musician's Manual
Battery maintenance
The reason that the SQ-80 "remembers" Programs and other parameters, even when the power is OFF.
is that all of its Internal
Sequencer Memory as well as Program and "Global" parameters.) The Battery that keeps the SQ-80's
Memory intact is located inside the SQ-80, and when it becomes discharged, it must be replaced by an
authorized ENSONIQ Repair Station.
RAM (Random Access Memory) is Battery-backed-up". (This includes the
The Battery that came in your
replacing, because the SQ-80 will tell you so. One day you will switch the Power ON, and instead o
its usual wake-up message, the Display will read:
WARNING — BATTERY VOLTAGE IS LOW
When this message appears, you should make sure that all Programs and Sequencer Data are saved to
disk or to Cartridge, and then take the SQ-80 to an authorized ENSONIQ Repair Station as soon as
ossible to have the Battery replaced.
Available Options
These optional accessories are available from your ENSONIQ dealer:
ENSONIQ Model SW-1 Foot Switch — For Voice sustain or Starting and Stopping the
>
Sequencer.
>
Model STC-8 EPROM Storage Cartridge — For Storing the Programs you create, or for
consolidating 80 of your most used Programs from disk and other sources. The 80 Programs in
the Program Cartridge, combined with the forty Internal Programs, give you 120 sounds instantly
available for performance and sequencing.
SQ-80 is good for up to six years of life. You will know when it needs
SAVE DATA AND CONSULT OWNERS MANUAL
>
Model CVP-1 CV PEDAL — A Control Voltage Foot Pedal which can be assigned as a
Modulator within the Voice section of the SQ-80 or used as a Volume Pedal.
Why You Should Fill Out and Mail Your Warranty Card
The
SQ-80 carries a one-year warranty covering all defects in material and work manship. The Warranty
Card which is included with your unit has complete details about the terms of the warranty.
By filling out and returning the Warranty Card, you can:
• help to expedite any warranty claims in the event that you need service.
• be registered to receive information about accessories and third party support for your
and receive timely information about new ENSONIQ products. and
• provide us with valuable feedback concerning features you would like to see on this and
future ENSONIQ products.
Do it now.
Section 1 — First Things First 11
SQ-80
Page 24
u
f
p
p
N
b
SQ-80 — Musician's Manual
PROGRAMMING THE SQ-80
The "human interface" used by the SQ-80 (the method by which you communicate with the device) was
developed for the ENSONIQ ESQ-1, and is generally agreed to be one of the most intuitive and easyto-use systems ever implemented on a synthesizer. Combining a large, readable Display with ten "Soft"
buttons, the SQ-80 literally puts everything you need to know right at your fingertips.
The method used to modify or "edit" programs and sequences is called
Page-driven parametric
programming, which is a mouthful. but don't worry. Once you've grasped a few basic concepts you'll
find that operating the SQ-80 is quite simple, given its enormous flexibility. You
ease and clarity with which it allows you to modify, or just keep track of, a great many variables.
-
11 soon appreciate the
Parametric programming
It is likely that you have already encountered some form of parametric programming on other
synthesizers. What this means is that instead of having a separate knob or Slider for each function, you
have one
select.
This approach has many advantages. the most obvious of which is that it greatly reduces the amount o
hardware — knobs, switches, faders, etc.— needed to control a wide variety of functions. (If the SQ-
80 had a separate control for each function, it would literally have hundreds of knobs.) The disadvantage
has often been that you were only able to see the value of one parameter at a time, making it hard to keep
track of things. This is where the Page concept comes in.
master Data Entry Slider. and two buttons, which adjust the value of whichever parameter yo
Pages
The SQ-80's 80-character fluorescent Display makes it possible to display information in Pages. For
each function you select, the Display shows you its 'Page', which contains all the information (all the
arameters) related to that function.
You can think of the SQ-80 in relation to a book — each time you press one of the Programming buttons
on the front panel, you are in effect "turning to" that function's
you want, the Display shows you which parameters are controlled from that Page. To activate a control,
ress the button directly above or below its name on the Display.
Page. Once you have turned to the Page
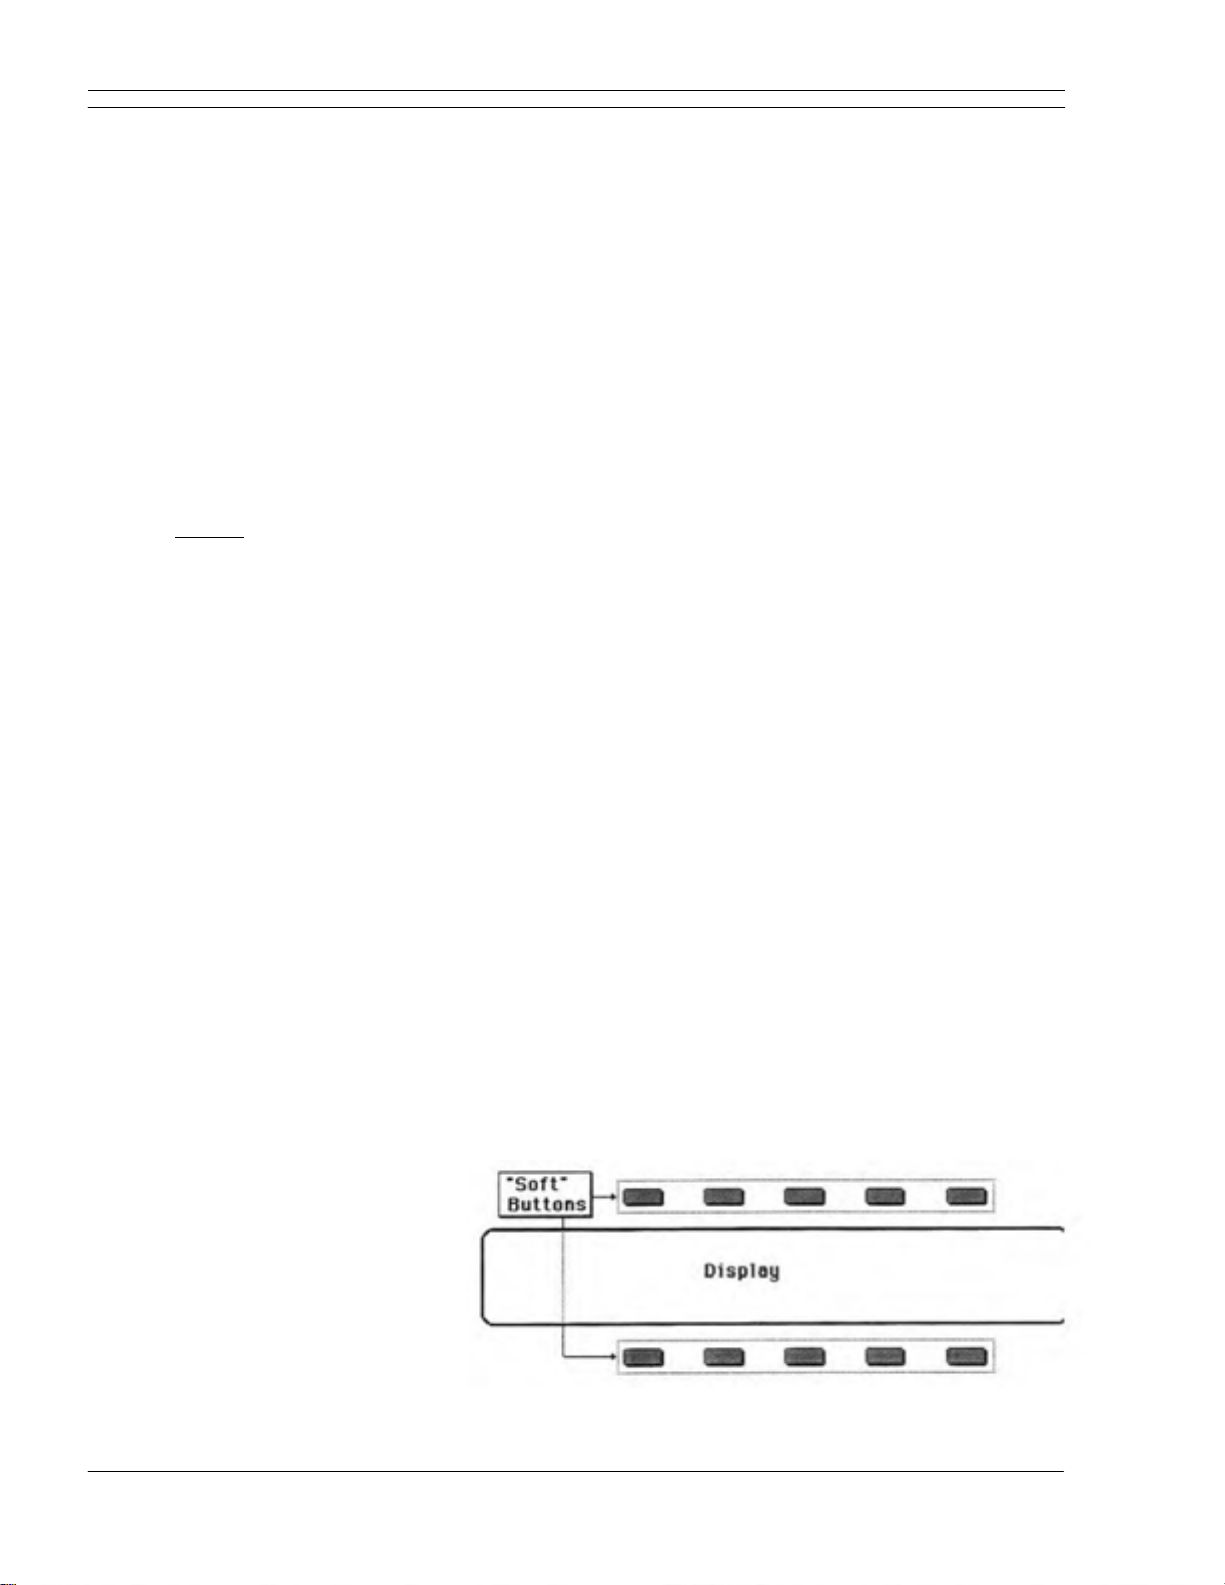
"Soft" Buttons
The ten Buttons above and below the Display thus have multiple functions — what they select depends
upon which Page is being displayed. Whenever you select a new Page, these ten Buttons serve to select
whatever parameters are displayed on that Page.
We call these "Soft" Buttons, to distinguish them from buttons which
have fixed. "Hard," functions, such as
Bank Buttons.
the
ot all "Soft" buttons are active on all
Pages. Only those
selectable parameter will be active on
a given Page.
uttons related to a
12 Section 1 — First Things First
Page 25
N
t
p
Changing a Parameter
Suppose you want to adjust the pitch of
Oscillator 1. Press the front panel Button labeled OSC 1:
The Display now shows Oscillator l's Page. It should look something_ like this:
SQ-80 — Musician's Manual
In the top left-hand corner of the Display you will always find the Name of the Page, which corresponds
to that of the button you pressed. To the right of that are the various parameters which can be selected
and modified from this page.
To raise or lower the pitch of Oscillator 1 by an octave, press the button directly above where it says
OCT= . This segment of the Display will now be underlined, telling, you that it has been selected. and
can be modified.
The currently selected parameter on a Page is always underlined.
ow that you have selected a parameter to be modified (OCT= ), use the Data Entry Slider and/or the
Up and Down Arrow buttons to the left of the Display to adjust its value. Moving the Slider will scroll
quickly up and down through the available range of values. Pressing the Up and Down Arrow buttons
will increase or decrease the value one step at a time.
To select and modify another parameter on the same Page, press the button above or below its name. Tha
arameter will now be underlined, and its value can be adjusted as be fore, with the Data Entry Slider and
the Up and Down Arrow buttons.
You'll notice that when changing Program parameters on the
to hear the change. If you are holding down a key (or keys) when you change a parameter, you won't
hear any difference until you release the key and play it (or any other key) again.
SQ-80, you must restrike a key in order
Section 1 — First Things First
13
Page 26
y
p
SQ-80 — Musician's Manual
If you select another Page
to the
"remembers" which parameter was last selected on a given Page, even when the power is turned off.
Be sure that the parameter you want to edit is sel ected before mo ving the Data Entry Slid er or the Up and
Down Arrow Buttons. Some parameter is alwa
OSC 1 Page, the parameter you had last selected will still be underlined. The SQ-80 alway s
(DCA 1 for instance), change some parameter on that Page, and then return
y
s selected on any given Programming Page.
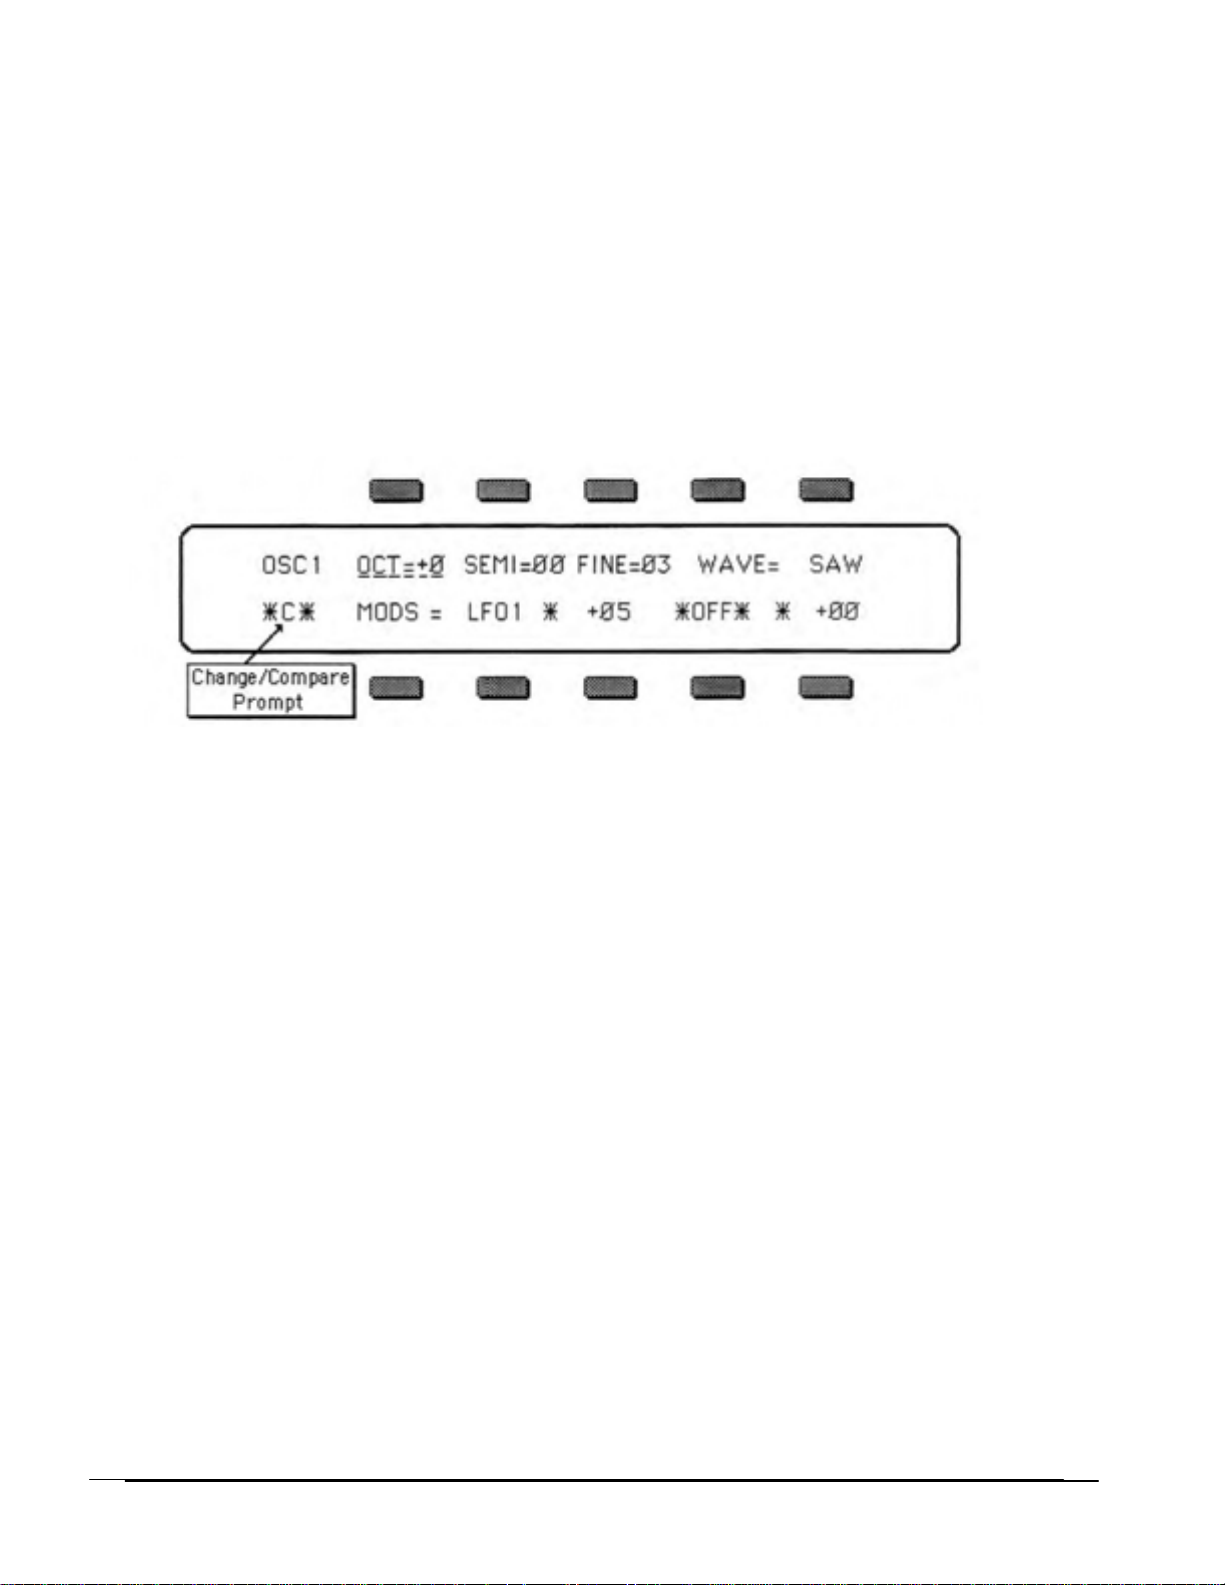
*C* — Change/Compare
As soon as you change any parameter in a program, a *C* will appear in the lower left-hand corner of
the Display, below the Page Name. It will remain there until you select another Program or save (Write)
the newly edited Program into memory.
Once a parameter change of any kind has been made, the *C* prompt will appear in the corner of ever
rogramming Page you select — not just on the Page that has been modified. This is a constant reminder
that something in the Program has been changed.
To hear the original, unchanged, Program, press the button labeled
disappear; you will hear the original sound and see the Page with its original settings. Press
again to return to your edited sound. You can toggle back and forth between the original and the edited
sound as often as you like.
COMPARE. The *C* will
COMPARE
Edit Buffer
You can edit a Program, while keeping the original Program intact, because the edited version is kept
in a special area of Memory called the
the altered Program is put in the Edit Buffer, repla cing whatever was previously there. O nly one Program
at a time can reside there — the Edit Buffer always contains the results of your last edit.
When you press the COMPARE Button. what you are doing is alternating between the Program in the
original Memory Location and the Program in the Edit Buffer. We refer to the P rogram in the Edit Buffer
as the Edit Program.
You can return to the Edit Program, even after selecting another Program (as long as you don't change
any parameters there) by pressing the
changes you make will affect the Edit Program. Bear in mind that if you do make any changes to a newly
selected Program,
Program.
that Program will automatically be placed in the Edit Buffer, easing the previous Edit
Edit Buffer. Whenever you change any parameter of a Program.
Compare Button. This puts you back in the Edit Buffer. and any
The rule of thumb is this:
Whatever Sound you hear, that's what you're editing.
14 Section 1 — First Things First
Page 27
t
w
w
A
y
w
t
SQ-80 — Musician's Manual
If you like the results of the changes you have made to a Program, you should rena me it and save the new
Program permanently to another Location (or save the new version back to the same location, repl acing_
the original) using the Write Page. The procedure for this is covered in the Section WRITE Page, p.76.
Bailing Out
Should you decide, while editing a Program, that you're not happy with what you've done, and you wan
to start over with the original Progr am, just go to the proper Program Select Page and sel ect the Program
again. Then you can start editing the Program again from scratch. You will lose the one you were
orking on before.
Active and Inactive Buttons
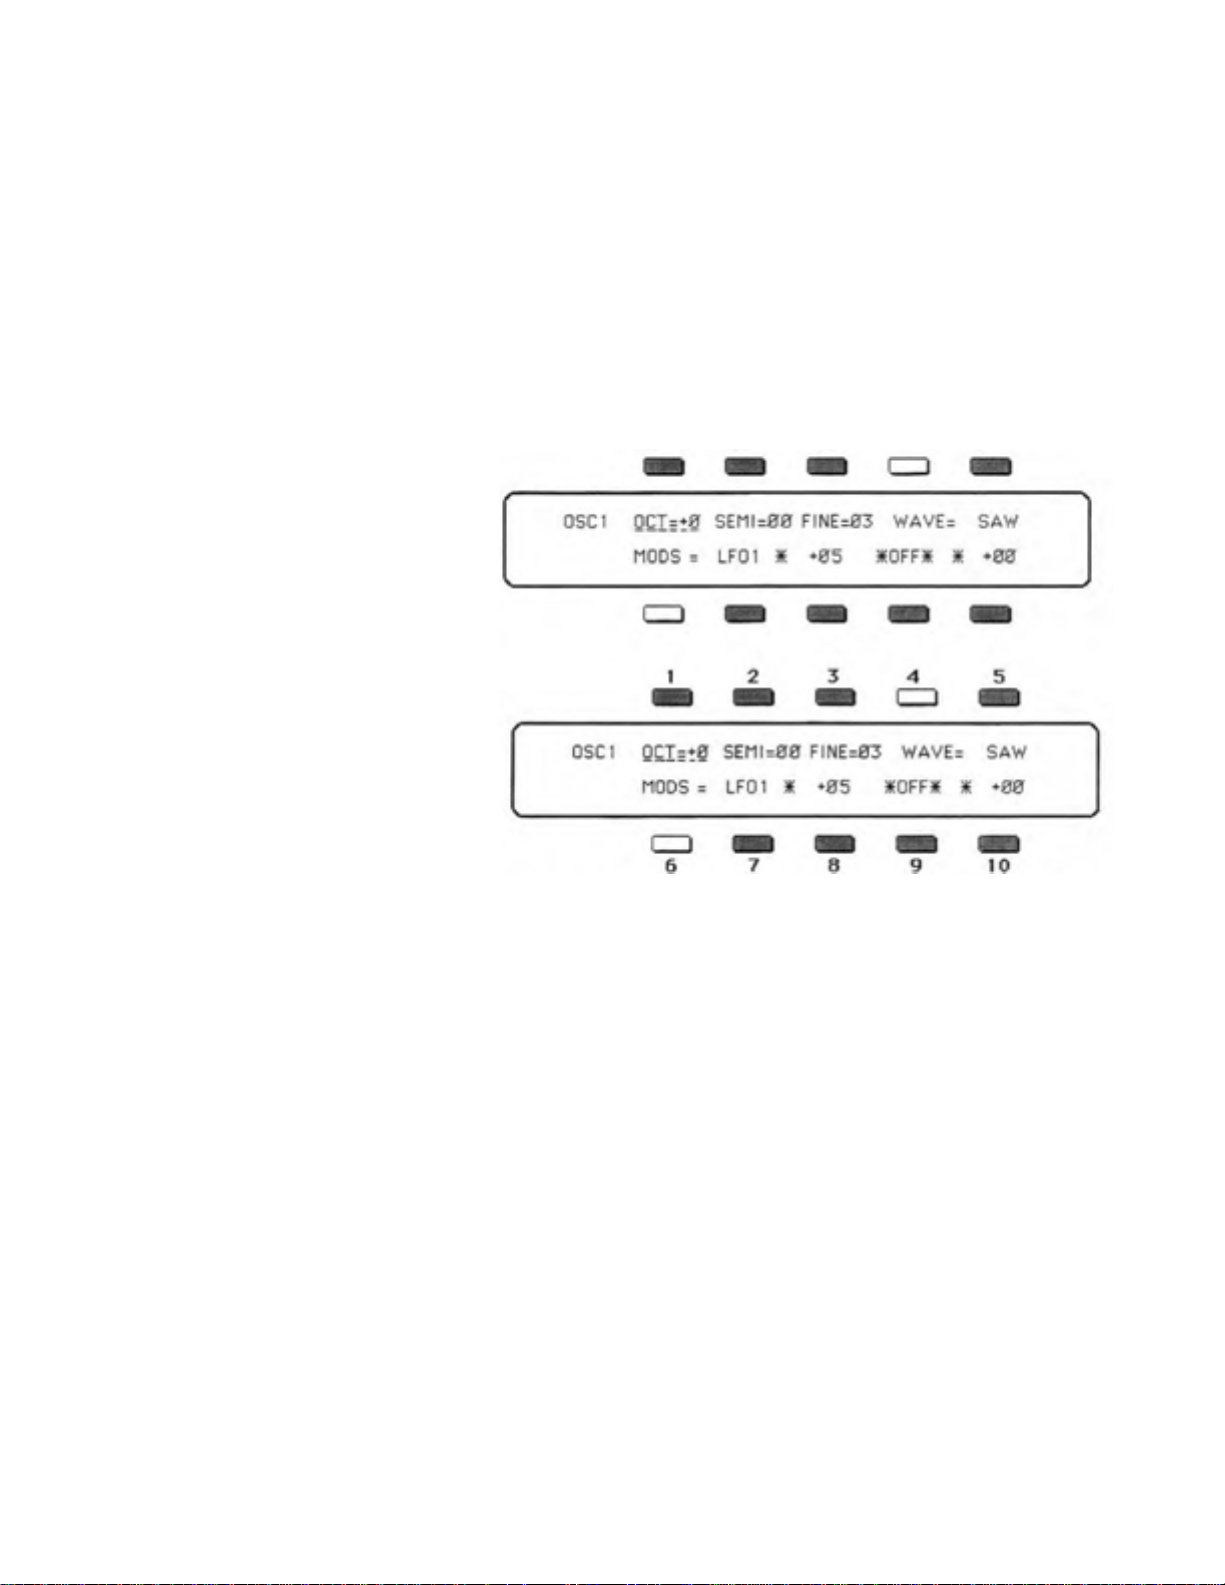
Ac mentioned previously not all buttons are active in a given Page. Throughout this Manual whenever
an SQ-80 Page is depicted, the active
buttons will be shown in grey, the
inactive ones in white. Taking the
example used above, the OSC 1 Page
ould appear like this:
lso, for consistency's sake, these
buttons will always be referred to b
location number — from upper left to
lower right. 1 through 10 as shown to
the right:
So we see that on the OSC 1 Page, Buttons number 1, 2, 3, 5, 7, 8, 9, and 10 are active — they can be
pressed to select a parameter to be modified. Buttons 4 and 6 are inactive on this Page. Pressing them
ill have no effect.
Section 1 —First Things Firs
15
Page 28

b
SQ-80 — Musician's Manual
REINITIALIZING THE SQ-80
What is Reinitialization?
The great power and flexibility of the
disguised as a keyboard instrument, but a computer nonetheless. The software that operates the
is very sophisticated. In fact, there is a 64k computer program that runs inside the SQ-80 (the Operating
System code). That's more than many personal computers. If you have ever used a computer, you should
be familiar with the need to occasionally re-boot your system when you get an error message, etc. Well,
reinitializing the
Why Reinitialize?
There are a number of things that can happen to the
scramble the system software — voltage surges. power failures, static electricity. etc. And as with any
computer, very infrequently some unforeseeable event or combination of events can cause the software
to become confused, with strange and unpredictable results. Some units which appear to be broken have
no hardware problem, just corrupted data in the internal RAM. In these cases, all that is needed is to
reinitialize the unit.
When to Reinitialize
If your
there; if you start getting unexplained Sy stem Error messages; if the Sequencer control an d Edit functions
start doing unpredictable things; try reinitializing the
SQ-80 begins to behave in peculiar way s: if the Display shows words or lines that shouldn't be
SQ-80 is the equivalent of re-booting your computer.
SQ-80 lies in the fact that it is really a computer — a computer
SQ-80
SQ-80 (or any computer syste m) which might
SQ-80 before you seek factory service.
Warning: When you reinitialize your SQ-80 all your current sounds and sequences will be lost (though
the original 40 Factory sounds are automatically loaded back into the Internal memory after reinitializing). Therefore good backup habits should be an important part of your routine. Save any
important data to disk or cartridge before reinitializing the
filters in your
To Reinitialize the SQ-80:
1. While holding down the
left corner above the fluorescent display.
2. The following message will appear:
3. Select *YES* (Or press *NO* to cancel the procedure for any reason.). After selecting *YES* the
wake-up screen appears, and initialization is complete. After you re-initialize the
Factory Internal Programs are automatically placed in the Internal Memory . Press any button to
continue. After reinitializing, you should tune the filters.
To Tune the Filters:
1. While holding down the
section.
2. The following message will appear:
Filter Tuning is complete when values for all eight filters are displayed. Press any button to continue.
SQ-80 after you reinitialize to reset the proper filter values.
Record button in the sequencer keypad, press the "Soft" button in the top
"ERASE ALL MEMORY AND REINITIALIZE"
Record button in the Sequencer keypad, press the Filter
"Filters Tuning". Filter tuning can take several seconds. The
SQ-80. Also, you should always tune the
SQ-80 the 40
utton in the voice
If reinitializing your SQ-80 does not correct the problem, then contact an authorized factory service
facility.
16
Section 1 — First Things First
Page 29

SECTION 2
Global Functions and MIDI Configuration
18 ....................MASTER Page
19 ......................... TU N E — Ma s t e r Tuning
19 ........................ K E Y B D — " S t r a i g h t S y n t h " K e y bo a r d S t a t u s
19 ........................ V E L — Ve l o c i t y S en s i t i v i t y
20 ........................ PEDAL — Foot Pedal Functi on Select
20 ........................ P i t c h B e nd R ange
20 ........................ P i t c h B e nd M ode
21 ...................MIDI Page
22 ......................... CH A N — Ba s e M I D I Channe l
22 ......................... OV F L — M I D I O v e r fl o w M o d e
22 ......................... XC T R L — S e l e c t E x te r n a l C o n t r ol l e r
23 ........................ P R E S S — P r e s s u r e ( A f t e r t o u c h ) C o n t ro l
24 ......................... MO D E — Se l e c t M I D I Mode
26 ......................... EN A B L E — M I D I E n a bl e s
SQ-80 — Musician's Manual
Section 2 — Global Functions and
MIDI Configuration 17
Page 30
SQ-80 — Musician's Manual
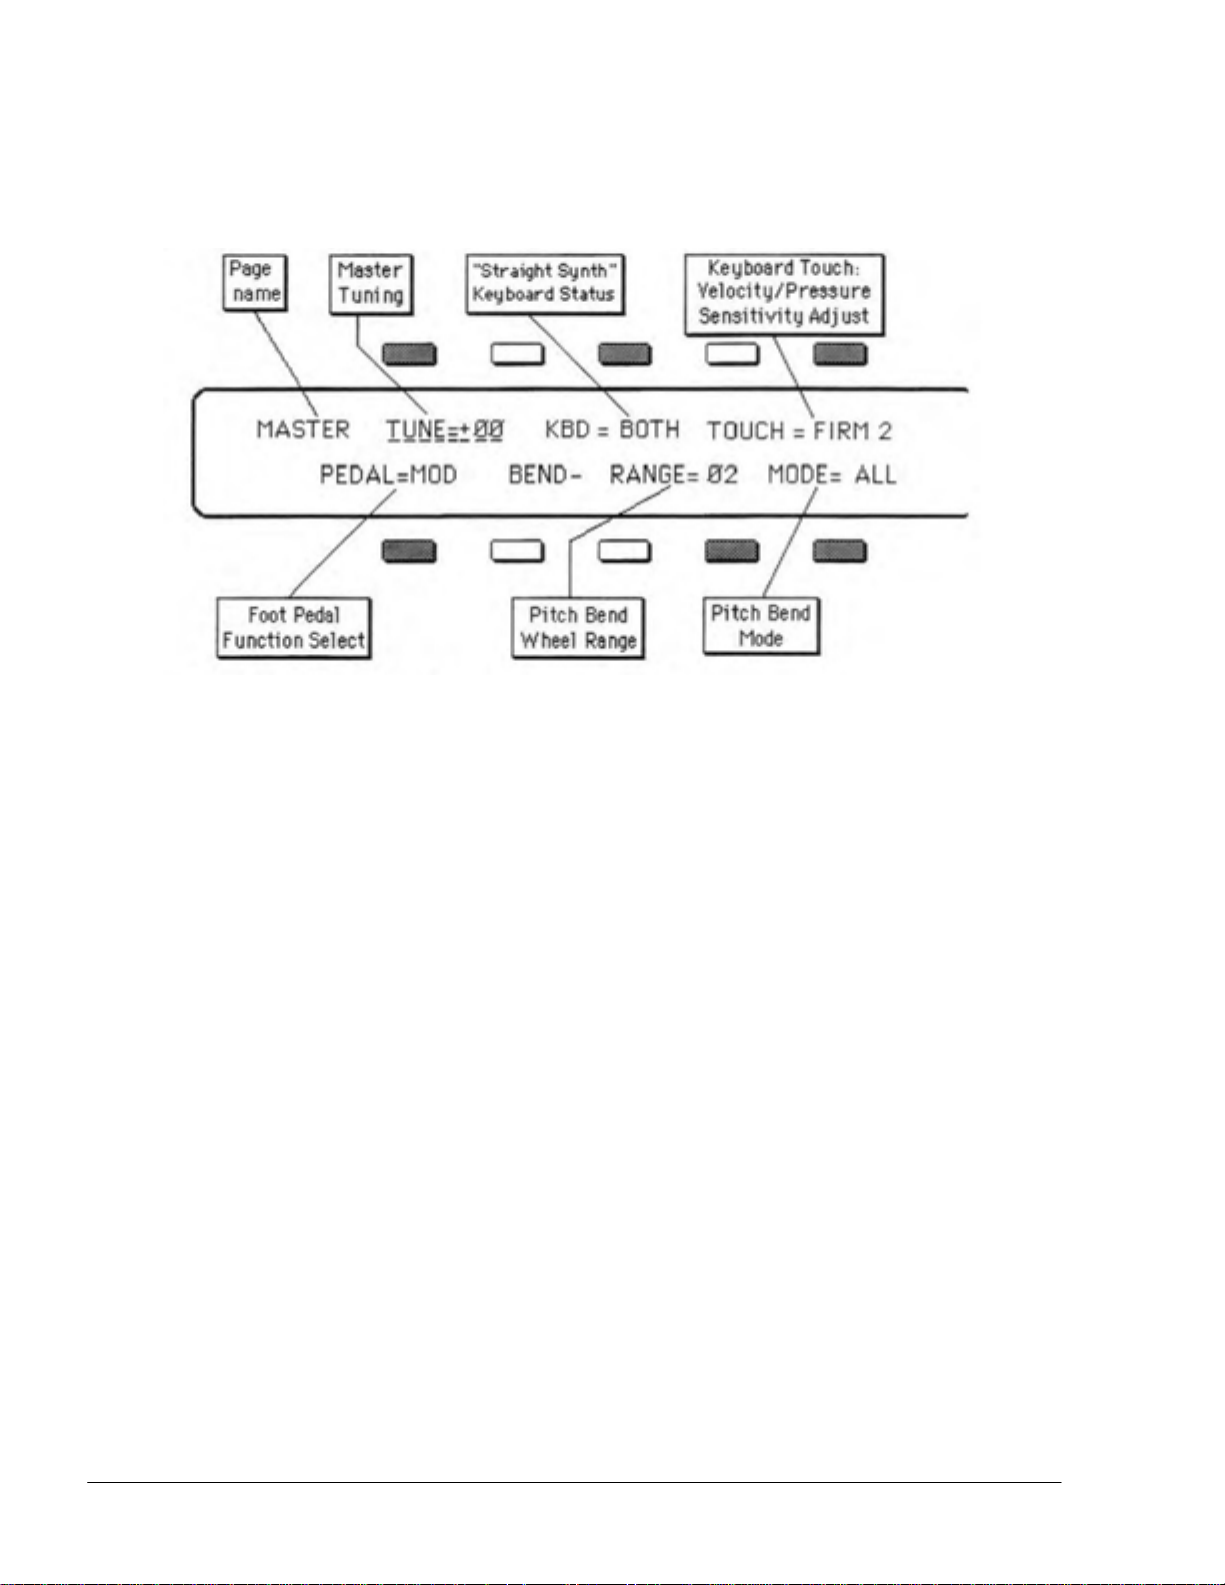
[MASTER] MASTER PAGE
Controls "Straight Synth" Status, Master Tuning, Velocity Sensitivity, Pedal Function and Pitch
Bend Range.
(Inactive Buttons appear White )
The parameters on this page are keyboard-wide, or "Global." The settings h ere will not change with
different Programs selected, but will remain in effect for whatever Program you are playing.
Aside from Master Tuning and overall Keyboard Touch (Velocity and Pressure Sensitivity), this page
also has a control for determining the Status of the "Straight Synth" — LOCAL, MIDI or BOTH. This
lets you determine whether playing the keyboard when no Sequencer Track is selected ("Straight Synth"
operation) will cause notes to play only on the
The
Master Pag e contains a control for selecting between Pitch Bend Modes — normal operation, where
the Bend Wheel affects all notes; and a special "Held" mode in which the Bend Wheel only affects those
keys which are being held down. Also on this Page is a control for choosing whether a CV Pedal plugged
into the SQ-80's rear panel will act as a Modulator or as a Volume Pedal.
These settings, like almost all SQ-80 parameters, will be "remembered" even when the SQ-80 is turned
OFF.
SQ-80, only out MIDI, or both.
Use this Page to:
1) Adjust the Master Tuning of the keyboard:
2) Set the
3) Adjust the overall
4) Set the optional
5) Set the
6) Select a
Status (LOCAL. MIDI or BOTH) of the "Straight Synth" keyboard:
Velocity/Pressure Sensitivity of the Instrument:
Control Voltage Foot Pedal to be a Modulator or a Volume Pedal;
range of the Pitch Bend Wheel; and
Pitch Bend Mode.
ACTIVE CONTROLS:
1. TUNE
Master Tune Adjust. Tunes the Keyboard to the desired Pitch. A setting of TUNE= +00 will
18 Section 2 — Global Functions and MIDI Configuration
Page 31

SQ-80 — Musician's Manual
yield Concert A=440 tuning. The total range of this control is about a half step (semitone) up or
down.
Range: -31 To +31.
3. KBD
"Straight Synth" Keyboard Status. This determines whether the "Straight Synth." (which is
what we call normal keyboard operation. with no Sequencer Tracks selected) will play locally
(only on the SQ-80), only over MIDI, or both. The "Straight Synth" is independent of the
Sequencer, so depending on the setting of this parameter you can play along with a Sequen ce
using only local voices, only a remote Instrument, or both. See the next section (MIDI Page) for
more on "Straight Synth" operation.
The three available settings are:
− > BOTH — When BOTH is selected here, notes, controllers and Program Changes played from
the keyboard when no Sequencer Track is selected will both play locally and be sent out MIDI.
This is the most common state. When you select a Program fro m the SQ-80 front Panel, the
corresponding Program Change will be sent out MIDI and you will hear the change locally.
_____> MIDI — Notes and controllers played from the keyboard when no Sequencer Track is selected
will only be sent out MIDI and will not play any local SQ-80 voices. It is comparable to "Local
-
Off
on some Instruments. When you select a Program from the SQ-80 front Panel. the
corresponding Program Change will be sent out MIDI.
− > LOCAL—Notes and controllers played from the keyboard when no Sequencer Track is selected
will only play on the SQ-80 and will not be sent out MIDI at all. When you select a Program from
the SQ-80 front Panel. no Program Change will be sent out via MIDI.
5. TOUCH
Velocity and Pressure Sensitivity Adjust. This parameter determines the responsiveness of all
Velocity-related parameters on the SQ-80 and lets you adjust the Pressure threshold. You can
adjust it to suit your own touch — that is. how hard you play and how hard you must press before
Pressure comes in. For each of the four velocity settings (SOFT. MED, FIRM and HARD) there
are four selectable Pressure thresholds (1-4). In each case, settings ending in 1 will require the
least force to bring in Pressure: settings ending in 4 will require the most force. One of these
combinations will no doubt provide a feel that is just right for your style of playing. The sixteen
available Velocity/Pressure settings are:
> SOFT 1, SOFT 2, SOFT 3, SOFT 4 — This is for someone with a light touch. On any of these
settings, a minimum of velocity is required to reach the maximum level of any Velocitycontrolled parameter. The Pressure threshold can be varied between SOFT 1 (minimum force
required to bring in Pressure) and SOFT 4 (maximum force required to bring in Pressure).
_> MED 1, MED 2, MED 3, MED 4 — Slightly harder keystrikes are required to reach maximum
velocity levels. The Pressure threshold is adjusted from MED 1 to MED 4 as described above.
− > FIRM 1, FIRM 2, FIRM 3, FIRM 4 — These settings represent about average velocity
sensitivity. One of these settings should be right for the player with an average touch. The
Pressure threshold is adjusted from FIRM 1 to FIRM 4 as described above.
− > HARD 1, HARD 2, HARD 3, HARD 4 — These settings are for the player who really digs in.
It provides the widest possible range of velocity sensitivity. The Pressure threshold is adjusted
from HARD 1 to HARD 4 as described above.
Section 2 — Global Functions and MIDI Configuration 19
Page 32

p
SQ-80 — Musician's Manual
6. PEDAL
Foot Pedal Function Select. The setting of this parameter determines whether a CVP-1 Foot
Pedal plugged into the PEDAL/CV jack on the SQ-80's rear panel will act as a Modulator
(varying the "Manual" level wherever PEDAL is selected as a Modulation source) or as a Volume
Pedal (changing the volume of the "Straight Synth" or any selected Track). Note that th is only
affects a Pedal plugged into the SQ-80 itself. The setting of this control has no effect whatever
on incoming MIDI Foot Pedal (controller #4) or Volume (controller #7) information. There are
two possible states:
> PEDAL=MOD — This is the de fault value. When PEDAL=MOD. the Foot P edal will act as a
Modulator in the Voice section of the SQ-80 and will have an effect on th e sound when PEDAL is
selected as a Modulator and assigned a depth other than zero. When PEDAL=MOD, moving the
Foot Pedal will cause MIDI Foot Pedal (controller #4) information to be sent out over MIDI.
− PEDAL=VOL — When PEDAL=VOL the Foot Pedal will adjust the volume of the SQ-80.
When no sequencer Track is selected, moving the Pedal will raise or lower the volume of the
"Straight Synth." When a Track is selected, moving the Pedal will have the same effect as
adjusting the MIX Level of that Track on the Mix
•
MIDI Page. Only the "Straight synth" or one
sequencer Track will be affected — only one Track's volume can be adjusted at a time. When
this setting is selected, moving the Pedal will send MIDI Volume (controller #7) messages out
over MIDI.
The SQ-80 sequencer will record and play back Foot Pedal information. just as it does any other
controller. However, the sequencer knows only that it is recording Foot Pedal data — it doesn't know
which value the Foot Pedal Function Select parameter is set to at any given time. When the sequence is
layed back, any Foot Pedal information in the Tracks will be interpreted either as modulator or as
volume information depending on the setting of this control at the time of playback. If a Track is recorded
with this parameter set one way, and then played back with it set the other way, you will not get the desired
result.
IMPORTANT NOTE: If you don't have a CV Pedal plugged into the SQ-80, you should NOT leave
this parameter set to PEDAL=VOL when you turn the unit off. If you do. the next time you power it up, th e
SQ-80 will set the "straight synth" volume to zero — it won't make any sound. To get the volume back
to normal, just go to the MASTER Page, select this parameter and set it to PEDAL=MOD.
9. BEND RANGE
Pitch Bend Wheel Range. Adjusts how far the Pitch Bend Wheel will bend a note up or down
when moved all the way in either direction. Each increment represents a Semitone.
Range: 0 To 12.
10. B E N D M O D E Pitch Bend Wheel Mode. Selects between two modes of operation for the Pitch
Bend Wheel.
There are two Modes:
− ALL—Moving the Pitch Bend Wheel will affect the pitch of all notes that are being played. This
is how most Pitch Wheels usually operate.
− > HELD — In this Mode, onl
y
those keys that are being held down when you move the Pitch Wheel
will be affected by the wheel. Keys that have been released will not bend, even if they are being
sustained by holding down the Sustain Foot Switch. This enables you to bend certain notes while
others remain unchanged in pitch. With a little practice you can simulate guitar and pedal steeltype techniques, and many other interesting effects.
20 Section 2 — Global Functions and MIDI Configuration
Page 33

[MIDI] MIDI PAGE
Controls MIDI Functions
SQ-80 — Musician's Manual
From this Page you control the MIDI (Musical Instrument Digital Interface) configuration of the SQ-
80 as well as determining which type of Pressure the SQ-80 k eyboard will generate locally and send out
via MIDI. Because of its built-in Sequencer, its controller-oriented features and its abil ity to receive and
store System Ex clusive information from a ny MIDI instrument, the
a bit more involved than most synthesizers.
In many ways. each Track of a Sequence acts like a separate little synthesizer. In fact we refer to the
Tracks
sending and receiving MIDI. There is a ninth "virtual synthesizer", independent of the eight Sequencer
Tracks — the one you use when you are not using the Sequencer, when you just select a sound and play.
We need some way to distinguish between this "Normal" Synth operation (which is what the first part
of this Manual is Primarily concerned with) and what happens when one of the Tracks of a Sequence is
selected.
Accordingly, when no Sequencer Track is selected,
Synth
this mode whenever you select a Program in the usual way. Most of the time you are in the "Straight
Synth
"Straight Synth" operation is to deliberately select one of the Tracks of a Sequence. When we speak of
the "Straight Synth" we are referring to the
in.
as "virtual synthesizers" because each is capable of independently playing Local voices and
-
operation. the keyboard is entirely independent of the Sequencer. You are automatically put in
-
section of the SQ-80 — you don't have to do anything special to get there. The only way to leave
we call this the "Straight Synth" mode. In "Straight
SQ-80 as it would behave if it didn't have a sequencer built
SQ-80's MIDI implementation is
Use this Page to:
1) Select the Base MIDI Channel;
2) Turn On or Off the
3) Select an External Controller to be used as a Modulator:
4) Enable the
5) Select a MIDI Mode: and
6) Determine which types of information will be sent and received over MIDI by the
MIDI Overflow Mode;
SQ-80 to send and receive Pressure (Aftertouch)
Section 2 — Global Functions and MIDI Configuration
SQ-80.
21
Page 34

SQ-80 — Musician's Manual
ACTIVE CONTROLS:
1. CHAN — Base MIDI Channel
We call this the Base Channel. It is the MIDI Channel that the "Straight Synth" section of the
SQ-80 will send and receive MIDI information on when no Sequencer Track is selected. When a
Track is selected, that Track will receive on the Base Channel if the
Any of the sixteen MIDI Channels may be selected (except when in MONO Mode: see below).
Range:
The
and only on this channel. Which Channel (or Channels) it receives
and which
01 To 16.
SQ-80's "Straight Synth" sectio n will always send MIDI information on the Base Channel,
MIDI Mode is selected (see #6 below).
2. OVFL — MUM Overflow Mode
MIDI Overflow Mode is a feature that allows two SQ-80'S connected together by MIDI to act
like a single 16 Voice synthesizer.
SQ-80 is in POLY Mode.
on depends upon this setting
When OFF: The SQ-80 will behave normally, sending out all enabled MIDI data.
When ON:
another note is played, whether from the keyboard or by the Sequencer. At this point, instead of
"stealing" an internal Voice to play the new note, it sends that note out over MIDI. It will continue
sending notes out MIDI until there is an internal Voice available to play a note.
If a Sequence is playing when Overflow is on, each Track with LOCAL or BOTH status will
overflow on its own designated MIDI Channel. The "Straight Synth" will Overflow on the Base
Channel. Tracks with MIDI or SEQ Status are not affected by Overflow Mode.
The SQ-80 will send out no MIDI key data until all eight Voices are playing, and
Note: Overflow Mode will work exactly the same way with any other synth set up to receive
MIDI Data from the
picking up and playing whenever the
WARNING:
seems to be mysteriously "losing voices." Make sure Overflow is OFF when you are using the
If you inadvertently leave this parameter set to ON, you will find that the SQ-80
SQ-80. How ever, the effect of a different synth with a different patch,
SQ-80 in normal operation.
4. XCTRL — Select External Controller
One of the Modulators that can be selected in the Programming section of the SQ-80 is XCTRL
External Controller. Each Controller on a Synthesizer (Breath Controller, MOD Wheel. or
—
Pressure, for example) has a standardized MIDI number, which is the number you select here to
make a particular Controller a Modulator in any of your Programs.
SQ-80 runs out of voices will be unpredictable at best.
Suppose, for example, that you are driving the
(or want to use a Breath Controller as a Modulator when playing the
set up a Program on the
is modulated by
Controller will now modulate th e
lists the accepted MIDI Controller numbers_
SQ-80 where the Filter Cutoff Frequency, or some other Manual Level.
XCTRL. Then assign this parameter a value of XCTRL= 02. The Breath
Filter, or whatever, on this Program. The chart on the next page
SQ-80 from a keyboard with a Breath Controller
22 Section 2 — Global Functions and MIDI Configuration
SQ-80 Keyboard). You can
Page 35

f
The following Controller Numbers have been agreed upon:
Number Controller Number Controller
1 Modulation Wheel 66 Sostenuto Pedal
2
4
6
7
Though the range of this Control is from 01 to 95, most of the values other than those li sted abov e
have no accepted function, as yet. They are there to accommodate future MIDI standards.
5. PRESS — Pressure (Aftertouch) Control
Breath Controller
Foot Pedal Controller
Data Entry Slider
Volume Pedal
Pressure (also called Aftertouch) is available as a Modulator in your SQ-80 Programs and is
generated by its keyboard. Pressure is generated by pressing down harder on a key or keys after
the initial keystrike. The
will record and play back Pressure. There are two types of Pressure —
SQ-80 both sends and receives Pressure via MIDI, and its Sequencer
Key Pressure.
92
93
94
95
SQ-80 — Musician's Manual
Tremolo
Chorus
Celeste
Phaser
Channel Pressure and
This is an important control because it determines whi ch type of Pressure. if any, will be in effect
locally on the
Pressure information will be sent and received via MIDI by the
selected as a modulator in an
the keyboard will send Key or Channel Pressure to the voice, or no Pressure at all.
This control has three possible states:
−
PRESS=OFF — This setting turns off Pressure entirely, both Locally and over MIDI.
When PRESS=OFF:
• The SQ-80 keyboard will not send or receive Pressure of either type over MIDI;
• Local voices played from the keyboard will not respond to Pressure:
• The Sequencer will not record Pressure into any Tracks you record, but will play back Pressure
information that was previously recorded into any Tracks.
You should select PRESS=OFF whenever you don't want or need Pressure for a given
application, particularly when sequencing. Pressure eats up Sequencer memory at an alarming
rate, so whenever you record a Track, whether LOCAL or MIDI, with a patch that doesn't
respond to Pressure. set this parameter to OFF. This will avoid wasting valuable Sequencer
memory and also avoid clogging up the MIDI "airwaves" with a lot of unnecessary Pressure
information.
−
PRESS=CHAN — This enables the SQ-80 to generate and send via MIDI the most common type o
Pressure — Channel Pressure. With Channel Pressure, after a note is played, pressing down
harder on the key modulates every note currently playing. Like a MOD Wheel, Channel Pressure
is "Global" — it affects the entire keyboard when activated. When PRESSURE=CHAN:
• Local Voices played from the SQ-80 keyboard will respond to Channel Pressure only;
• The Sequencer will record Channel Pressure into any Tracks you record:
• The
• Either Channel Pressure or Key Pressure will be received via MIDI as it comes in.
SQ-80 and what will be recorded by the Sequencer. as well as controlling what
SQ-80. W hen Pressure has been
SQ-80 Program, the setting of this parameter determines whether
SQ-80 keyboard will send only Channel Pressure out via MIDI; however
Section 2 — Global Functions and MIDI Configuration
23
Page 36

SQ-80 — Musician's Manual
At present, Channel Pressure is recognized by more MIDI instruments than Key Pressure. When
you are playing or sequencing an external M IDI instrument from the
seem to be having an effect, it could be that the
and the receiving instrument only recognizes Channel Pressure. In this case, set this parameter to
PRESS=CHAN when playing or sequencing that instrument.
SQ-80 is set to send Key Pressure (see below)
SQ-80, and Pressure doesn't
> PRESS=KEY — This enables the SQ-80 to generate and send via MIDI a second, mo re selective
type of Pressure —
each note independently. If you press down on any given key within a chord, only that note will
be affected by Pressure — all others remain unmodulated. This type of Pressure allows for a
whole new range of expression in your playing.
When PRESSURE=KEY:
• Local Voices played from the
• The Sequencer will record Key Pressure into any Tracks you record;
• The
• Either Channel Pressure or Key Pressure will be received via MIDI as it comes in.
SQ-80 keyboard will send only Key Pressure out via MIDI; however
Key Pressure. Key Pressure (also called Polyphonic Pressure) modulates
SQ-80 keyboard will respond to Key Pressure only:
Sequencer Notes: This parameter determines which (if any) type of Pressure the Sequencer will record.
Once a Track has been recorded, however, the Track "remembers" which type of Pressure was used.
When the Sequence is played back, each Track will put out the type of Pressure that was recorded into
it, no matter what the setting of this parameter. If there is unwanted Pressure information in a Track, use the
REMOVE CONTROLLERS Edit function to get rid of it.
Note also that Key Pressure generates
Sequencer Memory at an incredible rate. Turn this parameter OFF when recording Tracks which don't call for
Pressure.
a lot of information, and recording it can use up the SQ-80's
Try this: Select an Internal Program on the SQ-80 which responds to Pressure and play several notes
with this parameter set to PRESS=KEY. Play a chord, and then exert some extra pressure on just one
note at a time. Notice how each note responds independently to your pressing down on the keys. Now
switch this parameter to PRESS=CHAN and do the same. See how the Pressure now affects all notes when any
one key is pressed.
You can consult the MIDI Implementation Chart of the MIDI instrument(s) you will be using, in
conjunction with the
set this parameter to the appropriate value when playing or sequencing each instrument from the
80.
SQ-80 and its Sequ encer, to see which, if any, type of Pressure it responds to. Then
SQ-
6. MODE — Select MIDI Mode
The MIDI Mode determines how MIDI information will be received by the SQ-80 and its
Sequencer. The MIDI Mode has no effect on what is sent — The "Straight Synth
eight Tracks of the Sequencer will always send on their selected MIDI channels. There are four
"
Section and
MIDI Modes that can be selected here:
---> OMNI — In
sixteen MIDI channels, when no Track is selected. If one of the eight Tracks of a Sequence is
selected, then the Track will receive any enabled MIDI data on any channel.
POLY — In POLY Mode the "Straight Synth" section of the SQ-80 will receive only on the Base
--->
MIDI channel
of the eight Tracks of a Sequence is selected, then the Track will receive incoming MIDI data.
only on the Base channel.
OMNI Mode the "Straight Synth" section of the SQ- 80 will receive on all of the
(see #1 above). MIDI information on all other channels will be ignored. If any
24 Section 2 — Global Functions and MIDI Configuration
Page 37

t
SQ-80 — Musician's Manual
> MULTI — MULTI Mode is an ENSONIQ innovation which was specially designed to make
optimal use of the multi-timbral capabilities of its instruments.
Synth" section and each of the Sequencer's eight Tracks can each receive
independently on a different MIDI Channel.
The "Straight Synth" will send and receive on the Base Channel selected on this Pag e (#1 above).
Each Track of a Sequence will send and receive on its selected Channel (selected on the
In MULTI Mode the "Straight
MIDI information
Mix•MIDI Page in the Sequencer Section).
Different MIDI Channels should be selected for each Track! If the same MIDI Channel is
selected twice, priority is given first to the "Straight Synth" and then to the lowest numbered
Track that shares the Channel. For example:
• If MIDI Channel 1 is selected on this Page for the "Straight Synth", and Channel 1 is also
selected for Tracks 1 and 3, the "Straight Synth" will receive on Channel 1. and Tracks 1 and 3
will receive nothing. Or:
• If MIDI Channel 6 is selected for Tracks 2, 4, and 7. then Track 2 will receive on Channel 6,
and Tracks 4 and 7 will receive nothing. And so on.
MULTI Mode might be best thought of as "Multiple POLY" Mode. In MULTI Mode, each Track
behaves as a "virtual synthesizer", receiving independently on its own MIDI Channel. but with
access to all eight voices.
MONO — Before MULTI Mode was developed. MONO Mode was about the only way to have a
poly-timbral synthesizer. It is particularly well suited for driving the
Controller, or any other application where having up to eight independent,
Channels is desirable. When MONO Mode is selected:
• The "Straight Synth" section becomes Monophonic — only one note will play at a time. Unlik e
the usual
does not retrig
Mono Mode of the SQ-80, in this state there is no Note Memory — releasing one note
ger another note which is being held.
• The "Straight Synth" Section does not receive any MIDI information at all.
• The Base
MIDI Channel selected on this Page (#1 above) will be received by Track 1 of the
Sequencer. Track 2 will receive on the next Channel, Track 3 on the next, and so on. Each Track
receives monophonically (one note at a a time.) The Base Channel cannot have a value greater
than nine. If you select the
displayed properly, but you can't adjust them from there in MONO Mode. You can only adjust
the Base Channel. Though MIDI Channels are automatically assigned to the Tracks of the current
Sequence while you are in MONO Mode, the
previously assigned to each Track of each sequence, and when you select any of the other three
MIDI Modes, those channel assignments will be restored.
The chart at the righ
shows the MIDI
channels that will be
received by the eight
Tracks, in
MONO
Mode, for the pos-
sible Base Channels.
Mix•MIDI Page, you will see the MIDI Channel assigned each Track
SQ-80 remembers which MIDI channel was
If Base Channel=
Track 1
Track 2 .. 2 3
Track 3
Track 4
Tracks
Track 6
Track 7
Track 8
receives on
"
" "
," "
"" "
" 8 9 1 0 1 1 1 2 1 3 1 4 1 5 1 6
1 2 3 4 5 6 7 8 9
3 4 5 6 7 8 9 1 0 1 1
4 5 6 7 8 9 1 0 1 1 1 2
5 6 7 8 9 1 0 1 1 1 2 1 3
6 7 8 9 1 0 1 1 1 2 1 3 1 4
" 7 8 9 1 0 1 1 1 2 1 3 1 4 1 5
SQ-80 from a Guitar
monophonic,
2 3 4 5 6 7 8 9
4 5 6 7 8 9 10
Section 2 — Global Functions and MIDI Configuration
Page 38

SQ-80 — Musician's Manual
• The Base Channel Minus One
if the Base Channel is Chan.
on Chan
for Global Controllers.
2 will affect all the Tracks. If the Base Channel is Chan. 1, Chan. 16 becomes the Channel
becomes the MIDI Channel for global Controllers . For example,
3, any Controllers (Pitch bend. Pressure, MOD Wheel, etc.) received
9. ENABLE — MIDI Enables
This parameter determines what kinds of MIDI information will be sent and received by the SQ-
80, including the receiving of MIDI Song Selects (see p. 143). There are five possible states for
this parameter:
> KEY EVENTS ONLY — In this state the SQ-80 will send and receive only notes that are played
on the Keyboard, along with Song Selects (Song Selects are always sent). Controllers (such as
MOD Wheel. Pitch Bend, etc.). Program changes, and Parameter Changes will not be sent or
received. Song Selects will not be received.
> KEYS + CONTROLLERS — Key Events and Controllers only will be received. Parameter
Changes and Song Selects will be sent, but not received. Program changes will not be sent or
received.
> KEYS + CT + PROG CHNG — Key Events, Controllers, and Program Changes will be sent
and received
unit to change to the same numbered Program: or. if the
keyboard. Program changes made on that keyboard will cause the
numbered Program. Again, Parameter Changes and Song Selects are sent but not received.
in this Mode. Thi s means that changing Programs on the SQ-80 will instruct a slave
SQ-80 is being driven by another
SQ-80 to change to the same-
> KEYS + CT + PC + SNGSL — Same as KEYS + CT + PROG CHNG above, with the additio n
that MIDI Song Select messages will also be received. Key Events, Controllers, Program
Changes and Song Selects will be sent and received in this Mode.
> KEYS + CT + PC + SS + SX — Key Events, Controllers, Program Changes, Song Selects and
System Exclusive messages will all be received
via MIDI in this Mode. This enables the SQ-
80 to receive System Exclusive messages, such as Parameter Changes, Program Dumps,
Sequencer Data. etc. Any Parameter (Program or Global) that is changed on the SQ-80 will also
be changed on another SQ-80 connected to the first by MIDI.
Note: This is the only parameter on the SQ-80 whose setting is not always preserved when the unit is
turned off and then on again.
(ENABLE=KEYS + CT + PC + SS + SX) and you turn the po wer off, when you turn it on again this
parameter will be reset to ENABLE= KEYS + CT + PC + SNGSL. In other words, System Exclusive
messages will no longer be enabled. This is to prevent accidentally leaving System Exclusive messages
enabled, which can wreak havoc in some circumstances (notably while sequencing).
If the SQ-80 is enabled to receive System Exclusive messages
26
Section 2 — Global Functions and MIDI Configuration
Page 39

SO-80 — Musician's Manual
SECTION 3
Voice Programming
28 ...................Voice Diagram — an SQ-80 Voice
TM
29 ...................About CrossWave
30 ...................WAVES
30 ....................... D i g i t a l W a ve M e m o r y
30 ........................ W a v e f o r m s , I nharmonic Loops and Transient Attacks
32 ....................... S y n t h e t i c , S a mp l e d and Multisampled Waves
32 ........................ Names
32 ........................ S e l e c t i n g a W a v e f o r E a c h O s c i l l a t o r
33 ....................... C h e c k T h e m Ou t
33 ........................ T h e W a v e s
40 ...................MODULATORS
40 ........................ About Modulation
40 ....................... S e l e c t i n g a Modulator
41 ....................... Modulation Depth
41 ....................... Modulation Sources
45 ....................... U s i n g M odulators
47 ...................PROGRAMMING PAGES
48 ........................ O S C 1 - 3 — O s c illator Pitch Pages
50 ........................ D C A 1 - 3 — O s c illator Volume Pages
52 ....................... F I L T E R P age
54 ........................ D C A 4 — F i n a l V o l u m e P age
56 ........................ L F O 1 - 3 — L o w F r equency Oscillators
59 ....................... Understanding the Envelopes
65 ........................ E N V 1 - 4 — E n v e l ope Pages
68 ........................ M O D E S P age
71 ....................... S P L I T / L A Y E R P a ge
75 ..................Programming Conventions
76 ...................WRITE Page
76 ....................... S a v i n g a N e w P r o g r a m i n t o M e m o r y
78 ........................ C o p y i n g a n E x i s t i n g P r o g r a m t o A n o t h e r L o c a t i o n
Synthesis
Section 3 — Voice P rogra mming 27
Page 40

SQ-80 — Musician's Manual
Any of 'these 15 Modulation Sources can be independently
assigned wherever a MOD is indicated above.
For each of the SQ-80's 8 voices:
....Each Oscillator plays a Wave from the Digital Wave Memory;
-->The output of each Oscillator passes through the same-numbered
DCA (Digitally Controlled Amplifier);
-
>The output of the 3 DCA's passes through the Four-Pole Low Pass Filter;
-
-The output of the Filter goes to the final DCA - DCA 4.
-->The output of DCA 4 goes to the Panner, which pans the Program
between the Left and Right Audio Ou tputs.
-->Wherever a "Mod" is indicated in the above diagram, any of the 15
available Modulators may be assigned to vary the "Manual" setting.
28 Section 3 — Voice Programming
Page 41

SQ-80 — Musician's Manual
About Cross Wave
TM
Synthesis
The sound of most musical instruments can be separated into two basic parts:
• The Attack — the initial transient frequencies of the sound, which quickly die away. The scratch
of a bow on a violin string, the sound of a mallet striking a vibraphone, the pluck of a guitar string —
these are all examples of Transient Attacks.
• The Sustain — after the initial attack dies out, most sounds settle into a relatively stable pattern of
repeating wavecycles.
Usually the most complex and interesting part of a sound, and the hardest part to synthesize. is the initial
Attack. Ideally, we would like to be able to sample (digitally record) the Attack segments of various
sounds, and then Crossfade those Attacks with other sampled or synthesized Sustain Waves. This would
allow us to custom-build sounds with an endless variety of Attack and Sustain characteristics"
This is exactly what the SQ-80 is designed to do. Within each Program, each of the SQ-80's three
Oscillators can play a different Wave. Among the availa ble Waves are Transient Attacks, which are
used for the initial Attack portion of the sound, and two types of Sustain Waves — Waveforms, which
are single-cycle waves repeated over and over, and Inharmonic Loops, which are dynamic. multi-cycle
waves.
You can assign one Oscillator to play a Transient Attack. and have the other two play Sustain Waves.
Or you can assign two Oscillators to play different Transient Attacks simulta neously, and use one Sustain
wave. Any Oscillator can be assigned to play any Wave. The best thing about CrossWaveTM synthesis
is that you can use it to recreate the sound of a real instrument, such as a cello or marimba. or you can
create entirely new sounds by combining totally unrelated Attack and Sustain Wave s. How about a
Bowed Bell? Or a Plucked Vocal? The possibilities are limited only by the imagination of the
programmer.
Crossfading Waves
The basic idea of Crossfading is that the volume (or amplitude) of one sound fades out over time as
another sound fades in.
• The SQ-80's Transient Attack Waves have their own built-in fade-out. That is, these Waves do not
loop — they play through once at the beginning of the sound and stop.
• The Sustain Waves (the Waveforms and Inharmonic Loops) are faded in using the SQ-80's
Envelopes. One of the four Envelopes is assigned to modulate the DCA (Digitally Controlled Amplifier)
of the Oscillator playing the Sustain Wave (see Modulators. later in this Section). By setting the
Envelope's TIME 1 to a value of around 10, we can cause that Oscillator's level to fade in as the Transien t
Attack Wave played by another Oscillator is fading out. Here's the net effect:
Section 3 — Voice Programming 29
Page 42

p
p
SQ-80 — Musician's Manual
Throughout the rest of this Section you will learn about the Waves, Modulators. and Envelopes, and how to
control the pitch and volume of each Oscillator. Once you are familiar with the basic operations, try
examining some of the Factory Programs to see which Waves are played by the different Oscillators
(OSC 1-3 Pages), and how the volume of each Oscillator has been programmed (DCA 1-3 Pages).
WAVES
Digital Wave Memory
The
SQ-80's CrossWave
"read" from memory whichever Waves they are instructed to play for each Program (rather than just
producing simple sawtooth or square waves). The
in constructing sounds.
This wavedata is divided among 75 different Waves stored in the
of these Waves have been sampled (digitally recorded) from real musical sources: others hav e been
created synthetically. Some were sampled and then re-synthesized using various Digital Signal
Processing techniques.
Waveforms, Inharmonic Loops and Transient Attacks
The Waves which form the "raw material" of the
— Waveforms, Inharmonic Loops and Transient Attacks. Though Waveforms, Inharmonic Loops and
Transient Attacks are all forms of digitally encoded sound, they differ in fundamental ways.
• A
Waveform is a single cycle of a sound wave. It is Digitized, or converted into a series of numbers,
and stored in Memory. By rapidly repeating this single cycle over and over, an Oscillator can produce a
pitched sound which becomes a continuous Sound wave:
Unlike the sounds generated
by analog oscillators, Digital
Waveforms can be very com-
lex. and can contain any
combination of harmonics —
frequencies that are multiples
of the wave's fundamental
frequency. Every Waveform
has its own unique
which is the number and am-
litude of harmonics present
in the Wave. It is this Spectrum which gives every sound
its own identifiable characteristics.
TM
synthesis technique is based on the ability of its three Digital Oscillators to
Spectrum,
SQ-80 has 256 kilobytes of wavedata in ROM to use
SQ-80's Digital Wave Memory . Many
SQ-80 sounds are divided into three basic categories
The SQ-80 has 49 Waveforms. The first 32 Waveforms are the same as those in the ENSONIQ ESQ-1.
This means that ESQ-1 sounds can be played on the SQ-80. The reverse is partially true — SQ-80
sounds which use only the bottom 32 Waveforms (none of the other Waveforms, Transient Attacks or
Inharmonic Loops) will usually play properly on the
Transient Attack or Inharmonic Loop Waves will tend to produce unpredictable results when played on
ESQ-1 (until the Program is modified to use waveforms which are legal on the ESQ-1.)
the
ESQ-1. However, any SQ-80 sound s which use
30 Section 3 — Voice Programming
Page 43

g
SQ-80 — Musician's Manual
• An Inharmonic Loop is a relatively long portion of a sampled sound which is "looped" or repeated
over and over. It is similar to a Waveform, but where a Waveform is one wavecycle of a sound repeated
endlessly, an Inharmonic Loop contains many wavecycles of the sound. A waveform can capture the
basic timbral characteristics of a sound, but when a single cycle o f a wave is played ov er and over you
lose any sense of randomness or movement within the sound. A long, multi-cycle loop can contain
frequencies which are inharmonics — not exact multiples of the fundamental frequency. A Waveform
by definition cannot contain such frequencies. A Waveform is static; an Inharmonic Loop is dynamic.
Inharmonic Loops can capture the subtle shifts in the character of a sound which occur over time. They
account for the SQ-80's ability to create a certain class of "atmospheric" sounds not possible with
Waveforms.
Multi-cycle Inharmonic Loop
The only drawback of these types of Waves is that, being much longer pieces of sound, they take up an
enormous amount of memory compared to waveforms. Thus you are limited to a smaller number of
them.
The SQ-80 has 5 Inharmonic Loops. These particular Waves have been optimized to add breath,
movement and complexity to a sound — you can create all sorts of ear-grabbing textures by using
different combinations of Inharmonic Loops and Waveforms for the sustain segments of your sounds.
• A Transient Attack is the very first portion of a sound — the scratch of a bow, the pluck of a
string, the strike of a mallet, etc. A real sampled attack at the beginning of a sound tends to be more
sonically interesting and "punchier" than a synthesized attack. The SQ-80's various Transient Attack
Waves can be combined with the other types of waves (or with each other) to create a wide variety of
or very unusual sounds. This is the essence of
CrossWaveTM synthesis — crossfading these
sampled attacks with the various Waveforms and
Inharmonic Loops to create new sounds.
The Transient Attack Waves are not looped:
unlike the other types of Waves in the SQ-80,
they play through once and stop. They provide
the attack transients of the sound, and then other
Waves can be used for the sustain portion.
The SQ-80 has 11 Transient Attack Waves (not
counting the Drums).
• There is one more special category of Waves in the SQ-80 — Drum/Attacks. These Waves are
actual sampled Drum sounds. They can be used as Drums or as Transient Attack Waves within other
types of sounds. The last five Waves (DRUMS 1-5) combine the different Drum/Attack Waves in
various configurations to give you an entire multisampled drum set just by selecting a single Wave.
Section 3 —Voice Programmin
31
Page 44

SQ-80 — Musician's Manual
Synthetic, Sampled and Multisampled Waves
Many of the Waves in
techniques, to create a variety of Waves which contain specific harmonics in specific amounts. By
assigning different combinations of these synthetic Waves to two or more Oscillators, it is possible to
create sounds with almost any timbral characteristics.
Some Waveforms, and virtually all of the Attacks and Inharmonic Loops, are sampled — digitized from
some real musical source and stored in Memory. By crossfading and combining these Waves it is
possible to synthesize sounds that capture the character of an instrument in a way that no ordinary
synthesizer can.
SQ-80's Memory have been generated sy nthetically, using a number of different
Some of the
waves play in different ranges of the instrument. This is because many sounds lose their realism if they
are transposed too far from their source. The lowest note on a piano, if transposed up three octaves,
doesn't sound like a piano any more. Neither does the highest note transposed down
to use another example — take a recording of a human voice and play it back twice as fast. Does it sound
like a human voice? No. What does it sound like? Chipmunks. (This is technically known as the
Munchkin Effect.)
Multisampling means that the low notes of the Piano Waveform were sampled from a low note on the
piano, the middle notes were sampled from a middle note, and so on. You don't have to do anything
special to use these Multisampled Waves. The
selected just like the others.
The Synthetic Waves can be combined with the Sampled ones, to add harmonic content which enhances
the sound in some way. Any combination of Waveforms is possible, and each will have its own unique
sound.
Names
The
SQ-80's Waves are identified by their Names. You should neither take them too literally, nor let
yourself be limited by those Names. Don't, for example, expect the
Vocals —everything depends on the Program (the Envelopes. the F ilter settings, etc.). On the other h and,
don't let the Names alone limit what you try in terms of being creative. For example, if you find that
within a certain Program the
with it. Your ears are the only valid judge of what works.
SQ-80's Waves (such as the Piano Waveform) have been Multisampled — that is, different
three octaves. Or
SQ-80 treats each one as a single Wave, and they are
VOICE Waves to always sound like
BASS Waveform sounds like a harpsichord. or a kazoo. or whatever, go
Selecting a Wave for each Oscillator
Each of the three Oscillators can play a
different Wave within a Program. The
Waves are selected from the
Oscillator
Pitch Pages [OSC1, OSC2 and OSC3].
To select a Wave for
Button labeled
The Display shows you
select parameter.
Oscillator 1, press the
OSC 1.
Oscillator l's Page. In the upper right portion of the Page you find the Wave
32 Section 3 — Voice Programming
Page 45

SQ-80 — Musician's Manual
Press the "Soft" Button above the WAVE NAME. Now you can use the Data Entry Slider and the Up
and Down Arrow Buttons to change the W ave that OSC 1 will play . There are 75 available choi ces, each
with its own Name. Follow the same procedure to select a Wave for OSC 2 and OSC
section details each Wave by Name.
3. The following
Check Them Out
The best way to understand the SQ-80's Waves is not to read about them, but to hear them.
• Select an Internal Program. preferably one with infinite sustain such as an organ sound.
• Turn off the output of Oscillators 2 and 3 (Press the DCA2 button to select the Oscillator Volume
Page for Oscillator 2. Select the parameter OUTPUT=ON and switch it to OFF. Do the same on the
DCA3 Page).
Now select the OSC 1 Page as shown above, and select WAVE. Move the Data Entry Slider all the way
down so that the Sawtooth Waveform is selected (WAVE= SAW).
While repeatedly playing a note or chord. press the Up Arrow Button to step to the next Wave. Press
it again to hear the next one, and so on. In this way you can listen to each Wave in succession. compare
them to each other, and compare the timbral and percussive characteristics you hear in various ones to
their text descriptions below. When you are looking for the right Wave for a particular application, let
your ears be the guide.
THE WAVES
Note: The first 32 Waves (SAW through OCT+5) are the same as those contained in the ENSONIQ
ESQ-1. The remaining 43 Waves (starting from SAW 2) are unique to the SQ-80.
1) CLASSIC SYNTH WAVEFORMS
These Waveforms collectively form the bases of almost all classic Analog synthesizer sounds.
Their inclusion here gives the SQ-80 its ability to make those sounds with the best of them.
--> SAW — SAWTOOTH. The Sawtooth Wave needs no introduction. It contains all the
harmonics, and is extremely bright. The Sawtooth is the basis for many Analog sounds. notably
Strings and Brass.
---> BELL. The Bell Waveform contains many widely spaced harmonics, many of them odd
harmonics. It makes bright. Bell sounds.
SINE. The Sine Wave contains only the Fundamental, with no higher harmonics. It has very
pure tone, good for flutes, organs, etc.
Section 3 — Voice Programming 33
Page 46

SQ-80 — Musician's Manual
____
-> SQUARE. The Square Wave contains the Fundamental and all its odd-numbered harmonics at
a fixed ratio. The level of the harmonics is the same as the Sawtooth, except that there are no evennumbered harmonics. The Square Wave has a hollow sound, and is also the basis for many classic
synth sounds.
____
> PULSE. This Pulse Wave contains the Fundamental and all its integral harmonics at equal
amplitude. This is a very bright Waveform.
> NOISE 1. This is a Waveform taken from filtered Noise. It works best when tuned down low
(OCT= -3). (Note that the Noise Waveforms here differ
Waveforms are by definition repeating patterns, and Noise is random.)
from analog Noise generators, in that
> NOISE 2.
This is very close to White Noise. It has almost no pitch . but modulating the Oscillator
playing this Waveform with a fast LFO or an Envelope, will eliminate what pitch tracking there
is.
> NOISE 3.
This Waveform is good for putting random frequency components into a sound (the
attack "ping" of a mallet instrument, for example). It has a clangorous, metallic quality, and its
pitch tends to be unpredictable.
2) SAMPLED WAVEFORMS
The Sampled Waveforms contain harmonics that simply cannot be generated by an ordinary
synthesizer, since every musical source produces its own unique waveshapes and Frequency
Spectrum.
−
> BASS. This is a bright Bass Waveform, full of interesting harmonics, which, depending on the
Program, makes a great regular or synth-type Bass. Higher up it takes on a Clav-like character.
− > PIANO. A multisampled acoustic Piano wave. Its best range is OCT= -1.
____> EL PNO — ELECTR IC PIANO.
you to recreate this instrument with tremendous realism.
> VOICE 1.
A multisampled Vocal waveform, saying "Ah".
A Waveform taken from a popular Electric Piano — allows
− > VOICE 2. A multisampled Vocal waveform, using the same waveforms as VOICE 1. but with
a higher split point for each Wave
____ > KICK. This Waveform is optimized for one application. Tuned to OCT= -3, properly
enveloped, and played on the lowest key of the Keyboard, it reproduces a Kick drum.
____
> REED. One cycle from an Alto saxophone wave. With different Programs it can sound like
different Reed Instruments.
____
> ORGAN. This Waveform contains the fundamental and four Octaves (2nd, 4th. 8th, 16th and
32nd harmonics). Instant Pipe Organ. Also good for Bells.
34 Section 3 — Voice Programming
Page 47

3) ADDITIVE SYNTHESIS WAVEFORMS
These three Waveforms were created through Digital Additive Synthesis. Each contains the
Fundamental and certain specific harmonics in equal amounts.
____
> SYNTH 1. Contains the fundamental, and every third harmonic, st arting fro m the 2n d, up to the
26th . in equal amounts:
Harmonics: 1, 2, 5, 8, 11, 14, 17, 20, 23, 26.
SQ-80 — Musician's Manual
— > SYNTH 2.
the 25th in equal amounts:
Contains the fundamental, and every third harmonic, starting from the 4th. up to
Harmonics: 1, 4, 7, 10, 13, 16, 19, 22, 25.
> SYNTH 3. Contains the fundamental, and the prime-numbered harmonics, up to the 23rd. in
equal amounts:
Harmonics: 1, 2, 3. 5, 7, 11, 13, 17, 19, 23.
4) FORMANTS
These five Waveforms were created through a process called Time-Domain Formant-WaveFunction Synthesis. Each one has a sharp peak in its frequency spectrum— like pushing one band
of a graphic equalizer all the way up. These Waves are multisampled in such a wa y that the
frequency peak remains relatively constant up and down the keyboard, rather than tracking the
pitch of the note. Each has its peak centered around a different frequency. They tend to have a
nasal quality, and make excellent component waveforms for Vocals, Strings etc.
____
> FORMT 1. Has a frequency peak centered around 750 Hz.
−
FORMT 2. Has a frequency peak centered around 1 kHz.
FORMT 3. Has a frequency peak centered around 1.4 kHz.
− FORMT 4. Has a frequency peak centered around 1.75 kHz.
− FORMT 5. Has a frequency peak centered around 2.25 kHz
5) BAND LIMITED WAVEFORMS
These Waveforms are Band Limited — that is, their harmonic content has been restricted along
certain specific lines. They are good for adding controlled harmonics to a sound. or for combining
to achieve various timbres. Some are other Waves with some harmonics pulled out; some were
built "from scratch" to contain only certain harmonics.
PULSE2. Originally a Pulse Wave, like the Pulse Wave above, but with only the first 11
harmonics left in.
SQR 2. Originally a Square Wave, but with only the first 7 harmonics left in.
> 4 OCTS. Contains, in equal amounts, only four harmonics — 1st, 2nd. 4th, 8th. Fundamental
and three Octaves; again, good for Organ sounds.
____ > PRIME. Contains, in eq ual amounts, only the first five prime-numbered harmonics: 1st, 3rd.
5th. 7th, and 1 1 th.
Section 3 — Voice Programming
35
Page 48

SQ-80 — Musician's Manual
− BASS 2. Originally the Bass Wave, but with only the first eighteen harmonics left in.
− E PNO2. Originally an Electric Piano Wave, but with only the first nine harmonics left in. An
Electric Piano without the "ping."
> OCTAVE. Contains only the 1st and 2nd harmonics in equal amounts — the Fundamental and
one Octave.
−
Note:
6) MORE WAVEFORMS
OCT+5. Contains only the 1st, 2nd. and 3rd harmonics in equal amounts — the Fundamental,
one Octave and the Fifth above the octave.
All Waves from this point on are unique to the SQ-80.
These Waveforms, some sampled, some synthetic, and some sampled and then resynthesized.
give you yet
your sounds. They have been carefully selected for
−___
SAW 2. A band-limited sawtooth wave, containing only the first three harmonics.
____
> TRIANG. A triangle wave.
> REED 2. In
use for the Sustain portion of string and guitar sounds.
> REED 3.
another set of timbres from which to choose when deciding upon Sustain Waves for
maximum usability.
addition to being good for reed and woodwind sounds, this is a good Waveform to
This Wave has a nasal. oboe-like character. It is s imilar to the Formant Waves ex cept
that the frequency peak tracks up the keyboard along with the fundamental instead of remaining
constant.
____> GRIT 1. The three GRIT Waveforms give you a set of raw, harmonically dense Waves to use
for giving a sharp, cutting edge to a sound. They are particularly effective when used as Sustain
Waves which are only brought in at high
velocities. They also make good component waves for
ensemble string and brass sounds. Or use them to put some grit into the beginning of a sound.
GRIT 1 is somewhat band-limited, the least aggressive of the three.
−
− GRIT 3. The brightest of the three GRIT Waveforms. Extremely raw-edged, not recommended for
GRIT 2. Similar to GRIT 1 but with more high harmonics.
polite company. Good for adding bite to Cla
y
, electric guitar, horn and other bright sounds.
____-> GLINT 1. This Waveform contains a single very high harmonic which is multisampled in such
a way that the high harmonic remains in more or less the same place as you play up the keyboard.
Good for adding a high glassy shimmer to electric piano sounds, bells, etc. Changing the Octave
of an Oscillator playing any of the GLINT Waveforms will have no effect.
−
> GLINT 2. Same as GLINT 1 except that the high harmonic is lower.
− ___> GLINT 3. Same as GLINT 1 and 2 but the high harmonic is still lower.
> CLAV.
A multisampled Waveform, taken from the sustain segment of a Clay.
> BRASS.
This Wave consists of two samples. The lower half is a single cycle taken from a
trombone; the upper half is a single cycle from a trumpet note. Mix with other Sustain Waveforms
36 Section 3 — Voice Programming
Page 49

SO-80 — Musician's Manual
(notably SAW or PULSE) to create full-bodied brass ensemble sounds.
−
> STRING. A single cycle from a cello note. Full of rich harmonics chara cteristic of bowed
instruments. Makes a good sustain Waveform for the BOWING attack.
____> DIGIT 1. This Waveform and the next were created using Frequency Modulation. This
Waveform employs large amounts of modulator feedback within the FM algorithm to capture the
typical gritty sound which is usually associated with high-velocity keystrikes.
> DIGIT 2. Another Waveform created through Frequency Modulation. This wave captures the
characteristic sound of a digital piano.
> BELL 2.
Another single-cycle Bell Waveform, with many widely spaced harmonics.
− > ALIEN. A single-cycle Waveform taken from a Vocal wave. It has a quality which sounds partly
sampled. partly synthetic. Good for adding a different timbre to vocal patches. etc.
7) INHARMONIC LOOPS
These are complex, multi-cycle Sustain Waves. Composed of sampled segments of sound longer
than a single wavecycle, these Inhar monic Loops have an eleme nt of movement. or "breath." and an
an atmospheric quality not possible with conventional Waveforms.
> BREATH. A hollow, breathy sound with a bit of fundamental.
− > VOICE 3. Taken from a sample of female vocalists singing "Ooh."
− > STEAM. This wave is mostly "air" without a lot of fundamental. It lends an open, ethereal
quality to any sound.
− > METAL. Extremely dense with harmonics and inharmonics, this Wave has a deliberately
synthetic character.
− > CHIME. This Wave contains many widely spaced harmonics and inharmonics. A multi-cycle
sample of a large tubular bell was used as the source of this loop.
8) TRANSIENT ATTACKS
These Waves contain only the initial attack transients of various sounds. The Transient Attack
Waves do not repeat over and over like the other types of Waves — they play through once and
stop. You could say that these Waves have their own built-in decay Envelopes. A Transient
Attack Wave will play at the beginning of the sound and then fade out, allowing another Wave (or
Waves) to play the Sustain portion of the sound.
−
BOWING. A multisampled attack, fro m a cello in the lower, a violin in the upper, capturing
the initial scratch of the bow on a string. This Wave adds a realistic bow-scrape to string patches.
> PICK 1.
fingernail. Depending on the Program this attack can be used to evoke the sound of a number
The multisampled attack portion of a steel string acoustic guitar, played with the
of different picked instruments.
−
> PICK 2. This is the multisampled initial attack of an electric guitar, played with a nylon pick.
− MALLET. The attack portion of a mallet instrument — specifically a vibraphone. This makes
Section 3 — Voice Programming 37
Page 50

SQ-80 — Musician's Manual
an excellent attack for digital/FM-type piano sounds. Bright yet mellow.
> SLAP. The initial "pop" from a electric slap bass. This attack can be combined with the BASS
Waveform to create some extremely punchy and realistic bass sounds.
− PLINK. Created through additive synthesis, then resynthesized using the Karplus-Strong
Plucked String Algorithm. This and the next two Waves add a bright, hard attack to any sound,
and can sound warm or metallic depending on the context.
> PLUCK.
Algorithm. It is similar in character to PLINK but higher and clearer.
Also created using additive synthesis, and resynthesized with the Karplus-Strong
− > PLUNK. This attack started life as the sound of two wine glasses being clinked together. The
sample was then resynthesized using the Karplus-Strong Algorithm. Like PLINK and PLUCK, it
gives a sound an edge which will cut through the mix.
− > CLICK. Just what it sounds like — a click. Use this Wave to give bite to keyboard-ty pe sounds,
to recreate the click caused by dirty contacts in electric organs. etc. For best results, eliminate
the pitch tracking of the Oscillator playing this Wave (assign KBD2 to modulate the OSC pitch.
with a modulation depth of -63, then tune the Octave and Semitone to taste).
____ > CHIFF. The breathy "chiff' from the attack of a flute. This Wave is good for putting a little
"breath" into the attack of any sound.
> THUMP. This Attack Wave is sampled from the actual sound made by a piano's hammer hitting
____
the string, but with all the strings muted so that you only hear the thump. Less aggressive than
CLICK, it lets you put a realistic thump into the attack of piano. bell and other "hammered"
sounds. As with CLICK, it works best if you eliminate the pitch tracking.
9) DRUM/ATTACKS
This unique group of Waves serves two purposes. All are actual samples of real Drum sounds.
Their inclusion in the
SQ-80 gives you realistic, punchy drum sounds to use, either individually or
as an entire set (see #10 below). In addition, most of these Waves also make great Transient
Attacks when used with other Waves within a Program. For example, the TOMTOM Wave,
when played in the range at which it was sampled, sounds like a TomTom. But when used as an
Attack Wave and transposed above its natural range, it takes on a whole new character.
Experiment with using these Waves both as Drums and as Transient Attacks.
> LOGDRM. A Log Drum is a hollowed log with slits cut in the top. played with mallets. It has a
nice, rounded sound. LOGDRM makes an excellent Attack Wave as well as a good drum sound. I t
makes a unique "percussion" attack on Organ sounds, for instance, when tuned up an octave plus
a fifth from the fundamental.
− > KICK 2. A tight Kick Drum, with plenty of bottom, but with a nice "pop" to it. Unlike the KICK 1
Waveform, which is a single cycle, this is the entire sound of a Kick Drum and is not looped. Try
adding this Kick Drum right into the attack of a Bass sound.
____ > SNARE. A bright, punchy Snare drum, with a good amount of room ambience.
TOMTOM. This is a sample of a rotary-type TomTom, played in a big reverberant room. It has a
38
nice descending pitch component. As mentioned above, it makes an extremely interesting
Section 3 — Voice Programming
Page 51

Transient Attack Wave, especially in the upper octaves where it no longer sounds like a drum.
> HI HAT. A sampled closed hi hat sound.
10) MULTISAMPLED DRUM SETS
The last 5 Waves are special ones — they combine the individual Drum/Attack Waves into a
number of complete multisampled Drum Sets, spread out across the
By using the DRUMS
Wave. This is great when sequencing — it's like having a drum machine built into your synthesizer.
Due to their unique nature, the DRUM Waves are often best used alone in a Program, with the
other two Oscillators turned OFF. You can, however, create special effects, such as assigning
more than one Oscillator to play a DRUM Wave, slightly detuned, which would result in a flanged- or
chorused-sounding set.
The various configurations of the five sets give you different ranges of TomTom, Snare and Log
Drum to work with. One idea is to use a Wave like DRUMS 4, which contains only Kick, Hat
and Toms, to make a lower Program, and then split that Program with one that uses the SNARE
Wave. This approach allows you to create specialized set-u ps by processing various drums
through different Program parameters.
1-5 Waves you can have various combinations of drums together in one
SQ-80 — Musician's Manual
SQ-80's 5-octave key board.
> DRUMS 1. The five Drum/Attack Waves described above are here arranged into a single
"Wave" through multisampling.
___ > DRUMS 2-5. These Waves feature different combinations of drums across the keyboard,
offering you 1) more range on some of the drums, and 2) the ability to create custom s et-ups using,
Split Programs as described above. The illustration below shows how the Drums are arranged
on the keyboard for the
five DRUM Waves when the Waves are tuned to OCT=+O.
Section 3 — Voice Programming 39
Page 52

SQ-80 — Musician's Manual
MODULATORS
About Modulation
To modulate something is simply to cause it to change. Within the Voice architecture of the SQ-8 0 we
begin by setting basic, or Manual,
levels in various ways in order to create movement and dynamics within the Sound.
levels for Volume, Pitch. Brightness, etc., and we then modulate those
Suppose you switch on your stereo, and turn the volume half way up. We can call this the Manual
setting. It will stay at that level until it's changed. Now suppose that y ou take the Volume knob and begin
quickly turning it up and down, so the volume gets continuously louder and softer, louder and softer.
What you would be doing is modulating the volu me of your stereo. If you were to take the Treble
control, and do the same to that knob, you would be modulating the brightness of your stereo.
In much the same way we modulate various levels within the SQ-80 (though generally the approach is
less haphazard). There are 15 different Modulation Sources available, and they can each be
independently assigned to vary the Manual
− > The Pitch of each Oscillator [OSC I, OSC 2 and OSC 3]
− __ > The Volume of each Oscillator [DCA 1. DCA 2 and DCA 3]
____ > The Filter Cutoff Frequency. or the Brightness of the Program [FILTER]
The Depth of the Low Frequency Oscillators [LFO UFO 2 and LFO 3]
and
− > Panning the Program within the stereo mix [DCA 4] Page
The Final Volume of the Program [DCA 4] is a special case — it is always controlled by Envelope 4,
which is fixed as its Modulator.
Selecting a Modulator
On each of the Oscillator Pitch Pages. [OSC 1, OSC 2 and OSC 3]. the Oscillato r Volume Pages,
[DCA 1, DCA 2 and DCA 3], and the FILTER Page, you can select two different Modulators. The
format is similar for all these Pages — the controls on the bottom row of the Page are used to Modulate
the Levels set on the top row. Take for example the OSC 1 Page:
levels for:
Volume
To select a Modulator (or Modulators) for
the pitch of Oscillator 1. first press the
OSC 1 Button. then press either of the
Select Modulator "Soft" Buttons on
the Display, as pictured above. Use the
Data Entry Slider and the Up and Down
Arrow Buttons to select from among the
15 available Modulation Sources. Follow
the same procedure
to select Modulators on the other Pages listed above.
For Modulating Program Pan [DCA 4 Page] and LFO depth [LFO UFO 2 and LFO 3 Pages] only
one Modulator can be selected.
Helpful Hint: Moving the Data Entry Slider all the way up selects *OFF*, which is handy if you don't
want a Modulator applied in a particular location.
40 Section 3 — Voice Programming
Page 53

SQ-80 — Musician's Manual
Modulation Depth
Once you have selected a Modulator, use the control immediately to its right to adjust the Modulation
Depth,
Press the appropriate "Soft" Button. as
shown at the right, and use the Data
Entry Slider and the Up and Down
Arrow Buttons to adjust the Modulation Depth. Modulation Depth can be
Positive or Negative. A Modulation
Depth of
turning the Modulator
or the amount by which the Modulator will affect the Manual Level.
+00 has the same effect as
*OFF*.
Helpful Hint: With Modulation Depth, as with all Parameter values that have a center value (in this case,
+00), there is an easy way to reach that value. With the Modulation Depth selected, press the Down
Arrow Button, and while holding it down, press the Up Arrow Button. This automatically sets the
Modulation Depth to +00.
Modulation Sources
The 15 Modulation Sources available on the SQ-80 are as follows:
LFO 1, LFO 2 and LFO 3
The three
can produce Vibrato, Tremolo, and many other effects, depending on the LFO wave selected.
and where it is applied as a Modulator. There are four possible waveshapes for each LFO. The
Square wave only goes in a positive direction: the Triangle. Sawtooth and Noise Waves go
positive and negative. (Though negative Modulation depth will reverse the effect.) The
Diagrams below show the
Low Frequency Oscillators generate only very low frequency waves, which
maximum levels for each LFO waveshape.
See the LFO Page (p. 56) for a complete discussion of the LFO's.
Section 3 — Voice Programming 41
Page 54

SQ-80 — Musician's Manual
− ENV 1, ENV 2, ENV 3 and ENV 4
The SQ-80 has four complex Envelopes which can be applied as Modulators. Envelope Levels
can be positive or negative. The Envelopes are used to create changes, over time, in volume.
brightness, pitch etc. An important use of Envelopes is to "fade in" the level of the Sustain Wave
(or Waves) in a sound, so that it crossfades with the Transient Attack Wave. This is done by
assigning one of the Envelopes as a modulator on the the DCA Page of the Oscillator in question .
with a Modulation Depth of up to +63, setting the DCA's LEVEL to 00. and setting that
Envelope's T1 to about 10.
A comprehensive discussion of the SQ80 Envelopes follows in the Section
entitled Understanding the En-
velopes, p. 59.
Envelope Levels can go
from -63 to +63
_____> VEL — Velocity
Velocity means how hard you strike a key on the keyboard. Selecting VEL as a Modulator allows
you to modulate any Manual Level with Velocity. Velocity as a Modulation Source only goes
positive (though again, assigning a negative Modulation depth will make the net result a decrease
in a Manual Level with Velocity). VEL is velocity with a straight linear curve, meaning that level
increases evenly with greater velocity.
− VEL -X
This is Velocity with a different Curve. Where the effect of VEL is linear, VEL-X is exponential.
This means that VEL-X has hardly any effect when you play at low or medium velocity, but the
level rises rapidly to maximum with very hard keystrikes. This is useful for programming
dramatic changes into a sound which only occur when you really hit a key hard. The illustration
below shows the difference between VEL and VEL-X.
− KYBD — Keyboard Tracking
Uses the position of a note on the Keyboard as a Modulator. The scaling effect of this Modulator
is figured from MIDI key 0 to MIDI key 127.
As the illustration shows, the effect of KYBD is only positive-going (though a negative
42 Section 3 — Voice Programming
Page 55

A
—
—
SQ-80 — Musician's Manual
Modulation depth will reverse the effect) . Since scaling starts from MIDI key 0, there will always
be some effect on the SQ-80 keyboard, even on the lowest note. Manual Levels should be
adjusted accordingly.
KYBD 2
Another way to modulate any Manual Level with the position of a note on the Keyboard. KYBD2
employs a different curve. KYBD 2 goes negative as well as positive and, unlike KY BD, has
its full effect over the SQ-80's Keyboard.
+63
s the illustration shows, the effect
of KYBD 2 is to reduce the Manual
Level on notes below the break point 0-
(E
above Middle C), and increase
levels above that point. Negative
Modulation depths will do the oppo- _63
site.
WHEEL — Modulation Wheel
The MOD Wheel to the left of the Keyboard is assignable wherever a Modulator is selected. To
use the MOD Wheel for Vibrato (one common application) WHEEL must be assigned to
modulate the LFO that is modulating Oscillator Pitch. The MOD Wheel's effect is positive-going
only, from 0 (Wheel towards you) to +63 (Wheel away from you). Negative Modulation depths
will reverse the effect.
PEDAL — Voltage Control Foot Pedal
This selects the CVP-1 Foot Pedal, which can be plugged into the CV/Pedal Jack on the SQ-80's
rear panel, as a Modulator. Its eff ect will be the s ame as that of the MOD Wheel. I t can be applied
wherever a Modulator is selected.
Foot Pedal
(not Volume Pedal — that's a separate controller) is MIDI Controller #4. Note that
if you play the SQ-80 from an external keyboard equipped with a Foot Pedal, and wish to use the
Section 3 —Voice Programming 43
Page 56

SQ-80 — Musician's Manual
Pedal as a Modulator in your
Note also that the Foot Pedal will only act as a modulator when the
parameter is set to PEDAL=MOD on the Master Page. When that parameter is set to
PEDAL=VOL the Foot Pedal will act as a Volume Pedal. not as a modulator (though this has no
effect on incoming MIDI Foot Pedal data). See p. 20 for more details.
XCTRL — External Controller (MIDI only)
An External Controller such as a Breath Controller. Data Entry Slider. etc., which is received via
MIDI from another synthesizer, can be assigned as a Modulator within your
On the
You don't have to be playing the
example. if you have a Keyboard with a Breath Controller;
MIDI Page, you select the number of the External Controller that will be received.
80's MI DI In; 2) Make sure both instruments have Controllers Enabled (MIDI Page); 3) Select
Breath Controller as the External Controller that will be received by the
also on the MIDI Page); 4) assign XCTRL as a Modulator for Oscillator Volume, Filter Cutoff
Frequency, or some other Manual level within a Program, as shown in the following Section: and
5) Play the Sound from the SQ-80 keyboard, wh ile blowing into the Breath Controller connected
to the sending instrument. The Modulation will have the same effect as if you were playing from
the sending instrument.
_____
> PRESS — Pressure (Aftertouch)
Pressure, also called Aftertouch. is a modulator which varies a manual level within a Program
depending on how hard you press down on a key or keys. After you have struck a key, and while
the note is sustaining, continuing to press down harder on the key brings in Pressure. The
80's key board generates Pressure, and by using this modulator you can add a tremendous amount
of expression to your Programs without ever taking your hands off the keyboard.
SQ-80 Programs. you should select PEDAL, not XCTRL.
Foot Pedal Function Select
SQ-80 Programs.
SQ-80 from an external instrument for this to work. For
1) Connect its MIDI Out to the SQ-
SQ-80 (XCTRL=02,
SQ-
Pressure comes in two varieties — Key Pressure (or Poly Pressure), which affects each note
individually, and
when you exert pressure on any key. Either type of Pressure is available on the
types are received via MIDI. There is a Control on the
determines which of the two types of Pressure will be generated by the
given time. This control can also be set to PRESS=OFF. in which case the keyboard will not
generate Pressure internally, nor will it send or receive it via MIDI. (See
more details.)
When you record a Sequencer Track from the SQ-80 keyboard, the Track will record (and its
Program will respond to) whichever type of Pressure is selected on the
has been recorded. it will play back the type of pressure that was recorded, no matter what the
setting of the Pressure Control on the
memory. if you don't want Pressure on a given Track, set th e Pressure Control on the
to PRESS=OFF when recording that Track, and the Sequencer will not record Pressure.
Note that not all sounds are necessarily programmed to respond to Pressure. If Pressure seems
to have no effect when you play certain sounds, it is likely that the programmer did not assign
Pressure as a modulator anywhere within the Program.
The effect of Pressure as a modulator is positive-going only. though assigning a negative
modulation depth will cause increased Pressure to reduce Manual Levels.
Channel Pressure (or Mono Pressure) which affects all notes that are playing
SQ-80. and both
MIDI Page (PRESS=
SQ-80 keyboard at any
MIDI Page, p. 23, for
MIDI Page. On ce a Track
MIDI Page. Since Pressure uses up a lot of Sequencer
MIDI Page
) which
—
44 Section 3 — Voice Programming
Page 57

A
—
g
SO-SO — Musician's Manna!
USING MODULATORS
Modulating Oscillator Volume
The Volume of each of the three Oscillators within a Program depends on a combination of two things:
1) the setting of the base, or Manual Level (the Control labeled LEVEL= on the DCA
1, DCA 2 and DCA 3 Pages), and
2) the effect of any Modulators applied on any of those Pages.
The Manual Level can be thought of as a Volume Floor :
> If this Level is set to some value
greater than Zero for a given
DCA, and no Modulators are
applied, the Oscillator will play
at that level as long as a key is
held down.
> If the Manual Level is set to
some value greater than Zero.
and a Modulator (in this case an
Envelope) is selected and assigned a depth other than Zero,
the effect of the Modulator will
be added to (or subtracted from)
the Manual Level.
___ > If the Manual Level is set to
Zero, and a Modulator (the same
Envelope, in this case) is selected and assigned a depth other
than Zero, the depth of the
Modulator alone will determine
the Volume of the Oscillator.
This last combination (LEVEL=00, Envelope selected as
a modulator, modulation depth greater than
Zero) is the best way to "fade in" the Oscillator (s) playing the Sustain portion of a sound wh en a Transient
ttack Wave is being played by another Oscillator. Usually we use ENV 2 for this purpose. Set the
Envelope's TIME 1 to a value around 10. This will cause the v olume o f the Sustai n Wave to fade in as
the Transient Attack Wave fades out.
Section 3
Voice Programmin
45
Page 58

p
),
g
f
SQ-80 — Musician's Manual
Bear in mind that when you use an
the final effect will depend on the Modulation Depth and the Levels th at are set for the Envelop e or LFO on
their respective Pages.
Negative Modulation
Modulation De
interesting effects possible. If, for ex-
ample, the Manual Level is set to
the same Envelope used in the previous
examples is selected and assigned a
Negative Modulation depth, the resulting Volume curve looks like this:
Modulating the Filter Cutoff Frequency
Like Oscillator Volume, the
on a combination of two things:
1) the setting of the base, or Manual
2) the effect of any
th can be Positive or Negative (rangingfrom -63 to +63
Filter Cutoff Frequency, or the Brightness contour of a Program. depends
Page). and
Envelope or an LFO (Low Frequency Oscillator) as a Modulator.
ma kin
a great many
48, and
Level (the Control labeled FREQ= on the FILTER
Modulators applied on that Page.
___-> If we set the Filter Cutoff
Frequency manually (by
adjusting the parameter FREQ =
on the
of 64, and turn all Modulators OFF.
the Filter will open up to that level
when a key is pressed, allowing
frequencies below the Cutof
point to pass, and close down to
Zero when the key is released.
> If we select an Envelope as a
Modulator on the
and assign it a value greater than
Zero, its effect will be added to
the the Manual Level.
> If, instead, we generate a Tria ngle-
shape wave with one of the
FILTER Page ) to a level
FILTER Page
LFOs (Low Frequency Os-
cillators), and apply that LFO
wave as a Modulator on the
TER
added to the Manual Level, and
the Filter Cutoff Frequency will
rise and fall with the cycles of the
Page, its effect will be
FIL-
LFO.
46 Section 3 — Voice Programming
Page 59

SQ-80 — Musician's Manual
Of course, since two Modulators can be selected, you could apply both of these Modulators (or any other
combination) to the Filter Cutoff Frequency, and their effect would be added together. and then added
to the Manual Level.
As with Oscillator Volume, If the Manual
Cutoff Frequency will depend entirely on the depth and settings of any Modulators applied there.
Limits of Modulation
For all Modulation effects there is a maximum and a minimum range that cannot be exceeded. For
example, if the Filter Cutoff Frequency is manually set to its maximum value [127], you will not be
able to modulate the Frequency any higher, with an Envelope, LFO or other Modulator.
You cannot modulate an Oscillator's Output Level lower than Zero (silence). If a Modulator doesn't
seem to be having any effect, check that the other Modulators and manual settings are at appropriate
levels.
Level on the FILTER Page is set to FREQ. 00. the Filter
PROGRAMMING PAGES
The Page descriptions that follow encompass all the Program Parameters — those Parameters which
are saved with the individual Programs stored in the Memory of the SQ-80 . To select any of these Pages,
press the corresponding button in the Voice Section of the Front Panel.
In case you wish to make a written record of the settings for a particular Program, you will find a blank
Program Parameter Sheet in the back of this Manual. Feel free to photocopy this sheet and use the
copies to record the Parameter settings.
Section 3 — Voice Programming 47
Page 60

SQ-80 — Musician's Manual
[OSC1] OSCILLATOR PITCH PAGE
[OSC2]
[OSC3]
Controls Oscillator pitch and selects the Wave to be played by each Oscillator.
(I Inactive Buttons appear. in White)
The format of the Oscillator Pitch Page is the same for [OSC 1], [OSC 2] and [OSC
of these Pages is entirely independent.
Use these pages to:
1) Adjust the pitch of each Oscillator by octave, semitone, and fine increments;
2) Modulate the pitch of each Oscillator using any of the 15 available Modulation sources: and
3) Select the Waveform to be played by each Oscillator.
ACTIVE CONTROLS:
1. OCT
Adjusts the pitch of the Oscillator by octaves.
Range: -3 To +5.
2. SEMI
Adjusts the pitch of the Oscillator up by semitones (halfstep). Adjusting this control upwards
beyond 11 automatically increases the OCTAVE by one.
Range: 0 To 11.
3], although each
3. FINE
Adjusts the pitch of the Oscillator up by fine steps (detunes). E ach step here i s about 3 Cents
(hundredths of a semitone).
Range: 0 To 31.
48 Section 3 — Voice Programming
Page 61

5. WAVE
Selects the Wave that the Oscillator will play from among the 75 available Waves. (See
WAVES, p. 30)
7. MOD # 1
Selects the first source of Modulation. The Modulators selected on this page affect only the pitch
of the Oscillator.
8. MOD # 1 DEPTH
Sets the depth, or amount, by which Modulator #1 will affect the pitch of the Oscillator. The
Modulation amount can be positive or negative.
Range:
-63 To + 63.
9. MOD # 2
Selects the second source of Modulation. The effects of Modulator #1 and Modulator #2 are
added together. You can thus double the maximum Modulation depth of a given modulator by
selecting the same source for Modulator #1 and Modulator #2. The Modulators selected on this
page affect only the pitch
SQ-80 — Musician's Manual
of the Oscillator.
10. MOD # 2 DEPTH
Sets the depth, or amount, by which Modulator #2 will affect the pitch of the Oscillator. The
Modulation amount can be positive or negative.
Range:
-63 To + 63.
Section 3 — Voice Programming
49
Page 62

SQ-80 — Musician's Manual
[DCA1] OSCILLATOR VOLUME PAGE
[DCA2]
[DCA3]
Controls The Volume of Oscillators 1 through 3.
( Inactive Buttons appear i n 'White)
The format of the Oscillator Volu me Page is the same for [DCA1], [DCA2] and [DCA3], although each
of these Pages is entirely independent.
Each of these three DCA's (Digitally Controlled Amplifiers) controls the Volume (or amplitude) of the sam enumbered Oscillator (OSC). From the three DCA Pages you can adjust the relative balance of the t hr e e
Oscillators. By setting the Manual Level to LEVEL=00, and assigning an Envelope as the
modulator on the appropriate DCA Pages, you can Fade in the volume of the Sustain Wave(s) in a sound,
or perform additive synthesis by bringing in different Oscillators over time.
Use these pages to:
1) Set the Manual Output levels of the three Oscillators;
2) Modulate those levels using any of the 15 available Modulation Sources: and
3) Turn each Oscillator ON or OFF.
ACTIVE CONTROLS:
1. LEVEL
Determines the Manual, or base, volume (amplitude) of the Oscillator. This Level can be though t
of as a 'Volume floor' — the effect of any Modulator(s) is added
So even if LEVEL=00, the Oscillator will still have some amplitude if there is a Modulator (an
Envelope for instance) selected and assigned a Depth greater than Zero. Negative modulation
depths bring the volume lower
can silence the Oscillator, regardless of the setting of this control.
than the LEVEL setting. Large amounts of negative Modulation
to the Level set by this parameter.
50 Section 3 — Voice Programming
Page 63

If you want the volume of a particular Oscillator to be controlled entirely by an Envelope or other
modulator, be sure to set this parameter to LEVEL=00.
DCA's 1, 2, and 3 have been set up so that it is possible to get full volume from just one Oscillator.
This means, however, that it is possible to clip (overload) the output stage when all three
Oscillators are at full level. Different Waveforms contain different amounts of fundamental
energy, so the effect will vary. A conservative rule of thumb for Os cillator Volume is as follows:
With 1 Oscillator playing — set that Oscillator to 63.
With 2 Oscillators playing — set both Oscillators to 56.
With 3 Oscillators playing — set all three Oscillators to 52.
These are only guidelines, of course. In some cases, the clipping caused by all three Oscillators
playing wide open can be a desirable part of the sound. As always, let your ears be your guide.
5. OUTPUT — Oscillator Mute
Turns the Output of the Oscillator ON or OFF. independent of any other settings. This control is
very helpful when setting up complex Programs, as it allows you to silence any Oscillator, and
listen to the others, without disturbing your settings.
7. MOD # 1
Selects the first source of modulation. The modulators selected on this page affect only the
amplitude
modulation depths will control the volume of the Oscillator.
of the Oscillator. If LEVEL=00 (see #1 above) the modulators and their respective
SQ-80 — Musician's Manual
8. MOD # 1 DEPTH
Sets the depth, or amount, by which Modulator #1 will affect the amplitude of the Oscillator. The
Modulation amount can be positive or negative.
Range:
-63 To +63.
9. MOD # 2
Selects the second source of modulation. Again, a Modulator's maximum depth can be doubled
by assigning the same Modulator to
affect only the amplitude
10. MOD # 2 DEPTH
Sets the depth, or amount, by which Modulator #2 will affect the amplitude of the Oscillator. The
Modulation amount can be positive or negative.
Range:
-63 To +63.
MOD #1 and MOD #2 . The Modulators selected on this page
of the Oscillator.
Section 3 — Voice Programming
51
Page 64

A
SQ-80 — Musician's Manual
[FILT] FILTER PAGE
Controls the Four-Pole Low Pass Filter
(Inactive Buttons appear in White)
The outputs of the three Oscillators pass through the
Filter before going to the Final Volume stage,
[DCA4]. The Filter settings determine what frequencies will be allowed to pass through to the output.
Low Pass Filter allows only those frequencies below the Filter Cutoff Frequency to pass. Higher
frequencies are filtered out. The Filter Cutoff Frequency is se t to a certain level, and then it can be
continually varied by modulating the Filter (with an
Envelope, an LFO, Velocity, etc.).
Use this page to:
1) Set the
Manual Level for the Filter Cutoff Frequency;
2) Set the amount of Filter Resonance (or Q); and
3) Modulate the Filter Cutoff Frequency, using the Keyboard "Control Voltage" and
any of the 15 available Modulation Sources.
ACTIVE CONTROLS:
1. FREQ
Sets the initial, or Manual Level of the Filter Cutoff Frequency. A higher setting wi ll result in
a brighter sound. This setting represents the "Filter Floor
Modulators will be added to (or subtracted from) this level.
Range: 0 To
127.
"
— the effect of any selected
3. RES (Q)
Sets the amount of Filter Resonance, or Q. This controls th e amplitude of the resonant peak of
the filter. When the
frequencies. By then modulating the Filter Cutoff Frequency with an Envelope,
Q is raised, the Filter Cutoff Frequency is emphasized over all other
LFO, Mod
52 Section 3 — Voice Programming
Page 65

Wheel etc., you can create Filter Sweeps, Wah and Growl effects. Range:
31,
0 To
5. KEYBD
Keyboard Filter Tracking. Sets the amount by which the location of a note on the keyboard
will modulate the Filter Cutoff Frequency. This allows the relative brightness of a sound to
remain constant over the keyboard. KEYBD is comparable to the
of most Analog synths.
Higher values of this parameter will cause the Filter to open up more (get brighter ) as you play
higher up the keyboard. The maximum value
one octave for each octave you go up the Keyboard.
Range: 0 To 63.
(63) will raise the Filter Cut off Frequency roughly
Keyboard Control Voltage
7. MOD # 1 Selects the first source of Modulation for the Filter Cutoff
Frequency.
8. MOD # 1 DEPTH
Sets the depth, or amount, by which Modulator #1 will affect the Filter Cutoff Frequency.
Modulation amounts can be positive or negative.
Range:
-63 To + 63.
SQ-80 — Musician's Manual
9. MOD # 2 Selects the second source of Modulation for the Filter Cutoff
Frequency.
10. MOD # 2 DEPTH
Sets the depth, or amount, by which Modulator #2 will affect the Filter Cutoff Frequency.
Modulation amounts can be positive or negative,
Rangy
-63 To + 63.
Section 3 — Voice Programming
53
Page 66

—
SQ-80 — Musician's Manual
[DCA 4] FINAL VOLUME PAGE
Controls Program Volume and Panning.
( I nactive Buttons appear in White)
Note: The Modulation Source for [DCA 4] is always [ENV 4].
The outputs of the three Oscillators, after passing through the Filter, go to [DCA4]. This Final DCA
(Digitally Controlled Amplifier), together with [ENV4], which is fixed as its Modulator, determines the
overall volume envelope of the Program. You will always hear the effect of Envelope 4 on the Program
it is "hard wired" to DCA 4 and always controls the final volume of the Program.
Use this page to:
1) Adjust the amplitude of the entire Program;
2)
3) Modulate the Program Pan using any of the 15 available Modulation Sources.
ACTIVE CONTROLS:
Pan the Program left, right or center; and
4. PAN — Manual Level
Pans the Program the between the Left and Right Outputs. Possible Values range from 00 (all
the way to the Left), to
that the
Range:
SQ-80's audio outputs must be connected in Stereo for this parameter to have any effect.
00 to 15.
15 (all the way Right. ) A value of 08 will pan the Program to Center. Note
7. ENV 4 MOD. DEPTH — Final Volume
Determines the amount by which DCA 4 will be Modulated by ENV 4, which is fixed as its
Modulator. The net effect of this parameter is to increase or decrease the Volume of the entire
Program. This is useful for matching the levels of different Programs, to avoid radical volume
54 Section 3 — Voice Programming
Page 67

changes when switching between them. Also it is useful for balancing the relative levels of Split
and/or Layered Programs
Rance:
Bear in mind that the overall Volume curve of the Program will depend on the setting of this
parameter and the settings on the
00 to 63.
9. Select PAN Modulator
This control selects a Modulator for the PAN Setting. Modulators applied here will add to, or
subtract from, the Manual Level, just as they do elsewhere. Thus an
here will make the Program Pan back and forth with Time. Applying
make a note's placement in the stereo mix depend on how hard you strike a key. And so on.
SQ-80 — Musician's Manual
(see SPLIT/LAYER Page, p.71).
ENV 4 Page.
LFO used as a Modulator
Velocity [VEL] here would
Or you can apply the Keyboard
side, the middle keys in the middle, and the high keys on the right side of the stereo mix,
10. PAN Modulator Depth
Sets the amount by which the PAN Modulator will affect the Manual Pan Setting. Higher values
will cause more dramatic Pan Modulation. Negative Modulation Depths are particularly useful
here. Any Negative value here
Positive, value
of
08).
Range:
-63 to +63.
(+32) in terms of how it affects the Pan of the P rogram (assuming a Manual L evel
(KYBD 2) as a Modulator to make the low keys play on the left
(-32 for instance) will have exactly the opposite effect of the same.
Section 3 — Voice Programming
55
Page 68

SQ-80 — Musician's Manual
[LFO 1] LOW-FREQUENCY OSCILLATOR PAGE
[LFO 2]
[LFO 3]
The format of the LFO Page is the same for [LFO 1], [LFO 2], and [LFO 3], although each of
these Pages is independent. The
applied wherever a
Note that the
goes from
be a decreasing one, causing the effect of the
down.
Level 1(L1) to Level 2 (L2). Since L1 can have a higher value than L2, the Ramp can actually
Modulation Source is to be selected.
LFO Delay (which normally allows the effect to enter gradually) is set using a Ramp which
Low Frequency Oscillators are used as Modulators, and may be
LFO to diminish, or disapp ear, over the time the key is held
Use this page to:
1) Set the LFO Frequency (speed);
2) Determine whether the
3) Select the waveform that the
4) Set
5) Select a Modulator fro m any of the 15 available Sources to modulate the Output Level of
LFO Delay parameters; and
the
LFO.
LFO resets each time a key is struck;
LFO will play;
ACTIVE CONTROLS:
1. LFO FREQ. Determines the speed of the LFO.
Range: 0 To 63.
2. RESET
Turns RESET mode on or off.
When ON: The
LFO Waveform will return to the beginning of its cycle each time a new key is
56 Section 3 — Voice Programming
Page 69

SQ-80 — Musician's Manual
struck. This is good for synchronizing
When OFF:
The LFO wave will cycle continuously, without Resetting.
LFO sweeps with key hits.
4. HUMAN
When ON: This control will add a random element to the LFO Frequency, making the effect
less "mechanical" sounding.
When OFF:
The LFO Frequency will behave normally, with perfect repetition.
5. WAV
Selects the Waveform which the LFO will play. The choices are:
TRI — Triangle wave
SAW — Rising Sawtooth wave (Use negative modulation for a falling Sawtooth.)
SQR — Square wave (positive-going only)
NOISE — Random
NOTE: Controls # 6, 7, and 8 combi ne to form a linear Ramp which defines the LFO Dela
Ramp goes from LEVEL 1, which is the starting Level, to
it can be an increasing or a decreasing Ramp.
LEVEL 2, which is the sustain Level, and
y
. The
6. L1
This is LEVEL 1, the Level at which the LFO will play when the key is first struck.
Range: 0 To 63.
7. DELAY
Determines the Rate at which the LFO's amplitude will go from LEVEL 1 to LEVEL 2. Range:
0 To 63.
Note that here it is the Rate of Change
Therefore,
shorter Delay. The amount of Time it takes for the LFO to reach LEVEL 2 thus depends on
a
both the Rate and the Level.
A value of Zero will cause the LFO to remain at LEVEL 1,
(or the Slope of the Ramp) which is set, not a fixed Time.
lower values of this parameter will cause a longer Delay; hi gher values will result in
Section 3 — Voice Programming 57
Page 70

SQ-80 — Musician's Manual
8. L2
This is LEVEL 2, the Level that the LFO will reach at the end of the Ramp defined by the
DELAY. It will remain at this Level until the key is released.
Range: 0 To 63.
10. MOD
Selects the Modulation Source for LFO depth. The effect of this Modulator is added
amount of
LFO depth provided by the Ramp defined by Controls # 6, 7 and 8.
to the
,
Note that the
producing unusual LFO waveforms.
The final,
be adjusted precisely using the Modulation Depth controls on the other Pages.
LFO itself can be used to modulate its own Output, or that of another LFO,
modulated, LFO Output is then available as a Modulation Source, whose depth can
Note: To use the MOD Wheel for Vibrato within a Program (perhaps the most common application
for an LFO):
1) assign WHEEL as the Modulator for an LFO,
2)
3) assign that LFO to modulate the Pitch of the Oscillators (OSC 1-3 Pages), with a
modulation depth of around +2 to +5)
Within the Factory Sounds that came with your
(where it is applicable).
set Ll and DELAY to Zero for that LFO, and
SQ-80, LFO 1 is always used for Wheel Vibrato
To use the Pressure for Vibrato within a Program, you follow almost the same procedure:
1) assign PRESS as the Modulator for an LFO,
2) set
3) assign that LFO to modulate the Pitch of the Oscillators
modulation depth of around +2 to +5),
Make sure PRESS=KEY or PRESS=CHAN on the
Pressure you want.
L1 and DELAY to Zero for that LFO, and
(OSC 1-3 Pages), with a
MIDI Page, depending on which type of
58 Section 3 — Voice Programming
Page 71

A
W
Secti
—
Voi
g
9
SQ-80 — Musician's Manual
UNDERSTANDING THE ENVELOPES
n Envelope is a shape, or " contour" that we a pply to some signal sour ce to make it change through tim e.
Naturally occurring sounds have their own Envelopes. They don't just start and stop — they might start
loud and fade to silence, or slowly swell from silence to a huge crescendo; they might start out very bright
and grow duller; they might have subtle variations in pitch, and so on.
In a synthesizer we imitate these effects, and create wholely new ones, by generating Envelopes and then
using them to modulate pitch. volume, brightness, etc. The SQ-80 has four Envelopes which can be
independently assigned as modulation sources to the various OSC's, DCA's, LFO's, PAN and the
FILTER.
The ADSR Connection
Let's start by taking a look at the commonly used ADSR (Attack, Decay, Sustain, Release) type
Envelopes found on many synthesizers. With the ADSR Envelope, the name says it all. You have four
parameters to control:
Attack — The Time it takes to go from zero, when a key is struck, to peak level
Decay — The Time it takes to go from the peak level to the Sustain Level
Sustain — The Level at which the signal remains as long as the key is held down
Release — The Time it takes to return to zero after the key is released
ADSR Envelope
Notice that an Envelope is really just a series of Levels that change through Time. With the four
parameters of the ADSR Envelope, we can control three Times (Attack, Decay and Release) and one
Level (Sustain). This is fine for many basic volume and brightness Envelopes, but for more complex
sounds — for subtle pitch Envelopes and other cool effects — it becomes necessary to have more specific
control over more Times and Levels. Which brings us back to the SQ-80.
Times and Levels
The four Envelopes on the SQ-80 are defined in terms of Time and Level. For each Envelope, you have
control over four Time segments (TIME 1, TIME 2, TIME 3, and TIME 4) and three Levels (LEVEL
1, LEVEL 2
and LEVEL 3),
hen a key is struck the Envelope level, starting at Zero, takes a fixed amount of time defined by TIME 1
to reach LEVEL 1. It then takes TIME 2 to reach LEVEL 2. Next. at the end of TIME 3 it reaches
LEVEL 3, where it will remain as long as the key is held down. After the key is released the signal takes
TIME 4 to return to Zero (unless the value of TIME 4 is followed by an "R." in which case a Second
Release Time will follow TIME 4. See below).
on 3
ce Programmin
5
Page 72

v
t
T
f
W
SQ-80 — Musician's Manual
The four TIME parameters appear on the Envelope Page as [T1], [T2 ], [T3] and [T4] , the three LEVEL
parameters as [L1], [L2] and [L3]. The figure below shows a typical Envelope as defined by the SQ-
80 Envelope parameters:
Notice that the Envelope shape depicted here resembles the ADSR En-
elope discussed earlier. Though this
is only one of many shapes that are
possible with the SQ-80 Envelopes, i
is one of the most useful for modulating the Volume and Brightness of a
Sound.
If we now look at the SQ-80 Envelope
parameters as they apply to this standard ADSR-type Envelope, we can see
that TIME 1 represents the attack time:
IME 2 and TIME 3, a two-stage decay: and TIME 4 represents the release time. LEVEL 1 is the peak level: LEVEL 2 is an intermediate
decay level; and LEVEL 3 is the sustain level.
Time, not Rate
It is very important to note that all of the Envelopes' Time components, [T1]. [T2], [T3] and [T4] are
expressed in terms of Time, not Rate. Thus, for example, when a key is struck the signal will
alwa ys travel from Zero to LEVEL 1 in the fixed am ount of time defined by TIME 1. If the value o
LEVEL 1 is raised, the signal will still reach the new, higher, LEVEL 1 in the same amount of time.
Second Release — Using T4 for Simulated Reverb
hen the value of T4 is between 00 and 63, TIME 4 behaves just as expected — the Envelope level goes
from the Release level to zero in the amount of time specified by T4. Above 63, there is another range
of values for T4, which go from 00R to 63R. When the value o f T4 is followed by "R", there is a Second
Release, or simulated Reverb effect.
For values of T4 between 00R and 63R:
• During TIME 4, instead of going to zero, the Envelope drops to a low level, after which it fades to zero
at a fixed rate.
This creates a simulated reverb effect which can enhance a great many
types of sounds.
60 Section 3 — Voice Programming
Page 73

y
g
p
g
q
g
j
Negative Levels
In the sample Envelope shown above, all of the Level values were positive. But the
ou to assign a negative value to any of the Envelope Levels, makin
shapes. In the Envelope to the right, for
example, LEVEL 2 is given a value of
-
ossible a wide variety of interestin
SQ-80 also allows
32.
Such an Envelope allows you to modulate a signal to levels below
settings, as well as above them.
Say you apply such an Envelope as a
modulator to the
Filter Cutoff Fre-
uency. If the Manual settin
the Manual
on the
FILTER Page, (FREQ= ) is set for about 2 kHz., modulating the Filter Cutoff Frequency with this
Envelope would cause the Filter to behave like this:
The extent of the effect in the example above would vary depending on the Modulation depth. Bear
in mind that Modulation depth can also have a negative value. The combination of negative Envelope
Levels and negative Modulation depths makes for almost infinite possibilities for controlling Pitch,
Volume, Brightness, LFO depth, etc.
Other Envelope Shapes
There are many possibilities for creating interesting Envelopes — here are
ust a few. If LEVEL 1 is set to Zero,
then TIME 1 becomes a delay, TIME 2
the attack time, LEVEL 2 the peak
level,
applied to one of the
cause that Oscillator to "wait" before
beginning to play.
and so on. Such an Envelope,
DCA's, would
Section 3 — Voice Programming 61
Page 74

V
f
SO-80 — Musician's Manual
Another useful shape is a simple pitch Envelope. You can, for example, imitate the way Horns often
"slide" into a note, rather than beginning right on pitch. By setting TIME 1
to Zero, LEVEL 1 to some negative
value, and LEVEL 2 and LEVEL 3 to
Zero, you now have an Envelope
which, when used to modulate Oscillator Pitch, will cause the pitch to "slide"
up to the proper note in the amount of
time defined by TIME 2.
This could be a rather long, dramatic "slide", or an almost imperceptibly short one, depending on the
value you assign to TIME 2. How much the Pitch is altered will depend on the value of LEVEL
the Modulation depth.
1 and
Velocity Control Of Envelopes
There are two parameters on the Envelope Page which allow you to alter an Envelope depending on
y
ke
board velocity, or how hard you strike a key.
[LV] Velocity Level control
The first of these, LV or Velocity Level Control, will lower all three levels (L1, L2 and L3) with a softer
keystrike. This means that the settings you assign to LEVEL 1, LEVEL 1 and LEVEL 3 are maximum
Levels, the Levels that will be reached with the hardest keystrike. The amount of LV determines how
much those Levels will be reduced as you play softer. Two different velocity curves are available.
With this parameter you can have continuous dynamic control over the three
levels by varying how hard you play.
The most common uses of the
elocity
Level Control have to do with varying,
the volume and brightness of a Program, though in the previous example,
(LV] could be u sed to alter the depth o
the Pitch Envelope with velocity.
Linear or Exponential Velocity Response
As with TIME 4, The range of the parameter LV actually goes from 0 to 63 twice:
• Values from 00
proportionally with velocity.
• Values from 00X to 63X will cause the Envelope's level to increase exponentially with velocity.
That is, the Envelope will not increase to maximum level except at the very top of the velocity
ra ng e. By assigning these exponential values to
and Oscillator volu me whi ch oc cur o nly w hen y ou pl ay a n ote re ally hard . The illustration on the
next page shows th e difference between the behavior of linear and exponential values of
illustration assumes values of
L to 63L will cause velocity to affect the level in a linear fashion — level increases
LV, you can create dramatic changes in pitch, timbre
LV (the
63L and 63X respectively),
62 Section 3 — Voice Programming
Page 75

p
p
N
Secti
SQ-80 — Musician's Manual
[T1V] Velocity Attack control
The second velocity-related parameter is T1V — Velocity Attack Control. As the name implies this
arameter makes TIME 1, the Envelope attack time, respond to keyboard velocity. When the value of
T1V is increased, a harder keystrike will decrease TIME 1, resulting in a faster attack.
This allows for great expression on
String sounds and the like, making
ossible to have a long, smooth Attack or a sharp, crisp Attack simply by
varying how hard you play, The
greater the value of
TIME 1 will be decreased with
velocity. If TIME 1 already equals
Zero. this parameter will have no
effect.
T1V, the more
.
it
Keyboard Scaling of Decay Times
[TK] Keyboard Decay Scaling
The final Envelope parameter is [TK] — Keyboard Decay Scaling. Raising the value of TK has the
effect of decreasing
decay faster than lower ones. The higher the value assigned to
Time between the highest and lowest notes. This is useful for simulating the Decay patterns of many
acoustic instruments (piano, for instance) whose lower notes tend to ring much longer than the higher
ones.
TIME 2 and TIME 3 as you play higher up the Keyboard. Higher notes will therefore
TK, the greater the difference in Decay
ote that if TIME 2 and TIME 3 both have a value of Zero, this parameter will have no effect.
on 3 —Voice Programming
63
Page 76

,
N
b
SQ-80 - Musician's Manual
Envelope Times
The chart below gives the approximate amount of Time, in seconds, that corresponds to each possible
value of the
values that can be assigned to
of those values will yield.
Time components of the Envelopes (T1, T2, T3 and T4). The numb ers in bold type are the
T1, T2, T3 or T4; the numbers in plain type show how long a Time each
T=:
0
1
2
3
4
5
6
7
8
9
10
11
12
13
14
15
Time(sec,)
.00
.01
.01
.02
.02
.03
.03
.03
.04
.04
.04
.05
.06
.06
.07
.08
T=:
16
17
18
19
20
21
22
23
24
25
26
27
28
29
30
31
Time(sec,)
.09
.10
.11
.13
.14
.16
.18
.20
.23
.25
.29
.32
.36
.40
.45
.51
T=:
32
33
Time(sec.)
.57
.64
34 .72
35
36
37
38
39
40
41
42
43
44
45
46
47
.81
.91
1,02
1.14
1.28
1.44
1.61
1.81
2.03
2.28
2.56
2.87
3.23
48
49
50
51
52
53
54
55
56
57
58
59
60
61
62
63
T=:
Time(sec.)
3.62
4.06
4.56
5.12
5.75
6.45
7.24
8.13
9.12
10.24
11.49
12.90
14.48
16.25
18.25
20.48
ote: Envelope Times will be as shown above only when TK=0, and T1V=0. These two parameters
have the effect of decreasing Envelope Times
(TK
ased a note's position on the keyboard, and
T1V based on Velocity.) If either has a value greater than Zero, T1, T2 or T3 could be shorter
than indicated by the chart, depending on where and how hard you play.
Also, if T4 is between 00R and 63R, the Second Release stage is added onto T4.
64 Section 3 - Voice Programming.
Page 77

p
[ENV 1] ENVELOPE PAGE
[ENV 2]
[ENV 3]
[ENV 4]
Controls the parameters of the four Envelopes.
SQ-80 — Musician's Manual
The format of the Envelope Page is the same for [ENV 1], [ENV 2], [ENV 3] and [ENV 4], although
each Page is independent. The Envelopes are used as Modulators, and may be applied wherever a
Modulation Source is selected.
All Envelope parameters are expressed in terms of TIME and LEVEL. It is important to note that the
Time components of the Envelopes ([T1], [T2], [T3], and [T4]) each define a fixed Time
Thus, if you raise the value of LEVEL 1 but leave TIME 1 the same, the Envelope will still take the same
amount of Time to reach the new, higher,
Also note that the Level parameters can be positive or negative. This allows for a wide variety of
Envelope shapes, especially useful for modulating the Filter Frequency, the pitch of an Oscillator, etc.
The
SQ-80's four Envelopes feature a special Second Release mode, which can be used to create a
Simulated Reverb effect within the Program, particularly when used on Envelope 4. Setting T4 to any
value which is followed by an "R" calls the Second Release into play. (See
revious Section for more details,)
LEVEL 1,
"Second Release" in the
, not a Rate.
ACTIVE CONTROLS:
1. Li - LEVEL 1
This is the LEVEL that the Envelope will reach at the end of the Time defined by TIME 1. All
Envelopes start at a level of Zero and proceed toward LEVEL 1 when a key is pressed.
Range:
-63 To +63.
2. L2 - LEVEL 2
The LEVEL that the Envelope will reach at the end of TIME 2.
Range:
-63 To +63.
Section 3 — Voice Programming 65
Page 78

SQ-80 — Musician's Manual
3. L3 - LEVEL3
The LEVEL that the Envelope will reach at the end of TIME 3. This is the Sustain Level. The
Envelope will remain at this level until the key is released. After the Key is released, the Envelope
will return to Zero.
Range:
-63 To +63.
4. LV — Velocity Level Control.
This parameter makes all three Levels, LEVEL 1. LEVEL 2 and LEVEL 3, respond to Keyboard
Velocity, or how hard you strike the key. When the value of [LV] is raised, a softer keystrike
will decrease all three Levels. The greater the value, the more the Levels will decrease as you
play softer. Thus the Levels set by LEVEL 1, LEVEL 2 and LEVEL 3 define th e maximum
Levels, and parameter [LV] subtracts from those Levels.
• Values of LV between L and 63L cause the envelope levels to be affected by velocity in
a linear fashion;
• Values of LV between 00X and 63X cause the effect of velocity to be exponential — little
effect until maximum velocity is reached. The direction of the modulation is the same — only the
curve is different. (See the diagram in the previous section which illustrates the difference
between linear and exponential effects of LV.)
Range:
L To 63L for Linear response, 00X To 63X for Exponential response.
5. T1V — Velocity Attack Control.
This control makes TIME 1 respond to Keyboard Velocity. Raising its value will cause a
decrease in the value of TIME 1 as a key is struck harder, shortening the Attack Time. The greater
the value, the faster LEVEL 1 will be reached with a hard keystrike. (This Parameter will have
no effect if TIME 1 = 0.)
Range:
00 To 63.
6. T1 - TIME 1
The amount of Time between when the key is struck and when the Envelope reaches LEVEL 1.
In most applications this is the Attack Time. The higher the value the longer the TIME. Range:
00 To 63.
7. T2 - TIME 2
The Time it takes the Envelope to go from LEVEL 1 to LEVEL 2. In most applications this is
the first of two Decay stages.
Range: 00 To 63.
8. T3 - TIME 3
The Time it takes the Envelope to go from LEVEL 2 to LEVEL 3. In most applications this is a
second Decay stage. At the end of TIME 3, the Envelope will remain at LEVEL 3 until the key is
released.
Range:
00 To 63.
9. T4 - TIME 4
Release Time, or Release plus Second Release (Simulated Reverb). For values of 00 to 63,
T4 defines the amount of Time it will take the Envelope to return to Zero from LEVEL 3 (or from
whatever it currently is, if LEVEL 3 has not yet been reached) after the key is released.
66 Section 3 — Voice Programming
Page 79

Secti
SQ-80 — Musician's Manual
For values of R to 63R, when the key is Released, the Envelope will take TIME 4 to drop to a
low level, and then will fade to zero at a fixed rate. This Second Release stage creates a
Simulated Reverb effect, giving a sense of space to the sound. (See "Second Release" in the
previous Section for an illustration of this effect.)
Range: 00 To 63 for Normal Release; R To 63R for Release plus Second Release (Simulated Reverb).
10. TK
Keyboard Decay Scaling. Raising the value of this parameter will cause the value of both TIME 2
and TIME 3 to decrease as you go higher up the keyboard. Thus higher notes will decay faster
than lower ones. This is true of many acoustic instruments. The greater the value of [TK], the
more the decay time will decrease as y ou play higher up the keyboard. [TK] will have no effect if
TIME 2 and TIME 3 are Zero.
Range:
00 To 63.
on 3 —Voice Programming
67
Page 80

f
SQ-80 — Musician's Manual
[MODES] MODES PAGE
Controls Glide, Sync, AM, and Mono Modes, as well as Voice, Envelope and Oscillator Restart
Modes.
( Inactive Buttons appear in White )
All of the Parameters on this Page are part of the
Program.
ACTIVE CONTROLS:
1. SYNC
2.
Syncs the phase of
playing one complete cycle of its waveform and begins another,
of its cycle, whether the previous cycle is complete or not.
This produces the popular "Hard Sync" effect, which can be similar to a Filter sweep. The effect
is most noticeable when the Frequency of
to produce unpredictable results when used with Transient Attack or Inharmonic Loop Waves.
AM — Amplitude Modulation.
When ON, the Amplitude of Oscillator 1 modulates the Amplitude of Oscillator 2. OSC 2's
Amplitude Envelope will be ignored. This results in the creation of "Sideband" frequencies at th e
sum and difference of the frequencies being played by the two Oscillators.
When
etc.),
are tuned to more complex intervals, the effect is more extreme. Since the Amplitude o
OSC 1 and OSC 2 are tuned to simple intervals of each other (such as octaves or fifths,
AM Mode can produce FM-like enharmonics, for bell sounds, etc. When the Oscillators
Oscillator 2 to that of Oscillator 1, In other words, whenever OSC1 finishes
Oscillator 2 is no longer being controlled by DCA 2, you must use DCA 4 and ENV 4 to control
the volume of the Sound.
Program (or patch), and will apply only to the selected
OSC 2 will reset to the beginning
Oscillator 2 is varied, or modulated. Sync will tend
3.
MONO
In MONO mode the SQ-80 behaves like a classic one-voice Monophonic synth. It is useful with
lead-type sounds where chords are not necessary or desirable. With
68 Section 3 — Voice Programming
MONO mode ON, only one
Page 81

SQ-80 — Musician's Manual
note can be played at a time. Priority is given to the
being held down, the most recent note you play will sound. However, the envelope will not be
re-triggered by striking a key as long as any other key is held down.
does not stack all eight voices on one key — only one voice plays.
last note played — even if another note is
Mono mode on the SQ-80
5. GLIDE
Also called Portamento. This causes the pitch of the Oscillators to "glide" between notes i nstead
of the usual abrupt transition. The higher the value, the longer it will take to get from the pitch
of the first note played to that of the second. Range:
0 To 63.
Note: The GLIDE function behaves in one of two ways, depending on whether or not MONO mode is
engaged:
With MONO mode OFF: The pitch of any note played will 'glide' to its proper pitch from that
of the note played by that voice immediately before it, at the rate that has been set. In this mode
the
dramatic.)
With MONO mode ON:
no other keys held down, there is no
the first, the note will glide from the pitch of the first key to that of the second. Release the second
key (still holding the first one down) and it glides back. In other words,
GLIDE is polyphonic, and whole chords can be made to swoop up and down together. (Very
You have what is called Fingered Portamento. If a key is pressed with
GLIDE. If you then play a second key while holding down
the effect is only present
when a note is played while another key is held down. You can thus play Staccato for runs
without
GLIDE, and Legato for runs with GLIDE.
Note: The next two Parameters (#7, [VC] VOICE Restart, and #8, [ENV] ENVELOPE Restart)
affect only what happens when you play the same note twice in succession.
7. VC —VOICE Restart
When ON: If the same key is restruck before the n ote has died away, it will be assigned the sa me
Voice that was previously playing it. That Voice will be 'stolen' to play the new note. This is
fine for many sounds, such as piano, but it can be annoying with others, especially sounds with
long Attack or Release times, like strings, where you don't necessarily want a note to abruptly
disappear just because you have played the same note again.
When OFF:
it, and the first Voice will continue to play. If there are already two Voices playing that note, the
older of the two is 'stolen'. (Two Voices will alternate playing the note if it is struck repeatedly.)
As mentioned above, for sounds with long Attack or Release times (such as long filter sweeps,
etc.) this is often better.
If a key is restruck before the note has died away, a new Voice will be assigned to
8. ENV —ENVELOPE Restart
When ON: If the same key is restruck, all four Env elopes wi ll reset , and st art their cycles at Zero
level.
When OFF:
is, when the same note is played again. It will then take
new ramp is in the same direction (up or down) as the original attack segment or not. In other
words, each Envelope behaves normally, except that its
whatever Level it was at when the key was restruck.
Each Envelope will start its cycle at its present level, regardless of what that level
TIME 1 to reach LEVEL 1, whether the
Starting Level, normally Zero, becomes
Section 3 — Voice Programming
69
Page 82

n
SQ-80 — Musician's Manual
9. OSC —Oscillator (Waveform) Restart
When ON: All three Oscillators are halted before the start of a sound, and are restarted together
when a key is struck, so that they will start out playing in phase with each other. Any phasing,
or "beating" between the oscillators (due to detuning, etc.) will be the same each time a key is
struck.
When OFF:
Therefore the relative phase of the Oscillators will be unpredictable. This will tend to randomly
vary the phase shift and tonal characteristics of the sound.
The Oscillators are not stopped before a new note is played, but continue to play.
10. CYC —Envelope Full Cycle Mode
When ON: The Envelopes will pass through their full cycles every time a key is struck. In this
Mode the SQ-80 pays no attention to whether you hold the key down or let it go immediately —
each Envelope simply 'runs' through all its stages (ignoring the sustain stage after
each keystrike. This can be useful for many percussion-type sounds, bell sounds, filter sweeps
and other sounds where you want consistently repeatable Envelopes that are not dependent on
keyboard technique.
When OFF:
when the key goes up, whether LEVEL 3 has been reached or not.
This is the Normal Mode of operation. All Envelopes will go into the Release stage
TIME 3) with
70 Section 3 — Voice Programmi
g
Page 83

—
[SPLIT•LAYER] Split•Layer PAGE
Controls Splitting the Keyboard and Layering Different Sounds together
SQ-80 — Musician's Manual
( Inactive Buttons appear in White)
Programs on the
SQ-80 can be Layered (so that two Programs play at once over the whole keyboard),
Split (so that each half of the keyboard plays a different Program), and Split/Layered (so that the Split
Program is layered with yet another Program).
It is important to note that the para meters on this Page are all
and/or Layer configurations you set up here must be Saved as part of a new Program in order to be
retained. For example, if you start with a Piano Program, and then Layer that with a String Program, you
can now save the new Layered combination in a new Location — the original String_ and Piano Sounds
will remain intact in their original locations.
Also bear in mind that wherever two Programs are Layered, the
it will start "stealing" voices after four have been played, rather than the usual eight. The number of
voices is only reduced where a Layer is in effect, however. Splits cause no loss of voices.
part of the Program — that is, any Split
SQ-80 beco mes a four-voice Synthesizer
Use this Page to:
1) Activate the Layer function;
2) Choose the
3)
4) Choose the Split Program;
5) Choose the
6) Layer a second Sound with the Split Program
7) Choose the
Split the Keyboard (Upper or Lower) between two different Programs;
Layer Program;
Split Key:
(Split/Layer mode); and
Split/Layer Program.
Section 3 — Voice Programming
71
Page 84

r
SQ-80 — Musician's Manual
ACTIVE CONTROLS:
1, SPLIT/LAYER ON/OFF
This activates the Split/Layer mode. In order for this control to have any effect, the Keyboard
must first be Split, either Upper or Lower (see #6 below).
When ON:
The Split P rogram will be Layered (will play simultaneously) with the Program
whose name appears to the right of thi s control (#3). This will result in a reduction to four Voices
only on the SPLIT/LAYERED half of the Keyboard.
3. Select SPLIT/LAYER Program
The Program whose name appears here will be Layered with the Split Program when an Upper
or Lower Keyboard Split has been selected. It is possible to have a Split/Layer without Layer
mode being on. The Program shown here is Layered only with the Split Program.
When this control is selected (Underlined), you can choose a new SPLIT/LAYER Program in
one of two ways:
• Use the Data Entry Slider and the Up and Down Arrow Buttons to scroll through the various
Programs in Memory until you find the one you want; or
• Press Internal, CART A, or CART B to select a Master Bank: then press one of the fou
Bank Se lect Buttons and, while holding it down, select the Program you want. You will he
returned to the Split/Layer Page with the new Program selected as the SPLIT/LAYER
Program. There will always be a Program name in this Location, whether the SPLIT/LAYER
mode is engaged or not.
4. LAYER ON/OFF This acts as a switch to turn On or
Off the Layer mode.
When ON:
The Current Program (the one you are editing) will be Layered (combined) with the
Program whose name appears immediately to the right (see #5 below), and both Programs will
play simultaneously. Activating the Layer mode reduces the number of available Voices in the
layered portion of the keyboard to four (from eight).
5. Select LAYE R Program
The Program whose name appears here will be Layered with the Current Program when the
Layer mode is switched On. When this control is selected (Underlined), you can choose a new
LAYER Program in one of two ways:
• Use the Data Entry Slider and the Up and Down Arrow Buttons to scroll through the various
Programs in Memory until you find the one you want: or
• Press Internal, CART A, or CART B to select a Master Bank, then press one of the four
Bank Select Buttons and, while holding it down, select the Program you want. You will be
returned to the Split/Layer Page with the new Program selected as the LAYER Program.
There will always be a Program name in this Location, whether the Layer mode is On or not.
6. SPLIT Select
This control is used to Split the Keyboard between two Programs, as well as to determine which
Keyboard half each will occupy. There are three possible states:
OFF — Normal Keyboard assignment: no Split.
72 Section 3 — Voice Programming
Page 85

r
r
f
SQ-80 — Musician's Manual
> UPPER — When SPLIT=UPPER is selected, the Split Program (see #8) will play on the Uppe
Keyboard (that is, above the Split Key), and the Current Program will play on the Lower
Keyboard (below the Split Key).
> LOWER — When SPLIT=LOWER is selected, the Split Program will play on the Lower
Keyboard (that is, below the Split Key), and the Current Program will play on the Upper
Keyboard (above the Split Key).
So when you select UPPER or LOWER here, you are selecting which area of the
Keyboard the
always occupy the the opposite Keyboard half.
Split Program will occupy. The Current Program (the one you started from) will
8. Select SPLIT Program
The Program whose name appears here will occupy the half of the Keyboard as d esignated above
(#6), if
When this control is selected (Underlined), you can choose a new
ways:
• Use the
various Programs in Memory until you find the one you want; or
• Press
SPLIT=UPPER or SPLIT=LOWER has been selected.
SPLIT Program in one of two
Data Entry Slider and the Up and Down Arrow Buttons to scroll through the
Internal, CART A, or CART B to select a Master Bank, then press one of the fou
Bank Se lect Buttons and, while holding it down, select the Program you want. You will be
returned to the
Split/Layer Page with the new Program selected as the SPLIT Program.
Note: When ever you select a Layer Program, a Split Program, or a Split/Layer Program, the SQ-
80
only "remembers" the Location of that Program in Internal or Cartridge Memory — not the
Program itself. If you move a Program, put another in its place, or transfer an entire Bank o
Programs, the Layer. Split, or Split/Layer Program on this Page might still be "pointing to" a
Location that no longer contains the sound you had in mind.
Section 3 — Voice Programming 73
Page 86

f
t
SQ-80 — Musician's Manual
For example, if you create and save a Program where a Brass sound is Layered with a String
sound, and you then Write over the String Program (or insert a different Cartridge in the case o
Layering with a Cartridge Program,) a different Layer Program will play — whatever is now in
the Location originally occupied by the String sound.
If your Layer, Split, or Split/Layer Program is a Cartridge Program, and you remove the
Cartridge, the word *CART* will appear instead of the Program name, and the Program that will
play will be the Internal Program with the same relative Memory Location (until you replace the
Cartridge).
This also means that if you transfer an entire Bank of Programs from a Cartridge to the Internal
Memory (or vice versa), any
their previous Locations, and may not work once the Cartridge is removed, or you insert a
different Cartridge. In this case, you should go through the transferred Programs and edit them
so that the
the Programs back into their current Locations.
Layer, Split, and Split/Layer Programs are in the new Bank, and then Save (Write)
Layer, Split, and Split /Layer Programs will still be "pointing to"
Also, if you select a Program for your
Layer, or Split, only the main part of that Program will play — not any Layers or Splits that are
programmed into it. It is only possible for one
time. So you can't, for example, make a Triple Layer by selecting an already-Layered Program
as the Layer Program.
Layer, Split, or Split/Layer Program that itself contains a
Layer, Split, or Split/Layer to be active at any
10. Select SPLIT Key
This designates the note on the keyboard at which the Programs will Split, if SPLIT=UPPER
or SPLIT=LOWER has been selected (#8 above).
Range:
Key Numbers given here are
numbering keys, rather than just coun ting up from the lowest note on th e keyboard. Thus the Low
C on the
key # 96.
21 To 108.
MIDI key Numbers — they reflect the MIDI standard for
SQ-80 Keyboard is MIDI Key # 36; Middle C is MIDI Key # 60: the High C is MIDI
Helpful Hint: The value of this parameter can be adjusted using the Data Entry Slider and the Up and
Down Arrow buttons, or by using the following short cut:
• With the SPLIT KEY parameter selected (underlined) press and hold down the Record button (in the
Sequencer section).
• While holding down the
Split Key. The Split Key number showing on the Display will be updated accordingly.
Record button, play any key on the keyboard. That key will be set as the
The available range of values (21 To
108) corresponds to the the 88 key range
of a grand piano. This allows the Spli
Key to actually be out of the range of the
SQ-80 keyboard — but such splits will
only be effective if the
via MIDI from an instrument with more
than a 61-note keyboard. The
itself always plays whichever Program is
on the
Upper half.
74 Section 3 — Voice Programming
SQ-80 is played
Split Key
Page 87

SQ-80 — Musician's Manual
PROGRAMMING CONVENTIONS
There are a number of Programming conventions which we have tried to follow within all SQ-80 and
ESQ factory Programs whenever possible. They will help you to know where to begin when editing
factory Programs. You may also find them to be handy rules of thumb to follow when creating your o wn
Programs.
LFO's
− > LFO 1 is used for Wheel Vibrato, when it is part of the
Program.
Envelopes
> ENV 1 is used for Pitch Envelopes (modulating OSC 1, 2 or 3).
___ > ENV 2 is used for individual volume Envelopes (modulating DCA 1, 2 or 3).
> ENV 3 is used for Filter Envelopes (modulating the Filter Cutoff Frequency).
− ENV 4 is always fixed as the overall volume Envelope (DCA 4).
Of course these do not all apply for every Program. Any Envelope can be routed anywhere you want
it to go (except to
the factory Programs follow these conventions.
> LFO 2 and LFO 3 are available for other purposes.
DCA 4), and some Programs will call for different applications. But where applicable,
Program Names
− (/) Where a Program is Layered, a slash (/) is incorporated into the Name.
− > (+) Where a Program contains a Split, a plus sign (+) is incorporated into the Name.
Section 3 — Voice Programming
75
Page 88

b
b
SQ-80 — Musician's Manual
[WRITE] WRITE PROGRAM PAGE
To Save a New or Edited Program into Memory, or Copy an Existing Program to another
Location.
Saving a New Program Into Memory
Once you have modified an existing Program, or created an entirely new one, you can Write, or save,
that Program to any Internal or Cartridge Memory Location using the WRITE PROGRAM Page. This
Page is also used to Rename the Program with the name of your choice.
When you are ready to Write a Program into M emory, first d ecide on a Name of up to six letters for y our
new Program. Then:
1. Select the WRITE Page by pressing the button labeled WRITE on the front Panel. The Page will
come up as shown above, with the current Program Name showing. You will see a Cursor, or
underline,
2. Edit the Program Name using the Data Entry Slider and the two Move Cursor
beneath the first letter of that Name.
uttons on the
Display, labeled LEFT and RIGHT" You can move the Data Entry Slider up and down to scroll
through the available characters, or step through them one at a time with the Up and Down Arrow
uttons. Experiment until you find the first letter you want. Then press the RIGHT button to move
the Cursor :o the next location. Again, scroll through the characters until you find the correct one.
Repeat this procedure until the display shows the name you have chosen.
You can move the Cursor back and forth using the LEFT and RIGHT buttons, changing letters, as
often as you like, until you're satisfied. There are some pretty weird characters in there, along with
the usual letters and numbers, to choose from. Be creative.
Helpful Hint: Moving the Data Entry Slider all the way down
gives you a blank space.
,
3. Select a Memory Location for y our new Program. You can "flip through" the v arious Program
Select Pages in both the Internal Memory or the Cartridge to find a Program you want to write over.
76 Section 3 — Voice Programming
Page 89

(Remember that you will be replacing whatever is already there, so be careful! )
SQ-80 — Musician's Manual
Press one of the
show the Program Select Page for that Bank, with two differences:
• None of the Program names are
underlined, and
• the word
in the lower left-hand corner, below the Page Name.
When you release the Bank Select Button, the Display will return to the WRITE PROGRAM Page.
Press another Bank Select Button and the Display shows you the Programs for that Bank. To look
at the Programs in a different Master Bank
Button for that Master Bank, and then press and hold down any of the four Bank Select Buttons, as
before.
Bank Select Buttons, 1 - 4. As long as you hold the button down, the Display will
"WRITE" is flashing
(CART A or CART B for instance), simply press the
4. "But Wait, I need to hear them!" You may find that it's not enough to look at all those Program
Names — you want to audition a few before deciding which to erase. In this case, press the button
beneath the word
the
WRITE mode.
Now use the Bank Select Buttons and the Program Select Pages in the usual way to select and listen
to the Programs in memory. Your new Program is still safe in the
*EXIT* on the Display . This returns you to the Page you were on before entering
SQ-80's Edit buffer.
WARNING! — While you're doing this, DO NOT change any parameters in the Programs you
audition, as this would instantly replace your hard-earned new Program in the Edit Buffer with
something else entirely, and you might get upset.
When you are through listening, return to the Program you wan t to save by pressing the COMPARE
Button. The *C* prompt will appear in the lower-left corner of the Page. Now press the WRITE
Button to return to the WRITE PROGRAM Page. Your new Sound, and its new Name should be
just where you left them.
5. Write the Program in Memory. Once you have decided where you want to save the new Program.
Press the appropriate Bank Select Button, and while holding it down,
corresponds to the Program you wish to Write over. This Writes the new Program, with its n ew
Name. into that Memory Location.
The Display will show the message "WRITING PROGRAM" which will remain for about two
seconds.
SQ-80 will then return to the
The
Program Select Page of the Bank
into which the new Program has
just been saved. The new Program
is underlined, and is thus selected
as the Current Program:
press the "Soft" Button which
Section 3 — Voice Programming 77
Page 90

SQ-80 — Musician's Manual
*EXIT*
The Button beneath the word *EXIT* can be pressed at any time to exit the WRITE Page and return
to the Page you were on before entering it.
Copying an Existing Program to Another Location
Sometimes you'll want to take an existing Program, one that you haven't been editing, and simply copy
it to another Memory Location. For example, you might want to put the ten most commonly used
Programs in the same Bank, for easy access during performance. Normally, the
at the Edit Buffer. But you have the option of Writing an existing, unedited Program.
WRITE Page "looks"
First select the Program you want to copy. Then press the
when the *C* (Change/Compare) is not showing in the lower-left corner of the Display causes the SQ-
80 to ask you the following question:
Answering
Program onto the
you can now use the
exactly as before to copy that Program
to any other Memory Location. Again,
remember that you will erase whatever
Program you write over — it's not a
bad idea to save all Internal Programs
to a Cartridge or to disk before doing any major Memory reshuffling, because once a Program is gone,
it's gone.
Answering
*YES* places the Current
WRITE Page, and
WRITE Page
*NO* will put you on the WRITE Page with the Edit Program showing.
WRITE Button. Pressing the WRITE Button
78 Section 3 — Voice Programming
Page 91

SECTION 4
The Sequencer
81 ..................The Sequencer
81 ........................ T h e MI D I C onnection
82 ........................ D i g i ta l S equencing
83 ..................The "System"
84 ...................Sequences And Songs
84 ......................... W h a t i s a S equence?
84 .........................Sequencer Master Banks
84 .........................Sequencer Banks
85 ........................ S e l e c t i n g a S equence
86 ........................ S e l e c t i n g a S ong
86 ........................ P l a yi n g S equences
86 ........................ P l a yi n g S ongs
87 ..................."Transport" Controls
88 ...................Sequencer States
89 ..................Utility Pages
89 ........................."KEEP FIRST TRACK"
89 ......................... P L A Y / K E E P P age
91 ........................"SAVE CHANGES TO OLD SEQUENCE"
91 ............................. Altering a Sequence In Song Mode
93 ...................TRACKS
93 .........................About Tracks
94 ...................SELECT — Tracks Select Page
94 ......................... S e l e c t i n g a T r a c k
95 ........................Changing the Program on a Track
96 ........................ " Un se l e c t i n g " a T r a c k — " S t r a i g h t S y n t h " M ode
96 ......................... T r a c k D i s p l a y s
98 ..................Mix•MIDI Page
98 .........................Sub -pages
99 ........................Track Status
100 ......................T r a c k P r o g r a m N u m b e r
100 ........................... A N o t e A b o u t M I D I Pr o g r a m N u m b e r s
101 ...................... T r a c k M i x
101 ........................... M u t i n g a T r a c k
102 ...................... T r a c k M I D I C hannel
SQ-80 — Musician's Manual
Section 4 — The Sequencer
79
Page 92

SQ-80 — Musician's Manual
103.................CONTROL — Sequencer Control Page
106.................LOCATE — Sequence Locate Page
107 ......................Auto-Locate Controls
108 ................CREATE/ERASE Page
111 ................Recording a Sequence
111 ...................... Se q uencing on the SQ-80 alone
111 ...................... Re c o r d i n g t h e F i r s t T r a c k
112 ...................... Us i n g t h e Foot Switch to define Sequence Length
112 ...................... Re c o r d i n g O t h e r T r a c k s
114 ...................... Ov e rd u b M o d e — "P u n c h i n g In "
115 ...................... "P u n c h i n g O u t "
115 ................MIDI Sequencing on the SQ-80
115 ...................... Ba s i c M I D I C onnections
116 ...................... Us i n g a MIDI Thru Box
116 ...................... MI D I M o d e a n d C h a nnel — Destination Instru ments
117 ...................... Tr a c k C o n f i g u r a t i o n
118 ...................... Re c o r d i n g t h e F i r s t T r a c k
118 ...................... Ot h e r T r a c k s
120 ................Sequencer EDIT Functions
120 ................EDIT Page
121 ......................TR A C K — E d i t i n g a T r a c k
12 7....................... S T E P — T r a ck S t e p E d i ti n g
131 ......................SE Q — E d i t i n g a Se q u e n c e
134 ............................Mak i n g a S equence Template
135 ................Song Mode
13 6....................... S O N G E d i t Pa g e
138 ...................... Ma k i n g a S ong
139 ......................LO C A TE — S o n g L o c at e P a g e
80 Section 4 — The Sequencer
Page 93

p
—
N
SQ-80 — Musician's Manual
THE SEQUENCER
The Sequencer section of the SQ-80 is a integrated part of the design of the instrument, and an extremely
owerful device in its own right. Building a Sequencer this sophisticated into the same box with a
synthesizer creates many new possibilities for writing, recording and performing music. We think you
will find the Sequencer extremely straightforward and easy to use — having both your Sequencer and
your master keyboard controller right at your fingertips in one box is what makes the
approach to digital sequencing so unique.
At the same time, the great flexibility of this integrated synthesizer/sequencer design can make for a few
complexities, Since the Synthesizer and the Sequencer are interrelated, what you do on one sometimes
affects the other. There are a few pos sible routes to confusion here. However, if you pay close attention
to the explanations in this Manual, use your common sense, and open your mind to a few new concepts,
you will be happily sequencing in no time.
ENSONIQ
The eight-track
Sequencer built into the SQ-80 is based upon the same d ata structure as that of the
ENSONIQ ESQ-1. Since the two instruments share the same Sequencer file format, individual
sequences recorded on the
185 for more on
ESQ-1 compatibility).
ESQ-1 can be tr ansferred to and played on the SQ-80. and vice-vers a (see p.
Note: If you can't wait to start sequencing, you can turn right to the chapter "Recording a Sequence"
which begins on page 111. We recommend, however, th at you eventually come back and familiarize
yourself with the many other Sequencer controls and functions described in this Section. This is th e only
way to truly take advantage of the power of the
SQ-80 Sequencer.
The MIDI Connection
Almost everyone is familiar by now with MIDI — that magical connection that lets you play one
instrument (or a whole roomfull of them) from another. MIDI — Musical Instrument Digital Interface
is a standard that has been agreed upon by manufacturers for translating musical events into specific
numbers.
When you strike the Middle C on th e
of numbers representing a Key Down,
was struck. When you release the key the
connected to the
thing happens whenever you move a controller, such as the Pitch or MOD Wheel. or when you select
a new sound — each of these events is translated into a series of numbers which are transmitted out the
MIDI Out jack.
SQ-80 c an read and translate those number s to play the same middle C itsel f. The same
SQ-80, for inst ance, it instantly sends to its MIDI Out jack a series
along with the location on the Keyboard, and how hard the key
SQ-80 sends a number meaning Key Up. A MIDI instrument
ow imagine a recorder which, instead of recording the sounds of an instrument, records the same kind
of Digital information that is sent and receiv ed over MIDI — Key Down, Key Up. Key Number and
Velocity. Pitch Bend, MOD Wheel, and so on — and you have imagined a Digital Sequencer.
A Sequencer records and plays back the "control information" rather than the actual notes. This means
that there is no degradation of the sound in the recording process no matter how many times you overdub
or re-record a part. A Sequencer is sort of an electronic player piano.
Section 4 — The Sequencer
81
Page 94

SO-80 — Musician's Manual
Digital Sequencing
A general understanding of how a Digital Sequence Recorder like the SQ-80 does what it does, and how
it differs from an eight-track audio tape recorder, will help you to get the most out of your instrument.
The key thing to bear in mind is this — the Sequencer only records what you play. Sequencer Memory
is used up on the basis of Events
tape) is always used up by the same amount over a fixed period of time.
This means that a Sequencer will use virtually the same amount of Memory to record 100 notes, whether
you play those notes over ten seconds or ten minutes. When you strike a key, the Sequencer records a
Key Down.
amount of time between the Key Down and the Key Up do esn't really affect the amount of Memory
required to record the note.
It then counts the Clock pulses until you release the key, when it records a Key Up. The
(Keys struck, Controll ers, etc.), while a tape reco rder's memory (the
Compare this to an audio tape recorder. With tape, Time
amount of tape to record a minute of music, whether the signal contains one note or one hundred.
You might say that tape is linear
dynamic
Sequencer Memory. For example, while Key Events (the notes you play) use up relatively little Memory
each, Controllers
numbers which can fill up the Memory in a hurry. Thus if you're trying to squeeze one more Track into
a Sequence when there is not much Memory left, you know to go easy on the Controllers.
— it is used only as needed. The difference is essential to learning how to manage the SQ-80's
such as MOD Wheel. Pitch Bend , Breath controller. etc., are recorded as a flood of
— it is spent at a fixed rate — while Digital Sequencer Memory is
is the thing. A tape recorder will use the same
82 Section 4 — The Sequencer
Page 95

SQ-80 — Musician's Manual
THE "SYSTEM"
The diagram below illustrates the signal paths and the "component parts" that make up the SQ-80 —the
SQ-80 System. As you grow more familiar with the SQ-80 and its functions, you should refer back to
this diagram, as it will answer many of your questions concerning which signals can be routed where.
As indicated by the above diagram:
1) There are two available Control Signal sources — incoming MIDI Data, and the
(shown above as Master Keyboard).
2) Both the
Sequencer.
3) Both the
4) Each of the Tracks can be thought of as a "virtual synth" and can be addressed from the
Keyboard, from MIDI, or from Data recorded on the Sequencer.
(A "virtual synth" is defined here as something that has 1) its own Program, 2) its own MIDI Channel.
and 3) eight voices available for it to play. Of course, since the
"synths" — the Straight Synth and the eight Tracks — cannot all play at any one instant in time. But
the
time, if someone else is not using them.) Note th at the
to receive independently on its own MIDI Channel.
5) Both the
6) The stereo outputs of the Straight Synth and the eight Tracks combine to form the Left and Right
Audio Outputs of the
SQ-80 Keyboard and incoming MIDI can address any of the Tracks of the eight-track MIDI
SQ-80 Keyboard and incoming MIDI can address the Straight Synth.
SQ-80 has only eight voices, the nine
SQ-80's Dynamic Voice Assignment means that each Track has eight voices available at any
SQ-80 must be in MULTI Mode for each Track
SQ-80 Keyboard and the. Sequencer can send MIDI Out.
SQ-80.
SQ-80 Keyboard
SQ-80
Note: The diagram above is conceptual and somewhat simplified. It is intended primarily as an aid to
understanding.
Section 4 — The Sequencer 83
Page 96

—
SQ-80 — Musician's Manual
SEQUENCES AND SONGS
What is a Sequence?
A
Sequence on the SQ-80 is comparable to a Pattern on a drum machine. Each Sequence has a defined
length (though you can change it at any time). A Sequence can be as short or as long as you want (within
the limitations of Memory). Within a given Sequence, each of the eight Tracks has its own Internal
Program and MIDI configuration (MIDI Channel, Status. Program number. etc.), all of which is
"remembered" by the
Each time you select a new Sequence, each Track used within a Sequence will send out a Program Change
and MIDI Volume instructions on its designated MIDI Channel. unless the Track has been assigned
LOCAL only Status — in which case you can have the new Track play a new Internal Program. Internal
Program, MIDI Channel, MIDI Program, etc. for each Track do not change within a given Sequence —
that is what the
In Song Mode, Sequences will play consecutively in any order, with up to 99 Steps, and up to 99
Repetitions of each Step. Whenever a new Sequence begins to play as a Step in a Song, the effect is the
same as when you select the Sequence — each Track will send out a Program Change on its MIDI
Channel, change its Internal Program, or whatever you have programmed that Track of that Sequence
to do.
SQ-80 for each Sequence.
SQ-80's Song Mode is for.
You'll find that you can control all your MIDI instruments — playing, recording, and changing Sounds
without ever leaving the SQ-80 Keyboard.
Sequencer Master Bank
The Button labeled
SEQ. above the three Program Ma ster Bank Buttons, selects the Sequencer Master
Bank. The Sequencer Master Bank contains 60 Sequence Memory Locations, and 20 Song Memory
Locations. Not all of these locations necessarily contain a Sequence or Song at a given time.
Sequencer Banks
Press the
Sequencer Memory rather than the Program Memory. There are six Banks of ten Sequences and two
Banks of ten Songs.
Sequencer Master Bank (SEQ) Button. The four Bank Select Buttons now access the
84 Section 4 — The Sequencer
Page 97

w
t
w
SQ-80 — Musician's Manual
Selecting a Sequence
Press the buttons labeled SEQ 1
.
4, SEQ 2
.
5 or SEQ 3.6 to see the Sequence Select Pages for the first
three Sequencer Banks numbered SEQ 1, SEQ 2 and SEQ 3. These Sequences are numbered 01 through
30. When you press SEQ 1-4, the Display shows:
Press the SEQ button again. Now pressing these same three Bank Select buttons will show you the
Sequence Select Pages for the next three Sequencer Banks, numbered SEQ 4, SEQ 5 and SEQ 6. These
Sequences are numbered 31 through 60.
Press SEQ again to return to the first three Sequence Select Pages. Repeated pressing of the SEQ button
ill toggle the Display back and forth between SEQ 1 and SEQ 4: between SEQ 2 and SEQ 5: between
SEQ 3 and SEQ 6: and between the two banks of Songs.
Pressing the "Soft" Button next to any of the ten Sequence Locatio ns on a Page selects that as the curren
Sequence, Only those with (SEQ—) before the Sequence number can be selected. A location where
(XXX—) appears represents a Sequence which hasn't been defined yet — it contains no Sequence Data
and cannot be selected until you Create a Sequence in that Location. As with everything on the SQ-80.
hen you select a Sequence it becomes underlined.
The currently selected Sequence is always underlined.
Section 4 — The Sequencer 85
Page 98

A
W
W
g
W
SQ-80 — Musician's Manual
dot (.) to the left of a Sequence location means there is data recorded in that Sequence. A Sequence
Location with no dot means that the Sequence has been created, but that nothing has yet been recorded
there.
henever you select a Sequence or a Song, the SQ-80 sends out a MIDI Song Select message. See p.
143 for more details on Song Selects.
Selecting a Song
ith the SQ-80's Song Mode you can chain Sequences together to form up to twenty different Songs.
Press Song 1
•
2 to see the first Song Select Page. Then press the SEQ button again to see the second Son
Select Page. Repeatedly pressing the SEQ button toggles between the two Song Banks.
Either a Sequence or a Song can be selected — never both. While the thirty Sequences are identified by
number only, the ten Songs can have Names. When you press Song, the Display shows:
Pressing the "Soft" Button above or below any of the 20 Song Locations selects that as the current Song.
Only those with a Name can be selected. A location where (XXXX) appears represents a Song which
hasn't been created yet and cannot be selected.
The currently selected Song is always underlined.
Playing Sequences
Try selecting a Sequence, and pressing the Play Button in th e Sequencer Section, to the right of the
Display. The selected Sequence will begin to play.
hile one Sequence is playing you can select another one. An underline will begin to flash beneath the
new Sequence, but the original one will continue to play. When the first Sequence is finished, the
underline will switch to the new Sequence, and it will play. In this fashion you can string Sequences
together in real time, as they play. The Display always tells you which is Playing (underline) and which
is selected to play next (flashing underline).
Press the Stop•Cont Button or the Sequencer Foot Switch to Stop the Sequence.
Playing Songs
To Play a Song, simply select one of the Songs in memory, as described above, and press the Play Button
in the Sequencer Section. Unlike Sequences, you can't switch Songs while one is playing. The
Sequencer must be stopped to select a new Song.
Press the Stop•Cont Button or the Sequencer Foot Switch to Stop the Song.
86 Section 4 — The Sequencer
Page 99

SQ-80 — Musician's Manual
"TRANSPORT" CONTROLS
The bottom row of Buttons in the Sequencer section of the SQ-80 are used to start and stop the Sequencer,
and to enter the various other Sequencer States. These buttons are similar to the Play, Stop and Record
controls on a tape deck. To
Button), and the Auto-Locate controls found on the LOCATE Page (which might be compared to the
fast forward and rewind), they give you the ability to Play or Record from any Bar within a Sequence.
When the Sequencer is Stopped:
• Pressing Play starts the Sequencer playing from the beginning of the Sequence or Song.
(Unless you have just u sed the
Button acts like Stop•Cont.)
gether with the Sequencer Foot Switch (which duplicates the Stop•Cont
Auto-Locate Controls, in which case the first press of the Play
• Pressin
from the location selected with the
• Pressin
it was last stopped. or from the location selected with the
g Stop•Cont starts the Sequencer playing from the point where it was last stopped, or
Auto-Locate Controls.
g Play while holding down Record starts the Sequencer Recording from the point where
Auto-Locate Controls.
When the Sequencer is in PLAY:
• Pressing Stop
• Pressing
• Pressin
Record.
g Record puts the Sequencer into Overdub. It will wait for you to play before going into
•
Cont stops the Sequencer.
Play starts the Sequence again from the beginning.
When the Sequencer is in RECORD:
• Pressing Stop
• Pressing
First Track. When recording the First Track, pressin
•
Cont stops the Sequencer.
Play takes the Sequencer out of Record and puts it into Audition Play. (Except on the
g Play has no effect.)
Sequencer Foot Switch
The Rear Panel jack labeled Sequencer Ft. Sw. accepts an ENSONIQ SW-1 Foot Switch. When a Foot
Switch is plugged into this jack, pressing it will have the same effect as pressing
recording the first Track of a Sequence, or when in Overdub, when it can be used to put the Sequencer
into Record without playing.
Stop•Cont, except when
The Sequencer Foot Switch exactly duplicates the behavior of the Stop•Cont Button (except in the
REC Standby or Overdub states).
Section 4 — The Sequencer 87
Page 100

f
SQ-80 — Musician's Manual
SEQUENCER STATES
On all Sequencer Pages except the CREATE/ERASE Page and the EDIT Pag e. the Status of the
Sequencer is always shown in the lower-left corner of the Display. This tells you which State the
Sequencer is in at any given time.
When a Sequence is selected, the possible Sequencer States are:
STOP — Sequencer at rest.
PLAY — Sequencer Playing curr ent Sequence. Fro m STOP, PLAY is entered by pressing th e Play
Button, or pressing the Stop
•
Cont Button.
REC (flashing) — This is a Record "Standby" state that occurs only when recording the First Track o
a Sequence. When
metronome starts
start until you begin to play. The point where you begin to play then becomes Bar # 1 of the new
Sequence.
Record/Play is pressed to record the First Track, REC flashes and the
(CLICK mu st be ON), allowing you to adjust th e Tempo. Recording does not
REC — Recording on the selected Track. Record is entered by:
1) Playing any note while REC is flashing (First Track only);
2) Pressing
3) Playing any note while ODUB is flashing (see Overdub Mode below).
The
first — that is, after the length of the Sequence is defined. It will not Record past the end of a
Sequence. At the end of the Sequence it will leave
Record/Play (all .later Tracks): or
SQ-80 automatically exits the Record State at the end of a Sequence on all Tracks after the
Record and (assuming LOOP= ON) enter the
Audition Play State.
ODUB (flashing) — Overdub is another way of entering Record. It allows you to "Punch In" wh ereve r
you want on a Track, on any Track after the first.
To enter Overdub: While the Sequencer is in Play, press the Record Button. The Status indicator
in the lower left corner of the Display will begin flashing
you play a note or press the
At the point you wish to punch in, just begin to play or press the Foot Switch. The Sequencer will
record your new data from the point where you began to play up to the end of the Sequence, where
it will leave Record and go into the
Sequencer Foot Switch.
Audition Play State.
ODUB. Nothing will be recorded until
88 Section 4 — The Sequencer
 Loading...