

Page 1
User’s Guide
Page 2
READ THIS FIRST!
WARNING!!WARNING!!
To reduce the risk of fire or electric shock, do not expose this product
to rain or moisture.
Grounding Instructions
This product must be grounded. If it should malfunction or break down,
grounding provides a path of least resistance for electric current to reduce the
risk of electric shock. This product is equipped with a cord having an equipmentgrounding conductor and a grounding plug. The plug must be plugged into an
appropriate outlet that is properly installed and grounded in accordance with
all local codes and ordinances.
DANGER: Improper connection of the equipment-grounding conductor can
result in the risk of electric shock. Check with a qualified electrician or service
personnel if you are in doubt as to whether the product is properly grounded.
Do not modify the plug provided with this product — if it will not fit the outlet,
have a proper outlet installed by a qualified electrician.
CAUTION
RISK OF ELECTRIC
CAUTION : TO REDUCE THE DANGER OF
DO NOT REMOVE COVER (OR BACK)
This symbol is intended to alert the user to the presence of
uninsulated "dangerous voltage" within the product's
enclosure that may be of sufficient magnitude to constitute
a risk of electronic shock to persons.
This symbol is intended to alert the user to the presence of
important operating and maintenance (servicing)
instructions in the literature accompanying the appliance.
ELECTRIC SHOCK
Page 3

“INSTRUCTIONS PERTAINING TO A RISK OF FIRE,
ELECTRIC SHOCK, OR INJURY TO PERSONS”
IMPORTANT SAFETY INSTRUCTIONS
WARNING—When using electric products, basic precautions should always be followed
and all warnings heeded, including the following:
1. Read and follow all enclosed instructions before using the product.
2. Do not use this product near water - for example, near a bathtub, washbowl, kitchen
sink, in a wet basement, or near a swimming pool, or the like.
3. Product should be used only with a cart or stand recommended by the manufacturer.
4. This product, either alone or in combination with an amplifier and headphones or
speakers, may be capable of producing sound levels that could cause permanent hearing loss. Do not operate for a long period of time at a high volume level or at a level
that is uncomfortable. If you experience any hearing loss or ringing in the ears, you
should consult an audiologist.
5. The product should be located so that its ventilation openings are not blocked.
6. The product should be located away from heat sources such as radiators, heat registers,
or other products that produce heat.
7. The product should be connected to a power supply only of the type described in the
operating instructions or as marked on the product.
8. This product may be equipped with a polarized line plug (one blade wider than the
other) or grounding-type plug (two blades and a third grounding prong). If you are
unable to insert the plug into the outlet, contact an electrician to replace your obsolete
outlet. The wide blade and third prong are provided for your safety—do not defeat the
safety purpose of the polarized or grounding-type plug.
9. Unplug this product during lightning storms or when unused for a long period of time.
10. Care should be taken so that objects do not fall and liquids are not spilled into the
enclosure through openings.
11. The product should be serviced by qualified service personnel when:
a. The power supply cord or the plug has been damaged; or
b. Objects have fallen, or liquid has been spilled into the product; or
c. The product has been exposed to rain or moisture; or
d. The product does not appear to operate normally or exhibits a marked change
in performance; or
e. The product has been dropped, or the enclosure damaged.
12. Do not attempt to service the product beyond that described in the user-maintenance
instructions. All other servicing should be referred to qualified service personnel.
13. Clean product only with a damp cloth.
14. Protect the power cord from being walked on or pinched, particularly at plugs, convenience receptacles, and the point where they exit from the product.
15. Only use the attachments/accessories specified by the manufacturer.
SAVE THESE INSTRUCTIONS
Page 4

Avista 7600 User’s Guide
Copyright © 1998
EMU-ENSONIQ® Corp
155 Great Valley Parkway
Box 3035
Malvern, PA 19355-0735
USA
World Wide Web http://www.ensoniq.com
Printed in U.S.A.
All Rights Reserved
Your Authorized ENSONIQ Dealer is your primary source for
service and support. If you have any questions concerning the use
of this unit, please contact your Authorized ENSONIQ Dealer first.
For additional technical support, or to find the name of the nearest
Authorized ENSONIQ Repair Station, call ENSONIQ Customer
Service.
This manual is copyrighted and all rights are reserved by EMUENSONIQ Corp. This document may not, in whole or in part, be
copied, photocopied, reproduced, translated, or reduced to any
electronic medium or machine readable form without prior written
consent from EMU-ENSONIQ Corp. The Avista 7600 software is
copyrighted and all rights are reserved by EMU-ENSONIQ Corp.
Although every effort has been made to ensure the accuracy of the
text and illustrations in this manual, no guarantee is made or
implied in this regard.
ENSONIQ and Avista 7600 are trademarks of EMU-ENSONIQ
Corp.
Part # 9310023301-A Model # MM-171
Page 5

Table of Contents
Welcome to the Avista 7600 1
The Main Features of the Avista 7600 1
About this User’s Guide 1
Included Accessories 2
Setting Up the Avista 7600 2
Getting Ready 2
Contents of the Stand Box 2
Contents of the Hardware Bag 2
Required Tools 2
Avista 7600 Stand Assembly Instructions 3
Rear-Panel Connections 4
DC 15V In (Power) 4
Stereo Out 4
Foot Pedal Jacks 4
MIDI Jacks 5
Contrast 5
Turning the Avista 7600 On and Off 6
Listening to the Avista 7600 6
Volume Control 6
The Avista Controls and Display 7
The Minus and Plus Buttons 7
The Display 7
Selecting Preset Sounds 8
Selecting Other Sounds 8
Playing the Avista 7600 Demos 8
Selecting Sounds 8
The Avista 7600’s General MIDI Sounds 9
The Avista 7600’s General MIDI Drum/Percussion Kits 10
Adjusting a Sound’s Volume 10
Layering Two Sounds 10
Adjusting the Volume of a Layer 10
The Master Controls Section 11
Transposing the Notes You Play 11
Adjusting the Response of the Keyboard 11
Using the Avista’s Metronome 12
Setting the Metronome’s Time Signature 12
Activating the Metronome 12
Adjusting the Metronome Tempo 12
Adding Effects to a Sound 13
To Turn the Reverb or Chorus Effects On 13
To Adjust the Volume of an Effect 13
Recording Music in the Avista 7600 14
The Rec/Play Controls 14
Making a Recording 15
Page 6

To Play Back a Recording 15
Using the Other Recorder Controls 15
Playing a Specific Portion of Your Recording 15
To Make a New Recording 15
To Change a Recording’s Tempo 16
To Re-Orchestrate a Recording 16
Using the Avista Floppy Drive 16
The Disk Controls 16
The Floppy Drive 17
Working with Floppy Disks 17
Write-Protection 17
Formatting a Floppy Disk for Use 18
Saving Your Recordings to Disk 18
Updating and Over-Writing Disk Files 19
Loading Recordings from Disk 20
Muting an SMF Recording’s Melody 20
The Avista 7600 and MIDI 21
Transmitting MIDI from the Avista 7600 21
To Select the Channel on Which the Avista Transmits MIDI Data 21
Receiving MIDI Data on the Avista 7600 22
Muting a MIDI Channel 22
Viewing the Sounds Played on Each MIDI Channel 22
Proper Operation of the Avista 7600 23
Temperature Guidelines 23
Care and Feeding of the Disk Drive 23
Clean-Up and Maintenance 24
Polarization and Grounding 24
AC Line Conditioning 25
Page 7

Welcome to the Avista 7600
Congratulations on your purchase of the ENSONIQ Avista 7600. We’re
confident that you’ll experience many hours of pleasure with this
elegant, easy to use and great-sounding keyboard.
The Main Features of the Avista 7600
• Your Avista 7600 contains 136 terrific sounds that you can play
using its realistic piano-style keyboard. You can listen to these
sounds through the Avista’s built-in speakers, your headphones, or
you can connect the Avista’s stereo output to the inputs of a home
stereo amplifier or audio recorder.
• You can play two sounds at once, layered on top of each other.
• You can instantly transpose your playing into any key with a tap or
two of the Avista’s Transpose button.
• You can add reverb and/or chorusing effects to the Avista’s sounds,
making them sound even more exciting.
• You can record your playing into the Avista’s built-in recorder—
and then hear it instantly played back. Once recorded, you can
store your music on a floppy disk using the Avista’s built-in floppy
drive. You can load your music back into the Avista’s recorder at
any time; you can even load your recording into your home
computer with the proper software installed.
• You can play any General MIDI (GM) recording once you’ve loaded
it into your Avista from a floppy disk. There are thousands of GM
recordings available for purchase from your local music store, or
downloadable—often for free—from the Internet. When playing a
GM recording, you can mute the melody part, allowing you to sing
or play the melody yourself.
• If you’ve got a computer or other external MIDI sequencer, you can
play the Avista’s sounds via MIDI.
About this User’s Guide
Throughout this booklet, you’ll see special pieces of information
presented as notes, tips and warnings.
• Notes provide important qualifying information relating to the
topic being discussed.
• Tips describe handy uses for the feature being described.
• Warnings contain important information that can help you avoid
damage to your music, the Avista or yourself.
ENSONIQ Avista 7600 User’s Guide
1
Page 8

Included Accessories
• music stand • foot pedal
• power adapter • Avista 7600 User’s Guide
• warranty card • power adapter line cord
Setting Up the Avista 7600
Getting Ready
Prior to assembling the Avista 7600’s stand, make sure that you have all
of the necessary parts and tools.
Contents of the Stand Box
• 2 stand legs (left and right) • Center support board
• 2 metal brackets • hardware bag
Contents of the Hardware Bag
• Four M6 x 30 screws • Four M5 x 30 screws
• Four plated thumbscrews • Eight screw-hole covers
Required Tools
You’ll need a #2 (medium) Philips-head screwdriver.
ENSONIQ Avista 7600 User’s Guide
2
Page 9
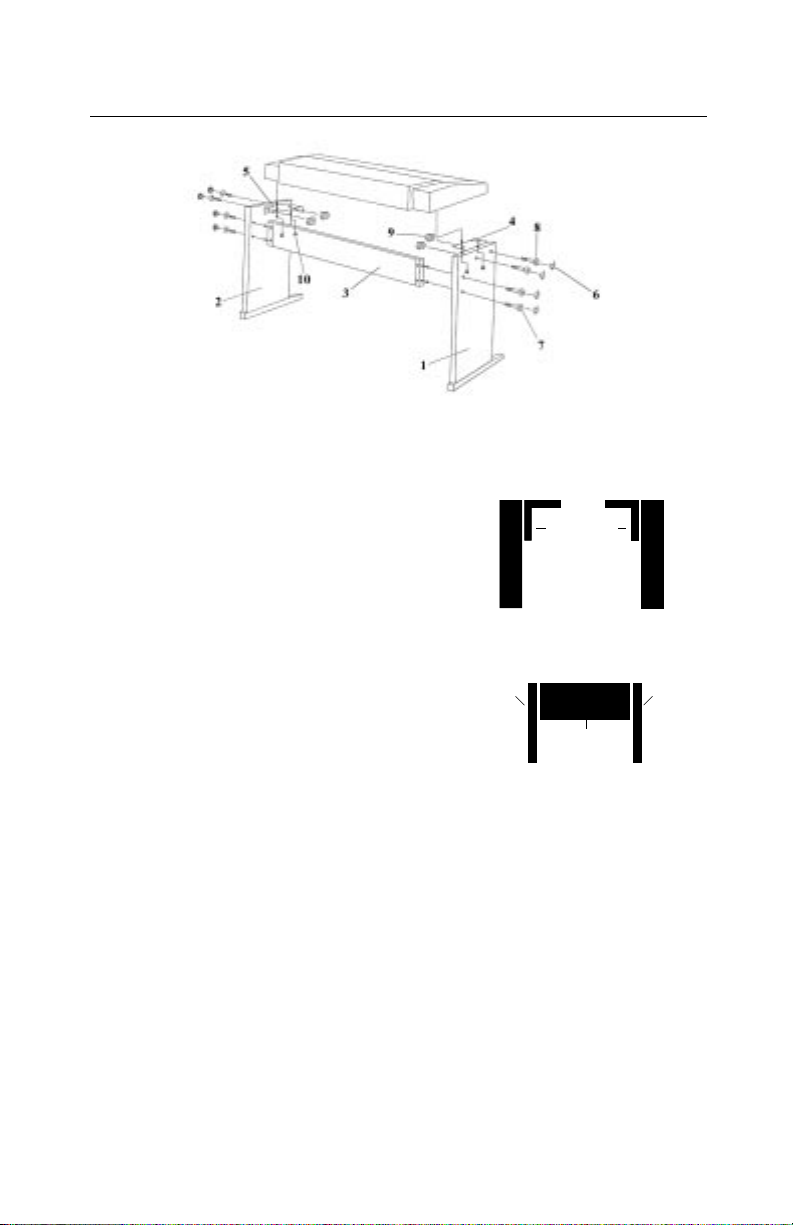
Avista 7600 Stand Assembly Instructions
1. Using the four larger screws (8), connect a bracket (4 and 5) to the
inside of each leg (1 and 2) so that its lip is facing toward the foot
side of the leg. Each bracket has two
circular holes on one of its sides, and
two oval-shaped holes on its other
side. When attaching a bracket to a
leg, align the two circular holes with
the two bracket holes on the leg.
Insert each screw from the outside of
the leg and fasten it on the inside of
the bracket using a nut (9).
2. Taking care not to crack the center
support board (3), use the smaller
screws (7) to attach it to the inside of
one of the legs and then the other.
Oval-shaped holes on top
Circular holes
When each leg is viewed from
its front edge, the brackets
should look like this
Center support
board
LegLeg
3. Set the stand upright and place the Avista on top of the stand so
that its keyboard is facing the leg feet.
4. From underneath, use the plated thumbscrews (10) to attach the
keyboard to the oval-shaped holes in the brackets. You may have to
slightly re-position the keyboard so that its holes line up with the
holes in the brackets.
5. Snap each of the four screwhole covers (6) into a hole on the
outside of each stand leg to cover the head of the screw mounted in
the hole.
6. Insert the music stand into the slots in the top of the Avista 7600.
ENSONIQ Avista 7600 User’s Guide
3
Page 10

Rear-Panel Connections
Contrast
MIDI
Thru Out In
Output
DC 15V InDamper Soft Stereo
+-
Note: The rear-panel jacks are also labeled on top of the Avista so that
they can be easily located from the front.
DC 15V In (Power)
To supply power to the Avista, connect the small end of the supplied
power adapter to the Avista’s DC 15V In jack. Connect one end of the
supplied line cord to the adapter, and the other end to a 110-volt
grounded wall outlet.
Warning: See “Polarization and Grounding” on Page 24.
Stereo Out
The Stereo Output jack allows you to send the Avista’s high-quality
stereo sound output to any pair of line-level inputs such as those found
on a home stereo system amplifier, cassette recorder or mixer. The jack is
intended for use with a “Y” cable that has a stereo 1/4” plug on one
end—the end that connects to the Avista’s jack—and a pair of mono
plugs (RCA-type or 1/4”) at the other end. These cables can be
purchased at most audio/TV supply stores.
Warning: When connectingthe Avista to a home stereo, set the stereo’s
volume carefully to avoid damaging your speakers.
Note: The volume of the Stereo Out jack is set at a fixed line level, and is
unaffected by the setting of the Avista’s Volume slider.
Note: Connecting a cable to the Stereo Output jack does not turn off the
Avista’s built-in speakers.
Foot Pedal Jacks
• Damper—When a foot switch—such as the supplied foot pedal—is
connected to the Avista’s Damper jack, the pedal acts in the same
manner as a sustain pedal on a piano.
• Soft—When the foot pedal is connected to the Avista’s Soft jack, the
pedal acts in the same manner as a soft pedal on a piano.
Tip: The Avista 7600 ships with one foot pedal. You can purchase a
second pedal by calling ENSONIQ Customer Service at 610-647-3930.
ENSONIQ Avista 7600 User’s Guide
4
Page 11

MIDI Jacks
If you intend to connect the Avista to an external MIDI device, you’ll
need to attach one or more MIDI cables—purchased separately—to the
Avista’s MIDI jacks. MIDI and MIDI operations are described on Page
21.
• In—To transmit MIDI data from an external device into the Avista,
connect one end of a MIDI cable to the device’s MIDI Out jack and
the other end to this jack.
• Out—To transmit MIDI data from the Avista to an external device,
connect one end of a MIDI cable to this jack and the other end to
the external device’s MIDI In jack.
• Thru—When you’re interconnecting a series of MIDI devices and
want to pass MIDI information from one device to the next, connect
a MIDI cable between one device’s MIDI Thru jack and the MIDI In
jack of the next device in the daisychain.
Contrast
The Contrast knob allows you to set the contrast of the Avista’s display
so that its characters are easily readable from any viewing angle. To
adjust the contrast, seat yourself in your intended playing position and
turn the knob clockwise and/or counter-clockwise to achieve maximum
display legibility.
ENSONIQ Avista 7600 User’s Guide
5
Page 12

Turning the Avista 7600 On and Off
To turn the Avista 7600 on, press the front-panel Power
button—the display will light and show “Welcome!” To
turn it off, press the button again.
Listening to the Avista 7600
You can listen to the Avista 7600 through its built-in speakers or by
plugging standard stereo headphones into either of the 1/4” stereo
headphone jacks—labeled “Phones1” and “Phones2”—located below
and just to the left of the lowest key on the keyboard.
Note: When headphones are connected to either Phones jack, the
Avista’s speakers are turned off so that you can listen privately.
Note: If your headphones have a stereo mini-plug, you can purchase a
stereo mini-to-stereo 1/4” adapter at many audio supply stores.
Volume Control
To set the Avista 7600’s overall listening level, adjust the position of its
Volume slider.
Volume
Tip: You can also adjust the volume of each sound. See Page 10.
ENSONIQ Avista 7600 User’s Guide
6
Page 13

The Avista Controls and Display
The Avista’s front panel is divided into five sections, each of which
controls a certain type of activity. These are all described in this User’s
Guide.
• The master controls section allows you to set the sensitivity of its
keyboard, transpose your playing and activate and adjust the builtin metronome.
• The eight sound buttons under the display allow you to quickly
select and layer sounds.
• The Reverb/Chorus section allows you to select and adjust effects
that can be added to the Avista’s sounds, and contain the very
important minus and plus buttons (described below).
• The buttons in the Disk-Rec/Play section serve a dual purpose.
When the Disk-Rec/Play button’s LED is lit, these buttons control
the Avista’s floppy disk operations. When the LED is unlit, these
buttons control the Avista’s built-in recorder.
The Minus and Plus Buttons
The minus and plus buttons located above the
Reverb and Chorus buttons play a part in many
of the things you’ll do with the Avista 7600.
Whenever you’re selecting a sound from the list of the Avista’s sounds,
or editing some displayed value, you can select the next lowest item—or
value—by clicking the minus button, and the next highest by clicking
the plus button.
- +
The Display
The Avista’s display is the window through which you view the settings
associated with its many features. Whatever you do, information
relevant to the task at hand appears on the display.
Grand Piano 001
Tip: You can change the readability of the display by adjusting its
contrast. See Page 5.
ENSONIQ Avista 7600 User’s Guide
7
Page 14

Playing the Avista 7600 DemoS
The Avista contains three pre-recorded demonstration
songs—or “demos”— to give you an idea of its capabilities.
• To listen to all three demos, press the blue Demo button.
• To stop the demo, press the button again.
• To select and play one of the demos, hold down the Demo button
and press the plus or minus button to select the desired demo.
Selecting Sounds
6
Demo
8
Piano 11Piano 22Piano 33Organ4Strings5Brass
Choir7Vibraphone
Selecting Preset Sounds
Before you can play one of the Avista’s sounds, you must first select the
sound. Each of the eight buttons beneath the display is pre-set to select
one of eight commonly-used sounds.
Button Selects Button Selects
1 Grand Piano 001 5 Strs Ensemble 049
2 Bright Piano 002 6 Brass 062
3 Chorused Piano 006 7 Choir Aahs 053
4 Church Organ 020 8 Vibraphone 012
To select one of the eight preset sounds, press its button.
Selecting Other Sounds
In GM mode, you can select any of the other onboard sounds:
1. Press the blue GM button so that its LED lights.
2. Press the desired sound button.
3. Press the minus or plus button to select the desired sound.
Tip: Hold down the minus or plus button to quickly scroll down or up,
respectively, through the list of sounds.
All of the Avista’s sounds except its drum kits are numbered to show
their place in the GM sound list.
Button
LED
GM
The sound you choose will be assigned to the sound button you pressed
until you exit GM mode (or turn off the Avista). To reset the button to its
original sound, press the GM button again to exit GM mode.
ENSONIQ Avista 7600 User’s Guide
8
Page 15

The Avista 7600’s General MIDI Sounds
Grand Piano 001
Bright Pno 002
E.Grand Pno 003
Honky-T Pno 004
Elec. Pno 005
Chorused Pno 006
Harpischord 007
Clavinet 008
Celesta 009
Glockenspiel 010
Music Box 011
Vibraphone 012
Marimba 013
Xylophone 014
Tubular Bell 015
Dulcimer 016
Hammnd Organ 017
Percus Organ 018
Rock Organ 019
Church Organ 020
Reed Organ 021
Accordion 022
Harmonica 023
Tango Accdn 024
Nylon Guitar 025
Steel Guitar 026
Jazz Guitar 027
Clean Guitar 028
Muted Guitar 029
Overdrv Gtr 030
Distort Gtr 031
Guitar Harm 032
Acoust Bass 033
Finger Bass 034
Pick Bass 035
Fretless Bas 036
Slap Bass1 037
Slap Bass2 038
Synth Bass1 039
Synth Bass2 040
Violin 041
Viola 042
Cello 043
Contrabass 044
Tremolo Strs 045
Pizz Strings 046
Orch Harp 047
Timpani 048
Strs Ensemb1 049
Strs Ensemb2 050
Syn String1 051
Syn String2 052
Choir Aahs 053
Voice Oohs 054
Syn Voice 055
Orch Hit 056
Trumpet 057
Trombone 058
Tuba 059
Muted Trumpt 060
French Horn 061
Brass 062
Syn Brass1 063
Syn Brass2 064
Soprano Sax 065
Alto Sax 066
Tenor Sax 067
Baritone Sax 068
Oboe 069
English Horn 070
Bassoon 071
Clarinet 072
Piccolo 073
Flute 074
Recorder 075
Pan Flute 076
Bottle Blow 077
Shakuhachi 078
Whistle 079
Ocarina 080
Lead 1 081
Lead 2 082
Lead 3 083
Lead 4 084
Lead 5 085
Lead 6 086
Lead 7 087
Lead 8 088
Pad 1 089
Pad 2 090
Pad 3 091
Pad 4 092
Pad 5 093
Pad 6 094
Pad 7 095
Pad 8 096
FX 1 097
FX 2 098
FX 3 099
FX 4 100
FX 5 101
FX 6 102
FX 7 103
FX 8 104
Sitar 105
Banjo 106
Shamisen 107
Koto 108
Kalimba 109
Bagpipe 110
Fiddle 111
Shanai 112
Tinkle Bell 113
Agogo 114
Steel Drums 115
Woodblock 116
Taiko Drum 117
Melodic Tom 118
Synth Drum 119
Rvrse Cymbal 120
Fret Noise 121
Breath Noise 122
Seashore 123
Bird Tweet 124
Telephone 125
Helicopter 126
Applause 127
Gun Shot 128
ENSONIQ Avista 7600 User’s Guide
9
Page 16

The Avista 7600’s General MIDI Drum/Percussion Kits
In addition to the 128 sounds listed on the preceding page, the Avista
7600 contains a set of General MIDI drum kits. Unlike normal GM
sounds, in which a single sound plays up and down the keyboard, in a
GM drum kit, each key plays its own sound. While the keyboard
placement of individual drum or percussion sounds is consistent from
kit to kit, each General MIDI kit has its own musical personality. The
kits are:
Standard Kit Room Kit Power Kit Electronic Kit
TR-808 Kit Jazz Kit Brush Kit Orchestra Kit
Adjusting a Sound’s Volume
You can adjust the volume of any selected sound without affecting the
Avista’s overall volume. To do this:
1. Hold down the sound’s button until “Volume=[the current volume
setting]” appears.
2. Press the minus or plus button to set the volume as desired.
Layering Two Sounds
You can layer two sounds so that when you play a key on the keyboard,
both sounds are heard. This can be done using the eight preset sounds
or sounds you’ve temporarily assigned to the sound buttons (see
“Selecting Other Sounds” on Page 8). To layer two sounds:
1. Press and hold down the sound button for the first sound you want
to use. This sound is called the “primary sound.”
2. While still holding down the first sound’s button, press the button
for the second sound you want to use—this sound is called the
“layer.” The display will show the number of the primary sound
and the layer sound joined by a “+” sign.
3. When the numbers of the two sounds appear, release both buttons.
Adjusting the Volume of a Layer
To adjust the volume of the layer sound:
1. Press and hold down the button for the primary sound.
2. While still holding down the primary sound’s button, press and
hold the button for the layer sound until “LAYER VOL=[the current
layer volume setting]” appears.
3. Press the minus or plus button to set the volume as desired.
ENSONIQ Avista 7600 User’s Guide
10
Page 17

The Master Controls Section
Using the buttons in the master controls section of the Avista 7600’s
front panel, you can transpose your playing, change the response of the
Avista’s keyboard, and set and activate the built-in metronome.
Touch
Transpose Metro Meter Tempo
Transposing the Notes You Play
The Avista 7600 can transpose your playing up or
down by as much as an octave in semitone steps.
This allows you to play in whatever key you find
comfortable—the Avista will shift the notes to the
desired key for you. This is accomplished using the
Transpose buttons. The Avista’s display shows the
amount of transposition in effect.
• To transpose your notes upward, repeatedly press the upper
Transpose button until the number of semitones by which you want
to raise your key is displayed.
• To transpose downward, press the lower Transpose button until the
number of semitones by which you want to lower your key is
displayed. A minus sign will be shown before the displayed
number to show that you’re below concert pitch.
Tip: To return to concert pitch, press both Transpose buttons at the same
time—the display will show “00” when no transposition is in effect.
Transpose
Adjusting the Response of the Keyboard
The manner in which the Avista’s touch-sensitive
keyboard plays its sounds can be adjusted to suit the
amount of force with which you like to play. This
allows you to play comfortably and still get the most
out of the Avista’s sounds. The best way to find the
setting that’s right for you is to experiment by spending
some time with each one. Press the Touch button
repeatedly to select any of the four settings.
• Soft—This setting is designed for players who use a minimum
amount of force.
• Medium—This average setting will suit most users.
ENSONIQ Avista 7600 User’s Guide
Touch
11
Page 18

• Hard—Use this setting if you like to pound the keys.
• Fixed—This setting turns off the touch sensitivity of the Avista’s
keyboard so that, regardless how hard you play, the sounds will
respond as if you’ve hit the keys with maximum force. This can be
handy when recording drum sounds, since it will produce a
recording without any volume fluctuations.
Using the Avista’s Metronome
The Avista provides a built-in metronome as a rhythmic reference for
your playing. This can be handy when practicing. The metronome can
also be heard when you record in the Avista, though the metronome’s
sound is not itself recorded.
Setting the Metronome’s Time Signature
The Avista’s metronome can be set to any of seven meters:
2/4 4/4 6/8 12/8
3/4 5/8 9/8
To select a meter, repeatedly press the Meter button
until the desired time signature is displayed.
Meter
Activating the Metronome
To turn the metronome on, click the Metro—for
“metronome”—button. To turn it off, press the
button again.
As the metronome plays, the four LEDs above the Tempo buttons light
to show your place in each measure. At the first beat of each measure,
all four LEDs light simultaneously.
Metro
Adjusting the Metronome Tempo
The metronome can be set to play at any tempo from 40 beats per
minute to 240 beats per minute. The tempo can be changed when the
metronome is turned off, or when it’s on—when you change the tempo
while the metronome is on, you hear the changes you make and see the
rate at which the LEDs blink change as well.
• To slow down the metronome, press the
left-hand Tempo button until the desired
tempo is displayed and/or heard.
• To speed up the metronome, press the
right-hand Tempo button.
ENSONIQ Avista 7600 User’s Guide
Tempo
12
Page 19

Adding Effects to a Sound
The Avista contains two effects that can greatly enhance sounds:
• Reverb makes your sounds seem as if they’re playing in a large
room or concert hall.
• Chorus adds a lovely swirling shimmer to your sounds.
Either of these effects can be turned on or off at any time. They can be
used alone or together. You can also adjust the volume of the reverb
and/or chorus.
To Turn the Reverb or Chorus Effects On
• To activate the reverb effect, press the Reverb
button so that its LED lights.
• To activate the chorus effect, press the Chorus
button so that its LED lights.
To Adjust the Volume of an Effect
If the desired effect is not currently active, click its button once to
activate it. The Avista’s display will show “REVERB DEPTH” or
“CHORUS DEPTH.”
To decrease or increase an effect’s volume:
1. Press and release the desired effect’s button.
2. Press the minus button to decrease the effect’s volume, or the plus
button to increase it.
Reverb
Chorus
Note: If both effects are turned on, the display will show “CHOVERB
DEPTH,” allowing you to adjust their volumes simultaneously.
ENSONIQ Avista 7600 User’s Guide
13
Page 20

Recording Music in the Avista 7600
The Avista 7600 contains a recorder that you can use to capture your
playing. When you play the Avista’s keyboard and use its foot pedal,
each activity automatically generates MIDI data—in fact, it’s this MIDI
data that causes the Avista’s sounds to play. The Avista’s recorder is,
technically , a MIDI sequencer that records all of this data, including:
• which keys you pressed, and when
• how hard you struck the keys
• how long you held down the keys
• when and for how long you depressed any connected foot pedals
When the sequencer plays back the data, the Avista’s sounds play just as
they did when you played the keyboard, though, of course, you don’t
see the keys or foot switches move. In a sense, the recorder acts much
like an old player piano: it doesn’t record music itself; rather, it records
the motions of the keyboard and foot switches.
This has a few interesting advantages:
• You can use the Tempo buttons to change the recording’s tempo as
it plays back.
• You can re-orchestrate the music by selecting a different sound.
• You can easily store a large number of recordings on any single
floppy disk, since MIDI data is much more compact than actual
recordings of sound.
Tip: If you’ve got a computer with a MIDI sequencing program, you can
load your recordings into the computer from floppy for further work.
The Rec/Play Controls
The Avista’s recorder uses a set of buttons that serve a
dual purpose: when the Disk LED is unlit, the buttons
operate the recorder; when the LED is lit, they control
floppy disk operations. To light or unlight the LED, press
the blue Disk-Rec/Play button.
The symbols beneath the buttons show their function when used to
control the recorder.
Set Start Set End Top Stop Play Record Pause
ENSONIQ Avista 7600 User’s Guide
Disk
Rec/Play
14
Page 21

Making a Recording
Making a recording in the Avista is simple. To record your playing:
1. Select the time signature and tempo to be recorded using the Meter
and Tempo buttons, as described on Page 12.
2. Press the Record button. You’ll hear a one-measure
countoff, after which recording will actually begin.
3. The Avista will begin recording as soon as you start playing.
4. When you’re done recording, press the Stop button.
Tip: If you’d like a rhythmic reference as you record, turn on the
metronome prior to Step 2 (see Page 12). If you’d like to record after
a one-measure count-off, quickly press the Record button twice in
Step 2 above.
To Play Back a Recording
1. Rewind the recorder back to the beginning—or
“top”—by pressing the Top button.
2. Press the Play button to begin playback.
Using the Other Recorder Controls
• If you’d like to stop playback before the end of the recording, press
the Stop button.
• To suspend playback, press the Pause button. To
resume, press Pause again, or press the Play
button.
Playing a Specific Portion of Your Recording
During playback, press the Set Start button at the
beginning of the section you want to hear, and the Set
End button at its end. When you next play the
recording, only the music between these two locations
will be heard. To listen to the recording from its
beginning or to its end, press the Stop button and
then click the Start or End button, respectively.
To Make a New Recording
To make a new recording, press the Top button to return to the
beginning of your recording, and then repeat the steps in “Making a
Recording” above. The new recording will replace the old one.
ENSONIQ Avista 7600 User’s Guide
Set Start button
Set End button
15
Page 22

To Change a Recording’s Tempo
During playback or when the recorder is stopped, you can alter the
tempo of a recording you’ve made by performing the following actions.
• To slow the tempo of a recording, press the left-hand Tempo button
repeatedly until the desired tempo is heard and/or displayed.
• To speed up the tempo of a recording, press the right-hand Tempo
button.
To Re-Orchestrate a Recording
You can re-orchestrate a recording at any time—during playback or
when the recorder is stopped—by selecting a new sound to play the
recorded MIDI data. To select one of the preset sounds, press one of the
eight sound buttons (described on Page 8). To pick a sound that’s not
assigned to a sound button, press any of the buttons and repeatedly
press the minus or plus button to select the desired sound.
Using the Avista Floppy Drive
The Avista’s built-in floppy disk drive allows you to store your
recordings on high-density (HD) 3.5” floppy disks. These disks can be
purchased at any computer supply outlet and many stationery stores.
Once saved to a floppy disk, you can re-load and play your recordings
at any time.
Tip: You can also use the Avista’s drive to load and play pre-recorded
GM songs in Standard MIDI File format.
The Disk Controls
Floppy-disk-related operations are accomplished by
pressing the same buttons used when operating the
recorder. When the Disk LED is lit, the buttons are
assigned to floppy-disk duty. To turn the LED on,
press the blue Disk-Rec/Play button.
The label above each button shows the button’s purpose when used for
disk operations.
Files Load Save Format Yes No
ENSONIQ Avista 7600 User’s Guide
Disk
Rec/Play
16
Page 23

The Floppy Drive
The Avista’s floppy drive is located on its rear panel to the left of its
connection jacks, when viewed from the back. The drive’s face provides
a slot into which a floppy can be inserted for use in the Avista.
Slot
Note: The floppy drive is a sensitive piece of electronic equipment and,
as such, should be treated with care. See “The Care and Feeding of the
Floppy Disk Drive” on Page 23.
Disk
Eject button
Slot
A disk is inserted into the drive—labelside up, with its shutter window to the
right—by sliding the floppy into the
drive’s slot until the drive grabs the disk
and seats it in the drive’s mechanism.
To remove a floppy from the drive, press
the drive’s Eject button, shown above.
Working with Floppy Disks
Write-Protection
Floppy disks can be write-protected to prevent you from accidentally
writing new disk files over already-saved files that you don’t want to
erase. Therefore, if you intend to save your recordings to a floppy, you
must make sure that the floppy is not write-protected prior to inserting
it into the drive for use. You can tell if a disk is write-protected by
turning it over—so that it’s label-side-down—and examining the small
window in its lower-right-hand corner.
If the tab is in the down
position and the write-
protect window is open,
the disk is write-protected.
It can only be read.
If the tab is in the up
position, the write-protect
window is closed, and the
disk is not write-protected.
It can be written to and
read.
Shutter
window
ENSONIQ Avista 7600 User’s Guide
17
Page 24

Formatting a Floppy Disk for Use
Before a floppy can be read or written to by the Avista, is data structure
must be formatted. The Avista uses a standard DOS format, so its disks
can be formatted in any computer that supports DOS formatting. In
addition, the Avista offers its own formatting utility. An un-formatted
disk only needs to be formatted the first time it’s used.
Warning: Formatting completely erases a floppy disk. Before formatting
a floppy, make sure that it contains no data that you want to keep.
To format a floppy in the Avista:
1. Make sure the disk is not write-protected.
2. Insert the floppy into the drive.
3. Press the blue Disk-Rec/Play button, if necessary, to ensure that the
Disk LED is lit.
4. Press the Format button.
Format
The display will show:
Format? (Y/N)
5. If you’re ready to proceed, press the Yes
Yes No
button. If you want to cancel the operation,
press the No button.
If you press the Yes button, the Avista will proceed to format the
floppy. The procedure takes a few moments—the Avista’s display
will tell you when formatting is complete.
Saving Your Recordings to Disk
To save a recording to disk:
1. Insert a formatted disk into the floppy drive.
2. If the Disk LED is not already lit, press the Disk-Rec/Play button.
3. Press the Save button.
Save
The display will show:
SONG_000.MID
ENSONIQ Avista 7600 User’s Guide
18
Page 25

“SONG_000.MID” is the default name for the first disk file to be
saved since powering up the Avista. As you save additional
recordings, the number in the default name will grow. You can
select your own eight-character name for the disk file, as described
below. If you’d like to use the default name, skip to Step 8.
Note: Each name is followed by “.MID,” the required file extension
for Standard MIDI Files, the type of file that the Avista uses.
Standard MIDI Files (SMFs) can be loaded from floppy into any
computer or external sequencer that supports Standard MIDI Files.
4. Note that the “S” in “SONG” is underlined. The underline shows
that you can change this character. Press the minus or plus button
repeatedly to select the desired first letter of the disk file’s name.
Each of the eight sound buttons beneath the display selects one of
the eight characters in your disk file’s name for editing.
5. Press the second sound button (Piano2)—notice how the underline
moved beneath the second character on the display to show that it
can now be edited.
6. Press the minus or plus button repeatedly to select the desired
second letter of the disk file’s name.
7. Repeat Steps 5 and 6 to select each of the characters required to
spell out your intended disk file’s name.
8. When you’ve finished naming your disk file—or if you skipped
here from Step 3—press the Yes button to finish saving your
recording to floppy. To cancel the operation, press the No button.
Updating and Over-Writing Disk Files
If a file already exists on the floppy with the name you’ve selected, the
display will show:
Overwrite? (Y/N)
If you press the Yes button, the Avista will replace the disk file with the
music currently in the recorder. If you’re updating an already-saved
recording and want to replace the old version, press the Yes button to
proceed. If you want to preserve the file already on disk, press the No
button and repeat the steps above to save the current recording with a
different name.
ENSONIQ Avista 7600 User’s Guide
19
Page 26

Loading Recordings from Disk
The Avista 7600 can load any SMF-format disk file—within the limits of
its available memory—from a floppy, whether it’s a recording made on
the Avista, or elsewhere. To load a disk file:
1. Insert the desired disk into the floppy drive.
2. If the Disk LED is not already lit, press the Disk-Rec/Play button.
3. Press the Load button.
Load
The display will show the name of the first SMF file it finds on the
floppy.
4. To view the names of other SMFs on
Files
the disk, repeatedly press the righthand File button. To move backward
in the list of files on the disk, press
the left-hand File button.
5. When the name of the file you wish to load is displayed, press the
Yes button to load the file into the recorder.
Warning: When you load a recording into the recorder, it replaces the
recording currently in the recorder’s memory. If you wish to preserve
this recording, save it to floppy before loading a new one.
Muting an SMF Recording’s Melody
You can silence any of the tracks—including the melody—in a loaded
SMF, allowing you to play or sing along.
To mute a melody track:
1. Select the melody track by
pressing the Channel button
repeatedly until the track’s
Channel
number is shown on the left side
of the display.
2. Press the minus button—a small “m” will appear in the display to
show that the track’s sound is muted.
3. To un-mute the melody, press the plus button.
ENSONIQ Avista 7600 User’s Guide
20
Page 27

The Avista 7600 and MIDI
The Avista 7600 can transmit MIDI data from its keyboard and foot
pedal(s), allowing you to use its keyboard to control an external MIDI
instrument, such as an external sound module or MIDI sequencer.
In addition, MIDI data that the Avista 7600 receives from an external
device can play its internal sounds.
Note: The transmission and/or reception of MIDI data is dependent on
the proper connection of MIDI cables. See Page 5.
Transmitting MIDI from the Avista 7600
MIDI data can travel from one instrument to another on any of 16
channels. The Avista can transmit data from its keyboard and foot
pedal(s) on any MIDI channel you desire.
To Select the Channel on Which the Avista Transmits MIDI Data
1. Press the Channel button. The display will show the
settings for the first MIDI channel, Channel 1.
1*Grand Piano
• The number at the left of the display shows the number of the MIDI
channel being viewed.
• The asterisk after the “1” shows that the Avista will transmit its
MIDI data on this channel.
• The sound currently assigned to the channel is shown to the right.
Channel
Tip: Use the sound or plus and minus buttons to select a sound to be
played by the Avista—as you select a sound, a Program Change value
corresponding to the sound’s number will be transmitted via MIDI.
To view the settings for the other 15 channels, repeatedly press the
Channel button—after Channel 16, the display will return to Channel 1.
To change the channel on which MIDI data will be transmitted, navigate
to the desired channel’s display as described above, and press the plus
button—an asterisk will appear next to the channel’s number.
Note: Only one channel may be selected at a time for the transmission of
MIDI data.
ENSONIQ Avista 7600 User’s Guide
21
Page 28

Receiving MIDI Data on the Avista 7600
The Avista can automatically receive MIDI data on any or all of the 16
MIDI channels at any time—no action is required on your part to
activate this feature. An external MIDI device can select the desired
sound for each channel and set its volume, stereo placement and so on.
The sound for each channel plays according to the MIDI instructions the
Avista receives. This feature allows you to use the Avista’s superior
sounds for the playing of General MIDI recordings from a computer or
other external sequencer.
You can, if you like, silence, or “mute,” the Avista’s sound on any of the
16 MIDI channels when it receives MIDI data from an external source.
Muting a MIDI Channel
To mute a MIDI channel:
1. Select the desired channel by pressing the
Channel button repeatedly until the
channel’s number is shown on the left
Channel
side of the display.
2. Press the minus button—a small “m” will appear in the display to
show that the channel’s sound is muted.
3. To un-mute the sound, press the plus button.
Viewing the Sounds Played on Each MIDI Channel
You can view the sound being played by each MIDI channel when the
Avista receives MIDI data. to do this:
1. Select the desired channel by pressing the
Channel button repeatedly until the channel’s
number is shown on the left side of the display.
Channel
The display will show the sound being played by the channel.
ENSONIQ Avista 7600 User’s Guide
22
Page 29

Proper Operation of the Avista 7600
Temperature Guidelines
The Avista 7600 contains a substantial amount of computerized and
electronic circuitry that can be susceptible to damage when exposed to
extreme temperature changes. When the Avista 7600 is brought inside
after sitting in a cold climate (i.e., the back seat of your car),
condensation builds up on the internal circuitry in much the same way
a pair of glasses fogs up when you come inside on a cold day. If the unit
is powered up as this condensation occurs, components can short out or
be damaged. Excessively high temperatures also pose a threat to the
unit, stressing both the internal circuits as well as the case. With this in
mind, it is highly advisable to follow these precautions when storing
and setting up your Avista 7600:
• Avoid leaving the Avista 7600 in temperatures of less than 50
degrees Fahrenheit or more than 100 degrees Fahrenheit.
• When bringing the Avista 7600 indoors after travel, allow the unit
at least 20 minutes to reach room temperature before powering up.
In the case of excessive outdoor temperatures (below 50 degrees
Fahrenheit or above 100 degrees Fahrenheit), allow an hour or more
before power up.
• Avoid leaving the Avista 7600 inside a vehicle exposed to direct
sunlight.
Care and Feeding of the Disk Drive
The Avista 7600’s disk drive is used to store sounds, rhythms, and
sequencer data. This disk drive will store your data on a high-density
(HD) 3.5" floppy disk.
HD floppies have two windows.
Floppy disks are a magnetic storage medium, and should be treated
with the same care you’d give important audio tapes. Just as you would
use high quality audio tapes for your important recording needs, we
recommend using high quality floppy disks for your Avista 7600. Here
are a few Do’s and Don’t’s concerning disks and the disk drive.
ENSONIQ Avista 7600 User’s Guide
23
Page 30

Do’s:
• Use high-density (HD) 3.5" disks.
• Keep your disks and the disk drive clean and free of dust, dirt,
liquids, etc.
• Label your disks and keep a record of what is saved on each.
Don’t’s:
• Don’t use single-sided (SD) disks. These disks have not passed
testing on both sides. While a single-sided disk might work with
the Avista 7600, it is possible that you will eventually lose
important data to a disk error if you try using single-sided disks.
• Don’t put anything other than a disk into the disk drive.
• Don’t transport the unit with a disk in the drive.
• Don’t expose disks to temperature extremes. Temperatures below
50˚ F and above 140˚ F can damage the plastic outer shell.
• Don’t expose your disks to moisture.
• Don’t subject disks to strong magnetic fields. Exposure to magnetic
energy can permanently damage the information on the disk. Keep
disks away from speaker cabinets, tape decks, power cables, airline
x-ray equipment, power amplifiers, TV sets, and any other sources
of magnetic energy.
• Don’t eject the disk while the drive is operating.
Clean-Up and Maintenance
Clean the exterior of your Avista 7600 with a soft, lint-free, dry (or
slightly damp) cloth. You can use a slightly dampened cloth (with a
mild neutral detergent) to remove stubborn dirt, but make sure that the
Avista 7600 is thoroughly dry before turning on the power. Never use
alcohol, benzene, volatile cleaners, solvents, abrasives, polish or rubbing
compounds.
Polarization and Grounding
Like many modern electrical devices, your ENSONIQ product has a
three-prong power cord with earth ground to ensure safe operation.
Some products have power cords with only two prongs and no earth
ground. To ensure safe operation, modern products with two-prong
power cords have polarized plugs which can only be inserted into an
outlet the proper way.
ENSONIQ Avista 7600 User’s Guide
24
Page 31

Some products do not have polarized plugs and can be connected to an
outlet incorrectly. This may result in dangerous high voltages on the
audio connections, which could cause you physical harm or damage
any properly grounded equipment to which they are connected.
Three-prong
PolarizedNon-polarized
with earth ground
We recommend observing the following precautions:
• If you own equipment with two-pronged power cords, check to see
if they are polarized or non-polarized. You might consider having
an authorized repair station change any non-polarized plugs on
your equipment to polarized plugs to avoid future problems.
• Exercise caution when using extension cords or plug adapters.
Proper polarization should always be maintained from the outlet to
the plug. The use of polarized extension cords and adapters is the
easiest way to maintain proper polarity.
• Whenever possible, connect all products with grounded power
cords to the same outlet ground. This will prevent equipment
damage and minimize hum in the audio output.
AC outlet testers are available from many electronic supply and
hardware stores. These can be used to check for proper polarity of
outlets and cords.
AC Line Conditioning
As with any computer device, the Avista 7600 is sensitive to sharp peaks
and drops in the AC line voltage. Lightning strikes, power drops, or
sudden and erratic surges in the AC line voltage can scramble the
internal memory, and in some cases, damage the unit’s hardware. Here
are a few suggestions to help guard against such occurrences:
• A surge/spike suppressor. A surge/spike suppresser absorbs
surges and protects your gear from all but the most severe overvoltage conditions. You can purchase multi-outlet power strips
with built-in surge/spike suppressers.
• A line conditioner. This is the best, although more expensive, way
to protect your gear. In addition to protecting against surges and
spikes, a line conditioner guards the equipment against excessively
high or low line voltages. If you use the Avista 7600 in lots of
different locations with varying or unknown AC line conditions,
you might consider investing in a line conditioner.
ENSONIQ Avista 7600 User’s Guide
25
Page 32

Avista 7600 User’s Guide
Part Number 9310023301-A
Model Number MM 171
 Loading...