

Page 1

Reference Manual
L
EADING THE WORLD IN SOUND INNOV A TION
TM
Page 2
READ THIS FIRST!
WARNING!!WARNING!!
Grounding Instructions
This product must be grounded. If it should malfunction or break down, grounding provides a path of
least resistance for electric current to reduce the risk of electric shock. This product is equipped with a
cord having an equipment-grounding conductor and a grounding plug. The plug must be plugged into an
appropriate outlet that is properly installed and grounded in accordance with all local codes and ordinances.
DANGER: Improper connection of the equipment-grounding conductor can result in the risk of electric
shock. Check with a qualified electrician or service personnel if you are in doubt as to whether the
product is properly grounded. Do not modify the plug provided with this product — if it will not fit the
outlet, have a proper outlet installed by a qualified electrician.
CAUTION
RISK OF ELECTRIC SHOCK
DO NOT OPEN
CAUTION : TO REDUCE THE DANGER OF ELECTRIC SHOCK
DO NOT REMOVE COVER (OR BACK)
NO USER SERVICEABLE PARTS INSIDE
REFER SERVICING TO QUALIFIED SERVICE PERSONNEL
This symbol is intended to alert the user to the
presence of uninsulated "dangerous voltage"
within the product's enclosure that may be of
sufficient magnitude to constitute a risk of electronic shock to persons.
This symbol is intended to alert the user to the
presence of important operating and maintenance (servicing) instructions in the literature
accompanying the appliance.
SEE IMPORTANT SAFETY INSTRUCTIONS ON BACK COVER!
Page 3

"INSTRUCTIONS PERTAINING TO A RISK OF FIRE,
ELECTRIC SHOCK, OR INJURY TO PERSONS"
IMPORTANT SAFETY INSTRUCTIONS
WARNING—When using electric products, basic precautions should always be followed, including
the following:
1. Read all the instructions before using the product.
2. Do not use this product near water - for example, near a bathtub, washbowl, kitchen sink , in a wet
basement, or near a swimming pool, or the like.
3. This product should be used only with a cart or stand that is recommended by the manufacturer.
4. This product, either alone or in combination with an amplifier and headphones or speakers, may be
capable of producing sound levels that could cause permanent hearing loss . Do not operate for a
long period of time at a high volume level or at a level that is uncomfortable. If you experience any
hearing loss or ringing in the ears, you should consult an audiologist.
5 . The product should be located so that its location or position does not interfere with its proper
ventilation.
6 . The product should be located away from heat sources such as radiators, heat registers, or other
products that produce heat.
7 . The product should be connected to a power supply only of the type described in the operating
instructions or as marked on the product.
8. This product may be equipped with a polarized line plug (one blade wider than the other). This is a
safety featu r e . If you are unable to insert the plug into the outlet, contact an electrician to replace
your obsolete outlet. Do not defeat the safety purpose of the plug.
9. The power supply cord of the product should be unplugged from the outlet when left unused for a
long period of time.
10. Care should be taken so that objects do not fall and liquids are not spilled into the enclosure through
openings.
11. The product should be serviced by qualified service personnel when:
a. The power supply cord or the plug has been damaged; or
b. Objects have fallen, or liquid has been spilled into the product; or
c. The product has been exposed to rain; or
d. The product does not appear to operate normally or exhibits a marked change in performance;
or
e. The product has been dropped, or the enclosure damaged.
12 . Do not attempt to service the product beyond that described in the user-maintenance instructions.
All other servicing should be referred to qualified service personnel.
SAVE THESE INSTRUCTIONS
Page 4

TM
RRRReeeeffffeeeerrrreeeennnncccceeee MMMMaaaannnnuuuuaaaall
VVVVeeeerrrrssssiiiioooonnnn 3333....000000
ll
00
Page 5

AAAASSSSRRRR----XXXX PPPPrrrroooo RRRReeeeffffeeeerrrreeeennnncccceeee MMMMaaaannnnuuuuaaaall
Written, designed, and illustrated by: Robby Berman
Thanks to: Jim Bryan
Please record the following information:
Your Authorized ENSONIQ Dealer:___________________________ Phone:_______________
Your Dealer Sales Representative:_________________________________________________
Serial Number of Unit:___________________________ Date of Purchase:_________________
Your Authorized ENSONIQ Dealer is your primary source for service and support. The above information will be
helpful in communicating with your Authorized ENSONIQ Dealer, and provide necessary information should you need
to contact ENSONIQ Customer Service. If you have any questions concerning the use of this unit, please contact your
Authorized ENSONIQ Dealer first. For additional technical support, or to find the name of the nearest Authorized
ENSONIQ Repair Station, call ENSONIQ Customer Service at (610) 647-3930 Monday through Friday 9:30 AM to 12:15
PM and 1:15 PM to 6:30 PM Eastern Time. Between 1:15 PM and 5:00 PM we experience our heaviest call load. During
these times, there may be delays in answering your call.
ll
Copyright © 1998
ENSONIQ¨ Corp
155 Great Valley Parkway
Box 3035
Malvern, PA 19355-0735
USA
World Wide WebÑhttp://www.ensoniq.com
Printed in U.S.A.
All Rights Reserved
This manual is copyrighted and all rights are reserved by ENSONIQ Corp. This document may not, in whole or in part,
be copied, photocopied, reproduced, translated, or reduced to any electronic medium or machine readable form without
prior written consent from ENSONIQ Corp. The ASR-X Pro software/firmware is copyrighted and all rights are
reserved by ENSONIQ Corp.
Although every effort has been made to ensure the accuracy of the text and illustrations in this manual, no guarantee is
made or implied in this regard.
IIIIMMMMPPPPOOOORRRRTTTTAAAANNNNTTTT::
Note: This equipment has been tested and found to comply with the limits for a Class B digital device, pursuant to part
15 of the FCC Rules. These limits are designed to provide reasonable protection against harmful interference in a
residential installation. This equipment generates, uses and can radiate radio frequency energy and, if not installed and
used in accordance with the instructions, may cause harmful interference to radio communications. However, there is no
guarantee that interference will not occur in a particular installation. If this equipment does cause harmful interference
to radio or television reception, which can be determined by turning the equipment off and on, the user is encouraged to
try to correct the interference by one or more of the following measures:
* Reorient or relocate the receiving antenna.
* Increase the separation between the equipment and receiver.
* Connect the equipment into an outlet on a circuit different from that to which the receiver is connected.
* Consult the dealer or an experienced radio/TV technician for help.
Changes or modifications to the product not expressly approved by ENSONIQ could void the user's FCC authority to
operate the equipment.
In order to fulfill warranty requirements, your ASR-X Pro should be serviced only by an Authorized ENSONIQ Repair
Station. The ENSONIQ serial number label must appear on the outside of the unit, or the ENSONIQ warranty is void.
ENSONIQ, ASR-X Pro, Scratch Pad, Patch Selects and SoundFinder are trademarks of ENSONIQ Corp.
::
PPPPaaaarrrrtttt NNNNuuuummmmbbbbeeeerrrr 999933331111 0000 0000222233332222 00001111----AA
AA
MMMMooooddddeeeellll NNNNuuuummmmbbbbeeeerrrr MMMMMMMM----1111777700
00
Page 6
TTTTeeeemmmmppppeeeerrrraaaattttuuuurrrreeee GGGGuuuuiiiiddddeeeelllliiiinnnneeeess
The ASR-X Pro contains a substantial amount of computerized and
electronic circuitry that can be susceptible to damage when exposed to
extreme temperature changes. When the ASR-X Pro is brought inside after
sitting in a cold climate (i.e., the back seat of your car), condensation builds
up on the internal circuitry in much the same way a pair of glasses fogs up
when you come inside on a cold day. If the unit is powered up as this
condensation occurs, components can short out or be damaged. Excessively
high temperatures also pose a threat to the unit, stressing both the internal
circuits as well as the case. With this in mind, it is highly advisable to follow
these precautions when storing and setting up your ASR-X Pro:
¥ Avoid leaving the ASR-X Pro in temperatures of less than 50 degrees
Fahrenheit or more than 100 degrees Fahrenheit.
¥ When bringing the ASR-X Pro indoors after travel, allow the unit at
least 20 minutes to reach room temperature before powering up. In
the case of excessive outdoor temperatures (below 50 degrees
Fahrenheit or above 100 degrees Fahrenheit), allow an hour or more
before power up.
¥ Avoid leaving the ASR-X Pro inside a vehicle exposed to direct
sunlight.
CCCCaaaarrrreeee aaaannnndddd FFFFeeeeeeeeddddiiiinnnngggg ooooffff tttthhhheeee DDDDiiiisssskkkk DDDDrrrriiiivvvvee
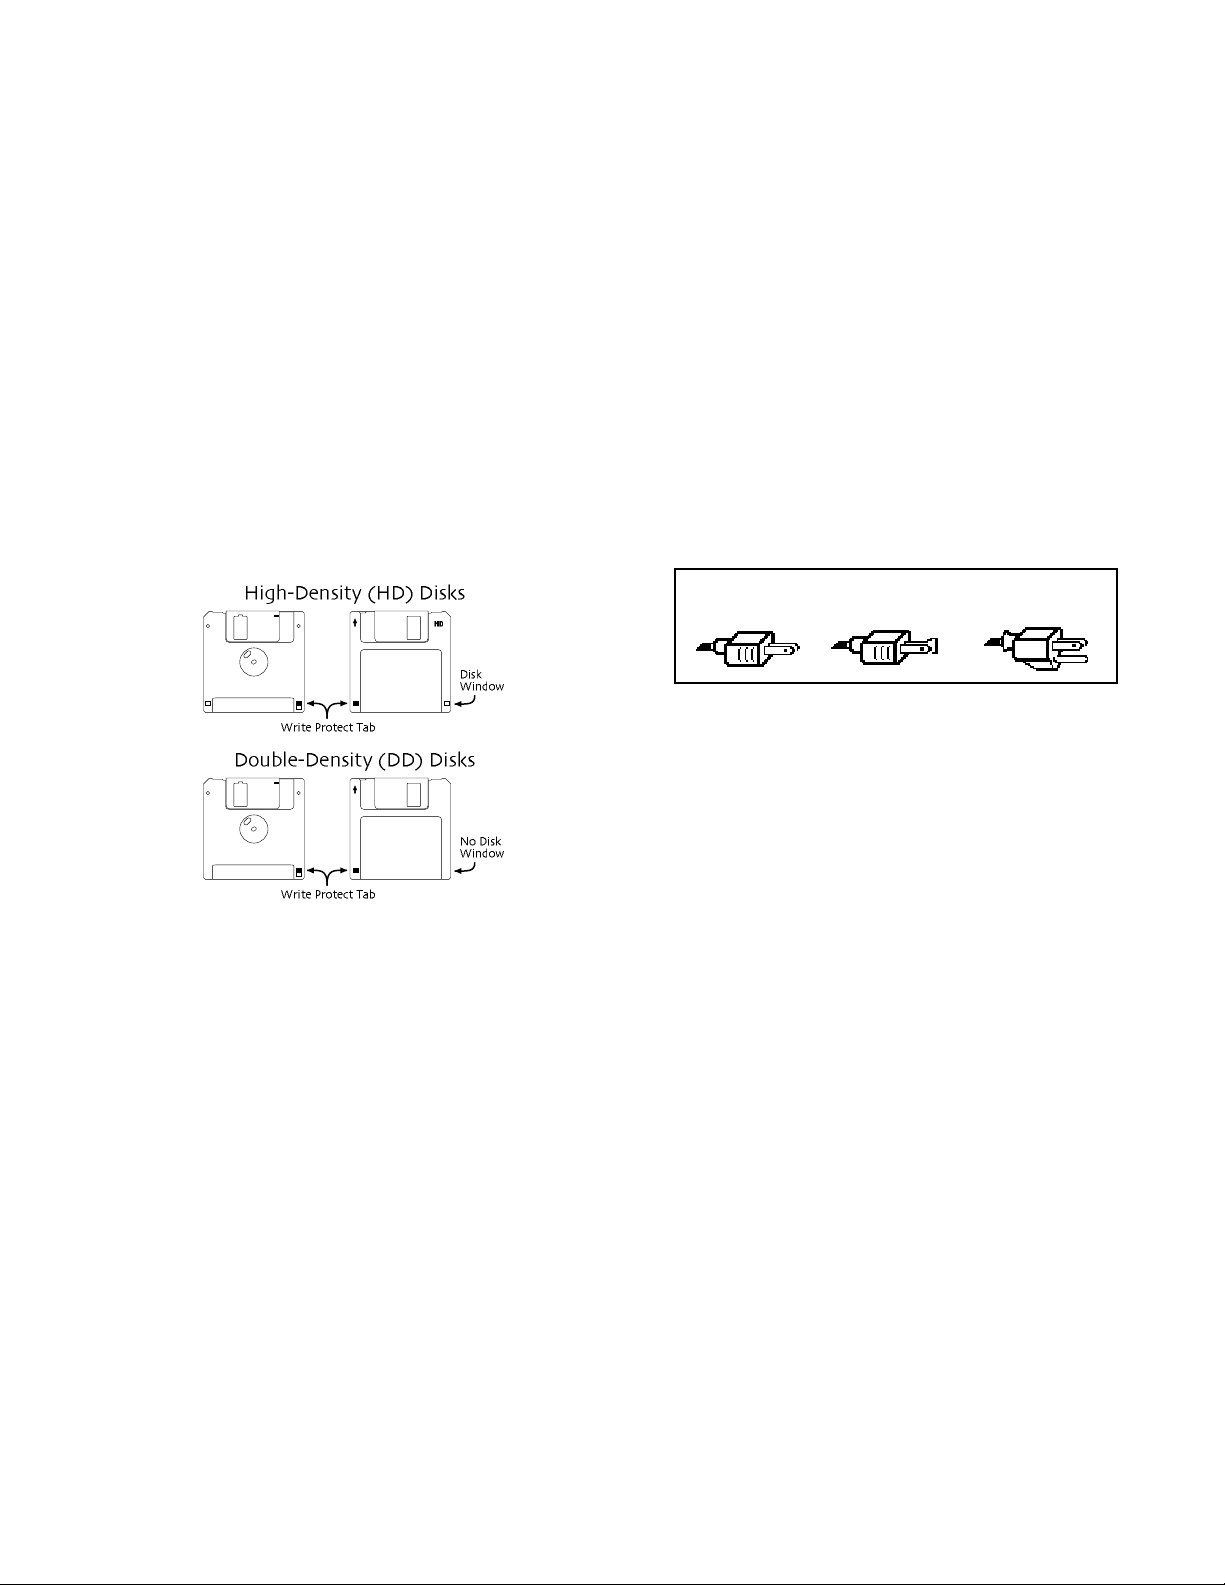
The ASR-X ProÕs disk drive is used to store sounds, rhythms, and sequencer
data. This quad-density disk drive will store your data on a high-density
(HD) 3.5Ó micro floppy disk. You can also store data on a DOS-formatted
double-density (DD) 3.5Ó micro floppy disk.
Disks have a sliding write-protection tab so that you can protect your data
against accidental erasure. When the write-protection tab covers the protect
window, you can store information on the disk. Sliding the tab so that the
window is open will protect the disk against being accidentally reformatted
or having files deleted. High density disks can be easily identified because
they have an additional disk window located on the lower right corner of
the disk.
Floppy disks are a magnetic storage medium, and should be treated with
the same care youÕd give important audio tapes. Just as you would use high
quality audio tapes for your important recording needs, we recommend
using high quality floppy disks for your ASR-X Pro. Here are a few DoÕs
and DonÕtÕs concerning disks and the disk drive.
::
DDDDooooÕÕÕÕssss::
¥ Use either high-density (HD) or double-density (DD) 3.5Ó disks. Both
types are available from most computer stores.
¥ Keep your disks and the disk drive clean and free of dust, dirt, liquids,
etc.
¥ Label your disks and keep a record of what is saved on each.
::
DDDDoooonnnnÕÕÕÕttttÕÕÕÕssss::
¥ DonÕt use single-sided (SD) disks. These disks have not passed testing
on both sides. While a single-sided disk might work with the ASR-X
Pro, it is possible that you will eventually lose important data to a
disk error if you try using single-sided disks.
¥ DonÕt put anything other than a disk into the disk drive.
¥ DonÕt transport the unit with a disk in the drive.
ss
ee
¥ DonÕt expose disks to temperature extremes. Temperatures below 50û
F and above 140û F can damage the plastic outer shell.
¥ DonÕt expose your disks to moisture.
¥ DonÕt dry your disks in a microwave oven.
¥ DonÕt subject disks to strong magnetic fields. Exposure to magnetic
energy can permanently damage the information on the disk. Keep
disks away from speaker cabinets, tape decks, power cables, airline x-
ray equipment, power amplifiers, TV sets, and any other sources of
magnetic energy.
¥ DonÕt eject the disk while the drive is operating (i.e., when the disk
drive light is on).
CCCClllleeeeaaaannnn UUUUpppp aaaannnndddd MMMMaaaaiiiinnnntttteeeennnnaaaannnnccccee
Clean the exterior of your ASR-X Pro with a soft, lint-free, dry (or slightly
damp) cloth. You can use a slightly dampened cloth (with a mild neutral
detergent) to remove stubborn dirt, but make sure that the ASR-X Pro is
thoroughly dry before turning on the power. Never use alcohol, benzene,
volatile cleaners, solvents, abrasives, polish or rubbing compounds.
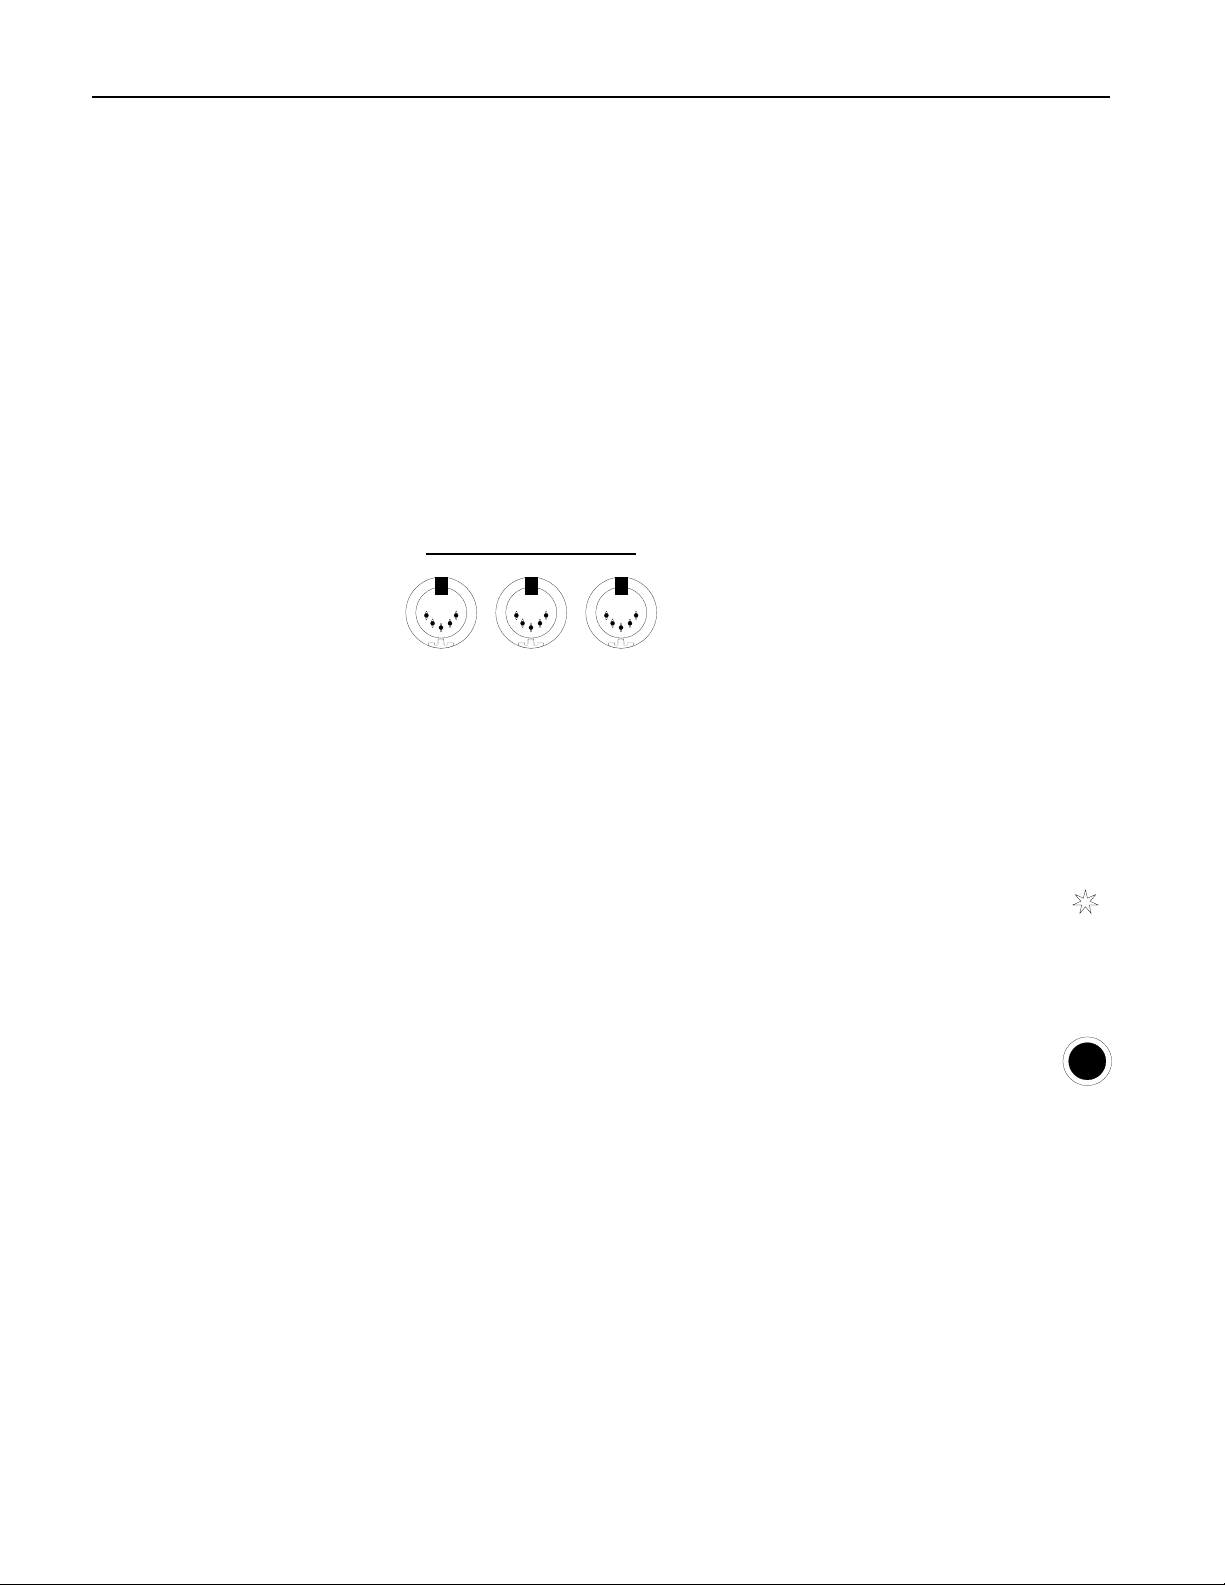
PPPPoooollllaaaarrrriiiizzzzaaaattttiiiioooonnnn aaaannnndddd GGGGrrrroooouuuunnnnddddiiiinnnngg
Like many modern electrical devices, your ENSONIQ product has a threeprong power cord with earth ground to ensure safe operation. Some
products have power cords with only two prongs and no earth ground. To
ensure safe operation, modern products with two-prong power cords have
polarized plugs which can only be inserted into an outlet the proper way.
ee
gg
Three-prong
PolarizedNon-polarized
Some products, such as older guitar amplifiers, do not have polarized plugs
and can be connected to an outlet incorrectly. This may result in dangerous
high voltages on the audio connections, which could cause you physical
harm or damage any properly grounded equipment to which they are
connected, such as your ENSONIQ product.
To avoid shock hazards or equipment damage, we recommend the
following precautions:
¥ If you own equipment with two-pronged power cords, check to see if
they are polarized or non-polarized. You might consider having an
authorized repair station change any non-polarized plugs on your
equipment to polarized plugs to avoid future problems.
¥ Exercise caution when using extension cords or plug adapters. Proper
polarization should always be maintained from the outlet to the plug.
The use of polarized extension cords and adapters is the easiest way
to maintain proper polarity.
¥ Whenever possible, connect all products with grounded power cords
to the same outlet ground. This will ensure a common ground level to
prevent equipment damage and minimize hum in the audio output.
AC outlet testers are available from many electronic supply and hardware
stores. These can be used to check for proper polarity of outlets and cords.
AAAACCCC LLLLiiiinnnneeee CCCCoooonnnnddddiiiittttiiiioooonnnniiiinnnngg
As with any computer device, the ASR-X Pro is sensitive to sharp peaks and
drops in the AC line voltage. Lightning strikes, power drops, or sudden and
erratic surges in the AC line voltage can scramble the internal memory, and
in some cases, damage the unitÕs hardware. Here are a few suggestions to
help guard against such occurrences:
¥ A surge/spike suppressor. A surge/spike suppresser absorbs surges
and protects your gear from all but the most severe over-voltage
conditions. You can get multi-outlet power strips with built-in
surge/spike suppressers for little more than the cost of unprotected
power strips, so using one is a good investment for all your electronic
equipment.
¥ A line conditioner. This is the best, but by far the more expensive way
to protect your gear. In addition to protecting against surges and
spikes, a line conditioner guards the equipment against excessively
high or low line voltages. If you use the ASR-X Pro in lots of different
locations with varying or unknown AC line conditions, you might
consider investing in a line conditioner.
gg
with earth ground
Page 7

Table of Contents
TTTTaaaabbbblllleeee ooooffff CCCCoooonnnntttteeeennnnttttss
1111WWWWeeeellllccccoooommmmeeee 11
The ASR-X Pro Experience Begins........................................................................................................................................1
What Else is in the Box?..................................................................................................................................................1
Setting Up the ASR-X Pro........................................................................................................................................................1
Using the Audio Outputs................................................................................................................................................1
Setting the Output Volume............................................................................................................................................2
The Audio Inputs .............................................................................................................................................................2
Making MIDI Connections..............................................................................................................................................2
Using a Foot Switch with the ASR-X Pro .....................................................................................................................2
Powering the ASR-X Pro ................................................................................................................................................2
The ASR-X Pro Controls..........................................................................................................................................................3
The ASR-X Pro Display...................................................................................................................................................3
The Knobs.........................................................................................................................................................................3
The Exit/No and Enter/Yes Buttons and Their LEDs................................................................................................3
Playing the Demo.....................................................................................................................................................................4
Important ASR-X Pro Concepts.............................................................................................................................................4
Architecture Overview...................................................................................................................................................4
About Note, Tips and Warnings in the ASR-X Pro Documentation................................................................................6
Optional Accessories for the ASR-X Pro ..............................................................................................................................6
2222TTTTrrrraaaacccckkkkssss 77
Introduction to Tracks..............................................................................................................................................................7
To Select One of the Tracks in the Currently Selected Sequence..................................................................................7
Selecting a Sound for a Track................................................................................................................................................7
Selecting a TrackÕs Sound Using the Sound Type and Sound Name Knobs.......................................................8
Selecting a TrackÕs Sound Using the Essentials Buttons..........................................................................................9
Selecting and Playing a TrackÕs Sound Via MIDI........................................................................................................10
Selecting and Programming a MIDI-OUT Sound......................................................................................................10
Quickly Erasing a Track Sound.....................................................................................................................................11
Editing Track Parameters........................................................................................................................................................11
What Each Track Parameter Does...............................................................................................................................12
Muting and Soloing a Track ....................................................................................................................................................19
Muting and Soloing from the Front Panel...................................................................................................................19
Muting Tracks via MIDI ...................................................................................................................................................19
3333PPPPaaaaddddssss 222211
The Pads:Overview..................................................................................................................................................................21
What are the Pads?.........................................................................................................................................................21
What the Pads Play..........................................................................................................................................................22
Octave Transpose Buttons............................................................................................................................................23
Patch Select Buttons .......................................................................................................................................................23
11
You Are Here...........................................................................................................................................................5
WhatÕs Where .........................................................................................................................................................5
The All Notes Off Button........................................................................................................................................6
77
Banks and Sounds..................................................................................................................................................8
SoundFinder............................................................................................................................................................8
Programming the Essentials Buttons..................................................................................................................9
Overrides and Offsets............................................................................................................................................11
Editing Track Parameters Via MIDI......................................................................................................................12
11
Standard Sounds ....................................................................................................................................................22
Kit Sounds ................................................................................................................................................................22
The Kit Mapper .......................................................................................................................................................23
Patch Selects and MIDI..........................................................................................................................................24
ss
ENSONIQ ASR-X Pro Reference Manual i
Page 8

Table of Contents
Programming the Pads...........................................................................................................................................................24
Choosing a PadÕs Sound.........................................................................................................................................................25
Overview of the Pad Edit Parameters..................................................................................................................................25
Determining a PadÕs Behavior ..............................................................................................................................................26
Editing a PadÕs Sound..............................................................................................................................................................27
Processing a SoundÕs Wave...................................................................................................................................................36
Stomp!........................................................................................................................................................................................39
4444EEEEffffffffeeeeccccttttssss 444411
Overview of the ASR-X Pro Effects.......................................................................................................................................41
Selecting and Editing a Sequence's Effects........................................................................................................................43
Setting a Sequence's Insert Control Track..........................................................................................................................46
Bypassing a Sequence's Effects............................................................................................................................................46
LFO Wave Shapes....................................................................................................................................................................47
Distortion Curves .....................................................................................................................................................................47
5555SSSSaaaammmmpppplllliiiinnnngggg////RRRReeeessssaaaammmmpppplllliiiinnnngggg 444499
Overview...................................................................................................................................................................................49
Overview..........................................................................................................................................................................24
To Prepare the Selected TrackÕs Sound for Pad Editing................................................................................24
Selecting a Pad for Editing....................................................................................................................................25
PAD Parameters..............................................................................................................................................................26
The ASR-X Pro Modulators ...........................................................................................................................................27
WAVE Parameters ..........................................................................................................................................................29
PTCH Parameters...........................................................................................................................................................30
ENV1 Parameters ...........................................................................................................................................................31
FILT Parameters..............................................................................................................................................................32
FLT1 and FILT2 Parameters .........................................................................................................................................33
ENV2 Parameters ...........................................................................................................................................................33
AMP Parameters .............................................................................................................................................................33
ENV3 Parameters ...........................................................................................................................................................34
MOD Parameters............................................................................................................................................................34
MISC Parameters ............................................................................................................................................................35
The Pad Process Display............................................................................................................................................... 36
The Pad Processes .........................................................................................................................................................36
Normalize gain? .....................................................................................................................................................36
Scale loudness?......................................................................................................................................................36
Reduce sample bits?............................................................................................................................................. 37
Invert sample data?...............................................................................................................................................37
Truncate length?.................................................................................................................................................... 38
Copy sound?...........................................................................................................................................................38
Scale time?..............................................................................................................................................................38
Sound Type...................................................................................................................................................................... 39
Oscillator #......................................................................................................................................................................39
Mode..................................................................................................................................................................................39
Oscillator Mode Stomper Parameters........................................................................................................................40
Filter Mode Stomper Parameters ................................................................................................................................40
11
Insert Effects.....................................................................................................................................................................41
The Insert Control Track....................................................................................................................................... 41
Global Reverb.................................................................................................................................................................. 42
FX Busses: How Sounds are Sent to the Effects........................................................................................................42
To Select an Effect...........................................................................................................................................................43
To Edit an Effect...............................................................................................................................................................43
Insert Effect and Global Reverb Context Parameters .....................................................................................44
Insert Effect Real-Time Modulation Parameters..............................................................................................44
99
What is Sampling? ..........................................................................................................................................................49
What is Resampling?............................................................................................................................................. 49
What Happens When You Create a Wave.................................................................................................................49
What can be Sampled in the ASR-X Pro.....................................................................................................................49
Using the ASR-X Pro Audio Inputs...............................................................................................................................50
ii ENSONIQ ASR-X Pro Reference Manual
Page 9

Resampling Setup ....................................................................................................................................................................50
Source................................................................................................................................................................................50
In Bus.........................................................................................................................................................................51
Recording Mode ..............................................................................................................................................................51
Auto-Normalize...............................................................................................................................................................51
Record Time.....................................................................................................................................................................51
Pre-Trigger Time.............................................................................................................................................................52
Trig Mode..........................................................................................................................................................................52
Setting the Trigger Threshold........................................................................................................................................52
Sampling/Resampling a Wave..............................................................................................................................................53
How to Start and Stop Sampling a Wave ....................................................................................................................53
Sending a Wave to Pads..........................................................................................................................................................53
What Happens When You Send a Wave to a Pad or Pads?....................................................................................54
Automatically Spreading a Wave Across all of a KitÕs Pads............................................................................55
6666SSSSeeeeqqqquuuueeeennnncccciiiinnnngggg 555577
Overview....................................................................................................................................................................................57
How the ASR-X Pro Sequencer Works .......................................................................................................................57
What is a Sequence? ......................................................................................................................................................57
Operating the Sequencer.......................................................................................................................................................58
The Sequence Select Button..................................................................................................................................................59
Creating a New Sequence.............................................................................................................................................60
Selecting Sequences ......................................................................................................................................................60
The Sequence Edit Button......................................................................................................................................................60
Tempo...............................................................................................................................................................................60
RecordMode.....................................................................................................................................................................61
Step Recording........................................................................................................................................................61
Recording Track Parameter Changes................................................................................................................63
Recording Sequence Volume and Tempo Changes......................................................................................63
Loop Playback..................................................................................................................................................................64
Time Signature.................................................................................................................................................................64
Using Regions...................................................................................................................................................................64
RecordQuantize...............................................................................................................................................................65
Edit Click/Countoff?........................................................................................................................................................65
The Sequence Process Button..............................................................................................................................................67
Undo track ?......................................................................................................................................................................67
Quantize track?................................................................................................................................................................67
Copy track?.......................................................................................................................................................................72
Erase track? ......................................................................................................................................................................74
Erase trk to end?..............................................................................................................................................................74
Rename sequence?........................................................................................................................................................75
Append sequence? ........................................................................................................................................................75
Copy this sequence?......................................................................................................................................................75
Erase this sequence?......................................................................................................................................................76
Erase all sequences?......................................................................................................................................................76
Enter pattern mode?.......................................................................................................................................................76
Create a new song? ........................................................................................................................................................77
Playing a Song.........................................................................................................................................................77
Exiting and Re-Entering Song Mode...................................................................................................................77
Editing a Song..........................................................................................................................................................77
Adding a Step to the End of a Song .....................................................................................................................78
Inserting and Erasing Song Steps ........................................................................................................................78
The ASR-X Pro Sequencer and MIDI....................................................................................................................................79
7777DDDDiiiisssskkkk////GGGGlllloooobbbbaaaallll 888811
The Disk/Global Controls.......................................................................................................................................................81
Storage Options...............................................................................................................................................................81
Introduction to Floppy Disk Storage .....................................................................................................................................81
The Floppy Disk Drive....................................................................................................................................................81
Introduction to SCSI Storage...................................................................................................................................................82
What is SCSI?....................................................................................................................................................................82
77
11
Table of Contents
ENSONIQ ASR-X Pro Reference Manual iii
Page 10

Table of Contents
The Disk Buttons......................................................................................................................................................................86
The System/MIDI Button........................................................................................................................................................92
About SCSI Device IDs ...................................................................................................................................................83
About Termination .........................................................................................................................................................84
Folders/Directories ........................................................................................................................................................85
Invisible Folders......................................................................................................................................................85
Preparing for SCSI...........................................................................................................................................................85
Attaching SCSI Cables...........................................................................................................................................85
Powering Up SCSI Devices ...........................................................................................................................................85
Troubleshooting Your SCSI System ............................................................................................................................86
SMDI Transfers ................................................................................................................................................................86
SCSI Device Selection and Navigation........................................................................................................................86
Select Device?........................................................................................................................................................ 87
Scan SCSI Devices?...............................................................................................................................................87
Folder Navigation................................................................................................................................................... 87
Creating a New Folder Using the ASR-X Pro....................................................................................................88
Creating a New Folder Using a Computer........................................................................................................88
The Save Button.............................................................................................................................................................. 88
File Types that can be Saved...............................................................................................................................89
Saving the Contents of the Scratch Pad to Disk ...............................................................................................90
Naming Disk Files...................................................................................................................................................90
The Load Button..............................................................................................................................................................90
File Types that can be Loaded.............................................................................................................................90
A Note About Imported ASR-10 and ASR-88 Sounds ...................................................................................91
Selecting an Individual File to be Loaded..........................................................................................................92
Selecting a Location into which a Sound will be Loaded..............................................................................92
Set system prefs?............................................................................................................................................................ 93
Touch Curve...........................................................................................................................................................93
Patch Selects........................................................................................................................................................... 93
FtSw L and FtSw R (...............................................................................................................................................93
AutoSelect FXBus...................................................................................................................................................94
Track ParamReset..................................................................................................................................................95
Auto-Zero Cross.....................................................................................................................................................95
SCSI Device ID ........................................................................................................................................................95
SCSI Termination ...................................................................................................................................................95
Alter system pitch?.........................................................................................................................................................95
The System Pitch Bend Setup.............................................................................................................................95
Fine Tuning .............................................................................................................................................................96
PitchTbl....................................................................................................................................................................96
Edit MIDI settings?........................................................................................................................................................... 96
Local-Off Operation of the ASR-X Pro................................................................................................................96
ClockSource............................................................................................................................................................97
Xmit MIDI Clocks ....................................................................................................................................................97
Bank&ProgChgRecv..............................................................................................................................................97
ResetControlRecv..................................................................................................................................................97
AllNotesOff Recv ....................................................................................................................................................97
SysEx Device ID...................................................................................................................................................... 97
CTRL1, CTRL2, CTRL3 and CTRL4..................................................................................................................... 97
Access disks utils?...........................................................................................................................................................98
Format disk?............................................................................................................................................................98
Copy [disk name] disk?........................................................................................................................................98
Optimize [disk name] disk?Ó...............................................................................................................................99
A Note About the SCSI Copy and Optimize Utilities........................................................................................ 99
Reset SCSI bus?...................................................................................................................................................... 99
Write-Protect ..........................................................................................................................................................100
Erase disk files?.......................................................................................................................................................100
Rename disk files?.................................................................................................................................................100
Directory Sorted.....................................................................................................................................................101
Free........................................................................................................................................................................... 101
iv ENSONIQ ASR-X Pro Reference Manual
Page 11

Enter MemoryManager?................................................................................................................................................101
Show free memory?..............................................................................................................................................101
Erase memory banks? ..........................................................................................................................................101
Erase sound?...........................................................................................................................................................101
Rename sound? .....................................................................................................................................................101
Change sound type?..............................................................................................................................................102
Exp Name.................................................................................................................................................................102
Save these settings?........................................................................................................................................................102
8888EEEExxxxppppaaaannnnddddiiiinnnngggg tttthhhheeee AAAASSSSRRRR----XXXX PPPPrrrroooo 1111000033
Overview....................................................................................................................................................................................103
An Important Note About Electro Static Discharge............................................................................................................103
Opening the ASR-X Pro...........................................................................................................................................................103
Installing Additional Sampling/Resampling Memory........................................................................................................104
Installing an ENSONIQ EXP-Series Wave Expansion Board.............................................................................................106
Updating the ASR-X Pro Operating System ........................................................................................................................108
9999SSSSuuuupppppppplllleeeemmmmeeeennnnttttaaaallll IIIInnnnffffoooorrrrmmmmaaaattttiiiioooonnnn 1111111111
List of ROM Waves....................................................................................................................................................................111
List of SoundFinder Categories..............................................................................................................................................112
Drum and Percussion Maps...................................................................................................................................................113
ENSONIQ Drum Map......................................................................................................................................................113
ENSONIQ Percussion Map ............................................................................................................................................113
GM Kit Map........................................................................................................................................................................114
List of Quantize Templates.....................................................................................................................................................115
What Is MIDI?.............................................................................................................................................................................115
Life In The MIDI World ....................................................................................................................................................115
Understanding MIDI........................................................................................................................................................116
MIDI Hardware........................................................................................................................................................116
How MIDI Channels Work .............................................................................................................................................116
How MIDI Messages Work.............................................................................................................................................117
The Art of MIDI..................................................................................................................................................................117
List of MIDI Controller Names.................................................................................................................................................118
ASR-X Pro MIDI Implementation...........................................................................................................................................119
MIDI Implementation Chart...........................................................................................................................................119
MIDI Controllers Reception Behavior..........................................................................................................................120
Reset All Controllers Reception Behavior...................................................................................................................120
Track ParamReset Behavior..........................................................................................................................................121
Using RPNs and NRPNs to Edit Parameters ...............................................................................................................122
Registered Parameters..........................................................................................................................................122
Non-Registered Parameters................................................................................................................................123
List of NRPNs............................................................................................................................................................123
Pitch Tables and the MIDI Tuning Standard Format.................................................................................................124
List of ROM Pitch Tables.................................................................................................................................................124
xx
IIIInnnnddddeeeexx
33
11
Table of Contents
127
ENSONIQ ASR-X Pro Reference Manual v
Page 12

1ÑWelcome
11
11
TTTThhhheeee AAAASSSSRRRR----XXXX PPPPrrrroooo EEEExxxxppppeeeerrrriiiieeeennnncccceeee BBBBeeeeggggiiiinnnnss
SSSSeeeettttttttiiiinnnngggg UUUUpppp tttthhhheeee AAAASSSSRRRR----XXXX PPPPrrrroo
WWeeeellllccccoooo
WW
ee
mmmmee
ss
Congratulations on your purchase of the ENSONIQ ASR-X Pro Advanced Sampler/Resampler. This box
is the ultimate groove machineÑideal for deejays and musicians who enjoy grabbing sounds out of the
air and turning them into mind-boggling loops.
This bookÑthe ASR-X Pro Reference ManualÑcontains detailed information on all of the ASR-X ProÕs
many features. If youÕd like to start getting to know your ASR-X Pro through a hands-on tour of its hot
spots, take a look at the ASR-X Pro UserÕs Guide, which contains step-by-step quick-starts for the major
features of the ASR-X Pro, a list of all of its built-in sounds and descriptions of its insert effect parameters.
For the latest information on the ASR-X Pro and other ENSONIQ products, visit ENSONIQÕs World Wide
Web site at http://www.ensoniq.com.
WWWWhhhhaaaatttt EEEEllllsssseeee iiiissss iiiinnnn tttthhhheeee AAAASSSSRRRR----XXXX PPPPrrrroooo BBBBooooxxxx??
The following items are included with every ASR-X Pro shipped from the ENSONIQ factory:
¥ ENSONIQ X-Audio Sampling CD ¥ ENSONIQ ASR-X Pro UserÕs Guide
Volume 1ÑProducersÕ Mix ¥ ENSONIQ ASR-X Pro Reference Manual
¥ hex wrench ¥ AC power cable
??
oo
UUUUssssiiiinnnngggg tttthhhheeee AAAAuuuuddddiiiioooo OOOOuuuuttttppppuuuuttttss
As shipped from ENSONIQ, the ASR-X Pro provides two ways to listen to the sounds it makes:
¥ You can listen to the ASR-X Pro using headphones by plugging your headphones into the 1/4Ó
Phones jack on the ASR-X Pro rear panel.
¥ Using 1/4Ó audio cables, you can connect the Left and Right Main Outs to a mixer or amplifier. The
ASR-X Pro outputs produce a great-sounding stereo image. If youÕd prefer to use the ASR-X Pro in
mono, connect only the Left or Right Main Out jack to your mixer or amplifier, and make sure
nothing is plugged into the other Main Out jack.
WWWWaaaarrrrnnnniiiinnnngggg:::: You can use 1/4Ó to RCA-type adapters to connect the ASR-X Pro outputs to a home
stereo, but do so with care, since the dynamic range of the ASR-X Pro is much greater than that of
a CD or record, and could damage your speakers. See ÒSetting the Output volumeÓ below.
AAAAuuuuxxxx OOOOuuuutttt 1111,,,, AAAAuuuuxxxx OOOOuuuutttt 2222,,,, AAAAuuuuxxxx OOOOuuuutttt 3333,,,, AAAAuuuuxxxx OOOOuuuutttt 44
These four pairs of stereo outputs become available for use with the purchase and installation of an
ENSONIQ X-8 output expander board. You can connect them to a mixer, amplifier or stereo system.
ss
Main Out
Right
Mono Mono
Left
Phones
44
ENSONIQ ASR-X Pro Reference Manual 1
Page 13
1ÑWelcome
SSSSeeeettttttttiiiinnnngggg tttthhhheeee OOOOuuuuttttppppuuuutttt VVVVoooolllluuuummmmee
The ASR-X Pro, like all digital equipment, produces its best fidelity when its front panel Volume knob is
turned all the way upÑwhen using the ASR-X Pro with a mixer or amplifier, use the input level controls
on the mixer or amplifier to find a usable volume setting for the ASR-X Pro. When the ASR-X Pro is
connected to a home stereo, turn the ASR-X Pro Volume knob all the way down, power up (see below),
and, while playing its pads with maximum force, slowly turn up the ASR-X Pro Volume knob to find a
level that sounds good but doesnÕt cause the stereoÕs inputs to distort.
TTTThhhheeee AAAAuuuuddddiiiioooo IIIInnnnppppuuuuttttss
The two Audio Input jacks on the rear panel of the ASR-X Pro allow you to sample audio from a
microphone or line-level audio sourceÑsuch as a CD player or phonographÑconnected to your ASR-X
Pro. The use of the Audio Inputs is described in Chapter 5.
ss
MMMMaaaakkkkiiiinnnngggg MMMMIIIIDDDDIIII CCCCoooonnnnnnnneeeeccccttttiiiioooonnnnss
The ASR-X Pro has powerful MIDI capabilities. The rear panel MIDI jacks are:
¥ MIDI ThruÑThis jack is used when the ASR-X Pro is part of a MIDI daisy-chain, with multiple MIDI
devices connected in a row. Any MIDI data that the ASR-X Pro receives will be passed along from
this jack to the MIDI In of the next device in the series.
¥ MIDI OutÑThe ASR-X Pro sends MIDI data out of this jack. Since the ASR-X Pro can play external
MIDI sounds from its pads or sequencer tracks, or provide a timing reference for an external
sequencer, connect this jack to the MIDI In of a MIDI sound module, sequencer, or MIDI patchbay.
¥ MIDI InÑThe ASR-X Pro responds to MIDI data sent through a MIDI cable connecting this
jack to the MIDI Out of an external MIDI controller, sequencer, storage device or MIDI
patchbay. When the ASR-X Pro is receiving MIDI data, its front-panel MIDI LED flashes.
ee
ss
MIDI
InOutThru
MIDI
UUUUssssiiiinnnngggg aaaa FFFFooooooootttt SSSSwwwwiiiittttcccchhhh wwwwiiiitttthhhh tttthhhheeee AAAASSSSRRRR----XXXX PPPPrrrroo
Connecting a foot switch to the ASR-X ProÕs rear-panel Dual Foot Switch jack allows you to
use a foot switch for conventional purposesÑas a sustain pedal, for exampleÑor for
performing certain operations hands-free. Chapter 7 describes the many possible uses of a foot
switch with the ASR-X Pro. The ASR-X Pro can accommodate a dual foot switchÑsuch as
ENSONIQÕs SW-10Ñor a single foot switch, such as ENSONIQÕs SW-2 or SW-6.
CCCCoooonnnnnnnneeeeccccttttiiiinnnngggg SSSSCCCCSSSSIIII DDDDeeeevvvviiiicccceeeess
To learn how to connect SCSI devices to your ASR-X Pro, see Chapter 8.
PPPPoooowwwweeeerrrriiiinnnngggg tttthhhheeee AAAASSSSRRRR----XXXX PPPPrrrroo
Connect one end of the supplied AC cable to the ASR-X ProÕs line jackÑlocated next to the On/Off
switch on the rear panelÑand the other end to a grounded AC outlet. The ASR-X Pro works with all
standard voltages.
TTTTuuuurrrrnnnniiiinnnngggg OOOOnnnn tttthhhheeee AAAASSSSRRRR----XXXX PPPPrrrroo
When powering up the ASR-X Pro, as with any audio gear, turn down your monitoring system to avoid
any unwanted level spikes. To turn on the ASR-X Pro, press in the top of the rear-panel On switch.
2 ENSONIQ ASR-X Pro Reference Manual
ss
oo
oo
oo
Dual
Foot Switch
(Sustain)
Page 14
1ÑWelcome
TTTThhhheeee AAAASSSSRRRR----XXXX PPPPrrrroooo CCCCoooonnnnttttrrrroooollllss
Each section of the ASR-X Pro provides buttons for its related tasks. In addition, there are a set of
common controls and indicators that youÕll find yourself using again and again.
Sound
Type
yy
TTTThhhheeee AAAASSSSRRRR----XXXX PPPPrrrroooo DDDDiiiissssppppllllaaaayy
The display located in the center of the ASR-X Pro front panel is your doorway to all of the ASR-X ProÕs
workings. Information relating to everything you do is presented on this display. Each chapter in this
manual describes what youÕll see while using your ASR-X ProÑand what it all means.
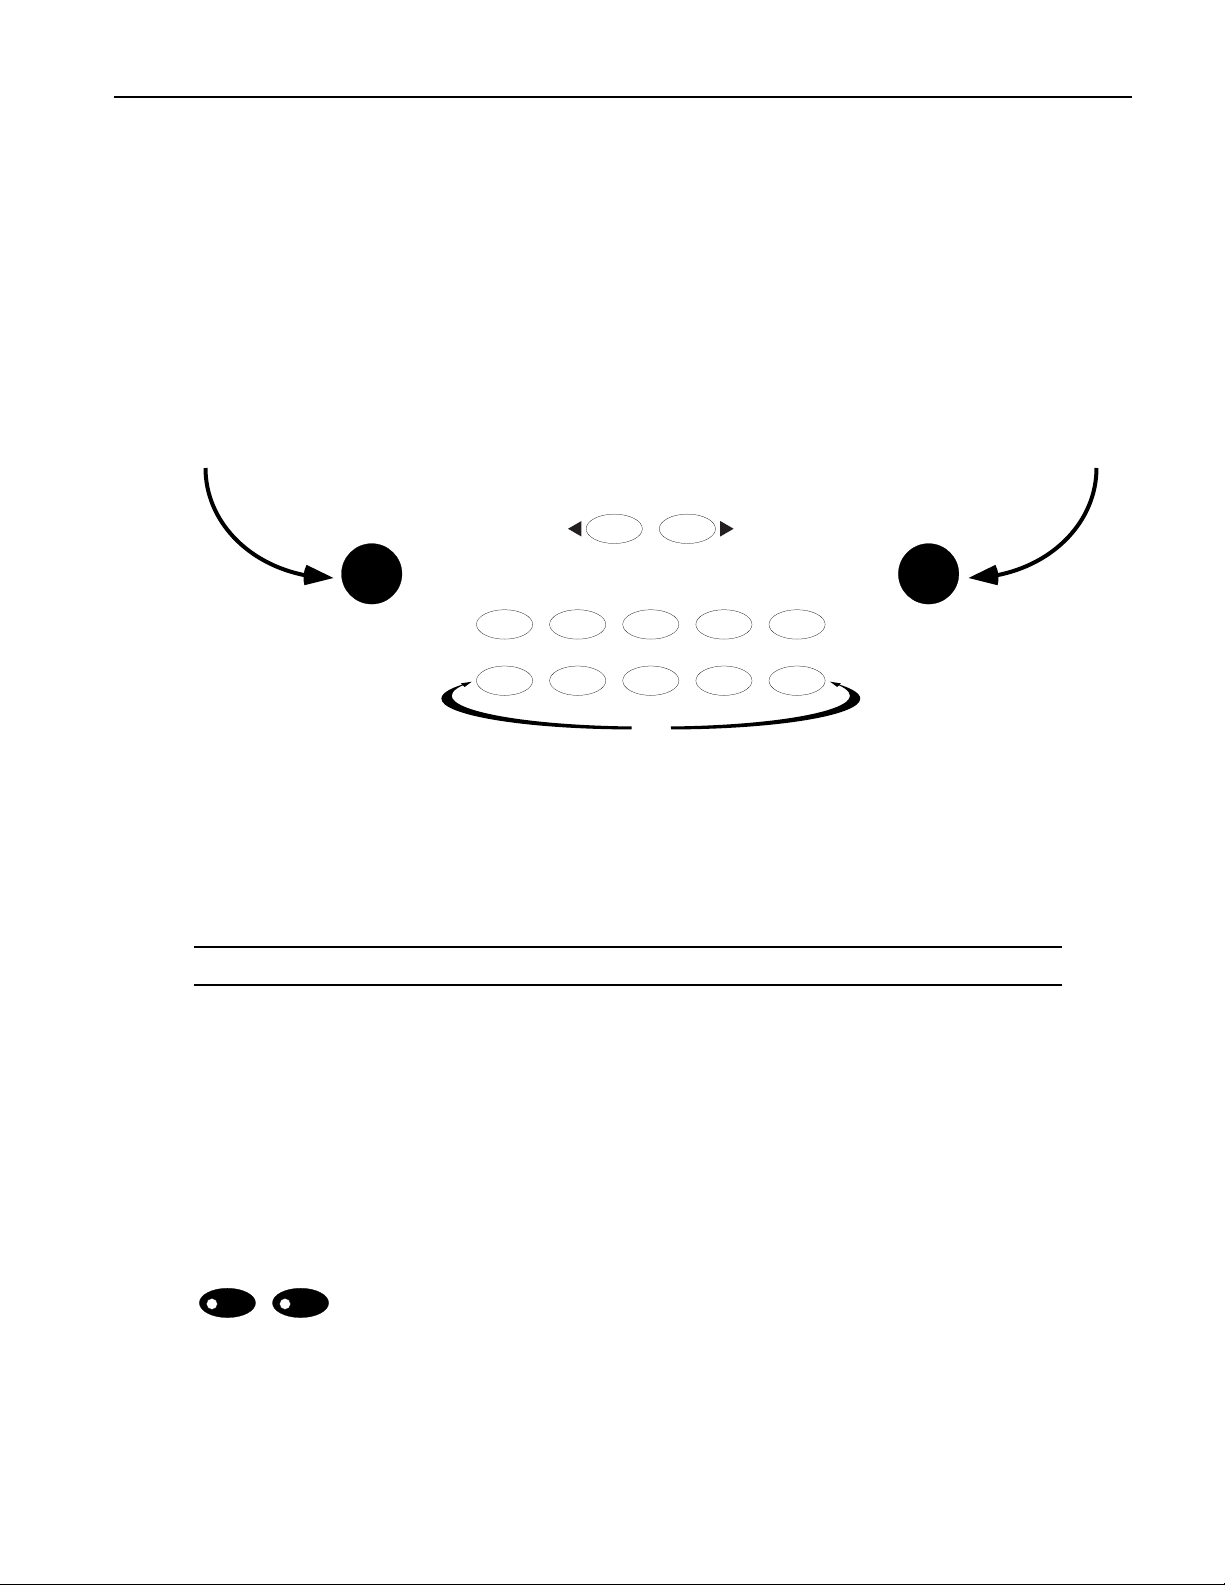
TTTThhhheeee KKKKnnnnoooobbbbss
In the center of the front panel, below the display, are two knobs central to most every ASR-X Pro
activity. These knobs each have two names, since they operate in two wide-ranging contexts.
ss
Parameter Value
ss
116
0
567
1
Select Track
MIDI Channel
Essentials
23
Demo
4
89
Sound
Name
¥ When youÕre selecting sounds for tracks or for pads in the ASR-X Pro, the central knobs are referred
to as the Sound Type and Sound Name knobs. These names are printed underneath the knobs, as
shown above. The Sound Type and Sound Name knobs are the key to unlocking the power of the
ASR-X ProÕs SoundFinder feature. Each knob does just what its name suggests: the Sound Type
knob selects a kind of sound, and the Sound Name selects an individual sound.
TTTTiiiipppp:::: To learn more about selecting sounds and SoundFinder, see Chapter 2.
¥ Virtually every other ASR-X Pro activity also uses the two central knobs. In these contexts, theyÕre
referred to as the Parameter knob and the Value knob. These names are printed above the knobs, as
shown in the above illustration.
¥A parameter is a characteristic of the ASR-X Pro software that can be changed.
¥A value is the setting of a parameter.
The Parameter knob is used for the selection of a parameter for editing, and the Value knob changes its
value. There are times that the knobs are used for selecting procedures to be performedÑin these cases as
well, the knobs are referred to as the Parameter and Value knobs.
TTTThhhheeee EEEExxxxiiiitttt////NNNNoooo aaaannnndddd EEEEnnnntttteeeerrrr////YYYYeeeessss BBBBuuuuttttttttoooonnnnssss aaaannnndddd TTTThhhheeeeiiiirrrr LLLLEEEEDDDDss
Exit Enter
The two buttons marked ÒExit/NoÓ and ÒEnter/YesÓ are central to the performance of
ss
many ASR-X Pro procedures, and are used for navigating the ASR-X Pro displays and
No Yes
parameters.
Most of the operations performed on the ASR-X Pro are posed as questions on its displayÑat such a time,
think of these buttons as No and Yes buttons. When the ASR-X Pro asks you a question, the LEDs in the
buttons flash as a reminder that the ASR-X Pro requires a response from you in order to proceed with the
selected operation. To answer ÒNoÓ or ÒYes,Ó press the appropriate button.
ENSONIQ ASR-X Pro Reference Manual 3
Page 15
1ÑWelcome
Some of the ASR-X ProÕs features offer sets of parameters and procedures. In such cases, youÕll begin by
answering ÒYesÓ to a top-level question, which will have the effect of beginning the procedure. From
there youÕll encounter parameters presented on sub-displays that relate to the top-level question. To exit
back out to the top level of the ASR-X Pro, you can press the Exit/No button.
PPPPllllaaaayyyyiiiinnnngggg tttthhhheeee AAAASSSSRRRR----XXXX PPPPrrrroooo DDDDeeeemmmmoo
oo
The ASR-X Pro contains some short demonstration pieces to give you an idea of the kind of music it can
produce. These demos are based on the wave data built into the ASR-X Pro. To play the main demo:
1. Locate the Essentials buttons on the ASR-X Pro's front-panel.
2. Hold down the Essentials Button 5.
0
567
1
3. While still holding the Button 5 down, press Essentials Button 9.
567
4. Release both buttons.
The display will show...
Start demo playback?
MAINDEMO: Internal
Essentials
23
Demo
Demo
4
89
89
5. Press the Enter/Yes button to hear the demo.
3. To stop the demo, press any button on the ASR-X Pro front panel.
4. To select the individual demos that make up the main demo, turn the Parameter knob to select other
demo categories, and the Value knob to select individual demos in the selected categoryÑthen press
Enter to hear the selected demo.
IIIImmmmppppoooorrrrttttaaaannnntttt AAAASSSSRRRR----XXXX PPPPrrrroooo CCCCoooonnnncccceeeeppppttttss
AAAArrrrcccchhhhiiiitttteeeeccccttttuuuurrrreeee OOOOvvvveeeerrrrvvvviiiieeeeww
ww
ss
The ASR-X Pro is a groovestation containing a variety of elements, each represented by an area (or two,
in the case of the pads) of the ASR-X Pro front panel:
¥ tracks ¥ sampling/resampling
¥ pads (and pad editing) ¥ sequencer
¥ effects ¥ disk functions and global settings
While each area has its own chapter in this manual describing it in detail, itÕs important that you always
know where you are and what youÕre doing.
4 ENSONIQ ASR-X Pro Reference Manual
Page 16
1ÑWelcome
YYYYoooouuuu AAAArrrreeee HHHHeeeerrrree
¥ In the ASR-X Pro, there is always a sequence selected, even if you havenÕt recorded anything.
¥ In the ASR-X Pro, there is always a track selected, even if you havenÕt recorded anything.
Therefore, the important thing to remember about the architecture of the ASR-X Pro is this simple rule:
ee
This means that:
¥ When you press the Track Sound button and pick a new sound, youÕre choosing a new sound for the
currently selected track (described in Chapter 2).
¥ When you play the pads, youÕre playing the sound on the currently selected track (see Chapter 3).
¥ When you convert a standard sound into a RAM kit, the newly created RAM kit is assigned to the
currently selected track (described in Chapter 3).
¥ When you select new sounds or otherwise edit or process whatÕs on a pad, youÕre editing one of the
pads in the RAM kit on the currently selected track (described in Chapter 3).
¥ When you sample or resample and send your wave(s) to one or more pads, youÕre sending them to a
RAM kit on the currently selected track (described in Chapter 5).
¥ When you play the pads and record in the sequencer, youÕre recording on the currently selected
track (described in Chapter 6).
WWWWhhhhaaaattttÕÕÕÕssss WWWWhhhheeeerrrree
The ASR-X Pro contains essentially three types of memory:
1. ROM (for ÒRead-Only MemoryÓ)ÑThis is a permanent and unchangeable area of memory that
contains the wave data used by the sounds shipped with your ASR-X Pro; it also contains the
sounds themselves.
2. RAM (for ÒRandom Access MemoryÓ)ÑThis area of memory holds:
¥ the contents of the Scratch Pad ¥ waves youÕve sampled and sent to pads
¥ the sounds that play your samples ¥ RAM kits youÕve created and edited
¥ sequences ¥ System/MIDI settings
ee
NNNNooootttteeee:::: RAM memory is fast, efficient memory; itÕs also volatile, which means that everything you
do will be stored in RAM only until you turn off the ASR-X Pro, at which time RAM is cleared.
While this offers you a clean slate each time you turn on the ASR-X Pro, it also means that itÕs
important to remember to save your work to disk before powering down.
ENSONIQ ASR-X Pro Reference Manual 5
Page 17

1ÑWelcome
3. FLASHÑFLASH memory is a writable form of permanent memory in which the ASR-X Pro stores its
operating systemÑits contents are retained even when the ASR-X Pro is turned off. In addition,
when the ASR-X Pro is shipped from the factory, FLASH holds the default system, click and
resampling setup parameter values, as well as the default Essentials buttons sound assignments and
USER quantization templates. You can write your own custom settings to FLASH; see Chapter 7.
When you update your operating system version from floppy, the new version is written to FLASH.
TTTThhhheeee ÒÒÒÒAAAAllllllllooooccccaaaattttiiiinnnngggg mmmmeeeemmmmoooorrrryyyyÓÓÓÓ MMMMeeeessssssssaaaaggggee
From time to time you may see ÒAllocating memoryÓ briefly appear on the ASR-X Pro display. This is
completely normalÑit means that the ASR-X Pro is defragmenting its RAM memory to make most
efficient use of available space. Defragmenting takes bits and pieces of free RAM joins them into
uninterrupted, larger chunks of memory. This helps your data play back quickly and smoothly.
HHHHoooowwww MMMMaaaannnnyyyy NNNNooootttteeeessss CCCCaaaannnn bbbbeeee PPPPllllaaaayyyyeeeedddd aaaatttt OOOOnnnnccccee
The ASR-X Pro supports 32-voice polyphony, which means that 32 sound layers can be playing at any
given moment. Different sounds use different numbers of layersÑsounds based on the samples you
create use one or two per note, while ROM sounds may use up to 16 per noteÑso the number of notes
that can be played simultaneously depends very much on the sounds being used. To learn more about
sound layers, see Chapter 3.
TTTThhhheeee AAAAllllllll NNNNooootttteeeessss OOOOffffffff BBBBuuuuttttttttoooonn
ItÕs not uncommon for MIDI devices to get momentarily confused, given
the amount of MIDI data that moves through the cables in a MIDI studio,
and the ASR-X Pro is no exception. The Disk/Global Load button doubles
as a handy All Notes Off button. If notes in the ASR-X Pro continue
playing when you feel they should stop, double-click this button to turn
off all of the currently sounding notes.
nn
AAAAbbbboooouuuutttt NNNNooootttteeee,,,, TTTTiiiippppssss aaaannnndddd WWWWaaaarrrrnnnniiiinnnnggggssss iiiinnnn tttthhhheeee AAAASSSSRRRR----XXXX PPPPrrrroooo DDDDooooccccuuuummmmeeeennnnttttaaaattttiiiioooonn
Throughout the ASR-X Pro Reference Manual and UserÕs Guide, youÕll encounter notes, tips and
warnings, offset from the rest of the text by borders, and always beginning with the word ÒNote,Ó ÒTipÓ
or ÒWarningÓ in bold type. Each of these has its own meaning:
ee
ee
Disk / Global
Load Save System
Save AllAll Notes Off MIDI
nn
¥ Note: information regarding the topic being discussed that should not be overlooked.
¥ Tip: a way of using the feature being discussed thatÕs worth being aware of.
¥ Warning: information thatÕs vital in preventing damage to the ASR-X Pro, other equipment, or you.
OOOOppppttttiiiioooonnnnaaaallll EEEENNNNSSSSOOOONNNNIIIIQQQQ AAAAcccccccceeeessssssssoooorrrriiiieeeessss ffffoooorrrr tttthhhheeee AAAASSSSRRRR----XXXX PPPPrrrroo
¥ X-8 output expanderÑThe X-8 output expander provides additional outputs for your ASR-X Pro,
usable as four pairs of stereo outputs, or as eight mono outputs.
¥ SW-10 foot switchÑThe SW-10 provides two foot pedals mounted on a single base that let you take
full advantage of the ASR-X Pro many hands-free possibilities.
¥ SW-2 foot switchÑThe SW-2 synthesizer-style single foot switch can access the many possibilities
available to a foot switch on the ASR-X Pro.
¥ SW-6 foot switchÑThe SW-2 piano-style single foot switch can access the many possibilities
available to a foot switch on the ASR-X Pro.
¥ X-Audio audio CDsÑEach X-Audio series CD contains a huge assortment of materials that can be
sampled into the ASR-X Pro.
¥ EXP Series Wave Expansion BoardsÑThese exciting boards from ENSONIQ provide the ASR-X Pro
with new sounds and ROM wave data.
6 ENSONIQ ASR-X Pro Reference Manual
oo
Page 18
2ÑTracks
22
22
TTTTrrrraaaacccckkkkss
ss
IIIInnnnttttrrrroooodddduuuuccccttttiiiioooonnnn ttttoooo TTTTrrrraaaacccckkkkss
Whatever you do in the ASR-X ProÑand whatever kind of sound you play from its pads or via
MIDIÑyouÕre always on a track in a sequence, even when you havenÕt yet recorded any notes. When you
choose and listen to the sounds built-in to your ASR-X Pro, or that youÕve sampled/resampled yourself,
youÕre actually choosing sounds for the currently selected track. Tracks are absolutely central to life with
an ASR-X Pro. The Track buttons allow you to control the properties of each track.
Each track has:
¥ a sound that can be played using the ASR-X Pro pads or from an
external controller via MIDI, or a sound that can play an external
MIDI device.
¥ an editable set of parameters that determine how the sound will
behave while itÕs assigned to the track.
¥ a mute/solo capability that can silence the track or isolate by turning
all other tracks off.
¥ its own MIDI channel for receiving and transmitting MIDI data. Each
trackÕs MIDI channel is the same as its track numberÑthere are 16 tracks
in each sequence.
These topics are discussed in detail in this chapter.
ss
Sound Edit Mute
Track
Mix / FX Bus
Select Track
116
MIDI Channel
Solo
TTTToooo SSSSeeeelllleeeecccctttt OOOOnnnneeee ooooffff tttthhhheeee TTTTrrrraaaacccckkkkssss iiiinnnn tttthhhheeee CCCCuuuurrrrrrrreeeennnnttttllllyyyy SSSSeeeelllleeeecccctttteeeedddd SSSSeeeeqqqquuuueeeennnnccccee
The track display tells you which track is currently selected. To view it, press the Track Sound button.
The currently selected track
ee
m
¦01 ROM08:000
PERCSOLO: Thump Kick
TTTToooo SSSSeeeelllleeeecccctttt aaaa TTTTrrrraaaacccckk
1. Press the Select Track right arrow button to select a higher-numbered
track, or the left arrow button to select a lower-numbered track.
TTTTiiiipppp:::: Hold down either button to scroll through the tracks.
SSSSeeeelllleeeeccccttttiiiinnnngggg aaaa SSSSoooouuuunnnndddd ffffoooorrrr aaaa TTTTrrrraaaacccckk
There are four ways to place a sound on the currently selected track, all
of which begin with pressing the Track Sound button:
¥ You can select a trackÕs sound using the front-panel Sound Type
and Sound Name knobs, taking advantage of the ASR-X Pro
powerful SoundFinder featureÑsee ÒSelecting a TrackÕs Sound
Using the Sound Type and Sound Name KnobsÓ below.
¥ You can select a trackÕs sound by sending MIDI Bank Select and Program Change messages to the
ASR-X ProÑsee ÒSelecting a TrackÕs Sound Via MIDIÓ later in this section.
¥ You can transform any ROM sound on the track into a new, editable RAM drum kit by sampling or
resampling and sending your sample to a pad (see Chapter 5).
kk
Select Track
116
MIDI Channel
kk
Track
Sound Edit Mute
Mix / FX Bus
Solo
ENSONIQ ASR-X Pro MusicianÕs Manual 7
Page 19
2ÑTracks
¥ You can transform any ROM sound on the track into a new, editable RAM drum kit by editing the
sound using the Pad editing controls (see Chapter 3).
When a new sound is selected for a track, the ASR-X Pro will automatically reset certain track parameters
if the System/MIDI Track ParamReset parameter is set to ÒOnÓ (see Chapter 7). For a list of these
parameters, see ÒTrack ParamReset BehaviorÓ in Chapter 9.
BBBBaaaannnnkkkkssss aaaannnndddd SSSSoooouuuunnnnddddss
Sounds are stored in the ASR-X Pro in groups called banks. A bank can contain up to 127 sounds. Each
bank has a corresponding MIDI Bank Select number that allows it to be selected via MIDI, and within
each bank , each sound has a program number corresponding to a MIDI Program Change value so that it,
too, can be selected via MIDI (see ÒSelecting and Playing a TrackÕs Sound Via MIDIÓ later in this chapter).
SSSSeeeelllleeeeccccttttiiiinnnngggg aaaa TTTTrrrraaaacccckkkkÕÕÕÕssss SSSSoooouuuunnnndddd UUUUssssiiiinnnngggg tttthhhheeee SSSSoooouuuunnnndddd TTTTyyyyppppeeee aaaannnndddd SSSSoooouuuunnnndddd NNNNaaaammmmeeee KKKKnnnnoooobbbbss
Sound selection using the ASR-X Pro front-panel knobs is simple. The ASR-X Pro utilizes ENSONIQÕs
acclaimed SoundFinderª technology to make the location and selection of sounds logical and easy.
SSSSoooouuuunnnnddddFFFFiiiinnnnddddeeeerr
SoundFinder is a database of all the sounds in your ASR-X Pro. The power of a database lies in its ability
to let you to view information in a manner of your choosing. SoundFinder keeps a list of all the sounds
available in your ASR-X Pro, and shows them to you in convenient categories called sound types.
SoundFinder sound types show you sounds by instrument familyÑvocals or bells, for exampleÑor by
other useful criteria, including the location in the ASR-X ProÕs memory where they reside. The ALL-SND
category is especially useful,: it shows all of the ASR-X Pro sounds arranged in alphabetical order.
TTTTiiiipppp:::: When you select a sound from a SoundFinder category, the ASR-X Pro remembers the sound
youÕve selected, and offers it to you as a first choice when you return to the category.
While most of SoundFinderÕs categories describe types of musical instruments, there are three additional
categories that allow you to select sounds based on the location in memory in which they reside:
ss
ss
rr
¥ EXP-SNDÑThis category contains sounds located on an EXP Series Wave Expansion Board.
¥ ROM-SNDÑThis category contains sounds stored in permanent ROM.
¥ RAM-SNDÑThis category contains sounds stored in temporary RAM. There are two banksÕ worth
of RAM sound memory (to learn about banks, see ÒBanks and SoundsÓ above).
You can also set a track to transmit MIDI dataÑsee ÒSelecting and Programming a MIDI-OUT Sound.Ó
TTTToooo SSSSeeeelllleeeecccctttt aaaa SSSSoooouuuunnnndddd UUUUssssiiiinnnngggg tttthhhheeee SSSSoooouuuunnnndddd TTTTyyyyppppeeee aaaannnndddd SSSSoooouuuunnnndddd NNNNaaaammmmeeee KKKKnnnnoooobbbbss
1. Press the Track Sound button.
Sound Edit Mute
The display shows you information thatÕs helpful when picking sounds:
The track being edited Where the sound it resides The soundÕs MIDI bank and program numbers
Track
Mix / FX Bus
Solo
ss
l l n n
¦01 ROM08:000
PERCSOLO: Thump Kick
ii
The currently selected SoundFinder category The currently selected sound
8 ENSONIQ ASR-X Pro MusicianÕs Manual
Page 20
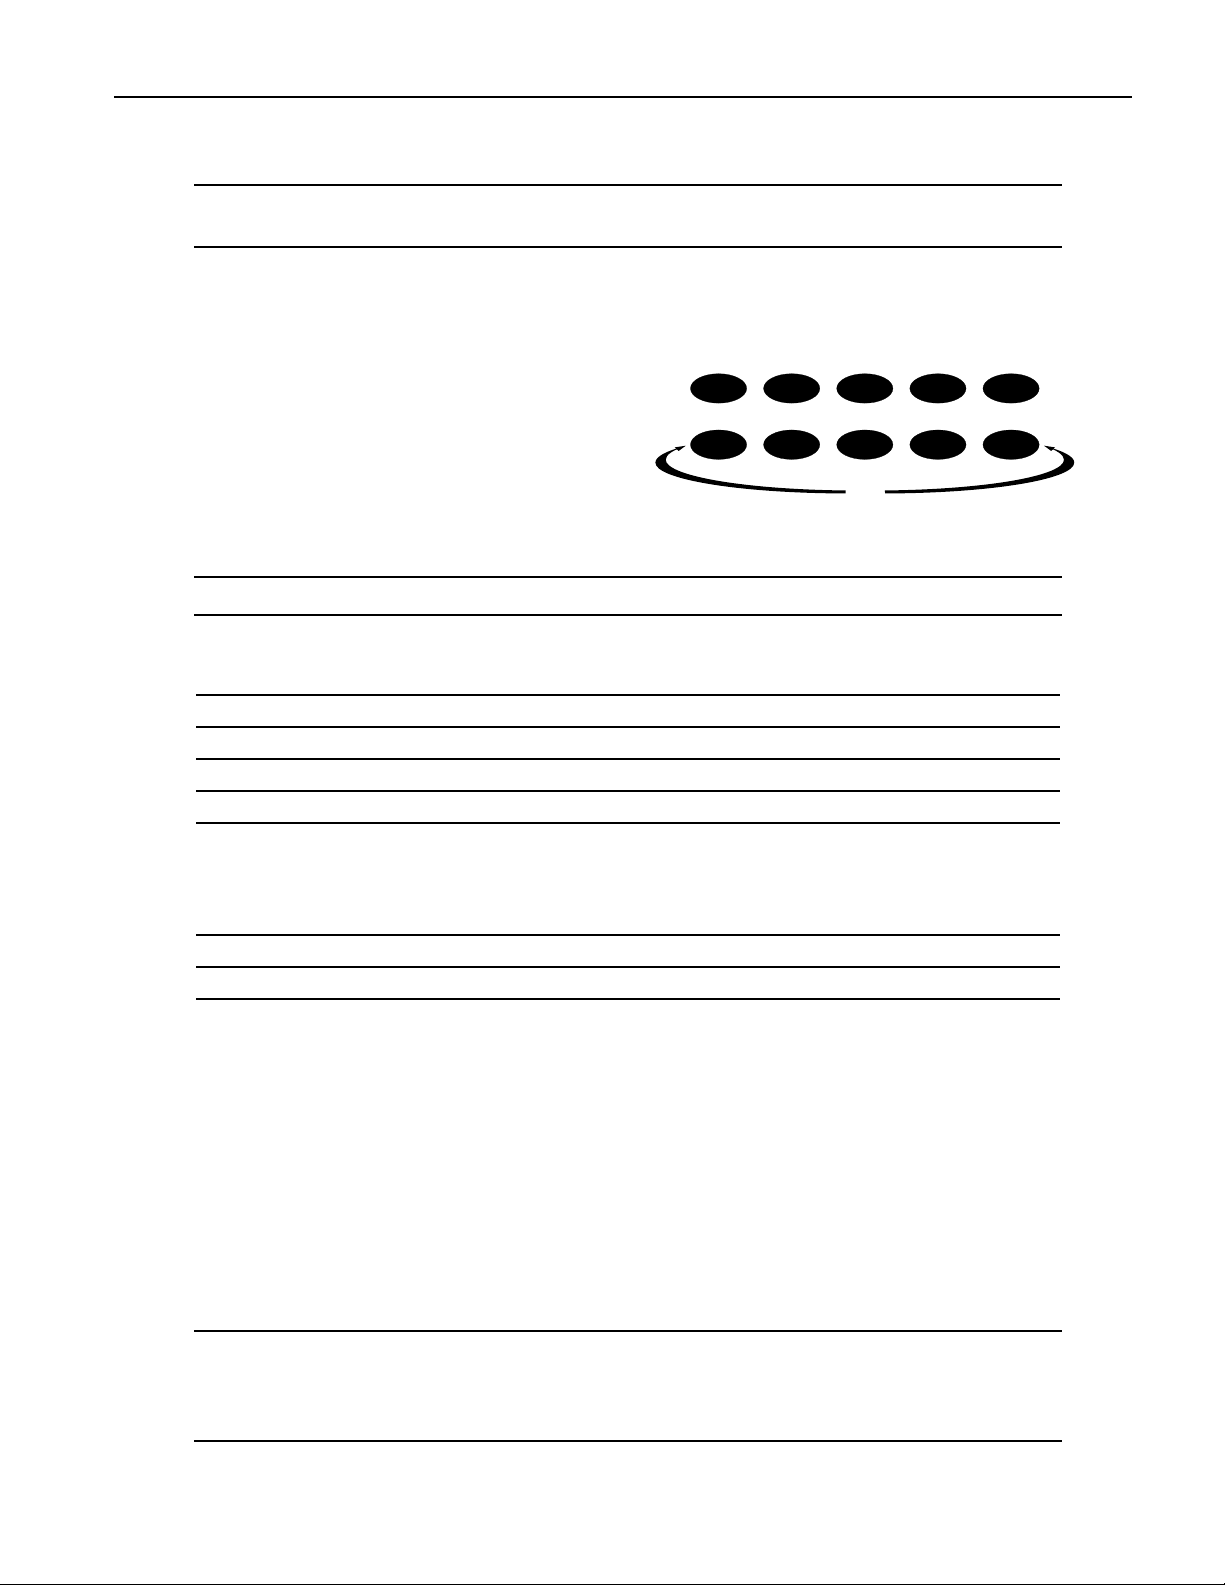
2. Turn the Sound Type knob to select a different SoundFinder category, if desired.
TTTTiiiipppp:::: To quickly locate all RAM kits, turn the Sound Type knob all the way to the left (to the USER-
SND category). To find the sounds that play your waves, turn it all the way right (*CUSTOM).
3. Turn the Sound Name knob to select a new sound.
2ÑTracks
SSSSeeeelllleeeeccccttttiiiinnnngggg aaaa TTTTrrrraaaacccckkkkÕÕÕÕssss SSSSoooouuuunnnndddd UUUUssssiiiinnnngggg tttthhhheeee EEEEsssssssseeeennnnttttiiiiaaaallllssss BBBBuuuuttttttttoooonnnnss
The ten Essentials buttons provide instant access
ss
Essentials
to 15 0f your favorite sounds. To assign an
Essential sound to the currently selected track:
0
1
23
1. Press the Track Sound button.
2. Press the desired Essentials button for
Essential sounds 0-9, or hold down an
567
Demo
upper Essentials button and press the
button beneath it for Essential sounds 10-14.
TTTTiiiipppp:::: You can also select Essentials using foot switchesÑsee Chapter 7.
The single Essentials buttons are pre-programmed by ENSONIQ with the following sounds:
Essentials button: selects: Essentials button: selects:
0 Gizmo Kit 5 Vintge Bs 1
1 Dance Kit 6 Sweep Bass
2 HeavyDrmKit 7 Snot-T-Bass
3 OlÕSkoolKit 8 Mono Boy
4 GM Kit 9 TiteÕTÕBass
The upper and lower Essentials pairs are programmed to select these sounds:
4
89
Essentials pair: selects: Essentials pair: selects:
0 and 5 R. Peggio 3 and 8 PaddedEPno
1 and 6 Classic Syn 4 and 9 Techno Sync
2 and 7 Squared Off
PPPPrrrrooooggggrrrraaaammmmmmmmiiiinnnngggg tttthhhheeee EEEEsssssssseeeennnnttttiiiiaaaallllssss BBBBuuuuttttttttoooonnnnss
ss
You can assign one any of your own favorite sounds to an Essentials button in any of the following ways:
¥ Select the desired sound using the Sound Type and Name knobs, hold down the Track Sound button
and, while still hold it, press the Essentials button to which you want to assign the sound.
¥ Hold down the desired Essentials button and, while still holding it, select the desired sound using
the Sound Type and Name knobs.
¥ After setting up a foot switch for the selection of Essentials (Chapter 7), select the desired sound
using the Sound Type and Name buttons, hold down the Track Sound button and, while still
holding it, select the intended Essentials button using your foot switch.
TTTTiiiipppp:::: You can save your current Essentials sound assignments to diskÑsee Chapter 7.
TTTTiiiipppp:::: To learn how to store Essentials assignments permanently into FLASH memory, see ÒSave
these settings?Ó in Chapter 7.
ENSONIQ ASR-X Pro MusicianÕs Manual 9
Page 21

2ÑTracks
SSSSeeeelllleeeeccccttttiiiinnnngggg aaaannnndddd PPPPllllaaaayyyyiiiinnnngggg aaaa TTTTrrrraaaacccckkkkÕÕÕÕssss SSSSoooouuuunnnndddd VVVViiiiaaaa MMMMIIIIDDDDII
You can select sounds for tracks by sending the ASR-X Pro MIDI Bank Select LSB and Program Change
values on each trackÕs MIDI channel (the MIDI channel corresponding to its track number). Sounds can
also be played from MIDI on each trackÕs MIDI channel.
NNNNooootttteeee:::: Each track always receives and responds to MIDI data received on its MIDI channel,
regardless of which track is currently selected.
NNNNooootttteeee:::: In order for the ASR-X Pro to respond to Bank Select and Program Change messages, its
System/MIDI Bank&ProgChgRecv parameter must be set to ÒOnÓ (see Chapter 7 for more
information). In addition, the target trackÕs ProgramChngeRecv and Bank Select Recv parameters
must also be set to ÒOnÓ (these two parameters are described later in this chapter).
The track sound selection display shows you the Bank Select LSB and Program Change values for the
displayed sound. You can program these Bank Select and Program Change values into an external MIDI
device in order to select the sounds via MIDI later on.
The soundÕs Bank Select LSB value The soundÕs Program Change value
II
ln
¦01 ROM09:012
BASS-SYN:BarkinÕBass
TTTToooo SSSSeeeelllleeeecccctttt aaaannnndddd PPPPllllaaaayyyy aaaa TTTTrrrraaaacccckkkkÕÕÕÕssss SSSSoooouuuunnnndddd VVVViiiiaaaa MMMMIIIIDDDDII
1. Set a MIDI device to transmit on the channel of the track whose sound you want to select or play.
2. Send the appropriate Bank Select and Program Change values to the ASR-X Pro.
3. Send note and controller data from your external device to play the trackÕs sound.
II
SSSSeeeelllleeeeccccttttiiiinnnngggg aaaannnndddd PPPPrrrrooooggggrrrraaaammmmmmmmiiiinnnngggg aaaa MMMMIIIIDDDDIIII----OOOOUUUUTTTT SSSSoooouuuunnnndd
You can set up a track to transmit Bank Select, Program Change, note and controller data to an external
MIDI device by assigning a MIDI-OUT sound to the track. When a track uses a MIDI-OUT sound, the
track will produce no sound on the ASR-X Pro itselfÑinstead, notes played on the pads, as well as data
recorded on the track, will be transmitted from the ASR-X Pro on the track's MIDI channel.
TTTToooo SSSSeeeelllleeeecccctttt aaaannnndddd PPPPrrrrooooggggrrrraaaammmm aaaa MMMMIIIIDDDDIIII----OOOOUUUUTTTT SSSSoooouuuunnnndd
To assign a MIDI-OUT sound to a track, turn the Sound Type knob clockwise all the way to select the
MIDI-OUT sound category. The MIDI-OUT category does not require you to select an individual sound
as suchÑinstead, its display allows you to set Bank Select MSB and LSB and Program Change values for
transmission from the selected track in order to select the desired sound in the external MIDI device.
The currently selected track and MIDI channel
dd
dd
m
¦01 Bank MSB:LSB:Prg
MIDI-OUT:000:000:000
jjjp
The MIDI-OUT SoundFinder category MSB value LSB value Program Change value
To set a Bank Select or Program Change value to be transmitted, select the desired field by turning the
Value knobÑthe selected field will flash to show that it can be edited. Turn the Value knob to set the
desired Bank Select MSB, LSB and/or Program Change value. The values are transmitted as theyÕre set.
NNNNooootttteeee:::: Some MIDI devices select banks in response to received Bank Select MSB and/or LSB
messages. Consult your external device's documentation to learn which values to use.
10 ENSONIQ ASR-X Pro MusicianÕs Manual
Page 22
TTTTiiiipppp:::: You can assign a MIDI-OUT sound to an Essentials buttonÑwhen the Essentials button is
pressed, the sound's Bank Select LSB and Program Change values will be transmitted.
2ÑTracks
QQQQuuuuiiiicccckkkkllllyyyy EEEErrrraaaassssiiiinnnngggg aaaa TTTTrrrraaaacccckkkk SSSSoooouuuunnnndd
You can quickly erase a RAM sound from a track by holding down the Track Sound button and, while
still holding it, pressing the No button. When the ASR-X Pro asks you if youÕre sure you want to delete
the sound and any references to it, press the Yes button to erase the soundÑit will be removed from
RAM and replaced by the ROM sound Silence.
NNNNooootttteeee:::: Since this feature removes the selected sound and its copies, make sure not to inadvertently
erase the original ÒSMPL XÓ version of the sound. If you erase this sound, the ASR-X Pro will also
delete all copies of the sound, including the final version. Delete only the unwanted copiesÑif
you havenÕt re-named your sounds using the Memory Manager, these will be the versions whose
names end with an underscore and a number. Erase the original version of a sound only when
you want to remove it and any sounds based upon it from memory.
EEEEddddiiiittttiiiinnnngggg TTTTrrrraaaacccckkkk PPPPaaaarrrraaaammmmeeeetttteeeerrrrss
Editing a trackÕs parametersÑand therefore determining the behavior of its soundÑinvolves the same
technique regardless of the parameter being edited.
TTTToooo EEEEddddiiiitttt aaaa TTTTrrrraaaacccckkkk PPPPaaaarrrraaaammmmeeeetttteeeerr
1. Press the Track Edit/Mix/FX Bus button in the Track section of the ASR-X Pro front panel.
ss
rr
dd
Track
Sound Edit Mute
Mix / FX Bus
2. Turn the Parameter knob to select the track parameter youÕd like to edit.
All of the track parameter displays show the track number and currently selected sound on the top
line, and the selected parameter and its value on the bottom line:
The track being edited The trackÕs sound
Solo
mm
¦01 OhMyOhMy
Track Volume= 100
ii
The currently selected parameter The parameterÕs value
3. Turn the Value knob to change the setting of the selected parameter .
OOOOvvvveeeerrrrrrrriiiiddddeeeessss aaaannnndddd OOOOffffffffsssseeeettttss
ASR-X Pro sounds are made up of layers of waves. Track parameters allow you to easily change the
settings in all of a soundÕs layers at once by altering them in one of two ways. Each track parameter is
either:
¥ an override, which sets all of the layers in the currently selected sound to the absolute value you set.
¥ an offset, which raises or lower the programmed values by the amount you set.
Overrides set all of a soundÕs layers to the same absolute value for the selected parameter.
ss
ENSONIQ ASR-X Pro MusicianÕs Manual 11
Page 23
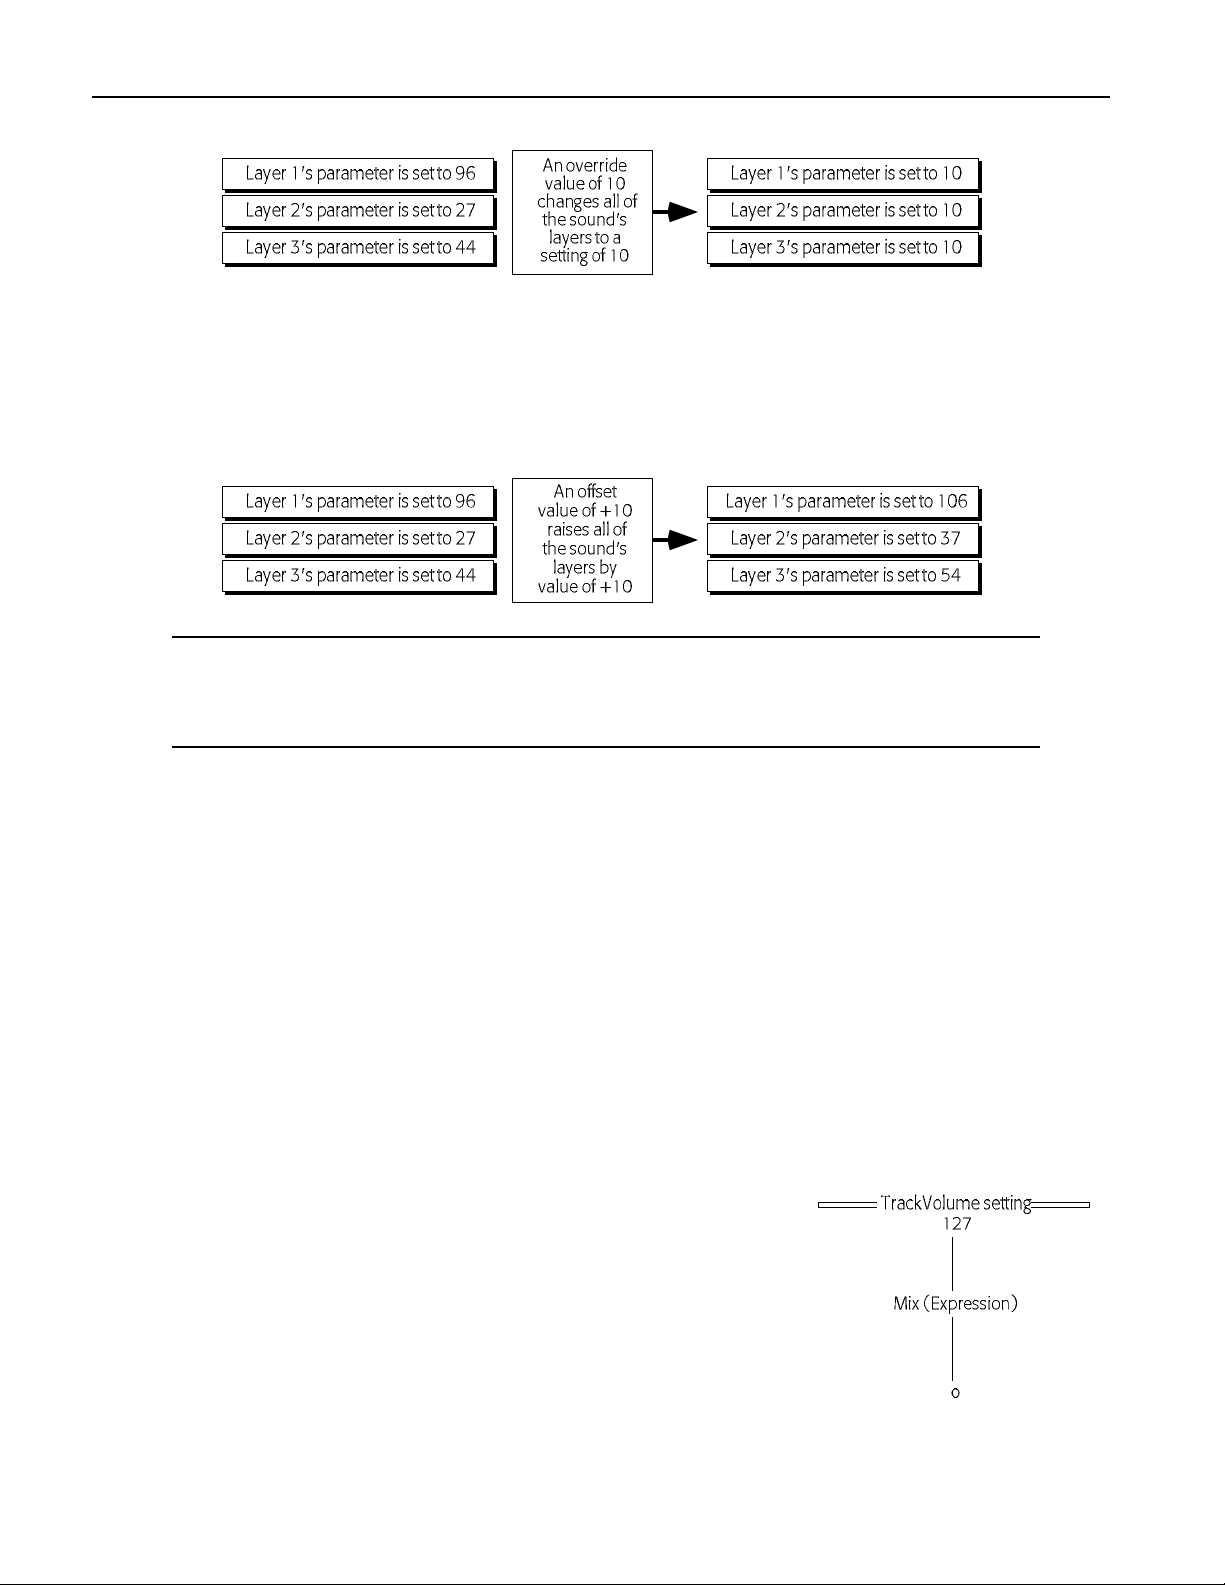
2ÑTracks
When an override parameter is set to ÒProg,Ó the originally programmed setting for each layer is
retained.
Offsets are typically used to affect all of a soundÕs layers at once, retaining their different settings for the
selected parameter in relation to one other. Offset parameters offer values that have positive/negative
aspects (shown with a Ò+Ó or Ò-Ó). When an offset is set to Ò0,Ó the originally programmed value for each
layer is in effect.
NNNNooootttteeee:::: Offsets adjust layer parameters only within the parametersÕ legitimate rangesÑthey canÕt
force them beyond those limits. If a track offset parameter appears to be having no effect, itÕs
likely that the setting for the parameter in the soundÕs layers has already reached its maximum or
minimum setting.
EEEEddddiiiittttiiiinnnngggg TTTTrrrraaaacccckkkk PPPPaaaarrrraaaammmmeeeetttteeeerrrrssss VVVViiiiaaaa MMMMIIIIDDDDII
Track parameters can be edited via MIDI in two ways. Some of the parameters, such as Track Volume,
Mix (Expression) and Pan correspond to standard MIDI sound controllers, and can be adjusted by
sending the ASR-X Pro values for the relevant controllers. In addition, most of the track parameters can
be edited using special registered and non-registered MIDI parameters (RPNs and NRPNs). To learn
more about RPNs and NRPNs, see Chapter 9.
WWWWhhhhaaaatttt EEEEaaaacccchhhh TTTTrrrraaaacccckkkk PPPPaaaarrrraaaammmmeeeetttteeeerrrr DDDDooooeeeess
TTTTrrrraaaacccckkkk VVVVoooolllluuuummmmee
The Track Volume parameter allows you to override the loudness ceiling programmed into the selected
trackÕs sound. A Volume setting of 127 will leave the soundÕs level set as it was programmed. Lower
values will reduce the soundÕs loudnessÑdown by 96dB at a value of 0.
Track Volume can also be edited via MIDI with controller #7 (Volume) messages.
MMMMiiiixxxx ((((EEEExxxxpppprrrreeeessssssssiiiioooonnnn))
The Mix (Expression) parameter can raise or lower the level of the
sound on the selected track, but only as high as the maximum set by
the Track Volume parameter.
You can set an acceptable loudness ceiling for a sound with the Track
Volume parameter, and use the Mix (Expression) parameter to adjust
its level without worrying that it will ever become too loud.
ee
))
II
ss
Mix (Expression) can also be edited via MIDI with controller #11
(Expression) messages.
12 ENSONIQ ASR-X Pro MusicianÕs Manual
Page 24
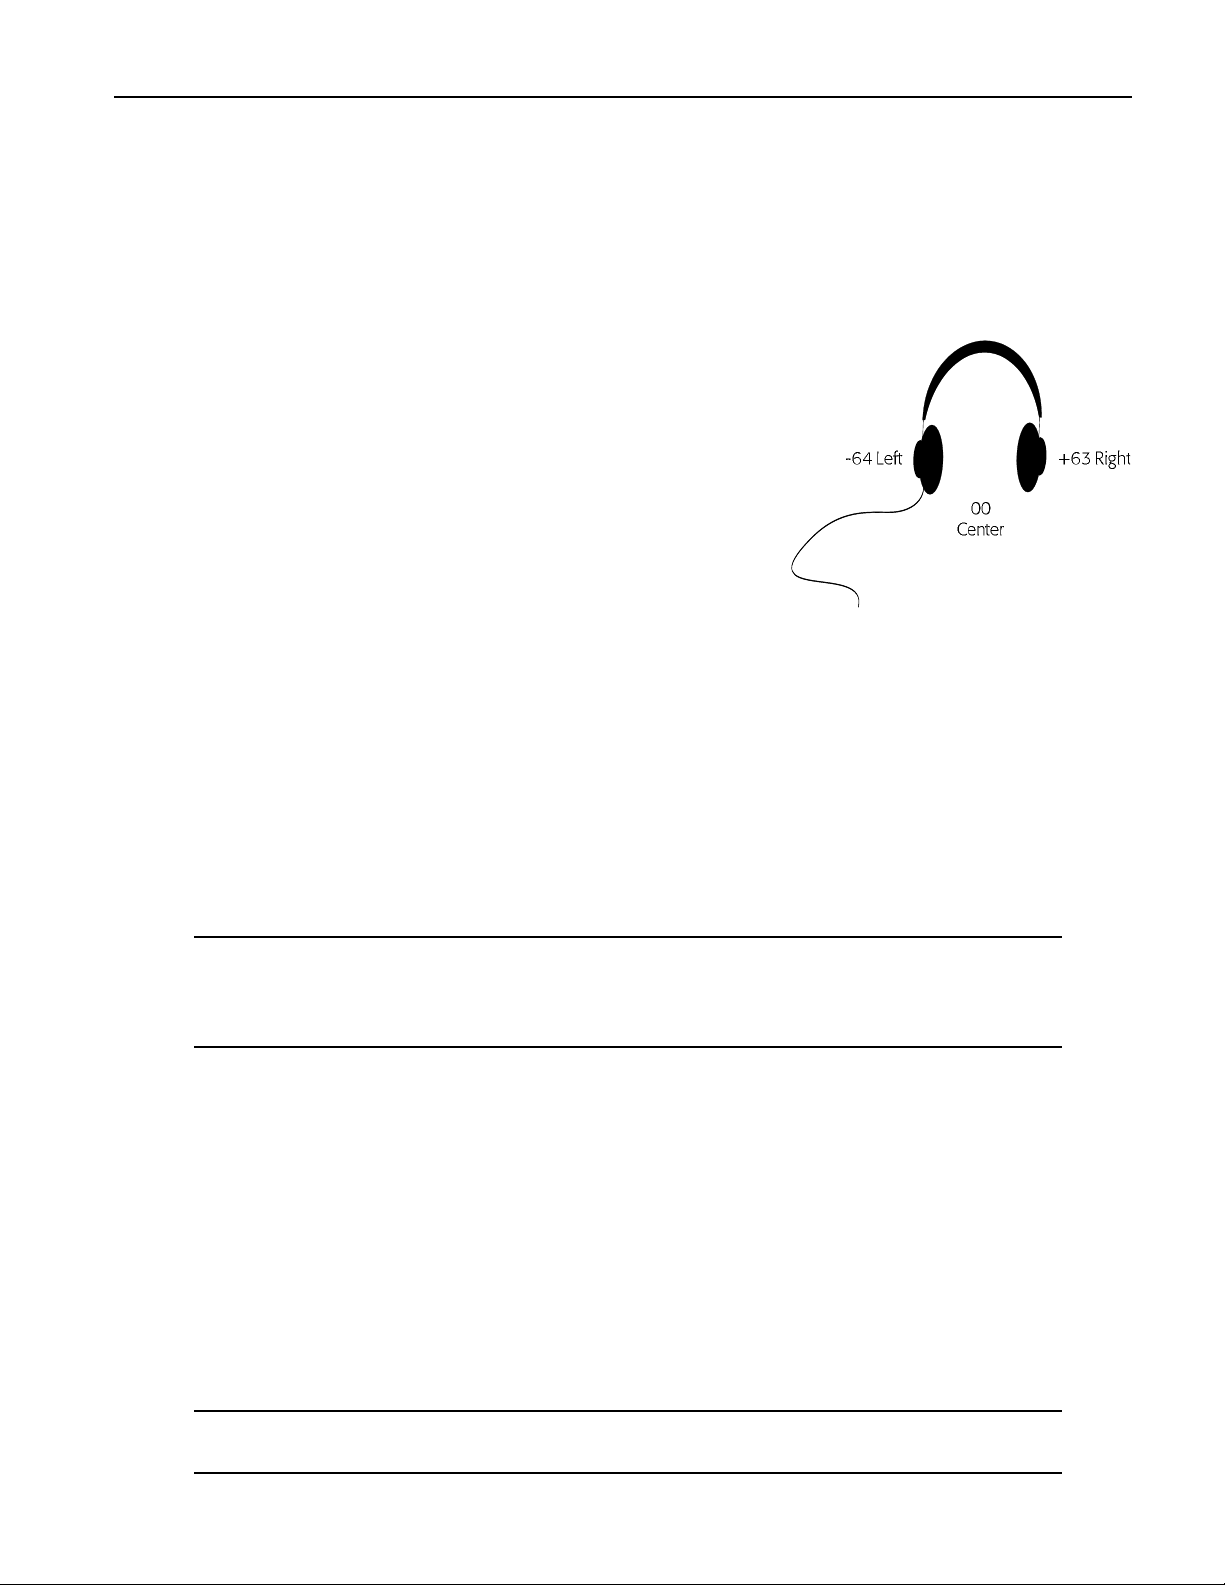
2ÑTracks
VVVVoooollll////MMMMiiiixxxx PPPPoooollllaaaarrrriiiittttyy
The Vol/MixPolarity parameter reverses the manner in which the selected trackÕs sound will respond to
Volume and Mix (Expression) messages received via MIDI. When set to +Pos, the sound will respond
normally: higher Volume and Mix (Expression) values will result in greater loudness. When set to -Neg,
higher Volume and Mix (Expression) values will lower the level of the sound.
TTTTrrrraaaacccckkkk PPPPaaaann
ASR-X Pro sounds are programmed to be heard in specific
places in the left/right stereo field. By adjusting the Track Pan
setting, you can offset the stereo placement of the currently
selected trackÕs sound. A value of Center 00 will leave the sound
panned as it was programmed. Lower values will shift it to the
left, and higher values will move it to the right. If components
within the sound are panned differently, their relative positions
will be maintained as the sound is shifted in either direction.
Track Pan can be edited via MIDI with controller #10 (Pan)
messages.
ss
FFFFXXXX BBBBuuuuss
The FX Bus parameter allows you to assign the selected trackÑand its soundÑ to the current sequenceÕs
insert or global reverb effects, or left un-effected, or Òdry.Ó This is accomplished by assigning the track to
an FX (for ÒeffectÓ) bus. (Using the ASR-X Pro Effects is described in Chapter 4.) You can select:
¥ ProgÑto have the sound of each pad use its own FX Bus setting in a kit sound, or to have a standard
sound use its Alt Bus setting.
¥ InsertÑto send the selected trackÕs sound to the sequenceÕs insert effect.
¥ LightReverbÑto add a minimal amount of global reverb to the selected trackÕs sound.
¥ MediumReverbÑto add a greater amount of global reverb to the selected trackÕs sound.
¥ WetReverbÑto add the maximum amount of global reverb to the selected trackÕs sound.
¥ DryÑto leave the selected trackÕs sound un-effected, or Òdry.Ó
yy
nn
NNNNooootttteeee:::: When an X-8 output expansion board has been installed, an additional four busses become
available. These stereo FX busses, AuxOut1, AuxOut2, AuxOut3 and AuxOut4 allow you to send
a trackÕs sound directly to the auxiliary outputs. To use the auxiliary busses as separate mono
busses, pan the tracks routed to them hard left or hard right (see ÒTrack PanÓ above).
MIDI controller #91 can be used to select one of the reverb busses or the dry bus for any track other than
the insert control track. This is accomplished by sending the ASR-X Pro a controller #91 value on the
trackÕs MIDI channel. When the track receives a controller #91 value of:
¥ 0, it will be assigned to the Dry FX bus.
¥ 1-40, it will be assigned to the LightReverb FX bus.
¥ 41-80, it will be assigned to the MediumReverb FX bus.
¥ 81-127, it will be assigned to the WetReverb FX bus.
TTTTrrrraaaacccckkkkMMMMIIIIDDDDIIIIOOOOuuuutt
When a track's TrackMIDIOut parameter is set to ÒEnable,Ó the track can transmit MIDI data on its
corresponding MIDI channel when it uses a MIDI-OUT sound.Ó When the parameter is set to ÒDisable,Ó
no MIDI data for the track will be transmitted from the pads or sequencer.
NNNNooootttteeee:::: The ASR-X Pro intelligently transmits a track's Bank Selects and Program Changes only
when theyÕre different from the last ones transmitted from the track.
ENSONIQ ASR-X Pro MusicianÕs Manual 13
tt
Page 25

2ÑTracks
PPPPiiiittttcccchhhh BBBBeeeennnndddd UUUUpppp aaaannnndddd PPPPiiiittttcccchhhh BBBBeeeennnndddd DDDDoooowwwwnn
The Pitch Bend Up and Pitch Bend Down parameters allow you to separately set how you want the
selected trackÕs sound to respond to up and down Pitch Bend messages received via MIDI.
Pitch Bend Up and Pitch Bend Down can be set to:
¥ 1-12dn or 1-12upÑto lower or raise the pitch of the selected trackÕs sound by 1 to 12 equal-temper
semitones when Pitch Bend up or down messages are received via MIDI.
¥ ProgÑto respond to received up or down Pitch Bend messages according to the programming in the
trackÕs sound.
¥ SysÑto use the global system Pitch Bend Up or Down values (see Chapter 7 for details).
¥ OffÑto ignore received up or down Pitch Bend messages.
TTTTiiiipppp:::: Each track provides a filterÑthe Pitch Bend Recv parameterÑthat you can use to disable or
enable its response to Pitch Bend messages received via MIDI. This parameter is described later
in this chapter.
OOOOccccttttaaaavvvveeee SSSShhhhiiiifffftt
The Octave Shift parameter allows you to shift, by octaves, the pitch at which the selected track will play
its sound. A setting of 0oct means the sound will play at its programmed octave tuning value. You can
tune the sound up or down by a maximum of four equal-temper octaves.
SSSSeeeemmmmiiiittttoooonnnneeee SSSShhhhiiiifffftt
The Semitone Shift parameter allows you to shift, in semitone steps, the pitch at which the selected track
will play its sound. A setting of 0st means the sound will play at its programmed semitone tuning value.
You can shift the sound upward by as much as 63 equal-temper semitones or downward by 64 semitones.
tt
tt
nn
FFFFiiiinnnneeee TTTTuuuunnnniiiinnnngg
The Fine Tuning parameter allows you to re-tune the sound on the selected track by cents. A setting of
0cents means the sound will use its programmed fine tuning value. You can lower or raise the soundÕs
fine tuning by -50 to +49 cents. 100 cents equals one semitone.
PPPPiiiittttcccchhhhTTTTbbbbll
ASR-X Pro contains a variety of non-standard tunings, or pitch tables. The PitchTbl parameter allows the
selected trackÕs sound to use one of these special tunings.
TTTTiiiipppp:::: Each track in the ASR-X Pro has its own PitchTbl parameter that determines the pitch table to
be used by the sound on the track. By setting each track to a different pitch table, you can
program the ASR-X ProÕs tracks to produce 16 different tunings at once!
The PitchTbl parameter can be set to:
¥ ProgÑto use the pitch table the sound was originally programmed to use.
¥ SysÑto use the global system pitch table. (See Chapter 7 to learn about designating a system-wide
¥ One of the pitch tables built into the ASR-X Pro.
Chapter 9 provides a list of the built-in ASR-X Pro pitch tables.
TTTTiiiipppp:::: With the proper software, you can also design your own pitch table on a computer, and
transmit it to the ASR-X Pro via MIDI. ÒAbout RAM Pitch TablesÓ in Chapter 9 provides detailed
information on creating your own pitch tables.
gg
ll
pitch table.)
14 ENSONIQ ASR-X Pro MusicianÕs Manual
Page 26

2ÑTracks
GGGGlllliiiiddddeeee MMMMooooddddee
The Glide Mode parameter allows you to set the glide characteristics of the selected trackÕs sound. The
parameter can be set to:
¥ ProgÑso that gliding from note to note will occur according to the soundÕs programming.
¥ OffÑso that no gliding will occur.
¥ OnÑso that all of the layers in the sound will glide from note to note.
NNNNooootttteeee:::: When this parameter is set to ÒOnÓÑenabling gliding in the selected trackÕs soundÑadjust
the Glide Time parameter (described below) to set the speed at which the trackÕs sound will glide
from note to note.
If the Glide Mode parameter is set to ÒProgÓ or ÒOff,Ó the parameter can also be toggled on or off via
MIDI by sending MIDI controller #65 (Portamento) values to the ASR-X Pro on the selected trackÕs MIDI
channel. Values of 64 or above will turn glide on; values of 63 or lower will turn it off (there is no way to
select the Prog setting via MIDI). When controller #65 is used for this purpose, the ASR-X Pro display will
not show that the parameter has been resetÑit will simply happen. In order to return control of the Glide
Mode parameter to the ASR-X ProÕs front-panel, a controller #65 value of 63 or less must be sent to the
ASR-X Pro on the selected trackÕs MIDI channel.
GGGGlllliiiiddddeeee TTTTiiiimmmmee
When a trackÕs sound is programmed to glide from note to note, the Glide Time parameter allows you to
adjust the speed at which its notes will glide from one to the next. The parameter can be set anywhere
from -64 to +63. A value of 0 means that the sound will glide at its programmed speed. Higher values will
slow the soundÕs glide, and lower values will cause it to speed up.
ee
ee
DDDDeeeellllaaaayyyy OOOOffffffffsssseeeett
The Delay Offset parameter can be used to increase the amount of time it will take for a trackÕs sound to
be heard after it receives a key down message, either from a pad or via MIDI. If a sound has been
programmed with a delay time, the delay offset will lengthen that delay time by up to 2500 milliseconds
(ms). If a sound has no programmed delay time, the Delay Offset parameter can delay it up to 2500ms. If
the parameter is set to 0ms, no delay time will be added to the sound.
SSSSyyyynnnnccccLLLLFFFFOOOO&&&&NNNNooooiiiissssee
The SyncLFO&Noise parameter allows you to alter the behavior of any LFOs and noise generators in the
selected trackÕs sound that are programmed to be synchronized to the ASR-X ProÕs sequencer or to
incoming MIDI clocks. The parameter can be set to:
¥ ProgÑto allow the synchronized LFOs and noise in the trackÕs sound to behave as programmed.
¥ NormalÑto de-synchronize any synchronized LFOs and noise in the trackÕs sound.
¥ 1/1 to 1/32TÑto set the rhythmic relationship of any synchronized LFOs and noise in the trackÕs
sound to the ASR-X ProÕs system tempo, or to incoming MIDI clocks. A ÒTÓ following a number
signifies a triplet value.
TTTTiiiipppp:::: The System/MIDI ClockSource parameter determines whether the ASR-X Pro sequencer or
MIDI clocks will control synchronized LFOs or noise. See Chapter 7.
NNNNoooorrrrmmmmaaaallll LLLLFFFFOOOO RRRRaaaatttteeeess
The Normal LFO Rates parameter allows you to raise or lower the programmed speed of any
unsynchronized LFOÕs in the selected trackÕs sound. The parameter can be set from -64 to +63. A value of
0 means the trackÕs sound will retain its programmed LFO rate. A value other than 0 will be added to or
subtracted from the soundÕs originally programmed rate.
tt
ee
ss
ENSONIQ ASR-X Pro MusicianÕs Manual 15
Page 27

2ÑTracks
LLLLFFFFOOOO DDDDeeeepppptttthh
The LFO Depth parameter allows you to increase or decrease the programmed depth of the LFOÕs in the
selected trackÕs sound. The parameter can be set from -64 to +63. A value of 0 means the trackÕs sound
will retain its programmed LFO depth. A value higher than 0 will increase the depth of the soundÕs LFOs,
while values below zero will reduce it.
LLLLFFFFOOOO DDDDeeeellllaaaayyyy TTTTiiiimmmmee
The LFO Delay Time parameter allows you to lengthen or shorten the delay programmed for any of the
LFOs in the selected trackÕs sound. The parameter can be set from -64 to +63. A value of 0 means the
trackÕs sound will retain its programmed LFO delay setting. Any value above 0 will lengthen the soundÕs
LFO delay times, while any values below 0 will shorten them.
AAAAmmmmpppp EEEEnnnnvvvv AAAAttttttttaaaacccckk
The Amp Env Attack parameter allows you to lengthen or shorten the attack times of amplitude
envelopes within the selected trackÕs sound. The parameter can be set anywhere from -64 to +63. A value
of 0 will leave the attack times of amplitude envelopes within the trackÕs sound behaving as
programmed. Values above 0 will lengthen the attack times, while values below 0 will shorten them.
AAAAmmmmpppp EEEEnnnnvvvv DDDDeeeeccccaaaayy
The Amp Env Decay parameter allows you to lengthen or shorten the decay times of amplitude
envelopes within the selected trackÕs sound. The parameter can be set anywhere from -64 to +63. A value
of 0 will leave the decay times of amplitude envelopes within the trackÕs sound behaving as programmed.
Values above 0 will lengthen the decay times, while values below 0 will shorten them.
hh
ee
kk
yy
AAAAmmmmpppp EEEEnnnnvvvv RRRReeeelllleeeeaaaassssee
The Amp Env Release parameter allows you to lengthen or shorten the release times of amplitude
envelopes within the selected trackÕs sound. The parameter can be set anywhere from -64 to +63. A value
of 0 will leave the release times of amplitude envelopes within the trackÕs sound behaving as
programmed. Values above 0 will lengthen the release times, while values below 0 will shorten them.
FFFFiiiilllltttteeeerrrr CCCCuuuuttttooooffffff
The Filter Cutoff parameter allows you to raise or lower the filter cutoff settings programmed into the
selected trackÕs sound. The parameter can be set anywhere from -64 to +63. A value of 0 will leave the
cutoff settings in the trackÕs sound unchanged. Values above 0 will raise the cutoff settings, while values
below 0 will lower them.
FFFFiiiilllltttteeeerrrr RRRReeeessssoooonnnnaaaannnnccccee
The Filter Resonance parameter allows you to raise or lower the resonance settings programmed into the
selected trackÕs sound. The parameter can be set anywhere from -64 to +63. A value of 0 will leave the
resonance settings in the trackÕs sound unchanged. Values above 0 will increase the resonance settings,
while values below 0 will lower them.
FFFFiiiilllltttt EEEEnnnnvvvv AAAAttttttttaaaacccckk
The Filt Env Attack parameter allows you to lengthen or shorten the attack times of filter envelopes
within the selected trackÕs sound. The parameter can be set anywhere from -64 to +63. A value of 0 will
leave the attack times of filter envelopes within the trackÕs sound behaving as programmed. Values above
0 will lengthen their attack times, while values below 0 will shorten them.
ee
ff
ee
kk
FFFFiiiilllltttt EEEEnnnnvvvv DDDDeeeeccccaaaayy
The Filt Env Decay parameter allows you to lengthen or shorten the decay times of filter envelopes within
the selected trackÕs sound. The parameter can be set anywhere from -64 to +63. A value of 0 will
16 ENSONIQ ASR-X Pro MusicianÕs Manual
yy
Page 28

2ÑTracks
leave the decay times of filter envelopes within the trackÕs sound behaving as programmed. Values above
0 will lengthen the decay times, while values below 0 will shorten them.
FFFFiiiilllltttt EEEEnnnnvvvv RRRReeeelllleeeeaaaassssee
The Filt Env Release parameter allows you to lengthen or shorten the release times of filter envelopes
within the selected trackÕs sound. The parameter can be set anywhere from -64 to +63. A value of 0 will
leave the release times of filter envelopes within the trackÕs sound behaving as programmed. Values
above 0 will lengthen the release times, while values below 0 will shorten them.
AAAAmmmmpppp&&&&FFFFiiiilllltttt EEEEnnnnvvvv VVVVeeeell
The Amp&Filt Env Vel parameter allows you to increase or decrease the velocity sensitivity of the
amplitude and filter envelopes within the select trackÕs sound. The parameter can be set anywhere from 64 to +63. A value of 0 will not change the responsiveness of the amplitude and filter envelopes in the
trackÕs sound. Values above 0 will increase the effect of velocity upon the soundÕs envelopes, while lower
values will decrease its impact.
KKKKeeeeyyyy RRRRaaaannnnggggeeee LLLLoooo,,,, KKKKeeeeyyyy RRRRaaaannnnggggeeee HHHHii
The Key Range Lo and Key Range Hi parameters allow you to limit the pitches that the sound on the
selected track will play. The Key Range Lo parameter sets the lowest note that will play, while the Key
Range Hi parameter sets the highest. Either parameter can be set anywhere from A0 to C8. Middle C is
C4. (Some MIDI controller manufacturers refer to Middle C as C3Ñif youÕre playing the ASR-X Pro from
an external MIDI device, check the deviceÕs manual.)
NNNNooootttteeee:::: A soundÕs Key Range Lo value should not be set above its Key Range Hi setting, nor should
its Key Range Hi value be set below its Key Range Lo setting.
ee
ll
ii
VVVVeeeelllloooocccciiiittttyyyyRRRRaaaannnnggggeeee LLLLoooo,,,, VVVVeeeelllloooocccciiiittttyyyyRRRRaaaannnnggggeeee HHHHii
The VelocityRange Lo and VelocityRange Hi parameters allow you to set an allowable velocity range for
the selected track. When the track receives velocity values from the pads or via MIDI that fall outside of
that range, the trackÕs sound wonÕt play. The VelocityRange Lo parameter sets the lowest allowable
velocity; the VelocityRange Hi parameter sets the highest. Either parameter can be set from 0 to 127.
NNNNooootttteeee:::: A soundÕs VelocityRange Lo value should not be set above its VelocityRange Hi setting, nor
should its VelocityRange Hi value be set below its VelocityRange Lo setting.
VVVVeeeelllloooocccciiiittttyyyyMMMMooooddddee
ItÕs not uncommon for different components of ASR-X Pro sounds to be heard only when the pads are
struck, or MIDI notes are received, with particular velocities. The Velocity Mode parameter provides a
way to alter sounds so you can reliably produce these values and, therefore, the sounds those velocities
produce. When the Velocity Mode parameter is set to any value other than Normal, velocities that fall
within the soundÕs velocity window (see the VelocityRange Lo, VelocityRange Hi parameter description
above) are automatically converted to the velocity set with the Velocity Mode parameter. The possible
settings for the parameter are Normal, and Fix 001 through Fix 127.
PPPPrrrreeeessssssssuuuurrrreeeeMMMMooooddddee
The ASR-X Pro responds to channel and polyphonic pressure messages that it receives via MIDI. The
PressureMode parameter allows you to determine how the trackÕs sound will respond to MIDI pressure
messages. You can set this parameter to:
¥ OffÑso that the trackÕs sound will not respond to keyboard pressure. If pressure has been assigned
as an insert effect modulation source, that response to pressure is also disabled.
ee
ee
ii
ENSONIQ ASR-X Pro MusicianÕs Manual 17
Page 29

2ÑTracks
¥ AutoÑso that the trackÕs sound will respond to whichever type of pressure the ASR-X Pro receives
via MIDI.
¥ ChannelÑso that the trackÕs sound will only respond to channel pressure.
¥ KeyÑso that the trackÕs sound will only respond to key pressure.
PPPPrrrrooooggggrrrraaaammmmCCCChhhhnnnnggggeeeeRRRReeeeccccvv
The ProgramChngeRecv parameter enables or disables the selected trackÕs response to received MIDI
Program Change messages. The parameter can be set to ÒOnÓ or ÒOff.Ó
BBBBaaaannnnkkkk SSSSeeeelllleeeecccctttt RRRReeeeccccvv
The Bank Select Recv parameter enables or disables the selected trackÕs response to received MIDI Bank
Select messages. The parameter can be set to ÒOnÓ or ÒOff.Ó
DDDDaaaattttaaaa EEEEnnnnttttrrrryyyy RRRReeeeccccvv
The Data Entry Recv parameter enables or disables the selected trackÕs response to received Data Entry
(controller #6) messages. The parameter can be set to ÒOnÓ or ÒOff.Ó
PPPPiiiittttcccchhhh BBBBeeeennnndddd RRRReeeeccccvv
The Pitch Bend Recv parameter enables or disables the selected trackÕs response to received Pitch Bend
messages. The parameter can be set to ÒOnÓ or ÒOff.Ó
MMMMoooodddd WWWWhhhheeeeeeeellll((((1111)))) RRRReeeeccccvv
The Mod Wheel(1) Recv parameter enables or disables the selected trackÕs response to received Mod
Wheel (controller #1) messages. The parameter can be set to ÒOnÓ or ÒOff.Ó
FFFFoooooooottttPPPPeeeeddddaaaallll((((4444)))) RRRReeeeccccvv
The FootPedal(4) Recv parameter enables or disables the selected trackÕs response to received Foot Pedal
(controller #4) messages. The parameter can be set to ÒOnÓ or ÒOff.Ó
vv
vv
vv
vv
vv
vv
VVVVoooolllluuuummmmeeee((((7777)))) RRRReeeeccccvv
The Volume(7) Recv parameter enables or disables the selected trackÕs response to received Volume
(controller #7) messages. The parameter can be set to ÒOnÓ or ÒOff.Ó
PPPPaaaannnn((((11110000)))) RRRReeeeccccvv
The Pan(10) Recv parameter enables or disables the selected trackÕs response to received Pan (controller
#10) messages. The parameter can be set to ÒOnÓ or ÒOff.Ó
EEEExxxxpppprrrreeeessssssssnnnn((((11111111)))) RRRReeeeccccvv
The Expressn(11) Recv parameter enables or disables the selected trackÕs response to received Expression
(controller #11) messages. The parameter can be set to ÒOnÓ or ÒOff.Ó
SSSSuuuussssttttaaaaiiiinnnn////SSSSoooossssttttRRRReeeeccccvv
The Sustain/SostRecv parameter enables or disables the selected trackÕs response to received Sustain or
Sostenuto (controllers #64 and #66, respectively) messages. The parameter can be set to ÒOnÓ or ÒOff.Ó
SSSSyyyyssssCCCCTTTTRRRRLLLL1111 RRRReeeeccccvvvv,,,, SSSSyyyyssssCCCCTTTTRRRRLLLL2222 RRRReeeeccccvvvv,,,, SSSSyyyyssssCCCCTTTTRRRRLLLL3333 RRRReeeeccccvvvv,,,, SSSSyyyyssssCCCCTTTTRRRRLLLL4444 RRRReeeeccccvvvv,,
The SysCtrl1 Recv, SysCtrl2 Recv, SysCtrl3 Recv and SysCtrl4 Recv parameters enable or disable the
selected trackÕs response to received MIDI messages for any of the special user-assignable SysCTRLs (see
Chapter 7 to learn more about these definable controllers). The parameters can be set to ÒOnÓ or ÒOff.Ó
vv
vv
vv
vv
,,
18 ENSONIQ ASR-X Pro MusicianÕs Manual
Page 30
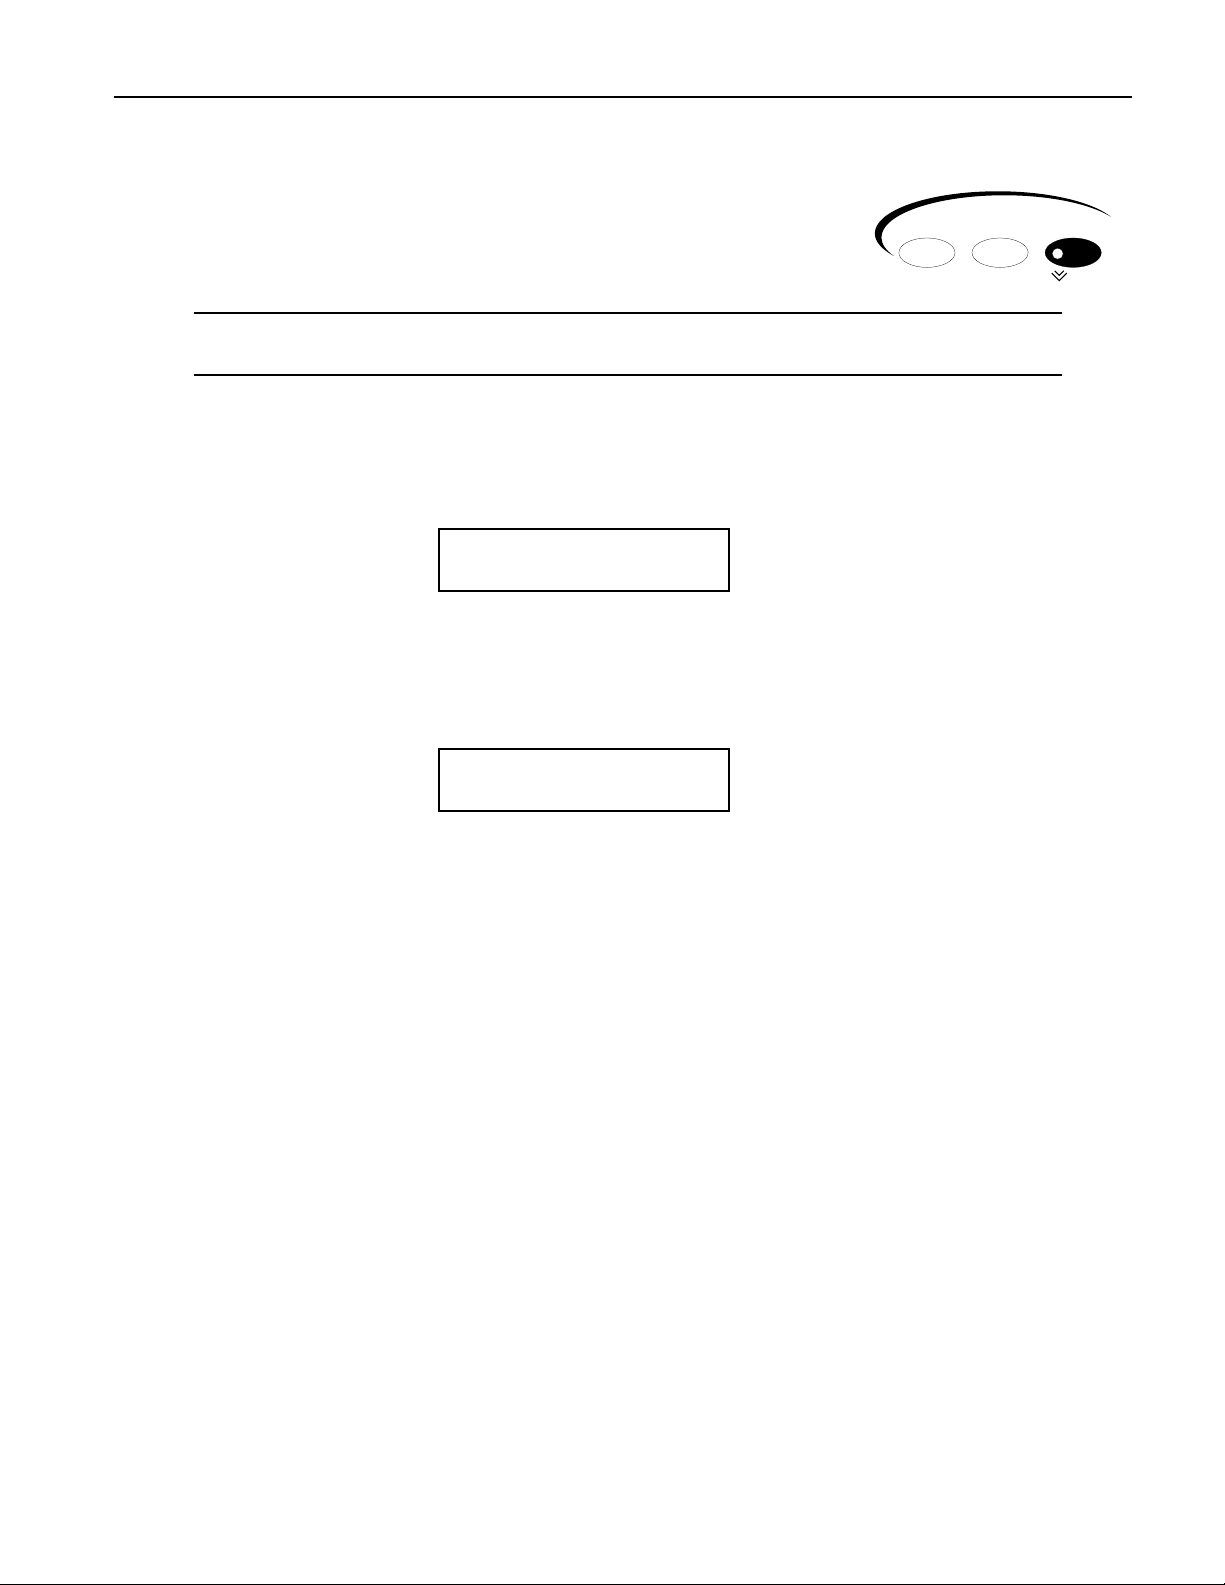
2ÑTracks
MMMMuuuuttttiiiinnnngggg aaaannnndddd SSSSoooollllooooiiiinnnngggg aaaa TTTTrrrraaaacccckk
The Mute/Solo button provides an easy way to enable or disable the
playback of the tracks in a sequence. You can silence, or mute, the selected
trackÑor you can solo the track by silencing all of the tracks except the
selected track.
TTTTiiiipppp:::: The sequencer will automatically record track mutings and un-mutings if theyÕre performed
while the track being muted or un-muted is being recorded.
kk
MMMMuuuuttttiiiinnnngggg aaaannnndddd SSSSoooollllooooiiiinnnngggg ffffrrrroooommmm tttthhhheeee FFFFrrrroooonnnntttt PPPPaaaannnneeeell
¥ To mute the currently selected track, press the Mute button onceÑthe Mute LED will light, and the
word ÒmuteÓ will appear in the display to show that the selected track has been silenced.
¦01 mute ROM08:000
PERCSOLO: Thump Kick
¥ To unmute the currently selected track, press the Mute button onceÑthe Mute LED will turn off and
the track will once again be audible.
¥ To solo the currently selected track, double-click the Mute buttonÑthe Mute LED will flash, and the
word ÒsoloÓ will flash in the display.
¦01 solo ROM08:000
PERCSOLO: Thump Kick
m
m
Sound Edit Mute
Track
Mix / FX Bus
Solo
ll
¥ To un-solo the currently selected track, press the Mute buttonÑthe Mute LED will turn off and any
tracks that were audible prior to soloing the track will once again be audible.
¥ To solo groups of tracksÑthis is called a group-soloÑselect each of the tracks in turn and double-
click the Mute button for each track.
¥ To remove the currently selected track from a group-solo, double-click the Mute button.
The ASR-X Pro solo is intelligent in that it remembers if any tracks in the sequence were already muted
prior to soloing, and restores them to that state when the solo is disengaged. When a track is soloed, and
any track other than the soloed track is selected, the display will flash the word Òmute.Ó Tracks that were
already silenced before the solo was engaged will show a non-flashing Òmute.Ó
MMMMuuuuttttiiiinnnngggg TTTTrrrraaaacccckkkkssss vvvviiiiaaaa MMMMIIIIDDDDII
Tracks can be muted via MIDI by sending a controller #119 message on the channel whose number
corresponds to the track you want to mute. The track will respond to a controller #119 value of:
¥ 127 by muting the track.
¥ 000 by un-muting the track.
¥ 064 causes a track thatÕs part of a group-solo to be removed from the solo group.
II
ENSONIQ ASR-X Pro MusicianÕs Manual 19
Page 31

3ÑPads
33
33
PPPPaaaaddddss
TTTThhhheeee PPPPaaaaddddssss:::: OOOOvvvveeeerrrrvvvviiiieeeeww
WWWWhhhhaaaatttt aaaarrrreeee tttthhhheeee PPPPaaaaddddssss??
All MIDI samplers and MIDI synthesizersÑthe ASR-X Pro, of course, belongs in both categoriesÑshare
two fundamental elements: sounds and a way to play them. The most common device used to play
sounds is the conventional white-and-black-keys keyboard. Typically, a key on a keyboard will play the
note that would be produced by striking the same key on a traditional instrument, such as a piano.
Each semitone is represented by a MIDI note name. The octavesÑwhich begin at each C naturalÑare
numbered, as shown above. The ASR-X Pro can address MIDI notes from A0 to C8.
ss
ww
??
In the flexible realm of the sampler, however, any sound can be assigned to any MIDI note.
A key on a keyboard connected to a sampler is really nothing more than a switch that plays whatever
sound is assigned to the corresponding MIDI note. The ASR-X Pro provides pads instead of a piano-style
keyboard for this purposeÑthe ASR-X Pro is a groove machine, and grooves are most fun when banged
into being. (You can also play ASR-X Pro sounds via MIDI from any MIDI controller; see Chapter 2.)
The 13 ASR-X Pro pads trigger 13 adjacent MIDI note numbers, the equivalent of 13 adjacent keys on a
piano-style keyboard (unless the Kit Mapper, described later in this chapter, is on). You can use the pads
to play single notes or chords.
The pads default to playing the octave beginning at C2, though they can be re-directed up or down to
trigger the MIDI note numbers in any octave (see ÒOctave Transpose ButtonsÓ later in this chapter).
ENSONIQ ASR-X Pro Reference Manual 21
Page 32

3ÑPads
WWWWhhhhaaaatttt tttthhhheeee PPPPaaaaddddssss PPPPllllaaaayy
The ASR-X Pro provides two major types of sound structuresÑstandard sounds and kit sounds. Precisely
what the pads play depends on the structure of the sound assigned to the currently selected track.
yy
SSSSttttaaaannnnddddaaaarrrrdddd SSSSoooouuuunnnnddddss
Standard sounds play digital recordings of audio called waves. This can be:
¥ waves built into your ASR-X Pro ROM. ¥ waves youÕve loaded into your ASR-X Pro.
¥ waves that youÕve created in the ASR-X Pro.
The waves in standard sounds are arranged in layers comprised of wave data and parameters that shape
the data. Some of the ROM standard sounds in your ASR-X Pro are comprised of multiple layers, which
may contain groups of related waves in order to accurately reproduce a real-world or synthesized sound.
Sounds that play the waves you create on the ASR-X Pro are organized in layers, as wellÑstereo waves
are played by sounds with two layers, mono waves are played by sounds using one layer.
When a standard sound is selected, each pad will play the sound at a different pitch, determined by the
setting of the selected trackÕs PitchTbl parameter (see Chapter 2), and whether or not the Kit Mapper is
turned on (the Kit Mapper is described later in this chapter).
KKKKiiiitttt SSSSoooouuuunnnnddddss
Kit sounds utilize a powerful structure first introduced in ENSONIQÕs MR synthesizer series. In a kit
sound, each note from B1 to D7 actually plays its own complete soundÑeither a standard sound or
another kit sound. Therefore, what the pad plays depends on the sound youÕve assigned to it.
If youÕve assigned the same standard sound to more than one pad, they play the same sound. Since each
pad has its own set of PAD parameters (described later in this chapter), you can program the pads to play
22 ENSONIQ ASR-X Pro Reference Manual
ss
ss
Page 33

3ÑPads
different variations of the same sound, perhaps setting them to play at different pitches. You can also
program each pad in a kit to play a sound thatÕs unrelated to what the other pads are playingÑin this
case each pad triggers something completely unique.
NNNNooootttteeee:::: Each pad in a kit defaults to playing its sound at the pitch that would be heard at C4. The
Tuning Shift parameter described later in this chapter can change the pitch of the padÕs sound.
OOOOccccttttaaaavvvveeee TTTTrrrraaaannnnssssppppoooosssseeee BBBBuuuuttttttttoooonnnnss
The ASR-X Pro pads default to playing the octave-plus-one-note beginning
at the C natural two octaves below Middle CÑC2. The Octave Transpose
buttons provide a means of changing which of five octaves in the selected
sound will be addressed by the 13 pads. You can:
¥ repeatedly press the either Octave Transpose button to redirect the pads upward or downward.
¥ press either Octave Transpose button once, and turn the Value knob to select the desired octave.
The Pad Xpose (short for Òpad transposeÓ) display shows you the octave in the currently selected sound
thatÕs being played by the pads:
The selected track The location in memory, bank and program number of the selected sound
ss
Octave Transpose
l m n n
¦01 ROM09:010
Pad XPose=2oct C4-C5
ip
The amount by which the pads have been shifted upward The octave being played
TTTThhhheeee KKKKiiiitttt MMMMaaaappppppppeeeerr
Typically, the pads in the ASR-X Pro play 13 adjacent notes. When youÕre using a kit sound that conforms
to the ENSONIQ drum or percussion maps (described in Chapter 9), these 13 notes may be variations of
the same kit component. The Kit Mapper re-assigns the pitches played by the pads so that the important
elements of a typical kitÑwhich are mapped to different octaves within the kitÑare available at once.
rr
¥ To turn on Kit Mapper , tap the left Octave Transpose button until the display shows
ÒPadXpose=Kit Mapper.Ó To turn it off, press the right-hand Octave Transpose button.
PPPPaaaattttcccchhhh SSSSeeeelllleeeecccctttt BBBBuuuuttttttttoooonnnnss
The Patch Selectª buttons provide access to variations of the ASR-X Pro ROM
sounds. The layers in these sounds are programmed to supply up to four
different versions of the basic sound, or sometimes completely different sounds
that complement the basic sound. The Patch Select buttons are used for turning
on and off these different sets of layers.
NNNNooootttteeee:::: All ENSONIQ samplers since the original EPS have offered the expressive power of Patch
Selects. Well-programmed sounds created on those instruments take advantage of this feature.
ENSONIQ ASR-X Pro Reference Manual 23
ss
Patch Selects™
Page 34

3ÑPads
To hear the effect of the Patch Select buttons, press one or both as you play an ASR-X Pro ROM sound.
The four possible Patch Select states are:
¥ RightÑwhen only the right button is pressed. ¥ LeftÑwhen only the left button is pressed.
¥ BothÑwhen both buttons are depressed. ¥ OffÑwhen no Patch Select button is pressed.
The default behavior of the Patch Select buttons is that they are active only when theyÕre being held
down. This can be changed by resetting the System/MIDI Patch Selects parameter (see Chapter 7).
PPPPaaaattttcccchhhh SSSSeeeelllleeeeccccttttssss aaaannnndddd MMMMIIIIDDDDII
The Patch Select states listed above can be invoked via MIDI by sending MIDI controller 70 values on the
MIDI channel of the track containing the sound you wish to manipulate. Send the ASR-X Pro a value of:
¥ 32 to ÒpressÓ the left Patch Select button. ¥ 127 to ÒpressÓ both Patch Select buttons.
¥ 64 to ÒpressÓ the right Patch Select button. ¥ 0 to ÒpressÓ neither Patch Select button.
II
PPPPrrrrooooggggrrrraaaammmmmmmmiiiinnnngggg tttthhhheeee PPPPaaaaddddss
OOOOvvvveeeerrrrvvvviiiieeeeww
ww
The ASR-X Pro allows you to edit the behavior of the pads in any kit sound. You can:
¥ select a new sound to be played by the pad.
¥ adjust the manner in which the pad will play its sound by setting volume, panning, effect routing
and tuning parameters.
When a pad is playing a sound that uses waves youÕve created on your ASR-X Pro by sampling or
resampling, you can also:
¥ set the manner in which the padÕs sound will play back its wave(s).
¥ program the sound using an extensive suite of sound-sculpting parameters.
¥ perform various permanent operations upon the soundÕs wave data.
NNNNooootttteeee:::: If you attempt to perform wave operations by pressing the Pad Process button when the
selected sound is not playing an ASR-X Pro-created wave the display will show the ÒSynthesize
Stomper sound?Ó prompt described later in this chapter.
ss
Any ASR-X Pro sound can be converted into a kit so that it can be edited. The sound will function
essentially as it always didÑhowever, youÕll be able to re-program the sound pad-by-pad.
In order to program a soundÕs pads, two conditions must be met:
1. The sound must be a kit, or converted into a kit for editing.
2. The sound must be in RAM, so that it can be altered (sounds in ROM are unalterable).
The ASR-X Pro has a name for a sound that meets both of these requirements: itÕs called a RAM kit.
TTTToooo PPPPrrrreeeeppppaaaarrrreeee tttthhhheeee SSSSeeeelllleeeecccctttteeeedddd TTTTrrrraaaacccckkkkÕÕÕÕssss SSSSoooouuuunnnndddd ffffoooorrrr PPPPaaaadddd EEEEddddiiiittttiiiinnnngg
The ASR-X Pro knows when a sound is ready to be edited. If the selected sound is a RAM kit, itÕs already
editable. When the selected sound is not a RAM kitÑif, for example, itÕs a ROM sound or a non-kit RAM
soundÑthe ASR-X Pro will ask the following question when you press the Pad Sound or Edit buttons:
gg
Make a RAM kit from
¦01:Sweep Bass?
ip
The selected track The selected sound
When you press the ÒYesÓ button in response to this question, the ASR-X Pro creates a copy of the
selected sound as a kit in RAM, and assigns it to the selected track. The newly created kit will add an
24 ENSONIQ ASR-X Pro Reference Manual
Page 35

3ÑPads
underscore and a two-digit number to the end of the soundÕs original nameÑabbreviating the original
name if necessaryÑ to show that itÕs based on the original sound. The new kit can be found in the USERSND and DRUM-KIT SoundFinder categories.
TTTTiiiipppp:::: You can rename a RAM kit at any time using the MemoryManager. See Chapter 7.
If the selected sound is a ROM kit soundÑso that it already has the desired kit structure for editing, but is
a permanent, uneditable ROM soundÑyou can press the Pad Sound or Edit buttons and press any pad to
view the name of the sound itÕs playing and the settings of its parameters. If you attempt to change the
sound played by a pad, the above display will appear, asking if you want to make a RAM copy of the kit.
SSSSeeeelllleeeeccccttttiiiinnnngggg aaaa PPPPaaaadddd ffffoooorrrr EEEEddddiiiittttiiiinnnngg
To edit a pad, you must first press the pad to select it. The displays that relate to the various pad-editing
functions all show, in their upper-left corners, the pad thatÕs currently selected. If youÕd like to select a
pad outside of the current pad octave range, use the Octave Transpose buttons to select the octave in
which the pad can be foundÑthen press the desired pad to select it for editing,
CCCChhhhoooooooossssiiiinnnngggg aaaa PPPPaaaaddddÕÕÕÕssss SSSSoooouuuunnnndd
When the selected track contains a RAM kit sound, pressing the Pad
Sound button allows you to choose a new sound for any of its pads.
The pad sound-selection resembles the track sound-selection display:
The pad being edited The selected track The soundÕs memory residency, bank and program number
gg
dd
l l n n n
padD2 ¦01 ROM08:000
PERCSOLO: Thump Kick
The currently selected SoundFinder category The currently selected sound
You can choose a new sound for the selected pad by turning the Sound Type knob to pick the type of
sound you want, and the Sound Name knob to select the individual sound.
TTTTiiiipppp:::: If the selected track contains a ROM kit sound, you can press the Pad sound button and then
press each pad button to view the name of the sound being played by the pad; however, you can
only change a padÕs sound if youÕve copied the ROM kit into RAM for editing.
ii
Sound Edit Process
Pad
Loop / Filter
Stomp !
TTTTiiiipppp:::: You can quickly erase a RAM sound from a pad by holding down the Pad Sound button and,
while still holding it, pressing the No button. The sound Silence will be assigned to the pad.
OOOOvvvveeeerrrrvvvviiiieeeewwww ooooffff tttthhhheeee PPPPaaaadddd EEEEddddiiiitttt PPPPaaaarrrraaaammmmeeeetttteeeerrrrss
The Pad Edit parameters allow you to determine the behavior of the
sound played by each pad in a RAM kit. This includes ROM or RAM
sounds that play the ASR-X ProÕs built-in sound waves, as well as the
waves that you create yourself and have sent to pads. All of these
parameters are accessed by pressing the Pad Edit button.
To simplify navigation, the Pad Edit parameters are divided into 12 sub-groups.
The PAD parameters are always available, regardless of the type of sound being played by the selected
pad. They allow you to determine the manner in which the pad will play its sound, and are described
ENSONIQ ASR-X Pro Reference Manual 25
ss
Sound Edit Process
Pad
Loop / Filter
Stomp !
Page 36

3ÑPads
below in ÒDetermining a PadÕs Behavior.Ó The PAD parameter settings become part of the selected
trackÕs RAM kit.
TTTTiiiipppp:::: You can view the PAD parameter settings for a ROM sound by pressing the Pad Edit button,
pressing any pad, and turning the Parameter knob to view the padÕs settings. In the case of nonkit sounds, all of the padÕs will show the same parameter values.
The ASR-X Pro also provides the following groups of sound parameters when the selected pad is playing
a sound based on an ASR-X Pro-created wave stored in RAM memory. The settings for these parameters
become part of the padÕs sound. The full sample-programming power of the ASR-X Pro is unleashed
through the use of these parameters, described later in this chapter in ÒEditing a PadÕs Sound.Ó
¥ WAVE ¥ FLT1 ¥ ENV3
¥ PTCH ¥ FLT2 ¥ MOD
¥ ENV1 ¥ ENV2 ¥ MISC
¥ FILT ¥ AMP
All of the Pad Edit parameters share a common display layout that tells you the note corresponding to the
pad being edited, the type of parameter selected, the name of the sound the pad is playing, and the
selected parameterÕs current value:
The padÕs note The type of parameter The sound the pad is playing
lm n
C2 PAD SMPL1_01
Pad Volume= +2dB
ii
The currently selected pad parameter The selected parameterÕs value
TTTTiiiipppp:::: You can jump among the parameter groups by repeatedly pressing the Pad Edit button.
NNNNooootttteeee:::: When editing Pad parameters, itÕs important to remember that each track can play its
soundÑor sounds, in the case of kitsÑin its own way. If editing Pad parameters produces
unexpected results, check the track parameters for the currently selected track to see if theyÕre
influencing the sound youÕre attempting to edit.
DDDDeeeetttteeeerrrrmmmmiiiinnnniiiinnnngggg aaaa PPPPaaaaddddÕÕÕÕssss BBBBeeeehhhhaaaavvvviiiioooorr
PPPPAAAADDDD PPPPaaaarrrraaaammmmeeeetttteeeerrrrss
The PAD parameters allow you to determine the manner in which each pad in the currently selected
RAM kit will play its sound. All of the PAD parameters settings are permanently stored in the RAM kit
when you save it. When a padÕs sound contains multiple layers, all of its layers are affected
simultaneously by PAD parameter edits.
PPPPaaaadddd VVVVoooolllluuuummmmee
The Pad Volume parameter allows you to raise or lower the level of the sound being played by the
selected pad. The parameter can be set anywhere from -50dB to +14dB. When the Pad Volume parameter
is set to 0dB, the padÕs sound will play at its originally programmed volume.
PPPPaaaadddd PPPPaaaann
The Pad Pan parameter allows you to shift the stereo image of the selected padÕs sound leftward or
rightward in the stereo field. The parameter can be set anywhere from Left -64 to Right +63. A value of
Center 00 will leave the soundÕs original stereo placement intact.
nn
ss
ee
rr
26 ENSONIQ ASR-X Pro Reference Manual
Page 37

3ÑPads
NNNNooootttteeee::::: This parameter shifts the entire sound being played by the selected pad left or right, so that
the soundÕs internal stereo imaging is preserved.
ss
FFFFXXXX BBBBuuuuss
The FX bus parameter allows you to assign the selected padÕs sound to one of the ASR-X ProÕs FX busses.
The parameter can be set to:
¥ ProgÑso that if the pad is playing a standard sound, the soundÕs Alt Bus will be used, or if the pad
is playing a kit sound, the sound played by each note in the kit will use its own FX Bus setting.
¥ InsertÑto route the padÕs sound to the currently selected sequenceÕs insert effect.
¥ LightReverbÑto apply a minimal amount of reverb to the padÕs sound.
¥ MediumReverbÑto apply an average amount of reverb to the padÕs sound.
¥ WetReverbÑto apply a large amount of reverb to the padÕs sound.
¥ DryÑto leave the padÕs sound un-effected.
¥ AuxOut1, AuxOut2, AuxOut3 or AuxOut4Ñto send the padÕs sound directly to one of the four
auxiliary outputs. These values are only available when an X-8 output expansion board is installed.
NNNNooootttteeee:::: These values are used whenever the selected trackÕs FX Bus parameter (see Chapter 2) is set
to ÒProg.Ó
TTTTuuuunnnniiiinnnngggg SSSShhhhiiiifffftt
The Tuning Shift parameter allows you to raise or lower the note to be played by the pad. In many cases,
this parameter will have the effect of raising or lowering the pitch at which the padÕs sound will be heard.
When the pad is playing a sound that contains more than a single waveÑexamples of this would be
drum kits, or sounds with multiple-sample layersÑthe parameter will have the effect of pointing the pad
to a different noteÑand therefore, possibly different wave dataÑ within the padÕs sound. The parameter
can be set anywhere from -64st (ÒstepsÓ) to +63st. When the Tuning Shift parameter is set to 0st, the padÕs
sound will play at the pitch equivalent to striking a Middle C (C4) . When the pad is playing a wave
youÕve created in the ASR-X Pro, the wave will be heard at its original pitch.
NNNNooootttteeee:::: The Tuning Shift parameter raises or lowers the note to be played by the pad in semitone
steps when the sound employs an equal-temperament tuning table. However, some ASR-X Pro
sounds use special tunings. For example, the tuning of drum sounds often varies only by small
increments as you move from key to key, in order to simulate the subtle pitch shifts of real-world
drums. The effect of the Tuning Shift parameter depends, therefore, on the tuning table used by
the padÕs sound.
EEEEddddiiiittttiiiinnnngggg aaaa PPPPaaaaddddÕÕÕÕssss SSSSoooouuuunnnndd
The following groups of parameters allow you to program sounds based on ASR-X Pro waves.
tt
dd
TTTThhhheeee AAAASSSSRRRR----XXXX PPPPrrrroooo MMMMoooodddduuuullllaaaattttoooorrrrss
Some of the parameters in this section can be changedÑor modulatedÑin real time by an external
mechanism called a modulator. These parameters can be set to:
ss
Off for no modulation
Full Amt The maximum amount of modulation is applied to the modulation destination
LFO the selected waveÕs LFO
Stepped a significant amount of random noise modulation at a rate determined by the
Smoothed a subtle amount of random noise modulation at a rate determined by the
ENSONIQ ASR-X Pro Reference Manual 27
NoiseSource Rate parameter (see later in this section)
NoiseSource Rate parameter (see later in this section)
Page 38

3ÑPads
Env1 the selected waveÕs Envelope 1
Env2 the selected waveÕs Envelope 2
Env3 the selected waveÕs Envelope 3
Velocity MIDI velocity: higher values cause greater modulation; lower values cause less
modulation
Vel+Press a combination modulator, with MIDI velocity and pressure messages together
achieving maximum modulation amounts
MIDI Key# MIDI note numbers set the modulation destination parameter to absolute
corresponding values
Keyboard MIDI note numbers above C4 raise the modulation destinationÕs value from its
setting; lower note numbers reduce it
Pressure MIDI channel or polyphonic (ENSONIQ PolyKeyª) pressure; higher values cause
greater modulation, lower values cause less modulation
PitchWhl MIDI pitch bend raises or lowers modulation destination value; a pitch bend wheel
at rest transmits a central modulation value of 64
ModWheel MIDI modulation wheel (controller #1); maximum values are attained when the
mod wheel is pushed all the way forward
Whl+Press A combination modulator, with MIDI mod wheel and pressure messages together
achieving maximum modulation amounts
FootPedal MIDI foot pedal (controller #4); maximum values are attained when the foot pedal is
pushed all the way forward
Sustain MIDI sustain pedal (controller #64) operating as a modulation switch: down
produces maximum modulation; up produces no modulation
Sostenuto MIDI sostenuto pedal (controller #66) operating as a modulation switch: down
produces maximum modulation; up produces no modulation
SysCTRL1 the first of the ASR-X ProÕs assignable MIDI controllers (see Chapter 7)
SysCTRL2 the second of the ASR-X ProÕs assignable MIDI controllers (see Chapter 7)
SysCTRL3 the third of the ASR-X ProÕs assignable MIDI controllers (see Chapter 7)
SysCTRL4 the fourth of the ASR-X ProÕs assignable MIDI controllers (see Chapter 7)
PatchSel the Patch Select buttons: the left button produces a modulation value of 32; the right
button 64; both buttons 127; neither button 0
28 ENSONIQ ASR-X Pro Reference Manual
Page 39

3ÑPads
WWWWAAAAVVVVEEEE PPPPaaaarrrraaaammmmeeeetttteeeerrrrss
TTTThhhheeee PPPPllllaaaayyyybbbbaaaacccckkkk ooooffff WWWWaaaavvvveeeess
ss
ss
The waves you create on your ASR-X Pro are digital recordings of a sound. Digital recording captures
audio by taking snapshots of the sound many times per secondÑ44,100 times per second in the ASR-X
Pro. Therefore, instead of recording continually, it actually samples the sound many times per second. On
playback, the ear perceives these snapshots, or Òsamples,Ó as a single sonic entityÑin the ASR-X Pro, this
single entity is called a Òwave.Ó The ASR-X Pro can play the list of samples that make up a wave forward
or backward, play specified sections of samples, or play sections of them over and over for as long as you
hold down a pad or key on an external MIDI keyboard. The WAVE parameters control these features.
PPPPaaaarrrraaaammmmeeeetttteeeerr
PlayMode OnceForward,
Start/Loop 00 to 99% for
Sample Start 0 to the number of
Loop Start 0 to the number of
Loop End 0 to the number of
StartToEndIndex 0 to 127 Allows you to choose one of 128 locations between the
IndxModSrc (see modulator list) Selects a modulator for the StartToEndIndex. See ÒThe
Index ModAmt -127 to +127 Determines the degree to which the IndxModSrc will affect
rr
ee
RRRRaaaannnnggggee
OnceBkwrd,
LoopForward,
LoopFwd&Bwd
sample start, loop
start and loop end
points
samples that
comprise the entire
wave.
samples that
comprise the entire
wave.
samples that
comprise the entire
wave.
DDDDeeeessssccccrrrriiiippppttttiiiioooonn
Determines the direction and manner in which the wave
will play:
OnceForwardÑthe wave will play from beginning to end
once and stop.
OnceBkwrdÑthe wave will play from back to front once
and stop.
LoopForwardÑthe wave will play from the beginning to its
loop end point, at which time it will start again from the
loop start point and play to the loop end point repeatedly
until the pad or key is lifted.
LoopFwd&BwdÑthe wave will play from the beginning to
its loop end point, at which time it will play backwards to
the loop start point and then forwards to the loop end
repeatedly until the pad or key is lifted.
Provides three editable fields that allow you to set the wave
playback start point, loop start point and loop end point as
percentages of the waveÕs samples. This can be viewed as a
coarse adjustment for these three points. Optimal loop
points are automatically offered when the System/MIDI
AutoZero Cross parameter is set to ÒOnÓ (see Chapter 7).
Determines the point from which the wave will play on
key-down, expressed as individual samples. This is a fineadjust for the wave playback start point.
Determines the point from which the wave will loop when
PlayMode is set to LoopForward or LoopFwd&Bwd,
expressed as individual samples. This is a fine-adjust for
the wave playback loop start point.
Determines the point to which the wave will play, whether
the wave is set to loop or not, expressed as individual
samples. This is a fine-adjust for the wave playback loop
end point.
Sample Start and Loop End points from which to begin
wave playback. A setting of 0 causes the wave to start
playback from the Sample Start point.
ASR-X Pro Modulators" earlier in this section for a list of
the available StartToEndIndex modulators.
the StartToEndIndex.
nn
AAAA CCCCoooouuuupppplllleeee ooooffff WWWWAAAAVVVVEEEE IIIIddddeeeeaaaass
ss
¥ You can set Sample Start to a higher value than Loop Start. When your wave is a beat loop, this lets
you play a few beats from the end of the wave before the loop starts playing.
¥ By modulating the StartToEnd Index, you can start playback of a wave from a different place within
the wave every time you strike its pad. When Envelope 3 is set to Repeat (see later in this chapter),
the wave will restart playback from the StartToEnd Index point each time the envelope repeats.
ENSONIQ ASR-X Pro Reference Manual 29
Page 40

3ÑPads
PPPPTTTTCCCCHHHH PPPPaaaarrrraaaammmmeeeetttteeeerrrrss
ss
The PTCH parametersÑfor Òpitch parametersÓÑallow control of the selected soundÕs pitch bend, tuning,
glide and modulation.
PPPPaaaarrrraaaammmmeeeetttteeeerr
Pitch Bend Up 12 down to 12 up,
Pitch Bend Down 12 down to 12 up,
PitchBendMode Normal, Held Determines whether or not the sound will pitch-bend
SemitoneTuning -64st to 64st Lowers or raises the pitch of the padÕs sound by semitones.
Fine Tuning -127 to +127 Fine tunes the pitch of the padÕs sound by steps of one cent
KeybdTrack various Determines the pitch response of the padÕs sound to MIDI
PitchTbl various, RAM Selects a pitch table which may be accessed by the sound
Glide Mode Off, On Enables/disables glide (portamento) in the padÕs sound.
Glide Time 0 to 127 Determines the amount of time it takes for the pitch to glide
Voice Mode Poly, Mono Determines whether the padÕs sound will be polyphonic or
PtchModSrc (see modulator list) Selects a pitch modulator for the padÕs sound. See ÒThe
Pitch ModAmt -127 to +127 Determines the amount and polarity of pitch modulation
Pitch ModRange 0st to 64st Determines the maximum amount of pitch shifting the
LFO Pitch ModAmt 0 to 127 Determines the degree to which the LFO will affect the
rr
RRRRaaaannnnggggee
Off
Off
ee
DDDDeeeessssccccrrrriiiippppttttiiiioooonn
Determines the maximum number of steps by which the
pad's sound will be raised or lowered when the ASR-X Pro
receives pitch bend messages from a MIDI pitch bend
wheel pushed all the way up (forward).
Determines the maximum number of semitone steps by
which the pad's sound will be lowered or raised when the
ASR-X Pro receives pitch bend messages from a MIDI pitch
bend wheel pulled all the way down (back).
normally or in held mode. Normally, when MIDI pitch
bend messages are received, all notes sounding are affected
by the pitch bend messages. In held mode, only notes
physically being held downÑnotes which have not yet
received a key-up messageÑare affected when pitch bend
messages are received. The held option is useful for a
number of musical situations, including the simulation of
pedal steel guitars or solo string lines played against a
chordal background.
(1/100 of a semitone).
note numbers. The default setting is Western equal
temperament; other options include ratio relationships to
received note numbers, inverted equal temperament or
assignment to the soundÕs pitch table, determined by the
PitchTbl parameter (see below).
(see ÒList of ROM System Pitch TablesÓ in Chapter 9 for a
list of pitch tables). The ASR-X Pro supports the MIDI
Tuning Change StandardÑpitch tables may be transmitted
via MIDI SysEx to the ASR-X ProÕs RAM pitch table (see
ÒASR-X Pro MIDI ImplementationÓ in Chapter 9 for more
details).
The exact nature of the soundÕs glide is determined by the
Voice Mode parameter (see below).
from one note to another when glide is enabled: 0
represents the shortest glide time, 127 the longest. When
Voice Mode=Mono (see below), glide in the ASR-X Pro is
constant-time portamento: the time it takes to glide from
note to note is the same regardless of how far way from
each other the notes are.
monophonic. When Voice Mode=Poly, notes glide from a
random selection of pitches.
ASR-X Pro Modulators" earlier in this section for a list of
the available pitch modulators.
caused by the Pitch Mod within the overall limit designated
by the Mod Range parameter (see below).
Pitch Mod may cause, in keyboard steps. The amount of
pitch change invoked by each step is dependent on the
soundÕs pitch table.
pitch of the padÕs sound.
nn
30 ENSONIQ ASR-X Pro Reference Manual
Page 41

3ÑPads
Env1PitchModAmt -127 to +127 Env1PitchModAmt provides a special routing that endows
EEEENNNNVVVV1111 PPPPaaaarrrraaaammmmeeeetttteeeerrrrss
ss
Envelope 1 with unique capabilities in the modulation of
the soundÕs pitch. When applied to the soundÕs pitch via
the Env1PitchModAmt parameter, Envelope 1
automatically sustains at the pre-enveloping pitch,
regardless of its Sustain Level (4) setting. Instead, its
Sustain Level (4) setting serves to determine which
Envelope 1 level values will cause the pitch to rise above
the un-enveloped pitch and which level values will drive it
below. Envelope 1 level values equal to the Sustain Level
(4) value will cause the sound to play at the un-enveloped
pitch. Higher level values will shift the pitch upward, and
lower values will shift the pitch downward. This feature
allows for the creation of bi-directional pitch envelope
shapes, while conveniently ensuring that the padÕs sound
will always sustain at the un-enveloped pitch.
The following parameters pertain to the first of the selected soundÕs three envelopes. Envelope 1 is
typically applied to pitch, though it may be used as a modulator for any modulatable parameter. When
Envelope 1 is applied to a soundÕs pitch through the Env1PitchModAmt pitch parameter, itÕs endowed
with some special attributes, described above.
PPPPaaaarrrraaaammmmeeeetttteeeerr
Envelope Mode Normal, Finish,
Attack Time (1) 0 to 99 Determines the time it takes for the envelopeÕs level to
Attack Level (1) 0 to 127 Determines the level the envelope will reach at the end of
Ramp Time (2) 0 to 99 Determines the time it takes the envelope to go from Attack
Ramp Level (2) 0 to 127 Determines the level the envelope will reach at the end of
Ramp Time (3) 0 to 99 Determines the time it takes the envelope to go from Ramp
Ramp Level (3) 0 to 127 Determines the level the envelope will reach at the end of
Decay Time (4) 0 to 99 Determines the time it takes the envelope to go from Ramp
rr
ee
RRRRaaaannnnggggee
Repeat
DDDDeeeessssccccrrrriiiippppttttiiiioooonn
Envelope 1 may function in one of three ways:
¥ NormalÑEnvelope 1 plays through normally. When the
key is released, the envelope takes the Release Time (5) to
go from the current level down to zero.
¥ FinishÑEnvelope 1 finishes playing through all its stages,
ignoring the key-up event. The envelope spends no time at
the Sustain Level (4) stage. When the Decay Time (4)
interval is finished, instead of stopping at the Sustain Level
(4) stage, the envelope immediately goes into the Release
Time (5) stage. This is good for percussive-type sounds
where you want the envelope to be the same for every note,
no matter how long the key is held down.
¥ RepeatÑAt the end of the Ramp Time (3) stage, instead of
sustaining, Envelope 1 goes immediately back to the
beginning and repeats, starting with the Attack Time (1)
stage. When the key is released, the envelope stops
repeating and moves into the release stage, taking the
Release Time (5) interval to go from the current level down
to zero. This type of envelope can be used to create complex
LFO-type effects.
travel from zero (when a note-on is received) to Attack
Level (1). The higher the value, the longer the time.
the time defined by Attack Time (1).
Level (1) to Ramp Level (2).
Ramp Time (2).
Level (2) to Ramp Level (3).
Ramp Time (3).
Level (3) to the Sustain Level (4) stage. At the end of
DecayTime (4,) the envelope will remain at Sustain Level
(4) until the key is released.
nn
ENSONIQ ASR-X Pro Reference Manual 31
Page 42

3ÑPads
Sustain Level (4) 0 to 127 Determines the level the envelope will reach at the end of
Release Time (5) 0 to 99 Determines the time it takes the envelope to return to zero
Keybd TimeScaling 0 to 99 Makes the envelope times longer or shorter, depending on
VelAtckTimeModAmt 0 to 99 Determines the degree to which higher velocities will
VelRelTimModAmt -127 to +127 Determines the degree to which higher release velocities
Vel Levels ModAmt -127 to +127 Determines to what degree velocity will affect envelope
Vel Curve Quickrise,
Convex1,
Convex2,
Convex3,
Linear,
Concave1,
Concave2,
Concave3,
Concave4,
LateRise
Decay Time (4) and that it will retain until a note-off or
sustain-off message is received. When Envelope 1 is used to
modulate pitch through the Env 1 Amt parameter, this
parameter functions differentlyÑsee ÒEnv1PitchModAmtÓ
above.
after the key has been released.
the key played. The scaling effect of this parameter is based
on a center break point of F4+. Higher values will make all
envelope 1 times (except Release Time [5}) shorter for keys
above F4+, and longer for keys below F4+. Envelope times
for F4+ itself are not affected by this parameter.
shorten Envelope 1Õs Attack Time (1). This parameter will
have no effect if Attack Time (1)=0.
will make Envelope 1Õs Release Time (5) shorter or longer.
When the value is positive, a higher release velocity value
will result in a shorter Release Time (5). When the value is
negative, a higher release velocity value will result in a
longer Release Time (5). This parameter will have no effect
if Release Time (5)=0.
levels. Values above 0 increase the amount of velocity
required to reach the Envelope 1 values determined by its
level settings. Vel Curv gives you further control over the
velocity response of the envelope.
Selects which of the velocity response curves the envelope
will use if the velocity level control (Vel Levels ModAmt) is
set to some value other than zero.
FFFFIIIILLLLTTTT PPPPaaaarrrraaaammmmeeeetttteeeerrrrss
ss
Each sound in an ASR-X Pro sound has a pair of independently configurable multi-mode dynamic digital
filters. The following FILTÑfor ÒfilterÓÑparameters determine the overall behavior of the soundÕs two
filters.
PPPPaaaarrrraaaammmmeeeetttteeeerr
Mode 3PoleLP/1PoleLP,
Link Independent,
Resonance (Q) 0-50 When Filter Mode=Resonant2LP/2LP, this sets the
rr
ee
RRRRaaaannnnggggee
Resonant2LP/2LP,
Resonant2BP/2BP,
FilterBypass
FLT2 uses FLT1
DDDDeeeessssccccrrrriiiippppttttiiiioooonn
Determines the filter configuration for the sound: LP=lowpass filter, which allows frequencies lower than the filter
cutoff frequency (Fc) to be heard; HP=high-pass filter,
which allows frequencies above the Fc to be heard. Each
sound has two filters: the first is always LP, while the
second may be LP or HP. The steepness of each filter is
determined by its pole setting; the higher the pole value,
the more extreme the filterÕs slope becomes. A 1-pole filter
rolls off frequencies at 6 dB per octave, a 2-pole filter at 12
dB, and a 3-pole at 18 dB per octave. The Resonant2LP/2LP
value makes both filters resonant; Resonant2BP/2BP
creates a combined dual resonant band pass filter.
When set to On, Filter 2 uses Filter 1Õs settings; when Off,
Filter 2 uses its own settings.
loudness of the frequencies at the cutoff points of both
filters. When Filter Mode=Resonant2BP/2BP, this sets the
width of both of the bands, and the cutoff frequency levels.
nn
32 ENSONIQ ASR-X Pro Reference Manual
Page 43

3ÑPads
FFFFLLLLTTTT1111 aaaannnndddd FFFFIIIILLLLTTTT2222 PPPPaaaarrrraaaammmmeeeetttteeeerrrrss
ss
The following parameters are available for both of the selected soundÕs two filters.
PPPPaaaarrrraaaammmmeeeetttteeeerr
Filter Cutoff 0 to 127 Determines the selected filterÕs cutoff frequency. Filter 1 is
Keybd Track Off, various Determines how the selected filterÕs cutoff frequency will
TrackBreakpoint C-1 to G9 Determines which note will be treated as the nominal
Cut ModSrc (see modulator list) Selects a modulator for the selected filterÕs cutoff frequency.
Cutoff ModAmt -127 to +127 Determines the amount by which the Cut ModSrc will
Env2CutoffModAmt 0 to 127 Determines the degree to which Envelope 2 will affect the
rr
RRRRaaaannnnggggee
ee
DDDDeeeessssccccrrrriiiippppttttiiiioooonn
always a low-pass filter: frequencies within the selected
wave that are lower than the FLT1 Filter Cutoff setting will
pass, or be heard. Frequencies above it will be filtered out.
Lowering the FLT1 Filter Cutoff value is similar to turning
down the treble on a home stereo. The effect of the cutoff
frequency in FILT2 will depend on the setting of the FILT
Mode parameter.
change as various pitches are played, expressed in ratios.
Positive values raise the cutoff as higher notes are played.
center of the key track range, and produce neither negative
or positive cutoff modulation.
See ÒThe ASR-X Pro Modulators" earlier in this section for a
list of the available modulators.
lower or raise the selected filterÕs cutoff frequency.
selected filterÕs cutoff frequency.
nn
EEEENNNNVVVV2222 PPPPaaaarrrraaaammmmeeeetttteeeerrrrss
ss
The following parameters pertain to the second of the selected soundÕs three envelopes. Envelope 2 is
typically applied to filter cutoff settings, though it may be used as a modulator for any modulatable
parameter. The parameters available for Envelope 2 are identical to those associated with Envelope 1 (see
ÒENV1 ParametersÓ earlier in this chapter).
AAAAMMMMPPPP PPPPaaaarrrraaaammmmeeeetttteeeerrrrss
ss
The AMPÑfor ÒamplifierÓÑparameters provide control of the selected soundÕs keyboard rolloff
characteristics, volume modulation and stereo panning modulation.
PPPPaaaarrrraaaammmmeeeetttteeeerr
Rolloff Mode Off, Below, Above Enables/disables a progressive volume reduction for the
Roll Slope 0-127 Determines the extremity of the rolloff when Rolloff Mode
Roll Breakpoint C-1 to G9 Determines the note above or below which the rolloff
Vol ModSrc (see modulator list) Selects a modulator for the soundÕs volume. See ÒThe ASR-
Volume ModAmt -127 to +127 Determines the degree to which the Vol ModSrc will lower
Pan ModSrc (see modulator list) Selects a modulation source for the soundÕs position in the
Pan ModAmt -127 to +127 Determines the degree to which the modulator will move
rr
RRRRaaaannnnggggee
ee
DDDDeeeessssccccrrrriiiippppttttiiiioooonn
sound, either above or below the Roll Breakpoint (see
below).
is set to ÒAboveÓ or ÒBelow.Ó.
occurs when Rolloff Mode is not set to ÒOff.Ó
X Pro Modulators" earlier in this section for a list of the
available modulators. Note that Envelope 3 always affects
the soundÕs volume.
or raise the volume of the sound.
stereo field. See ÒThe ASR-X Pro Modulators" earlier in this
section for a list of the available modulators.
the soundÕs stereo position to the left (negative values) or
right (positive values).
nn
ENSONIQ ASR-X Pro Reference Manual 33
Page 44

3ÑPads
Alt Bus Default,
EEEENNNNVVVV3333 PPPPaaaarrrraaaammmmeeeetttteeeerrrrss
LightReverb,
MediumReverb,
WetReverb, Dry
ss
Determines the effect bus to which the sound will be routed
when itÕs selected for a track if the System/MIDI
AutoSelect FXBus parameter is set to ÒOn.Ó
The following parameters pertain to the third of the selected soundÕs three envelopes. Envelope 3 is
typically applied to the soundÕs volume settings, though it may be used as a modulator for any
modulatable parameter. The parameters available for Envelope 3 are identical to those associated with
Envelope 1 (see ÒENV1 ParametersÓ earlier in this chapter).
MMMMOOOODDDD PPPPaaaarrrraaaammmmeeeetttteeeerrrrss
ss
The MOD parametersÑor Òmodulation parametersÓÑcontrol the behavior of the soundÕs LFO and noise
generator.
PPPPaaaarrrraaaammmmeeeetttteeeerr
LFO Shape Triangle, Sine+Tri,
LFO Start Phase 0 to 127 Determines the starting phase of the LFO, when
LFO Rate 0 to 99 Determines the speed of the LFO.
Rate ModSrc (see modulator list) Selects a modulator for the LFO rate. See ÒThe ASR-X Pro
LFO Rate ModAmt -127 to +127 Determines the degree to which the Rate ModSrc will slow
LFO Depth 0 to 127 Determines the amplitude of the LFO.
DpthModSrc (see modulator list) Selects a modulator for the LFO depth. See ÒThe ASR-X Pro
LFODepth ModAmt -127 to +127 Determines the degree to which the modulator will
LFO Delay Time 0 to 99 Determines the time it takes for the LFO to go from zero to
rr
ee
RRRRaaaannnnggggee
Sine, Pos-Tri, PosSine, Sawtooth,
Square
DDDDeeeessssccccrrrriiiippppttttiiiioooonn
Determines the wave shape of the soundÕs LFO:
TriangleÑcommonly used to modulate pitch to produce
vibrato
Sine+TriÑmixture of a sine and triangle wave, a somewhat
pointy sine wave
SineÑpure fundamental frequency, more rounded in its
peaks and valleys than the triangle wave
Pos-TriÑa positive-only triangle wave useful for
simulating vibrato on instruments like the guitar where a
player can only bend notes up
Pos-SineÑpositive-only sine wave useful for simulating
vibrato on instruments like the guitar where a player can
only bend notes up
SawÑsawtooth wave commonly used for special effects
SquareÑpositive-only square wave useful for producing
in-tune trill effects
Retrigger=On. With a setting of 0, the LFO will always
restart at the beginning of its cycle.
Tip: When LFO Start Phase=0, this parameter determines
what part of the LFO wave will be applied as a fixed
modulator upon key-down.
Tip: When this parameter is set to 0, the LFO will produce
modulation only upon new note-ons, and will not further
modulate already-sounding notes.
Modulators" earlier in this section for a list of the available
LFO Rate Mod modulators.
down or speed up the LFO Rate.
Modulators" earlier in this section for a list of the available
LFO Depth Mod modulators.
decrease or increase the LFO depth.
the amount determined by the LFO Depth parameter.
Values above 0 will cause the LFO to take longer to achieve
its full depth.
nn
34 ENSONIQ ASR-X Pro Reference Manual
Page 45

3ÑPads
LFO Key Restart Off, On Determines whether the LFO will restart with each note-on.
LFO Sync Normal, various
NoiseSourceRate 0 to 127 Determines the speed of the stepped and smooth
Noise Sync Normal, various
MMMMIIIISSSSCCCC PPPPaaaarrrraaaammmmeeeetttteeeerrrrss
rhythmic divisions
of the current
sequence tempo or
received MIDI
clocks
rhythmic divisions
of the current
sequence tempo or
received MIDI
clocks
ss
When set to ÒOff,Ó the LFO will cycle continuously without
resetting, whether a note is being played or not. When set
to ÒOn,Ó the LFO waveform will always commence at its
starting location, as determined by the LFO Start Phase
parameter, when a note-on is received.
Enables/disables synchronization of the LFO to the
currently selected sequence, by providing rhythmic
divisions of its pulse. The LFO may be also be synchronized
to received MIDI clocks when the System/MIDI
ClockSource parameter is set to ÒMIDI.Ó
modulators (see ÒThe ASR-X Pro Modulators" earlier in this
section).
Tip: When this parameter is set to 0, the noise modulators
will choose new random values only upon new note-ons,
and will not further modulate already-sounding notes.
Enables/disables synchronization of the stepped and
smooth noise modulators to the currently selected
sequence, by providing rhythmic divisions of its pulse. The
LFO may be also be synchronized to received MIDI clocks
when the System/MIDI ClockSource parameter is set to
ÒMIDI.Ó
The MISCÑfor ÒmiscellaneousÓÑparameters are a small assortment of parameters and a sound-renaming facility.
PPPPaaaarrrraaaammmmeeeetttteeeerr
Sustain Pedal Off, On Enables or disables the soundÕs response to sustain pedal
Key Group Assign Off, 1 to 16 Allows assignment of the sound to one of 16 monophonic
SoundFinder all SoundFinder
FinderPref None, DEMO-
Rename Sound? (see description) When this display is visible, pressing the Yes button will
rr
ee
RRRRaaaannnnggggee
categories
SND, USER-SND,
USER&DEMO
DDDDeeeessssccccrrrriiiippppttttiiiioooonn
presses.
key groups. Key groups are used when youÕd like two or
more sounds to cut each other off, particularly helpful
when emulating real-world situations where two sounds
would be mutually exclusive. For example, when
programming hi-hat sounds, you can assign your open hihat sound and your closed hi-hat sound to the same key
group. When these two sounds are played as part of a RAM
kit, the last one played will silence the other, as it would in
a real hi-hat.
Determines the SoundFinder category for the sound.
Enables inclusion of the sound in the DEMO-SND and
USER-SND SoundFinder sound type categories. The USERSND category provides easy access to sounds youÕve
created yourself.
cause the sound naming page to appear. The top line of the
display shows the soundÕs current name. You can re-name
the selected sound by turning the Parameter knob or
pressing the Select Track buttons to choose any of the 11
character positions, and turning the Value knob to dial in
the desired character for each position.
nn
ENSONIQ ASR-X Pro Reference Manual 35
Page 46

3ÑPads
PPPPrrrroooocccceeeessssssssiiiinnnngggg aaaa SSSSoooouuuunnnnddddÕÕÕÕssss WWWWaaaavvvvee
When a pad contains a sound based on an ASR-X Pro-created wavesample,
or Òwave,Ó the Pad Process button provides access to a number of tools for
processing the soundÕs wave. In addition, whether or not the pad contains a
sound based on a wave. the Pad Process button provides access to Stomper,
a unique synthesis algorithm that lets you to create your own new sounds.
Since these tools modify and create wave data, when you perform one of the pad processes:
¥ the ASR-X Pro makes a copy of the wave
¥ it performs the selected operation
¥ it places the processed copy on the Scratch Pad. You can then play the scratch pad to audition the
results of the process youÕve performed.
If youÕre pleased with the your pad-processing results, you can send the contents of the Scratch Pad to a
pad in your kit (the procedure for sending to pads is described in Chapter 5).
NNNNooootttteeee:::: The Stomper algorithmÑunlike other pad processesÑis available at all times, regardless of
the nature of the currently selected pad sound. ItÕs described at the end of this chapter.
TTTThhhheeee PPPPaaaadddd PPPPrrrroooocccceeeessssssss DDDDiiiissssppppllllaaaayy
The processes accessed by pressing the Pad Process button share a common display:
The pad being edited ÒPROCÓ for ÒprocessÓ The padÕs sound
yy
ee
ln n
D2 PROC SMPL1_01
Normalize gain?
The process to be performed
i
Sound Edit Process
Pad
Loop / Filter
Stomp !
This display asks you if youÕd like to perform the process shown. For some of these
questionsÑNormalize gain?; Invert Sample data?; Truncate length?Ña press of the Yes button initiates
the displayed procedure. For the others, pressing the Yes button leads you to further settings that you
may want to adjust before performing the procedure. You can cancel the selected process whenever the
red/green No/Yes LEDs are flashing by pressing the No button.
As each process takes place, the ASR-X Pro display informs you of its progress.
TTTThhhheeee PPPPaaaadddd PPPPrrrroooocccceeeesssssssseeeess
NNNNoooorrrrmmmmaaaalllliiiizzzzeeee ggggaaaaiiiinnnn??
The ASR-X Pro can normalize the selected wave to digitally boost its volume to its loudest level short of
clipping. This allows the wave to take the fullest possible advantage of the 16 bits available for its
reproduction, and helps ensure that you wonÕt have to over-boost its volume for it to be heard.
Normalization seeks out the waveÕs loudest sample, multiplies it to the highest acceptable level, and then
uses the same multiplication value on the rest of the waveÕs samples.
Since the process requires no user input, pressing the Yes button in response to ÒNormalize gain?Ó
executes the normalization operation.
SSSSccccaaaalllleeee lllloooouuuuddddnnnneeeessssssss??
The ASR-X Pro lets you lower or raise the overall volume of a wave by percentage you set through the
use of its scaling facility. When you press the Yes button in response to ÒScale loudness?Ó two settings
36 ENSONIQ ASR-X Pro Reference Manual
ss
??
??
Page 47

3ÑPads
become available that allow you to set the manner in which the wave will be scaled. To view these two
settings, turn the Parameter knob; to adjust them, turn the Value knob.
¥ Scale factorÑlets you set the percentage by which your waveÕs volume will be raised or lowered,
from 1% to 200%. A setting of 100% will leave the wave at its present volume. Values lower than
100% will reduce its volume, and values over 100% will increase it.
¥ Clip MethodÑIf the volume of a wave is scaled to a level that requires more than the available 16
bits, the sound will clip. The Clip Method provides two settingsÑNormal or WarpÑ that allow you
to determine what will happen to such waves:
TTTTiiiipppp:::: The Warp setting can lead to some interesting distortion effects.
When youÕve set the two scaling parameters to your liking, press the Yes button to scale the wave.
RRRReeeedddduuuucccceeee ssssaaaammmmpppplllleeee bbbbiiiittttssss??
The ASR-X Pro samples audio at a resolution of 16 bits. While this resolution produces excellent sound,
16-bit data can use up significant amounts of the ASR-X ProÕs RAM. If you lower the resolution of a
selected wave, you can free up RAM for more sampling. In addition, there may be times when youÕd like
a rougher-sounding sample. Reducing sample bits is an excellent way to deliberately ÒtrashÓ a wave.
When you press the Yes button in response to ÒReduce sample bits?Ó the ASR-X Pro presents a display
that allows you to set the desired bit resolution of your wave.
??
Reduce SMPL1_01
Number of bits= 12
i
Turn the Value knob to change this value
When youÕve selected the desired resolution, press the Yes button to reduce the waveÕs resolution.
IIIInnnnvvvveeeerrrrtttt ssssaaaammmmpppplllleeee ddddaaaattttaaaa??
The ASR-X Pro can invert a waveÕs data, essentially turning it upside-down, in order to make it easier to
loop. Inverting a wave does not change its sound.
??
Answering the ÒInvert sample data?Ó by pressing the Yes button initiates the inversion operation.
ENSONIQ ASR-X Pro Reference Manual 37
Page 48

3ÑPads
TTTTrrrruuuunnnnccccaaaatttteeee lllleeeennnnggggtttthhhh??
In order to make most efficient use of you ASR-X ProÕs memory, you should trim and discard those
portions of your waveÕs data that you donÕt intend to use, freeing up the memory space they occupy.
When you press the Yes button in response to ÒTruncate length?Ó the ASR-X Pro deletes all data in your
wave that occurs before the Sample Start point and after the Loop End point.
CCCCooooppppyyyy ssssoooouuuunnnndddd??
The ASR-X Pro allows you to copy the selected wave to other pads in the currently selected RAM kit.
When you press the Yes button in response to ÒCopy sound?Ó the CopyMode display appears, where you
can turn the Value knob to select one of two copy modes:
¥ ParamsÑThis copy mode will only copy the selected waveÕs parameter values without copying the
wave itself.
¥ Params+DataÑThis copy mode will copy both the wave and its parameters.
??
??
NNNNooootttteeee:::: You can use this process to create multiple copies of a wave, each with its own loop settings.
The original wave's Start/Loop, Sample Start, Loop Start and Loop End parameters are not
duplicated along with its other parameter settings so that copies are created ready for re-looping.
When youÕve selected the desired copy mode, press the Yes button to perform the copy procedure. The
ASR-X Pro will show:
The octave that the pads are currently playing
m
C2...0oct..C3 CopyTo
X Pads?
i
The pad from which youÕre copying
The display top line shows the octave currently selected for playing by the pads. You can press the
Octave Transpose buttons to select a different octaveÕs worth of pads to which to copy the selected wave
and/or its parameters. The ÒXÓ shows you the pad thatÕs currently selectedÑthe pad that contains the
data youÕre about to copy. When the desired octave is displayed, press the pad or pads to which you
want to copy your dataÑa corresponding pad emblem will appear in the display for each pad you press.
When youÕve selected your destination(s), press the Yes button to complete the copy procedure.
SSSSccccaaaalllleeee ttttiiiimmmmeeee??
The ÒScale time?Ó command alters the duration of a wave without altering its pitch, allowing you to
stretch or shrink a wave to fit a particular tempoÑsuch as when you want to re-size rhythms for use as
loops. When you press the ÒYesÓ button in response to ÒScale time?Ó the following parameters can be
accessed by turning the Parameter knob:
??
¥ AmountÑThis parameter sets the percentage by which the waveÕs duration will be made longer or
shorter. A value of 100% will leave the wave at its current length; values lower than 100% will
38 ENSONIQ ASR-X Pro Reference Manual
Page 49

3ÑPads
shrink the duration of the wave, while values higher than 100% will increase it. Try different values
for this parameter to establish the percentage of time scaling required for your situation.
¥ QualityÑsets the fidelity of the time-scaled wave. The High(slow) value produces cleaner-sounding
waves, but will take a greater amount of time to process. When experimenting with the Amount
parameter to determine its correct value for your timing needs, set the Quality parameter to
Low(fast) to save time. Once youÕve settled on an Amount value, set Quality to the desired setting
and re-scale the wave.
SSSSttttoooommmmpppp!!
Stomper is an non-real-time algorithm created by HŒkan ÒZapÓ Andersson that allows you to construct
your own vintage-synth-style sounds using the ASR-X ProÕs processor. You create a Stomper sound by
setting parameters that describe the soundÕs characteristics, and then hit the Yes button to instruct
Stomper to build the sound and place it in the Scratch PadÑfrom there it can be assigned to pads a RAM
kit sound in the same manner as any other wave. Stomper allows you to select the soundÕs waveform
content, its filteringÑincluding resonant filteringÑand volume, or amplitude, characteristics. Since
Stomper creates your sound right in the ASR-X Pro, the resulting 16-bit sound is terrific.
To learn more about Stomper, visit its Web site at http://www.Master-Zap.com.stomper
Stomper is accessed by pressing the Pad Process button. When the
currently selected pad uses a sound thatÕs not based on a loaded wave,
ÒSynthesize Stomper sound?Ó is displayed. When the sound on the pad
is based on a wave, scroll all the way clockwise after pressing the Pad
Process button to reveal ÒSynthesize sound?Ó In either case, the
displayed question provides access to StomperÕs parameters. As you move through the Stomper
parameters, the Yes and No LEDs will flash to indicate that you can build you sound at any time by
pressing the Yes button, or leave Stomper by pressing the No/Exit button. As the sound is being created,
a progress indicator will be displayed.
SSSSoooouuuunnnndddd TTTTyyyyppppee
Stomper provides a set of presets that can be used as is, or as a starting point for your own sounds. Turn
the Value knob to select any of the following presets:
!!
Sound Edit Process
ee
Pad
Loop / Filter
Stomp !
KICK1 KICK2 SNARE TOM CRASH HAT
When you change the value of any parameters, an additional USER preset is created.
OOOOsssscccciiiillllllllaaaattttoooorrrr ##
Each Stomper sound can contain up to four active oscillators, each of which has its own set of parameters
and can be configured to function as a waveform oscillator or as a low-pass resonant filter. Before setting
up an oscillator, you must first select it by turning the Value knob when the Oscillator # display is visible.
ee
MMMMooooddddee
The Mode display allows you to set the currently selected oscillator as you wish. An oscillator can be set
to Off, Oscillator or Filter. Turn the Value knob to the desired setting.
TTTTiiiipppp:::: When an oscillator is set to Filter mode, it filters all lower-numbered oscillators.
NNNNooootttteeee:::: The ASR-X Pro presents only those parameters relevant to the selected oscillatorÕs mode. As
a result, the remaining Stomper displays youÕll see depends on the selected oscillatorÕs mode.
ENSONIQ ASR-X Pro Reference Manual 39
##
Page 50

3ÑPads
OOOOsssscccciiiillllllllaaaattttoooorrrr MMMMooooddddeeee SSSSttttoooommmmppppeeeerrrr PPPPaaaarrrraaaammmmeeeetttteeeerrrrss
ss
The following Stomper parameters are available when the selected oscillator is set to oscillator mode.
Parameter: What it does:
Waveform Selects the waveform to be used by the oscillator. Choices are: Sine, Saw, Square, Triangle
Noise Factor Controls the amount of random frequency deviation applied to the oscillator from 0.00 to
Noise Rate Sets the rate of the random frequency deviation. A value of 0 is off; a value of 1 means that
Start Time Sets the oscillatorÕs start time in the final sound in milliseconds. A typical setting would be
End Time Determines the duration of the oscillator by setting its end point, in milliseconds.
Start Freq Sets the starting frequency, or pitch, of the oscillator, from 0 to 20,000Hz in steps of 10.
End Freq Sets the final frequency, or pitch, of the oscillator, from 0 to 20,000Hz in steps of 10.
FreqCurveShape Sets the shape of the curve as the oscillator travels from its start frequency to its end
Start Amp Scale Sets the starting amplitude, or volume, of the oscillator, from 0% to 100%.
End Amp Scale Sets the ending amplitude, or volume, of the oscillator, from 0% to 100%.
AmpCurveShape Sets the shape of the curve as the oscillator travels from its start amplitude to its end
Tone CurveShape Sets the amount of distortion added to the shape of the oscillatorÕs waveform, from 0.01 to
FFFFiiiilllltttteeeerrrr MMMMooooddddeeee SSSSttttoooommmmppppeeeerrrr PPPPaaaarrrraaaammmmeeeetttteeeerrrrss
1.00 in 1/100ths steps.
noise will be applied every sample; 2 would be every second sample, and so on.
0; increasing the value delays the sounding of the oscillator.
frequencyÑthis can be set from 0.01 to 10.00 in .01 steps and from 10 to 100 in steps of 1.
amplitudeÑthis can be set from 0.01 to 10.00 in .01 steps and from 10 to 100 in steps of 1.
10.00 in .01 steps and from 10 to 100 in steps of 1.
ss
These Stomper parameters are available when the selected oscillator is set to low-pass filter mode.
Parameter: What it does:
Start Cutoff Sets the starting cutoff frequency, determining the point above which frequencies will be
End Cutoff Sets the ending cutoff frequency, determining the point above which frequencies will be
Start Resonance Sets the amount of resonance (Q) at the start of the sound, from 0.00 to 0.99 in steps of .1.
End Resonance Sets the amount of resonance (Q) at the end of the sound, from 0.00 to 0.99 in steps of .1.
attenuated at the beginning of the sound. Parameter can be set from 0Hz to 20,000Hz.
attenuated at the end of the sound. Parameter can be set from 0Hz to 20,000Hz.
40 ENSONIQ ASR-X Pro Reference Manual
Page 51

4ÑEffects
44
44
EEEEffffffffeeeeccccttttss
OOOOvvvveeeerrrrvvvviiiieeeewwww ooooffff tttthhhheeee AAAASSSSRRRR----XXXX PPPPrrrroooo EEEEffffffffeeeeccccttttss
The ASR-X Pro contains an ENSONIQ ESP2 digital signal processing chip that simultaneously provides
two effects for each sequence: an insert effect and a global reverb. One track in each sequenceÑcalled the
insert control trackÑcan be endowed with some special abilities relating to the sequence's insert effect.
These concepts are explained in this overview. Each of the 16 tracks in a sequence can be routed to either
of these effects, left un-processedÑor dryÑor sent to one of the auxiliary outputs that are available when
an X-8 output expansion board has been installed in the ASR-X Pro. The procedures for taking advantage
of these features appear elsewhere in this chapter, unless otherwise noted.
IIIInnnnsssseeeerrrrtttt EEEEffffffffeeeeccccttttss
Insert effects are powerful, highly programmable effects. There are 40 insert effects in the ASR-X Pro, any
one of which can be selected for use with any sequence:
01 Parametric EQ 15 Chorus→Rev 29 ResVCF→DDL
02 Hall Reverb 16 Flanger→Rev 30 Dist→VCF→DDL
03 Large Room 17 Phaser→Rev 31 Pitch Detuner
04 Small Room 18 EQ→Reverb 32 Chatter Box
05 Large Plate 19 Spinner→Rev 33 Formant Morph
06 Small Plate 20 DDL→Chorus 34 RotarySpeaker
07 NonLinReverb1 21 DDL→Flanger 35 Tunable Spkr
08 NonLinReverb2 22 DDL→Phaser 36 Guitar Amp
09 Gated Reverb 23 DDL→EQ 37 Dist→DDL→Trem
10 Stereo Chorus 24 Multi-Tap DDL 38 Comp→Dist→DDL
11 8-VoiceChorus 25 Dist→Chorus 39 EQ→Comp→Gate
12 Rev→Chorus 26 Dist→Flanger 40 EQ→Chorus→DDL
13 Rev→Flanger 27 Dist→Phaser
14 Rev→Phaser 28 Dist→Auto Wah
ss
ss
Select Edit
ss
Effects
Bypass
Insert effects can be manipulated in real time, allowing exceptionally musical control of their behavior
(see "Insert Effect Real-Time Modulation Parameters" later in this chapter).
TTTTiiiipppp:::: See ÒInsert Effect ParametersÓ in the ASR-X Pro UserÕs Guide for a description of each insert
effectÕs parameters.
TTTThhhheeee IIIInnnnsssseeeerrrrtttt CCCCoooonnnnttttrrrroooollll TTTTrrrraaaacccckk
In each sequence, one track can be designated as the insert control track. The insert control track has some
special properties:
¥ Any sound that has been programmed to use an insert effect will automatically install that insert
effect into the sequence when the sound is selected for use by the insert control track.
¥ The insert control track can be used to manipulate the sequence's insert effect in real time. In
addition, when an external MIDI device is being used with the ASR-X Pro, MIDI messages received
on the insert control track's MIDI channel can also manipulate the insert effect.
ENSONIQ ASR-X Pro Reference Manual 41
kk
Page 52

4ÑEffects
GGGGlllloooobbbbaaaallll RRRReeeevvvveeeerrrrbb
Global reverbs are top-quality programmable reverb effects. There are eight global reverbs, any of which
can be selected for use in any sequence:
01 SmoothPlate 05 Small Room
02 Large Hall 06 Reflections
03 Small Hall 07 Bright
04 Big Room 08 Huge Place
FFFFXXXX BBBBuuuusssssssseeeessss:::: HHHHoooowwww SSSSoooouuuunnnnddddssss aaaarrrreeee SSSSeeeennnntttt ttttoooo tttthhhheeee EEEEffffffffeeeeccccttttss
Each track and each pad in the ASR-X Pro has its own FX Bus parameter for assigning its sound to one of
the FX busses (for Òeffect bussesÓ). The FX busses are the means by which sounds travel to an effect.
There are five FX busses in an ASR-X Pro as it's shipped from the factory:
¥ the insert FX bus
¥ the light reverb FX bus
¥ the medium reverb FX bus
¥ the wet reverb FX bus
¥ the dry FX bus
The insert FX bus directs a sound to the sequence's insert effect.
The light reverb, medium reverb and wet reverb busses all direct a sound to the global reverb.
Three busses are provided for this purpose so that each can be set to send a different amount of sound
into the global reverb, resulting in three different degrees of reverb available for each sound.
bb
ss
A sound assigned to the dry FX bus will remain un-processed.
There is a sixth option available when assigning a sound to an FX bus, though it's not an FX bus. A "Prog"
value is provided that allows the different keys in an ASR-X Pro drum kit to retain their individual FX
bus routings.
Chapter 2 describes the method for editing track parameters such as the FX Bus parameter. Chapter 3
describes how to edit the FX Bus parameter for a pad.
NNNNooootttteeee:::: When an X-8 output expansion board has been installed, an additional four stereo
bussesÑAuxOut1, AuxOut2, AuxOut3 and AuxOut4Ñare available. These busses send a track
and its sound directly to one of the auxiliary outputs. You can also use these stereo busses as
eight mono busses by panning tracks hard left or right (see Chapter 2).
TTTTiiiipppp:::: The ASR-X Pro can automatically select FX busses for sounds as they are assigned to tracks.
See Chapter 7.
TTTThhhheeee AAAAlllltttt BBBBuuuuss
The ASR-X Pro can automatically select an appropriate effect for a sound when itÕs selected for a track by
reading the setting of the soundÕs Alt Bus parameterÑsee Chapter 7 to learn about the AutoSelect FXBus
parameter, which enables this feature. See Chapter 3 to learn about setting the Alt Bus parameter. The Alt
Bus is also used by standard sounds on tracks or pads whose FX Bus parameter is set to ÒProg.Ó
ss
42 ENSONIQ ASR-X Pro Reference Manual
Page 53

4ÑEffects
SSSSeeeelllleeeeccccttttiiiinnnngggg aaaannnndddd EEEEddddiiiittttiiiinnnngggg aaaa SSSSeeeeqqqquuuueeeennnncccceeee''''ssss EEEEffffffffeeeeccccttttss
Selecting and editing a sequence's insert effect or global reverb involves the same simple pair of
techniques, regardless of the effect being edited.
TTTToooo SSSSeeeelllleeeecccctttt aaaannnn EEEEffffffffeeeecccctt
1. Press the Select button in the Effects section of the ASR-X Pro front panel.
2. To select an insert effect, turn the Parameter knob so that the Insert Effect display appears:
To select a global reverb, turn the Parameter knob so that the Global Reverb display appears:
tt
Effects
Select Edit
Bypass
This shows that you're on the insert effect selection display
m
Insert Effect=
33 Formant Morph
i
The currently selected insert effect
This shows that you're on the global reverb selection display
m
Global Reverb=
01 User Settings
i
This reflects the current global reverb settings
ss
3. Turn the Value knob to select the insert effect or global reverb you desire.
TTTToooo EEEEddddiiiitttt aaaannnn EEEEffffffffeeeecccctt
1. Press the Edit button in the Effects section of the ASR-X Pro front panel.
2. To edit the insert effect, turn the Parameter knob until the display shows:
tt
Effects
Select Edit
Bypass
Effects:
Edit insert effect?
To edit the global reverb, turn the Parameter knob until the display shows:
Effects:
Edit global reverb?
3. When you've selected the type of effect you'd like to edit, press the Yes button.
4. Turn the Parameter knob to select any of the parameters available for the effect you're editing.
ENSONIQ ASR-X Pro Reference Manual 43
Page 54

4ÑEffects
The left-most parameters provide settings that determine the context in which the effect operates
(see "Insert Effect and Global Reverb Context Parameters" below). These are followed by parameters
relating to the effect itselfÑthe top line of each of these displays shows the name of the effect being
edited:
The effect being edited
m
Insert:Stereo Chorus
Chorus Depth= 0.8ms
ii
The currently selected parameter The parameter's value
At the end of the parameter list for each insert effect is a set of parameters that enable and control
real-time modulation for the effect. See ÒInsert Effect Real-Time Modulation ParametersÓ below.
5. Turn the Value knob to change the setting of any parameter .
TTTTiiiipppp:::: For a listing of all of the effect parameters available in the ASR-X Pro, see later in this chapter.
IIIInnnnsssseeeerrrrtttt EEEEffffffffeeeecccctttt aaaannnndddd GGGGlllloooobbbbaaaallll RRRReeeevvvveeeerrrrbbbb CCCCoooonnnntttteeeexxxxtttt PPPPaaaarrrraaaammmmeeeetttteeeerrrrss
In addition to the parameters provided for sound sculpting, each insert effect and global reverb also
contains parameters that allow you to determine how the effect will fit into the sequence in which it's
being used.
Each insert effect contains these context parameters:
¥ Insert FX Bus: Input MixÑThis parameter allows you to establish the amount of insert effect you
want to apply to any sounds routed to the insert FX bus. This is expressed as a wet/dry balance,
with "dry" describing sounds prior to being processed by the insert effect, and "wet" describing the
output of the insert effect. This parameter can be set anywhere from "Full Dry" to "Full Wet."
¥ Insert FX Bus: GlobalReverb AmtÑThe insert FX bus mix (described above) can be fed into the
global reverb, so that reverb can be added to sounds processed by the insert effect. This parameter
determines the amount of insert FX bus signal sent to the global reverb, and can be set anywhere
from 0 to 127.
Each global reverb contains these context parameters:
¥ LightReverb FX Bus: Global Reverb AmtÑThis parameter sets the amount of signal sent to the
global reverb from the light reverb FX bus. This parameter may be set anywhere from 0 to 63.
¥ MediumReverb FX Bus: Global Reverb AmtÑThis parameter sets the amount of signal sent to the
global reverb from the medium reverb FX bus. This parameter may be set anywhere from 32 to 95.
¥ WetReverb FX Bus: Global Reverb AmtÑThis parameter sets the amount of signal sent to the global
reverb from the wet reverb FX bus. This parameter may be set anywhere from 64 to 127.
¥ Reverb: (selected reverb's name) Return LevelÑThis parameter sets the level of the global reverb
output. This can be used as an overall global reverb control that simultaneously raises or lowers the
reverb volume for all of the reverb FX busses. Settings from 0 to 127 are available.
ss
IIIInnnnsssseeeerrrrtttt EEEEffffffffeeeecccctttt RRRReeeeaaaallll----TTTTiiiimmmmeeee MMMMoooodddduuuullllaaaattttiiiioooonnnn PPPPaaaarrrraaaammmmeeeetttteeeerrrrss
The ASR-X Pro insert effects can be manipulated in real time, providing the opportunity for animated,
expressive effect processing. This manipulation is achieved through the modulation of insert effect
parameter settings, using a control device of your choosing on the selected sequence's insert control track.
Each insert effect provides a set of parameters that allow you to set up real-time control of the effect.
NNNNooootttteeee:::: While a single track in each sequenceÑthe insert control trackÑcontrols the real-time
modulation of an insert effect, the changes made to the insert effect will be applied to any sounds
routed to the insert FX bus.
44 ENSONIQ ASR-X Pro Reference Manual
ss
Page 55

4ÑEffects
¥ Insert: Mod SrcÑThis parameter allows you to select a device with which the insert effect will be
controlled. A wide range of devices is supported:
Off There will be no effect modulation.
FullModAmt The parameter being modulated will be set to its maximum amount.
Velocity The parameter being modulated will respond to the quickness, or hardness, of keystrikes
Vel+Pressure The parameter being modulated will respond to the quickness, or hardness, of keystrikes
+PosMIDIkey# The parameter being modulated will use the MIDI note number from the most recently
-NegMIDIkey# The parameter being modulated will use the MIDI note number from the most recently
Pressure The parameter being modulated will respond to received MIDI poly or channel pressure
PitchWheel The parameter being modulated will respond to received MIDI pitch bend values.
ModWheel The parameter being modulated will respond to received MIDI mod wheel (MIDI
Wheel+Press The parameter being modulated will respond to a combination of received MIDI mod
FootPedal The parameter being modulated will respond to received MIDI foot pedal (MIDI controller
Sustain The parameter being modulated will respond to sustain pedal presses produced by a foot
Sostenuto The parameter being modulated will respond to sostenuto pedal presses produced by a
SysCTRL1-4 System Controllers 1-4 are system-wide user-designated real-time modulators (see Chapter
from the pads or received via MIDI.
from the pads or received via MIDI, combined with received MIDI poly or channel
pressure messages.
struck pad or most recently received MIDI keystrike as its value setting, with 0 being
interpreted as the lowest note of the MIDI range and 127 as the highest .
struck pad or most recently received MIDI keystrike as its value setting, with 127 being
interpreted as the lowest note of the MIDI range and 0 as the highest.
values.
controller #1) values.
wheel and poly or channel pressure values
#4) values.
switch connected to the ASR-X Pro or received via MIDI.
foot switch connected to the ASR-X Pro or received via MIDI.
7 for further information).
¥ Insert: Mod Src Min and Insert: Mod Src MaxÑThese two parameters allow you to establish a range
of values from the control device to which the insert effect will respond. Each of these may be set
anywhere from 000% to 100%.
¥ Insert: Mod DestÑThis parameter allows you to choose the insert effect parameter you'd like to
manipulate.
¥ Insert: Mod Dest Min and Insert: Mod Dest MaxÑThese two parameters allow you to set limits for
the amount of change that can be made to the setting of the parameter being modulated. If the Mod
Dest Min value is set above than the Mod Dest Max value, response to the control device will be
inverted: lower control device values will raise the parameter's setting, and vice versa.
NNNNooootttteeee:::: To control an insert effect in real time using an external MIDI device, make sure to set your
external control device to the same MIDI channel as the sequence's insert control track.
ENSONIQ ASR-X Pro Reference Manual 45
Page 56

4ÑEffects
SSSSeeeettttttttiiiinnnngggg aaaa SSSSeeeeqqqquuuueeeennnncccceeee''''ssss IIIInnnnsssseeeerrrrtttt CCCCoooonnnnttttrrrroooollll TTTTrrrraaaacccckk
You can designate any of a sequence's 16 tracks as the Insert Control Track, or you can turn the Insert
Control Track feature off for the selected sequence.
TTTToooo SSSSeeeetttt tttthhhheeee IIIInnnnsssseeeerrrrtttt CCCCoooonnnnttttrrrroooollll TTTTrrrraaaacccckk
1. Press the Edit button in the Effects section of the ASR-X Pro front panel.
2. Turn the Parameter knob until the display shows:
kk
Effects
Select Edit
Bypass
kk
Effects:
InsertCntrlTrack= 01
i
The number you see here may be different
3. Turn the Value knob to select an insert control track for the currently selected sequence, or select
"off" to disable the feature.
BBBByyyyppppaaaassssssssiiiinnnngggg aaaa SSSSeeeeqqqquuuueeeennnncccceeee''''ssss EEEEffffffffeeeeccccttttss
There may be times at which you'll find it useful to temporarily silence a sequence's insert effect or global
reverb in order to hear a soundÑor soundsÑwithout the effect with which they're associated. This is
accomplished by bypassing the effects. The ASR-X Pro provides three methods of achieving this:
ss
¥ You can quickly bypass both the insert effect and global reverb by rapidly double-clicking on the
Effect section's Edit button.
¥ If either "Edit insert effect?" or "Edit global reverb?" are displayed, you can press the Edit Effect
button a second time to bypass the displayed effect.
¥ You can use the Bypass parameter to bypass the insert effect, the global reverb, or both.
When an effect is bypassed, *BYPD* appears on all of the displays with which the effect is associated. If
both effects are bypassed Ò*ALL-BYPASS*Ó is shown.
TTTToooo UUUUsssseeee tttthhhheeee BBBByyyyppppaaaassssssss PPPPaaaarrrraaaammmmeeeetttteeeerrrr ffffoooorrrr BBBByyyyppppaaaassssssssiiiinnnngggg EEEEffffffffeeeeccccttttss
1. Press the Edit button in the Effects section of the ASR-X Pro front panel.
Effects
Select Edit
Bypass
2. Turn the Parameter knob until the display shows:
ss
Effects:
Bypass= None
i
The setting you see here may be different
3. Turn the Value knob to select the effect, or effects, you'd like to silence.
46 ENSONIQ ASR-X Pro Reference Manual
Page 57

4ÑEffects
LLLLFFFFOOOO WWWWaaaavvvveeee SSSShhhhaaaappppeeeess
Many insert effects have an LFO Shape parameter that determines how the LFO signal will rise or fall.
There are eight possible values:
ss
DDDDiiiissssttttoooorrrrttttiiiioooonnnn CCCCuuuurrrrvvvveeeess
Many distortion-based insert effects have a Dist Curve parameter that determines the type of clipping
produced by the distortion. There are five possible distortion curves:
ss
ENSONIQ ASR-X Pro Reference Manual 47
Page 58

5ÑSampling/Resampling
55
55
OOOOvvvveeeerrrrvvvviiiieeeeww
SSSSaaaammmmpppplllliiiinnnngggg////RRRReeeessssaaaammmmpppplllliiiinnnngg
ww
WWWWhhhhaaaatttt iiiissss SSSSaaaammmmpppplllliiiinnnngggg??
Sampling is the process of digitally recording sound. Digital recording captures sound by taking many
brief snapshots of the soundÑ44,100 snapshots per second in the ASR-X ProÑand storing each of these
as numerical data. Each of these snapshots is each called a sample. When a sampler plays back the
recording the spaces between such quickly occurring samples are imperceivable, and the original sound
is faithfully reproduced. In the ASR-X Pro, a digital recording is called a wave. In fact, ÒwaveÓ refers to
either a mono wave or a stereo wave, even though a mono wave is comprised of a single digital
recording, while a stereo wave is actually made up of two such recordings panned left and right. Waves
in the ASR-X Pro are AIF (for ÒApple Interchange FormatÓ) files.
WWWWhhhhaaaatttt iiiissss RRRReeeessssaaaammmmpppplllliiiinnnngggg??
Resampling is, as its name implies, simply sampling something again. The importance of resampling in
the ASR-X Pro should not be underestimated, though, since you can resample any sound the ASR-X Pro
produces and use the resampled material in your grooves, or as the basis for even more resampling. Used
together with the ASR-X ProÕs built in effects and editing tools, resampling is the key to getting the most
out of your ASR-X Pro. ItÕs for this reason that the sampling and resampling section and buttons on the
ASR-X Pro front panel are labeled ÒResampling.Ó
gg
??
??
WWWWhhhhaaaatttt HHHHaaaappppppppeeeennnnssss WWWWhhhheeeennnn YYYYoooouuuu CCCCrrrreeeeaaaatttteeee aaaa WWWWaaaavvvvee
When you sample audio on your ASR-X Pro, the newly
created wave is stored invisibly in RAM and becomes
playable from the Scratch Pad.
This pad can be played in the same manner as any other
pad. The Scratch Pad is unique, however, in that itÕs only
a temporary means of playing a wave. To make fullest
use of a wave, it must be assigned to one or more pads
in a RAM kit. Sending to pads is described in detail later
in this chapter.
TTTTiiiipppp:::: You can save the contents of the Scratch Pad
directly to disk along with a sound that will play
them. The procedure is described in Chapter 7.
WWWWhhhhaaaatttt ccccaaaannnn bbbbeeee SSSSaaaammmmpppplllleeeedddd iiiinnnn tttthhhheeee AAAASSSSRRRR----XXXX PPPPrrrroo
The ASR-X Pro can create stereo or mono waves from:
¥ its own outputs, letting you easily resample new sounds from its sounds and sequences, taking full
advantage of the ASR-X Pro effects.
¥ the two Audio Input jacks on its rear panel that let you sample anything from a mic, turntable or CD
player. You can make these samples with or without adding effects.
¥ the ASR-X Pro outputs and the audio inputs at the same time.
ÒSelecting a Source,Ó later in this chapter describes how to select your audio source.
ee
Resampling
Setup
Send
To Pad(s)
Start
Stop
Scratch Pad™
oo
ENSONIQ ASR-X Pro Reference Manual 49
Page 59

5ÑSampling/Resampling
UUUUssssiiiinnnngggg tttthhhheeee AAAASSSSRRRR----XXXX PPPPrrrroooo AAAAuuuuddddiiiioooo IIIInnnnppppuuuuttttss
The rear panel of the ASR-X Pro provides two 1/4Ó input
jacks to which you can connect line-level audio
sourcesÑsuch as a turntable or CD playerÑor a low
impedance microphone. YouÕll also find a Mic/Line
switch and an Input Level adjustment knob whose uses
are described below.
You can send audio into the ASR-X Pro through either or both of the Audio Input jacks. If youÕre using a
microphone, or microphone-level device, flip the Mic/Line toggle switch upward for the best results.
When using a line-level device, flip the switch to its downward position.
SSSSeeeettttttttiiiinnnngggg tttthhhheeee OOOOppppttttiiiimmmmuuuummmm AAAAuuuuddddiiiioooo IIIInnnnppppuuuutttt VVVVoooolllluuuummmmee
The volume of audio being sent into the ASR-X ProÕs Audio Inputs is shown in the frontpanel Sampling Level LED array. When the ASR-X Pro detects incoming audio, the lower
green LED flashes. When the audio is in danger of being too loud, causing clipping, the red
LED flashes. In the ASR-X Pro, the red LED does not necessarily mean that your input
signal is too loudÑit means only that you should listen to it carefully to make sure that itÕs
not undesirably clipping or distorting. The red LED lights at -6dB.
To adjust the volume of the signal being sent into the Audio Inputs, slowly turn the rear-panel Input
Level knob to achieve the best setting. You can also turn up or down the actual source of the audio.
RRRReeeessssaaaammmmpppplllliiiinnnngggg SSSSeeeettttuuuupp
This section describes the first steps of the sampling/resampling process:
setting up. All of the features described in this section are accessed by
pressing the Resampling Setup button.
Once youÕve pressed the Setup button, you can turn the Parameter knob
to select the parameter youÕd like to adjust and turn the Value knob to set
the selected parameter. The factory defaults for these parameters are
listed in each description in case you want to restore them after using the
ÒSave these settings?Ó command (Chapter 7).
TTTThhhheeee RRRReeeessssaaaammmmpppplllliiiinnnngggg SSSSeeeettttuuuupppp DDDDiiiissssppppllllaaaayy
All of the sampling/resampling setup parametersÑwith the exception of
the Trig (for ÒtriggerÓ) parameter and meterÑshare a common display
format in which the phrase ÒResampling SetupÓ appears on the top line,
and the parameter being adjusted appears on the bottom line:
pp
ss
Setup
Send
To Pad(s)
Start
Stop
Input Level
Resampling
Scratch Pad™
Sampling
Level
Peak
Signal
Mic
Line
Audio Input
Right Left
ee
yy
Resampling Setup:
Source= MainOut
i
The parameter selected for editing
SSSSoooouuuurrrrccccee
50 ENSONIQ ASR-X Pro Reference Manual
ee
The first item to determine when you want to sample or resample is the source of the audio to be
sampled. When the Resampling Setup Source parameter is displayed, you can set it to:
¥ MainOutÑto resample audio being produced by the ASR-X Pro, including sounds or sequences.
¥ Input+MainOutÑto capture audio being produced by the ASR-X Pro, combined with audio being
sent into its Audio Inputs. When this value is selected, an additional In Bus parameter is available
factory default value: MainOut
Page 60

5ÑSampling/Resampling
that allows you to send the Audio InputsÕ signal into the desired ASR-X Pro effect (see ÒSelecting an
FX Bus when Sampling a Mix of the Audio Inputs and the ASR-X Pro OutputÓ below).
¥ Input+InsertÑto sample the Audio InputsÕ signal after itÕs been processed through the currently
selected insert effect.
¥ Input DryÑto sample the Audio InputsÕ signal without any ASR-X Pro effects added.
ss
IIIInnnn BBBBuuuuss
When Resampling Setup Source parameter is set to ÒInput+MainOut,Ó you select the effect, if any,
through which the Audio InputsÕ signal will be sampled. The In Bus parameter can be set to:
¥ OffÑto silence the Audio InputsÕ signal.
¥ Insert, LightReverb, MediumReverb, WetReverbÑto route the Audio InputÕs signal into the ASR-X
Pro effects (see Chapter 4 to learn more about ASR-X Pro effects).
¥ DryÑto apply no effects to the Audio InputÕs signal.
factory default value: Insert
RRRReeeecccc MMMMooooddddee
The Rec Mode parameter allows you to determine whether youÕll be recording a mono or stereo wave.
You can set this parameter to:
¥ StereoÑso that a stereo wave (really a pair of waves panned left and right) will be created from
¥ Left MonoÑso that a mono wave will be created from the left side of the selected audio source. The
¥ Right MonoÑthis functions in the same manner as Left mono, except that it uses the right side of the
AAAAuuuuttttoooo----NNNNoooorrrrmmmmaaaalllliiiizzzzee
The ASR-X Pro can automatically normalize your wave when you create it. Normalizing digitally boosts
the wave to its loudest volume short of clipping or distortion in order to achieve the best fidelity and
signal-to-noise ratio. The Auto-Normalize parameter turns this automatic volume correction on or off.
TTTTiiiipppp:::: You can normalize a wave after youÕve sampled it, if you prefer, by utilizing the Pad Process
normalization feature (see Chapter 3).
ee
audio produced by the selected source. When the Source parameter is set to ÒMainOut,Ó the entire
stereo image produced by playing the ASR-X ProÕs pads or sequencer will be captured. When the
Audio Inputs are being used, the incoming audioÕs stereo image is retained; if only the left or right
Audio Input jack is being used, the signal will remain only on the left or right, respectively.
left side of the source will be panned to the center for monitoring purposes and for being sent into
the effect and for being routed into the effects when theyÕre being sampled (the left output of the
effects will be captured in the wave).
stereo.
ee
factory default value: Stereo
factory default value: Off
RRRReeeeccccoooorrrrdddd TTTTiiiimmmmee
Each wave occupies a portion of the ASR-X ProÕs sample memory for as long as the ASR-X Pro is turned
on, or until you erase the wave. The longer the duration of the wave, the more memory is required, and
stereo waves, since they actually contain two mono waves, take up twice as much memory as mono
waves do. If you create stereo waves, youÕll consume the available memory twice as fast. The ASR-X ProÕs
sample memory can be easily expanded to 34 megabytes through the installation of SIMM chips (see
Chapter 7).
TTTTiiiipppp:::: You can find out how much memory is available in your ASR-X Pro using the Memory
Manager. See Chapter 7.
The ASR-X Pro provides the Record Time parameter to let you limit the amount of sample time youÕre
willing to commit to a wave youÕre about to sample. You may choose to do this to hold a chunk of
memory aside for later sampling, or simply to limit the length of the wave for musical reasons. Record
ENSONIQ ASR-X Pro Reference Manual 51
ee
factory default value: [maximum time in stereo]
Page 61

5ÑSampling/Resampling
Time can be set anywhere from 0.5 secÑfor ÒsecondsÓÑto the maximum amount of sampling time
remaining in your ASR-X Pro. The parameter shows you the amount of memory available for the type of
samplingÑstereo or monoÑthat youÕve selected with the Rec Mode parameter, described above.
PPPPrrrreeee----TTTTrrrriiiiggggggggeeeerrrr TTTTiiiimmmmee
The ASR-X Pro will automatically begin sampling/resampling whenever it detects audio of a specified
loudness when its Trig mode parameter (see below) is set to ÒThresholdÓ or ÒNote Event.Ó Pre-triggering
allows you to grab audio that occurs during a specified period of time just before your source reaches a
volume loud enough to cause sampling to begin. This is possible since the ASR-X Pro continually
captures audio into its sample memory behind the scenes once sampling is enabled. Pre-triggering can
help ensure that the front of whatever youÕre sampling isnÕt chopped off before it reaches the threshold
volume (see ÒSetting the Trigger ThresholdÓ below to learn about setting this threshold). You can set the
length of pre-trigger time anywhere from 0ms (for ÒmillisecondsÕ) to 99ms.
TTTTrrrriiiigggg MMMMooooddddee
There are three ways that the ASR-X Pro can begin sampling/resampling what it hears. Each of these
choices is represented by a value that can be selected for the Trig (Trigger) Mode parameter:
¥ ManualÑWith this setting, the ASR-X Pro will only begin sampling when you press the Sample
¥ ThresholdÑWith this setting the ASR-X Pro will begin sampling when it detects audio from the
¥ Note EventÑWith this setting, the ASR-X Pro will begin sampling when a pad is played or a MIDI
Each of these modes is activated by pressing the Sample Start/Stop button, and de-activated by pressing
the Start/Stop button a second time (see ÒHow to Start and Stop Sampling a WaveÓ below).
ee
Start/Stop button.
selected source that reaches the threshold set with the Trig parameter, described below.
note (note-on) message is received form an external MIDI device on any MIDI channel. This is
especially handy when youÕre resampling sounds in the ASR-X Pro.
ee
factory default value: 3ms
factory default value: Threshold
SSSSeeeettttttttiiiinnnngggg tttthhhheeee TTTTrrrriiiiggggggggeeeerrrr TTTThhhhrrrreeeesssshhhhoooolllldd
The Trig parameter allows you to set a volume threshold at which the ASR-X Pro will begin
sampling/resampling its source when the Trigger Mode parameter (described above) is set to
ÒThreshold.Ó This parameter is presented in a special display that makes it easy to select a useful volume:
The top line is a meter that shows the volume of notes as you play
dd
m
Meter: §§§§§
Trig= ¼
j
The pad symbol shows the current threshold setting
By playing some notes on a pad or via MIDI that represent what you intend to sample, you can see the
volume of your audio on the displayÕs top line. By turning the Value knob, you can move the pad symbol
to match the level at which you expect to play the audio youÕll be sampling.
TTTTiiiipppp:::: Take a few moments to find the right Trig settingÑif you set the threshold too low, sampling
may begin too early; if you set it too high, sampling may not begin when you want it to if you
play a pad or key too softly.
52 ENSONIQ ASR-X Pro Reference Manual
Page 62

5ÑSampling/Resampling
SSSSaaaammmmpppplllliiiinnnngggg////RRRReeeessssaaaammmmpppplllliiiinnnngggg aaaa WWWWaaaavvvvee
ee
HHHHoooowwww ttttoooo SSSSttttaaaarrrrtttt aaaannnndddd SSSSttttoooopppp SSSSaaaammmmpppplllliiiinnnngggg aaaa WWWWaaaavvvvee
The Start/Stop button is the device that turns sampling/resampling in
the ASR-X Pro on and off. When the ASR-X Pro is not sampling, pressing
the Start/Stop button engages the sampling function in a manner
determined by the setting of the Trig Mode parameter (described above):
¥ When Trig Mode is set to ÒManual,Ó the ASR-X Pro begins
sampling at the moment you press the Start/Stop button.
¥ When Trig Mode is set to ÒThreshold,Ó pressing the Start/Stop
button causes the ASR-X Pro to begin listening for a source signal
loud enough to trigger the beginning of sampling.
¥ When Trig Mode is set to ÒNote Event,Ó pressing the Start/Stop
button causes the ASR-X Pro to wait for a pad to be played, or a
MIDI Note message to trigger the beginning of sampling.
NNNNooootttteeee:::: After you press the Start/Stop button when Trig mode is set to either ÒThresholdÓ or ÒNote
Event,Ó the display will show waiting for ÒWaiting For Trigger.Ó Press Start/Stop a second time
to begin sampling without triggering. To disable trigger sampling, press the Exit/No button.
Once sampling begins, the ASR-X Pro display shows you its progress:
Sampling In Progress
======*
i
This graphically shows the amount of sampling time being used
Setup
Send
To Pad(s)
Start
Stop
Resampling
Scratch Pad™
ee
The bottom line of the display becomes a meter that shows how much of the sampling time allotted with
the Record Time parameter (see above) has been consumed by the wave youÕre creating.
TTTTiiiipppp:::: You can view other areas in the ASR-X Pro as sampling occursÑthis can be handy when
resampling the sequencer or when tweaking sounds or effects in real-time. ÒSampling In
ProgressÓ flashes on the displayÕs top line in alternation with the display pertaining to the nonsampling area of the ASR-X Pro youÕve selected.
When sampling is in progress, pressing the Start/Stop button stops sampling. When sampling is
complete, the ÒSendTo Pads?Ó display appears (see below to learn about sending a wave to pads). You
can audition your new wave at this point by playing it on the Scratch Pad.
SSSSeeeennnnddddiiiinnnngggg aaaa WWWWaaaavvvveeee ttttoooo PPPPaaaaddddss
When youÕve finished sampling/resampling, the new wave is playable
from the Scratch Pad. To make the wave truly usable, however, youÕll
want to send it to one or more pads in the currently selected RAM kit.
NNNNooootttteeee:::: If the currently selected track is not using a RAM kit when
you begin sampling, the ASR-X Pro will convert the trackÕs
sound into a RAM kit for you, so that youÕll have somewhere to
send your wave. The new kitÑwhich will be named after the
original sound with a number added to its endÑcan be found in
the USER-SND and DRUM-KIT SoundFinder categories.
ss
Resampling
Setup
Send
To Pad(s)
Start
Stop
ENSONIQ ASR-X Pro Reference Manual 53
Scratch Pad™
Page 63

5ÑSampling/Resampling
TTTTiiiipppp:::: If youÕd like to sample into an otherwise empty kitÑa Òclean slate,Ó in other wordsÑselect
the ROM sound called ÒSilenceÓ before you sample. This will be converted into a RAM kit that
will play only your wave. You can assign any sounds you like to its pads after youÕve finished
sampling and sending your wave to the desired pad or pads.
When you press the Resampling Start/Stop button to finish sampling, the ÒSendToPads?Ó display
automatically appears:
If youÕd like to send the wave to a pad in an octave other than the one currently being played by the pads,
you can select the desired octave using the Octave Transpose button (see Chapter 3 to learn more about
using the Octave Transpose buttons). The display will always show you the octave currently being
played by the pads.
After selecting the desired octave, press each pad to which youÕd like to send your wave. (You can use
the Octave Transpose buttons at any time during the SendTo Pads procedure, allowing you to send your
wave to any pads in any octaves.) The display will graphically show which pads have been selected.
The top line shows the octave to which the pads are currently pointing
m
C2...0oct..C3 SendTo
Pads?
C2...0oct..C3 SendTo
» ¼¼ Pads?
This shows the second, fifth and sixth pads in the selected octave as having been pressed
If youÕve selected a pad, but would like to un-select it, press it againÑand wave wonÕt be sent to the pad.
When youÕve selected all of the pads to which you want to send your wave, press the Yes button. If youÕd
like to cancel the procedure, press the No button.
TTTTiiiipppp:::: After youÕve sent a wave to pads, the wave remains in the Scratch Pad until you sample
something else or turn the ASR-X Pro off. You can send the contents of the Scratch Pad to a pad
in a RAM kit at any time by pressing the Resampling Send To Pad(s) button.
WWWWhhhhaaaatttt HHHHaaaappppppppeeeennnnssss WWWWhhhheeeennnn YYYYoooouuuu SSSSeeeennnndddd aaaa WWWWaaaavvvveeee ttttoooo aaaa PPPPaaaadddd oooorrrr PPPPaaaaddddssss??
When you send a wave to a pad in the selected trackÕs RAM kit, the ASR-X Pro creates a standard RAM
sound that plays the wave (see Chapter 3 to learn more about ASR-X Pro standard and kit sounds). The
sound is named ÒSMPLÓ followed by a numberÑwhen you power up, the ASR-X Pro starts back at
SMPL1 and raises the SMPL number value each time you sample something new and send it to pads. The
SMPL sound is not actually played by any of the padsÑitÕs created as a safety copy of the sound that can
be selected from SoundFinder and assigned to a track or pad at any time.
When you send your wave to pads, the ASR-X Pro creates copies of the SMPL soundÑone for each pad.
Each of these will be named similarly to the sound, but will have an additional underscore and number
following its name. For each pad you send the wave to, the number increases by one. This allows you to
be able to tell which sound is played by each pad. You can change the name of any of these sounds using
the Memory Manager if you like (see Chapter 7).
??
54 ENSONIQ ASR-X Pro Reference Manual
Page 64

5ÑSampling/Resampling
Having each pad play the wave using its own sound allows you to edit each padÕs sound separately
while keeping the wave on which itÕs based intact (to learn more about editing pad sounds, see Chapter
3). These sounds are normal ASR-X Pro standard sounds and are stored in the lowest-numbered empty
locations in RAM. They can be selected for use by a pad in any RAM kit or by any track in the sequencer.
AAAAuuuuttttoooommmmaaaattttiiiiccccaaaallllllllyyyy SSSSpppprrrreeeeaaaaddddiiiinnnngggg aaaa WWWWaaaavvvveeee AAAAccccrrrroooossssssss aaaallllllll ooooffff aaaa KKKKiiiittttÕÕÕÕssss PPPPaaaaddddss
There may be times when youÕd like to spread your wave across all the pads, with each one playing it at a
different pitch. To do this, press the Track Sound button, dial in the *CUSTOM SoundFinder category,
and select the original SMPL sound (SMPL1, for example). As a standard sound, it will be played by all
the pads. To hear the wave at its original pitch and speed, use the Octave Transpose button to aim one of
the pads at Middle C (C4). Middle C is always the root key for a wave.
ss
ENSONIQ ASR-X Pro Reference Manual 55
Page 65

6ÑSequencing
66
66
SSSSeeeeqqqquuuueeeennnncccciiiinnnngg
The ASR-X Pro contains a potent 16-track sequencer for the construction of groovesÑor any other kind of
music. This chapter describes the concepts behind the ASR-X Pro sequencer and how to harness its
power. All of the sequence recording, playback and mixing controls are found grouped together on the
ASR-X Pro front panel.
There are two sets of sequencing buttons. They are:
¥ the Sequence buttonsÑwhich provide sequence settings as well as sequence and track tools. These
are described in ÒThe Sequence Select Button,Ó ÒThe Sequence Edit ButtonÓ and ÒThe Sequence
Process ButtonÓ later in this chapter.
¥ the Transport buttonsÑprovide the controls for operating the sequencer. These are described in
ÒOperating the SequencerÓ later in this chapter.
gg
Sequence
Select Edit Process
New Tap / Tempo Undo
Transport
Record Stop Play
Scoop Locate Top
Rew
F Fwd
OOOOvvvveeeerrrrvvvviiiieeeeww
ww
HHHHoooowwww tttthhhheeee AAAASSSSRRRR----XXXX PPPPrrrroooo SSSSeeeeqqqquuuueeeennnncccceeeerrrr WWWWoooorrrrkkkkss
The ASR-X Pro sequencer records the MIDI information generated by the ASR-X Pro pads or by MIDI
data received from an external MIDI device. When the sequencer plays this data back, it sends it to the
areas within the ASR-X Pro that produce its sounds and effects, and your music is faithfully reproduced.
The sequencer can also be synchronized to an external MIDI timing source, such as a computer or standalone sequencer (see Chapter 7Õs ÒEdit MIDI Settings?Ó).
Each musical event the sequencer records takes up space in the ASR-X ProÕs memory. Unlike
conventional recording media such as tape, when thereÕs no musical activityÑduring rests between
notes, for example, or when youÕre holding a long noteÑno data is required and no memory is used.
WWWWhhhhaaaatttt iiiissss aaaa SSSSeeeeqqqquuuueeeennnncccceeee??
A sequence is a piece of music recorded by the ASR-X Pro using MIDI technology. Each sequence can
contain the separate, synchronized recordings of up to 16 performances, each using its own soundÑeach
of these is called a track. Each sequence also has its own insert effect and global reverb to which its tracks
can be routed (Chapter 4 explains the ASR-X Pro effects in detail). ASR-X Pro sequences are Standard
MIDI Files (SMFs) that can be read from floppy by any Macintosh or PC-compatible computerÑwhen
you load an ASR-X Pro sequence into your computer sequencer, you can still use the ASR-X ProÕs sounds
by accessing them via MIDI.
NNNNooootttteeee:::: The entire structure of the ASR-X Pro is based on the 16 tracks of the currently active
sequence (see Chapter 2 to learn about tracks, including how to select tracks, how to assign
sounds to tracks and how to edit them).
??
ss
ENSONIQ ASR-X Pro Reference Manual 57
Page 66

6ÑSequencing
There is always a sequence active in the ASR-X Pro, even if you havenÕt recorded on any of its tracks yet.
The ASR-X Pro can hold up to 128 sequences, each of which can be selected in turn (see ÒThe Sequence
Select ButtonÓ later in this chapter to learn how to select sequences).
Each sequence can be renamed, copied or deleted from memory. Controls are provided that allow you to
determine the behavior of a sequence, from its tempo to the nature of its pre-recording countoff, and so
on. These sequence settings are described in ÒThe Sequence Edit ButtonÓ later in this chapter. The
performances contained on the tracks in a sequence can be edited and perfected through the use of
various onboard processes, described later in this chapter in ÒThe Sequence Process button.Ó
OOOOppppeeeerrrraaaattttiiiinnnngggg tttthhhheeee SSSSeeeeqqqquuuueeeennnncccceeeerr
The Transport buttons are the means by which most sequencer recording and playback operations are
performed.
In general, the Transport controls function in a manner similarly to the controls on any cassette or CD
player, tape recorder or VCR.
TTTToooo aaaaccccccccoooommmmpppplllliiiisssshhhh tttthhhhiiiissss::
Play a sequence Press the Play button.
Stop playback of a sequence Press the Stop button.
Jump back to the beginning of a sequence Press the Play button twice.
Rewind to the top of the sequence Hold down the Record button and press the Stop button.
Rewind bar by bar Hold down the Record and Stop buttons.
Fast forward bar by bar Hold down the Stop and Play buttons.
Record a track Hold down the Record button and press Play.
To punch in on a track manually. Press the Play button to start playback. Hold down the Record
Start from any location within a sequence Hold down the Stop button, and while continuing to hold it, turn
Scoop all instances of a pitch from a track Select the track from which youÕd like to scoop the note. Hold
Scoop out notes as the track plays In Add mode, select the desired track and hold down the Record
::
rr
Transport
Record Stop Play
Scoop Locate Top
Rew
DDDDoooo tttthhhhiiiissss::
button and press the Play button at the location at which you
want to start recording. Note: You can punch in using a foot
switchÑsee Chapter 7. In addition, the sequencer Region feature
provides automated punching-inÑsee ÒUsing RegionsÓ later in
this chapter.
the Parameter knob to select the desired measure or type in the
measureÕs number using the Essentials buttons as a numeric
keypad. Press the arrow buttons to select a beat, and turn the
Value knob to select a clock. When youÕve selected a location, let
go of the Stop button and press the Play button.
down the Record button and while holding down Record, press
the pad, or key on an external MIDI keyboard, for the note you
want to remove. The ASR-X Pro will offer to remove all instances
of the note. Press the Yes button to complete the procedure.
button (see ÒRecordModeÓ later in this chapter). While
continuing to hold down Record, press the Play button . Let go of
both buttons. Re-press and hold the Record button, play the pad,
or key on an external MIDI keyboard, for the note that you want
to remove. As long as you hold down the Record button and the
noteÕs pad/key, all occurrences of the note will be removed from
the track.
F Fwd
::
58 ENSONIQ ASR-X Pro Reference Manual
Page 67

6ÑSequencing
TTTThhhheeee TTTTrrrraaaannnnssssppppoooorrrrtttt LLLLEEEEDDDDss
The Play and Record button contain LEDs that provide information about what the sequencer is doing:
¥ The green LED in the Play button lights whenever the sequencer is playing.
¥ The red Record LED lights when recording is taking place in the currently selected track.
¥ The red Record LED flashes when the sequencer is waiting to record, or to scoop notes from a track.
TTTThhhheeee TTTTrrrraaaannnnssssppppoooorrrrtttt DDDDiiiissssppppllllaaaayyyyss
When operating the sequencer Transport controls, one of two displays will always appear, except when
youÕre adjusting the sequence setting accessed by pressing the Sequence Edit button. In all other cases:
¥ When the sequencer is playing, the sequencer track page is displayed. This display tells you what
track is currently selected, where you are in the sequence, and the name and SoundFinder category
of the trackÕs sound. If a track has not yet been recorded, the display will show the word ÒEmptyÓ in
the special information area shown below. If the track is muted or soloed (see Chapter 2), this area of
the display will show ÒmuteÓ or Òsolo.Ó
The currently selected track Special information The bar and beat of the current location in the sequence
ss
ss
lm m
¦01 1.01
KEYS :LOOKIT THIS
ii
The SoundFinder category and name of the trackÕs sound
¥ When you are moving within a sequence in a non-play modeÑsuch as when youÕre fast forwarding,
rewinding or selecting a location within the sequenceÑthe locate display appears.
The current location of the sequence
Locate: 2.03
Go To= 2.03.001
NNNNooootttteeee:::: The location within a sequence is measured in barsÑor measuresÑbeats and clocks. A
clock is 1/384th of a quarter note. This 384 ppqn (pulse-per-quarter-note) resolution means that
the ASR-X Pro sequencer can capture the most subtle of rhythmic nuances. When an SMF
recorded at some ppqn other than 384 is loaded into the ASR-X Pro, the ASR-X Pro adjusts its
playback timing resolution so that the SMF plays as intended. When additional tracks are
recorded in the sequence, theyÕre recorded at the SMFÕs ppqn.
TTTThhhheeee SSSSeeeeqqqquuuueeeennnncccceeee SSSSeeeelllleeeecccctttt BBBBuuuuttttttttoooonn
The Sequence Select button provides access to sequence selection and creation tools. Each time the
Sequence Select button is pressed, one of two displays appears, allowing you to create a new sequence or
select one thatÕs currently in the ASR-X ProÕs memory.
nn
Select Edit Process
New Tap / Tempo Undo
m
ji p
The bar, beat and clock where playback will begin
Sequence
ENSONIQ ASR-X Pro Reference Manual 59
Page 68

6ÑSequencing
CCCCrrrreeeeaaaattttiiiinnnngggg aaaa NNNNeeeewwww SSSSeeeeqqqquuuueeeennnnccccee
When the sequence-creation display appears you can press the flashing Yes button to create a new
sequence. The new sequence will be assigned a default name and number that tells you which empty
sequence location it will occupy.
ee
Create new sequence?
SEQ00002
ip
The sequenceÕs default name This number shows the new sequence will be the second one in memory
TTTTiiiipppp:::: To quickly select the sequence creation display, double-click the Sequence Select button.
TTTTiiiipppp:::: See ÒThe Sequence Process ButtonÓ later in this chapter to learn how to rename a sequence.
SSSSeeeelllleeeeccccttttiiiinnnngggg SSSSeeeeqqqquuuueeeennnncccceeeess
When the ASR-X Pro shows its sequence selection display, you can turn the Value knob to select any of
the sequences currently in the ASR-X ProÕs memory. You can also select the desired sequence by typing
its number using the Essentials buttons as a numeric keypad.
The selected sequence is the first one in memory The number of sequences in memory
ss
lm
Sequence 1 of 4:
Grand Slam
i
The name of the selected sequence
When youÕve selected the desired sequence, press the Enter button to load it into the sequencer, where it
can be played or edited.
TTTThhhheeee SSSSeeeeqqqquuuueeeennnncccceeee EEEEddddiiiitttt BBBBuuuuttttttttoooonn
The Sequence Edit button provides access to sequence settings. When you press the Sequence Edit button,
the ASR-X Pro displays one of the settings for the currently selected sequence in the form of a parameter.
Turn the Parameter knob to access each of these, and turn the Value knob to select the desired value for
the displayed parameter.
TTTTeeeemmmmppppoo
oo
Each sequence has a basic tempo setting that determines how fast it will play, expressed in BPM (Òbeats
per minuteÓ). You can set the current sequenceÕs tempo manually, by selecting the whole-integer or
fractional area of the Tempo parameter display and dialing in the desired value, or by tapping out the
beat you want at any time on the Sequence Edit buttonÑwhen you do so, the ASR-X Pro will jump to the
Tempo display to let you see the tempo youÕre playing.
TTTTiiiipppp:::: The Final Mix record mode (see ÒRecordModeÓ below) allows you to record full-integer
tempo changesÑfractional changes are not recorded.
nn
Sequence
Select Edit Process
New Tap / Tempo Undo
60 ENSONIQ ASR-X Pro Reference Manual
Page 69

6ÑSequencing
RRRReeeeccccoooorrrrddddMMMMooooddddee
The ASR-X Pro sequencer provides several different recording modes, each of which allows you to
perform a different type of recording or mixing task:
¥ ReplaceÑThis is the most basic recording mode, where newly recorded material replaces anything
¥ AddÑIn Add mode, newly recorded material is combined with anything previously recorded on a
¥ StepÑThe Step mode allows you to use the ASR-X Pro sequencer as a non-real time recording
¥ Track MixÑTrack mix mode allows you to record real-time track parameter changes onto a track.
¥ Final MixÑFinal Mix mode allows you to record whole-sequence volume and tempo changes. See
SSSStttteeeepppp RRRReeeeccccoooorrrrddddiiiinnnngg
Step recording lets you record notes and chords on a track while the sequencer only moves forward when
you instruct it to do so. During playback, a step-recorded track plays at the sequenceÕs normal tempo,
causing all the notes and pedal presses youÕve entered to sound as if they were performed normally. Step
recording is ideal for impossible-to-play passages, or for times when a not-quite-human-sounding
performance is desired.
In step recording, each track is divided up into divisions of a beat, called steps.
ee
that was previously recorded on the selected track. In Replace mode, the length of a sequence is
defined by its longest track.
track, so that both the new and old material is heard on playback. In Add mode, the length of a
sequence is defined by the length of the first track.
device, where each note or chord is entered one at a time. See ÒStep RecordingÓ below for details.
See ÒRecording Track Parameter ChangesÓ later in this section.
ÒRecording Sequence Volume and Tempo ChangesÓ later in this section.
gg
With the sequence at rest, you enter notes and sustain/sostenuto pedal presses at their desired locations.
ENSONIQ ASR-X Pro Reference Manual 61
Page 70

6ÑSequencing
The sequence is then advanced, step-by-step, through the track, as you place the desired notes, chords or
sustain/sostenuto pedal presses where you want them. Notes are recorded at the velocity with which
theyÕre played on the keyboard. By paying attention to the velocities at which you play your notes, you
can help simulate a natural sound.
TTTTiiiipppp:::: Chords can be recorded by playing the notes in the chord simultaneously or one at a time.
The ASR-X Pro provides a suite of step-recording parameters. Turn the Parameter knob to select each
parameter, and the Value knob to change the selected parameterÕs setting. ItÕs best to set up all of the step
parameters as youÕd like before you play notes on the ASR-X Pro pads or send notes to the ASR-X Pro via
MIDI. All of the step recording parameters share a common display format:
The selected track The selected Step value
mm
Trk01 Step: 1/4
Time= 1.01.001
i
The bottom line shows each step recording parameter and its value
SSSStttteeeepppp RRRReeeeccccoooorrrrdddd ppppaaaarrrraaaammmmeeeetttteeeerr
Time Shows your current location in the sequence. Notes played on the
Step Size Sets the division of the beat at which notes will be placed. This
Gate Time Sets the length of each recorded note. This can be set to:
rr
TTTThhhheeee ppppaaaarrrraaaammmmeeeetttteeeerrrrÕÕÕÕssss ppppuuuurrrrppppoooossssee
pads or received via MIDI will be places at the displayed
location..
may be set to:
1/1, 1/1T, 1/2D, 1/2, 1/2T, 1/4D, 1/4, 1/4T, 1/8D, 1/8, 1/8T,
1/16D, 1/16, 1/16T, 1/32D, 1/32, 1/32T, 1/64D, 1/64 and 1/64T.
Note: ÒDÓ=Òdotted valueÓ; ÒTÓ= ÒtripletÓ
1/1, 1/1T, 1/2D, 1/2, 1/2T, 1/4D, 1/4, 1/4T, 1/8D, 1/8, 1/8T,
1/16D, 1/16, 1/16T, 1/32D, 1/32, 1/32T, 1/64D, 1/64, 1/64T,
Step and Held.
Note: ÒDÓ=Òdotted valueÓ; ÒTÓ= Òtriplet.Ó
When the parameter is set to ÒStep,Ò the duration of each note
will equal the Step size.
When the parameter is set to ÒHeld,Ò the duration of each note is
set by holding down the noteÕs pad, or key on an external MIDI
keyboard, and advancing the Time value, letting go of the pad or
key where you want the note to end.
ee
62 ENSONIQ ASR-X Pro Reference Manual
Page 71

6ÑSequencing
Gate Percentage When Gate Time is set to any value other than ÒHeld,Ó the Gate
Auto-Step Allows you to set the manner in which the sequencer will
To begin step recording, turn the Parameter knob counter-clockwise to return to the Time display, hold
down the Record button and press the Play button. To end recording, press the Stop button.
RRRReeeeccccoooorrrrddddiiiinnnngggg TTTTrrrraaaacccckkkk PPPPaaaarrrraaaammmmeeeetttteeeerrrr CCCChhhhaaaannnnggggeeeess
When you hold down the Record button and press the Play button to begin recording in Track Mix mode,
the ASR-X Pro shows the Track Mix display for one of the trackÕs parameters (see in Chapter 2).
Percentage parameter lets you to shorten the length of recorded
notes by reducing the selected Gate Time value by a percentage.
Tip: Try a Gate Percentage setting of 80% to approximate a realtime performance.
advance through the track. When Auto-Step is set to ÒOn,Ó each
note played (see tip below about chords) will cause the sequencer
to advance to the next step. When itÕs set to ÒOff,Ó the track will
advance to the next step each time you press the Enter button.
Tip: You can move to next step using a foot switch, if you like.
See Chapter 7Õs ÒSet system prefs?Ó
Tip: The sequencer interprets notes played closely
togetherÑwithin 100 milliseconds of each otherÑas being a
chord. When Auto-Step is on, only notes played further apart will
advance the track to the next step. If youÕd like to play the notes
in a chord one-by-one, turn Auto-Step off.
ss
Trk01 Mixdown 1.01
Mix (Expression)=127
Using Track Mix mode, you can record real-time changes for the following parameters, each of which can
be altered via a standard MIDI controller:
¥ Mix (Expression)Ñcontroller #11 ¥ Amp Env DecayÑcontroller #76
¥ Track PanÑcontroller #10 ¥ Amp Env ReleaseÑcontroller #72
¥ Glide TimeÑcontroller #84 ¥ Filter CutoffÑcontroller #74
¥ Normal LFO RatesÑcontroller #75 ¥ Filter ResonanceÑcontroller #77
¥ Amp Env AttackÑcontroller #73
To move among the available parameters, while recording in Track Mix mode, turn the Parameter knob
or press either the Exit or Enter button. When the desired parameter is shown, you can turn the Value
knob to change its settingÑall changes you make will be recorded.
RRRReeeeccccoooorrrrddddiiiinnnngggg SSSSeeeeqqqquuuueeeennnncccceeee VVVVoooolllluuuummmmeeee aaaannnndddd TTTTeeeemmmmppppoooo CCCChhhhaaaannnnggggeeeess
When you hold down the Record button and press the Play button to begin recording in Final Mix mode,
the ASR-X Pro shows one of two Final Mix displays: one for the sequenceÕs overall volume...
ss
Trk01 Mixdown 1.01
Final Mix= 100%
...and one for its tempo.
Trk01 Mixdown 1.01
Final Tempo= ¤:120
To move between the two displays, turn the Parameter knob or press either the Exit or Enter button.
When the desired parameter is shown, you can turn the Value knob to increase the sequenceÕs track mix
settingsÑwhich rise and fall as a single entityÑ or its tempo setting. The rate of increase or decrease to
the mix setting is expressed as a percentage of its original value.
ENSONIQ ASR-X Pro Reference Manual 63
Page 72

6ÑSequencing
NNNNooootttteeee:::: Use Final Mix for volume changes with careÑit would be a good idea to save a safety copy
of your work to disk firstÑsince there is no undo available for Final Mix volume changes.
TTTTiiiipppp:::: If youÕd like to use the Final Mix mode on a selected group of tracks only, mute all of the
sequenceÕs other tracks. Final Mix will only affect the un-muted tracks.
LLLLoooooooopppp PPPPllllaaaayyyybbbbaaaacccckk
A sequence can be programmed to play through once to the end and stop, or to loop back to its beginning
over and over again until you press the Stop button. The value selected for the Loop Playback parameter
Ñeither ÒNoÓ or ÒYesÓÑdetermines whether or not the sequence will loop.
TTTTiiiimmmmeeee SSSSiiiiggggnnnnaaaattttuuuurrrree
The time signature of an ASR-X Pro sequence can be changed whenever the sequence is not playing,
either before or after recording has taken place. If you change the time signature after recording, your
music will not changeÑit will merely be interpreted by the sequencer as being at the new time signature.
kk
ee
The name of the selected sequence
m
OohYeah 1.01
Time Signature= 4/4
jp
The time signature numerator The time signature denominator
When Time signature is displayed, you can turn the Parameter knob to select the numerator or
denominatorÑthe selected item will flash to show itÕs selectedÑand turn the Value knob to dial in the
desired value. The numerator can be set from 1 to 99; the denominator can be set to 1, 2, 4, 8, 16, 32 or 64.
TTTTiiiipppp:::: For you convenience, when you reset the time signature denominator, the denominator for
the sequenceÕs metronome click is set to match the new denominator (see ÒClick TimingÓ below).
UUUUssssiiiinnnngggg RRRReeeeggggiiiioooonnnnss
The ASR-X Pro sequencer allows you to define a section of the currently selected sequence as a region. A
region can have several uses. It can be:
¥ the only section of the sequence thatÕs heard when you play the sequence.
¥ the portion of the sequence that gets re-recorded during automated punching in.
¥ a section of the sequence or of a track upon which you perform one of the sequence processes (see
ÒThe Sequence Process ButtonÓ later in this chapter.)
A region is defined by setting and turning on the Region FromPoint and/or Region ToPoint. The
FromPoint sets the beginning of the region, while the ToPoint sets its end.
After recording a sequenceÕs first track, Region To is automatically turned on, defining the length of the
sequence. To override thisÑin order to lengthen the sequenceÑ you can turn Region To off.
TTTTiiiipppp:::: You can turn on only the FromPoint or ToPoint if youÕd like to use the sequenceÕs original
end or beginning , respectively, as the end or beginning of the region.
64 ENSONIQ ASR-X Pro Reference Manual
ss
Page 73

6ÑSequencing
To turn on and set the Region FromPoint, set the Region FromPoint parameter to ÒOn,Ó and turn the
Parameter knob to display the From= parameter:
The name of the selected sequence
m
OohYeah 1.01
From= 1.01.001
ji p
Bar beat and clock
Turn the Parameter knob to select the bar number, beat number and clock number youÕd like to set, and
turn the Value knob to dial in the desired value. The Region ToPoint is set in the same way, using the
Region ToPoint and To= parameters.
TTTTiiiipppp:::: You can set the From or To value to the nearest beat by pressing the Enter button.
TTTToooo aaaaccccccccoooommmmpppplllliiiisssshhhh tttthhhhiiiissss::
Play only a specific section of a sequence Use the region parameters to define the section of the sequence
Set up an automated punch-in Use the region parameters to define the section of the sequence
Define a section of the sequence a portion
of a track for processing.
RRRReeeeccccoooorrrrddddQQQQuuuuaaaannnnttttiiiizzzzee
::
ee
::
DDDDoooo tttthhhhiiiissss::
you want to play. The standard play, rewind and fast forward
functions will operate within the region youÕve defined.
you want to record. Hold down the Stop button and turn the
Parameter knob all the way counter-clockwise to set the Locate
point to 1.01.001. Hold down the Record button and press the
Play button. As the sequence plays, the Record LED will flash.
When the sequence reaches the Region FromPoint, recording will
begin.
Use the region parameters to define the section of the sequence
you want to process. Each of the processes that can be performed
on a sequence or trackÑexcept UndoÑwill offer a Òwithin
regionÓ option that allows you to process only the defined region
(see ÒThe Sequence Process buttonÓ later in this chapter).
The RecordQuantize feature allows you to correct the timing of your performances as you record them in
the ASR-X Pro sequencer. Quantizing while you record saves you time by eliminating the need to
perform standard post-recording quantization. The RecordQuantize parameter must be set prior to
recording. It can be set to any of the following values:
¥ OFFÑto disengage input quantization
¥ 1/2 ¥ 1/8 ¥ 1/32
¥ 1/2T ¥ 1/8T ¥ 1/32T
¥ 1/4 ¥ 1/16 ¥ 1/64
¥ 1/4T ¥ 1/16T ¥ 1/64T
EEEEddddiiiitttt CCCClllliiiicccckkkk////CCCCoooouuuunnnnttttooooffffffff??
??
When ÒEdit Click/Countoff?Ó is displayed, responding by pressing the Yes button will call up a
collection of parameters that let you to set the nature of the metronome click that can be used as a
rhythmic reference while recording or listening to the selected sequence. Also available are parameters
that allow you to customize the countoff, if any, that will be heard before the selected sequence plays
during recording or playback.. The factory defaults for these parameters are listed in each description in
case you want to restore them after using the ÒSave these settings?Ó command (Chapter 7).
NNNNooootttteeee:::: When a sequence is set to have a countoff, the countoff will be shown in the sequencer
displays as negative values climbing upward to the first beat of the sequence.
ENSONIQ ASR-X Pro Reference Manual 65
Page 74

6ÑSequencing
CCCClllliiiicccckk
The Click parameter determines in what circumstances, if any, the sequenceÕs reference metronome will
be heard. It can be set to:
¥ OffÑso that there will be no metronome heard during recording or playback.
¥ Record OnlyÑso that the metronome will only be heard during recording.
¥ Play OnlyÑso that the metronome will only be heard during playback.
¥ Record/PlayÑso that the metronome will be heard during recording and playback.
kk
factory default value: Record Only
CCCClllliiiicccckkkk SSSSoooouuuunnnndd
The Click Sound parameter determines the sound that will be used for the sequenceÕs reference
metronome click. It can be set to:
¥ ClickÑso that the metronome sound will be a mechanical click.
¥ StickÑso that the metronome sound will be two drumsticks hitting together.
VVVVoooolllluuuummmmee
The click Volume parameter sets the loudness of the sequenceÕs metronome click.
nn
PPPPaaaann
The click Pan parameter value sets the stereo position of the metronome click.
FFFFXXXX BBBBuuuuss
The click FX Bus parameter allows you to send the metronome click through one of the ASR-X Pro effects
by routing it to:
¥ InsertÑso that the metronome will be heard through the sequenceÕs insert effect.
¥ LightReverbÑso that the metronome will be heard with a small amount of reverb.
¥ MediumReverbÑso that the metronome will be heard with an average amount of reverb.
¥ WetReverbÑso that the metronome will be heard with a large amount of reverb.
¥ DryÑso that the metronome will not be routed through the ASR-X Pro effects.
¥ AuxOut1, AuxOut2, AuxOut3, AuxOut4Ñso that the metronome will be routed to one of the ASR-X
dd
factory default value: Click
ee
ss
ProÕs auxiliary outputs and removed from the main mix.
factory default value: 100
factory default value: Center 00
factory default value: Dry
NNNNooootttteeee:::: The AuxOut values are available only when an X-8 output expander is installed.
CCCClllliiiicccckkkk TTTTiiiimmmmiiiinnnngg
The Click Timing parameter sets the division of the beat to be played by the metronome, and may be set
to 1/2, 1/4, 1/8, 1/16 and 1/32 notes, as well as their triplet values (shown with a ÒT.Ó)
CCCCoooouuuunnnnttttooooffffff
The Countoff parameter determines in what circumstances, if ever, a countoff will be heard before the
sequence begins. It can be set to:
¥ OffÑso that there will be no countoff heard during recording or playback.
¥ Record OnlyÑso that the countoff will be heard at the beginning of the sequence prior to recording.
¥ Play OnlyÑso that the countoff will be heard at the beginning of the sequence during playback.
¥ Record/PlayÑso that the countoff will be heard before recording or playing back the sequence.
CCCCoooouuuunnnnttttooooffffffff SSSSoooouuuunnnndd
The Countoff Sound parameter sets the sound to be played as the countoff rhythmic reference. It can be
set to:
¥ QuietÑso that there will be nothing heard during the countoff.
66 ENSONIQ ASR-X Pro Reference Manual
gg
ff
factory default value: Record Only
dd
factory default value: 1/4
factory default value: Click
Page 75

¥ ClickÑso that the countoff sound will be a mechanical click.
¥ StickÑso that the countoff sound will be two drumsticks hitting together.
6ÑSequencing
CCCCoooouuuunnnnttttooooffffffff BBBBaaaarrrrss
The Countoff Bars parameter sets the length of the countoff in measures; it can be set to anywhere from 1
to 16 measures.
TTTThhhheeee SSSSeeeeqqqquuuueeeennnncccceeee PPPPrrrroooocccceeeessssssss BBBBuuuuttttttttoooonn
The Sequence Process button provides access to various track and
sequence editing tools. Each of these performs a particular process on the
selected track or sequence, and each is presented as a top-level question
that can be answered by pressing the No or Yes button. Pressing No
takes you to the sequence selection display described in ÒThe Sequence
Select ButtonÓ earlier in this chapter. Pressing the Yes button either
executes the process or brings you to relevant parameters presented on sub-displays that allow you to
determine exactly how the process will be performed. Once youÕve defined the process to be performed
by adjusting the parameters offered on these sub-displays, pressing the Yes button will execute the
selected process.
NNNNooootttteeee:::: The displayed questions relating to processes are not always shown on the display exactly
as depicted in the following descriptionsÑon the display, they include the number of the selected
track or sequence where appropriate.
TTTTiiiipppp:::: When youÕre using the sequencerÕs region feature (see ÒUsing RegionsÓ earlier in this
chapter), the sequences processes will conveniently offer ÒWithin RegionÓ values where
applicable.
ss
nn
factory default value: 1
Sequence
Select Edit Process
New Tap / Tempo Undo
UUUUnnnnddddoooo ttttrrrraaaacccckkkk ??
The ASR-X Pro allows you to undo your last recording or process. Pressing the Yes button in response to
this displayed question restores your track to the state it was in before you last recorded on it, or
processed it.
TTTTiiiipppp:::: You can quickly jump to the Undo question at any time by double-clicking the Sequence
Process button.
QQQQuuuuaaaannnnttttiiiizzzzeeee ttttrrrraaaacccckkkk??
The ASR-X Pro provides a powerful set of tools for correcting or altering the timing of recorded notes.
These processes are described by the general term quantizing. When you quantize notes, you shift them in
time to line up with specified divisions of the sequenceÕs tempo, as in this simplified illustration:
??
??
ENSONIQ ASR-X Pro Reference Manual 67
Page 76

6ÑSequencing
The various ASR-X Pro quantization tools are sophisticated, but simple to use. By using them in
combination with each other, you can set up some quite elaborate quantizing processes. Each is presented
as a parameter on a quantizing sub-display.
TTTTiiiipppp:::: You can execute a quantize process by pressing the Yes button at any time that one of the
quantize displays is visibleÑthe current settings for all of the quantize parameters will be used.
TTTTeeeemmmmppppllllaaaattttee
The ASR-X Pro provides complete quantization setups as templates. These templates set all of the quantize
parameters to sensible settings for the task after which theyÕre namedÑfor a complete list of the
quantization templates, see Chapter 9. You can a template to use as is, or as a starting point for your
quantization programming. When a template has been edited, this will show Ò**EDITED**.Ó
TTTTiiiipppp:::: You can create and save your own templates that contain quantization settings youÕd like to
re-use. The first four templatesÑUSER TEMP 1 through 4Ñare memory locations in which you
can store your favorite quantization settings. See ÒSave quantize as?Ó later in this section.
QQQQuuuuaaaannnnttttiiiizzzzeeee TTTToo
The Quantize To parameter sets the division of a beat to which notes will be aligned during the
quantization process.
ee
oo
68 ENSONIQ ASR-X Pro Reference Manual
Page 77

6ÑSequencing
The parameter can be set to:
¥ 1/1Ñwhole notes ¥ 1/4TÑquarter-note triplets ¥ 1/32Ñthirty-second notes
¥ 1/1TÑwhole-note triplets ¥ 1/8Ñeight notes ¥ 1/32TÑthirty-second-note triplets
¥ 1/2Ñhalf notes ¥ 1/8TÑeight-note triplets ¥ 1/64Ñsixty-fourth notes
¥ 1/2TÑhalf-note triplets ¥ 1/16Ñsixteenth notes ¥ 1/64TÑsixty-fourth-note triplets
¥ 1/4Ñquarter notes ¥ 1/16TÑsixteenth-note triplets
MMMMeeeetttthhhhoooodd
The ASR-X Pro offers two ways to quantize your music. You can set the Method parameter to:
¥ NormalÑto quantize the notes in the selected track using the traditional quantization method:
¥ DeltaÑto use a revolutionary ENSONIQ method of quantization first introduced in the MR-61 and
dd
moving the beginning of each note to the nearest occurrence of the Quantize To value.
MR-76 that preserveÕs the playerÕs musical intent in a way that normal quantization canÕt. With delta
quantization, if what youÕve recorded drifts out of time with the sequence, as long as it makes
rhythmic sense internally, you can quantize it to perfection.
Delta quantization examines the spaceÑor deltaÑbetween the beginning of the sequence and the
first note and resizes the space to match the nearest multiple of the quantize To value, shifting all of
the later notes in the track so that they retain their original relationship to the first note. This process
is then repeated for the space between the first and second note, and so on, until all of the notes in
the track have been correctly quantized.
ENSONIQ ASR-X Pro Reference Manual 69
Page 78

6ÑSequencing
NNNNooootttteeee:::: When Method=Delta, the only additional quantize parameter requiredÑand availableÑis
Quantize To.
SSSSttttrrrreeeennnnggggtttthh
The Strength parameter determines to what degree the notes in the track will be aligned to the Quantize
To value. This parameter allows you to correct the timing of the music on a track to the extent that you
desire, without necessarily making it absolutelyÑsome might say ÒunnaturallyÓÑperfect. Sometimes, a
little quantizing help is all that a performance needs. The Strength parameter is expressed in percentages.
A value of 100% will line up the beginning of the notes in the track exactly to the division of the beat
chosen with the Quantize To value. A Strength setting of 0% will leave the notes unaffected.
SSSSwwwwiiiinnnngg
This parameter allows you to add a ÒswingÓ feel to your quantized tracks. Every other occurrence of the
type of note set by the Quantize To parameter is altered to sit slightly behind the beat. When the notes in
your track are aligned to the resulting combination of even and slightly lagging notes, a swing feel is
achieved.
hh
gg
70 ENSONIQ ASR-X Pro Reference Manual
Page 79

6ÑSequencing
The Swing parameter can be set from 50%Ñfor no swingÑwhere each of the Quantize To notes occurs
precisely halfway between the note before it and the note after, to 74%, where every other note is pushed
nearly halfway towards the following note.
RRRRaaaannnnddddoooomm
The Random parameter allows you to add aesthetically pleasing timing irregularities to a track as you
quantize it. This can help simulate the small rhythmic fluctuations likely to be present in a naturally
occurring performance. The irregularities provided by the ASR-X ProÕs randomizing function are
intelligently created. They donÕt jump erratically ahead of or behind the beat note by noteÑinstead,
randomized notes occur in slightly rushed or lagging groups, as would be the case with a real musician
playing around a rigid tempo. The Random parameter can be set from 0%Ñfor no randomizationÑto
50%, where randomized notes may be as much as half of the Quantize To value ahead of or behind the
beat.
SSSShhhhiiiifffftt
The Shift parameter allows you to move all of the music recorded on a track ahead in time, or back, by as
much as the Quantize To value. Shift can be set anywhere from -100% to +100%. A Shift setting of 0% will
not shift the music. A setting of -100% will make move it earlier in time by the amount set with the
Quantize To parameter +100% will move it later by the same amount.
LLLLoooowwww KKKKeeeeyyyy////HHHHiiiigggghhhh KKKKeeeeyy
The Low Key and High Key parameters allow you to select a note range to be quantized. All notes
outside of this range will be left unaltered when you execute the quantize command. The Low Key
parameter determines the lowest note that will be quantized, and the high Key parameter determines the
highest.
WWWWiiiinnnnddddoooowwww MMMMiiiinnnniiiimmmmuuuummmm aaaannnndddd WWWWiiiinnnnddddoooowwww MMMMaaaaxxxxiiiimmmmuuuumm
The Window Minimum and Window Maximum parameters allow you to determine by how much notes
must deviate from the Quantize To value before theyÕre subjected to quantization. This allows you to
correct only the notes in a track that are clearly off, without affecting other unobjectionably placed notes.
These parameters are expressed as percentages of deviation from the Quantize To value, and may be set
from 0%Ñno deviationÑto 50%, or halfway to the next occurrence of the value selected with the
Quantize To parameter. The window created applies to notes that fall both ahead of and behind each
occurrence of the value set with the Quantize To parameter. This is shown in the following illustration.
mm
tt
yy
mm
ENSONIQ ASR-X Pro Reference Manual 71
Page 80

6ÑSequencing
QQQQuuuuaaaannnnttttiiiizzzzeeeeNNNNooootttteeeeOOOOffffffffss
Quantizing typically affects the beginning of each noteÑthe note-on. In the ASR-X Pro, you can also
quantize the ends of notes to the value set with the Quantize To parameter. This has the effect of
changing the durations of the notes on the track to the length set with the Quantize To parameter. The
QuantizeNoteOffs parameter may be switched on or off.
ss
MMMMoooovvvveeee NNNNooootttteeee OOOOffffffffss
When you quantize the notes on a track, the beginning of each note is lined up to the Quantize To value.
If the Move Note Offs parameter is set to On, the entire note will be moved according to the various
quantizing parametersÑand will remain the same length. If this parameter is switched off, only the
beginning of the notes will be moved. The ends of the notes will be unchanged, and, therefore, the length
of quantized notes will likely change as only their beginnings are moved to new positions.
SSSSaaaavvvveeee qqqquuuuaaaannnnttttiiiizzzzeeee aaaassss??
The ASR-X Pro allows you to save your current quantization settings as a re-usable quantization
template. To do this, select USER TEMP 1, 2 3 or 4 and press the Yes button. To use one of your templates,
return to the first quantizing sub-displayÑTemplate=Ñand select the desired template.
TTTTiiiipppp:::: USER templates can be stored permanently in FLASH memory or on disk in a
SYSTEMSETUP fileÑsee Chapter 7 for details.
CCCCooooppppyyyy ttttrrrraaaacccckkkk??
The ASR-X Pro offers the opportunity to copy a track, or elements of the track, in a variety of ways to an
assortment of destinations. The variety of tasks accomplished using the track copy process utilize a
shared set of parameters presented on this processÕs sub-displays. As you set each of the parameters, the
ASR-X Pro offers you additional options based on the values youÕve already selected.
TTTTiiiipppp:::: Press the Yes button in response to ÒCopy track?Ó; set the first parameter displayed as you
wish and then turn the Parameter knob clockwise to see if any other parameters are offered. At
the point at which no additional parameters appear, press the Yes button to execute the process.
ss
??
??
72 ENSONIQ ASR-X Pro Reference Manual
Page 81

6ÑSequencing
ee
SSSSccccooooppppee
The Scope parameter is always provided when copying tracks. By setting its value, you determine what
will be copied. You can select:
¥ Entire TrackÑto copy the whole track, including its track settings and all recorded data.
¥ TrkParams OnlyÑto copy only the settings for the sequenceÕs tracks, but no recorded data.
¥ TrkData OnlyÑto copy the recorded data, but not the settings for the sequenceÕs tracks.
¥ Within RegionÑto copy only the recorded data within the defined region. This value is available
only when the Region FromPoint and/or ToPoint parameter is set to ÒOnÓ (see ÒUsing RegionsÓ
earlier in this chapter).
ee
PPPPaaaassssttttee
The Paste parameter determines how the copied material will be interact with the data already present in
the location to which youÕll be copying it. This parameter is not available when Scope=TrkParams Only.
The Paste parameter can be set to:
¥ AppendÑto append the beginning of the current track to the end of the destination track.
¥ ReplaceÑto replace any data already present at the destination with the copied material.
¥ MergeÑto combine the copied material with anything already present at the destination.
ENSONIQ ASR-X Pro Reference Manual 73
Page 82

6ÑSequencing
((((DDDDeeeessssttttiiiinnnnaaaattttiiiioooonnnn )))) SSSSeeeeqq
The Seq parameter allows you to choose a sequence other than the currently selected sequence as a
destination for your copied material when Paste=Replace or Append. Turn the Value knob to select any
of the sequences in the ASR-X ProÕs memory.
DDDDeeeessssttttiiiinnnnaaaattttiiiioooonnnn TTTTrrrraaaacccckk
The Destination Track parameter allows you to select the track to which the track elements youÕve chosen
will be copied. Turn the value knob to select the desired track in the sequence chosen with the
(destination) Seq parameter above, or in the currently selected sequence if Paste=Merge.
DDDDeeeessssttttTTTTiiiimmmmee
When Paste=Append, the DestTime parameter allows you to select a location within the destination track
after the end of its data. The track youÕre copying will be placed in the destination track at this location.
Turn the Parameter knob to selectÑand the Value knob to setÑthe desired bar, beat and clock value.
EEEErrrraaaasssseeee ttttrrrraaaacccckkkk??
The ASR-X Pro offers the opportunity to erase a track, or elements of the track, with great specificity. As
you set each of the parameters provided on this processÕs sub-displays, the ASR-X Pro offers you
additional choices based on the values youÕve already selected.
TTTToooo aaaaccccccccoooommmmpppplllliiiisssshhhh tttthhhhiiiissss::
Erase all data on the track Set Scope to ÒEntire TrackÓ and press the Yes button.
Erase a specific MIDI controllerÕs data Set Scope to ÒTrk Data Only.Ó Turn the Parameter knob
Erase a specific note range Set Scope to ÒTrk Data Only.Ó Turn the Parameter knob
Erase any other type of data Set Scope to ÒTrk Data Only.Ó Turn the Parameter knob
ee
??
qq
kk
::
AAAAfffftttteeeerrrr rrrreeeessssppppoooonnnnddddiiiinnnngggg ÒÒÒÒYYYYeeeessssÓÓÓÓ ttttoooo tttthhhheeee ttttoooopppp----lllleeeevvvveeeellll qqqquuuueeeessssttttiiiioooonnnn,,,, ddddoooo tttthhhhiiiissss::
clockwise and set Event to ÒController.Ó Turn the Parameter knob
clockwise and set Cntrl to the desired controller. Press the Yes
button.
clockwise and set Event to ÒNote Range.Ó Turn the Parameter
knob clockwise and set Lo Key to the lowest note you want to
erase. Turn the Parameter knob clockwise and set High Key to
the highest note you want to erase. Press the Yes button.
clockwise and set Event to the type of data you want to erase.
Press the Yes button.
::
TTTTiiiipppp:::: When the Region FromPoint and/or ToPoint parameters are set to ÒOn,Ó the track-erasing
process also offers a ÒWithin RegionÓ value for its Scope parameter. Use this value to perform all
of the above-listed tasksÑwith the exception of erasing the whole trackÑon only the portion of
the track that falls within the current region From and To points.
TTTTiiiipppp:::: The simplest rule of thumb to follow when using this process is to press the Yes button in
response to the top-level question, set the first parameter displayed as you wish and then turn the
Parameter knob clockwise to see if any other parameters are offered. At the point at which no
additional parameters appear, press the Yes button to execute the process.
EEEErrrraaaasssseeee ttttrrrrkkkk ttttoooo eeeennnndddd??
Answering ÒYesÓ to this question provides a quick way to clear unwanted music from the end of the
selected sequence. This process will erase everything recorded in the sequence that occurs after the
currently selected location in the sequence. ItÕs a good idea to hold down the Stop button and verify that
youÕve got the desired location selected before answering Yes to this question. If it isnÕt, press the Stop
button, and while holding it down, turn the Parameter knob to select the desired measure, press the
arrow buttons to select a beat, and turn the Value knob to select the desired clock. When you let go of the
Stop button, the sequence will go to the location youÕve dialed in.
74 ENSONIQ ASR-X Pro Reference Manual
??
Page 83

6ÑSequencing
RRRReeeennnnaaaammmmeeee sssseeeeqqqquuuueeeennnncccceeee??
Any sequence can be renamed at any time by pressing the Yes button in response to this question. Turn
the value knob to select each character position and turn the Value knob to dial in the desired character.
NNNNooootttteeee:::: You can give a sequence a name of up to 20 characters, even though the sequencer displays
on the ASR-X Pro will not typically show all 20 of these characters. The extended name will be
visible if you transport your ASR-X Pro sequenceÑsince itÕs a Standard MIDI FileÑvia floppy to
a computer. To view all 20 characters of a sequenceÕs name on the ASR-X Pro, hold down the
Sequence Select button. You can turn the Value knob to view the long names of all onboard
sequences.
AAAAppppppppeeeennnndddd sssseeeeqqqquuuueeeennnncccceeee??
The ASR-X Pro allows you to attach the currently selected sequence to the end of another sequence in
memory. You can construct songs by appending the sections of the song to each other in the correct
order. This process offers two sub-displays.
??
??
The number of the currently selected sequence
m
Append seq 2 to?
Seq= 1: Shortie
ii
The number and name of the target sequence
This display allows you to select the sequence to which the currently selected sequence will be attached.
The name of the selected sequence
m
Append seq 2 at?
DestTime= 1.01.001
ji p
Bar beat and clock
When this display is visible, you can at what point after the target sequence the currently selected
sequence will be heard. This parameter defaults to attaching the selected sequence at the beginning of the
measure following the target sequenceÕs last recorded data. to change this setting, turn the Parameter
knob to select the value youÕd like to reset, and turn the Value knob to do so.
TTTTiiiipppp:::: When two sequences with different time signatures and/or tempos are attached using the
append process, both of their time signatures and/or tempos are retained.
TTTTiiiipppp:::: When sequences are appended to each other, the insert effect and track settings from the
destination sequence is used.
CCCCooooppppyyyy tttthhhhiiiissss sssseeeeqqqquuuueeeennnncccceeee??
The ASR-X Pro allows you to copy the currently selected sequence to the next empty sequence location.
You can choose to copy:
??
¥ Entire SeqÑWhen this value is selected, everything in the sequence, including all of its tracksÕ
settings and note data, will be copied.
¥ SeqParams OnlyÑWith this value, only the settings for the sequenceÕs tracks will be copied.
ENSONIQ ASR-X Pro Reference Manual 75
Page 84

6ÑSequencing
EEEErrrraaaasssseeee tttthhhhiiiissss sssseeeeqqqquuuueeeennnncccceeee??
The ÒErase this sequence?Ó process allows you to delete the currently selected sequence from memory. It
also providesÑwhen the Region FromPoint or Region ToPoint parameters are on (see ÒUsing RegionsÓ
earlier in this chapter)Ñthe opportunity to clear unwanted materials from the ends of the sequence. Two
choices are offered when either of the above region parameters are set to ÒOnÓ:
¥ Entire SeqÑWith this value, the entire sequence will be erased when you press the Yes button.
¥ Outside RegionÑWith this value selected, only recorded data that occurs earlier than the region
From point (if the Region FromPoint parameter is set to ÒOnÓ) and/or after the region To point (if
the Region ToPoint parameter is set to ÒOnÓ) will be erased.
EEEErrrraaaasssseeee aaaallllllll sssseeeeqqqquuuueeeennnncccceeeessss??
This question offer to clear your ASR-X Pro sequencer memory. Press the Yes button to perform this
processÑa second display will ask you to confirm your decision. Press the Yes button again to erase all
sequences currently in the ASR-X ProÕs memory.
EEEEnnnntttteeeerrrr ppppaaaatttttttteeeerrrrnnnn mmmmooooddddeeee??
Pattern mode allows you to chain sequences, one after the other, in real time. This can be handy when
jamming, in performance, or when trying out song structures. (If youÕre ready to actually create a song,
use song mode, described below.) You can play along on the pads, and use the Octave Transpose buttons
and Patch Selects (the Patch Selects will be reset at the start of each sequence). When you press the Yes
button in response to ÒEnter pattern mode?Ó the ASR-X Pro will scan the contents of its sequencer
memory, and show the pattern mode sequence selection display:
??
??
??
The sequence cued up to play next
m
Nxt 001: Groove
Groove 1.01
ii
The sequence currently being played The bar/beat location in the current sequence
Turn the Value knob or type the desired sequenceÕs number using the Essentials buttons as a numeric
keypad to select the first sequence you want to hearÑyour selection will be shown on the displayÕs top
line. Press the Enter button to lock in your choice, and press the Play button to start playback.
TTTTiiiipppp:::: You can also choose sequences in pattern mode with the Select Track arrow buttons.
Using any of the methods described above, select the next sequence you want to hearÑits name will be
shown on the top line of the displayÑand press the Enter button to lock in your choice. When the
currently playing sequence reaches the end, the sequence selected on the top line will start to play. Repeat
this process for the next sequence, and so on.
TTTTiiiipppp:::: You can cue up the next sequence in advance when you want to let the currently playing
sequence loop for a while before proceeding to the next sequence. To do this, select the desired
next sequence without hitting the Yes button. When youÕre ready to hear the next sequence, hit
the buttonÑthe currently playing sequence will play to its end, and the next sequence will play.
TTTTiiiipppp:::: If youÕve selected a next sequence and hit the Yes button, you can hit the No button to
prevent it from playing. This allows you to change your next-sequence selection, and will cause
the sequence shown on the bottom line to loop.
To exit pattern mode, hit the Sequence Stop button and then proceed with normal ASR-X Pro operations.
76 ENSONIQ ASR-X Pro Reference Manual
Page 85

6ÑSequencing
CCCCrrrreeeeaaaatttteeee aaaa nnnneeeewwww ssssoooonnnngggg??
Pressing the Yes button in response to ÒCreate a new song?Ó places the ASR-X Pro in song mode, in
which you can chain sequences together to play as songs. This is achieved by creating a playlist made up
of song stepsÑthere can be up to 200 steps in a song. Each step plays one of the sequences currently in
the ASR-X Pro. While listening to a song, you can play the pads, and use the Octave Transpose buttons
and Patch Selects (the Patch Selects will be reset at the start of each new song step).
NNNNooootttteeee:::: Each sequence used in a song retains its insert effectÑwhen a step is played, the insert
effect associated with its sequence is used.
When you enter song mode, the song-creation display is presented:
??
The currently selected song step
m
Add Song Step 001?
Seq 001: Intro
jp
The location of the stepÕs sequence The name of the stepÕs sequence
A song is comprised of steps that will be played back one after the other. The currently selected step is
shown on the top line of the display. Turn the Value knob or type the desired sequenceÕs number using
the Essentials buttons as a numeric keypad to select the sequence that you want played at the displayed
step, and press the Yes button to lock in your setting and advance to the next step.
PPPPllllaaaayyyyiiiinnnngggg aaaa SSSSoooonnnngg
In song mode, press the Sequence Play button to cause the ASR-X Pro to build (if necessary) and play the
song. As the song plays, the display shows you the step in its playlist thatÕs currently being heard.
gg
The song step being played
m
Song Step 1 of 2
Intro 1.01
ji
The name of the stepÕs sequence The current bar/beat location within the stepÕs sequence
When the song isnÕt playing, turn the Parameter knob to select any of the songÕs steps or type the stepÕs
number using the Essentials buttonsÑand press the Play button to start playback from the selected step.
EEEExxxxiiiittttiiiinnnngggg aaaannnndddd RRRReeee----EEEEnnnntttteeeerrrriiiinnnngggg SSSSoooonnnngggg MMMMooooddddee
You can leave song modeÑrestoring the ASR-X Pro to its normal sequence modeÑby pressing the
Sequence Select button. To return to your song, press the Sequence Process button and dial all the way
clockwise to select the ÒEnter song mode?Ó When this question is displayed, press the Yes button.
EEEEddddiiiittttiiiinnnngggg aaaa SSSSoooonnnngg
In song mode, press the Sequence Edit button to cause the main song editing display to appear:
gg
ee
The currently selected song step
m
Edit Song Step 001?
Seq 001: Intro
jp
The location of the stepÕs sequence The name of the stepÕs sequence
ENSONIQ ASR-X Pro Reference Manual 77
Page 86

6ÑSequencing
When this display is visible, turn the Parameter knob to select the step to be editedÑthe bottom line of
the display shows the stepsÕ sequence. You can choose a different sequence to be played at the step by
turning the Value knob or typing its number on the Essentials buttons and then pressing the Yes button.
AAAAddddddddiiiinnnngggg aaaa SSSStttteeeepppp ttttoooo tttthhhheeee EEEEnnnndddd ooooffff aaaa SSSSoooonnnngg
To add a step to the end of a song, turn the Parameter knob one tick past the songÕs last stepÑthe ASR-X
Pro will offer to add a new song step. Turn the Value knob or type the desired sequenceÕs number using
the Essentials buttons as a numeric keypad to select the desired sequence and press the Yes button.
IIIInnnnsssseeeerrrrttttiiiinnnngggg aaaannnndddd EEEErrrraaaassssiiiinnnngggg SSSSoooonnnngggg SSSStttteeeeppppss
You can add or remove steps in the middle of its playlist. When the main song editing display is visible,
press the Sequence Process button to toggle between the insert and erase song step displays.
gg
ss
The song step at which a new step will be added
m
Insrt Song Step 001?
Seq 001: Intro
jp
The location of the new stepÕs sequence The name of the new stepÕs sequence
When you insert a step, a new step is added to the playlist at the selected locationÑthe sequence
displayed on the lower line of the display will be played by the inserted step. Select the desired location
for your new step, select the sequence you want it to play and press the Yes button to insert the step.
The song step to be removed from the playlist
m
Erase Song Step 001?
Seq 001: Intro
jp
The location of the stepÕs sequence The name of the stepÕs sequence
When you erase a song step, the selected step is removed from the playlist. Select the song step youÕd like
to remove and press the Yes button to erase it.
78 ENSONIQ ASR-X Pro Reference Manual
Page 87

6ÑSequencing
TTTThhhheeee AAAASSSSRRRR----XXXX PPPPrrrroooo SSSSeeeeqqqquuuueeeennnncccceeeerrrr aaaannnndddd MMMMIIIIDDDDII
II
RRRReeeeccccoooorrrrddddiiiinnnngggg iiiinnnnttttoooo tttthhhheeee SSSSeeeeqqqquuuueeeennnncccceeeerrrr ffffrrrroooommmm aaaannnn EEEExxxxtttteeeerrrrnnnnaaaallll MMMMIIIIDDDDIIII DDDDeeeevvvviiiiccccee
The ASR-X Pro sequencer is always ready for recording from an external MIDI controller. Each of the 16
tracks in the sequencer receives data on the MIDI channel of the same number.
To record incoming MIDI data, use the same techniques as when recording from the ASR-X Pro pads.
NNNNooootttteeee:::: Since recording always occurs on the track, or tracks, corresponding to the MIDI channel(s)
on which data is received, keep in mind that the track thatÕs currently selected on the ASR-X Pro
has nothing to do with which track(s) will be recorded. Set your incoming MIDI channels/tracks
carefully so that you donÕt inadvertently end up recording over tracks you intend to keep.
ee
NNNNooootttteeee:::: The undo function is available after the recording of MIDI data only if a single track was
recorded and the track was also selected on the ASR-X Pro.
TTTTrrrraaaannnnssssmmmmiiiittttttttiiiinnnngggg MMMMIIIIDDDDIIII DDDDaaaattttaaaa ffffrrrroooommmm tttthhhheeee SSSSeeeeqqqquuuueeeennnncccceeeerr
MIDI transmission from the each of the ASR-X ProÕs tracks is enabled or disabled by assigning a MIDIOUT sound to the track and via the setting of the TrackMIDIOut track parameter. See Chapter 2.
rr
ENSONIQ ASR-X Pro Reference Manual 79
Page 88

7ÑDisk/Global
77
77
DDDDiiiisssskkkk////GGGGlllloooobbbbaaaall
ll
TTTThhhheeee DDDDiiiisssskkkk////GGGGlllloooobbbbaaaallll CCCCoooonnnnttttrrrroooollllss
The Disk/Global area of the ASR-X Pro front panel contains two groups
of controls that share the common goal of performing operations that
affect the entire ASR-X Pro.
The Disk-related buttonsÑLoad and SaveÑare used for:
¥ loading files from disk into RAM or FLASH. ¥ saving files from RAM to disk.
Operation of the Disk controls is described later in this chapter in ÒThe Disk Buttons.Ó
The System/MIDI button provides access to tools for:
¥ customizing the system-wide behavior of the ASR-X Pro to suit the way you create music.
¥ setting up the overall MIDI functionality of the ASR-X Pro.
¥ getting the most out of the ASR-X Pro RAM.
¥ performing various disk-file management functions.
The System/MIDI tools are described later in this chapter in ÒThe System/MIDI Button.Ó
SSSSttttoooorrrraaaaggggeeee OOOOppppttttiiiioooonnnnss
The ASR-X Pro allows the loading and saving of data using:
ss
ss
Disk / Global
Load Save System
Save AllAll Notes Off MIDI
¥ a built-in floppy disk drive ¥ a SCSI interface for connection to external SCSI devices
Floppy disk and SCSI storage both have their own advantages and disadvantages:
¥ Floppy disk storage offers the ease and cost-effectiveness of a built-in drive. In addition, you can
automatically load a system set-up file or update to your operating system from floppy at boot-up.
On the other hand, saving and loading data can be slow, especially with large files.
¥ SCSI hard and removable drives are fast and can greatly enhance the ASR-X Pro experience. SCSI
CD-ROM drives allow you to load sounds from ENSONIQ, Akai and Roland CD-ROMsÑyou can
also load .wav and AIF files from ISO-9660-format CD-ROMs. On the other hand, SCSI devices must
be purchased separately. In addition, SCSI devices can be finicky, and may require troubleshooting.
IIIInnnnttttrrrroooodddduuuuccccttttiiiioooonnnn ttttoooo FFFFllllooooppppppppyyyy DDDDiiiisssskkkk SSSSttttoooorrrraaaaggggee
TTTThhhheeee FFFFllllooooppppppppyyyy DDDDiiiisssskkkk DDDDrrrriiiivvvvee
The ASR-X Pro contains a built-in floppy disk drive. The ASR-X Pro floppy drive can read or write to any
3.5-inch high-density or double-density floppy disk. Floppy disks can be write-protected so that the files
they contain cannot be accidentally written over. If you plan to save ASR-X Pro files to a floppy, make
sure that itÕs write-protect feature is not engaged. You can tell if a disk is write-protected by flipping it
over (so that itÕs label-side down) and examining the small window in its lower right-hand corner.
ee
ee
ENSONIQ ASR-X Pro Reference Manual 81
Page 89

7ÑDisk/Global
A disk is inserted into the driveÑlabel-side up, with its shutter window to the rightÑby sliding the
floppy into the driveÕs slot until the drive grabs the disk and seats it in the drive mechanism.
Disk are removed from the floppy drive by pressing on the button on the face of the driveÑthis causes
the floppy to pop out far enough from the drive mechanism that it can be grasped and removed.
WWWWaaaarrrrnnnniiiinnnngggg:::: The floppy disk drive is a sensitive piece of equipment and, as such, should be
approached with a measure of care. See ÒThe Care and Feeding of the Floppy Disk DriveÓ at the
front of this manual to learn the proper way to treat a floppy drive.
IIIInnnnttttrrrroooodddduuuuccccttttiiiioooonnnn ttttoooo SSSSCCCCSSSSIIII SSSSttttoooorrrraaaaggggee
WWWWhhhhaaaatttt iiiissss SSSSCCCCSSSSIIII??
SCSI is circuitry that allows for the high-speed transfer of data between computers and computer
peripherals, including CD-ROM drives, scanners, storage devices and musical instruments such as the
ASR-X Pro. The word ÒSCSIÓÑpronounced ÒscuzzyÓÑstands for ÒSmall Computer Systems Interface.Ó
In addition to internal circuitry, SCSI utilizes its own cables. These cables typically have 25- or 50-pin
connectors on one or both ends. SCSI devices are equipped with SCSI jacks to which SCSI cables can be
connected.
Up to eight SCSI devices can be
interconnectedÑdaisy-chaining
one after anotherÑin this manner
at any given time. The data
conduit created by the cabling that
connects a SCSI systemÕs devices is
referred to as a ÒSCSI bus.Ó
Most SCSI data is saved to a disk of some sort. Even removable SCSI cartridges contain a disk on which
data is stored. Some SCSI devicesÑsuch as CD-ROM playersÑuse disks whose contents canÕt be
changed. These are referred to as Òread-onlyÓ devices. Other SCSI devicesÑsuch as fixed and removable
drivesÑcontain writable disks to which you can save your data.
??
ee
The ASR-X Pro is a SCSI II deviceÑSCSI II is a faster, second-generation version of the original SCSI
protocol. If your SCSI cables donÕt match the ASR-X ProÕs SCSI interface's jack, you can purchase the
necessary adapter at any computer supply outlet. SCSI II devices are compatible with SCSI and SCSI III
devices. This manual refers to SCSI II as ÒSCSIÓ for simplicityÕs sake.
82 ENSONIQ ASR-X Pro Reference Manual
Page 90

7ÑDisk/Global
NNNNooootttteeee:::: If youÕre inexperienced with SCSI systems, read ÒAbout TerminationÓ and ÒAbout SCSI
Device IDsÓ below. All users should read ÒPreparing for SCSIÓ in this chapter before proceeding.
AAAAbbbboooouuuutttt SSSSCCCCSSSSIIII DDDDeeeevvvviiiicccceeee IIIIDDDDss
Each SCSI device in a SCSI systemÑincluding the ASR-X ProÑmust be assigned a number from 0 to 7,
with the number representing one of the eight possible positions in a SCSI chain. These numbers, called
ÒSCSI device IDs,Ó allow you to identifyÑand targetÑthe desired device when saving or loading data.
ItÕs very important that no two devices are set to the same ID numberÑif this occurs, the SCSI bus wonÕt
be able to distinguish between the devices. This can cause your entire SCSI system to misbehave.
ss
Some common SCSI devices are pre-configured to use certain SCSI ID numbers. If youÕll be connecting
your ASR-X Pro to any of these devices, be sure to avoid using these already-taken SCSI device IDs:
ee
DDDDeeeevvvviiiiccccee
Macintosh internal hard drives 0 unchangeable
ASR-10/88, TS-10/12, EPS16 PLUS 3 unchangeable
Macintosh internal CD-ROM drives 3 can be reset internally
ENSONIQ CD-ROM drives 4 can be reset via hardware switch
Iomega Zip drives 5 or 6 unchangeable
PC and Macintosh CPUs 7 unchangeable
ENSONIQ ASR-X Pro Reference Manual 83
UUUUsssseeeessss IIIIDD
DD
CCCCoooommmmmmmmeeeennnntt
tt
Page 91

7ÑDisk/Global
TTTTiiiipppp:::: If youÕre connecting your ASR-X Pro to an ASR-10/88 or TS-10 and a CD-ROM drive, itÕs a
good idea to set the CD-ROM drive to ID #4, allowing the ASR-10/88 take advantage of
ENSONIQÕs DirectMacroª feature, and to set the ASR-X Pro to some other unused ID number.
The ASR-X ProÕs SCSI Device ID parameter can be set to any number, as described later in this chapter.
AAAAbbbboooouuuutttt TTTTeeeerrrrmmmmiiiinnnnaaaattttiiiioooonn
The SCSI bus in any SCSI system is a circuit through which power flows from the first device in the chain
to the last. Such a circuit requires a resistor at each of its ends. These resistors, which supply termination to
the bus, prevent electricity from colliding with either end of the circuit and bouncing back, causing all
sorts of problems. Extra termination supplied by devices other than the first and last in the chain is also
problematic, since it impedes the easy flow of power up and down the bus. Therefore, the rule is: A SCSI
bus requires termination on either end and nowhere else.
nn
orÉ
Termination can be applied to the first and last device in a SCSI system through the use of:
¥ jumper connectors installed inside a SCSI device,
¥ a terminator plug externally installed in a deviceÕs spare SCSI jack
¥ software-switchable termination, as found in the ASR-X Pro.
The ASR-X Pro can supply termination or not, as your setup requires. This is controlled by the SCSI
Termination parameter described later in this chapter.
84 ENSONIQ ASR-X Pro Reference Manual
Page 92

7ÑDisk/Global
FFFFoooollllddddeeeerrrrssss////DDDDiiiirrrreeeeccccttttoooorrrriiiieeeess
Fixed and removable SCSI disks, CD-ROMs and floppies provide open expanses of memory to which
data can be stored, and from which itÕs retrieved. In an effort to aid the organization of all that data, it can
be useful to create smaller sub-divisions of memory into which related chunks of data can be stored and
from which they can be easily accessed. These sub-divisions are commonly called ÒdirectoriesÓ orÑas in
the ASR-X ProÑÒfolders.Ó Many CD-ROMs organize their files into such folders. Each folder can contain
other folders and on and on and on. The ASR-X Pro provides a simple method for digging down through
the folders on your SCSI disks to get to the locations and files you seekÑsee ÒSCSI Folder NavigationÓ
later in this chapter. See ÒCreating a New Folder on a SCSI Device Using the ASR-X ProÓ and ÒCreating a
New Folder on a SCSI Device Using a ComputerÓ later in this chapter to learn to create your own folders.
IIIInnnnvvvviiiissssiiiibbbblllleeee FFFFoooollllddddeeeerrrrss
When the ASR-X Pro saves files to a SCSI disk, it creates a set of folders into which files are automatically
saved. These folders are not visible when loading, saving, erasing or renaming disk files on the ASR-X
Pro since theyÕre used by the ASR-X ProÕs internal automatic filing system. The folders can be seen when
an ASR-X Pro disk is viewed on a computer. The names of the invisible folders are:
BANKS SEQUENCE SESSION SOUNDS WAVES
In addition, whenever the ASR-X Pro saves a file to a folder where the default folders donÕt already exist,
it will create a new set of invisible folders into which files can be saved.
PPPPrrrreeeeppppaaaarrrriiiinnnngggg ffffoooorrrr SSSSCCCCSSSSII
Since the ASR-X Pro provides convenient software-switchable SCSI device ID and termination settings,
the following sequence of events must take place in order when setting up the ASR-X Pro for SCSI.
ss
ss
II
1. Prior to being connected to other SCSI device, the ASR-X Pro must be powered on and its SCSI ID
and SCSI Termination system preferences set to their desired values. These parameters are described
in ÒSetting and Saving SCSI System PrefsÓ later in this chapter.
3. The SCSI ID and Termination parameter setting must be saved to a floppy disk as part of a
SYSTEMSETUP file. This procedure is described in ÒThe Save ButtonÓ later in this chapter.
4. The ASR-X Pro must be powered off, and then connected to any relevant SCSI devices. See
ÒAttaching SCSI Cables,Ó later in this chapter. Some common SCSI configurations are shown in
ÒIntroduction to SCSIÓ above.
5. Your ASR-X Pro Ñwith the floppy containing the SYSTEMSETUP file already in the floppy
driveÑmust be powered up for use. See ÒPowering Up SCSI DevicesÓ later in this chapter.
AAAAttttttttaaaacccchhhhiiiinnnngggg SSSSCCCCSSSSIIII CCCCaaaabbbblllleeeess
WWWWaaaarrrrnnnniiiinnnngggg:::: To avoid damaging your equipment, SCSI cables should be connected and disconnected
only when the power is turned off to all devices on the SCSI bus.
The connectors at the end of SCSI cables are
shaped in such a way that they can only be
plugged into SCSI jacks in the proper direction.
PPPPoooowwwweeeerrrriiiinnnngggg UUUUpppp SSSSCCCCSSSSIIII DDDDeeeevvvviiiicccceeeess
The order in which SCSI devices should be turned on varies from setup to setup. A general rule of thumb
is to power up your terminated devices firstÑthe devices on either end of your SCSI daisy-chainÑand
then power up the devices in-between. If the devices in your SCSI system fail to start up properly, or if
some devices are not being recognized by other devices, experiment with different power-up sequences.
ss
ss
ENSONIQ ASR-X Pro Reference Manual 85
Page 93

7ÑDisk/Global
TTTTrrrroooouuuubbbblllleeeesssshhhhoooooooottttiiiinnnngggg YYYYoooouuuurrrr SSSSCCCCSSSSIIII SSSSyyyysssstttteeeemm
If your SCSI devices are not working properly, start by ensuring that the following items have been
properly set up, since these are the most common causes of SCSI trouble:
¥ Make sure that you have termination at either end of your SCSI daisy-chain, and only at its ends.
¥ Make sure that no devices are sharing a SCSI device ID number.
¥ Try turning on your devices in different orders.
¥ Make sure all of your devices are turned on.
The ASR-X Pro provides a Reset SCSI Bus command that can help straighten out a SCSI bus thatÕs gotten
confused for some reason. Its use is described later in this chapter.
If problems persist, try unconnecting your cables and re-connecting them; occasionally, cables that appear
to be seated correctly are not. ItÕs also possible that one or more of your SCSI cables have become
unreliable. ItÕs a good idea to have some spare SCSI cables around for troubleshooting purposes.
If you need further assistance, contact ENSONIQ customer Service at (610) 647-3930 Monday through
Friday 9:30 a.m. to 12:15 p.m. and 1:15 p.m. to 6:30 p.m. Eastern Time.
SSSSMMMMDDDDIIII TTTTrrrraaaannnnssssffffeeeerrrrss
SMDI is a protocol that allows the transfer of sounds and samples from one SMDI-compliant program or
product to another via SCSI. The ASR-X Pro can passively receive and transmit sounds via SMDIÑthere
are no actions to be performed on the ASR-X Pro itself when performing a SMDI transfer. Once a sound
has been sent to the ASR-X Pro, it can be saved to disk as a standard sound. To avoid competition for its
resources, avoid performing SMDI transfers during sampling or sequencing on the ASR-X Pro.
ss
mm
TTTThhhheeee DDDDiiiisssskkkk BBBBuuuuttttttttoooonnnnss
Everything you do on the ASR-X Pro can be stored to disk and loaded back into the ASR-X Pro whenever
you wish. ASR-X Pro floppy and SCSI disks use a standard DOS format, so ASR-X Pro sequence and
wave files can be loaded into a Macintosh or PC-compatible computer for further work. Most disk
operations are performed after pressing the Disk/Global Save or Load buttons. The System/MIDI button
provides access to a collection of disk utilitiesÑsee ÒAccess disk utils?Ó later in this chapter.
NNNNooootttteeee:::: Before you can save ASR-X Pro files to disk, the disks must be properly formatted. This can
be accomplished on a computer or on the ASR-X Pro. To learn how to format a disk on the ASR-X
Pro, see ÒAccess disk utils?Ó later in this chapter.
ss
SSSSttttoooorrrraaaaggggeeee DDDDeeeevvvviiiicccceeee SSSSeeeelllleeeeccccttttiiiioooonnnn aaaannnndddd NNNNaaaavvvviiiiggggaaaattttiiiioooonn
Since the ASR-X Pro can be connected to a large array of SCSI devicesÑas well as its floppy driveÑa
system is provided that allows you to select the desired device for any disk-related activity.
1. A load device can be selected from which data can be loaded.
2. A save device can be selected to which ASR-X Pro data can be saved.
3. A device can be selected as the subject of disk utility operations described later in this chapter.
Until power-down, the ASR-X Pro retains the device thatÕs been selected for each of these roles. This
spares you from having to re-select devices when you want to load a file from one device and save it to
anotherÑthe ASR-X Pro remembers the last load device, save device, and so on.
The device-selection process is essentially the same for each activity. When you press the Disk/Global
Load or Save buttons, or answer the System/MIDI ÒAccess disk utils?Ó question by pressing the Yes
button, the ÒSelect Device?Ó display appears. (If it doesnÕt, you can turn the Parameter knob all the way
nn
86 ENSONIQ ASR-X Pro Reference Manual
Page 94

7ÑDisk/Global
counter-clockwise to access the display.) The procedures for selecting a device and navigating through
the directories/folders of a SCSI device are described below.
SSSSeeeelllleeeecccctttt DDDDeeeevvvviiiicccceeee??
When the Load or Save buttons are pressedÑor the disk utilities are accessedÑthe ÒSelect Device?Ó
display appears after power-up with the floppy disk selected for use, and looking something like this:
??
This may also read ÒSelect load device?Ó or ÒSelect save device?Ó
m
Select device?
Floppy Disk
i
The currently selected storage device
The device shown on the bottom line of the display is the device selected for the current task. To select
the floppy drive, turn the Parameter knob to select ÒFloppy DiskÓ is itÕs not already displayed.
To choose a connected SCSI device for use, turn the Value knob clockwise one tick to the right of ÒFloppy
Disk.Ó The first time that this occurs after power-up, the ASR-X Pro will scan the SCSI bus to learn what
devices are connected. The display will show the ASR-X Pro checking each of the seven SCSI IDs to see if
they represent connected devices (the ASR-X Pro is already using one of the eight possible SCSI IDs).
When the ASR-X Pro has finished, the SCSI device with the lowest ID number will be selected.
Select device?
SCSI 4:CDR-016
ip
The currently selected storage device The disk in the device
You can turn the Value knob counterclockwise to select any of the other connected SCSI devices.
NNNNooootttteeee:::: If a connected SCSI device is shown as *NOT READY*, most likely the device is a CD-ROM
player or removable drive and its CD-ROM or cartridge is not currently installed.
Once youÕve selected a device, turn the Parameter knob clockwise by one tickÑthe ASR-X Pro will read
the contents of the disk in the selected device. To jump directly to the files on the disk, hit Enter instead.
SSSSccccaaaannnn SSSSCCCCSSSSIIII DDDDeeeevvvviiiicccceeeessss??
If you change something in your SCSI systemÑif youÕve switched CD-ROMs or removable cartridges, for
exampleÑyouÕll need to re-scan the SCSI bus so that the ASR-X Pro can see the changes. To do so, turn
the Value knob all the way clockwise until you see ÒScan SCSI devices?Ó and press the Yes button.
SSSSCCCCSSSSIIII FFFFoooollllddddeeeerrrr NNNNaaaavvvviiiiggggaaaattttiiiioooonn
When youÕve chosen a SCSI device, turn the Parameter knob one tick to the right to view the outer-most
folders on the selected deviceÕs disk. The display will look something like this:
This may also say ÒSaveÓ or UtilsÓ The selected ID# The currently selected disk
??
nn
ln n
Load 6:ENSONIQDISK
Folder:GRUVZ »
ip
The name of the currently selected folder ÒDownÓ symbol
The upper left-hand area of the display shows the type of operation being performed and the ID number
of the selected device.
ENSONIQ ASR-X Pro Reference Manual 87
Page 95

7ÑDisk/Global
Turn the Value knob to view the names of the other folders available in this location on the selected disk.
The down symbol in the lower right-hand corner of the display indicates that the currently displayed
folder can be opened by pressing the Enter button. To close the folder youÕre in, and to move back
upward in the folder hierarchy, press the Exit button.
Turn the Parameter knob clockwise at any time to show the files types available in the selected location.
Turn the Value knob to choose individual files of the selected type.
TTTTiiiipppp:::: Turn the Parameter knob fully counter-clockwise to return to the ÒSelect device?Ó display.
When youÕve navigated to the folder or file you seek, standard ASR-X Pro loading, saving, erasing and
renaming procedures can be used. These procedures are detailed later in this chapter.
CCCCrrrreeeeaaaattttiiiinnnngggg aaaa NNNNeeeewwww FFFFoooollllddddeeeerrrr oooonnnn aaaa SSSSCCCCSSSSIIII DDDDeeeevvvviiiicccceeee UUUUssssiiiinnnngggg tttthhhheeee AAAASSSSRRRR----XXXX PPPPrrrroo
When saving disk files or using the disk utilities, you can create new folders. To do this:
1. While viewing the currently selected SCSI deviceÕs name on the ÒSelect Device? display, turn the
Parameter knob so that ÒFolderÓ appears in the lower left portion of the display.
2. Turn the Value knob all the way clockwise so that the display shows ÒCreate new?Ó
3. Press the Yes button.
4. Spell out the new folderÕs name by using the Parameter knob or left/right arrow buttons to select
each character position in turn, and the Value knob to dial in the desired character for each position.
NNNNooootttteeee:::: When creating your own folders on an ASR-X Pro disk, do not use the names reserved for
the invisible default folders (described in ÒInvisible FoldersÓ earlier in this chapter).
5. When youÕve finished, press the Yes button to complete the creation of your new folder.
NNNNooootttteeee:::: If you create a new folder inside an invisible folder, the folder youÕve created will be
conveniently accessible at the outermost level of the diskÕs folder hierarchy.
CCCCrrrreeeeaaaattttiiiinnnngggg aaaa NNNNeeeewwww FFFFoooollllddddeeeerrrr oooonnnn aaaa SSSSCCCCSSSSIIII DDDDeeeevvvviiiicccceeee UUUUssssiiiinnnngggg aaaa CCCCoooommmmppppuuuutttteeeerr
You can use a computer to create folders on an ASR-X Pro disk. When doing so, there are a couple of
things to bear in mind to help ensure that the disk will be easy to use with the ASR-X Pro:
¥ Avoid using the names assigned to the invisible folders so as not to conflict with the ASR-X ProÕs
automatic filing system.
¥ ItÕs best not to create a folder within any of the invisible default folders (these folders can be seen on
a computer), since the ASR-X Pro will make such a folder visible to provide you access to any
folders within itÑthis may create unnecessary confusion when viewing the diskÕs contents.
oo
rr
TTTThhhheeee SSSSaaaavvvveeee BBBBuuuuttttttttoooonn
To save an ASR-X Pro file to disk, you:
1. press the Disk/Global Save button.
2. navigate to the desired floppy or SCSI disk and folder.
3. select the type of file to be saved.
4. name the file.
6. press the Yes button to finish saving the file.
NNNNooootttteeee:::: If the file or files youÕre saving require more space than is available on a single disk, the
ASR-X Pro will ask if youÕre ready to proceed, and ask you to supply additional disks as needed.
88 ENSONIQ ASR-X Pro Reference Manual
nn
Disk / Global
Load Save System
Save AllAll Notes Off MIDI
Page 96

7ÑDisk/Global
FFFFiiiilllleeee TTTTyyyyppppeeeessss tttthhhhaaaatttt ccccaaaannnn bbbbeeee SSSSaaaavvvveeeedd
dd
When you press the Disk/Global Save button, the ASR-X Pro reads the directory of the disk in the drive,
and presents you with a list of the types of files that can be saved to disk.
Save to disk?
ALL-SESSION: S ESSION
i
The type of file to be saved
To choose a type of file to save, turn the Parameter knob to choose:
¥ ALL-SESSIONÑThe ALL-SESSION file saves everything currently in RAM as files with a common
name. An ALL-SESSION file saves:
¥ an ALL-SOUNDS file (see below).
¥ all of the waves currently in RAM as separate 1-AIF WAVE files.
¥ an ALL-SEQS file (see below).
¥ a SYSTEMSETUP file (see below).
TTTTiiiipppp:::: Double-click the Save button to get to the ALL-SESSION saving display at any time.
¥ ALL-SEQSÑAn ALL-SEQS file saves all of the sequences currently in RAM as a single disk file.
¥ 1-SEQUENCEÑA 1-SEQUENCE file saves the selected sequence to disk as a Standard MIDI File
(SMF). Each track contains SysEx data that allows the trackÕs parameter settings to be reloaded from
disk or transmitted to the ASR-X Pro via MIDI from an external sequencer.
¥ ALL-SOUNDS ÑAn ALL-SOUNDS file saves all of the sounds currently in RAM. The ALL-
SOUNDS file type also saves any waves currently in memory as 1-AIF WAVE files.
¥ 1-SOUNDÑThe 1-SOUND file type saves the currently selected sound to disk. If the sound is
playing a wave currently in RAM, the wave is saved to disk as well, as an 1-AIF WAVE file.
TTTTiiiipppp:::: When you save a kit as a 1-SOUND file, all of the sounds and waves it uses are saved as well.
¥ SYSTEMSETUPÑA SYSTEMSETUP file saves the current System/MIDI, Resampling Setup and
sequencer Click settings, as well as your current USER quantization templates.
¥ ESSENTIALSÑAn ESSENTIALS file saves your current Essentials buttons assignments.
TTTTiiiipppp:::: You can save special ALL-SESSION and SYSTEMSETUP files that will load automatically
when stored on a floppy inserted in the ASR-X ProÕs drive at power-up. To do this, name the
desired SYSTEMSETUP file ÒSYSSETUPÓ and/or the desired ALL-SESSION file ÒAUTOLOAD.Ó
Each file type has its own 3-character DOS extension. As in any DOS-based system, the ASR-X Pro
identifies disk files by this extension. Each file is automatically saved into the appropriate folder.
FFFFoooollllddddeeeerrrr////DDDDiiiirrrreeeeccccttttoooorrrryyyy NNNNaaaammmmeeeeWWWWhhhhaaaattttÕÕÕÕssss SSSSttttoooorrrreeeedddd TTTThhhheeeerrrree
SESSION ALL-SESSION files .ssx
SYSTEMSETUP files .spb
BANKS ALL-SOUNDS files .sbx
SEQUENCE sequence banks files associated with ALL-SESSION files .mfb
1-SEQUENCE files .mid
SOUNDS 1-SOUND files .sou
WAVES 1-AIF WAVE files .aif
alias files that prevent duplicate saving of 1-AIF WAVE files .als
(current folder) ESSENTIALS .fav
ee
FFFFiiiilllleeee EEEExxxxtttteeeennnnssssiiiioooonnnnss
ss
ENSONIQ ASR-X Pro Reference Manual 89
Page 97

7ÑDisk/Global
NNNNooootttteeee:::: Though itÕs desirable that files be stored in these folders/directories, the ASR-X Pro can
ÒseeÓ and load files from anywhere on a disk.
SSSSaaaavvvviiiinnnngggg tttthhhheeee CCCCoooonnnntttteeeennnnttttssss ooooffff tttthhhheeee SSSSccccrrrraaaattttcccchhhh PPPPaaaadddd ttttoooo DDDDiiiisssskk
After youÕve pressed the Save button and the ASR-X Pro has read your diskÕs directory, you can save the
contents of the Scratch Pad to disk by pressing the Scratch PadÑthe ASR-X Pro will create a sound that
plays the wave(s) in the Scratch Pad and that you can save to disk.
NNNNaaaammmmiiiinnnngggg DDDDiiiisssskkkk FFFFiiiilllleeeess
Each file you save to disk should be given a unique name. The ASR-X Pro will not allow two files with
the same name on a single diskÑif you save a file that has the same name as a file on the disk, the older
file will be replaced by the new one. This allows you to easily update files by resaving them to disk
without re-naming themÑit also means that you can unintentionally erase a file you meant to keep.
ss
kk
Save to disk?
ALL-SESSION: S ESSION
i
The character currently selected for editing is underlined
To name a disk file youÕre saving, press the left and right Select Track buttons to select each of its eight
character locations. Turn the Value knob to choose the desired character for each location. If youÕre
naming an ALL-SESSION file, each of its component files will share the name you designate.
When youÕve finished naming your file, press the Yes button to save the file to disk.
NNNNooootttteeee:::: When you name a disk file, youÕre not changing the name of the item it contains.
TTTThhhheeee LLLLooooaaaadddd BBBBuuuuttttttttoooonn
To load a file from disk into the ASR-X Pro, you:
1. press the Disk/Global Load button.
2. navigate to the desired floppy or SCSI disk and folder.
3. select the type of file to be loaded.
4. select the specific file to be loaded.
5. if youÕre loading a 1-SOUND file, select the RAM location into which you want to load the sound.
6. press the Yes button to load the file.
NNNNooootttteeee:::: If files youÕre loading are on multiple disks, begin loading the files from the first of these
disksÑthe ASR-X Pro will ask for each disk as it needs it.
FFFFiiiilllleeee TTTTyyyyppppeeeessss tttthhhhaaaatttt ccccaaaannnn bbbbeeee LLLLooooaaaaddddeeeedd
When you press the Disk/Global Load button, the ASR-X Pro reads the directory of the disk in the drive,
and presents you with a list of the types of files that can be loaded from disk.
nn
Disk / Global
Load Save System
Save AllAll Notes Off MIDI
dd
Load from disk?
ALL-SESSION: S ESSION
i
The type of file to be loaded
90 ENSONIQ ASR-X Pro Reference Manual
Page 98

7ÑDisk/Global
To choose a type of file to load, turn the Parameter knob to choose:
¥ ALL-SESSIONÑThe ALL-SESSION file type restores all of the items that were in RAM when the file
was saved. It loads:
¥ an ALL-SOUNDS bank.
¥ the 1-AIF WAVE files played by sounds in the ALL-SOUNDS bank.
¥ an ALL-SEQS file.
¥ a SYSTEMSETUP file.
¥ ALL-SEQSÑAn ALL-SEQS file loads the sequences that were in RAM when the file was saved.
¥ 1-SEQUENCEÑThe 1-SEQUENCE file loads a Standard MIDI File (SMF) created on the ASR-X Pro
or any SMF-compliant sequencer.
¥ ALL-SOUNDS ÑAn ALL-SOUNDS file restores all of the sounds that were in RAM when the file
was saved, as well as any 1-AIF WAVE files required to produce the sounds.
¥ 1-SOUNDÑThe 1-SOUND file type loads a single sound, as well as any 1-AIF WAVE files required
to produce the sound.
¥ 1-WAV WAVEÑA 1-WAV WAVE file loads a .wav-format wave file created on an external device.
1-WAV WAVE files are loaded directly into the Scratch Pad, from where they can be sent to pads
and incorporated into ASR-X Pro sounds.
NNNNooootttteeee:::: The ASR-X Pro converts .wav files to AIF format as it loads them into the ASR-X Pro.
¥ 1-AIF WAVEÑ A 1-AIF WAVE file loads an AIF-format wave file created on the ASR-X Pro or an
external device. 1-AIF WAVE files are loaded directly into the Scratch Pad, from where they can be
sent to pads and incorporated into ASR-X Pro sounds.
¥ SYSTEMSETUPÑThe SYSTEMSETUP loads the System/MIDI, Resampling Setup and sequencer
Click parameter settings, and USERS quantization templates in place when the file was saved.
¥ ASR-SNDÑAn ASR-SND file loads a sound saved to a single high-density (HD) or double-density
(DD) floppy, or SCSI drive, from an ENSONIQ ASR-10, ASR-88, EPS 16 PLUS or EPS. The ASR-X
Pro can also load such sounds stored on disk in Giebler EnterprisesÕ popular .efe and .efa format (to
contact Giebler Enterprises, visit their Web site at http://www.giebler.com).
¥ AKAISNDÑAn AKAISND file imports a sound from an AKAI S-1000 SCSI disk.
¥ SNDÑA SND file imports a sound from a Roland S-770 SCSI disk.
AAAA NNNNooootttteeee AAAAbbbboooouuuutttt IIIImmmmppppoooorrrrtttteeeedddd SSSSoooouuuunnnnddddss
The ASR-X Pro, ASR-10/88, EPS 16 PLUS, EPS, AKAI S-1000 samplers and Roland S-770 samplers each
have their own distinctive voice architecture, with their own set of parameters. You may experience some
changes in such sounds when theyÕre played on your ASR-X Pro Ña direct translation of every parameter
in an imported sound to the ASR-X ProÕs architecture is not always possible.
Most ASR-10/88, EPS 16 PLUS and EPS features have counterparts in the ASR-X Pro voice architecture
that are translated when a sound is imported. A few features lack such a counterpart, however:
¥ A-B FADE IN-TO, C-D FADEOUT-TO, and FADECURVE parameters settings are not imported.
¥ ASR-10/88, EPS 16 PLUS and EPS pitch tables are not imported.
¥ Only the START, LPSTRT-X and TRANSWAV loop modulators are translated.
¥ All ASR-10 and ASR-88 sounds are set to the MediumReverb FX Bus when theyÕre imported.
¥ The ASR-X Pro VelLevels Amount settings for Envelopes 1, 2 and 3 are derived by averaging the
HARD VEL LEVELs 1 and 2 and the SOFT VEL LEVELS 1 and 2 for each envelope in the original
ASR-10/88 sound.
¥ When a layerÕs LYR GLIDEMODE parameter is set to any value other than ÒOFFÓ in an ASR-10/88
sound, the layerÕs Glide Mode is set to ÒOnÓ and its Voice Mode to ÒMonoÓ when itÕs imported.
ss
NNNNooootttteeee:::: EPS sounds do not contain all of the above features.
ENSONIQ ASR-X Pro Reference Manual 91
Page 99

7ÑDisk/Global
The amount of time that it takes to import a sound depends on the number of wavesamples in the sound,
since each waveÕs parameters must be translated to the ASR-X Pro architectureÑthe process can take
several minutes to complete. Once imported, a sound becomes a ASR-X Pro standard sound: it can be
played, converted to a RAM kit and edited using the PAD parameters, and saved to floppy or SCSI disk.
SSSSeeeelllleeeeccccttttiiiinnnngggg aaaannnn IIIInnnnddddiiiivvvviiiidddduuuuaaaallll FFFFiiiilllleeee ttttoooo bbbbeeee LLLLooooaaaaddddeeeedd
Once youÕve selected the type of file to be loaded, turn the Value knob to select a specific file. Once
youÕve chosen the file you want to load, press the Yes button, and the ASR-X Pro will load the file.
NNNNooootttteeee:::: If a file youÕre loading was created on a computer and its name contains more than the eight
characters supported by DOS, the fileÕs name will be truncated according to the following rules: if
the file was named on a Macintosh, an exclamation point will appear at the beginning of its
name; if it was created on a PC-compatible, the last two characters will be an arrow and a digit.
SSSSeeeelllleeeeccccttttiiiinnnngggg aaaa LLLLooooccccaaaattttiiiioooonnnn iiiinnnnttttoooo wwwwhhhhiiiicccchhhh aaaa SSSSoooouuuunnnndddd wwwwiiiillllllll bbbbeeee LLLLooooaaaaddddeeeedd
When loading a 1-SOUND file, an additional display appears when you press the Yes button after
selecting the file to be loaded.
The currently selected RAM bank and program number
dd
dd
lm
Load into RAM00:000
RAM-SND :Hot 2 Touch
i
The name of the sound currently in the selected location
When this display appears, you can turn the Value knob to select any location in either of the ASR-X ProÕs
two RAM sound banksÑRAM 00 and RAM01. If you select a location that already contains a sound, the
sound youÕre loading will replace the one currently in the location. Unused locations show **EMPTY.**
When youÕve selected a location, press the Yes button to load the sound.
TTTThhhheeee SSSSyyyysssstttteeeemmmm////MMMMIIIIDDDDIIII BBBBuuuuttttttttoooonn
The System/MIDI button provides access to parameters and tools for setting up your overall ASR-X Pro
environment and for memory and disk file management. These various items are grouped into several
broader categories, each of which is accessed by pressing the System/MIDI button, turning the Parameter
knob to view and then pressing the Yes button to respond to a displayed question. The questions are:
¥ Set system prefs?ÑPressing the Yes button in response to this question reveals parameters that
control the response of the pads, what occurs when you select new track sounds, SCSI ID and
termination, the Patch Select buttons and foot switches, and the zero-cross loop-finding feature.
¥ Alter system pitch?ÑPressing the Yes button in response to this question causes the ASR-X Pro to
display parameters that determine its response to received MIDI pitch bend messages, that allow
you to fine-tune the overall pitch of the ASR-X Pro, and set the ASR-X ProÕs tuning table.
¥ Edit MIDI settings?ÑPress the Yes button in response to this question to display parameters that set
the base MIDI channel for the ASR-X Pro, its response to and transmission of sequencer
synchronization data, its response to several types of received MIDI messages, its System Exclusive
ID number and allows you to define four special system-wide real-time MIDI controllers.
92 ENSONIQ ASR-X Pro Reference Manual
nn
Disk / Global
Load Save System
Save AllAll Notes Off MIDI
Page 100

7ÑDisk/Global
¥ Access disk utils?ÑPressing the Yes button in response to this question causes the ASR-X Pro to
display an assortment of utilities for formatting disks, copying and optimizing SCSI disks, resetting
a SCSI bus, erasing disk files, renaming disk files, determining how files will be displayed, and also
provides a read-out of the free space available on the currently select disk.
¥ Enter MemoryManager?ÑPress the Yes button in response to this to display informational displays
showing how much free memory is currently available and the name of an installed expansion
board, as well as a set of tools for onboard memory management that provide the ability to clear the
onboard memory banks, erase or rename a sound and change a soundÕs SoundFinder category.
¥ Save these settings?ÑPressing the Yes button saves your current System/MIDI, Resampling Setup
and sequencer Click settings, as well as USER quantization templates, to FLASH memory.
Some of these parameters are accessed by responding ÒYesÓ to questions posed on sub-displays under
the top-level question. To exit from a sub-display or from the System/MIDI displays altogether, press the
Exit button each time you want to move up a level back out to the ASR-X Pro front panel. The factory
default value for each parameter is listed with its description in case you want to restore the default after
using the ÒSave these settings?Ó command described later in this chapter.
SSSSeeeetttt ssssyyyysssstttteeeemmmm pppprrrreeeeffffssss??
TTTToooouuuucccchhhh CCCCuuuurrrrvvvvee
The ASR-X Pro pads are velocity-sensitive, responding with tremendous accuracy to how hard or soft
you play. The Touch Curve parameter allows you to adjust the velocity response of the pads to match
your playing style and technique. There are six available Touch Curve settings:
¥ Table-1ÑWith this setting, the pads offer an easily controllable, compressed dynamic response.
Table-1 is optimized for players with a light touch.
¥ Table-2ÑThis setting is similar to Table-1, but designed for players who play hard.
¥ Table-3ÑWith this setting, the pads offer a full dynamic range for musicians with a high degree of
control over the force with which they play. Table-3 is optimized for players with a light touch.
¥ Table-4ÑThis setting is similar to Table-3, but designed for players who play hard.
¥ Fixed 64ÑThis setting causes the pads to always respond as if youÕve hit them precisely half as hard
as they can be hit. This can be useful in simulating vintage synthesizers with no velocity control.
¥ Fixed127ÑThis causes the pads to always respond as if youÕve hit them as absolutely hard as they
can be hit. This is good for drum/percussion parts in which you donÕt want dynamic changes.
PPPPaaaattttcccchhhh SSSSeeeelllleeeeccccttttss
The ASR-X Pro Patch Select buttons can be set to operate in one of two modes, each of which is invoked
by one of two values for the Patch Selects parameter:
¥ LiveÑWith this setting, the Patch Select buttons are momentary switches. This means that the sound
changes caused by pressing either, or both, of the Patch Select buttons lasts for only as long as the
button is physically held down.
¥ HeldÑWith this setting, playing a note from the pads or via MIDI locks in the Patch Select button or
buttons being held when the note is played. To release the button(s), tap either of the Patch Select
button; subsequent notes will sound as they should when no Patch Select buttons are being pressed.
??
ee
ss
factory default value: Table-2
factory default value: Live
FFFFttttSSSSwwww LLLL aaaannnndddd FFFFttttSSSSwwww RRRR ((((ÒÒÒÒFFFFooooooootttt SSSSwwwwiiiittttcccchhhh LLLLeeeefffftttt,,,, RRRRiiiigggghhhhttttÓÓÓÓ))
The ASR-X Pro can accommodate either a dual foot switch with two pedalsÑsuch as the ENSONIQ SW10Ñor a single foot switch with one pedalÑsuch as the ENSONIQ SW-2 or SW-6. The FtSw L and FtSw R
parameters allow you to assign a broad range of functions to any pedals youÕre using. When a dual foot
switch is connect, both the FtSw L and FtSw R parameters are active, controlling the behavior of the left
and right pedals, respectively. When a single foot switch is connected, FtSw R controls its behavior.
TTTTiiiipppp:::: To learn how to connect foot switches to the ASR-X Pro, see Chapter 1.
ENSONIQ ASR-X Pro Reference Manual 93
))
factory default values: FtSwl=Unused; FtSwR=Sustain
 Loading...