

Page 1

Chapter 2
Before You Begin
10
Page 2
Computer Settings
Windows XP/Windows 7/Windows 8/Windows 10
In order to use the Access Point, you must rst congure
the TCP/IPv4 connection of your Windows OS computer
system.
1a. Click the Start button and open the Control Panel
1b. Move your mouse to the lower right hot corner to
display the Charms Bar and select the Control Panel in
Windows 8 OS.
Windows 8
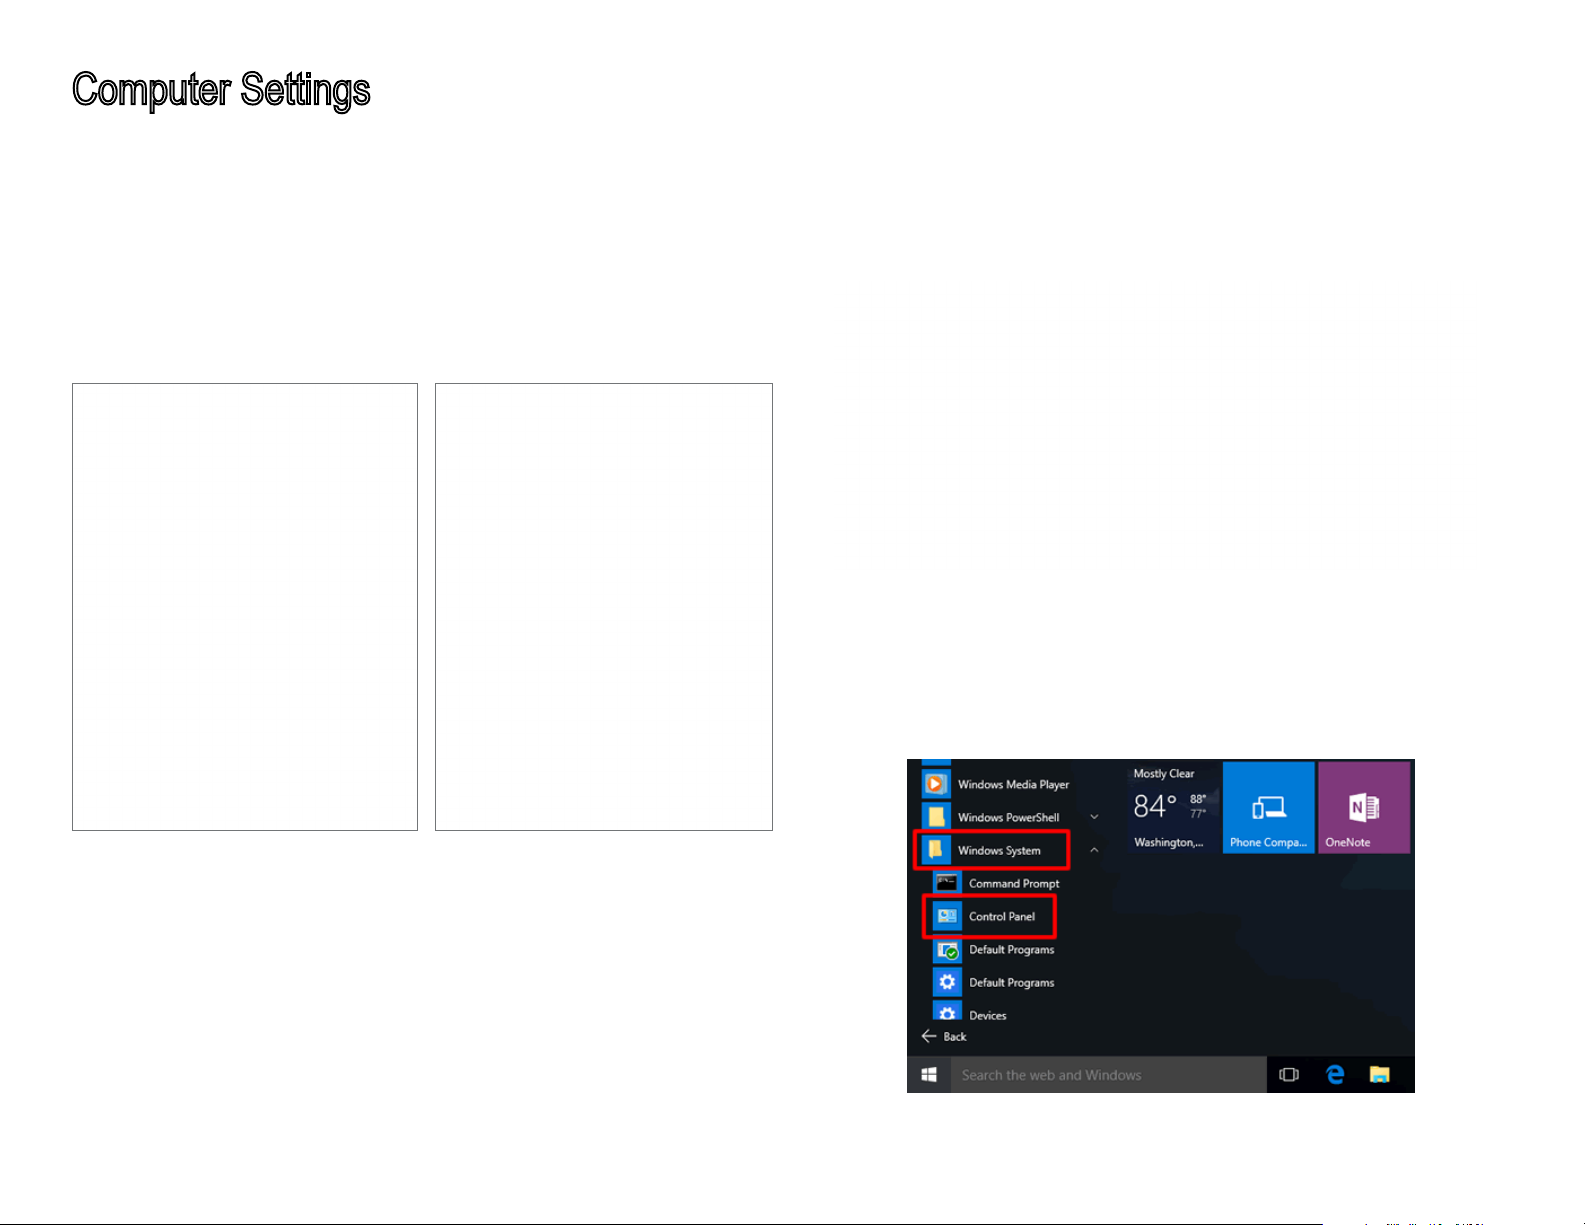
1c. In Windows 10, click Start to select All APPs to enter the
folder of Windows system for selecting Control Panel.
Windows XP Windows 7
Windows 10
11
Page 3

2a. In Windows XP, click Network Connections.
2b. In Windows 7/Windows 8/Windows 10, click View
Network Status and Tasks in the Network and Internet
section, then select Change adapter settings.
3. Right click on Local Area Connection and select Properties.
4. Select Internet Protocol Version 4 (TCP/IPv4) and then
select Properties.
5. Select Use the following IP address and enter an IP
address that is dierent from the Access Point and Subnet
mask, then click OK.
12
Page 4

Note: Ensure that the IP address and Subnet mask are
on the same subnet as the device.
For example: AP IP address: 192.168.1.1
PC IP address: 192.168.1.2 – 192.168.1.255
PC Subnet mask: 255.255.255.0
13
Page 5

Apple Mac OS X
4. In Congure IPv4, select Manually.
1. Go to System Preferences (Which can be opened in the
Applications folder or selecting it in the Apple Menu).
2. Select Network in the Internet & Network section.
5. Enter an IP address that is dierent from the Access
Point and Subnet mask then press OK.
Note: Ensure that the IP address and Subnet mask are
on the same subnet as the device.
For example: A device IP address: 192.168.1.1
PC IP address: 192.168.1.2 – 192.168.1.255
PC Subnet mask: 255.255.255.0
6. Click Apply when done.
3. Highlight Ethernet.
14
Page 6

HardwareInstallation
1. Connect one end of a RJ45 Ethernet cable to the PoE In (LAN/Uplink) port on the rear of the Access Point.
2. Connect the other end of the RJ45 Ethernet cable to a PoE Ethernet switch or the PoE Out port on the PoE injector.
3. Using another RJ45 Ethernet cable, connect one end to the Ethernet port on the computer, and connect the other end
to another port on the PoE Ethernet switch or to the Data In port on the PoE injector.
4. Provide power to the PoE injector/switch.
5. Verify that the Power LED on the AP is steady orange.
6. Proceed to set up the Access Point using the computer.
15
Page 7

Mounting the Access Point
Using the provided hardware, the Access Point can be attached to a ceiling or wall.
To attach the Access Point to a ceiling or wall using the mounting bracket
A) Slide the ceiling mount base into the slot of this Access Point.
B) Hold the Access Point with one hand to reach the other hand over the T-rail side of the bracket. Then hook the
stationary end of the ceiling mount bracket on to the T-rail.
16
Page 8

Wall mount the Access Point
A) Determine where the Access Point will be placed; mark the location for the two base plate mounting holes on
the wall. Use the appropriate drill bit to drill a hole on each mark (1/3” or 8.1mm diameter; 1” or 26mm deep).
B) Screw the anchors into the holes until they are ush with the wall.
C) Screw the included screws into the anchors.
D) Slide the wall mount base into the slot of the Access Point.
17
Page 9

Chapter 3
Configuring Your Access Point
18
Page 10

Conguring Your Access Point
This section will show you how to congure the device
using the web-based conguration interface.
**The model name display will be varied in the dierent device**
Default Settings
Please use your Ethernet port or wireless network adapter
to connect the Access Point.
IP Address 192.168.1.1
Username/Password admin/admin
Web Conguration
1. Open a web browser (Internet Explorer/Firefox/Safari)
and enter the IP Address http://192.168.1.1.
2. The default username and password are: admin.
Once you have entered the correct username and
password, click the Login button to open the web-
based conguration page.
**The model name will be varied in the web browser**
3. If successful, you will be logged in and see the EAP
User Menu.
Note: If you have changed the default LAN IP Address
of the Access Point, ensure you enter the correct IP
Address.
19
Page 11

Chapter 4
Building a Wireless Network
20
Page 12

The EWS375AP has the ability to operate in various modes. This chapter describes the operating modes of above three
models.
Access Point Mode
In Access Point Mode, the EWS375AP behaves like a central connection for stations or clients that support IEEE 802.11a/b/
g/n networks. The stations and clients must be congured to use the same SSID (Service Set Identier) and security password
to associate with the EWS385AP.
2.4 GHz 5 GHz
Client
Client
Client
Client
EWS375AP
Client
Client
21
Page 13

AP Mesh Mode
Under the AP Mesh mode, the EWS375AP can be used as the central connection hub for station or clients that support
IEEE 802.11 b/g/n network. Under this mode, the EWS385AP can be congured with the same Mesh SSID and security
password in order to associate with other EWS385AP, as well as connect with clients under the same SSID and encryption
signatures. For example, you would use one band to connect Access Points in range with Mesh mode and the other band
to broadcast trac on the network.
EWS375AP
22
 Loading...