

Page 1
EDS6115
User’s Manual
Page 2

Table of Content
1. Product Overview ................................................................................................................................................................................................ 6
1.1. Introduction ................................................................................................................................................................................................. 6
1.2. Read Before Using ........................................................................................................................................................................................ 7
1.3. Key Features ................................................................................................................................................................................................. 8
1.4. Package Contents ......................................................................................................................................................................................... 9
1.5. Physical Description ................................................................................................................................................................................... 10
2. Installation ......................................................................................................................................................................................................... 11
2.1. Hardware Setup ......................................................................................................................................................................................... 11
2.2. Ceiling / Wall Mount .................................................................................................................................................................................. 15
2.3. IP Camera Connection ................................................................................................................................................................................ 17
2.3.1. Connecting via Ethernet Cable ................................................................................................................................................................... 18
2.3.2. Connecting via Wi-Fi Setup ........................................................................................................................................................................ 19
3. Accessing the Camera after Installation ............................................................................................................................................................ 20
3.1. Managing using PC or Laptop .................................................................................................................................................................... 21
3.1.1. EnViewer Finder ......................................................................................................................................................................................... 21
3.1.1.1. EnViewer Finder: Network ................................................................................................................................................................. 24
3.1.1.2. EnViewer Finder: DDNS...................................................................................................................................................................... 29
3.1.1.3. EnViewer Finder: Config..................................................................................................................................................................... 31
3.1.1.4. EnViewer Finder: Upgrade ................................................................................................................................................................. 34
3.1.1.5. EnViewer Finder: Reset ...................................................................................................................................................................... 35
3.1.1.6. EnViewer Finder: Reboot ................................................................................................................................................................... 36
3.1.2. Web Browser .............................................................................................................................................................................................. 37
Page 3

3.2. Manage using Tablet or Mobile Phones .................................................................................................................................................... 39
4. First Time Basic Settings ..................................................................................................................................................................................... 40
4.1.1. Setting the Interface Language .................................................................................................................................................................. 46
4.1.2. Changing the Camera Name ...................................................................................................................................................................... 47
4.1.3. Setting the Camera Time............................................................................................................................................................................ 49
4.1.4. Setting the Storage Folder ......................................................................................................................................................................... 50
4.1.5. Adding a User Account ............................................................................................................................................................................... 51
4.1.6. Wireless Setting ......................................................................................................................................................................................... 52
5. User Interface ..................................................................................................................................................................................................... 56
5.1. Navigation Panel ........................................................................................................................................................................................ 57
5.2. Live View Settings ...................................................................................................................................................................................... 61
5.3. Main Menus ............................................................................................................................................................................................... 64
5.4. System ........................................................................................................................................................................................................ 66
5.4.1. Status.......................................................................................................................................................................................................... 67
5.4.2. Service Port ................................................................................................................................................................................................ 69
5.4.3. Time ........................................................................................................................................................................................................... 70
5.4.4. PC Storage Path .......................................................................................................................................................................................... 71
5.4.5. Firmware .................................................................................................................................................................................................... 72
5.4.6. Back-up ...................................................................................................................................................................................................... 75
5.4.7. Reboot/Reset to Default ............................................................................................................................................................................ 80
5.4.8. Language .................................................................................................................................................................................................... 81
5.5. Network ..................................................................................................................................................................................................... 82
5.5.1. IP Configuration ......................................................................................................................................................................................... 83
Page 4

5.5.2. EnGenius Cloud Service ............................................................................................................................................................................. 87
5.5.3. UPnP ........................................................................................................................................................................................................... 92
5.6. Wireless ...................................................................................................................................................................................................... 93
5.6.1. Basic ........................................................................................................................................................................................................... 94
5.6.2. WPS ............................................................................................................................................................................................................ 97
5.6.3. AP Profile .................................................................................................................................................................................................... 99
5.6.3.1. Add ................................................................................................................................................................................................... 100
5.6.3.2. Edit ................................................................................................................................................................................................... 102
5.6.3.3. Move Up / Down .............................................................................................................................................................................. 103
5.6.3.4. Delete ............................................................................................................................................................................................... 104
5.6.3.5. Connect ............................................................................................................................................................................................ 104
5.7. Media ....................................................................................................................................................................................................... 106
5.7.1. Video ........................................................................................................................................................................................................ 107
5.7.2. Camera ..................................................................................................................................................................................................... 109
5.7.2.1. Light Setting ..................................................................................................................................................................................... 110
5.7.2.2. Flicker Control .................................................................................................................................................................................. 113
5.7.2.3. Mirror ............................................................................................................................................................................................... 114
5.7.2.4. Day/Night Mode ............................................................................................................................................................................... 116
5.7.3. Advanced .................................................................................................................................................................................................. 117
5.7.4. Privacy Mask ............................................................................................................................................................................................ 119
5.7.5. Audio ........................................................................................................................................................................................................ 120
5.8. Event Server ............................................................................................................................................................................................. 122
5.8.1. Network Storage ...................................................................................................................................................................................... 123
Page 5

5.8.1.1. NFS (Network File System) ............................................................................................................................................................... 125
5.8.1.2. SAMBA.............................................................................................................................................................................................. 126
5.8.2. FTP (File Transfer Protocol) ...................................................................................................................................................................... 127
5.8.3. E-mail Alerts ............................................................................................................................................................................................. 128
5.8.4. SD Card ..................................................................................................................................................................................................... 130
5.9. Event Management .................................................................................................................................................................................. 133
5.9.1. Setup Wizard ............................................................................................................................................................................................ 134
5.9.1.1. Wizard – Schedule Recording................................................................................................................................................................... 135
5.9.1.2. Wizard – Event ....................................................................................................................................................................................... 140
5.9.2. Event Control ............................................................................................................................................................................................ 148
5.9.3. Schedule Recording .................................................................................................................................................................................. 154
5.10. User Management ................................................................................................................................................................................... 156
5.10.1. Add User ................................................................................................................................................................................................... 158
5.10.2. Edit User ................................................................................................................................................................................................... 159
5.10.3. Delete User .............................................................................................................................................................................................. 161
6. Camera Connecting to EnGenius Router ......................................................................................................................................................... 163
6.1. Enable Router Storage Function .............................................................................................................................................................. 166
6.2. Camera Profile .......................................................................................................................................................................................... 170
6.2.1. Add Profile ................................................................................................................................................................................................ 170
6.2.2. Edit Profile ................................................................................................................................................................................................ 173
6.2.3. Delete Profile ........................................................................................................................................................................................... 174
6.2.4. Synchronize .............................................................................................................................................................................................. 175
6.3. Fine Tune Camera Configuration set by the Router ................................................................................................................................. 176
Page 6

6.3.1. Camera Storage Setting ............................................................................................................................................................................ 177
6.3.2. Camera Event Setting ............................................................................................................................................................................... 179
6.3.3. Camera Motion Detection Setting ........................................................................................................................................................... 180
6.4. Access the Media files on the Router ...................................................................................................................................................... 181
6.4.1. Using web browser .................................................................................................................................................................................. 181
6.4.2. Using Windows File Explorer ................................................................................................................................................................... 185
7. Camera Connecting to Other Router ............................................................................................................................................................... 188
8. Application Guide ............................................................................................................................................................................................. 189
8.1. Example 1: Remote Surveillance and Motion Detection. ........................................................................................................................ 191
8.1.1. Step 1: Choose Event Control ................................................................................................................................................................... 192
8.1.2. Step 2: Configure Motion Detection ........................................................................................................................................................ 193
8.1.3. Step 3: Configure Event Action ................................................................................................................................................................ 194
9. Trouble Shooting .............................................................................................................................................................................................. 196
9.1. Viewing Your Video .................................................................................................................................................................................. 196
9.2. Networking ............................................................................................................................................................................................... 197
9.3. Security and Privacy ................................................................................................................................................................................. 198
9.4. Cloud Video Services ................................................................................................................................................................................ 198
10. Appendix .................................................................................................................................................................................................. 199
Page 7

1. Product Overview
The EDS6115 is a 1-Megapixel Day & Night Wi-Fi Dome Network Camera which adds surveillance capability to a variety of network
environments. With a built-in removable mechanical IR-cut filter, it helps users keep an eye on what matters and get notified by what just
happened on demand allowing 24/7 monitoring remotely.
It features LED Infrared Night Vision with automatic activation system. Megapixel HD with High speed H.264 encoding ensures high quality
image recording without losing any details. Infrared Night Vision feature can assist to deliver 24/7 non-stop monitoring. With the support of
patented EnGenius Cloud service, users can monitor their surveillance networks remotely in real time any time anywhere on any computer or
on iOS or Android based mobile devices using EnGenius APPs.
1.1. Introduction
This document will guide you through detail steps for EDS6115 installation and both basic and advanced configurations. Familiarizing with
the product features can help you to fully utilize the camera for various application scenarios. Please note that the product feature may
improve over time, be sure to check out the latest firmware and user’s manual for most updated changes on EnGenius web site.
Thank you for choosing EnGenius products.
Page 8

1.2. Read Before Using
For users’ convenience, the camera is configured with DHCP enabled by default which allows the camera to get an IP address for itself
automatically. This applies to majority of the surveillance network settings. However, if you are connecting the product in an office (or any
public setting), you may need to consult the IT department in charged for IP setting detail to avoid IP address conflict.
Like all electronic devices, do not install the product in hazardous environment where humidity or temperature is high to avoid danger.
This camera is designed for indoor usage; when the camera is wall-mount installed, please secure the camera and wires in place to prevent it
from dangling.
Page 9

1.3. Key Features
Megapixel HD Resolution to Deliver Quality Streaming on A Variety of Mobile Devices and PCs
LED Infrared Night Vision up to 32 Feet (10 Meters) with Automatic Activation System
Wireless N Network Compliant with Optimum Wi-Fi Performance
Supports Simultaneous Dual-Stream Recording with High Speed H.264 Encoding
Built-in Microphone
Multiple Storage Options–Built-in Micro SD/SDHC Slot for Onboard Storage and Samba/FTP Client to Save to an External Storage
Supports Push Message and Play Back on Smart Devices triggered by Motion/Sound Detection
EnGenius Cloud Services Supported (Apps and Web-based Services)
Page 10
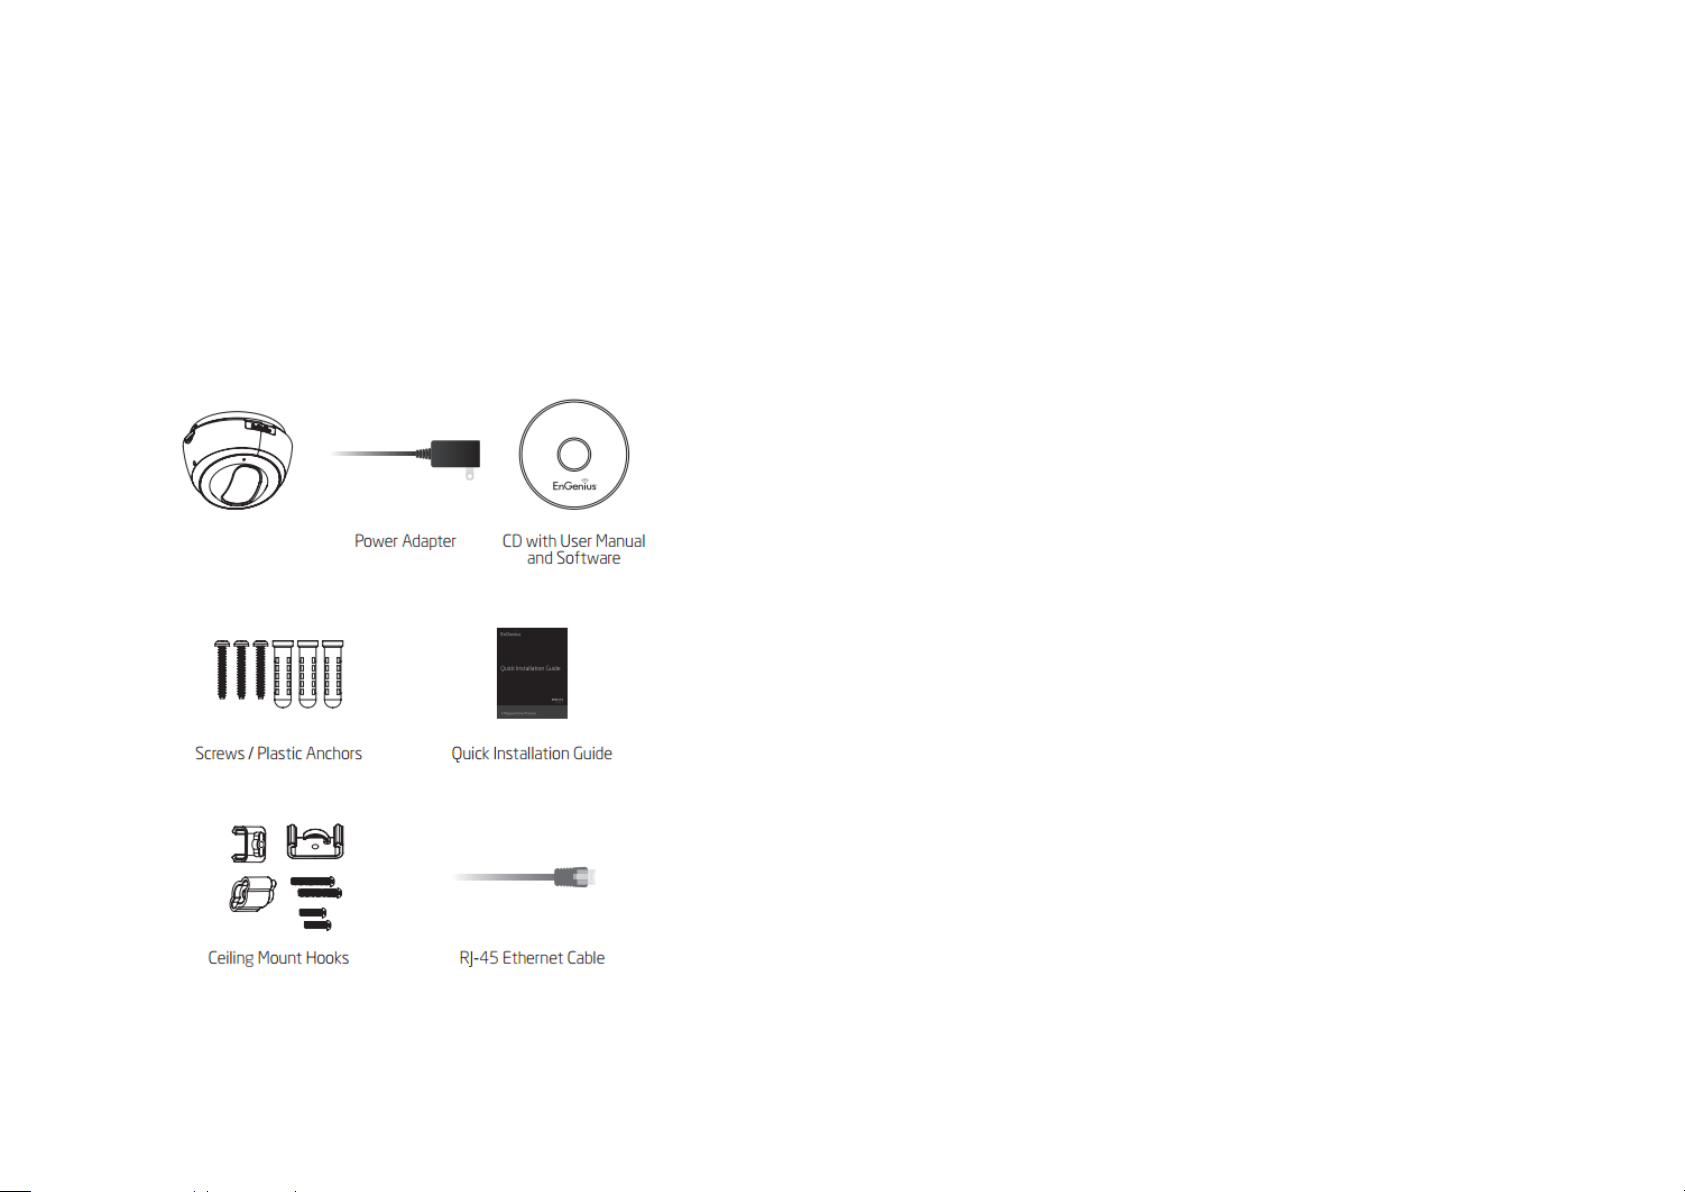
1.4. Package Contents
The package should contain all of following items shown below.
Page 11
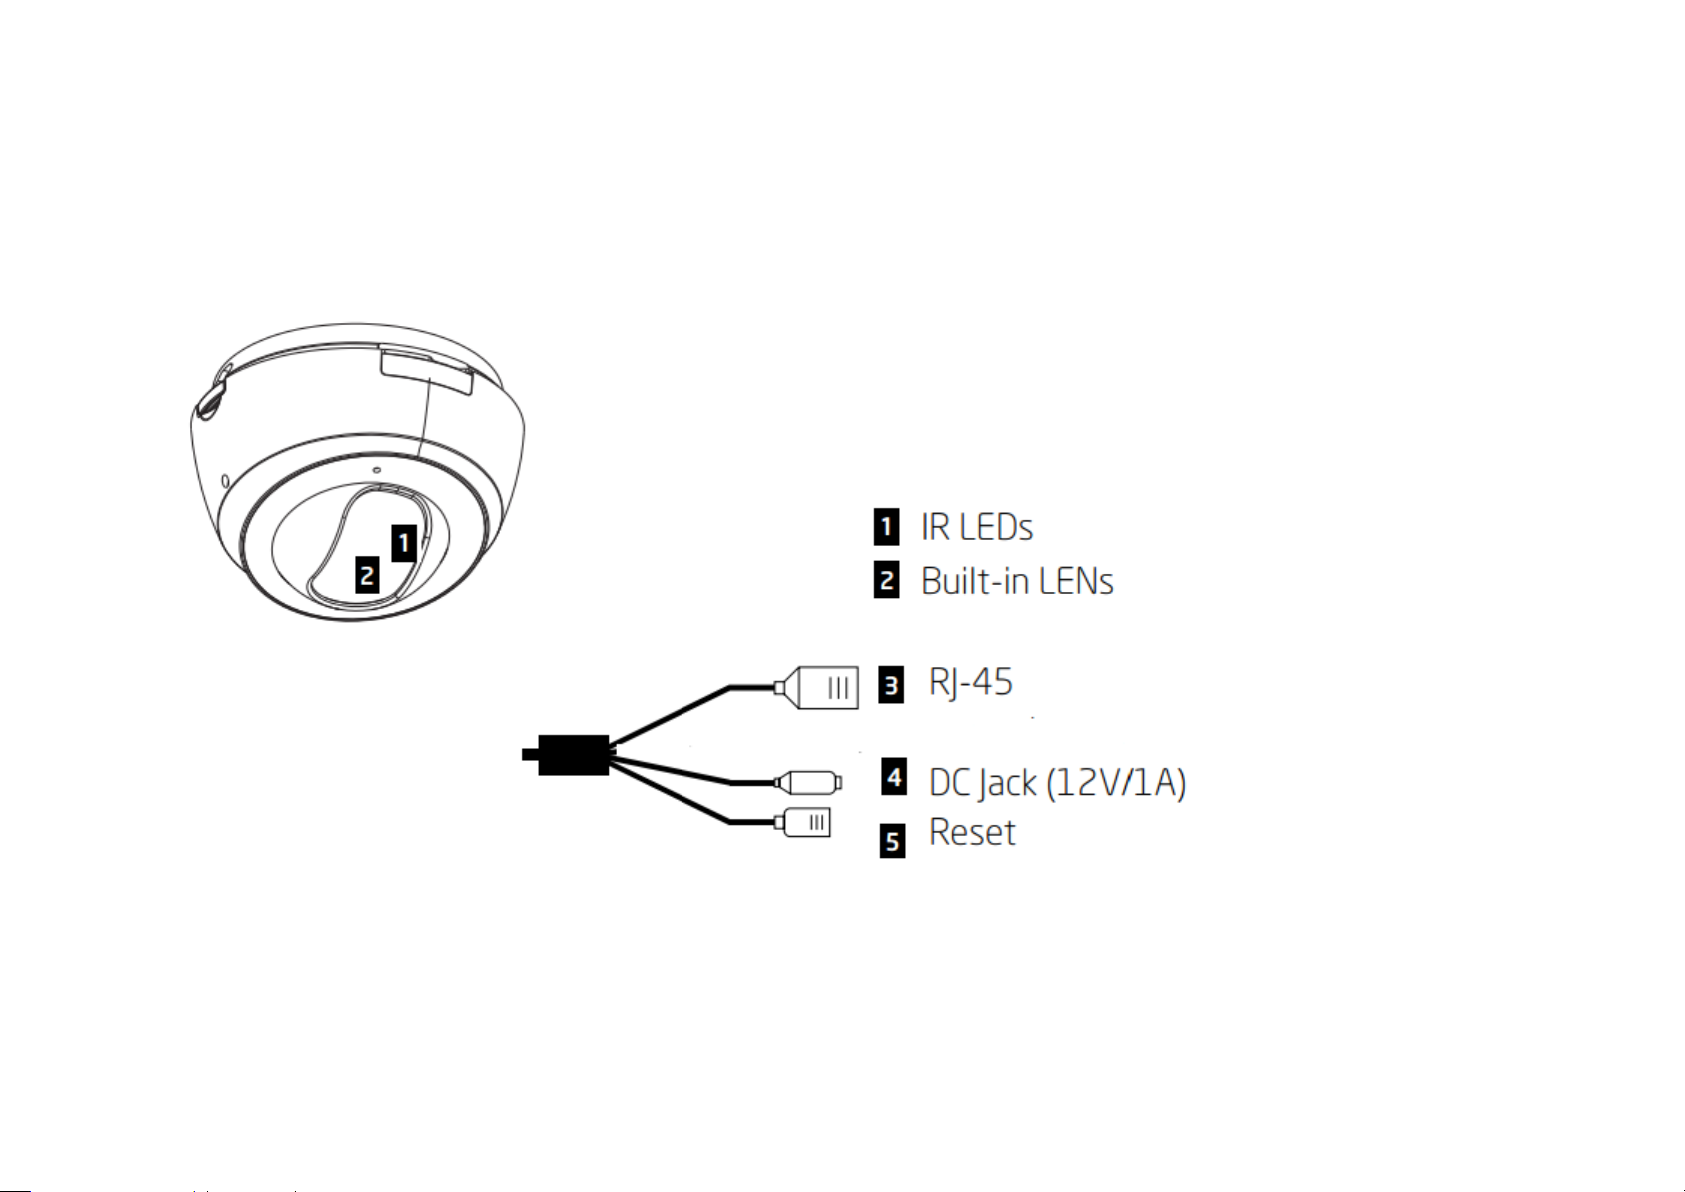
1.5. Physical Description
Page 12

2. Installation
2.1. Hardware Setup
Before installing the camera, please make sure the camera is properly configured and tested before hardware installation especially if it is
mounted on a wall. Please also make sure the power outlet is available near the installation site.
Page 13
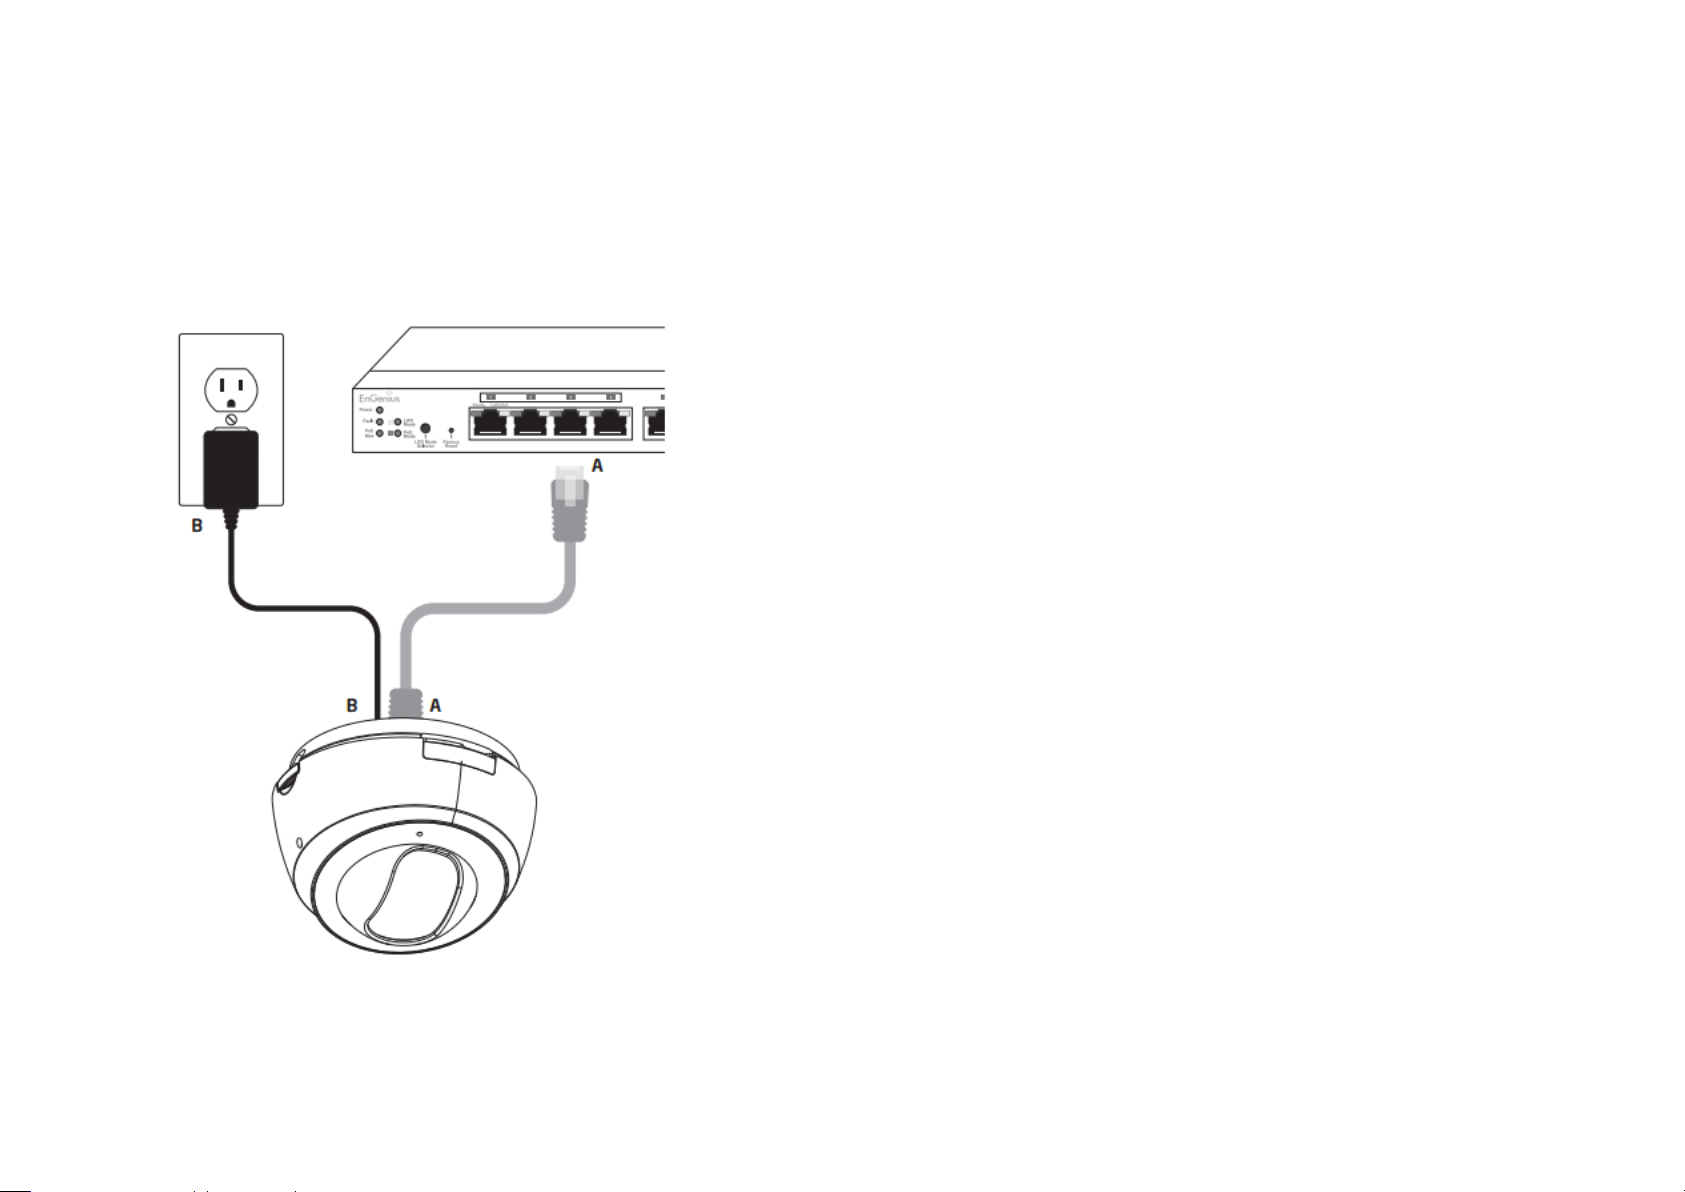
I. Basic Connection without PoE
Page 14
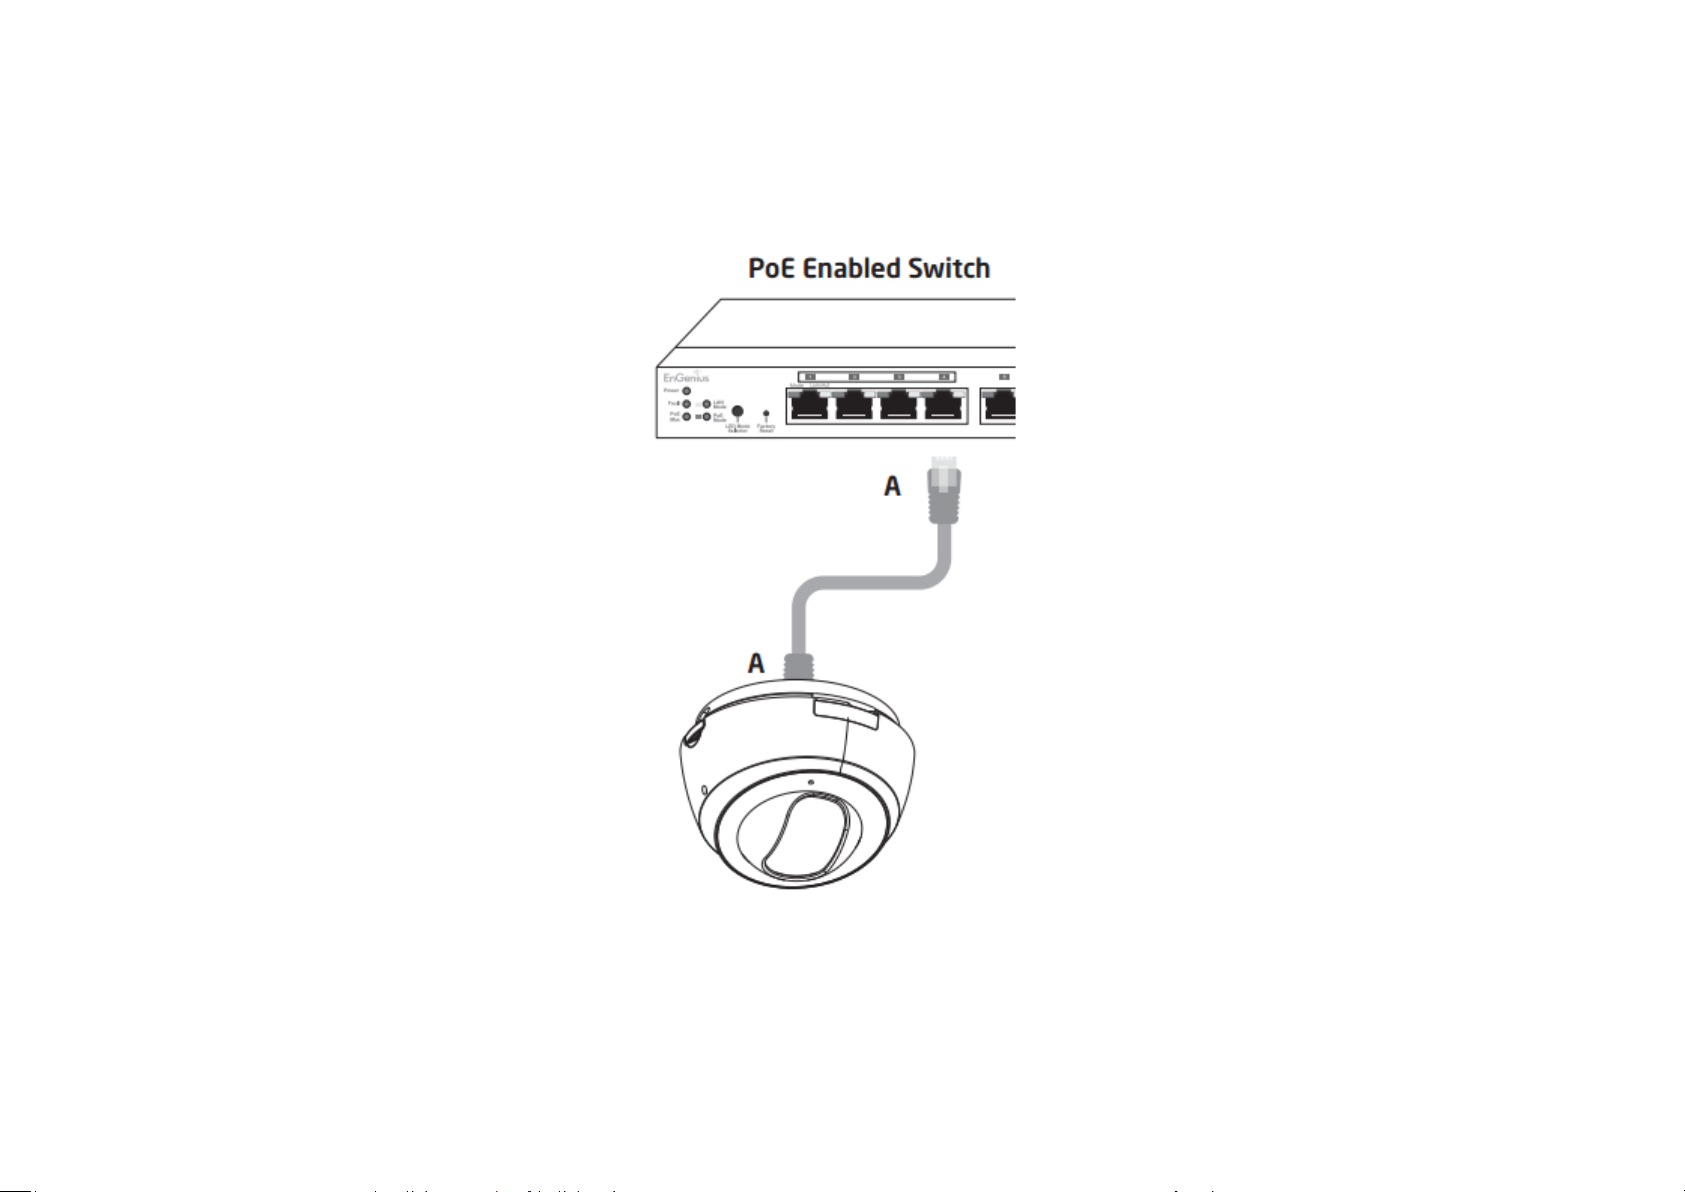
II. PoE Connection—Option 1
Page 15
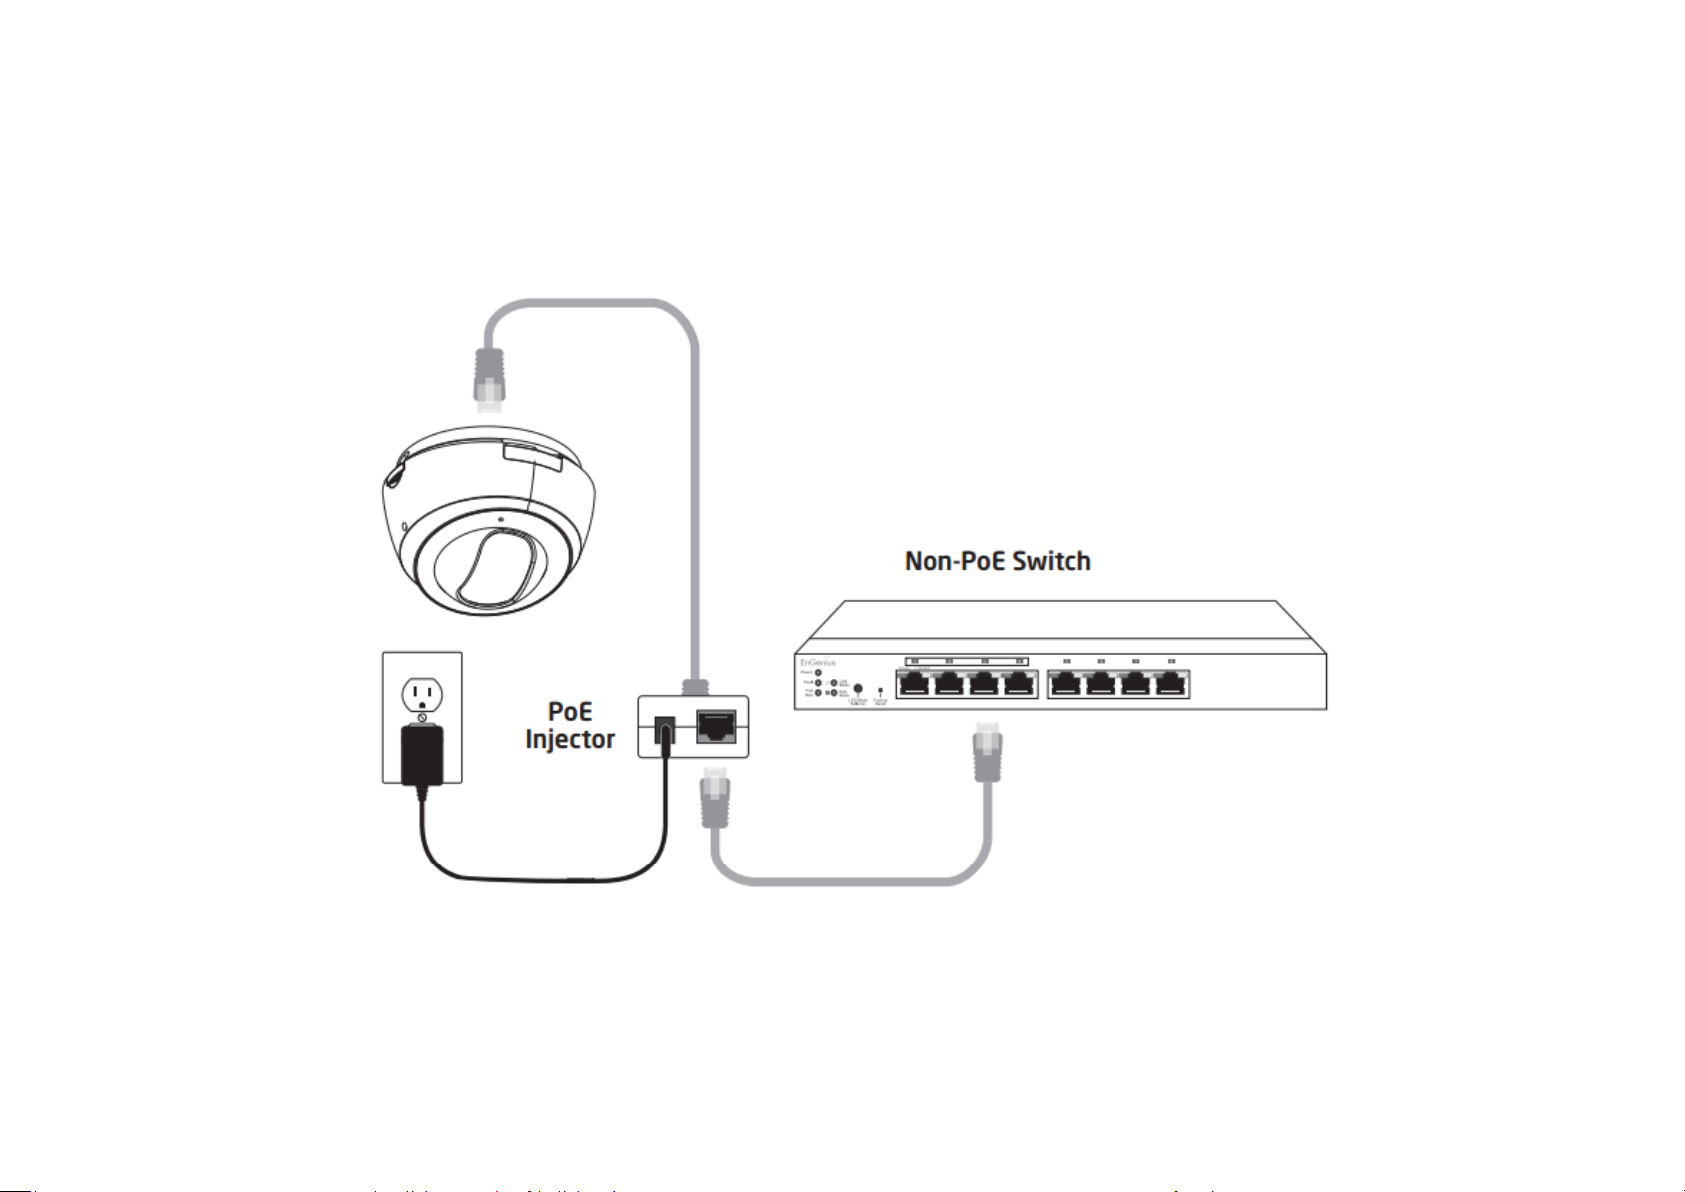
When connecting to a non-PoE switch, please connect the camera to a switch via PoE injector (optional).
III. PoE Connection—Option 2
Page 16
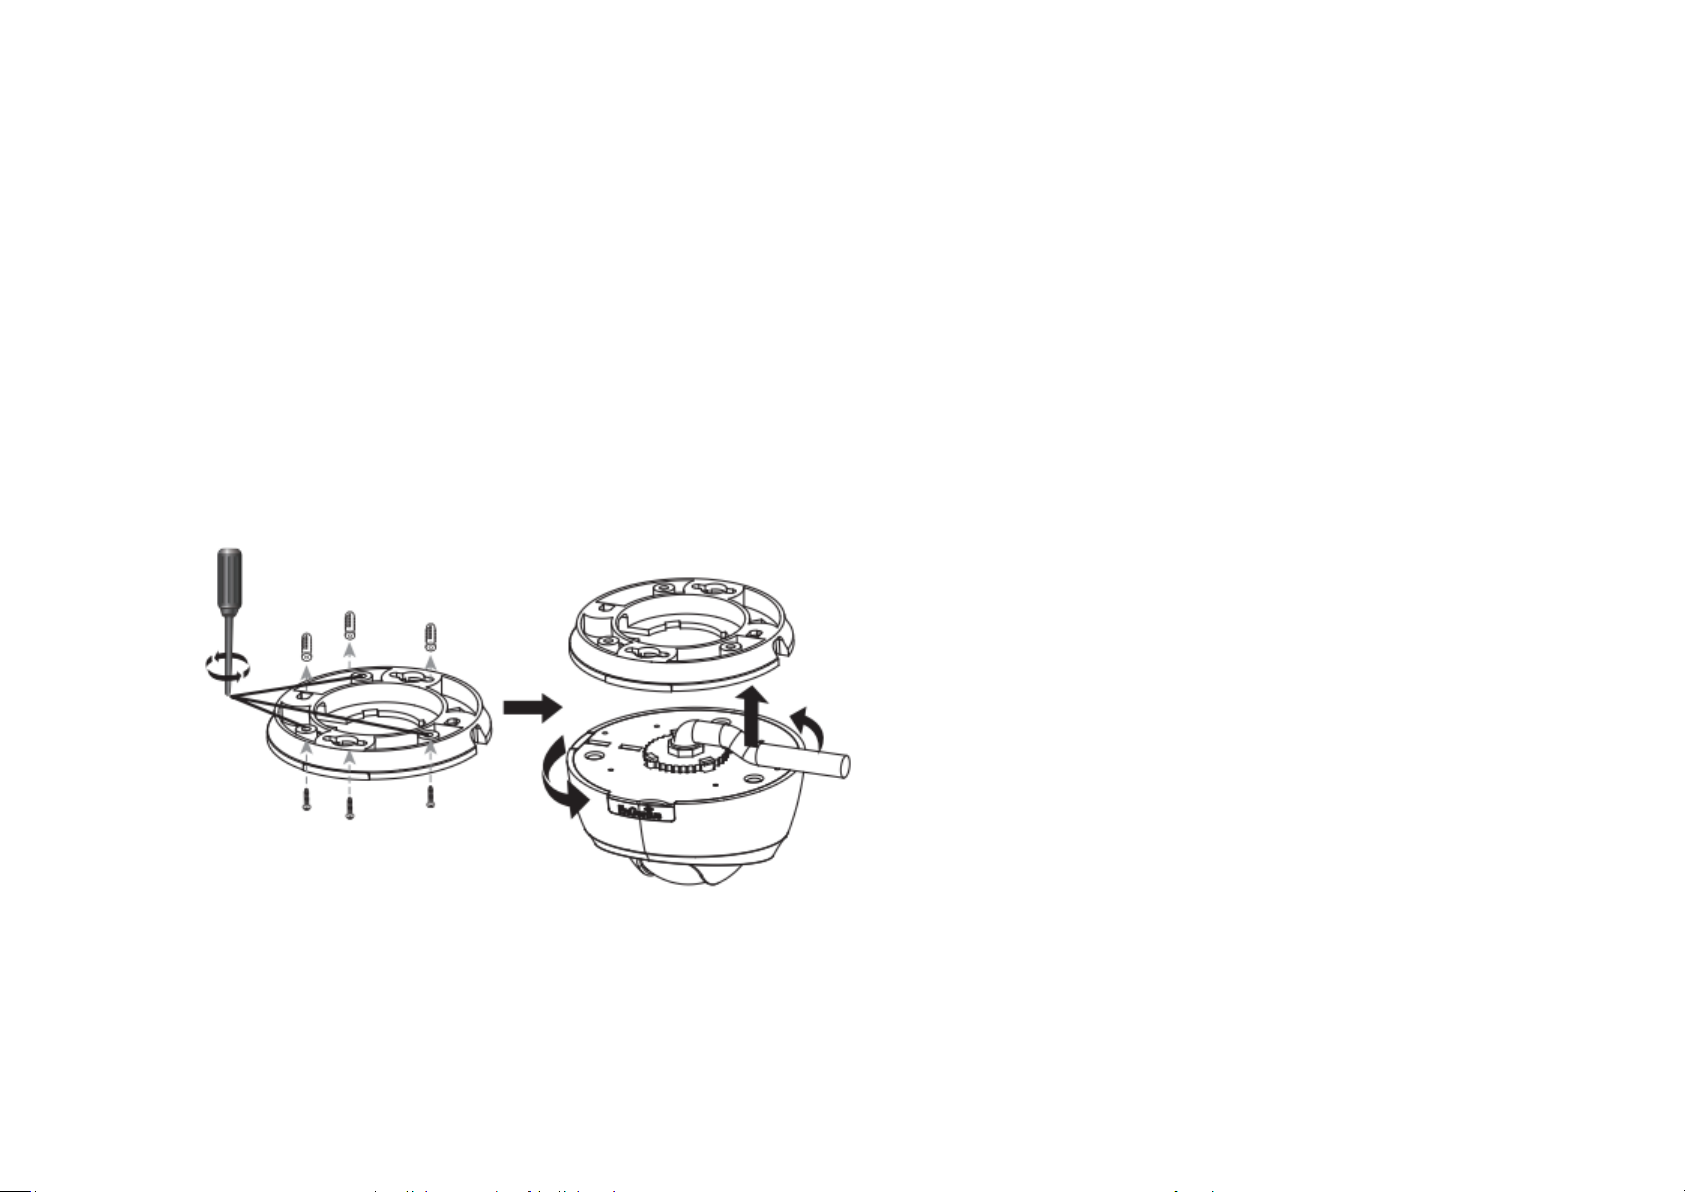
2.2. Ceiling / Wall Mount
Locate an area on the ceiling / wall and make sure the area is capable of supporting the weight of camera.
Use the ceiling mount bracket screw slots to drill the mounting screws into the ceiling or wall.
Twist the camera body into the ceiling mount bracket and route cables into the side of conduit entry tunnel.
Twist the camera to set counter-clockwise carefully and slowly until it is secured firmly.
Page 17
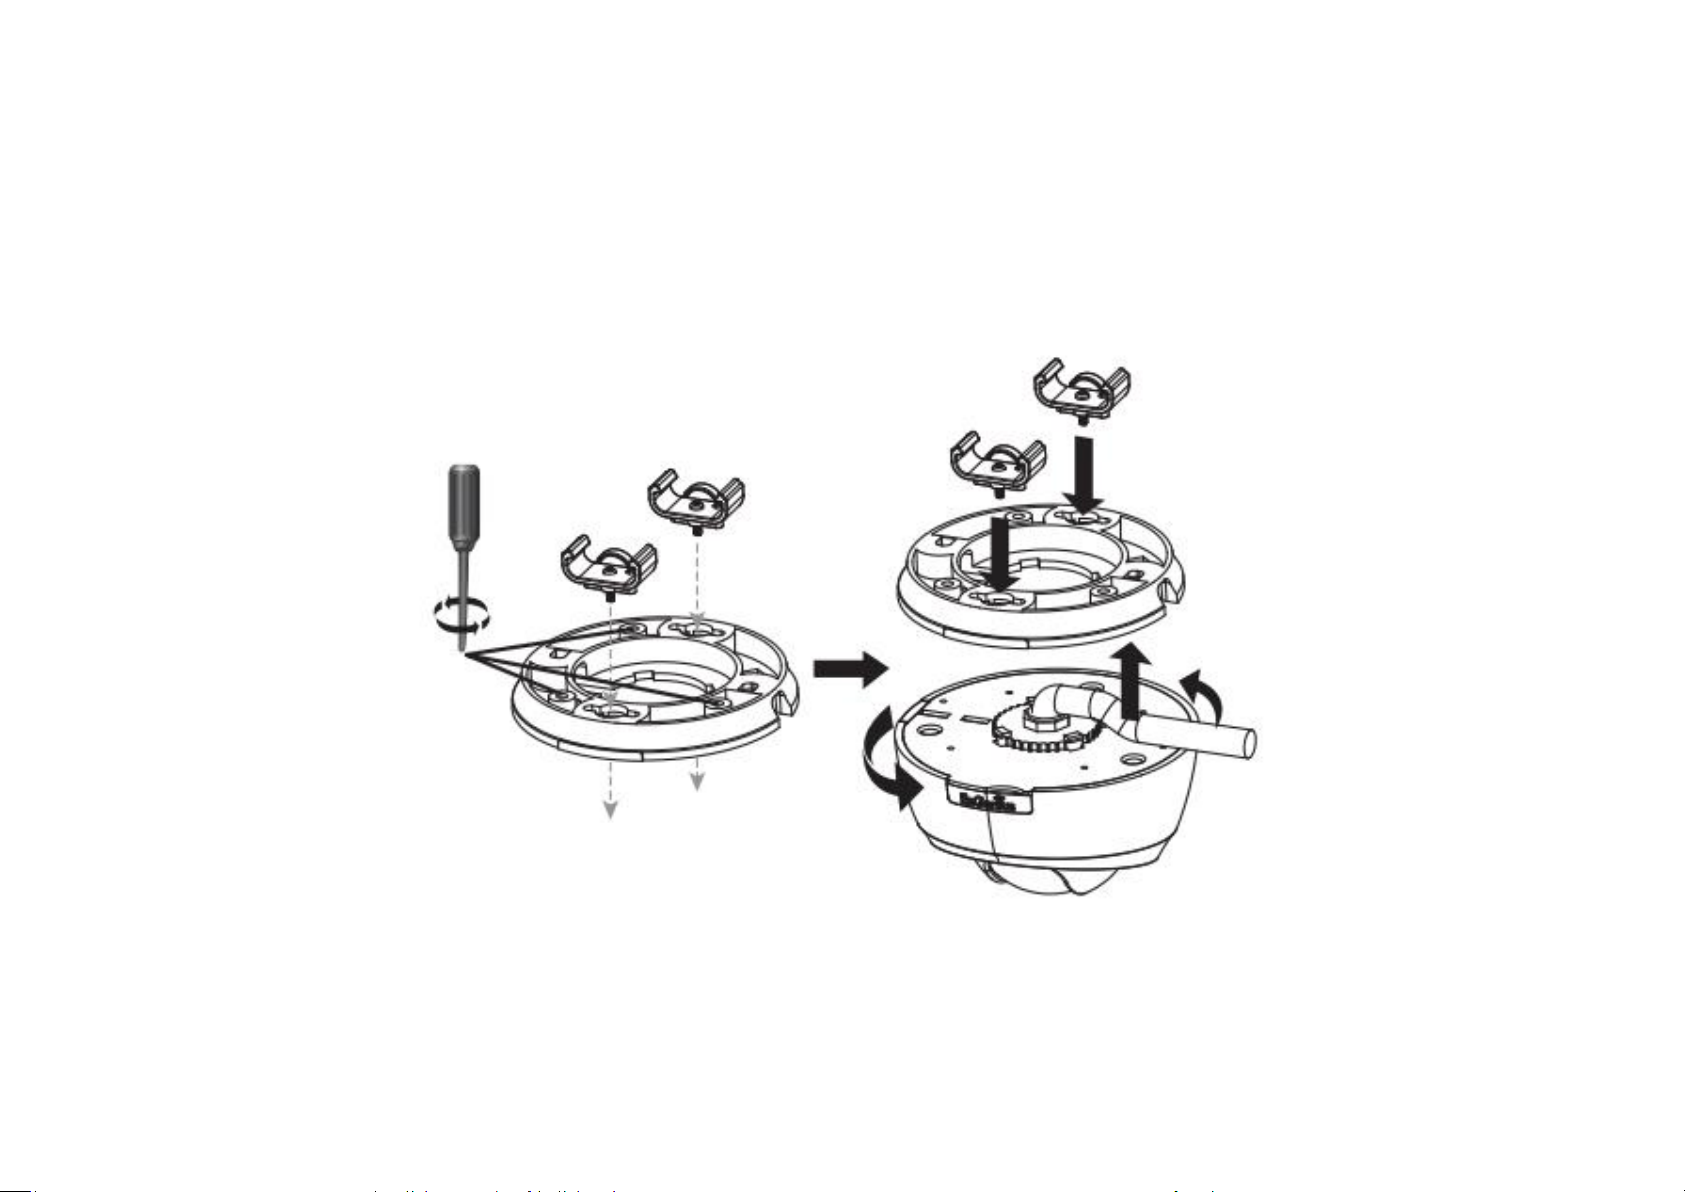
For Installation with ceiling mount hooks into the ceiling light grid steel framing, first use the hooks and screw into the ceiling mount bracket
until fixed upon the ceiling light grid steel framing. When done, twist the camera until it is secured.
Page 18
2.3. IP Camera Connection
Before setting up the camera with your router, please ensure the Internet is ready. When camera is configured with the router with
Internet connection, you can then access the camera through the Internet anytime anywhere. This section will guide you through the
connection setup. Please follow the following guide step by step to setup the connection between your camera and the router. There are two
ways to establish connection between the camera and router: Wired (Ethernet) and Wireless (Wi-Fi).
Page 19
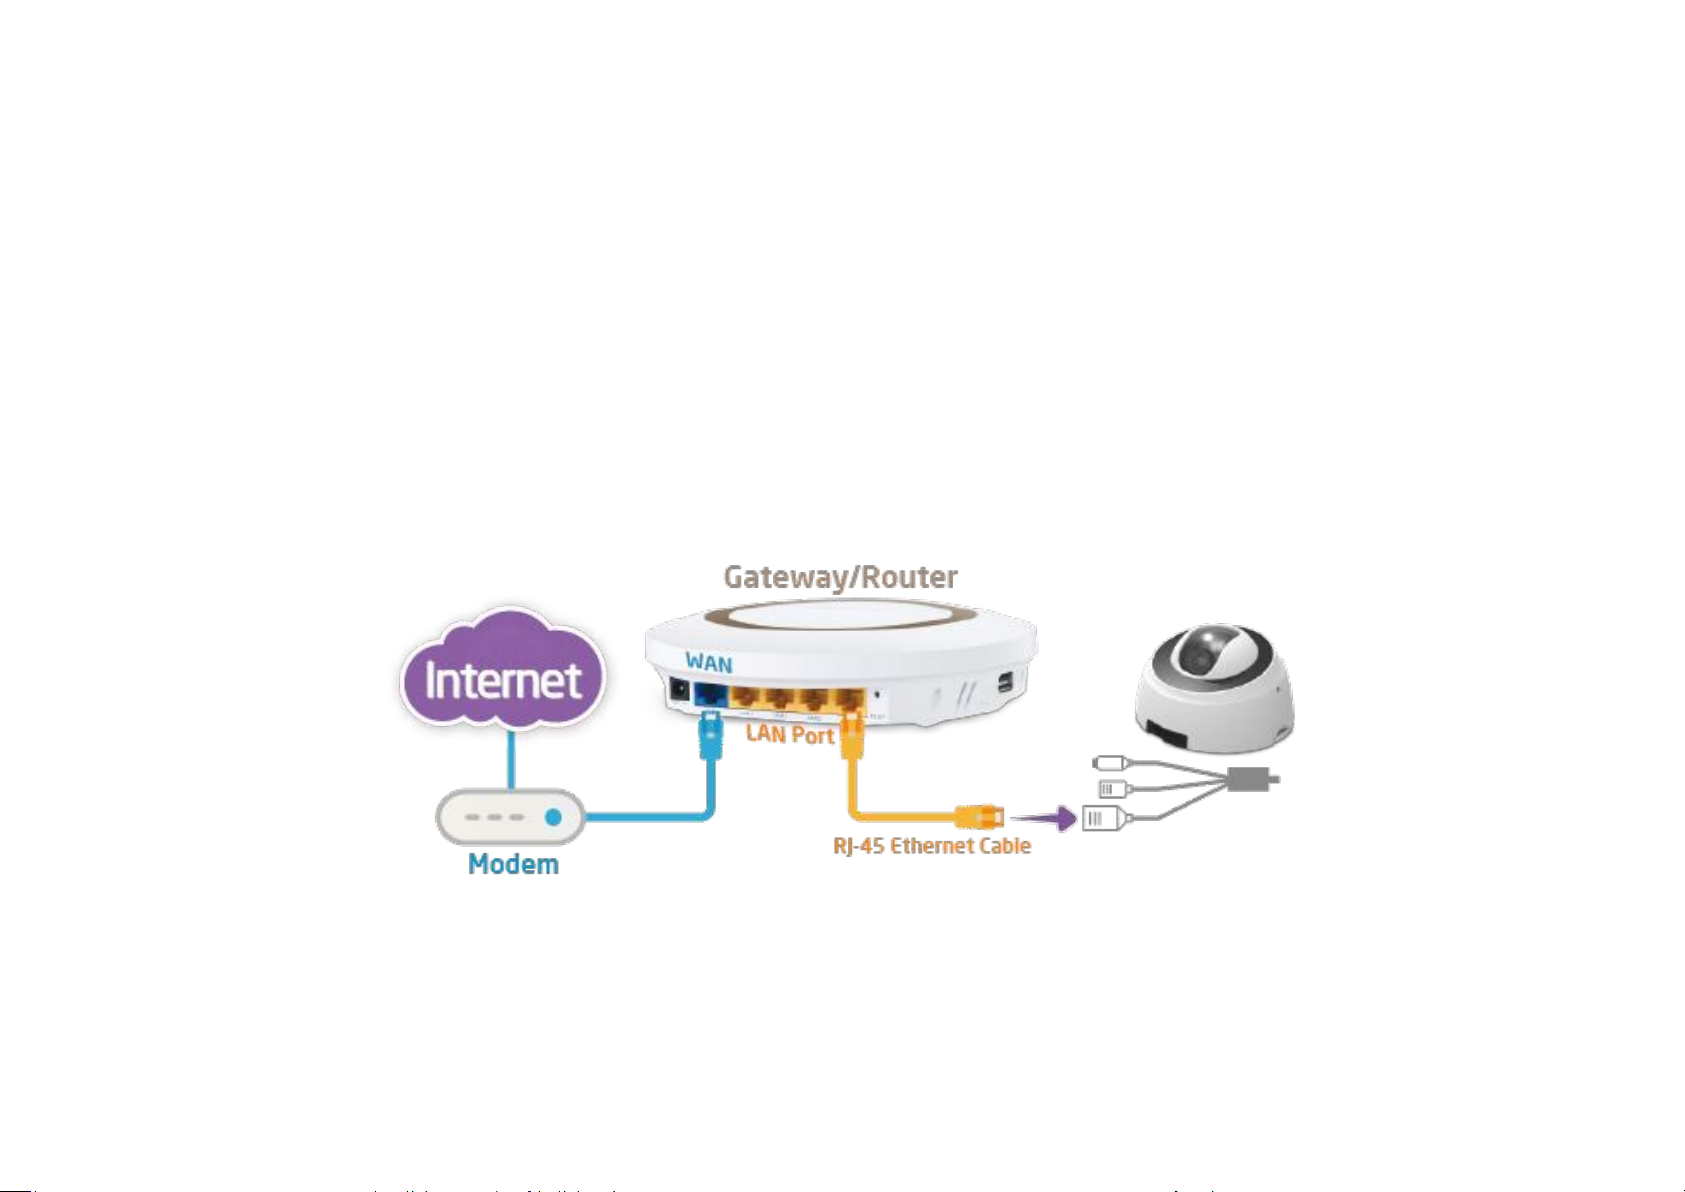
2.3.1. Connecting via Ethernet Cable
Connect the camera to the router on the LAN ports with a network CAT5 RJ45 Ethernet cable (shown below). You may use the cable that
came with the package for initial setup; however, you may be required to switch to wireless setting or purchase a longer cable to extend the
camera for longer range. As a rule of thumb, if your camera is close enough to the router use Ethernet cable if possible for optimized result;
and for wall mount installation, it’s best to adopt wireless setup. You can choose either way for the application you find suitable.
Page 20
2.3.2. Connecting via Wi-Fi Setup
It is recommended that to make initial setup with RJ45 Ethernet cable and then switch to wireless after you have completed all the
settings. However, you can also start wirelessly with WPS mechanism.
Ensure the router supports WPS feature and is enabled. Press the WPS button on both camera and the router at the same time. It may
take up to 90 seconds for the two devices to establish the connection. Make sure you are close enough to the router and ensure the router is
not occupied by heavy traffic or P2P loading.
Please note that there may be differences in WPS between vendors; therefore, if router does not respond to camera connection request
please use RJ45 cable for initial setup and manually configure wireless setting afterwards.
Page 21
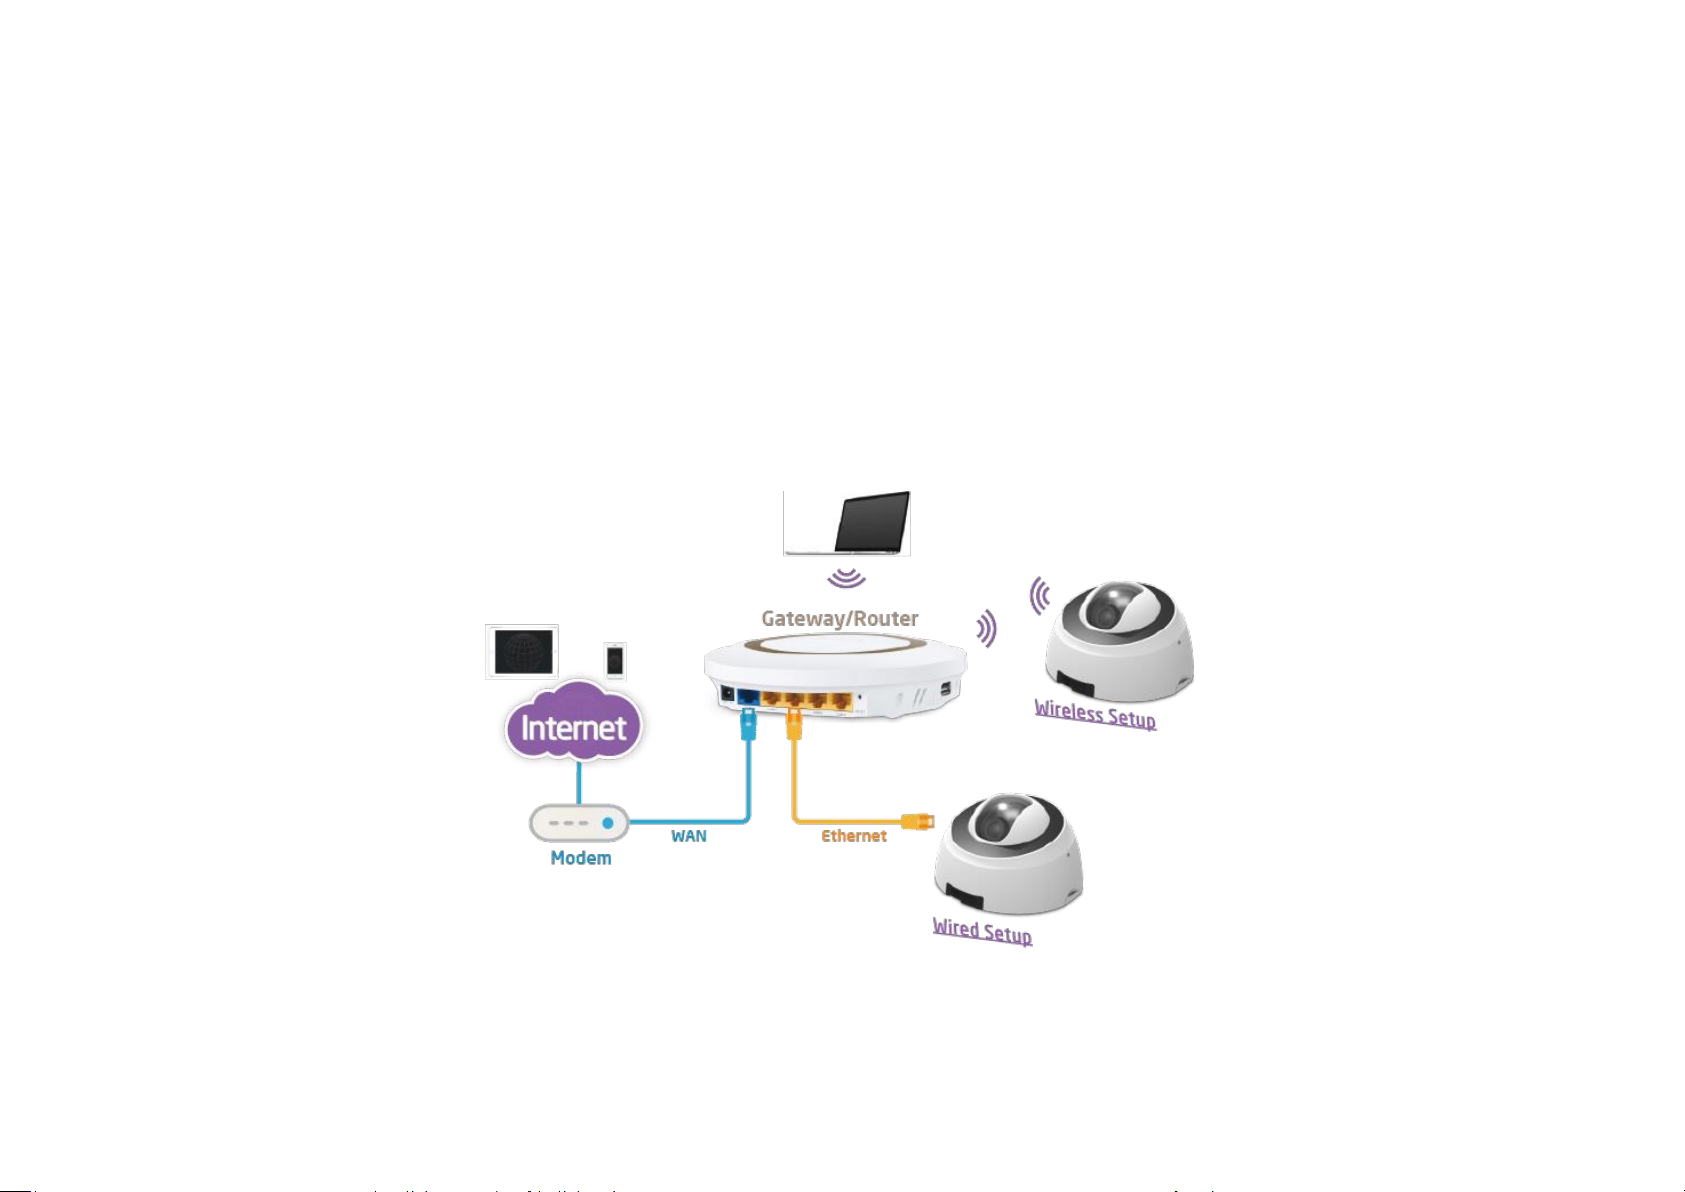
3. Accessing the Camera after Installation
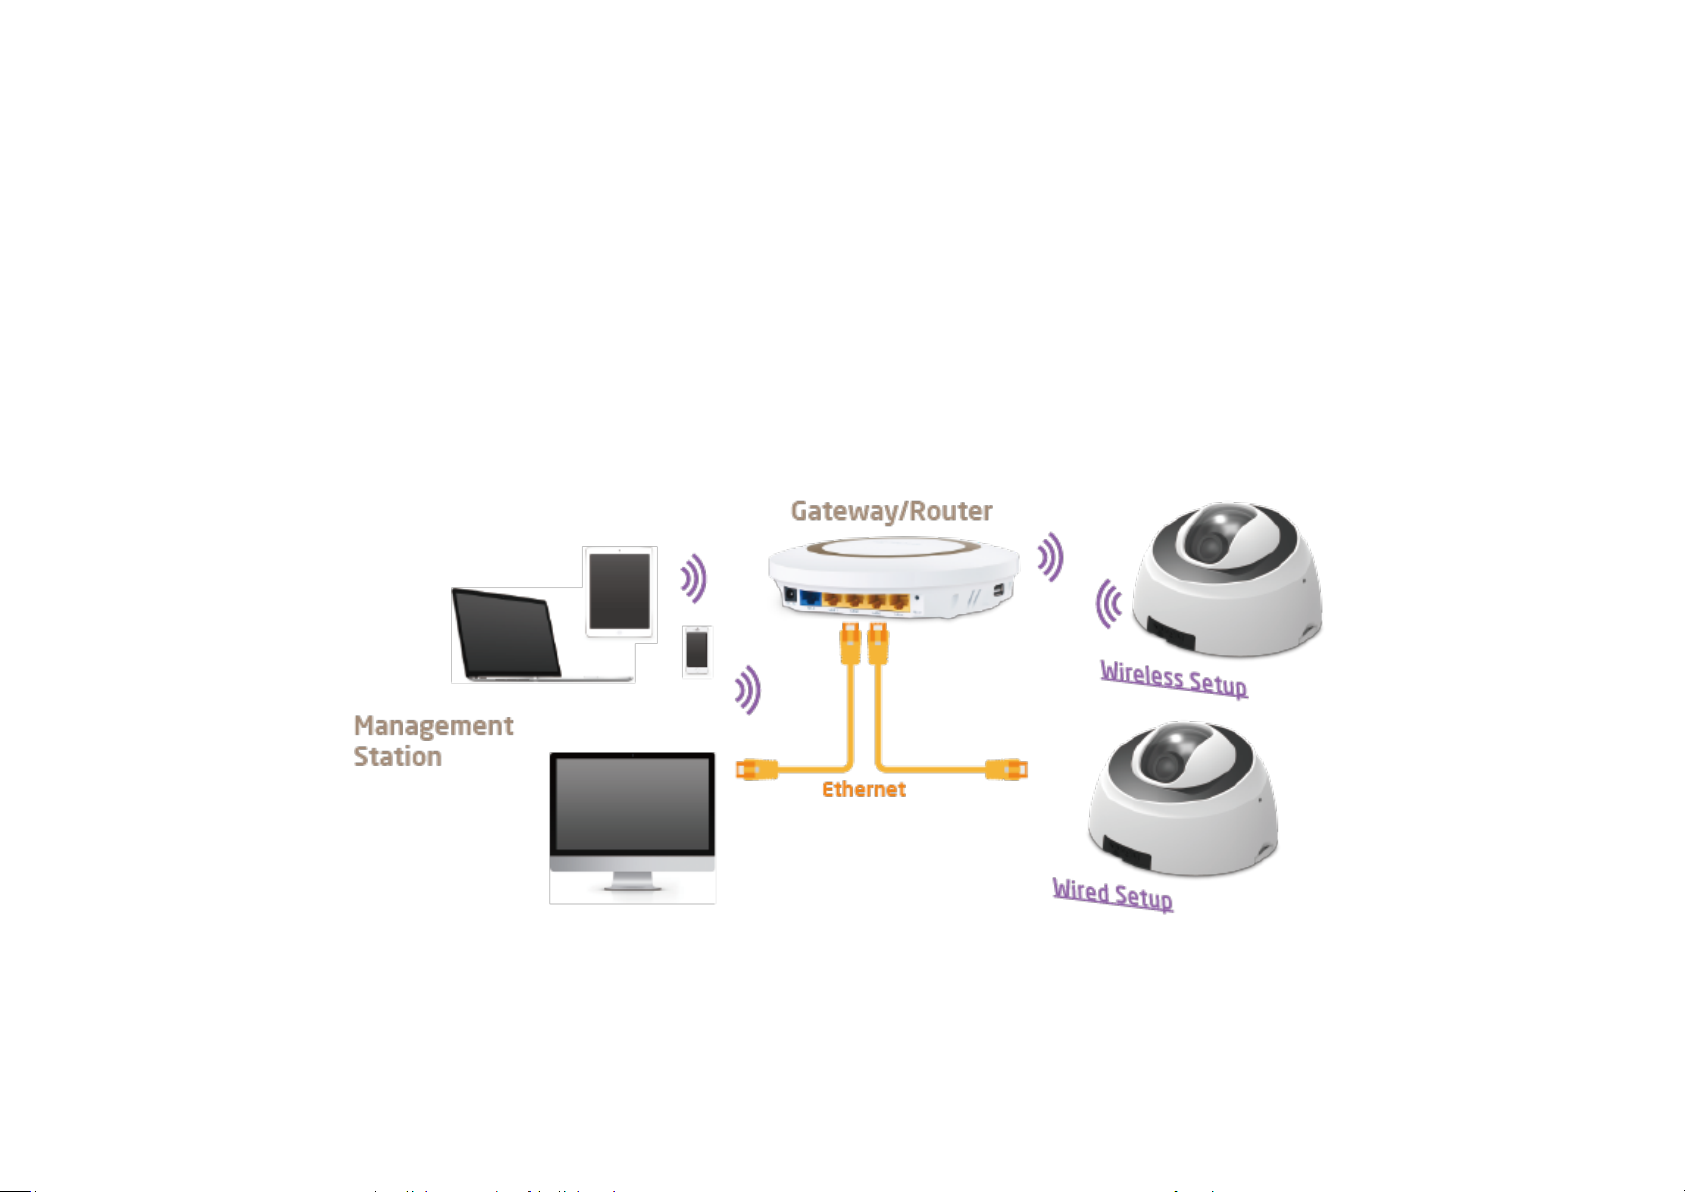
There are several ways to get access to your camera on your network. You should probably have a setup similar to the following diagram.
You can manage the camera using your PC, Laptop, Tablet or iOS/Android based mobile phone; we will call it management station in the
following context. The key point is that management station and the camera must be connected under the same subnet.
Page 22
3.1. Managing using PC or Laptop
3.1.1. EnViewer Finder
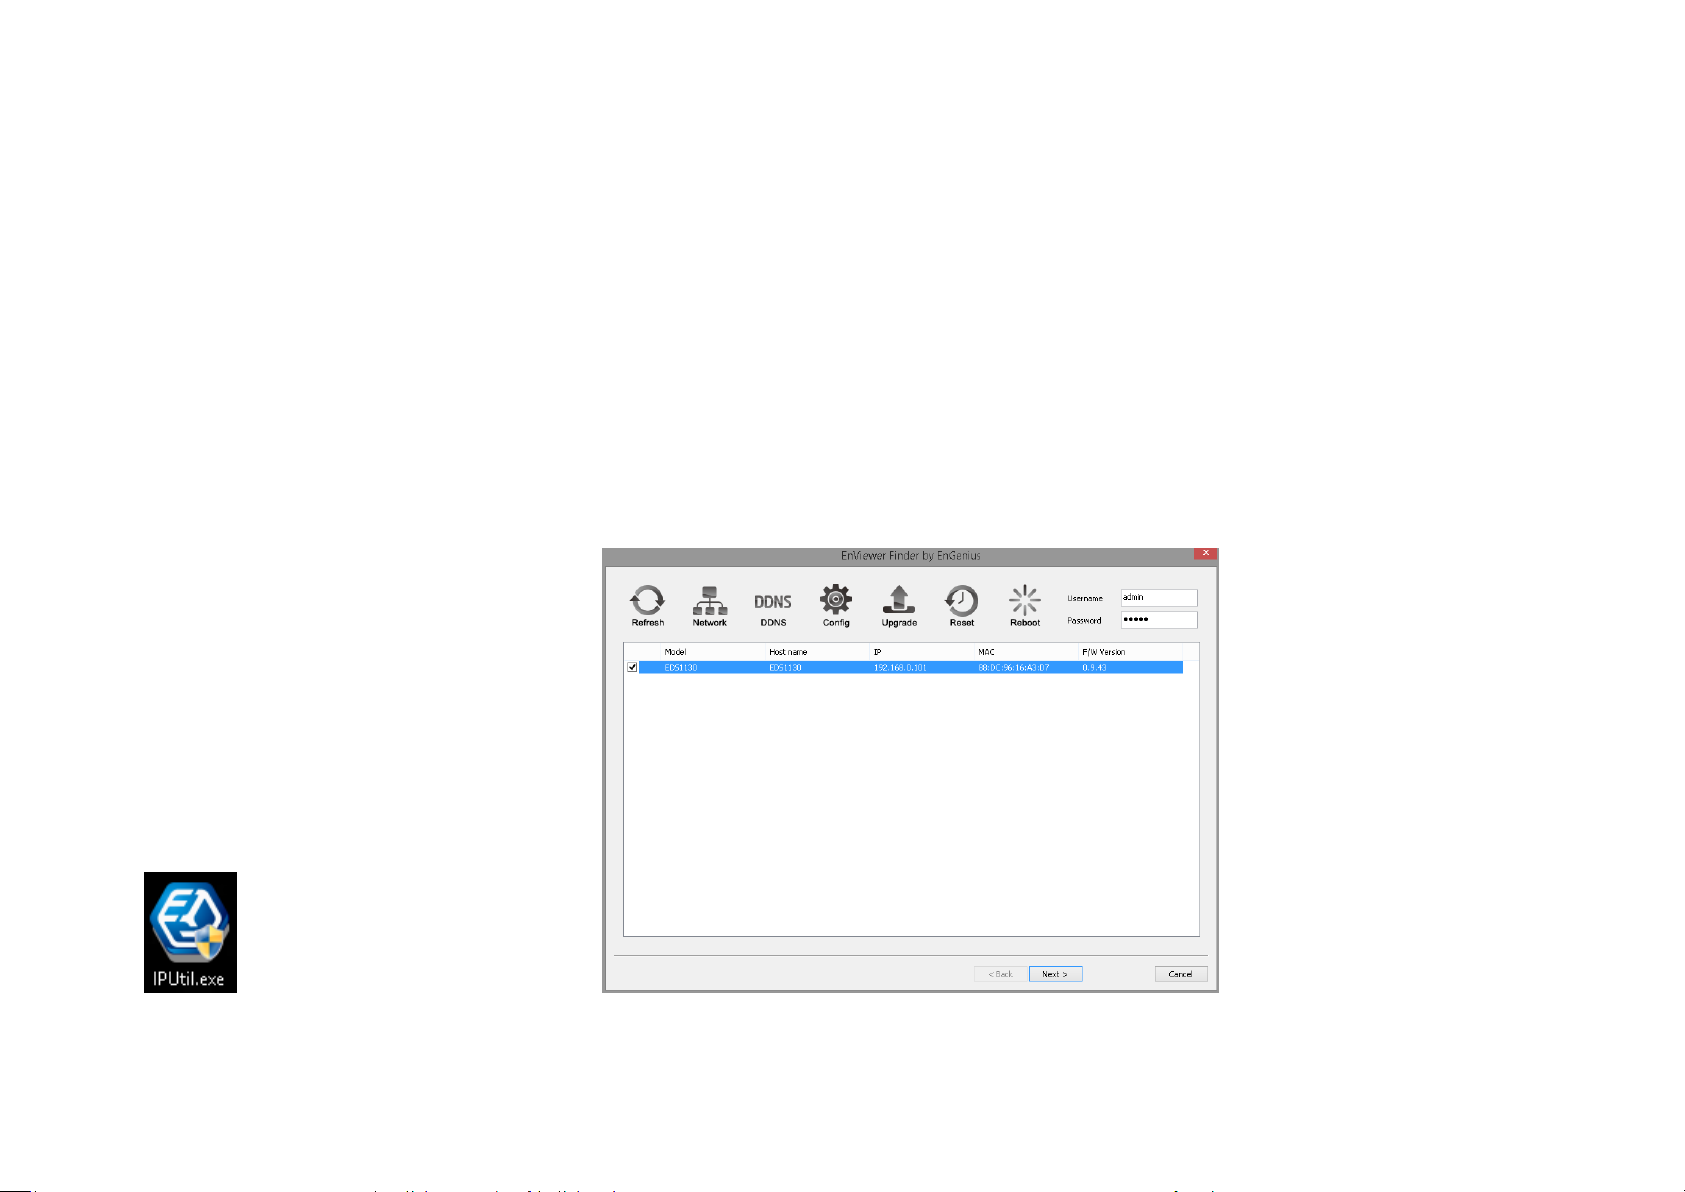
EnViewer Finder is a tool provided by EnGenius that helps you discover the camera within a local network. You should be able to find the tool
inside the CD. Please install the tool to your management station desktop for quick access when you need it. Please take note of the IP address
shown. In this example, 192.168.0.101 is the camera IP address.
Double-click on the icon to run.
Page 23

The camera list at the center displays the discovered cameras currently connected to your router (local network). If you do not find the
one you intend to configure, please click on Refresh to rescan the network until it appears on the list. Please turn off any heavy-loading
applications such as P2P that may occupy your network.
Enter Username and Password for the selected camera on the list.
Click on Next to start configuration.
The EnViewer Finder will guide you step by step through the basic settings Network, DDNS and Config. You can also switch between settings by
clicking the icons on the panel.
Rescan the network for camera.
Go to Network setting
Page 24

Go to DDNS setting
Go to Camera Video Configuration setting
Upgrade the current camera firmware
Reset the current camera to factory default
Reboot/restart the current camera
Page 25
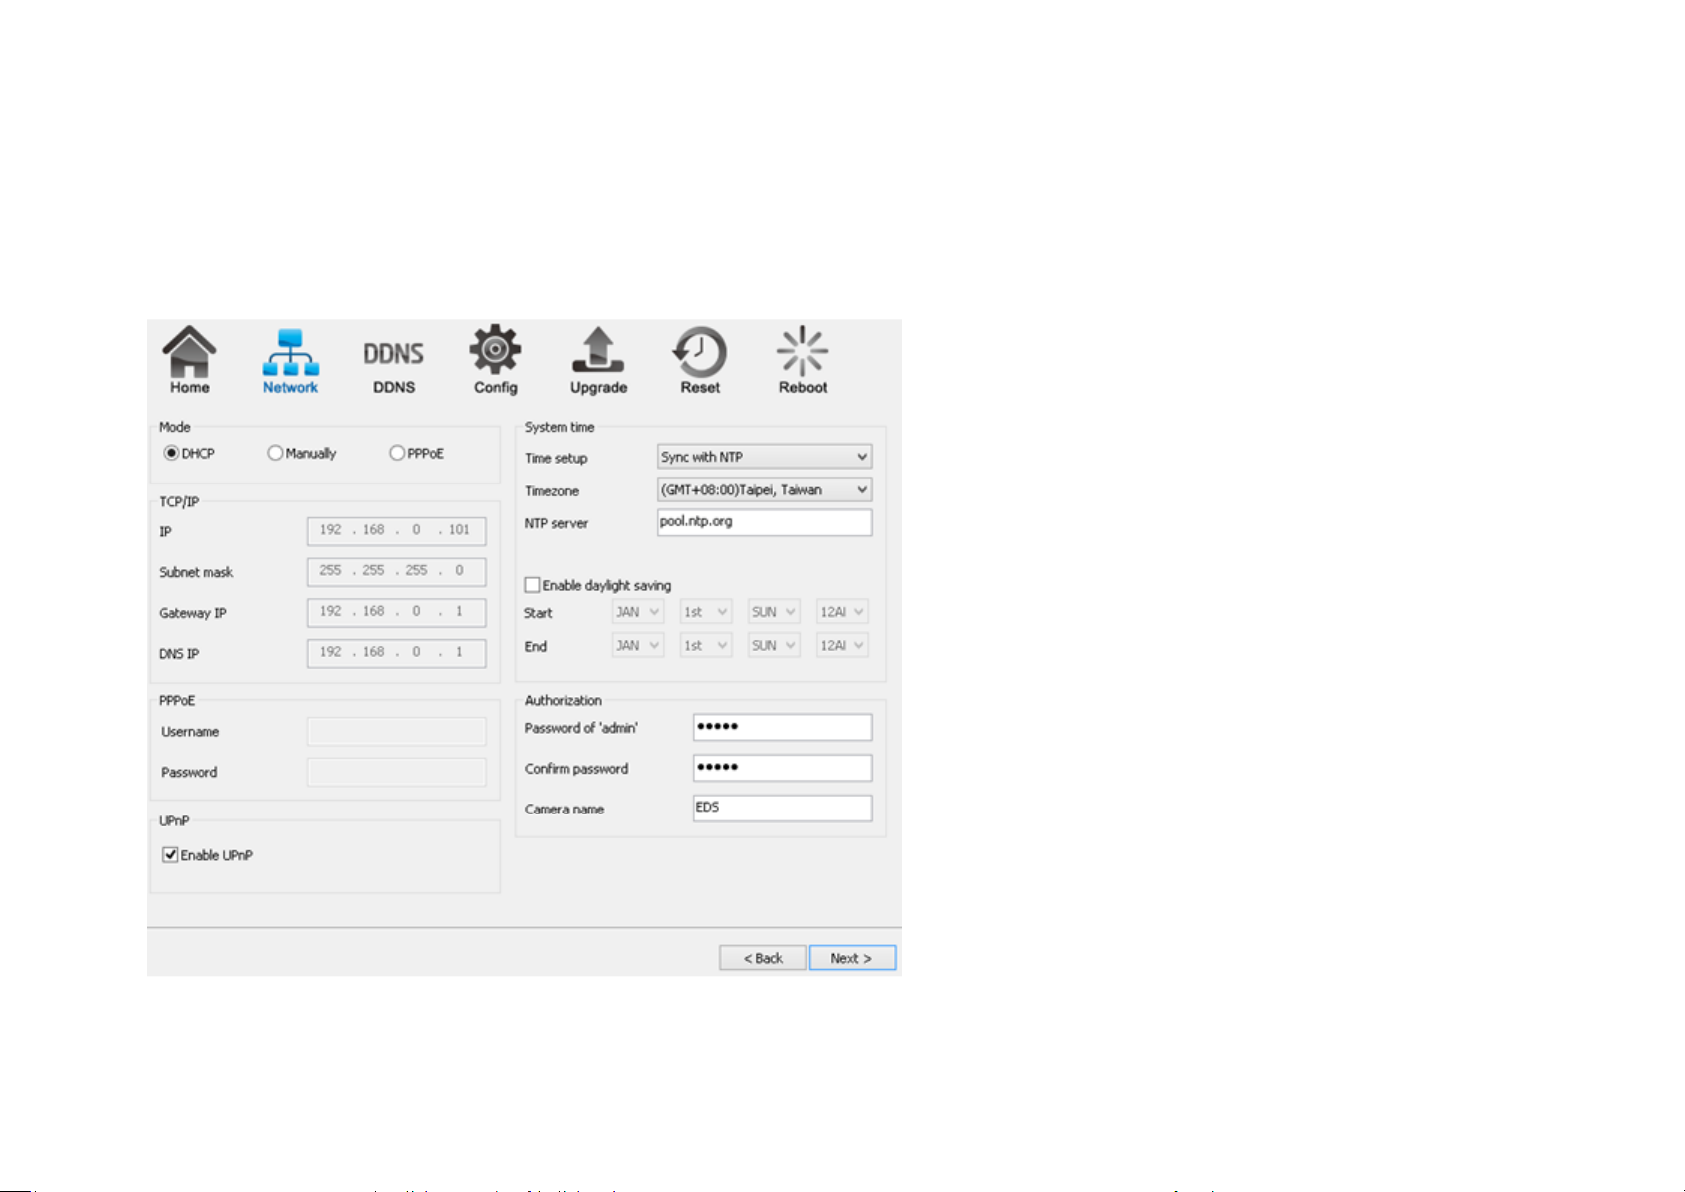
3.1.1.1. EnViewer Finder: Network
Page 26
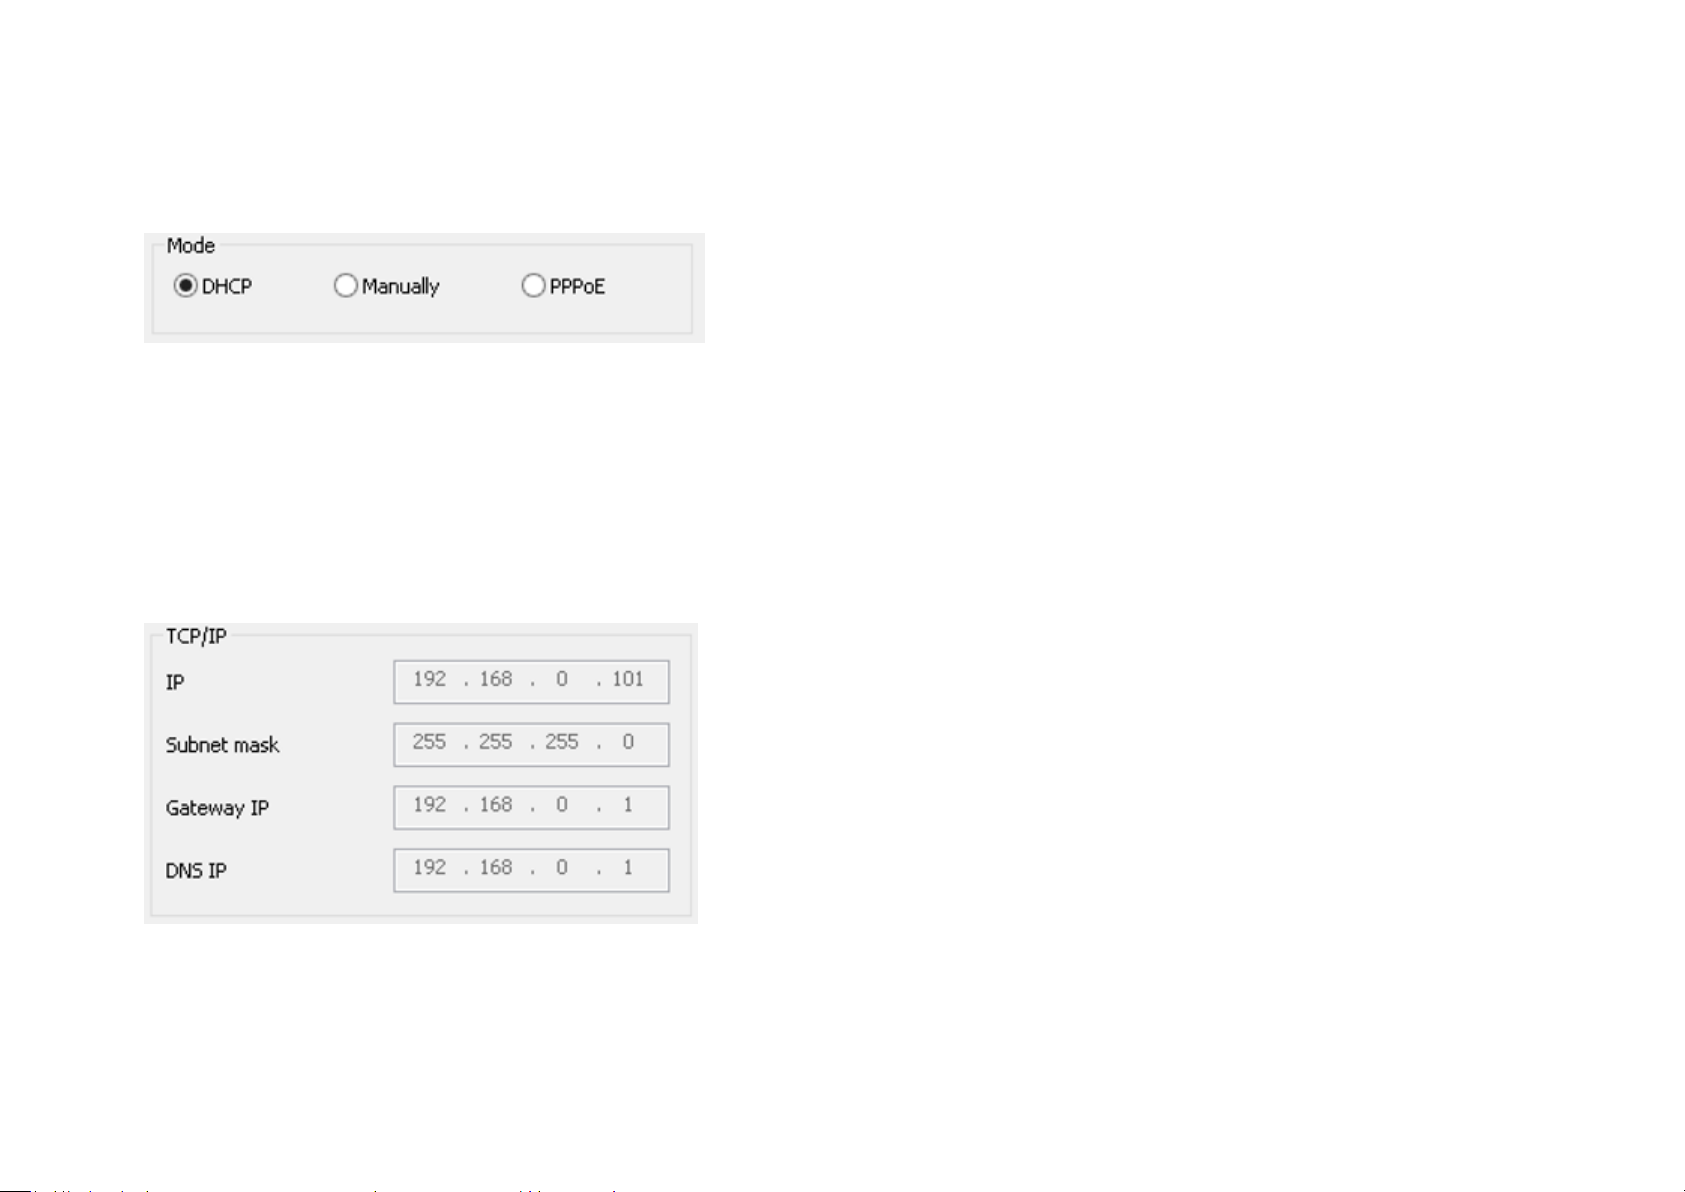
MODE: There are three modes that your camera can get its IP address. DHCP, Manually, or PPPoE.
DHCP:
It is the most popular way in the home network setting. It will request IP address from your router automatically. The requirement is that your
router should enable DHCP (which is basically the default setting for most of the home router vendors). You are not required to enter any IP
related information.
Manual:
You will need to assign the IP address details in TCP/IP section. Please ensure that the IP address is not being used by someone else in the
network.
Page 27
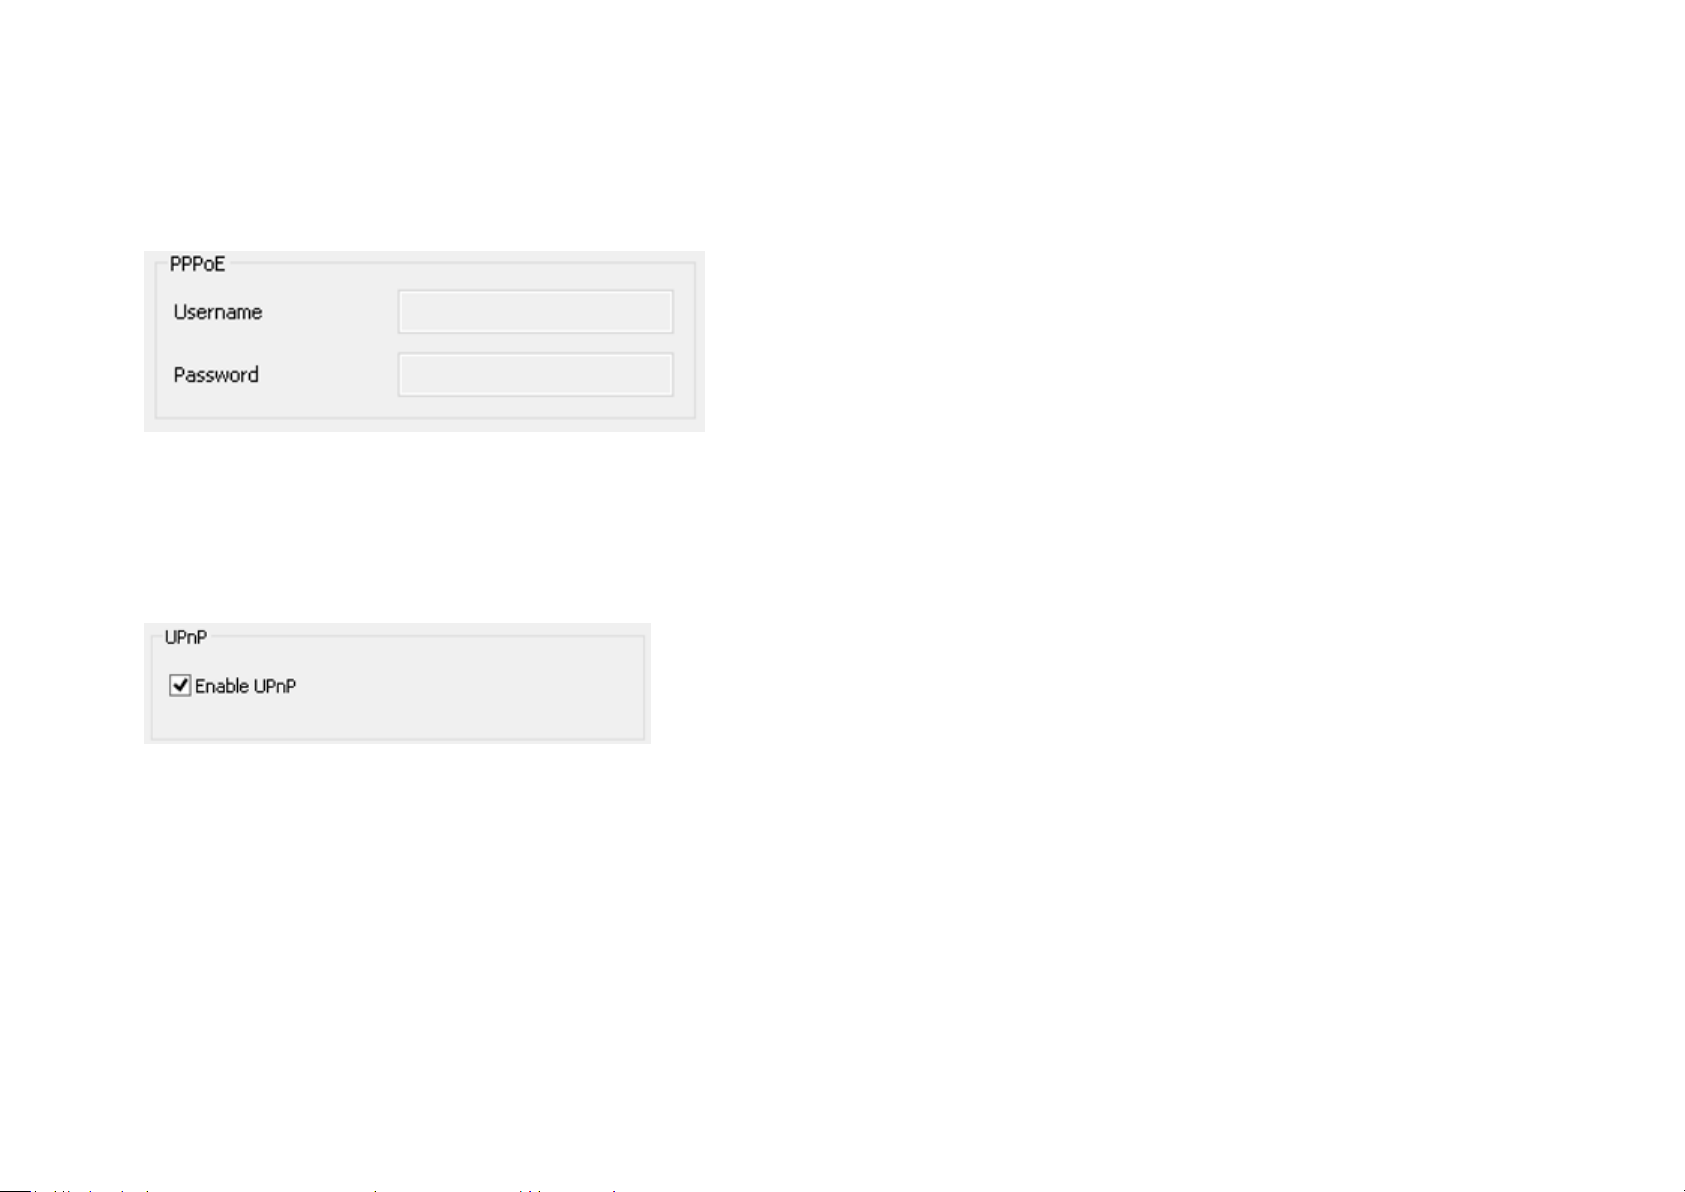
PPPoE:
If you are connecting to the Internet without going through your router, you can connect the camera directly to your modem (given that
your Internet service is using PPPoE protocol). Please consult your local ISP provider for more detail. Basically, the PPPoE setting is exactly the
same as your router. You need to provide at least the Username and Password to get access.
UPnP: this feature must be enabled so that the camera can be discovered by UPnP services. Leave it enabled if you unsure what UPnP is.
Page 28
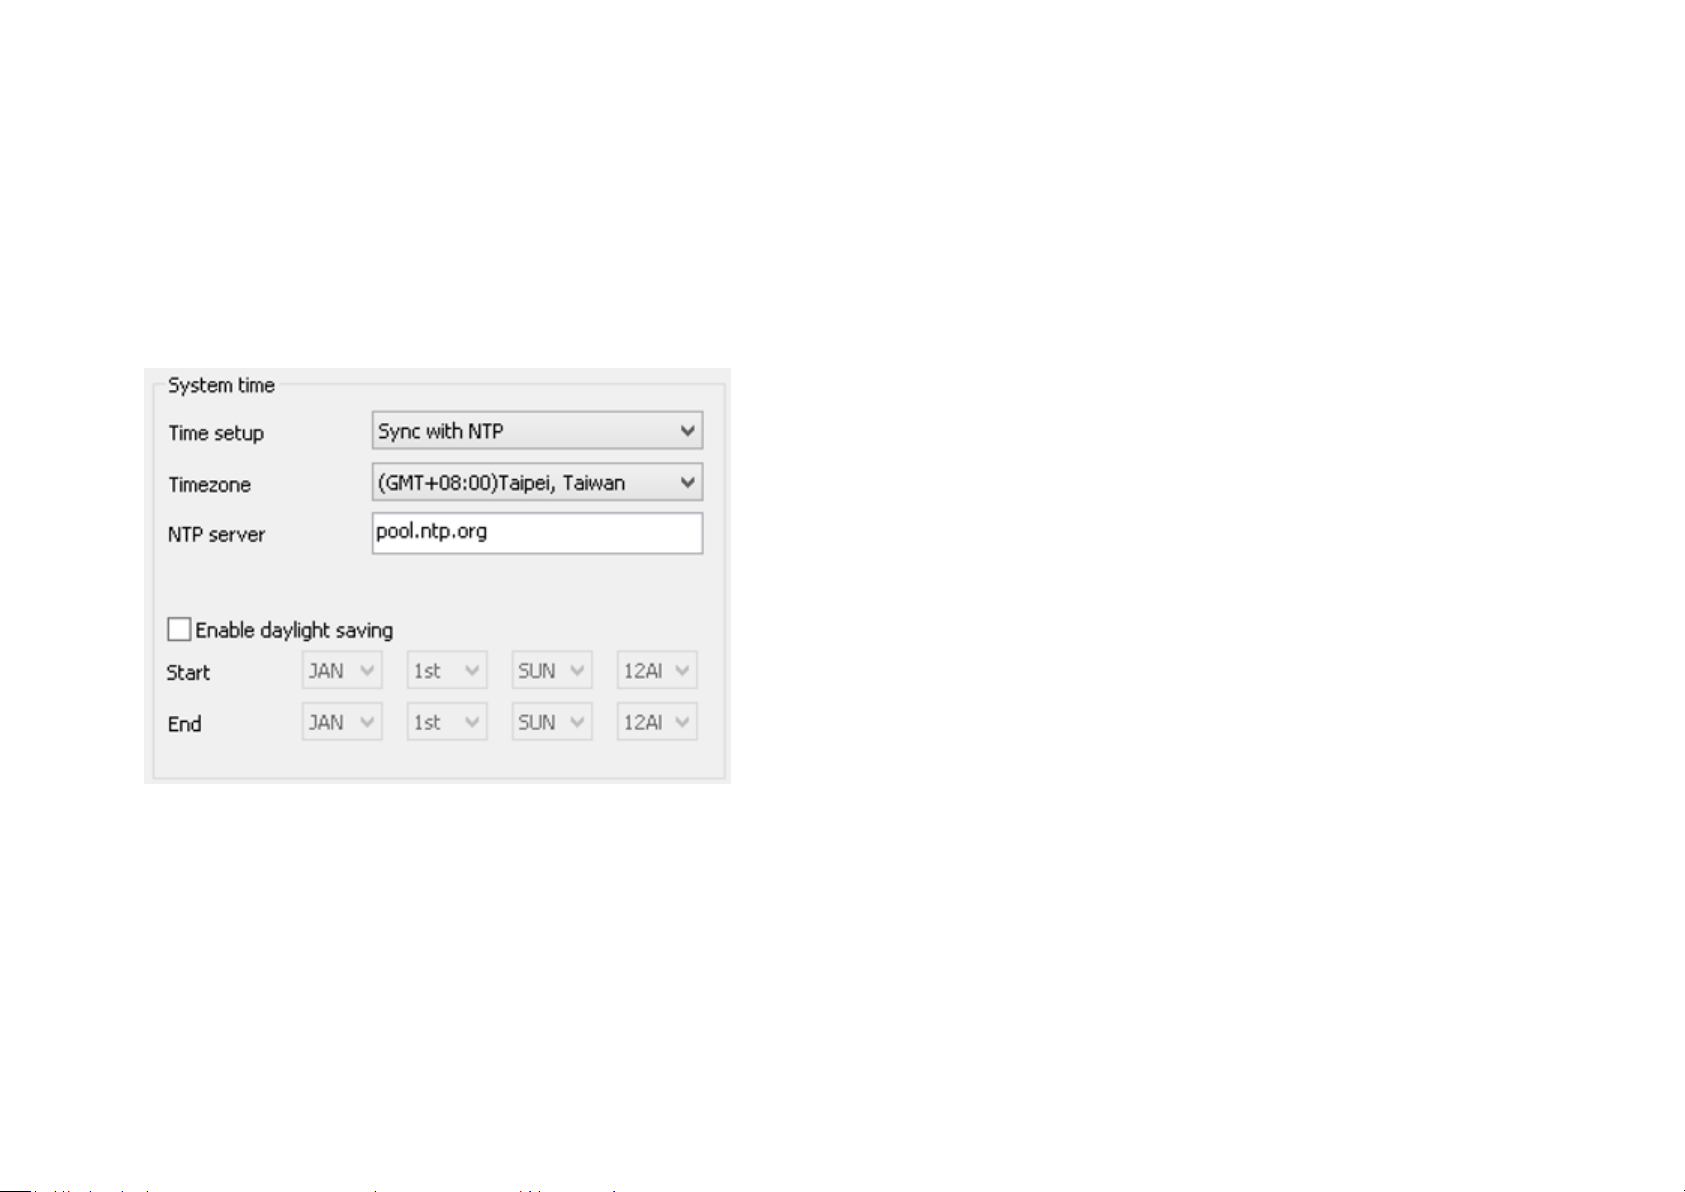
System Time:
Like any other surveillance system, time is essential because we want to keep track of the time of the events recorded or detected by the
camera. By default, the camera is connected to a public NTP server (pool.ntp.org) and its time is always synchronized with the server over the
Internet. Normally, you only need to change the Time Zone. Choose the one that matches your location. Leave the other setting as default
should be fine. Setting the wrong time server or time zone will result in inaccurate scheduling and time stamp.
Page 29

Authorization:
You may change the Password of ‘admin’ or Camera Name here. Please note that, once you changed the password. You will need to provide
your new password next time upon login to the camera through EnViewer Finder or Web Browser. The Camera Name is the camera host name
that represents the identity of the camera. If you installed several cameras, please assign a unique name for each camera for better
identification.
Page 30
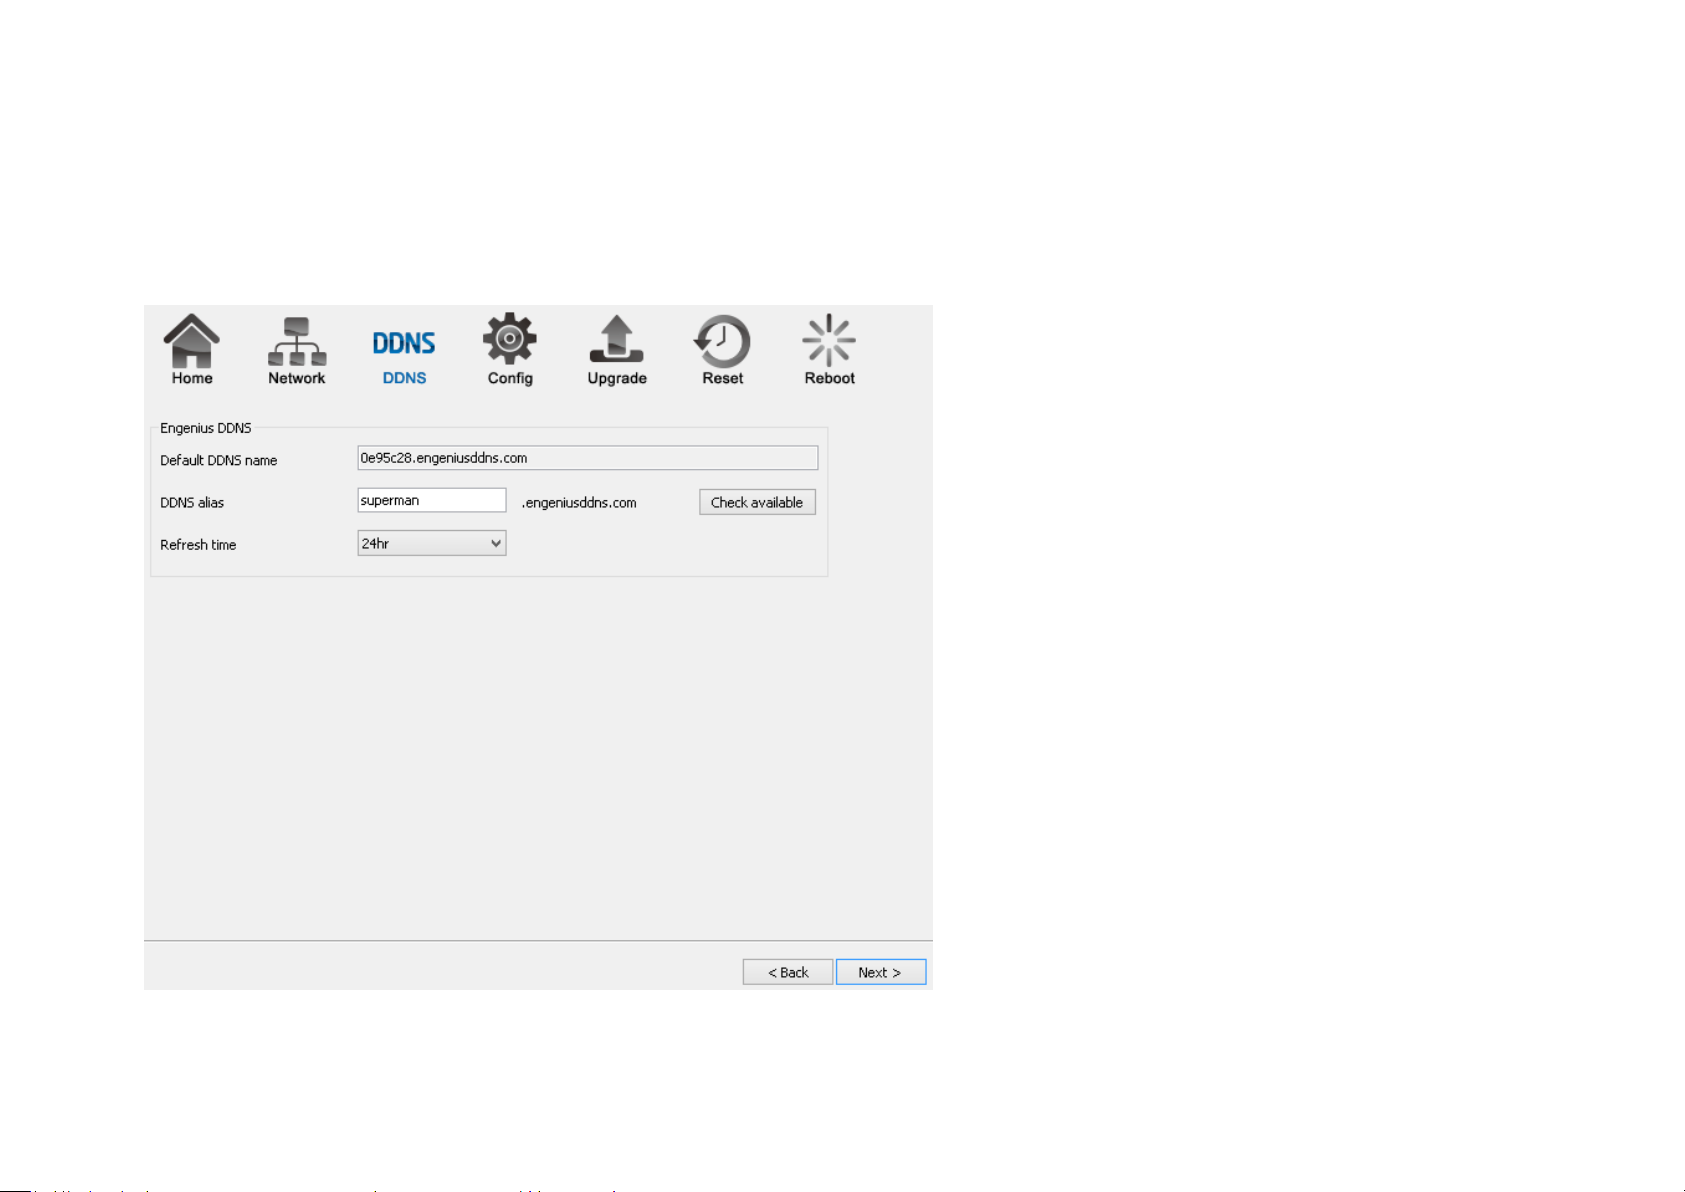
3.1.1.2. EnViewer Finder: DDNS
Page 31

Default DDNS name: Each camera has a unique DDNS name printed on the back of your camera. It is the default DDNS name.
DDNS Alias: You may try to rename it (alias) to a name so that you can memorize it better. For instance, you can use your initials with your
birthday as a combination; for example, ab19791220. Then you need to check whether the name has been taken by someone else by clicking
on Check Availability button. If the alias is not being used by others, then you can access the camera with both your default DDNS and the new
alias DDNS (ab19791220.engeniusddns.com).
Refresh Time: options are 3HR, 6HR, 9HR, 12HR and 24HR. DDNS server needs to synchronize with your IP address often so that you can access
your device over the Internet with DDNS name. Depends on your Internet Service provider, your WAN IP address lease time will be different.
You can check with your local Internet Service provider for WAN IP address refresh time. The default setting is 24HR (which means DDNS server
will check the synchronization every 24 hours). Normally, the default setting 24HR is okay for most cases.
Page 32

3.1.1.3. EnViewer Finder: Config
Page 33

URL
The URLs are provided for your reference. There are many 3rd party media player that supports RTSP streams. You can provide these URLs
to those players and view the camera streams in real time.
Resolution
Usually you do not need to worry about this page setting. However, you may need to know that the camera has two concurrent video
streams running at the same time. Stream 1 serves for monitoring over browser while Stream 2 serves mobile APP EnViewer. The reason that
Stream 2 has lower resolution (VGA) is that mobile devices have smaller screens and have limited network bandwidth than regular PC/Laptop;
therefore, keeping lower resolution helps to smoother the view.
Codec
Page 34

This setting determines what codec used for video compression. Please use the default for optimized performance. The compression
method affects overall performance and media file size. The options are reserved for advanced purposes only.
Max frame rate
This setting determines how many frames are taken per second. This setting affects the quality of the video. High frame rate results in
smoother video but larger video file.
Please Select this option before hitting Finish button. This will open the web browser with the detect Camera IP address entered in the web
browser URL for you. Please bookmark it to your favorite so that you don’t have to memorize the IP address when next time you want to login
into the camera. You can also use your DDNS name to access the camera management page. Either way works fine.
Click Finish when completed.
Page 35

3.1.1.4. EnViewer Finder: Upgrade
EnViewer Finder also allows you to upgrade your camera firmware. The product feature may improve over time, you may check EnGenius
official web site for the latest firmware. New firmware may contain bug fixes or feature improvement; please download the latest firmware file
to your local computer first before proceeding further:
Click Browse and select the firmware file you downloaded.
Click Update to proceed with upgrade process.
It may take a moment for the upgrade process; please wait patiently.
WARNING: Do not turn off the device in the middle of upgrade process. Terminating the device during the process will damage the device and
may cause the device to fail.
Page 36

3.1.1.5. EnViewer Finder: Reset
You can reset the camera to its factory default state and your settings on the camera will be erased.
Note: It will take a while for the camera to come back on again. Therefore, the camera will not appear on the camera list if you rescan the
network before it resets to default and boots up.
Page 37

3.1.1.6. EnViewer Finder: Reboot
You can reboot the camera on EnViewer Finder if the camera stops responding for unknown reason.
Click on Yes to proceed.
Note: It will take a while for the camera to come back on again. Therefore, the camera will not appear on the camera list if you rescan the
network before it boots up.
Page 38

3.1.2. Web Browser
You can use web browser on the management station to access the camera by entering IP address or DDNS of your camera. DDNS works
only if your router is connected to the Internet. Please refer to the previous section if you do not know the IP address or DDNS of your camera.
For this example we have our DDNS and IP address as follows:
DDNS: ab19791220.engeniusddns.com
IP Address: 192.168.0.101
If you are using EnGenius Intelligent Router or IoT Gateway please proceed to Manage camera over EnGenius Router chapter.
If not, please proceed to First Time Basic Setting chapter for more detail guide on camera initial settings.
Page 39

EnGenius Router/Gateway
If you are using EnGenius Intelligent Router or IoT Gateway, you can manage the camera through the router management interface. The
benefit of this is that you can manage both the router and the camera on a single integrated user interface. Please refer to Manage camera
over EnGenius Router section for detail.
Page 40

3.2. Manage using Tablet or Mobile Phones
You can manage your camera over Tablet or Mobile Phones using the free EnGenius APP EnViewer. EnViewer currently supports the two
most popular Android and iOS platforms. Please search the keyword “EnViewer” in Google Play or iOS Store.
Page 41

4. First Time Basic Settings
Open your browser and type in the camera IP (e.g. 192.168.0.103) address or the given DDNS name printed on the label on the back of
your camera (e.g. 0f9e76a.engeniusddns.com) using a regular web browser.
Page 42

Enter the default username admin and password admin. Click Login to proceed.
For the first time of login, you will be informed to download and install “WebCMS”. Please click on “Download WebCMS“ to start download
(you will be required to have Internet connection on your router). WebCMS enables browsers to support camera feature. Don’t worry if you are
prompted with a different version number because the software upgrades from time to time.
Page 43

If prompted with the following question, click on Save (Internet Explorer).
Save the downloaded file.
Page 44

Once download is completed, you MUST close all the browsers before install WebCMS.
Double click on WebCMS to install the program. You may not have noticed, the installation is very fast, it only takes a few seconds for
Page 45

WebCMS to be installed.
When installation is completed, open the browser and login into the camera again. You should be able to see the camera viewer in live as
shown below. If you do not see the viewer that means you did not install WebCMS properly or try login using other browsers.
NOTE: If you are seeing grey color in the viewer, it is because the camera has detected insufficient of light in the room and enabled night vision
mode automatically. If you point your camera to a brighter area, you should be able to see it switched to normal color mode. Try a few places
to get a feeling on how it works. If listening closely, you may hear the click sound from the camera when night vision is switched on and off.
Page 46

Congratulations, you are now ready to proceed with further camera settings!
Page 47

4.1.1. Setting the Interface Language
First of all you may want to change the user interface language. The default factory language is English. To change the language, click on
icon the make the change. On the language list, click to select the one you feel comfortable with from the list. The user interface with
refresh automatically with your chosen language.
Page 48

4.1.2. Changing the Camera Name
On the management page, click to access the configuration Main Menu.
On the Main Menu, select Network UPnP
Then, you may want to assign the camera with proper names for better identification if you have several cameras at the same time. Meaningful
names such as living room, kitchen, baby room or any other descriptions you find suitable to describe the space being monitored.
Select Network UPnP
Page 49

Hostname: Enter a new name into this field
Click Apply to change the camera name
Page 50

4.1.3. Setting the Camera Time
It is crucial to setup camera time properly so that scheduling can be arranged and events be recorded with accurate date and time.
On the Main Menu, select System Time
Please refer to Chapter 3 for time setting detail.
Page 51

4.1.4. Setting the Storage Folder
The Storage Folder is the location where media files will be placed.
On the Main Menu, select System PC Storage Path
Please refer to Chapter 3 for detail setting
Page 52

4.1.5. Adding a User Account
On the Main Menu, select User Management User Account
Please refer to Chapter 4 for User Management for adding a User.
Page 53

4.1.6. Wireless Setting
Please skip this step if you only use wired setup for your camera.
Ensure your router supports wireless connection and enabled.
On the management page, click to access the configuration Main Menu.
Page 54

On the other hand, we also need to enable camera’s wireless feature; please check again to ensure you have wireless enabled.
On the Main Menu, select Wireless Basic
Enable wireless by choosing Enable option
Page 55

Click on Site Survey button to search for existing wireless access points (AP).
When prompted with Site Survey window, click on Refresh button if you do not find your AP on the list.
On the site list, choose your preferred AP and then click Add to AP Profile.
Then, on the AP Profile Settings window, please check if the security settings are correct. Please review the settings: Encryption, WPA type,
and Pre-Shared Key type. They are automatically detected. Normally, you only need to provide the Pre-Shared Key (password). However, you
can still change the settings if they do not match with the actual AP wireless security settings.
Enter your Pre-Shared Key and press Save to complete the setting.
Page 56

Please wait for a moment for the setup to complete.
While waiting, you can remove RJ45 Ethernet Cable from the camera. It may take a moment for the camera to detach from wired network and
switch to the newly established wireless connection with the chosen AP (your router).
To check if the connection is successful, you can verify it by login into your camera again. In case the camera is still not accessible, please check
your router again to see whether your camera is connected. Also, check the security setting again just for sure.
Page 57

5. User Interface
Camera management page allows you to view and configure the camera at real time. This chapter will introduce all supported features and
detail configurations.
Page 58

5.1. Navigation Panel
The Navigation Panel is located at the top-right corner of the page. Since there are two different user levels (Administrator and Viewer),
the functions shown on the Navigation Panel also vary accordingly. For more information about user account, please refer to User
Management section.
Page 59

The viewer only has camera view features.
Administrator has full control of all the camera settings.
Page 60

Switch the management page to camera viewer within which snapshots or video clips can be taken at
real time.
Switch the management page to camera setting. Please refer to Main Menu section for detail camera
setting.
Allows user to change management page language setting.
Cloud Service Page
The descriptions are as follows
Page 61

Logout
Page 62

5.2. Live View Settings
Page 63

There are two streams running concurrently: Stream1 (1280 x 720) and Stream2 (640x480). Stream1 has the
higher resolution than stream2. Stream2 serves lower resolution for mobile devices which has smaller screens.
You can preview each stream at real time by selecting it from the list.
This opens the local folder where the real time captured images and clips are stored. You may change the
folder path at Main Menu System PC Storage Path
The Live View Management menu is located at the right side of the page.
Page 64

This switch only applies to resolution 640 x 360. When enabled, the preview image will switched to 1:1 mode.
By default the image will expand and fill the view screen if the actual image is smaller than the view.
This switch will hide the browser and expand the view to full screen. You can press ESC button to cancel the full
screen mode.
This button takes a snap-shot on the real time view and store the image in the local folder.
Toggle this button to start recording movie clip at real time. Click on the button to start recording. Please note
that when icon changed to purple icon the camera is recording. To stop recording, simply
click the button again.
Toggle this button to turn PC audio from the camera ON and OFF. The default is ON, click the button to turn it
ON; the icon should change to to signify OFF state.
Page 65

5.3. Main Menus
Only Administrator Users can get access to Main Menus. Viewers do not have the privilege of changing camera settings.
To get access to the Main Menu, click on the setting icon .
The Main Menu is shown below.
Page 66

Page 67

5.4. System
The System setting menu consists of system related configurations.
Page 68

5.4.1. Status
Status Page displays the detail system level information on the page including current time, firmware version, DDNS name, IP address and etc.
Page 69

Page 70

5.4.2. Service Port
The default setting is as follows. This is only reserved for advanced users who want to keep certain ports for other particular services.
Changing the ports will result in unexpected result. Unless necessary, please keep the default setting.
Page 71

5.4.3. Time
Like any other surveillance system, time is essential because we want to keep track of the time of the events recorded or detected by the
camera. By default, the camera is connected to a public time server (pool.ntp.org) and its time is always synchronized with the server over the
Internet. Normally, you only need to change the Time Zone. Choose the one that matches your location. Leave the other setting as default
should be fine. Setting the wrong time server or time zone will result in inaccurate scheduling and time stamp.
Time Setup: synchronized with time server or PC
Time Zone: select time zone
NTP Time Server: the time server address
Enable Daylight Saving: check the box if applicable
Start Time: The daylight saving start time
End Time: The daylight saving end time
Page 72

5.4.4. PC Storage Path
Folder Path: click “Browse” to change the path
Snapshot File Type: support image format JPG, PNG & BMP
Recording File Type: support format AVI & MP4
Compression rate comparison (High to Low):
JPG > PNG > BMP
MP4 > AVI
You should consider keeping the default setting because it reduces image or clip file size.
Page 73

5.4.5. Firmware
The product feature may improve over time; you may check EnGenius official web site for the latest firmware. New firmware may contain
bug fixes or feature improvement which is beneficial to you.
Either download the latest firmware file to your local computer or use Auto Firmware Upgrade when Internet connection is available. For
manual upgrade, click Browse and select the firmware file to start upgrading firmware.
Page 74

Select the downloaded new firmware then click on Open.
Page 75

Click Apply to start upgrading the firmware.
It may take a moment for the upgrading process, please wait patiently.
WARNING: Do not turn off the device in the middle of upgrade process. Terminating the device during the process will damage the device and
may cause the device to fail.
Page 76

5.4.6. Back-up
There are times that you may want to test new settings or keep different settings for different application scenarios. You can do this with
following steps:
Save Settings
Click Save to initiate setting backup process.
Page 77

Click Save to store the file to the chosen location.
Page 78

Restore Settings
Click on Browse to select the backup file.
Page 79

Choose the configuration file and click on Open.
Click on Upload to start storing process.
Page 80

It may take a moment for the uploading process, please wait patiently.
WARNING: Do not turn off the device in the middle of the upload. Terminating the device during the process will damage the device and may
cause the device to fail.
Page 81

5.4.7. Reboot/Reset to Default
There may be times that you feel like to restore the settings to factory default. To reset to default click on the button Reset to Default
If the camera for some reason stop responding or acting abnormally, you can choose to Reboot the Device. If the device still does not recover
to normal operation, please consider to perform a hard reset (unplug and re-plug the power adapter).
Page 82

5.4.8. Language
The default User Interface language is English, you can change the language with just a mouse click.
On the language list, click to select the one you feel comfortable with from the list. The user interface with refresh automatically with your
chosen language.
Page 83

5.5. Network
The Network setting menu consists of Network related configurations.
Page 84

5.5.1. IP Configuration
Each camera should be assigned with an IP address in the network for identification. IP Configuration setting allows you to change the
method with which the camera obtains its IP address. The default setting Dynamic IP (DHCP) is applicable to most of the application scenario.
However, advanced users can also change to Static IP or PPPoE whichever suit the purpose.
Mode: Static IP, PPPoE and Dynamic IP (DHCP)
Page 85

Static IP
If your network requires Static IP, you need to specify the detail IP settings similar to above. Please note that, if you are managing your camera
in local network similar to the example shown above, you will need to configure your management PC/Laptop under the same domain.
Page 86

PPPoE
If you are connecting to the Internet without going through your home router, you can connect the camera directly to your modem (given
that you are using PPPoE for your Internet service). Please consult your local network service provider for more detail. Basically, the PPPoE
setting is exactly the same as what your home router. You need to provide at least Username and Password to get access.
Page 87

Dynamic IP (DHCP)
MAC Address: Type in the MAC address to insert the local MAC address into the field.
Click Apply when configuration is done to activate new settings.
Note: If you have a working Internet connection through your router, there is no need to type in the MAC address. Providing such MAC address
only if the IP address assigner binds each IP with a specific MAC address.
Page 88

5.5.2. EnGenius Cloud Service
You must Enable EnGenius Cloud first and then choose the Type.
Page 89

A key part about EnGenius Cloud Service is DDNS. Dynamic DNS (DDNS) is a type of DNS that works with dynamic IP address. DDNS
keeps update its mapping regularly and ensures a consistent matching so that your device can be accessed over the Internet using a fixed DDNS
name. You can either use the default EnGenius DDNS Service or other 3rd party Service you prefer.
Users are recommended to use the free DDNS address printed on the label enclosed in the package. This is because ISP often leases
dynamic WAN IP address that changes from time to time. DDNS domain name will always be the same even if the WAN IP address changes.
The domain name can also be found on your System Status page.
Page 90

Default UID: default UID
UID Status: when working properly, it should show “Connected”.
Default DDNS: shows the default DDNS
Alias DDNS Name: You may find that your DDNS is too difficult to remember. EnGenius provides free DDNS name registration as long as the
alias is not yet been taken other EnGenius product users. You can check the availability by clicking on the button Availability Check for
verification. In this example, “superman.engeniusddns.com” is available. That is, when the setting is activated, both DDNS name
“superman.engeniusddns.com” and “0e95c28.engeniusddns.com” can be used to access this camera.
Refresh Time: options are 3HR, 6HR, 9HR, 12HR and 24HR. DDNS server needs to synchronize with your IP address often so that you can access
your device over the Internet with DDNS name. Depends on your Internet Service provider, your WAN IP address lease time will be different.
Page 91

You can check with your local Internet Service provider for WAN IP address refresh time. The default setting is 24HR (which means DDNS server
will check the synchronization every 24 hours). Normally, the default setting 24HR is okay for most cases.
DDNS Status: when working properly, it should show “Connected”.
Note: DDNS will only work only if your router is connected to the Internet. If router is not connected to the Internet, your DDNS status will
show “Disconnected”.
Page 92

If you prefer to use third-party DDNS server, you can choose this option.
The current supported third-party DDNS services are 3322(qdns), DHS, DynDNS, ZoneEdit and CyberGate. Choose the one that best suits your
purpose. You should provide your account information so that the camera can communicate with the selected DDNS vendor.
Your third-party DDNS service account credential should include the following information.
Host Name: please enter your registered Host Name
Username: please enter your registered Username
Password: please enter the password for this
Click Apply when configuration is done to activate new settings.
Page 93

5.5.3. UPnP
Universal Plug and Play (UPnP) allows the other device to detect the presence of the camera so that communication become possible. You
should enable UPnP if you wish your camera to be recognized by your router. UPnP Traversal makes camera remote access over the Internet
possible using camera DDNS name. You won’t be able to access the camera if you disable UPnP feature. Please keep it Enable if you are not
sure.
Hostname: You may rename your camera to other meaningful names such as storage room, lobby, or any other descriptions you find suitable
to describe the space being monitored.
UPnP: Enable or Disable
UPnPc: Enable or Disable
Click Apply when configuration is done to activate new settings.
Page 94

5.6. Wireless
All wireless related settings can be found under Wireless menu. The camera store several AP profiles (candidate AP list) although only one AP
will be connected at any given time.
Page 95

5.6.1. Basic
Under basic section, you can turn on or off the wireless radio, setting connection with the existing surrounding AP. Wireless Information shows
the current wireless status.
To setup a wireless connection, you must first enable wireless by choosing Enable option.
Page 96

Click on Scan button to search for existing wireless access points (AP).
When prompted with Site Survey window, click on Refresh button if you do not find your AP on the list.
On the site list, choose your preferred AP and then click Add to AP Profile.
Then, on the AP Profile Settings window, please check if the security settings are correct. Please review the settings: Encryption, WPA type,
and Pre-Shared Key type. They are automatically detected. Normally, you only need to provide the Pre-Shared Key (password). However, you
can still change the settings if they do not match with the actually AP wireless security settings.
Enter your Pre-Shared Key and press Save to complete the setting.
Page 97

Please wait for a moment for the setup to complete.
While waiting, you can remove RJ45 Ethernet Cable from the camera now. It may take a moment for the camera to establish wireless
connection with the chosen AP (your router).
Your camera should be connected to the AP now. You can verify it by login into your camera again. In case if the camera is still not accessible,
please check your AP’s wireless settings again to see whether your camera is connected.
Page 98

5.6.2. WPS
Wi-Fi Protected Setup (WPS) is a network security standard that allows users to easily secure a wireless network. This feature allows user
to setup wireless connection between the camera and AP without entering any detail wireless security configurations such as SSID, encryption
method or pre-shared key (password). However, you need to initiate WPS process on both the camera and the AP at the same time so that
they can find each other.
Normally, for WPS-enabled products, you should be able to find the WPS button on the product. Only few rare cases that require user to
initiate WPS process over web page. Make sure WPS feature is Enabled on both the camera and your AP or wireless router. Then, you need to
know how to initiate AP or wireless router’s WPS process first. It is mostly likely a simple push of the WSP button on your AP or wireless router.
On EDS6115, you can initiate WPS process on the web page or by pressing the WPS button.
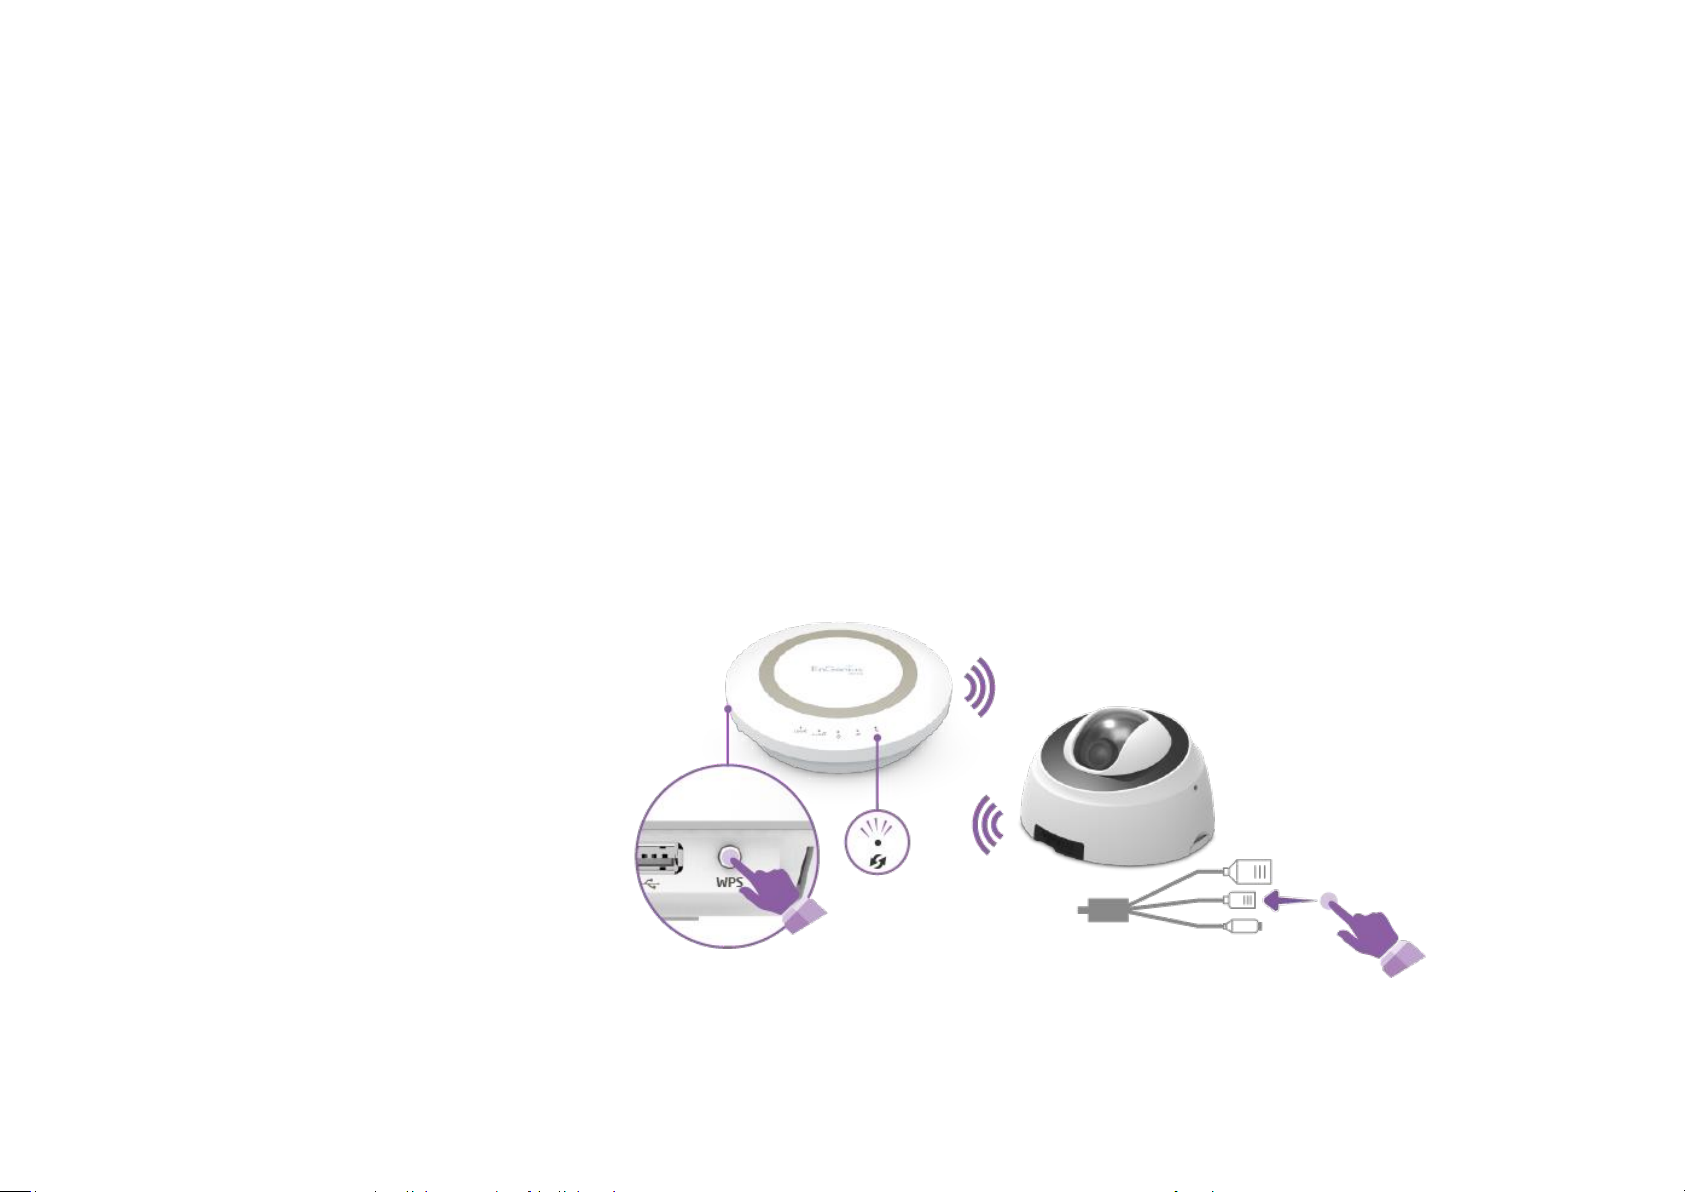
WPS Button
The simplest way to setup wireless connection with an AP or wireless router is by pressing on the WPS button.
First, press the WPS button on the AP (there may be changes on the LED lights as signs of initiation).
Then, press the WPS button of the camera.
Wait a minute for two devices to establish the wireless connection.
Done!
WPS over web page
You can initiate camera’s WPS process on the web page.
Page 99

First, press the WPS button on the AP or wireless router (there may be changes on the LED lights as signs of initiation).
On camera’s WPS page, press Start to Process.
Wait a minute for two devices to establish the wireless connection.
Done!
NOTE: For WPS to setup wireless connection successfully, timing is essential. Once AP or wireless router has initiated WPS process, your camera
WPS process must be initiated within a given time range. It would be best if you have two devices in close range so that WPS process on both
sides can be initiated immediately after another.
Page 100

5.6.3. AP Profile
You can keep several AP Profiles (settings) if your application may need to switch between APs in case one of them failed. Each profile matches
to a specific AP.
 Loading...