

Page 1

Digital
Long Range Industrial Cordless
Phone Systems
DuraFon PRO & DuraWalkie
User's Manual
Page 2

Safety Instructions. .. . .. ... ... ... ... ... ... ... ... ... ... ... ... ... .. . .. 4
General Safety Instructions. .. .. ... .. ... .. .. . .. .. ... .. ... .. .. . .. .. ... .. 4
Product Safety Instructions. .. ... ... ... ... ... ... .. . .. ... ... ... ... ... ... .5
Battery Safety Instructions. ...... .. ...... .. ...... ...... .. ...... .. ...... .. .7
Regulatory Information. .. ... ... .. . .. . .. ... .. . .. . .. ... ... .. . .. . .. ..8
Congratulations. ... .... ... . ... . ... . ... .... ... . ... . ... . ... .... ... . ... 10
Equipment Checklist. ... . ... . .... .... .... .... . ... . ... . ... . .... .... .11
Handset Illustration. ... .... ... . ... . ... . ... .... .... ... . ... . ... . ... ..13
Handset Features. ... ... . ... ... . ... ... . ... . ... ... . ... ... . ... ... . ... . 14
Basic Handset Features. ....... .. .. .. .. ....... .. .. .. ....... .. .. .. ...... ..14
Additional Handset Features. . .... .... ..... .... .... . .... .... ..... .... .16
Base Illustration..... .. ... .. . .. ... .. . .. ... .. . .. . .. ... .. . .. ... .. . .. ..21
Base Features...........................................................21
Basic Base Station Features............................................21
Additional Base Station Features... .. .. . .. .. .. . .. .. .. .. . .. .. .. . .. ...22
Administrator Features... .. .. .. . .. .. .. .. .. . .. .. .. .. . .. .. .. .. . .. .. .. .. .. . ..22
Charger Illustration. ... ... ... . ... ... . ... ... ... . ... ... . ... ... ... . ... 24
Charger Features. ... . .... .... . ... . .... .... . .... .... . ... . .... .... . .24
Getting Started. ... . .... . .... .... . .... .. ... . .... . .... .... . .... .... . ...26
Base Station Installation....................................................26
1
Page 3

Handset and Charger Installation. .. .. .. .. .. .. .. .. .. .. .. .. .. ...29
Basic Operations.......................................................30
Operation Modes.....................................................30
Making a Telephone Call(For DuraFon PRO only). .. . .. .3 4
Making a 2-Way/ Intercom Call..................................34
Making a Broadcast........ ......... ......................... .......35
Redial(For DuraFon PRO only). ........ ........ ........ ........ 36
Receiving a Telephone Call(For DuraFon PRO only). . . 3 6
Receiving an Intercom Call.............. .........................37
Ending a Call...........................................................38
Adjusting Receiver (Earpiece) Voice Volume. ..... ..... ...38
Placing a Call On Hold(For DuraFon PRO only).......... 38
Mute.......................................................................39
Do Not Disturb (Silent Ring)......................................39
Key Guard...............................................................39
To View Missed Call(s) (For DuraFon PRO only). .. .. .. ..39
To Call back from Call Log (For DuraFon PRO only). . . .. 4 0
Battery Recharge and Replacement. ...... ...... .............4 0
Advanced Operations................................................41
Handset Registration................................................41
2
Page 4

Advanced Registration.............................................42
Handset Group Subscription.....................................43
Call Transfer(For DuraFon PRO only)........................44
3-Way Conferencing(For DuraFon PRO only).............45
Base Select (For DuraFon PRO only)..................... ..45
Call Waiting(For DuraFon PRO only)...... ........... ........46
Auto-Attendant(AA)................................................47
AA Configuration by Administrator............................48
Change AA Parameters...........................................48
Line Dedication.......................................................50
Outbound Line Selection (For DuraFon PRO only)......50
Change System Settings by Administrator..................51
Phonebook Operations............................................52
Broadcast through PBX............................................55
Menu Operations.....................................................57
Technical Specifications...........................................66
3
Page 5

Caution : Your wireless telephone gives you fr eedom an d flexib ility
to stay in to uch whil e you move a round. H owever, t he safe an d
respons ible use o f the phon e depend s entire ly on you.
When usin g your pho ne equip ment, sa fety ins tructi ons shou ld be
followed to avoid t he risks o f fire, el ectric s hock, in jury to pe rson,
and damage to prope rty.
General Safety Instructions
1. When usi ng your wi reless p hone, en sure you r safety a nd the saf ety of
others:
a. Always wa tch wher e you are wa lking an d standi ng.
b. Don't le t a phone ca ll distr act you fr om worki ng safel y.
2. In an emer gency:
a. If an emer gency oc curs, di al the eme rgency p hone num ber.
Remembe r: If you ar e in an area w here you r phone do es not hav e a
clear sig nal from t he base, i t is highl y probab le that th e call may not
go throug h. Locat e the near est telepho ne or othe r
landline
communi cation s device t o call for h elp.
b. Emerge ncy call s may not au tomati cally pr ovide em ergenc y
personn el with yo ur name, p hone num ber or loc ation. Tell the
operato r
i) Your n ame and ph one numb er.
ii) The nature of the emergency.
iii) Whet her poli ce, fire , or medic al assis tance is n eeded.
iv) The exact location of the emergency, including address, cross
streets , milepo sts or lan dmarks.
3. Notice t o Hearin g Aid Users : This phone system is compatible with
inducti vely cou pled hea ring aid s.
4. Notice t o Cardia c Pacema ker User s: Preli minary s tudies d one by the
US FDA and oth ers have s hown tha t, altho ugh inte rferen ce to the
implant ed cardi ac pacem aker may o ccur whe n operat ing very c losely,
wireles s teleph ones do no t seem to po se a signi ficant p roblem f or
''
4
Page 6

pacemak er weare rs .
''
However, u ntil mor e is known , FDA sugge sts that p eople wi th
pacemak ers may wa nt to take p recaut ions whe n using or c arryin g a
wireles s teleph one to ens ure that t here is am ple dist ance bet ween the
telepho ne and the p acemak er. Do not ca rry the ha ndset in a b reast
pocket. I f you have a ny reaso n to suspe ct that in terference is taking
place, tu rn off your handset immediately.
Product Safety Instructions
1. Read and u nderst and all in struct ions.
2. Follow a ll warni ngs and in struct ions inc luding t hose mar ked on the
product .
3. Change s or modif icatio ns to this p roduct n ot expre ssivel y approv ed by
the manuf acture r will voi d the warr anty and t he FCC aut horiza tion to
operate t he equip ment. Us e only man ufactu rer prov ided acc essori es.
4. Do not use t he telep hone nea r water. Ne ver spil l liquid o f any kind o n
this prod uct.
5. Unplug t he produ ct from th e wall tel ephone j ack and po wer outl et
before cl eaning . Do not use l iquid or a erosol c leaner s. Use dam p cloth
for clean ing.
6. Do not pla ce this pr oduct on a n unstab le cart, s tand or ta ble. The
product m ay fall an d cause pe rsonal i njury or d amage to t he produ ct or
other pro perty. Place the base station and the charg er on hard , flat
surface s.
7. Power Ou tage:
In the even t of a power o utage, y our hand set char ger will n ot recha rge
the hands et batte ry, and the base station will not all ow you to ma ke an
outgoin g call or ta ke an inco ming cal l. Both th e charge r and the ba se
station r equire e lectri city for o perati on.
You should h ave a tele phone, t hat does n ot requi re elect ricity,
availab le for use d uring po wer outa ge, or hav e a tempor ary back up.
5
Page 7

power sup ply.
8. Slots or o pening s in the pro duct's h ousing a re provi ded for ve ntilat ion.
These openings must not be blocked or covered. Placing the product
on a bed, car peting , or other s imilar s urface m ay block t hese ope nings
and shoul d be avoid ed. This product should never be placed near or
over a radi ator or he at regis ter, or in a bu ilt-in i nstall ation un less pro per
ventila tion is pr ovided .
9. Never pu sh objec ts of any ki nd into th is produ ct throu gh housi ng slots /
openings as they ma y damage t he produ ct, touc h danger ous volt age
points or s hort out p arts tha t could re sult in fi re, electric shock, or injury.
10. This product should be operated only from the type of power source
indicat ed on the ma rking la bel. If yo u are not su re of the type of power
supply to y our home , consul t your dea ler or loc al power c ompany.
11. Do not overload wall power outlets and extension cords as this may
result in f ire or ele ctric sh ock.
12. To avoid el ectric s hock or bu rn, do not d isasse mble thi s produc t. Send
this prod uct to an au thoriz ed servi ce cente r when ser vice or repair
work is req uired. C all Cust omer Ser vice for l ocatio ns near you.
Opening o r removi ng cover s may expo se you to da ngerou s voltag es,
electri cal curr ents or ot her risk s. Incor rect reassembling of the product
may cause e lectri c shock wh en the pro duct is su bseque ntly use d.
13. Avoid using the product during a storm. There may be a risk of electric
shock fro m lightn ing.
14. Do not pl ace the pr oduct wh ere pers ons can st ep, trip , or fall on t he
product .
15. Do not pl ace cond uctive o bjects o ver or nea r the ante nna.
16. Do not us e the prod uct to rep ort a gas le ak while i n the vici nity of th e
leak.
6
Page 8

17. Do not in stall th e base sta tion or th e handse t charge r near mic rowave
ovens, ra dios, TV sets, speakers, or othe r electr ical equ ipment .
These appliances may cause interference to the product or
experie nce inte rferen ce from th e produc t.
18. Unplug the base s tation o r the char ger adap tor from t he wall po wer
outlet an d refer se rvicin g to an auth orized s ervice c enter un der the
followi ng condi tions:
a. If liqui d had been s pilled i nto the pr oduct.
b. When the p ower sup ply cord o r plug is da maged or f rayed.
c. If the pro duct has b een expo sed to rai n or water.
d. If the pro duct doe s not oper ate norm ally by fo llowin g the oper ating
instruc tions.
e. If the pro duct has b een drop ped or hou sing has b een dama ged.
f. If the pro duct sho ws a disti nct chan ge in perf ormanc e.
Battery Safety Instructions
1. Use only m anufac turer ap proved L ithium -Ion (Li -Ion) re charge able
batteri es and cha rger. Do no t use othe r types of r echarg eable ba tterie s
or non-re charge able bat teries . The batteries could short-ci rcuit, a nd
the batte ry enclo sure may b e damage d causin g a hazard ous cond ition.
2. Follow t he charg ing inst ructio n in this ma nual and i nstruc tion lab els
and marki ngs in the h andset a nd charg er compa rtment s.
3. Batter y must be re cycled o r dispos ed of prop erly. Do not disp ose the
battery i n a fire. The cells may explode.
4. Do not dis pose of th e batter y in munic ipal was te. Chec k with loc al
codes for d isposa l instru ctions .
5. Exerci se care in h andlin g the batt eries in o rder not t o short- circui t the
battery w ith cond uctive m ateria ls such as r ings, br acelets, keys,
pocketk nife, an d coins. The battery or co nducti ve mater ial may
overhea t and caus e burn or fi re.
6. Do not exp ose batt eries to r ain or wat er.
7. Do not ope n or mutil ate the ba ttery. Released electrolyte i s corros ive
and may cau se injur y to eyes or s kin. The electrolyte may be toxi c if
swallow ed.
8. During c hargin g, the bat tery hea ts up. This is normal and is not
dangero us.
7
Page 9

DuraFon P RO & DuraWalkie
FCC ID: NI3 -SP922
IC: 3616A -SP922
This devi ce compl ies with P art 15 of th e FCC Rules. Operation is
subject t o the foll owing tw o conditions:
1) this dev ice may no t cause ha rmful in terfer ence, and
2) this dev ice must a ccept an y interf erence r eceive d, including
interfe rence th at may cau se undes ired ope ration.
Privacy o f commun icatio ns may not b e ensure d when using this
phone.
1. The term “IC”: before the radio certification number only signif ies that
Industr y of Canad a techni cal spec ificat ions wer e met.
2. This telephone system complies with rules of the FCC Part 68 and
Canadia n IC/DOC C S-03. On t he botto m of the bas e statio n is a label
that cont ains, am ong othe r inform ation, t he FCC Reg istration Number,
Ringer Eq uivale nce Numb er (REN) a nd the Uni versal S ervice O rder
Code, whi ch is RJ-11C in the U.S. or CA-11A in Canada. Your
telepho ne compa ny may ask y ou for thi s inform ation.
3. The REN is useful to determine the quantity of devices you may
connect t o your tel ephone l ine and st ill have a ll devic es ring wh en your
telepho ne numbe r is calle d. In most , but not al l, areas t he sum of the
REN's of al l device s connec ted to one l ine shou ld not exc eed 5.0. To be
certain o f the numb er of devi ces you ma y connec t to your ph one line ,
you shoul d contac t your loc al telep hone com pany for t he maxim um
REN in your a rea.
4. If your te lephon e equipm ent caus es probl ems to the t elepho ne
network , the tele phone co mpany ma y ask you to d isconn ect your
phone sys tem from t he line un til the pr oblem ha s been cor rected .
Consult w ith your l ocal pho ne compa ny for you r rights i f this hap pens.
8
Page 10

5. Your telephone company may make chan ges in its f acilit ies, equ ipment ,
operati ons, or pr ocedur es that co uld affect the proper fu nction ing of
your tele phone sy stem. Co nsult wi th your lo cal phon e compan y for
your righ ts if this h appens .
6. This telephone system may not be used on coin service provided by
the telep hone com pany. Connection to party lines is subject to state
tariffs.
7. This telephone system has been tested and found to comply with the
limits fo r Class B di gital de vices, p ursuan t to Part 15 o f the FCC Rules
and RSS21 0 of the DOC R ules. These limits are designed to provide
reasona ble prot ection a gainst h armful i nterfe rence in a g eneral p ublic
install ation. O perati ons of the se devic es may sti ll encou nter
interfe rence fr om/to ne arby TV's, VCR's, radi os, comp uters, o r other
electro nic devi ces. To minimize or prevent such interference, the
telepho ne syste m should n ot be plac ed or oper ated nea r other
electro nic devi ces. If in terfer ence occ urs, mov ing the ba se station and
the hands et farth er away fr om them wi ll often r educe or e limina te the
interfe rence.
8. Howeve r, there is n o guaran tee that i nterfe rence wi ll not occ ur in a
particu lar inst allati on. If thi s teleph one syst em does ca use
interfe rence to o ther ele ctroni c device s, which c an be dete rmined b y
turning t he syste m off and on, the user is encouraged to try to cor rect
the inter ferenc e by one or se veral of t he follo wing mea sures:
a. Increa se the spa ce separ ation be tween th e handse t or base st ation
and the dev ice that i s experi encing i nterfe rence. We reco mmend at
least 1 met er (abou t 3 feet) be tween th e system a nd other electronic
devices .
b. Connec t the base s tation t o a power ou tlet on a ci rcuit se parate from
that used b y the devi ce exper iencin g interf erence .
c. Consul t the deal er or an exp erienc ed elect ronic te chnici an for hel p.
9
Page 11

You hav e purcha sed an exc eption al busin ess comm unicat ions too l from a
leading telephone syste m manufa cturer.
The EnGen ius Dura Fon PRO 4- port Ind ustria l Cordle ss Telephone
System is i deal for t he users i n variou s busine ss setti ngs. The DuraFon
PRO is the lo ngest ra nge, mul ti-bas e, multi -line te lephon e and 2-wa y
radio com munica tions sy stem pro viding u sers unp aralle l mobili ty and
flexibi lity. The EnGe nius Dur aWalkie handset provides long range 2-way
interco m and broa dcast co mmunic ation, w ithout t elepho ne capab ility.
With soph istica ted digi tal sign al proce ssing an d high qua lity har dware
designs, the Dura Fon PRO pr ovides l ong-ra nge tele phone co nnecti ons,
multi-b ase inst allati on and 2-w ay hands et-to- handse t commun icatio ns in
a wide variety of bus iness se ttings f rom mult i-leve l office buildings,
factori es, hote ls/res orts, co nventi on facil ities, w arehou ses, farms,
business comple xes, con struct ion site s, schoo l, car dea lershi ps, groc ery,
retail st ores and o ther dem anding b usines s enviro nments .
The uniqu e 2-way ra dio feat ure allo ws hands ets to com munica te with
each othe r as digit al, full -duple x 2-way ra dios. Me mbers of w ork grou p(s)
can be in con tact wit h their co -worke rs while l eaving p hone lin es avail able
for incom ing and ou tgoing c alls. Ha ndsets t hat are wi thin ran ge of each
other can u se the 2-w ay featu re even wh ile out of r ange of th e base sta tion.
DuraFon P RO can sup port up to 9 0 handse ts.
Importa nt Warranty Note:
U.S. cust omers: This EnGenius product has NO manufactur er's war ranty
unless pu rchase d from an En Genius Au thoriz ed Resel ler. To verify a
reseller is autho rized, p lease vi sit our we bsite at :
www.engeniustech.com
or contac t us at 714- 432-86 68.
10
Page 12

Equipment Checklist
1. In a Base + Han dset pac kage(D uraFon P RO), ple ase find the
followi ng compo nents:
a. Base Sta tion x 1
b. Base Ante nna x 1
c. Base AC/D C Adaptor x 1
d. Handse t x 1
e. Low Prof ile Hand set Anten na x 1
f . Optim al Perfo rmance H andset An tenna x 1
g. 1700mA Li-ion Battery Pac k x 1
h. Charge r x 1
i . Charg er AC/DC Ada ptor x 1
j . Telephone Cord x 4
k. Audio-i n Cable x 1
l . Belt Cl ip x 1
m. User's Ma nual, Qu ick Guid e, and Warranty Card
2. In a Hand set pack age(Du raFon PR O HC or Dura Walkie), please
find the fo llowin g components:
a. Handse t x 1
b. Low Prof ile Hand set Anten na x 1
c. Optima l Perfor mance Ha ndset Ant enna x 1
d. 1700mA Li-ion Battery Pac k x 1
e. Charge r x 1
f . Charge r AC/DC Adap tor x 1
g. Belt Cli p x 1
h. Quick Gu ide, and Warranty Card
3. In a B ase pack age(Du raFon PRO BU), please find the following
compone nts:
a. Base Sta tion x 1
b. Base Ante nna x 1
c. Base AC/D C Adaptor x 1
d. Telephone Cord x 4
e. War ranty Card
f . Au dio-in C able x 1
11
Page 13

Equipment Checklist
4. Option al Accessories
a. Outdoo r Antenna K it (incl uding an tenna an d cable)
b. Lightn ing Prot ection K it (incl uding ca ble)
c. DuraPo uch
d. Belt Cli p
e. Spare Ba ttery
f . Low Profi le Hands et Antenn a
g. Optima l Perfor mance Ha ndset Ant enna
h. Antenna Splitter (including cable)
12
Page 14
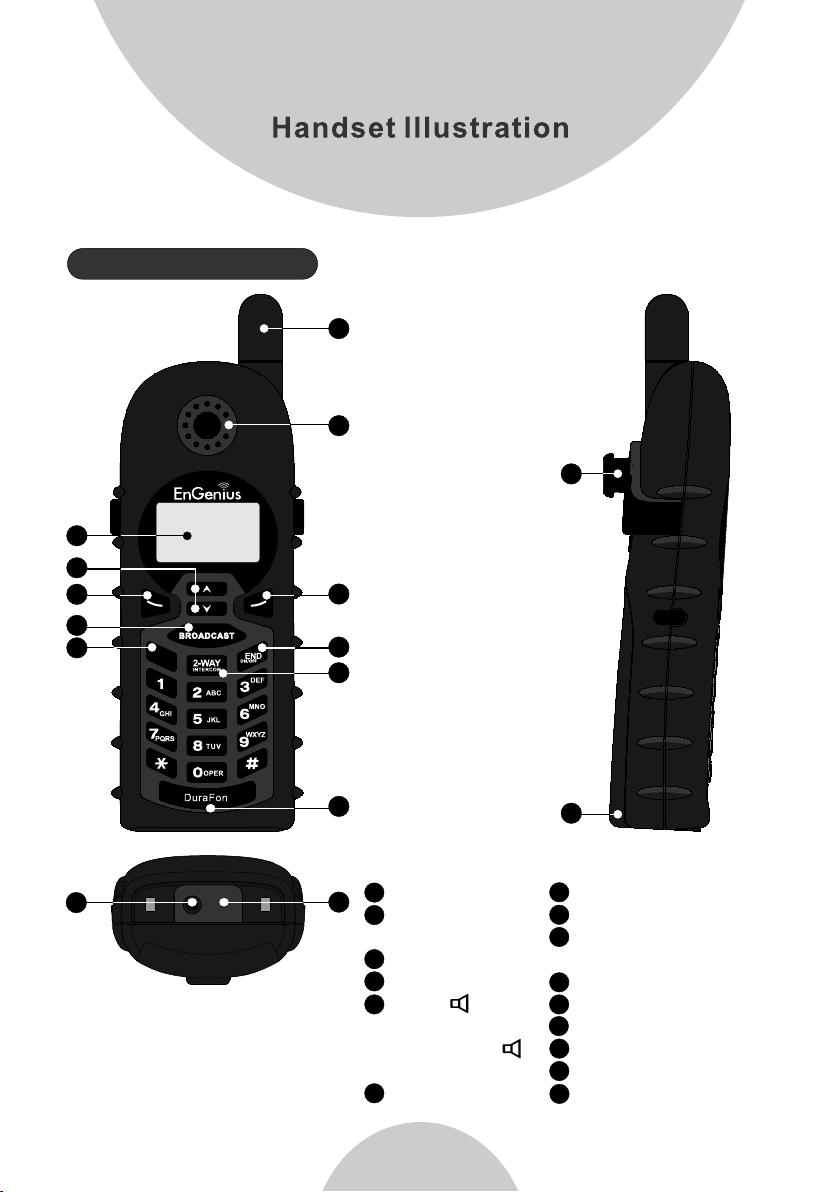
Handset Features
1
2
3
4
5
6
7
14
8
9
10
12
11
13
1
4-Line LCD
2
Volume control/
Scrolling
3
Left soft key
4
BROADCAST
5
TALK/
(For PRO)
KEY LOCK/
(For Walkie)
6
Antenna
13
15
7
Receiver
8
Right soft key
9
END &
Power ON/OFF
10
2-WAY//Intercom
11
Microphone
12
Travel/charger jack
13
Headset jack(2.5mm)
14
Belt Clip holder
15
Battery pack
Page 15
Handset Features
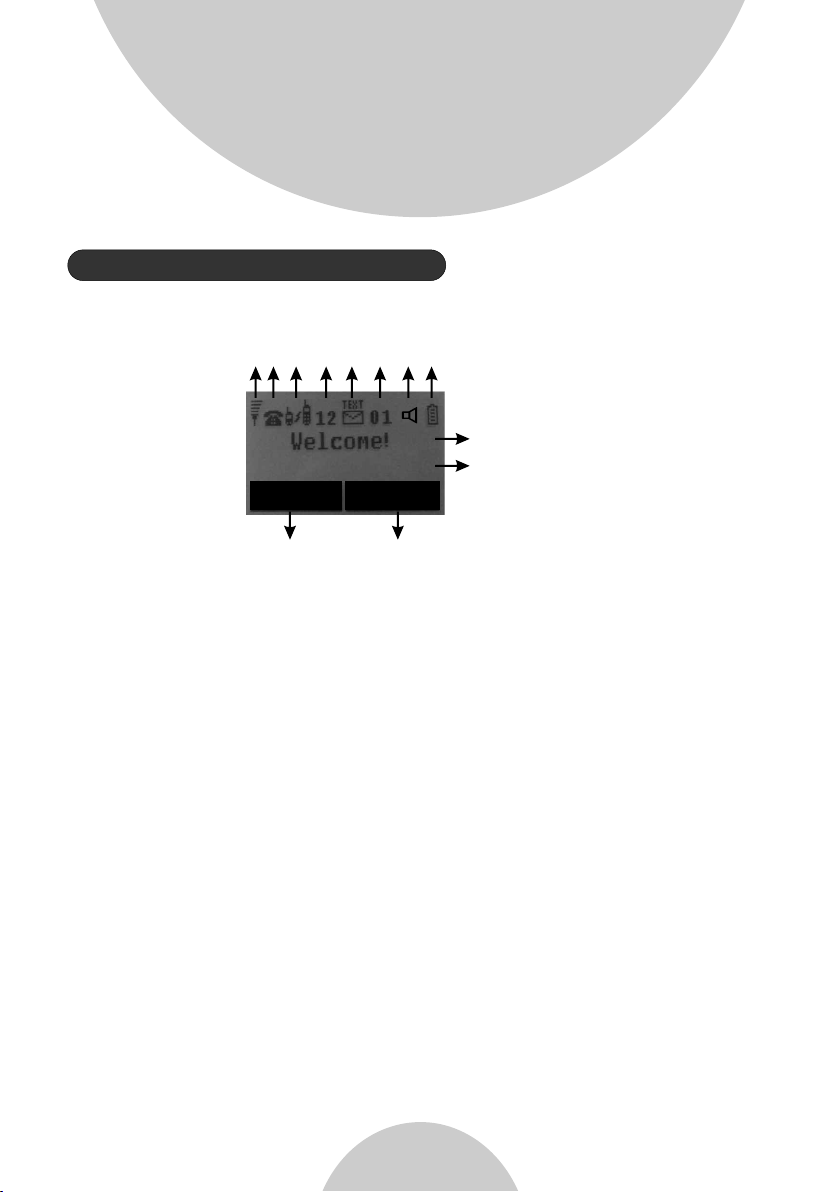
Basic Handset Features
1. 4-line L CD (Liqu id Cryst al Displ ay)
(1) (2) (3) (4) (5)
(6)
(7)
(8) (9)
MENUREDIAL
d
d
a. The LCD display has LED (Light Emitting Diode) for backlighting.
b. The 1 line of LCD consists of icons.
st
ee
c. Icons ex planat ion from l eft to rig ht.
(1) RSSI (R eceive S ignal St rength I ndicat or)
During a ca ll, the nu mber of ba rs is prop ortion al to the radio signal
strengt h receiv ed.
(2) Call in -progr ess (ON/ OFF-Hook)
◎
Indicat es if phon e line mod e is activ e.
(3) Inter com in-p rogres s
Indicat es if Inte rcom mod e is active.
(4) Hands et ID
Display s a handse t icon and a 2 -digit H andset I D.
(5) Text Envelope
Indicat es if ther e is new tex t message.
(6) Two-Digit Addre ss Index
◎
Shows add ress ind ex when vi ewing co ntents o f the call l ogs,
text mess ages or ph oneboo k.
(7) Line In dicato r
◎
Indicat es the num ber of the l ine bein g access ed by the handset.
(8) Speak er phone
Indicat es if spea ker phon e is activ e.
(9) Batte ry Stren gth
* Number of b ars is pro portio nal to the a mount of battery time
remaini ng.
* Indicat es charg ing when i n charge r cradle .
14
Page 16

Handset Features
d. The 2 and 3 lines of th e LCD, max imum 14 ch aracte rs each,
nd rd
display s tatus, m essage , menu sel ection s, or user-editable
alphanu merica l charac ters.
e. The last line displays the left and right soft keys.
Re: There is only right soft key in idle mode of DuraWalkie.
Note: “◎” means only shown on DuraFon PRO hand set.
2. Ringer
a. Rings to a n incomi ng call.
b. Distin ctive al ert soun ds indic ating va rious ev ents:
i. Single B eep: suc cessfu l key entr y.
ii. Doubl e beep: fa iled ope ration o r invali d key entr y, also indicates
power on/ off.
iii. Peri odic 1-L ong-2- Short Be eps (rep eat ever y 10 secon ds):
low batte ry warni ng.
iv. Perio dic 1-Lo ng-2-S hort Bee ps (repe at every 3 0 second s):
indicat es a call is o n-hold .
3. TALK/ SPEAKERPHONE (For Dura Fon PRO on ly)
( )
a. Places or answers a telephone or intercom call.
b. Sends a Fl ash sign al to phon e line to re trieve a d ial tone a fter the
call ends , or to perf orm the ca ll waiti ng featu re provided by local
phone com panies d uring a ca ll.
c. Press an d hold the k ey for one s econd to e nable/ disabl e
speaker phone.
4. KEYLOC K( ) (For Du raWalkie only)
a. In Idle mo de, pres s to lock up t he keypa d.
b. In 2-Way/Intercom mode, press and hold to enable/disable
speaker phone.
5. 2-WAY/INTER COM( )
a. Places a n interc om call to a nother h andset I D or a group I D.
b. Interc om calls a re digit al, full d uplex, a nd are con ducted w ithout t he
assista nce from t he base.
c. Press an d hold for one sec ond to ena ble/di sable
speaker phone.
15
Page 17

Handset Features
6. BROADC AST( )
a. Half dup lex broa dcasti ng to hand sets for i mmedia te annou ncemen t.
7. Left/R ight ( / ) Softkeys
a. Make men u select ion.
8. Up( ) /Dow n( ) Scrolling Keys
a. Scroll t hrough r ecords a nd menu se lectio ns.
b. Adjust r eceive r voice vo lume whe n in Talk mode.
9. END; On/ Off ( )Key
a. Ends a cal l.
b. Leaves c urrent m enu oper ation, u p one leve l.
c. Press fo r 3 second s to off the power.
Additional Handset Features
1. Multip le hands ets regi strati on
a. Up to 90 han dsets.
b. ID 10 and 11 are the first two ID's assigned by the b ase and ar e
designa ted “adm inistr ators” w ho can cha nge base s etting s such as
greetin g messag e and othe r base adm inistr ative fu nction s.
Note: Unl ess nece ssary, it is bett er not to as sign ID 10 a nd 11 to
DuraWakie handsets.
c. ID 01-07 : Group ID s. Hands ets can “s ubscri be” from t he hands et
menu to gro up(s) an d be paged w hen a caller or an interc om
caller en ters a Gro up ID.
landline
2. Ringer / Vibrator
a. Six ring er volum e select ions
(high/m edium/ low/vi brate/ vibrat e-and- ring/o ff).
b. Four rin ger type s electi ons.
16
Page 18

Handset Features
3. Caller I D(For Du raFon PR O
only)
a. Displa ys incom ing call p hone num ber and na me on the LC D(need s
Caller ID s ervice f rom loca l teleph one comp any).
Note: If be hind a PBX o r Key syst em, Call er ID info rmation will onl y
be recogn ized if th e PBX or Key s ystem passes that
informa tion thr ough the a nalog po rts.
4. Call Waiting with Caller ID(For DuraFon PRO only)
a. Displa ys 2 inco ming call information on the same phone line when
st
1 call is i n progre ss (need s Call Waiting with Caller ID service from
nd
local tel ephone c ompany ).
Note: If be hind a PBX o r Key syst em, Call er ID info rmatio n will onl y
be recognized if the PBX or Key system passes that
information through the analog ports.
5. Name Tagging with Calle r ID(For D uraFon P RO only)
a. Matche s the Call er ID with t he phone b ook entr ies; onc e matche d,
the LCD scr een will d isplay t he name or n icknam e instea d of pure
Caller ID i nfo (nee ds Call Waiting with Caller ID service from local
telepho ne compa ny).
Note: If be hind a PBX o r Key syst em, Call er ID info rmatio n will onl y
be recognized if the PBX or Key system passes th at
information through the analog ports.
6. DND (Do No t Distur b, i.e., S ilent Ring)
Silence s the inco ming cal l ring for c urrent c all only.
7. Three Ca ll Logs( For Dura Fon PRO )
a. Called L og: Stor es 10 phon e number s (up to 28 di gits eac h) diale d
only
most rece ntly. Can perform last- number r edial on a ll 10 numb ers.
b. Receiv ed Call Lo g: 10 entr ies (14- digit ph one numb er, 14-ch aracte r
names, an d time sta mp), nee ds Calle r ID servi ce from local
telepho ne compa ny.
Note: If be hind a PBX o r Key syst em, Call er ID info rmatio n will onl y
be recogn ized if th e PBX or Key system passes that
informa tion thr ough the a nalog po rts.
17
Page 19

Handset Features
c. Missed C all Log: 1 0 entrie s (14-di git phon e number, 1 4-char acter
names, an d time sta mp), nee ds Calle r ID servi ce from local
telepho ne compa ny.
Note: If be hind a PBX o r Key syst em, Call er ID info rmatio n will onl y
be recogn ized if th e PBX or Key s ystem pa sses tha t
informa tion thr ough the a nalog po rts.
d. Phone nu mbers an d names ca n be saved i nto phon ebook wh ile in
display.
8. Any Key Answe r (except END, Silent Soft Key)
9. Key-gu ard
10. Diali ng Prefi x(For Du raFon PR O only)
a. Up to 14 dig its, inc luding p ause(s ), one acc ess code c an be pre program med to be ad ded auto matica lly in fro nt of the di aled
number wh en diali ng from ca ll logs, p honebo ok, and di al-and -send
dialing .
11. Call Hol d(For Du raFon PR O only)
a. Places c all on hol d.
b. Batter y Hot Swap : Change b attery w hile cal l is on hold .
12. Mute
13. Phone book
a. 90 entri es, each s tores a ph one numb er or hand set ID (up t o 28 digit) an d name (up t o 14-cha racter ).
b. Alphab etical ly sorte d displa y and sear ched by le tter.
c. Dial fro m displa y.
d. During t he stand -by mode , you can en ter the ph oneboo k by
pressin g or scrol ling key.
e. Phone bo ok trans fer via wi reless l ink.
i. Transfer specific phonebook to one handset or all registered
handset s.
ii. Transfer all phonebooks to one handset or all registered
handset s.
Re: For Dur aWalkie, it can only store 2-digit handset ID(or Group
ID).
18
Page 20

Handset Features
14. Key Tone
a. Three ke y-tone v olume se lectio ns (high /low/o ff).
b. Four key -tone ty pe selec tions.
15. Call Timer(For DuraFon PRO only)
a. Displa y call tim e durati on for cur rent cal l during a nd immed iately
after the c all.
16. Call Tra nsfer
a. Direct Tr ansfer : transf er a telep hone cal l to anoth er hands et
without a nnounc ement.
b. Announc ed Transf er a telep hone cal l to anoth er hands et befor e
transfe rring a te lephon e call.
17. Call Co nferen cing(F or DuraF on PRO only)
a. 2-hand set and 1- line con ferenc ing.
b. 1-hand set and 2- line con ferenc ing.
18. Line Se lectio n(For Du raFon PR O only)
a. When ena bled fro m the hand set menu , a handse t user wil l be
prompte d to selec t from a lis t of avail able lin es befor e making an
outgoin g call.
19. PBX opt ion tran sfer(F or DuraF on PRO only)
a. PBX opti ons tran sfer via w ireles s link.
b. Transfer specific PBX option to one handset or all registered
handset s.
c. Transfer all PBX options to one handset or all registered handsets.
20. Base Selectio n For DuraFon PRO only
When enab le from th e handse t menu, a ha ndset us er can man ually
select th e base whi ch is the ne arest on e with use r before m aking
an outgoi ng call.
( )
19
Page 21
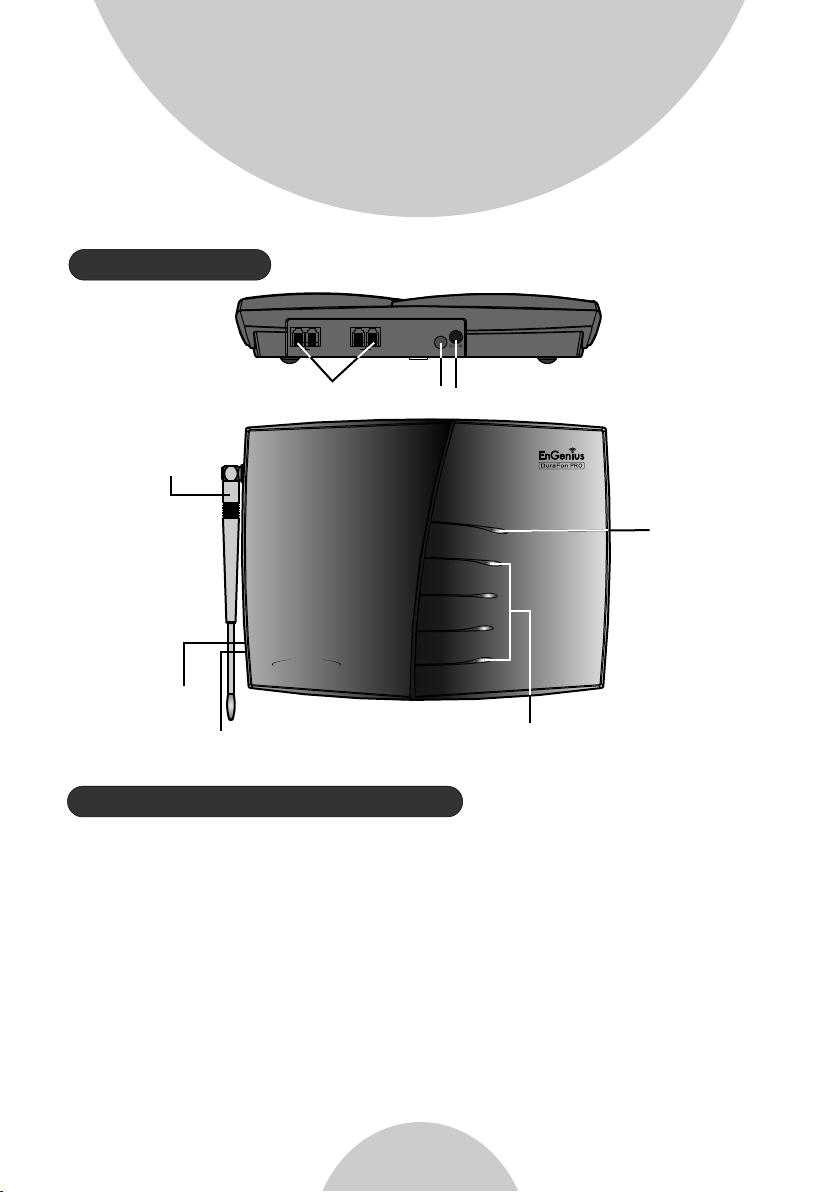
Base Features
Base Illustration
AUDIO
L4 L2
L3 L1
DC IN
Line in Audio in
DC IN
Antenna
Digit al 4-Li ne
Wirel ess Telep hone Sy stem
POWER
LINE 1
LINE 2
LINE 3
LINE 4
Power LED
REG Button
Reset Button
Basic Base Station Features
Line Status LED's
1. Antenn a
a. The ante nna port h as a rever se threa d connec tor; to re move
antenna o r cable, t urn cloc kwise; t o instal l, turn counterclockwise.
Imprope r instal lation m ay damag e the conn ector.
b. When usi ng an outd oor ante nna, loc ate the an tenna (n ot the bas e
station i tself) a s high as po ssible f or a clear t ransmission path.
2. LED
a. Power: I ndicat es base st ation ha s power.
b. In-Use : Indica tes an act ive tele phone li ne.
21
Page 22

Base Illustration
3. Reset Bu tton
a. Restor es base st ation to f actory s etting s.
b. Reset bu tton is in dented t o preven t accide ntal sys tem reset.
c. All hand sets (in cludin g admini strato r) and add itiona l base(s )
need to be re -regis tered af ter a base s tation r eset.
4. Regist ration K ey (REG)
Enters re gistra tion mod e along with handset, assigns handset ID
(10-99) .
5. L1~L4
Standar d RJ-11C/ CA-11A connector to plug in the telephone line.
6. Aud io-in Jack (3.5mm)
7. DC In: to pl ug in the po wer adaptor
Additional Base Station Features
1. 4-chan nel Auto-Attendant
a. 4 Auto-At tendan t can be act ive at the s ame time i n case of 4
simulta neous in coming c alls.
b. Allows pr ivate pa ging to a si ngle han dset (wi th indiv idual
Handset I D) or grou p paging t o a group of h andset s (with Gr oup
ID).
c. Per line AA en able/d isable b y admini strato r.
When disa bled for a l ine, the a dminis trator c an set all h andsets
to ring wit h an incom ing call o n that lin e, or a part icular
Handset /Group I D (eithe r one; not s imulta neousl y) can be
assigne d to have bo th incom ing and ou tgoing c all priv ileges
on that lin e. See AA Conf igurat ion by Admi nistra tor.
d. Up to 128 se conds cu stomiz able mai n greeti ng messa ge.
e. Defaul t of 4 lines AA is O FF.
22
Page 23

Base Illustration
2. Option al Outdo or Antenna Kit with cable
Administrator Features
Handsets 10 and 11 are designated administrators. Both have the same
authori ty to perf orm base s tation a dminis trativ e functi ons from their
handset menu sele ctions . No passw ord is req uired.
1. Suppor ts both DT MF and Pulse dialing (For DuraFon PRO only)
a. From an ad minist rator ha ndset (H andset 1 0 or 11 ), pr ess
9 1 1
dialing mod e.
b. Defaul t is Tone dialing.
2. Adm inistrator programmable Flash key timing (For DuraFon P RO
only)
a. From an ad minist rator ha ndset (H andset 1 0 or 11), p ress
9 1 2 to selec t flash ke y timing.
b. 9-leve l (100 ms - 90 0 ms) timi ng selec tions, d efault = 600 ms.
c. The default value (600 ms) works in most areas. Chan ging thi s
setting m ay resul t in Flash f unctio n not work ing. Change only when
you are cer tain the n ew value w ill work .
enter bas e ID(00 – 07 ) to select Tone or Pulse
MENU
MENU
3. Call Tran sfer to PB X Extens ion(Fo r DuraFon PRO only)
a. When the D uraFon P RO is inst alled be hind a PBX s ystem, you can
pre-pro gram the f eature c ode of cal l transf er function.
b. The Flash time is set at 600ms, by default, an d may be cha nged to
match PBX s etting s.
Re:If loo sing adm inistr ator han dsets (h andset 1 0 and 11) , all sett ings
must be res et (rese t the base a nd re-re gister all handsets).
23
Page 24

Charger Illustration
Charger Features
Spare Battery
Charging Slot
Spare Battery
Charging Indicator
Handset Charging
Slot
DC IN
24
Page 25

Charger Features
1. DC In
Connect s to Charg er AC Adapto r.
2. Handse t Chargi ng Slot
a. Charge h andset b attery w hen hand set is pla ced in cra dle.
b. Refer to t he hands et LCD for c hargin g status.
i. Chargi ng: LCD sc reen sho wed “Cha rging”.
ii. Fully C harged : batter y status b ar stand s still and the LCD screen
would display “Fully Charged”.
iii. Char ge Fail: S hould an e rror occ ur durin g chargi ng mode, t he
LCD screen would display “Charge Fail”.
3. Spare Ba ttery Ch arging S lot
a. Charge s pare bat tery whe n batter y is place d in slot.
B. LED as the s pare bat tery cha rging in dicato r.
i. Slot is em pty and th e power is o n: LED is Gr een ligh t.
ii. Charg ing: LED i s Orange l ight.
iii. Full y Charge d: LED ret urns to Gr een ligh t.
4. It is impo ssible t o overch arge the b attery using this charger.
5. The AC adapter can be used as a travel charger and plugged directly
into the ha ndset’s DC port (located next to the headset port).
However, y ou can not t urn off the power while charging with
the trave l charge r. A Warni ng message: “Unplug Travel Charger then
OFF” will b e shown on t he LCD dis play.
Notes:
1. Fully ch arge bat tery pac ks befor e first us e.
2. Both han dset and s pare bat teries c an be char ged at the s ame time .
3. Handse t will be “p ower on” a utomat ically w hen plac ing on the
chargin g slot.
4. Howeve r, if you run d own the ba ttery, it will take around one
minute fo r handse t to auto po wer on.
5. Removi ng a ringi ng hands et from th e chargi ng cradl e will aut o
answer th e call.
25
Page 26

Getting Started
Base Station Installation
For best pe rforma nce, mai ntain a di stance o f at least 1 m eter (ab out 3
feet) bet ween the b ase stat ion and ot her elec tronic d evices ( e.g., TV,
compute r, stereo , fax mach ine, ans wer mach ine, cor dless ph one, etc .).
1. Instal l base sta tion ant enna.
The base st ation' s antenn a port has a r everse -threa d connec tor; to
install a ntenna o r cable, t urn coun ter-cl ockwis e; to remo ve, turn
clockwi se. Impr oper ins tallat ion may da mage the c onnect or.
2. Plug the t ransfo rmer end o f the base s tation AC /DC adap tor into a
standar d AC electr ical pow er outle t, plug th e other en d into the “ DC In”
jack on the b ack of the b ase stat ion.
a. The base adaptor's DC plug is larger in dimension than the charger's
DC plug. The charger adaptor's DC plug will not fit into the base 's
DC In jack.
b. The base s tation 's power s upply (D C Adaptor ) and tele phone li ne
should be p lugged i nto a surg e protec tor with p hone lin e protec tion.
3. Plug one e nd of the ph one cord i nto one of t he 4 phone j acks mar ked L1
~ L4 and plug t he other e nd into th e teleph one outl et. Sinc e DuraFo n
PRO has the b uilt-i n “line de tectio n” featu re, it is ok ay to plug in the
phone jac ks in rand om order.
4. Connec t an exter nal tele phone an swerin g device b y follow ing the
instruc tions th at come wi th the ans wering d evice. An e xempla ry
configu ration : instal l the exte rnal ans wering d evice in -betwe en the
wall phon e jack(s ) and the Ba se Stati on. Eith er a multi ple of sin gle line answ ering de vices or a m ultipl e-line a nsweri ng devic e can be
used.
26
Page 27

Getting Started
5. To use the Music/Message-On-Hold feature: Connect one end of a
standar d audio ca ble into a r adio or au dio play er, and plu g the othe r
(3.5 mm) en d into the M OH jack on b ack of the b ase.
Notes:
Recomme nded pho ne line fe atures f rom the lo cal phon e compan y:
Multipl e phone li nes hunt grou p” is a usef ul featu re and wor ks well
with this p hone sys tem. This feature “ties” multi ple phon e lines to a
single ph one numb er. When an o utside c aller ca lls this c ommon
phone num ber, the ph one comp any auto matica lly find s a free lin e.
In a hunt gro up, the Ca ll Waiting and the Caller ID with Call Waiting
(or calle d Type II Caller ID) features are unnecessary because a 2
call will come in on a se parate l ine, rat her than o n the same l ine. For
nd
a 2 call comi ng in on a sep arate li ne, the ph one syst em's bui lt-in
Call Waiting feature will alert the user and allow the user to toggle
between 2 l ines.
Multi-b ase setu ps:
EnGeniu s DuraFo n PRO has th e capabi lity to ex pand the c overag e or
capacit y.
Re: For bes t perfor mance, m aintai n a distan ce of at lea st 10 mete rs
(about 30 f eet) bet ween any t wo base st ations .
* Expandi ng cover age :
Paralle l connec ts all L1/ L2/L3/ L4 in each b ase as bel ow schem atic
(up to 8 base s), the us e covera ge will be s everal t imes inc reased .
“
nd
Note: Telephone calls cannot be handed off b etween b ase unit s.
Legacy
PBX
1234 1234 1234
Base-1 Base-2 Base-3
27
Page 28

Getting Started
Re : when a cal l is comin g in from L1 , any hand set can pi ck up the
call, as lo ng as the ha ndset ar e in the cov erage of base1~3.
1. Handse t Regist ration .
a. Press but ton on Bas e “00” (de fault) , four LEDs will light up in
setting m ode.
b. Handse t operat ion: Pre ss (It will co mplete t he
registr ation pr ocess).
c. Repeat , as neede d, to add ha ndsets.
Note: Addi tional h andset s should b e added to t he syste m before
REG
MENU 6 1
adding additional base units.
2. Establ ishing a dditio nal Base U nits:
a. Press but ton on new B ase.
REG
10
Sel ect Mod e
1.A dd Base
b. Use Hand set 10 or 11 to add base :
Press .
MENU 8 1
c. Enter 01~ 07 (Base I D).
d. Repeat , as neede d, to add ba se units.
Notes:
10
Add ed Base
Num ber: **
CANCEL
1. Only Han dset 10, 11 can assign Base ID.
2. Base ”00 ” is a prima ry base. Al l handse ts must re gister o nly on
Base “00” .
*Expanding capa city:
User capa city can b e
increas ed by addi ng
Legacy
PBX
additio nal base u nits.
Up to 8 base un its can
be suppor ted.
1234
Base-1 Base-2 Base-3
1234
1234
28
Page 29

Getting Started
Re : Handse ts can ans wer call s from any p ort or lin e, unles s port is
dedicat ed to a spec ific han dset or gr oup.
1. Handse t Regist ration .
a. Press but ton on Bas e “00” (de fault) , four LEDs will light up in
setting m ode.
b. Handse t operat ion: Pre ss .
(It will co mplete t he regis tratio n proces s).
c. Repeat , as neede d, to add ha ndsets.
2. Establ ishing a dditio nal Base Units:
a. Press button on n ew Base.
b. Use Hand set 10 or 11 to Add base :
Press
c. Enter 01 ~07 (Bas e ID).
d. Repeat , as neede d, to add ba se units.
Notes:
1. Only Han dset 10, 11 can assign Base ID.
2. Base“0 0” is a prim ary base . All hands et must re gister o nly on Bas e
“00”.
3. To avoid interference, the interval between any two bases sh ould
be at least 1 0 meters ( about 30 f eet).
REG
REG
MENU 8 1 .
MENU 6 1
10
Sele ct M od e
1.Ad d Ba se
10
Adde d Ba se
Numb er : **
CANCEL
Handset and Charger Installation
1. Plug the t ransfo rmer end o f the Char ger AC/DC a daptor i nto a stan dard
AC electri c power ou tlet, pl ug the oth er end int o the “DC In ” jack on th e
back of the C harger.
2. Instal l batter y pack ont o the hand set.
3. Instal l handse t antenn a.
4. Place ha ndset on to the cha rger fro nt slot.
5. The phon e system i s now read y to perfo rm basic f unctio ns such as
making an d receiv ing phon e calls an d interc om calls . No base st ation
handset p rogram ming is ne eded for b asic ope ration s.
29
Page 30

Basic Operations
Operation Modes
Both the ba se stati on and han dset hav e levels o f operat ion at whi ch time
only cert ain proc edures o f functi ons can be p erform ed.
Re: The main differenc e betwee n DuraFo n PRO and DuraWalkie is the
handset o f DuraFo n PRO has th e capabi lity to ma ke telep hone cal ls,
and the han dset of Du raWalkie does not.
A. Base Ope ration M odes
1. IDLE mod e- this is t he defau lt mode. The “Intercom”, “Broa dcast” , and
“Volume ke ys” are ac tive in ID LE mode.
2. TALK mode- the base operates in this mode during a phone call,
interco m use, and b roadca st opera tion. The “In Use” , “Inte rcom”, a nd
“Broadc ast” LED w ill ligh t up respe ctivel y.
3. REGIST RATION mode- the base enters this m ode by pre ssing th e
button fo r three se conds. There are no active base unit keys on ce this
mode has be en enter ed. Four L EDs will l ight up in R egistr ation mo de.
B. Handse t Operat ion Mode s
1. IDLE mod e- this is t he defau lt mode.
a. If there i s no on-go ing acti vity, the hands et autom atical ly goes in to
SLEEP/I DLE mode t o save bat tery pow er.
b. The hand set can be t urned off completely by holding down the
key for 3 sec onds.
c. The idle s creen di splay (c ustom na me) can be e dited.
d. The 2-di git numb er repre sents th e handse t ID.
REG
END
2. Menu mod e
a. Press th e (Right s oftkey ) functi on key to ac tivate MENU mode.
b. In MENU mo de, the ha ndset se ttings a nd infor mation c ontain ed in
memory ca n be chang ed.
c. The functions available through the MENU selection are covered i n
greater d etail fr om page 53 .
d. The MENU structure display as below:
30
Page 31

Basic Operations
6. Chargi ng cradl e may be wal l mounte d, but an “ L” b racket s hould be
used for su pport un der the cr adle to av oid brea king mou nting sl ots.
An “L” brack et is not in cluded , but can be p urchas ed from a lo cal home
center.
Note:
1. The handset packaged along with a Base Station is pre-registered
at the fact ory. If you have a ne w handse t, you wil l need to re gister
the hands et with th e base sta tion in or der to be re cogniz ed as a
member ha ndset by t he base an d by other h andset s. See Han dset
Registr ation.
2. Fully ch arge bat tery pac ks befor e the firs t usage.
31
Page 32

DuraFon P RO
Basic Operations
Main menu
1.KeyGuard
2.PhoneBook
3.Call Logs
4.Sound
5.Settings
6.Registration
7.Unused
Sub-menu
1.Dialed
2.Received
3.Missed
1.Ring Volume
2.Ring Tone
3.Key Volume
4.Key Tone
1.Dial Prefix
2.Group Select
3.Base Select
4.Clear
5.Naming
6.Contrast
7.Backlight
8.Line Select
9.PBX Options
0.Language
#.PA On/Off
.Phone Reset
1.Register
2.Deregister
3. Remote REG
8.Multi-base
9.Admin
Select Mode:
1.Add Base
Admin:
1.System
2.Line Setting
3.Auto Attndnt
32
Page 33

DuraWalkie
Basic Operations
Main menu
1.KeyGuard
2.PhoneBook
3.Unused
4.Sound
5.Settings
6.Registration
7.Unused
Sub-menu
1.Ring Volume
2.Key Volume
3.Key Tone
1.Group Select
2.Clear
3.Naming
4.Contrast
5.Backlight
6.Language
#. PA On/Off
. Phone Reset
1.Register
2.Deregister
3.Remote REG
8.Multi-base
9.Admin
Select Mode:
1.Add Base
Admin:
1.System
2.Line Setting
3.Auto Attndnt
33
Page 34

Basic Operations
Making a Telephone Call (For DuraFon PRO only)
1. Press , wait for dial tone, and then enter phone number.
2. Altern ativel y, you can enter phone number first then press Key.
When usin g this met hod, you c an use the (Left) an d
(Right so ftkeys ) to edit th e number e ntered . “Delet e” erase s the last
digit ent ered. “C lear” er ases the e ntire li ne but rem ains in th e dialin g
mode.
3. Speed di al by acce ss the ent ries in th e phone bo ok.
a. Press or scrolling key to enter the phone book.
b. Press to dial the number.
4. To abort dia ling, pr ess key.
5. During t he call, p ress and h old the Key to act ivate the
speaker phone.
Notes:
1. After a li nk is esta blishe d, the Bas e ID will ap pear on th e upper right cor ner.
If no Base ID s hows up, i t implie s that you a re appro aching t he
boundar y of the cov erage.
2. If the lin e is occup ied, the L CD shows “ No Line Available” and
handset r eturns t o standb y mode.
3. If a link ca nnot be es tablis hed, the L CD will sh ow “No Con nectio n”
after a 12- second t ime out.
4. A call durat ion time r will sta rt displ aying th e length o f the call a fter
link is est ablish ed.
Making a 2-Way/ Intercom Call
TALK
TALK
END
TALK
CLEAR DELETE
TALK
The EnGen ius Indu strial C ordles s Phone Sy stem offers private,
Interco m/2-wa y radio ca lls inde penden t of the bas e statio n.
Interco m/2-wa y commun icatio n can be pla ced from h andset t o handse t.
Handset to Handse t Calls.
34
Page 35

Basic Operations
1. Press key follo wed by a two -digit h andset I D or Group I D.
2. Press key to end the c all.
3. During t he call, p ress and h old the K ey, the s peaker phone is
active.
Notes:
1. Interc om calls c an be made r egardl ess if the B ase Stat ion is
present .
2. If a Group I D is enter ed, the fi rst hand set (bel onging to that group)
that answ er will es tablis h a link wit h the call er. See Han dset
Group Sub script ion.
3. If a link ca nnot be es tablis hed, the L CD shows “ No Conne ction”
after a 12- second t ime out.
Making a Broadcast
1. Broadc asting a ll hands ets.
a. Press & ho ld key from on e handse t.
b. A series of be eps will i ndicat e initia tion of ha ndset br oadcas t to all
handset s within c ommuni cation c overag e.
c. Begin sp eaking a fter the s eries of b eeps has e nded.
d. Releas e key to end th e broadc asting.
2. Broadc asting a g roup of ha ndsets.
a. Enter th e Group ID a nd then pr ess & hold key .
b. A series of be eps will i ndicat e initia tion of ha ndset br oadcas t to all
handset s within c ommuni cation c overag e.
c. Begin sp eaking a fter the s eries of b eeps has e nded.
d. Releas e key to end th e broadc asting.
3. Broadc asting a n indivi dual han dset.
a. Enter th e Handse t ID and the n press & ho ld key.
b. A series of be eps will i ndicat e initia tion of ha ndset br oadcas t to all
handset s within c ommuni cation c overag e.
Re: When th e handse t is in use wi th a call or p ut a call on h old, it ca n’t
be enable d with bro adcast .
INTERCO M
END
BROADCA ST
BROADCA ST
BROADCA ST
TALK
BROADCA ST
BROADCA ST
35
Page 36

Basic Operations
Notes:
1. You need to continuo usly pre ss key when d oing
broadca st. The broadcast will be over once user release the key.
2. You ne ed to noti ce that there is no bi-bi-beep sound when
receivi ng a broad cast.
3. You ca n press th e (Left soft key) if yo u choose t o ignore
the call. The key opera tion is va lid only f or the cur rent
call. You can s ilent al l broadc ast by tur ning off the ringer to set
auto-si lence fr om the han dset men u.
Redial (For DuraFon PRO only)
SILENT
SILENT
BROADCA ST
1. Press (Left sof tkey).
2. The LCD shows the last phone number dialed. To dial thi s number,
press (Le ft softk ey).
3. Use Up or Do wn Arrow Ke y to scrol l throug h the last 1 0 phone nu mbers
dialed. S elect an d press key.
Note:
Interco m number s (Hands et ID) are n ot store d in the las t 10 numbe rs
dialed lo g.
Receiving a Telephone Call (For DuraFon PRO only)
1. When an in coming c all arri ves, the h andset w ill ring o r vibrat e unless
the ringe r has been t urned off.
2. If the han dset is on t he charg er cradl e (ringe r will be te mporar ily
switche d to “Ring ” if it has be en set to “Vibrate” ), lif t the hand set and
start the c onvers ation.
3. If the han dset is no t on the cra dle, pre ss any key ( except , and th e
SILENT
softk ey) to ans wer.
4. Duri ng the c all, p ress a nd hol d the Key, the speak erphon e is activ e.
Re:Dura Wal kie hand set can’ t receive a telephone call directly, but it c an
receive a t ransfe rred tel ephone c all from P RO hands et.
REDIAL
DIAL
DIAL
TALK
36
END
Page 37

Basic Operations
same tele phone ca ll to othe r DuraWalkie or
Also it can t ransfe r the
(Detail s refer to c all tran sfer)
PRO hands et.
Notes:
1. You can press (Lef t softke y) if you ch oose to ignore the
call.
Unlike tu rning off the ringer (from the handset menu), the
key opera tion is va lid only f or the cur rent cal l.
2. If Calle r ID servi ce is avai lable, t he LCD wil l displa y the inco ming
call info rmatio n. If the LC D shows “P rivate ” or “Unkn own” , the
caller' s inform ation ma y have bee n blocke d by the cal ler or the
origina ting pho ne compa ny.
Receiving an Intercom Call
1. When an in tercom c all arri ves, the h andset w ill ring o r vibrat e unless
the ringe r has been t urned off. Press ke y to answe r the inte rcom
call.
2. If the han dset is on t he charg er cradl e (ringe r will be te mporar ily
switche d to “Ring ” if it has be en set to “Vibrate” ), lif t the hand set and
start the c onvers ation.
3. If the han dset is no t on the cra dle, pre ss any key ( except and th e
SILENT
softkey ) to answe r.
4. During t he call, p ress and h old the K ey, the s peaker phone is
active.
SILENT
TALK
TALK
SILENT
END
Notes:
1. The LCD displays the caller's Handset ID.
2. You can press the if y ou choos e to ignor e the call . Unlike
turning o ff the ringer the key op eratio n is valid o nly for
the curre nt call.
SILENT
SILENT
37
Page 38

Ending a Call
Basic Operations
To end a telephone or intercom ca ll, pres s key or pla ce hands et into
chargin g cradle .
Adjusting Receiver (Earpiece) Voice Volume
1. Voice vol ume can on ly be adju sted dur ing a call .
2. There ar e 6 levels o f volume s electi ons. Def ault as vo lume 4. Us e
and scrol ling key to adjust.
3. The new se tting re mains effective for all future calls until changed
or handse t is power d own.
Placing a Call On Hold (For DuraFon PRO only)
1. For call s held at Du raFon PR O Base onl y
2. When a cal l is in prog ress, it c an be put on h old by pre ssing th e
(Right so ftkey) .
3. To return to the conversation, press .
Notes:
1. The call being placed on hold can only be removed from by
the hands et that pu ts it on hol d.
2. Handse t LCD disp lays a cal l is being o n hold. An al ert tone ( double
beep) eve ry 30 seco nds will r emind th e handse t that a cal l is being
on hold.
3. If the ope ration ( e.g., ca ll trans fer) after putting a call on-hold fails,
the held ca ll may be dr opped.
4. You ca n power off the ha ndset (e .g., cha nge batt ery) whi le call is
on hold.
5. After pow er on agai n, you can c ontinu e the call b y pressi ng
UNHOLD 3
(Le ft softk ey) or sel ect from the Opt ion menu t o
termina te the hol d state. You c an only un hold the c all when w ithin
END
HOLD
UNHOLD
HOLD
38
Page 39

Basic Operations
the cover age area o f the base . Once you 're out of the base
coverag e, you can r eturn to s tand-b y using “C lear hol d” function
in the “OPT ION” lis t item #3.
Mute
1. After a lin k is estab lished , you can pr ess (Left softkey) and
press to mute the handset microphone.
2. When mut e is activ e, the oth er party w ill not he ar your vo ice, but you
can still h ear the ot her part y.
3. To end the mut e, press (Lef t softke y) and pre ss to unmute
the hands et micro phone.
Re: If esta blishe d an inter com call , when end t he mute, p ress
(L eft softkey).
Do Not Disturb (Silent Ring)
1. Enter th e key sequ ence , then
select “O ff” . Press to confirm your choice. This will t urn off the
ringer un til it is tu rned on ag ain from t he menu.
2. For temp orary si lencin g the ring er when an i ncomin g call arr ives, pr ess
(Left softkey).
Key Guard
1. To prevent accidental dialing, you can press (Right softkey),
then pres s to select KeyGuard option. The handset keypad is
locked. N o key entr y is accep ted exce pt the pow er on/off key.
2. To unlock th e keypad , press (Lef t softke y) then wi thin 2
seconds , press th e digit to unlock.
3. Key Guar d is in effect until unlocked or powered off.
0
OPTION 0
UNMUTE
MENU Soun ds Ring Vol ume
SAVE
SILENT
1
UNLOCK
1
OPTION
MENU
To View Missed Call(s) (For DuraFon PRO only)
1. Whenev er you hav e missed i ncomin g call(s ), you can p ress
softkey t o enter th e call log s inform ation.
39
VIEW
Page 40

Basic Operations
2. You ne ed to subs cribe th e caller I D service from local telephone
company t o retrie ve this da ta.
To Call back from Call Log (For DuraFon PRO only)
1. When you r eview mi ssed inc oming ca ll(s), y ou can dir ectly ca ll back by
pressin g Key.
2. The displayed CID number in most cases will be a 10-digit number with
the 3-dig it area co de follo wed by the 7 -digit t elepho ne numbe r. If the
area code i s unnece ssary fo r callin g back, yo u can foll ow below r ule to
adjust th e callin g back num ber:
a. Press key once, t he 3-dig it area co de will be r emoved .
b. Press key twice , “1” will b e added in f ront of th e displa yed
number.
c. Press key three t imes, it w ill loop b ack orig inal dis played
number.
Re: The CID default is 10 digits, when press key, it will be
7-digit 11-dig it 10-di git in cir cle.
3. After th e displa yed numb er chose n, press t he key to call back.
Battery Recharge and Replacement
TALK
FORMAT
FORMAT
FORMAT
FORMAT
TALK
1. Charge t he batte ry when on e or sever al of the fo llowin g happen :
a. Phone be eps twic e every tw o second s.
b. Batter y icon is em pty.
c. Phone do es not res pond whe n a key is pre ssed.
d. LCD and ba ckligh ting bec ome dim.
e. A decrease i n covera ge is expe rience d.
2. You can replace the handset battery af ter plac ing the ca ll-in- progre ss
on hold.
3. Batter y talk tim e and stan dby time v ary depe nding on t he talk/ standby
pattern a nd the ope rating d istanc e. Retur ning the h andset b ack to the
chargin g cradle a s often as p ossibl e is recom mended f or best
perform ance. Us e only man ufactu rer prov ided battery and charger!
40
Page 41

Advanced Operations
Handset Registration
1. If your ha ndset is p urchas ed as part o f a system , it has been pre registe red with t he base st ation at t he facto ry.
2. If the Han dset ID re ads “00” , that mea ns it is a new h andset o r the ID
has been er ased. You need to regi ster the h andset w ith the ba se
station . In certa in situa tions, y ou may wan t to change a handset's ID.
For examp le, you wa nt to chan ge a parti cular ha ndset fr om a user to an
adminis trator ( ID 10 or 11), or vice versa. Or i n some rar e occasi ons,
you find an other ha ndset ha ving the s ame Hand set ID.
3. Regist ration :
a. Press -6 to ent er the reg istrat ion mode
b. Press an d hold the b ase's Re gistra tion button f or 2 secon ds
until the L 1, L2, L3, a nd L4 LED co me on.
c. Press ha ndset ke y , this completes the registration process.
The base station will assign a handset ID between 10 and 99. The
assigne d ID will be d isplay ed on the ha ndset LC D, indic ating
success ful regi strati on.
d. Repeat a bove ste ps for all a dditio nal hand sets.
e. The first two handsets registered will be given ID 1 0 and 11, which
gives the m admini strato r privil eges.
Re : Base “00 ” is a prima ry base. Al l handse ts must re gister to
Base “00” .
4. De-reg istrat ion:
a. You ca n de-reg ister a ha ndset from a base. De-registration will reset
the Hands et ID to 00, e rase the s ystem se curity code, and free up the
old ID for fu ture reg istrat ion.
b. After der egistr ation, t he hands et will no t be able to u se the bas e to
make or rec eive pho ne calls , nor can it u se the int ercom to reach
other han dsets.
c. Press ha ndset (Right s oftkey ).
d. Press th e handse t number k ey , this will enter the handset
registr ation me nu.
e. Press an d hold the b ase's button fo r 2 second s until L1 , L2, L3,
and L4 LED co me on.
MENU
REG
1
MENU
6
REG
41
Page 42

Advanced Operations
f. Press th e handse t number k ey , this completes the de-registratio n
process . Upon suc cessfu l de-reg istrat ion, the h andset w ill show ID “00”.
Notes:
1. The base has a 30 second registration timeout starting fro m
pressin g the but ton. The handset has a 12 second registration
timeout s tartin g from the t ime regi stration or de-registration option
has been se lected . The base and handset will automatically exit
registr ation mo de after t imeout .
2. Repeat r egistr ation or d e-regi strati on proce ss if unsu ccessf ul.
Advanced Registration
1. Advance d regist ration f unctio ns can be pe rforme d by admin istrat or
handset s (ID 10 and 11) only.
2. Admini strato r handse ts can per form adv anced re gistra tion fun ction
as long as it i s within r ange wit h the base s tation . The base stati on
does not ne ed to be in re gistra tion mod e.
3. De-reg ister a Ha ndset ID b y admini strato r:
a. Make sur e that the a dminis trator h andset i s within t he cover age
range of th e base sta tion.
b. Press ad minist rator ha ndset (Right sof tkey)
c. Press nu mber , this will enter the handset administration menu.
d. Press nu mber , handset enters system setting menu.
e. Press nu mber , and enter the two-digit Handset ID to be cleared.
f. Upon suc cessfu l operat ion, the h andset L CD will di splay “D one”,
otherwi se it will s how “Mes sage not r eceive d, try aga in”.
4. Obtain a S pecifi c Handse t ID:
a. If a parti cular Ha ndset ID i s prefer red over s equent ially as signed I D,
the admin istrat or can “te l” the bas e in advan ce what th e next ID
assignm ent shou ld be.
b. Press ad minist rator ha ndset (Right s oftkey ).
c. Press th e number , this will enter the handset administration menu.
d. Press nu mber , handset enters system setting menu.
e. Press nu mber , and enter the two-digit Handset ID to be assigned
next by the b ase.
f. Upon suc cessfu l operat ion, the h andset L CD will di splay “D one” ,
otherwi se it will s how “Mes sage not r eceive d, try aga in”.
REG
9
1
2
9
1
5
2
MENU
MENU
.
42
Page 43

Advanced Operations
g. If the han dset ID is a lready i n use by ano ther han dset, th e
adminis trator w ill be ale rted. In t hat case , the admi nistrator can
choose an other ID o r asks the h andset h aving th e desire d ID to
vacate by d e-regi sterin g with the b ase.
h. Perfor m regist ration i mmedia tely aft erward f or the han dset desiring
a specifi c ID to ensu re that th e ID is not ta ken by another handset.
5. Remote ly regis ter Hand set:
a. If base in stall in c eil or hig her loca tion, ad minist rator ha ndsets c an
perform r emote re gistra tion.
b. Press ad minist rator ha ndset (Right s oftkey ).
c. Press th e number , t his will e nter reg istrat ion mode .
d. Press th e number , t his will r eplace t he proce dures to p ress & hol d
the base button un til the L1 , L2, L3 and L 4 LED come o n.
e. Procee ding the h andset r egistr ation pr ocess fo r new hand sets.
Notes:
1. De-reg istrat ion by the a dminis trator w ill disa ble a hand set's ab ility
to use the ba se stati on to make o r receiv e phone ca lls. This also
frees up th e ID for fut ure regi strati on.
2. Handse ts de-re gister ed by the ad minist rator ca n still pe rform
interco m to other h andset s.
REG
6
3
MENU
Handset Group Subscription
1. Up to seve n handse t groups ( 01-07) c an be defi ned and ha ndsets c an
decide wh ich grou p(s) the y want to be i n.
2. For exam ple, Gro up 1 repre sents th e Custom er Servi ce Group , Group
2 represe nts the Sa les Grou p, and Gro up 3 is the Ma rketin g Group.
Suppose t hat Hand set 11 wants to receive incoming rings for all Sales
and Marke ting rel ated cal ls. Then handset 11 will need to “subscribe”
to Group 2 an d Group 3.
43
Page 44

Advanced Operations
3. Group Se lectio ns:
a. Press ha ndset to enter the handset setting menu
b. Press nu mber , handset enters group select menu.
c. Press softkey a nd enter t wo-dig it group n umber (0 1~07) to
add membe rship in a g roup.
d. Repeat f or all des ired gro ups.
e. Delete g roup sel ection s by press ing (Right s oftkey ) and
enter gro up numbe r.
Notes:
1. The handset can change group affiliations at any time.
2. The base (administrator) is not responsible for group assignments.
Consequ ently, it cannot unsubscribe a handset from a group .
Call Transfer (For DuraFon PRO only)
1. While a te lephon e call is in p rogres s, you can p lace it on h old and
transfe r the call .
2. Press softkey to put call on hold.
3. Press softk ey to ente r featur e list for s electi on.
4. Press nu mber and enter a two-digit Handset ID to call another
handset e xtensi on.
a. Un-ann ounced C all Trans fer:
Press bef ore the de stinat ion hand set answ ers, the c all is
automat ically t ransfe rred to th e destin ation ha ndset.
b. Announc ed Call Tra nsfer:
(1) Speak t o the dest inatio n handse t.
(2) Press softk ey or the to end annou ncemen t. The call
is transf erred to t he desti nation handset.
ADD
HOLD
OPTION
END
MENU 5
2
DELETE
2
XFER END
Notes:
1. If the des tinati on hands et does no t answer a fter han dset pag ing
timeout , the call i s routed b ack to the o rigina ting han dset.
2. Above des cribed “ Call Tran sfer” is f or DuraF on PRO han dset-t o handset c all tran sfers.
44
Page 45

Advanced Operations
3-Way Conferencing (For DuraFon PRO)
1. While a te lephon e call is in p rogres s, you can p lace cal l on hold an d
bring in an other ph one line o r anothe r handse t for a 3-wa y confer ence.
2. Press (Right softkey) to put the current call on ho ld.
3. Press (Righ t softke y) to ente r select ion menu .
4. 3-Way Confe rencing with a Second Handset:
a. Press nu mber and enter a two-digit Handset ID to call another
handset e xtensi on.
b. After th e second h andset a nswers , press th e Left softkey).
c. Two hands ets and on e phone li ne can now t alk simu ltaneo usly.
Any one part y can drop o ut of the 3- way conf erenci ng, leav ing the
remaini ng two par ties sti ll conne cted.
5. 3-Way Confe rencing with a Second Phone Line:
a. Press nu mber and enter a phone number to call another phone
line.
b. After the s econd li ne answe rs, pres s the (Left so ftkey) .
c. One hand set and tw o phone li nes can no w talk sim ultane ously.
i. If one pho ne line ha ngs up, th e handse t contin ues talking to the
remaini ng phone l ine.
ii. If the ha ndset pr esses key, the 2nd pho ne line wi ll be
dropped .
The handset and the first phone lin e contin ue conve rsatio n.
HOLD
OPTION
2
CONF
1
CONF
END
(
Notes:
1. 3-way co nferen cing bet ween 3 han dsets is n ot suppo rted.
2. Unlike 3 -way con ferenc ing prov ided by th e phone co mpany, 3-way
confere ncing in volvin g 2 phone li nes will t ake up two p hysica l lines,
leaving o nly two li nes left a vailab le for oth er hands ets.
The handset must have access to a second line.
Base Select (For DuraFon PRO only)
1. A handset can manual ly selec t the desi red base s tation b efore ac cess
outboun d line.
2. Press ha ndset (Right s oftkey ).
3. Press th e number , this will enter the handset setting menu.
MENU
5
45
Page 46

Advanced Operations
4. Press nu mber , handset enters Base Select setting mode.
5. Use or arr ow to scro ll up and do wn the selection (On/Off)
6. Make a sel ection ( defaul t =off), and press (Le ft softkey).
Re: When tu rns on the B ase Sele ct, you mu st enter 2 -digit Base
ID after pr ess the key.
Notes:
1. Becaus e this set ting all ows hand set manu ally sel ect the ba se
station , the hand set must b e in range w ith the desired base station.
Call Waiting (For DuraFon PRO only)
1. A handset, while ta lking on o ne phone l ine, can b e inform ed of the
arrival o f a new inco ming pho ne call.
2. For exam ple, sup pose tha t Handse t 15 is talk ing on Lin e 1. When a
new call co mes in on Li ne 4 and the c aller en ters ext ension n umber
*15* when p rompte d by the AA, or i f the call i s set to be ro uted to
Handset 1 5 when AA is dis abled.
. The base station recognizes that Handset
3
15 is busy. Instead of announcing to Line 4 that Handset 15 is busy, the
base send s an alert t o Handse t 15.
. Upon rece iving th e alert, t he hands et sound s an audib le doubl e beep
4
alert and L CD displ ays “New c all on Lin e 4”.
. Handset 1 5 can:
5
a. Ignore t he new cal l; conti nue talk ing to Lin e 1.
b. Press key to swi tch to Lin e 4.
c. Subseq uent pre ssing of key will t oggle be tween Li ne 1 and
Line 4.
d. Press key while talki ng to a line w ill term inate th at parti cular
call and au tomati cally sw itch bac k to talki ng to the remaining line.
Switch
END
3
SAVE
TALK
FLASH
Notes:
1. This built-in call waiting is separate from the Call Wa iting fe ature
availab le from th e local ph one comp any. The phone company
provide d Call Waiting functions on the same phone line, while the
DuraFon C all Waiting
2. This feature only works for 2 lines, if a 3 phone call comes for the
same hand set, the c all will n ot be rout ed to the ha ndset.
functio ns on two se parate p hone lin es.
rd
46
Page 47

Advanced Operations
3. It is reco mmende d to order f rom the lo cal phon e compan y Hunt
Group fea ture for a ll your li nes and no t subscr ibe to the Call Waiting
feature .
Auto-Attendant (AA)
1. When ena bled by th e admini strato r, an autom ated att endant w ould
greet a tel ephone l ine inco ming cal l.
2. The caller will be prompted by the greeting message to enter a two-digit
extensi on numbe r (Hands et ID) or pr ess for operator.
3. The greeting message is user programmable. The Handset ID that is
designa ted as the o perato r is also us er progr ammabl e.
i. Defaul t greeti ng messa ge (Main O GM): “Pl ease enter the extension
number or p ress for t he opera tor”.
ii. Defau lt opera tor: Han dset 10.
4. AA will ask fo r anothe r handse t ID if the fi rst entr y is inval id (no
registe red hand set with t hat ID) wi th the ann ouncem ent (OGM2): “The
extensi on you ent ered is in valid, p lease tr y anothe r extens ion or pre ss
0
for the operator”.
5. If there i s no entry t ime out, AA wi ll annou nce (OGM 3): “Ple ase hold ,
your call i s being tr ansfer red to the o perato r”. And aut omatic ally rin g
the opera tor hand set.
6. If the des tinati on hands et does no t answer ( busy, power off, or out of
range) af ter hand set pagi ng time ou t, the AA prom pts the ca ller for
another e xtensi on numbe r by annou ncing (O GM5): “T he exten sion
you’ve en tered is b usy or not a vailab le. Plea se enter a nother e xtensi on
number or p ress for the operator”.
7. If the 2 try is stil l not succ essful , AA will anno unce (OG M4): “So rry,
nobody ca n answer y our call r ight now. P lease tr y again la ter, good by”.
Then drops the call.
8. When the D URAFON P RO base st ation is c onnect ed to wire d PBX
extensi on lines , calls ad dresse d/rout ed to the AA ope rator ca n be sent
back to the o perato r of the wir ed PBX sys tem. From an administrator
handset , up to 10 key s/digi ts are all owed to pr ogram a sp ecific c ode in
order to tr ansfer t he calls b ack to the w ired PBX . This f eature c an only
be enable d and pre- progra mmed by an a dminis trator h andset ( Handse t
ID 10 or 11). Consult with the wired PBX manual for operat ion inst ructio ns
and corre ct key seq uence fo r transf er calls t o the oper ator from an
extensi on.
0
0
nd
0
47
Page 48

Advanced Operations
Notes:
1. Interc om calls a re not rou ted by Auto -Atten dant.
2. Routin g messag es OGM2, 3,4 and 5 ar e not user p rogram mable.
3. The timeout is 5 seconds for entering extension number.
4. The calls can be routed to either a Handset ID or an extension
number of t he wired P BX syste m, There can be only one operator
for the AA, wh ich is eit her an DUR AFON PRO h andset o r the wire d
PBX opera tor.
5. Call rou ting is at m ost 2 hops . That is, if both the 1 and th 2
handsets do not ans wer, the ca ll will be t ermina ted if the o perato r
st
does not an swer.
AA Configuration by Administrator
1. Administrator c an chang e the foll owing AA set tings:
a. Record /playb ack new ma in greet ing mess age.
b. Set numb er of ring s before AA pi cks up a cal l.
c. Turn on/o ff the AA line-by-line.
d. Set Desi gnated H andset I D for AA disab led line (s). Eit her the
Designa ted Hand set ID or th e Group ID c an use tha t particular line
for incom ing and ou tgoing c alls. Wh ich mean s this spe cific li ne(s)
will be ded icated t o a partic ular han dset (Ha ndset ID 1 0-99) or a
calling g roup (Gr oup ID 01- 07).
e. Design ate an ope rator, th e handse t which wo uld answ er un-ro utable
calls or wh en the cal ler choo ses “Ope rator” w hen prom pted.
nd
Change AA Parameters:
a. From an ad minist rator ha ndset (H andset 1 0 or 11), press
Menu
(Right so ftkey) .
b. Press nu mber , thi s will ent er admin istrat ion menu .
c. Press , handset enters AA setting menu.
3
i. Press and follow instruction to record new greeting mess age.
ii. Press to playback the current greeting message.
iii. Pres s to set number of rings before the AA picks up a call. Use
9
1
2
3
Up/Down a rrow to ch oose bet ween 2 and 9 r ings.
48
Page 49

Advanced Operations
iv. Press to turn AA On/Off. This can b e done sep aratel y for each
phone lin e by using U p/Down a rrows to s croll th rough Li ne 1 to
Line 4, and p ress or softkey to turn AA On/Off.If turning
off the AA may be useful when:
The line is not used by a group of people .
Externa l answer ing mach ine is to be a ttacked to the line.
v. Press a nd selec t from the following two options to set Operator
for AA:
“Handse t” : assig n a specif ic handset as operator by entering a
two-dig it hands et ID (default=Handset 10) as operator for all
calls add ressed t o the oper ator when AA is on, or
“PBX” : tra nsfer calls to be answered by the operator back to the
designa ted wire d PBX oper ator. Sys tem administrators must
know the pr oper pro grammi ng and “ca ll transfer” feature code
(availa ble from t he user ma nual of the wired PBX system) in
order to pe rform th is function correctly.
The following example is the inst ructio n to route a c all back t o
the brand N ’s PBX system by p ressin g “Flash -7-0-1 -8-3-0 ”,
where a Fla sh key is pr essed followed by the call transfer code
“70”, the n enter th e extension number “1830” immediately.
Confirm t he set up by p ress using t he (Left s oftkey ).
Notes:
1. Only adm inistr ator can c hange AA set tings.
2. Becaus e AA setting i s stored o n the base s tation , the hand set must
be in range w ith the ba se to make c hanges .
3. The maximum recording time for the greeting message is 128
seconds .
4. Allowing each line’s AA to be turned on or off sep aratel y is usefu l if
different lines are used for different purposes.
5. When AA is disabled, the line can be dedicated to either an
individ ual Hand set ID or a Gr oup ID.
6. The operator can be any individual handset or a group; it doesn’t
need to be an a dminis trator h andset ( Handse ts 10 and 11).
7. The minimum number of rings before the AA picks up cannot be
lower tha n two for th e purpos e of recei ving the C aller ID m essage .
4
On Off
5
SAVE
49
Page 50

Advanced Operations
Line Dedication
1. Line ded icatio n functi on can be pe rforme d by admin istrat or hands ets
(ID 10 and 11) only.
2. By defaul t all inco ming cal ls will ri ng all han dsets .
3. With the a dminis trativ e handse t, press for
Line Dedi cation s etting .
4. It will fi rst show L ine 1 and st atus. If y ou wish to d edicate line 1 to a
specifi c handse t or group , you need t o press . To dedicate lines 2-4
use or scrolling key on the keypad.
5. After cho osing a li ne, it wil l show and , when choo sing
YES
, you need to e nter the h andset I D or group I D for exte nsion
number. If y ou choos e , it will go back to Line setting menu.
Notes:
1. When ent ering Li ne Dedic ation se tting, i t will sho w line and s tatus.
If line is al ready de dicate d to a speci fic hand set or gro up, it will
show the ha ndset or g roup ID be hind the l ine. If li ne isn't d edicated
to a specif ic hands et yet, it w ill show “ ALL HS” behind the line.
2. When set ting Lin e Dedica tion, ma ke sure th e handse t or group I D
is correc t to avoid l osing ca lls sent s to an Dura Wakie handset or
invalid I D.
3. Handsets dedicated to a port will also receive calls fr om non dedicat ed line as w ell as the h andset ’s dedicated line. Use Line
Dedicat ion for a gr oup on oth er lines t o furthe r manage c alls.
Outbound Line Selection (For DuraFon PRO only)
NO
YES NO
MENU 9 2 2
OK
1. Press whil e the phon e is in stan dby to ent er Line
Select me nu.
2. Use or to switch between On and Off, d efault = O ff.
3. If set to On , when pre ssing o r entering a phone number followed
by pressi ng Key, the ha ndset LC D displa y will sho w “Selec t Line”
followe d by avail able lin es (1~4) . Select f rom one of t he avail able lin es
i.e. pres s to select line 1 and press to select line 2.
4. This feature is also supported when selecting a second line during call
confere ncing.
MENU 5 8
TALK
TALK
1 2
50
Page 51

Advanced Operations
Change System and Line Settings by Administrator
1. There ar e two syst em param eters th at can be ch anged by t he
adminis trator : clear (d e-regi ster) ha ndset ID a nd set the next handset
ID to be assi gned by th e base.
2. From an ad minist rator ha ndset (H andset 1 0 or 11), press
(Right so ftkey) .
3. Press nu mber , this will enter the administration menu.
4. Press nu mber , handset enters System setting menu.
a. Dial ton e:
Press to set up the dial tone to be either “Tone” or “Pulse” . Press
1 2
to choose “Tone” or press to ch oose “Pu lse”.
b. Flash ti me:
Press to set up the flash time from 100ms, 200ms, to 900m s (9
levels to c hoose fr om.) For e xample , press if the desired flash
time is 200 ms. Defa ult flas h is 600ms .
c. Line Det ect:
Press to set up the line detect to be either “On” or “Off” Press
to choose “ On” or pre ss to choose “OFF”. Default is ON .
d. Clear Ha ndset ID :
Press and enter a two-digit Handset ID when prompted to clear
this ID for l ater ass ignmen t.
e. Set next H andset I D to be assi gned:
Press and enter a two-digit Handset ID when prompted. This is
the ID that w ill be giv en out by th e base to th e next han dset
registe ring wit h the base .
5. Press nu mber , handset enters Line Setting menu.
a. Ente r Base ID( 00~07) t o access b ase.
b. Press to enter Broadcast setting.
i. Press or to select L3 or L4 (the status of setting will be
display ed on LCD)
ii. Press to enter th e settin g mode, an d the base I D will be
display ed on LCD.
iii. Pres s (Le ft softkey) to enable the broadcast function. Press
(Right s oftkey ) to disab le the broadcast function.
1
2
3
4
5
1
OFF
9
1
2
2
2
CHANGE
ON
MENU
1
51
Page 52

Advanced Operations
iv. After setting broadcast, press (Le ft softk ey) to ena ble the AA.
Press (Ri ght soft key) to di sable th e AA.
OFF
Re: L3 and L4 c an be sett ing as two b roadca st lines , repeat ed
above ite ms for set ting 2 broadcast line.
c. Press to enter Line dedication setting.
2
i. Select b ase's li ne and pre ss hands et (Right softkey).
ON
nd
OK
ii. Line De dicate c onfirm :
Press (Rig ht softk ey) to go back Line Setting Menu.
Press (Left softkey) then enter extens ion numb er.
NO
YES
Notes:
1. De-reg istrat ion by the a dminis trator w ill disa ble a hand set's ab ility
to use the ba se stati on to make o r receiv e phone ca lls. This also
frees up th e ID for fut ure regi strati on.
Phonebook Operations
1. You can store up to 90 entries in th e phoneb ook. Eac h entry ca n
contain a p hone num ber or han dset ID (u p to 28 digi ts) and a na me
(up to 14 cha racter s).
Re: For Dur aWalkie, each entry can store 2 digits handset ID or Group
ID.
2. To access ph oneboo k, press follo wed by or or
MENU 2
scrolli ng key whe n handse t in stand by mode.
3. To add a new entry:
a. Press softkey.
b. Enter a ph one numb er when LC D prompt s “Numbe r?” Use
softkey t o delete t he last di git ente red. Press when
ADD
DELETE
SAVE
complet ed.
c. You wi ll then be p rompte d to enter a name for the phone number just
entered .
(1) Press softkey t o enter a ph one numb er witho ut a name.
SAVE
All record s withou t a name wil l be place d on top of th e list, in the
order the y are ente red.
(2) To enter the name, press the corresponding keypad number one
or more tim es accor ding to th e order of the character on the key.
(3) Use softkey to delete the last character entered. When
complet ed, pres s softke y to confi rm your se lectio n.
DELETE
SAVE
52
Page 53

Advanced Operations
Notes:
1. When ent ering a ph one numb er, the cur sor auto matica lly adva nces
to the next d igit fie ld. Use or scrolling key to move the
cursor ba ckward o r forwar d to inser t or delet e.
2. When ent ering a na me, the cu rsor aut omatic ally adv ances to t he
next char acter fi eld if you p ress a differe nt key for t he next
charact er. If you ne ed to ente r consec utive ch aracte rs from the
same key, you can wait for the cursor to a dvance o r use or
scrolli ng key to mo ve the cur sor back ward or fo rward ma nually.
Also use or to move the cursor to insert or delete.
3. By defau lt, all le tters ar e entere d in the upp er case. U se the key
to toggle b etween u pper and l ower cas es.
4. A “Pause” en try repr esents a 2 .8 secon d delay in d ialing t he
followi ng digit s, which i s useful w hen call ing a sequ ence of
segment ed numbe rs (e.g. , access c ode, cre dit card number, auto attenda nt entri es, etc. ) Pause is e ntered b y pressing the * key
twice (LC D displa ys P).
Enterin g pause tw ice (PP) w ill resu lt in 5.6 se conds pa use in the
dialing .
4. The entries are alphabetically sorted and stored as a list in an
ascendi ng order ( A to Z) from th e top of the l ist.
a. If the pho nebook i s entere d from the m enu, the f irst entry displayed
is from the t op of the li st.
b. If the pho nebook i s entere d using th e arrow, th e first entry
display ed is from t he top of th e list.
c. If the pho nebook i s entere d using th e arrow, the first entry
display ed is from t he botto m of the lis t.
5. The first line of LCD display shows name and the 2 line s hows the
nd
phone num ber. If the p hone num ber is lon ger than 1 4 digits , press
OPTION
soft key and se lect Opt ion 3 to vie w the comp lete number.
6. To search for a record:
a. Use or scrolling key to enter the Phone Book mode.
b. Press a ke y that cor respon ds to the fi rst character of the name you
are looki ng for.
53
Page 54

Advanced Operations
c. For exam ple, you a re looki ng for “En Genius ”, and the n press th e
number onc e.
d. Use or scr olling k ey to loca te the exact record you are
looking f or .
7. To erase phonebook entry:
a. Use or scrolling key or the alphabetical search method to
located the record to be erased.
b. Press softkey to enter editing menu.
c. Press to erase the designated phone entry.
d. LCD shown “Are you sure?” Press Yes to double confirm your change.
8. To edit phonebook entry:
a. Use or scr olling k ey or the alphabetical search method to
locate th e record t o be edite d.
b. Press softke y to enter e diting m enu.
c. Press t o edit the d esigna ted phon e entry.
9. Dial fro m displa y:
a. Press or Inter com to dial the phone number or Handset ID
display ed.
3
OPTION
1
OPTION
2
TALK
10. To transf er (clon ing) pho nebook :
To transfer p honebo ok, both p arties h ave to ent er the pho nebook
transfe r mode fir stly by fo llowin g below:
a. Press follo w by or or scrolli ng key whe n
handset i n phoneb ook mode .
b. For phon e sendin g party, press to enter sending mode.
i. Either p ress (Left sof tkey) to t ransfe r all phon ebook
entries t o anothe r handse t(s).
ii. Or pres s (Right softkey) to transfer one entry to another
handset (s).
iii. Pres s 2-digi t handse t ID or grou p ID, then s elect all phoneb ook
entries o r one entr y to be tran sferred.
Re : “00” mea ns all han dsets
iv. During phonebook transferring, LCD shows “Sending” and 2 digit cou ntdown o n the LCD to i ndicat e the phon ebook nu mbers
which are w aiting f or sendi ng.
OPTION 4
1
TX ALL
TX ONE
54
Page 55

Advanced Operations
Key
2
4
7
9
*
2
Characters and Or ders
A B C 2
GHI4
PQRS7
WXYZ9
Space whe n in
charact er editi ng
# when in number
editing
c. For phon ebook re ceivin g party, press to enter receiving mode.
i. When ent ering th e receiv ing mode , LCD show s “Ready ”.
ii. Start t o receiv e phoneb ook, LCD s hows “Ge t phoneb ook from
Ext. # : xx” .
iii. A beep emitted whe n receiv ing each p honebo ok.
iv. When the phonebook receiving, 2-digit countdown on the LCD
to indica te the pho nebook n umbers w hich are w aiting f or
receivi ng.
Re: The phonebook transfer through the wireless interfa ce, it
may parti ally mis s transm ission b y interference.
Notes:
Charact er Table:
Key
1
3
5
8
0
#
Broadcast through PBX
Charact ers and Or ders
*' + , . ( ) & 1
DEF3
JKL5
TUV8
0
Toggle case when in
charact er editi ng
* P (Pause) when in
number ed iting
1. DuraFo n PRO and Du raWalkie both have the broadcast function, each
can broad cast ano ther han dset wit hout goi ng throu gh the bas e statio n,
as long as th e handse ts are con nectin g. Howev er, when se tting up t he
multi-b ase, the b roadca st featu re may not b e availa ble due to t he
coverag e range. I n that cas e, you can u se the fun ction of “ Broadcast
through P BX” to bro adcast .
2. From an ad minist rator ha ndset (H andset 1 0 or 11), press
(Right so ftkey) .
3. Press nu mber , this will enter administration menu.
9
55
MENU
Page 56

Advanced Operations
4. Press nu mber , handset enters Line setting menu.
2
a. Enter Ba se ID (00~ 07) to acc ess base .
b. Press to enter Broadcast setting.
1
i. Press or t o select L3 or L4 (the status of setting will be
display ed on LCD)
ii. Press to enter th e settin g mode, an d the base I D will be
CHANGE
display ed on LCD.
iii. Pres s (Left softkey) to enable the broadcast function. Press
(Right s oftkey ) to disable the broadcast function.
OFF
iv. After setting broadcast, pres s (Le ft softkey) to enable the AA.
Press (Ri ght soft key) to di sable th e AA.
Re: L3 and L4 c an be sett ing as two b roadca st lines , repeated
above ite ms for setting 2 br oadcas t line.
ON
ON
OFF
nd
5. When cal ling thr ough the l ine 3 or 4, th e caller w ill be pro mpt ed by th e
greetin g messag e to enter a t wo-dig it exten sion num ber ( “01” ~ “ 07”
for Group I D: “10” ~ “9 9” for Han dset ID: “ 00” for al l).
a. The greeting message: “Please enter the extension number” .
b. If there i s no entry a fter 5 sec onds, th e broadc ast will be enabled to
all hands ets.
Note:
1. Line 3 and o r 4 can be res erved fo r broadc ast func tion.
2. For a sing le broad cast por t; reser ve Line 3 fo r broadc ast and
line dedi cate (se e pg. 46) Li ne 4 to a non- existe nt hands et (ie:
99).
3. A base unit co nfigur ed with a si ngle bro adcast p ort Line s 1 and
2 may be used a s standa rd telep hone por ts or line s.
4. For dual b roadca st ports ; reserv e Line 3 and 4 f or broad cast and
line dedi cate Lin es 1 and 2 to a no n-exis tent han dset (ie : 99)
5. Broadc ast is lim ited to 30 s econds .
56
Page 57

Advanced Operations
Menu Operations
DuraFon P RO
Main menu
1.KeyGuard
2.PhoneBook
3.Call Logs
4.Sound
5.Settings
6.Registration
7.Unused
Sub-menu
1.Dialed
2.Received
3.Missed
1.Ring Volume
2.Ring Tone
3.Key Volume
4.Key Tone
1.Dial Prefix
2.Group Select
3.Base Select
4.Clear
5.Naming
6.Contrast
7.Backlight
8.Line Select
9.PBX Options
0.Language
#.PA On/Off
.Phone Reset
1.Register
2.Deregister
3.Remote REG
8.Multi-base
9.Admin
Select Mode:
1.Add Base
Admin:
1.System
2.Line Setting
3.Auto Attndnt
57
Page 58

Advanced Operations
1. Press (Ri ght softkey) while the phone is in standby.
2. Press to lock keypad (see Key Guard).
3. Press to view, search, erase, edit and transfer the phonebook
(see Phon ebook) .
4. Press to view the last 10 numbers called, received, or missed.
Records c an be eras ed or edit /save in to the pho nebook .
a. Press to view the last 10 phone numbers dialed, starting from the
most rece nt one. Us e or to scroll through the list.
i. Press (Righ t softke y) for options.
* Press and confirm to erase the current record.
* Press to edit and save or save without editing into the
phonebo ok.
* Press to view the complete number if the phone number is
longer th an 14 digi ts.
b. Press to view the last 10 phone numbers received, starting from
the most re cent one . Use or to scroll through the list.
i. Press (Righ t softke y) for opt ions.
* Press and confirm to erase current record.
* Press to view the arrival date and time of the call.
* Press to edit and save or save wit hout editing into the phoneb ook.
c. Press to view the last 10 phone numbers received but not
answere d, start ing from t he most re cent one . Use or to
scroll th rough th e list.
i. Press (Righ t softke y) for opt ions.
* Press and confirm to erase current record.
* Press to view the arrival date and time of the call.
* Press to edit and save or save without edi ting into the phonebook.
d. The two-digit index on the upper right corner of the LCD display
shows the l ocatio n in ascen ding ord er, with 01 b eing the m ost rece nt
call.
e. While vi ewing an y of the thr ee call lo gs, pres s (Lef t softke y) to
dial the ph one numb er.
MENU
1
2
3
1
OPTION
1
2
3
2
OPTION
1
2
3
3
OPTION
1
2
3
DIAL
Notes:
1. Only pho ne numbe rs are sto red in the t hree cal l logs. In tercom
calls are n ot recor ded.
58
Page 59

Advanced Operations
2. Caller I D servic e is requi red from y our loca l phone co mpany in
order to re ceive ph one numb ers, nam es and tim e stamps o n
incomin g calls. The Received and Missed Call Logs will register
no incomi ng calls i f Caller I D servic e is not ava ilable .
3. The Caller ID feature may not be supported by all PBX or Key
systems ’ analog ports, check with your equipment provider.
5. Press to set sound-related settings:
a. Press to select ringer volume: Use or to scr oll thro ugh 6
options : Low, Medi um, High , Vibrate, Vib and Ring, Off. P ress
(Left sof tkey) to s ave sele ction. D efault = High.
b. Press to select ringer tone: Use or to scrol l throug h 4
options : 0, 1, 2, and 3 . Press (Left softke y) to save s electi on.
Default = 0 .
c. Press to select key volume when a key is pressed: Use or
to scroll t hrough 3 o ptions : High, Low, and Off. Press
(Left sof tkey) to s ave sele ction. D efault = Low.
d. Press to select key tone: Use or to sc roll thr ough 4
options : 0, 1, 2, and 3 . Press (Left soft key) to sa ve selec tion.
Default = 0 .
6. Press to change handset settings:
a. Press to set dialing prefix:
i. Use or to scroll and select to turn on or off the di aling
prefix fe ature. D efault = Off.
ii. If “On” i s select ed, the ha ndset is prompted to enter a prefix, up to
14 digits .
iii. Use (Rig ht softk ey) and or to edit prefix.
iv. When this feature is tur ned on, th e LCD will p rompt th e user on
each outg oing pho ne call ex cept dur ing redi al or dial ing by
pressin g the key first w hether t o use the di aling pr efix. The
current p refix is a lso disp layed. Press (Left so ftkey) o r
(Right so ftkey) t o add the pr efix to the beginning of the number.
v. This feature is useful fo r access c ode, cal ling car d, and cre dit
card call s, etc.
b. Press to Group Sel ect: see H andset G roup Sub script ion.
c. Press to set or turn B ase Sele ct on or off. Default = Off.
See Base Se lect.
4
5
1
2
3
4
1
2
3
DELETE
TALK
SAVE
SAVE
59
SAVE
SAVE
YES NO
Page 60

Advanced Operations
d. Press to cl ear call l ogs and ph oneboo k:
i. Press and confirm to delete the entire phonebook.
Receive d, and Mis sed).
e. Press to edit the name of Custom or Line:
e-1. Pres s to change the power-up LCD display to show, e.g.,
custome r name or ot her gree ting mes sage:
e-2 Press to change t he name of l ine, whe n calls co ming, it w ill
indicat e the call s came fro m which li ne.
i. Use or to move the cursor backward or forward to insert
(to the lef t of the cur sor) or delete (the character above the cursor,
or left of th e cursor i f cursor is on the right of the last character).
ii. Enter c haract ers usin g the Char acter Table and method dis cussed
in the Phon ebook se ction.
iii. When f inishe d, press (Left softkey) to sav e change .
f. Press to change LCD display contrast:
i. Use or to scroll through values 1 to 12. Pick one that is
most suit able to yo u. Defau lt = 10.
ii. Press (Left softkey) to sav e settin g.
g. Press to change the LCD backlight:
i. Use or to scroll through options: On, Off, and 8 Seconds.
Default = 8 s econds , meanin g that the b acklight is always on.
The 8-second option will turn off the backlight after 8 seconds of
inactiv ity.
ii. Press (Left softkey) to save settin g.
h . Press to change the Line selection:
i. Use or to scroll through options: On or Off. D efault = Off,
meaning t hat you ca n not sele ct the oth er available lin es to dial.
ii.Press (Left softkey) to save settin g.
i. Press 9 to c hange th e PBX opti ons:
i. Press soft key to e dit a PBX fe ature to b e memorized and key
in the name o f the PBX fe atures j ust like editing a phonebook entry.
ii. Press (Left softkey) to save setting.
iii. Pres s and following by entering PBX options mode,
you can era se the PBX o ption.
iv. Press and following by entering PBX options mode,
you can edi t the PBX op tion.
v. Press and foll owing by e nterin g PBX opti ons mode ,
4
1
ii. Press and confi rm to clea r the thre e call log s (Calle d,
2
5
1
2
SAVE
6
SAVE
7
SAVE
8
SAVE
ADD
SAVE
OPTION 1
OPTION 2
OPTION 3
60
Page 61

Advanced Operations
you can tra nsfer th e PBX opti ons to oth er hands et(s).
Re: To transfer PBX options, both parties hav e to enter t he PBX
option mo de first ly by foll owing be llow:
For sendi ng party, press to enter sending mode.
* Either pr ess (Left softkey) to transfer all PBX
options t o anothe r handse t(s).
* Or press (Right softkey) to transfer a specific entry
to anothe r handse t(s).
* Press 2-d igit han dset ID or g roup ID, then select all PBX
options o r a specif ic entry to be transferred ( “00” means all
handset s)
* During PB X option s transf erring , LCD shows “Sending” , and
2-digit c ountdo wn on the LC D to indic ate the numbers of PBX
options w hich are w aiting f or sendi ng.
For recei ving par ty, pre ss to enter receiving mode.
* When ente ring the r eceivi ng mode, L CD shows “Ready” .
* Start to re ceive PBX options, LCD shows “Get PBX options
from Exit . #: x mm x” .
* When the PB X option s is recei ving, 2-digit countdown on the
LCD indic ates the n umber of P BX options which are waiting to
be receiv ed.
TX ALL
TX ONE
1
2
Note:
1. Different PBX makers use different analog codes to control PBX
functio n, like ca ll trans fer, call p ark, etc .; Please refer to your PBX
maker’s manual for this information.
2. Errors m ay occur i n PBX opti ons and ph oneboo k entrie s transf erred
wireles sly due to i nterfe rence. P lease re -enter e ntry manually if
problem s occur wi th a entry.
J. Press to change Language:
i. Use or to scroll through options: English, Spanish, and
French. D efault = E nglish , meanin g the LCD di splay shows in
English .
ii. Press (Left softkey) to save setting.
0
SAVE
61
Page 62

Advanced Operations
K. Press to t urn Broa dcast On /Off .
i. Press (Left softkey) to turn on the broadcast function
(includ ing the br oadcas t of handset to handset and base
to handse t).
ii. Press (Left sof tkey) to turn off the broa dcast fu nction
Re: When br oadcas t setting “Off ”, there i s an icon in dicate d
in the display, si de of the ba ttery ic on.
I. Press to m ake phon e Reset.
i. Press to clear all setti ng and ret urn to def ault (al l phoneb ooks,
CID logs, h andset registration will be cleared).
ii. Press to clear all setting but ke ep hands et regis tratio n as will.
7. Press to r egiste r or de-re gister h andset : See Hand set Regi stration.
8. Press to add new bases:
From an adm inistr ation ha ndset (H andset 1 0 or 11) to s et new Bas e 01
~07.
Maximum b ases is up t o 8. Befor e adding a n ew base, t he Hands et must
be regist ered in ma ster bas e (Base ID =00).
A. Press butto n on new Bas e.
B. Use Hand set 10 or 11 to Add base: Press
c. Enter 01 ~07 (Bas e ID).
9. Press to change system and Line setting: See System settin g and
Line Sett ing.
#ON
OFF
1
2
6
8
REG
MENU 8 1
9
62
Page 63

DuraWalkie
Advanced Operations
Main menu
1.KeyGuard
2.PhoneBook
3.Unused
4.Sound
5.Settings
6.Registration
7.Unused
Sub-menu
1.Ring Volume
2.Key Volume
3.Key Tone
1.Group Select
2.Clear
3.Naming
4.Contrast
5.Backlight
6.Language
#.PA On/Off
.Reset Phone
1.Register
2.Deregister
3.Remote REG
8.Multi-base
9.Admin
Select Mode:
1.Add Base
Admin:
1.System
2.Line Setting
3.Auto Attndnt
63
Page 64

Advanced Operations
1. Press (Right softkey ) while th e phone is i n standb y.
2. Press to lock keypad (see Key Guard).
3. Press to view, search, erase, edit and transfer and edit the
phonebo ok (see Ph oneboo k).
4. Press to set sound-related settings:
a. Press to select ringer volume: Use or to scr oll thro ugh
6 options : Low, Medi um, High , Vibrate, Vib and Ring, Off. P ress
(Left soft key) to save selection. Default = High.
b. Press to select ringer tone: Use or to scrol l throug h 4
options : 0, 1, 2, and 3 . Press (Left softke y) to save s electi on.
Default = 0 .
c. Press to select key volume when a key is pressed: Use or
to scroll t hrough 3 o ptions : High, Low, and Off. Press
(Left sof tkey) to s ave sele ction. D efault = Low.
d. Press to select key tone: Use or to sc roll thr ough 4
options : 0, 1, 2, and 3 . Press (Left softke y) to save s electi on.
Default = 0 .
5. Press to change handset settings:
a. Press to Group Select: see Handset Group Subscription.
b. Press to clear phonebook:
i. Press and confirm to delete the entire phonebook.
c. Press to change the power-up LCD display to show, e.g.,
custome r name or ot her gree ting mes sage:
i. Use or to move the cursor backward or forward to insert
(to the lef t of the cur sor) or delete (the character above the cursor,
or left of th e cursor i f cursor is on the right of the last character).
ii. Enter c haract ers usin g the Char acter Table and me thod dis cussed
in the Phon ebook se ction.
iii. When f inishe d, press (Left softkey) to sav e change .
d. Press to change LCD display contrast:
i. Use or to scroll through values 1 to 12. Pick one that
is most sui table to y ou. Defa ult = 10.
ii. Press (Left softkey) to sav e settin g.
MENU
1
2
4
1
SAVE
2
SAVE
3
SAVE
4
SAVE
5
1
2
1
3
SAVE
4
SAVE
64
Page 65

Advanced Operations
6
8
9
5
SAVE
6
SAVE
#
ON
OFF
1
2
REG
MENU 8 1
e. Press to change the LCD backlight:
i. Use or to scroll through options: On, Off, and 8 Seconds.
Default = 8 s econds , meanin g that the b acklight is always on.
The 8-second option will turn off the backlight after 8 seconds of
inactiv ity.
ii. Press (Left softkey) to sav e settin g.
f. Press to change Language:
i. Use or to scroll through options: English, Spanish, and
French. D efault = E nglish , meanin g the LCD di splay shows in
English .
ii. Press (Left softkey) to sav e settin g.
g. Press to t urn Broa dcast On /Off:
i. Press (Le ft softkey) to turn on the broadcast function
(includ ing the br oadcas t of hands et to hand set and base to
handset ).
ii. Press (Right so ftkey) t o turn off the bro adcast f unctio n.
Re: When br oadcas t settin g “Off ” , there is a n icon ind icated i n
the displ ay, sid e of the bat tery ico n.
h. Press to m ake Rese t Phone:
i. Press to clear all setting and return to default (al l phonebooks,
CID logs, h andset r egistr ation wi ll be clea red).
ii. Press to clear all setting but keep handset registration as well.
6. Press to r egiste r or de-re gister h andset : See Hand set Regi strati on.
. Press to add new bases:
7
From an adm inistr ator han dset (Ha ndset 10 o r 11) to set new Base 0 1~
07. Maxim um addit ional ba ses is up to 8 . Before a dding a ne w base,
the Hands et must be r egiste red in mas ter base ( Base ID =0 0).
a. Press button on new Base.
b. Use Hand set 10 or 11 to Add base: Press
c. Enter 01 ~07 (Bas e ID).
. Press to ch ange sys tem and Li ne setti ng: See sy stem set ting and
8
Line Sett ing.
65
Page 66

Technical Specifications
Electri cal S pec ifi cat ion s
Freq uen cy
RF Pow er
Channel Spacing
Number of C han nel s
Modulation
Multipl e Acce ss
Freq uen cy Ho ppi ng Ra te
TDMA Fr ame L eng th
Number of S lot s/F ram e
Number of U ser s/C arr ier
Receive r Sen sit ivi ty
Ante nna C onn ect or
Ante nna G ain
TX Pow er Co ntr ol Ra nge
Telephone Inte rfa ce
Speech Co din g
Channel Coding
Tra nsm iss ion D ata R ate
User Data R ate
Duplex
Voice Quality
No. of S yst em ID
Ring Signal
Auto -At ten dan t Cod ing
Flas h Time
Power Sou rce
Charger Curr ent
Charge Time
Regulation C omp lia nce
Oper ati ng Temp era tur e
Stor age Tem per atu re
Humidity
Dimensi on witho ut an ten na
Weig ht
Base S tat ion
902-928 MHz
Peak: 708 m W
Aver age : 304 m W
200 kHz
128
GMSK
Freq uen cy Ho ppi ng TD MA
100 per sec ond
10 ms
8
4
< -108 d Bm (@ B ER 10 )
Reverse T NC
2 dBi
6
dBi Ex ter nal ( opt ion al)
NA
RJ11 x 4
8 kbps G.72 9A
8 kbps Conv olu tio nal + C RC
170.678 k bps
128 kbps du ple x
Tim e Div isi on Du ple x (TD D)
TIA/ EIA -47 0B
65,5 36
20-50 Hz, 1 2-9 0 Vr ms
8 kbps G.72 9
100-900 ms pro gra mma ble
120V/7V AC /DC Adapter
NA
NA
FCC Pa rt 15 , Par t 68
-10 ~ 60 C
-10 ~ 70 C
20 75 %
280 x 215 x 53 mm
8.5 x 11. 0 x 2.1 i nch
907 grams
-2
Port abl e Han dse t
902-928 MHz
Peak: 708 m W
Aver age : 76 mW
200 kHz
128
GMSK
Freq uen cy Ho ppi ng TD MA
100 per second
10 ms
8
4
< -108 d Bm (@ B ER 10 )
Non-sta nda rd
2 dBi (L ong )
0.5 dB i (Sh ort )
100-708 mW
NA
8 kbps G.72 9A
8 kbps Conv olu tio nal + C RC
176.678 k bps
128 kbps du ple x
Tim e Div isi on Du ple x (TD D)
TIA/ EIA -47 0B
65,5 36
NA
8 kbps G.72 9
NA
3.6V, 170 0 mAh L i-i on
Batt ery
500 mA
4 hours (fr om em pty )
FCC Pa rt 15 , Par t 68
-10 ~ 60 C
-10 ~ 70 C
20 75 %
161 x 58 x 31 mm
6.3
x 2.2 x 1. 2 inc h
175 grams
-2
Notes:
1. NA = Not Applicable.
2. The ma nufac turer reserves the right to cha nge des igns an d
specifications without not ice.
66
Page 67

Index
2
2-WAY/INT ERCOM, 1 3, 15,19 , 34
3
3-Wa y Confer encing , 44, 45
A
Adjusti ng Recei ver (Ear piece) Vo ice
Volume, 38
Adminis trator F eature s, 22
Audio-i n Jack, 22
Auto Atten dant, 47 ,48,49
B
Base Sele ct, 45
Base Stat ion Feat ures, 21 , 22
Base Stat ion Inst allati on, 26
Battery, 5, 7, 11, 12, 13, 14, 15, 18, 25,
29, 30, 31, 3 8, 40, 59, 6 3, 65
Battery R echarg e and Repl acemen t, 40
Battery S trengt h, 14
BROADCA ST, 13, 16, 30 , 35, 36, 48 , 49,
52, 53, 58, 5 9, 63
Broadca st throu gh PBX, 52
Broadca sting a gr oup of han dsets, 3 5
Broadca sting al l handse ts, 35
Broadca sting an i ndivid ual hand set, 35
C
Call Conferenci ng, 20, 48
Call Forw arding , 19, 45, 46 , 56
Call Hold, 18
Call in-progres s, 14, 40
Call Timer, 19
Call Transfer, 19, 23 , 38, 44, 58
Call Waiting , 15, 17, 27 , 46, 47
Call Waiting w ith Call er ID, 17
Caller ID , 17, 18, 27 , 37, 40, 56
Cardiac Pacemak er, 4
Charger Feature s, 24, 25
D
DC In: Jack , 22
De-registrati on, 41, 42 , 43, 49
Dialing Prefix, 1 8, 56
DND, 17
Do Not Dist urb (Sil ent Ring ), 39
E
emergency, 4
Ending a Call, 38
Equipment Check list, 11, 12
Expandi ng cover age, 27
Expandi ng capac ity, 28
Externa l teleph one answ ering
device, 2 6
F
FCC, 5, 8, 9, 6 5
FDA, 4, 5
G
Group ID, 1 5, 16, 19, 3 5, 47,
51, 53, 58, 5 9, 64
H
Handset and Charg er
Install ation, 2 9
Handset Chargin g Slot, 24 , 25
Handset Feature s, 13, 14, 1 5,
16, 17, 18, 1 9, 20
Handset Group Sub script ion,
43, 56, 62
67
Page 68

Index
Handset ID, 14, 15, 1 8, 19, 22,
30, 35, 36, 3 7, 41, 42, 4 3, 44,
45, 49, 51, 5 3, 58, 59, 6 4
Handset Registr ation, 2 8, 29,
41, 59, 63
Handset to Handse t Calls, 3 4
Headset Jack, 13
Hearing Aid Users, 4
I
IC, 8
IDLE mode , 15, 30
Interco m in-pro gress, 1 4
interfe rence, 4 , 5, 7, 8, 9, 29 , 52, 58
K
Key Guard , 39, 55, 62
Key-gua rd, 18
L
Line Dedication, 47, 49
Line Indi cator, 14
Line Selection, 2 0, 47, 57
Lithium-Ion (Li -Ion), 7
M
Making a 2- Way / Intercom Call, 34
Making a Br oadcas t, 35
Making a Telephone Call, 34
MENU mode , 30
Multi-b ase setu ps, 27
Multipl e handse ts regis tratio n, 16
Mute, 18, 3 9
N
Name Tagging, 17
O
outdoor a ntenna , 12, 21, 22
P
PBX optio n, 20, 57, 5 8
PBX optio n transf er, 20
Phonebook, 14, 18 , 49, 50, 51 ,
52, 55, 57, 5 9, 62, 63
Placing a Call On Hol d, 38
Power Out age, 5
R
Receiving a Telephone Call, 36
Receiving an Inte rcom Cal l, 37
Redial, 17, 36, 56
Registr ation, 8 , 22, 28, 29 , 30,
31, 41, 42, 4 3, 49, 59, 6 3
Registr ation Ke y, 22
REGISTR ATION mode, 22, 30,
41, 42
Regulatory Info rmatio n, 8
REN, 8
Reset But ton, 22
Restore s base sta tion to fa ctory
setting s, 22
Reverse t hread co nnecto r, 21
Ringer / Vibrator, 15, 16, 36, 37,
39, 56, 62
RSSI, 14
S
Safety In struct ions, 4, 5 , 7
Spare Bat tery Cha rging Sl ot,
24, 25
Speaker p hone, 14 , 15, 34,
35, 37
Speed dial, 34
68
Page 69

Index
T
TALK mode, 16, 30
TALK/SPEAKERPHONE, 15
Technical Specifi cation s, 65
Text Envelo pe, 14
Text Messag ing, 14, 1 9, 59, 60, 6 3, 64
Three Cal l Logs, 17 , 55, 57
To Call back fr om Call Lo g, 40
To View Missed Call(s), 39
Tran sforme r, 26, 29
Two-Digit Address Index, 14 , 55
V
Vibrator, 16
Volume, 16, 19, 30, 38 , 39, 59, 60 , 64
W
Wall m ounted , 31
69
Page 70

Literature order number: 120-0009-01
P/N:6709A0243140
 Loading...