

Page 1
EnGenius Captive Portal “Ready”
Quick Installation Guide
Version 1.2 (for Hotspotsystem)
*** MUST READ ***
The package labelled “Captive Portal Ready” herein contains a Third-Party firmware &
management feature. It has distinctly different properties, configuration and capabilities
of that the stock product mentioned in the datasheet, CD user manual and box
packaging. This Quick Installation Guide supersedes any datasheet, CD user manual
and information on the box packaging to contain important instructions in setting up
your EnGenius Captive Portal Ready wireless networks. Please read and follow this
guide thoroughly to have an enjoyable experience in setting up your EnGenius Captive
Portal Ready Wireless Network.
Note: Guest authentication feature requires a separate paid subscription from thirdparty cloud captive providers to work.
Check List:
• Internet connection should be already setup & ready to use* (ADSL /Cable/Fiber modem router)
• Modem/Router must provide RJ45 port to connect with EAP300-CP or ENS202EXT-CP. An Ethernet cable
is further required for the ENS202EXT-CP
• Internet Browser (Recent version of Microsoft Internet Explorer or Firefox browser)
• A pencil or pen ready to use “My Personal Notes” on the last page to assist you in remembering
any account names and passwords created
Important Notes:
• (*) The internet connection should give you the ability to ping www.yahoo.com (resolve DNS) and to
normally browse a web page via http and https (SSL). If in doubt, use a laptop or computer with your
existing internet connection (which you will be connecting the equipment to) and type
http://www.yahoo.com on your browser. If there is no response, you need to resolve this with your internet
service provider before proceeding further this Quick Installation Guide
Page 2
Installing the first device
STEP 1
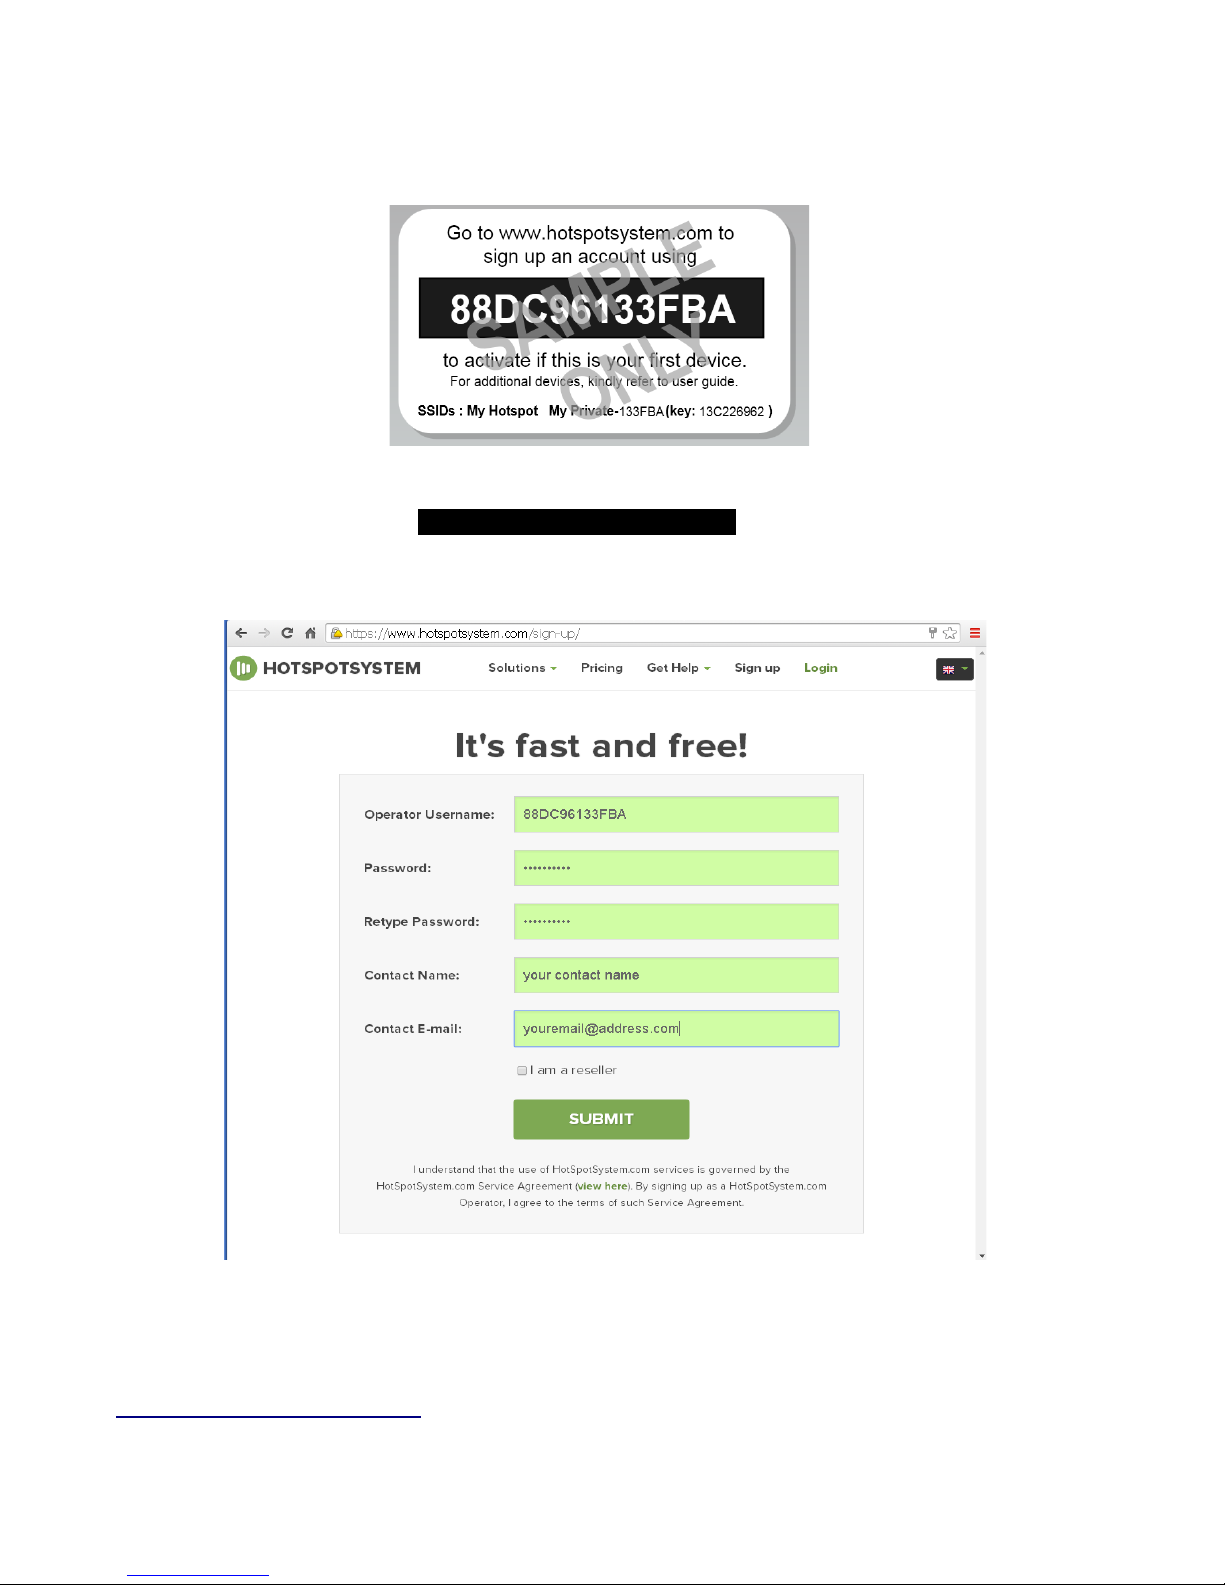
Follow the instructions on the users ID-sticker. The sticker is located on the device.
Go to the www.hotspotsystem.com and click ‘Sign up’ or ‘Sign up for free’. Sign up an account
using the operator username [the-characters-on-the-ID-sticker] to activate if this is your first device.
For adding additional device refer to the instructions later on in this manual.
Note:
- You can change the language in the top right corner
- As a reseller you have the possibility to make inter-alias, a sub portal. For more details see
http://www.hotspotsystem.com. Choose ‘I am a reseller’ in the sign up form
2
Page 3

STEP 2
Once you have signed up, click continue and choose your business model.
We recommend you to choose Hotspot FREE, which you can further modify and add information
like name, location, address, default bandwidth, skin of splash page, type of location and the
currency you want to use in case of payments. Click ‘submit’ to save the changes and continue the
process. (You can always change your Business Model at any time later)
3
Page 4

STEP 3
After the registration, connect a LAN cable from the LAN port of your existing Internet modem
router to the ethernet port of the EnGenius Captive Portal Ready device and power up. The device
will perform an initial setup which the status LED will constantly blink for 2 minutes. After
approximately two minutes, the product is ready. This can be verified by the 3 LEDs on the device.
(The WLAN LED of the ENS202EXT-CP is not in use in the Captive Portal Mode).
For ENS202EXT-CP devices,
Note: The ENS202EXT-CP must only be powered with the supplied 24V power adapter via the PoE
(Power over Ethernet) injector.
For EAP300-CP devices,
Note: The EAP300-CP supports both IEEE802.3af PoE (Power over Ethernet) or the included
power adapter. You may use either one as the power source. Do not use both at the same time.
In the wireless SSID scan, you can find the SSIDs by ‘My Hotspot is getting ready’. Once the initial
setup is completed, you find 3 SSIDs: MyHotspot, My Private (key is on the sticker) and Hotspot
[part of user ID]@[IP-address]. This last SSID is the help SSID. This is the IP-address that is
assigned on your Local Area Network. The fourth SSID is the Wireless Mesh which is used to
repeat the wireless signal to another device if the other device has not Ethernet connection.
Note: In the wireless SSID scan, you can find the SSIDs by ‘My Hotspot is getting ready’. Once the
initial setup is completed, you find 3 SSIDs: MyHotspot, My Private (key is on the sticker) and
4
Page 5

Hotspot [part of user ID]@[IP-address]. This last SSID is the help SSID. This is the IP-address that
is assigned on your Local Area Network. The fourth SSID is the Wireless Mesh
STEP 4
Your device is now ready to use. Connect to the SSID “ My Hotspot” and a simple authentication will appear
as below before internet access is allowed.
Changing of Guest Access
For any changes of access such as vouchers, email, sms, social media login by guest, you can
login at http://www.hotspotsystem.com with your operator name and select the desired packages.
Kindly note paid subscription applies accordingly.
Changing of hardware configuration
To change the broadcast SSIDs and/or assign preferred passwords to the device, you can type in
the IP-address of the device at the address field in the web browser if your computer is connected
to the Local Area Network. Otherwise, you can wirelessly connect to the default SSID “My PrivateXXXXXX” using the serial number of the device as the password and then typing the IP-address of
the device in your web browser.
5
Page 6

Installing additional devices
Because of the Mesh capabilities, additional devices can be added wirelessly or by
the wired LAN. If you want to configure it wirelessly, place the additional device close
to the first device with the wired internet access.
Step 1
Confirm that the first device is powered up and connected to your internet router and power up the
additional device. The device status light will start blinking constantly for next 2 minutes.
Step 2
In the wireless network scan you can find the SSIDs by ‘My Hotspot is getting ready’ while the
additional device is preparing itself. Once the initial setup is complete , the device will reboot and
now you will find 3 SSIDs with the data of the additional device: MyHotspot, My Private (key is on
the sticker) and Hotspot [part of user ID]@[IP-address].
6
Page 7

Step 3
Open up web browser screens and type in the IP-address of the additional device. After logged in,
go to System and click Hotspot Configuration.
Step 4
Edit the Operator Username (HS_NASID) from the first device into the screen of the additional
device.
Click on Summit to save
7
Page 8

Step 5
Also change the Operator Username under ‘Scheduled Tasks’ (System -> Schedulded Tasks),
click on Submit and reboot the device.
8
Page 9

From the control panel of the cloud portal, you can now see 2 devices.
___________________________________________________________________________
Completion of "Quick Installation Guide"
Kindly visit http://www.wifiabc.com and click on Knowledge Base for a complete
guide and tutorials on the Captive Portal Ready Devices, such as changing SSIDs,
adding or changing passphrase, blocking guest to Local Area Networks and VLANs
configuration.
9
Page 10

Quick Troubleshooting notes:
Cannot see the SSID “HotspotAABBCC@123.456.7.8”
Make sure the device is properly connected to your Local Area Network or Internet router which
has access to the internet. If connecting additional devices by wireless mesh to the first device, try
not to exceed 10 meters during initial setup. After setup, you can relocate it further. To restart initial
setup, power up device for at least 1 minute, then press-holding the reset button for 12 seconds
before releasing with a pointed object. You can verify the device's response from the LED lights.
Cannot connect to “My Private-AABBCC” or “HotspotAABBCC@123.456.7.8”
The 2 SSIDs are secured with an encryption pass-phrase. The pass-phrase is the serial number of
the device and also can be located on the ID-Sticker (key).
My personal Notes:
My MAC Address
88 : DC : 96 : : :
(SSID)Name Password
Operator Name
Guest Access
Node Name (SSID#1)
Node Name (SSID#2)
My Memos:
_______________________________________________________________
_______________________________________________________________
_______________________________________________________________
_______________________________________________________________
_______________________________________________________________
_______________________________________________________________
_______________________________________________________________
_______________________________________________________________
10
 Loading...