

Energy Power Bar One Owner's Manual

®
Energy Power™ Bar One
Owner's Manual
IMPORTANT SAFETY INSTRUCTIONS!
1. READ these instructions.
2. KEEP these instructions.
3. HEED all warnings.
4. FOLLOW all instructions.
5. DO NOT use this apparatus near water.
6. CLEAN ONLY with dry cloth.
7. DO NOT block any ventilation openings. Install in accordance with the manufacturer’s instructions.
8. DO NOT install near any heat sources such as radiators, heat registers, stoves, or other
apparatus (including amplifiers) that produce heat.
9. DO NOT defeat the safety purpose of the polarized or grounding type plug. A polarized plug has
two blades with one wider than the other. A grounding type plug has two blades and a third
grounding prong. The wider blade or the third prong are provided for your safety. If the provided
plug does not fit into your outlet, consult an electrician for replacement of the obsolete outlet.
10. PROTECT the power cord from being walked on or pinched, particularly at plugs, convenience
receptacles, and the point where they exit from the apparatus.
11. ONLY USE attachments/accessories specified by the manufacturer.
12. USE ONLY with a cart, stand, tripod, bracket, or table specified by the manufacturer,
or sold with the apparatus. When a cart is used, use caution when moving the cart/
apparatus combination to avoid injury from tip-over.
13. UNPLUG this apparatus during lightning storms or when unused for long periods of time.
14. REFER all servicing to qualified service personnel. Servicing is required when the apparatus
has been damaged in any way, such as power-supply cord or plug is damaged, liquid has been
spilled or objects have fallen into the apparatus, the apparatus has been exposed to rain or
moisture, does not operate normally, or has been dropped.
15. DO NOT expose this apparatus to dripping or splashing and ensure that no objects filled with
liquids, such as vases, are placed on the apparatus.
16. To completely disconnect this apparatus from the AC Mains, disconnect the power supply cord
plug from the AC receptacle.
17. The mains plug of the power supply cord shall remain readily operable.
18. DO NOT overload wall outlets or extension cords beyond their rated capacity as this can cause
electric shock or fire.
The exclamation point, within an equilateral triangle, is intended to alert the user to
the presence of important operating and maintenance (servicing) instructions in the
literature accompanying the product.
The lightning flash with arrowhead symbol within an equilateral triangle is intended to
alert the user to the presence of uninsulated “dangerous voltage” within the product’s
enclosure that may be of sufficient magnitude to constitute a risk of electrical shock
to persons.
WARNING: Do not place batteries in mouth or ingest. Keep out of reach of children and pets.
WARNING: Do not recharge non-rechargeable batteries.
Please dispose of any used batteries properly, following any local regulations. Do not incinerate.
C A U TI O N
RISK OF ELECTRIC SHOCK.
DO NOT OPEN.
WARNING: Do Not Open! Risk of Electrical Shock. Voltages in this
equipment are hazardous to life. No user-serviceable parts inside.
Refer all servicing to qualified service personnel.
Place the equipment near a main power supply outlet and make sure that you can easily access the
power breaker switch.
EU COMPLIANCE INFORMATION
Eligible to bear the CE mark; Conforms to European Union Low Voltage Directive 2006/95/
EC; European Union EMC Directive 2004/108/EC; European Union Restriction of Hazardous Substances (RoHS) Directive 2002/95/EC; European Union WEEE Directive 2002/96/
EC; European Union Eco-Design Directive 2009/125/EC; European Union Registration,
Evaluation, Authorization and Restriction of Chemicals (REACH) Directive 2006/121/EC
This product contains batteries that are covered under the 2006/66/EC European Directive, which cannot be disposed of with normal household waste. Please follow local
regulations.
WEEE NOTICE
Note: This mark applies only to countries within the European Union (EU) and Norway.
This appliance is labeled in accordance with European Directive 2002/96/
EC concerning waste of electrical and electronic equipment (WEEE). This
label indicates that this product should not be disposed of with household
waste. It should be deposited at an appropriate facility to enable recovery
and recycling.
WARNING: To reduce the risk of fire or electrical shock, do not expose this apparatus to rain or moisture.
WARNING: No naked flame sources – such as candles – should be placed on the product.
Place the equipment near a main power supply outlet and make sure that you can easily access the
power breaker switch.
WARNING: This product is intended to be operated ONLY from the AC Voltages listed on the back
panel or included power supply of the product. Operation from other voltages other than those
indicated may cause irreversible damage to the product and void the products warranty. The use of
AC Plug Adapters is cautioned because it can allow the product to be plugged into voltages in which
the product was not designed to operate. If the product is equipped with a detachable power cord,
use only the type provided with your product or by your local distributor and/or retailer. If you are
unsure of the correct operational voltage, please contact your local distributor and/or retailer.
BATTERY INFORMATION:
THIS PRODUCT CONTAINS A LITHIUM BATTERY. IF MISUSED OR ABUSED THIS CAN RESULT IN:
Smoke or gas hazard
Heat hazard
Fire hazard
Explosion hazard
WARNING: Batteries (battery pack or batteries installed) shall not be exposed to excessive heat
such as sunshine, fire or the like.
WARNING: Risk of leakage. Only use the specified type of batteries. Never mix new and used
batteries. Observe correct polarity. Remove batteries from products that are not in use for extended
periods of time. Store batteries in a dry place.
WARNING: Do not handle leaking or damage Lithium batteries.
WARNING: Danger of explosion if battery is incorrectly replaced. Replace only with the same or
equivalent type.

FCC AND CANADA EMC COMPLIANCE INFORMATION:
This device complies with part 15 of the FCC Rules. Operation is subject to the following
two conditions:
(1) This device may not cause harmful interference, and (2) this device must accept any
interference received, including interference that may cause undesired operation.
NOTE: This equipment has been tested and found to comply with the limits for a Class B
digital device, pursuant to part 15 of the FCC Rules. These limits are designed to provide
reasonable protection against harmful interference in a residential installation. This
equipment generates, uses and can radiate radio frequency energy and, if not installed
and used in accordance with the instructions, may cause harmful interference to radio
communications. However, there is no guarantee that interference will not occur in a
particular installation. If this equipment does cause harmful interference to radio or television reception, which can be determined by turning the equipment off and on, the user
is encouraged to try to correct the interference by one or more of the following measures:
Reorient or relocate the receiving antenna.
Increase the separation between the equipment and receiver.
Connect the equipment into an outlet on a circuit different from that to which the receiver
is connected.
Consult the dealer or an experienced radio/TV technician for help.
Approved under the verification provision of FCC Part 15 as a Class B Digital Device.
Caution: Changes or modifications not expressly approved by the manufacturer could void
the user’s authority to operate this device.
Caution: To comply with the limits of the Class B digital device, pursuant to Part 15
of the FCC Rules, this device is to comply with Class B limits. All peripherals must be
shielded and grounded. Operation with non-certified peripherals or non-shielded cables
my result in interference to radio or reception.
This Class B digital apparatus complies with Canadian ICES-003.
Cet appareil numérique de la classe B est conforme à la norme NMB-003 du Canada.

THANK YOU
Thank you for your purchase of the Energy Power™ Bar One! Energy has been a leader
in audio research and development as well as in the engineering and manufacturing of
high-quality speakers since 1973. Your new Energy Power Bar One is a compact, stylish,
easy to connect and use enhancement for TV, movie and even personal audio sound. Its
compact design puts a separately powered, dual bass driver subwoofer inside of the
soundbar that compliments the dual full-range drivers for dynamic sound without the
need of a separate subwoofer “box” taking up additional space in your room. Just “plug
n’ play” to almost any TV in just minutes, then sit back and let your favorite TV shows and
movies come to life.
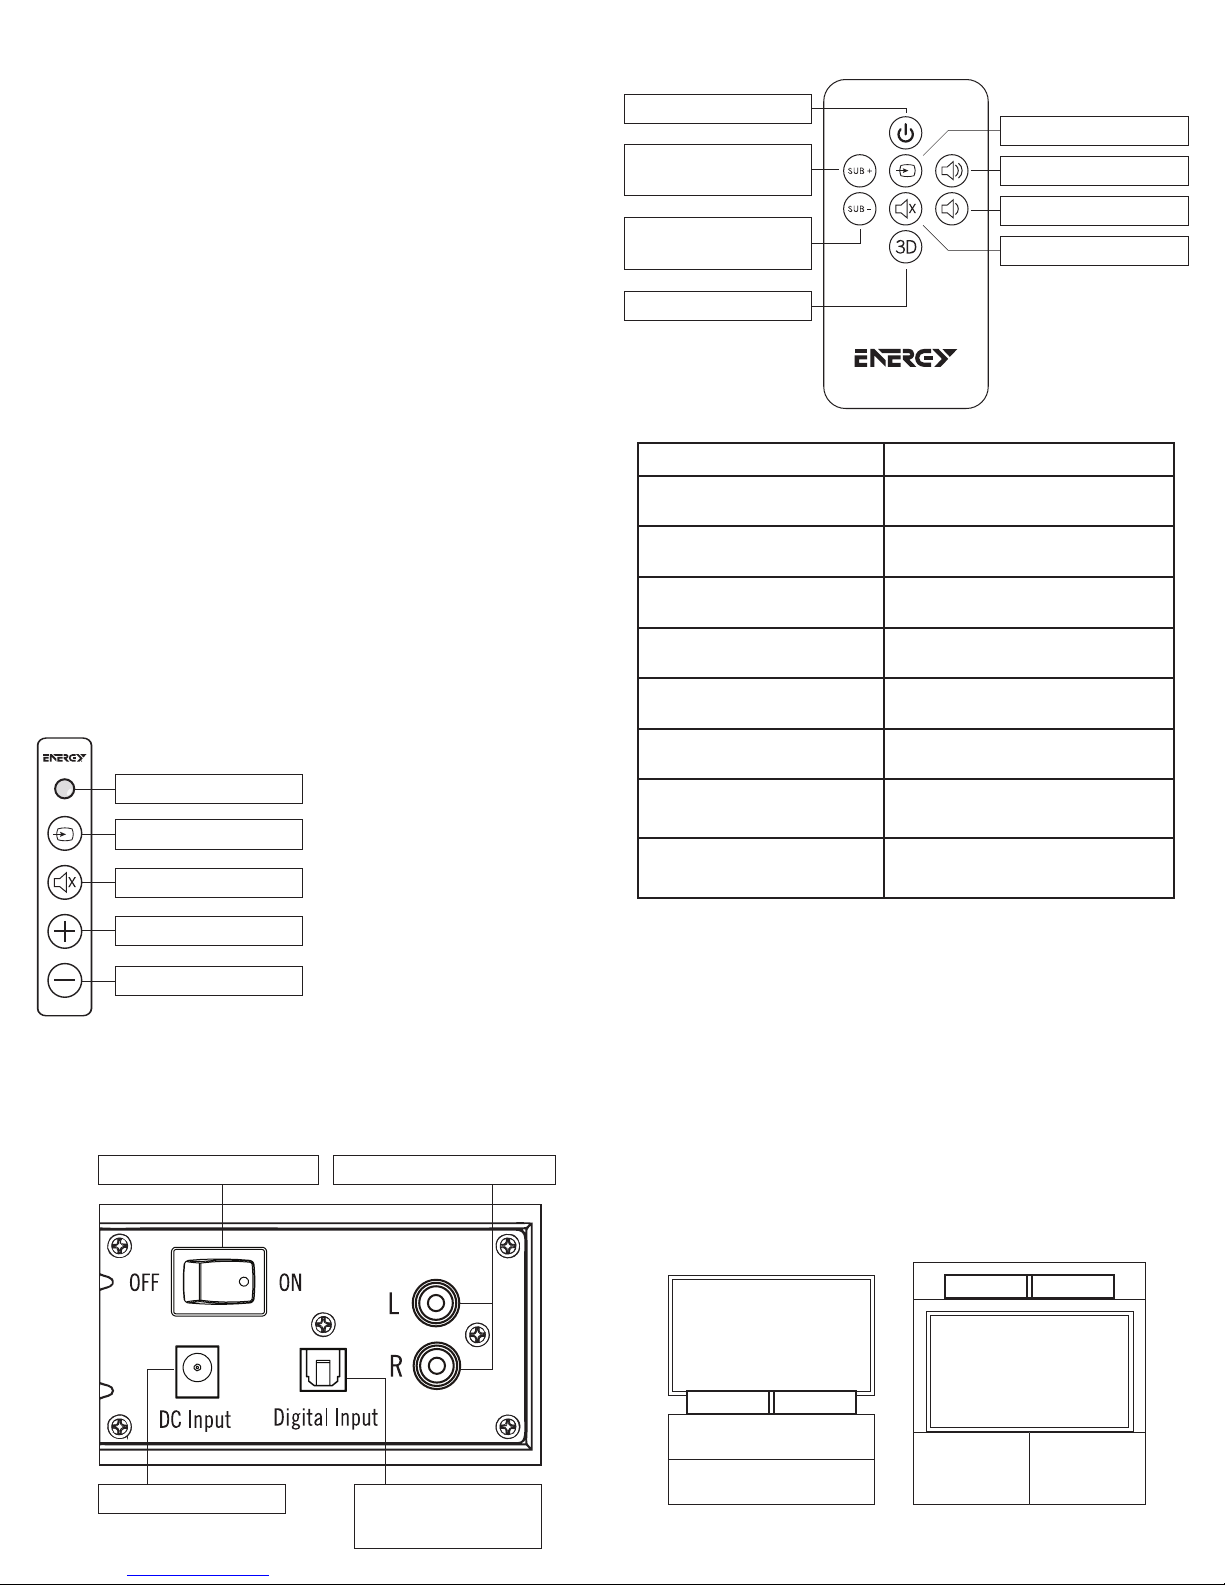
REMOTE CONTROL
ON/OFF
SUBWOOFER
VOLUME UP
SUBWOOFER
VOLUME DOWN
SOURCE
VOLUME UP
VOLUME DOWN
MUTE
PACKING LIST
1. SOUNDBAR
2. SOUNDBAR POWER SUPPLY/POWER CORD
3. ONE 5.3 FT. (1.6M) 3.5MM TO DUAL RCA CABLE
4. ONE 5.9 FOOT (1.8M) DIGITAL OPTICAL CABLE
5. TWO RUBBER FEET
6. ONE REMOTE CONTROL
7. CONNECTION GUIDE AND PROGRAMMING GUIDE
8. SOUNDBAR WALL-MOUNT TEMPLATE
9. THIS OWNER’S MANUAL
SOUNDBAR FRONT
STATUS LIGHT
SOURCE
MUTE
VOLUME UP
VOLUME DOWN
SOUNDBAR STATUS LIGHT
RED: In STANDBY (“Sleep”) Mode
GREEN: On Digital Optical Cable Input
ORANGE: On Analog RCA L/R Input
ORANGE (Flashing): RCA Input muted
GREEN (Flashing): Digital Input muted
RED (Flashing): Failure to learn a remote
control command
RED, GREEN OR ORANGE FLASHES ONCE:
A remote control signal has been received
SOUNDBAR REAR
Main Power
Analog RCA Inputs
3D SURROUND
REMOTE FUNCTION STATUS LIGHT
ON/OFF
SOURCE
MUTE
3D
VOLUME UP
VOLUME DOWN
SUBWOOFER VOLUME UP
SUBWOOFER VOLUME DOWN
GREEN: On Digital Optical Cable Input
ORANGE (FLASHING): RCA Input muted
GREEN (FLASHING): Digital Input muted
GREEN (ONE FLASH): Surround On
GREEN OR ORANGE (FLICKERS): A remote
GREEN OR ORANGE (FLICKERS): A remote
GREEN OR ORANGE (FLICKERS): A remote
GREEN OR ORANGE (FLICKERS): A remote
RED: Standby
GREEN/ORANGE: ON
ORANGE: On RCA Input
RED (ONE FLASH): Surround Off
control signal has been received
control signal has been received
control signal has been received
control signal has been received
PLACEMENT/INSTALLATION
Placing/wall-mounting the soundbar: The soundbar is designed to be placed on a flat
surface directly in front of your TV on its two supplied feet, on a shelf directly above or
below your TV in a piece of furniture with feet or wall-mounted (via keyholes on the rear of
the soundbar) under a TV that is also wall-mounted. If wall-mounting, connect supplied
cable (or other cable) to TV first, then use supplied wall-mount template to mount soundbar. If the two mounting holes drill into wall studs, screw two wood screws in those holes
to hang the soundbar on. If there are no wall studs where the holes are drilled, use wall
anchors that support at least 10 pounds to hang the soundbar on. Connect cable from TV
(see Connection section) to soundbar and hang soundbar on wall.
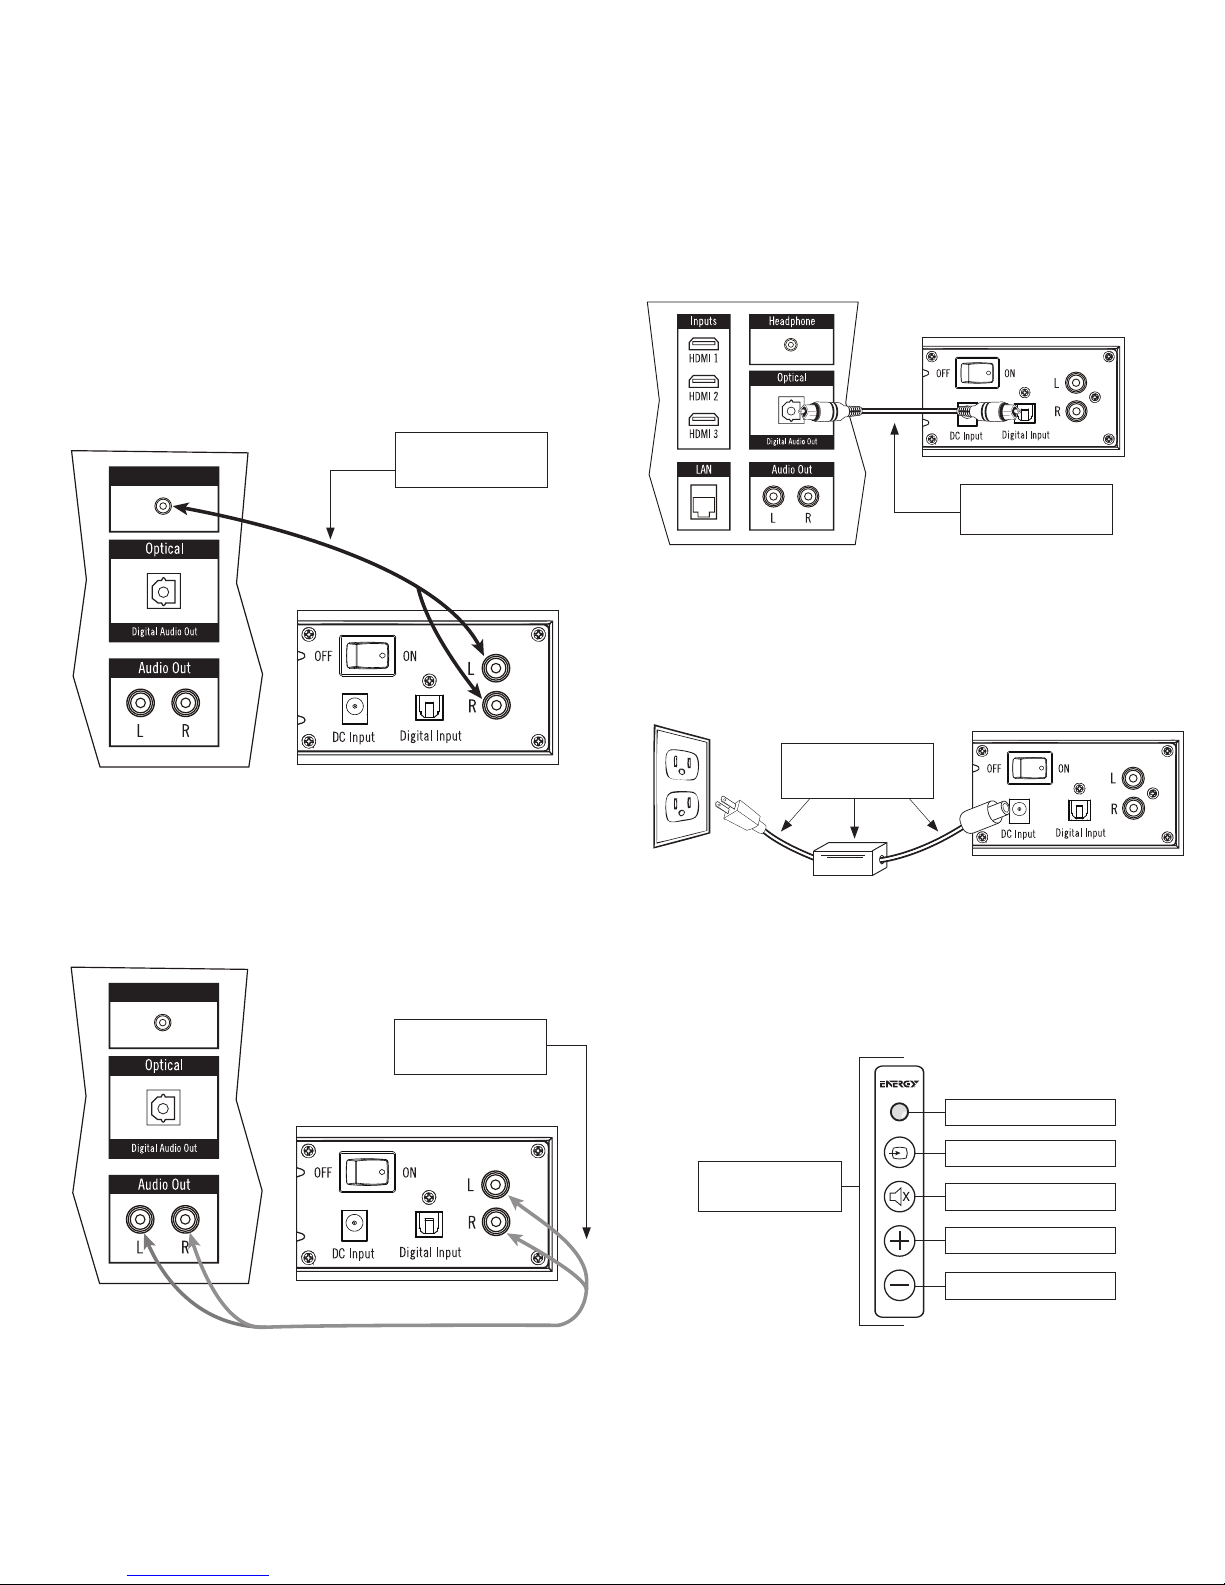
Power Supply Input
Digital Optical
Cable Input
TV
TV
CONNECTION
OFF ON
3.5mm/Headphone
1. Connecting the soundbar to your TV: The Energy Power Bar One needs to be
connected to your TV, Cable Box or Satellite Receiver. If you have other devices
connected to your TV, such as a DVD/BluRay player, gaming system, etc., connect
the Energy Power Bar One to the TV so that you can listen to all those and your TV
through the Energy Power Bar One. If there are no other devices connected to your
TV other than a cable or satellite box and you receive all of your television programs
from that box, you can connect the Energy Power Bar One to either that box (with
the supplied digital optical cable) or your TV. There are three different ways to connect the Energy Power Bar One to your TV, Satellite or Cable box.
A. 3.5mm/Headphone Output
Once you have placed the Energy Power Bar One where you want it, connect one end of the
supplied 3.5mm to dual RCA cable to your TV’s 3.5mm/headphone audio output jack and
connect the other end of the cable into the L/R RCA input jacks on the rear of the soundbar.
TV Connection Panel
3.5mm to Male RCA
Cable
3.5mm/Headphone
(Supplied)
C. Digital Optical Cable
Since most High Definition TV’s, Satellite and Cable boxes have a digital optical audio
output, we have included that cable. Remove the plastic caps on the end of the cable.
Simply connect one end of the cable into the corresponding output of your TV, Satellite or
Cable box and connect the other end of the cable into the digital optical input on the back
panel of the Energy Power Bar One.
NOTE: If you receive any or all of your channels using a separate antenna connected
to your TVs Coax/Antenna input, there may be no sound received from those channels
using the digital optical cable connection.
TV Connection Panel
Soundbar Connection Panel
Digital Optical Cable
(Supplied)
Soundbar Connection Panel
B. RCA Cable
You can use analog left and right audio outputs on your device and connect them to the
analog left and right inputs on the Energy Power Bar One back panel. (cable NOT supplied).
TV Connection Panel
3.5mm/Headphone
Male RCA to Male
RCA Cable
(Not Supplied)
2. Plug the AC power cord into the soundbar power supply, then connect the power
supply into the DC Input on the rear of the soundbar. Plug the AC power supply into
a “live” electrical outlet and turn the soundbar’s Main Power switch on the rear of
the soundbar to “On”. On the front of the soundbar, make sure the status light is
either solid green or orange (press any button once if light is steady red).
Soundbar Connection Panel
Power Supply
and AC Cord
PROGRAMMING YOUR TV REMOTE TO OPERATE THE SOUNDBAR
The following 3 steps should be used to program each function of your TV or cable box
remote control buttons (MUTE, VOLUME UP, & VOLUME DOWN). IF THE SOUNDBAR IS IN
STANDBY MODE (solid red status light), push the <SOURCE> button on the soundbar
until the status light is solid GREEN.
STATUS LIGHT
SOURCE
Soundbar Front
Control Panel
MUTE
VOLUME UP
Soundbar Connection Panel
VOLUME DOWN
1. Place the unit in learning mode: With the status light showing solid GREEN, press and
hold down both the <SOURCE> and <MUTE> buttons on the front of the soundbar at
the same time (approximately 3 seconds) until the status light flashes ORANGE.
2. Select the function to learn: Press the <MUTE> button once on the soundbar (the
status light changes to solid ORANGE). (Substitute the VOLUME UP & VOLUME
DOWN in place of <MUTE> when programming the other buttons during this step)

3. Learn the function: Hold your TV or cable remote control within one foot and
pointed at the front of the soundbar. Slowly press the <MUTE> button on your
remote control four times. On the first three presses, the status indicator light will
flicker ORANGE with each press. If the unit has successfully learned the function,
on the fourth press of the button, the light will flash GREEN several times and then
turn to solid GREEN. (Remember to use the VOLUME UP & VOLUME DOWN in place
of <MUTE> when programming the other buttons during this step)
To program the remaining functions, simply repeat all steps, substituting <MUTE> with the
new function and button presses (VOLUME UP, and VOLUME DOWN) on steps TWO and THREE.
CARE AND CLEANING
Occasional dusting or wiping of the cabinets with a soft cloth is all that is required. Never
use water, abrasive or solvent type cleaners or detergents. Never spray polishes or cleaners
on the drive units (woofer, midrange or tweeter) or on any controls or connection points. A
vacuum cleaner with a soft brush attachment may be used to clean the grille fabric.
Energy and the Energy logo are trademarks of Audio Products International Corp., registered in the
U.S. and other countries.
IMPORTANT NOTE: There is not a power on/off button on the front of the soundbar
(there is a “Main Power” switch on the soundbar’s rear panel). You DO NOT need to turn
off the soundbar when finished watching TV. When finished, turn off your TV (or Satellite
or Cable box if the soundbar is connected to that). The soundbar will automatically
go into a Standby or “sleep” mode if it does not receive an audio signal from your TV,
Satellite or Cable Box for approximately 10 minutes. Standby “On” mode is indicated by a
solid red status light on the soundbar front panel. When your TV, Satellite or Cable box is
turned back on and a signal is again received the soundbar will automatically come out
of Standby mode and turn on.
OPERATING THE ENERGY POWER™ BAR ONE
Once your soundbar is connected and operating, you will want to complete a few basic steps
to get the most enjoyment out of your system. First, you will want to turn off the speakers
on your TV and let your soundbar be your new sound source. Some TV’s will automatically
turn off their speakers when you connect the soundbar, while others you must manually turn
their speakers off. Each TV is different, but to manually turn off TV speakers you usually
must bring up a menu of some type, and go into that menu’s “audio” or “sound” portion
where you find a selection to turn TV speakers off. If you cannot turn your TV speakers off,
the soundbar will still give you an excellent enhancement to the sound coming from your TV,
and you can easily adjust your TV sound to blend with the soundbar’s sound. To make this
adjustment, first program your TV remote to operate the soundbar, then manually turn your
TV volume down all the way down from the controls on the TV itself. Next, press the VOLUME
UP (+) control on the front of the soundbar until you have a comfortable TV listening volume
level coming from the soundbar.
Audio Products International Corp., a wholly owned subsidiary of Klipsch Group, Inc., is a wholly
owned subsidiary of Voxx International Corporation.
TROUBLESHOOTING
Soundbar does not power on
s Is the power supply plugged into a “live” outlet?
s Is the soundbar “Main Power” rear switch on?
No sound from soundbar
s Is it plugged into a “live” outlet and “Main Power” rear switch on?
s Are all connections from TV/Cable or Satellite box pushed in tightly?
s Is TV/Cable or satellite box turned on and the volume turned up?
s Is the soundbar volume turned up?
s Is the soundbar “STANDBY” off? (LED green or orange solid)
s Is the soundbar on the correct source input?
s If using digital optical hookup, make sure TV/Satellite or Cable box is outputting
PCM sound, NOT Dolby
s Turn power off then back on
TV/Cable Box/Satellite Box Remote Will Not Program
s Carefully follow all programming instructions
s Program your original TV remote to the soundbar, then try using your universal
remote without programming it.
s You may need to repeat the programming of a function in some cases
s There may be some cases where the soundbar will not be able to learn all remote
control codes
For Questions, contact Energy Customer Service:
In the United States: 1-866-441-8208
®
Digital
FRENCH - CONSIGNES DE SÉCURITÉ IMPORTANTES!
1. LIRE ces instructions.
2. CONSERVER ces consignes.
3. RESPECTER tous les avertissements.
4. SUIVRE toutes les consignes.
5. NE PAS utiliser cet appareil à proximité de l’eau.
6. NETTOYER UNIQUEMENT avec un chiffon sec.
7. NE PAS OBSTRUER les orifices de ventilation. Installer conformément aux instructions du
constructeur.
8. NE PAS installer à proximité de sources de chaleur telles que les radiateurs, les grilles de chauffage,
les cuisinières et les autres appareils (notamment les amplificateurs) dégageant de la chaleur.
9. NE PAS neutraliser le dispositif de sécurité que constitue la fiche polarisée ou à broche de
terre. Une fiche polarisée a une lame plus large que l’autre. Une fiche à broche de terre est
munie de deux lames et d’une troisième broche pour la terre. La lame large ou la troisième
broche est prévue pour la sécurité de l’utilisateur. Si la fiche fournie ne rentre pas dans la prise
de courant, demander à un électricien de remplacer cette prise d’un type trop ancien.
10. PROTÉGER le cordon d’alimentation en s’assurant qu’il ne risque pas d’être piétiné ou écrasé,
en particulier près des fiches, des blocs multiprises et de son point de sortie de l’appareil.
11. UTILISER UNIQUEMENT les accessoires préconisés par le constructeur.
12. UTILISER exclusivement avec un chariot, un support, un trépied, une console ou
un bâti recommandé par le fabricant ou vendu avec l’appareil. Lorsqu’un chariot
est utilisé, faire preuve de prudence pour déplacer l’ensemble chariot/appareil afin
d’éviter un renversement pouvant causer des blessures.
13. DÉBRANCHER cet appareil en cas d’orage ou lorsqu’il reste inutilisé pendant une longue durée.
14. CONFIER tout travail de dépannage à un réparateur professionnel compétent. Faire réparer
l’appareil en cas de dommages, par exemple : fiche ou cordon d’alimentation endommagé,
liquide renversé sur l’appareil ou objet inséré dans l’appareil, appareil exposé à la pluie ou à
l’humidité, mauvais fonctionnement ou après une chute.
15. NE PAS exposer cet appareil à des éclaboussures ou des égouttements et veiller à ce qu’aucun
récipient rempli de liquide, tel qu’un vase, ne soit posé dessus.
16. Pour isoler complètement cet appareil de l’alimentation secteur, débrancher son cordon
d’alimentation de la prise de courant.
17. La fiche secteur du cordon d’alimentation doit rester accessible.
18. NE PAS surcharger les prises murales ou les rallonges au-delà de leur capacité nominale, ce
qui risquerait de provoquer un choc électrique ou un incendie
Le point d’exclamation contenu dans un triangle équilatéral avertit l’utilisateur
de la présence de consignes d’utilisation et de maintenance importantes dans la
documentation qui accompagne l’appareil.
L’éclair fléché dans un triangle équilatéral avertit l’utilisateur de la présence d’une
« tension dangereuse » non isolée à l’intérieur de l’appareil et d’une valeur suffisante
pour constituer un risque de choc électrique.
AVERTISSEMENT: PAVERTISSEMENT : Pour réduire les risques d’incendie et d’électrocution, ne pas
exposer cet appareil à la pluie ou à l’humidité.
AVERTISSEMENT : Ne pas poser sur ce produit des sources de flammes nues telles que des bougies.
INFORMATIONS SUR LES PILES :
CE PRODUIT CONTIENT DES PILES AU LITHIUM. LEUR UTILISATION À MAUVAIS ESCIENT OU DE FAÇON
ABUSIVE PEUT ENTRAÎNER LES DANGERS SUIVANTS :
Éliminer toute pile usagée conformément aux réglementations locales. Ne pas incinérer.
ATTENTIO N
RISQUE D’ÉLECTROCUTION
NE PAS OUVRIR
AVERTISSEMENT : Ne pas ouvrir ! Risque d’électrocution. Les tensions
présentes dans cet appareil peuvent être mortelles. Cet appareil ne con-
tient pas de pièces pouvant être remplacées par l’utilisateur. Tout travail
de dépannage doit être confié à un réparateur professionnel compétent.
Placer l’équipement à proximité d’une prise de courant et veiller à faciliter l’accès au disjoncteur.
AVERTISSEMENT : Ce produit a été conçu pour être alimenté EXCLUSIVEMENT par une source
d’alimentation secteur conforme aux valeurs indiquées en face arrière, ou par le bloc d’alimentation du
produit. L’alimentation à partir d’autres sources que celles indiquées risque d’endommager le produit
de façon irréversible et d’annuler sa garantie. L’utilisation d’adaptateurs de fiches secteur doit se faire
avec prudence, car elle peut permettre le branchement du produit sur des sources de tension pour
lesquelles le produit n’a pas été conçu. Si le produit est pourvu d’un cordon d’alimentation amovible,
utiliser uniquement un cordon du même type que celui fourni avec l’appareil, ou un cordon fourni par
un distributeur ou revendeur local. En cas de doute concernant la tension d’alimentation acceptable,
s’adresser au distributeur ou au revendeur local.
INFORMATIONS DE CONFORMITÉ UE
Autorisé à porter la marque CE. Conforme à la directive sur la basse tension 2006/95/CE
de l’Union européenne, à la directive MCE 2004/108/CE de l’Union européenne, à la directive concernant la restriction de l’utilisation de substances dangereuses (RoHS) 2002/95/
CE de l’Union européenne, à la directive DEEE (Déchets d’équipements électriques et
électroniques) 2002/96/CE de l’Union européenne, à la directive sur l’éco-conception
2009/125/CE de l’Union européenne, au règlement sur l’enregistrement, l’évaluation,
l’autorisation et le contrôle des substances chimiques (REACH) 2006/121/CE de l’Union
européenne.
Ce produit contient des piles qui sont couvertes par la directive européenne 2006/66/
CE et ne peuvent pas être éliminées avec les déchets ménagers normaux. Suivre les
réglementations locales en vigueur.
AVIS DEEE
Remarque : Cette marque n’est applicable qu’aux pays de l’Union Européenne (UE) et à
la Norvège.
Cet appareil est étiqueté conformément à la directive européenne
2002/96/CE relative à la gestion des déchets des équipements électriques
et électroniques (DEEE). Cette étiquette indique que ce produit ne doit pas
être jeté avec les ordures ménagères. Il faut le déposer dans une décharge
adéquate permettant la récupération et le recyclage.
Fumée ou gaz
Chaleur
Incendie
Explosion
AVERTISSEMENT : Ne pas soumettre les piles ou batteries (bloc intégré ou piles mises en place par
l’utilisateur) à une température excessive telle que celle du rayonnement solaire, d’un incendie, etc.
AVERTISSEMENT : Risque de fuite. Utiliser uniquement le type spécifié de piles. Ne pas mélanger des
piles usées avec des neuves. Respecter la polarité. Retirer les piles des produits devant rester inutilisés
pendant longtemps. Conserver les piles dans un endroit sec.
AVERTISSEMENT : Ne pas manipuler des piles au lithium endommagées ou ayant des fuites
AVERTISSEMENT : Risque d’explosion si les piles ne sont pas correctement mises en place. Remplacer
uniquement par des piles de type identique ou des piles équivalentes.
AVERTISSEMENT : Ne pas avaler les piles ni les mettre dans la bouche. Tenir hors de portée des enfants
et des animaux domestiques.
AVERTISSEMENT : Ne pas recharger les piles non-rechargeables.

INFORMATIONS DE CONFORMITÉ FCC ET CEM CANADA:
Cet appareil est conforme à la section 15 des règlements de la FCC. L’exploitation est
autorisée aux deux conditions suivantes :
(1) cet appareil ne doit pas produire d’interférences nuisibles et (2) cet appareil doit
accepter toutes les interférences reçues, y compris celles pouvant entraîner un fonctionnement indésirable.
REMARQUE : Cet appareil a été testé et reconnu compatible avec les limites des appareils numériques de classe B, en application de la section 15 des règles de la FCC.
Ces limites ont été établies de façon à offrir une protection raisonnable contre les
interférences nuisibles dans les installations résidentielles. Ce matériel génère, utilise et
peut émettre des radio-fréquences et, s’il n’est pas installé et utilisé en accord avec les
directives fournies, peut provoquer des interférences avec les communications radio. Il
est toutefois impossible de garantir que des interférences ne se produiront pas dans une
installation donnée. Si cet appareil entraîne des interférences nuisibles à la réception
des programmes de radio ou de télévision, ce qui peut se vérifier en le mettant hors tension puis de nouveau sous tension, l’utilisateur peut prendre les mesures suivantes pour
essayer de corriger les interférences :
réorientation ou déplacement de l’antenne de réception ;
augmentation de la distance entre l’appareil et le récepteur ;
branchement de l’appareil sur une prise de courant reliée à un circuit électrique différent
de celui du récepteur ;
consulter le détaillant ou un technicien radio/TV compétent sur ce sujet.
Homologation comme appareil numérique de classe B au titre des modalités de vérification FCC section 15.
Attention : Les changements ou modifications non expressément approuvés par le fabricant peuvent annuler le droit de l’utilisateur à utiliser cet appareil.
Attention : Pour être conforme aux limites des appareils numériques de classe B, selon
la section 15 des règlements de la FCC, cet appareil doit être conforme aux limites de
la classe B. Tous les périphériques doivent être blindés et reliés à la terre. Le fonctionnement avec des périphériques non certifiés ou des câbles non-blindés peut provoquer des interférences nuisibles à la réception des programmes radio.
Cet appareil numérique de la classe B est conforme à la norme NMB-003 du Canada.
MERCI
Merci d’avoir acheté le dispositif Energy Power™ Bar One! La société Energy est l’un
des chefs de file dans la recherche et le développement audio ainsi que dans l’étude
technique et la fabrication des enceintes de haute qualité depuis 1973. Votre nouveau
dispositif Energy Power Bar One est un accessoire compact, stylisé, facile à brancher et
à utiliser, améliorant le son des émissions de télévision, des films et même de l’audio
personnelle. Sa conception compacte permet le placement de deux caissons de graves
alimentés séparément à l’intérieur de la barre de son, ce qui complémente les deux
haut-parleurs pleine gamme sans nécessiter le recours à une enceinte de graves séparée
encombrante. Il suffit de brancher (type « plug and play) pratiquement à tous les
téléviseurs et en quelques minutes, vous pouvez vous relaxer et regarder vos émissions
télévisées ou vos films préférés.
LISTE DES PIÈCES
1. BARRE DE SON
2. BLOC D’ALIMENTATION/CORDON D’ALIMENTATION DE LA BARRE DE SON
3. UN CÂBLE DE 1,6 M (5,3 PIEDS) D’UNE FICHE DE 3,5 MM VERS DEUX FICHES RCA
4. UN CÂBLE OPTIQUE NUMÉRIQUE DE 1,8 M (5,9 PIEDS)
5. DEUX PIEDS EN CAOUTCHOUC
6. UNE TÉLÉCOMMANDE
7. UN GUIDE DE RACCORDEMENT ET UN GUIDE DE PROGRAMMATION
8. UN GABARIT POUR MONTAGE MURAL DE LA BARRE DE SON
9. CE MANUEL D’UTILISATION
AVANT DE LA BARRE DE SON
VOYANT D’ÉTAT
SOURCE
SOURDINE
VOLUME HAUT
VOLUME BAS
ARRIÈRE DE LA BARRE DE SON
Alimentation principale
VOYANT D’ÉTAT DE LA BARRE DE SON
ROUGE : En mode VEILLE (« sommeil »)
VERT : Entrée du câble optique numérique
activée
ORANGE : Entrée gauche/droite (L/R) RCA
analogique activée
ORANGE (clignotant) : Entrée RCA mise
en sourdine
VERT (clignotant) : Entrée numérique
mise en sourdine
ROUGE (clignotant) : Échec de
l’apprentissage d’une commande de
télécommande
ROUGE, VERT OU ORANGE CLIGNOTANT
UNE FOIS : Un signal de télécommande
a été reçu
Entrées RCA analogiques
TÉLÉCOMMANDE
MARCHE/ARRÊT
SOURCE
VOLUME HAUT DU
CAISSON DE GRAVES
VOLUME HAUT
VOLUME BAS
VOLUME BAS DU
CAISSON DE GRAVES
SOURDINE
AMBIOPHONIE 3D
FONCTION DISTANTE VOYANT D’ÉTAT
MARCHE/ARRÊT
SOURCE
SOURDINE
3D
VOLUME HAUT
VOLUME BAS
VOLUME HAUT DU CAISSON
DE GRAVES
VOLUME BAS DU CAISSON
DE GRAVES
VERT : Entrée du câble optique numérique activée
ORANGE (CLIGNOTANT) : Entrée RCA en sourdine
VERT (CLIGNOTANT) : Entrée numérique en sourdine
ROUGE (UN CLIGNOTEMENT) : Ambiophonie désactivée
VERT (UN CLIGNOTEMENT) : Ambiophonie activée
VERT OU ORANGE (SCINTILLEMENTS) : Un signal
VERT OU ORANGE (SCINTILLEMENTS) : Un signal
VERT OU ORANGE (SCINTILLEMENTS) : Un signal
VERT OU ORANGE (SCINTILLEMENTS) : Un signal
ROUGE : Veille
VERT/ORANGE : Activé
ORANGE : Entrée RCA activée
de télécommande a été reçu
de télécommande a été reçu
de télécommande a été reçu
de télécommande a été reçu
PLACEMENT/INSTALLATION
Placement/montage mural de la barre de son : La barre de son est conçue pour être
placée sur une surface plate directement en face du téléviseur à l’aide des deux pieds
fournis, sur une étagère directement au-dessus ou au-dessous du téléviseur dans un
meuble sur pieds ou encore montée sur un mur (en utilisant les encoches en trou de
serrure situées à l’arrière de la barre de son) sous un téléviseur lui aussi monté sur un
mur. Pour un montage mural, raccordez tout d’abord le câble fourni (ou un autre câble)
au téléviseur, puis utilisez le gabarit de montage mural fourni pour la mise en place de
la barre de son. Si les deux trous de montage sont percés dans des poteaux d’ossature
murale, vissez deux vis à bois dans ces trous pour y suspendre la barre de son. S’il n’y
a pas de poteaux muraux pour percer les trous, utilisez des ancrages de cloison sèche
pouvant soutenir au moins 4,5 kg pour y suspendre la barre de son. Raccordez le câble
à partir du téléviseur (voir la section Raccordement) à la barre de son et suspendez la
barre de son au mur.
Entrée d’alimentation
Entrée du câble
optique numérique
Téléviseur
Téléviseur

RACCORDEMENT
OFF ON
3.5mm/Headphone
1. Raccordement de la barre de son au téléviseur : La barre Energy Power Bar One
doit être raccordée à votre téléviseur, votre décodeur de câblodistribution ou votre
récepteur satellite. Si vous avez d’autres appareils raccordés à votre téléviseur,
par exemple un lecteur de DVD/Blu-ray, un système de jeu, etc., raccordez la barre
Energy Power Bar One au téléviseur afin de pouvoir écouter tous ces appareils et
votre téléviseur par la barre Energy Power Bar One. Si aucun autre appareil n’est
raccordé à votre téléviseur, sauf un décodeur de câblodistribution ou un décodeur
satellite et que vous recevez vos programmes de télévision à partir de ce décodeur,
vous pouvez raccorder la barre Energy Power Bar One à ce décodeur (avec le câble
optique numérique fourni) ou à votre téléviseur. Trois méthodes permettent de raccorder la barre Energy Power Bar One à votre téléviseur, votre décodeur satellite ou
votre décodeur de câblodistribution.
A. Sortie 3.5mm/Headphone (3,5 mm/casque)
Une fois que vous avez placé la barre Energy Power Bar One à l’endroit qui vous convient,
branchez une extrémité du câble d’une fiche de 3,5 mm vers deux fiches RCA à la prise de
sortie audio 3,5mm/casque de votre téléviseur et branchez l’autre extrémité du câble dans
les prises d’entrée RCA L/R à l’arrière de la barre de son.
Panneau de raccordement du téléviseur
Câble de 3,5 mm vers
3.5mm/Headphone
RCA mâle (fourni)
C. Câble optique numérique
Étant donné que la plupart des téléviseurs haute définition, des décodeurs satellites
et des décodeurs de câblodistribution sont dotés d’une sortie audio optique numérique
(DIGITAL OPTICAL AUDIO OUTPUT), le câble nécessaire a été inclus. Retirez les ca-
puchons en plastique à l’extrémité du câble. Il suffit de raccorder une extrémité du
câble à la sortie correspondante du téléviseur, du décodeur satellite ou du décodeur
de câblodistribution et de raccorder l’autre extrémité du câble à l’entrée optique
numérique sur le panneau arrière de la barre Energy Power Bar One.
REMARQUE : Si vous recevez certaines ou toutes vos chaînes en utilisant une
antenne séparée branchée à votre entrée coaxiale/d’antenne de télévision, il se
peut qu’aucun son ne soit reçu de ces chaînes en utilisant le raccordement du
câble optique numérique.
Panneau de raccordement du téléviseur
Panneau de raccordement de la barre de son
Câble optique
numérique (fourni)
Panneau de raccordement de la barre de son
B. Câble RCA
Vous pouvez utiliser les sorties audio analogiques droite et gauche de votre appareil et les
brancher aux entrées analogiques droite et gauche de votre appareil sur le panneau arrière
de la barre Energy Power Bar One. (câble NON fourni).
Panneau de raccordement du téléviseur
3.5mm/Headphone
Câble RCA mâle vers
RCA mâle (non fourni)
2. Branchez le cordon c.a. dans bloc d’alimentation de la barre de son dans l’entrée
c.c. à l’arrière de la barre de son. Branchez le bloc d’alimentation c.a. dans une
prise électrique sous tension et activez l’interrupteur d’alimentation principale à
l’arrière de la barre de son en le passant à la position « marche ». Assurez-vous
que le voyant d’état à l’avant de la barre de son est éclairé en vert ou orange
continu (appuyez une fois sur un bouton si le voyant reste rouge).
Panneau de raccordement de la barre de son
Bloc d’alimentation et
cordon d’alimentation c.a.
PROGRAMMATION DE LA TÉLÉCOMMANDE DE TÉLÉVISION POUR LE
FONCTIONNEMENT DE LA BARRE DE SON
Les trois étapes suivantes permettent de programmer chaque fonction de vos boutons
de télécommande de votre téléviseur ou de votre décodeur (SOURDINE, VOLUME HAUT et
VOLUME BAS). SI LA BARRE DE SON EST EN MODE VEILLE (voyant d’état rouge allumé en
continu), appuyez sur le bouton <SOURCE> de la barre de son jusqu’à ce que le voyant
d’état s’allume en continu en vert.
Panneau de raccordement de la barre de son
Panneau de
commande avant
de la barre de son
VOYANT D’ÉTAT
SOURCE
SOURDINE
VOLUME HAUT
VOLUME BAS
 Loading...