

Eneo Fastrax III EDC-3371, EDC-3222B Quick Installation Manual
1
Quick Installation Guide
Fastrax III
1/4” Day/Night Dome Camera, PTZ, 37x
EDC-3371

2
Contents
1. Safety Instructions / Maintenance ...................................................................................................................................................................................3
2. Introduction ....................................................................................................................................................................................................................
3
2.1 Features ............................................................................................................................................................................................................. 3
3. Installation and Configuration ..........................................................................................................................................................................................
5
3.1 Package Contents............................................................................................................................................................................................... 5
3.2 Basic Configuration of Fastrax III Dome Camera System .....................................................................................................................................6
3.3 Setting Dome Camera Termination ..................................................................................................................................................................... 7
3.4 Fail-safe Network ............................................................................................................................................................................................... 8
3.5 Setting Dome Camera Address (ID) ..................................................................................................................................................................... 9
3.6 Setting Dome Camera Protocol ........................................................................................................................................................................ 10
3.7 Connections .....................................................................................................................................................................................................11
3.8 Getting Started ................................................................................................................................................................................................. 11
4. Program and Operation .................................................................................................................................................................................................
12
4.1 Dome Camera Selection ................................................................................................................................................................................... 12
4.2 Accessing On-Screen Menu Utility .................................................................................................................................................................... 12
4.3 How to control On-Screen Menu Utility .............................................................................................................................................................12
4.4 More Information .............................................................................................................................................................................................. 12
5. Short Cut Key ................................................................................................................................................................................................................
13
6. Specifications ...............................................................................................................................................................................................................14
7. Dimensional Drawings ..................................................................................................................................................................................................
16
NOTE: The full manual is only available in English.
Komplette Betriebsanleitung
Full Manual
Mode d’emploi complète
Kompletna Instrukcja instalacji i obsługi
⇒
www.videor.com
www.eneo-security.com

3
1. Safety Instructions / Maintenance
• Read these safety instructions and the operation manual first before you install and commission the camera.
• Keep the manual in a safe place for later reference.
• Protect your camera from contamination with water and humidity to prevent it from permanent damage.
Never switch the camera on when it gets wet. Have it checked at an authorized service center in this case.
• Never operate the camera outside of the specifications as this may prevent the camera functioning.
• Do not operate the cameras beyond their specified temperature, humidity or power ratings.
• Operate the camera only at a temperature range of 0°C to +50°C and at a humidity of max. 90%.
• To disconnect the power cord of the unit, pull it out by the plug. Never pull the cord itself.
• Pay attention when laying the connection cable and observe that the cable is not subject to heavy loads, kinks, or damage and no moisture can get in.
• Do not attempt to disassemble the camera board from the dome.
• The warranty becomes void if repairs are undertaken by unauthorized persons. Do not open the camera housing.
• Never point the camera towards the sun with the aperture open. This can destroy the sensor.
• Installation, maintenance and repair have to be carried out only by authorized service centers.
Before opening the cover disconnect the unit from mains input.
• Contact your local dealer in case of malfunction.
• Only use original parts and original accessories from Videor E. Hartig GmbH.
• Do not use strong or abrasive detergents when cleaning the dome. Use a dry cloth to clean the dome surface.
In case the dirt is hard to remove, use a mild detergent and wipe gently.
• All openings provided in the housing for assembly purposes must be closed and/or sealed.
• The installer is responsible for ensuring that the degree of protection as per the technical specifications is upheld, e.g. by using all enclosed
gasket seals and O-rings, by waterproofing the cable exits with silicon or through laying the cable in such a way that the cable does not act as
a „gutter”.
• During assembly, care must be taken to ensure that existing seals are correctly inserted and are not displaced as a result of assembly.
You must not continue to use damaged seals.
NOTE: This is a class A digital device. This digital device can cause harmful interference in a residential area;
in this case the user may be required to take appropriate corrective action at his/her own expense.
2. Introduction
2.1 Features
The Fastrax III dome camera and the keyboard controller make up the building blocks for any surveillance/security system. Using multiple Keyboard
Controllers and multiple dome cameras, no place is too large for monitoring. Extensible and flexible architecture facilitates remote control functions for a
variety of external switching devices such as multiplexers and DVRs.
• Built-in optical power zoom camera with True Night Shot function
• 240 Preset positions.
• 8 Tours consist of Preset, Pattern, Auto-Scan and other Tours can be programmed with over 300 functions and Preset location.
While moving, each Preset scan can be watched in smooth Vector Scan mode.
• 16 Auto Scans with the normal, the vector, and the
random mode and the Endless Auto-Pan with 13 speed steps
• 8 Patterns (up to 500seconds)
• 8 Privacy zones
• 16 Area Titles
• 8 Alarm inputs / 4 Aux outs (NC & NO)
• Variable speed from 0.1°/sec to 380°/sec
Three Variable speed (SLOW, NORMAL, TURBO). Turbo speed is Max 380°/sec with CTRL key pressed
• Pan / Tilt speed is inversely proportional to the zoom ratio with the option.
• Maximum speed is 380°/sec when preset command
• Auto Calibration from 0.1° to 6° (Tilt range is 0° to 180°)
• Programmable user preferences (alarm, preset, title, etc.)
• 180° Digital Flip or 90° Auto Flip depended on the model
• Up to 999 selectable camera addresses (3999 by software setting)
• Multi-Language Menu Display, Password Confirmation
• Function Run Menu using DVR without function key (Pattern, SCAN, ...)
• Built-in RS-485/422 receiver driver
• Optional Clear bubble with black liner (shelter) for concealing the camera
• Optional Tinted Bubble, Indoor & Outdoor pendant housing with heater & blower, Indoor Flush mount, Parapet mount & Roof Top mount

4
Figure 1 - Typical System Configuration
Figure 2 - Optional Assemble bubble ring ass’y
NOTE: It is recommended to remove camera window for improving picture quality when you assemble bubble ring ass’y.
CAUTION: When installing a Fastrax dome on a high pole outside, caution should be taken to avoid vibration and shaking of Fastrax dome due to
windload or shock of passing heavy vehicles. If pole is not stable enough, it may cause malfunction in accurate tilt positioning.
up to 255 multiplexers
Alarm Input
(up to 8)
<Sensor>
<Siren>
<Flashing light>
Alarm
Output
(up to 4)
up to 99 DVRs
up to 254 cameras including 64 alarm modes
push
push
remove
camera window
bubble ring ass’y
screw
Remove window Assemble bubble ring ass’y
5
3. Installation and Configuration
3.1 Package Contents
The package contains the following:
1x Fastrax III (Dome Camera)
1x Bubble ring (optional)
1x Instruction manual
3x Assembly screws for attaching Fastrax III
3x Plastic anchor
1x 10Pin Connector
2x 12Pin Connector
CAUTION: Be sure to have caution labels (E version only) on both body and base of the camera.
Different version will not support alarm input and output.
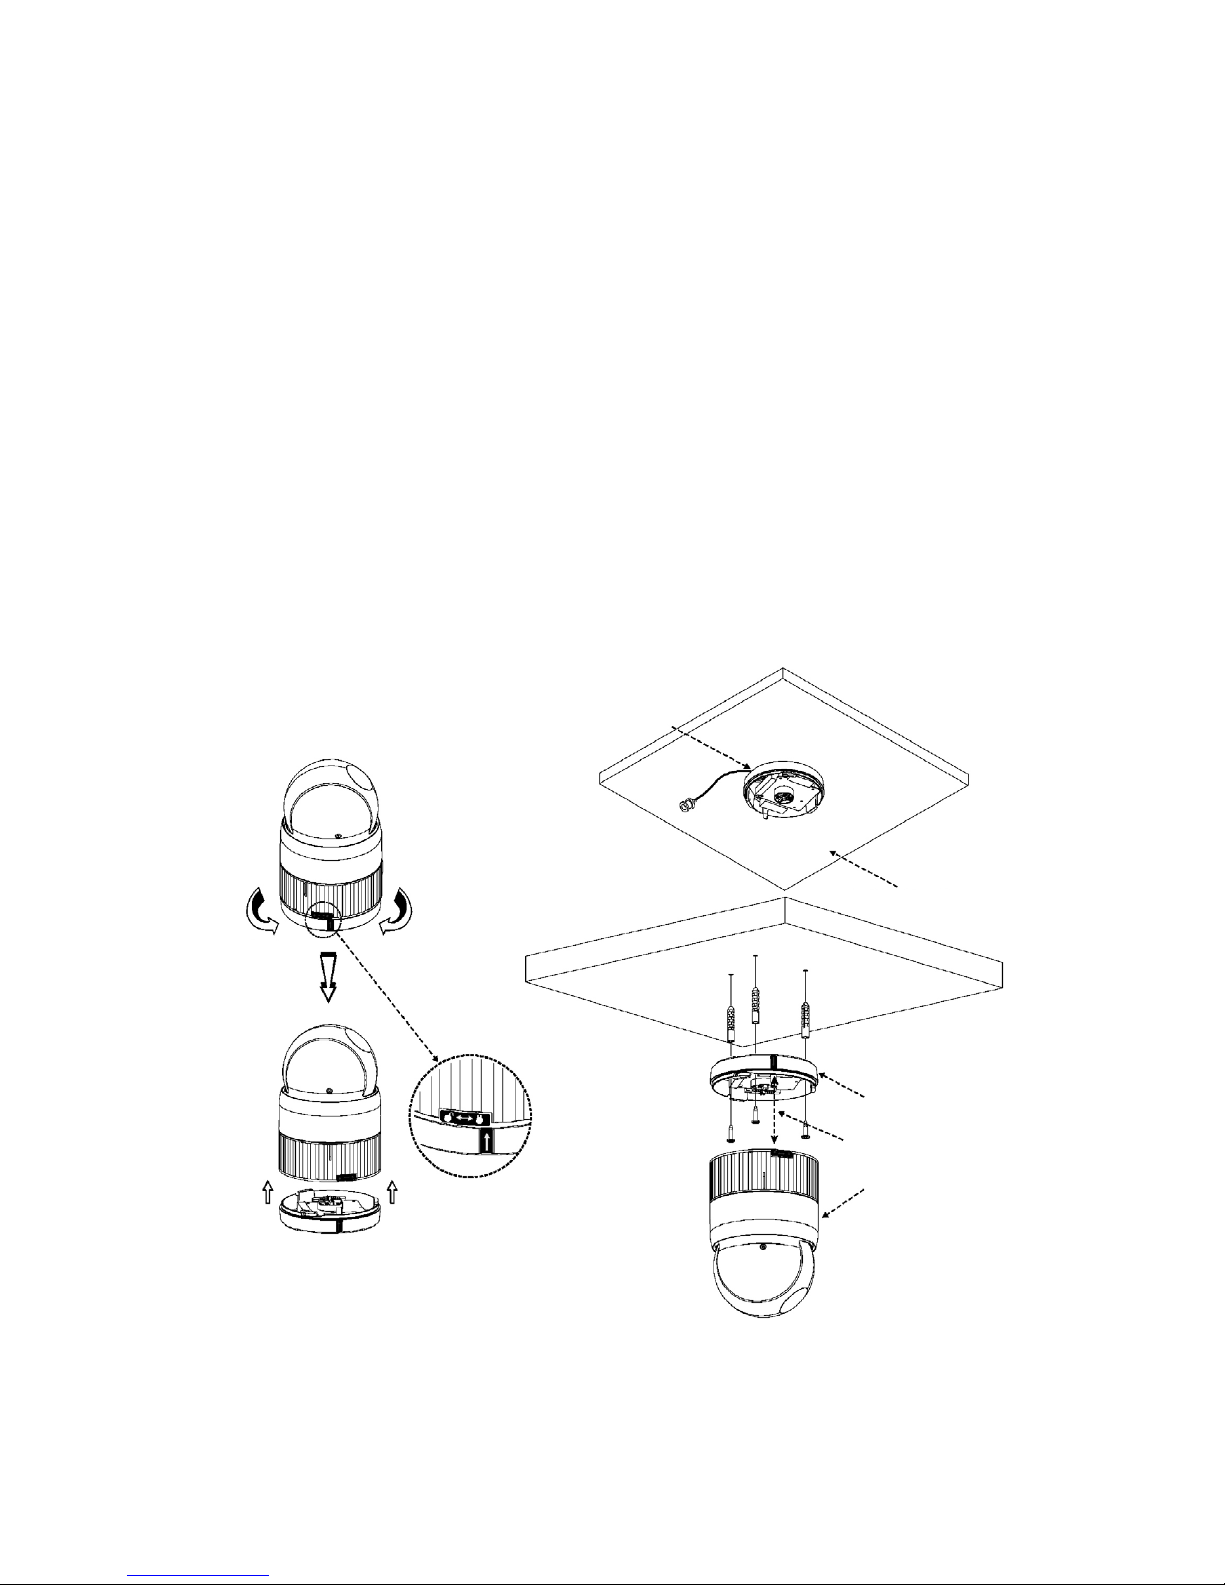
The dome camera is for use in surface mounting applications and the mounting surface should be capable of supporting loads up to 4.5kg.
The dome camera’s base should be attached to a structural object, such as a hard wood, wall stud or ceiling rafter that supports the weight of the dome
camera.
Figure 3 - Installation
Cable entry
Surface (ceiling)
Base
Align extruded tap in the base to
the keyhole on the PCB in the body
Body
LockUnlock
Lock
 Loading...