


 Loading...
ENHWI-N3
802.11n Wireless Router
User Manual
1

|
TABLE OF CONTENTS |
|
1 |
INTRODUCTION ........................................................................................................................ |
3 |
2 |
KEY FEATURES.......................................................................................................................... |
4 |
3 |
PACKAGE CONTENTS.............................................................................................................. |
5 |
4 |
PRODUCT LAYOUT................................................................................................................... |
6 |
5 |
NETWORK + SYSTEM REQUIREMENTS............................................................................. |
8 |
6 |
ENHWI-N3 PLACEMENT.......................................................................................................... |
8 |
7 |
SETUP LAN, WAN....................................................................................................................... |
9 |
8 |
PC NETWORK ADAPTER SETUP (WINDOWS XP) ............................................................ |
10 |
9 |
BRING UP ENHWI-N3.............................................................................................................. |
12 |
10 |
SMART WIZARD ...................................................................................................................... |
12 |
11 |
INITIAL SETUP ENHWI-N3.................................................................................................... |
26 |
12 |
AP ROUTER MODE.................................................................................................................. |
27 |
13 |
REPEATER MODE.................................................................................................................. |
84 |
APPENDIX A – FCC INTERFERENCE STATEMENT.................................................................. |
96 |
|
APPENDIX B – IC INTERFERENCE STATEMENT ..................................................................... |
97 |
|
2

I - Introduction
Congratulations on your purchase of ENHWI-N3 802.11n Wireless Router. ENHWI-N3 is backward compatible with wireless devices running under the 802.11g and 802.11b technologies. ENHWI-N3 is not only a Wireless Access Point, but also a wireless Repeater that extends your wireless coverage when used as a Repeater Mode in a established Local Area Networking or LAN, as well as 4-port 10/100 Mbps full-duplex Switch that connects your wired Ethernet LAN devices together at incredible speed.
At 150 Mbps wireless transmission rate, the Access Point built into the router uses advanced MIMO (Multi-Input, Multi-Output) technology to transmit multiple streams of data into a single wireless channel providing a seamless access to multimedia contents. Its robust RF signal travels farther, eliminates dead spots and extends network range. For data protection, wireless security and privacy, the ENHWI-N3 encodes all wireless transmissions with WEP, WPA, and WPA2 data encryptions.
With built-in DHCP Server & a powerful SPI firewall, the ENHWI-N3 protects your computers against intruders and known Internet attacks, and still provides safe and secured VPN pass-through. With data rate at incredible speed and QoS function, the ENHWI-N3 is ideal for media-centric applications such as streaming video, internet gaming, and VoIP telephony to run multiple media-intense data streams through the network at the same time, with no degradation in performance.
3

II - Key Features
Features |
Advantages |
|
|
Incredible Data Rate up to 150 Mbps** |
Easily handled heavy data loads |
|
such as MPEG audio / video |
|
streaming, |
|
|
IEEE 802.11b/g/n Compliant |
Fully Interoperable with IEEE |
|
802.11b/g/n compliant devices |
|
with legacy protection |
|
|
Four 10/100 Mbps Fast Switch RJ-45 |
Scalability. Extend your network |
Ports (with Auto-Crossover) |
computers. |
|
|
Firewall supports, DMZ, MAC Filter, IP |
Use to prevent attacks from |
Filter, URL Filter, ICMP Blocking, SPI, |
hackers or viruses from the |
Port Mapping, Port Forwarding, Port |
internet |
Trigger |
|
|
|
Support 802.1x Authenticator, 802.11i |
Provide mutual authentication |
(WPA/WPA2, AES), VPN pass-through |
(Client and dynamic encryption |
|
keys to enhance security) |
|
|
WDS (Wireless Distribution System) |
Make Wireless AP and Bridge |
|
mode simultaneously as a |
|
wireless repeater |
|
|
** Theoretical wireless signal rate based on IEEE standard of 802.11a, b, g, n chipset used. Actual throughput may vary. Network conditions and environmental factors lower actual throughput rate. All specifications are subject to change without notice.
4

III - Package Contents
Check and make sure that none of the items listed below are missing. Do not discard the packing materials, in case of return; the unit must be shipped back in its original packaging.
1.ENHWI-N3 Wireless 802.11n Router
2.100V~240V Power Adapter (Use only the supplied power adapter)
3.One piece 2 dBi 2.4 GHz SMA Upgradeable Antenna
4.Quick Installation Guide
5.CD-ROM (Smart Install and User’s Manual)
5

IV - Product Layout
|
|
Front Panel View |
|
|
|
|
|
|
LED Lights |
|
Description |
|
|
|
|
|
|
|
Lights up in Red when powered ON. |
|
POWER |
|
Blinks on TEST/RESET |
|
|
|
|
|
|
|
|
|
|
|
Lights up in Green when Wireless LAN is |
|
WLAN |
|
enabled. Blinks on traffic |
|
|
|
|
|
|
|
|
|
|
|
Blinks in Green on data traffic |
|
1 to 4 |
|
|
|
|
|
|
|
|
|
Lights up in Green when WAN port is use |
|
WAN |
|
|
|
|
|
|
6
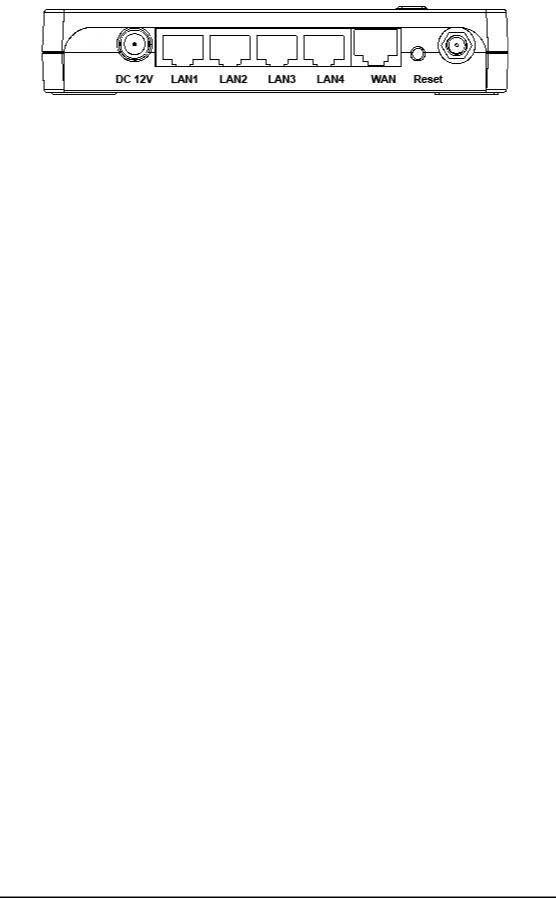
|
|
Rear View |
|
|
|
|
|
|
Item |
|
Description |
|
|
|
|
|
|
|
Press and release this button to reboot the |
|
Reset |
|
device. |
|
|
|
Press and hold this button for 10 seconds |
|
|
|
to load the factory default settings of the |
|
|
|
system. |
|
|
|
|
|
WPS™ |
|
Click this button to start WPS™ function. |
|
|
|
|
|
|
|
|
|
|
|
Power connector, connects to DC 12V 1As |
|
DC 12V |
|
Power Adapter |
|
|
|
|
|
|
|
Ports 1 to 4 Local Area Network |
|
LAN1 ~ LAN4 |
|
(LAN)10/100 Mbps RJ-45 ports |
|
|
|
|
|
|
|
Wide Area Network (WAN) port or |
|
WAN |
|
Internet Port. Connects to xDSL or Cable |
|
|
|
Modem |
|
|
|
|
7

V - Network + System Requirements
To begin using the ENHWI-N3, make sure you meet the following as minimum requirements:
hPC / Notebook Computer
hOperating System – Microsoft™ Windows® 98SE/ME/XP/2000/ Windows Vista™
h1 Free Ethernet port
hWi-Fi adapter card – optional.
hExternal xDSL (ADSL) or Cable modem with an Ethernet port (RJ-45).
hA Web Browser (Internet Explorer, Safari, Firefox, Opera etc.)
hFew Ethernet compatible CAT5 or better cables.
VI - ENHWI-N3 - Where to place
You can place ENHWI-N3 on a desk or other flat surface, or you can mount it on a wall. For optimal performance, place your ENHWI-N3 Wireless Router in the center of your office (or your home) in a location that is away from any potential source of interference, such as a metal wall or microwave oven. This location must be close to a power connection and your ADSL/Cable modem. If the antennas are not positioned correctly, performance loss can occur.
8
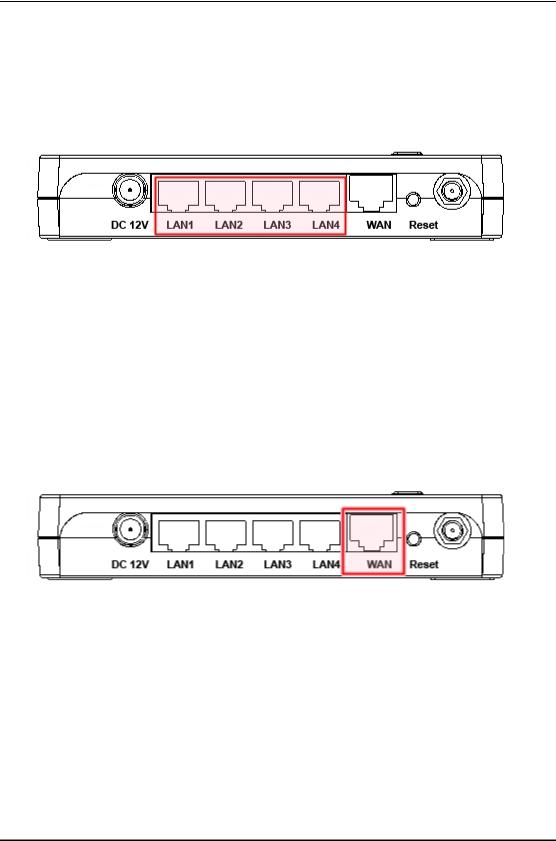
VII - Setup LAN, WAN
LAN connection:
Connect Ethernet cable between your PC/Notebook LAN port & one of the 4 available LAN ports on ENHWI-N3.
WAN connection:
Connect Ethernet cable between WAN port of your ADSL/CABLE modem & WAN port of ENHWI-N3. Make sure your ADSL/CABLE modem is already setup and working well. Contact your ISP (Internet Service Provider) if you have any questions.
9

VIII - PC Network Adapter Setup (Windows XP)
•Assuming your PC or Laptop is equipped with a Network Interface Card. Click on START Æ select “Control panel” Æ From the Control Panel Window select “Network Connections”
•Right-click (Use the right button of your mouse) the “Local Area Connection” icon then select and click “Properties”
10
•Click to Highlight the “Internet Protocol (TCP/IP)” then click “Properties” button
• Select the “General” tab.
a.ENHWI-N3 supports the DHCP function, please select both “Obtain an IP address automatically” and “Obtain DNS server address automatically”
11

IX - Power up the ENHWI-N3
Connect the supplied power-adapter to the power port and connect it to a wall power outlet. The ENHWI-N3 automatically enters and run the self-test phase. The Power LED will light a steady red light indicating that the ENHWI-N3 is ready for operation.
X - Smart Wizard
Before you start the ENHWI-N3 router’s Smart Wizard check for the followings:
•Internet connection should be setup & ready to use (ADSL or cable modem).
•Modem must provide an RJ-45 port to connect with a ENHWI-N3 Router
•Microsoft Windows compatible PC/Notebook with UPnP enabled Network Interface Card adapter. (This can be found in your network cards advanced properties within MS Windows)
•CAT 5 network cable(s), RJ-45 port on PC/Notebook.
Step 1: Connect ENHWI-N3 “WAN” port & your Modem’s LAN port with RJ45 cable.
Step 2: Power-up the ENHWI-N3. The red power LED in the front the panel should light up & stay on to indicate that the router is ready
Step 3: Connect one of the four available LAN ports to the PC/Notebook RJ-45 NIC port with a CAT 5 RJ-45 network cable.
Step 4: Insert the ENHWI-N3 CD into your CDROM drive and the “SMART WIZARD” should run automatically after just a few seconds. If not, open the Windows Explorer, go to the root directory of the CD. Double click on the Wizard.exe file.
12

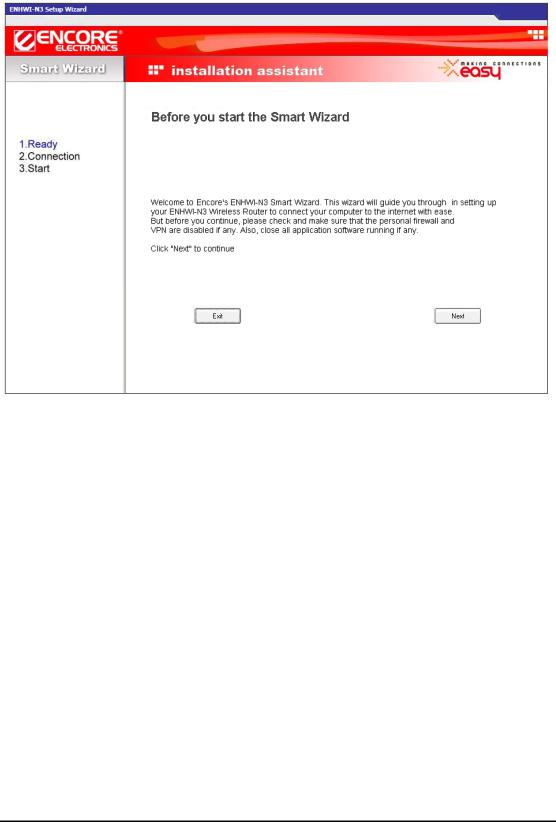
A welcome screen will pop up a few seconds and then will disappear.
13

NOTE: The product picture may be different from what you have
Click Setup Wizard to run basic setup settings of your ENHWI-N3. Click User Manual to open the user manual.
Click Adobe Reader to install Adobe Acrobat reader on your PC/Notebook. Click EXIT when finish or anytime you want to abort.
14
Setup Wizard
Click  to proceed. Click <Exit> to abort.
15
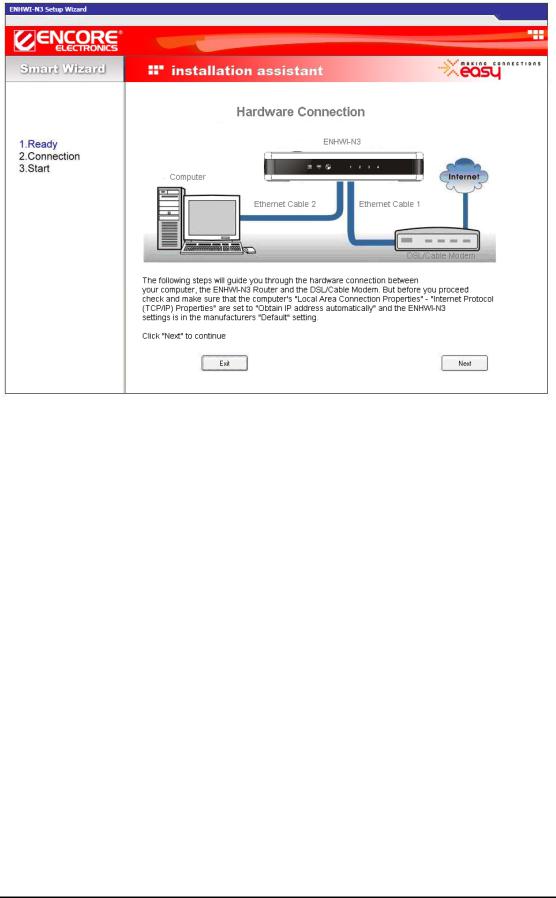
Make sure your DSL/CABLE modem is setup and working prior to this installation procedures. If not, call your Internet Service Provider and have them check and help you in setting up your DSL/Cable modem.
Click  to proceed.
16

Check the MODEM and ENHWI-N3 connection. It should be as shown below.
17

Check power connection for modem as well as ENHWI-N3. Make sure the antenna is connected to rear panel of ENHWI-N3. Click <Next> to proceed.
Notice the LED will light up at this stage. If not, check your procedures again.
18

Click  to configure WAN & Wireless settings.
19

Enter the factory default username is admin and password is also admin. Click  to continue. Your default browser screen will connect to the ENHWI-N3 User Interface screen using the factory default address http://192.168.0.1 .
Click |
to enter the mode selection screen. |
20
Select the mode your ENHWI-N3 is going to use. The Setup Wizard will skip the WAN configuration under AP Repeater Mode.
Click  and your ENHWI-N3 will automatically detect your “Internet” Network settings.
21

The Smart Wizard will detect the DHCP and PPPoE connections automatically. In the picture above it shows that the Smart Wizard detected a DHCP server. You can choose the detected service type or select “Others” to setup the WAN settings manually.
22

Here, you can configure the host name and MAC address of the ENHWI-N3. The “Clone MAC Address” button clones the MAC address of your PC and use it as the MAC address of your ENHWI-N3 router instead of the real MAC address of the router.
The Smart Wizard has finished setting up the WAN Configuration portion. Click
 to proceed to other portions.
23

Setting up Wireless LAN
Enter the name for your wireless network SSID (the default is ENCORE59FE74) and security key (default is 1234567890). Move and point your mouse over to the security level blocks from the weakest (red block) to the strongest (green block), and click on the selected block to select the level of security you desired. The “Key” type will depend on the wireless security you selected. If you choose WEP as the wireless security you will be prompted whether an ASCII or Hexadecimal is your preferred key type. Hexadecimal requires 10 character digits on the KEY: field.
Click  to proceed
24

To save configuration changes click
NOTE:
After the Wireless settings are saved and the ENHWI-N3 is rebooted, you need to reconnect your WLAN client using the new security settings you just changed. You will need to reenter the new wireless security key for the client and the ENHWI-N3 reestablish wireless connections.
25

XI – How to login to the ENHWI-N3 web based Graphical User Interface
The ENHWI-N3 use a web based user interface for setting up your router’s configuration, it can be access through your web browser such as Internet Explorer or Mozilla Firefox.
ENHWI-N3 web based user interface login procedure
1.OPEN your browser (Example: Internet Explorer, Mozilla, Netscape, etc).
2.Type-in http://192.168.0.1 exactly in address field and hit the [Enter] key on your keyboard.
3.Type-in the ENHWI-N3 Username and Password (the factory default is admin and admin)
4.Click  to navigate into the ENHWI-N3 configuration home page.
5.You will see the configuration home page of the ENHWI-N3 as follows.
26

ENHW-N3 Home Page Screen
XII - The AP Router Mode
SYSTEM
Shows the Uptime, Hardware information, Serial number as well as the Firmware version information and other vital information
z Status Tab
This page allows you to monitor the status of your router.
27

1. WAN Settings: Scroll down to see the full information. This section displays whether the WAN port is connected to a Cable / DSL modem. It also displays the router’s WAN IP address, Subnet Mask, ISP Gateway, MAC address and the Primary DNS.
28
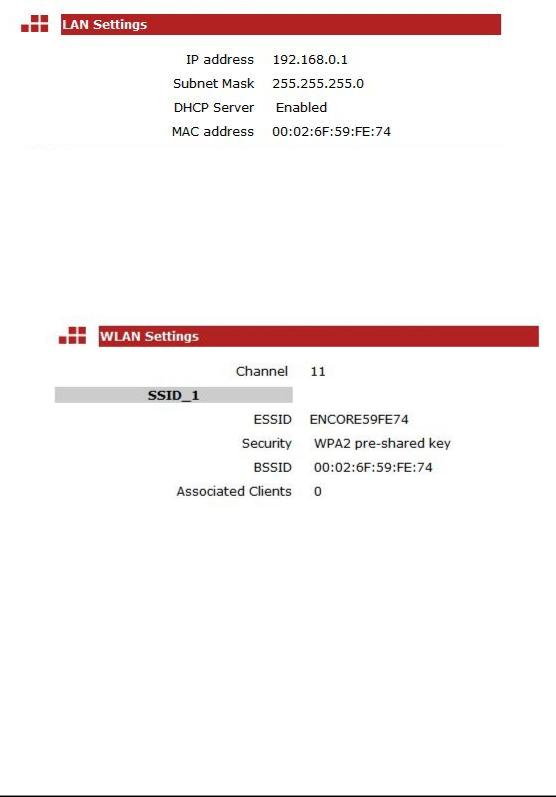
2. LAN Settings: Scroll down to see this section. Displays the ENHWI-N3 Router LAN port’s current information. It also shows whether the DHCP Server is enabled or disabled.
2.WLAN Settings: Scroll down to see this section. This section displays the current WLAN configuration settings. The wireless configuration details such as the SSID, Security settings, ESSID, BSSID, Channel number and wireless clients connected info are briefly shown.
z LAN Tab
29

The LAN Tab is where LAN settings can be change. If you are an entry level user, after hooking up the cables, try to access the internet from your computer. If you can open a website with no problem, leave the settings as it is. If changes were made,
click the  button to save the changed configurations.
LAN IP
IP address: 192.168.0.1 is the router’s LAN manufacturers default IP address (this will also be the “Default Gateway” IP address of your LAN clients). It can be change based on your LAN design and configurations. Typical designs don’t need to change this IP address.
IP Subnet Mask: 255.255.255.0 specifies the Subnet Mask address for your LAN segment. This is based on the IP address range used.
802.1d Spanning Tree: This is disabled by default. If 802.1d Spanning Tree function is enabled, this router will use the spanning tree protocol to prevent network loops.
30
Loading...