

E-MU Systems Planet Phat Owner's Manual

Fhlanett Phatt
OPERATION MANUAL
E-mu Systems, Inc.
Operation Manual
© 1996 E-mu Systems, Inc.
All Rights Reserved
• FI542 Rev. B
E-mu World Headquarters
E-mu Systems, Inc. U.S.A.
P.O. Box 660015
Scotts Valley, CA USA
95067–0015
Telephone: 408-438-1921
Fax: 408-438-8612
Important Notice:
In order to obtain warranty service on your Planet Phatt unit, the serial number
sticker must be intact and you must have a sales receipt or other proof of purchase.
If there is no serial number sticker on your Planet Phatt, please contact E-mu
Systems at once.
This product is covered under one or more of the following U.S. patents:
4,404,529; 4,506,579; 4,699,038; 4,987,600; 5,013,105; 5,072,645;
5,111,727; 5,144,676; 5,170,367; 5,248,845; 5,303,309; 5,317,104; 5,342,990;
5,430,244 and foreign patents and/or pending patents. Planet Phatt is a registered
trademark of E-mu Systems, Inc.
Europe, Africa, Middle East
E-mu Systems, Ltd.
Suite 6, Adam Ferguson House
Eskmills Industrial Park
Musselburgh, East Lothian
Scotland, EH21 7PQ
Telephone: +44 (0) 131-653-6556
Fax: +44 (0) 131-665-0473
PRINTED AND MADE IN THE USA
WARNING: READ THIS FIRST!
IMPORTANT SAFETY INSTRUCTIONS
Use in countries other than the U.S.A. may require the use of a different line
cord or attachment plug, or both. To reduce the risk of fire or electric shock,
refer servicing to qualified service personnel. To reduce risk of fire or electric
shock do not expose this product to rain or moisture.
GROUNDING INSTRUCTIONS
This product must be grounded. If it should malfunction or break down,
grounding provides a path of least resistance for electric current, reducing the
risk of electric shock. This product is equipped with a cord having an equipment-grounding conductor and a grounding plug. The plug must be plugged
into an appropriate outlet properly installed and grounded in accordance
with all local codes and ordinances.
DANGER
Improper connection of equipment grounding conductor can result in the
risk of electric shock. Check with a qualified electrician or service personnel
if you are in doubt as to whether the product is properly grounded. Do not
modify the plug provided with this product — if it will not fit the outlet,
have a proper outlet installed by a qualified technician.
CAUTION
If the 9091, Planet Phatt is rack mounted, a standard 19-inch open frame
rack must be used.
USER-MAINTENANCE INSTRUCTIONS
1. Planet Phatt should be kept clean and dust free. Periodically wipe the unit
with a clean, lint free cloth. Do not use solvents or cleaners.
2. There are no user lubrication or adjustment requirements.
3. Refer all other servicing to qualified service personnel.
INSTRUCTIONS PERTAINING TO A RISK OF FIRE,
ELECTRIC SHOCK, OR INJURY TO PERSONS
WARNING; When using electric products, basic precautions should
always be followed, including the following:
1. Read all instructions before using Planet Phatt.
2. To reduce the risk of injury, close supervision is necessary when Planet
Phatt is used near children.
3. Do not use Planet Phatt near water — for example near a bathtub, washbowl, kitchen sink, in a wet basement, on a wet bar, or near or in a swimming pool.
This symbol is intended to alert
the user to the presence of
important operating and
maintenance (servicing)
instructions in the literature
accompanying the appliance.
This symbol is intended to alert
the user to the presence of
uninsulated dangerous voltage
within the product's enclosure
that may be of sufficient
magnitude to constitute a risk of
electric shock to persons.

SAVE THESE INSTRUCTIONS
4. Planet Phatt should be situated so that its location or position does not
interfere with its proper ventilation.
5. Planet Phatt should be located away from heat sources such as radiators,
heat registers, fireplaces, stoves, or ovens.
6. Planet Phatt should only be connected to a power supply of the type
described in the operating instructions and as marked on the product.
7. This product, in combination with an amplifier, headphones, and speakers, may be capable of producing sound levels that could cause full or
partial hearing loss or damaged equipment. Do not operate for long
periods of time at high volume levels or at a level that is uncomfortable.
Additionally, care must be taken when programming any of the filters
contained herein using extreme operating parameters. This action could
also produce signals which result in unacceptable high sound levels as
noted previously. If you experience any hearing loss or ringing of the ears
consult your physician.
8. Planet Phatt may be equipped with a polarized line plug (one blade wider
that the other). This is a safety feature. If you are unable to insert this plug
into the outlet, do not defeat the safety purpose of the plug. Contact an
electrician to replace your obsolete outlet.
9. The power supply cord of Planet Phatt should be unplugged from the
outlet when left unused for a long period of time.
10. Care should be taken so that objects do not fall and liquids are not spilled
into the enclosure of Planet Phatt through openings.
11. The product should be serviced by qualified service personnel when:
A. The power supply cord has been damaged; or
B. Objects have fallen, or liquid has been spilled into the product; or
C. The product has been exposed to rain; or
D. The product does not appear to operate normally or exhibits a
marked change in performance; or
E. The product has been dropped or the enclosure damaged.
12. All servicing should be referred to qualified service personnel.
SAVE THESE INSTRUCTIONS

INTRODUCTION & BASIC SETUP 1
CONTENTS
Introduction
Planet Phatt Architecture ........................................................... 4
Connection Instructions .............................................................. 5
BASIC OPERATION 9
Main Controls .......................................................................... 11
Selecting MIDI Channels ........................................................... 12
Selecting Presets ....................................................................... 12
Adjusting Volume & Pan Position ............................................. 12
Beats/Song Mode ..................................................................... 13
Multi-Timbral Operation ..........................................................17
About Planet Phatt ................................................................... 18
MASTER MENU 19
Enabling the Master Menu .......................................................21
Master Tune ............................................................................. 21
Transpose ................................................................................. 22
Global Bend .............................................................................. 22
Global Velocity Curve ............................................................... 22
Mix Output ............................................................................... 24
MIDI Mode ............................................................................... 24
MIDI Mode Change .................................................................. 25
MIDI Overflow ..........................................................................25
MIDI Enable ............................................................................. 25
MIDI Bank Select ...................................................................... 25
MIDI Program ➔ Preset ............................................................ 26
Preset Change .......................................................................... 27
MIDI Controller Assign ............................................................. 27
X Factor Control ....................................................................... 27
Tempo Control ......................................................................... 28
Retrigger ................................................................................... 28
Pitch Wheel -> Scratch ............................................................. 29
MIDI Footswitch Assign ............................................................29
Send MIDI Data........................................................................ 30
Beats MIDI Out ......................................................................... 31
User Key Tuning........................................................................ 31
Song Start/Stop ........................................................................ 31
Global Tempo ........................................................................... 32
............................................................................................... 3

CONTENTS
MASTER MENU (continued)
Beats Control ............................................................................ 32
Beats Mode ............................................................................... 33
Demo Sequence ........................................................................ 33
Viewing Angle .......................................................................... 34
PROGRAMMING BASICS 35
Modulation .............................................................................. 38
Modulation Sources ................................................................. 39
Envelope Generators ................................................................. 40
Low Frequency Oscillators ........................................................ 41
MIDI Patch ............................................................................... 42
Filter Modulation ...................................................................... 43
What is a Filter? ....................................................................... 43
Parametric Filters ..................................................................... 46
The Z-Plane Filter ..................................................................... 46
Planet Phatt Signal Flow .......................................................... 48
Keyboard & Velocity Modulation ............................................. 49
Key Number .............................................................................. 50
Velocity Curves ......................................................................... 50
Realtime Modulation ................................................................ 51
MIDI Realtime Controls ............................................................ 52
Stereo Mix Outputs ................................................................... 54
EDIT MENU 55
Enabling the Edit Menu ............................................................ 57
Preset Name ............................................................................. 58
Primary Instrument .................................................................. 59
Secondary Instrument............................................................... 59
Key Range................................................................................. 59
Primary Key Range ................................................................... 60
Secondary Key Range ............................................................... 60
Coarse Tuning .......................................................................... 61
Fine Tuning .............................................................................. 61
Volume ..................................................................................... 61
Pan ........................................................................................... 61
Alternate Envelope On/Off ........................................................ 62
Primary Alternate Envelope Parameters ................................... 62
Secondary Alternate Envelope Parameters ............................... 62
Delay ........................................................................................ 63
Sound Start .............................................................................. 63

EDIT MENU (continued)
Reverse Sound...........................................................................63
Solo Mode ................................................................................ 64
Portamento Rate ...................................................................... 64
Chorus ...................................................................................... 64
Crossfade Mode ........................................................................ 65
Crossfade Direction .................................................................. 66
Crossfade Balance .................................................................... 66
Crossfade Amount .................................................................... 67
Cross-switch Point .................................................................... 67
Primary Filter Type ................................................................... 67
Primary Filter Cutoff & Q.......................................................... 69
Secondary Filter Type ............................................................... 69
Secondary Filter Cutoff & Q ...................................................... 69
Auxiliary Envelope ....................................................................70
LFO 1 - Shape & Amount.......................................................... 71
LFO 1 - Rate, Delay & Variation ...............................................71
LFO 2 - Shape & Amount.......................................................... 72
LFO 2 - Rate, Delay & Variation ...............................................72
Keyboard & Velocity Modulation Control................................. 73
Realtime Modulation Control ................................................... 74
Footswitch Control ................................................................... 75
Pitch Bend Range ..................................................................... 75
Pressure Amount ....................................................................... 75
MIDI Controller Amount ........................................................... 75
Velocity Curve ........................................................................... 76
Keyboard Center ....................................................................... 77
Keyboard Tuning ...................................................................... 77
Mix Output Assign .................................................................... 78
Preset Links ............................................................................... 78
Save Preset ............................................................................... 79
CONTENTS
STEP-BY-STEP 81
Linking Presets .......................................................................... 83
Editing Presets ..........................................................................84
Changing the Tuning of an Instrument .................................... 84
Chorus ...................................................................................... 85
Reversing the Instrument .......................................................... 85
Alternate Volume Envelope ....................................................... 86
Working with the Filter ............................................................. 87
Using Planet Phatt with a Sequencer........................................92

CONTENTS
REFERENCE SECTION 95
Preset Listing ............................................................................ 96
Instrument Listing .................................................................. 101
Beat Maps .............................................................................. 106
Technical Specifications .......................................................... 109
MIDI Specifications ................................................................. 110
Warranty ................................................................................ 126
Index ...................................................................................... 127

INTRODUCTION
& BASIC SETUP
1Chapter 1: Basic Setup

Planet Phatt Operation Manual2
PHONES
VOLUME
C01 Vol127 Pan=P
0
002 led:Romance
BEATS
HOME/ENTER
CURSOR
MIDI
POWER
DATA
<>
EDITMASTER
PLANET PHATT - The Swing System
Planet Phatt is a professional tone module created specifically for HipHop, Rap, Acid Jazz and Trip-Hop musicians. Planet Phatt is 16 part
multi-timbral, featuring 32 voices of polyphony and 640 presets
(384 ROM, 256 RAM). It is a superb song writing tool and a perfect
addition to the modern keyboard player's studio or live setup.
Planet Phatt is also equipped with our exclusive “BEATS” mode. 100
user-editable drum loops are stored in memory and can be synchronized to internal or external MIDI clock. The combination of beats,
tempo, any preset and the powerful “X-Factor” control allow you to
create literally millions of new groove ideas. Your custom Beats can
also be linked into 28 user-programmable Songs with looping and
programmable jumps. Beats and Songs can be easily modified to fit
your style.
INTRODUCTION
There are 640 presets on Planet Phatt, created by talented E-mu
programmers and other industry experts. Of course you can edit or
modify any and all parameters to create a limitless number of entirely
new sounds. Edit and tweak Planet Phatt’s sounds the way you like
them by using its powerful filters, MIDI synced LFO’s, and MIDIpatch
modulation system. Planet Phatt has plenty of real-time controls and
destinations that allow users to create floor-slamming, heart-pounding
masterpieces. Creating your own original sounds is easy, thanks to
Planet Phatt's logical user interface.
Other features include 3 stereo outputs for externally processing
sounds (also configurable as 6 polyphonic submixes with fully
programmable dynamic panning), integral sends and returns to allow
the addition of external effects units without the need for a separate
mixer, user-definable alternate tuning, and of course, an extensive
MIDI implementation.
In addition, when coupled with E-mu's Launchpad Performance
Controller, Planet Phatt becomes a self-contained interactive groove
machine for the stage or studio. Check it out…
3Chapter 1: Basic Setup
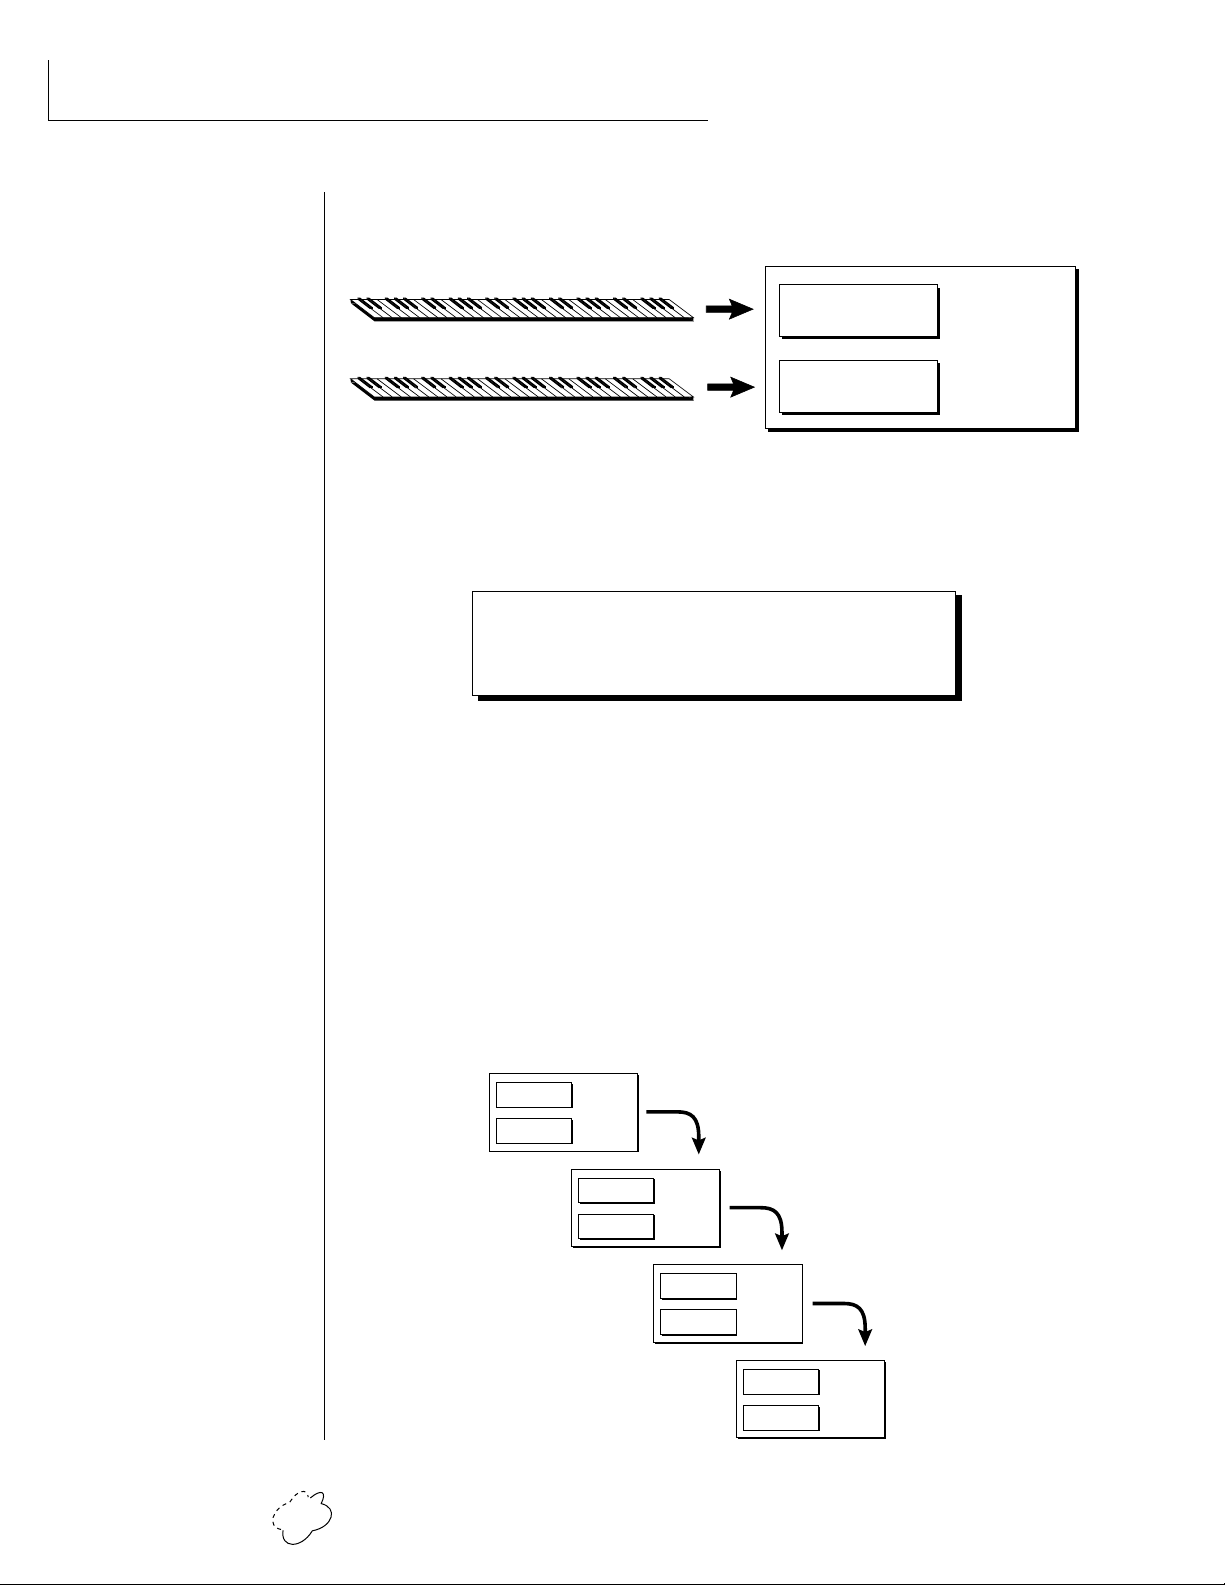
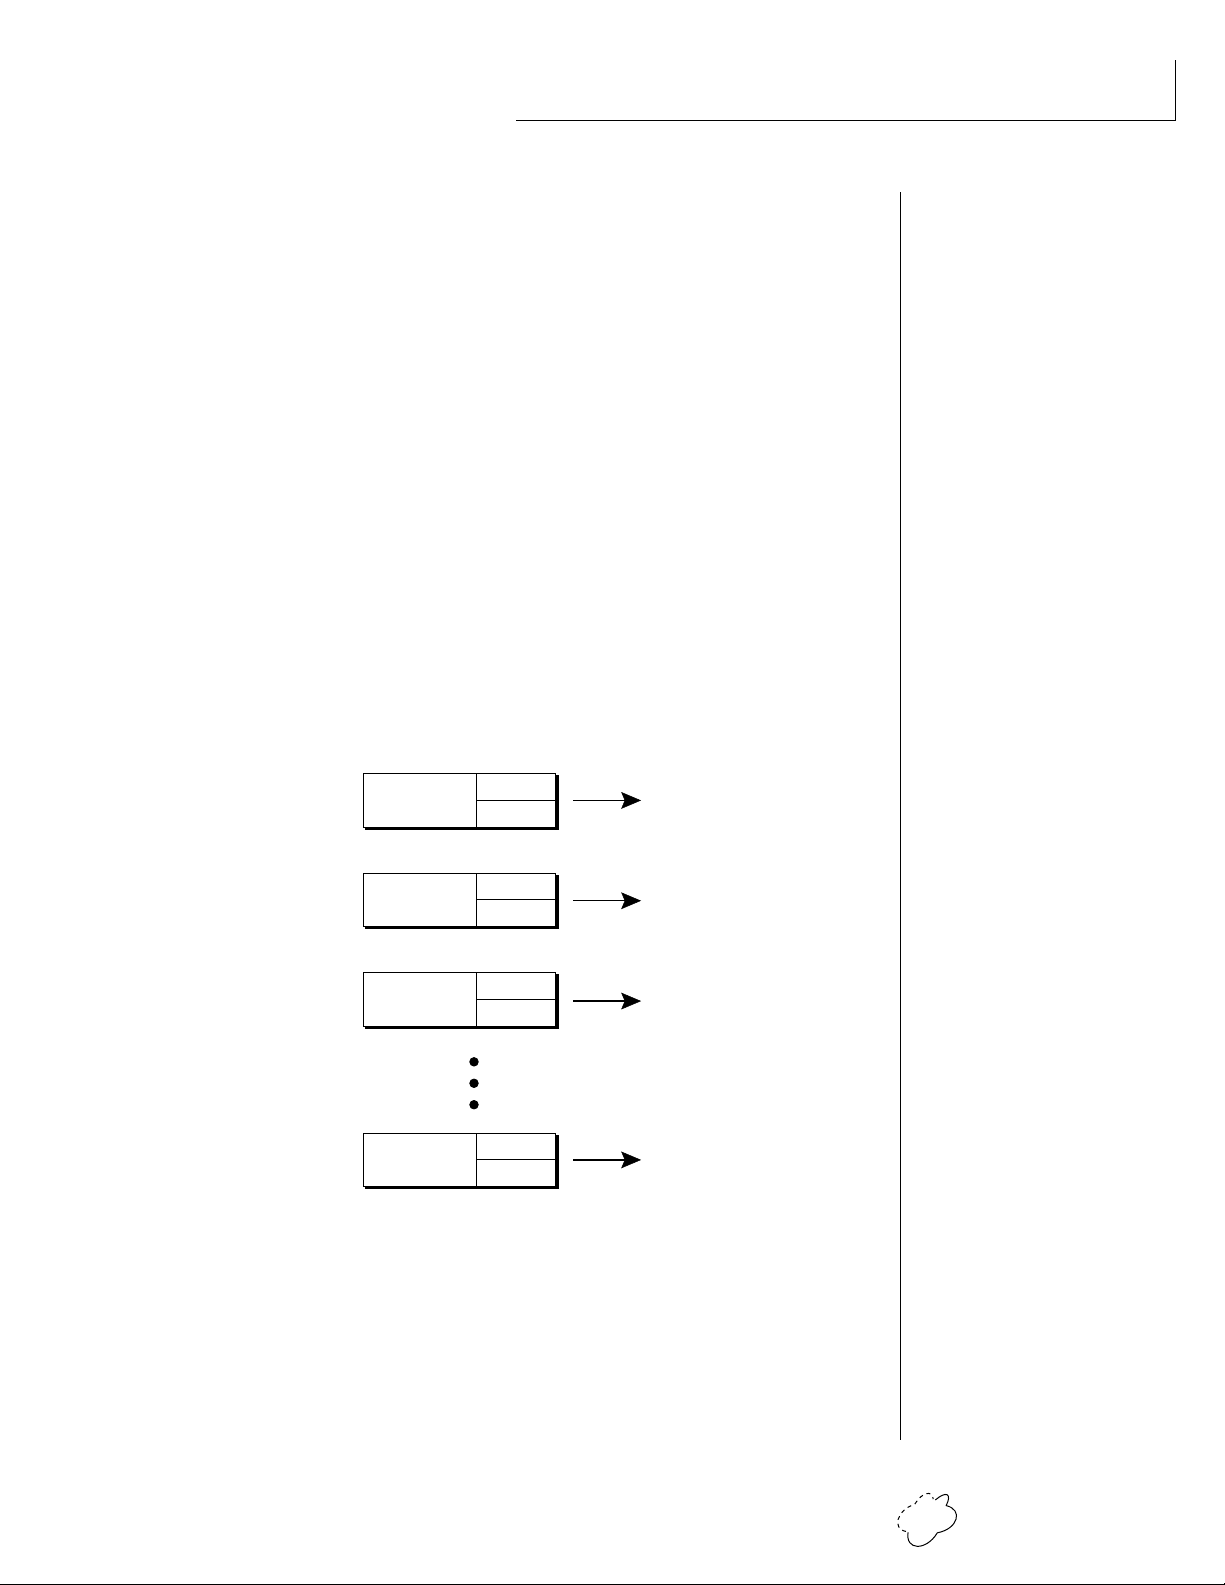
PLANET PHATT ARCHITECTURE
Planet Phatt is organized as shown in the diagram below.
INSTRUMENT
INSTRUMENT
The Preset is a complete set of all program parameters for a complete
Planet Phatt sound. The fully programmable user presets and the
unalterable ROM presets are organized into five banks of 128 presets
• User Presets can be
moved, erased or modified as
desired.
• ROM Presets cannot be
moved or altered unless they
are first copied to a user
location.
each.
Each preset consists of one or more instruments. An instrument is a
complete set of samples or a digital waveform which covers the entire
keyboard range. An instrument can be assigned to each of the Primary
and Secondary layers of the preset.
PRIMARY
PRESET
SECONDARY
BANKS 0 & 1 USER PRESETS
BANKS 2 - 4 ROM PRESETS
The primary and secondary layers are essentially two complete sounds,
stacked or placed adjacent to each other, which can be switched or
crossfaded together in various ways.
Up to four presets can be Linked in order to have more than one preset
on the keyboard at a time. The linked presets may overlap each other
for layered sounds or be adjacent to each other to create keyboard
“splits”.
PRIMARY
SECONDARY
PRESET
PRIMARY
PRESET
SECONDARY
PRIMARY
PRESET
SECONDARY
PRIMARY
PRESET
SECONDARY
Planet Phatt Operation Manual4
100-250VAC 50/60 Hz ~
Aux. or
Tape In
MIDI Controller
(MIDI Keyboard, Sequencer, etc.)
Control
Pedal
E-MU SYSTEMS, INC.
Scotts Valley, California U.S.A.
WARNING: TO REDUCE THE RISK OF FIRE
OR ELECTRIC SHOCK, DO NOT EXPOSE
THIS PRODUCT TO RAIN OR MOISTURE.
Male RCA plug
to
Male Phono Plug
MIDI Out
MIDI
To
Main Outs
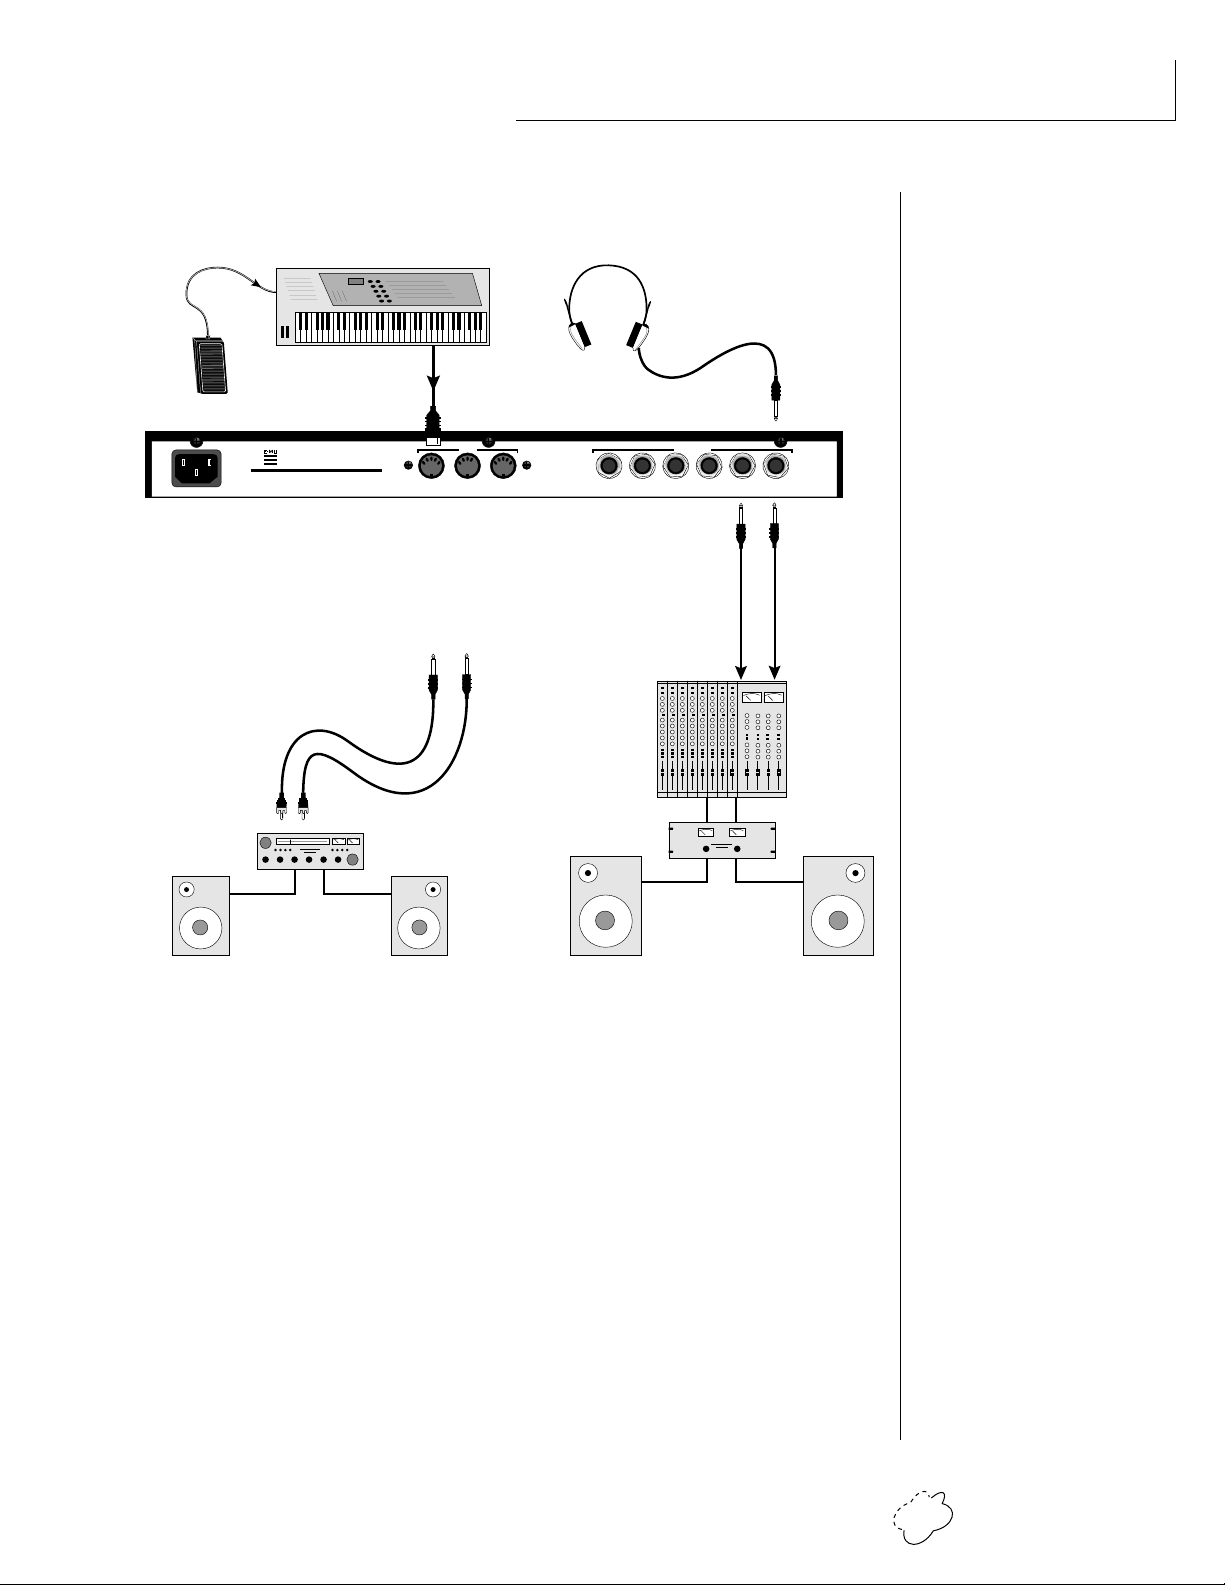
CONNECTION INSTRUCTIONS
SETUP #1 BASIC SETUP
The Headphone
Output is located
on the Front Panel
OUTPUTS
THRUOUTIN
R - SUB2 - L R - SUB1 - L R - MAIN - L
Mixer
Amp
MONO STEREO
Main Outs to Mixer In
▼ The headphone output
monitors the main outputs
only.
The submix outputs do NOT
feed into the headphone
output.
• • • If Planet Phatt does not
seem to be responding
correctly, make sure that
both Planet Phatt and your
MIDI controller are set to the
same MIDI channel.
Speakers
Home Stereo
System
Home Studio
System
MIDI In
Planet Phatt is controlled by MIDI messages received at the MIDI
In connector. Connect the MIDI In of the Planet Phatt to the
MIDI Out connector of a MIDI controller such as a MIDI keyboard
or MIDI drum pads.
Outputs
Planet Phatt is a high quality, stereo audio device. In order to
reproduce its wide dynamic range and frequency response, use a
high quality amplification and speaker system such as a keyboard
amplifier or home stereo system. A stereo setup is highly desirable
because of the added realism of stereophonic sound. Headphones
can be used if an amplifier and speaker system is not available.
Plug stereo headphones into the headphone jack located on the
left side of the front panel. The Right Main output jack serves as a
mono output when the Left Main plug is not plugged in.
5Chapter 1: Basic Setup

CONNECTION INSTRUCTIONS
SETUP #2 STUDIO SETUP
MIDI Controller
(MIDI Keyboard, Sequencer, etc.)
MIDI Out
Computer
MIDI
Out
MIDI
OutInIn
Additional
MIDI
In
Devices
MIDI In
100-250VAC 50/60 Hz ~
E-MU SYSTEMS, INC.
Scotts Valley, California U.S.A.
WARNING: TO REDUCE THE RISK OF FIRE
OR ELECTRIC SHOCK, DO NOT EXPOSE
THIS PRODUCT TO RAIN OR MOISTURE.
MIDI Switcher
Out In
Out
MIDI
THRUOUTIN
R - SUB2 - L R - SUB1 - L R - MAIN - L
OUTPUTS
Sub 2 Outputs
Sub 1 Outputs
MONO STEREO
Main Outputs
MIDI In
In this setup, Planet Phatt is controlled by MIDI messages received
at the MIDI In connector which have been routed by a MIDI
switcher. The MIDI switcher allows any MIDI controller such as a
MIDI keyboard, MIDI drum pads or a computer to be easily
connected.
MIDI Out
The MIDI Out jack is normally used to transmit program data to a
computer or other device.
Outputs
Planet Phatt has three sets of programmable stereo outputs; Main,
Sub 1, and Sub 2. Specific Planet Phatt presets (or MIDI channels)
can be routed to one of these stereo pairs in order to be further
processed or mixed separately.
Planet Phatt Operation Manual6
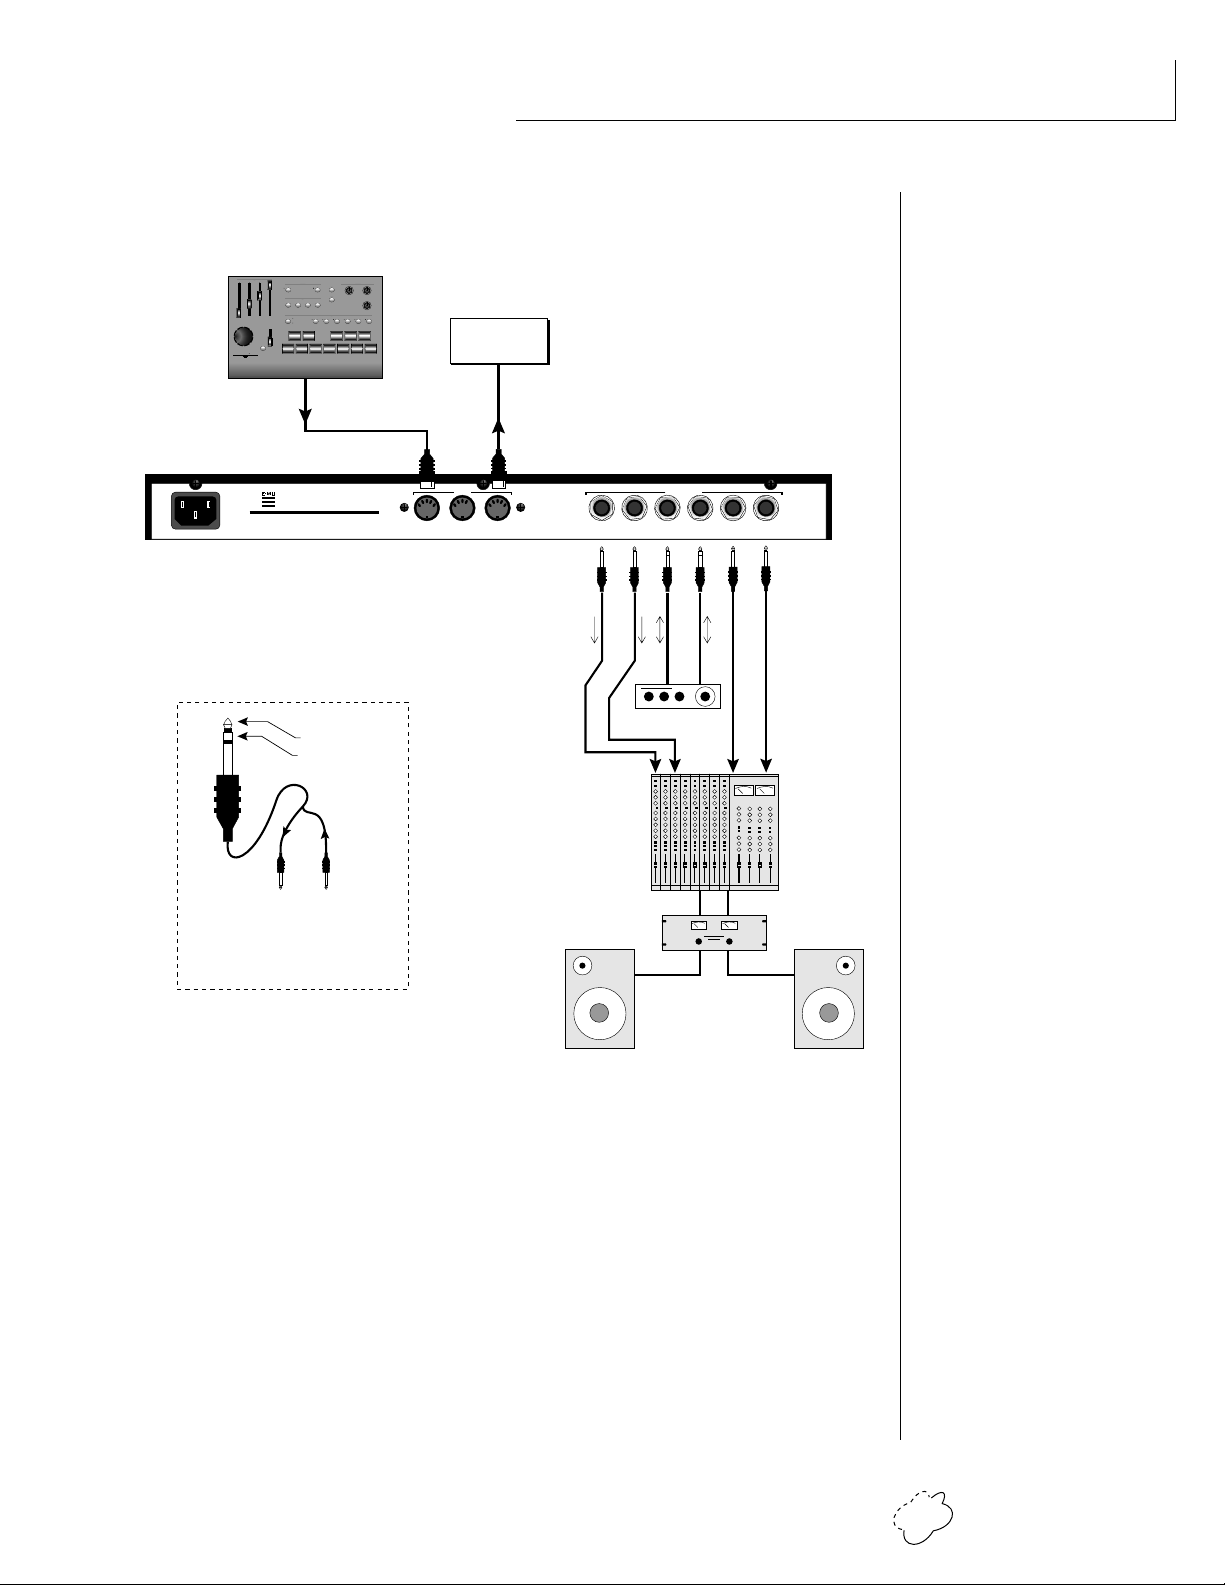
SETUP #3 PERFORMANCE SETUP
MIDI Controller
(Launchpad, MIDI Keyboard, Sequencer)
CONTROLLERS
PITCH
LAUNCH PAD
PERFORMANCE CONTROLLER
EDIT PARAMETERS TRANSPOSE
PERFORMANCE SELECT
SONG BANK PRESET
MIDI CLOCK
TRIGGERS
TRANSPORT
MODULATION
13 6810
INC
SAVESELECT CONTROL
DEC
TRIGGERS/TRANSPORT
RTZMODE
MIDI Out
OFF
C
+OCT
-OCT
C#
B
+2OCT
-2OCT
A#
D
+3OCT
-3OCT
D#
A
E
G#
F
G
F#
MIDI CHANNEL
1
16
2
15
3
14
4
5
13
6
12
11
7
8
10
9
PLAY
REC
STOPFFWDREW
11975421
Additional
MIDI
Devices
MIDI In
CONNECTION INSTRUCTIONS
E-MU SYSTEMS, INC.
Scotts Valley, California U.S.A.
WARNING: TO REDUCE THE RISK OF FIRE
100-250VAC 50/60 Hz ~
OR ELECTRIC SHOCK, DO NOT EXPOSE
THIS PRODUCT TO RAIN OR MOISTURE.
Sub Output
Return
(To Main Output)
Tip Ring
To Effect From Effect
SEND/RETURN CABLE
Signal is sent out on tip of plug and
returned to main outputs via ring of plug.
MIDI
THRUOUTIN
R - SUB2 - L R - SUB1 - L R - MAIN - L
OUTPUTS
MONO STEREO
Send
Send/Return
Effect Device
Main Outs to Mixer In
MIDI In
Planet Phatt is controlled by MIDI messages received at the MIDI
In connector. Connect the MIDI In of Planet Phatt to the MIDI
Out connector of a MIDI controller such as E-mu's Launchpad, a
MIDI keyboard, MIDI drum pads or a MIDI sequencer.
MIDI Thru
The MIDI Thru jack is used to connect additional MIDI devices
onto the MIDI chain. MIDI Thru transmits an exact copy of the
messages received at the MIDI In jack.
Outputs
The Sub 1 and Sub 2 output jacks on Planet Phatt are stereo jacks.
The tip of each jack (accessed when a standard phone plug is
inserted) connects to the left or right output of that group.
7Chapter 1: Basic Setup
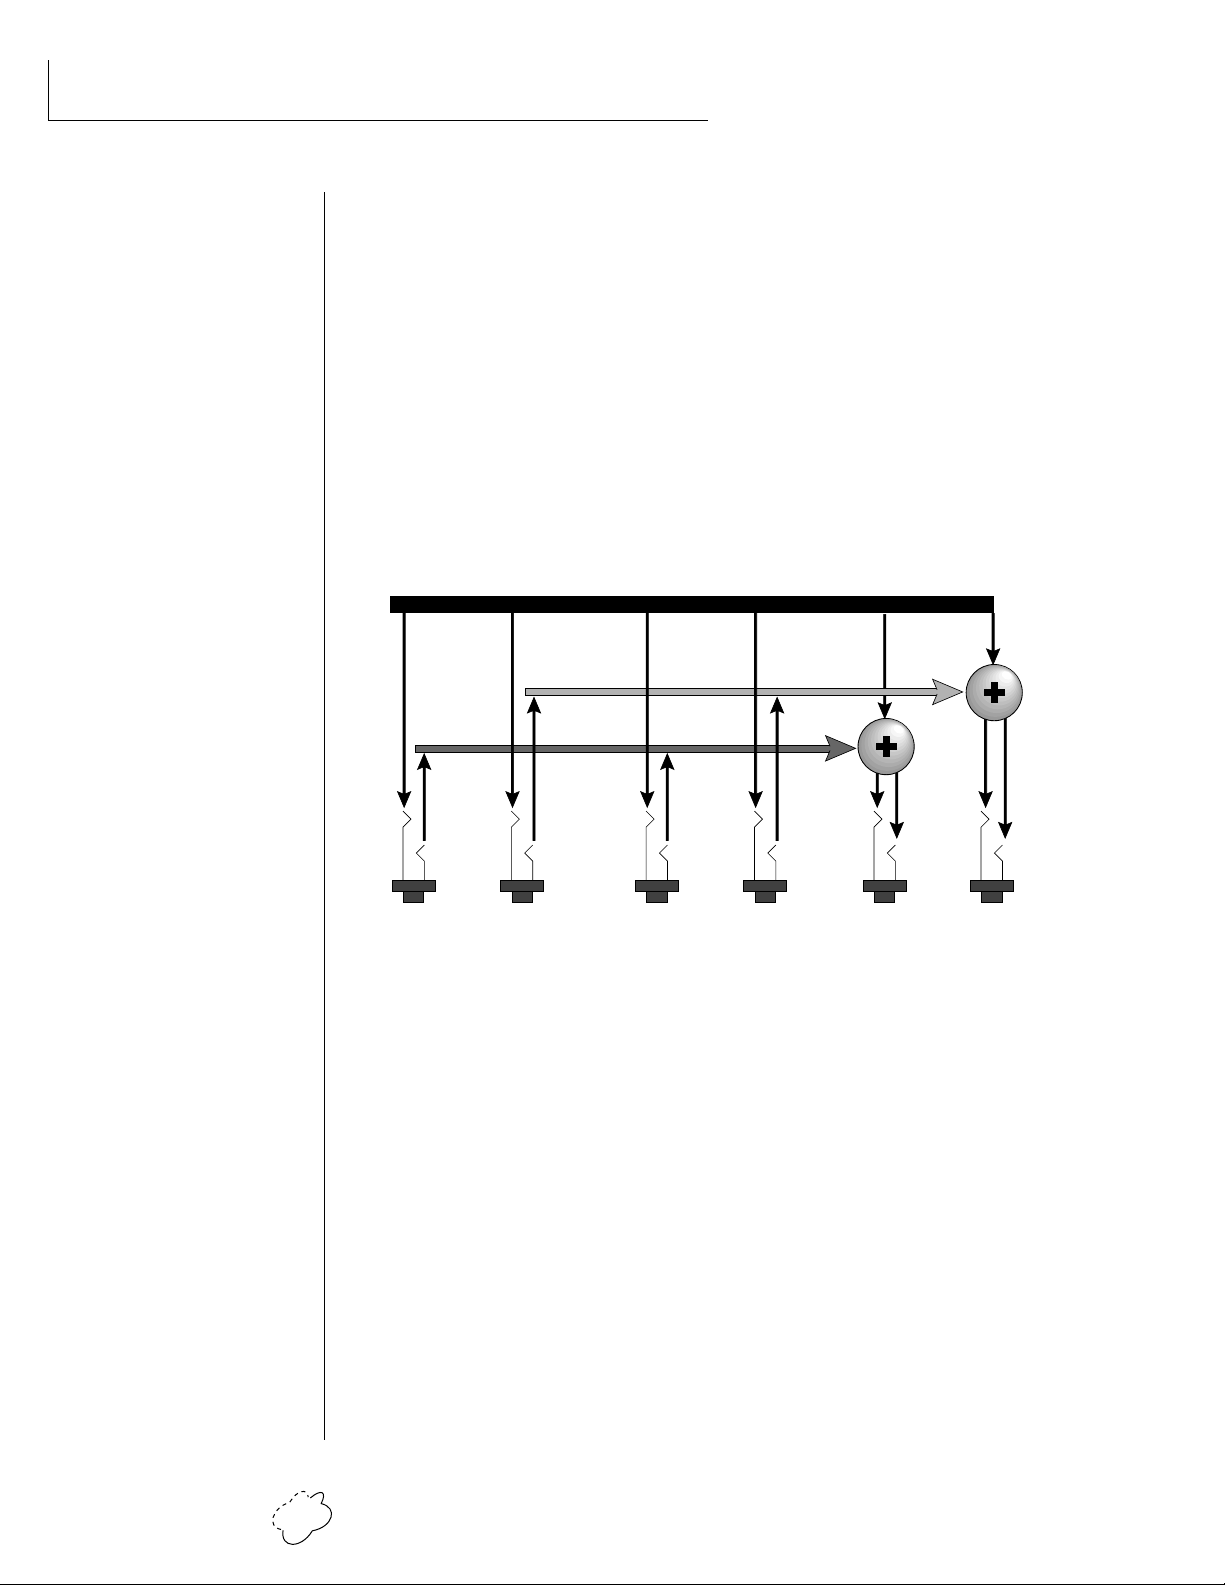
CONNECTIONS
If a stereo plug is inserted, the Ring of the stereo plug serves as a signal
Return which sums into the Main outputs.
Therefore, the Sub 1 and Sub 2 jacks can serve as effect sends and
returns in order to further process selected instruments and then
return them to the main mix.
••• Inserting a standard
mono phone plug halfway
into the jack allows you to
sum into the main outputs
without a special cable.
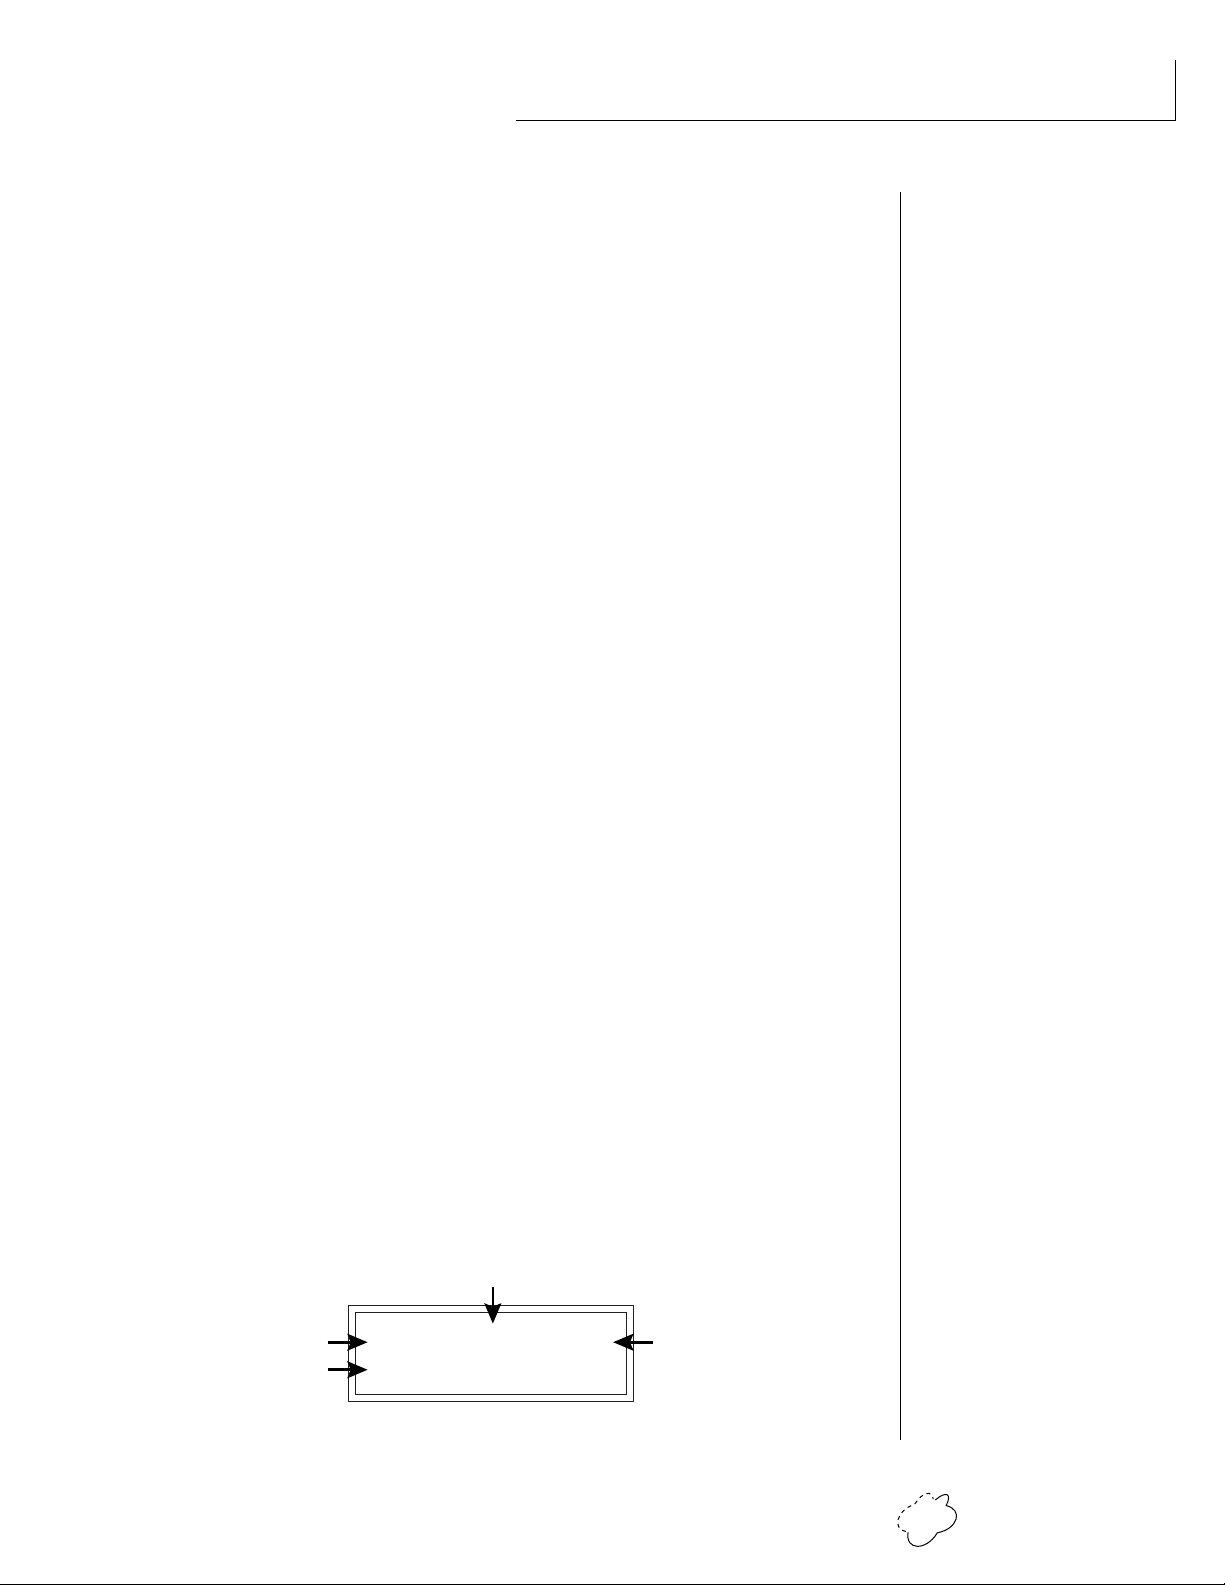
The diagram shows the Sub 1 and Sub 2 jacks being used as
send/returns in order to further process selected Planet Phatt presets
without using the effects bus on the mixing board. In a pinch, the
effect returns could also be used to sum additional instruments into
the main outputs.
Output Section
L Bus
R Bus
Tip
Tip
Ring
Tip
Ring
RL
SUB 2
Tip
Ring
Ring
RL
SUB 1
RL
MAINS
The Sub 1 and Sub 2 jacks can be used as effect returns to the Main Outputs.
POWER UP!
The power switch is located on the right side of the front panel. Planet
Phatt and its MIDI controller may be turned on in any order. When
power is applied, the liquid crystal display will light, indicating that
Planet Phatt is operating. You may have noticed that there is no
110/220 Volt power selector switch on Planet Phatt.
PLANET PHATT AUTOMATICALLY SWITCHES ITSELF TO
THE PROPER LINE VOLTAGE.
Planet Phatt Operation Manual8

BASIC
OPERATION
Chapter 2: Basic Operation 9

BASIC OPERATION
Planet Phatt Operation Manual10

MAIN CONTROLS
BASIC OPERATION
VOLUME
CONTROL
VOLUME
PHONES
HEADPHONE
JACK
DISPLAY
C01 Vol127 Pan=P
0
002 led:Romance
MASTER MENU
SELECT
EDIT MENU
SELECT
EDITMASTER
HOME/ENTER
BEATS
HOME/ENTER
BUTTON
CURSOR
CONTROLS
<>
CURSOR
MIDI
MIDI
ACTIVITY
DATA
DATA ENTRY
CONTROL
Power Switch
Switches AC power to Planet Phatt On and Off.
MIDI Activity LED
Indicates that MIDI data is being received.
Master Menu Select Button
The Master menu contains parameters that affect the entire
machine, not just certain presets. An illuminated LED to the left
of the button indicates that you are in the Master menu.
Edit Menu Select Button
The Edit menu is used when you want to change parameters of a
preset. An illuminated LED to the left of the button indicates that
you are in the Edit menu.
POWER
SWITCH
POWER
Home/Enter Button
The Home/Enter button is used to initiate a particular operation.
The red LED to the left of the enter button flashes to let you know
that Planet Phatt is waiting for your response.
Cursor Controls
These buttons move the cursor to the next parameter on the
display. (The cursor is a little flashing line underneath one of the
parameters in the display.) Press either cursor control repeatedly
until the cursor is underneath the desired parameter. The cursor
can also be moved bi-directionally using the data entry control
while the right cursor select button is being held down (i.e. Press
and hold the right cursor button and turn the data entry knob).
Data Entry Control
The data entry control is a stepped, variable control which is used
to change parameter values. The control increments or decrements the current value one unit with each click. This control
incorporates acceleration (values advance faster if the control is
turned quickly).
Volume Control
This is the master volume control for all audio outputs. Note: For
maximum dynamic range, set this control to full level.
Chapter 2: Basic Operation 11
BASIC OPERATION
• • • If Planet Phatt is not
responding properly or plays
the wrong preset, make sure
that both Planet Phatt and
your MIDI controller are set
to the same MIDI channel
and that the MIDI Volume is
turned up.
For more information about
MIDI, see MIDI Realtime
Controls on page 52.
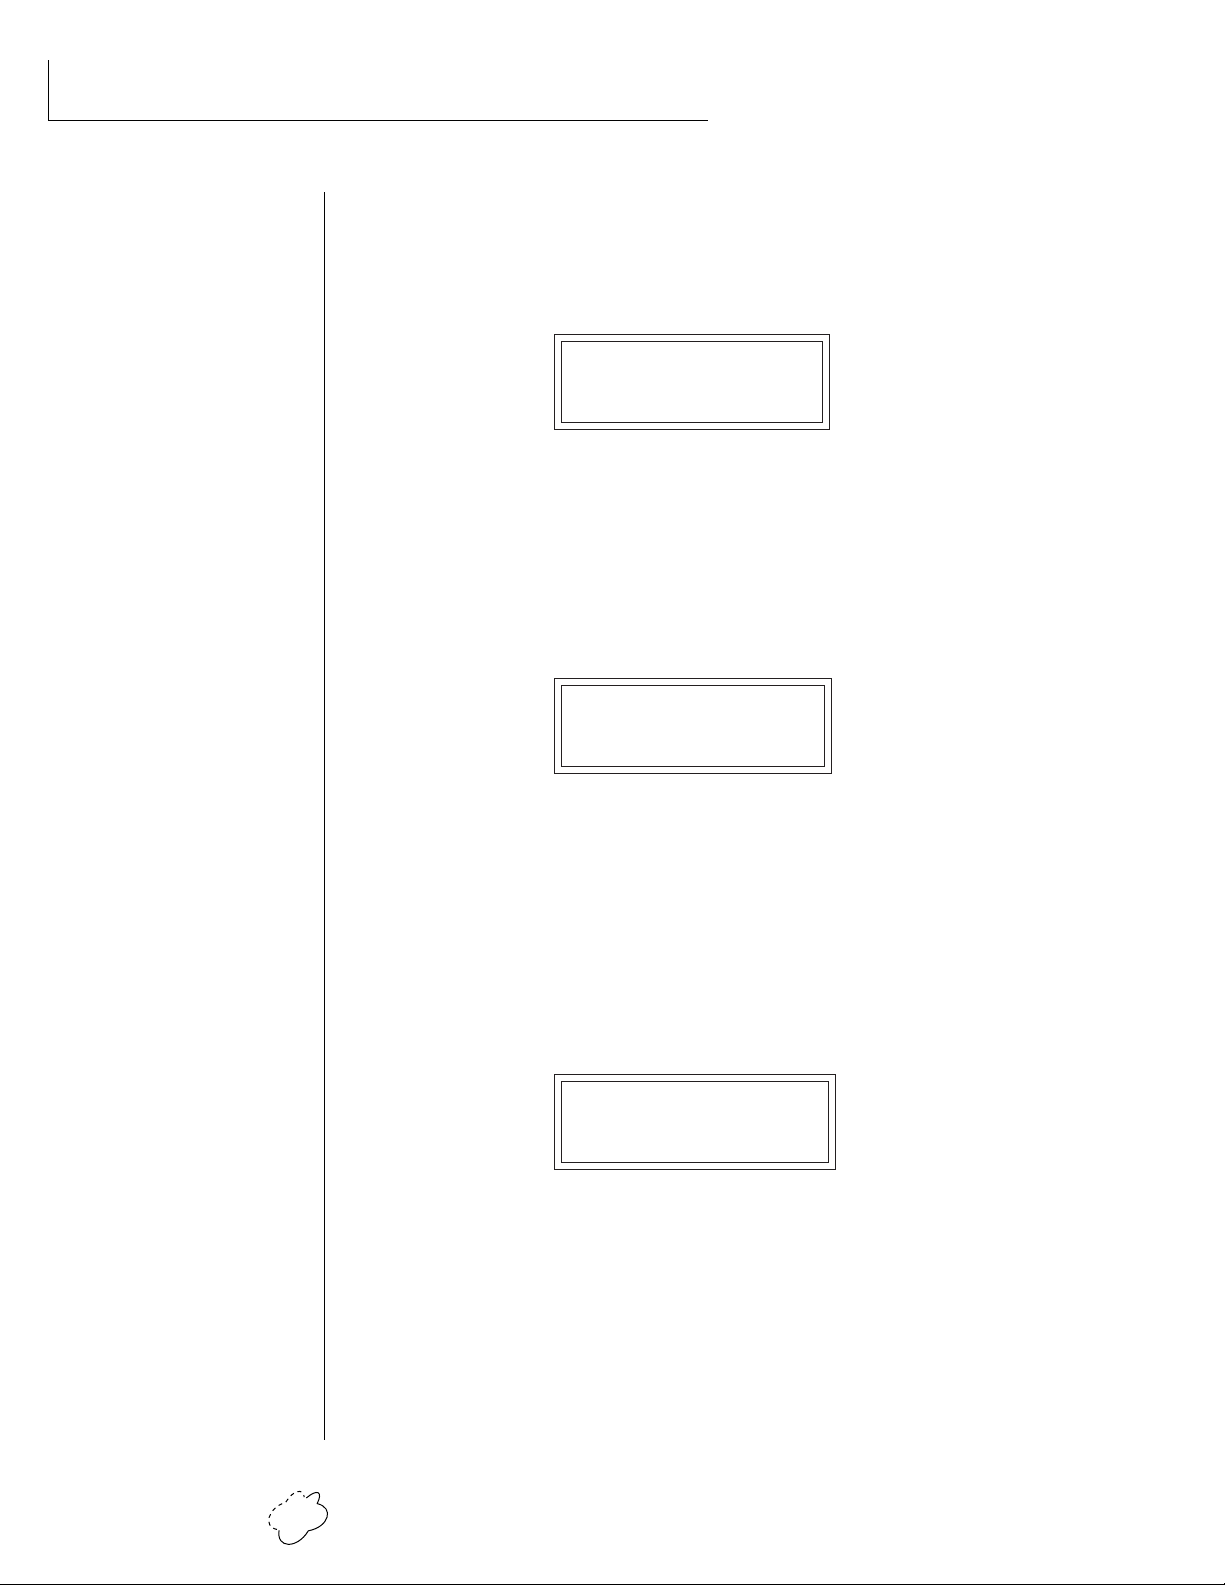
Bank Contents
128 RAM Presets
0
128 RAM Presets
1
128 ROM Presets
2
128 ROM Presets
3
128 ROM Presets
4
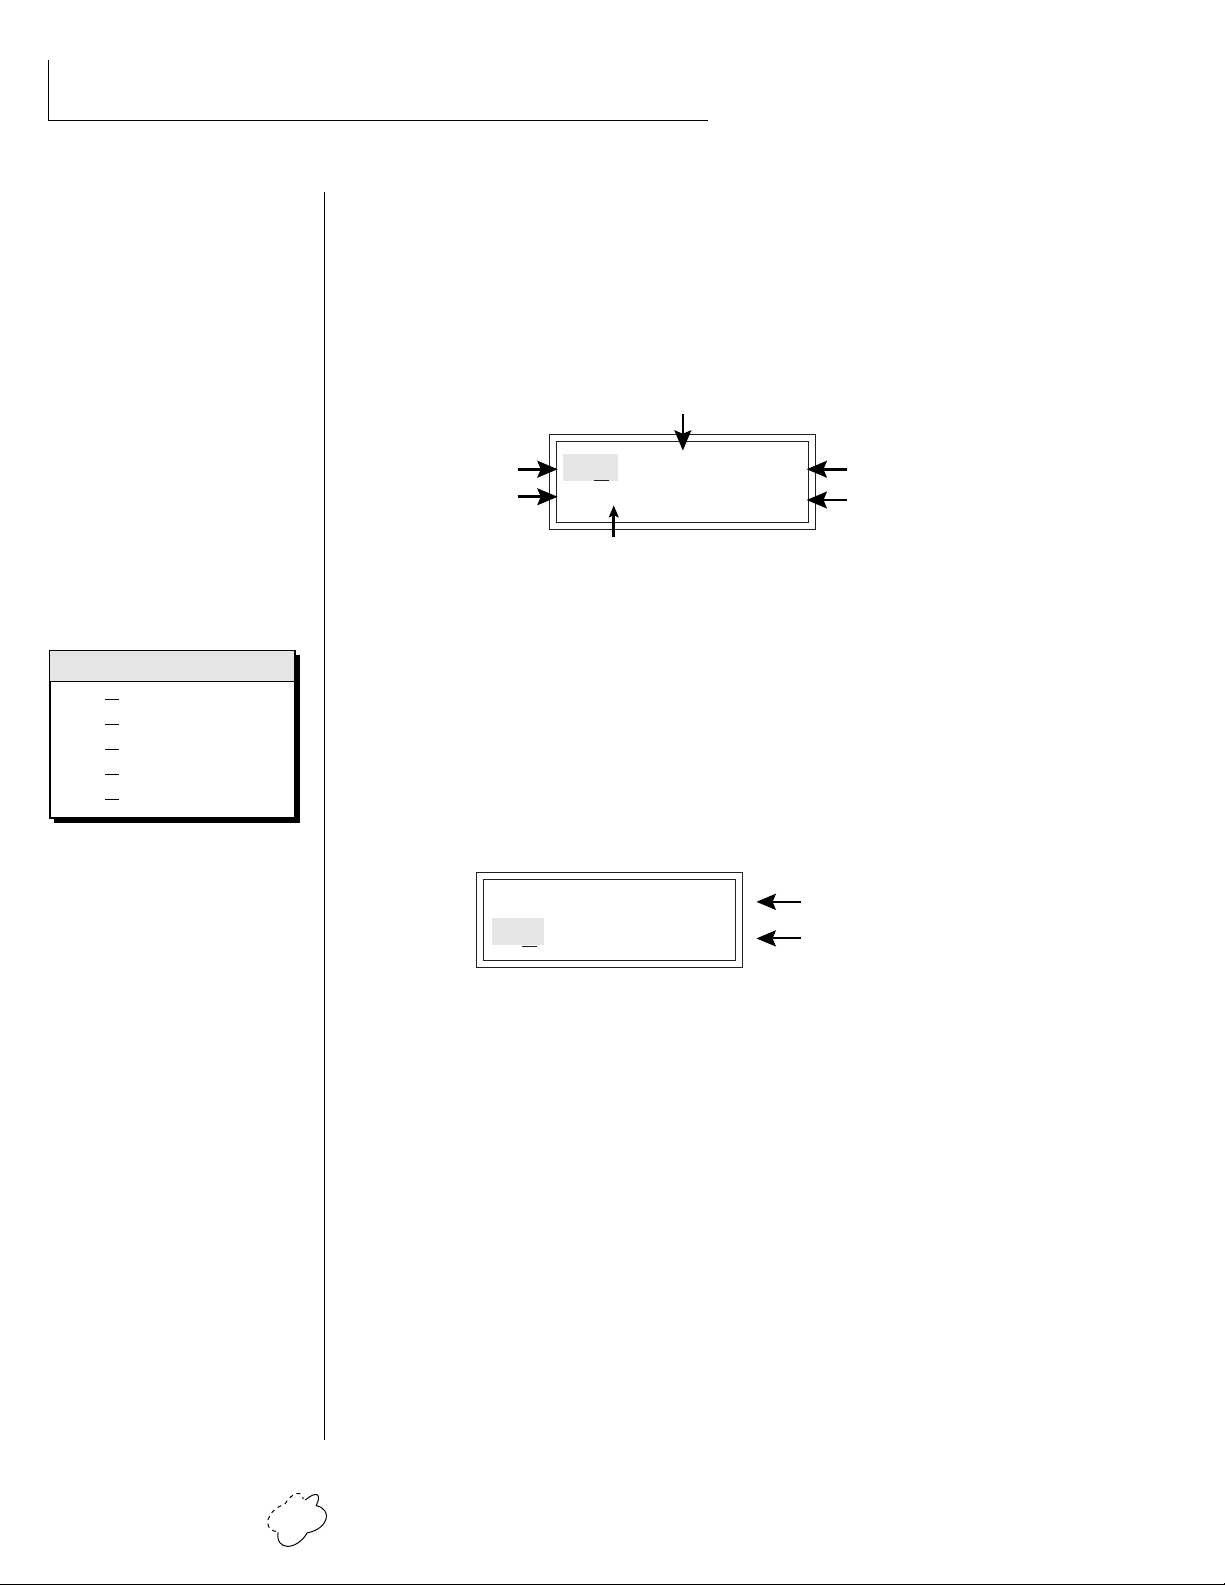
MIDI CHANNEL SELECTION
Press the cursor key repeatedly untiil the cursor is underneath the
channel number. (The cursor is a little flashing line underneath one of
the parameters in the display.) Rotate the data entry control to select
MIDI channel 01-16. As the channel is changed, the display will
change to show the preset, volume and pan associated with the
displayed channel.
Volume
MIDI Channel
Program No.
C01 Vol127 Pan=P
0
000 Preset Name
Bank No.
Stereo Position
Program Name
PRESET SELECTION
Press the cursor key repeatedly until the cursor is underneath the
program number. (The cursor is a little flashing line underneath one
of the parameters in the display.) As the data entry control is rotated,
the preset number and name will change. The displayed preset will be
assigned to the displayed MIDI channel. Programs are arranged into
banks of 128, as shown in the diagram at left. Banks can be selected
independently of the of the program number by pressing the the
Home/Enter button while turning the data entry knob.
••• Channel Pan should
normally be set to “P” unless
realtime control of panning is
desired. This will allow the
programmed pan setting for
each preset to be used.
C01 Vol127 Pan=P
0
0 Preset Name
00
MIDI Channel Parameters
Preset Information
CHANNEL VOLUME
Press the cursor key repeatedly until the cursor is underneath the
volume value. Rotate the data entry control to select volume 000-127.
(This is the same parameter as MIDI volume control #7, and changes
made over MIDI will be shown in the display.)
CHANNEL PAN
Press the cursor key repeatedly until the cursor is underneath the pan
value. Rotate the data entry control to select pan values -7 to +7 or
“P”. When “P” is selected, the pan value specified in the preset is
selected. Any other value will override the pan parameter in the preset. (This is the same parameter as MIDI pan control #10, and changes
made over MIDI will be shown in the display.)
Planet Phatt Operation Manual12
BASIC OPERATION
BEATS MODE
Planet Phatt contains a “Beat Sequencer” which can play any of 100
pre-programmed drum sequences called Beats. Any of Planet Phatt's
640 presets can be used with any beat. The X-Factor␣ control further
multiplies the number of possible beat combinations by changing
which instrument is assigned to each individual drum hit.
Beats can be also linked together to form Songs. Each song can have up
to 10 steps and each step can be programmed to loop up to 64 times
or loop indefinitely. Each step of a song can select a certain beat
pattern, jump to another step in the song, or jump to the beginning of
another song. Because of this jumping capability, songs can be made
as complex as you want. Planet Phatt holds a maximum of 28 songs
which can be quickly and easily transferred to a MIDI sequencer for
backup.
To Enter Beats or Song Mode
1. Press and hold both the Master button and the Edit button. The
Beats menu shown below will appear and the Enter LED will be
flashing.
2. Press the Enter button to Start the beat or song. The Enter LED
will be solidly on and the Master and Edit LEDs will flash once
each time the Beat pattern loops.
3. Press either cursor button and use the data entry control to select
a new beat or song, change the tempo, transpose the sequence
(X-Factor) or change the preset. Song numbers are located immediately after beat 99.
• • • The Beat number can
be selected remotely by using
a MIDI Song Select
command. Beats mode can
also be started and stopped
via a MIDI Song Start and
Stop command when the
Beats screen is displayed.
• • • There are four different
Beats modes:
Factory,
1:Constant Tempo,
2:Constant T,X,P
3:User Settings.
See page 33 for details.
4. Press the Enter button again to Stop the beat or song.
5. Press and hold both the Master button and the Edit button again
to return to the main screen. The song or beat will continue
playing unless you stopped it using the Enter button. The Master
and Edit LEDs will continue to flash, indicating Beats mode is On.
• To Turn Beats Off - Return to the Beats menu and press Enter.
Beats mode plays the preset assigned to MIDI channel 16. If you are in
Multi-mode, you can play along with beats mode on any of the MIDI
channels.
Tempo
Beat/Song Select
Program No.
B:03 T:120 X:+00
492 bts:Danzin
Chapter 2: Basic Operation 13
X-Factor
▼ Warning: Beware of using
Omni mode on multiple
channels while Beats are
playing. Unpredictable results
may occur.
BASIC OPERATION
• • • MIDI Song Numbers
(0-127) can select either
Beats (0-99) or Songs
(100-127)
• Beats Mode Parameters
B: Selects the beat number. There are 100 different beats to choose
from. Unless the Master menu Beats mode is set to option 2:Constant T, X, P, the preset will change when you change the beat.
T: Sets the Tempo of the sequence. The tempo is variable from 1
beats-per-minute to 255 bpm. Turning the tempo all the way down
selects External Clock mode (Ext). In external clock mode, the
tempo is derived from incoming MIDI clock pulses.
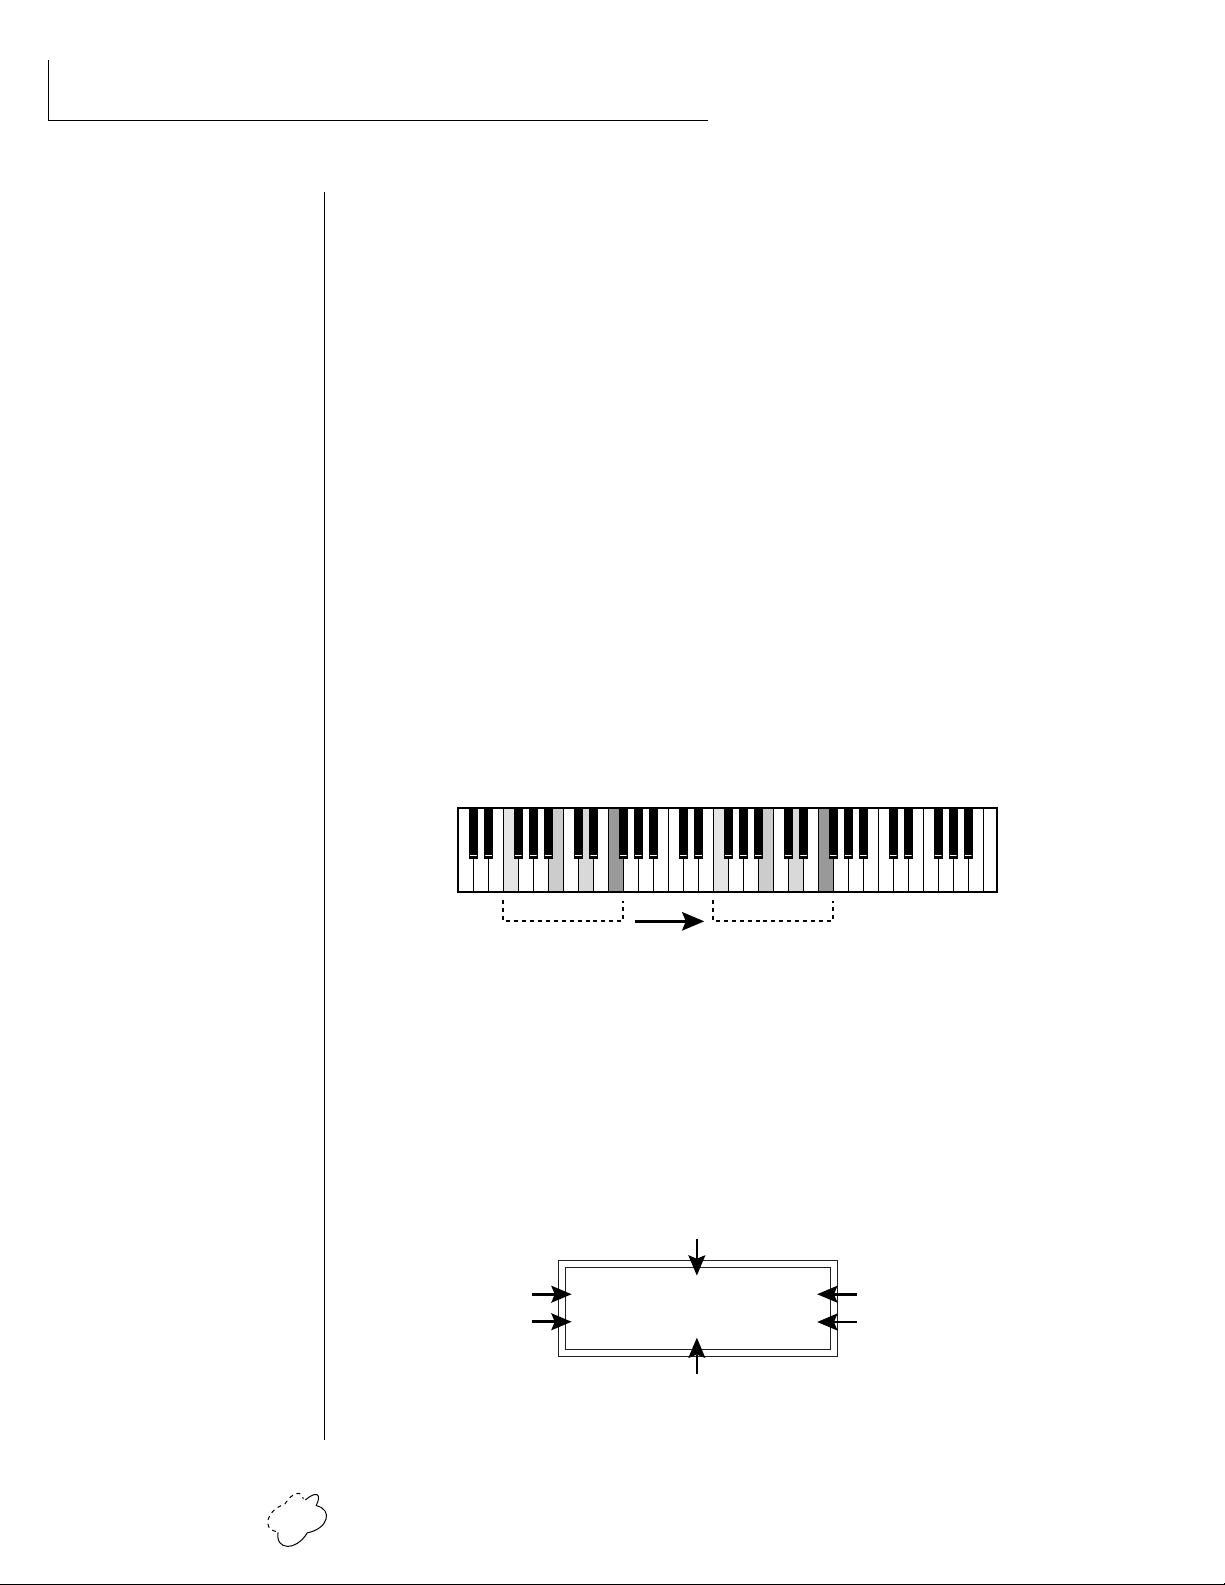
X: Selects the “X Factor” or transposition interval. Rather than change
the pitch of the instruments, transposition shifts the keyboard
position up and down. On “Beats” presets this has the effect of
changing the instruments on each beat. By combining the various
beats, presets and transpositions, you can create literally hundreds
of thousands of different grooves. On presets where there is one
sound stretched across the entire keyboard, transpose will transpose the pitch.
808 Kick
Snare
Chord
Scratch
1 324 1 324
Beat Same Beat
Lawn Mower
Synth Pad
Noise Burst
Deep Kick
Transpose +24
Transposing a “beats” preset shifts the keyboard and changes the sounds assigned to each beat.
SONG MODE
Song mode allows you to link beats together to form more complex
and repeatable song structures. Planet Phatt can record up to 28 songs
of up to 10 events each, numbered E0 through E9.
Tempo
Beat/Song Select
Event No.
S:03 T:120 X:+00
E1 do B23 [01]
X-Factor
No. of Times Played
Event Type
Planet Phatt Operation Manual14
• Song Mode Parameters
S: Selects the Song number from S00 to S27. Moving the data entry
control one increment past B99 selects the first Song (S00).
BASIC OPERATION
T & X: The Tempo and X-Factor can be edited for each event, but will
only be saved and recalled if the Beats Mode in the Master
menu is set to 3:User Settings.
E: Selects the Event number. An Event can do one of the following
things:
• Play a particular Beat, a specified number of times.
S:00 T:120 X:+00
E1: do B:05 [10]
• GoTo a Previous Event, and play it a specified number of times.
➜ plays Beat 05 10 times
S:00 T:120 X:+00
E2: to E1 [04]
• GoTo a particular new Song.
➜ go back to event E1, play 4 times
S:00 T:120 X:+00
E2: to S05 [--]
• Stop the Song
➜ go to Song S05 NO REPEATS!
• • • See Beats Mode in the
Master Menu for additional
information.
▼ Warning: The first Event
in a Song is always a
“Play Beat” Event.
• • • Song Beats do not have
to begin at event 00. If you
select Event 05 and press
Enter, the Song will begin
playing from event 5.
If the cursor is underneath
the Song number, the Song
will always begin at Event 0.
S:00 T:120 X:+00
E2: Stop [--]
[ ]: Number of times played from 1 to 64. Multiple plays are not
allowed on GoTo Song or Stop events. Moving the data entry
control one increment past 64 selects Infinite Repeat [<>]
➜ end of Song NO REPEATS!
Chapter 2: Basic Operation 15
BASIC OPERATION
Beat 21
Play [01]
E0
Beat 30
Play [01]
E1
Beat 62
Play [01]
E2
GoTo E0
Play [<>]
E3
Infinite Repeat
S22
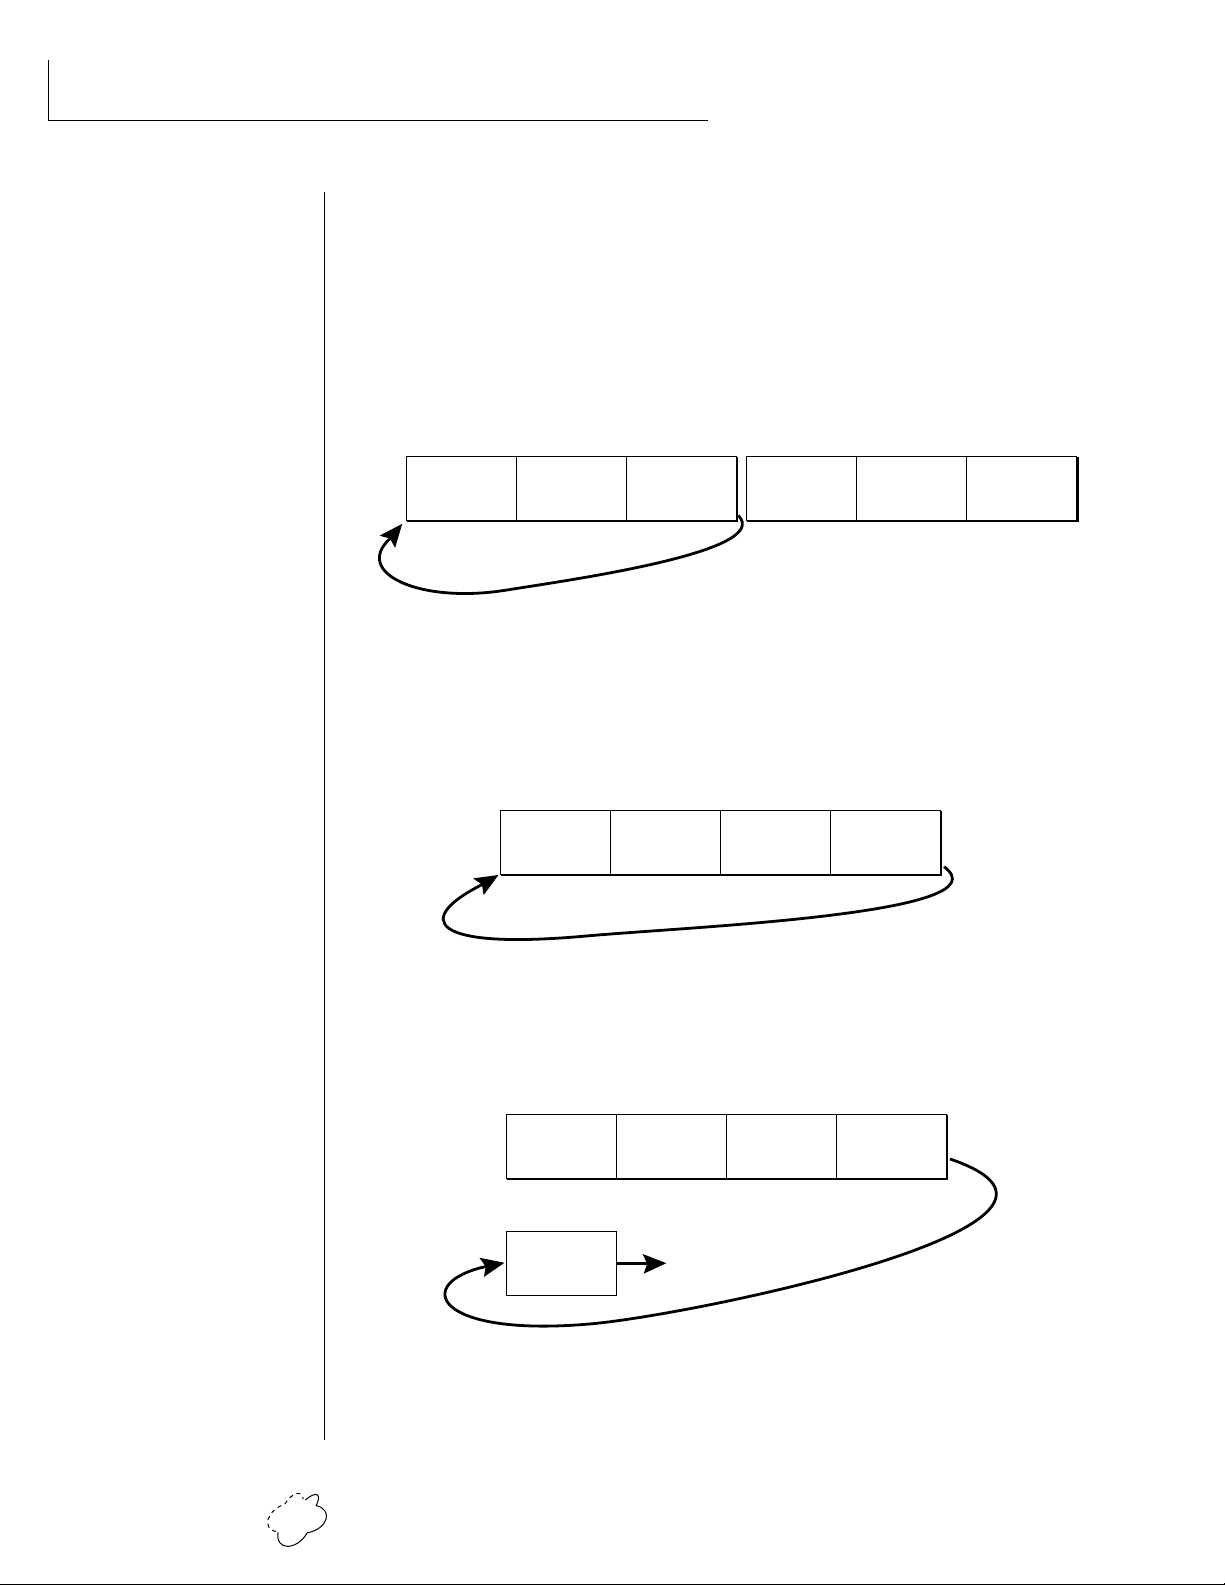
• Song Examples
Because of the Repeat and Jump functions, Songs can be made as
complex as you like. Remember to set Beats mode (in the Master
menu) to “3:User Settings” if you want the Song to play back your
own Tempo, X-Factor and Preset settings.
The diagrams below show a few examples of how songs can be
constructed.
S21
E0
Beat 07
Play [01]
E1
Beat 18
Play [01]
16 times
E2
GoTo E1
Play [16]
E3
Beat 48
Play [01]
E4
Beat 23
Play [01]
E5
Stop
Play [--]
In the above example, beat 7 plays once and then beat 18 plays once.
At event E2, the song jumps back and repeats E0 and E1. When events
E0 and E1 have looped 16 times, the song moves on to steps E3, E4,
and E5, which stops the song.
In the above example, beats 21, 30 and 62 are simply repeated indefinitely until you turn off Beat/Song mode.
S23
E0
Beat 02
Play [01]
E1
Beat 51
Play [01]
E2
Beat 40
Play [01]
E3
GoTo S20
Play [--]
E0
S20
Beat 7
Play [01]
etc.
Jump to Song 20
Instead of jumping to a previous step, song 23 jumps to song 20 in the
example above. This technique might be used to add a “lead in” to a
previously stored song.
Planet Phatt Operation Manual16
MULTI-TIMBRAL OPERATION
Multi-timbral operation means that Planet Phatt can play more than
one sound at the same time. To access multiple presets on different
MIDI channels simultaneously, follow these instructions:
1. Set the MIDI mode to MULTI-Mode, using the MIDI mode
function in the Master menu (page 24).
2. Decide which MIDI channels you wish the Planet Phatt to receive,
and turn all other channels OFF using the MIDI Enable function
in the Master menu (page 25). Up to 16 channels can be selected
simultaneously!
3. Select the desired preset for each of the MIDI channels you wish
the Planet Phatt to receive using the MIDI Channel/Preset
selection screen (see previous instructions).
4. Planet Phatt will now respond multi-timbrally on the MIDI channels you have specified. The volume and pan position parameters
can be adjusted over MIDI (for each MIDI channel) or using the
Cursor and Data Entry control in the MIDI Channel/Preset
selection screen.
BASIC OPERATION
Channel 01
Channel 02
Channel 03
Channel 16
Each of the 16 MIDI channels can be assigned to play a specific Planet Phatt preset.
Volume
Pan
Volume
Pan
Volume
Pan
Volume
Pan
PRESET
PRESET
PRESET
PRESET
Chapter 2: Basic Operation 17
BASIC OPERATION
ABOUT PLANET PHATT
Planet Phatt utilizes digital recordings of real instruments for the basis
of its sound. This is similar to a tape recorder except that inside Planet
Phatt, the sounds are permanently recorded on digital memory chips.
To perform this modern miracle, sounds and instrument waveforms
are first digitally recordered or “sampled”. After the sounds and waveforms have been truncated, looped and processed, they are “masked”
into the Planet Phatt ROM (Read Only Memory) chips.
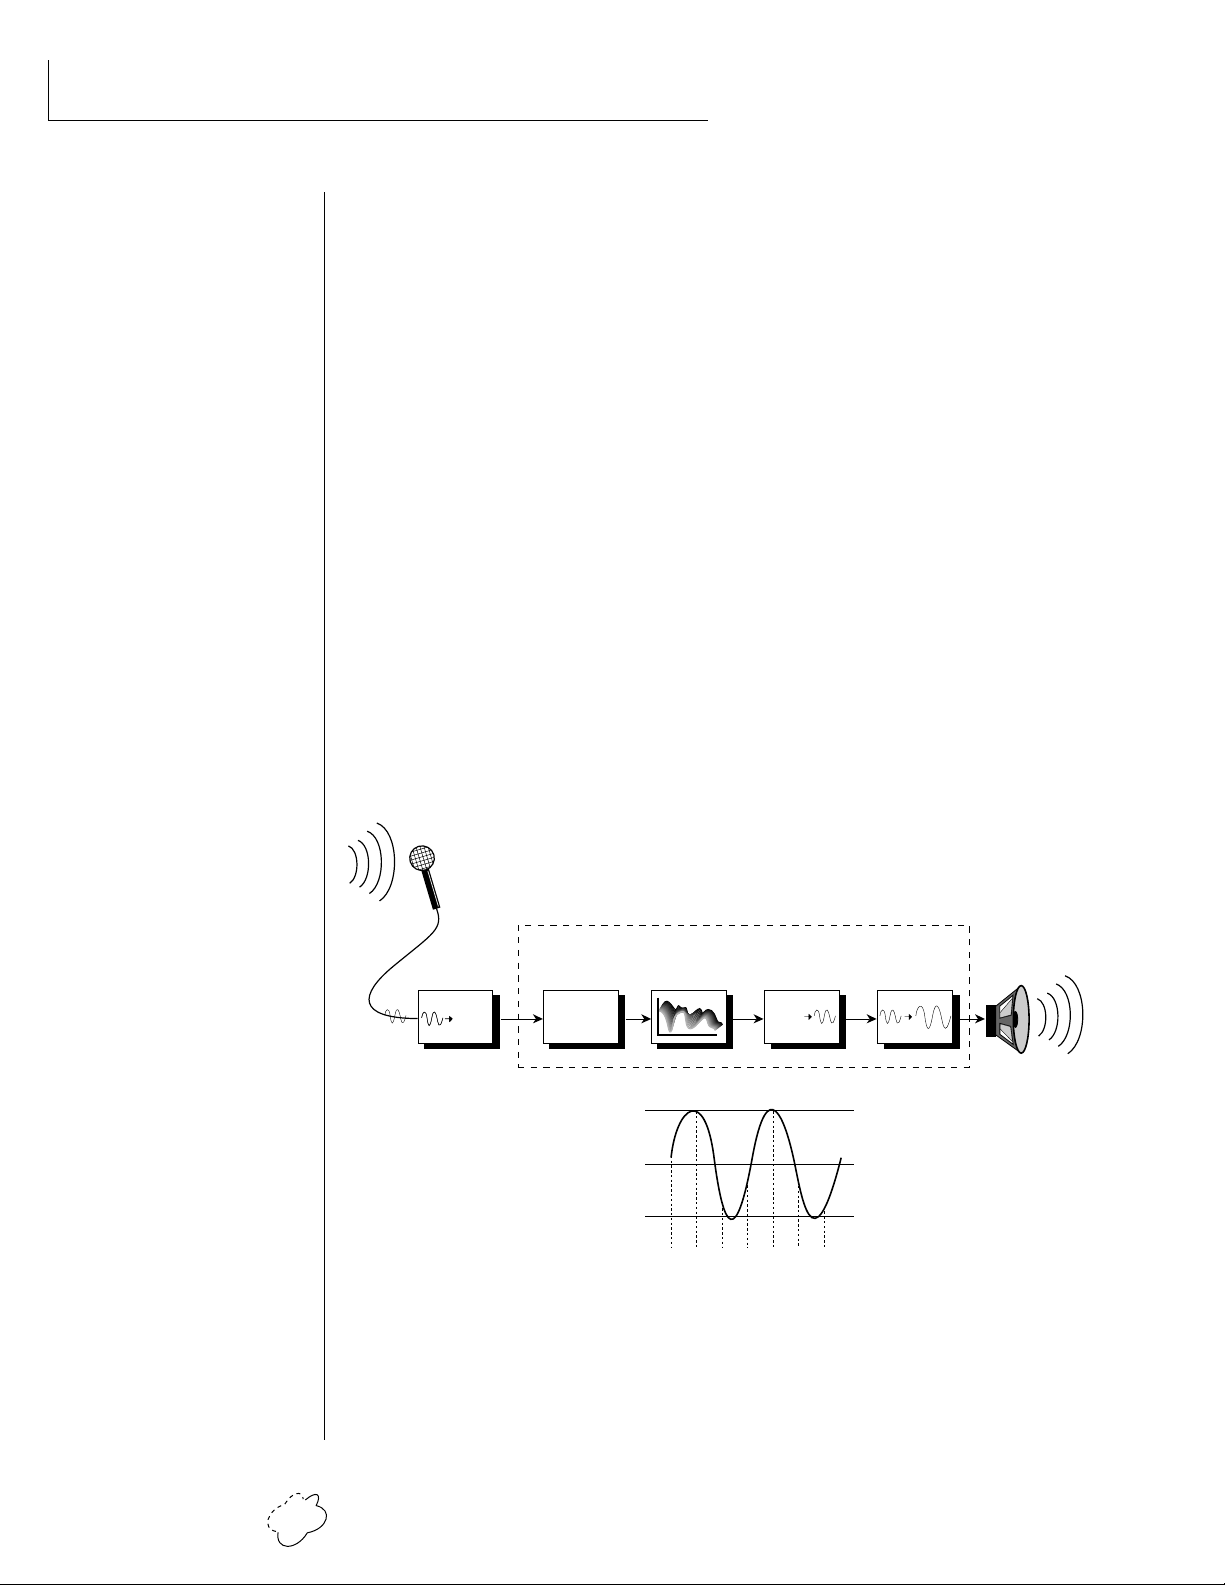
Conceptually, the sampling process is very simple, as shown in the
Basic Sampling System diagram. As a sound wave strikes the diaphragm of a microphone, a corresponding voltage is generated. To
sample the sound, the voltage level is repeatedly measured at a very
high rate and the voltage measurements are stored in memory. To play
the sound back, the numbers are read back out of memory, converted
back into voltages, then amplified and fed to a speaker which converts
the voltage back into sound waves. Of course, playing back 32 channels at different pitches tends to complicate matters, but this is basically how it works. In Planet Phatt, we have left out the Analog/Digital
converter stage since the sounds are already sampled for you.
Analog/Digital
Converter
1011001
1011001
Basic Sampling System
Planet Phatt
Memory
10100101001
01010010100
10101010100
10101001010
Z-Plane Filter Amplifier
3V
0V
-3V
Digital/Analog
Converter
1011001
-1V -2V3V-1V-2V3V1V
Planet Phatt Operation Manual18

MASTER
MENU
Chapter 3: Master Menu 19

MASTER MENU
Planet Phatt Operation Manual20

The Master menu contains functions that affect the overall operation
of Planet Phatt. For example, changing the Master Tune will change
the tuning of all the presets, not just the one currently displayed.
To enable the Master menu
Press the Master key, lighting the LED. The current screen will be
the one most recently selected since powering up Planet Phatt.
The cursor will appear underneath the first character of the screen
heading on line one.
To select a new screen
Press the cursor key repeatedly (or hold the right cursor key while
turning the data entry control) until the cursor is underneath the
screen title heading. Rotate the data entry control to select an-
other screen.
To modify a parameter
Press the either of the cursor keys repeatedly (or hold the right
cursor key while turning the data entry control) until the cursor is
underneath the parameter value. Rotate the data entry control to
change the value.
MASTER MENU
To return to Preset Select mode
Press the Master key, turning off the LED.
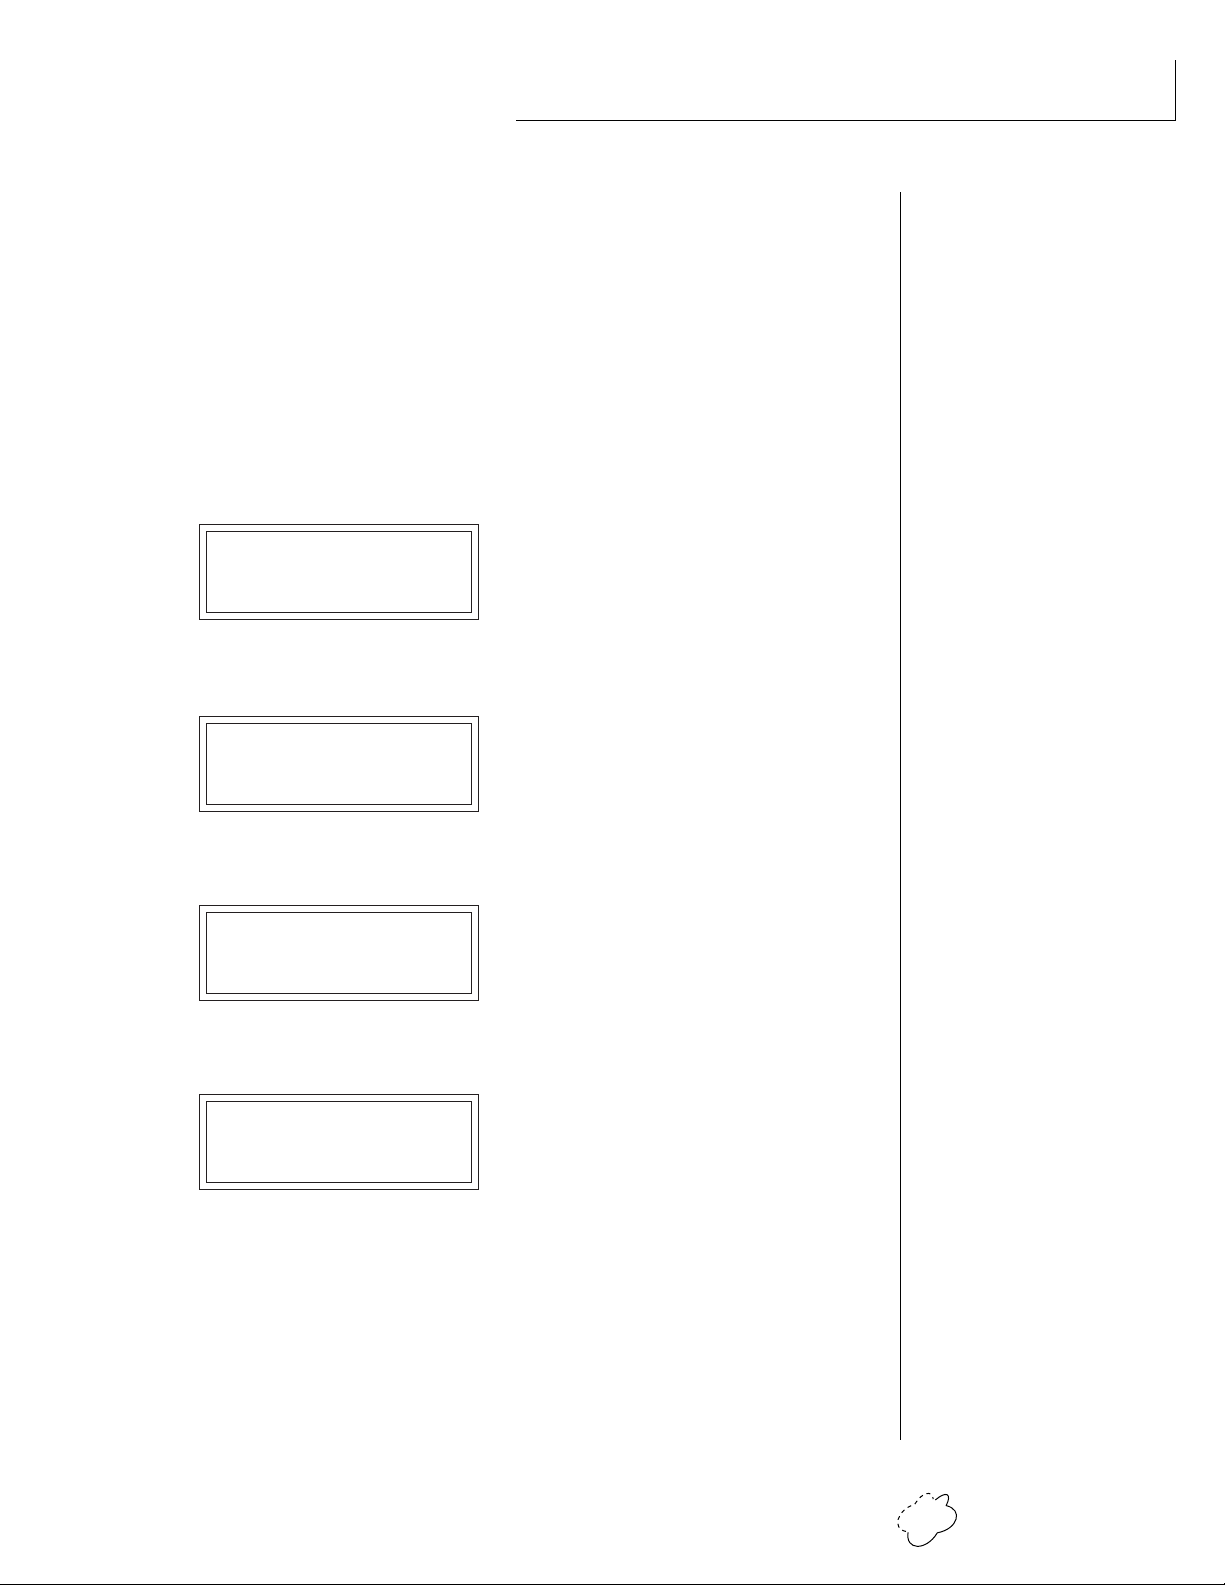
MASTER MENU FUNCTIONS
• Master Tune
Master Tune adjusts the overall tuning of all presets so that Planet
Phatt can be tuned to other instruments. The master tuning range is ±
1 semitone in 1/64th semitone increments. A master tune setting of
“00” would indicate that Planet Phatt is perfectly tuned to concert
pitch (A=440 Hz).
MASTER TUNE
+63
Chapter 3: Master Menu 21
MASTER MENU
• Transpose
This function transposes the key of Planet Phatt in half-step intervals
by shifting the keyboard position relative to middle C. The transpose
range is ± 12 semitones or one octave.
TRANSPOSE
+12 semitones
• Global Bend
This function sets the range of the pitch wheel only when it is routed
to control pitch. The maximum pitch bend range is ± 12 semitones.
This function only affects presets which have their individual pitch
bend range set to global.
GLOBAL BEND
+/- 12 semitones
• Global Velocity Curve
Incoming velocity data can be modified by a velocity curve in order to
provide different types of dynamics in response to your playing or to
better adapt to a MIDI controller. This function allows you to select
one of eight global velocity curves or leave the velocity data unaltered
(off). Global velocity curve only affects presets which have their individual velocity curve set to global.
GLOBAL VEL CURVE
8
Planet Phatt Operation Manual22
 Loading...