


E4K

C-iContents
IMPORTANT NOTICE:
IN ORDER TO OBTAIN WARRANTY SERVICE ON
YOUR E4K UNIT, THE SERIAL NUMBER STICKER
MUST BE INTACT AND YOU MUST HAVE A
SALES RECEIPT OR OTHER PROOF OF
PURCHASE. IF THERE IS NO SERIAL NUMBER
STICKER ON THE E4K, PLEASE CONTACT E-MU
SYSTEMS AT ONCE.
Emulator Four Keyboard
Sampling Synthesis Controller
Operation Manual
© 1995 E-mu Systems, Inc.
All Rights Reserved
• FI498 Rev. B
THIS PRODUCT IS COVERED UNDER ONE OR
MORE OF THE FOLLOWING U.S. PATENTS:
4,404,529; 4,506,579; 4,699,038; 4,987,600;
5,013,105; 5,072,645; 5,111,727; 5,144,676;
5,170,367; 5,248,845; 5,303,309; 5,317,104;
5,342,990; 5,430,244 AND FOREIGN PATENTS
AND/OR PENDING PATENTS. EMULATOR IS A
REGISTERED TRADEMARK OF E-MU SYSTEMS,
INC.
E-MU WORLD HEADQUARTERS
E-MU SYSTEMS, INC. U.S.A.
P.O. BOX 660015
SCOTTS VALLEY, CA USA
95067–0015
TELEPHONE: 408-438-1921
FAX: 408-438-8612
EUROPE, AFRICA, MIDDLE EAST
E-MU SYSTEMS, LTD.
SUITE 6, ADAM FERGUSON HOUSE
ESKMILLS INDUSTRIAL PARK
MUSSELBURGH, EAST LOTHIAN
SCOTLAND, EH21 7PQ
TELEPHONE: +44 (0) 131-653-6556
FAX: +44 (0) 131-665-0473

C-ii Emulator Four Keyboard
IMPORTANT SAFETY INSTRUCTIONS
Use in countries other than the U.S.A. may require the use of a
different line cord or attachment plug, or both. To reduce the risk
of fire or electric shock, refer servicing to qualified service person-
nel. To reduce risk of fire or electric shock do not expose this
product to rain or moisture.
GROUNDING INSTRUCTIONS
This product must be grounded. If it should malfunction or
break down, grounding provides a path of least resistance for
electric current, reducing the risk of electric shock. This product is
equipped with a cord having an equipment-grounding conductor
and a grounding plug. The plug must be plugged into an appropri-
ate outlet properly installed and grounded in accordance with all
local codes and ordinances.
DANGER
Improper connection of equipment grounding conductor can
result in the risk of electric shock. Check with a qualified electri-
cian or service personnel if you are in doubt as to whether the
product is properly grounded. Do not modify the plug provided
with this product. If it will not fit the outlet, have a proper outlet
installed by a qualified technician.
CAUTION
If the 6900, E4K is rack mounted, a standard 19 inch open frame
rack must be used.
USER-MAINTENANCE INSTRUCTIONS
1. The E4K should be kept clean and dust free. Periodically wipe
the unit with a clean, lint free cloth. Do not use solvents or
cleaners.
2. There are no user lubrication or adjustment requirements.
3. Refer all other servicing to qualified service personnel.
INSTRUCTIONS PERTAINING TO A RISK OF FIRE,
ELECTRIC SHOCK, OR INJURY TO PERSONS
WARNING; When using electric products, basic precautions
should always be followed, including the following:
1. Read all instructions before using the E4K.
2. To reduce the risk of injury, close supervision is necessary
when the E4K is used near children.
3. Do not use the E4K near water — for example near a bathtub,
washbowl, kitchen sink, in a wet basement, on a wet bar, or
near or in a swimming pool.
WARNING:
READ THIS
FIRST
This symbol is intended
to alert the user to the
presence of important
operating and mainte-
nance (servicing)
instructions in the
literature accompanying
the appliance.
This symbol is intended
to alert the user to the
presence of un-insulated
dangerous voltage
within the product's
enclosure that may be of
sufficient magnitude to
constitute a risk of
electric shock to persons.

C-iiiContents
4. The E4K should be situated so that its location or position does
not interfere with its proper ventilation.
5. The E4K should be located away from heat sources such as
radiators, heat registers, fireplaces, stoves, or ovens.
6. The E4K should only be connected to a power supply of the
type described in the operating instructions and as marked on
the product.
7. Care should be taken so that objects do not fall and liquids are
not spilled into the enclosure of the E4K through openings.
8. This E4K may be equipped with a polarized line plug (one
blade wider that the other). This is a safety feature. If you are
unable to insert this plug into the outlet, do not defeat the
safety purpose of the plug. Contact an electrician to replace
your obsolete outlet.
9. The power supply cord of the E4K should be unplugged from
the outlet when left unused for a long period of time.
10. This product, in combination with an amplifier and head-
phones and speakers, may be capable of producing sound
levels that could cause permanent hearing loss. Do not operate
for a long period of time at a high volume level or at a level
that is uncomfortable. If you experience any hearing loss or
ringing in the ears, consult an audiologist.
11. The product should be serviced by qualified service personnel
when:
A. The power supply cord has been damaged; or
B. Objects have fallen, or liquid has been spilled into the
product; or
C. The product has been exposed to rain; or
D. The product has been dropped or the enclosure damaged; or
E. The E4K does not operate normally or exhibits a marked
change in performance.
12. All servicing should be referred to qualified service personnel.
SAVE THESE INSTRUCTIONS

C-iv Emulator Four Keyboard
6
RADIO and TELEVISION INTERFERENCE
The equipment described in this manual generates and uses
radio-frequency energy. If it is not installed and used properly--
that is, in strict accordance with our instructions - it may cause
interference with radio and television reception.
This equipment has been tested and complies with the limits for
a Class B computing device in accordance with the specifications
in Subpart J of Part 15 of the FCC rules. These rules are designed to
provide reasonable protection against such interference in a
residential installation. However, there is no guarantee that the
interference will not occur in a particular installation, especially if
a “rabbit ear” TV antenna is used.
If the E4K does cause interference to radio or television recep-
tion, you can try to correct the interference by using one or more
of the following measures:
• Turn the television or radio antenna until the interference stops.
• Move the E4K to one side or the other of the television or radio.
• Move the E4K farther away from the television or radio.
• Plug the E4K into an outlet on a different circuit than the
television or radio.
• Consider installing a rooftop antenna with a coaxial lead-in
between the antenna and television set.
CAUTION: TO REDUCE THE RISK OF ELECTRIC SHOCK
DO NOT REMOVE COVER.
NO USER-SERVICEABLE PARTS INSIDE
REFER SERVICING TO QUALIFIED PERSONNEL
CAUTION
RISK OF ELECTRIC SHOCK
DO NOT OPEN

C-vContents
Contents
1 General Instructions
Introduction 3
Main Controls 7
Connections 13
Connecting to an Unformatted Hard Disk 18
Connecting to a Formatted SCSI Device 19
Sampling Basics 21
Definitions 22
Instant Gratification 34
2 Disk Menu
Disk Browser 41
Disk Utilities 45
Mount Drives 46
Copy System 46
Format Disk 47
Install File System 48
Backup 48
Load Bank 50
Save Bank 51
View 52
Info… 52
Folder 53
Bank 57
Preset 62
SoundSprint 62
Sample 68
Sequence 71

C-vi Emulator Four Keyboard
3 Master
Memory Statistics 77
Utilities Menu 78
Assignable Keys 78
Channel Volume 79
Tones 80
Volume Recalibration 80
Test Access 82
About the E4K/Credits 82
Bank Menu 83
Erase Bank 83
Name Bank 84
Auto Load Bank 84
Setup Menu 85
Tuning 86
Tuning Offset 86
Transpose 87
Audition Key 87
Output 88
Headroom 88
Output Boost 90
Output Format 91
Output Clock Rate 92
AES Boost 92
Miscellaneous Menu 93
Contrast 93
E4K SCSI ID 94
SCSI Termination On/Off 94
Mac on SCSI Bus 95
Zero Crossing Threshold 95
Undo/Redo Enable 97
Wrap Field Selection 98
Disk Button Goes To: 99
Import Options 100
Memory Configuration 102

C-viiContents
FX Menu 103
Master Effects A 103
Master Effects B 106
Sequence Manage 107
MIDI Globals 109
MIDI Mode 110
Basic Channel 110
Mode Select 111
Local Control 112
Effects Control Channel 113
MIDI Mix 115
MIDI Controllers 117
MIDI Preferences 119
Velocity Curve 119
Controller #7 Sensitivity 120
Controller #7 Curve 120
Global Pedal Override 121
Receive Program Change On/Off 121
Send Program Change On/Off 122
Magic Preset 122
4 Effects & Sequencer
Dual Effects Processors 127
The Effects Sends 128
Effects B Into Effect A 130
Three-way effects Control 131
Effects as Part of the Preset 132
Master Effects Programming 133
The Effects Channel in Multimode 135
Effect Descriptions 136
Sequencer Manager 141
Utilities 143
Copy 143
Info 144
Setup 145
Time 146

C-viii Emulator Four Keyboard
Memory 147
Name 148
Transport 148
To Record a Multitimbral Sequence 151
Recording MIDI SysEx 153
Erase 153
Export 154
Jukebox 156
5 Sample Manage
Overview 159
Utilities 160
Erase Sample 160
Copy Sample 161
Sample Dump 161
Defragment Memory 163
Name Sample 164
Create Sample 165
Left/Right Channels 165
Source & Rate 166
ADC Gain 167
Threshold 168
Sample Length 168
Arm Sample 169
Force Sample 169
Monitor On/Off 169
Keyboard Sample Trigger 170
Automatic Parameters 171
Place Sample 175
Export Sample 175
Get Info 176

C-ixContents
6 Sample Edit
Background 181
Utilities 190
Cut Section 191
Copy Section 193
Paste Section 194
DC Filter 198
Sample Calculator 199
Sample Integrity 200
Loop Type 201
Tools 1 203
Loop 203
Truncation 206
Taper 207
Gain Change 209
Stereo <-> Mono 211
Swap Left <-> Right 211
Tools 2 212
Sample Rate Convert 212
Digital Tuning 214
Compressor 215
Parametric EQ 220
Reverse Section 222
Tools 3 223
Time Compression 224
Pitch Change 225
Transform Multiplication 226
Doppler 227
Exciter 230
Undo 231

C-x Emulator Four Keyboard
7 Preset Manage
Name Preset 236
Erase Preset 237
Copy Preset 238
New Preset 239
Export Preset 240
Get Info… 241
8 Preset Edit
Background 244
Programming Basics 244
Modulation 245
Modulation Processors 252
Dynamic Filter 258
Selecting Voices, Samples & Groups 264
Groups 266
Preset Editor 267
Preset Edit - Global 270
Preset Effects A 271
Preset Effects B 276
Preset Edit - Links 280
Utilities 281
New Link 281
Copy Link 282
Delete Link 282
Subsume Link 283
Links - Key Window 284
Links - Velocity Window 286
Preset Edit - Voices 288
Utilities 289
New Voice 289
Copy Voice 289
Delete Voice 290
Split Voice 290
Solo Voice 292

C-xiContents
Sample Zone 293
New Sample Zone 293
Get Multisample 293
Delete Sample Zone 294
Combine 295
Expand 296
Voices - Key Window 297
Keyboard Ranges 298
Voices - Velocity Window 302
Velocity Range 303
Voices - Realtime Window 305
Preset Edit - Dynamic Processing 308
Utilities 311
Voice Select 312
Copy Voices 315
Delete Voices 317
Automatic Voice Selection 318
Set 318
Voice Tuning, Modifiers & Setup 319
Key Transpose 319
Coarse Tuning 320
Fine Tuning 321
Non-Transpose Mode 321
Chorus 322
Delay 323
Start Offset 323
Glide Rate & Curve 324
Solo Modes 325
Latch Mode 326
Assign Group 327
Amplifier/Filter 328
Amplifier Parameters 328
Amplifier Envelope 329
Filter Parameters 330
Filter Envelope 335

C-xii Emulator Four Keyboard
LFO/Auxiliary Envelope 336
LFO Parameters 336
Lag Processors 337
Auxiliary Envelope 338
Cords 339
Sample Retrigger 341
9 Appendix
SCSI 345
SCSI Problems 348
SMDI Transfers 349
Multiple Samplers on SCSI 350
E4K Menu Maps 351
Memory Expansion 354
Specifications 361
Warranty 362
Index 364

1
General
Instructions
Introduction 3
Main Controls 7
Connections 13
Connecting an Unformatted Hard Disk 18
Connecting a Formatted SCSI Device 19
Sampling Basics 21
Definitions 22
Instant Gratification 34

2 Emulator Four Keyboard

General Instructions 3
General
Instructions
Introduction
Congratulations on your purchase of the Emulator Four
Keyboard! The various functions of the E4K are organized in
this manual by their module. Screen displays and step-by-
step instructions are described for all aspects of use and
operation. Sidebars are used to highlight important points
or to give useful operational tips which might not be readily
apparent.
If you are totally unfamiliar with samplers and synthesiz-
ers in general, you may need more information than this
manual provides. We suggest that you read some of the
many books and magazines on the subject of music synthe-
sis. This will help you to get the most out of this extremely
powerful instrument.
Important Upgrade information
The E4K is a software-based device. The features and
functions of the E4K will be periodically enhanced and
upgraded and the new software will be mailed to you on
floppy disk. Please take a moment now to read the E-mu
Systems warranty and to fill out and send in your warranty
registration card. We NEED your mailing address in order to
send you upgrades and manual revisions.
The Emulator IV Keyboard
The E4K was designed to be the ultimate in professional
sampling keyboards. The features of the E4K expand the
state-of-the-art in performance instrument design, from ease
of use to the impeccable audio specifications. For starters,
the E4K contains an incredible 64 channels of polyphony
(32 stereo) and is expandable to 128 channels. The basic E4K
comes with 4 Megabytes of sample memory, but this is also
user-expandable up to 128 megabytes with standard SIMM
modules. With fully expanded memory, the E4K provides
over 24 minutes of sampling time!
- Tips contain handy
tips and tricks which
might not be readily
apparent.
& Cautions warn
you of situations that
may cause lost data or
audio problems.
?
Notes supply
additional information
which might be needed
for certain applications.

4 Emulator Four Keyboard
General
Instructions
Performance Features
The 76 note (6 octave) keyboard on the E4K is slightly
weighted for a responsive feel and responds to velocity and
pressure. Four realtime control sliders are integrated into
each of the factory sounds to control the most useful aspects
of timbre according to the nature of each preset. The
realtime control sliders can be easily reprogrammed to
control any parameter on the E4K.
In addition to the standard pitch and mod wheels, a new
“Thumby button” puts a control switch at your thumb tip.
The Thumby button is quite handy to control such things as
rotating speaker speed, timbre or any other programmable
function on the E4K.
Sequencer and Data Filer
The onboard sequencer is capable of reading and playing
back standard MIDI files (format 0 & 1) direct from a DOS
floppy disk and saving them to the internal hard disk drive.
Music sequences can be stored within E4K banks or as
separate objects.
Sound Libraries
The E4K has full access to the huge library of sounds
available from E-mu and other sources. It is fully compatible
with the legendary E-IV, e-64, EIII, EIIIX and ESI-32 libraries,
and can transparently read Emax II, Roland S-760 and Akai
S1000/S1100 banks as if they were its own.
Sound Storage
The E4K can access up to 1000 samples per bank arranged
in up to 1000 presets. The 50-pin SCSI interface provides
access to high density media such as hard disks, magneto-
optical disks or CD-ROM. The integral 3.5" floppy disk drive
provides a convenient means of updating the E4K software
which is periodically being enhanced and improved. Most
software upgrades will be mailed free to registered owners.
Our exclusive SoundSprint™ function automatically loads
presets from the hard disk as you browse through them. You
can continue to play while the new preset is loading in the
background.

General Instructions 5
General
Instructions
Other professional features include selectable sample rates
of 22.05 kHz, 24 kHz, 44.1 kHz, and 48 kHz. D/A converters
are 18-bit linear for wide dynamic range with multiple
channels. The Sigma-Delta A/D converters are 16-bit linear.
Sampling can be performed in either mono or true stereo.
Advanced DSP
The E4K’s advanced features make sampling a breeze.
Samples can be automatically truncated, normalized and
placed on the keyboard as the sample is taken and advanced
tools such as Auto Correlation, Loop Compression and
Crossfade Looping allow even the most difficult sounds to
be easily looped.
Samples can be digitally spliced and mixed with other
samples, and dynamically controlled from the keyboard
using velocity and positional crossfading and switching
functions. Advanced digital processing features such as
Sample Rate Conversion, Compression, Parametric Equaliza-
tion and Digital Tuning allow you to shape raw samples
more quickly and with greater precision than computer
based systems. Samples can be quickly and easily transferred
between the E4K and an external computer via SCSI if so
desired.
Additional digital processing functions include: Time
Compression and Expansion, which shorten or lengthen the
time of samples without changing the pitch; Pitch Change,
which changes the the pitch of a sample without altering
the time; Transform Multiplication, which can be used to
create weird and wonderful new timbres; and
Dopplerization, which allows you to move samples forward
and backwards in space as well as from side to side.
Built-in Digital Effects
The E4K incorporates a high quality internal effects
processor to add reverb and chorus effects while keeping the
sound in the digital domain. 71 different effects are
currently implemented. There are several controllable
parameters for each effect and any realtime control can be
assigned to control these parameters in performance.
Sounds with effects applied can easily be resampled and
then saved as an entirely new sound with ambience and
effects included.

6 Emulator Four Keyboard
General
Instructions
Digital Hardware Features
The E4K’s digital hardware implements up to 64 Z-plane
filters. These digital filters are very “analog-sounding” and
currently implement the following types of filters:
• 12, 24, or 36 dB/octave Lowpass filters with resonance
• 2nd & 4th order Highpass filters with resonance
• 2nd & 4th order Bandpass filters with resonance
• Contrary Bandpass filter
• Three types of swept EQ filters
• Three Phasers and one Flanger with resonance
• Six powerful Morphing filters
Modulation sources include three multi-stage envelope
generators and two multi-wave LFOs per channel, as well as
a full MIDI modulation control over virtually every param-
eter. The digital patchbay also contains a set of arithmetic
modifiers which allow you to create complex synthesis
models.
The E4K is 16 part multi-timbral, allowing complex
sequencing and sound effects creation, and can be con-
trolled by remote control using an external computer. A
MIDI expander card is available which increases the number
of MIDI channels from 16 to 32 channels.
• Eight polyphonic audio outputs allow you to mix and
process specific sounds.
• Resampling - The E4K can resample its own output in the
digital domain for layering and the creation of new and
exciting effects.
• IBM compatible ASCII keyboard interface controls all E4K
operations including naming and browsing.
• A digital interface (S/PDIF & AES/EBU) is another standard
option which facilitates the transfer of stereo digital audio
between digital recorders, mixers, etc.
The E4K is based on the latest G-chip and H-chip digital
hardware. The G-chip allows smooth sample transposition
over a 10-octave range while the H-chips retain the warm,
musical character of traditional analog filters.
The E4K is an extremely powerful and reliable eighth
generation instrument. We at E-mu Systems sincerely hope it
will help you realize and further your musical potential.
General Instructions 7
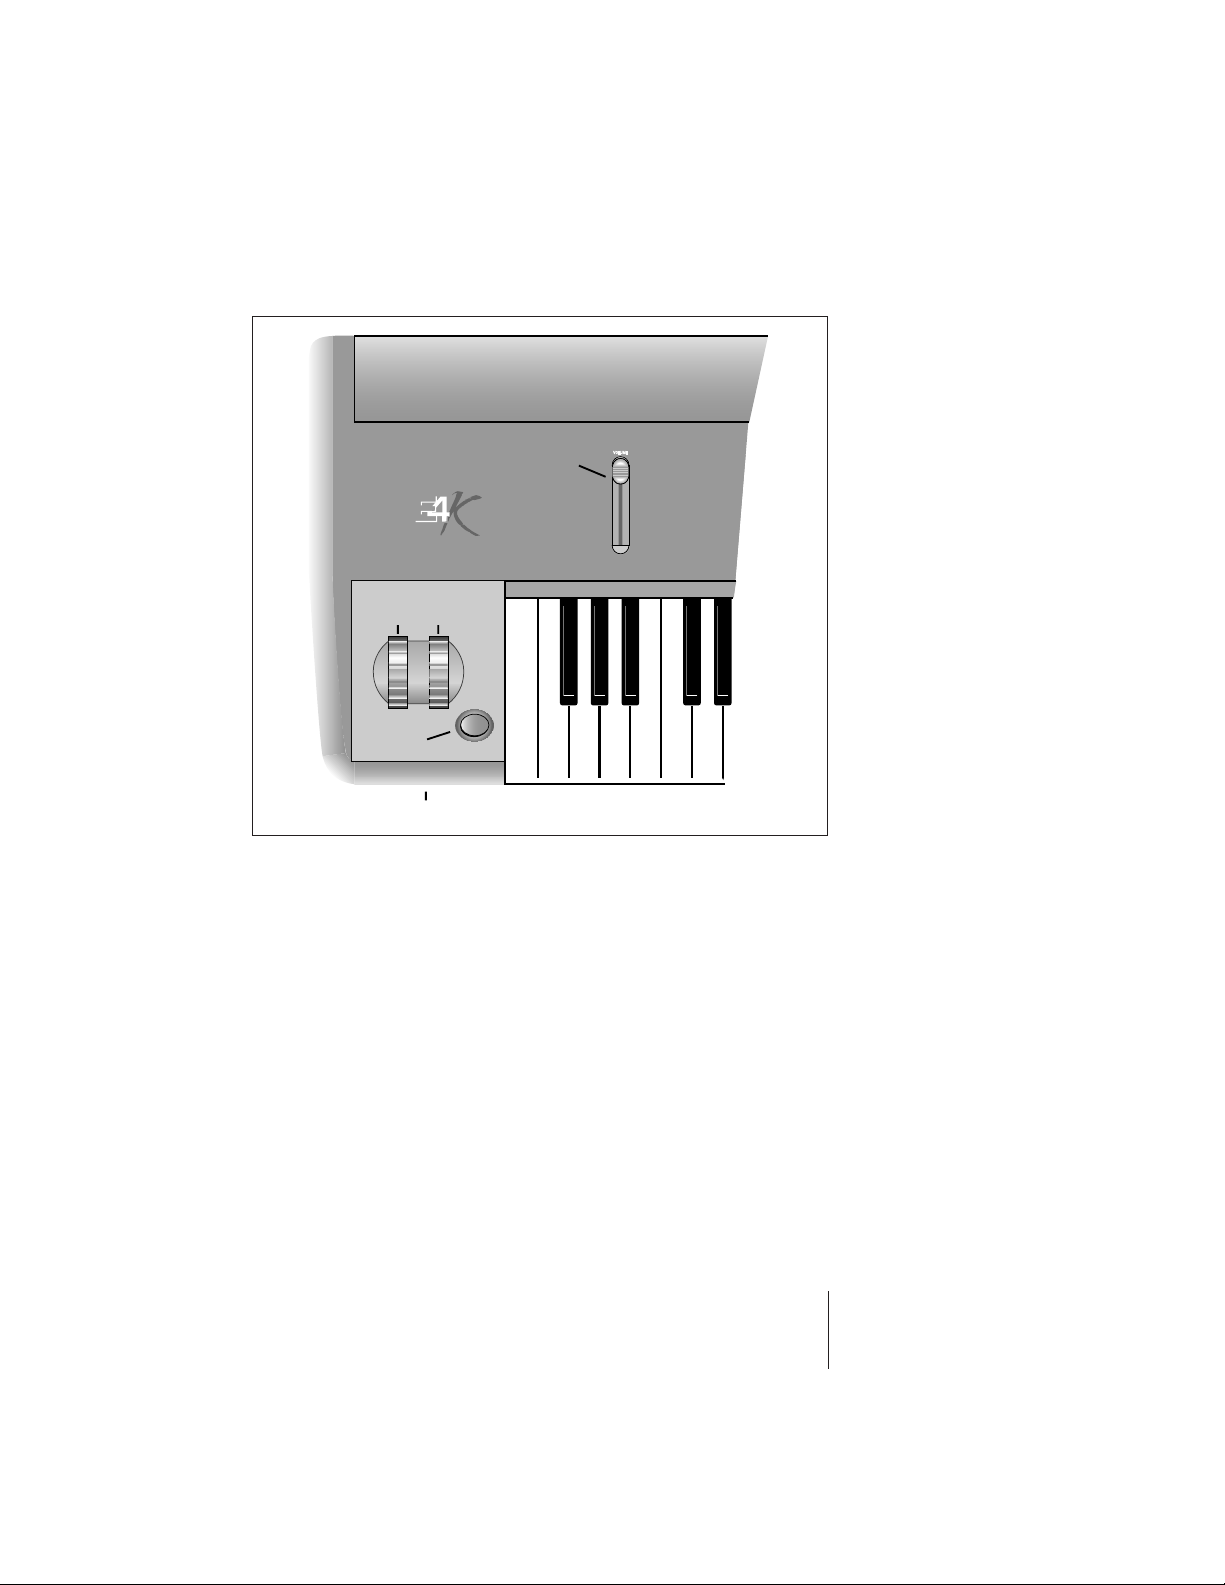
Main Controls
Controller Wheels
The wheels are realtime performance controls and are
completely programmable in the preset as to their function.
The Pitch Control wheel is a center detent, spring-loaded
type and is normally used as a pitch bender. The Mod
Control wheel is not spring-loaded.
“Thumby” Button
The Thumby button can be thought of as a footswitch for
your hand. Like all the controllers on the E4K, its function is
completely programmable. The Thumby button can also be
latched by using a the Thumb flip-flop input (Cords menu).
Volume Control
This is the master volume control for all outputs including
S/PDIF and the headphone output. The master volume is a
digital control. For maximum dynamic range, set this con-
trol near or at maximum.
Master
Volume
Control
Pitch
Control
Mod
Control
Thumby
Button
Floppy Disk Drive
8 Emulator Four Keyboard
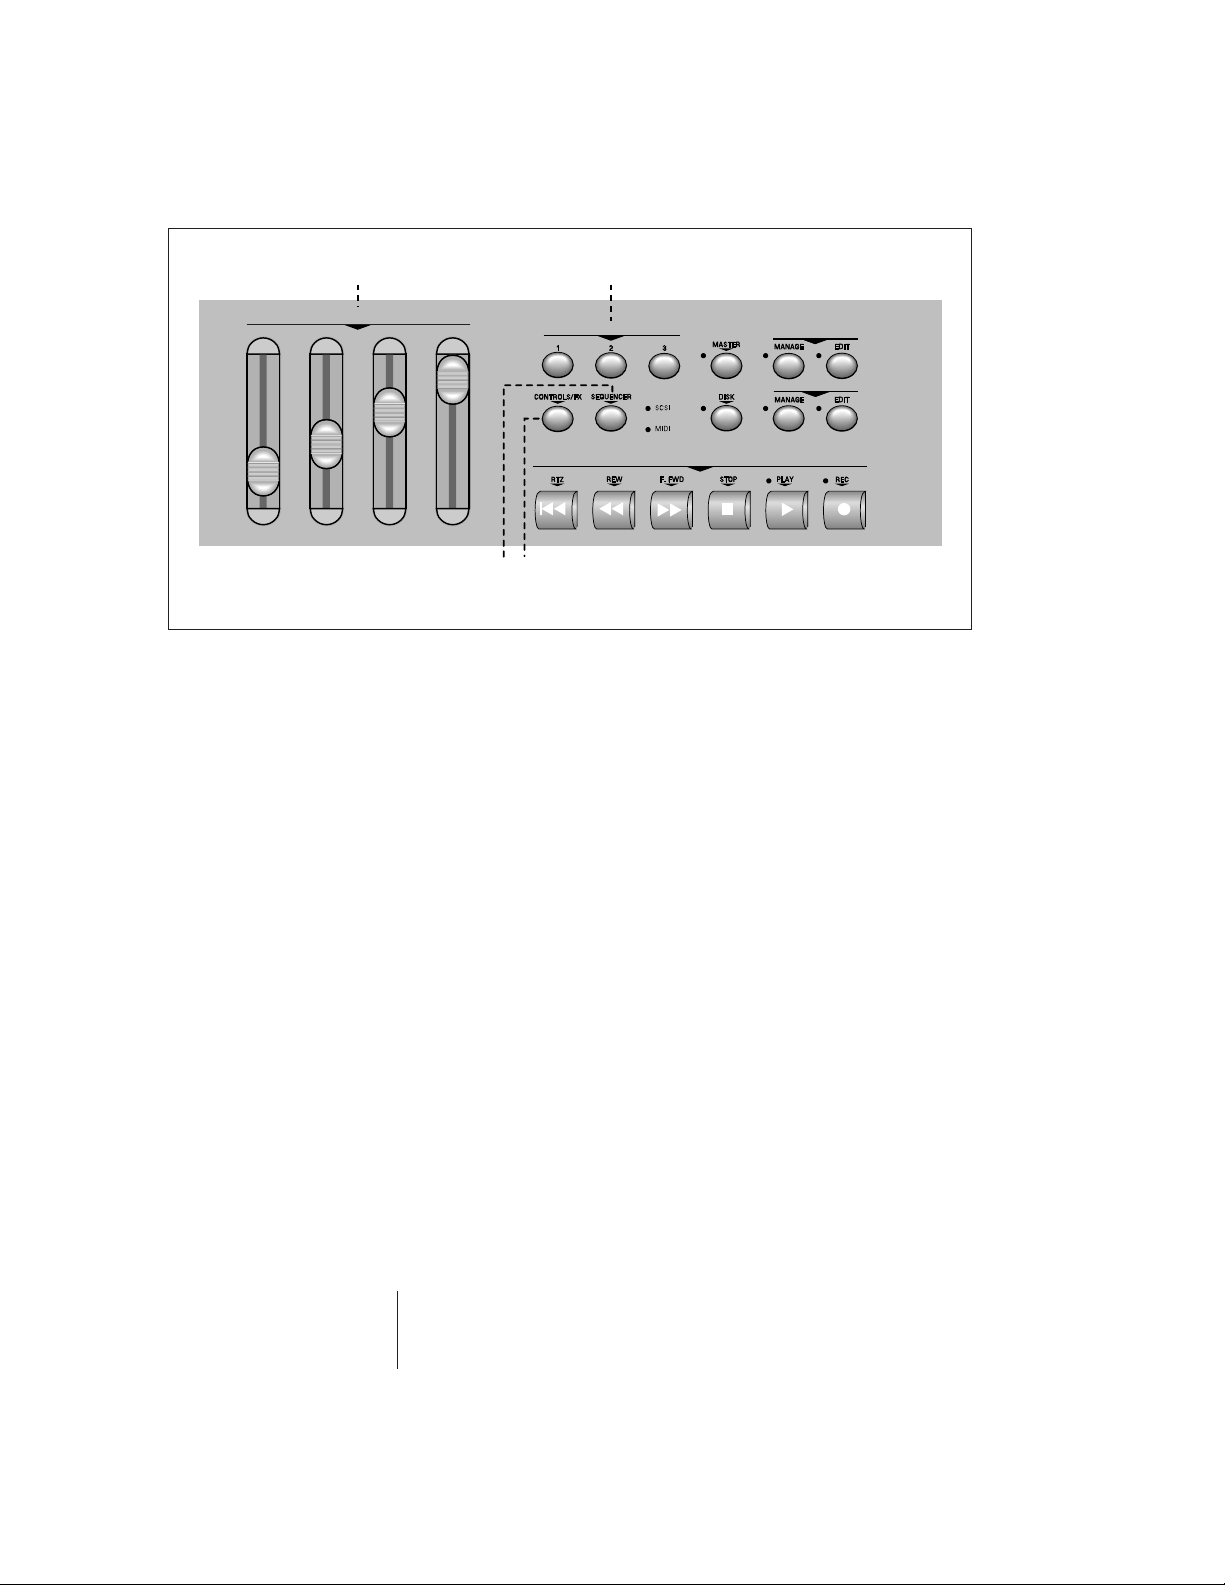
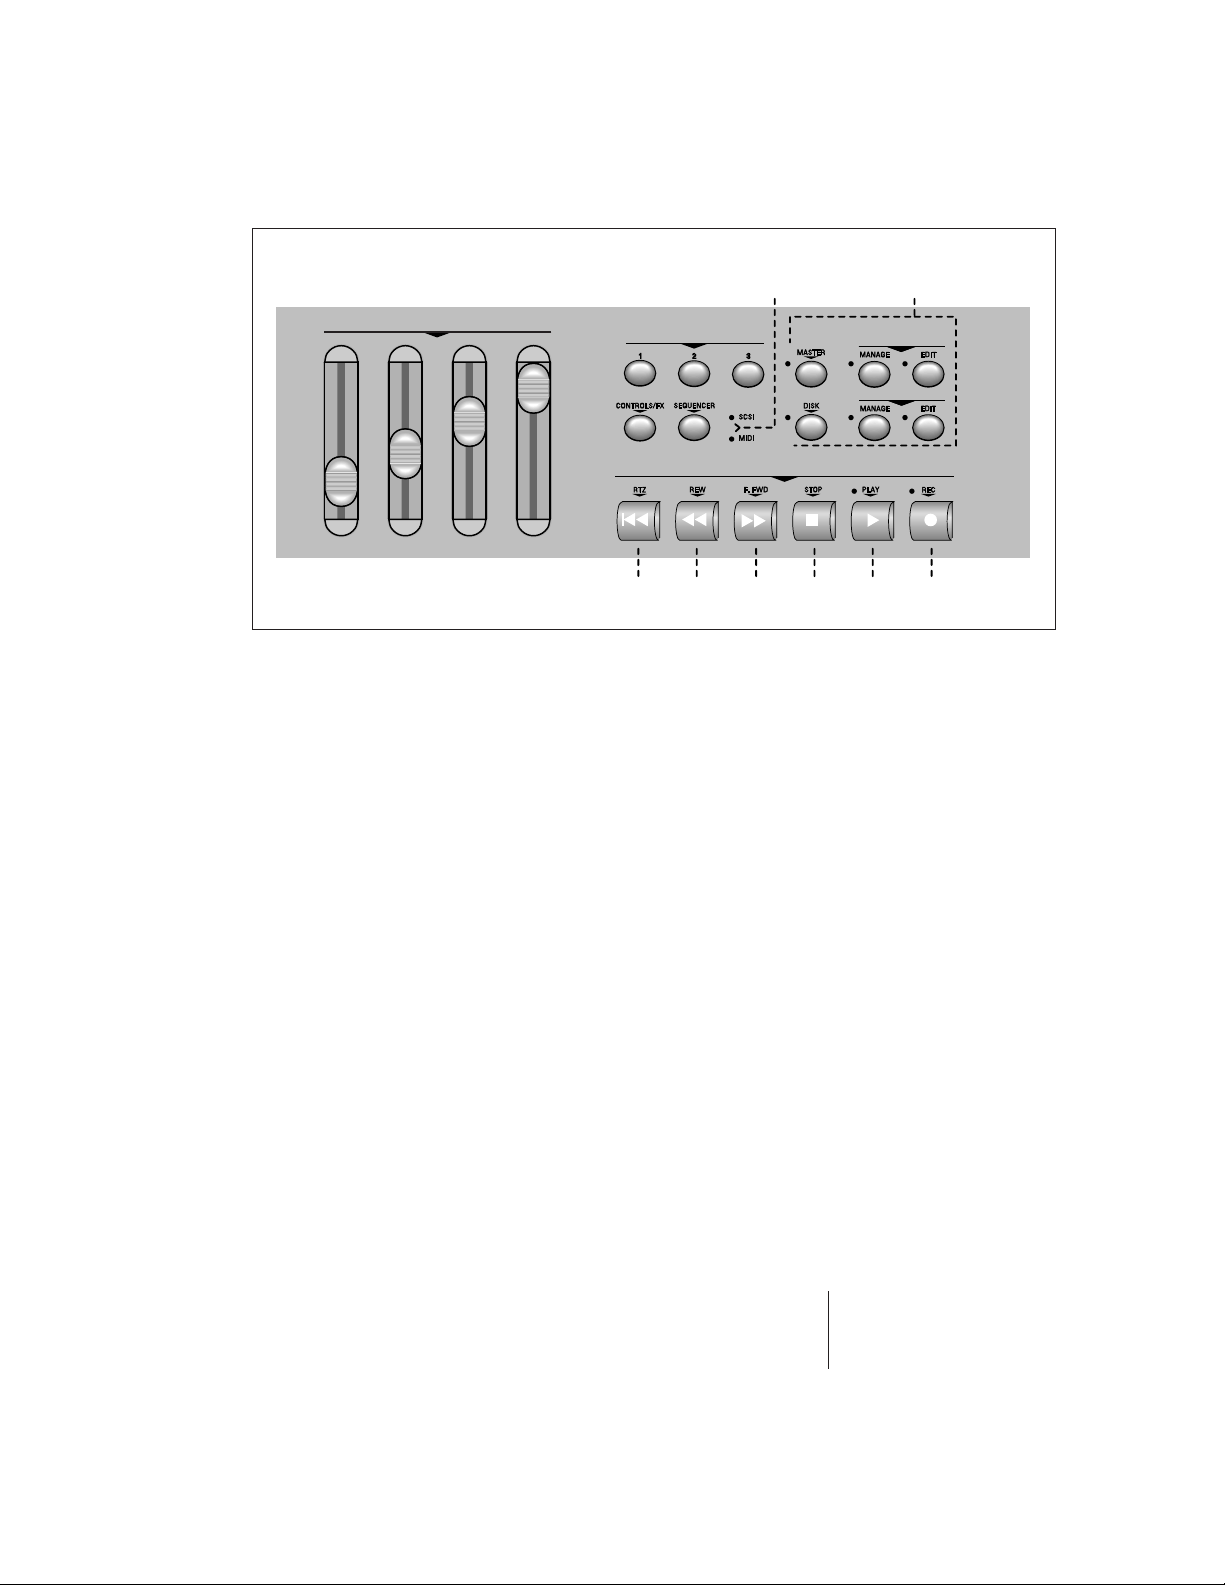
Real Time Faders
These four sliders are powerful performance controls allow-
ing easy access to the most useful aspects of a sound. The
function of each fader is completely programmable per
preset (Preset Edit, Cords), as is the setting of each fader.
The functions of the realtime faders have been integrated
into the presets in the E-mu supplied factory banks.
Assignable Keys
These are user-assigned keys which can cause a jump to any
screen. To link an assignable key to the current screen:
1. Press and hold one of the assignable keys.
2. After two seconds, a pop up window will appear inform-
ing you that the assignable key has been programmed
for the current screen.
For additional information, see Assignable Keys in chapter
three, Master Menu.
Controls/FX Access Key
Pressing this key causes an immediate jump to the Effects
and Controls section of the Preset Edit or Master modules.
Sequencer Manage Key
Pressing this key causes an immediate jump to the Sequencer
Manage screen of the Master module.
- Tip: The Controls
key will access the
Effects menu (either
Master FX or Preset FX)
that you used last. Press
the Controls key to Set
the key to the selected
menu. Press the Controls
key repeatedly to rotate
around through the
menus.
PRESET
SAMPLE
SEQUENCER
REAL TIME CONTROLLERS
ASSIGNABLE KEYS
Realtime Controllers Assignable Keys
Controls & Sequencer
Access Keys
General Instructions 9
Sequencer Transport Controls
These six buttons control the primary functions of the
realtime sequencer. Additional sequencer options are located
in the Master module and can be quickly accessed by press-
ing the Sequencer key.
MIDI & SCSI Indicator LEDs
The LEDs illuminate to show activity on the SCSI bus or
incoming MIDI data.
Module Select Keys
The functions of the E4K are grouped according to their
function in six modules. The Sample Manage and Sample
Edit modules deal with operations at the sample level. The
Preset Manage and Preset Edit modules deal with operations
at the preset level. The Master module contains functions
that affect the entire machine. Any function that has to do
with the disk, such as loading, saving and the like is accessed
through the Disk module.
PRESET
SAMPLE
SEQUENCER
REAL TIME CONTROLLERS
ASSIGNABLE KEYS
Sequencer Transport Controls
MIDI & SCSI
Indicators
Module
Select Keys

10 Emulator Four Keyboard
Function Keys
The lower line of the display will usually contain a row of up
to six “soft keys”. The soft-keys indicate the function of the
keys directly below them.
Cursor Keys
The left, right, up, and down cursor keys are primarily used
to move the cursor around in the display. The cursor is a
reversed-out section in the display which indicates the
currently selected parameter. In the preset selection screen
the left and right cursor keys can be used to select the
previous or next preset.
Enter Key
The Enter key is used to confirm a particular operation.
Enter can be used in place of an affirmative function key
response such as “OK” or “Go”. In the Disk Browser, pressing
the Enter key will advance the selection from: Drives ->
Folders -> Banks -> Presets -> Samples. (The Exit key reverses
the progression.)
Exit Key
The Exit key allows you to back out of a module one menu
at a time, each time the button is pressed. It can also be used
anytime you do not want to execute a particular function. In
the Sample Manage module, it can also be used to terminate
the sampling process.
- Tip: Holding down
the Enter key while
turning the data entry
control allows “fine
tuning” of the value by
one number per click.
?
Note:
The liquid
crystal display contains
a “Screen Saver” which
automatically dims the
backlight after ten
minutes of inactivity.
Any type of activity will
reactivate the display to
full brightness.
Function Keys
General Instructions 11
Page Select Keys (Previous & Next)
The previous and next page keys are primarily used to move
back and forth between pages when multiple pages of
options exist. Each button has an associated LED arrow
which illuminates if there is more information on the
previous or next page. Arrows in the top corners of the
display also indicate if there are more available pages. In the
preset selection screen, the page select keys can be used to
select the previous or next preset.
Numeric Keys
The numeric keys can be used to quickly select a particular
preset or to enter data in precise amounts.
Lock Key - The +/- key has an alternate function as a digit
“Lock” key which sets the number of digits that you must
enter to change a preset. The status of the lock key is shown
in the lower left corner of the display (lock 9.., lock 99.).
With one digit locked (100s column), the last two digits of
the preset number must be entered to select a preset.
(Example: To go from preset 100 to preset 125, you would
key in 2 and then 5.) Note that the number of presets avail-
able via the numeric keys jumps from 10 to 100.
With two digits locked (10s and 100s column), any one of
ten presets can be selected with a single key press. The
numeric keys select only the last digit (or ones column) of
PAGE
PRESET SELECT
ENTEREXIT
Cursor Keys
Numeric Keys Set Key
Data Entry
Control
Lock Key
SET
.1+/- 234567890
Enter,
Exit
Inc,
Dec
Page Select

12 Emulator Four Keyboard
General
Instructions
the three digit number preset number. For example, if the
currently selected preset were 067, pressing the numeric key
“3” would instantly select preset 063.
With lock turned off, you select a preset by entering a 1, 2 or
3 digit number. If fewer than three digits are entered, you
must press Enter or the Go key after selecting the number.
• The lock key can also be used as a quick way to set the
current rank of ten Bookmarks in SoundSprint™ mode. From
Sound Sprint mode, press and hold the Lock key, then press
a numeric key. This sets the tens column or rank to the
number you selected. For example, if you selected Lock-2,
selecting 2 on the keypad would select bookmark 22.
Entering Data - The numeric keys can be used anytime the
data to be entered is a number, such as selecting samples and
presets when you know the exact number. You could simply
enter the number without the leading zero as in “10”, In this
case, after entering the number, you will be asked to confirm
the value by pressing “Go”. The +/- key can be used to
indicate if the value is positive or negative. The numeric keys
can also be used for naming as some of the keys are labeled
“telephone-style” with 3 characters above the key.
Inc/Dec Keys
The increment and decrement keys are used primarily to
duplicate the function of the data entry control when a finer
degree of control is required. In the preset selection screen
the inc/dec keys can be used to select the previous or next
preset.
Data Entry Control
The data entry control is a stepped, variable control which is
used to change parameter values. The control increments or
decrements the current value one unit each click. This
control incorporates acceleration (values advance faster if
the control is quickly turned).
Set Key
The set key is used to set a “Bookmark” in SoundSprint
mode. To set a bookmark, press and hold the Set key while
in SoundSprint mode, then press one of the numeric keys.
The current preset will be stored under that numeric key and
can be selected by pressing the numeric key while in
SoundSprint mode. Set also doubles as a decimal point key.
- Tip: Up to 100
Bookmarks can be saved
to non-volatile EEPROM.

General Instructions 13
Connections
SCSI Port
SCSI is a high-speed parallel interface which is normally used
to interface the E4K with external mass storage devices such
as hard disks or magneto-optical discs. The dual 50-pin SCSI
ports can also be used to link the E4K with an external
computer for extremely fast file transfers. The E4K contains
advanced SCSI links to facilitate multiple “master” devices
on the SCSI bus, such as multiple E4Ks or a computer and an
E4K.
For more information on SCSI installation, see page 1-18.
Also refer to the manual that accompanies your external
SCSI device.
OPTION PORT
S/PDIFOption Port
SCSI Port MIDI
In/Out/Thru
ASCII
Interface
21 RLRLRLRLRL
FOOTSWITCH FOOTPEDAL SAMPLE
SUB 3
SUB 2 SUB 1 MAIN HEADPHONE
100-250 VAC 50/60 HZ 2A
ON
OFF
POWER
Sample
Inputs
Footswitch
Inputs
Footpedal
Input
Submix
Outputs
Headphone
Output
Main Stereo
Outputs
AC Power

14 Emulator Four Keyboard
General
Instructions
MIDI Connection
The E4K provides a MIDI IN, a MIDI OUT and a MIDI THRU
port.
• The MIDI IN port connects to the MIDI OUT port of an
external MIDI controller which could be a keyboard, a
sequencer, MIDI drum kit or whatever. Note that the E4K
can only respond to information that your controller
transmits. (i.e. If your MIDI keyboard does not have
velocity and pressure sensitivity, the E4K will not respond
to velocity and pressure.)
• MIDI OUT can be connected to another MIDI instrument
or computer. The MIDI OUT jack transmits all keyboard
controller and preset change information to a sequencer
or additional instruments and can also be used to transfer
MIDI sample dump information (transfers sample data).
• MIDI THRU simply re-transmits any information received
at the MIDI IN port.
Option Port
The option port allows you to add additional hardware
options such as a MIDI expander card which adds an addi-
tional 16 MIDI channels. Other option cards will be an-
nounced as they are developed.
S/PDIF Digital Interface
The digital interface allows the E4K to transfer digital audio
back and forth with other digital devices equipped with
S/PDIF or AES/EBU digital I/O. Keeping the signal in the
digital domain is desirable to keep the signal to noise level as
high as possible.
The digital input allows you to sample directly from a
DAT recorder or other digital device. The digital output
reflects the data at the stereo outputs of the E4K. See the
Sample Manage module and Output Format (located under
Output in the Master menu) for more information.
AC Power Connection
The E4K may be used in environments ranging from 100
volts to 240 volts at either 50 Hz or 60 Hz. No change of
voltage settings is required.
The E4K automatically switches itself for the proper
line voltage.

General Instructions 15
General
Instructions
ASCII Keyboard Interface
A standard IBM PC style ASCII keyboard can be connected
to the rear panel ASCII Keyboard connector. The keyboard
must be connected before power is applied in order for the
E4K to recognize it. All the front panel controls of the E4K
can be accessed via the keyboard. Having an ASCII keyboard
is also a real time saver when naming samples, presets, banks
and sequences. The keyboard functions are charted below.
E4K ASCII KEYBOARD
Exit Esc
Ten Key Pad Ten Key Pad
Cursor Keys Cursor Keys, Ten Key Pad
Page Keys Ten Key Pad 3, 9
Numeric Selection [Num Lock, Ten Key Pad]
Inc/Dec +/-
F1-F6 [F1-F6]
Preset Edit [Alt, A], [Alt, F], [Ctrl, E]
Sample Manage [Alt, S]
Sample Edit [Alt, D], [Ctrl, G]
Preset Manage [Alt, P]
Master [Alt, M]
Multimode [Alt, Z]
Disk [Ctrl, D]
Load Bank [Ctrl, L], [Alt, ] ]
Save Bank [Ctrl, S], [Alt, [ ]
Search Dialog [Ctrl, F] in Browser
Rename Dialog [Ctrl, R] in Browser
Audition Preset [Ctrl, A] Preset related modules
Audition Sample [Ctrl, A] Sample related modules
16 Emulator Four Keyboard
General
Instructions
Footswitch Inputs
The footswitches can be routed to control any parameter on
the E4K through the Preset Edit, Cords menu.
The two control footswitch jacks accept either a normally-
open or normally-closed, momentary contact footswitch.
The footswitch polarity is automatically sensed on power-up.
Additionally, a MIDI footswitch command, on the controller
channels programmed in the Master, MIDI menu, will be
transmitted from the MIDI Out port whenever a footswitch
is pressed.
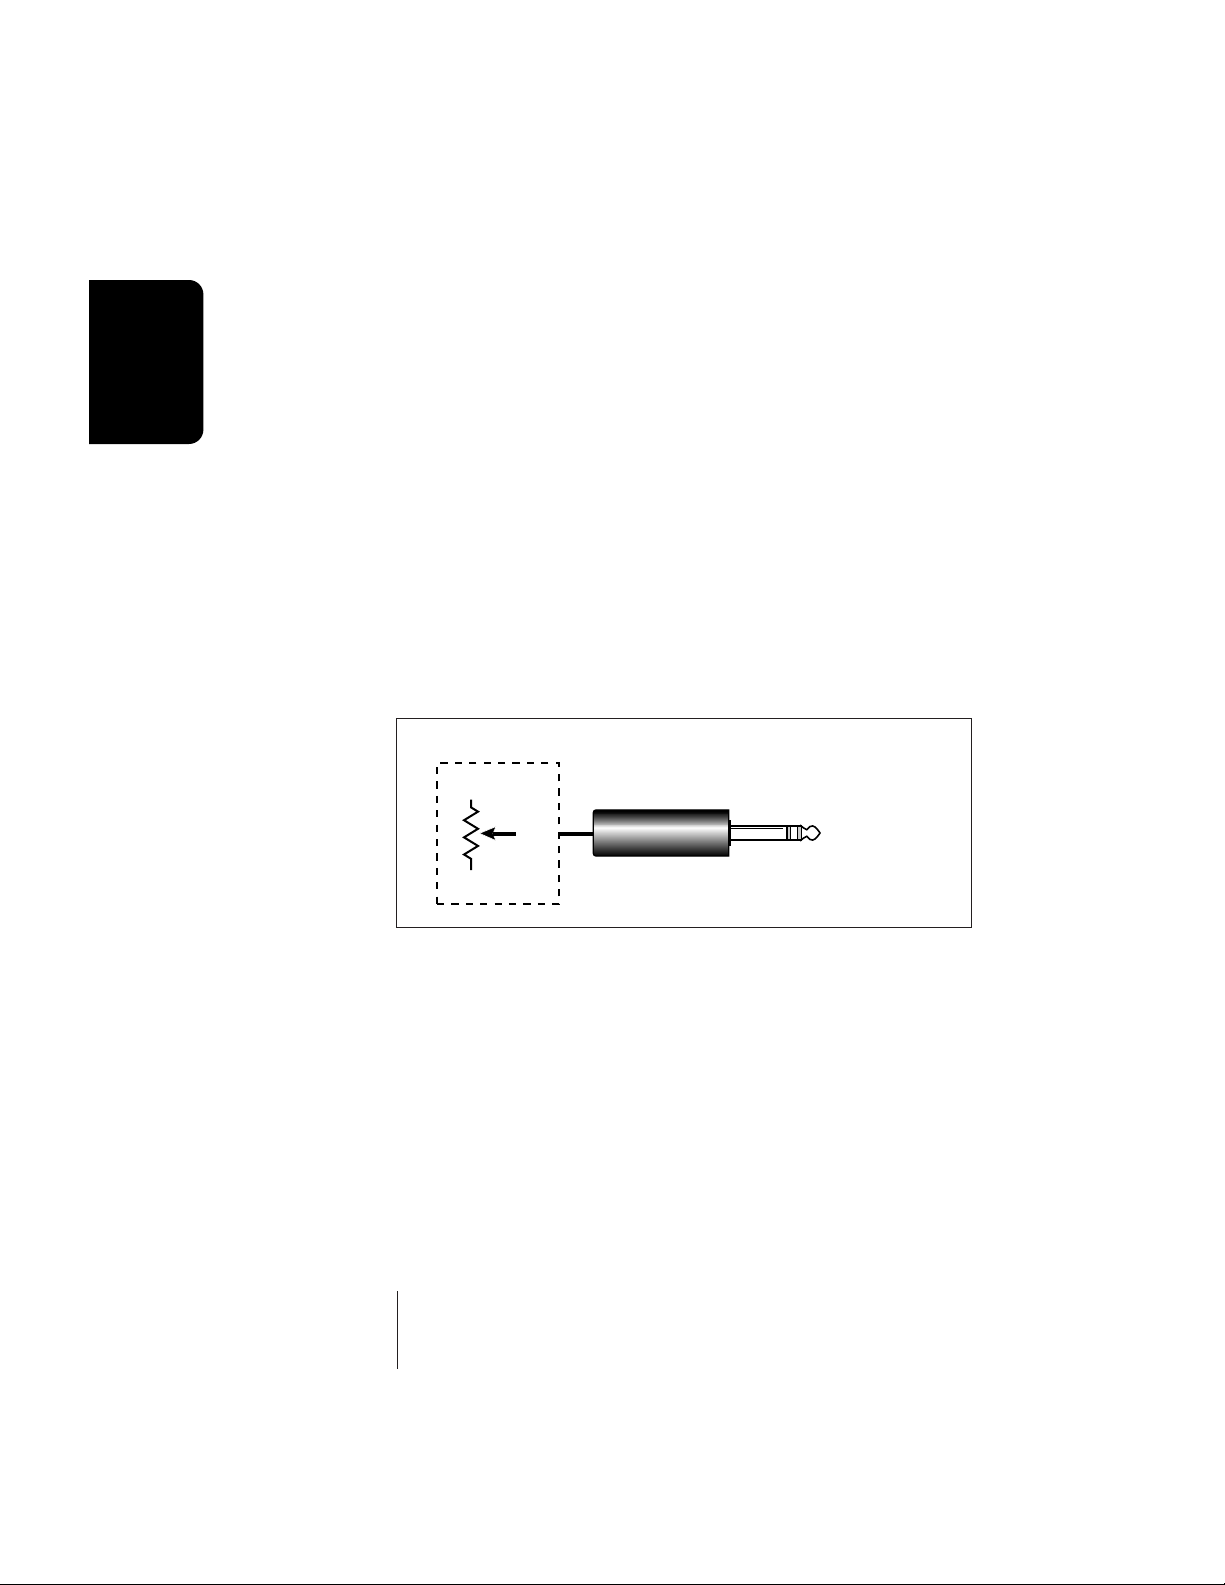
Footpedal Input
A control footpedal can be used as a realtime performance
control in the same manner as the front panel realtime
faders or the control wheels. The pedal can be routed to any
parameter in the Preset Edit, Cords menu.
Additionally, a MIDI continuous controller message, on
the controller channel programmed in the Master, MIDI
menu, will be transmitted from the MIDI Out port whenever
the footpedal is moved.
Sample Inputs
The two electronically balanced sample input jacks accept
any level input from microphone to line level. Input imped-
ance is 4KΩ. The gain of the sample input preamplifiers is
controlled from the New screen in the Sample Manage
module. When in the Sample Manage module the sample
inputs can be monitored from the main outputs.
Main Outputs
The E4K has provisions for a variety of output connection
schemes. The most common hookup will probably be using
the main stereo outputs. The electronically balanced main
outputs are available at 1/4" stereo phone jacks. Output level
is -2 dBu. Output impedance is 50 ohms.
Stereo Plug
Tip
Ring
Gnd
Pedal
PEDAL WIRING
?
Note:
The footpedal
can be either a voltage
type (which outputs a
DC voltage from 0-9
volts at the tip of the
plug) or a resistance
type (see the diagram at
right).
- Tip: Use a stereo
plug if you want the
sample inputs to be
balanced (tip -, ring +).

General Instructions 17
General
Instructions
Submix Outputs
In addition to the main stereo outputs, there are 3 additional
pairs of unbalanced submix outputs which can be used
when individual processing on specific instruments is
desired. Any combination of MIDI channels can be pro-
grammed to appear at a submix output pair. Any voice can
also be assigned to a submix pair (In the Amplifier screen of
the Preset Edit module). MIDI channels can be assigned to
the submix pair in the Multimode screen. The submix
outputs are all stereo jacks. The tip of each jack (accessed
when a standard phone plug is inserted) connects to the left
or right output. If a stereo plug is inserted, the Ring of the
stereo plug serves as a signal Return which sums to the main
outputs after the effects processors.
Therefore the Submix jacks can serve as effects sends/
returns in order to further process selected voices or
channels without using the effect sends on your mixer.
The submix outputs are stereo jacks with -2 dBu outputs on
the tip of the jack. Impedance is 50 ohms.
- Tip: Inserting a
phone plug halfway into
a sub out jack sums it
into the main output.
This is a handy trick
when you need one or
two more mixer inputs.
Tip
Ring
Tip
Ring
SUB 3 BALANCED MAINS
RL RL
R Bus
L Bus
Output Section
Effects
Section
Tip
Ring
Tip
Ring
SUB 2
RL
Tip
Ring
Tip
Ring
SUB 1
RL
Headphone Output
The headphone output is taken from the main outputs and
the volume slider controls also controls the headphone level.
This is a high quality headphone amplifier with an output
level compatible with professional grade headphones.

18 Emulator Four Keyboard
General
Instructions
þ To Connect the E4K to an Unformatted Hard Disk
1. Position the SCSI device and the E4K in a stable location.
Hard disk drives are particularly susceptible to shock and
vibration. Make sure that you position your hard disk
where it won’t be bumped or moved while in use.
2. Important: Make sure that all power to the E4K and the
SCSI device is turned OFF.
3. Connect the SCSI device to your E4K using a quality
SCSI cable. Make sure that the connectors are firmly
mated and that the wire “keepers” are locked in place.
There are two type of SCSI cables in common use: the
50-pin Centronics type and the 25-pin DB connector
type. The E4K uses the 50-pin Centronics type connec-
tor.
4. Set the SCSI ID of your external SCSI device to any
number other than 6. (6 is the default ID of the E4K).
Consult the operation manual of your SCSI device for
this procedure.
5. Turn on the external SCSI device and the E4K.
6. Make sure your hard disk really is unformatted. Format-
ting a hard disk erases all the data on it. Press the Disk
button. If the display does not show the external hard
disk icon, the hard disk is may be unformatted. Try
mounting the drives (Utilities, in the Disk Browser). Also
check that the SCSI ID is not set to 6 (E4K's default).
7. Format the hard disk. While in the Disk Browser, press
the soft key Utils. A new line of options will appear.
8. Select Format. The display will warn that formatting
erases everything on the hard disk. Press the OK soft key
to continue.
9. The E4K will format the hard disk drive. Formatting
takes a few minutes. The time will vary depending of the
capacity of the disk.
10. After formatting, the hard disk will appear in the disk
browser and is now ready to accept data. Use the left/
right cursor keys or the data entry control to select the
newly formatted hard drive. Use the function key under
Info… to get information about the new drive.
- Tip: If the hard disk
is already formatted
with another file system,
you can use the Install
File System function
instead of formatting
the disk. See Disk
Utilities.
 Loading...