

Page 1

2.0 Software
OperOper
Addendum
E-MU PN FI 10383 Rev. A
Page 2

Page 3

•
•
•
Audity 2000
2.0 Software Addendum
Page
New Features in Version 2.0
4.
Up to 64 voice Polyphony!
4.
Additional user presets! 4 banks of 128 user presets.
4.
New main display screen shows preset and ROM group.
4.
New Sound Navigator feature allows you to browse sounds by ROM
Group, Preset Number, Bank, Preset Category or Preset Name.
6.
New Bank Select protocol for selecting USER, AUDTY, or XTREM banks
over MIDI.
7.
Multi-setups allow you to save 16 “snapshots” of Audity’s current
Master menu/Preset/Volume/Pan/Arp configuration.
10.
MIDI All Notes Off/All Sound Off/Reset All Controllers bug fix
10.
Arpeggiator Resolution knob bug fix description
11.
New Mix Output screen adds another FX Send and shows the true
routing of signal to FX engine or submix outputs.
12.
FX B Delay Time can now be controlled by internal or external clocks.
13. Arpeggiator knobs can now be generic controllers.
14. New Preset FX PatchCords allow you to modulate effects amounts.
14. New Edit All Layer parameter
14. New Solo Layer parameter
15. 9 New LFO waveforms! (17 total)
16. New Envelope Repeat mode for Filter and Auxiliary Envelopes.
16. Audity now contains 12 User Tuning Tables and 12 Factory Tables.
19. New Demo Sequence screen.
20. New Copy Preset Bank function.
20. Random Preset creator makes amazing new presets using random
components of the presets in ROM.
22. New Clock/Tempo display screen.
22. Preset Tempo Offset screen allows you to offset the tempo parameters
in the preset by any arbitrary value.
Support for the hot new “XTREME” ROM sound set.
Improved Reverb algorithms. Smoother and creamier— like butta!
New Arpeggiator Patterns include with the XTREME ROM set.
3
E-MU Systems
Page 4

4
Audity 2000 2.0 Software Addendum
64 Voice Polyphony
64 Voice Polyphony
512 User Presets
New Main Screen
Although its sound engine is designed for 64 voices, Audity was originally a
32-voice machine due to its powerful 12th order filters which used up the
available filter resources.
Audity 2.0 is now 64 voice polyphonic when 6th order filters are used or 32
voice polyphonic when all filters are 12th order. Audity’s intelligent 2.0
software dynamically allocates filter resources for maximum polyphony in
all situations. When using combinations of 6th and 12th order filters the
polyphony is between 32 and 64 voices.
By a feat of magic, 256 User Preset locations have been added for a total of
512. The Audity bank contains 640 factory ROM presets and the new
EXTREME ROM bank contains 256 ROM presets. That’s 1408 presets total!
Audity’s main screen has been improved to show the Preset Bank and to
include the Sound Navigator features.
MIDI Channel
ROM or RAM Preset Location
C01 V127 P01R A:off USER
Sound Navigator
Preset Category
0360 pad: 2ManyDolphins
Sound Navigator allows you to search through preset and instrument
categories to find the type of sound you’re looking for. Each preset and
instrument has a name and a three letter preset category. You can create
your own categories in order to group favorite presets. The category is
assigned in the Edit menu (Preset Name). Instrument categories are fixed.
When you want to find presets in a particular category, you simply change
the category field in the main screen, then move the cursor to the preset
name field to scroll through all the presets in the selected category.
When the cursor is on the Preset Category field, turning the Data Entry
Control selects different preset categories. The Name Field will change to
show the first preset in each category.
C01 V127 P00 A:off
USER
0321 bas: Interference
E-MU Systems
Preset Category
Preset Name
Page 5
Audity 2000 2.0 Software Addendum
Sound Navigator
v
To Change the Preset Category
Press either cursor key repeatedly until the cursor is underneath the
1.
Preset Category Field.
Rotate the Data Entry Control to select one of the Preset Categories.
2.
Preset Categories are displayed in alphabetical order.
v
To Select a Preset within a Category
After selecting a category, move the cursor to the Preset Name field.
1.
Rotate the Data Entry Control to scroll through the presets in the
2.
selected category. Note that the preset numbers will no longer change
sequentially.
Compatibility with old Audity presets
Sound Navigator uses the first 4 characters of the Preset name for the
Navigator Category. Older Audity presets are not named using the category
prefix which would cause problems for Sound Navigator (this would create
hundreds of categories). Therefore, old presets are placed in a new category
called “usr:” (User) with the actual name listed to the right of the colon,
truncated to fit the remaining 12 characters with the following additional
rules:
Instrument Category
If there is a colon in the 4th character space, the name will not be
1.
altered in any way. The first 3 characters will simply be used as the
category and the rest of the name will remain the same.
If there is a character other than a colon in the 4th space, the preset will
2.
be assigned to the category “usr:” and the original name will start to the
right of the colon, truncating the length as necessary.
If the name needs to be truncated, the Audity will first try to remove
3.
spaces in the name so that it will fit.
Numbers at the end of the name will not be truncated and will remain
4.
as the final character of the name.
When the cursor is on the Instrument Category field (Edit menu), turning
the Data Entry Control selects different instrument categories. The Name
Field changes to show the first instrument in each category. Move the
cursor back to the instrument number to select instruments in the selected
category.
L1
INSTRUMENT ROM: AUDTY
0305 b
as : Buzz Bass
1. Choose Category
2. Scroll through Instruments
Audity 2000 - 2.0 Software Addendum 5
Page 6

Audity 2000 2.0 Software Addendum
Sound Navigator
6
New Bank Select Protocol
MIDI BANK SELECT
MSB LSB
cc00 cc32
USER
USER
USER
USER
00
00
00
00
00
01
02
03
The MIDI standard calls for a two part bank select command consisting of
an MSB (most significant byte) and an LSB (least significant byte). Audity
version 1.0 ignored the MSB portion of the message. With the introduction
of the new EXTREME ROM bank, we have followed the standard MIDI
specification for bank selection. Select a bank, then send the program
change number. Without a bank select command, presets are selected from
within the current bank. The chart below shows the bank select commands
for the three sound banks.
MIDI BANK SELECT
MSB LSB
RAM
Bank 0
Bank 1
Bank 2
Bank 3
AUDTY
AUDTY
AUDTY
AUDTY
AUDTY
In order to maintain compatibility with older sequences which do not send
the MSB portion of the Bank Select, there is a special feature added in
software version 2.0. If no MSB is sent, Audity assumes MSB 0 and all LSB
bank selects will act as in version 1.0 (i.e. your old sequences will work).
Once an MSB other than 0 is sent, Audity assumes that any LSBs are to be
applied to the most recent MSB.
cc00 cc32
03
03
03
03
03
ROM ROM
Bank 0
00
Bank 1
01
Bank 2
02
Bank 3
03
Bank 4
04
MIDI BANK SELECT
MSB LSB
cc00 cc32
XTREM
XTREM
02
02
00
01
Bank 0
Bank 1
E-MU Systems
If you have older sequences that send only the Bank Select LSB, it’s
probably a good idea to update the sequences to include both the MSB and
LSB. Otherwise, if you ran a newer sequence that included an MSB, LSB
bank select, presets in your older sequence may not be selected correctly.
New AUDTY Bank Ordering
LSB
LSB
New
Banks
LSB
LSB
LSB
LSB
LSB
Audity version 2.0 includes two additional USER preset banks (which
default to RAM copies of the AUDTY 0 and AUDTY 1 banks). Your old
sequences will work as long as you don’t modify the presets they use in
these new banks. This is yet another reason to update your sequences with
MSB & LSB bank selects.
0
User 0
1
User 1
2
User 2,
User 3,
3
AUDTY 2
4
AUDTY 3
5
AUDTY 4
6
defaults to RAM copy of AUDTY 0
defaults to RAM copy of AUDTY 1
Page 7

•
•
•
•
•
•
Audity 2000 2.0 Software Addendum
Multisetups
Multisetups
A Multisetup is a group of parameters that you might associate with a
particular sequence or song. It is like a “snapshot” of the current MIDI
channel configuration of the module. There are 16 setups numbered 0-15.
Multisetups 0-14 are user programmable. Multisetup 15 is a factory preset.
A Multisetup includes ALL the following parameters:
Preset/Volume/Pan/Arp assignments for each of the 16 MIDI channels.
Multisetup Name
Clock Tempo or “Use MIDI” setting
ALL MASTER MENU PARAMETERS except…
MIDI Program Change->Preset map
User Key Tuning Tables
RESTORE MULTISETUP
0
03 Song for Alex
Multisetups can also be restored (selected) via MIDI Bank and Program
change commands. Bank Select: MSB = 80, LSB = 00, then send a Program
Change command (0-15) corresponding to the Multisetup you wish to
select.
To Enable the Multisetup Menu
v
Press the Master button, lighting the LED. The three Multisetup screens are
located near the end of the list. The cursor appears below the first character
of the screen heading on line one.
v
To Select a New Screen
Press the Home/Enter button or press the Cursor button repeatedly until
the cursor is below the screen title heading. Rotate the Data Entry Control
to select another screen.
To Modify a Parameter
v
Press either Cursor button repeatedly (or hold down the left or right cursor
button while turning the Data Entry Control) until the cursor is below the
desired parameter value. Rotate the Data Entry Control to change the value.
v
To Return to the Main Screen
Press the Master button, turning off the LED.
Audity 2000 - 2.0 Software Addendum 7
Page 8

Audity 2000 2.0 Software Addendum
Restoring Multisetups
8
Restoring Multisetups
MIDI Bank Select
commands are implemented
using Continuous Controllers.
MSB = cc00 and LSB = cc32
Audity 2000 contains 16 Multisetup locations. 15 of these (0-14) are user
locations which you can use to store your own Multisetups.
Multisetups can also be restored using a MIDI Bank Select followed by a
Program Change command (0-15).
Bank Select: MSB = 80, LSB = 00, then send a Program Change command
(0-15) corresponding to the Multisetup you wish to select.
RESTORE MULTISETUP
0
03 Song for Alex
v
To Restore (Select) a Multisetup:
Press the Master menu button, lighting the LED. The Restore Multi-
1.
setup screen is the fifth screen from the last in the Master menu. The
cursor appears below the first character of the screen heading on line
one.
Go to the “Restore Multisetup” screen (shown above) using the Data
2.
Entry Control.
Press either cursor button to move the cursor to the bottom line of the
3.
screen.
Now, use the Data Entry Control to select a Multisetup. The Enter LED
4.
will be flashing.
Press the Enter button to load the selected Multisetup.
5.
E-MU Systems
To Save a Multisetup:
v
Set the Preset, Volume, Pan and Arp settings the way you want them for
1.
all 16 channels. Set the Master menu parameters the way you want
them.
Press the Master menu button lighting the LED and go to “Save Setup
2.
To”. This is the third screen from the last in the Master menu.
If you wish to name your new Multisetup continue on, otherwise skip
3.
to step 6.
Scroll to the “Multisetup Name” screen (shown below) using the Data
4.
Entry Control.
MULTISETUP NAME
003
User Setup 03
Page 9

Audity 2000 2.0 Software Addendum
MIDI All Notes Off/All Sound Off/Reset All Controllers
Press either cursor button to move the cursor to the bottom line of the
5.
screen, then use the Data Entry Control to change letters. Use the
cursor buttons to select letters to be changed.
Scroll to the “Save Multisetup” screen (shown below) using the Data
6.
Entry Control.
SAVE SETUP to
014
Destination Multisetup
Press either cursor button to move the cursor to the bottom line of the
7.
screen.
Now, use the Data Entry Control to select the destination location. The
8.
Enter LED will be flashing.
Press the Enter button to save the Multisetup.
9.
MIDI All Notes Off/
All Sound Off/Reset
All Controllers
Arp Resolution Knob
Audity software version 1.0 did not honor the MIDI channel of the All
Notes Off/All Sound Off/Reset All Controllers messages. Instead, it incorrectly affected all channels. This has been corrected in version 2.0.
In addition, All Notes Off now correctly honors the state of the Sustain
Pedal. All Notes Off will no longer shut off notes if the Sustain Pedal is held.
Notes remain in the Sustain state until the pedal is released. All Sound Off
shuts down all notes on the MIDI channel immediately.
The behavior of MIDI controller transmission of the Arp Resolution
controller (first knob, third row) has changed in Audity 2.0. When the knob
is fully clockwise the controller value sent is now the maximum (127). This
is the opposite of the Audity 1.0 where the knob transmitted starting at
maximum, (127= fully counter-clockwise) and decreased to the minimum
as it was turned clockwise.
This could affect sequences authored in version 1.0 where the Arp
Resolution knob was recorded into the sequence. The sequence will play
back into Audity 2.0 with reversed parameter values on this knob.
Audity 2000 - 2.0 Software Addendum 9
Page 10

Audity 2000 2.0 Software Addendum
Changes to the Mix Output Screen
Changes to the Mix Output Screen
The Mix Output parameter allows you to override the routing assignments
made in each preset and instead assign the outputs according to MIDI
channel. For each of the 16 MIDI channels, you can select Send 1-4, or
Preset. When Preset is selected, the output assignment defined in the Preset
Edit menu is used.
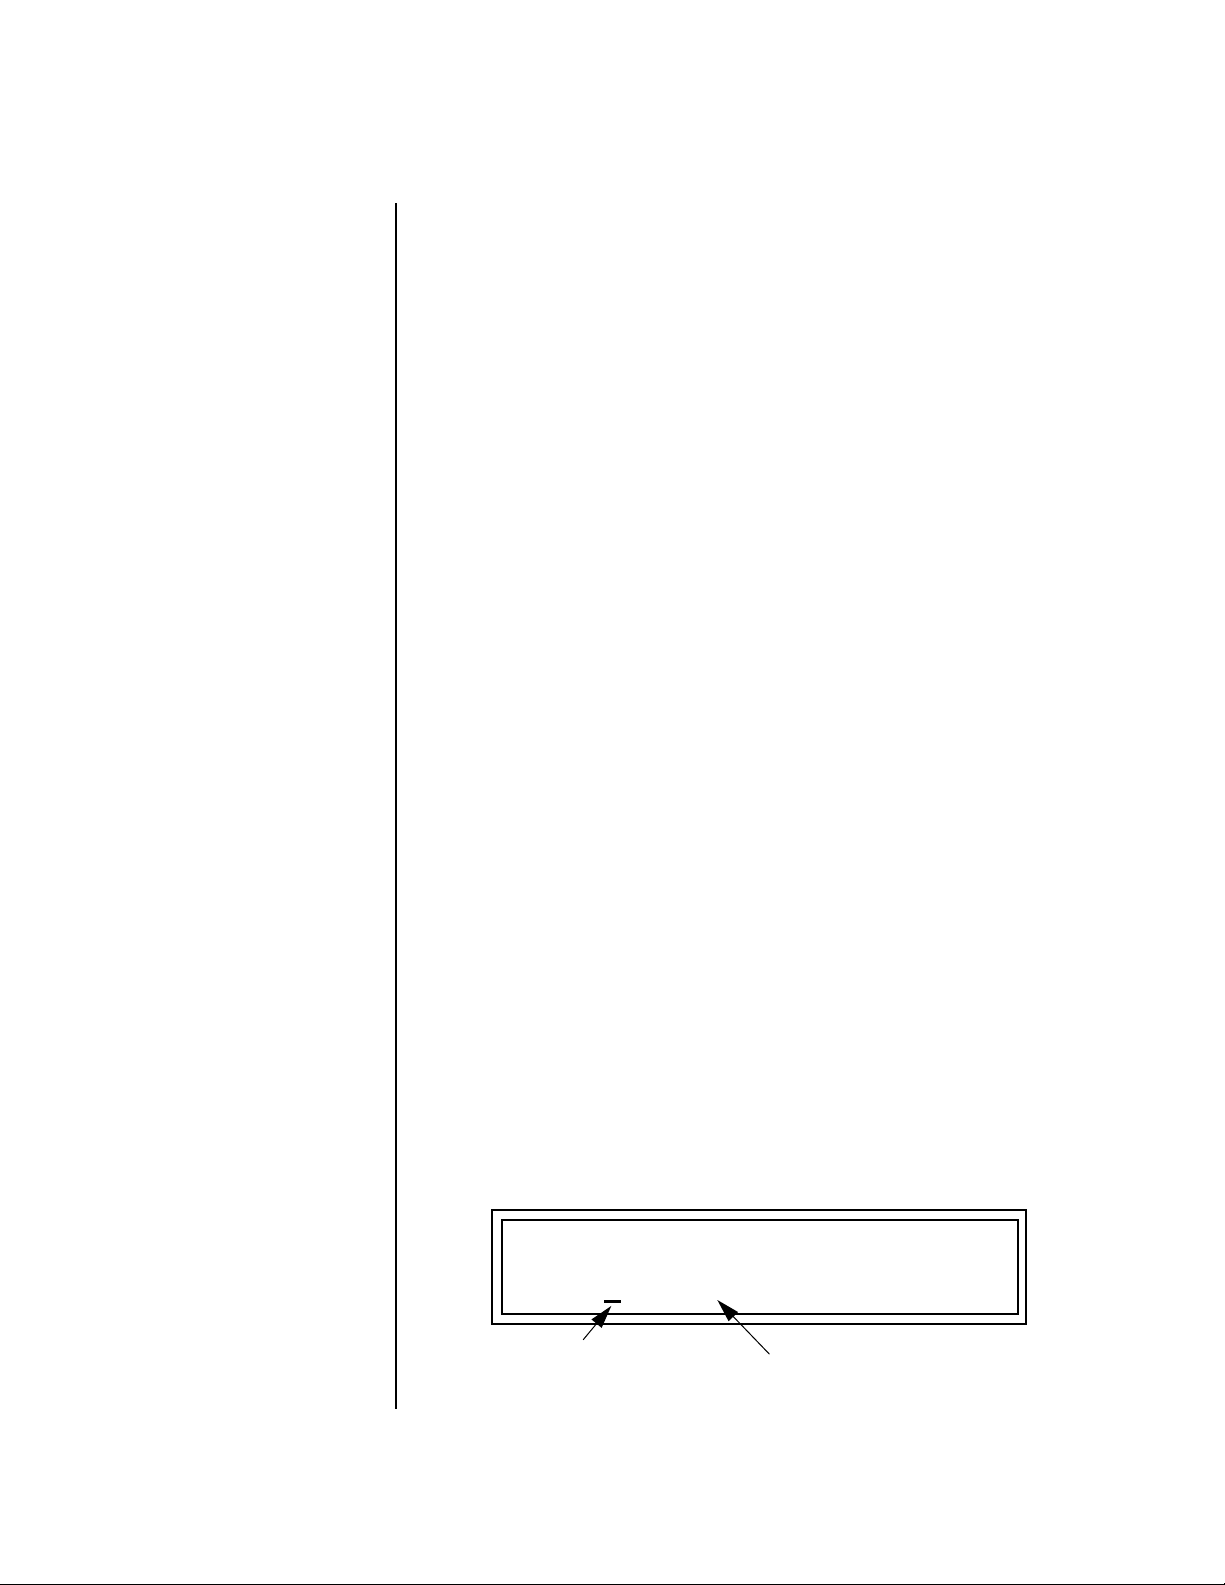
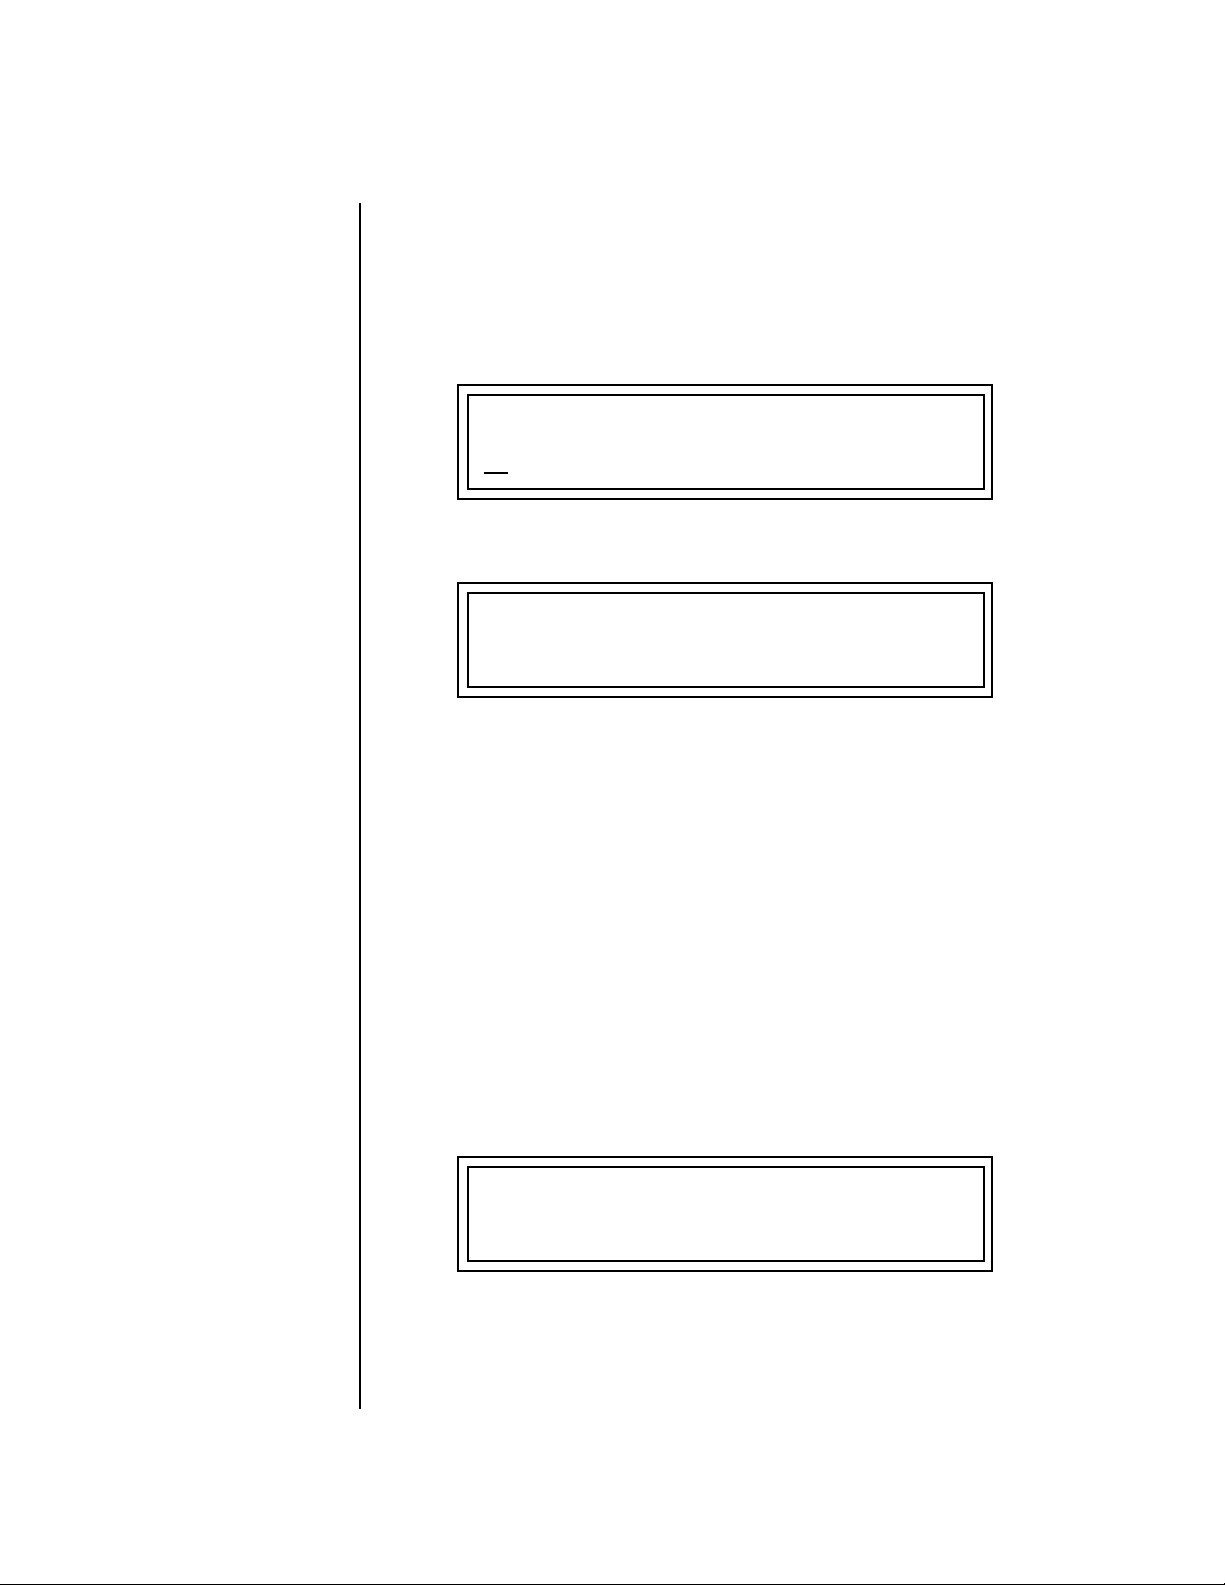
MIX OUTPUT
channel 16: Send2->main
Indicates that the signal is
routed to the Main output jacks.
The
Output Routing
routing of Send 2 or Send 3 to either:
1) the effects processor input or… 2) the rear panel submix jacks.
If the Sub 1 output is NOT being used, the signal is routed through the
effects processors, then on to the main outputs. If a plug were inserted into
one of the Sub 1 jacks the destination field would read “Sub1” and the dry
signal would be routed directly to the Sub 1 outputs on the back panel.
field (pointed to by the arrow) reflects the true
Send Routings
Send 1 - Main Outputs
Send 2 - Subout 1 or Main Outs
Send 3 - Subout 2 or Main Outs
Send 4 - Main Outputs
MIX OUTPUT
channel 15: use preset
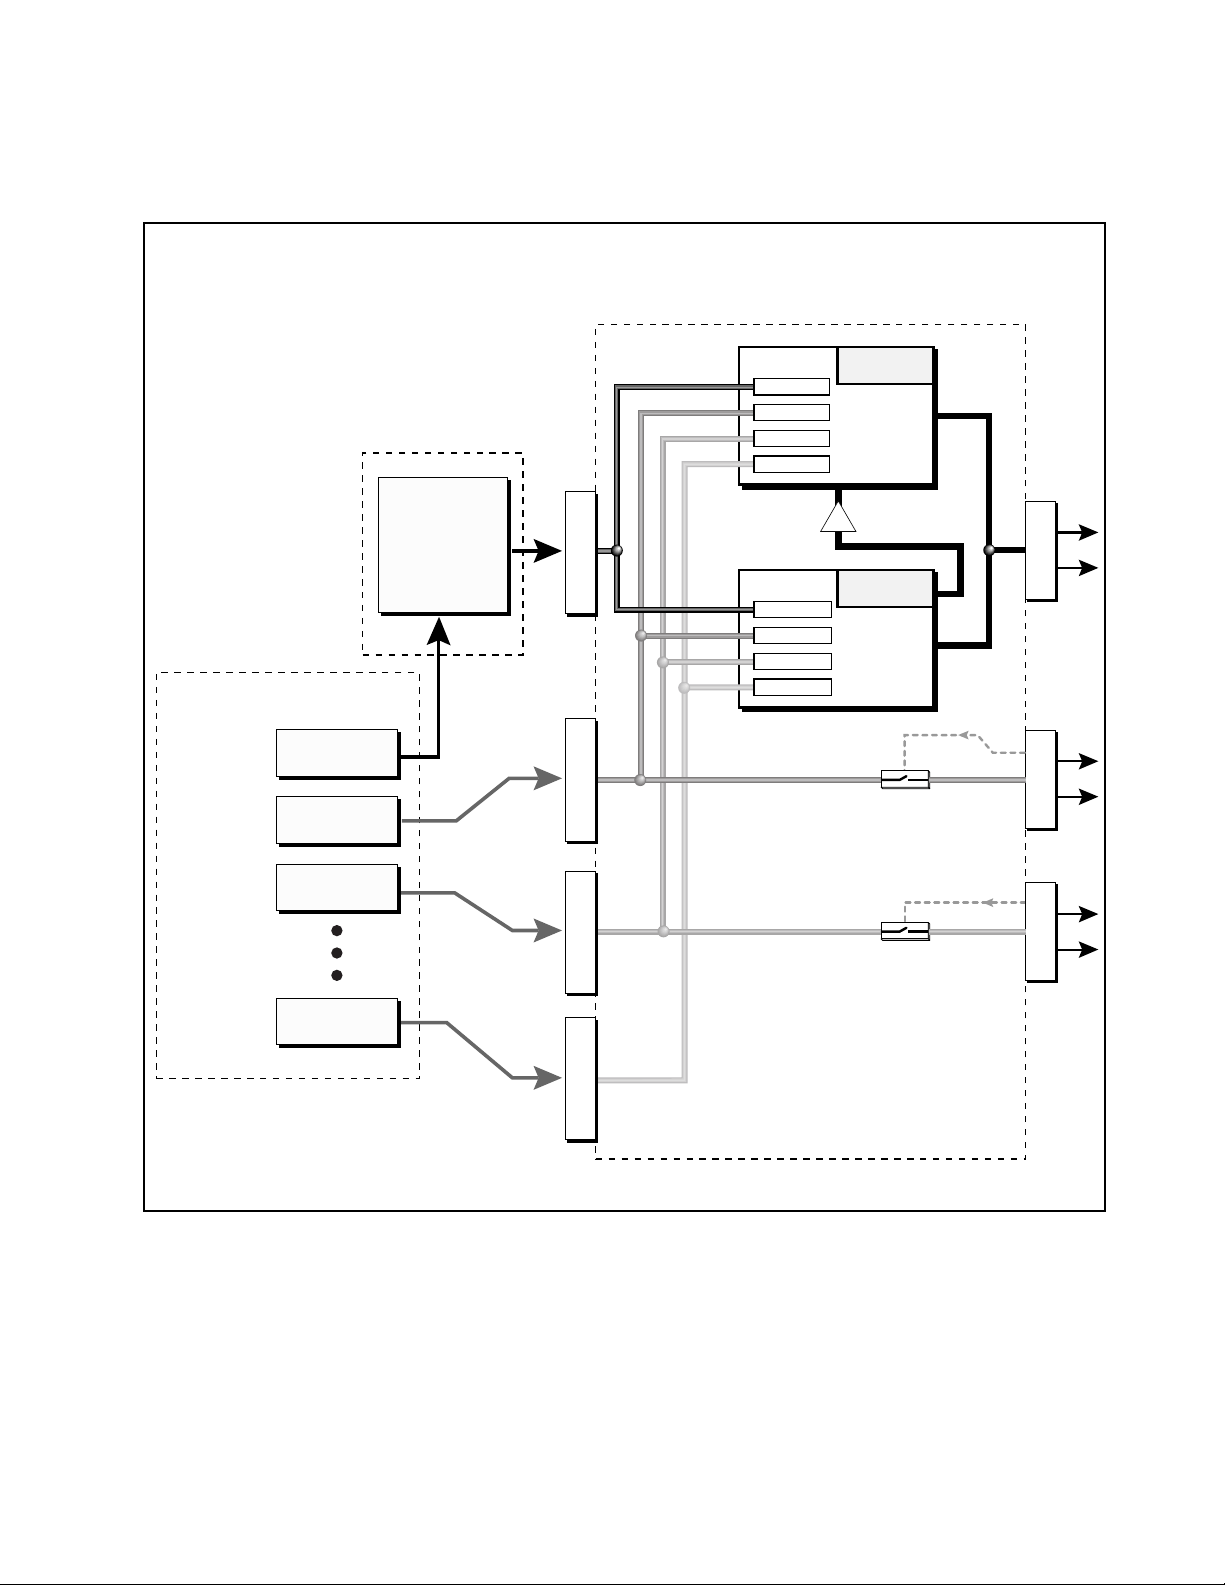
The Sends function as effect processor inputs (effect sends). Send 2 and
Send 3 are also used to route sounds to the Sub 1 and 2 outputs on the back
panel. When a plug is inserted into the associated Submix jack on the back
panel, the
processor and the signal is routed directly to the output jack. The actual
output routing is shown in parentheses in the display. If you don’t want the
wet portion of the signal in the main mix, turn down the Send Level.
The Dry Send is disconnected from the Effects Processors even if only one plug is
inserted into the Submix jack.
The four Effect Sends allow you to get the most out of the two effect
processors. For example, with Effect B set to an echo algorithm, you could
route one MIDI channel to Send 3 and set the effect amount to 80%.
Another MIDI channel could be routed to Send 4 with an effect amount of
only 5%. This is almost like having two different effects!
The Mix Output function is also useful when sequencing since it lets you
route specific MIDI channels (and thus sequencer tracks) to specific Sub
outputs (on the back panel) where there they can be processed with EQ or
other outboard effects.
Dry portion of the Send is disconnected
from the effects
10
E-MU Systems
Page 11
S
U
B
1
M
A
I
N
OUTPUT SECTION
& EFFECTS PROCESSORS
FX Sends
Hall 1
Effect
A
FX Sends
Chorus
Effect
B
B➟A
Jack
Detect
Jack
Detect
S
U
B
2
PRESET
Mix
Output
Mix Output
Send 1
Send 1 15%
Send 2 10%
Send 3 0%
Send 4 0%
Send 1 0%
Send 2 0%
Send 3 20%
Send 4 15%
MASTER MENU
PRESET
EDIT MENU
Ch 1
SEND 2Ch 2
SEND 3Ch 3
SEND 4Ch 16
S
E
N
D
1
S
E
N
D
2
S
E
N
D
3
S
E
N
D
4
Sends 2 and 3 can be routed to the effects processors or to rear panel submix jacks.
When a plug is inserted into a Submix jack, the Dry portion of the Send is disconnected
from the effects processor and is routed to the Submix output jacks.
Audity 2000 2.0 Software Addendum
Changes to the Mix Output Screen
Audity 2000 - 2.0 Software Addendum
11
Page 12

Audity 2000 2.0 Software Addendum
FXA Submix Routing 4 FX Sends
FXA Submix Routing 4 FX Sends
FXB Submix Routing 4 FX Sends
Delay Time can be Controlled by the Master Clock
There are now four FXA sends as described on the previous pages.
FXA SEND AMOUNTS 1 : 10%
2 : 20% 3: 30% 4 : 0%
There are also now four FXB sends as described on the previous pages.
FXB SEND AMOUNTS 1 : 10%
2 : 20% 3: 30% 4 : 0%
FX B Delay times can now be controlled by the Master Clock. This great
feature allows you to synchronize echoes with your Arpeggiator patterns or
sequences regardless of tempo. Echoes interact with Arp patterns to create
complex polyrhythms and syncopations. Use either internal or external
clock with any FXB delay effect. Select Delay values before 0mS to access
the note values (just like the LFO). Make sure you try out this feature!!
Real-time Controller Assignments
OO
OO
“Knobs MIDI Out” in the
Master menu must be enabled
for Audity’s controller knobs to
be transmitted.
12 E-MU Systems
FXB FEEDBK LFORATE DELAY
000 003 1
Use these three pages to assign twelve real-time control sources. The Arpeggiator knobs can now be assigned to any available MIDI controller number
and can be patched in the PatchCord screen.
Each MIDI Controller number you select is assigned to a letter (A - L) for
internal routing. The front panel Controller Knobs and twelve MIDI
controller numbers share these A-L controller routings.
These screens let you select which MIDI real-time controller numbers
will be received by Audity (from 1 to 31 and from 64 to 95) and which
controller numbers will be transmitted over MIDI if the front panel
control knobs are turned. The PatchCord routing and amount in the Edit
menu determine what effect the controller has on each preset. Real-time
controllers are shown in the PatchCord menu as MIDI A through MIDI L.
/8
Page 13

OO
OO
Audity 2000 factory
presets have certain synth
parameters assigned to each
controller letter and so these are
“Global” controller
assignments.
For example, assigning a MIDI
controller to “A” in this screen
would let you control filter Fc for
all the factory presets.
Audity 2000 2.0 Software Addendum
Arpeggiator Controller Assign
REALTIME CONTROLLER #
A: 21 B: 22 C: 23 D: 24
REALTIME CONTROLLER #
E: 25 F: 26 G: 27 H: 28
Note: Controllers 7 and 10 are already assigned to Volume and Pan for each
MIDI channel. Controllers 91 & 93 are the standard controller numbers for
reverb and chorus send amounts.
Following are a few of the standardized MIDI Controller numbers as
defined by the MIDI Manufacturers Association. The controllers shown in
Bold are automatically routed to the destination (volume & pan) or have
their own PatchCord source. Others, such as Portamento Time, can be
routed using a PatchCord to have the desired effect.
Arpeggiator
Controller Assign
1 - Modulation Wheel
2 - Breath Controller
3 - Aftertouch (Rev. 1 DX7)
4 - Foot Pedal
5 - Portamento Time
6 - Data Entry
Use this page to assign four MIDI real-time control sources to the four front
panel arpeggiator functions. The arpeggiator controllers use the “single
byte” (7-bit) MIDI real-time controller message format and use controllers
numbered from 1 to 31 and 64 to 95. In this screen you set up which
controller numbers will be received over MIDI and which controller
numbers will be transmitted if the arpeggiator controls are turned. The
“Knobs MIDI Out” feature must be enabled in order to transmit the Arp
controllers.
7 - Volume
8 - Balance
9 - Undefined
10 - Pan
11 - Expression
ARP CONTROLLER#
I: 95 J: 81 K: 82 L: 83
Please Note: The arpeggiator functions are permanently wired to
controllers I-L and any changes made on the assigned MIDI controller
number will adjust the associated arpeggiator control.
Audity 2000 - 2.0 Software Addendum 13
Page 14

Audity 2000 2.0 Software Addendum
Effects Patchcords
Effects Patchcords Effects PatchCords give you real-time control of the effects send amounts.
You can dynamically adjust the effects mix during a sequence or live performance. The effect processors are a powerful synthesis tool and this feature
lets you control and use them in exciting new ways. There are 12 effects
PatchCords per preset with a source, a destination and an amount control.
The amount can be set from -100 to +100. The effects PatchCord controls
are added to the FX Send Amounts set in the Master or Edit menus.
OO
OO
The FX Cords allow you
to crossfade between effects.
FX CORDS #01
1) Set FXA Send 1 to 100%.
2) Set FXB Send 1 to 0%.
3) Set FX Cord #1 to FXA Send 1
at -100.
4) Set FX Cord #2 to FXB Send 1
at +100.
Increasing the controller amount
will crossfade from FXA to FXB.
Modulation Sources: Modulation Destinations
Off Off
PitchWhl (Pitch Wheel) Effect A Send 1
ModWhl (Modulation Wheel) Effect A Send 2
Pedal Effect A Send 3
MIDI Volume (Controller 7) Effect A Send 4
MIDI Pan (Controller 10) Effect B Send 1
MIDI A-L Effect B Send 2
Pedal -> FXBSend2 +100
Effect B Send 3
Effect B Send 4
Preset Edit All Layers Enable
OO
OO
TRY THIS FEATURE!
This function allows you to turn the Edit All Layers feature on or off. “Edit
All Layers” is an Edit menu feature which allows you to select all layers (A)
in order to edit all four layers simultaneously. Because this feature can be
confusing to the beginning programmer, it can be disabled here in the
Master menu. Check this feature out when you’re ready. It’s great!
PRESET EDIT ALL LAYERS
enabled
Play Solo Layers When constructing multilayer sounds it is often useful to turn off one or
more of the layers so you can hear what you’re doing! This feature allows
you to temporarily solo individual layers or listen to them in any combination. This screen differs from the other Edit screens in that it is NOT
saved with the preset. The values reset to “Off” each time you exit the Edit
menu.
Solo is activated by setting any layer to On (On = the layer is being Soloed).
Any layers set to On will play and any layers set to Off will be muted. If all
layers are set to Off, then Solo mode ends and all layers play normally.
When you exit the Edit menu, all layers play normally.
14 E-MU Systems
Page 15
Audity 2000 2.0 Software Addendum
New LFO Waveforms
PLAY SOLO LAYERS
1: off 2: off 3: off 4: off
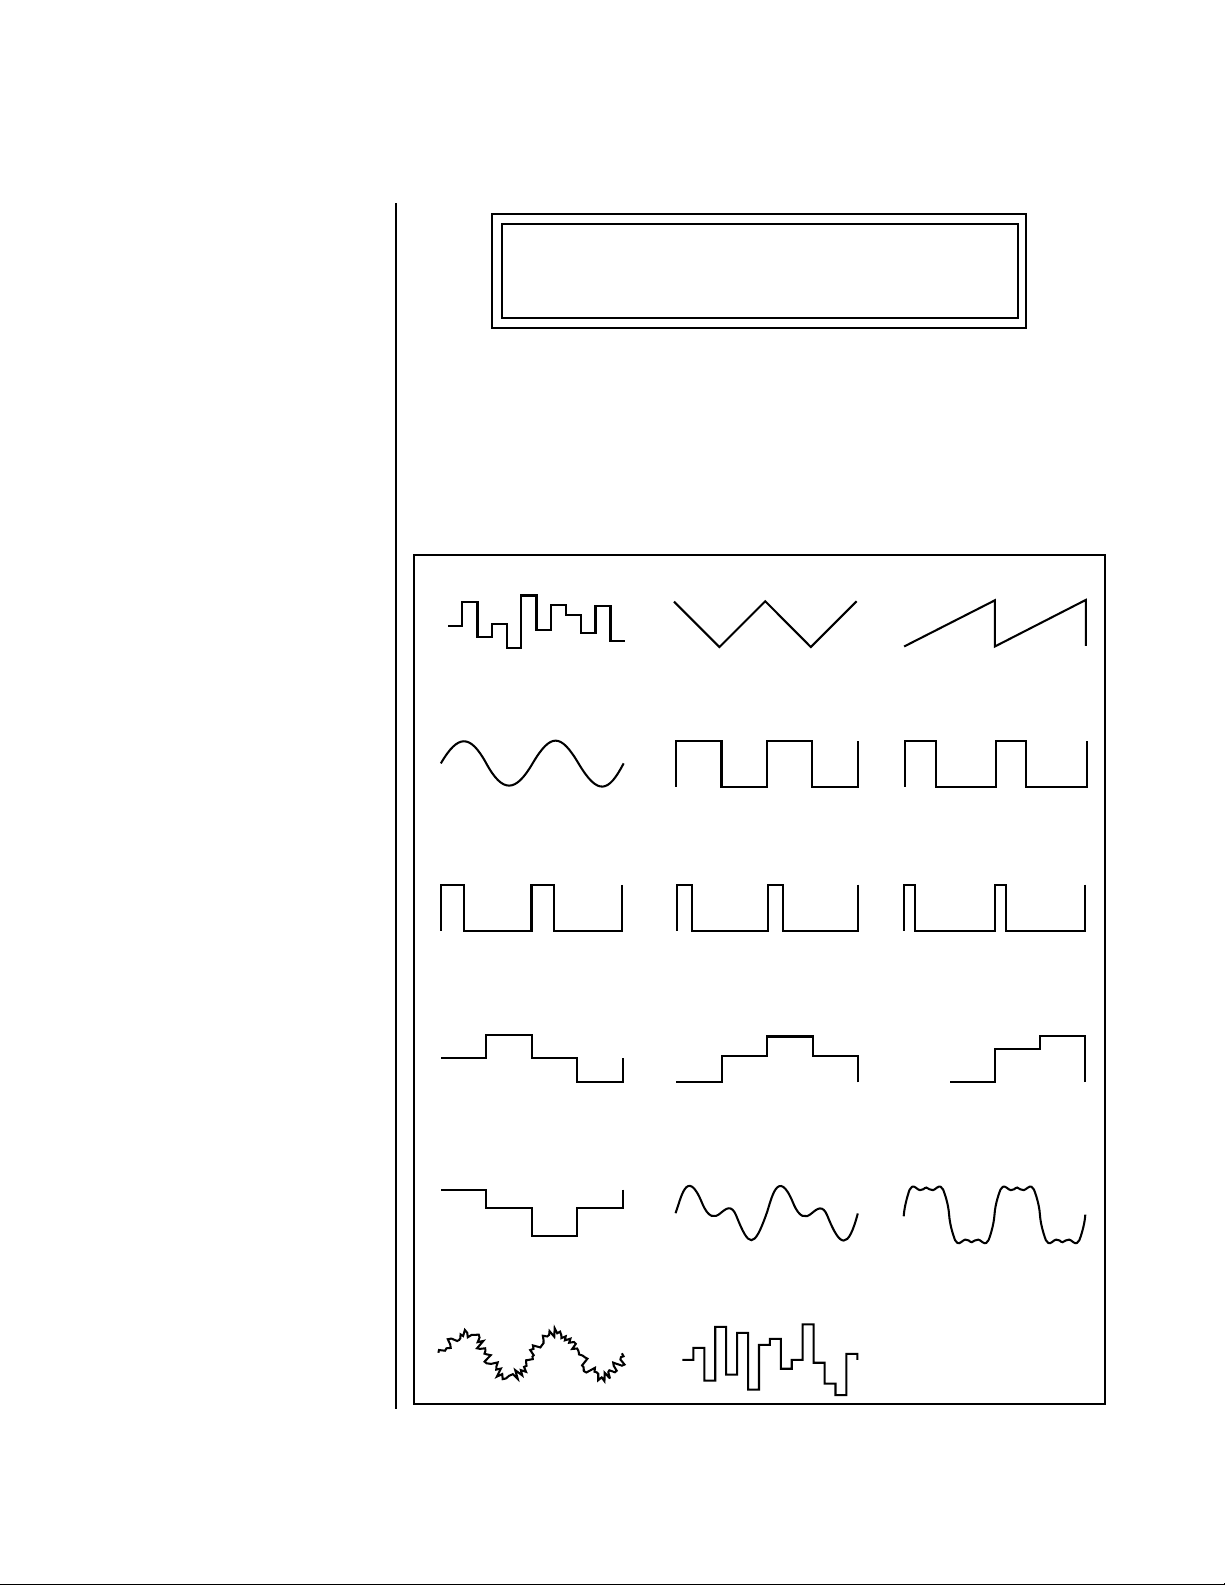
New LFO Waveforms Audity now contains 17 LFO waves as shown in the diagram below. The
new pattern shapes can be combined (Send both LFOs to the same
destination and adjust the amounts) for even more variation. Try routing the
random wave to the filter cutoff for interesting timbral effects.
LFO Waveforms
LFO Tricks & Tips:
• The Random LFO wave is truly
random and is different for
each voice and layer.
• The Pattern (Pat) waveforms
will sound the same on
different layers and voices.
• Sine + Noise is very useful for
simulating trumpet and flute
vibrato.
★
When routing Hemi-quaver
to Pitch:
+38 = major scale
-38 = phrygian scale
+76 = whole tone scale
(+38) + (+76) = diminished
(two cords)
odd amount = S+H sound
Random
Sine
25% Pulse
Pat: Octaves
+ Octave
- Octave
Triangle
Square
Pat: Fifth+Octave
C
G
C
Sawtooth
33% Pulse
12% Pulse16% Pulse
Pat: Sus4 trip
G
F
C
Note: References to musical
intervals in the pattern LFO
shapes are with the LFO
routed to pitch and a
PatchCord amount of +38.
C
A#
Sine + Noise
Pat: Neener
G
Sine 1,2 Sine 1,3,5
Hemi-quaver
Audity 2000 - 2.0 Software Addendum 15
Page 16
Audity 2000 2.0 Software Addendum
Envelope Repeat
Envelope Repeat The Filter and Auxiliary Envelope Generators can now be made to repeat.
When the envelope repeat function is On, the Attack (1&2) and Decay
(1&2) stages will continue to repeat as long as the key is held. As soon as
the key is released, the envelope continues through its normal Release
stages (1 & 2). To turn on Envelope Repeat:
1. Move the cursor until it is underneath the Mode field as shown below.
L1
FILTER ENVELOPE
ode: time-based
M
2. Turn the data entry control clockwise. The lower line changes to:
L1
FILTER ENVELOPE
Repeat: off
3. Move the cursor underneath the on/off field, then turn the data entry
control clockwise so that Repeat is On.
Tuning Tables There are now 12 user definable tuning tables and 12 factory tuning tables.
The initial frequency of every key can be individually tuned using the user
tuning tables, facilitating the creation of alternate or microtonal scales.
The User Tuning Table screen is located in the Master menu. Using the
cursor key and the Data Entry Control, select the key name, the coarse
tuning and the fine tuning. The key name is variable from C-2 to G8.
Coarse Tuning is variable from 0 to 127 semitones. The fine tuning is
variable from 00 to 63 in increments of 1/64 of a semitone (approximately
1.56 cents). For each preset, the specific tuning table is selected in the
Edit menu.
OO
OO
The user key tuning can
be used to tune individual
percussion instruments.
USER KEY TUNING Table:1
Key: C1 Crs: 036 Fine: 00
Audity 2000 now contains twelve factory programmed tunings. The
Keyboard Tuning parameter in the Edit Menu selects which tuning is used
by the current preset. The factory tuning tables are described on the
following page.
16 E-MU Systems
Page 17

Audity 2000 2.0 Software Addendum
Tuning Tables
The factory Keyboard Tuning tables are described in the following table.
Tuning Tables Description
Equal Temperament Standard Western tuning
(12 equally spaced notes per octave)
Just C Just intonation. (Based on small interval ratios. Sweet
and pure, non-beating intervals.)
Vallotti Vallotti & Young non-equal temperament. (Similar to
12 tone equal temperament. Each key has a different
character for a given scale.)
19-Tone 19 tone equal temperament. (19 notes per octave.
Difficult to play, but works well with a sequencer.)
Gamelan 5 tone Slendro and 7 tone Pelog. (Javanese. Pelog are
white keys, Slendro are black keys. Exotic tunings of
Gamelan flavor.)
Just C2 Allows you to play the following chords in the key of C:
C, E, F, G, A, B, C#m, D#m, Em, G#m, Am, Bm
Just C-minor Allows you to play the following chords in the key of C:
Just C3 Allows you to play the following chords in the key of C:
Werkmeister III A “well” temperament developed in the 17th century.
Kirnberger Another well temperament developed by Johann
Scarlatti A variant of Meantone tuning which was used from the
Repeating Octave Middle C octave is repeated up and down the keyboard.
User 1-12 Define your own tuning tables (Master menu).
b
, D, Eb, G, Ab, Cm, Em, Fm, Gm
C, D
b
C, D, F, B
Although you can play in all keys, each key sounds
slightly different.
Philipp Kirnberger where no pitch is more than 12
cents off from equal temperament.
15th to 18th centuries.
Link with a preset in equal temperament to form
unusual inversion up and down the keyboard.
, C#m, Dm, Em, F#m, G#m, Am
The Just C Tuning Tables
Well Tempered and Just were standard keyboard tunings up until the 18thcentury when the current “equal tempered” scale became prevalent. In an
equal tempered scale, the octave is equally divided into 12 parts. In Just or
Well Tempered scales, the 12 notes are separately tuned to produce pure
chords. However, in Just tunings you are limited to playing certain chords
and if you play the wrong chord it may sound…well, BAD!
Audity 2000 allows you to modulate between keys by providing you 12 user
tuning tables. Tuning tables can be changed as you play using a program
change (create several presets with the same sound and different tuning
tables), by MIDI SysEx command (using a programmable MIDI footswitch
Audity 2000 - 2.0 Software Addendum 17
Page 18

Audity 2000 2.0 Software Addendum
Tuning Tables
Audity 2000 implements
the MIDI Tuning Dump protocol
which allows you to create
tuning tables on your personal
computer and download them
via MIDI. There are several
computer applications available
on the internet which let you
create and download tuning
tables via MIDI.
or other device), or using a continuous controller (link 2 presets and
cross-switch between them using a controller).
These new tuning tables take the concept of just intonation a step beyond
previous E-mu products. Fully explaining the mysteries of just intonation is
beyond the scope of this manual, but the subject is covered exhaustively in
Hermann Helmholtz’s On the Sensations of Tone, available at most libraries
and bookstores.
The new tables are called Just C2, Just C3, and Just C Minor. Try playing in
the key of C/Cm using each table. You’ll quickly discover both the wonders
and the frustrations of just intonation! In Just C, for example, you’ll find
that the chords C, Em, F, G, and Am sound beautiful. If you hold one of
these chords, you’ll hear no “beating”. After playing for a few minutes,
switch back to Equal Temperament for a rude awakening!
At this point you might wonder why anyone would use Equal Temperament to begin with. For the answer to that question, play a D, Dmi, or Bb
chord! The intervallic ratios that make the C & G chords sound so pure
make the D chord sound horribly out of tune. That's why we had to include
Just C3. In this tuning, D, Dmi and Bb sound in tune, but the G chord will
sound wrong.
Each of the 4 tables allows you to play a different group of common chords
in just intonation. Sadly, there is no single 12 note tuning that will allow all
of the common chords to be in tune, and of course that's why they
invented the equal temperament tuning system that we use today.
Just C
Play these chords: C, E, F, G, A, Cm, C#m, Em, F#m,
Gm, Am
Just C2
Play these chords: C, E, F, G, A, B, C#m, D#m, Em, G#m,
Just C minor
Play these chords: C, D
Just C3
Play these chords: C, D, F, B
b
, D, Eb, G, Ab, Cm, Em, Fm, Gm
b
, C#m, Dm, Em, F#m, G#m, Am
Am, Bm
18 E-MU Systems
Page 19

Audity 2000 2.0 Software Addendum
Multisetups
Playing Demo Sequences
The Demo Screen has been updated to allow more sequences. The actual
number of demo sequences depends on which ROM sounds sets are
installed. You can play these demo sequences by accessing the Demo
Sequence page.
DEMO SEQUENCES AUDTY
A
2K Audity Demo 1
v To Play a Demo Sequence
1. Press and hold both Master and Edit buttons to enter the demo mode.
2. Move the cursor to the lower line of the display using either cursor key.
3. Select a sequence using the data entry control. The Enter LED will be
flashing.
4. Press the Enter button to begin playing the selected sequence. The
screen shown below appears.
PLAYING: Audity Demo 1
Press ENTER to stop
5. Press the Enter button again to stop playing the sequence.
6. When a demo sequence plays to the end, the next demo will automati-
cally begin playing. The screen will display the new demo name.
7. With the sequence stopped, press either the Master or Edit button to
Exit demo sequence mode.
Audity 2000 - 2.0 Software Addendum 19
Page 20

Audity 2000 2.0 Software Addendum
Copy Preset Bank
Copy Preset Bank
The new Copy Preset Bank command lets you copy an entire bank from
any ROM or RAM bank location to any RAM (user) bank. This function can
be especially useful after installing a new sound SIMM.
COPY BANK
From: A
ROM or RAM
Preset Location
UDTY 2 To: User 1
Bank No.
Destination
Bank No.
v To Copy a Preset Bank
1. Press the Save/Copy menu button.
2. Move the cursor to the “From” field on the bottom line on the display.
3. Use the Data Entry Control to select the preset bank you want to copy
from.
4. Move the cursor to the “To” field on the bottom line on the display.
5. Use the Data Entry Control to select the User preset bank you want to
copy into.
6. Press the Enter/Home button to overwrite the bank.
Create Random Preset
Examine interesting
presets to learn how they work
using the Edit menu.
This is a great feature which creates a new preset using portions of the ROM
presets as source material. By merging random presets, really great
sounding presets can be generated with ease. Use this feature to generate
wild new sounds, to get new programming ideas, or just for fun.
RANDOMIZE PRESET User
0
000
Any User Preset
v To Create a Random Preset
1. Press the Save/Copy menu button.
2. Use the data entry control to scroll to the Randomize Preset screen. The
preset name shown will be the current preset. (The preset you start with
has no effect on the randomization process.)
3. Press Enter. A new random preset will be created. You need to save this
preset if you want to keep it.
4. Don’t like the sound? Press Enter again and a new random sound will
be generated.
20 E-MU Systems
Page 21

Audity 2000 2.0 Software Addendum
Multitimbral Sequencing
Multitimbral
Sequencing
“Multitimbral” means that Audity 2000 can play multiple sounds at the
same time. For a multitimbral sequence to play back correctly, the proper
preset must be selected for each MIDI channel. This could be done by
inserting preset changes into each track of your sequence before the
sequence starts. Audity 2000 also provides another way to store this
“pre-sequence setup” using the Multisetup menu.
Using Multisetups, you’ll set up the preset, volume and pan settings for
each MIDI channel as you build your sequence, then save the Multisetup
when it’s the way you want it. Sending one preset change command before
the sequence starts selects the Multisetup and MIDI settings for all 16 MIDI
channels.
v To Set up Audity 2000 for Multitimbral Operation
1. Set the MIDI mode to “multi mode,” using the MIDI mode function in
the Master menu.
2. Decide which MIDI channels you want Audity 2000 to receive (16
channels can be used simultaneously). You can turn any unused
channels (or channels assigned to other MIDI devices) OFF using the
MIDI Enable function in the Master menu.
3. Select the desired preset for each of the MIDI channels you want the
Audity 2000 to receive using the MIDI Channel/Preset selection screen.
You can also set the initial Volume, Pan, Arp settings for each channel
(as well as the Master Tempo).
1. Select Channel
2. Select Preset
4. Audity 2000 now responds multitimbrally on each of the MIDI
channels you have specified. The volume and pan position parameters
can be adjusted dynamically over MIDI (during the sequence).
5. Save the Multisetup.
C01 V127 P00 A:P USER
2
032
cmp: Jethro
v To Link a Multisetup with your Sequence
1. Insert a MIDI bank and program change in the lead-in measure of your
sequence to select the proper Multisetup before the sequence starts.
Bank Select: MSB = 80, LSB = 00, on any MIDI channel, then send a
Program Change command (0-15) corresponding to the Multisetup
you wish to select.
2. The Multisetup will now be selected before the sequence starts.
Audity 2000 - 2.0 Software Addendum 21
Page 22

Audity 2000 2.0 Software Addendum
Multitimbral Sequencing
Base Tempo Audity 2000 contains an internal Master Clock. The Master Clock controls
all the arpeggiators, synchronizes the LFOs when in Tempo-based mode,
controls the times of Tempo-based envelopes, and can be used as a
modulation source in the PatchCords section. There are two tempo values
shown in the display.
• Base Tempo - The base tempo is the value to which the MIDI controller
specified in the Tempo Controller screen will be applied.
• Current Tempo - The current tempo is equal to the base tempo
modulated by the MIDI controller specified in the Tempo Controller
screen. If no MIDI Tempo controller message has been received since the
last Base Tempo change, the Current Tempo will be equal to the Base
Tempo.
The LED to the right of the button blinks at the current tempo rate. Current
Tempo is NOT displayed when the Base Tempo is set to “MIDI Clock”.
v To Change the Master Tempo:
1. Move the cursor to the lower line of the display.
2. Adjust the Base Tempo using the Data Entry Control.
BASE TEMPO
1
20 bpm (current: 182)
The Master Tempo values range from 1 through 300 beats per minute
(BPM) or you can select “use MIDI clock” to use an external MIDI clock
source.
Preset Tempo Offset This function allows you to double or halve the Master Tempo as it applies
to this preset. When playing or sequencing several presets in Multimode,
the Master Tempo may be too fast or slow for one preset. Using this feature,
you can adjust the tempo for the misbehaving preset. The Tempo Offset can
use the current tempo or be set to half or twice the current tempo.
TEMPO OFFSET
use current tempo x 2
22 E-MU Systems
Page 23

Page 24

World Headquarters
E-mu Systems, Inc. USA
PO Box 660015
Scotts Valley, CA USA
95067-0015
Tel: (831) 438-1921
Fax (831) 438-6812
www.emu.com
Europe, Africa, Middle East
E-mu Systems, Ltd.
Suite 6 Adam Ferguson House
Eskmills Industrial Park
Musselburgh, East Lothian
Scotland, EH21 7PQ
Tel: +44 (0) 131-653-6556
Fax +44 (0) 131-665-0473
 Loading...