

Page 1
S820
Tuner TNT/DVB-T USB
www.intuix.net
Service Hot line 0820 825 333*
* numéro indigo 0,15 TTC/min
www.intuix.net
(and other countries)
www.intuix.net
Service Hotline 0900-510 255 00*
* 1,99 /Min. vom deutschen Festnetz
Einen kostenlosen eMail-Support erhalten Sie
über www.intuix.net
Manuel d’utilisation
user guide
Benutzerhandbuch
www.intuix.net
Page 2
TV numérique
S820
Tuner TNT
(TNT)
Manuel d’utilisation
ADAPATEUR TV
antenne murale
ADAPTATEUR TV
ANTENNE MURALE
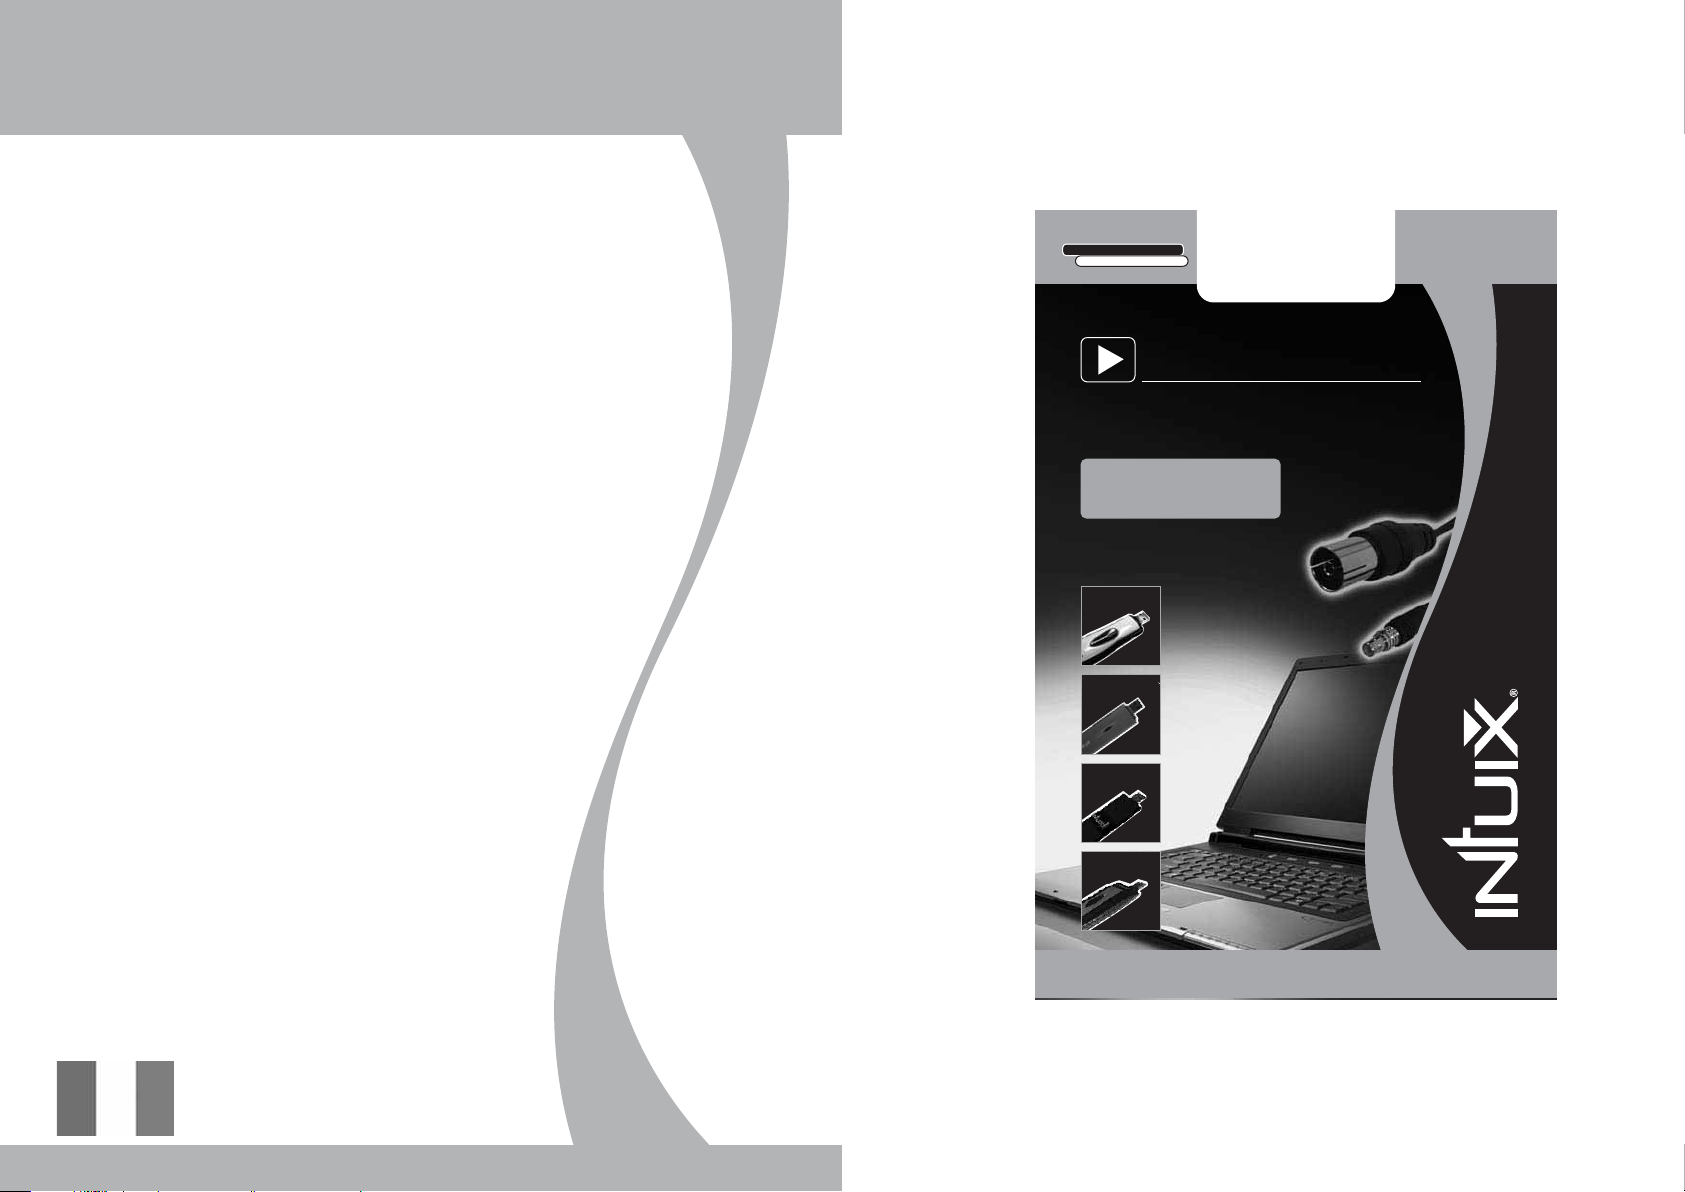
Adapatateur pour prise d’antenne murale.
Wall antenna adaptator
Hausantennenadaptater
Raccordez votre clé tuner TNT INTUIX
à votre prise d’antenne murale !!
Link your USB DVB-T tuner
to your wall antenna !!
Compatible TV Tuner USB
S800 / S810 / S815 / S820
S800
S810
21
30
21
30
0E-
0E
-
/21
/2
10
7≠
07
21
_
2
30
≠_
%
0E-
¥5
2
/21
00
7
07
(2
%¥
21
≠_
÷0
30
+§
2
50
0E-
1
__
/21
2+
%¥
8
0
5
07
21
50
≠_
7
0
2
7
%¥
(2÷
30
0E
50
(2÷
-
0
0
/2
0
17
7
2
+§
+§
%
(2÷
¥5
0
1
__
0*
0
1
__
7
5
2+
0
+§
0*
8
2+
5
1
__
8
21
2+
5
8
300
5
21
E-
21
/21
300
300
E-
7
E-
2%
/21
¥50
7
/21
2%
0*
¥50
7
7
5
0*
0
7
0*
2%
5
0
0*
¥50
0*
7
5
0
0*
S815
S820
www.intuix.net
Page 3

SOMMAIRE
A propos de la clé électronique Hybride . . . . . . . . . . . . . . . . . . . . . . . . . . . . . . . . . . . . . . . . . . . . . . . . . . . . . . . . . . . . . . FR-02
Installation du logiciel . . . . . . . . . . . . . . . . . . . . . . . . . . . . . . . . . . . . . . . . . . . . . . . . . . . . . . . . . . . . . . . . . . . . . . . . . . . . FR-02
Connecter la clé électronique TNT . . . . . . . . . . . . . . . . . . . . . . . . . . . . . . . . . . . . . . . . . . . . . . . . . . . . . . . . . . . . . . . . . FR-03
Lancement du logiciel . . . . . . . . . . . . . . . . . . . . . . . . . . . . . . . . . . . . . . . . . . . . . . . . . . . . . . . . . . . . . . . . . . . . . . . . . . . . FR-03
Description de la barre d'outils . . . . . . . . . . . . . . . . . . . . . . . . . . . . . . . . . . . . . . . . . . . . . . . . . . . . . . . . . . . . . . . . . . . . FR-04
Enregistrement . . . . . . . . . . . . . . . . . . . . . . . . . . . . . . . . . . . . . . . . . . . . . . . . . . . . . . . . . . . . . . . . . . . . . . . . . . . . . . . . . FR-05
Modes d’affichage . . . . . . . . . . . . . . . . . . . . . . . . . . . . . . . . . . . . . . . . . . . . . . . . . . . . . . . . . . . . . . . . . . . . . . . . . . . . . . FR-07
Télétexte ....................................................................................... FR-08
EPG (Guide de programme électronique) . ........................................................... FR-09
Guide de dépannage . . . . . . . . . . . . . . . . . . . . . . . . . . . . . . . . . . . . . . . . . . . . . . . . . . . . . . . . . . . . . . . . . . . . . . . . . . . . . FR-10
FR-01
Page 4
A PROPOS DE LA CLÉ ÉLECTRONIQUE HYBRIDE
CONNECTER LA CLÉ ÉLETRONIQUE HYBRIDE
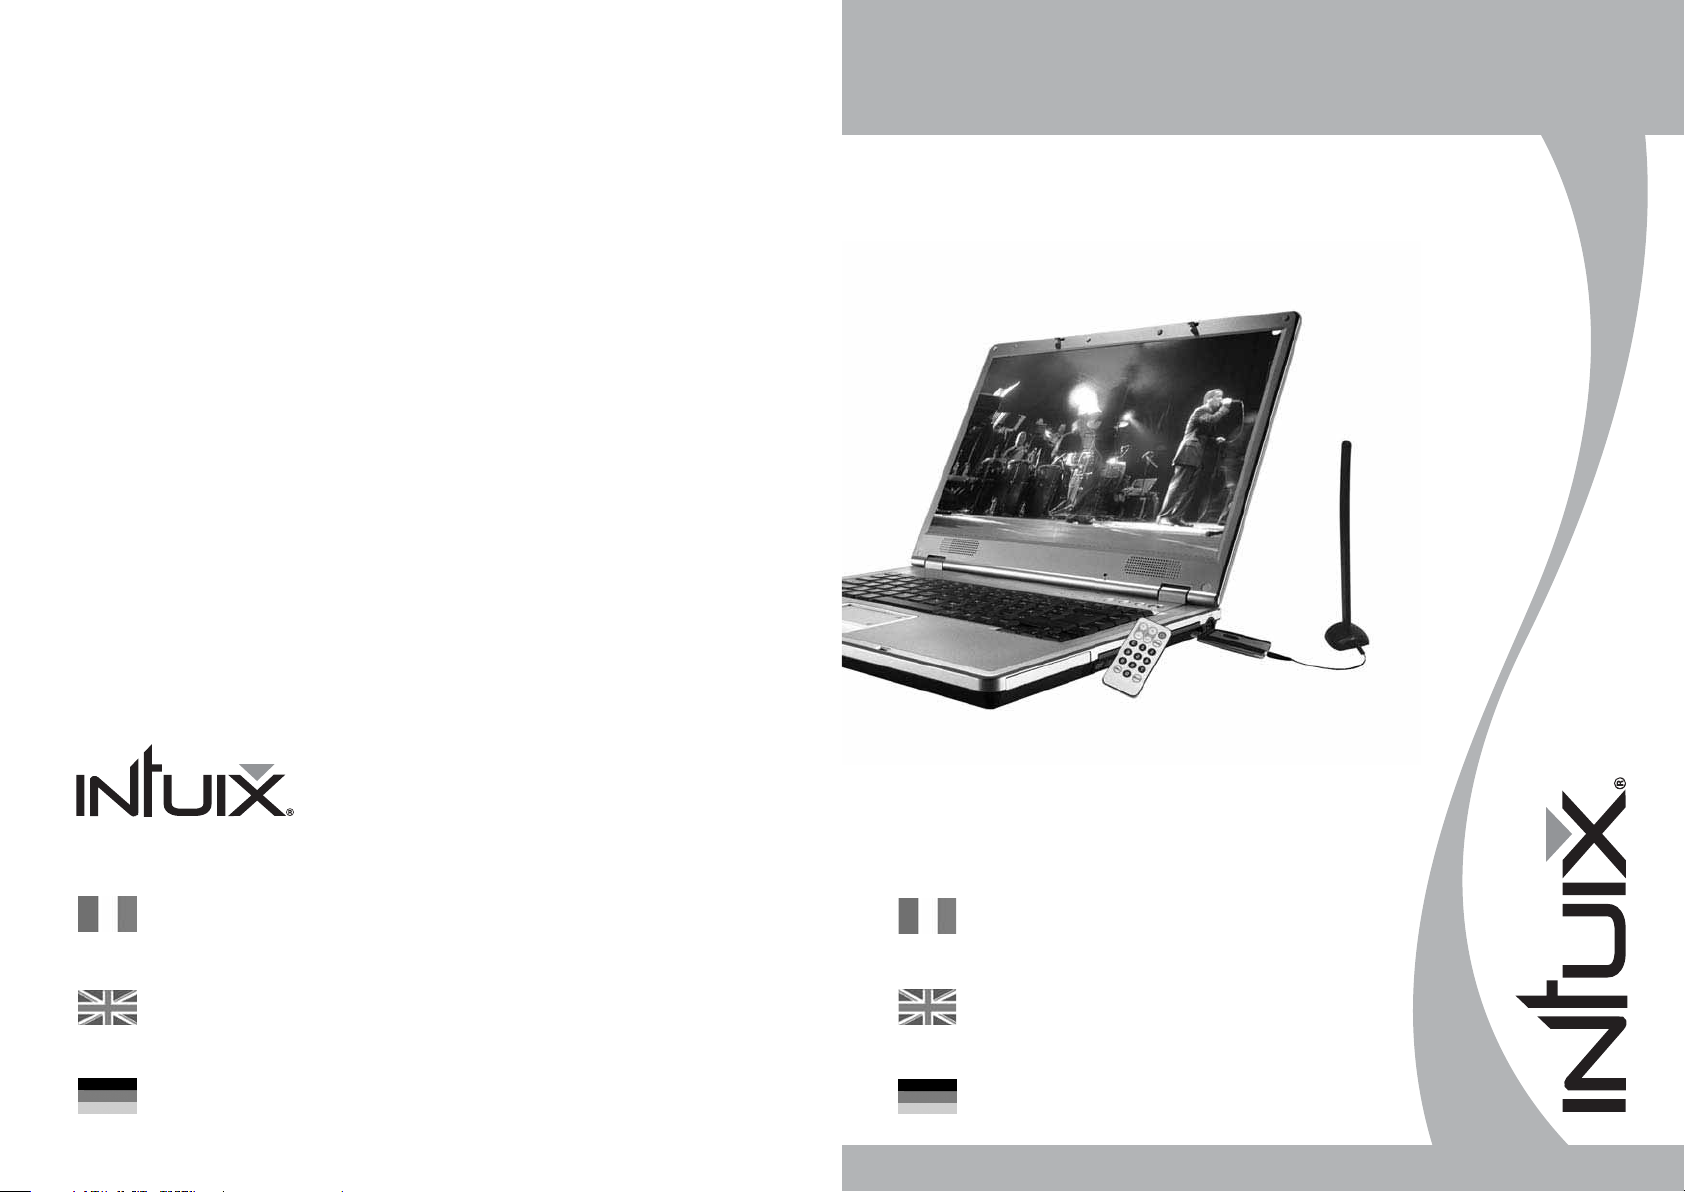
La clé électronique hybride est un récepteur analogique et TNT de diffusion vidéo numérique qui se branche directement dans le port USB de votre ordinateur et ne nécessite aucune source d'alimentation supplémentaire,
la rendant extrêmement portable. Elle peut rechercher et enregistrer toutes les stations TV numériques ou
hertzienne disponibles et reproduire n'importe laquelle sur l'écran de votre ordinateur.
Configuration minimale requise
- Port USB
- Direct-X 9c
- Windows 2000 SP4/XP
- Pentium IV 1,4GHz ou équivalent
- 256 Mo de RAM
- Carte son compatible DIrectX 9c
- Carte vidéo compatible DIrectX 9c
- 100Mo d'espace de disque dur (installation seulement)
Contenu de l'emballage
- Clé électronique TNT
- CD du logiciel
- Guide de démarrage rapide
- Antenne
Accessoire disponible dans le commerce :
- Adaptateur pour raccord antenne murale (IXA DVBT ADP)
* Veuillez noter que l'antenne a une base magnétique et ne doit pas être placée à côté de tout article qui peut être affecté par
les champs magnétiques, par exemple, ordinateur ou écran TV, disquettes ou cartes de crédit.
Notez que Microsoft, Windows, Windows 2000 et Windows XP sont des marques commerciales déposées de Microsoft Corp.
Guide d'Utilisation Rapide du Mini Tuner TV USB
Installation Logicielle
Veuillez installer tous les logiciels nécessaires AVANT de connecter votre dongle
hybride.
• Insérez le CD-ROM fourni dans le lecteur de CD de votre ordinateur.
• L'écran d'installation apparaîtra. Cependant, s'il n'apparaît pas, cliquez sur
Démarrer>Exécuter et tapez D:\setup.exe, où D fait référence à la lettre
assignée à votre lecteur de CD.
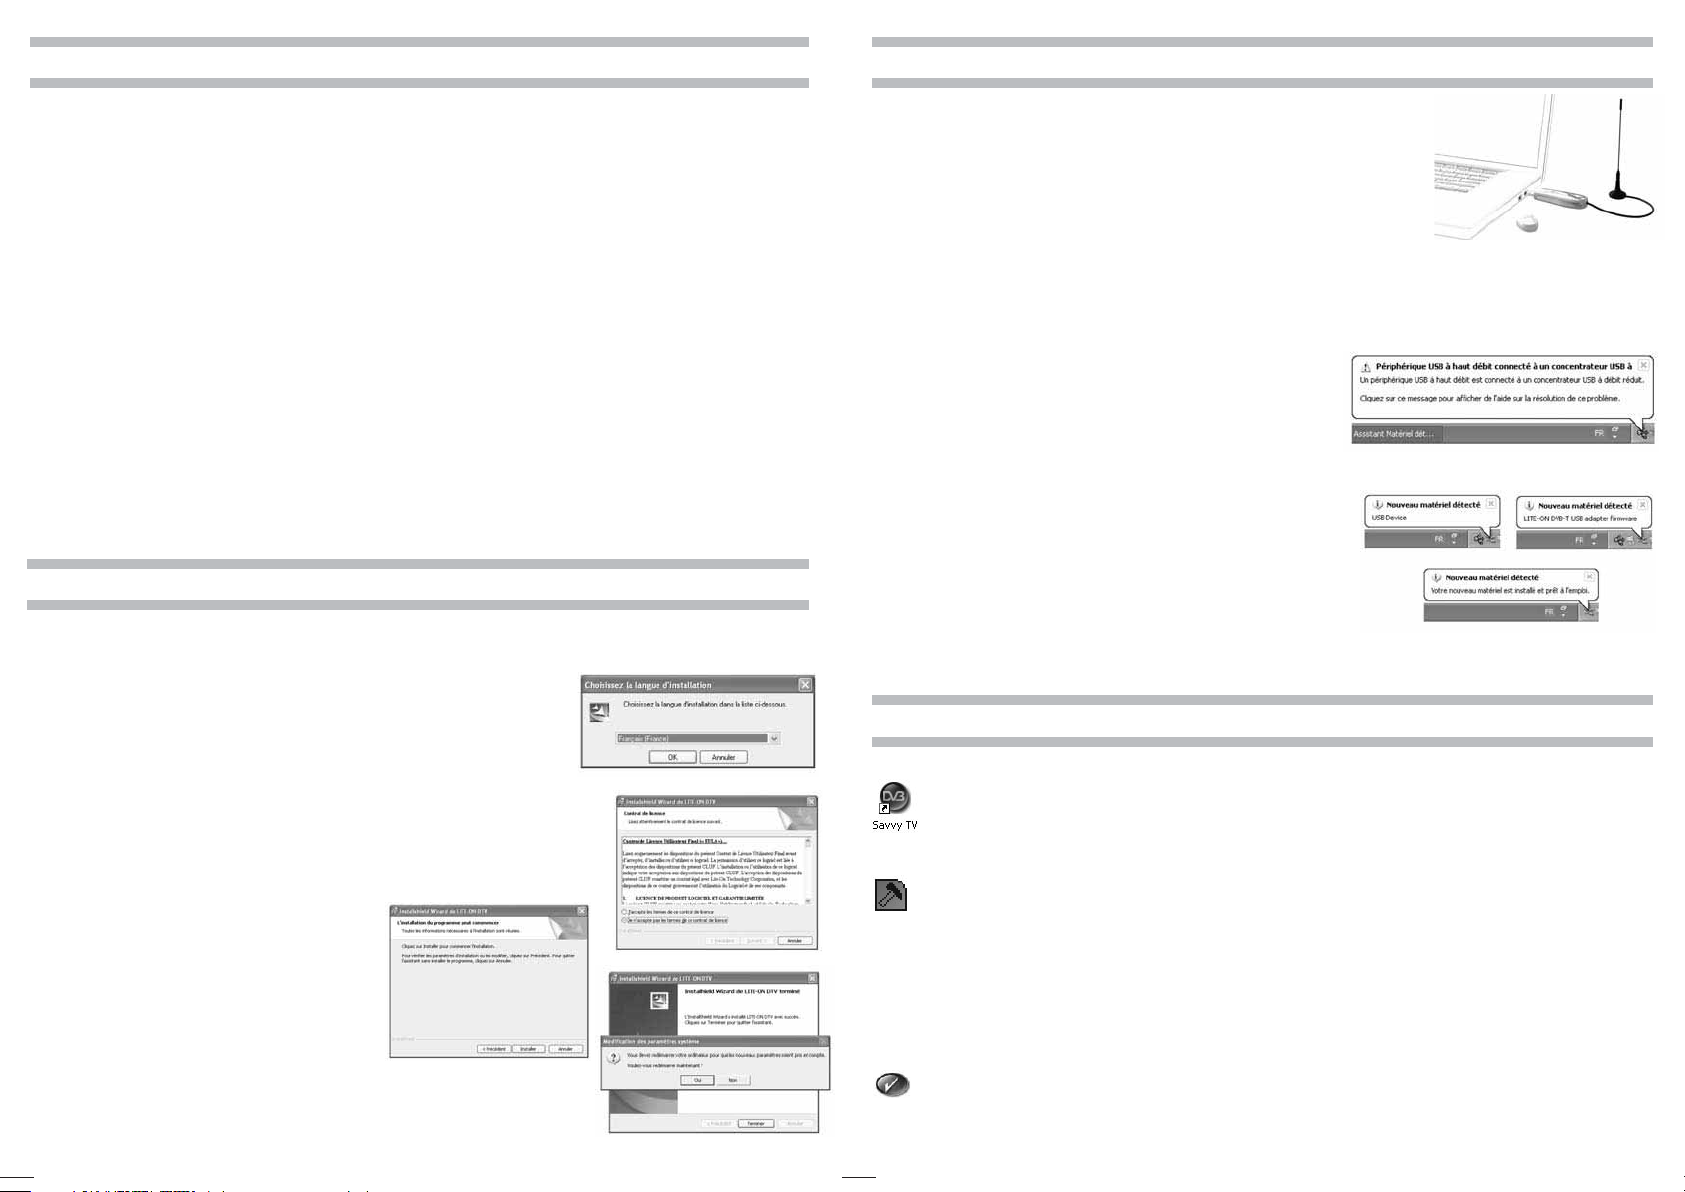
• Il vous sera demandé de choisir la langue d'installation de la manière suivante.
Choisissez une langue et cliquez sur OK.
Choisissez une langue et puis cliquez sur OK.
Il vous sera maintenant demandé d'accepter le Contrat de licence d'utilisateur final.
Assurez-vous de cocher la case J'accepte les termes dans le contrat de licence,
puis cliquez sur Suivant.
Retirez le capuchon de la clé électronique TNT, localisez un port USB libre sur
votre ordinateur et branchez la clé. Une fois que l'ordinateur détecte
le nouveau matériel, l'assistant Nouveau matériel commencera.
Le TNT Tuner étant un périphérique compatible USB 2.0, vous pouvez recevoir le message suivant
s'il est branché dans un port USB 1.1. Le TNT marchera néanmoins avec l'USB 1.1. Cliquez simplement
sur le X en haut à droite de ce message pour faire disparaître ce dernier.
Vous verrez plusieurs messages pendant l'installation de la clé électronique TNT.
Veuillez être patient, ce processus prend quelques minutes.
Lancement du logiciel
Double-cliquez sur l'icône Savvy TV qui apparaît sur votre bureau. L'écran
de la TV et le panneau de contrôle apparaîtront (voir la page suivante). Notez
que le logiciel peut prendre quelques secondes pour s'ouvrir.
Si l'écran de Configuration n'apparaît pas automatiquement, cliquez sur
l'icône Configuration du panneau de contrôle pour atteindre l'écran de
Configuration.
Après quelques secondes, l'écran suivant apparaîtra.
Cliquez sur Installer pour continuer l'installation.
Une fois que le logiciel a terminé son installation,
il vous sera demandé de redémarrer l'ordinateur. Appuyez sur Oui.
FR-02 FR-03
L'écran de Configuration comporte 5 onglets (sur la gauche). Cliquez d'abord sur
l'onglet Détection Périphérique et assurez-vous que votre tuner hybride est
sélectionné comme périphérique principal. Ensuite cliquez sur l'onglet
Configuration TV, choisissez votre région dans la liste déroulante et cliquez
sur la loupe pour rechercher les chaînes disponibles. Une fois la recherche terminée,
cliquez sur l'icône coche en bas à droite de l'écran de Configuration.
Page 5

DESCRIPTION DE LA BARRE D’OUTILS
Regarder la TV
• Utilisez les boutons Chaîne Haut/Bas ou les touches haut/bas du clavier pour vous déplacer parmi les chaînes
les unes après les autres. Vous pouvez également saisir directement un numéro de chaîne.
• Utilisez les boutons volume haut/bas ou les touches gauche/droite du clavier pour augmenter/diminuer le volume.
Utilisez le bouton Muet pour couper ou rétablir le son.
ENREGISTREMENT
Recording
There are 3 ways to record:
4
27
5 6
26
25
7 8 9
24
23
22
3
28
1. Réduire l'affichage
2. Afficher en plein écran
3. Ouvrir un fichier vidéo
4. Capture
5. Sous-titres
6.Télétexte
7. EPG (Guide de Programmation Electronique)
8. Configuration
9. Volume
10. Signal
11. Chaîne Bas
12. Chaîne Haut
13. Enregistrer
14. Réduire
1110
14
12
13
Live Recording
To record what is currently being shown on the screen, press the record button.
16
18
17
TimeShift Recording
NOTE: TimeShift recording is very useful when you are watching a program and may have
to leave just for a moment, for example if the phone rings.
21
19
20
To activate TimeShift recording, simply press the TimeShift button. This will start timeshifting
the program currently being shown. The computer may now be left unattended. When you return
to the computer, you can use the forward wind or rewind buttons to search within the recording.
Use the play button to play or the pause button to pause. None of these buttons will stop
15. Fermer
the recording. To stop time shift recording, press the stop button.
16. Rappeler
17. Sélection Audio
18.TimeShift
19. Couper/Rétablir Son
Scheduled Recording
Press on the EPG icon, which will open the EPG window. Double-click on the program you wish
to record. This will open the Schedule Record window, as follows:
20. Monter Volume
21. Baisser Volume
22. Informations Chaîne
23. Informations Programme
24. Visuel
25. Aperçu Chaîne
26. Principal/secondaire
27. Modifier le mode de l'écran
28. Changer le périphérique
FR-04 FR-05
Page 6
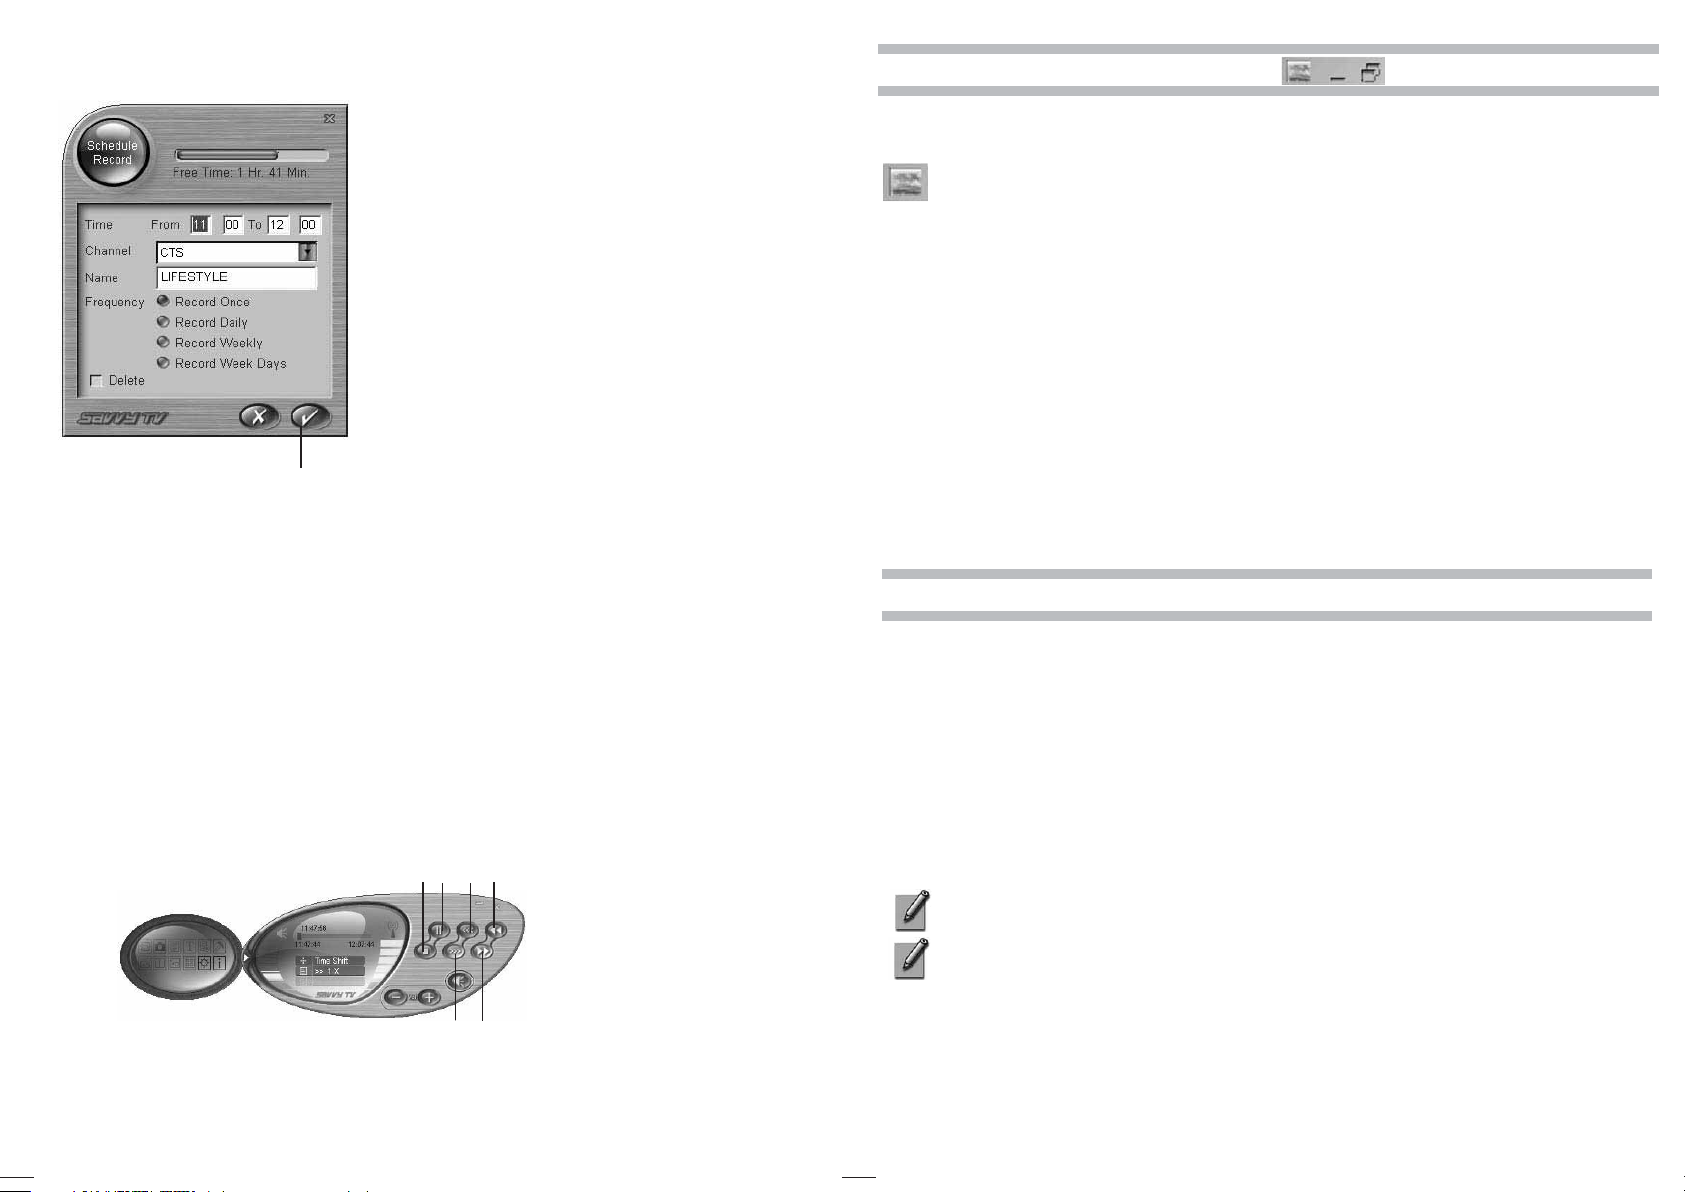
(CLIQUEZ ICI POUR VALIDER)
Les informations nécessaires à la programmation
de l'enregistrement seront déjà saisies. Toutefois,
les informations suivantes peuvent être
éditées manuellement :
•Heures de début et de fin de l'enregistrement
(format 24 heures)
•Chaîne
•Un nom pour l'enregistrement
•La fréquence d'enregistrement
Pour accepter les détails de l'enregistrement
programmé, cliquez sur l'icône coche dans
l'angle inférieur droit de l'écran
Enregistrement Programmé.
MODES D’AFFICHAGE
Affichage en fond d'écran
Cette option définira l'écran TV comme fond d'écran d'ordinateur (mode plein écran).
Toute autre fenêtre ou fenêtre sera placée au dessus de l'écran TV.
Le mode de visionnement normal peut être restauré à partir de la barre des tâches Windows
(voir la remarque ci-dessous).
Réduire la fenêtre
Cette option réduira l'écran. Il peut être restauré à partir de la barre des tâches (Voir la remarque
ci-dessous).
Ecran plein
Cette option affichera le plein écran TV, et supprimera le panneau de contrôle.
Cliquez n'importe où sur l'écran pour revenir au mode de visionnement normal.
Regarder les Programmes Enregistrés
Cliquez sur l'icône Ouvrir fichier vidéo, ce qui lancera une fenêtre du navigateur, vous permettant de rechercher
les fichiers mpg/mpeg. Cette méthode vous permet de visionner à la fois des enregistrements programmés
et des enregistrements en direct et également d'autres fichiers mpeg.
Le Panneau de Contrôle Enregistrement/Lecture
Le panneau de contrôle Enregistrement/Lecture diffère légèrement du panneau de contrôle standard
de la manière suivante :
29
32
30
31
29. Arrêter
30. Lecture/
pause
31. Retour au
ralenti
32. Retour
33. Avance
33
34
FR-06 FR-07
34. Avance au
ralenti
Remarque concernant les Modes de Visualisation
L'écran d'affichage et le panneau de contrôle peuvent être restaurés à partir de la barre des tâches comme suit :
- Cliquez droit sur l'onglet Sawy TV dans la barre des tâches Windows.
- Sélectionnez Restaurer le panneau d'affichage ou Restaurer le panneau de contrôle.
Notez que si vous êtes actuellement en mode Fond d'écran, vous aurez besoin de choisir l'option Mode fenêtre
pour revenir au mode de visionnement normal.
REMARQUE: Un Guide Utilisateur plus détaillé est inclus sur le CD fourni.
REMARQUE: Microsoft, Windows, Windows 2000 et Windows XP sont des marquescommerciales
déposées par Microsoft Corp.
Page 7

TÉLÉTEXTE
EPG (Guide de programme électronique)
Le Logiciel de TV numérique Sawy TV permet d’accéder au Télétexte.
Pour ce faire, cliquez sur le bouton Télétexte sur le panneau de commande.
Le panneau de commande Télétexte et l’écran d’affichage Télétexte apparaîtront comme suit :
Raccourcis-claviers colorés
Bouton Aller à la Page
Affichage du numéro de page
Touches de direction
Bouton action
Le logiciel Sawy TV est compatible EPG. Ceci signifie que vous pouvez avoir un accès instantané à la liste
des programmes qui vous sont disponibles.
Pour accéder à cette caractéristique, cliquez sur le bouton EPG du panneau de contrôle.
L'écran suivant apparaîtra :
Vous trouverez une liste des chaînes en bas à gauche.
Elles peuvent être consultées à l'aide des flèches vers le haut et bas au dessus de la liste.
Cliquez sur n'importe laquelle de ces chaînes changera la chaîne que vous regardez actuellement (mis en évidence
en vert, avec les programmes mis en évidence en bleu).
En haut à gauche apparaît la date. En haut de la section principale, vous verrez l'heure.
Les boutons permettent de faire défiler la date ou l’heure et de consulter les programmes.
Notez que certaines chaînes peuvent ne pas offrir la fonction EPG.
Il y a plusieurs façons de naviguer en mode Télétexte.
Les touches de direction gauche/droite peuvent être utilisées pour se déplacer à travers les pages télétexte.
Si des sous-pages sont disponibles, alors les touches de déplacement du curseur haut/bas peuvent être utilisées pour
naviguer à travers celles-ci. Par exemple sur la figure ci-dessus la page est 100 et la sous-page est 08.
Le champ affiche le numéro de page qui peut être aussi saisi directement. Après que le numéro de page est saisi, cli-
quez sur le bouton Aller à la Page afin d’aller à cette page.
Les quatre boutons colorés (rouge, vert, jaune et bleu) peuvent être utilisés comme raccourcis-claviers pour aller
directement aux liens colorés qui apparaissent au bas de l’affichage de l’écran télétexte.
Le bouton action vous permet de choisir n’importe quel numéro de page affiché à l’écran.
Une fois que le bouton action a été appuyé, il changera de couleur. Vous pouvez alors utiliser les touches de direc-
tion haut/bas pour naviguer sur l’écran. Une fois que la page à laquelle vous voudriez aller est mise en évidence,
appuyez sur le bouton action à nouveau pour aller à cette page.
FR-08 FR-09
Page 8

GUIDE DE DÉPANNAGE
Problème Raison possible Solution
Aucune image La fréquence choisie est Aucune image n'apparaîtra
Aucun Son Le mode silence est activé Cliquez sur l'icône haut-parleurs
Impossible d’affiner la qualité Signal médiocre Déplacer l'antenne pour
d’affichage et de réception une meilleure réception
La performance de l'image Votre PC n'utilise pas la dernière Téléchargez la dernière
est médiocre version de Direct X version de Direct X
Un message d'erreur apparaît La clé électronique Branchez la clé électronique,
lorsque vous démarrez le logiciel, n'est pas branchée ou si nécessaire, débranchez
disant "Veuillez brancher le syntoniseur". et rebranchez
Le tuner chauffe Les composants électroniques Ceci ne nuit pas au fonctionnement
pendant l'utilisation du tuner génèrent de votre PC ; la température
une fréquence de radio sur les chaînes radio
à côté de l'indicateur de volume
pour restaurer le son
Le niveau du volume est Augmenter le volume
réglé trop bas
Mauvais pays choisi dans Choisissez le pays correct
les paramètres dans Configuration
Le matériel de l'ordinateur Mettez à niveau le matériel
ne correspondant pas à la pour correspondre à la
configuration minimale requise configuration minimale requise
Trop de programmes sont Fermer les programmes
utilisés en même temps inutiles
Signal médiocre Déplacez l'antenne pour une
meilleure réception
L'ordinateur portatif utilise Essayez de brancher
l'alimentation de batterie l'ordinateur portable dans la
source d'alimentation
naturellement de la chaleur du tuner se stabilise au bout
d'une quinzaine de minutes
Qu’est-ce que la TNT ?
La TNT ou Télévision Numérique Terrestre est une évolution majeure dans l’histoire de la télévision.
L’arrivée de la couleur dans les petites lucarnes françaises en 1967 a apporté davantage de confort.
En 2005, la TNT révolutionne à la fois l’image et le son de votre TV : Son Dolby Digital 5.1, et images
haute résolution, qualité DVD.
18 chaînes gratuites
En conservant votre installation actuelle (TV reliée à une antenne râteau), un adaptateur TNT vous
permet de recevoir 18 chaînes TV, gratuitement, et sans aucun abonnement.
Votre zone est-elle couverte par la TNT ?
Couverture en septembre 2005 : 50% de la population française sera située
dans des zones couvertes par la TNT - voir carte ci-dessous.
Couverture théorique Juin 2006 :
65% de la population française
FR-10 FR-11
Zones couvertes
Page 9

TV numérique
S820
Tuner TNT
(TNT)
User guide
CONTENTS
About the DVB-T Dongle . . . . . . . . . . . . . . . . . . . . . . . . . . . . . . . . . . . . . . . . . . . . . . . . . . . . . . . . . . . . . . . . . . . . . . . . . EN-14
Software Installation . . . . . . . . . . . . . . . . . . . . . . . . . . . . . . . . . . . . . . . . . . . . . . . . . . . . . . . . . . . . . . . . . . . . . . . . . . . . . EN-14
Connecting the DVB-T Dongle . . . . . . . . . . . . . . . . . . . . . . . . . . . . . . . . . . . . . . . . . . . . . . . . . . . . . . . . . . . . . . . . . . . . . EN-15
Initial Setup . . . . . . . . . . . . . . . . . . . . . . . . . . . . . . . . . . . . . . . . . . . . . . . . . . . . . . . . . . . . . . . . . . . . . . . . . . . . . . . . . . . . EN-15
Description of Toolbars . . . . . . . . . . . . . . . . . . . . . . . . . . . . . . . . . . . . . . . . . . . . . . . . . . . . . . . . . . . . . . . . . . . . . . . . . . . EN-16
Watching Digital TV . . . . . . . . . . . . . . . . . . . . . . . . . . . . . . . . . . . . . . . . . . . . . . . . . . . . . . . . . . . . . . . . . . . . . . . . . . . . . . EN-17
Recording . . . . . . . . . . . . . . . . . . . . . . . . . . . . . . . . . . . . . . . . . . . . . . . . . . . . . . . . . . . . . . . . . . . . . . . . . . . . . . . . . . . . . . EN-17
Viewing Modes ................................................................................. EN-19
Teletext ........................................................................................ EN-20
EPG (Electronic Program Guide) . . . . . . . . . . . . . . . . . . . . . . . . . . . . . . . . . . . . . . . . . . . . . . . . . . . . . . . . . . . . . . . . . . . EN-20
Troubleshooting Guide ........................................................................... EN-21
EN-13
Page 10

ABOUT THE DVB-T DONGLE
CONNECTING THE DVB-T DONGLE
The DVB-T dongle is a digital video broadcast receiver that plugs straight into the USB port of your computer and
requires no additional power source, making it extremely portable. It can scan for and save all available digital TV
stations and play any of these on your computer screen.
Minimum System Requirements
- USB port
- DirectX 9c
- Windows 2000/XP
- Pentium IV 1,4GHz ou équivalent
- 256MB RAM
- DirectX 9c compatible sound card
- DirectX 9c compatible video card
- 32MB HDD space (installation only)
Package Contents
- DVB-T dongle
- Software CD
- Quickstart guide
- Antenna
* Please note that the antenna has a magnetic base and should not be placed near any items that can be affected by magnetic fields,
for example, computer or TV screens, floppy disks, or credit cards.
Note that Microsoft, Windows, Windows 2000 and Windows XP are registered trademarks of Microsoft Corp.
SOFTWARE INSTALLATION
Please install all necessary software BEFORE connecting your DVB-T dongle.
- Insert the provided CD-ROM into the CD drive of your computer.
-The installation screen will appear. However, if it does not, click on Start>Run and type D:\setup.exe,
where D refers to the letter assigned to your CD drive.
-You will be asked to choose the setup language, as follows :
Remove the cap from the DVB-T dongle, locate a free USB port
on your computer and plug in the dongle. Once the computer
recognises the new hardware, the New Hardware wizard will begin.
As the DVB-T is a Hi-Speed device, you may receive the following message if it is plugged into an older USB 1.1 port.
The DVB-T will still work with USB 1.1. Simply click on the X in the top right-hand corner of this message.
You will see several messages during the installation of the DVB-T dongle.
Please be patient, as this process make take a few minutes.
Choose a language and then click OK.You will now be asked to accept the End User
License Agreement. Be sure to check the I accept the terms in the license agreement
box, then click on Next.
After a few seconds, the following screen will appear.
Click on Install to continue the installation.
Once the software has finished being installed, you will be asked to restart
the computer. Press Yes .
EN-14 EN-15
INITIAL SETUP
Double-click on the Savvy TV icon, which appears on your desktop. The TV
display panel and control panel will appear (See next page). Note that the
software may take a few seconds to open.
If the Settings screen does not automatically appear, click the Settings icon
in the control panel to access the Settings screen.
The Settings screen has 5 tabs (to the left). First click on the Source tab and make
sure that your hybrid tuner is chosen as the primary source. Now click on the
Channels tab, choose your region from the drop-down list, and click the magnifying
glass to scan for available channels. Once the scan is complete, click the tick icon
at the bottom-right of the Settings screen.
Page 11

DESCRIPTION OF TOOLBARS
WATCHING DIGITAL TV
• Use the channel up/down buttons, or the keyboard up/down cursor keys, to move through the channels one by one.
Alternatively you can type a channel number directly.
• Use the volume up/down buttons, or the keyboard right/left cursor keys to
increase/decrease the volume. Use the mute button to mute or un-mute the sound.
RECORDING
Recording
There are 3 ways to record:
4
27
5 6
26
25
7 8 9
24
23
3
28
1. Minimise display
2. Full screen display
3. Open video file
4. Snapshot
5. Subtitles
6.Teletext
7. EPG (Electronic Program Guide)
8. Setup
9. Volume
10. Signal
11. Channel down
12. Channel up
13. Record
14. Minimise
1110
14
12
13
Live Recording
To record what is currently being shown on the screen, press the record button.
16
18
17
TimeShift Recording
NOTE: TimeShift recording is very useful when you are watching a program and may have
to leave just for a moment, for example if the phone rings.
22
21
19
20
To activate TimeShift recording, simply press the TimeShift button. This will start timeshifting
the program currently being shown. The computer may now be left unattended. When you return
to the computer, you can use the forward wind or rewind buttons to search within the recording.
Use the play button to play or the pause button to pause. None of these buttons will stop
15. Close
the recording. To stop time shift recording, press the stop button.
16. Recall
17. Audio select
18.TimeShift
19. Mute/un-mute
20. Volume up
Scheduled Recording
Press on the EPG icon, which will open the EPG window. Double-click on the program you wish
to record. This will open the Schedule Record window, as follows:
21.Volume down
22. Channel information
23. Program information
24. Visual
25. Channel preview
26. Main/child
27. Change screen mode
28. Change device
EN-16 EN-17
Page 12

(Clic here)
The information you require to record the proram will already
be entered. However, the following information can be
edited manually:
•Start and end times of the recording (24 hour format)
•Channel
•A name for the recording
•Frequency of recording
To accept the details of the scheduled recording, click the tick icon
at the bottom-right of the Schedule Record screen.
VIEWING MODES
Display as Wallpaper
This option will set the TV screen as the computer wallpaper.
In effect, it will be set as full screen and moved to the back.
Any other windows or icons will be placed on top of the TV screen.
Normal viewing mode can be restored from the Windows taskbar (see note below).
Minimise Window
This option will minimise the screen.
It can be restored from the Windows taskbar (See note below).
Full Screen
This option will display the TV full screen, and remove the control panel.
Click anywhere on the screen to return to normal viewing mode.
Watching Recorded Programs
Press the open video file icon, which will open up a browser window, allowing you to search for recorded
mpg/mpeg files. This method allows you to view both scheduled recordings and live recordings, as well
as other mpeg files.
The Recording/Playback Control Panel
The recording/playback control panel differs slightly from the standard control panel, as follows:
29
32
30
31
29. Stop
30. Play/pause
31. Slow motion rewind
32. Rewind
33. Forward wind
34. Slow motion forward wind
33
34
EN-18 EN-19
A Note About Viewing Modes
Both the display screen and the control panel can be restored from the Windows taskbar as follows:
- Right-click on the Sawy DTV tab in the Windows taskbar.
- Select Restore Display Panel or Restore Control Panel.
Note that if you are currently in Wallpaper mode, you will need to choose the Window Mode option to return
to normal viewing mode.
NOTE: A more detailed User Guide is included on the enclosed CD.
NOTE: Microsoft, Windows, Windows 2000, Windows XP and Window MCE are registered
trademarks of Microsoft Corp.
Page 13

TELETEXT
The Sawy Digital TV software can also access Teletext. To do so, click on the Teletext button
on the control panel.
The Teletext control panel and the Teletext display screen will appear as follows:
Coloured hotkeys
Arrow keys
This will open up the following screen:
You will find a list of channels down the left-hand side.
These can be scrolled through, using the up and down arrows above and below the list.
Clicking on any of the channels will change which channel you are currently viewing (highlighted in green,
with programmes highlighted in blue). In the top left-hand corner, you will see the date.
This can also be changed, using the accompanying arrows. To the top of the main section, you will see the time.
Again, this can be scrolled through, using the arrows.
Note that some channels may not offer the EPG function.
Go to page button
Page number display
There are several ways to navigate whilst in Teletext mode.
The left/right arrow keys can be used to move through the teletext pages one at a time. If subpages are available,
then the up/down cursor keys can be used to navigate through these. In the above picture, for example, the page is
100, and the subpage is 08.
The page number display field can also be typed into directly. After the page number is typed, click on the Go to Page
button in order to go to that page.
The four coloured buttons (red, green, yellow and blue) can be used at hotkeys to go directly to the coloured links
which appear at the bottom of the teletext display screen.
The action button enables you to choose any page number displayed within the screen.
Once the action button has been pressed, it will change colour. You can then use the up/down arrow keys to naviga-
te within the screen.
Once the page you would like to go to is highlighted, press the action button again to go to that page.
Action button
EPG (Electronic program guide)
The Sawy Digital TV software is EPG compatible. This means that you can get instant access to the list of programmes available to you.
To access this feature, click on the EPG button on the control panel.
TROUBLESHOOTING GUIDE
Problem Possible Reason Solution
No picture Currently viewing radio No picture will appear on
station radio channels
No sound Mute mode is activated Click on the speaker icon
beside the volume indicator
to restore the sound
Volume level is set too low Increase volume
Cannot tune stations Poor signal Move the antenna for better
reception
Wrong country is chosen in Setup Choose the correct country in Setup
Picture performance is poor Not using latest version of Download latest version of
Direct X Direct X
Computer hardware does Upgrade hardware to meet
not meet minimum requirements minimum requirements
Too many programs are Close unnecessary programs
being used at the same time
Poor signal Move the antenna for better
reception
Laptop computer is using Try plugging the laptop into
battery power its power supply
Error message appears Tuner is not plugged in Plug in tuner, or if
when starting software, saying necessary, disconnect and
“Please plug in the tuner”. then reconnect.
The DVB-T tuner Electronic parts of this tuner this doesn't affect your PC ;
is heating while operating are reasonably heating heat stabilizes automatically
after 15 minutes
EN-20 EN-21
Page 14

S820
DVB-T TUNER
Benutzerhandbuch
INHALTSVERZEICHNIS
Über den DVB-T Tuner . . . . . . . . . . . . . . . . . . . . . . . . . . . . . . . . . . . . . . . . . . . . . . . . . . . . . . . . . . . . . . . . . . . . . . . . . . . . D-24
Softwareinstallation . . . . . . . . . . . . . . . . . . . . . . . . . . . . . . . . . . . . . . . . . . . . . . . . . . . . . . . . . . . . . . . . . . . . . . . . . . . . . . D-24
Anschließen des DVB-T Tuners . . . . . . . . . . . . . . . . . . . . . . . . . . . . . . . . . . . . . . . . . . . . . . . . . . . . . . . . . . . . . . . . . . . . . D-25
Erste Einstellungen . . . . . . . . . . . . . . . . . . . . . . . . . . . . . . . . . . . . . . . . . . . . . . . . . . . . . . . . . . . . . . . . . . . . . . . . . . . . . . . D-25
Beschreibung der Steuersymbole . . . . . . . . . . . . . . . . . . . . . . . . . . . . . . . . . . . . . . . . . . . . . . . . . . . . . . . . . . . . . . . . . . . D-26
Aufnahme . . . . . . . . . . . . . . . . . . . . . . . . . . . . . . . . . . . . . . . . . . . . . . . . . . . . . . . . . . . . . . . . . . . . . . . . . . . . . . . . . . . . . . . D-29
Ansichtsmodi . . . . . . . . . . . . . . . . . . . . . . . . . . . . . . . . . . . . . . . . . . . . . . . . . . . . . . . . . . . . . . . . . . . . . . . . . . . . . . . . . . . . D-29
Teletext ......................................................................................... D-30
EPG (Electronic Program Guide) . ................................................................... D-30
Anleitung zur Fehlerbehebung . . . . . . . . . . . . . . . . . . . . . . . . . . . . . . . . . . . . . . . . . . . . . . . . . . . . . . . . . . . . . . . . . . . . . . D-31
D-23
Page 15

ÜBER DEN DVB-T TUNER
ANSCHLIEßEN DES DVB-T TUNERS
Der DVB-T Dougle ist ein Tuner für digitalen Fernsehempfang, der direkt in den USBAnschluss an Ihrem Computer
eingesteckt wird und keine zusätzliche Stromversorgung benötigt. Diese Eigenschaft macht ihn super bequem tragbar. Er kann nach allen verfügbaren Digital-TV-Stationen suchen, die Ergebnisse speichern und diese auf Ihrem
Computerbildschirm wiedergeben.
Mindestsystemanforderungen
- USB-Anschluss
- DirectX 9c
- Windows 2000/XP
- Pentium IV 1,4GHz ou équivalent
- 256MB RAM
- DirectX 9c-kompatible Soundkarte
- DirectX 9c-kompatible Videokarte
- 32MB freier Speicherplatz auf der Festplatte (nur für die Installation)
Paketinhalt
- DVB-T Tuner
- Software-CD
- Schnellstartanleitung
- Antenne
- Hausantennenadapter
* Bitte denken Sie daran, dass die Antenne einen magnetischen Boden hat und nicht in die Nähe von Gegenständen, die Störungen
durch magnetische Felder haben können, wie z.B. Computer, Fernseher, Disketten oder Kreditkarten gestellt werden sollte.
Beachten Sie, dass Microsoft, Windows, Windows 2000 und Windows XP eingetragene Warenzeichen der Microsoft Corp. sind.
SOFTWAREINSTALLATION
Bitte installieren Sie alle notwendige Software, BEVOR Sie den DVB-T-Tuner anschließen.
- Legen Sie die beigelegte CD-ROM in das optische Laufwerk Ihres Computers ein.
- Das Installationsfenster wird geöffnet. Falls nicht, dann klicken Sie bitte auf Start>Ausführen und tippen D:\setup.exe
ein, wobei D für den Laufwerkbuchstaben Ihres optischen Laufwerks steht.
- Sie werden aufgefordert eine Setupsprache wie folgt auszuwählen:
Entfernen Sie die Kappe von dem DVB-T Tuner. Suchen Sie einen freien USB-Anschluss
an Ihrem Computer und stecken dann den USB-Stick ein.
Der Hardware-Assistent erscheint, wenn der Computer die neue Hardware erkennt.
Da der DVB-T ein Hi-Speed-Gerät ist, erhalten Sie u.U. die folgende Meldung, wenn er in einen älteren
USB 1.1-Anschluss eingesteckt wurde.
Der DVB-T funktioniert ebenfalls mit USB 1.1. Klicken Sie einfach auf
das X-Symbol in der oberen rechten Ecke dieses Meldungsfensters.
Während der Installation des DVB-T Tuners werden einige Meldungen angezeigt.
Dieser Vorgang kann einige Minuten dauern.
Haben Sie bitte Geduld.
Wählen Sie eine Sprache aus und klicken anschließend auf OK. Sie werden gefragt,
ob Sie den Benutzerlizenzvertrag akzeptieren. Wählen Sie bitte die Option Ich
akzeptiere die Bestimmungen im Lizenzvertrag und klicken anschließend auf Weiter.
Nach ein paar Sekunden wird das folgende Fenster
geöffnet. Klicken Sie auf Installieren,
um die Installation fortzusetzen.
Sobald die Softwareinstallation abgeschlossen ist, werden Sie aufgefordert,
den Computer neu zu starten. Klicken Sie auf Ja.
D-24 D-25
ERSTE EINSTELLUNGEN
Doppelklicken Sie auf das Symbol Savvy TV, welches auf Ihrem Desktop erscheint. Daraufhin werden
das TV-Anzeigefeld und das Steuerfeld angezeigt (siehe nächste Seite). Beachten Sie, dass es einige
Sekunden dauern kann, bis sich die Software öffnet.
Erscheint der Setup-Bildschirm nicht automatisch, klicken Sie auf das Symbol Setup im Steuerfeld, um
den Setup-Bildschirm aufzurufen.
Der Setup-Bildschirm verfügt über 5 Registerkarten (auf der linken Seite). Klicken Sie zuerst auf die
Registerkarte Device detect (Gerät erkennen) und stellen Sie sicher, dass Ihr Hybrid-Tuner
als primäres Gerät ausgewählt ist. Klicken Sie jetzt auf die Registerkarte TV setup (TV-Setup), wählen
Sie Ihre Region im Listenfeld und klicken Sie auf das Vergrößerungsglas, um verfügbare Kanäle
einzulesen. Sobald dieser Scanvorgang abgeschlossen ist, klicken Sie auf das Häkchensymbol unten
rechts im Setup-Bildschirm.
Page 16

BESCHREIBUNG DER STEUERSYMBOLE
Fernsehen
• Navigieren Sie mit den Kanal-Nach-oben/-unten-Tasten oder den Nach-oben/-unten-Cursortasten auf der Tastatur
durch die einzelnen Kanäle. Sie können eine Kanalnummer auch direkt eingeben.
• Erhöhen/verringern Sie die Lautstärke mit den Lauter-/Leiser-Tasten oder den Nach-rechts/-links-Cursortasten
auf der Tastatur. Mit der Ton aus-Taste können Sie die Tonausgabe aus- oder einschalten.
AUFNAHME
Aufnahme
Es gibt 3 Aufnahmemöglichkeiten:
4
27
5 6
26
25
7 8 9
24
23
22
3
28
1. Anzeige minimieren
2. Vollbildanzeige
3. Videodatei öffnen
4. Momentaufnahme
5. Untertitel
6.Teletext
7. EPG (Elektronische Programmanleitung)
8. Setup
9. Lautstärke
10. Signal
11. Kanal-Nach-unten
12. Kanal-Nach-oben
13. Aufnahme
14. Minimieren
1110
14
12
13
Live-Aufnahme
Um das aufzunehmen, was gerade auf dem Bildschirm angezeigt wird, drücken
Sie die Aufnahme-Taste.
16
18
17
Zeitversetzte Aufnahme
HINWEIS: Eine zeitversetzte Aufnahme bietet sich an, wenn Sie gerade fernsehen und für nur
21
19
20
kurze Zeit weggehen müssen, wenn z.B. das Telefon klingelt.
Um eine zeitversetzte Aufnahme zu aktivieren, drücken Sie die Taste
Zeitversetzung. Das derzeitig angezeigte Programm wird jetzt zeitlich versetzt und Sie können den
Computer unbeaufsichtigt stehen lassen. Wenn Sie wieder vor dem Computer sitzen, können Sie
15. Schließen
16. Wiederherstellen
17. Audiowahl
18. Zeitversetzung
19.Ton aus/ein
20. Lauter
21. Leiser
22. Kanalinformationen
die Aufnahme mit den Tasten Vorlauf oder Rücklauf durchsuchen. Mit der Wiedergabe-Taste spielen Sie die Aufnahme ab und mit der Pause-Taste unterbrechen Sie sie kurzzeitig. Keine dieser
Tasten wird die Aufnahme stoppen. Um die zeitversetzte Aufnahme zu stoppen, müssen Sie die
Stopp-Taste drücken.
Programmierte Aufnahme
Klicken Sie auf das EPG-Symbol, woraufhin sich das EPG-Fenster öffnet.
Doppelklicken Sie auf das aufzunehmende Programm. Es öffnet sich das nachstehende Fenster
Schedule Record (Aufnahme programmieren):
23. Programminformationen
24. Visuell
25. Kanalvorschau
26. Erwachsener/Kind
27. Bildschirmmodus ändern
28. Gerät ändern
D-26 D-27
Page 17

Die Informationen, die für eine Aufnahme des Programms
erforderlich sind, werden bereits eingegeben sein. Folgende
Informationen können jedoch manuell eingegeben werden:
•Start- und Endzeiten der Aufnahme (24-Stundenformat)
•Kanal
ANSICHTSMODI
Anzeige als Hintergrund
Diese Schaltfläche stellt die TV-Anzeige als Hintergrund des Computerdesktops ein. Dadurch wird das TV-
Bild auf dem ganzen Bildschirm und im Hintergrund angezeigt. Alle anderen Fenster oder Symbole
ers cheinen dann über dem angezeigten TV-Bild. Den Normalansichtsmodus können Sie von der Window
Taskleiste wiederherstellen (siehe Hinweis unten).
•Ein Name für die Aufnahme
•Häufigkeit der Aufnahme
Um die Details der programmierten Aufnahme zu
akzeptieren, klicken Sie auf Häkchensymbol unten rechts im
Bildschirm Schedule Record (Aufnahme programmieren).
(Clic here)
Betrachten aufgenommener Programme
Klicken Sie auf das Symbol Videodatei öffnen, woraufhin sich ein Browser-Fenster öffnet, in dem Sie nach
Aufnahmedateien im MPG/MPEG-Format suchen können. Auf diese Weise sehen Sie nicht nur programmierte
Aufnahme und Live-Aufnahmen sondern auch andere MPEG-Dateien.
Das Steuerfeld für Aufnahme/Wiedergabe
Das Steuerfeld für Aufnahme/Wiedergabe unterscheidet sich etwas vom Standard - Steuerfeld, siehe unten:
29
32
30
31
29. Stopp
30. Wiedergabe/ Pause
31. Rücklauf in Zeitlupe
32. Rücklauf
33. Vorlauf
34. Vorlauf in Zeitlupe
Fenster minimieren
Diese Schaltfläche minimiert das Anzeigefenster. Die normale Fenstergröße können Sie von der Windows
Taskleiste aus wiederherstellen (siehe Hinweis unten).
Vollbild
Diese Schaltfläche zeigt das TV auf dem ganzen Bildschirm und blendet das Steuerfeld aus. Klicken Sie
auf eine beliebige Stelle auf dem Bildschirm, um den Normalansichtsmodus wiederherzustellen..
Ein Hinweis zu den Anzeigemodi
Das Anzeigefeld und das Steuerfeld können beide wie folgt über die Windows Taskleiste aufgerufen werden:
• Klicken Sie mit der rechten Maustaste auf die Registerkarte Savvy TV in der
Windows-Taskleiste.
• Wählen Sie Restore Display Panel (Anzeigefeld wiederherstellen) oder Restore Control Panel
(Steuerfeld wiederherstellen).
Klicken Sie im Vollbildmodus auf eine beliebige Stelle im Bildschirm, um den normalen Anzeigemodus
wiederherzustellen.
HINWEIS: Die mitgelieferte CD enthält eine detailliertere Bedienungsanleitung.
HINWEIS: Microsoft, Windows, Windows 2000 und Windows XP sind eingetragene Markenzeichen
der Microsoft Corp.
33
34
D-28 D-29
Page 18

TELETEXT
Die Sawy Digital TV Software erlaubt Ihnen auch die Teletextfunktion zu nutzen.
Klicken Sie hierzu auf die Teletext-Schaltfläche auf dem Steuerfeld.
Das Teletext-Steuerfeld und das Teletext-Anzeigefenster erscheinen wie folgend:
DVB-T – Was ist das?
Die Technik der Zukunft ist digital – Ob Kameras, Studiotechnik, Übertragungssysteme oder
Empfangsgeräte: Sie alle arbeiten mit Digitaltechnik, die vor etwas mehr als 20 Jahren mit der CD im
Audiobereich ihre Geburtsstunde erlebte. Mit dem neuen digitalen terrestrischen Fernsehen – also einfach
über Antenne - besteht erstmals die Möglichkeit zum portablen und sogar mobilen Fernsehempfang.
Alles was Sie brauchen ist eine DVB-T SetTop Box - vergleichbar einem Satelliten-Receiver -, die die
digitalen Daten in bewegte Bilder umwandelt. Dann kann es auch schon losgehen. Weitere Informationen
erhalten Sie unter: www.ueberallfernsehen.de..
Farbige Hotkeys
Zur Seite
Seitennummernanzeige
Pfeil-Schaltflächen
Aktionsschaltfläche
Im Teletextmodus gibt es mehrere Navigationsmethoden.
Die nach links/rechts zeigende Pfeil-Schaltfläche erlaubt Ihnen durch eine Teletextseite zu rollen. Wenn es untergeord-
nete Seiten gibt, dann können Sie mit der Auf/Ab-Pfeiltaste diese Seiten umblättern. Auf dem obigen Bild z.B. ist die
Seite 100 und die untergeordnete Seite 08.
Sie können auch direkt eine Nummer in das Seitennummernanzeigefeld eingeben. Klicken
Sie nach dem Eingeben der Seitennummer auf die Zur Seite, um diese Seite zu öffnen.
Die vier farbigen Schaltflächen (rot, grün, gelb und blau) können als Hotkeys verwendet werden, um direkt zu den
mit Farbe gekennzeichneten Links, die unten auf dem Teletext-Anzeigefenster erscheinen, zu gelangen.
Die Aktionsschaltfläche erlaubt Ihnen eine auf dem Fenster angezeigte Seitennummer auszuwählen. Die Farbe wird
geändert, sobald die Aktionsschaltfläche angeklickt wurde. Anschließend können Sie mit der nach oben/unten zeigenden Pfeil-Schaltfläche innerhalb des Fensters navigieren. Wenn die gewünschte Seite markiert ist, klicken Sie bitte
noch einmal auf die Aktionsschaltfläche, um diese Seite zu öffnen.
EPG (Electronic program guide)
Die Sawy Digital TV Software ist EPG-kompatibel. Dies bedeutet, dass Sie sofort auf die Liste mit den verfügbaren
Programmen zugreifen können.
Um diese Funktion zu verwenden, klicken Sie bitte auf die EPG-Schaltfläche auf dem Steuerfeld.
Vorerst bis zu 28 Programme kostenlos empfangen (nur GEZ-Gebühr)
EFolgende Programme sind je nach Sendegebiet zu empfangen. Detaillierte Programmlisten Ihres
Sendegebietes finden Sie unter www.ueberallfernsehen.de.
Wo ist DVB-T zu empfangen?
DVB-T Empfangsbereich
deutschlandweit
Stand : 29 Juni 2005
DVB-T in Betrieb
DVB-T in Betrieb öffentlich-rechtlich
DVB-T Start ab November 2005 (öffentlich-rechtlich)
DVB-T Start in Planung (öffentlich-rechtlich)
DVB-T Start in Planung
Die Programmbelegung variiert in den einzelnen
Regionen. DVB-T Projekte in Deutschland
www.ueberallfernsehen.de
Stand : 29 Juni 2005
EINFACH
• Ohne Kabel
• Ohne Satellit
• Nur mit Antenne
ÜBERALL
• In der Wohnung
• Im Fahrzeug
• Unterwegs
FERNSEHEN
• Unterhaltung
• Information
• Neue Mediendienste
D-30 D-31
 Loading...