

Empire BP28(B, C, G)M(K)(N, P)-5, FF28BM(K)(N Owner's Manual
...
OWNER’S MANUAL
INSTALLER: Leave this manual with the appliance.
CONSUMER: Retain this manual for future reference.
™
WARNING
FIRE OR EXPLOSION HAZARD
Failure to follow safety warnings exactly
could result in serious injury, death or
property damage.
— Do not store or use gasoline or other am-
mable vapors and liquids in the vicinity of
this or any other appliance.
— WHAT TO DO IF YOU SMELL GAS
• Do not try to light any appliance.
• Do not touch any electrical switch; do
not use any phone in your building.
• Leave the building immediately.
• Immediately call your gas supplier
from a neighbor’s phone. Follow the
gas supplier’s instructions.
• If you cannot reach your gas supplier,
call the re department.
— Installation and service must be per-
formed by a qualied installer, service
agency or the gas supplier.
WARNING: If not installed, operated and
maintained in accordance with the manufacturer’s instructions, this product could
expose you to substances in fuel or from
fuel combustion which can cause death or
serious illness.
POWER-VENT
HIGH-EFFICIENCY FIREPLACE
BAY WINDOW MANTIS MODELS
BF28(B,C,G)M(K)(N,P)-5
BP28(B,C,G)M(K)(N,P)-5
BI28(B,C,G)M(N,P)-5
FIREPLACE MANTIS MODELS
FF28BM(K)(N,P)-3
FW28BM(K)(N,P)-3
FI28BM(N,P)-3
This appliance may be installed in
an aftermarket, permanently located,
manufactured home (USA only) or mobile
home, where not prohibited by state or local
codes.
This appliance is only for use with the type
of gas indicated on the rating plate. This
appliance is not convertible for use with other
gases, unless a certied kit is used.
WARNING
HOT GLASS
CAUSE BURNS.
DO NOT TOUCH
UNTIL COOLED.
NEVER
A barrier designed to reduce the risk of burns from the
hot viewing glass is provided with this appliance and shall
be installed for the protection of children and other at-risk
individuals.
ALLOW CHILDREN
TO TOUCH GLASS.
WILL
GLASS
Page 1

TABLE OF CONTENTS
SECTION PAGE
IMPORTANT SAFETY INFORMATION ......................................................................................... 3
SAFETY INFORMATION FOR USERS OF LP-GAS ..................................................................... 4
OPERATING THE FIREPLACE ..................................................................................................... 5
HOW TO START THE FIREPLACE ............................................................................................... 6
HOW TO CHANGE BURNERS – SWITCHING BURNERS .......................................................... 6
HOW TO TURN THE FIREPLACE OFF ........................................................................................ 7
HOW TO OPERATE ECONOMY MODE ....................................................................................... 7
REMOTE TRANSMITTER AND RECEIVER ................................................................................. 7
REMOTE BUTTONS ..................................................................................................................... 7
REMOTE DISPLAY ........................................................................................................................ 7
REMOTE RECEIVER .................................................................................................................... 8
REMOTE SETUP - INSTALL/REPLACE BATTERIES .................................................................. 8
REPLACE THE REMOTE CONTROL BATTERIES ......................................................................8
REPLACE THE REMOTE RECEIVER BATTERIES ..................................................................8-9
REMOTE SETUP - PROGRAMMING THE REMOTE ................................................................... 9
REMOTE SETUP - SETTING THE TEMPERATURE UNITS ........................................................ 9
STARTING THE FIREPLACE - REMOTE ..................................................................................... 9
REMOTE OPERATION - MANUAL MODE .................................................................................... 9
REMOTE OPERATION - THERMOSTAT MODE ........................................................................ 10
REMOTE FUNCTION - LOCK-OUT ............................................................................................ 10
REMOTE SETUP - WALL CLIP ................................................................................................... 10
HOW TO RESET THE FIREPLACE ............................................................................................ 10
HUMIDIFIER OPERATION .......................................................................................................... 11
HOW TO CLEAN THE GLASS DOOR ....................................................................................... 11
HOW TO REMOVE THE GLASS DOOR - BAY WINDOW MODELS ..................................... 11-12
HOW TO REMOVE THE GLASS DOOR - FIREPLACE MODELS ............................................. 12
SERVICE AND MAINTENANCE ................................................................................................. 13
CIRCULATING AIR BLOWER ..................................................................................................13
FILTER ...................................................................................................................................... 13
RECOMMENDED MAINTENANCE .......................................................................................... 13
WARRANTY ................................................................................................................................14
APPLIANCE MAINTENANCE HISTORY .....................................................................................15
Page 2
IMPORTANT SAFETY INFORMATION
THIS IS A HEATING APPLIANCE
Safety markings are frequently used in this manual to designate a degree or level of seriousness and should not be ignored.
WARNING indicates a potentially hazardous situation that if not avoided, could result in
personal injury or death.
CAUTION indicates a potentially hazardous situation that if not avoided, may result in mi-
nor or moderate injury or property damage.
WARNING
This appliance must be installed and repaired by a quali-
ed service person who is familiar with the proper installation and operation of the Mantis Power-Vent High Ef-
ciency Fireplace. Installers who are not familiar with the
installation of the Mantis and have questions, should contact Empire Comfort Systems, Inc. prior to installing the
appliance to avoid creating a hazardous operating condition.
• Due to high temperatures the appliance should be located out of trafc and away from furniture and draperies.
• Children and adults should be alerted to the hazards
of high surface temperatures and should stay away to
avoid burns or clothing ignition.
• Young children should be carefully supervised when
they are in the same room as the appliance. Toddlers,
young children and others may be susceptible to accidental contact burns. A physical barrier is recommended if there are at risk individuals in the house. To re-
strict access to a replace or stove, install an adjustable
safety gate to keep away toddlers, young children and
other at risk individuals out of the room and away from
hot surfaces.
• Clothing or other ammable material should not be
placed on or near the appliance.
• Any safety screen or guard removed for servicing an
appliance, must be replaced prior to operating the
appliance.
• Keep burner and control compartment clean.
• For manufactured home (USA only) or mobile home
or residential installation convertible for use with
natural gas and liqueed petroleum gases when
provision is made for the simple conversion from one
gas to the other.
• Young children should be carefully supervised when
they are in the same room as the appliance. Toddlers,
young children, and others may be susceptible to accidental contact burns. A physical barrier is recommended if there are at-risk individuals in the house. To
restrict access to a replace or stove, install an adjustable safety gate to keep toddlers young children, and
other at-risk indivicuals out of the room and away from
hot surfaces.
WARNING
Installation and repair should be done by a QUALIFIED
SERVICE PERSON. The appliance should be inspected
before use and at least annually by a qualied service
person. More frequent cleaning may be required due to
excessive lint from carpeting, bedding materials, etc. It
is imperative that control compartments, burners and
circulating air passageways of the appliance be kept
clean.
• DO NOT put anything around the heater that will
obstruct the ow of combustion and ventilation air.
• DO keep the appliance area clear and free from
combustible material, gasoline and other ammable
vapors and liquids.
• DO examine venting system periodically and replace
damaged parts.
• DO make a periodic visual check of burner. Clean and
replace damaged parts.
• DO NOT use this heater if any part has been under water.
Immediately call a qualied service technician to inspect
the heater and to replace any part of the control system
and any gas control which has been under water.
• DO NOT operate this appliance without the front panel
installed.
• A barrier designed to reduce the risk of burns from the
hot viewing glass is provided with this appliance and
shall be installed for the protection of children and other
at-risk individuals.
• If the barrier becomes damaged, the barrier shall be
replaced with the manufacturer’s barrier for this appliance.
• Any safety screen, guard, or barrier removed for servicing an appliance must be replaced prior to operating the
appliance.
30067-2-0315 Page 3

SAFETY INFORMATION FOR USERS OF LP-GAS
LP-Gas (Propane) is a ammable gas which can cause res
and explosions. In its natural state, propane is odorless and
colorless. You may not know all the following safety precautions
which can protect both you and your family from an accident.
Read them carefully now, then review them point by point with the
members of your household. Someday, there may not be a
minute to lose, everyone’s safety will depend on knowing exactly what to do. If, after reading the following information, you
feel you still need more information, please contact your gas
supplier.
LP-GAS WARNING ODOR
If a gas leak happens, you should be able to smell the gas because of the odorant put in the LP-Gas.
That’s your signal to go into immediate action!
• Do not operate electric switches, light matches, use your
phone. Do not do anything that could ignite the gas.
• Get everyone out of the building, vehicle, trailer, or area.
Do that IMMEDIATELY.
• Close all gas tank or cylinder supply valves.
• LP-Gas is heavier than air and may settle in low areas
such as basements. When you have reason to suspect
a gas leak, keep out of basements and other low areas.
Stay out until reghters declare them to be safe.
• Use your neighbor’s phone and call a trained LP-Gas
service person and the re department. Even though
you may not continue to smell gas, do not turn on the
gas again. Do not re-enter the building, vehicle, trailer,
or area.
• Finally, let the service man and reghters check for escaped gas. Have them air out the area before you return.
Properly trained LP-Gas service people should repair the
leak, then check and relight the gas appliance for you.
NO ODOR DETECTED - ODOR FADE
Some people cannot smell well. Some people cannot smell
the odor of the chemical put into the gas. You must nd out if
you can smell the odorant in propane. Smoking can decrease
your ability to smell. Being around an odor for a time can affect
your sensitivity or ability to detect that odor. Sometimes other
odors in the area mask the gas odor. People may not smell
the gas odor or their minds are on something else. Thinking
about smelling a gas odor can make it easier to smell.
The odorant in LP-Gas is colorless, and it can fade under
some circumstances. For example, if there is an underground
leak, the movement of the gas through soil can lter the odorant. Odorants in LP-Gas also are subject to oxidation. This
fading can occur if there is rust inside the storage tank or in
iron gas pipes.
The odorant in escaped gas can adsorb or absorb onto or
into walls, masonry and other materials and fabrics in a room.
That will take some of the odorant out of the gas, reducing its
odor intensity.
LP-Gas may stratify in a closed area, and the odor intensity
could vary at different levels. Since it is heavier than air, there
may be more odor at lower levels. Always be sensitive to the
slightest gas odor. If you detect any odor, treat it as a serious leak.
Immediately go into action as instructed earlier.
• Learn to recognize the odor of LP-Gas. Your local LP-Gas
Dealer can give you a “Scratch and Sniff” pamphlet. Use
it to nd out what the propane odor smells like. If you suspect that your LP-Gas has a weak or abnormal odor, call
your LP-Gas Dealer.
• If you are not qualied, do not light pilot lights, perform
service, or make adjustments to appliances on the LPGas system. If you are qualied, consciously think about
the odor of LP-Gas prior to and while lighting pilot lights
or performing service or making adjustments.
• Sometimes a basement or a closed-up house has a musty
smell that can cover up the LP-Gas odor. Do not try to
light pilot lights, perform service, or make adjustments in
an area where the conditions are such that you may not
detect the odor if there has been a leak of LP-Gas.
• Odor fade, due to oxidation by rust or adsorption on walls
of new cylinders and tanks, is possible. Therefore, people
should be particularly alert and careful when new tanks or
cylinders are placed in service. Odor fade can occur in new
tanks, or reinstalled old tanks, if they are lled and allowed
to set too long before relling. Cylinders and tanks which
have been out of service for a time may develop internal
SOME POINTS TO REMEMBER
rust which will cause odor fade. If such conditions are
suspected to exist, a periodic sniff test of the gas is
advisable. If you have any question about the gas odor,
call your LP-Gas dealer. A periodic sniff test of the LPGas is a good safety measure under any condition.
• If, at any time, you do not smell the LP-Gas odorant and
you think you should, assume you have a leak. Then take
the same immediate action recommended above for the
occasion when you do detect the odorized LP-Gas.
• If you experience a complete “gas out,” (the container
is under no vapor pressure), turn the tank valve off
immediately. If the container valve is left on, the container
may draw in some air through openings such as pilot light
orices. If this occurs, some new internal rusting could
occur. If the valve is left open, then treat the container as
a new tank. Always be sure your container is under vapor
pressure by turning it off at the container before it goes
completely empty or having it relled before it is
completely empty.
30067-2-0315Page 4

Operating the Fireplace
CLOSED
Before you start
1. With main electrical power to the replace turned off, install 4
AA sized 1.5V batteries into the remote receiver. The remote
receiver is located inside the replace, mounted to the top of
the blower housing and secured with hook and loop tape. Set
up receiver and remote per instructions on pages 7-10. If you
do not wish to use the factory installed wireless remote and
wish to operate the replace manually, set the switch on the
remote receiver to the “ON” position.
RECEIVER LOCATION
ADJ. LEARN
REMOTE ONOFF
If electrical power is present, the Power light on the front control panel will be illuminated. If the Power light is not illuminated, verify the replace is plugged in and the breaker and
the main power switch are on.
3. Verify the main gas supply to the replace is on. The shutoff
valve should be in the “OPEN” position.
OPEN
2. Verify there is electrical power to the unit. Verify the main
burner switches are in the “OFF” position and turn the main
power switch “ON”.
Main Burner Switches
Main Power Switch
30067-2-0315 Page 5
How to Start the Fireplace
BATTERY COVER SLIDES ON/OFF
LEARN BUTTON
SLIDE SWITCH
OFF/REMOTE/ON
BATTERY
COMPARTMENT
FREQUENCY
ADJUSTMENT
ACCESS HOLE
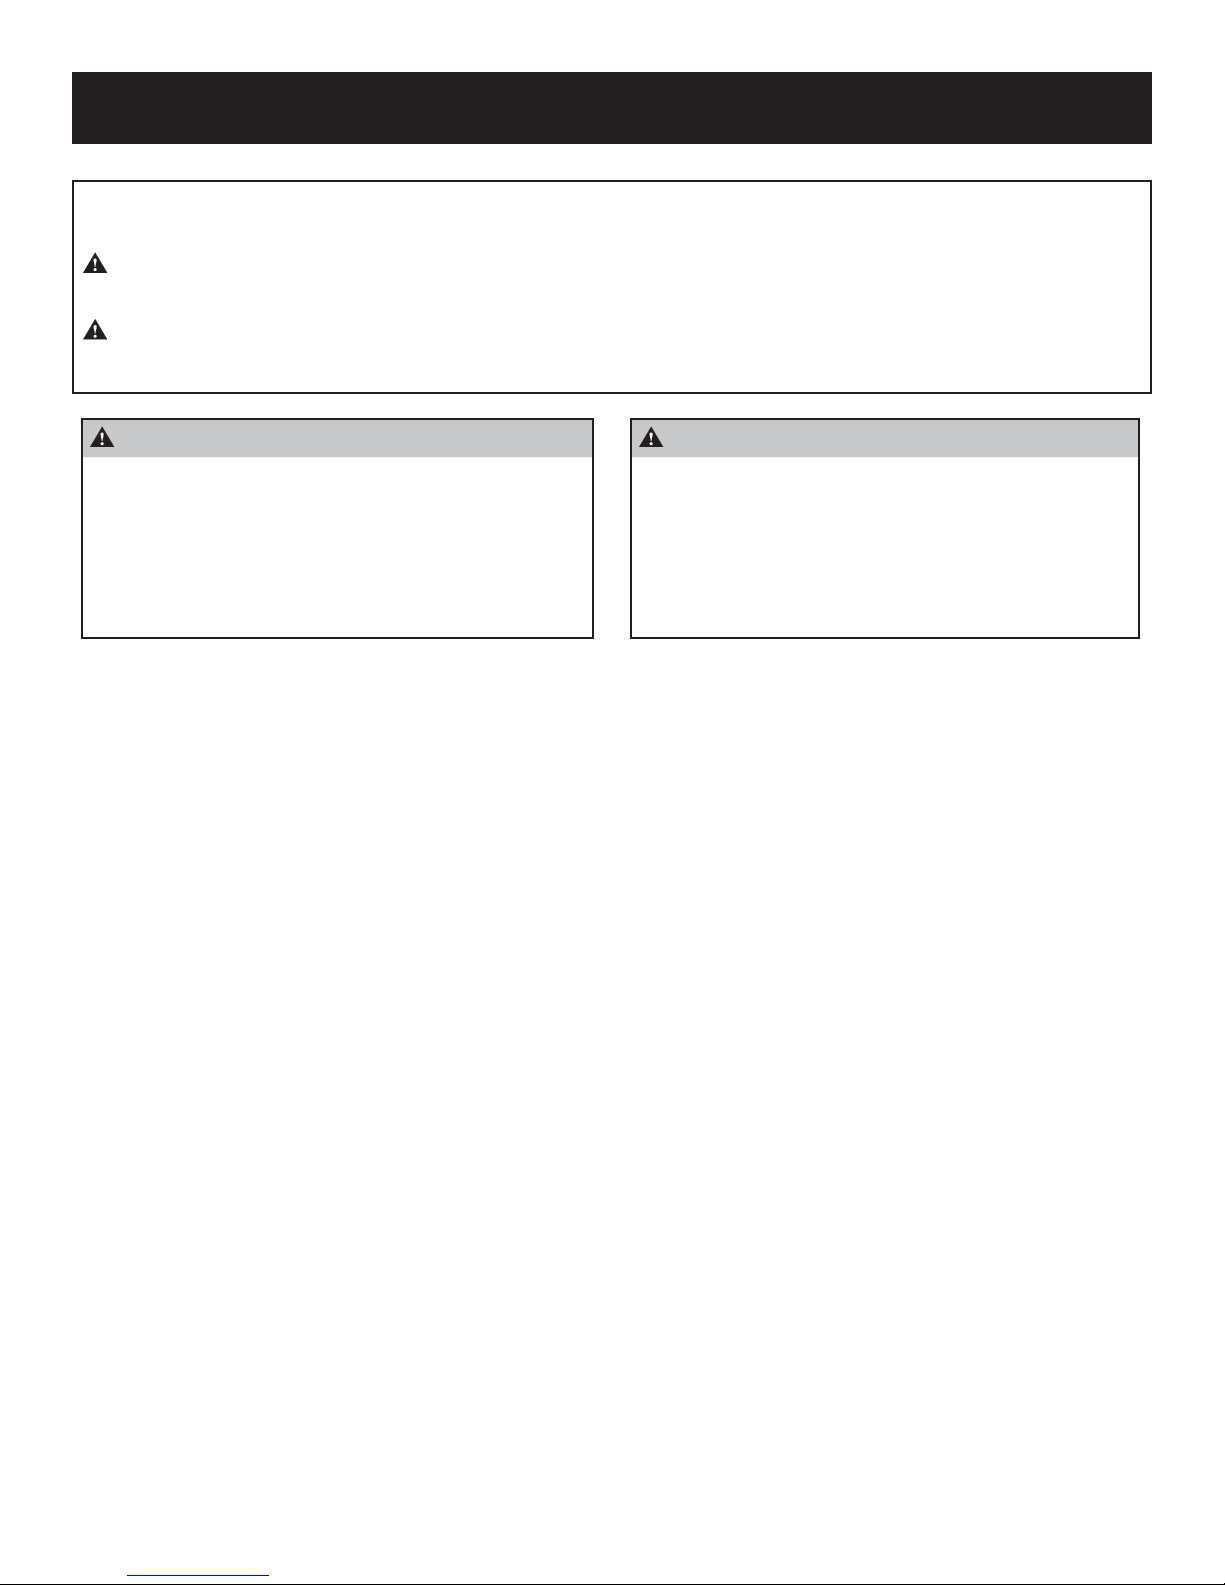
1. Turn burner switches to the “ON” position. Adjust the remote
thermostat to the desired temperature or press “ON” on the
remote (if used). If the remote receiver has been set to “ON”
for manual operation, the startup sequence will begin automatically and both Front and Rear burner lights will begin to
ash.
If it is not desirable to operate both burners, only turn on the
switch for the desired burner. When the startup sequence begins, only the light for the burner selected will begin to ash.
4. If operating both of the replace’s burners, after the rst burner is lit, the second igniter will start to glow red, the burner light
will turn off, and the burner will light. Once the burner is lit, the
light will illuminate steadily.
5. The Blower will activate on low automatically when the replace is warm enough and the low speed blower light will illuminate. The blower will automatically advance to a higher
speed if it is needed, the blower speed will be indicated on the
front control panel.
2. The light for the Exhaust Fan will illuminate as the replace
prepares to ignite.
How to Change Burners – Switching Burners
If the replace is being operated on one burner, and it is desired
to change and operate the other burner, rst turn the other burner
“ON” before turning the original burner “OFF”.
Example: If the front burner is operating and you would like to operate the rear burner instead, rst turn the rear burner switch “ON”,
wait a second, then turn the front burner switch “OFF”. Following
this sequence will speed the change from one burner to the other
and prevent the replace from locking out and requiring a reset.
The table below outlines the input rate of both front and rear burn-
ers.
Model
Front Burner
Input (BTUH)
Bay Window Mantis 9,000 19,000
Fireplace Mantis 13,000 15,000
Rear Burner
Input (BTUH)
3. In a few seconds, one of the igniters will glow red, the corresponding burner light will turn off and the burner will light.
Once the burner is lit, the light will illuminate steadily.
30067-2-0315Page 6

How to Turn the Fireplace Off
To turn the replace off, simply switch the burner switch or switches
to the “OFF” position, turn the remote off, or adjust the temperature
set point down. The burners will instantly go off, but the circulating
blower will still operate until the heater cools off. It is normal for the
blower to turn on and off while it is cooling down.
How to Operate Economy Mode
When operating the replace with the remote thermostat, the remote operation of the front burner my be over-ridden and made to
operate continuously. To activate the Economy Mode, verify the
burner switches are in the “ON” position. Press and release the
red button that is located next to the burner switches. The button
will illuminate indicating that the Economy Mode is active.
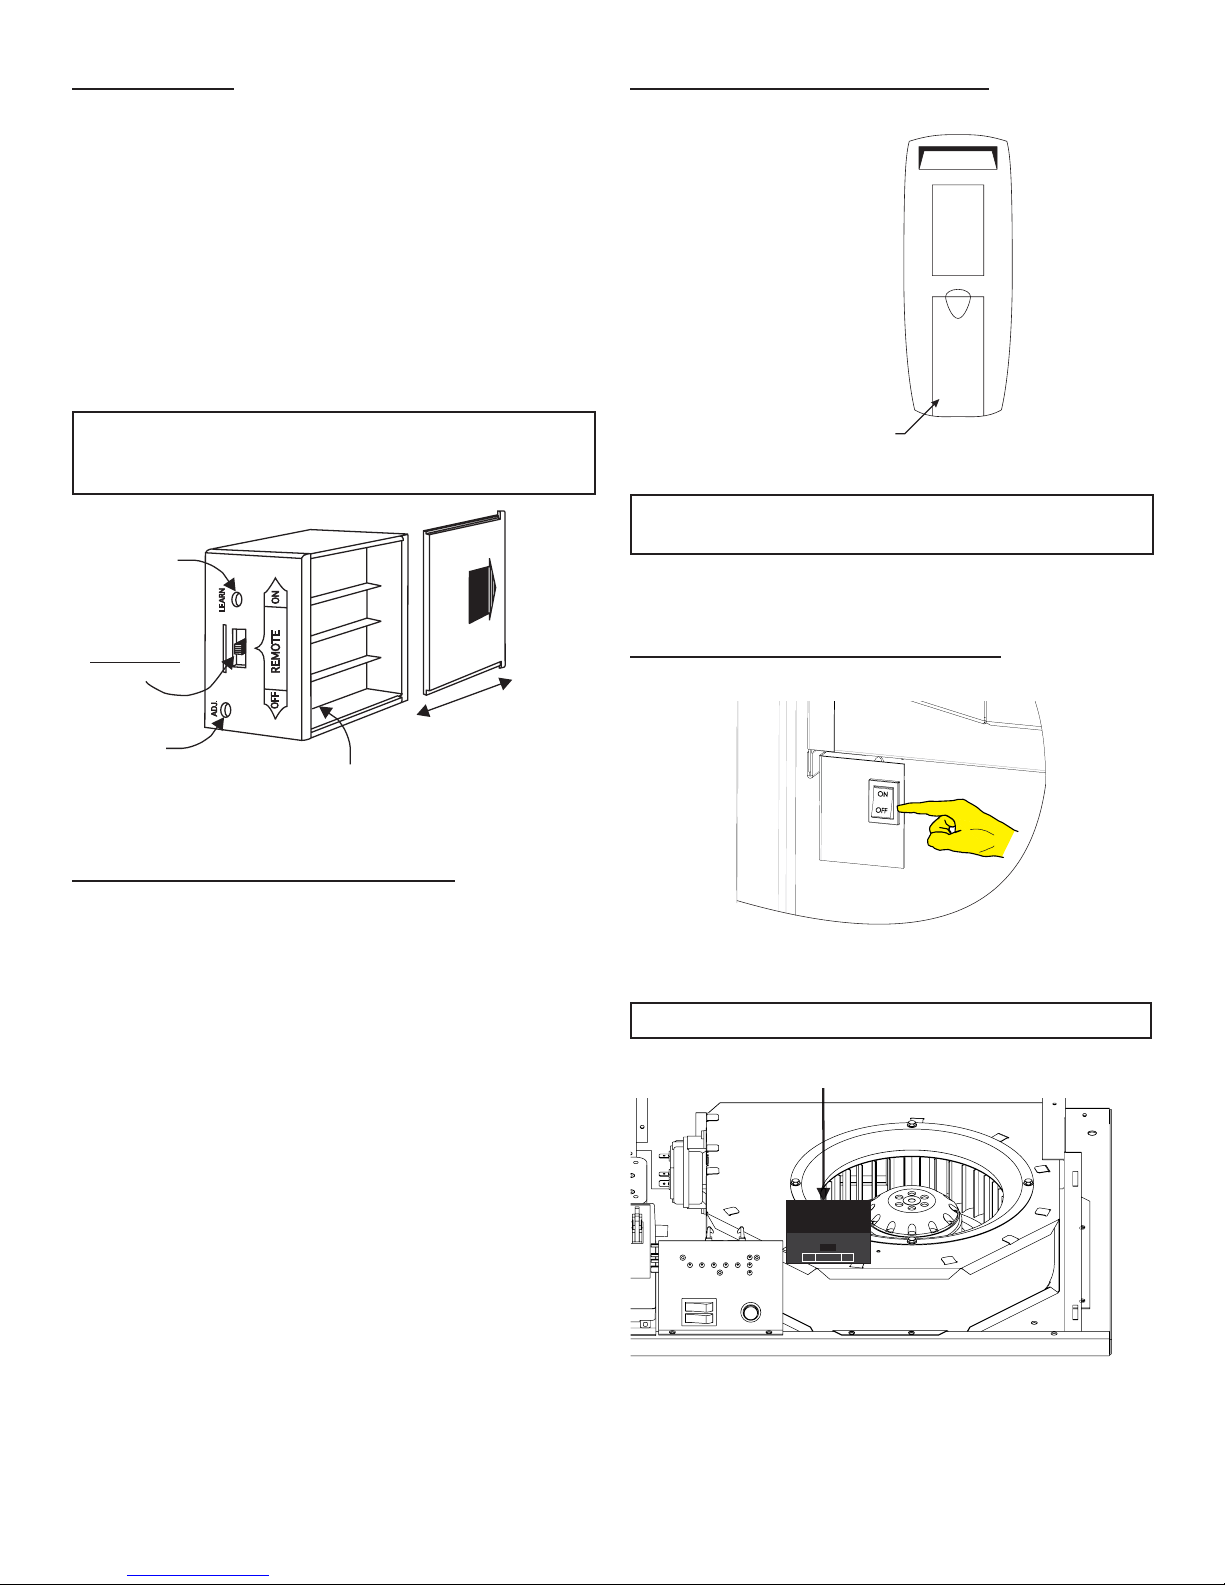
Remote Transmitter and Receiver
The remote control transmitter operates on (2) 1.5V AAA batteries.
It is recommended that ALKALINE batteries be used for maximum
battery life and maximum operational performance.
Remote Buttons
ON Button - Turns replace manually ON.
OFF Button- Turns replace manually OFF.
MODE Button- Changes remote from manual mode to thermostat
mode.
SET Button- Adjusts temperature setting in thermostat mode.
The front burner will activate and will remain on as long as the
button is illuminated and the burner switch remains in the “ON”
position. The rear burner will cycle with the remote.
To deactivate the Economy Mode, press and release the red button. The button will no longer be illuminated, indicating that the
Economy Mode is no longer active.
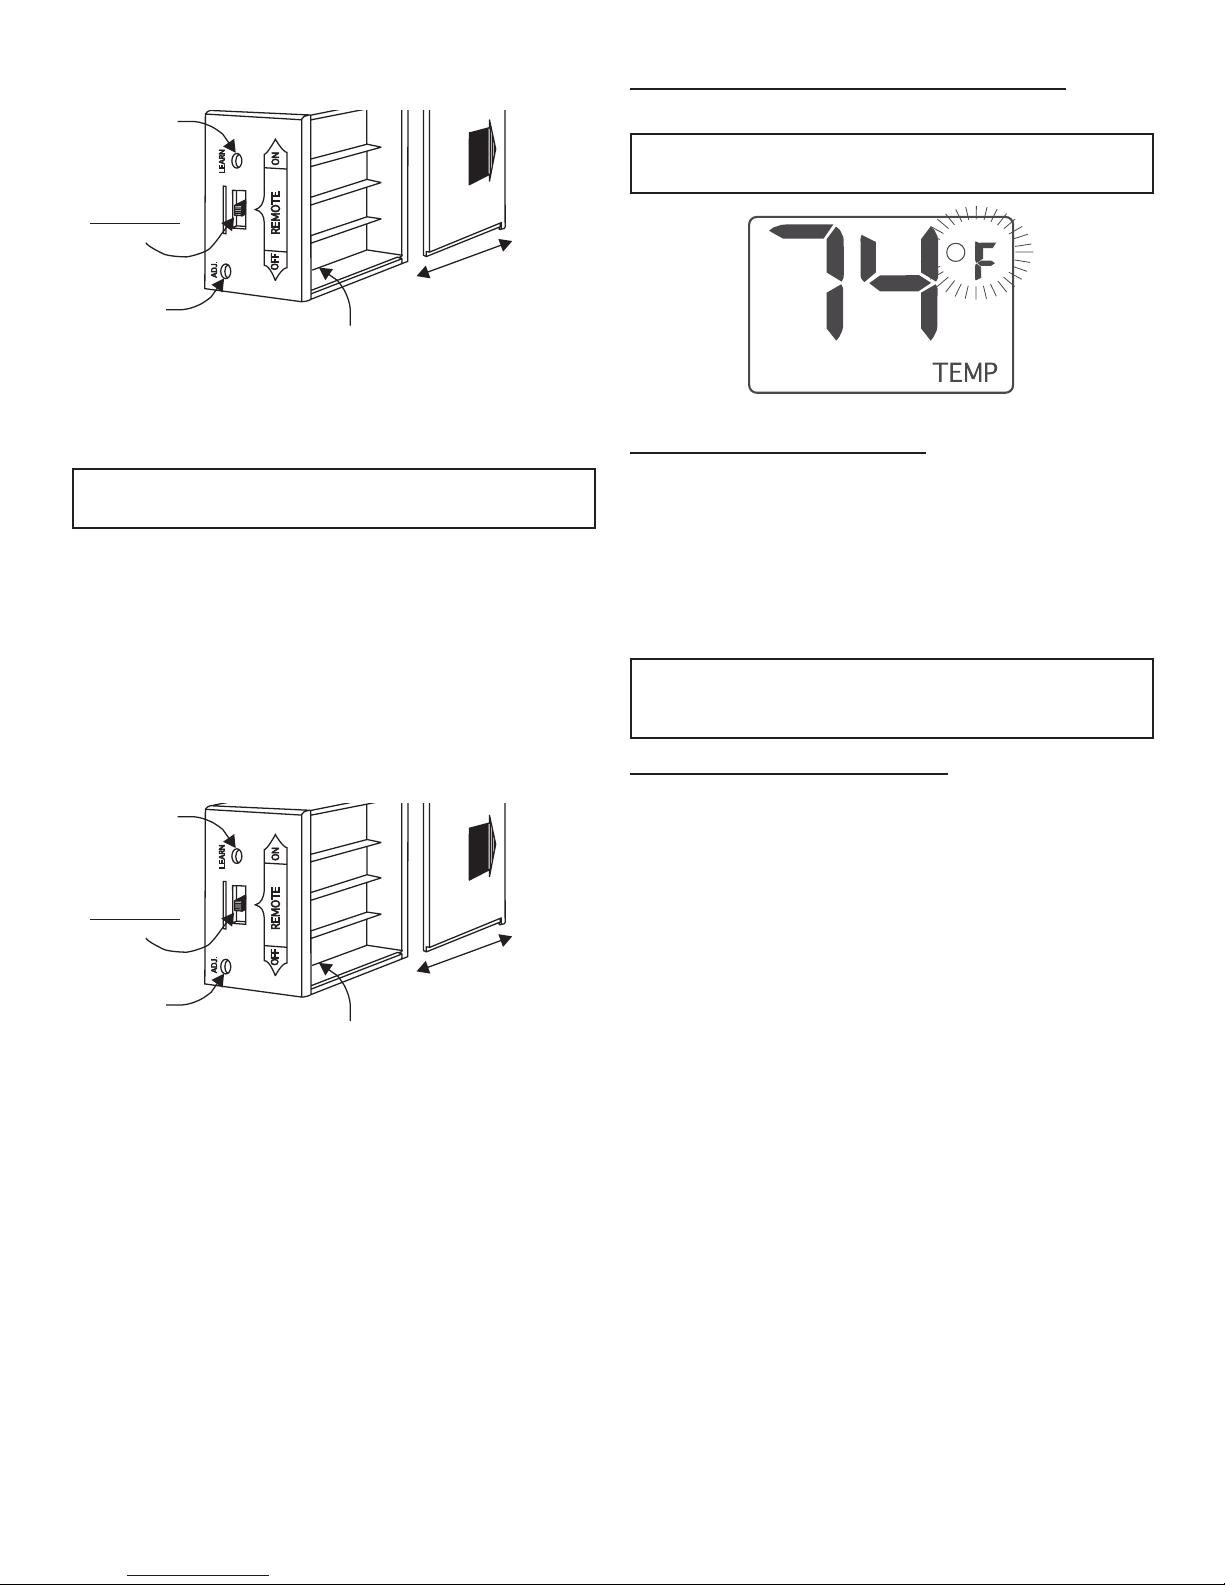
Remote Display
1. DISPLAY Indicates current room temperature.
2. °F OR °C
3. FLAME Indicates burner/valve in operation.
4. ROOM Indicates remote is in Thermostatic mode.
5. TEMP
6. SET
Indicates current temperature units in degrees Fahrenheit or Celsius.
Indicates that display is showing temperature reading.
Appears during the setting of the desired
temperature for the Thermostatic mode.
30067-2-0315 Page 7
Remote Receiver
BATTERY COVER SLIDES ON/OFF
LEARN BUTTON
SLIDE SWITCH
OFF/REMOTE/ON
BATTERY
COMPARTMENT
FREQUENCY
ADJUSTMENT
ACCESS HOLE
BATTERY COMPARTMENT
The remote receiver operates on 4 AA-size 1.5V batteries.
It is recommended that ALKALINE batteries be used for maximum
battery life and performance.
The remote receiver has a 3-position slide switch for selecting the
MODE of operation: ON/REMOTE/OFF
• With the switch in the ON position (toward the LEARN button), the replace will remain on until the switch is placed in
the OFF or REMOTE position, or until the burner switches are
turned off.
• With the switch in the REMOTE position (centered), the replace will operate commands received from the remote.
• With the switch in the OFF position (away from the LEARN
button), the replace is off.
Note: It is suggested that the slide switch be placed in the off
position if you will be away from your home for an extended
period of time.
Replace the Remote Control Batteries
Slide open the battery compartment panel located on the back of
the remote control.
Remove the old batteries and install two AAA sized batteries into
the battery compartment.
Note:
Verify that the batteries are installed in the proper
position.
It is recommended that ALKALINE batteries be used for maximum
battery life and performance.
Replace the Remote Receiver Batteries
Remove the lower louvered panel of the replace and turn the
Main power switch to the “OFF” position.
Remote Setup - Install/Replace Batteries
Both the handheld remote control and the remote receiver (located
inside of the replace) are battery operated. These batteries will
need to be replaced periodically as part of the normal maintenance of the heater.
Lift the remote receiver from its location on top of the blower housing. The remote receiver is held onto the blower housing with hook
and loop tape.
Note:
Do not disconnect the wires.
RECEIVER LOCATION
ADJ. LEARN
REMOTE ONOFF
30067-2-0315Page 8
Slide open the battery compartment panel located on the bottom
BATTERY COVER SLIDES ON/OFF
LEARN BUTTON
SLIDE SWITCH
OFF/REMOTE/ON
BATTERY
COMPARTMENT
FREQUENCY
ADJUSTMENT
ACCESS HOLE
BATTERY COVER SLIDES ON/OFF
LEARN BUTTON
SLIDE SWITCH
OFF/REMOTE/ON
BATTERY
COMPARTMENT
FREQUENCY
ADJUSTMENT
ACCESS HOLE
of the remote receiver.
Remote Setup - Setting the Temperature Units
To change the temperature units press the ON key and the OFF
key on the remote at the same time.
Note: The factory setting for the temperature units is degrees
Fahrenheit.
Remove the old batteries and install four AA sized batteries into
the battery compartment.
Note:
Verify that the batteries are installed in the proper
position.
It is recommended that ALKALINE batteries be used for maximum
battery life and performance.
It may be necessary to program the remote receiver to LEARN
the security code of the transmitter upon initial use, if batteries
are replaced, or if a replacement transmitter is purchased from
your dealer. When matching security codes, be sure the slide button on the receiver is in the REMOTE position; the code will NOT
“LEARN” if the slide switch is in the OFF position. Program the
remote receiver to LEARN a new security code by pushing in the
LEARN button on the top of the remote receiver and then pressing
any button on the transmitter.
Starting the Fireplace - Remote
The remote control has two modes for operating the replace;
Manual and Thermostatic. When operating in Manual Mode, the
replace can be turned on/off manually. When operating in Thermostatic Mode, you set the desired room temperature and the remote will automatically turn the replace on/off to achieve the set
temperature.
To operate the replace with the remote, the switch on the remote
receiver must be set to “Remote” and both burner switches must
be in the “ON” position.
Note: The remote receiver emits one beep when it receives an
ON or OFF command manually, but no beep when cycling on
and off automatically in THERMOSTAT mode.
Remote Operation - Manual Mode
To turn the replace on press the ON key on the remote. The replace will begin the lighting sequence and the remote LCD screen
will show ON. After 3 seconds the LCD screen will default to display room temperature and the ame icon will appear.
To turner the replace off, press the remote’s OFF key. The replace will shut off and the LCD screen will show OF, after 3 seconds the LCD screen will default to display room temperature.
A change in the receiver’s beeping pattern indicates the transmitter’s code has been programmed into the receiver.
If you are unsuccessful in matching the security code on the rst
attempt, wait 1 - 2 minutes before trying again.
30067-2-0315 Page 9
 Loading...