


Emphaser ES112A User Manual
CONNECTION
Disassemble the main housing of the connector plug, by removing the two screws
from the black bottom part of the housing, using a screwdriver. Secondly, unscrew
the metal clamp in the black bottom part of the plug and connect the +12V power
cable, the chassis ground power cable and the remote wire to the gold plated screw
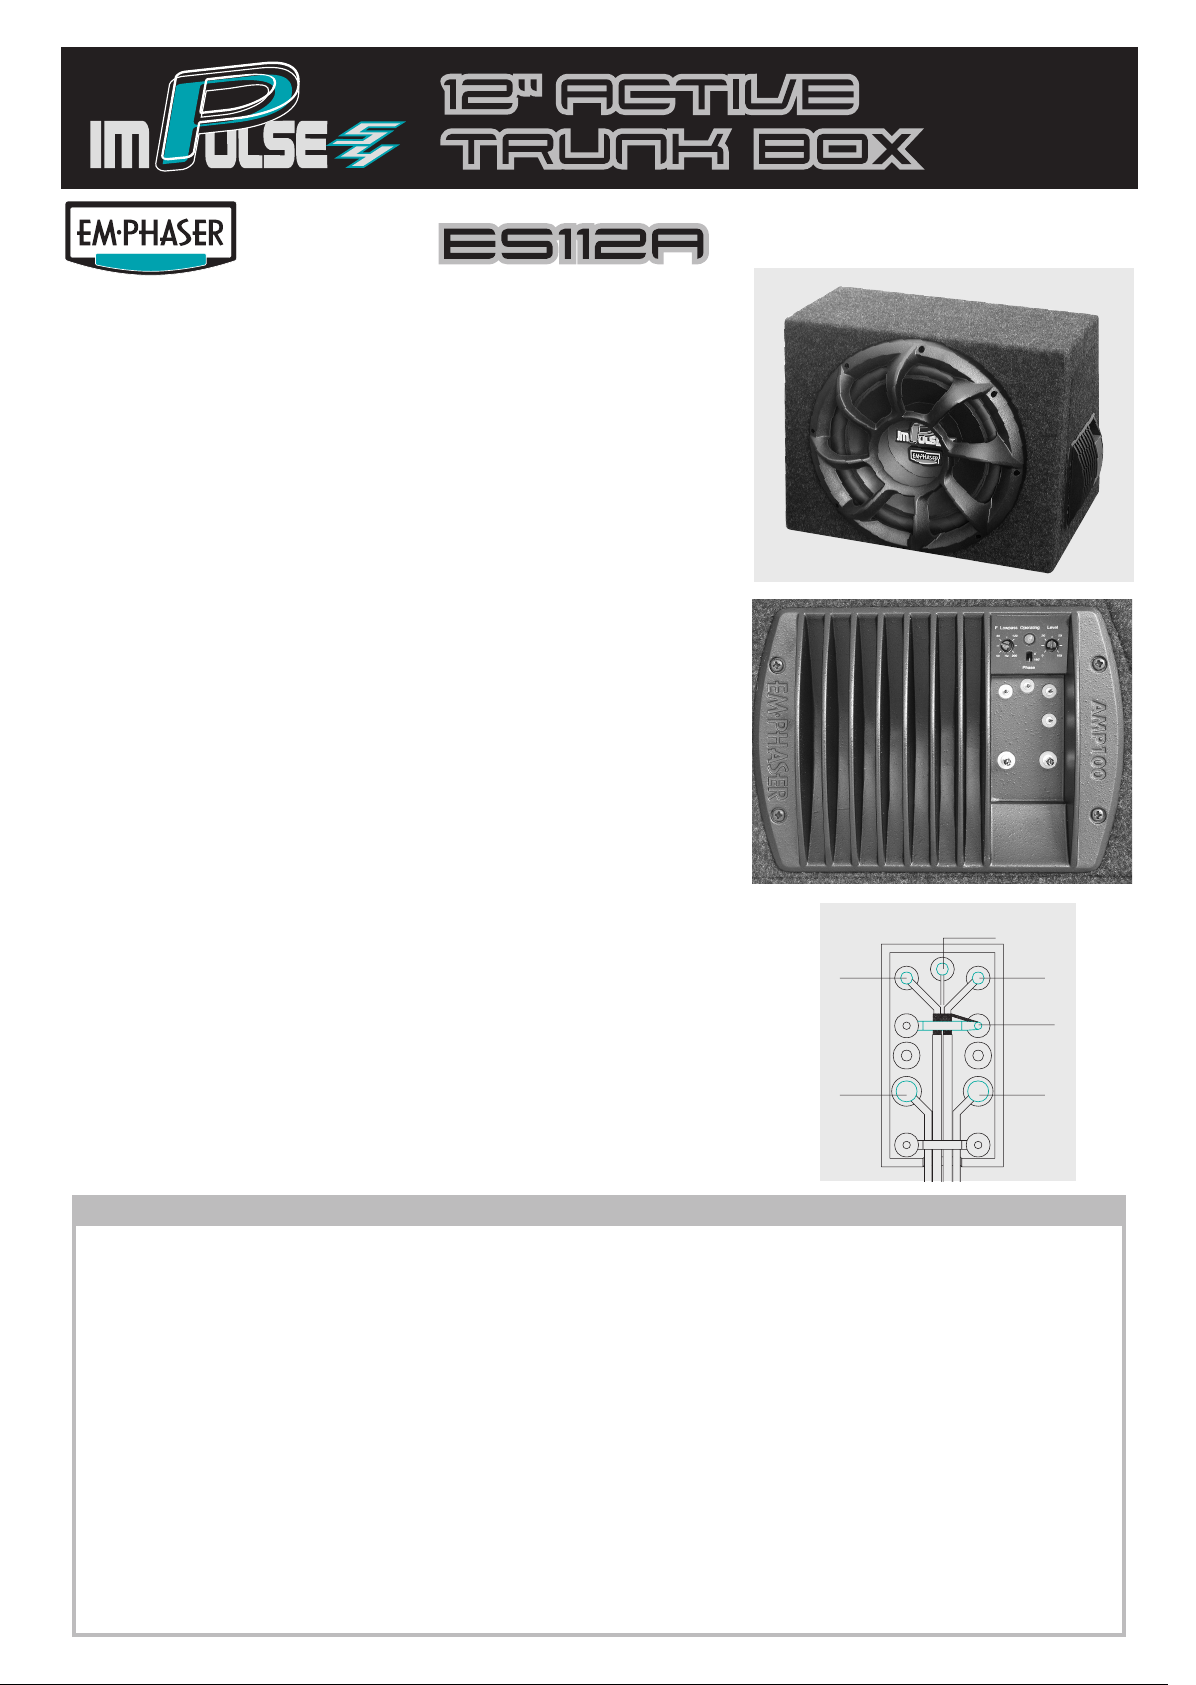
terminals binding posts. Please follow the provided schematic connection setup drawing displayed at the right. You now have to cut off both RCA plugs from your stereo interconnect cable and connect the ends to the screw terminals binding posts terminals indicated with "Left", "Right" and "Ground". If you do not want to cut your
RCA interconnect cable, you can also use and modify a Y-adapter (2F/1 M) to fit
this purpose. Please note: This amplified subwoofer model will only work properly
by using an unfiltered stereo line-out signal from your head-unit. The power output
leads from the integrated amplifiers of a given head-unit must NOT be used. You
can now re-assemble the main-plug, and insert it into the amp-module.
SETTINGS
Bass, treble and loudness functions of your head-unit must be set to their 0/ neutral
position, before you attempt to find out the correct crossover frequency and the
absolute acoustical phase of your ES112A amplified subwoofer. The knob indicated
with "F Lowpass" should initially be set at 85 Hz (10 o’clock position), to get started. You can now turn the "Level" knob (input gain) clockwise, until you hear a good
and solid reproduction of bass sounds on the driver seat. The next step is the phase
adjustment procedure: The 2position slide switch called "Phase", allows to reverse
the acoustical phase of the bass frequencies reproduced by your trunk box sub. The
position which gives you more bass in the 75 to 100 Hz region, is correct. Use a
small screwdriver, to determine the in-phase position, by sliding the tiny pin switch
up and down. Finally, you can fine-tune the crossover frequency and the input gain
level, to match your preferred bass intensity and tonal quality. This tweaking will
need some time, but is well worth the efforts. As a rule of thumb, a lowpass frequency setting too low, will give you an unprecise and infra-bass heavy sound, while
a setting too high, will tend to produce droning bass. We now wish you lots of
listening pleasure!!!
RCA
Left
Batt
Amp
Remote
RCA
Right
RCA
Ground
Batt
TECHNICAL SPECIFICATIONS
ES112A
Rated Power Output (13.8V, 4 Ohms, THD = 0.1%) 120 Watts RMS
Damping Factor (4 Ohms) 300
Input Sensivity 350 mV – 4 V
Low-Pass Cross-Over Slope 12dB/Oct.
Variable Cross-Over Frequency 50 – 200 Hz
Switchable Phase 0 – 180°
Frequency Response 20 – 180 Hz
Dimensions HxWxD 355 x 445 x 350 mm
EMPHASER Inc., Wyoming, Michigan, U.S.A.
Exclusive distribution for Europe & Asia
ACR, Brändli & Vögeli AG
Bohrturmweg 1, CH-5330 Zurzach, Switzerland
Phone: (+41) (0)56 - 269 64 64,
Fax: (+41) (0)56 - 269 64 65
Web: www.acr.ch
ANSCHLUSS
Ziehen Sie den grünen Stecker vom Amp-Modul ab. Entfernen Sie den grünen
Steckeroberteil durch herausdrehen der beiden Halteschrauben im schwarzen
Steckerunterteil. Demontieren Sie anschliessend die Zugentlastung und schliessen
2
Sie die abisolierten 10mm
Masse- und 12 Volt Powerkabel, sowie die
Remoteleitung an den drei dafür vorgesehenen Schraubklemmen an. Die nebenstehende Grafik dient als Referenz zum sicheren Anschluss. Schneiden Sie beide
Cinch-Stecker des NF-Kabels ab und schliessen die auf korrekte Länge abisolierten
Enden gemäß der Anschlussskizze an. Anstelle die Cinch-Stecker der NF-Leitung
abzuzwacken, kann auch ein Y-Adapter (mit zwei weiblichen und einem männlichen Stecker) für diesen Zweck konfiguriert werden. Bitte beachten Sie, daß nur
ungefilterte NF Line-out Signale vom Radio optimale Resultate garantieren, die integrierten Verstärkerausgänge dürfen auf keinen Fall an das Amp-Modul angeschlossen werden! Montieren Sie abschliessend die Zugentlastung und den Deckel,
nun können Sie den Stecker am Amp-Modul anschliessen.
EINSTELLUNGEN
Setzen Sie alle Klangregler (Treble / Bass) an Ihrem Head-Unit in die
Neutralposition und deaktivieren Sie die Loudnessfunktion. Stellen Sie den
"F Lowpass" Regler am Amp-Modul auf ca. 85 Hz (~ 10 Uhr Stellung) und drehen
Sie den "Level" Regler soweit auf, bis sich ein gutes Bassfundament mit genügend
Druck einstellt. Schalten Sie versuchsweise mit einem kleinen spitzen
Schraubenzieher den mit "Phase" bezeichneten Schiebeschalter um. Die Stellung in
welcher der obere Bassbereich lauter klingt, ist richtig. In den allermeisten Fällen ist
dies in der 0° Stellung der Fall. Nun können Sie durch die Feineinstellung des
Basspegels am "Level" Regler und Veränderung der Trennfrequenz am "F Lowpass"
Regler, den Klang im Bassbereich Ihren Wünschen anpassen. Dabei führt eine zu
tief eingestellte Lowpass Trennfrequenz zu einem unkonturierten und tiefbass lastigen Klang, während eine zu hohe Trennfrequenz normalerweise eine starke
Dröhnneigung erzeugt. Wir wünschen Ihnen viel Spass mit Ihrem Subwoofer von
EMPHASER.
Amp
Remote
Cinch
Links
Batt
Cinch
Rechts
Cinch
Masse
Batt
WARRANTY CONDITIONS
GARANTIE: 2 JAHRE
Garantie-Einschränkungen
Nicht unter Garantie fallen Schäden infolge von:
1. Überlastung der Lautsprecher durch zu hohe oder verzerrte Verstärkerleistung etc.
2. schädlichen Einwirkungen von übermäßiger Feuchtigkeit, Flüssigkeiten, Hitze, Sonneneinstrahlung oder übermäßiger Verschmutzung.
3. mechanischer Beschädigung durch Unfall, Fall oder Stoss; Schäden
durch nicht autorisierte Reparaturversuche oder nicht durch den Hersteller ausdrücklich autorisierte Modifikationen.
Die Garantie dieses Produkts bleibt in jedem Fall auf die Reparatur bzw.
den Ersatz (Entscheidung beim Hersteller) des jeweiligen EMPHASERProdukts beschränkt. Schäden durch unsachgemäße Verpackung oder
Transportschäden werden nicht durch diese Garantie gedeckt. Jeder
über diese Garantie-Erklärung hinausgehende Anspruch und jede
Haftung für direkte oder indirekte Folgeschäden werden ausdrücklich
abgelehnt.
LIMITED WARRANTY: 24 MONTHS
Warranty Limitations
This warranty does not cover any damage due to:
1. Speaker overload due to excessive or distorted amplifier power etc.
2. Exposure to excessive humidity, fluids, heat, direct sunrays or
excessive dirt or dust.
3. Accidents or abuse, unauthorized repair attempts and modifications not explicitly authorized by the manufacturer
This warranty is limited to the repair or the replacement of the defective
product at the manufacturer´s option and does not include any other
form of damage, whether incidential, consequential or otherwise.
This warranty will not cover any loss during transportation, transport
costs or any other damage caused by transport or shipment of the
product.