


EM6330

EM6330
CamLine Pro Pan/Tilt Full HD IP camera

2 | ENGLISH
EM6330 – CamLine Pro Pan/Tilt Full HD IP
camera
Table of contents
1.0 Introduction ........................................................................................................... 3
1.1 Packing contents ............................................................................................... 4
1.2 Requirements to access the camera. ................................................................. 4
1.3 Hardware components. ...................................................................................... 4
2.0 Installing the camera ............................................................................................. 6
2.1 micro SD-Card installation ................................................................................. 6
2.2 Mounting the camera on the wall ....................................................................... 6
2.3 Connecting the camera to your network using a network cable .......................... 6
2.4 Installing the CamLine Pro App on an Apple/Android device .............................. 7
2.5 Installing/removing the camera in the APP on Apple/Android device .................. 8
2.5.1 Delete the camera from the camera list ...................................................... 8
2.5.2 Remove the video stream from the camera overview in the main screen .... 9
2.6 Installing the software and camera on a PC or notebook (Windows). ................. 9
2.7 Adding the camera to a wireless network ......................................................... 10
2.7.1 Connecting to Wi-Fi using the WiFi smart configuration. ............................10
2.7.2 Connecting to Wi-Fi using the App. ............................................................10
2.7.3 Connecting to WiFi using the PC utility (windows). ....................................11
3.0 Viewing images ................................................................................................... 14
3.1 On your smartphone/tablet (Android, iPhone, iPad) ......................................... 14
3.2 On your PC (Windows) in a remote location. ................................................... 14
4.0 CamLine Pro for iPhone/iPad/Android ................................................................. 14
4.1 The Layout of CamLine Pro ............................................................................. 14
4.2 Menu of the app............................................................................................... 15
4.3 Overview and control of the camera ................................................................ 16
4.4 Settings of the camera ..................................................................................... 17
4.4.1 Select a different camera ...........................................................................17
4.4.2 View recordings stored on the SD-card ......................................................18
4.4.3 View recordings stored on the locally .........................................................18
4.4.4 Remove camera from overview .................................................................18
4.4.5 Camera settings ........................................................................................19
4.5 Camera settings .............................................................................................. 19
4.5.1 Reconnect .................................................................................................19
4.5.2 Remove this device ...................................................................................19
4.5.3 Reboot this device .....................................................................................20
4.6 Advanced settings ........................................................................................... 20
4.6.1 Camera password .....................................................................................20
4.6.2 Time zone settings ....................................................................................21
4.6.3 WiFi ................................................................ ...........................................21
4.6.4 Alarm settings ............................................................................................22
4.6.5 FTP settings ..............................................................................................24

3 | ENGLISH
4.6.6 Mail settings ..............................................................................................25
4.6.7 SD card settings ........................................................................................26
5.0 CamLine Pro PC software ................................................................................... 27
5.1 The overview of the CamLine Pro PC software ................................................ 27
5.2 Software settings ................................................................ ............................. 28
5.2.1 Software settings ................................ ....................................................... 28
5.2.2 Config manager .........................................................................................28
5.2.3 User manager ............................................................................................28
5.2.4 Recording manager ...................................................................................28
5.2.5 Alarm manager ..........................................................................................28
5.3 Camera settings .............................................................................................. 28
5.3.1 UID ............................................................................................................28
5.3.2 Recording ..................................................................................................29
5.3.3 Alarm .........................................................................................................30
5.3.4 WiFi setting ................................................................................................31
5.3.5 Date/Time ..................................................................................................31
5.3.6 Device settings ..........................................................................................32
5.4 Playback local recordings ................................................................................ 36
5.5 Pan/Tilt ............................................................................................................ 38
6.0 The webpage of the camera ................................................................................ 38
6.1 Login by Web browser ..................................................................................... 38
6.2 The layout of CamLine Pro .............................................................................. 39
6.3 FTP setting ................................ ................................................................ ...... 40
6.4 Alarm settings .................................................................................................. 40
6.5 System settings ............................................................................................... 41
7.0 Restore factory settings ....................................................................................... 41
8.0 Upgrade Device Firmware .................................................................................. 41
9.0 Frequently Asked Questions and other related information .................................. 42
10.0 Service and support ........................................................................................... 42
11.0 Warning and points of attention ......................................................................... 42
12.0 Warranty conditions ........................................................................................... 44
1.0 Introduction
Congratulations with the purchase of this high-quality Eminent product! This product
has undergone extensive testing by Eminent’s technical experts. Should you
experience any problems with this product, you are covered by a five-year Eminent
warranty. Please keep this manual and the receipt in a safe place.
Register your product now on www.eminent-online.com and receive product updates!
4 | ENGLISH
1.1 Packing contents
The following parts need to be present in the packing:
EM6330
Power supply
Quick install guide
Network cable
Mounting bracket with screws and plugs
Window sticker
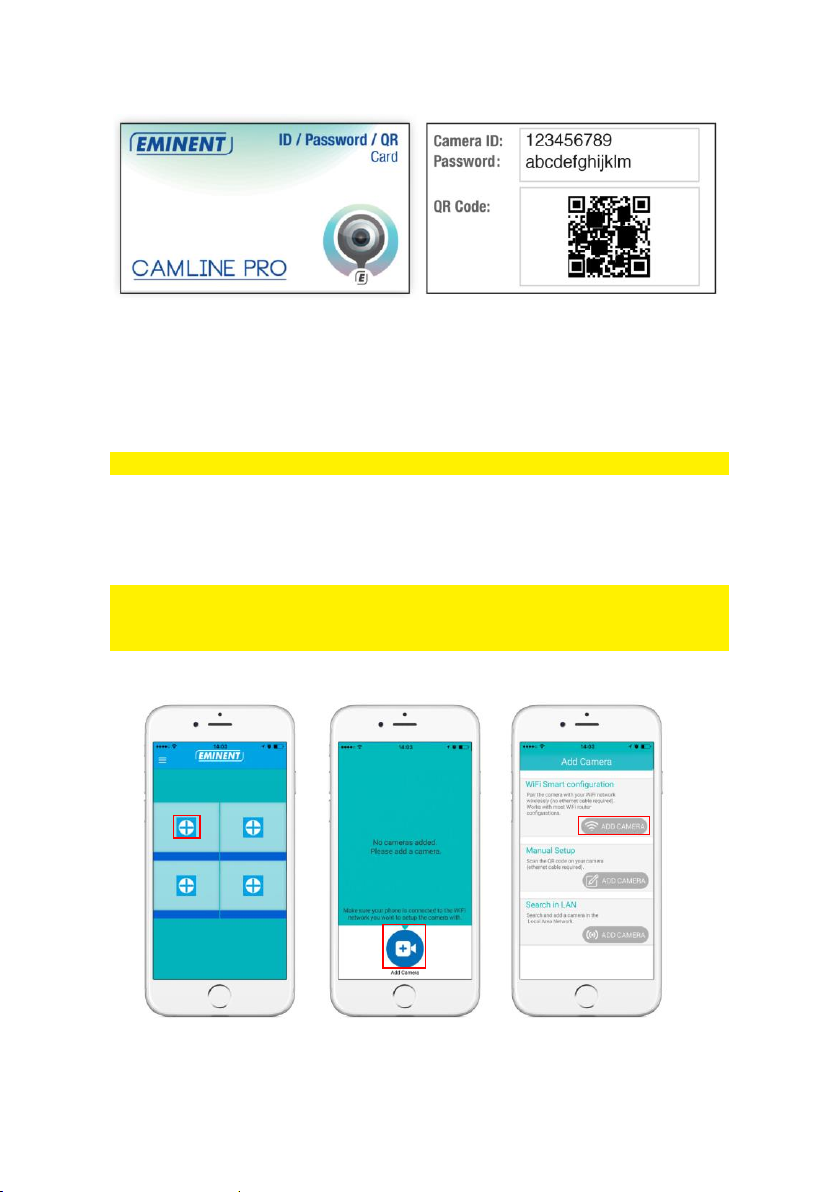
ID/Password card
1.2 Requirements to access the camera.
It is very easy to access the video images of the EM6330 on your smartphone, tablet
or PC. You only need the ID or QR code that is displayed on your bottom label and
download the application for your device. You do not need to remember or setup the
configuration of your modem/router to be able to access the camera.
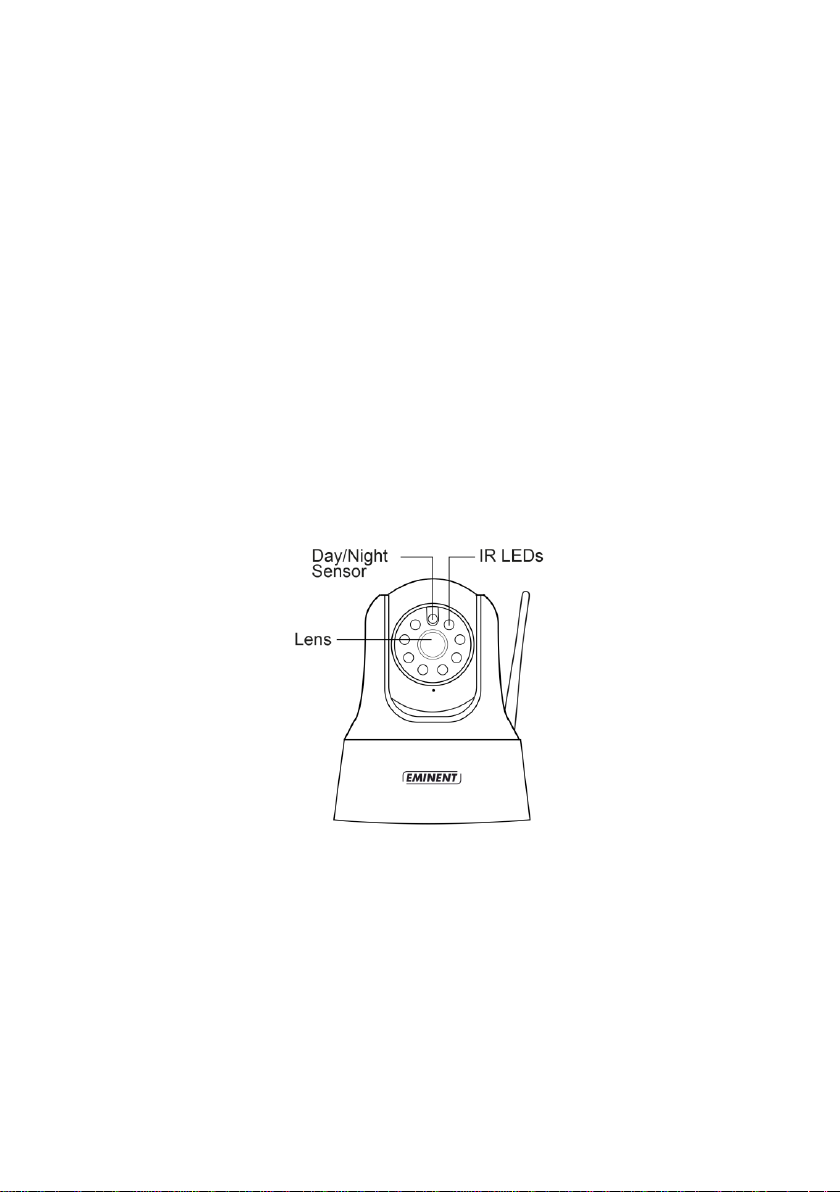
1.3 Hardware components.
The major components on the front panel of the EM6330 are:
1. Lens – the lens is inside the camera body and the focus of the lens is fixed, you
do not need to spend time to adjust the focus.
2. IR LED – for the Infra-Red lighting of the night mode usage.
3. Day/Night sensor – sensor for day/night detection

5 | ENGLISH
The major components on the back panel of the EM6330 are:
1. Power jack – this is the place to plug in the power adapter. The power needed for
this EM6330 is 5V/2A, please make sure you are using the correct power adapter.
2. Microphone – for receiving the audio/voice.
3. Micro SD-Card reader
4. WiFi antenna
5. Ethernet jack – this is the place to plug in the RJ45 Ethernet cable.
6. Reset button – this is the button to reset the EM6330 to default factory settings.
You need to use a small stick like pencil or tooth stick to press the reset button for
more than 15 seconds to enable the reset function. Please refer to section 7.0 for
more details.
7. Internal Speaker
The major components on the bottom of the EM6330 are:
1. Bracket screw – this is the position to screw in the bracket of the EM6330. With
the bracket, you can install the EM6330 on the wall.

6 | ENGLISH
2.0 Installing the camera
A few short and simple steps are necessary to connect and assign the camera, and to
enjoy the use of the camera. Use the following steps to connect the camera.
2.1 micro SD-Card installation
The video streams can be recorded and be stored onto an internal micro SD-Card.
Insert a micro SD-Card in the micro SD-card reader at the back of the camera.
2.2 Mounting the camera on the wall
1. Once the camera is connected correctly with your computer, you can mount the
camera on a wall or ceiling.
2. Use the mounting stand to mark the holes at the location where you want to mount
the camera.
3. Drill the holes and fill the holes with the supplied plugs.
4. Mount the bracket stand to the wall or ceiling using the supplied screws.
5. Mount the camera on the bracket.
6. Connect the power supply into the wall socket and connect the power tip to the
camera.
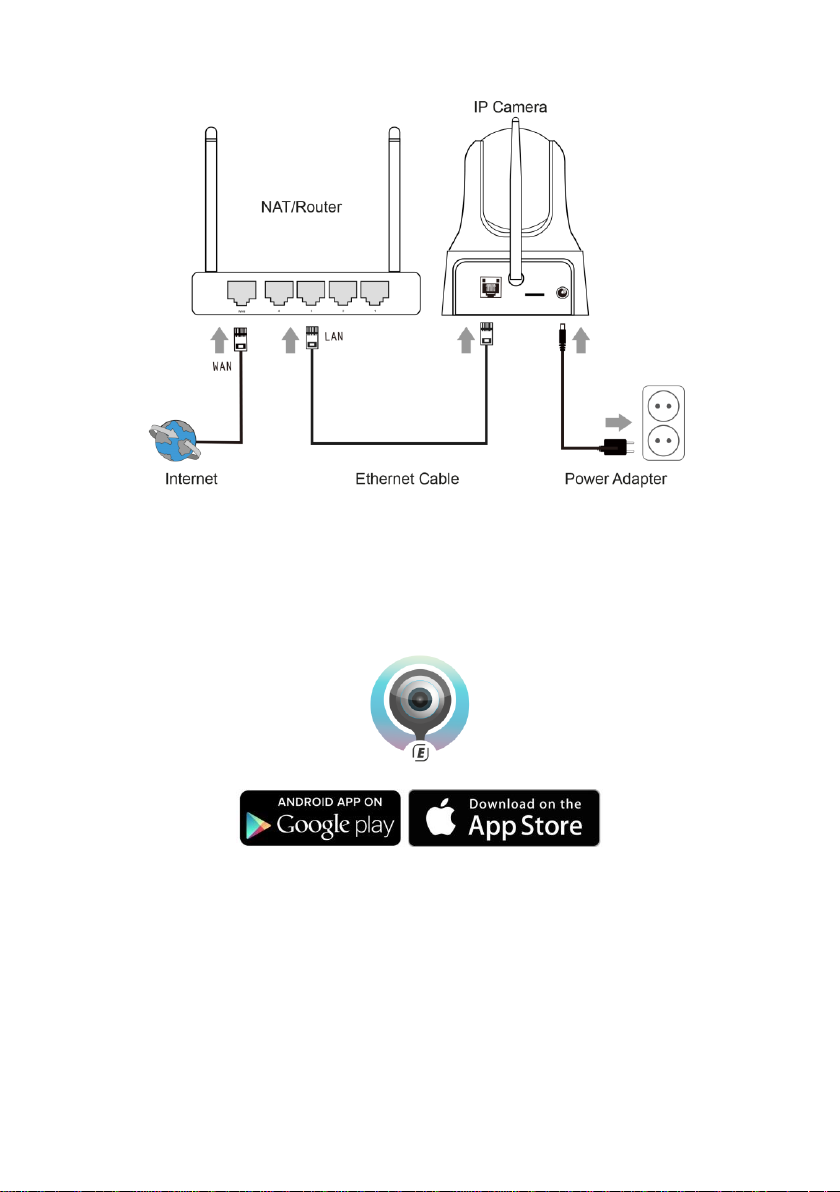
2.3 Connecting the camera to your network using a
network cable
This step can be skipped if you wish to configure the camera using the WiFi smart
config.
We advise to connect the camera first with a network cable. Once the camera works
correctly, you can use your wireless network.
1. Connect the camera to a power outlet using the supplied power adapter.
2. Connect the camera to your router or switch using the supplied network cable.
7 | ENGLISH
2.4 Installing the CamLine Pro App on an Apple/Android
device
The EM6330 can be controlled and configured by using the “CamLine Pro” APP.
Search for the CamLine Pro APP in the Apple App-store or in the Google Play Store.
Download and install the APP on your phone/tablet.
8 | ENGLISH
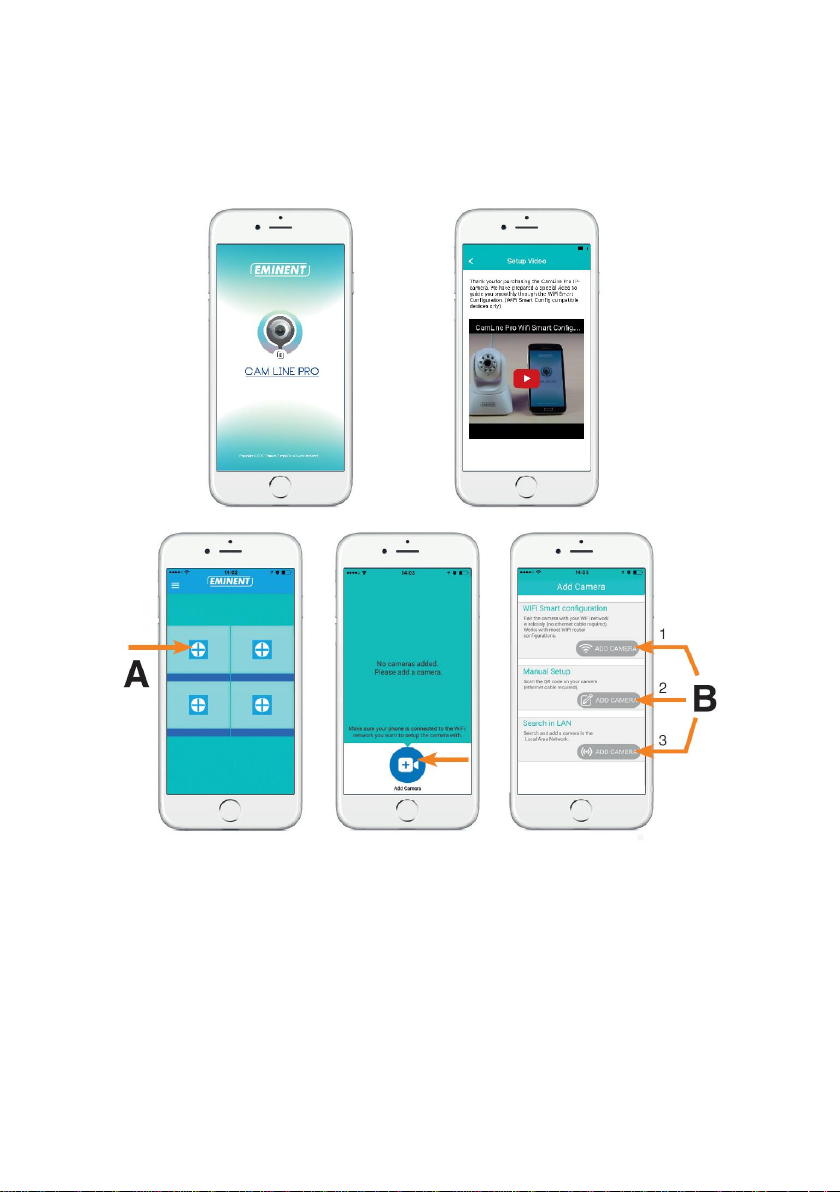
2.5 Installing/removing the camera in the APP on
Apple/Android device
1. Open “CamLine Pro”.
2. Select the “+” (A).
3. Select “Add camera”.
4. Choose for option 1,2 or 3 (B) the option that matches the best with your setup
situation and press “Add camera”.
5. Follow the instructions on the screen
6. Press “Add” to add the camera.
2.5.1 Delete the camera from the camera list
On iOS:

9 | ENGLISH
1. To delete a camera from the camera list. Press the menu button in the upper left
corner and select “Camera list”.
2. Slide the camera you wish to delete from right to left, the “Delete” button will
appear.
3. Press the “Delete” button to remove the camera from the list.
On Android:
1. To delete a camera from the camera list. Press the menu button in the upper left
corner and select “Camera list”.
2. Press “Edit”.
3. A button will appear next to the camera.
4. Press the button next to the camera to delete the camera from the camera list
2.5.2 Remove the video stream from the camera overview in the main screen
When you wish to remove a video stream from the main screen press the icon
from the video stream you wish to remove and press to remove the video stream
from the main screen.
2.6 Installing the software and camera on a PC or
notebook (Windows).
Before you can view the video of the camera, you need to install the software
”CamLine Pro”.
1. Download the PC software from our website www.eminent-online.com
2. Unzip the file on your windows PC
3. Click the file setup.exe
4. Run the wizard to install the application CamLine Pro.
5. The application is installed on the PC
6. Open “CamLine Pro”. (If prompted with a screen about the firewall click “always
allow”).
7. A pop-up screen will appear to enter the user credentials. Default user = admin,
default password = admin
8. Click the icon to add the camera
9. Give the camera you wish to add a name for example “Living room”.
10. To add the camera manually enter the camera ID located on the ID/password card
(proceed with step 13).
11. If the computer and the EM6330 is connected to the same network, the Camera
can be added by clicking “LAN search”.
12. The ID of the camera located on the Camera ID card or the bottom label will
appear in the camera list and can now be selected.
13. Press “OK”.
14. The default password entered by the PC software is “ipcam” select the password
field and change the password to match the password located on the Camera ID
10 | ENGLISH
card and press “OK”.
2.7 Adding the camera to a wireless network
There are 3 options to connect the EM6330 to your wireless network. First option is to
configure the settings by using the WiFi smart configuration, the APP settings and the
third option with the PC (Windows) software settings.
Note: The device will reboot if necessary followed by calibration of the camera.
2.7.1 Connecting to Wi-Fi using the WiFi smart configuration.
This function is only available when the camera is used for the first time or after a
factory reset.
Note: Make sure your smartphone/tablet is connected to the same WiFi network as
the WiFi you wish to connect the camera too (make sure this is a 2,4GHz WiFi
network)
Open the APP “CamLine Pro”.
Follow the instructions on the screen.
2.7.2 Connecting to Wi-Fi using the App.
1. Ensure the camera is connected to the network with a Ethernet cable.
1 2 3
11 | ENGLISH
2. Start the App “CamLine Pro”.
3. Make sure the camera you wish to configure to connect to the WiFi is already
added to the camera list and is already listed in the camera overview.
4. Open the menu of the camera by pressing the button in the camera you wish
to add to the WiFi network.
5. Press .
6. Select “Advanced settings”.
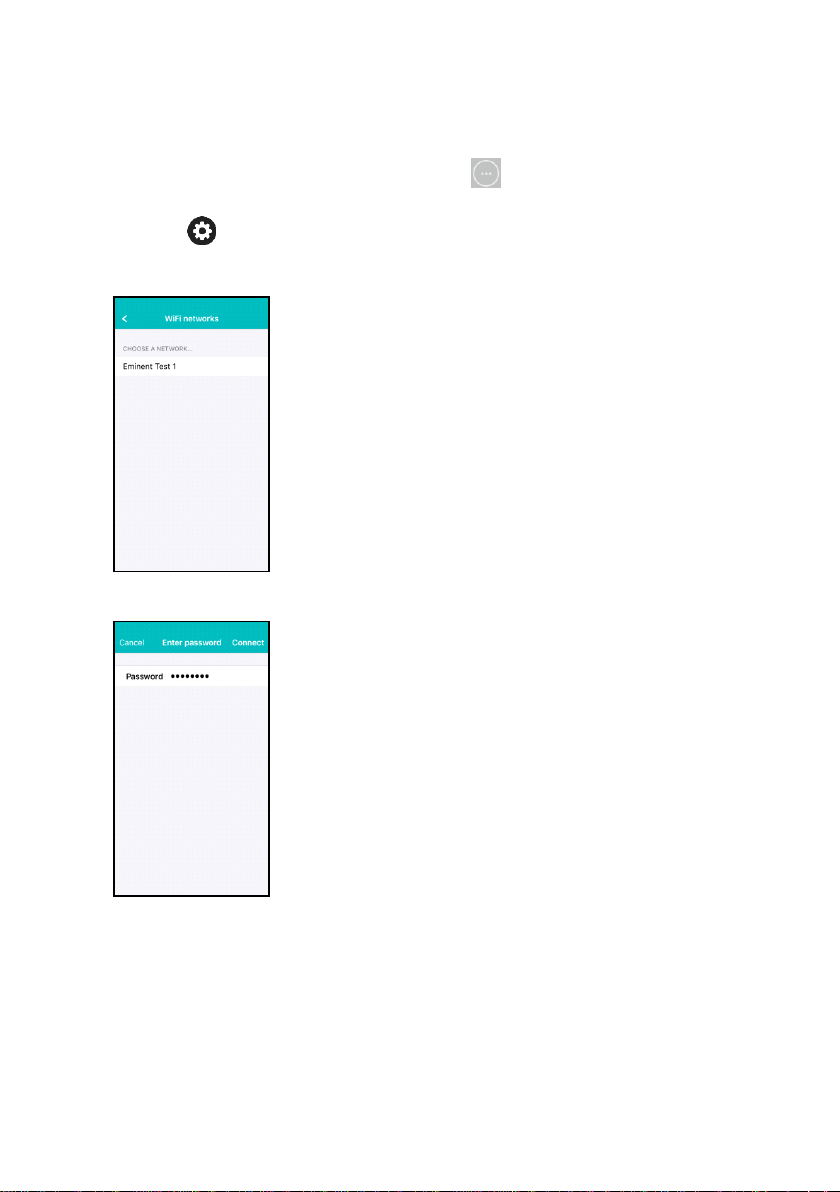
7. Select “WiFi”.
8. A list of available WiFi networks is displayed.
9. Select the WiFi network you wish to connect to.
10. Enter the wireless encryption key and press “Connect”
11. To activate the WiFi connection disconnect the Ethernet cable.
2.7.3 Connecting to WiFi using the PC utility (windows).
1. Ensure the camera is connected to the network with a Ethernet cable.
2. Ensure the camera is added to the device list (see chapter 2.3)
12 | ENGLISH
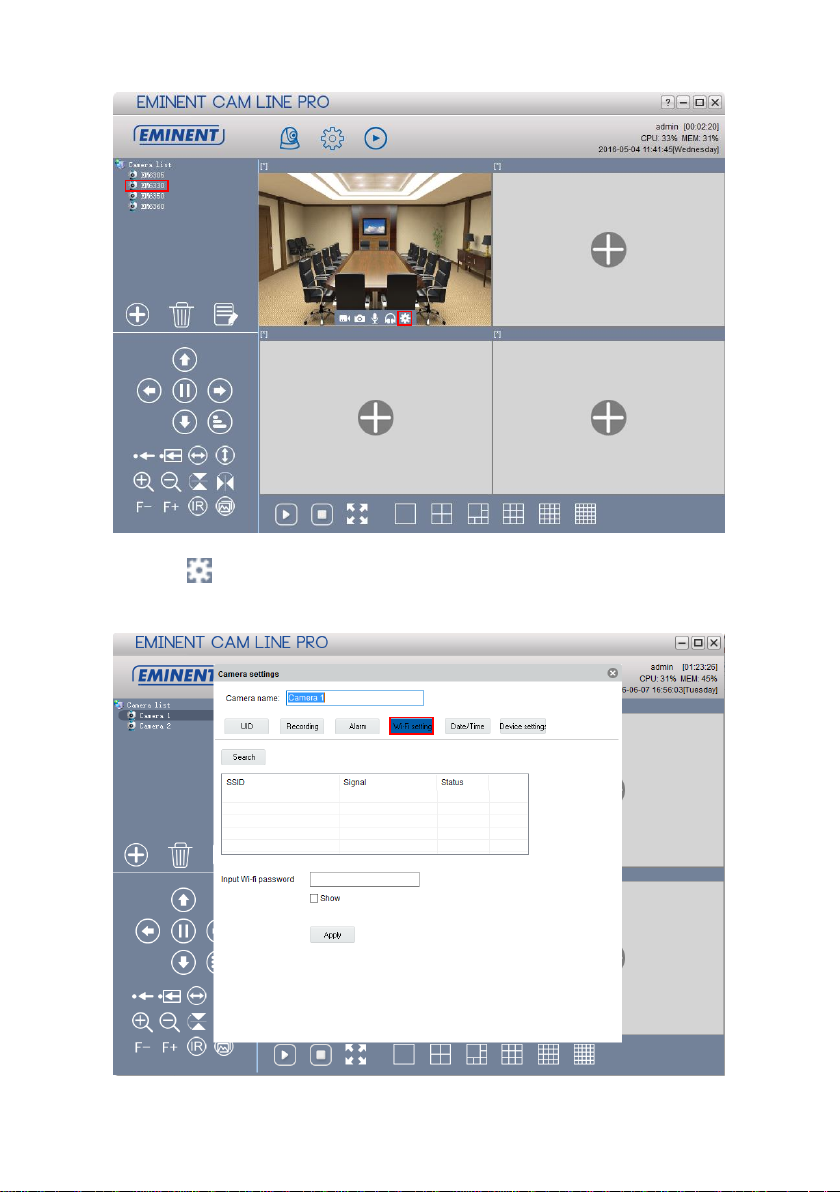
3. Select the camera in the camera list
4. Press from the camera view of the camera you wish to connect to the WiFi
connection.
5. The settings menu will be displayed
6. Go to the Menu option “Wi-Fi setting”
13 | ENGLISH
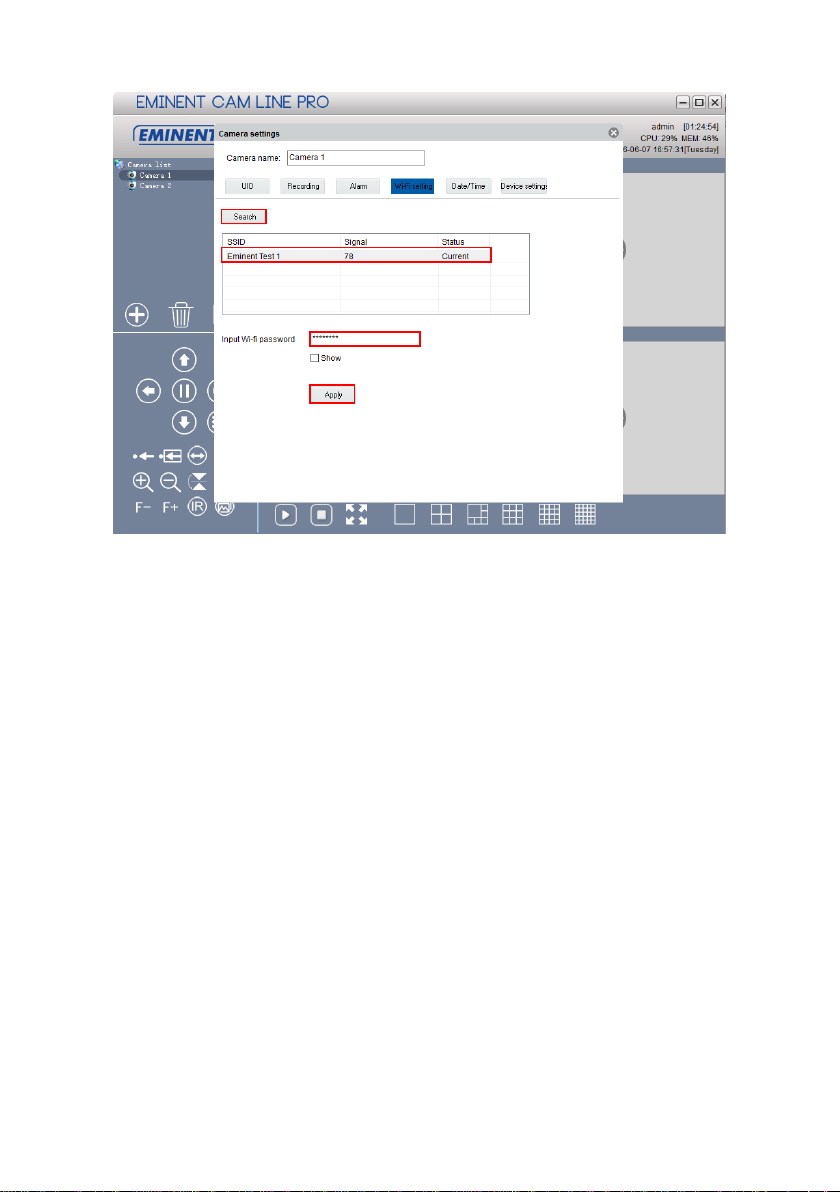
7. Click “Search” to search for available wireless networks.
8. Select the WiFi connection you wish to connect your camera to (if the camera is
recently restarted please be patient and wait for the Wireless connection to be
displayed by repeatedly pressing “Search”).
9. Enter the Encryption settings and the WPA-PSK key of the wireless network
10. Click “Apply”.
11. Disconnect the Ethernet cable to connect to the wireless network.
14 | ENGLISH
3.0 Viewing images
You can view the images both on your computer and on your smartphone screen, as
we explain in the sections below.
Optionally, you can install the supplied software so you can find the camera directly
with your computer and make recordings with your computer.
3.1 On your smartphone/tablet (Android, iPhone, iPad)
Start the App CamLine Pro, press the camera view of the camera you wish to
view/control from the 4-camera view. The device will start connecting with the camera
and will show live images of the camera including the camera control buttons. If the
smartphone is rotated to landscape the video stream will be displayed in Full-screen
(rotation feature of the smartphone needs to be enabled).
3.2 On your PC (Windows) in a remote location.
After CamLine Pro software is installed, it’s very easy to add a camera into the camera
list of the CamLine Pro software, press the “+” button, key in the CAM ID and
password (from the ID/Password Card) and press “OK”. The camera will be added to
the camera list. To view the stream select and drag and drop the camera in the screen
you wish to display the stream of the camera. You will then see the video stream
immediately. No further NAT/router setting modifications are needed. The camera can
be controlled remotely as well.
4.0 CamLine Pro for iPhone/iPad/Android
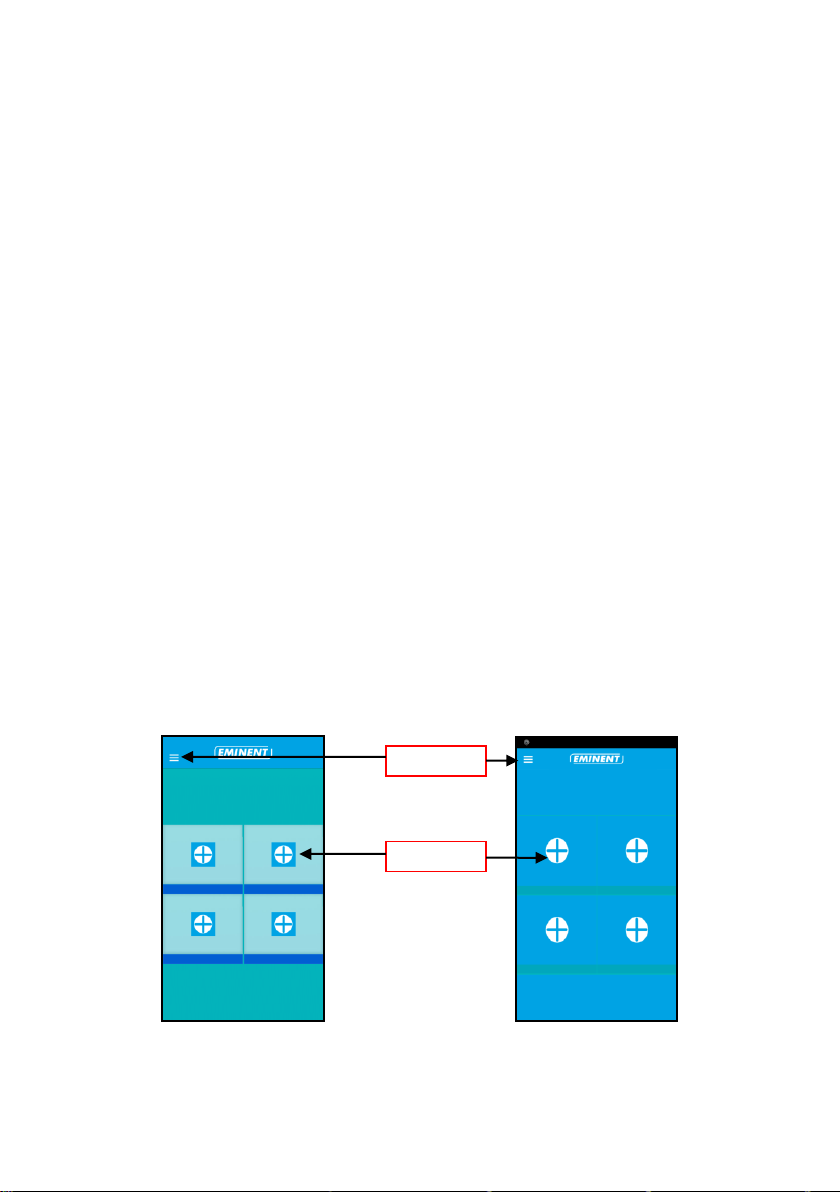
4.1 The Layout of CamLine Pro
iOS Android
Add camera
Menu
 Loading...