Page 1
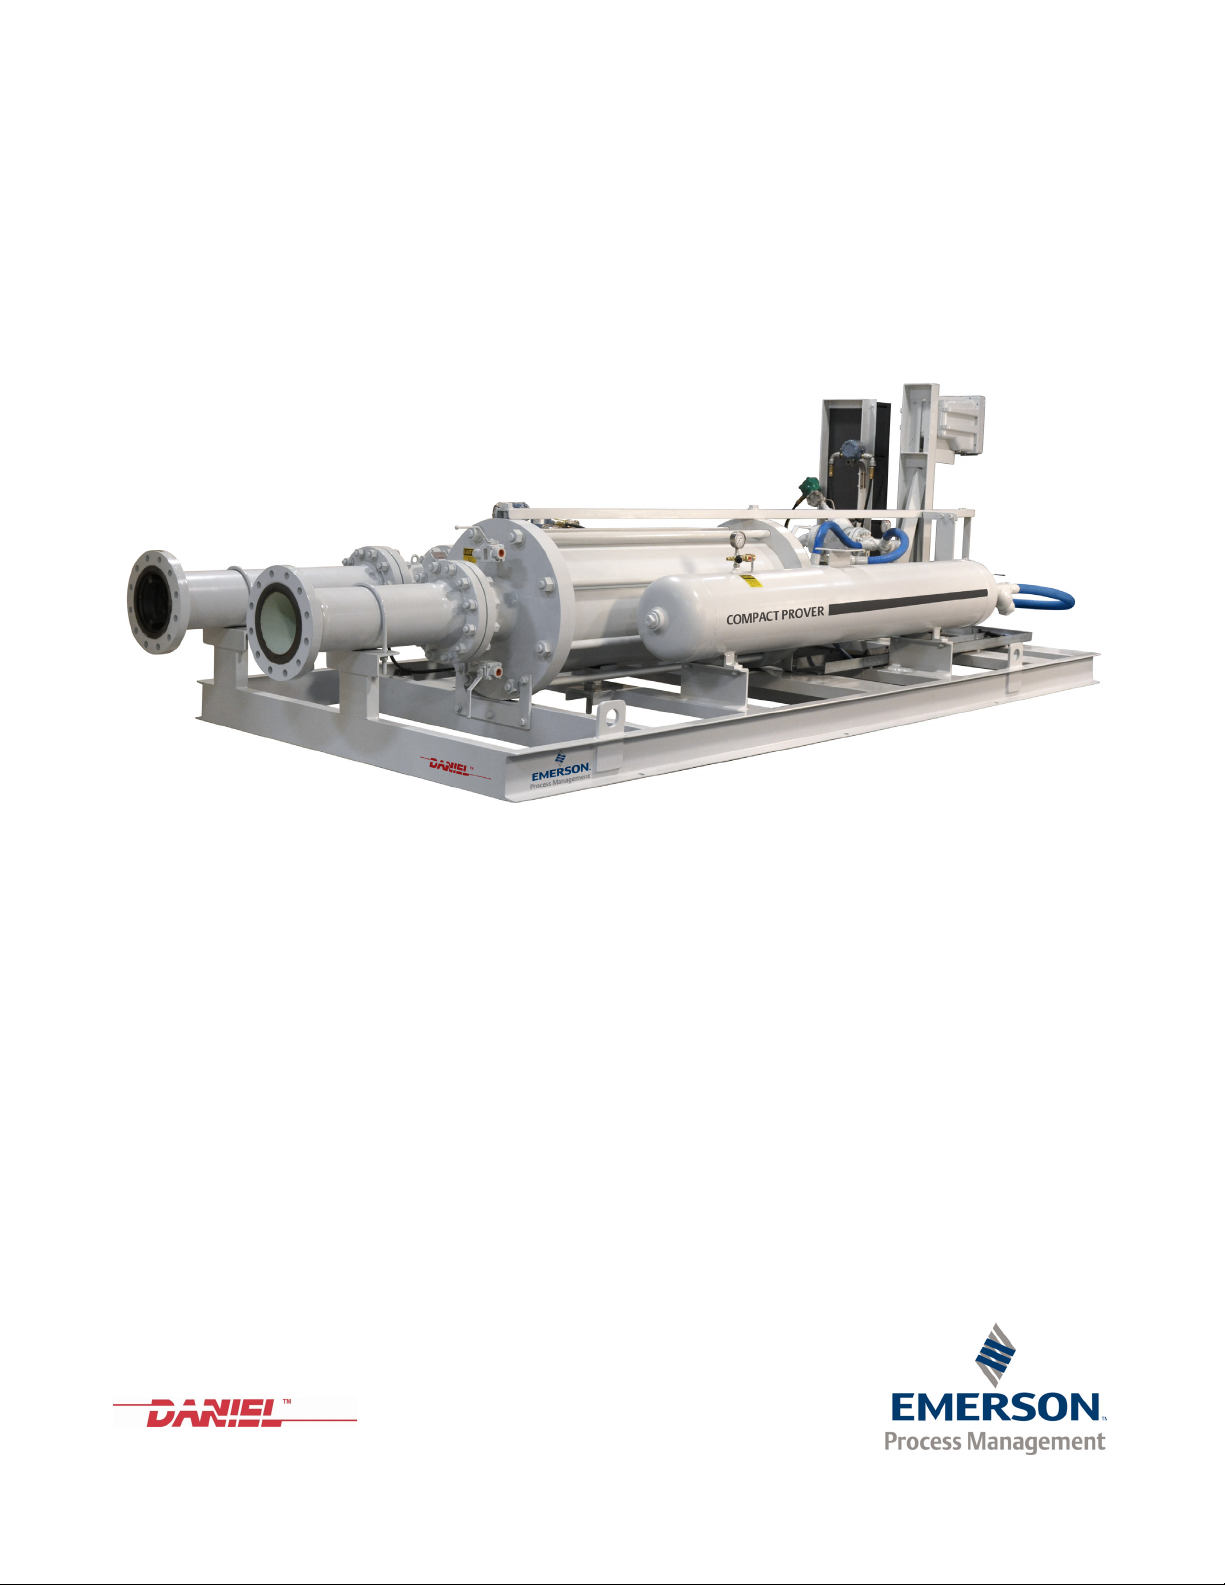
Compact Prover
Operating and maintenance instructions
Part Number: 3-9008-701, Rev. J
January 2015
Page 2

Page 3
Daniel customer service
Location Tel ephone number Fax number
North America/Latin America +1.713.467.6000 +1.713.827.4805
Daniel Customer Service +1.713.827.6314 +1.713.827.6312
USA (toll free) +1.888.356.9001 +1.713.827.3380
Asia Pacific (Republic of Singapore) +65.6777.8211 +65.6777.0947.0743
Europe (Stirling Scotland, UK) +44 (0)1786.433400 +44 (0)1786.433401
Middle East Africa (Dubai, UAE) +971 4 8118100 +971 4 8865465
Email
• Customer Service: tech.service@emersonprocess.com
• Customer Support: daniel.cst.support@emerson.com
• Asia-Pacific: danielap.support@emerson.com
• Europe: DanielEMA.CST@EmersonProcess.com
Return Material Authorization (RMA)
A Return Material Authorization (RMA) number must be obtained prior to returning any equipment for any reason.
Download the RMA form from the Support Services web page by selecting the link below.
www2.emersonprocess.com/EN-US/BRANDS/DANIEL/SUPPORT-SERVICES/Pages/Support-Services.aspx?
Page 4
Signal words and symbols
This is a safety alert symbol. It is used to alert you to potential physical injury hazards. Obey
all safety messages that follow this syLmbol to avoid possible injury or death.
Safety alert symbol
Danger indicates a hazardous situation which, if not avoided, will result in death or serious
injury.
Warning indicates a hazardous situation which, if not avoided, could result in death or serious
injury.
Caution indicates a hazardous situation which, if not avoided, could result in minor or
moderate injury.
Caution indicates a hazardous situation which, if not avoided, could result in minor or
moderate injury.
Pay special attention to the following signal words, safety alert symbols and statements:
Important
Important is a statement the user needs to know and consider.
Tip
Tip provides information or suggestions for improved efficiency or best results.
Note
Note is a “general by-the-way” content not essential to the main flow of information.
Page 5

Important safety instructions
Installing, operating or maintaining a Daniel product improperly could lead to serious injury or
death from explosion or exposure to dangerous substances. To reduce this risk:
• Comply with all information on the product, in this manual, and in any local and national
codes that apply to the product.
• Do not allow untrained personnel to work with this product.
• Use Daniel parts and work procedures specified in this manual.
Daniel Measurement and Control, Inc. (Daniel) designs, manufactures and tests products to
function within specific conditions. Because these products are sophisticated technical
instruments, it is important that the owner and operation personnel strictly adhere both to the
information printed on the product and to all instructions provided in this manual prior to
installation, operation, and maintenance.
Daniel also urges you to integrate this manual into your training and safety program.
BE SURE ALL PERSONNEL READ AND FOLLOW THE INSTRUCTIONS IN THIS MANUAL AND ALL
NOTICES AND PRODUCT WARNINGS.
Product owners (Purchasers):
• Use the correct product for the environment and pressures present. See technical data
or product specifications for limitations. If you are unsure, discuss your needs with your
Daniel representative.
• Inform and train all personnel in the proper installation, operation, and maintenance of
this product.
• To ensure safe and proper performance, only informed and trained personnel should
install, operate, repair and maintain this product.
• Verify that this is the correct instruction manual for your Daniel product. If this is not
the correct documentation, contact Daniel at 1-713-827-6314. You may also download
the correct manual from:
http://www.daniel.com
• Save this instruction manual for future reference.
• If you resell or transfer this product, it is your responsibility to forward this instruction
manual along with the product to the new owner or transferee.
• ALWAYS READ AND FOLLOW THE INSTALLATION, OPERATIONS, MAINTENANCE AND
TROUBLESHOOTING MANUALS AND ALL PRODUCT WARNINGS AND INSTRUCTIONS.
• Do not use this equipment for any purpose other than its intended service. This may
result in property damage and/or serious personal injury or death.
Page 6

Product Operation Personnel:
• To prevent personal injury, personnel must follow all instructions of this manual prior to
and during operation of the product.
• Follow all warnings, cautions, and notices marked on, and supplied with, this product.
• Verify that this is the correct instruction manual for your Daniel product. If this is not
the correct documentation, contact Daniel at 1-713-827-6314. You may also download
the correct manual from:
http://www.daniel.com
• Read and understand all instructions and operating procedures for this product.
• If you do not understand an instruction, or do not feel comfortable following the
instructions, contact your Daniel representative for clarification or assistance.
• Install this product as specified in the INSTALLATION section of this manual per
applicable local and national codes.
• Follow all instructions during the installation, operation, and maintenance of this
product.
• Connect the product to the appropriate pressure and electrical sources when and
where applicable.
• Ensure that all connections to pressure and electrical sources are secure prior to and
during equipment operation.
• Use only replacement parts specified by Daniel. Unauthorized parts and procedures can
affect this product's performance, safety, and invalidate the warranty. “Look-a-like”
substitutions may result in deadly fire, explosion, release of toxic substances or
improper operation.
• Save this instruction manual for future reference.
Page 7

Notice
THE CONTENTS OF THIS PUBLICATION ARE PRESENTED FOR INFORMATIONAL PURPOSES ONLY,
AND WHILE EVERY EFFORT HAS BEEN MADE TO ENSURE THEIR ACCURACY, THEY ARE NOT TO
BE CONSTRUED AS WARRANTIES OR GUARANTEES, EXPRESSED OR IMPLIED, REGARDING THE
PRODUCTS OR SERVICES DESCRIBED HEREIN OR THEIR USE OR APPLICABILITY. ALL SALES ARE
GOVERNED BY DANIEL'S TERMS AND CONDITIONS, WHICH ARE AVAILABLE UPON REQUEST. WE
RESERVE THE RIGHT TO MODIFY OR IMPROVE THE DESIGNS OR SPECIFICATIONS OF SUCH
PRODUCTS AT ANY TIME.
DANIEL DOES NOT ASSUME RESPONSIBILITY FOR THE SELECTION, USE OR MAINTENANCE OF
ANY PRODUCT. RESPONSIBILITY FOR PROPER SELECTION, USE AND MAINTENANCE OF ANY
DANIEL PRODUCT REMAINS SOLELY WITH THE PURCHASER AND END-USER.
TO THE BEST OF DANIEL'S KNOWLEDGE THE INFORMATION HEREIN IS COMPLETE AND
ACCURATE. DANIEL MAKES NO WARRANTIES, EXPRESSED OR IMPLIED, INCLUDING THE IMPLIED
WARRANTIES OF MERCHANTABILITY AND FITNESS FOR A PARTICULAR PURPOSE WITH RESPECT
TO THIS MANUAL AND, IN NO EVENT, SHALL DANIEL BE LIABLE FOR ANY INCIDENTAL, PUNITIVE,
SPECIAL OR CONSEQUENTIAL DAMAGES INCLUDING, BUT NOT LIMITED TO, LOSS OF
PRODUCTION, LOSS OF PROFITS, LOSS OF REVENUE OR USE AND COSTS INCURRED INCLUDING
WITHOUT LIMITATION FOR CAPITAL, FUEL AND POWER, AND CLAIMS OF THIRD PARTIES.
PRODUCT NAMES USED HEREIN ARE FOR MANUFACTURER OR SUPPLIER IDENTIFICATION ONLY
AND MAY BE TRADEMARKS/REGISTERED TRADEMARKS OF THESE COMPANIES.
Page 8

Warranty and Limitations
1. LIMITED WARRANTY: Subject to the limitations contained in Section 2 herein, Daniel Measurement &
Control, Inc. ("Daniel") warrants that the licensed firmware embodied in the Goods will execute the
programming instructions provided by Daniel, and that the Goods manufactured by Daniel will be free from
defects in materials or workmanship under normal use and care and Services will be performed by trained
personnel using proper equipment and instrumentation for the particular Service provided. The foregoing
warranties will apply until the expiration of the applicable warranty period. Goods are warranted for twelve
(12) months from the date of initial installation or eighteen (18) months from the date of shipment by Daniel,
whichever period expires first. Consumables and Services are warranted for a period of 90 days from the date
of shipment or completion of the Services. Products purchased by Daniel from a third party for resale to Buyer
("Resale Products") shall carry only the warranty extended by the original manufacturer. Buyer agrees that
Daniel has no liability for Resale Products beyond making a reasonable commercial effort to arrange for
procurement and shipping of the Resale Products. If Buyer discovers any warranty defects and notifies Daniel
thereof in writing during the applicable warranty period, Daniel shall, at its option, correct any errors that are
found by Daniel in the firmware or Services or repair or replace F.O.B. point of manufacture that portion of the
Goods or firmware found by Daniel to be defective, or refund the purchase price of the defective portion of the
Goods/Services. All replacements or repairs necessitated by inadequate maintenance, normal wear and usage,
unsuitable power sources or environmental conditions, accident, misuse, improper installation, modification,
repair, use of unauthorized replacement parts, storage or handling, or any other cause not the fault of Daniel
are not covered by this limited warranty, and shall be at Buyer's expense. Daniel shall not be obligated to pay
any costs or charges incurred by Buyer or any other party except as may be agreed upon in writing in advance
by Daniel. All costs of dismantling, reinstallation and freight and the time and expenses of Daniel's personnel
and representatives for site travel and diagnosis under this warranty clause shall be borne by Buyer unless
accepted in writing by Daniel. Goods repaired and parts replaced by Daniel during the warranty period shall be
in warranty for the remainder of the original warranty period or ninety (90) days, whichever is longer. This
limited warranty is the only warranty made by Daniel and can be amended only in a writing signed by Daniel.
THE WARRANTIES AND REMEDIES SET FORTH ABOVE ARE EXCLUSIVE. THERE ARE NO REPRESENTATIONS OR
WARRANTIES OF ANY KIND, EXPRESS OR IMPLIED, AS TO MERCHANTABILITY, FITNESS FOR PARTICULAR
PURPOSE OR ANY OTHER MATTER WITH RESPECT TO ANY OF THE GOODS OR SERVICES. Buyer acknowledges
and agrees that corrosion or erosion of materials is not covered by this warranty.
2. LIMITATION OF REMEDY AND LIABILITY
PERFORMANCE. THE REMEDIES OF BUYER SET FORTH IN THIS AGREEMENT ARE EXCLUSIVE. IN NO EVENT,
REGARDLESS OF THE FORM OF THE CLAIM OR CAUSE OF ACTION (WHETHER BASED IN CONTRACT,
INFRINGEMENT, NEGLIGENCE, STRICT LIABILITY, OTHER TORT OR OTHERWISE), SHALL DANIEL'S LIABILITY TO
BUYER AND/OR ITS CUSTOMERS EXCEED THE PRICE TO BUYER OF THE SPECIFIC GOODS MANUFACTURED OR
SERVICES PROVIDED BY DANIEL GIVING RISE TO THE CLAIM OR CAUSE OF ACTION. BUYER AGREES THAT IN NO
EVENT SHALL DANIEL'S LIABILITY TO BUYER AND/OR ITS CUSTOMERS EXTEND TO INCLUDE INCIDENTAL,
CONSEQUENTIAL OR PUNITIVE DAMAGES. THE TERM "CONSEQUENTIAL DAMAGES" SHALL INCLUDE, BUT NOT
BE LIMITED TO, LOSS OF ANTICIPATED PROFITS, REVENUE OR USE AND COSTS INCURRED INCLUDING
WITHOUT LIMITATION FOR CAPITAL, FUEL AND POWER, AND CLAIMS OF BUYER'S CUSTOMERS.
: DANIEL SHALL NOT BE LIABLE FOR DAMAGES CAUSED BY DELAY IN
Page 9

Operating and maintenance instructions Table of Contents
3-9008-701 Rev J January 2015
Contents
Daniel customer service ................................................................................... 3
• Signal words and symbols .............................................................................. 4
• Important safety instructions ......................................................................... 5
• Notice .......................................................................................................... 7
• Warranty and Limitations............................................................................... 8
Section 1: Introduction
1.1 General ...................................................................................................... 1
1.2 Description ................................................................................................. 1
1.3 Mechanical description ................................................................................ 2
1.4 Technical data............................................................................................. 6
Section 2: Installation and set-up
2.1 Installation ............................................................................................... 13
2.2 Set-up ...................................................................................................... 15
2.2.1 Supplying electrical power to the compact prover ....................................... 15
2.2.2 Connection of the operating computer ....................................................... 16
2.2.3 12 or 24V DC Interface Board....................................................................... 18
2.2.4 Charging the Pneumatic Spring Plenum....................................................... 21
2.3 Base volume certification ........................................................................... 23
2.4 Calibration integrity seal installation procedure .......................................... 24
Section 3: Operation
3.1 General operational theory ........................................................................ 27
3.2 Operating instructions .............................................................................. 30
Section 4: Maintenance
4.1 Seal Leak Check......................................................................................... 35
4.2 Base volume determination........................................................................ 37
4.2.1 Certification techniques............................................................................... 37
4.2.2 Water draw procedure: (Reference Figure 4-4 and notes on page 47).......... 42
4.3 Certification Data Sheet and Calculations.................................................... 49
4.3.1 Data Sheet Entries ....................................................................................... 49
4.3.2 Calculations................................................................................................. 50
4.4 Seal Replacement ...................................................................................... 52
4.4.1 Measurement Piston and Flow Tube ............................................................ 52
4.4.2 Optical Seal Support .................................................................................... 60
4.4.3 Hydraulic Cylinder and Hydraulic Seal Support............................................. 63
Table of Contents 9
Page 10

Table of Contents Operating and maintenance instructions
January 2015 3-9008-701 Rev J
4.5 Optical conversion kit ................................................................................67
4.6 Detector Switch Replacement .....................................................................68
Section 5: Troubleshooting
5.1 General.....................................................................................................73
5.2 Interface Signals........................................................................................ 73
5.3 Measurement Piston Movement.................................................................. 75
5.4 The auto plenum adjust panel.....................................................................80
Section 6: Special tools and equipment
6.1 Tool list ....................................................................................................85
Section 7: Parts list
7.1 General.....................................................................................................89
7.2 Replacement Parts List ...............................................................................89
10 Table of Contents
Page 11

Operating and maintenance instructions List of Tables
3-9008-701 Rev J January 2015
List of Tables
Table 1-1 Hydraulic ........................................................................................................................... 7
Table 1-2 Standard compact prover set-up data ................................................................................ 8
Table 1-3 Power requirements........................................................................................................... 9
Table 3-1 Spring plenun ‘R’ values ................................................................................................... 31
Table 4-1 Torque table ....................................................................................................................55
Table 4-2 Tie rod nut torque ............................................................................................................ 57
Table 4-3 Hydraulic cylinder tie rod nut torque................................................................................ 67
Table 4-4 Volumetric percent change for compact provers ............................................................. 71
Table 6-1 Tool size requirement ...................................................................................................... 86
Table 6-2 Torque values for pipe flange stud/nut sets...................................................................... 87
Table 7-1 Parts list ........................................................................................................................... 90
List of Tables 11
Page 12

List of Tables Operating and maintenance instructions
January 2015 3-9008-701 Rev J
12 List of Tables
Page 13

Operating and maintenance instructions List of Figures
3-9008-701 Rev J January 2015
List of Figures
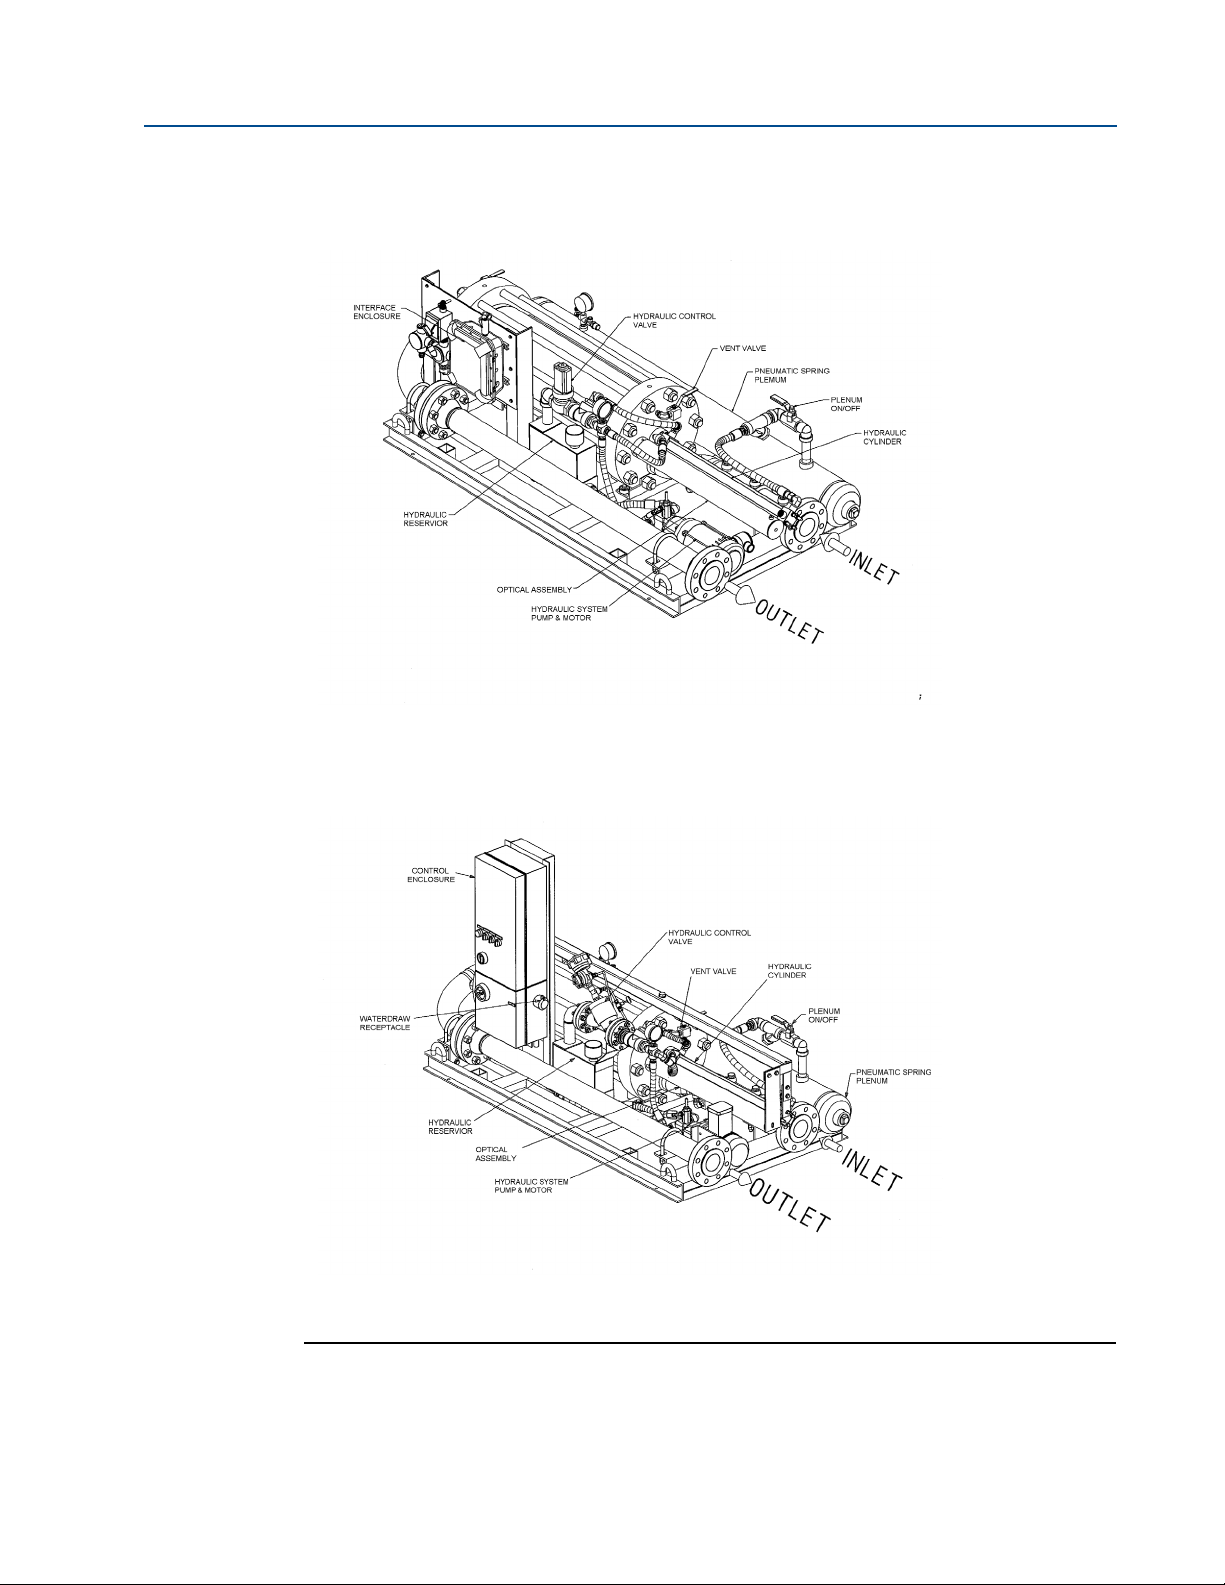
Figure 1-1 Outline drawings - Compact prover .............................................................................. 4
Figure 1-1 Outline drawings - Compact prover (Continued)........................................................... 5
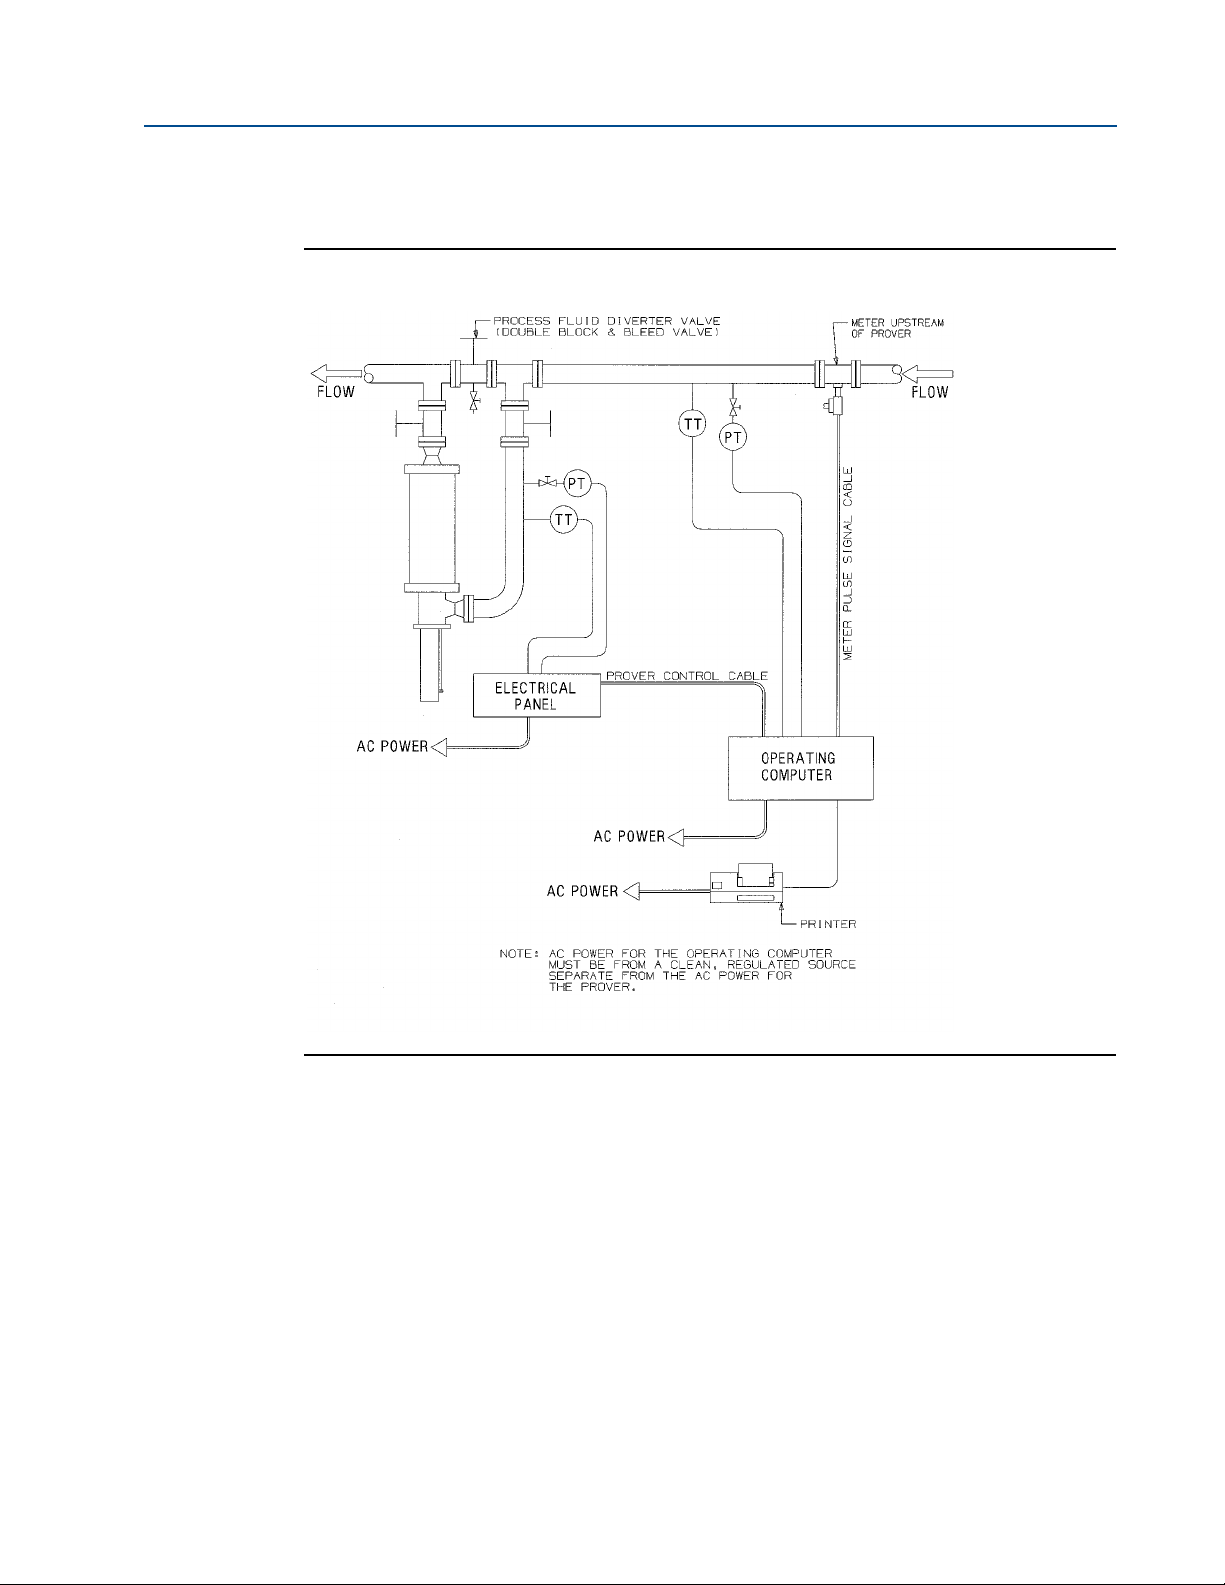
Figure 2-1 Typical prover installation........................................................................................... 15
Figure 2-2 Double chronometry .................................................................................................. 17
Figure 2-3 12V Prover interface board ......................................................................................... 19
Figure 2-4 12/24V Prover interface board.................................................................................... 20
Figure 2-5 Typical nitrogen adjust panel...................................................................................... 22
Figure 2-6 Connection diagram................................................................................................... 23
Figure 3-1 Standby position......................................................................................................... 28
Figure 3-2 Initial motion.............................................................................................................. 28
Figure 3-3 Proving ....................................................................................................................... 29
Figure 3-4 End of proving run ...................................................................................................... 29
Figure 3-5 Piston returning to upstream position ........................................................................ 30
Figure 3-6 Spring plenum ............................................................................................................ 31
Figure 3-7 Hydraulic system ........................................................................................................ 33
Figure 4-1 Leak detector kit......................................................................................................... 35
Figure 4-2 Leak detector kit installed........................................................................................... 36
Figure 4-3 Compact prover water draw assembly typical NEC style (non-explosion proof)........... 40
Figure 4-3 Compact prover water draw assembly (continued) Typical Ex-proof style ................... 41
Figure 4-4 Water draw system..................................................................................................... 42
Figure 4-5 Test measure temperature stabilization...................................................................... 45
Figure 4-6 Typical volumetric determination data sheet.............................................................. 48
Figure 4-7 Typical prover control panel assembly (12” shown) .................................................... 49
Figure 4-8 Poppet O-ring installation........................................................................................... 54
Figure 4-9 Optical seal support assembly - 8” and 18” and all units built prior to
January 1, 2006 ............................................................................................................ 61
Figure 4-10 Optical seal support assembly - 24” (built after January 1, 2006) and 34”.................... 62
Figure 4-11 Hydraulic seal support assembly................................................................................. 63
Figure 4-12 Typical hydraulic cylinder assembly ............................................................................ 65
Figure 4-13 Detector switch removal #1........................................................................................ 68
Figure 4-14 Detector switch removal #2........................................................................................ 69
Figure 4-15 Detector switch adjustment ....................................................................................... 70
Figure 5-1 Prover signal timing.................................................................................................... 74
List of Figures 13
Page 14

List of Figures Operating and maintenance instructions
January 2015 3-9008-701 Rev J
Figure 5-2 Prover wiring diagram (single phase power)................................................................76
Figure 5-3 Prover wiring diagram (three phase power).................................................................77
Figure 5-4 Prover wiring diagram (ATEX internal).........................................................................78
Figure 5-5 Prover wiring diagram (ATEX external)........................................................................79
Figure 5-6 DC powered solenoids ................................................................................................82
Figure 5-7 AC powered solenoids.................................................................................................83
Figure 7-1 Spare parts diagram (flow tube)..................................................................................95
Figure 7-2 Spare parts diagram (Flow tube) (continued) ..............................................................96
Figure 7-3 Spare parts diagram (Mechanical components) ..........................................................97
Figure 7-4 Spare parts diagram (Electrical components)..............................................................98
14 List of Figures
Page 15

Operating and maintenance instructions Section 1: Introduction
3-9008-701 Rev J January 2015
11
12
13
14
15
16
Section 1: Introduction
1.1 General
This manual is designed to provide information and guidance to personnel responsible for the
operation and maintenance of the Compact Prover. The content of this manual is intended to
describe the normal operational characteristics of the Compact Prover. By necessity, this
manual is written for standard provers. It does not include specific information pertinent to
specially designed items or non-standard equipment. Operating and Maintenance Instructions
for special equipment will be supplied as necessary.
The Compact Prover is not a stand-alone system. The prover requires the use of an operating
computer that is capable of Dual Chronometry Pulse Interpolation. The operating computer will
process and summarize all proving data. Refer to the Operation section of this manual for more
information.
1.2 Description
The Compact Prover provides improved accuracy, rapid operation and continuous flow for
performance testing, or ‘proving’, of liquid flow meters in an operational line. Modern
electronics permit exact time determination and pulse counting, which provides high accuracy
proving with a smaller volume and fewer flowmeter pulses than any previous proving
technology.
Because of its reduced size and a unique patented piston design, which includes an internal
poppet valve, the Compact Prover can be easily installed in most operational lines and operated
with minimal disturbance to flow. The prover’s internal design incorporates an inherent fail-safe
feature constructed to assure uninterrupted liquid flow.
The Interface Enclosure contains a printed circuit board which conditions the signals generated
by the prover. The operating computer, which is typically located in a control room, receives
these signals and generates data from the proving passes. This data can be printed for manual
implementation to the process line flow meter. Some proving applications can be programmed
for automatic implementation.
A typical proving run should generate the following raw data:
1. The exact time interval, in seconds, for the certified volume of the prover to be
displaced.
2. The exact time interval, in seconds, to tabulate flow meter pulses.
3. The exact number of whole meter pulses generated by the liquid displaced during the
proving run.
Typical data given by the operating computer include:
• Frequency: Flowmeter pulses/second, Hz
• Flow rate: Units of volume/minute or hour (Can be gpm, bph, lpm or m /hr.)
• K-Factor: Flowmeter pulses/unit of volume
General 1
Page 16

Section 1: Introduction Operating and maintenance instructions
January 2015 3-9008-701 Rev J
• Meter Factor: Correction factor (multiplier) for meter readout
1.3 Mechanical description
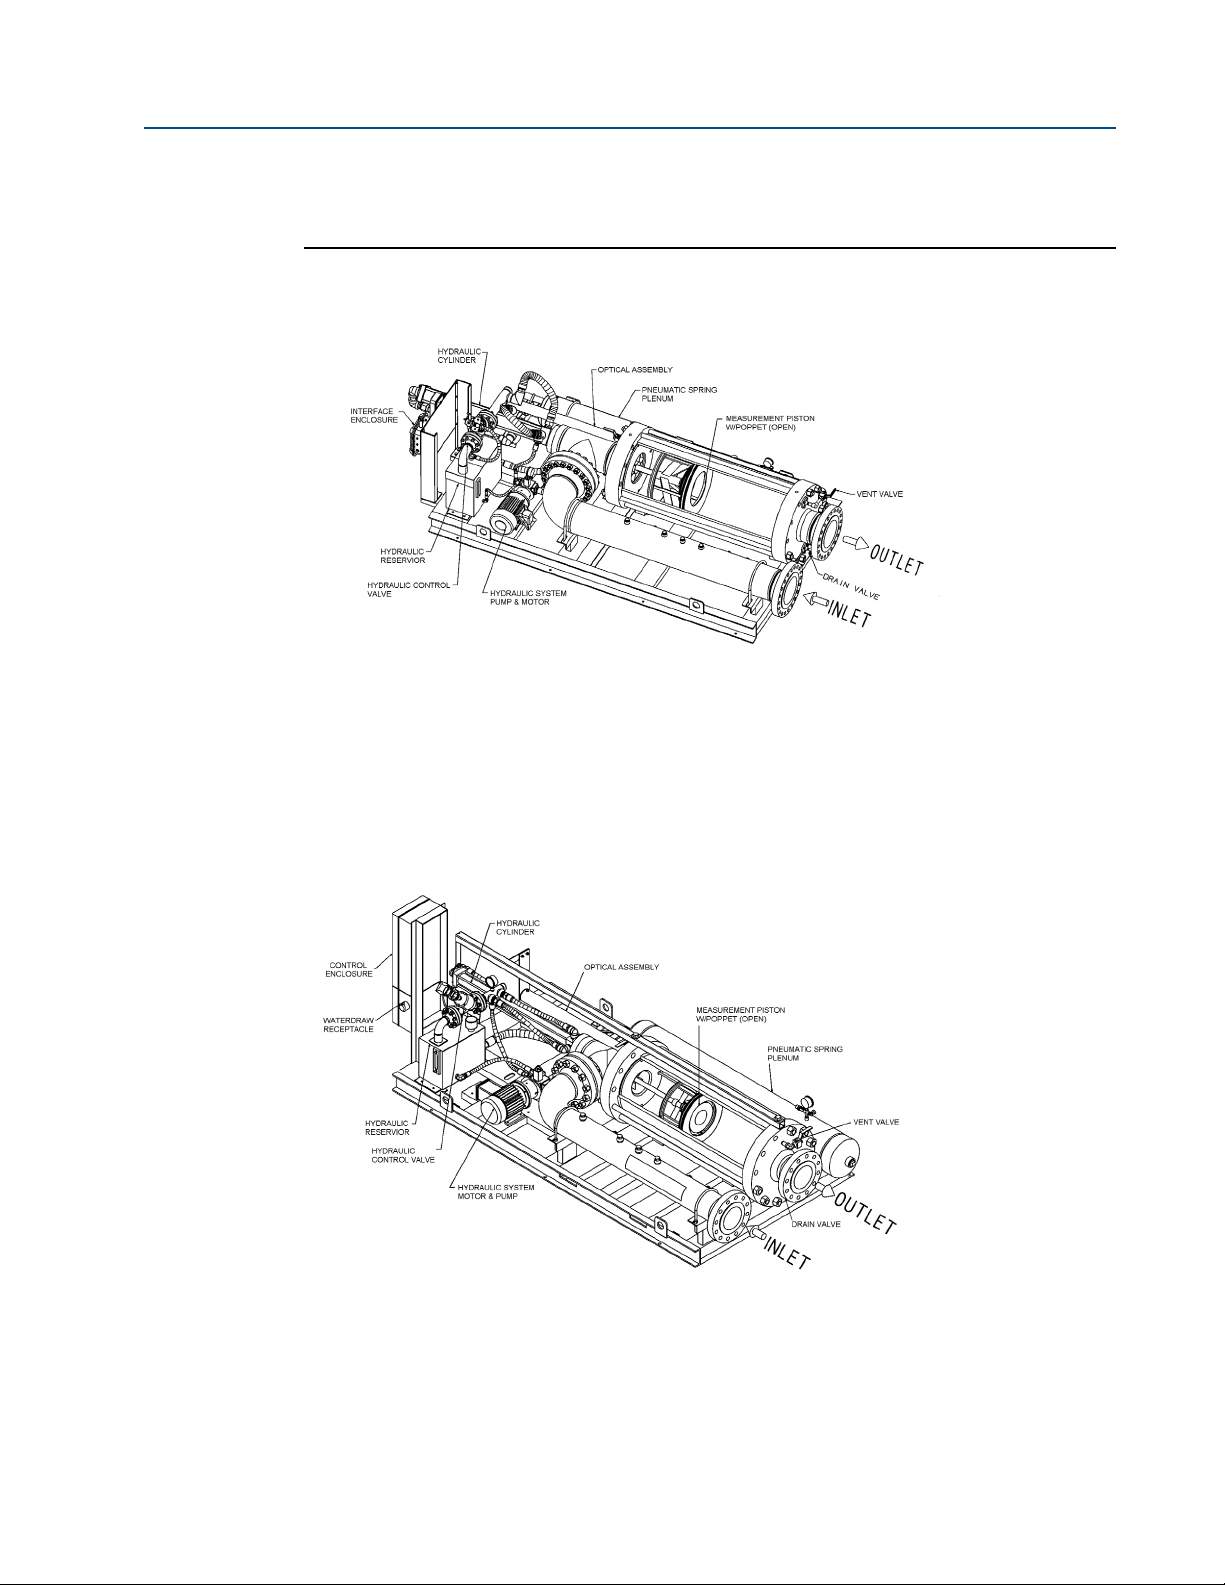
The basic outline of the compact prover and its component parts are shown in Figure 1-1. The
compact prover consists of a free flowing measurement piston and a coaxial mounted poppet
valve, all within a precision flow tube. The poppet valve is incorporated within the measurement
piston and is connected to the hydraulic cylinder by way of an actuator shaft. A calculated
pressure in the pneumatic spring plenum, in combination with the hydraulic system, operates
the actuator piston within the hydraulic cylinder. The pressure in the pneumatic spring plenum
closes the poppet valve, allowing the piston to proceed through a proving pass. Once the pass is
complete, the hydraulic system returns the piston to the upstream (standby) position while
holding the poppet valve open. Normal flow of the liquid will pass through the open poppet
valve. Optical sensors are used to detect the position of the piston inside the flow tube. These
sensors generate position signals, which are used for proper operation and data calculation.
Refer to Section 3: Operation for complete operation instructions.
Flow tube:
The flow tube is a stainless steel tube with a precision machined, hard chrome-plated bore. It
contains the prover piston, poppet valve, and fail-safe mechanism.
End connections:
The inlet and outlet end connections for installing the compact prover in line are ANSI 16.5
raised face flanges. Reference Section 1.4 for Technical data.
Hydraulic cylinder:
The hydraulic cylinder contains the actuator piston to act as a barrier between the gas in the
pneumatic spring plenum and the hydraulic oil. It provides the forces necessary to open and
close the poppet valve and to operate the prover through it’s cycle. Connected to the actuator
piston is the actuator shaft, which is connected to the poppet on the opposite end.
Optical assembly:
This intrinsically safe component is precision designed for accurate volume measurement within
5 ten thousandths (0.0005) of one inch or 0.0127 mm. There are three optical sensors
(switches) used: one for the upstream (standby) position, and two for defining the displaced
volume of fluid flowing through the prover. These slotted switches have an infrared LED and a
phototransistor on opposite sides of the slot. The prover generates a signal when a “flag” passes
through the slot and blocks the infrared light from the phototransistor. The flag is attached to
2 Mechanical description
Page 17

Operating and maintenance instructions Section 1: Introduction
3-9008-701 Rev J January 2015
the measurement piston by means of the detector shaft. The passage of the flag through the
slotted optical switches defines the displaced volume (base volume) of the prover. For detailed
information on the Optical Assembly, see Section 4: Maintenance.
Hydraulic control valve:
This normally closed two-way valve controls the hydraulic operation of the prover. The valve is
energized to open during a proving pass, and de-energized to close for the piston return to the
upstream (standby) position. There are two styles of control valve used. Style is dependent
upon prover size and electrical system (NEC or ATEX Type). See Figure 1-1.
Hydraulic pump:
The hydraulic pump is a variable displacement vane-type unit driven by an electric motor. It
supplies the power necessary to overcome the plenum pressure and return the piston
upstream. Once the piston has reached the upstream position, the pump assumes a neutral
condition maintaining hydraulic pressure at no flow for minimum power consumption.
Pneumatic spring plenum:
The charge of pressurized gas in the pneumatic spring plenum supplies the energy necessary to
overcome the shaft seal friction and close the poppet valve. A portion of the charge is required
to overcome the force generated by the product pressure within the prover acting on the
actuator shaft and the detector shaft. When properly adjusted, this charge allows for minimum
pressure differential (usually only a few inches of water column) across the piston.
Mechanical description 3
Page 18
Section 1: Introduction Operating and maintenance instructions
January 2015 3-9008-701 Rev J
Figure 1-1 Outline drawings - Compact prover
Typical 8”, 12”, 18”, 24”, 34” and 40” NEC Type
Typical 8”, 12”, 18”, 24”, 34” and 40” ATEX Type
4 Mechanical description
Page 19
Operating and maintenance instructions Section 1: Introduction
3-9008-701 Rev J January 2015
Figure 1-1 Outline drawings - Compact prover (Continued)
Typic a l 12” Mini NEC Type
Typic a l 12” Mini ATE X Type
Mechanical description 5
Page 20

Section 1: Introduction Operating and maintenance instructions
Follow all the safety and equipment limits recommended in 1.4 Technical data of this manual. It is the owner’s and/or purchaser’s responsibility to comply with these parameters.
PERSONAL PROTECTION HAZARD
Follow all parameters for the compact prover indicated below.
Failure to do so may result in injury or equipment damage.
January 2015 3-9008-701 Rev J
1.4 Technical data
Materials of construction:
Standard: 17-4 stainless steel flow tube with hard chrome plating, carbon steel pipe and flanges
Standard maximum working pressure:
8" to 24" Size: 150 lb. ANSI 285 psig (1965 kPa) @ 100.F (38.C)
260 psig (1793 kPa) @ 200.F (93.C)
8" to 24" Size: 300 lb. ANSI 740 psig (5102 kPa) @ 100.F (38.C)
675 psig (4654 kPa) @ 200.F (93.C)
8" to 24" Size: 600 lb. ANSI 480 psig (10204 kPa) @ 100.F (38.C)
1350 psig (9308 kPa) @ 200.F (93.C)
34" and 40" Size: 300 lb. ANSI 740 psig (5102 kPa) @ 100.F (38.C)
675 psig (4654 kPa) @ 120.F (49.C)
For intermediate pressures refer to ANSI B16.5
Prover size based on flow tube diameter.
Maximum working temperature:
8” to 24" Size: -20 to 200.F (-29 to 93.C)
6 Technical data
Page 21
Operating and maintenance instructions Section 1: Introduction
3-9008-701 Rev J January 2015
34” and 40" Size: 20 to 120.F (-7 to 49.C)
Standard ambient temperature range: -4.F to 104.F (-20.C to 40.C)
Consult factory for other changes.
Important
Temperature span differential between tie rods and flow tube not to exceed 200.F (93.C) on
standard 8" to 24" models and 100.F (38.C) on 34” and 40" models.
Performance:
Repeatability 0.02% or better (water draw)
Standard capacities and specifications:
• Flow Range (1000:1): See Table 1-2
• Prover Nominal Base Volume (dependent on size): See Tabl e 1- 2
• Volume Ratio (Upstream/Downstream Volume): See Ta ble 1-2
• Hydraulic System: Fill with type MIL-H-5606 (Aviation Grade E Hydraulic Fluid) or
equivalent in quantities. See Table 1-1
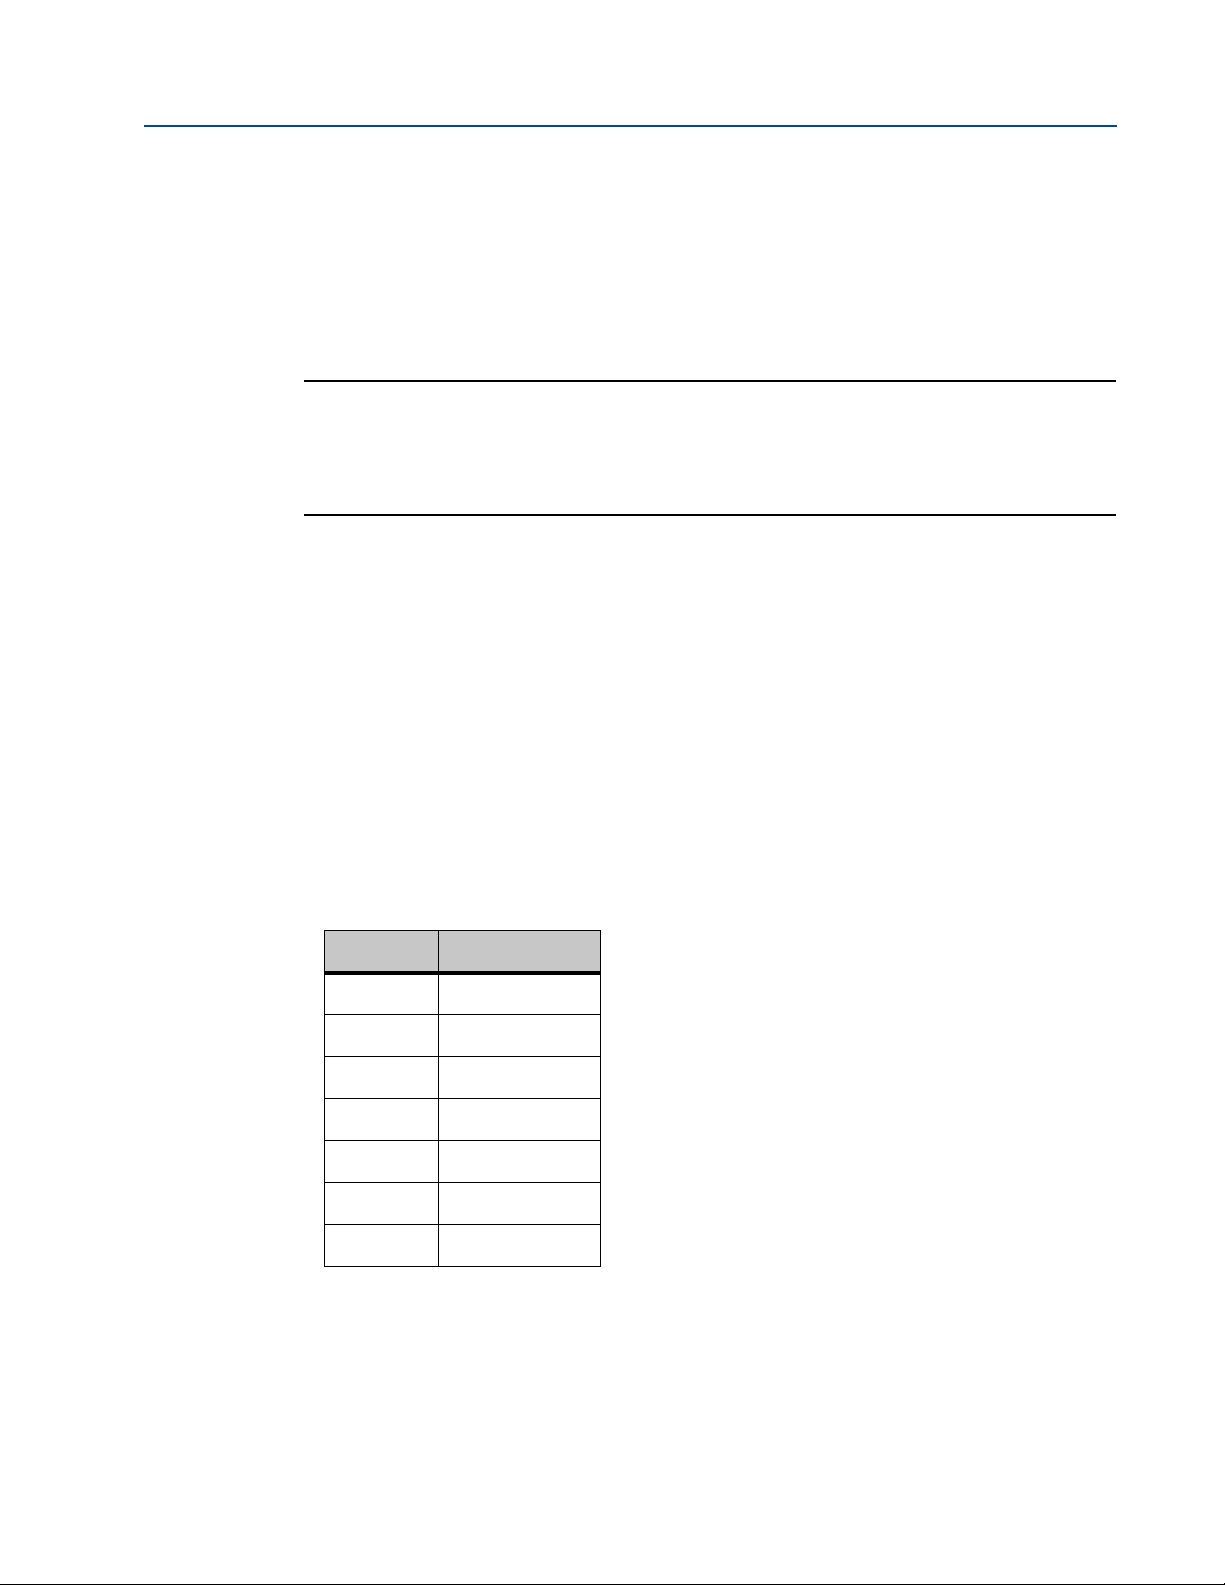
Table 1-1 Hydraulic
Prover size System capacity
8”
12” Mini
12”
18”
24”
34”
40”
3 gal (11.4 L)
3 gal (11.4 L)
3 gal (11.4 L)
10 gal (38 L)
25 gal (95 L)
60 gal (227 L)
93 gal (352 L)
Note: Possible equivalents:
• Mobile Aero HF series
• Aeroshell 41
Technical data 7
Page 22

Section 1: Introduction Operating and maintenance instructions
January 2015 3-9008-701 Rev J
Table 1-2 Standard compact prover set-up data
Nominal
prover
shipping
dimension
s (L X W X
H)
Approxima
te shipping
weight
Nominal
flow tube
dia.
Provers rate ranges
minimum maximum
Nominal
prover
base
volume
Multiplier
for stream
volume
Flowtube
I.D
Wall
thickness
Inlet/
Outlet
flange size
8”
12” Mini
12”
18”
24”
34”
40”
0.25 gpm
0.946 lpm
0.357 bph
3
0.057 m
1.0 gpm
3.78 lpm
1.43 bph
3
0.227 m
1.75 gpm
6.623 lpm
2.5 bph
3
0.397 m
3.5 gpm
13.247 lpm
5.0 bph
3
0.794 m
7.0 gpm
24.495 lpm
10.0 bph
3
1.595 m
12.6 gpm
47.691 lpm
18.0 bph
3
2.860 m
17.5 gpm
66.237 lpm
25.0 bph
3
3.972 m
ph
ph
ph
ph
ph
ph
ph
250 gpm
946 lpm
357 bph
3
57 m
ph
1000 gpm
3.780 lpm
1430 bph
3
227 m
mp
1750 gpm
6623 lpm
2500 bph
3
397 m
ph
3500 gpm
13247 lpm
5000 bph
3
794 m
ph
7000 gpm
26495 lpm
10000 bph
3
1595 m
ph
12600 gpm
47691 lpm
18000 bph
3
2860 m
ph
17500 gpm
66237 lpm
25000 bph
3
3972 m
ph
5 gal
(20 liters)
10 gal
(40 liters)
15 gal
(60 liters)
30 gal
(120 liters)
65 gal
(250 liters)
100 gal
(400 liters)
170 gal
(650 liters)
0.990590 8.250
(20.955
cm)
0.991670 12.250
(31.115
cm)
0.991670 12.250
(31.115
cm)
0.993020 17.500
(44.450
cm)
0.993464
Pre 2006
25.500
(64.770
cm)
.992369
0.988536 34.00
(86.360
cm)
0.985938 40.00
(101.60
cm)
0.6875
(1.746 cm)
0.8750
(2.222 cm)
0.8750
(2.222 cm)
1.2500
(3.175 cm)
1.0625
(2.699 cm)
1.2500
(3.175 cm)
1.500
(3.810cm)
2” 121" x 56" x
50" (307cm
x 142cm x
127cm)
4” 147" x 62" x
55" (373cm
x 157cm x
140cm)
6” 172" x 67 x
57" (437cm
x 170cm x
145cm)
8” 193" x 76" x
56" (490cm
x 193cm x
142cm)
12” 220" x 96" x
66" (559cm
x 244cm x
168cm)
16” 230" x 102"
x 74"
(584cm x
259cm x
188cm)
20” 240" x
130"x77"
(610cm x
330cm x
196cm)
2,200 lbs
(998 kgs)
4,400 lbs
(1,995 kgs)
4,900 lbs
(2,223 kgs)
7,300 lbs
(3,311 kgs)
13,400 lbs
(6,078 kgs)
19,200 lbs
(8,709 kgs)
35,000 lbs
(13,876
kgs)
Notes:
1. Temperature and pressure tap on the outlet flange (1” dia.) can be supplied upon
request.
2. Fluid viscosity ranges up to 10,000 centistokes.
3. Considerations for meter type and pulse output quality should be made for all compact
prover applications.
4. Compact prover performance depends upon the quality of the pulse signal from the
meter being proved.
8 Technical data
Page 23

Operating and maintenance instructions Section 1: Introduction
3-9008-701 Rev J January 2015
5. For more information on pulse quality and compact provers, reference API Chapter 4.2.
6. For certified dimensional drawings, please contact the factory.
7. Upstream multipliers are approximate. Actual values can be obtained from the Base
Volume Certification (water draw) method.
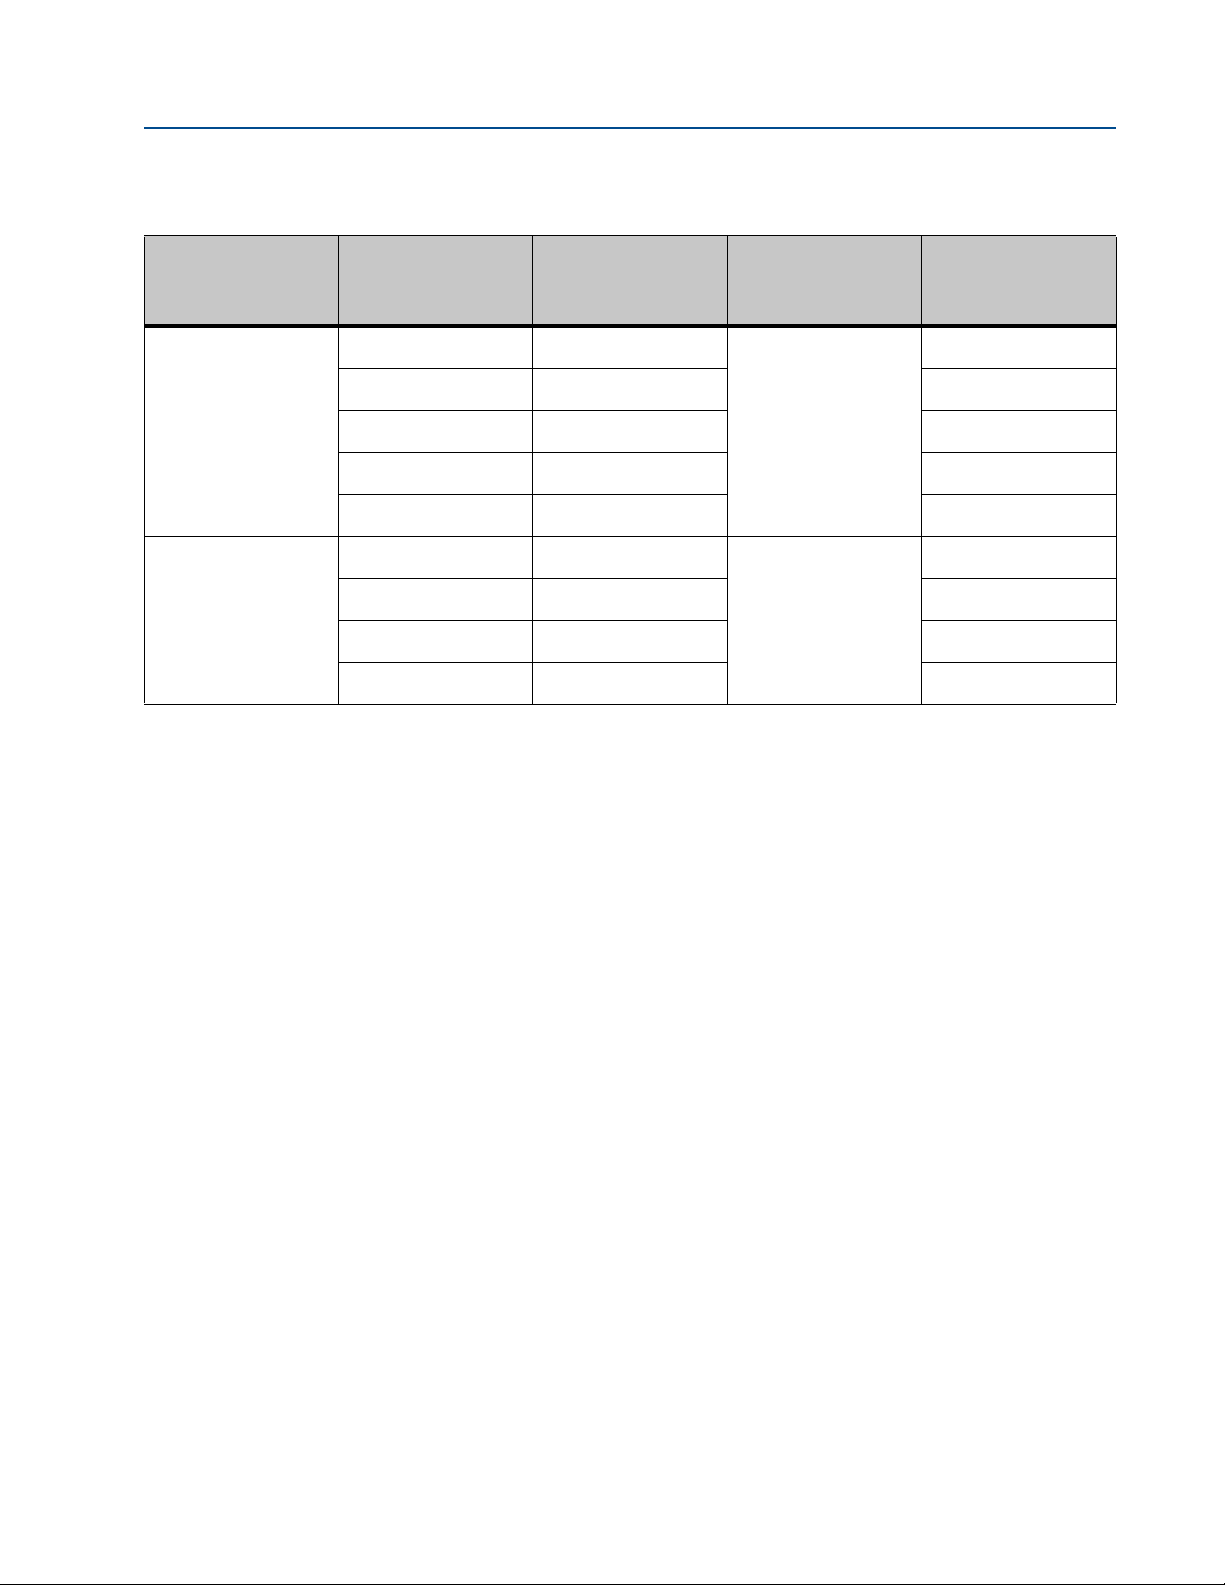
Table 1-3 Power requirements
Size
8” and 12” Mini
12”
AC line voltage,
frequency and
phase
115/60/1
220/50/1 &230/60/1
380/50/3
415/50/3
460/60/3
115/60/1
220/50/1 & 230/60/1
380/50/3
415/50/3
460/60/3
115/60/1
220/50/1 & 230/60/1
Hydraulic system
motor full load
amps
13.4
6.7
3.0
2.7
2.2
19
8.4
3.0
2.7
2.2
19
19
Hydraulic system
motor
configuration
1Hp Single 10
1 Hp Single 5
1.5 Hp Single .2
1.5 Hp Single .2
1.5 Hp Single 5
1.5 Hp Single
1.5 Hp Dual, 2 Circuits .2
1.5 Hp Dual, 1 Circuit .2
Hydraulic control
valve in-rush
amperage
10
5
.2
.2
5
380/50/3
18”
24”
Technical data 9
415/50/3
460/60/3
690/50/3
230/60/3
380/50/3
415/50/3
460/60/3
690/50/3
9.4
8.2
6.5
4.8
13
9.4
8.2
6.5
4.8
5 Hp Single .2
5 Hp Single .2
5 Hp Single .2
5 Hp Single .2
5 Hp Single
.2
.2
.2
.2
.2
Page 24
Section 1: Introduction Operating and maintenance instructions
January 2015 3-9008-701 Rev J
Table 1-3 Power requirements
Size
34”
40”
AC line voltage,
frequency and
phase
230/60/3
380/50/3
415/50/3
460/60/3
690/50/3
230/60/3
380/50/3
415/50/3
460/60/3
Hydraulic system
motor full load
amps
39
22
20
19.5
12.8
50
28
26
25
Hydraulic system
motor
configuration
15 Hp Single
20 Hp Single
Hydraulic control
valve in-rush
amperage
.2
.2
.2
.2
.2
.2
.2
.2
.2
Notes:
1. Consult the factory for optional voltages not listed.
2. The operating computer must be connected to a power source separate from that of
the prover to avoid variance in signal caused by line load charge and discharge.
3. Grounding wire within power cable must be connected to the installed location
electrical system grounding bus or electrical equivalent. A supplemental grounding
cable is available as an option.
4. For provers that are not equipped with a main circuit breaker, sizing of the main circuit
breaker should be based upon the hydraulic system motor full load amperage. Follow
applicable electrical codes for proper requirements.
Connection requirements:
Reference Tab le 1 - 2 for flange sizes
Pneumatic spring plenum:
Dry compressed nitrogen is required for charging the spring plenum.
Pressure drop: (Inlet flange to outlet flange)
Approximately 11.2 psig on gasoline at maximum flow (Metric units - .79 kg km ) Piston only:
Approximately 3 inches (7.6 cm) of water during a proving pass.
Approvals: For standard provers, sizes 8” thru 24” Canadian Standards Association (CSA) for
Class 1, Division 1, Group D File Number: LR 32408-18, Class 2258-02, Process Control
10 Technical data
Page 25

Operating and maintenance instructions Section 1: Introduction
3-9008-701 Rev J January 2015
Equipment for Hazardous Locations PED - sizes 12” Mini, 12”, 18” and 34”, British Standards
Institute
ATEX - 8" through 34", DEMKO 03 ATEX 0322369 (Option 1 designs only)
Ex d e ia m IIB T4
Certifications are pending for sizes not listed here.
Technical data 11
Page 26

Section 1: Introduction Operating and maintenance instructions
January 2015 3-9008-701 Rev J
12 Technical data
Page 27

Operating and maintenance instructions Section 2: Installation and set-up
3-9008-701 Rev J January 2015
21TOP (14)
Section 2: Installation and set-up
2.1 Installation
The compact prover may be installed permanently in a process line or used as a portable unit.
The prover is intended for above ground use and should be operated level to prevent the
formation of air pockets within the flow tube. A permanently installed standard prover should
be set up horizontally with considerations given to the accessibility of electrical power and
control operation. Consult a Daniel representative for further information regarding portable
provers.
Important
For optional vertical installation, special modifications to the prover hydraulic system and flow
tube supports will be required. The standard prover built for horizontal installation should not
be installed in a vertical position without proper modifications.
Refer to Figure 2-1 for a typical, permanent, compact prover installation in a process line.
Installation of a double block and bleed valve configuration is recommended in the process line
to assure that all metered fluid is passing through the prover. Be sure to follow API guidelines for
ANSI flanged connections and proper locating distance from the meter under test. Use gaskets
and retaining bolts of proper size and pressure rating for prover inlet and outlet flanges.
ReferenceTabl e 1 -2 for correct flange information. Consideration of available workspace around
the prover is necessary for normal operation and maintenance.
When installing this equipment, bolting must conform to the requirements of ASME B16.5
paragraph 5.3 and to the material requirements of ASME B16.5 Table 1B. Gaskets must conform
to the requirements of ASME B16.20.
It is the customer's responsibility to ensure that piping or other attachments connected to the
compact prover do not place adverse stresses on the compact prover. The design of the
compact prover has not been assessed for the effects of traffic, wind or earthquake loading.
It is the customer's responsibility to provide fire prevention measures and equipment per local
regulations.
The compact prover has been designed with a minimum of 1.5mm (1/16 inch) corrosion
allowance. The customer should implement a periodic inspection and maintenance program to
ensure that no part of the compact prover's pressure-retaining components has corrosion or
erosion exceeding this amount.
Installation 13
Page 28

Section 2: Installation and set-up Operating and maintenance instructions
EXPLOSION HAZARD
Do not exceed the maximum working pressure of prover as stamped on the nameplates.
Failure to observe pressure rating limits may result in serious personal injury and equipment
damage.
January 2015 3-9008-701 Rev J
Important:
It is the customer's responsibility to install this equipment in a system that provides adequate
over-pressure protection.
Important:
Lines should be flushed thoroughly to rid piping of potentially damaging foreign material such
as welding bead, pipe scale, etc. before the prover is placed into service. A strainer of proper size
should be installed upstream of the prover to protect it from the introduction of foreign
material.
14 Installation
Page 29
Operating and maintenance instructions Section 2: Installation and set-up
3-9008-701 Rev J January 2015
Figure 2-1 Typical prover installation
2.2 Set-up
2.2.1 Supplying electrical power to the compact prover
Reference Table 1-3 for standard voltage and amperage information. Optional voltage and
amperage information not listed in Table 1-3 is provided with the documentation package
(electrical schematic) shipped with every prover. If this information is not included with the
shipment, contact a local Daniel representative for assistance.
Standard provers are shipped with a multi-conductor power cable for connection to a power
supply. If an electrical conduit connection is desired, remove the existing power cable. Access to
Set-up 15
Page 30

Section 2: Installation and set-up Operating and maintenance instructions
January 2015 3-9008-701 Rev J
the motor starting switch will be necessary for this conversion. Be sure to follow all applicable
electrical codes for the area of installation.
2.2.2 Connection of the operating computer
Standard provers are shipped with a control cable for connection to the operating computer. If
an electrical conduit connection is desired, remove the existing control cable. Access to the
interface enclosure will be necessary for this conversion. Be sure to follow all applicable
electrical codes for the area of installation.
The compact prover control signals are designed to worldwide control standards. This includes
digital and analog signals. The electrical schematic will define how each connection (conductor)
is used. Manuals and instructions supplied with the operational computer of choice will assist
with proper control connections. Reference Section 5.2 for additional troubleshooting
information. If you require further assistance for these connections, contact a local Daniel representative.
The operating computer will need to be properly configured for the application and must be
capable of Dual Chronometry Pulse Interpolation
computer to have a high frequency master oscillator, which counts time in 0.000001 parts of a
second.
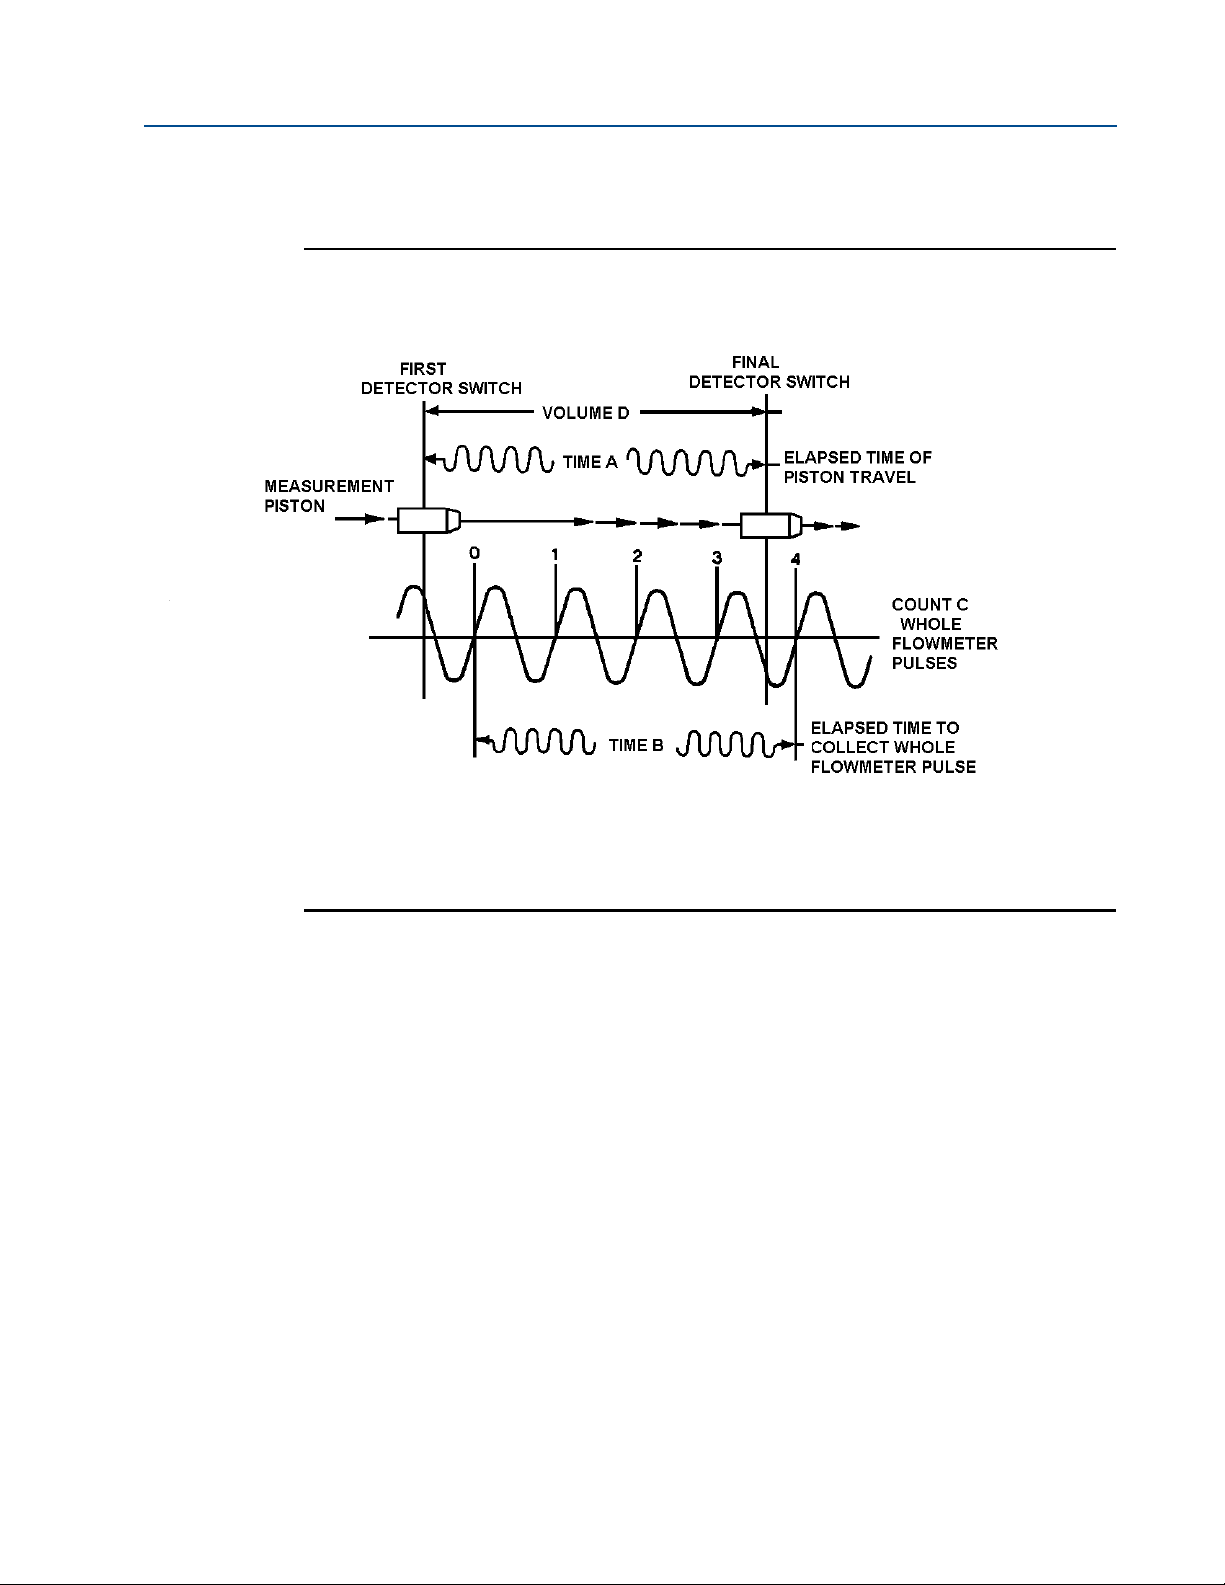
. This calculation method requires the
This master oscillator must operate two counters, referred to here as “Time A” and “Time B”.
Time “A" must start counting when the flag trips the first detector switch. Time “B” must start
counting with the leading edge of the first flowmeter pulse after Time A has started.
Time “A” is stopped when the flag trips the final detector switch. Time “B” is stopped with the
leading edge of the first flowmeter pulse after Time “A” has stopped, (Reference Figure. 2-2).
Using the ratio of Counter Time “A” and Counter Time “B” will allow for accurately counting a
fraction of a flowmeter pulse to within 1 part in 10,000 as shown below:
K= K-Factor, or counts per unit volume, from the flowmeter
A = Time for displaced volume B = Time for whole meter pulses
C = Total number of whole meter pulses
D = Displaced volume
Qualified personnel who are knowledgeable of the computer’s operating system, configuration
variables, and compact proving applications should complete the configuration of the
operating computer.
16 Connection of the operating computer
Page 31
Operating and maintenance instructions Section 2: Installation and set-up
3-9008-701 Rev J January 2015
Figure 2-2 Double chronometry
Connection of the operating computer 17
Page 32

Section 2: Installation and set-up Operating and maintenance instructions
January 2015 3-9008-701 Rev J
2.2.3 12 or 24V DC Interface Board
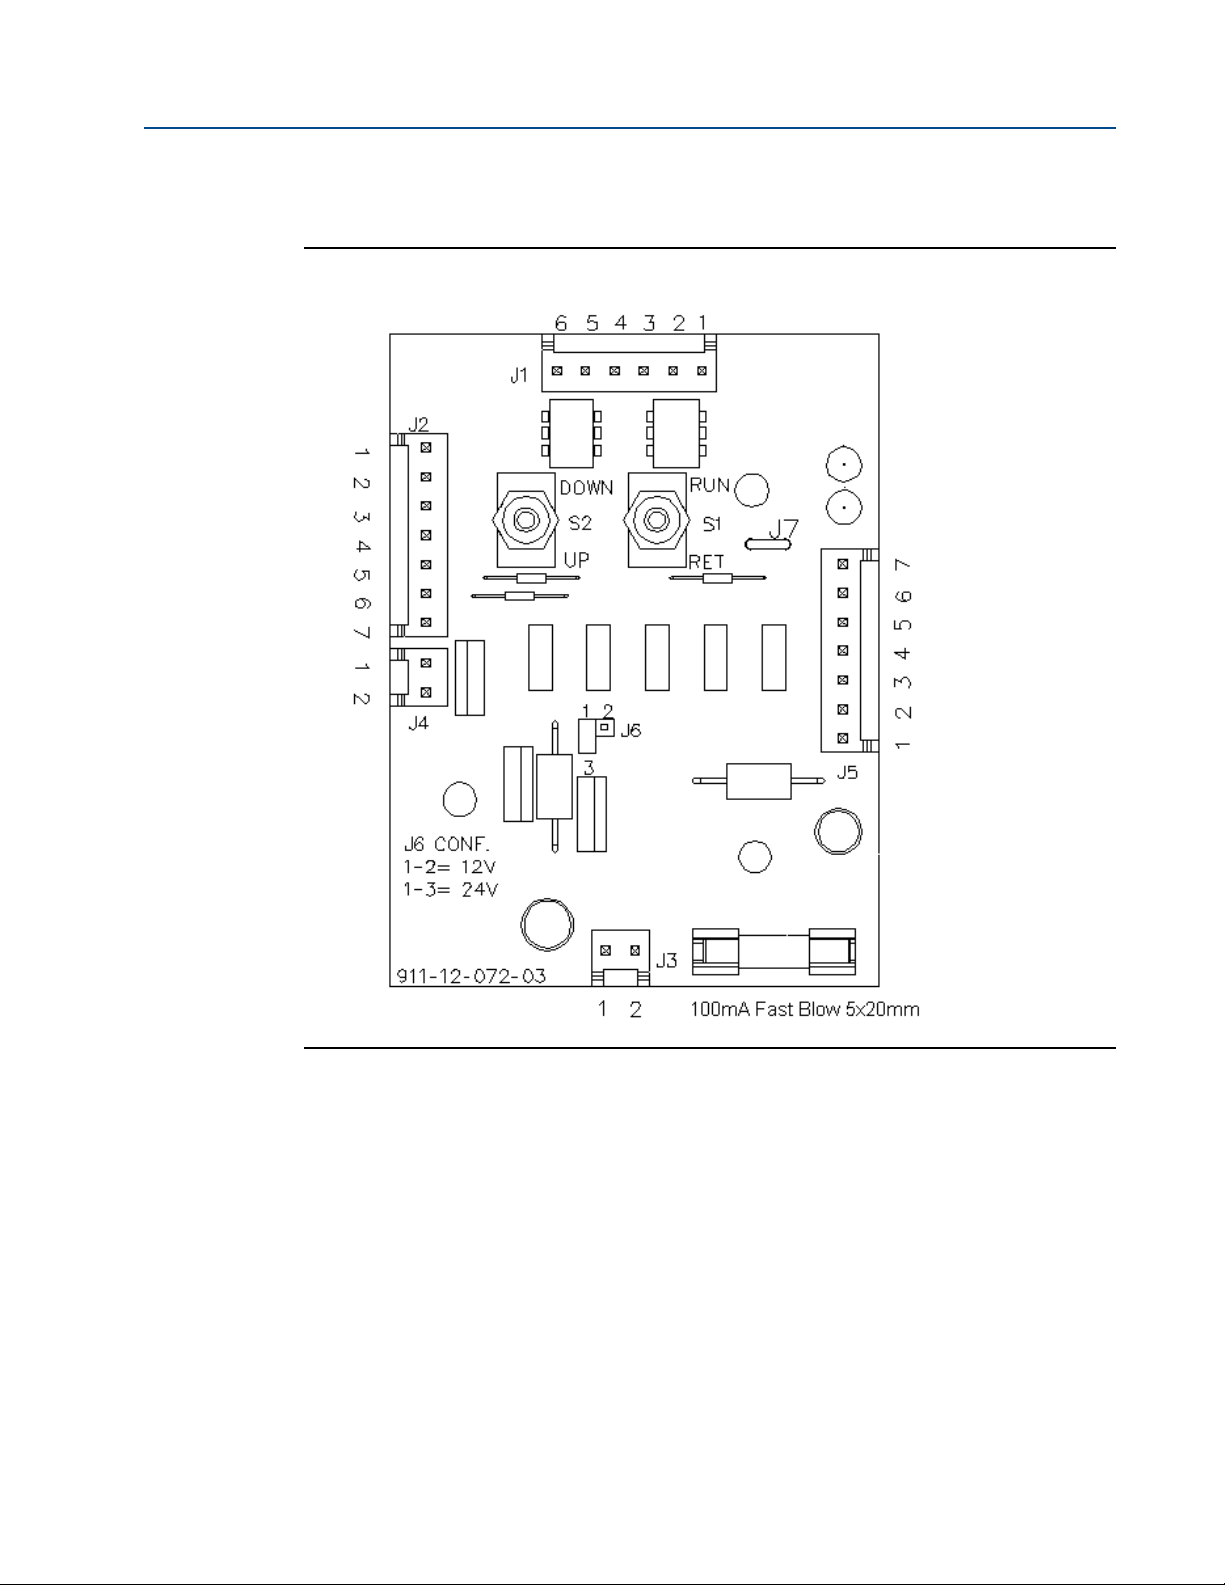
There are two (2) different styles of interface boards: 12V DC and 12/24V DC. See Figure 2-3 and
2-4. The power required for the interface board is supplied through the control cable. The DC
power source is typically located in the control room or can be supplied from the operating
computer if so equipped. See the electrical schematic provided with the prover documentation
package for proper connections of the control cable.
The 12V interface board is designed to operate on 12V DC (±15%, 100mA max). The 12/24V
interface board can operate on either 12 (±15%, 100mA max) or 24V DC (±15%, 250mA min)
depending on the configuration of jumper J6, see Figure 2-4. For 12V operating power, J6 must
be jumpered to pins 1 and 2. For 24V operation, J6 must be jumpered to pins 1 and 3. If
operating voltage is applied incorrectly, there is an integral fuse for board protection. In the
event that the fuse is blown, confirm the configuration of jumper J6 and replace the fuse with a
100mA, fast blow fuse ONLY.
The 12/24V interface board is installed in all compact provers made after September 2002. It
may also be used to replace the 12V interface board on older model provers. Contact a Daniel
representative if you are unsure which interface board your compact prover is equipped with or
if you need assistance replacing the old 12V board with the new 12/24V board. Request service
bulletin SE101 for detailed retrofit information.
Important:
Do not handle electronic-sensitive equipment without an ESD grounding wrist-strap. Failure to
use an anti-static grounding device could cause damage to the compact prover electronics and
render them inoperable.
18 12 or 24V DC Interface Board
Page 33

Operating and maintenance instructions Section 2: Installation and set-up
3-9008-701 Rev J January 2015
Figure 2-3 12V Prover interface board
J1: To optical assembly (pin 6 not used)
J2: To control connection
J3: To water draw hardware kit
J4: To run valve
J5: For external control of S1 and S2
S1: Run — Return
S2: Upstream - Downstream
12 or 24V DC Interface Board 19
Page 34
Section 2: Installation and set-up Operating and maintenance instructions
January 2015 3-9008-701 Rev J
Figure 2-4 12/24V Prover interface board
J1: To optical assembly (pin 6 not used)
J2: To control connection
J3: To water draw hardware kit
J4: To run valve
J5: For external control of S1 and S2
J6: 1-2 12V Operation
1-3 24V Operation
S1: Run — Return
S2: Upstream - Downstream
20 12 or 24V DC Interface Board
Page 35

Operating and maintenance instructions Section 2: Installation and set-up
3-9008-701 Rev J January 2015
2.2.4 Charging the Pneumatic Spring Plenum
The pneumatic spring plenum must be charged for proper operation. The prover is shipped
from the factory with an empty spring plenum for safety. Nitrogen is NOT supplied with the
compact prover and must to be acquired locally before meter proving can begin. Calculations
for proper pressure settings of the spring plenum are discussed in Section 3.2.
As an option, the compact prover may be equipped with an automatic plenum adjustment
panel. The panel consists of charge and vent solenoid valves and a pressure transmitter. A typical
panel is shown in Figure 2-5, a connection diagram is shown in Figure 2-6. An operating
computer with the adjustment routine pre-programmed, using an analog input (4-20mA) and
two digital outputs, will be able to automatically adjust the spring plenum pressure before
proving runs begin. See Section 5.4 for troubleshooting these signals.
Charging the Pneumatic Spring Plenum 21
Page 36

Section 2: Installation and set-up Operating and maintenance instructions
January 2015 3-9008-701 Rev J
Figure 2-5 Typical nitrogen adjust panel
22 Charging the Pneumatic Spring Plenum
Page 37

Operating and maintenance instructions Section 2: Installation and set-up
3-9008-701 Rev J January 2015
Figure 2-6 Connection diagram
2.3 Base volume certification
The prover base volume has been certified at the factory using the volumetric displacement
method (water draw) per API guidelines. The base volume has been adjusted to 0.0 gauge
pressure and the reference temperature as stated on the volumetric determination report
supplied with each prover documentation package. The operating computer will need to be
programmed with these base volumes. Upstream or downstream volumes will be used
depending on the application and location of the meter under test.
The volumetric displacement (water draw) technique, described in Section 4.2, is the factory
recommended procedure for certification of the base volume of the compact prover. It is
recommended that this procedure be repeated at regular intervals to confirm proper operation.
Frequency of base volume determination is dependent on usage, but should not exceed 3 years.
Certification may be necessary following repair or service procedures involving any disassembly
or seal replacement of the piston, poppet or flow tube. Certification is not necessary following
repair of the hydraulic cylinder if the flow tube is not disassembled. For specific information
regarding prover base volume certification related to maintenance of the optical assembly, see
Section 4.6. A lead seal wire should be installed to assure calibration integrity once certification
is completed as described in Section 2.5.
The upstream volume of any compact prover is slightly smaller than the downstream volume
due to the main piston shaft and optical shaft which are both located on the upstream side of
the piston.
If the meter is located upstream, or on the inlet side of the prover, then the upstream volume
must be used.
If the meter is located downstream, or on the outlet side of the prover, then the downstream
volume must be used.
Base volume certification 23
Page 38

Section 2: Installation and set-up Operating and maintenance instructions
January 2015 3-9008-701 Rev J
2.4 Calibration integrity seal installation procedure
Purpose:
The purpose is to provide a procedure for ensuring the calibrated volume integrity of the
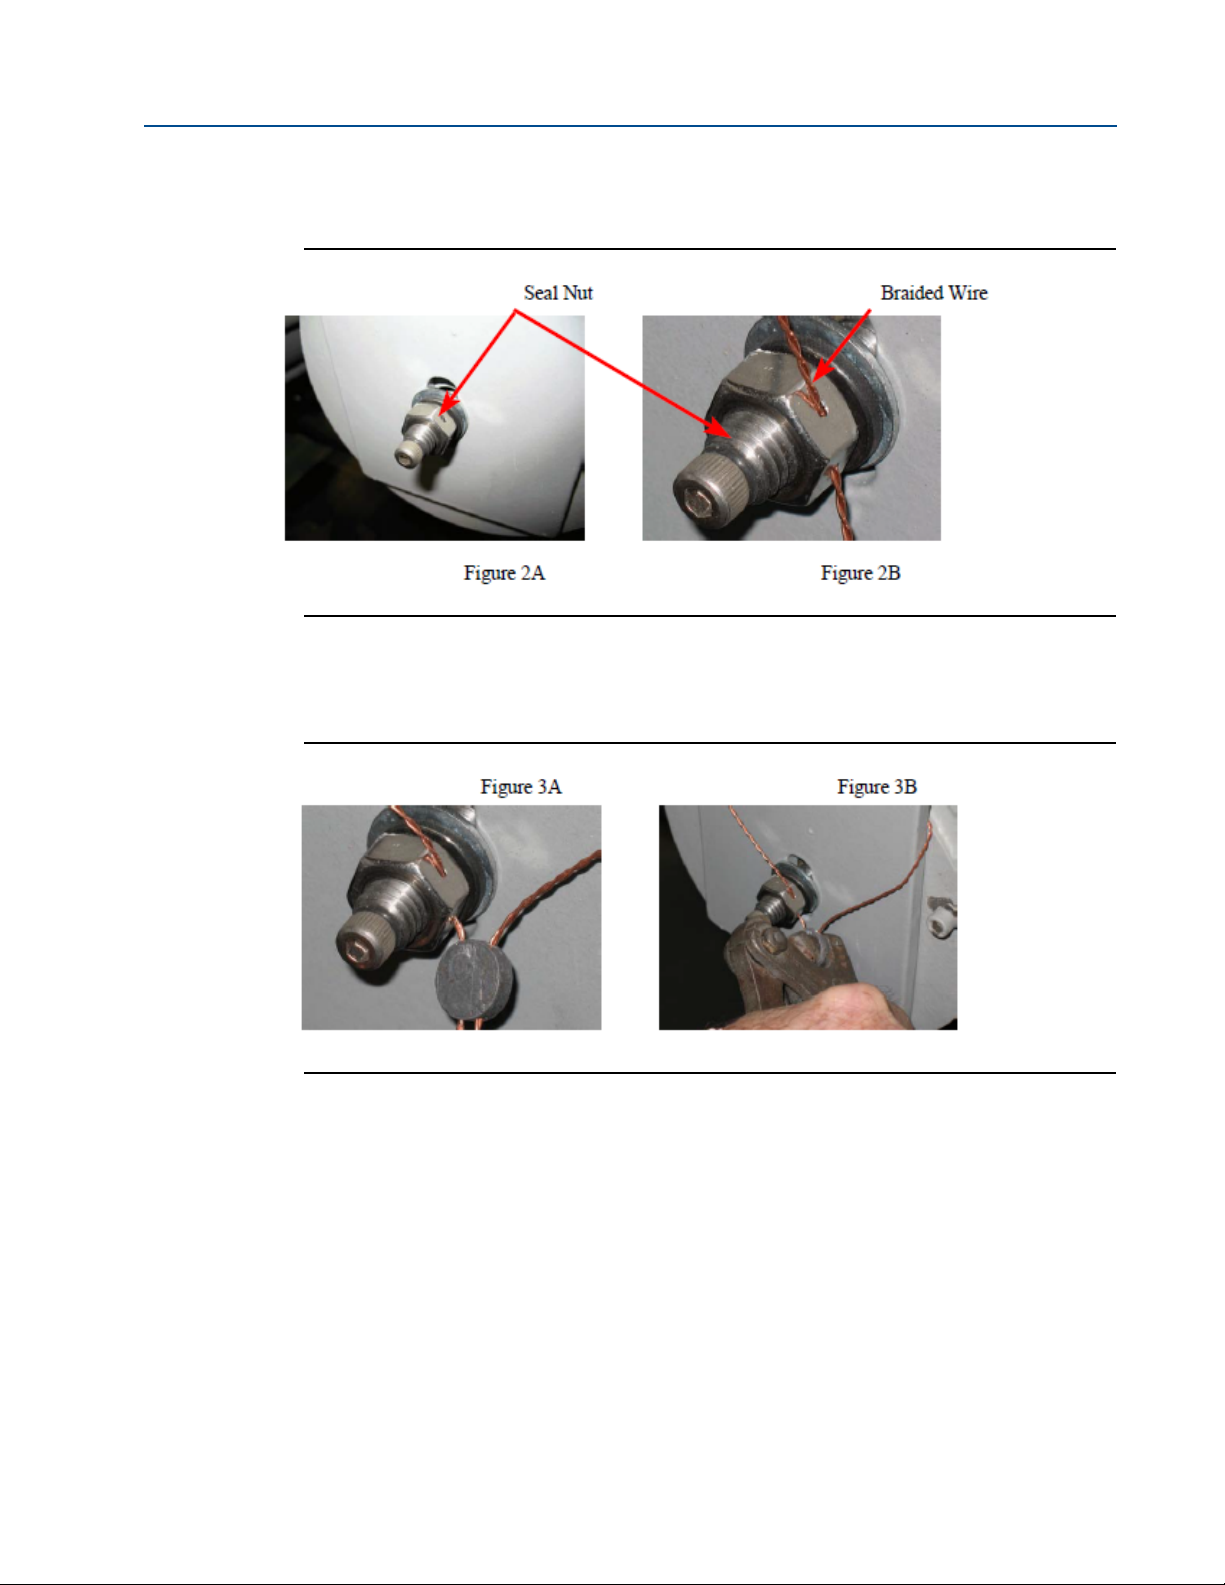
compact prover. The optical assembly as shown in figures 1A and 1B have a simple but sure way
of ensuring the integrity of the assembly.
A security seal can be applied to prevent removal of the cover of the optical assembly which
contains the solid state volume detectors.
The purpose of this seal is to prevent removal of this cover which would expose the switches to
possible tampering which could affect the calibrated volume of the compact prover. The
following steps will demonstrate the process of installing this lead seal.
Location of optical assembly with seal nut and lead seal.
24 Calibration integrity seal installation procedure
Page 39
Operating and maintenance instructions Section 2: Installation and set-up
3-9008-701 Rev J January 2015
Step 1 Once the seal nut is securely tightened in place (see Figure 2A); insert the braided wire
through the hole in the nut as shown in Figure 2B.
Step 2 Wrap the braided wire around the support plate (see Figure 1B).
Step 3 Insert the two ends of the braided wire through the lead seal and slide the seal up the
wire until the slack has been pulled out of the wire (see Figure 3A).
Step 4 Secure the seal using a clamping set of pliers thus closing the holes in the lead seal around
the braided wire.
The final result should appear similar to Figure 1B.
Calibration integrity seal installation procedure 25
Page 40

Section 2: Installation and set-up Operating and maintenance instructions
January 2015 3-9008-701 Rev J
26 Calibration integrity seal installation procedure
Page 41

Operating and maintenance instructions Section 3: Operation
A positive stop feature is incorporated into the outlet flange for fail safe operation. This prevents
any accidental blockage of the process flow stream. Reference Figure 3-4.
3-9008-701 Rev J January 2015
Section 3: Operation
3.1 General operational theory
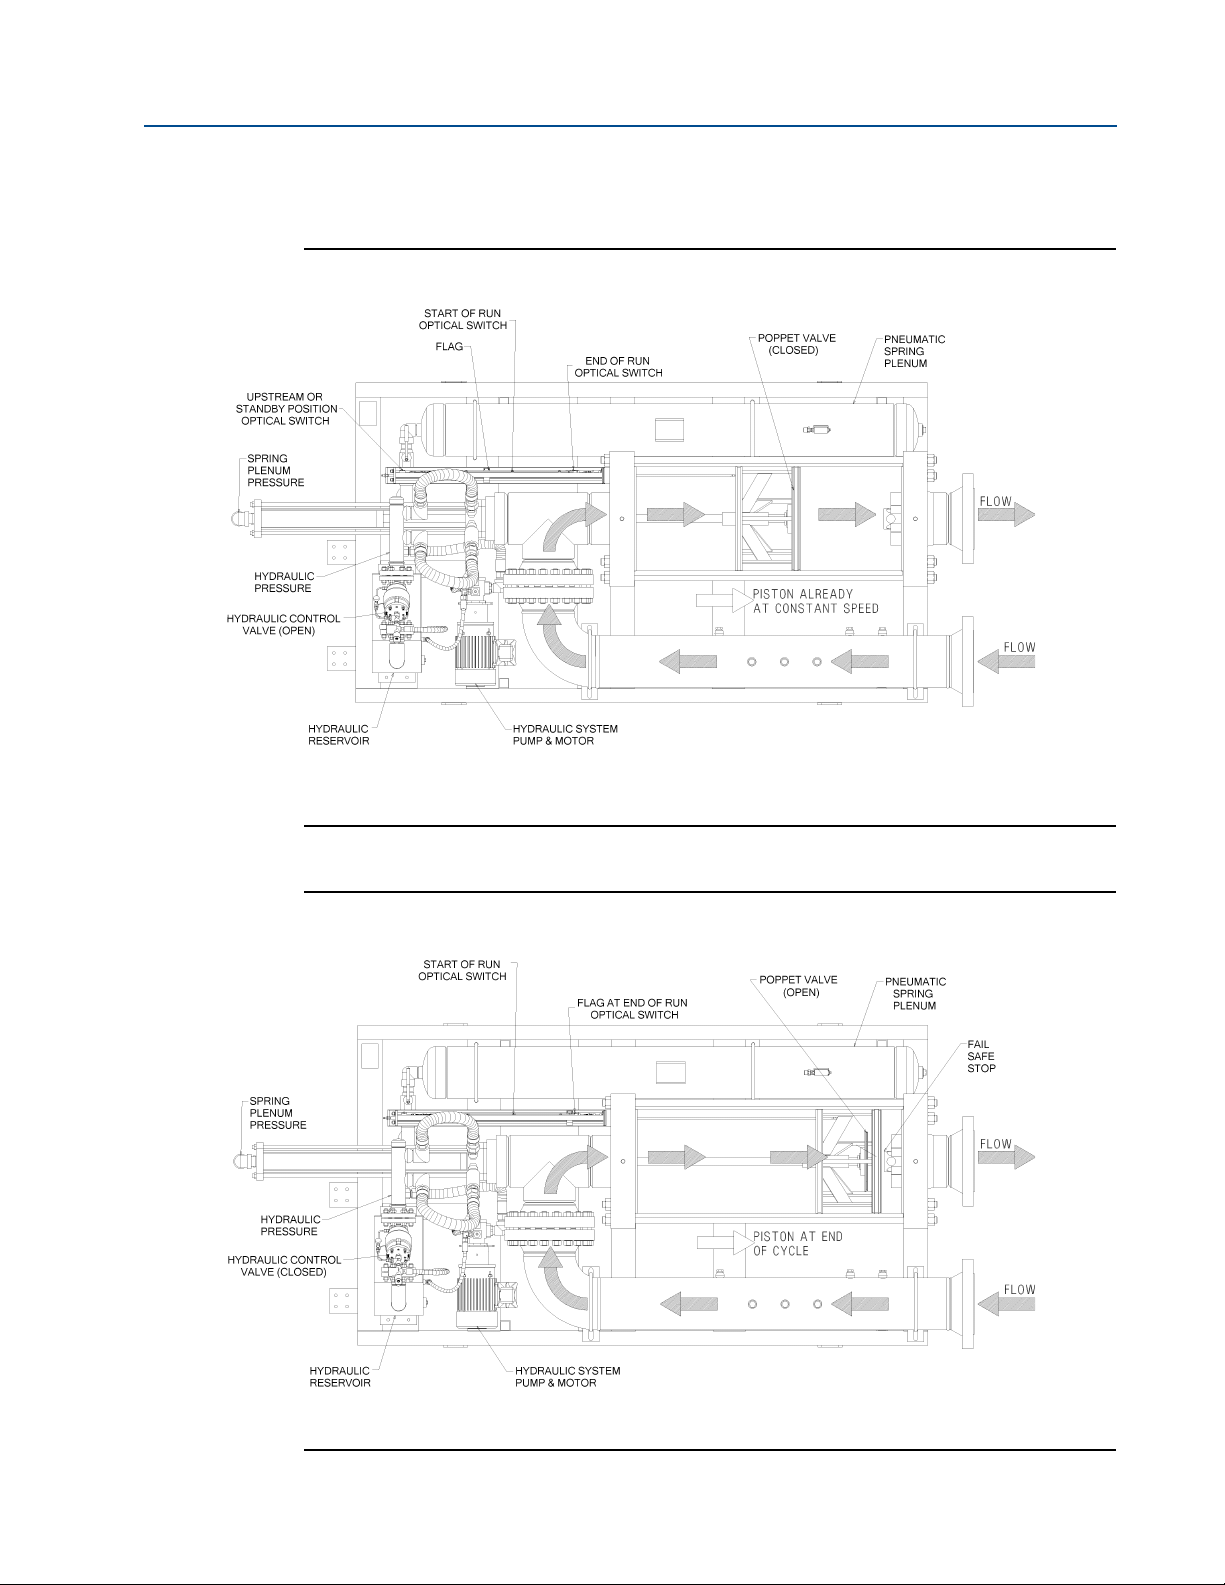
The operational sequence of the compact prover is as follows:
1. The measurement piston is normally in the upstream (standby) position, with the
poppet valve open, and is held in place by the hydraulic pressure on the actuator piston
(Figure 3-1).
2. The hydraulic control valve opens and releases the hydraulic pressure. Pressure from
the pneumatic spring plenum, on the upstream side of the actuator piston, closes the
poppet valve and the piston begins moving downstream at the process fluid flow rate
(Figure 3-2).
3. As the measurement piston moves downstream, the optical volume switches are
‘tripped’ by the flag connected to the piston (Figure 3-3). These volume switch signals
are instantly sent to the operating computer for calculations discussed in Section 4.6.
4. When the flag trips the second optical volume switch, the hydraulic control valve closes.
Hydraulic pressure builds and begins to push the actuator piston upstream, opening
the poppet valve. Process fluid is then allowed to flow through the piston (Figure 3-4).
5. The actuator piston, measurement piston, poppet, actuator shaft, detector shaft and
flag will then move back to the upstream (standby) position (Figure 3-5). Once the
upstream position is reached (Figure 3-1), the hydraulic pump will assume it’s neutral
condition maintaining hydraulic pressure to hold the measurement piston upstream.
The prover is now ready to begin another pass.
General operational theory 27
Page 42

Section 3: Operation Operating and maintenance instructions
January 2015 3-9008-701 Rev J
Figure 3-1 Standby position
Figure 3-2 Initial motion
28 General operational theory
Page 43
Operating and maintenance instructions Section 3: Operation
3-9008-701 Rev J January 2015
Figure 3-3 Proving
Figure 3-4 End of proving run
General operational theory 29
Page 44

Section 3: Operation Operating and maintenance instructions
January 2015 3-9008-701 Rev J
Figure 3-5 Piston returning to upstream position
3.2 Operating instructions
The compact prover should be connected to the process line, similar to Figure 2-1, either
upstream or downstream of the meter under test. Electrical power should be supplied and the
operating computer should be connected to the prover. The operating computer should also be
configured for the application. If these conditions are not met, DO NOT attempt to operate the
compact prover. Refer to Section 2 for Installation and Set-up procedures.
1. Check all drain and vent valves to be sure that they are closed. Vents and drains are
located on the top and bottom of the flow tube end flanges. Reference Figure 1-2.
2. Open the spring plenum shut-off valve.
3. The pneumatic spring plenum must be charged with dry nitrogen for proper operation.
Check the pressure in the spring plenum. There will be a factory-installed gage
mounted to the plenum tank for reference (Figure 3-6). The proper plenum pressure is
determined by the following formula:
where R is a known constant for each size prover. See Table 3-1 below.
30 Operating instructions
Page 45

Operating and maintenance instructions Section 3: Operation
3-9008-701 Rev J January 2015
Table 3-1 Spring plenun ‘R’ values
Prover size R
8”
12” Mini
12”
18”
24”
34”
40”
3.5
3.2
3.2
5
5*
3.7
4.45
* R = 5.88 for Provers shipped before January 1, 2006
Figure 3-6 Spring plenum
Operating instructions 31
Page 46

Section 3: Operation Operating and maintenance instructions
EXPLOSION HAZARD
Regulate the pressure of the supply source to the allowable level and avoid exceeding the
maximum working pressure of the tank.
Failure to do so during the filling of the Nitrogen Tank could result in serious personal injury.
January 2015 3-9008-701 Rev J
If the plenum pressure is greater than the calculated value, the excess pressure must be vented
from the plenum. If the plenum pressure is less than the calculated value, the supply bottle will
need to furnish the necessary pressure needed. Connect the supply bottle according to
manufacturer’s instructions and charge the spring plenum to the required pressure.
Notes:
1. As a guideline, spring plenum pressure should be within 0 to +5% of the calculated
pressure.
2. If prover installation is vertical, use 40 psig in the above formula in place of 60 psig.
3. For provers equipped with the automatic plenum adjustment panel, plenum pressure
should be automatically adjusted before the proving cycle begins. The operating
computer should be configured for this application. See Section 2.2.4 and Section 5.4
for troubleshooting. For vertical provers with plenum adjust panel, consult factory for
new “R” value.
4. With the hydraulic system motor not running, check to see that the hydraulic reservoir
is filled to approximately 75% capacity. If not, fill tank to proper level using hydraulic
fluid specified inSection 1.4.
5. Turn on the hydraulic pump. The hydraulic pressure should build to 380-400 psig (2728 kg/cm ) once the piston reaches the upstream (stand-by) position.This is verified by
the hydraulic system pressure gage, typically located on the hydraulic pump (Figure 3-
7).
6. Slowly open the inlet valve to allow the process fluid to flow into the prover.
32 Operating instructions
Page 47

Operating and maintenance instructions Section 3: Operation
3-9008-701 Rev J January 2015
Figure 3-7 Hydraulic system
7. Vent all air from the system using the hand valves located on the inlet and outlet flanges
of the flow tube. Slowly close the process fluid diverter valve (double block and bleed)
and open the outlet valve. The prover is now ready to begin the proving cycle.
8. Connect the signal cable from the meter under test to the operating computer for
proving operations. Once the operating computer receives all the signals, proving runs
can begin. Reference the operating computer instruction manual for proper computer
operation.
9. After proving runs are completed and results are satisfactory, the process flow may be
diverted back to the process line as described in steps 10 and 11. Once this is done,
power down the prover.
Operating instructions 33
Page 48

Section 3: Operation Operating and maintenance instructions
January 2015 3-9008-701 Rev J
If the process flow is to be left running through the prover, be sure to leave the hydraulic system
motor running. The hydraulic pump will go into by-pass mode and hold the piston upstream.
The motor will draw minimal current for low power consumption.
10. Open the process fluid diverter valve (double block and bleed) and slowly close the
inlet/outlet valves to the process line.
11. Drain the prover flow tube by opening the appropriate drain and vent valves located on
the top and bottom of the inlet and outlet flanges.
Important:
Disposal of drained fluid should be done in an environmentally responsible manner.
34 Operating instructions
Page 49

Operating and maintenance instructions Section 4: Maintenance
MAINTENANCE HAZARD
Ensure that all equipment doors are closed and protective covers are in place, except when
maintenance is being performed by qualified persons.
Failure to do so can cause personal injury.
3-9008-701 Rev J January 2015
Section 4: Maintenance
4.1 Seal Leak Check
For factory part number of seal Leak Detector Kit, see Section 7: Parts list, Parts.
Reference Figure 4-1 and Figure 4-2.
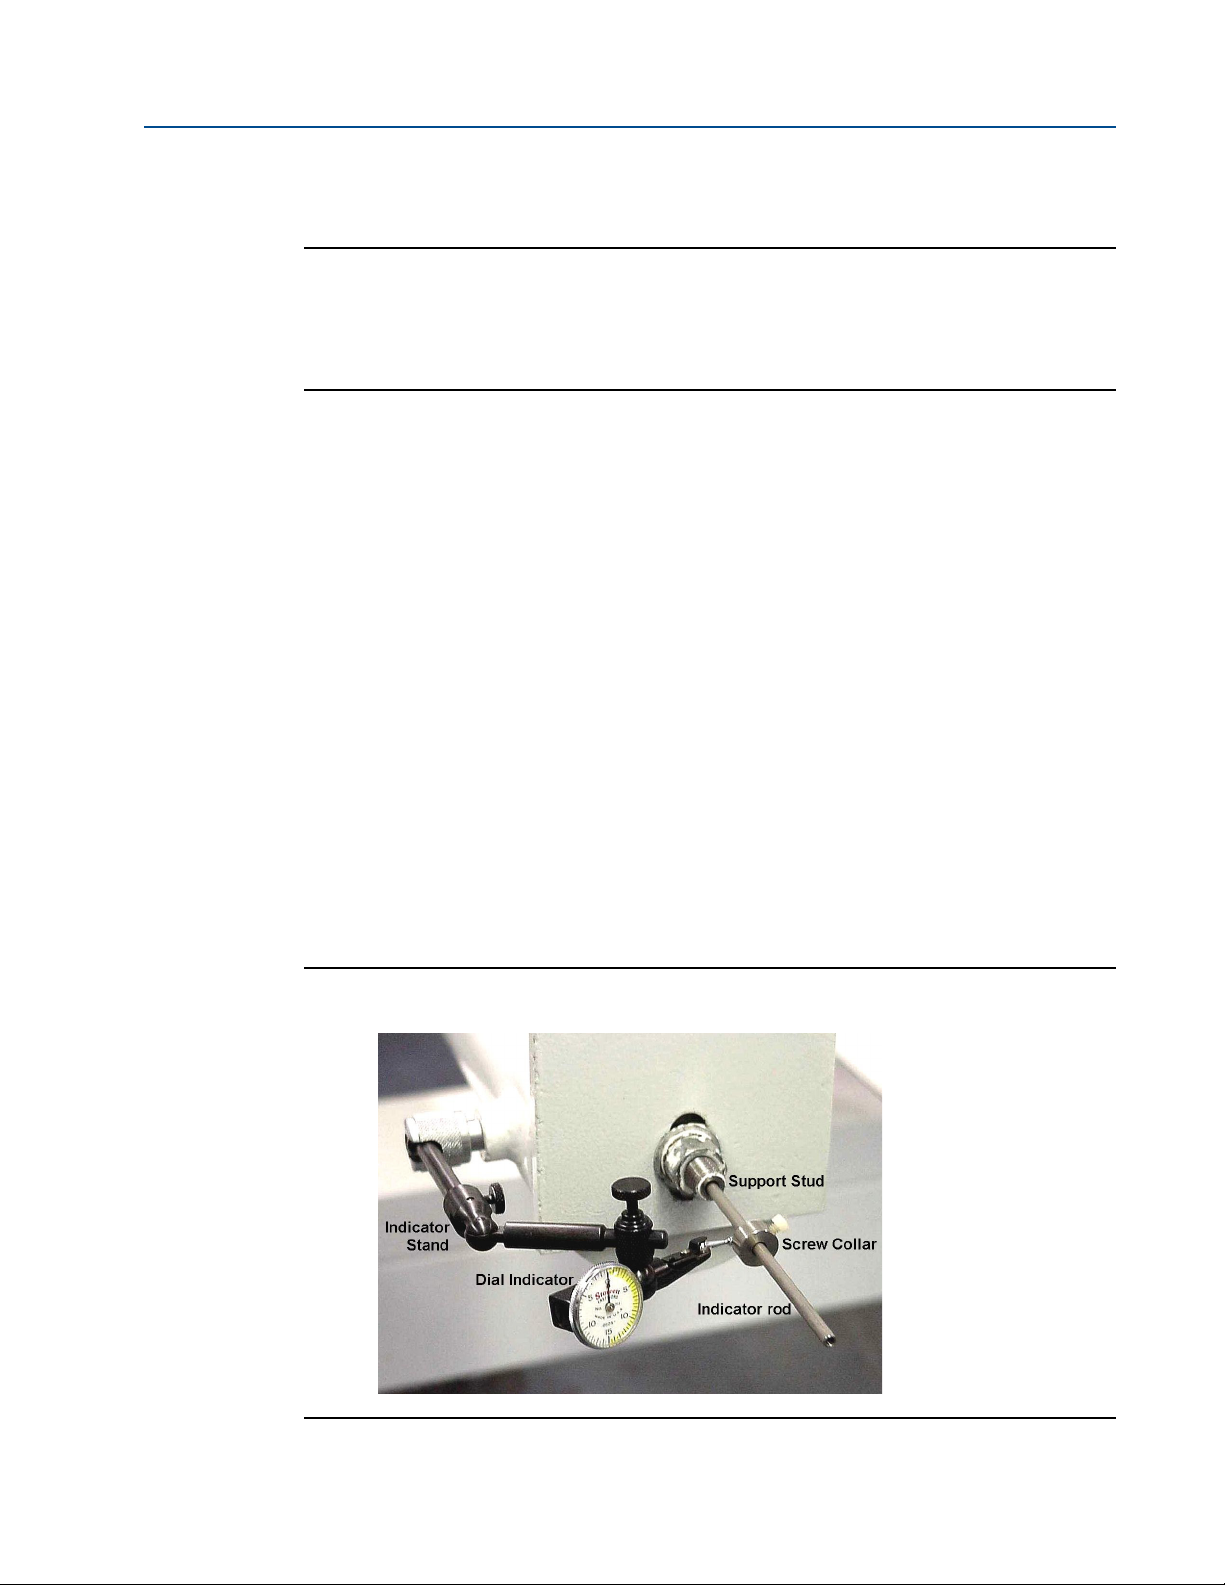
Figure 4-1 Leak detector kit
Seal Leak Check 35
Page 50
Section 4: Maintenance Operating and maintenance instructions
January 2015 3-9008-701 Rev J
Important:
It is ESSENTIAL that the liquid and prover temperatures remain stable during the leak check
procedure as thermal expansion or contraction will give incorrect results.
The kit shown in Figure 4-1 is designed to operate with the Optical A ssembly cover tube securely
anchored in place. The mounting boss on the outboard end of the cover tube must be
approximately 90° from the support bracket. Re-position if necessary.
The Compact Prover measurement piston seals may be checked as follows:
1. Block the prover OUTLET using a double block and bleed valve (bubble-tight shut off) or
blind flanges. Check the block and eliminate any leaks.
2. Fill the prover with fluid and bleed ALL AIR from the flow tube by operating the vent
valves located on the inlet and outlet flanges. This operation may move the
measurement piston within the flow tube. Verify that all the vent and drain valves on
the prover are free from leaks. Eliminate any and all leaks if necessary.
3. Verify the spring plenum pressure for the fluid pressure applied. See Section 3.2, step 3,
for proper calculations. Adjust the spring plenum pressure to the correct calculated
value. A minimum of 75 psig (5.3 kg/cm) is required.
4. Remove the screw from the boss on the end of the optical cover. Thread the indicator
stand into the boss. Mount the dial indicator onto the indicator stand. Remove the
screw from the end of the optical support stud.
Figure 4-2 Leak detector kit installed
36 Seal Leak Check
Page 51

Operating and maintenance instructions Section 4: Maintenance
3-9008-701 Rev J January 2015
5. Place the measurement piston in the upstream position for simple attachment of the
indicator rod. The measurement piston may be moved upstream by activating the
hydraulic system.
6. The indicator rod is designed in multiple sections to span a distance that will reach the
length of the optical assembly. This allows for multiple leak check positions along the
flow tube. The first rod piece to be used is the piece with the larger thread. Insert this
piece through the hole in the support stud and thread into the end of the detector
shaft. Add rod sections as necessary to reach leak check positions desired, pay
attention to the area between the volume switches. The measurement piston can be
moved downstream by releasing pressure on the outlet flange vent valve.
Important:
Do not allow indicator rod to completely go into the support stud while moving the
measurement piston downstream. Allowing the indicator rod to go completely into the support
stud may result in severe damage to the equipment
7. Be certain the hydraulic system motor is not running before the leak check test begins.
This assures that only the spring plenum pressure is acting on the measurement piston.
8. Position the dial indicator probe near the indicator rod. Slide the screw collar down the
indicator rod until contact is made with the probe of the dial indicator. Move the screw
collar only slightly more in order to ‘pre-load’ the dial indicator and then tighten the
collar to the indicator rod.
9. Zero the dial indicator and monitor for five minutes. A dial indicator movement greater
than 0.004 inches (.102 mm) in five minutes indicates that a leak is present in the
system. Inspect the system and eliminate any leaks. Remove any possible trapped air.
Refer to Section 5: Troubleshooting for detailed instructions on measurement piston
seal replacement if necessary.
10. Once testing is complete and results are satisfac tory, return the measurement piston to
the full upstream position and remove all parts of the indicator rod and the remaining
components of the seal leak detector kit from the prover and replace the screws in the
support stud and mounting boss.
4.2 Base volume determination
4.2.1 Certification techniques
Compact prover base volume determination varies with frequency of use and operating
environment. Annual base volume re-certification is typical. Re-certification cycles should not
exceed three (3) years. The volume determination procedures in this manual are designed to
assist the user in creating an effective certification program.
The exact upstream and downstream base volumes must be known for correct proving
calculations. For example, a 12” compact prover with a nominal volume of 15 U.S. gallons could
Base volume determination 37
Page 52

Section 4: Maintenance Operating and maintenance instructions
January 2015 3-9008-701 Rev J
be determined to have an exact volume of 15.00123 or 14.99712 gallons. These types of
numbers are typical and necessary. The particular volume used is determined by the physical
location of the meter under test, either upstream or downstream of the prover. If only one base
volume is used for proving, base volume certification will only need to be completed for the
needed volume and not for both.
The base volume of the compact prover is verified at the factory using test measures that are
traceable to the National Institute of Standards and Technologies (NIST). Additional information
about certification techniques can be found in the American Petroleum Institute (API) manual of
Petroleum Measurement Standards, Chapter 4.2 for Small Volume Provers, Chapter 4.7 for Field
Test Measures, and Chapter 12.2 for Calculation of Petroleum Quantities.
Volume Displacement Certification:
The following procedures describe the compact prover base volume determination using the
water draw method. There are three procedures explained; (a) an Upstream only, (b) a
Downstream only, and (c) the Combined method. The measurement piston seal integrity
should be verified prior to any water draw by performing the seal leak check as described in
Section 4.1.
Important:
Before certification is attempted, the prover should be level and isolated from any connecting
piping systems other than those related to the water draw. In choosing the location of the
prover during the test, temperature variations must be considered. Temperatures must be
maintained as stable as possible throughout the operation.
Equipment Required:
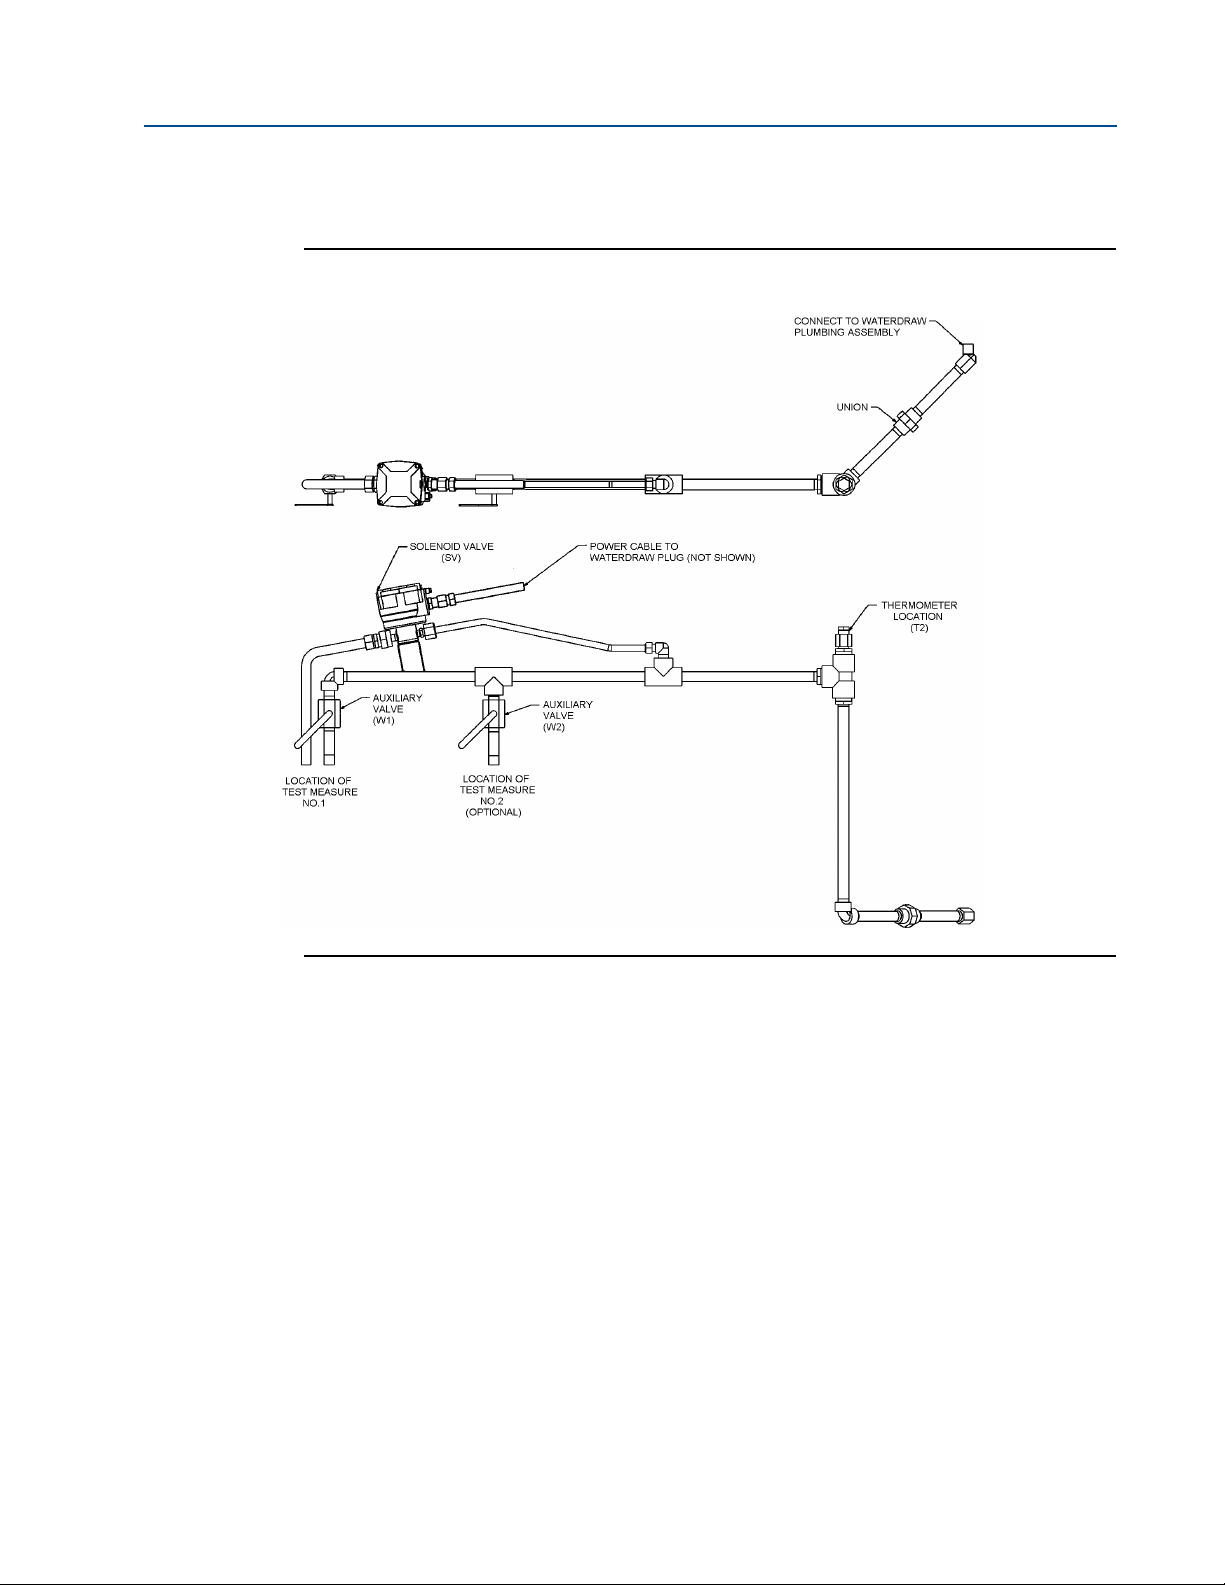
• Water draw hardware kit with manual valves and a solenoid valve similar to Figure 4-3.
For part numbers of factory available water draw hardware kits, see Section 7.
• A plumbing setup as shown in Figure 4-4. Check all valves and any threaded
connections for leaks prior to beginning the water draw procedure. The plumbing
setup must be leak free.
• Certified High Sensitivity (Field Standard) Test Measure traceable to the National
Institute of Standards and Technology (N.I.S.T.) or other certifying agency.
• A water source with a flow rate of approximately 10 gpm (38 lpm) at 30-100 psi (207 to
689 kPa) non-fluctuating and free from entrained air.
• One digital thermometer with contact probe.
• Three (3) glass stem thermometers with 1/5 degree divisions and a range of 30 to 124.F
(-1 to 50°C), traceable to the National Institute of Standards and Technology (N.I.S.T.)
or other certifying agency, as applicable. One thermometer may be mounted in a
temperature thief device. See Figure 4-5.
• One pressure gauge, 0-100 psig range (689 kPa).
38 Certification techniques
Page 53

Operating and maintenance instructions Section 4: Maintenance
3-9008-701 Rev J January 2015
• Certification Data Sheet for recording data. Refer to Figure 4-6 for example data sheet.
Refer to Section 4.3 for explanation of symbols.
Notes:
1. Temperature transmitters are not recommended.
2. Factory water draw hardware kits are provided with (2) thermometers.
3. Pressure transmitters are not recommended.
4. Pressure gauges are not included in factory water draw hardware kits.
Certification techniques 39
Page 54

Section 4: Maintenance Operating and maintenance instructions
January 2015 3-9008-701 Rev J
Figure 4-3 Compact prover water draw assembly typical NEC style (non-explosion proof)
40 Certification techniques
Page 55
Operating and maintenance instructions Section 4: Maintenance
3-9008-701 Rev J January 2015
Figure 4-3 Compact prover water draw assembly (continued) Typical Ex-proof style
Certification techniques 41
Page 56

Section 4: Maintenance Operating and maintenance instructions
January 2015 3-9008-701 Rev J
Figure 4-4 Water draw system
4.2.2 Water draw procedure: (Reference Figure 4-4 and notes on page 47)
1. Isolate the prover from operational lines using double block and bleed valves or blind
flanges. Verify that the prover is level. Drain and flush all process fluid from the prover.
Dispose of all process fluids in an environmentally safe manner.
2. Assemble the water draw plumbing system. See Figure 4-4. All connections must be
leak-free to assure proper operation. It is recommended that thread sealant be used on
all pipe connections. Pipe sizing should be equal to or greater than the size of the vent
and drain connections (V1, V2, D1, D2) that are supplied on the prover.
3. For factory built NEC type water draw hardware kits, connect a 3 conductor cable from
the enclosure terminal block to the correct power source, 115 or 230 VAC as applicable.
See Figure 4-3. The remaining 2 conductor cable, connects to receptacle J-3 on the
prover Interface Board. Access to the interior of the interface enclosure will be
necessary. Figure 4-7 shows the location of the interface board on the NEC-type prover
electrical panel. Figure 2-3 and Figure 2-4 show the different locations possible for J-3
on the different interface boards.
For factory built ATEX type water draw hardware kits equipped with the water draw plug, simply
connect the plug to the receptacle on the control enclosure. The water draw plug and
receptacle is available as an option for the NEC style factory built water draw hardware kits.
Contact a Daniel representative for more information.
42 Water draw procedure: (Reference Figure 4-4 and notes on page 47)
Page 57

Operating and maintenance instructions Section 4: Maintenance
3-9008-701 Rev J January 2015
4. Supply appropriate operational voltage (+12 or 24 VDC) to the prover interface board
at receptacle J-2, pins 2 (-) and 4 (+). Reference Section 2.4 to verify proper voltage
required for the interface board. Reference Figure 2-3 and Figure 2-4 for the location of
J-2.
5. Loosen and remove the cover on the optical detector switch assembly. Be careful not to
damage the optical switches on removal or replacement of optical cover during the
entire water draw process. See Note 4 on page 47.
6. Be sure the prover hydraulic system is connected to the appropriate AC power source.
Reference the documentation package for the electrical schematic to verify proper
voltage required.
Do not start the hydraulic system motor at this time. Check to see that the hydraulic tank is
filled to its proper level, reference Section 3.2, step 4.
7. Verify the spring plenum cut off valve is open and adjust the spring plenum pressure to
approximately 75 psig (5.3 kg/cm ).
8. The prover and water draw system must now be filled with water and cycled to purge
ALL air. See Note 1 on page 47.
Open valves V1, V2, D1, D2, W1 and W3. Start the flow of water into the prover. As the prover
fills with water, air will escape through valve W1. Observe the flag position.
The measurement piston will travel to the full downstream position. Once water appears at W1,
set the valves for upstream flow by closing V2 and D1. Valves V1, D2, W1 and W3 remain open.
Observe the flag position.
The measurement piston will now travel to the full upstream position. When water appears
again at W1, reset the valves for downstream flow by opening D1 and V2, and then closing V1
and D2. After the piston reaches the full downstream position, this process should be repeated
until ALL air is removed from the system.
9. Once all the air is removed, set the valves for downstream flow (first open V2 and D1,
then close V1 and D2). Close valve W3 to allow the test measure to begin filling. When
the test measure fills, throttle valve W3 to allow water to escape at the same rate that
water is entering the test measure to maintain the water level in the test measure at or
near the zero mark. Allow system to circulate until the prover and test measure
temperatures are within 1/2.F (1/4.C) of each other.
Water draw procedure: (Reference Figure 4-4 and notes on page 47) 43
Page 58

Section 4: Maintenance Operating and maintenance instructions
January 2015 3-9008-701 Rev J
Be sure this procedure places the measurement piston and flag into the full downstream
position.
10. The measurement piston must now be placed into the start position for the
measurement cycle.
For an Upstream water draw (procedure a): Skip to step 19.
For a Downstream (procedure b) or Combined (procedure c) water draw: Turn on the hydraulic
system motor. Toggle the UPSTREAM/DOWNSTREAM switch (S2) on the interface board to the
downstream position. Actuate the RUN/RETURN switch (S1) to the return position. (See Note 3
on page 47.) This will engage the hydraulic system and return the piston upstream. Reference
Figure 2-3 and Figure 2-4.
Once the measurement piston reaches the upstream position, actuate the RUN/RETURN switch
(S1) to the run position. This will release the hydraulic pressure and the measurement piston will
begin traveling downstream. This will also open the solenoid valve (SV) on the water draw
hardware kit. (If this water draw procedure is being repeated from step 19, valve W1 may be reopened). When the flag nears the first optical switch (within 1” to 2”), close valve W1 while
throttling valve W3 back to maintain water level in the test measure at or near the zero mark.
Replace the optical assembly cover immediately. The hydraulic system motor may now be
turned off if desired.
11. Water flow into the test measure is now only through the solenoid valve (SV). When the
flag enters the first optical volume switch, the solenoid valve (SV) will close and all
water flow will stop. At this point, fully open valve W3 to drain the test measure and
wait any specified drain time. Close valve W3.
12. Check and record the system (flow tube) pressure at P1. Actuate the RUN/RETURN
switch (S1) to the run position. (See Note 3 on page 47.) This will open the solenoid
valve (SV) on the water draw hardware kit and begin to fill the test measure. Open valve
W1, if desired, to increase piston travel speed.
13. Record temperature measurements at T1 and T2 under flowing conditions.
14. Valve W1 must be closed before flag reaches the second optical volume switch. This
can be determined by listening to the tone of the water splashing in the test measure.
When the water level begins to rise into the tapered top of the test measure, the tone
will rapidly increase. At this point, immediately close valve W1. When the flag enters the
second optical volume switch, valve SV will close and the water flow will stop. The test
measure now contains the downstream volume.
44 Water draw procedure: (Reference Figure 4-4 and notes on page 47)
Page 59
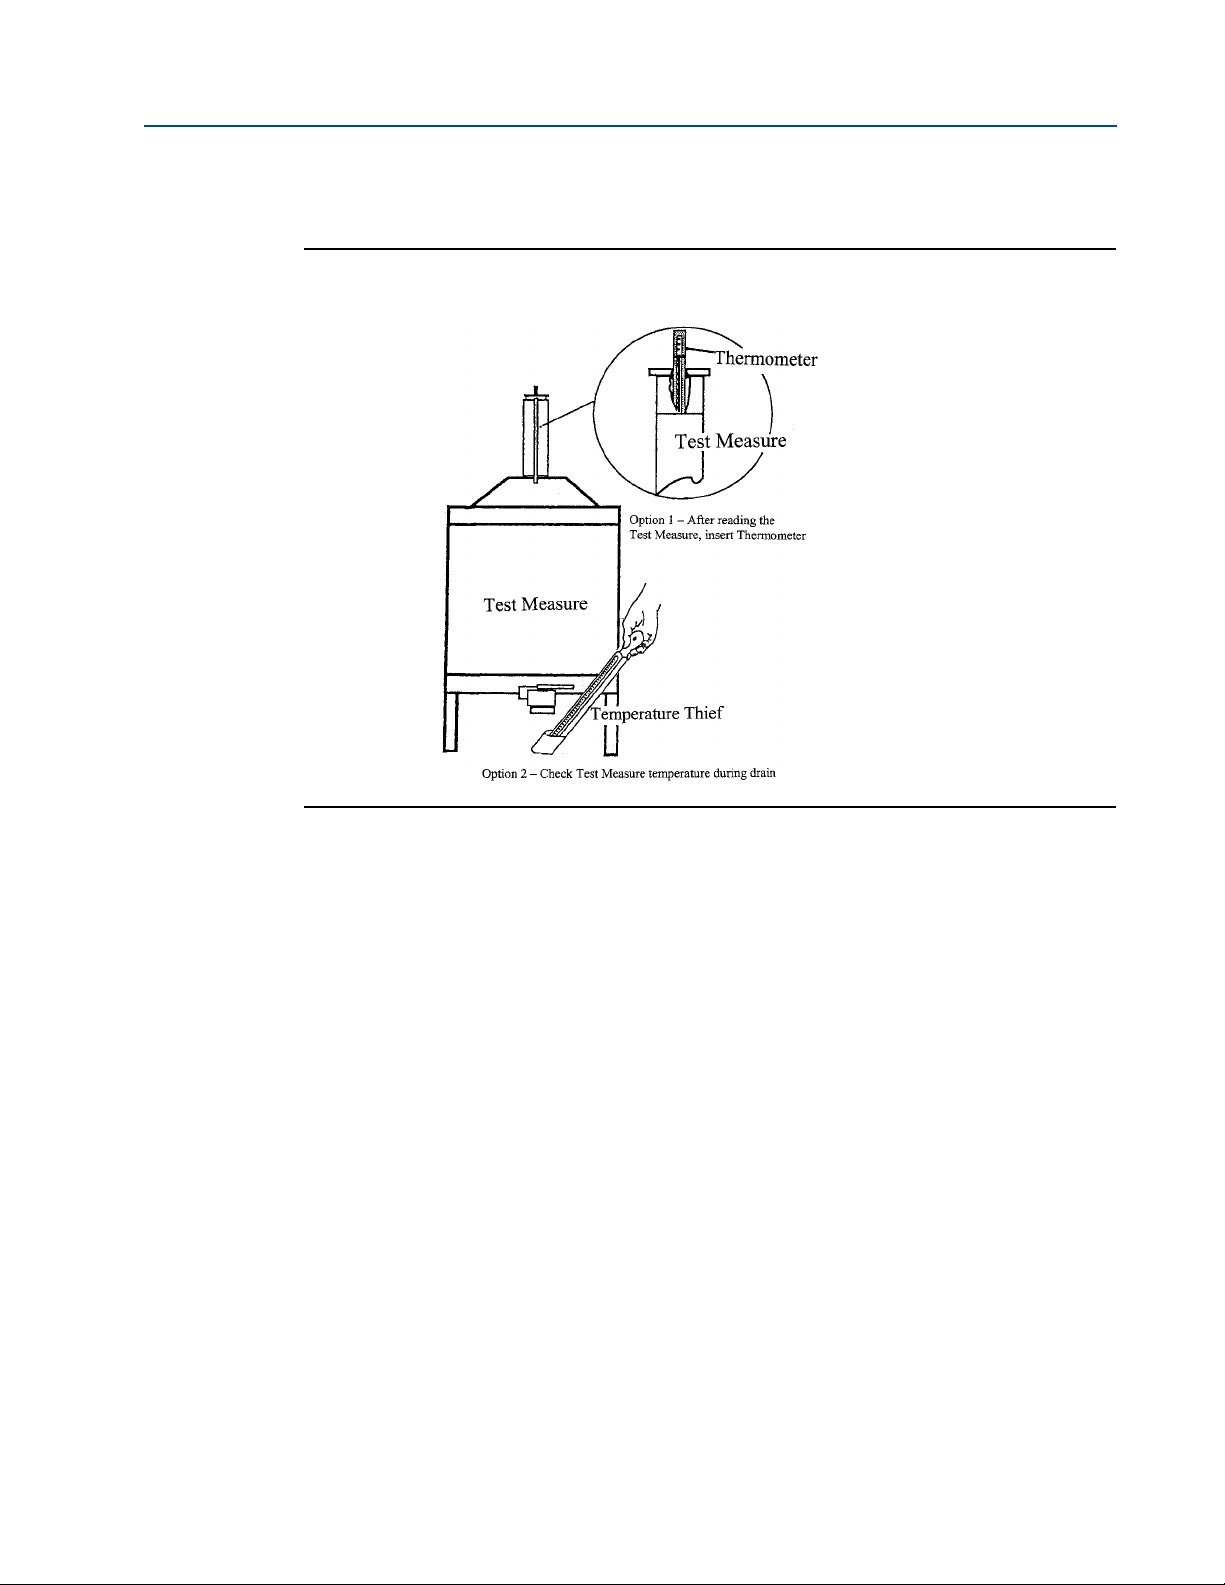
Operating and maintenance instructions Section 4: Maintenance
3-9008-701 Rev J January 2015
Figure 4-5 Test measure temperature stabilization
15. Slide optical assembly cover back to expose the second optical volume switch and the
ends of the invar rods. Measure and record the temperature at Td (invar rod
temperature) using the digital thermometer and contact probe. Replace the optical
assembly cover. See Note 4 on page 47.
16. Record the water level shown on the calibrated section of the test measure. This
measurement must be taken from the bottom of the meniscus inside the glass tube.
17. Record Tm, the temperature of the test measure (i.e. the water temperature inside the
test measure). Open valve W3 momentarily, allowing about ½ gallon (2 liters) of water
to drain out, and measure the temperature of the drained water with the temperature
thief. (Figure 4-5).
18. Open valve W1 momentarily to replace the water drained from the test measure. This
will allow the flag to proceed downstream just beyond the second optical volume
switch.
19. For the Upstream (procedure a) and Combined (procedure c) water draw: Verify valve
W1 is closed and reset the valves for upstream flow (V1 and D2 open; V2 and D1
closed). Proceed to step 20.
20. For the Downstream (procedure b) water draw: Return to step 10 and repeat the
process for as many Downstream cycles as desired. See Note 2 on page 47. Be certain
the optical assembly cover is in place and toggle the UPSTREAM/DOWNSTREAM switch
(S2) on the interface board to the upstream position. Actuate the RUN/RETURN switch
(S1) to the run position. (See Note 3 on page 47-14.) This will open the solenoid valve
(SV) and the measurement piston will begin to move upstream. Throttle valve W3, if
Water draw procedure: (Reference Figure 4-4 and notes on page 47) 45
Page 60

Section 4: Maintenance Operating and maintenance instructions
January 2015 3-9008-701 Rev J
necessary, to maintain the water level in the test measure near the zero mark. When the
flag exits the second optical volume switch, the solenoid valve (SV) will close and the
water flow will stop.
21. Fully open valve W3 to drain the test measure and wait any specified drain time. Close
valve W3.
22. Check and record the system (flow tube) pressure at P1. Actuate the RUN/RETURN
switch (S1) to the run position. (See Note 3 on page 47.) This will open the solenoid
valve (SV) on the water draw hardware kit and begin to fill the test measure. Open valve
W1, if desired, to increase piston travel speed.
23. Record temperature measurements at T1 and T2 under flowing conditions.
24. Valve W1 must be closed before the flag reaches the first optical volume switch. This
can be determined by listening to the tone of the water splashing in the test measure.
When the water level begins to rise into the tapered top of the test measure, the tone
will rapidly increase. At this point, immediately close valve W1. When the flag exits the
first optical volume switch, valve SV will close and the water flow will stop. The test
measure now contains the upstream volume.
25. Slide optical assembly cover back to expose the second optical volume switch and the
ends of the invar rods. Measure and record the temperature at Td (invar rod
temperature) using the digital thermometer and contact probe. Replace the optical
assembly cover. See Note 4 on page 47.
26. Record the scale reading shown on the calibrated section of the test measure. This
measurement must be taken from the bottom of the meniscus inside the glass tube.
27. Record Tm, the temperature of the test measure (i.e. the water temperature inside the
test measure). See Figure 4-5. Open valve W3 momentarily, allowing about ½ gallon (2
liters) of water to drain out, and measure the temperature of the drained water with the
temperature thief.
28. Open valve W1 momentarily to replace the water drained from the test measure. This
will allow the flag to proceed upstream just beyond the first optical volume switch.
29. For the Upstream (procedure a) water draw: The measurement piston must be moved
to the downstream position. Close valve D2, and open valves V2 and D1. This will allow
the measurement piston to move downstream. Observe the flag position until the
piston reaches the full downstream position and replace the optical cover. Proceed
from step 19 for as many Upstream measurement cycles as desired. See Note 2 on page
47.
For the Combined (procedure c) water draw: Reset the valves for downstream flow (V2 and D1
open; V1 and D2 closed) and continue to step 30.
30. Toggle the UPSTREAM/DOWNSTREAM switch (S2) on the interface board to the
downstream position. Actuate the RUN/RETURN switch (S1) to the run position. (See
Note 3 on page 47.) This will open the solenoid valve (SV) and the measurement piston
will begin to move downstream. Throttle valve W3, if necessary, to maintain the water
46 Water draw procedure: (Reference Figure 4-4 and notes on page 47)
Page 61

Operating and maintenance instructions Section 4: Maintenance
3-9008-701 Rev J January 2015
level in the test measure near the zero mark. When the flag enters the first optical
volume switch, the solenoid valve (SV) will close.
31. Fully open valve W3 to drain the test measure and wait any specified drain time. Close
valve W3. At this point, actuating the RUN/RETURN switch (S1) will begin the next
measurement cycle. (See Note 3 on page 47.) The procedure may now be repeated
from step 12 for as many Combined water draw cycles as desired. See Note 2 on page
47.
Notes for water draw procedures:
1. Once the water draw displacement procedure is started it should be carried to
conclusion in a continuous process without interruption or delay.
2. One measurement cycle of the water draw process must be performed with the flow
rate reduced 25 to 50%. This may be accomplished by throttling valve W1. This is
typically performed for the second cycle.
3. Run/Return and Upstream/Downstream selector switches are labeled S1 and S2
(respectively) on the Interface Board itself. ATEX style provers, and NEC provers
equipped with the optional water draw plug, have these switches operational to the
front of the control enclosure, or interface enclosure (as applicable). Labels on the front
of the enclosure will dictate the switch operation for water draw purposes.
4. The optical cover should be replaced for each measurement cycle. However, it does not
have to be fastened permanently each time. Simply slip the cover completely over the
optical assembly to black out any ambient light that could alter optical switch
operation.
5. Once the water draw procedure is completed, replace the optical cover and follow the
procedure in Section 2.4.
Water draw procedure: (Reference Figure 4-4 and notes on page 47) 47
Page 62
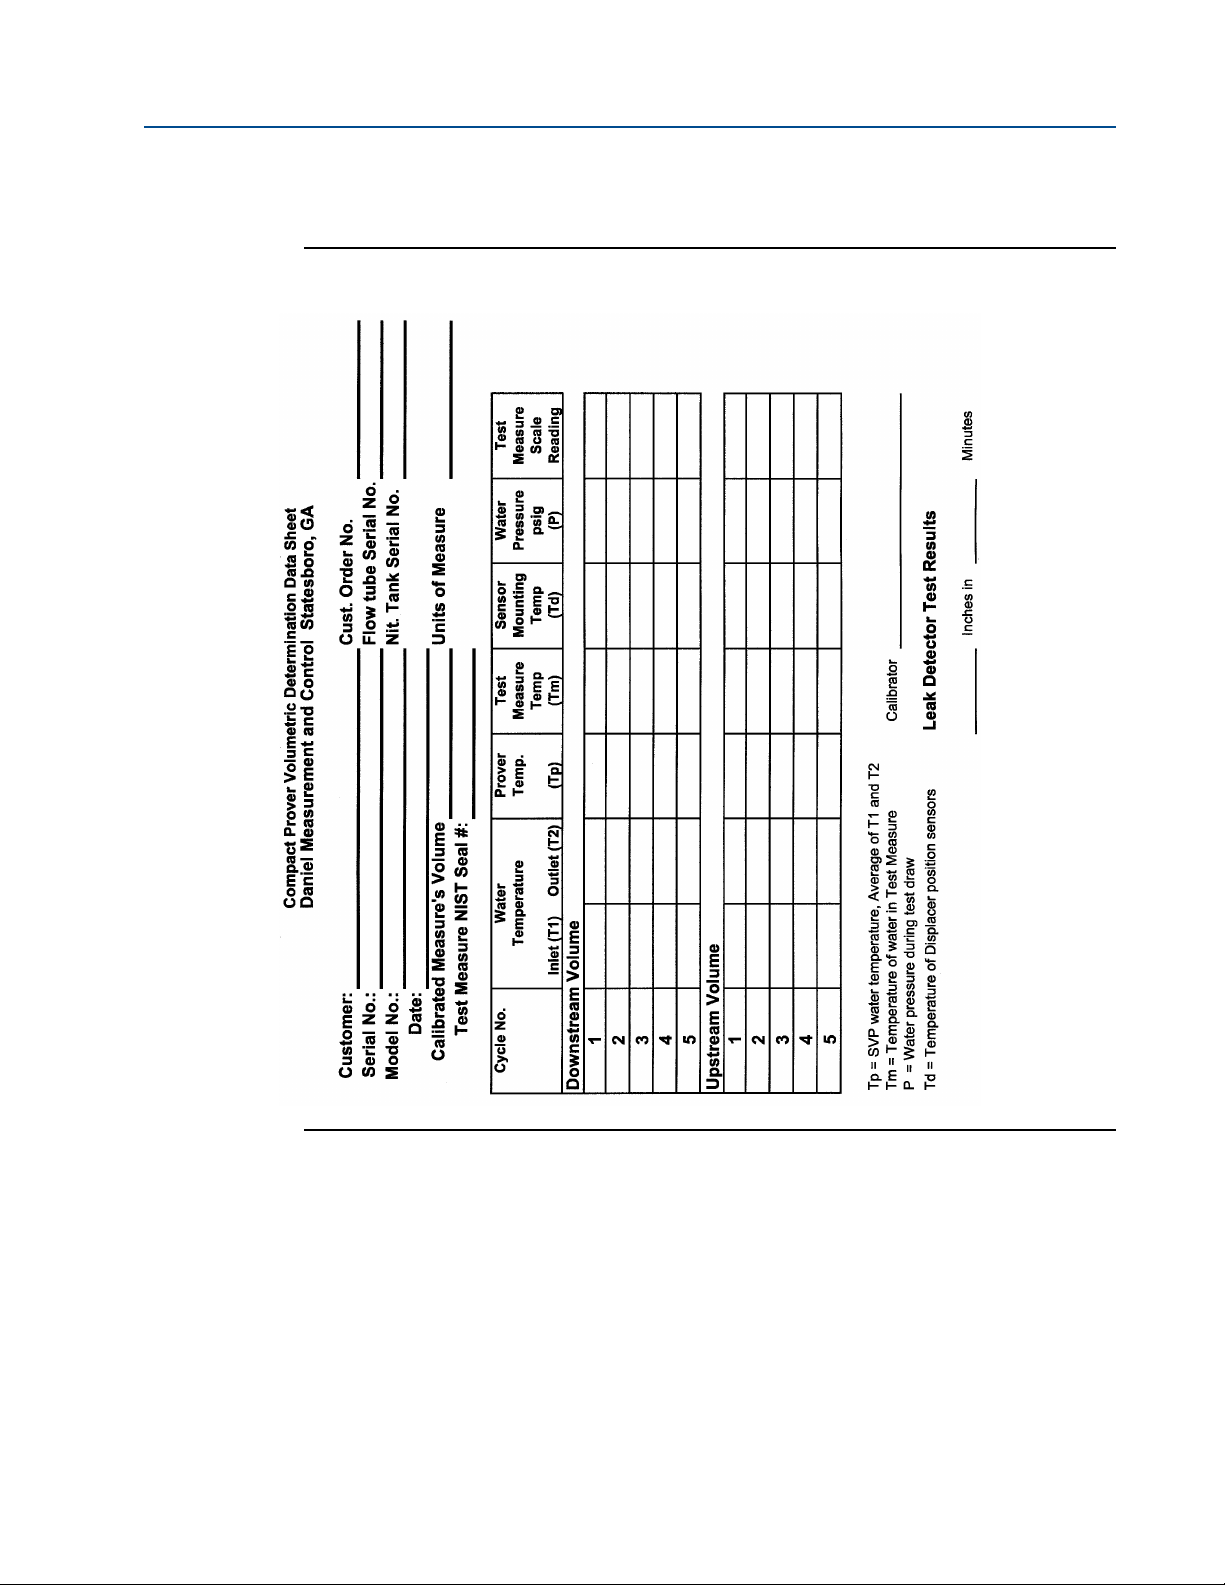
Section 4: Maintenance Operating and maintenance instructions
January 2015 3-9008-701 Rev J
Figure 4-6 Typical volumetric determination data sheet
48 Water draw procedure: (Reference Figure 4-4 and notes on page 47)
Page 63
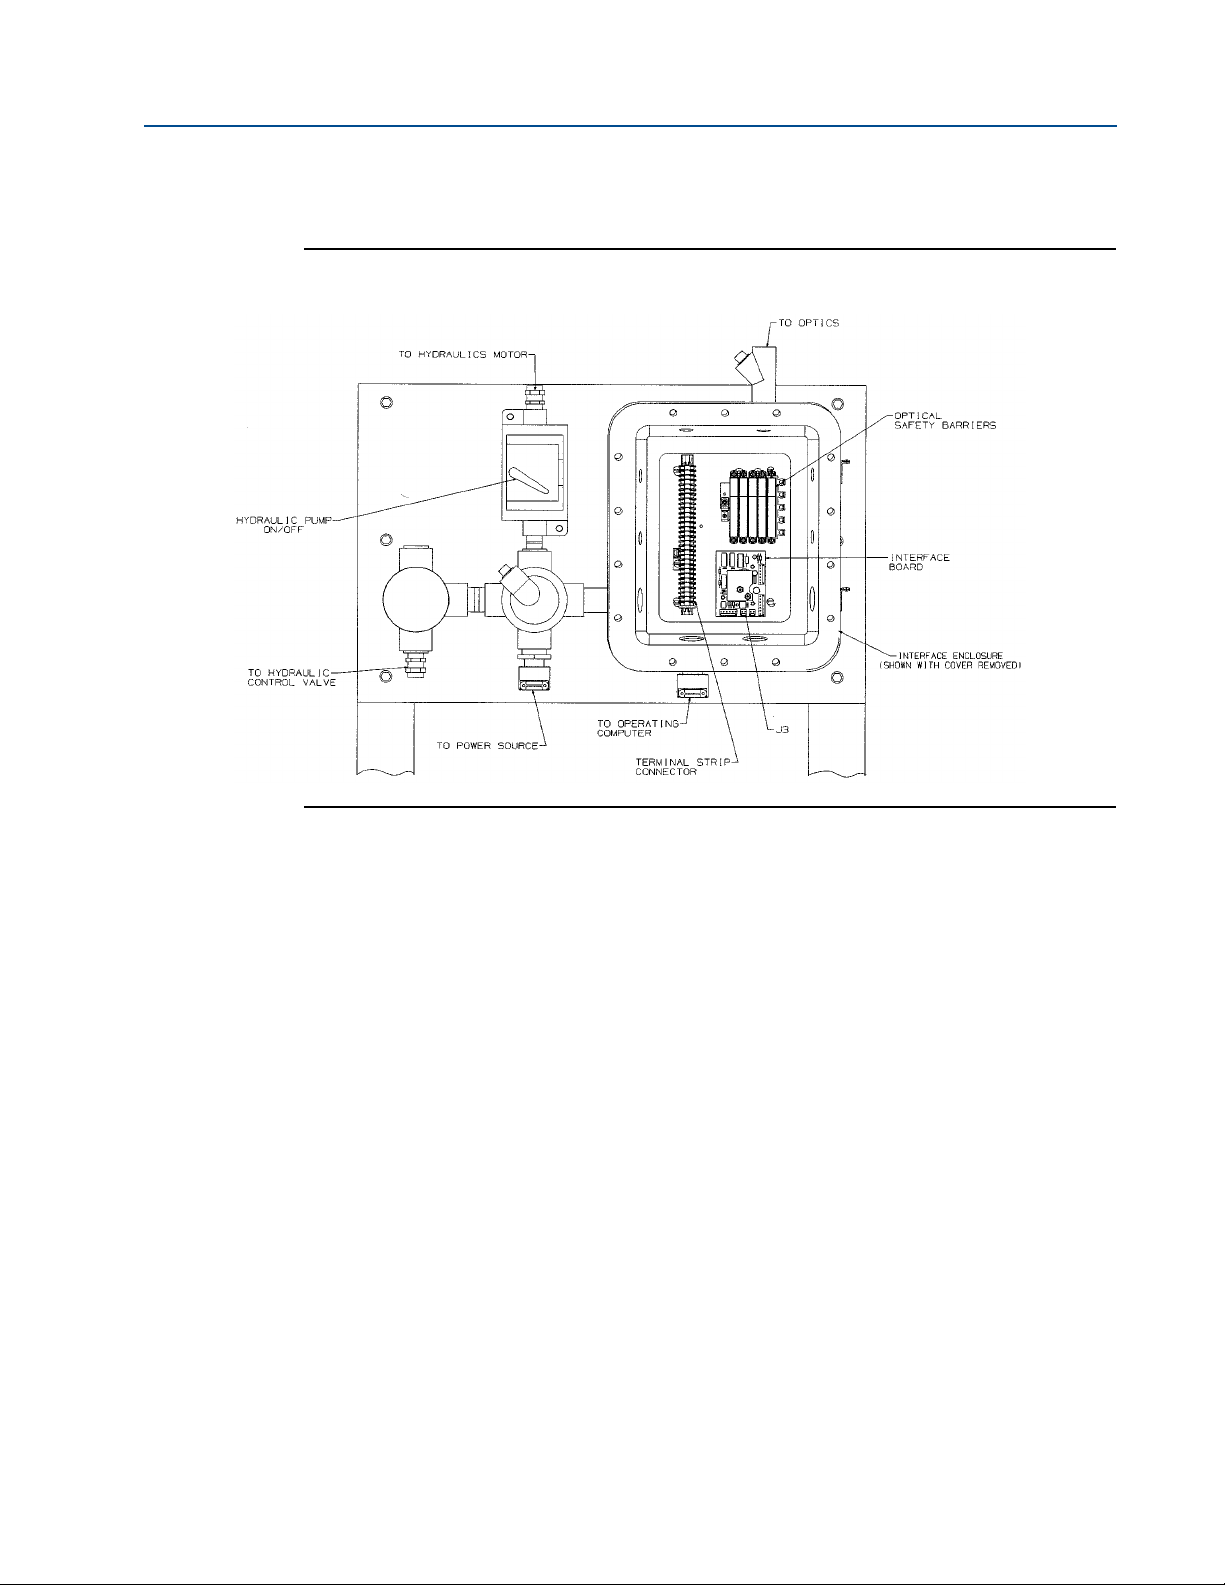
Operating and maintenance instructions Section 4: Maintenance
3-9008-701 Rev J January 2015
Figure 4-7 Typical prover control panel assembly (12” shown)
4.3 Certification Data Sheet and Calculations
4.3.1 Data Sheet Entries
The following is a step-by-step procedure for using the Volumetric Determination Data Sheet to
obtain the base volume of the prover, adjusted (corrected) to reference conditions.
An example of a typical data sheet is shown in Figure 4-6.
Record the following variables on a data sheet for each measurement cycle as defined below:
1. Water Inlet Temperature (T1): The temperature of the water as it enters the prover.
2. Water Outlet Temperature (T2): The temperature of the water as it exits the prover.
3. Prover Temperature (Tp): The average of T1 and T2.
4. Tes t Measure Temperature (Tm): The temperature of the water in the test measure.
This is measured with the temperature thief during the water draw procedure.
5. Sensor Mounting Temperature (Td): This is the temperature of the Invar Rods used for
spacing the optical switches. The temperature is measured during the water draw
procedure. As an option, ambient temperature may be used.
6. Water Pressure (P): The pressure recorded from the pressure gage of the water draw
system.
Certification Data Sheet and Calculations 49
Page 64

Section 4: Maintenance Operating and maintenance instructions
January 2015 3-9008-701 Rev J
7. Test Measure Scale Reading: Actual measurement recorded from the calibrated section
of the test measure. This is a + or — reading from the zero mark.
4.3.2 Calculations
The following formula will be used in the process of calculating the Compact Prover base
volume at reference conditions:
1. Vtp: The corrected prover volume at reference conditions.
2. Vm: The stated volume of the test measure, plus or minus the scale reading recorded
on the data sheet from the water draw.
3. Tmp: Volumetric correction factor for differences between the prover and the test
measure temperatures as found in American Petroleum Institute (API) Chapter
11.2.3(m) Water Certification of Volumetric Provers.
4. Css: This is the correction factor for the temperature of the stainless steel test measure,
the carbon (or stainless steel) flow tube, and the Invar rods. The correction factor is
determined using the following formula:
Where:
Tm is the temperature of the test measure recorded from the water draw procedure using the
temperature thief.
Tb is the reference temperature.
Etm is the cubical coefficient of expansion of the stainless steel test measure depending on
temperature units being used: 0.0000265/ F or 0.0000477/ C.The manufacturer of the test
measure will also give this value that may be used if desired for improved accuracy.
Tp is the temperature of the prover. This is the average of T1 and T2.
Eft is the squared coefficient of expansion used for the flow tube. This number will vary
depending on the material of the flow tube.
50 Calculations
Page 65

Operating and maintenance instructions Section 4: Maintenance
3-9008-701 Rev J January 2015
°F °C
Carbon steel 0.0000124 0.0000223
17-4 Stainless steel 0.0000120 0.0000216
Cast 304 Stainless Steel 0.0000177 0.0000319
304 Stainless Steel 0.0000192 0.0000346
32205 Duplex 0.0000152 0.0000274
Td is the Sensor Mounting Temperature recorded from the water draw procedure.
Eir is the linear coefficient of expansion for the Invar Rods. This value is based on the
temperature units used and will be 0.0000008/ F or 0.00000144/ C.
5. Cpl: This is the compressibility reduction factor for water. This factor is determined by
the following formula:
Where P is the pressure recorded at P1 during the water draw procedure in psig,
or
Where P is the pressure recorded at P1 during the water draw procedure in kPa.
6. Cps: This is the correction factor for the expansion of the flow tube due to pressure.
This factor is determined by the following formula:
Where:
P is the pressure recorded at P1 during the water draw procedure.
D is the inside diameter of the flow tube.
E is the Modulus of elasticity for the material of the flow tube. If pressure is measured in psi,
this value will be 28,500,000 for stainless steel and 30,000,000 for carbon steel. If pressure is
Calculations 51
Page 66

Section 4: Maintenance Operating and maintenance instructions
January 2015 3-9008-701 Rev J
measured in kPa, the Modulus of elasticity for stainless steel will be 196,500,574.5,
206,842,710 for carbon steel, and 200,000,000 for 2205duplex stainless steel.
t is the wall thickness of the flow tube. Be sure to use identical units of measure for the
thickness as used for the diameter of the flow tube.
Vtp must be calculated for each set of data collected during each measurement cycle of the
water draw procedure.
The downstream base volume will be the average of the corrected volumes (Vtp’s) of the
downstream cycles of the water draw. The repeatability of the downstream corrected volumes
must be within.02%, see formula below. Enter the downstream base volume into the operating
computer if the meter under test is located downstream of the prover.
The upstream base volume will be the average of the corrected volumes (Vtp’s) of the upstream
cycles of the water draw. The repeatability of the upstream corrected volumes must be within
.02%, see formula below. Enter the upstream base volume into the operating computer if the
meter under test is located upstream of the prover.
4.4 Seal Replacement
Should the seals within the Compact Prover ever need to be replaced, the procedures in this
section will guide the qualified technician through a simple step by step process. Before
attempting any repair or disassembly procedures, the following details must be observed:
• Disconnect power to the operating computer and the prover. This will prevent
accidental power up of the prover hydraulics and electronics.
• Disconnect, or isolate, the prover from the process line (pressure and flow).
• Drain all fluid from the flow tube by opening the drain and vent valves located at the top
and bottom of the end flanges on each end of the flow tube. Dispose of any process
fluids in an environmentally safe manner.
4.4.1 Measurement Piston and Flow Tube
To determine if the measurement piston seals need inspection for possible replacement,
perform the leak test as described in Section 4.1. If line product is leaking from either end of the
flow tube (between the flow tube and end flanges), the flow tube seals in the end flanges are in
need of inspection for possible replacement.
There are two methods for measurement piston and flow tube seal replacement. Procedure A
will be necessary if a complete tear-down of the prover is required. Procedure B will be necessary
if only the piston and flow tube seals are in need of replacement.
Procedure A: Piston and Flow Tube Disassembly
Reference Figure 7-2, Section 7: Parts list.
52 Seal Replacement
Page 67

Operating and maintenance instructions Section 4: Maintenance
3-9008-701 Rev J January 2015
1. Disassemble the optical and hydraulic systems following the appropriate disassembly
instructions. See Section 4.4.2 and Section 4.4.3 respectively.
2. Slide a piece of plastic tubing, approximately 2 feet longer than the flow tube, over the
actuator shaft and remove the optical detector shaft from the threaded mounting
boss.
3. Attach the outlet flange to a hoist and support the flange so that it will be held in place
when the tie rods are removed.
4. Make sure that the support saddles below the flow tube will hold it in position without
allowing it to drop when the outlet flange is removed. Adjust if necessary.
5. Remove the tie rod nuts securing the outlet flange assembly.
6. Remove the outlet flange.
7. Use the tube protecting the actuator rod to push the measurement piston to the end of
the flow tube. DO NOT PUSH THE MEASUREMENT PISTON OUT OF THE FLOW TUBE.
8. Using sufficient personnel (at least 2), pull the measurement piston out of the flow
tube. Be sure to support the weight of the piston as it is removed from the flow tube.
This will keep the actuator shaft from damaging the flow tube.
9. After removal, support the piston in such a way as to prevent the piston weight from
resting on the seals on the front of the measurement piston.
10. Press the poppet valve open and secure it in position using a wooden block or nonmarring dowel.
11. Remove the o-ring from the groove in the poppet valve. Removal of the poppet valve at
this time will ease replacement of the poppet seal.
12. Remove the piston seals and rulon riders.
13. Carefully clean and examine the flow tube bore for scoring, corrosion or other signs of
wear or damage. Consult the factory concerning replacement.
14. Remove the tie rods from the prover excluding the two tie rods at the bottom. These
may remain in place.
15. Lift the flow tube slightly off the support saddles. Pull it away from engagement with
the inlet flange. A hoist will be necessary for this operation.
16. Remove the inlet and outlet flange o-rings and inspect for damage.
Procedure A: Piston and Flow Tube Assembly
In the following procedure where lubrication of parts is recommended, it should be noted that
excessive amounts of lubrication should be avoided as the base volume of subsequent water
draw could be affected.
1. If the upstream flow tube o-ring is to be replaced, install the new o-ring in its groove
using lubricant (white lithium grease) to hold in place.
2. Install the flow tube on its saddles, flush against the inlet flange. Adjustment of the
saddles may be necessary.
Measurement Piston and Flow Tube 53
Page 68

Section 4: Maintenance Operating and maintenance instructions
January 2015 3-9008-701 Rev J
3. Place the pieces of guide conduit (used in disassembly) through the upstream flange
and flow tube.
4. Lubricate the poppet valve o-ring and fit it onto the groove in the poppet valve. It is
recommended that the o-ring be pressed into the groove in places 90. apart to help
eliminate any twisting or stretching. See Figure 4-8. Care must be taken when working
the seal into the poppet groove as the seal may stretch and not seat correctly. The use
of a smooth plastic tool may assist in working the seal into the poppet groove. Working
the seal on opposite sides of the groove every few inches will assist in proper
installation. Use care to prevent damage to the o-ring.
Figure 4-8 Poppet O-ring installation
54 Measurement Piston and Flow Tube
Page 69

Operating and maintenance instructions Section 4: Maintenance
3-9008-701 Rev J January 2015
5. If the poppet valve has been removed from the measurement piston, install it at this
time. Torque the poppet bolts.
Table 4-1 Torque table
Torque requirement
Prover size Poppet bolt size
ft - lbs N - m
8
12m
12
18
24
34
40
1/4 - 20
3/8 - 16
3/8 - 16
3/8 - 16
1/4 - 20
1/2 - 20
3/8 - 16
1/2 - 13
6
15
15
15
6
25
15
25
8
20
20
20
8
34
20
34
NOTE: For high temperature 2 piece poppets, the 3/8-24 screw requires 24 ft.lbs (33 N.m)
torque
6. Lubricate the two measurement piston seals with light oil and install them on the
piston. The open sides of the two seals will be facing away from each other when
installed correctly. Each seal will require proper fitting. Once the seal is around the
groove, the seal must be pushed into the groove. A ‘snap’ will be heard once the seal
seats in the groove. Be sure to check that the entire seal is properly seated.
7. Test fit of the rulon riders on the measurement piston. Trim any excess length so that
there will be a 1/16” (2 mm) gap between the ends of each rider. Remove the riders
from the piston and lay them over the end of the flow tube.
Important:
The 12” Compact Prover has two different sized riders; a thick rider and a thin rider. The thick
rider fits in the upstream groove of the piston. The thin rider fits in the downstream groove of
the piston, between the two piston seals. All other size provers have identical riders.
8. Lubricate the inside of the flow tube with light oil. Align the measurement piston with
the flow tube and insert the actuator shaft into the guide conduit. Pay attention to the
threaded mounting boss (for the detector shaft) and align as necessary.
9. Carefully insert the measurement piston into the flow tube until the first rulon rider
groove is about to go into the flow tube. Install the first rulon rider onto the
measurement piston with the gap at the bottom of the piston. Lubricate the rider with
light oil.
Measurement Piston and Flow Tube 55
Page 70

Section 4: Maintenance Operating and maintenance instructions
January 2015 3-9008-701 Rev J
10. Slide the measurement piston into the flow tube up to the upstream seal. Lubricate the
upstream seal with light oil. If the upstream seal is installed correctly, the seal should
slip into the flow tube when gently pressing on the piston.
11. Press the measurement piston into the flow tube until the second rulon rider groove is
about to go into the flow tube. Install the second rider onto the piston with the gap at
the bottom of the piston. Lubricate the rider with light oil.
12. Press the piston into the flow tube past the second rulon rider and up to the
downstream seal. Lubricate the downstream seal with light oil. Gently press on the
poppet until the downstream seal slips into the flow tube.
13. Using a flashlight, look through the hole in the inlet flange where the optical detector
shaft goes through. Check the alignment of the threaded mounting boss on the piston.
The boss must be aligned with this hole in the inlet flange for correct installation of the
detector shaft. Rotate the piston if necessary to align the boss.
14. Remove the guide conduit from the actuator shaft. Pull the actuator shaft out from the
tee of the inlet flange until the piston is approximately half way inside the flow tube.
Recheck the alignment of the mounting boss on the piston with the hole in the inlet
flange for the detector shaft.
If realignment is necessary, the poppet must be used to ‘tap’ the piston into position. Pull on the
actuator shaft enough to open the poppet. Spin the actuator shaft, in the direction necessary
for alignment, when slightly pushing the poppet against the piston. This will make the poppet
‘tap’ on the piston and move the piston into alignment. It may be necessary to repeat this
procedure to align the threaded mounting boss correctly.
15. Install the detector shaft into the threaded mounting boss and tighten by hand. At this
point, it is recommended to install the optical seal support over the detector shaft. This
holds the piston in alignment for the remainder of the assembly procedures. See
Section 4.4.2 for optical seal support assembly and installation.
16. Install the o-ring in the groove of the outlet flange using lubricant to hold it in place.
17. Lift the outlet flange with a hoist and align it on the end of the flow tube. Insert four (4)
tie rods through the flow tube flanges that are diagonal from each other.
18. Install the tie rod nuts to the four tie rods and tighten them to pull the flow tube and
the outlet flange snug against the inlet flange. Pay attention to the o-rings in the end
flanges and be certain they remain in place. Care should be taken to avoid scraping
paint into the space between the flanges and the flow tube.
19. Install the remaining tie rods and nuts. Tighten nuts enough to bring the flanges and
flow tube together.
20. Check the alignment of the outlet flange with the inlet pipe flange. A standard level and
the installation studs (for the outlet flange) may be useful. Rotation of the outlet flange
will bring the bolt pattern into alignment.
21. Torque the tie rod nuts to the values specified in Table 4-2 for the proper prover size.
Torque all the tie rod nuts in a ‘criss-cross’ pattern.
56 Measurement Piston and Flow Tube
Page 71

Operating and maintenance instructions Section 4: Maintenance
3-9008-701 Rev J January 2015
22. Follow the appropriate assembly procedures for installation of the hydraulic seal
support, hydraulic cylinder, optical seal support, and optical assembly. See Section 2.4,
Section 4.4.2 and Section 4.4.3.
23. It is recommended that the leak check procedure be performed after seal replacement
to assure that the measurement piston seals are working correctly. See Section 4.1.
24. A hydrostatic pressure test is also recommended following the re-assembly of the
Compact Prover.
Table 4-2 Tie rod nut torque
Torque requirement
Prover size Nut size
8
3/4”
1”
12m
1”
1-3/8”
12
1”
1-3/8”
18
1-1/4
1-1/4”
24
1-1/4”
1-1/2”
1-5/8”
1-7/8”
150 300 600
Ft - lbs N - m Ft - lbs N - m Ft - lbs N - m
115
153
159
127
389
807
646
156
208 396 537 396 537
216 412 559
906 1230
172 330 448
906 1230
528 1008 1368
1612 2188
1095
877 1675 2273
3734 5067
3140 4261
34
40
2”
2”
1521
2064 3945 5353 n/a n/a
4168 5656 n/a n/a
Procedure B: Piston and Flow Tube Disassembly
1. Place the measurement piston in the full upstream position. Close nitrogen valve.
2. Attach the outlet flange to a hoist and support the flange so that it will be held in place
when the tie rods are removed.
3. Make sure that the support saddles below the flow tube will hold it in position without
allowing it to drop when the outlet flange is removed. Adjust if necessary.
Measurement Piston and Flow Tube 57
Page 72

Section 4: Maintenance Operating and maintenance instructions
January 2015 3-9008-701 Rev J
4. Remove the tie rod nuts securing the outlet flange assembly.
5. Remove the outlet flange and then all but the lower two tie rods.
6. Using a hoist, support the flow tube. Take care to keep the flow tube level to prevent
damage to the piston, actuator shaft, and detector shaft.
7. Keeping the flow tube level, slide the flow tube off the piston.
8. After removal, support the piston in such a way as to prevent the piston weight from
resting on the seals of the hydraulic seal support or the optical seal support.
9. Press the poppet valve open and secure it in position using a wooden block or nonmarring dowel.
10. Remove the o-ring from the groove in the poppet valve. Removal of the poppet valve at
this time will ease replacement of the poppet seal.
11. Remove the piston seals and rulon riders.
12. Carefully clean and examine the flow tube bore for scoring, corrosion or other signs of
wear or damage. Consult the factory concerning replacement.
Procedure B: Piston and Flow Tube Assembly
1. In the following procedures where lubrication of parts is recommended, it should be
noted that excessive amounts of lubrication should be avoided as the base volume of
subsequent water draw could be affected.
2. Lubricate the poppet valve o-ring and fit it onto the groove in the poppet valve. It is
recommended that the o-ring be pressed into the groove in places 90° apart to help
eliminate any twisting or stretching. See Figure 4-8. Care must be taken when working
the seal into the poppet groove as the seal may stretch and not seat correctly. The use
of a smooth plastic tool may assist in working the seal into the poppet groove. Working
the seal on opposite sides of the groove every few inches will assist in proper
installation. Use care to prevent damage to the o-ring.
3. If the poppet valve has been removed from the measurement piston, install it at this
time. See Table 4-1 for torque values.
4. Lubricate the two measurement piston seals with light oil and install them on the
piston. The open sides of the two seals will be facing away from each other when
installed correctly. Each seal will require proper fitting. Once the seal is around the
groove, the seal must be pushed into the groove. A ‘snap’ will be heard once the seal
seats in the groove. Be sure to check that the entire seal is properly seated.
58 Measurement Piston and Flow Tube
Page 73

Operating and maintenance instructions Section 4: Maintenance
3-9008-701 Rev J January 2015
5. Test fit of the rulon riders on the measurement piston. Trim any excess length so that
there will be a 1/16” (2 mm) gap between the ends of each rider. Remove the riders
from the piston and lay them aside for later use.
Important:
The 12” compact prover has two different sized riders; a thick rider and a thin rider. The thick
rider fits in the upstream groove of the piston. The thin rider fits in the downstream groove of
the piston, between the two piston seals. All other size provers have identical riders.
6. Lubricate the inside of the flow tube with light oil. Align the flow tube with the
measurement piston.
7. Carefully slide the flow tube over the measurement piston until the first seal goes into
the flow tube. Take care to prevent the seal from folding backwards during this process.
Install the first rulon rider onto the measurement piston with the gap at the bottom of
the piston. Lubricate the rider with light oil.
8. Slide the flow tube over measurement piston up to the rear rider. The second piston
seal should slip into the flow tube without fail.
9. Install the second rulon rider onto the measurement piston with the gap at the bottom
of the piston. Lubricate the rider with light oil.
10. Press the flow tube over the measurement piston until the second rulon rider goes into
the flow tube.
11. Slide the flow tube up to the upstream flange.
12. Install the o-ring in the groove of the outlet flange using lubricant to hold it in place.
13. Lift the outlet flange with a hoist and align it on the end of the flow tube. Insert four (4)
tie rods through the flow tube flanges that are diagonal from each other.
14. Install the tie rod nuts to the four tie rods and tighten them to pull the flow tube and
the outlet flange snug against the inlet flange. Pay attention to the o-rings in the end
flanges and be certain they remain in place. Care should be taken to avoid scraping
paint into the space between the flanges and the flow tube.
15. Install the remaining tie rods and nuts. Tighten nuts enough to bring the flanges and
flow tube together.
16. Check the alignment of the outlet flange with the inlet pipe flange. A standard level and
the installation studs (for the outlet flange) may be useful. Rotation of the outlet flange
will bring the bolt pattern into alignment.
Measurement Piston and Flow Tube 59
Page 74

Section 4: Maintenance Operating and maintenance instructions
HIGH PRESSURE HAZARD
Release all pipeline/process fluid pressure from the prover.
Failure to do so may result in serious personal injury.
January 2015 3-9008-701 Rev J
17. Torque the tie rod nuts to the values specified inTable 4-2 for the proper prover size.
Torque all the tie rod nuts in a ‘criss-cross’ pattern.
18. It is recommended that the leak check procedure be performed after seal replacement
to assure that the measurement piston seals are working correctly. See Section 4.1.
19. A hydrostatic pressure test is also recommended following the re-assembly of the
compact prover.
4.4.2 Optical Seal Support
To determine if the optical seal support is in need of repair, check the weep hole at the bottom
of the seal support. If line product is leaking from the weep hole, the seals internal to the
support should be inspected for possible replacement.
Disassembly
Reference Figure 4-9.
1. Remove the bracket securing the optical switch cover.
2. Remove the optical switch cover and o-ring.
3. Disconnect the main plug to the optical switch wiring harness near the seal support.
Remove the ‘hoop style’ wire anchor that holds it to the optical frame.
4. Loosen the clamping screws that hold the flag assembly to the detector shaft.
5. Carefully slide the flag assembly off of the shaft. DO NOT damage or disturb the
position of the optical switches. Be careful not to strike them with the flag when it is
removed.
6. Remove the optical assembly by removing the four (4) socket head screws holding it to
the seal support. Temporarily place the optical assembly where it will not get damaged.
60 Optical Seal Support
Page 75
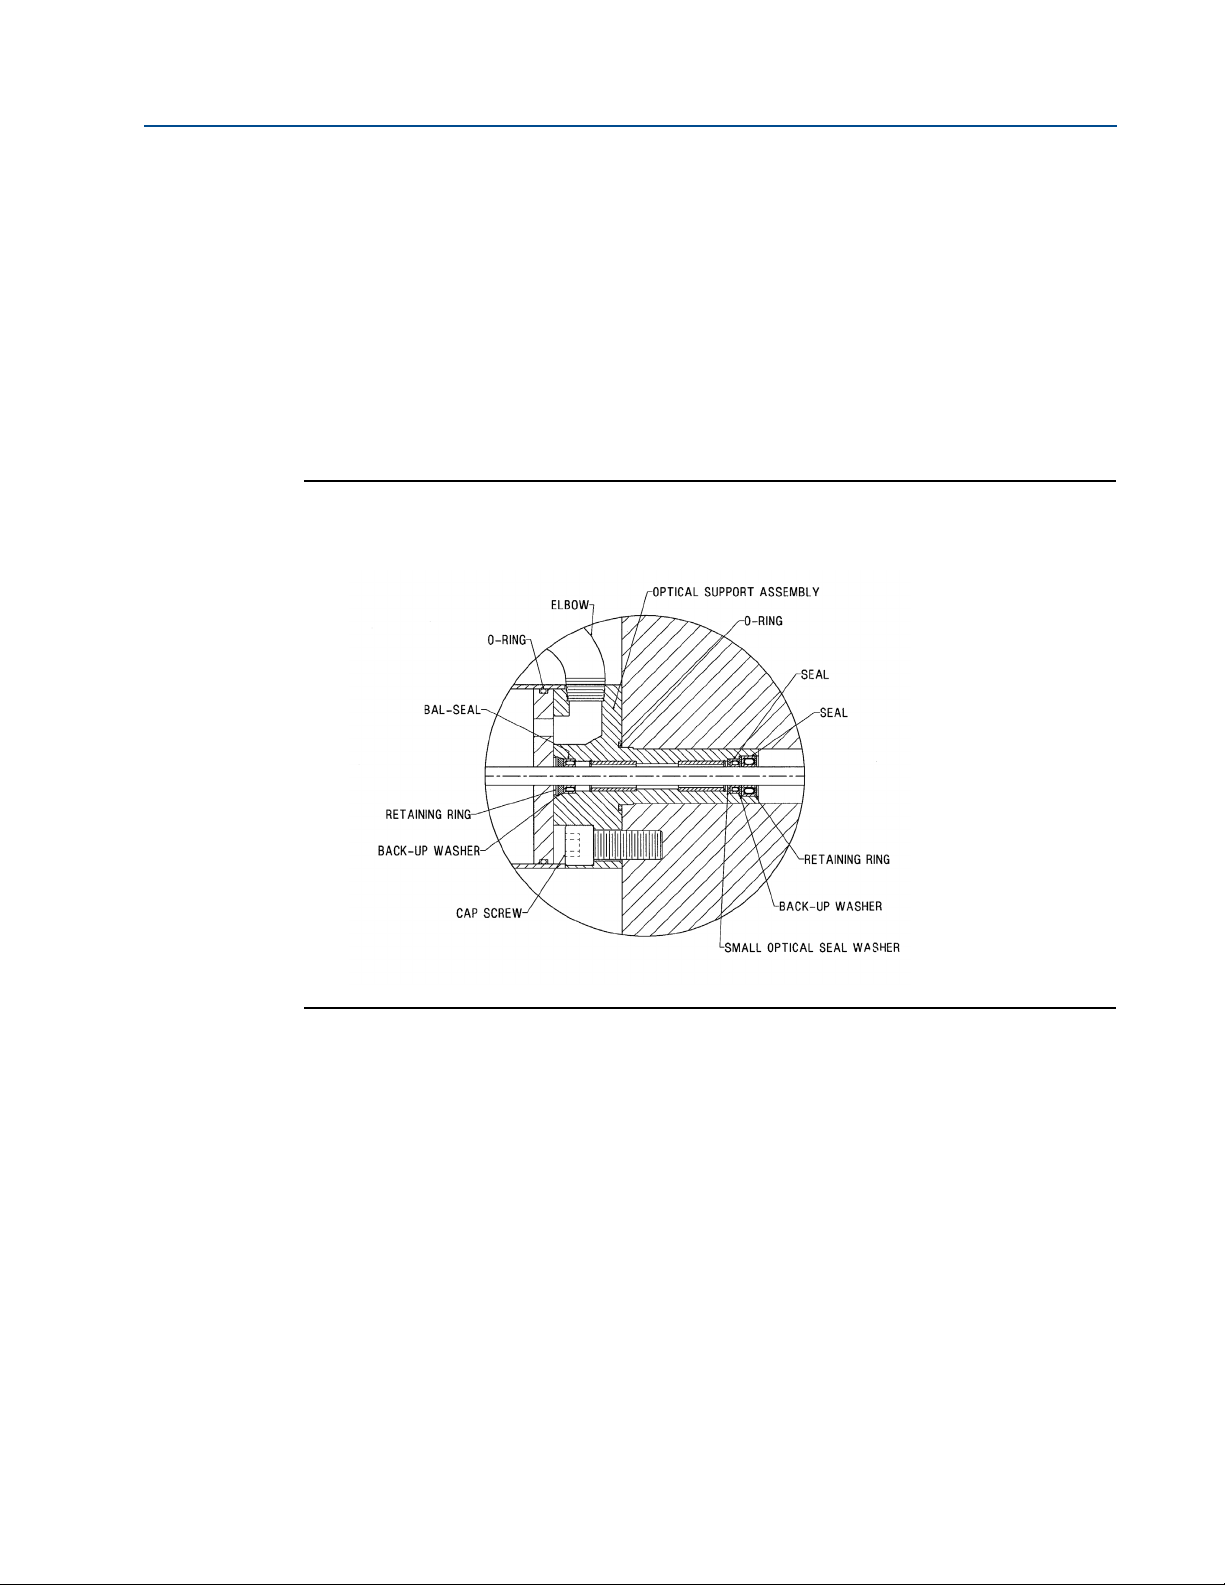
Operating and maintenance instructions Section 4: Maintenance
3-9008-701 Rev J January 2015
7. Remove the three (3) socket head screws from the optical seal support that hold it to
the inlet flange. Remove the seal support and o-ring by carefully sliding it off the
detector shaft. Inspect for wear or damage.
TIP: If the conduit connection to the optical seal support needs to be removed, loosen the
clamping nut on the blue conduit and remove the connection pins from inside the wiring
harness plug described in step 3. A small pointed utensil may be used for this. Once the wires are
removed from the plug, the wires may be pulled out of the seal support. Do not remove the
clear tubing protecting the wires in the seal support.
Figure 4-9 Optical seal support assembly - 8” and 18” and all units built prior to January 1,
2006
8. Referring to Figure 4-9 or Figure 4-10, whichever is applicable, remove the retaining
rings, seals, and back-up washers from the optical seal support. Inspect for wear or
damage.
9. Clean all parts (except electrical assemblies) in a suitable solvent as required and
inspect for signs of abnormal wear, corrosion, cracking, etc.
10. Inspect optical shaft for nicks, scratches, galling or build up of contaminants. Polish
with 400 grit or finer sandpaper with water and wipe with solvent as required.
11. Check the rulon bushings in the optical seal support for clearance on the optical shaft.
Correct clearance is .0015 to .005 inch (.038 to .127 mm). If clearance is excessive
consult the factory concerning replacement.
Optical Seal Support 61
Page 76

Section 4: Maintenance Operating and maintenance instructions
January 2015 3-9008-701 Rev J
Figure 4-10 Optical seal support assembly - 24” (built after January 1, 2006) and 34”
Assembly
Reference Figure 4-9 and Figure 4-10
1. On the smaller diameter end of the optical seal support, install the small optical seal
washer, the small bal-seal, the backup washer, the larger bal-seal and retaining ring in
that order. The open ends of all seals are to face into the flow tube. On the opposite end,
install the bal-seal and the backup washer. Secure with the retainer ring.
2. Install the o-ring on the optical seal support.
3. Install the optical seal support assembly to the inlet flange using the three (3) socket
head cap screws. Pay attention to the location of the modified cap screw, which is
located across from the conduit elbow.
NOTE: If the wiring harness plug was removed during disassembly, reinstall the wires and plug at
this point. The mating harness plug on the optical assembly may be used as reference to install
the wires back into the plug. Make the wire colors match one another. Slightly bend the
retaining clip out if necessary to make the pins fit securely. A ‘snap’ sound will be heard when
the pins are in place.
4. Slide the flag back and forth along the optical assembly checking to assure that it
passes through the center of each optical switch. Adjust if necessary.
5. Slide the optical assembly and the flag over the detector shaft. Install the optical
assembly to the seal gland using the four (4) socket head cap screws. Pay attention to
the location of the small cap screw.
6. Place the piston in the full upstream position.
7. Center the flag in the upstream switch then tighten the clamp screws. The flag should
be firmly clamped to the detector shaft.
62 Optical Seal Support
Page 77
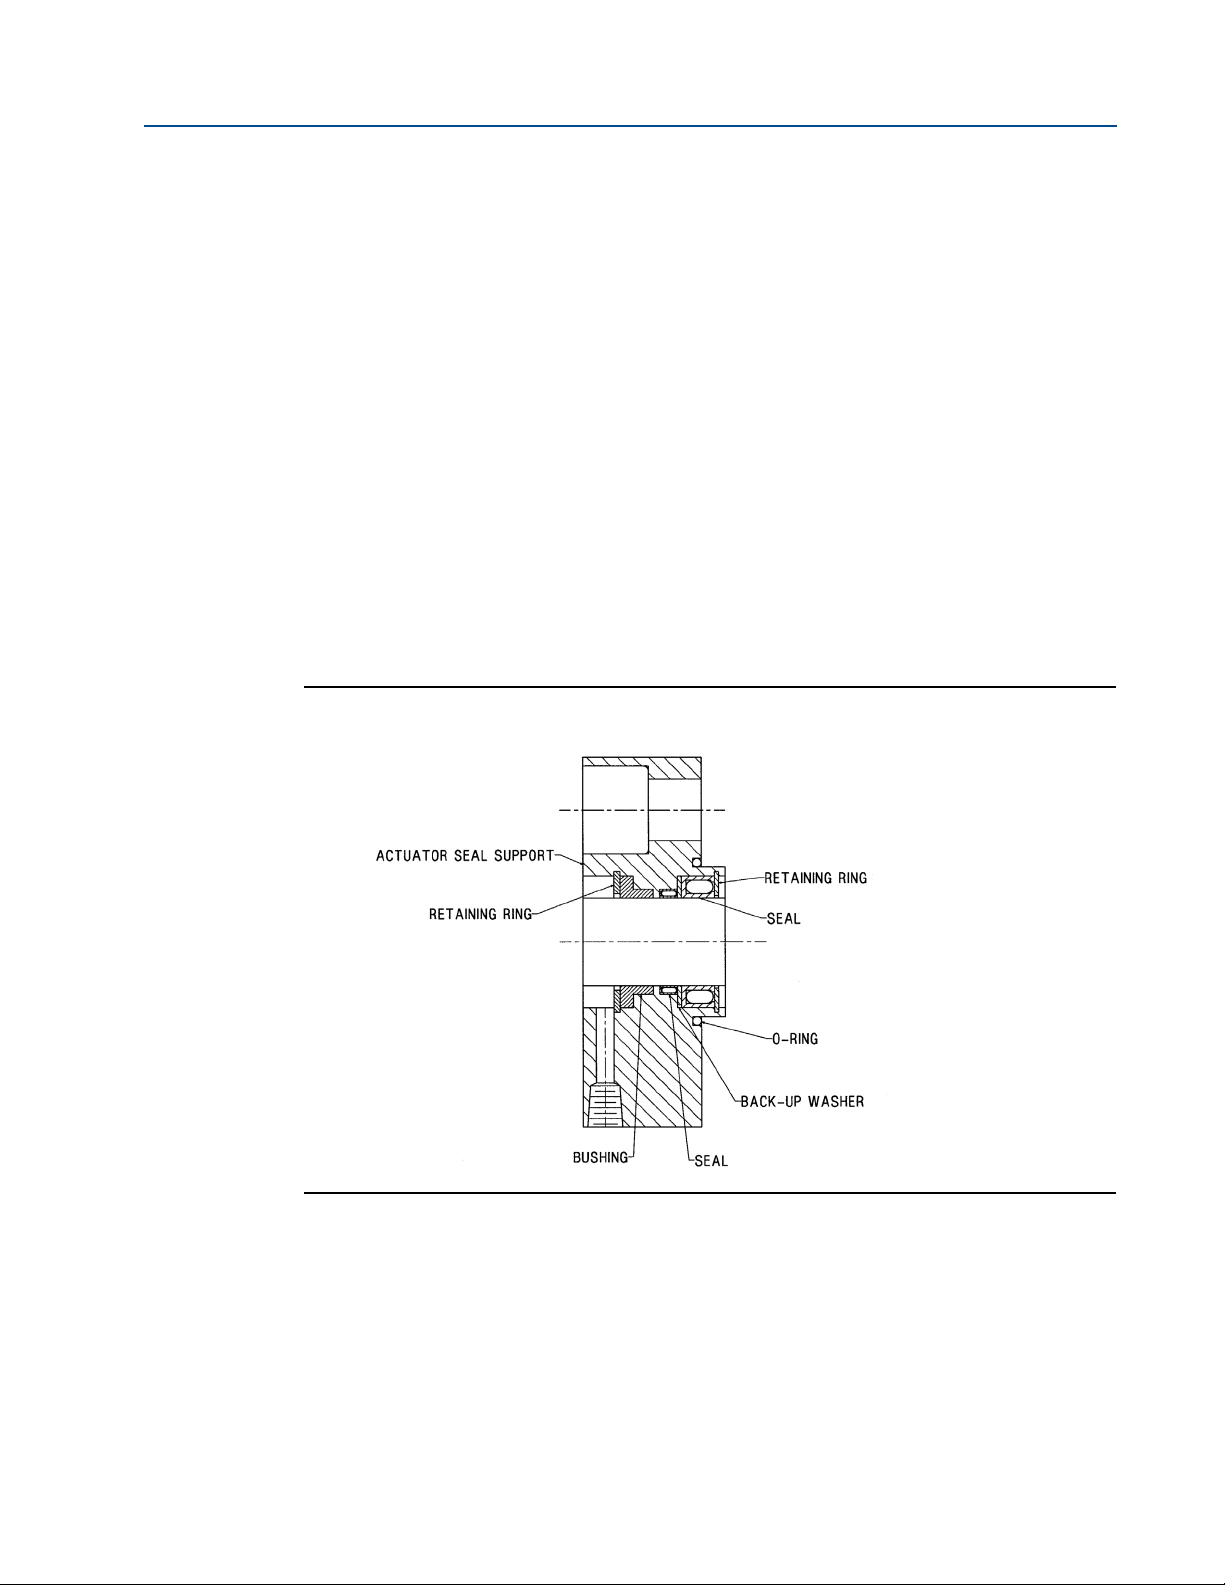
Operating and maintenance instructions Section 4: Maintenance
3-9008-701 Rev J January 2015
8. After achieving proper alignment of the optical system, install the o-ring and the cover
tube. The cover should be positioned with the boss on the side.
9. Install the brace from the support bar to the optical assembly.
10. If calibration is required, proceed to Section 4.4.2, if not, see Section 2.4.
4.4.3 Hydraulic Cylinder and Hydraulic Seal Support
To determine if any of the seals in the hydraulic cylinder or the hydraulic seal support are in need
of replacement, check the weep hole at the bottom of the seal support. If line product is leaking
from the weep hole, the support seals are in need of replacement. If there is hydraulic fluid
leaking from the weep hole, the seals internal to the hydraulic cylinder are in need of inspection
for possible replacement.
Disassembly
ReferencesFigure 4-11 and Figure 4-12
Figure 4-11 Hydraulic seal support assembly
1. Close the spring plenum shut-off valve to the hydraulic cylinder and remove the valve’s
handle. This will prevent accidental opening of the spring plenum and loss of the
nitrogen within.
2. Loosen the Nitrogen supply line at the end of the hydraulic cylinder. Allow the gas in the
supply line to escape.
Hydraulic Cylinder and Hydraulic Seal Support 63
Page 78

Section 4: Maintenance Operating and maintenance instructions
January 2015 3-9008-701 Rev J
3. Disconnect the Nitrogen supply line from the hydraulic cylinder.
4. Drain the hydraulic fluid from the hydraulic cylinder by disconnecting the pressure hose
from the hydraulic pump. If the fluid is caught in a clean container, it may be reused. If
the fluid is not to be reused, disposal should be done in an environmentally safe
manner.
5. Remove the four nuts securing the upstream flange of the hydraulic cylinder.
6. Remove the support bracket holding the upstream end of the hydraulic cylinder.
7. Remove the upstream flange and o-ring from the actuator cylinder.
8. Remove the four hydraulic cylinder tie rods. If the rods cannot be removed by hand,
install two nuts, tighten them together and use a wrench on the inner nut to unscrew
the rod.
9. Remove the hydraulic cylinder tube and o-ring taking care not to damage the actuator
piston or cylinder tube. Oil will drain from the cylinder as it is pulled from its'
downstream flange.
10. Remove the lock nut attaching the actuator piston. An impact wrench is recommended
for this step. However, if one is not available the strap wrench listed in Section 6.1 may
be used to hold the actuator shaft while a wrench is used to remove the actuator piston
nut.
Important:
Do not damage the outer surface of the actuator shaft.
Damaging the actuator shaft may result in seal damage.
11. Remove the actuator piston and cushion. Care should be taken when removing the
piston from the actuator shaft, as there is an o-ring inside the piston. Remove the
actuator piston as if unthreading a nut from a screw.
64 Hydraulic Cylinder and Hydraulic Seal Support
Page 79
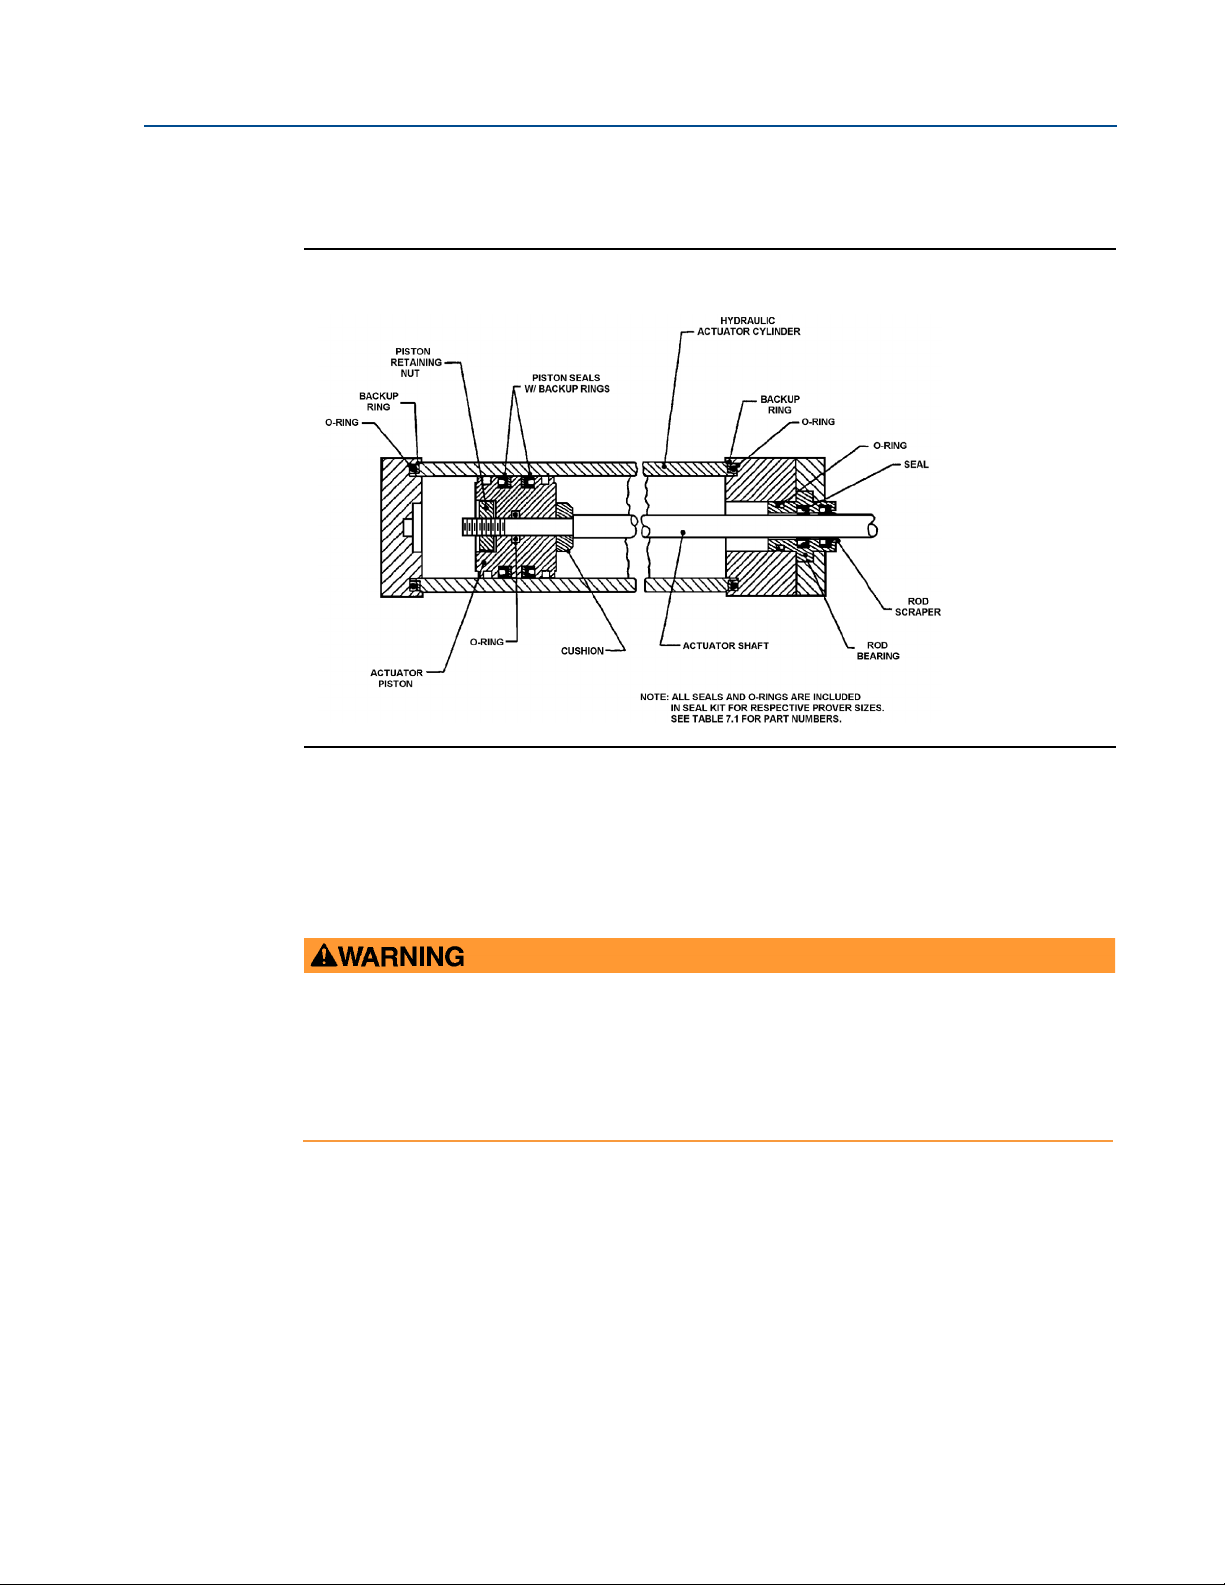
Operating and maintenance instructions Section 4: Maintenance
HIGH PRESSURE HAZARD
Release all pipeline/process fluid pressure from the prover.
Failure to do so may result in serious personal injury.
3-9008-701 Rev J January 2015
Figure 4-12 Typical hydraulic cylinder assembly
12. Remove the hydraulic lines from the downstream flange of the hydraulic cylinder.
13. Remove the downstream flange of the hydraulic cylinder. Some prover sizes will require
the removal of mounting screws for this flange.
14. Remove the socket head screws attaching the actuator seal support to the tee of the
inlet flange. Remove the actuator seal support by carefully sliding it off the actuator
shaft.
15. Referring to Figure 4-11, remove the retaining ring, seals and back-up washer from the
actuator seal support. Determine the suitability of the backup washer for reuse.
16. Clean all parts in a suitable solvent as necessary and inspect for signs of abnormal wear,
corrosion, cracking etc.
17. Inspect the actuator shaft for nicks, scratches, galling, or build up of contaminants.
Hydraulic Cylinder and Hydraulic Seal Support 65
Polish with 400 grit or finer sandpaper (emory cloth) and water. Wipe with solvent as
needed.
Page 80

Section 4: Maintenance Operating and maintenance instructions
January 2015 3-9008-701 Rev J
18. Check the bushing in the actuator seal support for clearance on the actuator rod.
Correct clearance is .002 to .005 inch (.051 to .127 mm). If clearance is excessive,
consult the factory for replacement.
Assembly
In the following procedure where lubrication of parts is recommended, it should be noted that
excessive amounts of lubrication should be avoided as the base volume of subsequent water
draw could be affected.
Reference Figure 4-11 and Figure 4-12.
1. Install the inner seal, the backup washer, the outer (larger) seal and retaining ring into
the hydraulic seal support. Open ends of both seals are to face the flow tube.
2. Install the o-ring on the hydraulic seal support holding it in place with a small amount of
lubricant.
3. Install the hydraulic seal support on the inlet flange by sliding it onto the actuator shaft.
Apply a small amount of grease to the actuator shaft at the beveled edge to ensure the
seals do not fold over. Align the support with the weep hole pointing down. A slight
rotation of the support may be necessary to align the bolt pattern between the support
and the inlet flange. Secure the support with the socket head screws.
4. Install the downstream flange of the hydraulic cylinder by sliding it onto the actuator
shaft. Apply a small amount of grease to the actuator shaft at the beveled edge to
ensure the seals do not fold over. Align the hydraulic ports in the flange with the
hydraulic hoses and the stud holes with those in the hydraulic seal support.
5. Install the cushion on the actuator shaft with the chamfer facing the flow tube.
6. Install new seals on the actuator piston and install the piston to the actuator shaft. Use
care not to damage the o-ring in the bore of the actuator piston with the shaft threads
by threading it onto the actuator shaft.
7. Install the locking nut and tighten with an impact wrench. The locking nut should be
tightened until the actuator piston is unable to turn.
8. Install the two (2) o-rings on the end of the hydraulic cylinder tube. Pay attention to the
flat o-ring as it must be installed with the flat side against the shoulder on the end of the
tube. Then install the round o-ring.
9. Install the hydraulic cylinder tube over the actuator piston. Use a smooth piece of
plastic to compress the piston seal as necessary. Slide the tube up to within
approximately 1” of the downstream flange. Be sure the o-rings are in place.
10. Install the hydraulic cylinder tie rods into the tee of the inlet flange. If the rods have
longer threads on one end, install these ends in the tee.
11. Install the o-rings onto the upstream end of the hydraulic cylinder tube. These o-rings
are installed in the same manner as in step 8.
12. Install the upstream flange of the hydraulic cylinder. Also install the bracing plate from
the support bar if so equipped.
66 Hydraulic Cylinder and Hydraulic Seal Support
Page 81
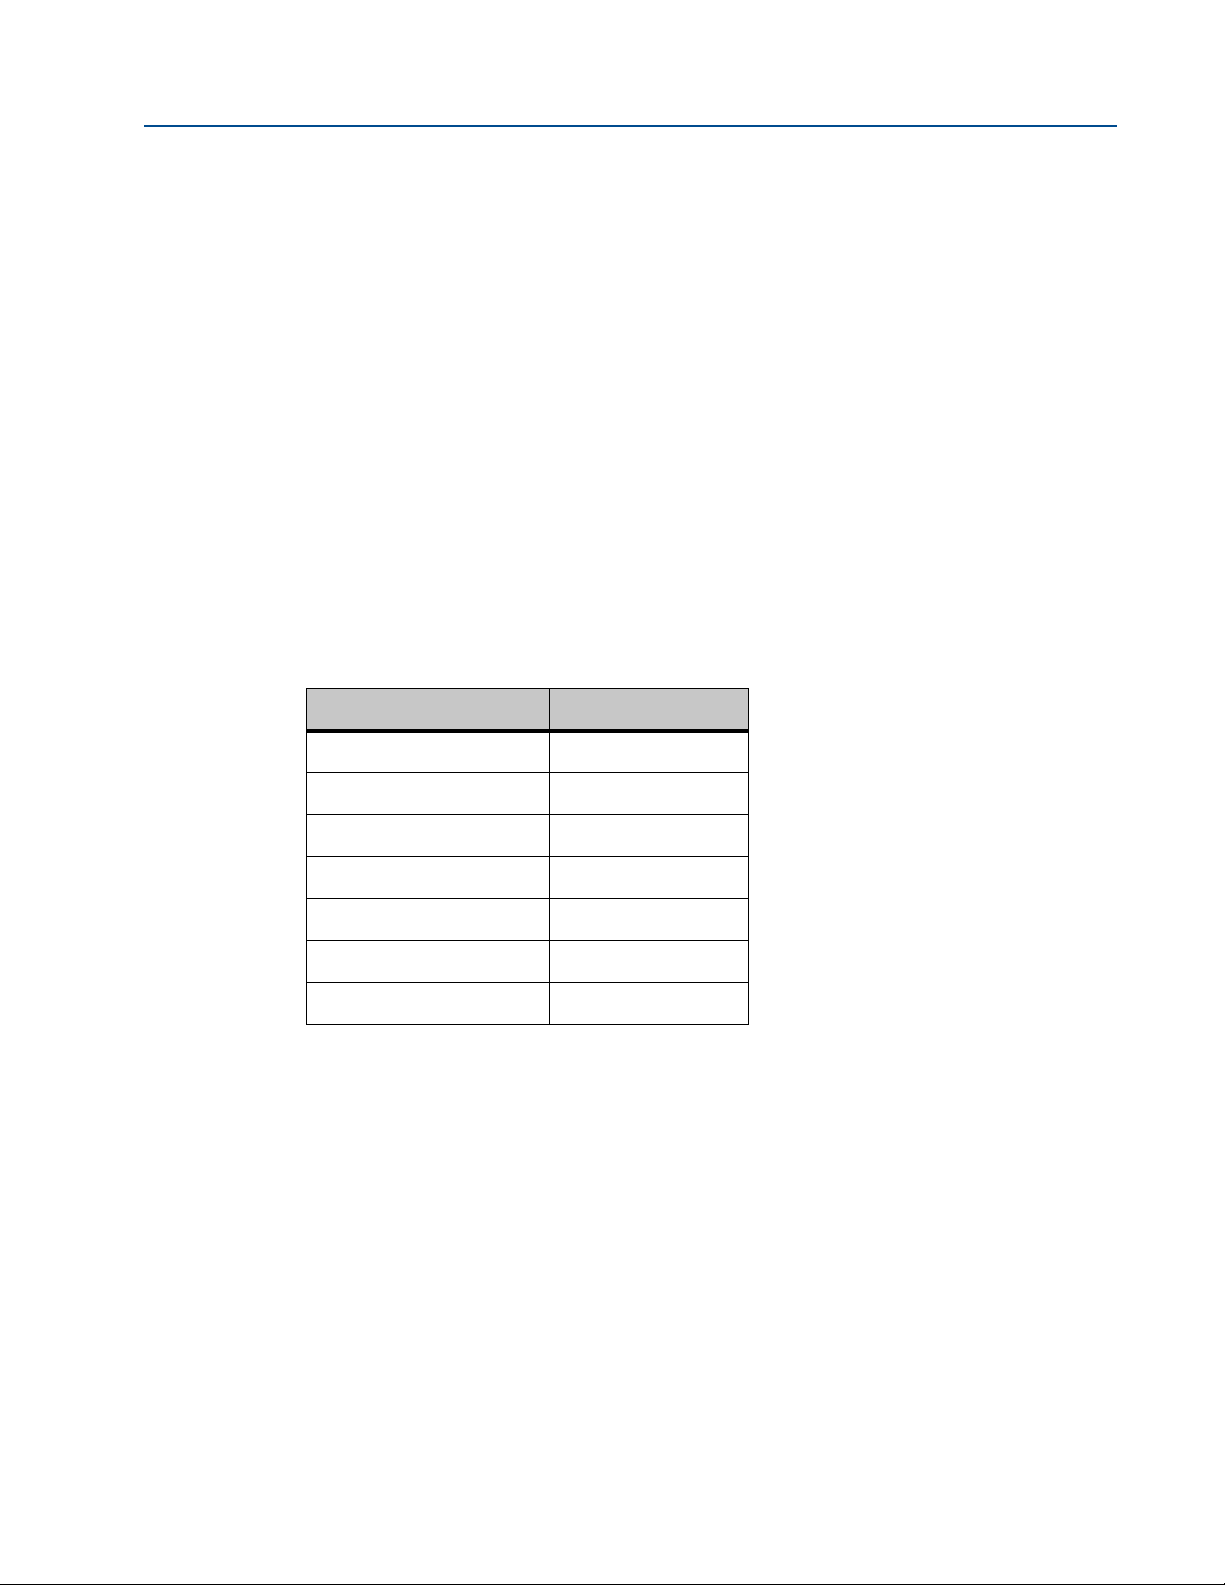
Operating and maintenance instructions Section 4: Maintenance
3-9008-701 Rev J January 2015
13. Install the four nuts on the hydraulic cylinder tie rods. Double check the o-rings on each
end of the hydraulic cylinder tube to make sure they are in place. Tighten the nuts
evenly to bring the hydraulic cylinder tube and flanges together. Torque to
specifications listed inTable 4-3.
Tip: To ensure proper alignment of the hydraulic cylinder, use a level to verify the alignment with
the flow tube.
14. Connect the nitrogen supply hose from the spring plenum and the hydraulic hoses to
the hydraulic cylinder.
15. Install the operating handle on the nitrogen shut-off valve. Open the shut-off valve and
check for and eliminate any leaks.
16. Once the prover is fully assembled, check the hydraulic reservoir for proper level. Turn
on the power and start the hydraulic system motor. Check for and eliminate any
hydraulic system leaks. Once all air is eliminated from the hydraulic system, turn off the
motor and re-check the reservoir for proper level.
Table 4-3 Hydraulic cylinder tie rod nut torque
Prover size Tor q ue value
8”
12” Mini
12”
18”
24”
34”
40”
25 ft lbs (34 Nm)
45 ft lbs (61 Nm)
45 ft lbs (61 Nm)
125 ft lbs (170 Nm)
220 ft lbs (299 Nm)
600 ft lbs (814 Nm)
1,400 ft lbs (1900 Nm)
4.5 Optical conversion kit
Compact provers purchased prior to June 1989 are designed with a ‘shotgun’ style optical
assembly. These older provers may be retrofitted to accommodate the new ‘plug style’ optical
assembly. Installation instructions are provided with the kit. Switch replacement on the new
Optical conversion kit 67
Page 82
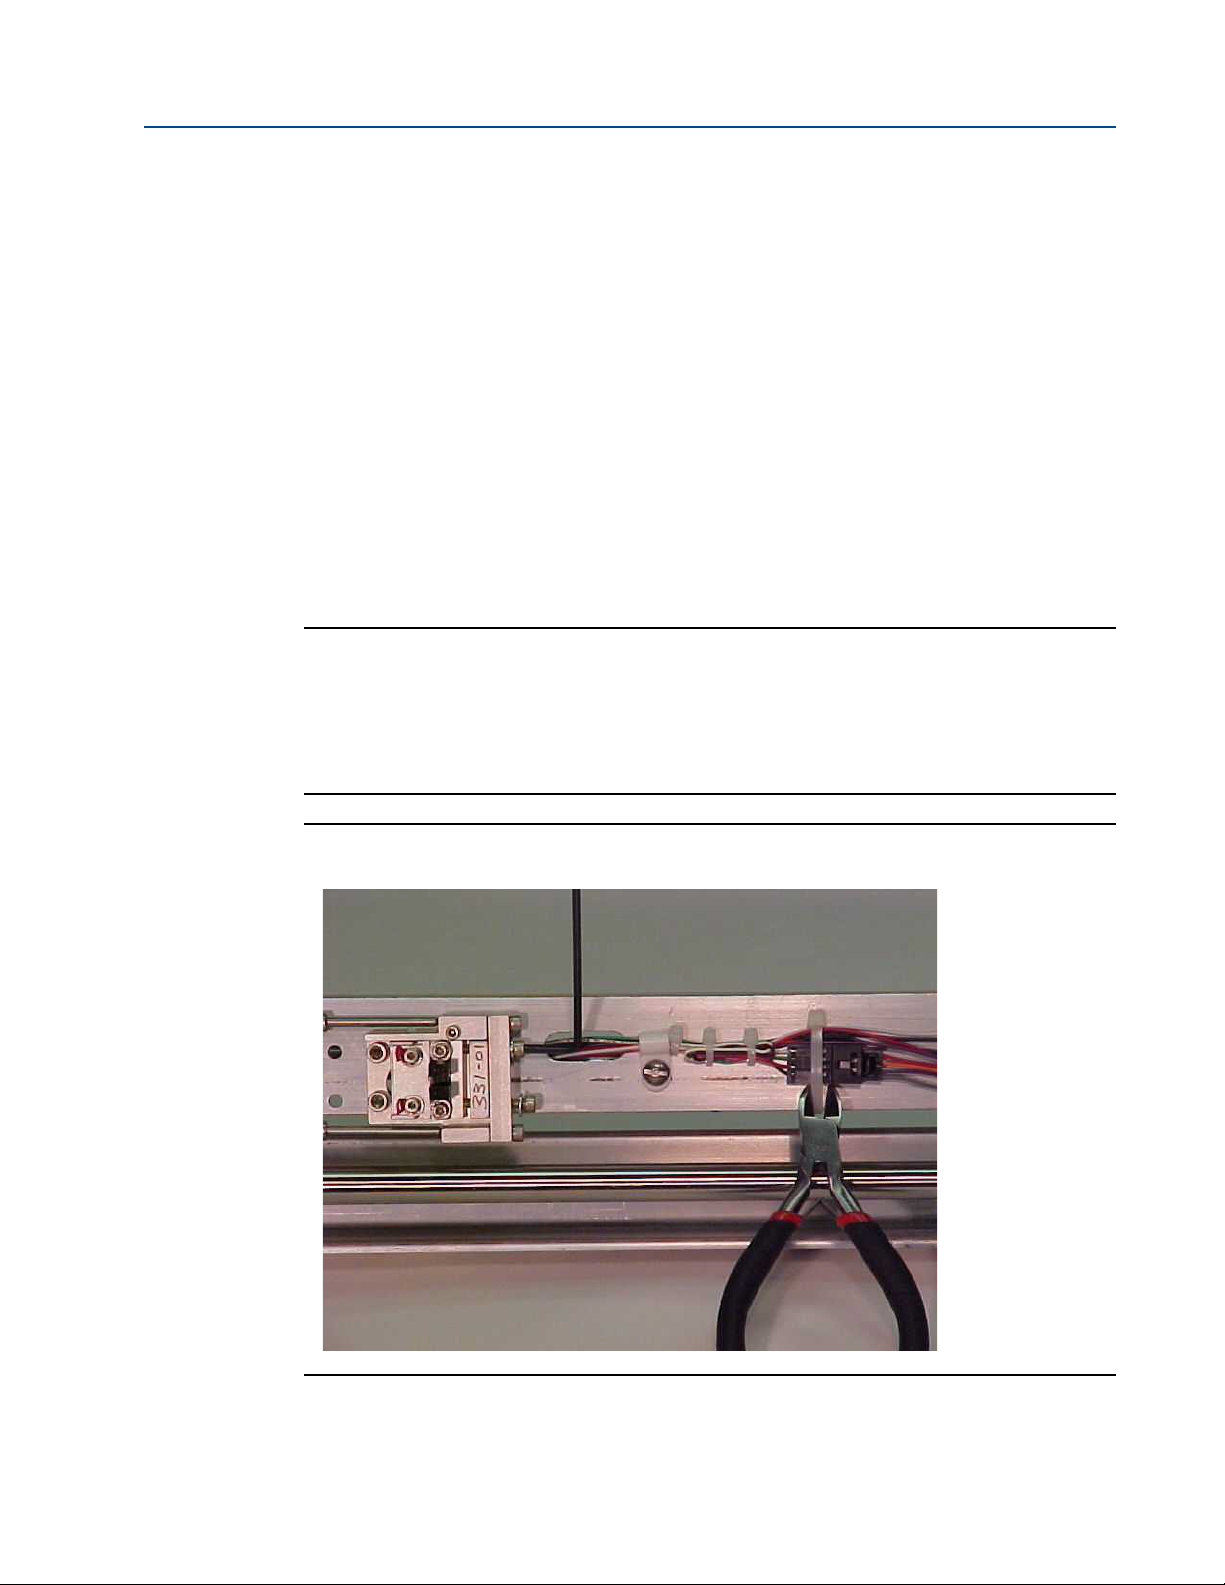
Section 4: Maintenance Operating and maintenance instructions
January 2015 3-9008-701 Rev J
design has been simplified from the old design. Volume re-certification is no longer necessary
when replacing a volume switch on the ‘plug style’ or the ‘pin-and-socket’ optical assemblies.
See Section 4.6 for further information regarding switch replacement on the ‘plug style’ optical
assembly.
See Table 7-1 for part numbers of retrofit kits for these older provers.
Compact provers built from June 1989 to December 2000 have the ‘pin-and-socket’ optical
assemblies. If an upgrade to the new ‘plug style’ optical assembly is desired, a new optical
assembly will be required. See Table 7-1 for these part numbers.
4.6 Detector Switch Replacement
Reference Figure 4-13, Figure 4-14 and Figure 4-15.
Important:
When using more than one intrinsically safe circuit, the rules and regulations for interconnection shall be duly observed. The Switch Pad location has been factory set and under normal
conditions will not require adjustment.
Figure 4-13 Detector switch removal #1
68 Detector Switch Replacement
Page 83

Operating and maintenance instructions Section 4: Maintenance
3-9008-701 Rev J January 2015
1. Disconnect electrical power to the unit.
2. Remove the support bracket at the outboard end of the detector shaft dust cover.
3. Remove the dust cover.
4. Carefully cut the wire ties holding the plug for the inoperative switch and remove any
‘hoop style’ anchors necessary. Disconnect the plug from the main harness by releasing
the latch and separating the plug. (Figure 4-13)
5. Remove the mounting/adjustment screws holding the optical switch to the switch pad.
(Figure 4-13)
Figure 4-14 Detector switch removal #2
6. Carefully remove the switch assembly while feeding the switch plug through the frame.
Be careful not to catch the plug on any other wires. (Figure 4-14)
7. Install the new switch. For a volume switch, ensure that the assembly base is positioned
flat against the switch pad and square against the right end of the pad where the
elongated holes are located.
Detector Switch Replacement 69
Page 84

Section 4: Maintenance Operating and maintenance instructions
January 2015 3-9008-701 Rev J
8. Adjust the switch position so that the detector passes through the center of the switch.
If necessary, loosen the bearing housing and slide it along the shaft while adjusting the
switch position.
It may be necessary to pry the bearing housing free from the optical shaft by using a small
screwdriver in the rear slot. Return the bearing housing to its original position and tighten all
screws. (Figure 4-15)
Figure 4-15 Detector switch adjustment
9. Plug the new switch into the main harness, feeding the plug back through the frame to
the original location. Anchor the plug to the frame using a new wire tie and replace any
“hoop-style” wire anchors.
10. Verify wires will not interfere with the detector movement. Adjust and/or anchor as
necessary.
11. Replace the dust cover and support bracket.
70 Detector Switch Replacement
Page 85

Operating and maintenance instructions Section 4: Maintenance
3-9008-701 Rev J January 2015
12. Upon completion of volume certification see Section 2.4.
If the switch replacement procedure has been performed correctly, the replacement switch will
be within 0.001 inches (.0254 mm) from the original switch position. The formula for cylinder
volume can be used to determine the degree of change in the water draw volume.
Example for a 12” prover:
Water draw volume change for 0.001 inch of switch movement =
π (d/2) (0.001) = π (12.25/2) (0.001) = 0.1178 in
3
Since 15 gallons = 3465 in3 :
The percent change = 0.1178/3465(100) = 0.0034%
This percent change in the water draw volume is well within the 0.02% allowed.
Similar changes can be expected in the other size provers. See Table 4 -4 below.
Table 4-4 Volumetric percent change for compact provers
Prover size
8”
12” Mini
12”
18”
Nominal
prover base
volume
5 gal (20 L)
10 gal (40 L)
15 gal (60 L)
30 gal (120 L)
Flow tube I.D.
8.250”
(20.955 cm)
12.250”
(31.115 cm)
12.250”
(31.115 cm)
17.500”
(44.450 cm)
Base volume
from nominal
1,155 in3
(20000 cm
2,310 in3
(40000 cm
3,465 in3
(60000 cm
6,930 in3
(120000 cm
3
)
3
)
3
)
3
)
Percent
change
0.0046%
(.0044%)
0.0051%
(.0048%)
0.0034%
(.0032%)
0.0035%
(.0033%)
24”
65 gal (250 L)
100 gal (400 L)
34”
170 gal (650 L)
40”
Detector Switch Replacement 71
25.500”
(64.770 cm)
34.00”
(86.360 cm)
40.00”
(101.60 cm)
15,015 in3
(250000 cm
23,100 in3
(400000 cm
39,270 in3
(650000 cm
3
3
3
)
)
)
0.0034%
(.0033%)
0.0039%
(.0037%)
0.0032%
(.0032%)
Page 86

Section 4: Maintenance Operating and maintenance instructions
January 2015 3-9008-701 Rev J
72 Detector Switch Replacement
Page 87

Operating and maintenance instructions Section 5: Troubleshooting
HIGH VOLTAGE HAZARD
Wear appropriate personal protective equipment and follow all safety instructions when
working with high voltage electrical circuits.
Failure to do so will result in serious injury or death.
3-9008-701 Rev J January 2015
Section 5: Troubleshooting
5.1 General
Should the electrical system of the compact prover require repair, the following two sections
contain solutions and information to help solve problems that may be encountered. If these
steps and information do not help solve the operational problem, contact a Daniel
representative for assistance. Figure 5-2 and Figure 5-3 are provided as typical wiring diagrams
for reference. Special build electrical systems will have an electrical diagram supplied with the
documentation package.
5.2 Interface Signals
Reference Figure 2-3 and Figure 2-4.
Important
Do not handle electronic-sensitive equipment without an ESD grounding wrist-strap.
Failure to use an anti-static grounding device could cause damage to the compact prover
electronics and render them inoperable.
The compact prover interface board control circuits communicate with the operating computer
using digital signals. These signals are the RUN command input, the UPSTREAM output, and the
volume DETECTOR output.
RUN command: The run command signal is held high (approx. 12VDC) by the interface board
and must be pulled low (less than 2VDC) by the operating computer to launch the measurement
piston. This signal is present between pins 2(-) and 5(+) of J-2.
UPSTREAM output: The upstream signal is designed as an open collector (30VDC, 400mA max)
output. This signal must be pulled high by the operating computer. It is pulled low by the
interface board whenever the flag is within the upstream switch. This signal is present between
pins 2(-) and 6(+) of J-2.
DETECTOR output: The detector signal is designed as an open collector (30VDC, 400mA max)
output. This signal must be pulled high by the operating computer, and is pulled low by the
General 73
Page 88

Section 5: Troubleshooting Operating and maintenance instructions
January 2015 3-9008-701 Rev J
interface board whenever the flag is within either of the optic volume switches. This signal is
present between pins 2(-) and 7(+) of J-2.
Figure 5-1 is a timing diagram that shows the interface signal operation that the operating
computer will see coming from the compact prover during a proving cycle. The diagram
positions are explained below.
t1- Computer sends RUN signal low, hydraulics go into bypass, poppet closes and
measurement piston and flag start downstream.
t2 - Flag clears upstream (stand-by) switch; upstream signal goes high.
t3 - Flag enters the first volume switch sending detector signal low.
As flag exits switch, signal goes high.
t4 - Flag enters the second volume switch sending detector signal low. As flag exits switch,
signal goes high.
t5 - Computer sends RUN signal high, hydraulics are activated, poppet opens and
measurement piston starts upstream.
t6 - Flag enters the second volume switch sending detector signal low. As flag exits switch,
signal goes high. Computer ignores pulses during return stroke.
t7 - Flag enters the first volume switch sending detector signal low. As flag exits switch, signal
goes high. Computer ignores pulses during return stroke.
t8 - Flag enters upstream (stand-by) switch, upstream signal goes low. Compact prover
remains in this condition until RUN command is received from computer.
Figure 5-1 Prover signal timing
74 Interface Signals
Page 89

Operating and maintenance instructions Section 5: Troubleshooting
3-9008-701 Rev J January 2015
5.3 Measurement Piston Movement
Piston does not move upstream: (No hydraulic pressure)
1. Check to be sure the hydraulic system motor is running. If so, check the hydraulic
control valve operation by disconnecting the AC voltage at the junction box adjacent to
the valve. If the Piston fails to return, the hydraulic control valve is stuck open and is in
need of repair or the hydraulic pump is defective.
2. If the piston returned in step 1, reconnect the AC voltage to the control valve and then
unplug the DC power to the control relay at connection J-4 on the prover interface
board. If the piston does not return, the control valve relay is defective.
3. If the piston returned in step 2, check the voltage between pins 2 (-) and 5 (+) of
connection J-2 on the interface board. If this voltage is low (less than 2V), the operating
computer is responsible. If this voltage is high (more than 8V), the interface board is
defective.
4. If the operating computer is found responsible, check the red LED on the prover
interface board. If this LED is illuminated, and the flag is not in a volume switch, this
indicates a problem in the volume switch circuit. Make a jumper connection between
pins 2 and 3 of connection J-1 on the prover interface board. If connecting this jumper
turns the LED off, check the optical barriers for approximately 230 ohms resistance (for
fuse barriers, 250 ohms for non-fused) across connection terminals 1 and 3. If no
resistance is detected, replace the fuse of the barrier in question (or replace the nonfused barrier) and check the grounding system integrity.
If the barrier resistance is found acceptable, the cause will be in the optical assembly wiring or
volume switches.
Piston does not move downstream: (Hydraulic pressure will not release)
1. Apply the correct AC voltage for the solenoid at the connection to the hydraulic control
valve. If the control valve fails to open (piston does not launch), the solenoid may be
defective or the valve itself is stuck closed.
2. If the control valve opened in step 1, disconnect J-4 on the prover interface card and
apply a voltage of 12VDC to the control side of the relay. If the control valve does not
open, the control valve relay is defective.
3. If the control valve opened in step 2, reconnect J-4 and jump a connection between pins
2 and 5 of J-2 on the prover interface board (control voltage must be present at pin 4 (+)
and 2 (-) of J-2).
If the control valve does not open (piston does not launch), the prover interface board is
defective.
4. If the control valve opened in step 3, the operating computer is not sending the run
command (dropping to 0V) to pin 5 of J-2. One possible cause for this problem may be
that the operating computer is not receiving the upstream signal from the optical
assembly. The voltage between pins 6 (+) and 2 (-) of J-2 on the prover interface board
should be low (less than 2V) and the green LED illuminated (if equipped) with the piston
Measurement Piston Movement 75
Page 90
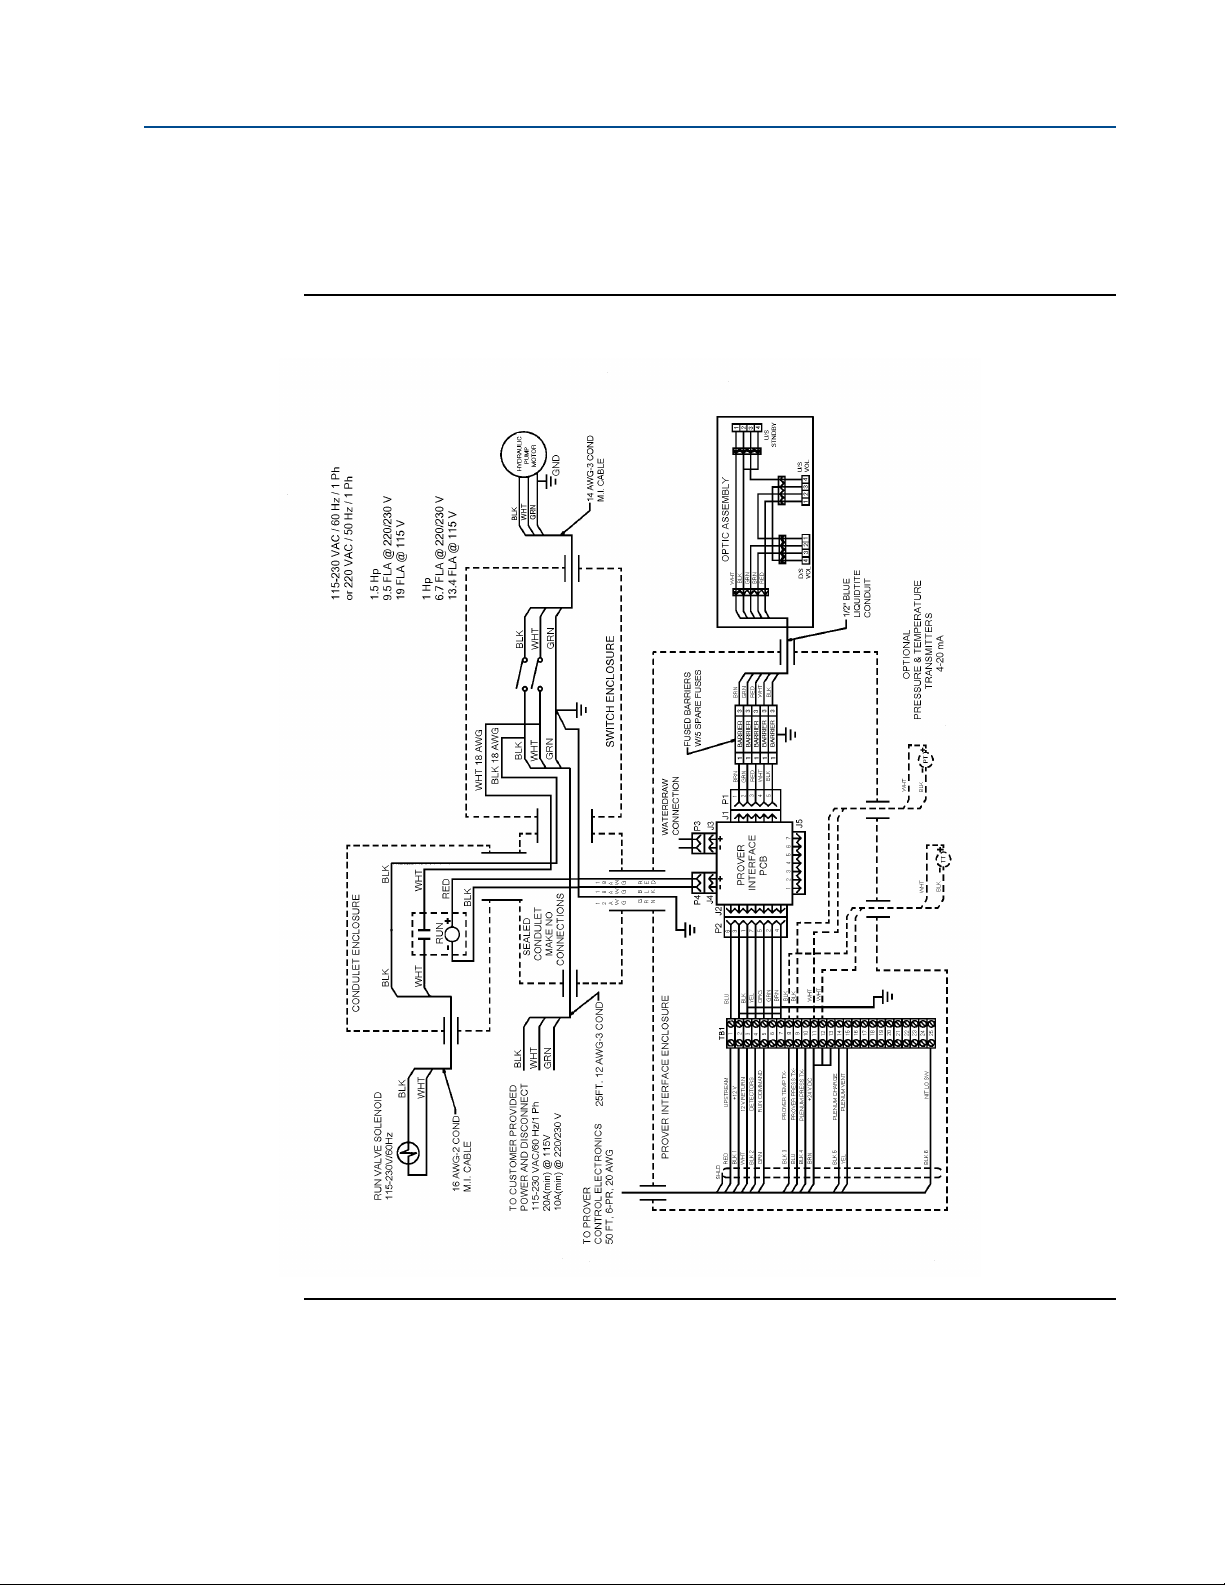
Section 5: Troubleshooting Operating and maintenance instructions
January 2015 3-9008-701 Rev J
in the full upstream position. Be sure to check the safety barriers for proper resistance.
If the barrier resistance is acceptable, the cause may be in the optical assembly wiring or
upstream switch.
Figure 5-2 Prover wiring diagram (single phase power)
76 Measurement Piston Movement
Page 91
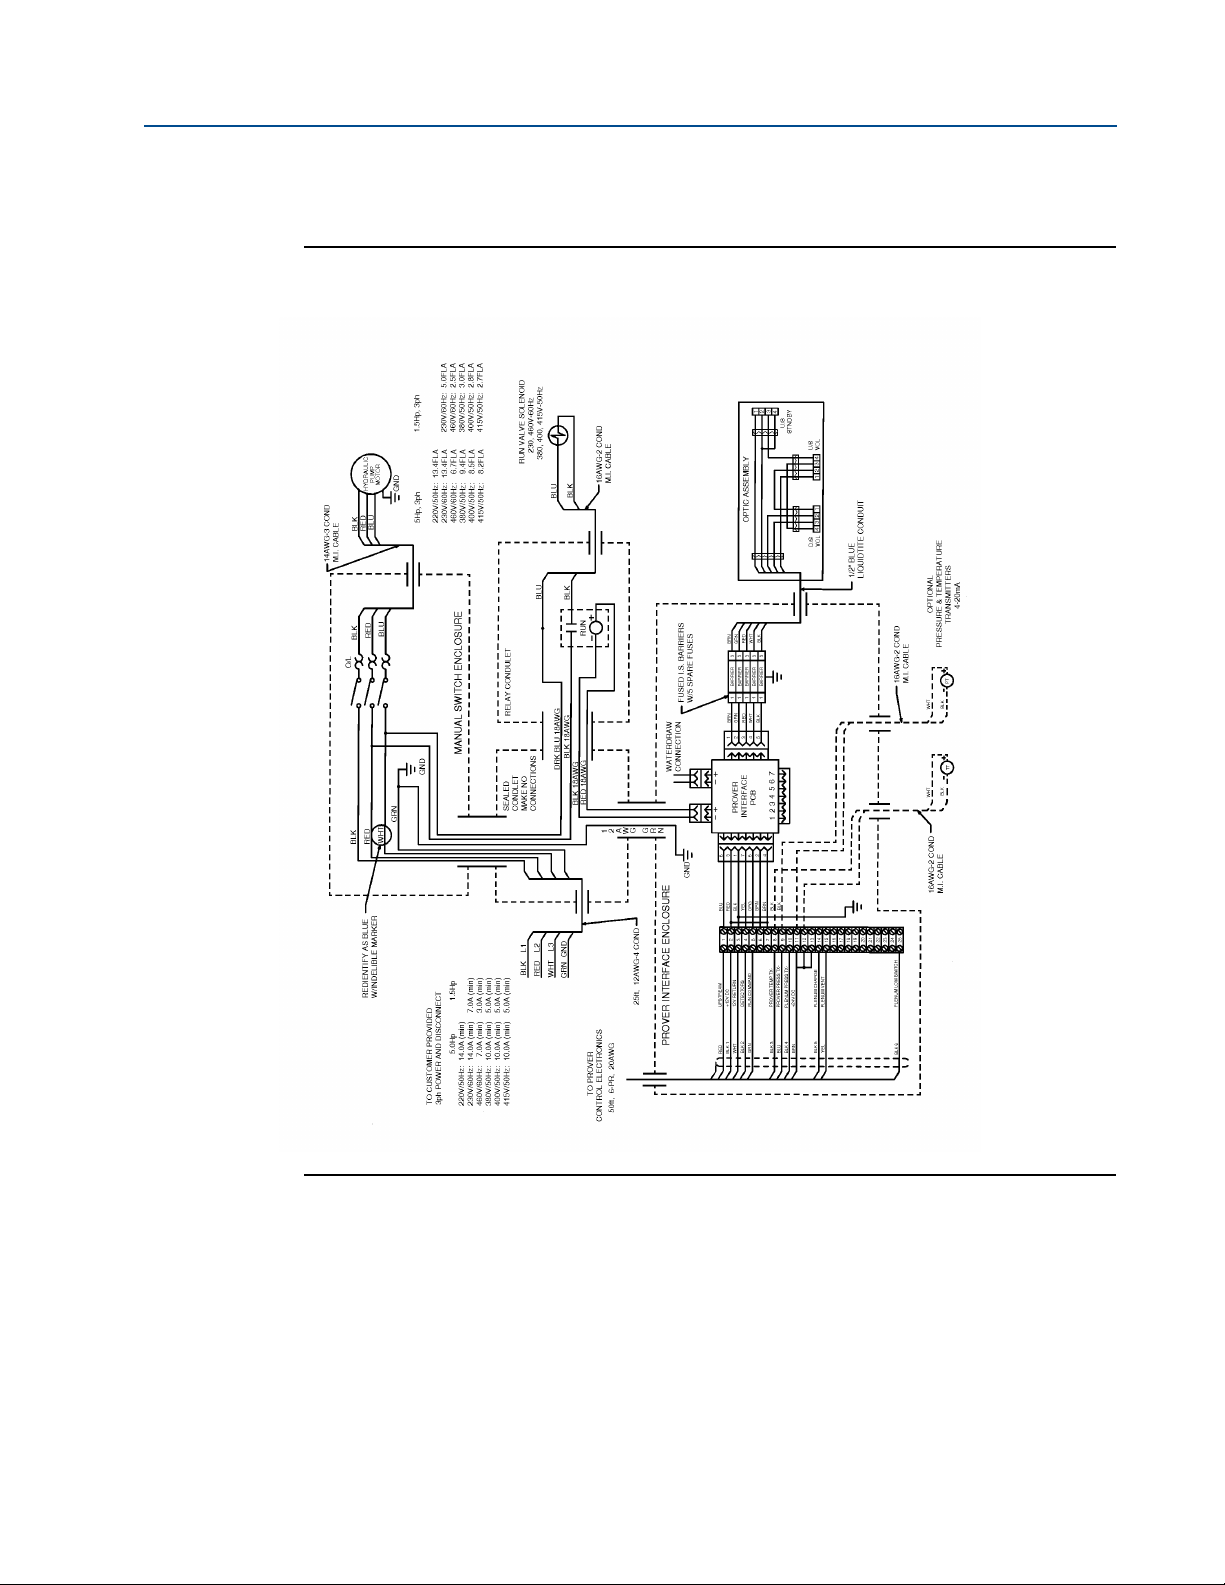
Operating and maintenance instructions Section 5: Troubleshooting
3-9008-701 Rev J January 2015
Figure 5-3 Prover wiring diagram (three phase power)
Measurement Piston Movement 77
Page 92

Section 5: Troubleshooting Operating and maintenance instructions
January 2015 3-9008-701 Rev J
Figure 5-4 Prover wiring diagram (ATEX internal)
78 Measurement Piston Movement
Page 93
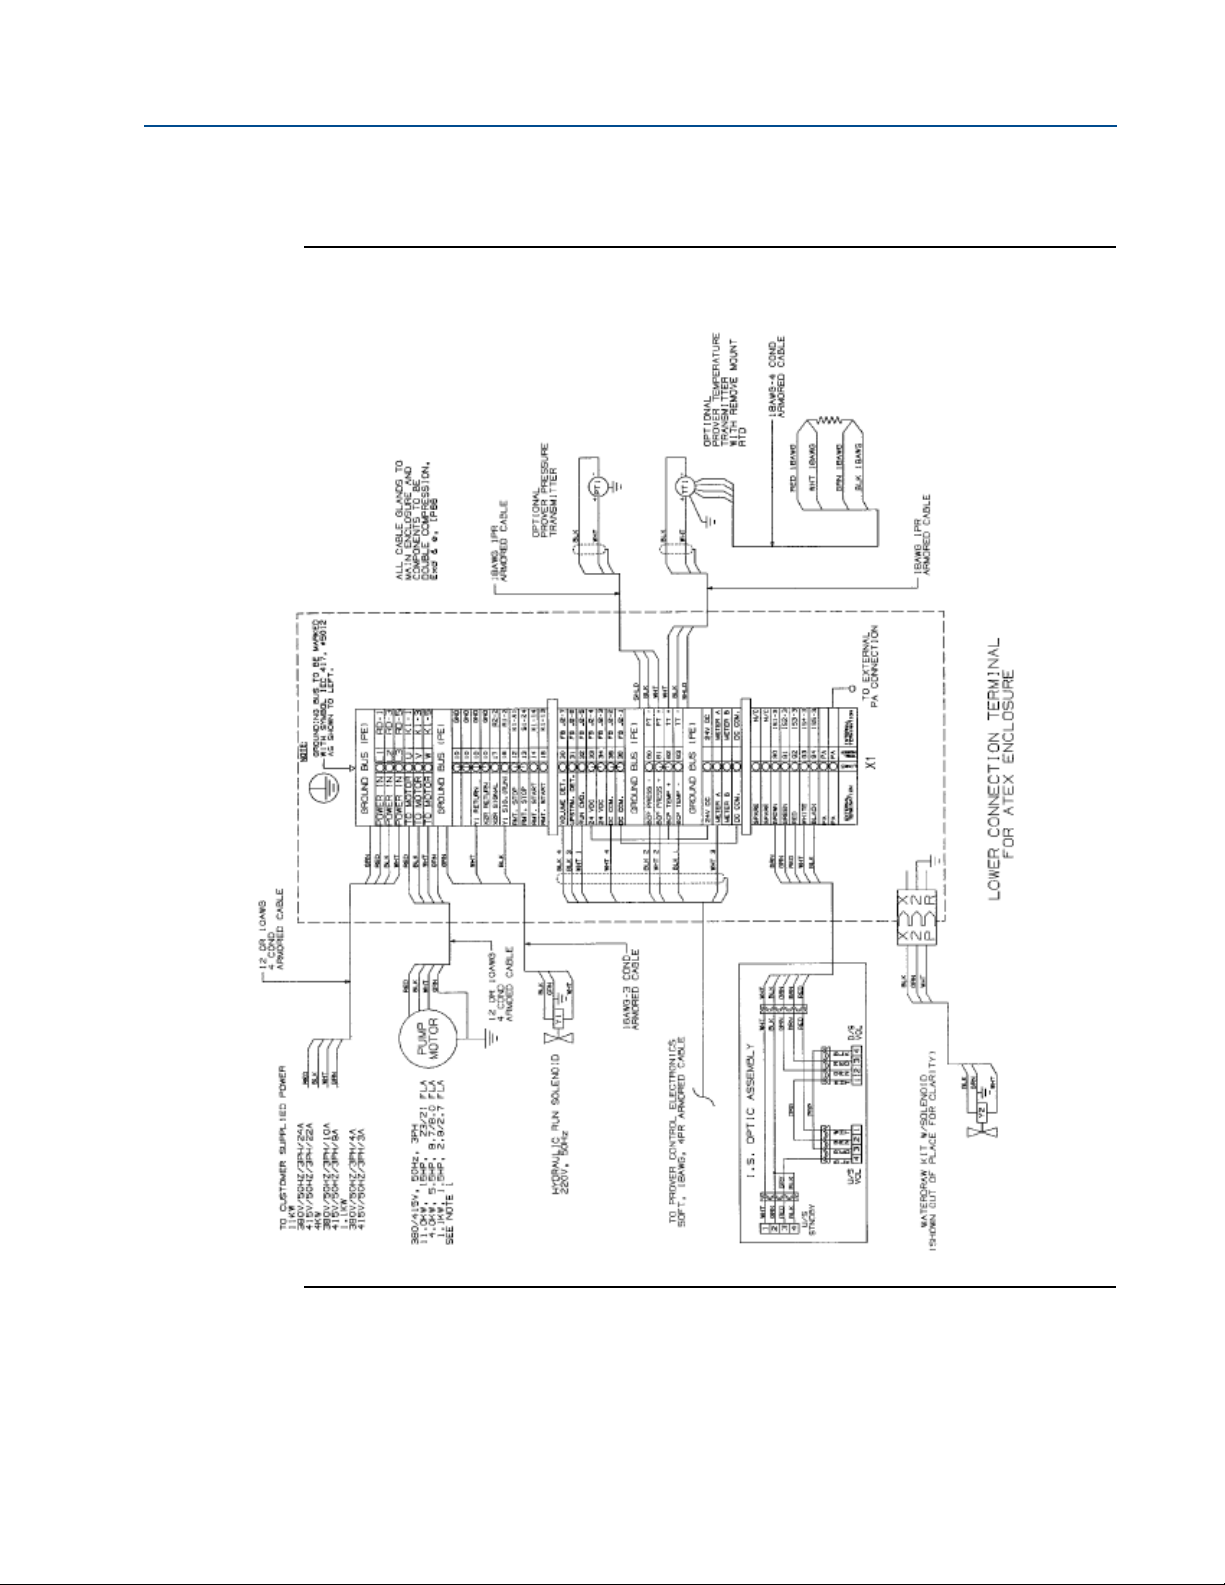
Operating and maintenance instructions Section 5: Troubleshooting
3-9008-701 Rev J January 2015
Figure 5-5 Prover wiring diagram (ATEX external)
Measurement Piston Movement 79
Page 94

Section 5: Troubleshooting Operating and maintenance instructions
January 2015 3-9008-701 Rev J
5.4 The auto plenum adjust panel
Compact prover plenum adjustment panels can have either AC or DC power solenoids.
Sometimes these solenoids will not work correctly or at all. The problem typically lies in the
control circuits for the solenoid relays. These circuits for the relays are DC powered directly from
the operating computer. The control coil of these relays must be wired to match the computer
output configuration.
Signal determination:
Prover flow computers use one of the following output signal types for charge and vent:
• Driving current
• Sinking current
Note
• Measure the signal voltage levels at TB1 wit a typical DMM (Digital multi meter) set for DC
voltage in the prover interface closure or at the relay itself. TB1 is the most common place
to take these measurements because all conductors and signals should be present.
• If the signal does not change state (with high or low voltage) at TB! or at the relay, trace
back to the operating computer for accurate measurements. There should be no loose or
corroded connections.
Driving current signal
The operating computer will output a +24V DC signal when active and the DC negative will be
common to both relays. When not active, the signal will go to 0V DC.
• Use a negative reference (-) for the DMM at a convenient point where the computer and
prover DC negative is common between two.
• If necessary, disconnect the signal conductor at the computer to take accurate
measurements.
Sinking current signal
The operating computer will output a DC negative signal when active and the +24V DC will be
common to both relays. When not active, the signal will go to +24V DC.
• Use a positive reference (+) for the DMM at the main DC power source for the system or at
TB1.
• If necessary, disconnect the signal conductor at the computer to take accurate
measurements.
80 The auto plenum adjust panel
Page 95

Operating and maintenance instructions Section 5: Troubleshooting
3-9008-701 Rev J January 2015
Correction procedure:
Determine which type of computer output is being used and compared this to the wiring at the
relays.
1. If necessary, refer to the prover’s wiring diagram.
2. If +24V DC is common to both relays and the negative (-) from the coil of each relay
goes back to TB1, they are wired for sinking current.
3. If the DC negative (-) is common to both relays, and the positive (+) wire from the coil of
each relay goes back to TB1, they are wired for driving current.
4. Correct the wiring as needed for the type of computer signal being used.
5. See Figure 5-6 and Figure 5-7 for simplified diagrams.
6. Restore power and test signals again for correct operation.
7. If the solenoids begin to work as desired but the proving computer still automatically
aborts the proving sequence, be certain the plenum “time out” (the time set within the
computer’s configuration to charge/vent the plenum) is long enough to fill or vent the
plenum. Due to the small orifice of the solenoid valves, it can take some time to adjust
the plenum pressure to the needed value. Manual charging or venting of the plenum
may be necessary.
The auto plenum adjust panel 81
Page 96

Section 5: Troubleshooting Operating and maintenance instructions
January 2015 3-9008-701 Rev J
Figure 5-6 DC powered solenoids
82 The auto plenum adjust panel
Page 97

Operating and maintenance instructions Section 5: Troubleshooting
3-9008-701 Rev J January 2015
Figure 5-7 AC powered solenoids
The auto plenum adjust panel 83
Page 98

Section 5: Troubleshooting Operating and maintenance instructions
January 2015 3-9008-701 Rev J
84 The auto plenum adjust panel
Page 99

Operating and maintenance instructions Section 6: Special tools and equipment
3-9008-701 Rev J January 2015
Section 6: Special tools and equipment
6.1 Tool list
The following list of parts will aid the qualified technician in repair of the compact prover:
1. Heavy Duty non-marking Strap Wrench, McMaster-Carr part number: 5349A12
McMaster-Carr
P.O. Box 440
New Brunswick, NJ 08903-0440
Telephone: 732-329-3200
Fax: 732-329-3772
Net: www.mcmaster.com
2. Torque Wrenches
Torque wrenches are necessary for assembly and repair of the compact prover.
See Tables 4-2 and 4-3 for specified torque ratings of the compact prover Tie
Rods and Hydraulic Cylinders. See Table 4-1 for torque requirements for
poppet.
3. Standard Allen wrenches, box-end wrenches and other common tools may also be used
for repair of the compact prover. Refer to Table 6-1.
Tool list 85
Page 100

Section 6: Special tools and equipment Operating and maintenance instructions
January 2015 3-9008-701 Rev J
Table 6-1 Tool size requirement
8”
12m”
12”
18”
150#
300#
600#
150#
300#
600#
150#
300#
600#
150#
300#
600#
Tie rod nut
socket size
1-5/8”
1-5/8”
1-5/8”
1-5/8”
1-5/8”
2-3/16”
1-5/8”
1-5/8”
2-3/16”
2”
2”
2-3/8”
Hydraulic tie
rod nut
socket
9/16” 3/4” 5/16” 1/2” & 3/8”
3/4” 15/16” 1/2” 1/2” & 3/8”
3/4” 15/16” 1/2” 1/2” & 3/8”
1-5/16” 1-7/16” 5/8” 1/2” & 3/8”
Hydraulic
cylinder
piston nut
socket size
Allen screw
for hydraulic
gland
Allen screw
for optical
gland
24”
34”
40”
150#
300#
600#
150/300#
150/300#
2”
2-3/8”
2-15/16”
3-1/8”
3-1/8”
1-7/16” 2-3/16” 5/8” 1/2” & 3/8”
2-3/16” n/a 3/4” 1/2”
3/8” 3/8” & 5/8”
86 Tool list
 Loading...