

Page 1
Rosemount™ TankMaster™ Mobile
Inventory Management Software
User Guide
00809-0100-5120, Rev AA
April 2021
Page 2

TMN Mobile
NOTICE
Read this manual before working with the product. For personal and system safety, and for optimum product performance,
ensure you thoroughly understand the contents before installing, using, or maintaining this product.
For equipment service or support needs, contact your local Emerson Automation Solutions/Rosemount Tank Gauging
representative.
2
Page 3

User Guide Contents
00809-0100-5120 April 2021
Contents
Chapter 1 Introduction.............................................................................................................. 5
1.1 Features.......................................................................................................................................5
1.2 Manual overview..........................................................................................................................8
1.3 Technical documentation............................................................................................................ 9
Chapter 2 What is Rosemount™ TankMaster™ Mobile?............................................................ 11
2.1
Start page..................................................................................................................................11
2.2 Workspace.................................................................................................................................14
Chapter 3 Getting started.........................................................................................................17
3.1 Preparations.............................................................................................................................. 17
3.2 Preparations for mobile device users..........................................................................................18
3.3 Sign in procedure.......................................................................................................................19
3.4 Install digital certificate..............................................................................................................23
3.5 Install certificate and app on Android device..............................................................................28
3.6 Install certificate and app on iOS device..................................................................................... 35
Chapter 4 View Tank Data........................................................................................................ 47
4.1 Tank data...................................................................................................................................47
4.2 Tank cards................................................................................................................................. 49
4.3 Tank details............................................................................................................................... 53
4.4 Tank groups...............................................................................................................................55
4.5 Tank movement........................................................................................................................ 56
4.6 Tank notes.................................................................................................................................57
4.7 Watchlists..................................................................................................................................58
Chapter 5 System Administration.............................................................................................59
5.1 Administration mode.................................................................................................................59
5.2 User administration................................................................................................................... 61
5.3 System settings......................................................................................................................... 66
5.4 Status information.....................................................................................................................75
Chapter 6 User Settings............................................................................................................79
6.1 Account.....................................................................................................................................79
6.2 Password................................................................................................................................... 81
6.3 Tank groups...............................................................................................................................83
Chapter 7 Data Presentation.................................................................................................... 87
7.1 Data presentation......................................................................................................................87
Chapter 8 License management............................................................................................... 89
8.1 License management.................................................................................................................89
Rosemount TankMaster Mobile 3
Page 4

Contents User Guide
April 2021 00809-0100-5120
4 User Guide
Page 5

User Guide Introduction
00809-0100-5120 April 2021
1 Introduction
This is an introduction to the Rosemount™ TankMaster™ Mobile Inventory Management
software.
Rosemount TankMaster Mobile is an application for remote monitoring of tank farms. It is
designed for standard web browsers and mobile phones. The application connects with
servers that run Rosemount TankMaster inventory management software.
The graphical interface gives you a clear overview of tanks. Various views are available for
different levels of detail.
Rosemount TankMaster Mobile is designed to meet applicable requirements for network
and system security in international standard IEC 62443-3-3. It is designed for an
architecture that supports segmentation of network layers and separate security zones
with different access levels for various components.
Rosemount TankMaster Mobile is designed for the Docker platform. This ensures stable
and reliable operation and simple installation in various computer network environments.
Subscribe to software updates
You can subscribe to Rosemount TankMaster Mobile updates for a specified period of
time.
A license gives you access to software upgrades and security patches when available.
Software updates are available on TankMaster.Rosemount.com/ServiceCenter.
1.1 Features
TankMaster Mobile features real-time information on tank status. It collects data from
existing TankMaster systems, and presents it in web browser interface on local or remote
client computers, tablets, and smart phones.
Features can be summarized as:
• Web browser based user interface
• Connects to tank server in existing TankMaster systems
• Allows remote tank monitoring via web browser
• Access live inventory data – when and where you need it
• Get instant overview of all tanks
• Easy-to-use web application optimized for computer, tablet, and smartphone
• Cyber secure solution, compliant with the IEC 62443-3-3 standard
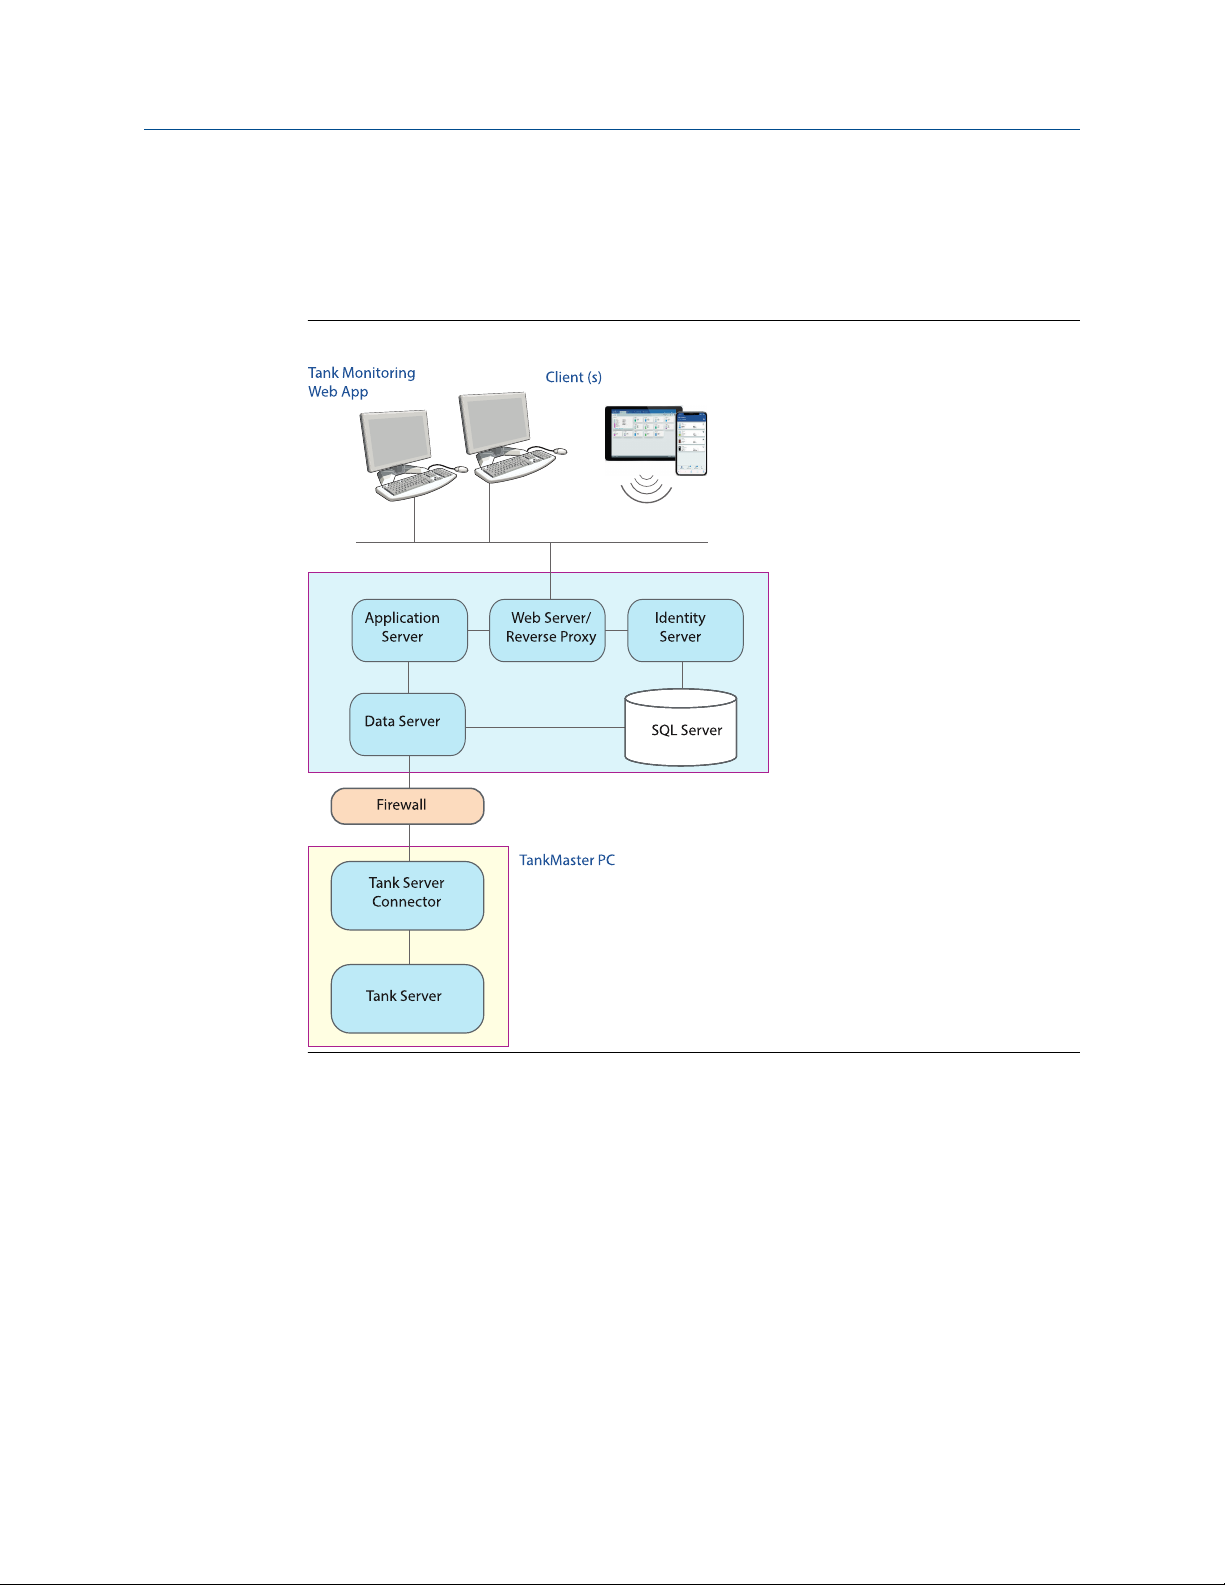
Rosemount TankMaster Mobile allows you to remotely monitor your tank farm. A
dedicated server connects TankMaster Mobile with virtually any standard web browser
and presents data collected from connected TankMaster servers.
Rosemount TankMaster Mobile 5
Page 6
Introduction User Guide
April 2021 00809-0100-5120
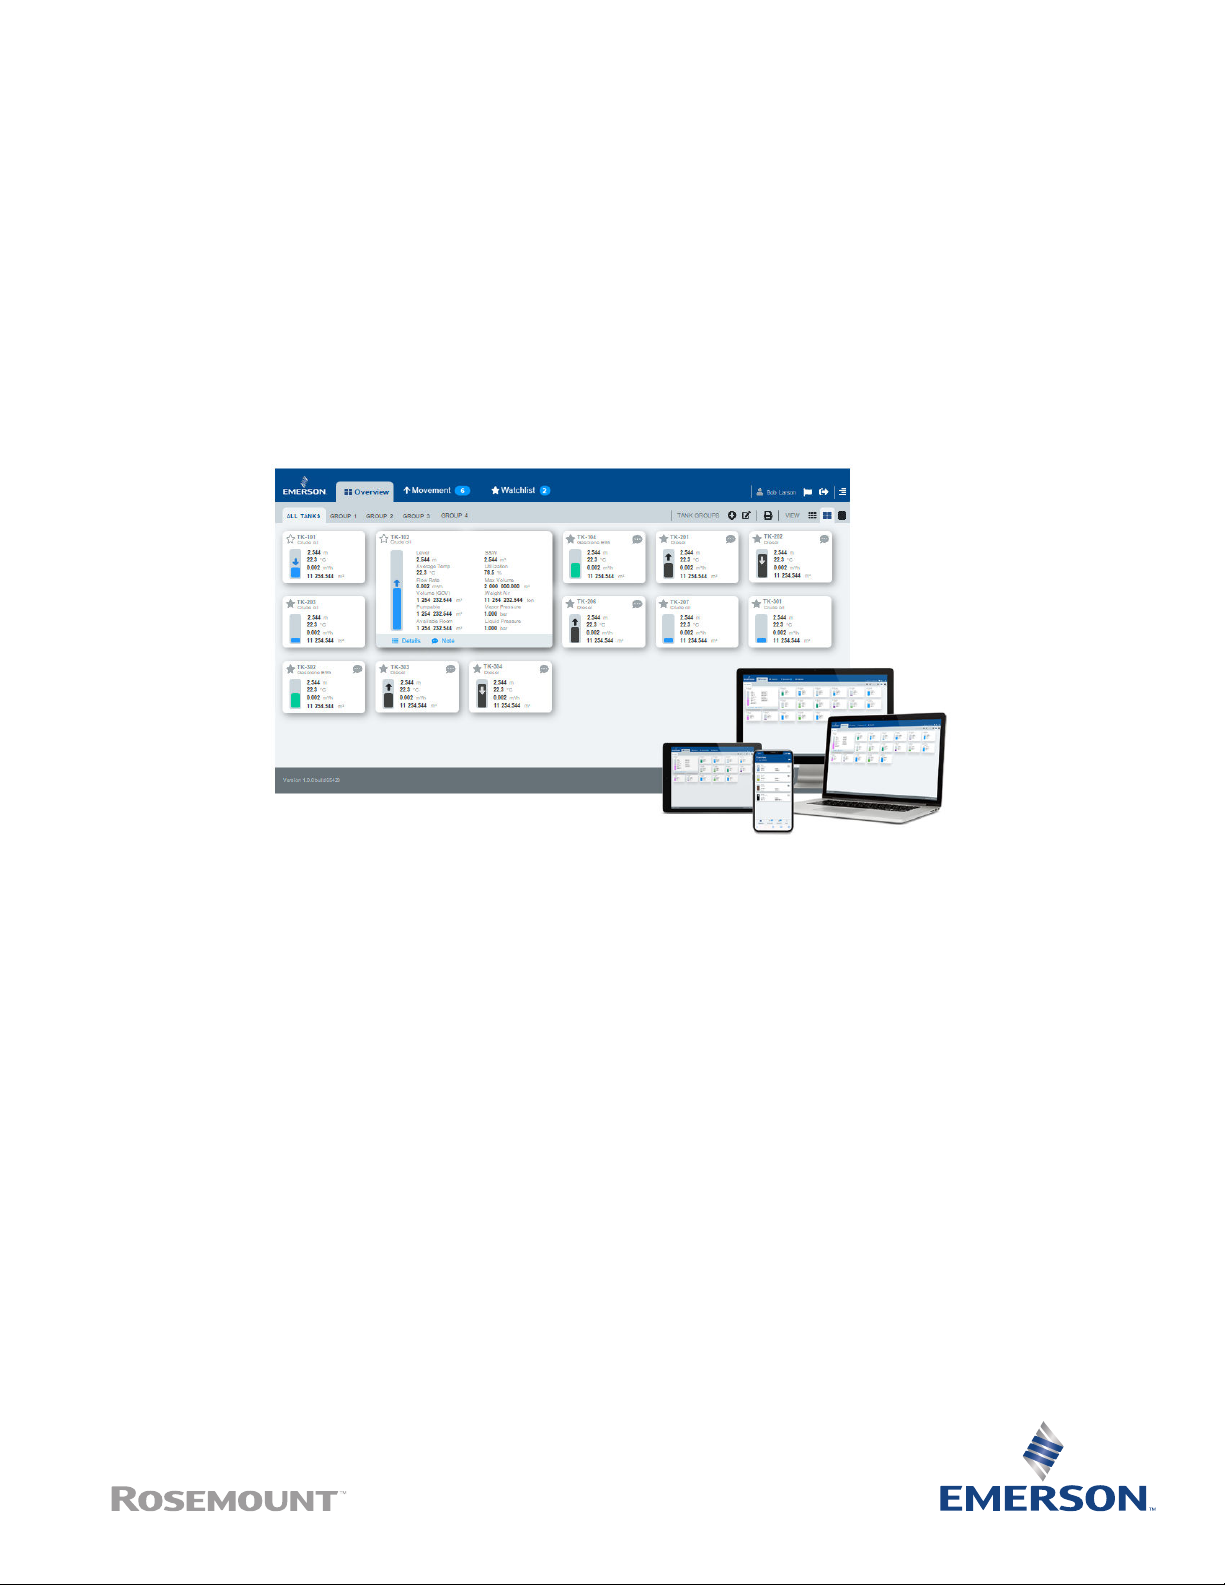
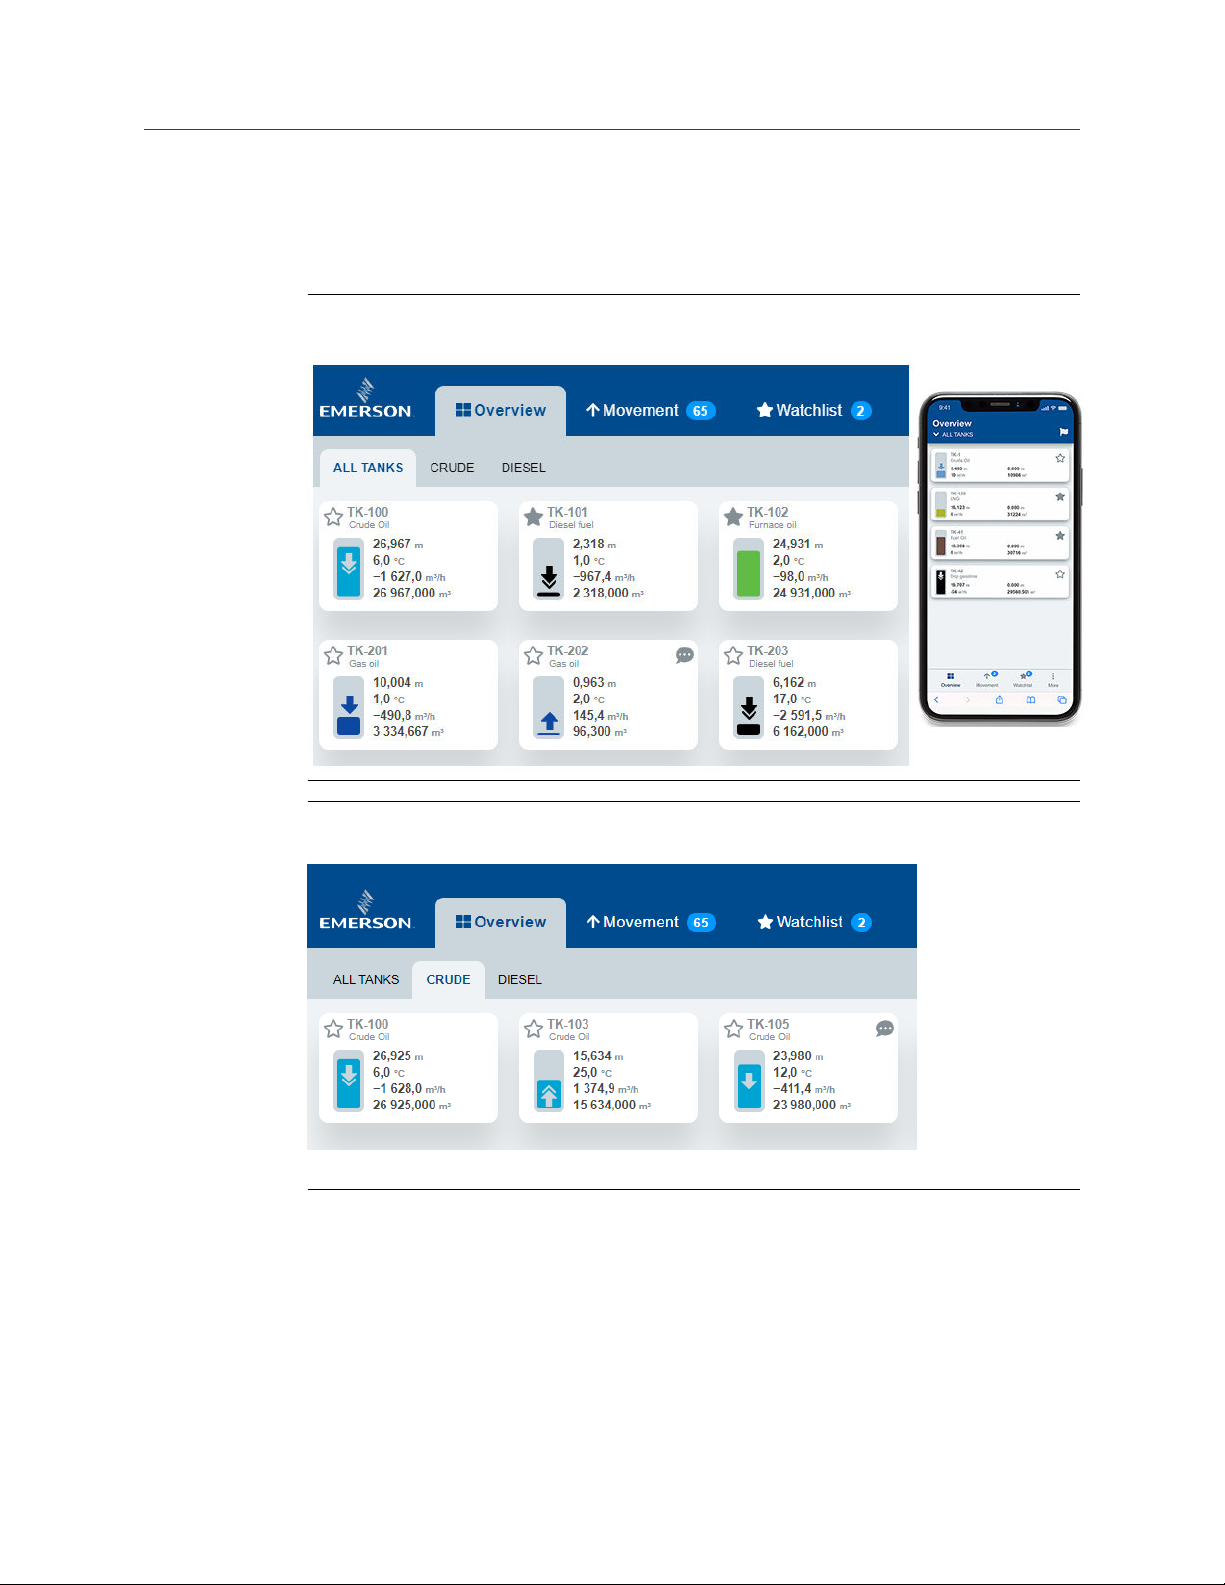
Figure 1-1: TankMaster Mobile Overview
Figure 1-2: TankMaster Mobile Overview on Mobile Phone
TankMaster Mobile is based on servers that communicate with existing TankMaster tank
server and provides measurement data and status information for presentation in a web
user interface.
TankMaster Mobile supports responsive design principles. Tank cards and windows adapt
to different screen sizes. User experience is not compromised as program windows are
rescaled and re-sized.
The Tank server is part of the existing TankMaster system. It manages all measurement
data and status information for the connected devices.
The Tank Server Connector communicates with the existing TankMaster system's Tank
server. It collects measurement data and status information and provides it to the Data
server.
6 User Guide
Page 7
TankMast er Mobile
User Guide Introduction
00809-0100-5120 April 2021
The connector runs on a separate machine and exposes its ports to the plant network only.
It will not allow traffic outside this network layer.
The Data server feeds the Application server with tank data. The Application server then
provides the encrypted information to connected web browser clients.
Figure 1-3: TankMaster Mobile System Architecture
Rosemount TankMaster Mobile 7
Page 8

Introduction User Guide
April 2021 00809-0100-5120
1.2 Manual overview
This manual is a guide for using the Rosemount™ TankMaster™ Mobile application.
Chapter Introduction provides a description of the TankMaster Mobile workspace and
system architecture.
Chapter What is Rosemount™ TankMaster™ Mobile? provides a brief introduction to the
Rosemount TankMaster Mobile web browser interface.
Chapter Getting started provides information on how to start using the TankMaster
Mobile web application.
Chapter View Tank Data describes tank data presentation with tank cards.
Chapter System Administration describes various system administration functions such as
user administration, license management, and more.
Chapter User Settings describes setup functions available for all users such as My Profile
setup, changing password, and adding tank groups.
Chapter Data Presentation provides an overview of how status information is presented in
tank cards.
8 User Guide
Page 9

User Guide Introduction
00809-0100-5120 April 2021
1.3 Technical documentation
The Rosemount™ Tank Gauging System includes a wide portfolio of user documentation.
For a complete list, see product pages on Emerson.com/Rosemount.
Reference manuals
• Rosemount Tank Gauging System Configuration Manual (00809-0300-5100)
• Rosemount 2460 System Hub (00809-0100-2460)
• Rosemount 2410 Tank Hub (00809-0100-2410)
• Rosemount 5900S Radar Level Gauge (00809-0100-5900)
• Rosemount 5900 Proof Test with Reference Reflector (00809-0200-5900)
• Rosemount 5900C Radar Level Gauge (00809-0100-5901)
• Rosemount 2240S Multi-Input Temperature Transmitter (00809-0100-2240)
• Rosemount 2230 Graphical Field Display (00809-0100-2230)
• Rosemount 5300 Guided Wave Radar (00809-0100-4530)
• Rosemount 5408 Radar Level Transmitter (00809-0300-4408)
• Rosemount Tank Gauging Wireless System (00809-0100-5200)
• Rosemount TankMaster WinOpi (00809-0200-5110)
• Rosemount TankMaster WinSetup (00809-0100-5110)
• Rosemount TankMaster Floating Roof Monitoring (00809-0500-5100)
• Rosemount TankMaster Network Configuration (00809-0500-5100)
• Rosemount 5900 Radar Level Gauge and Rosemount 2410 Tank Hub Safety Manual
Option S (00809-0500-5100)
Rosemount TankMaster Mobile 9
Page 10

Introduction User Guide
April 2021 00809-0100-5120
Product data sheets
• Rosemount Tank Gauging System Data Sheet (00813-0100-5100)
• Rosemount 2460 System Hub Product Data Sheet (00813-0100-2460)
• Rosemount 2410 Product Data Sheet (00813-0100-2410)
• Rosemount 5900S Product Data Sheet (00813-0100-5900)
• Rosemount 5900C Product Data Sheet (00813-0100-5901)
• Rosemount 2240S Product Data Sheet (00813-0100-2240)
• Rosemount 2230 Product Data Sheet (00813-0100-2230)
• Rosemount 5300 Product Data Sheet (00813-0100-4530)
• Rosemount 5408 Product Data Sheet (00813-0100-4408)
10 User Guide
Page 11
User Guide What is Rosemount™ TankMaster™ Mobile?
00809-0100-5120 April 2021
™
2 What is Rosemount™ TankMaster
Mobile?
2.1 Start page
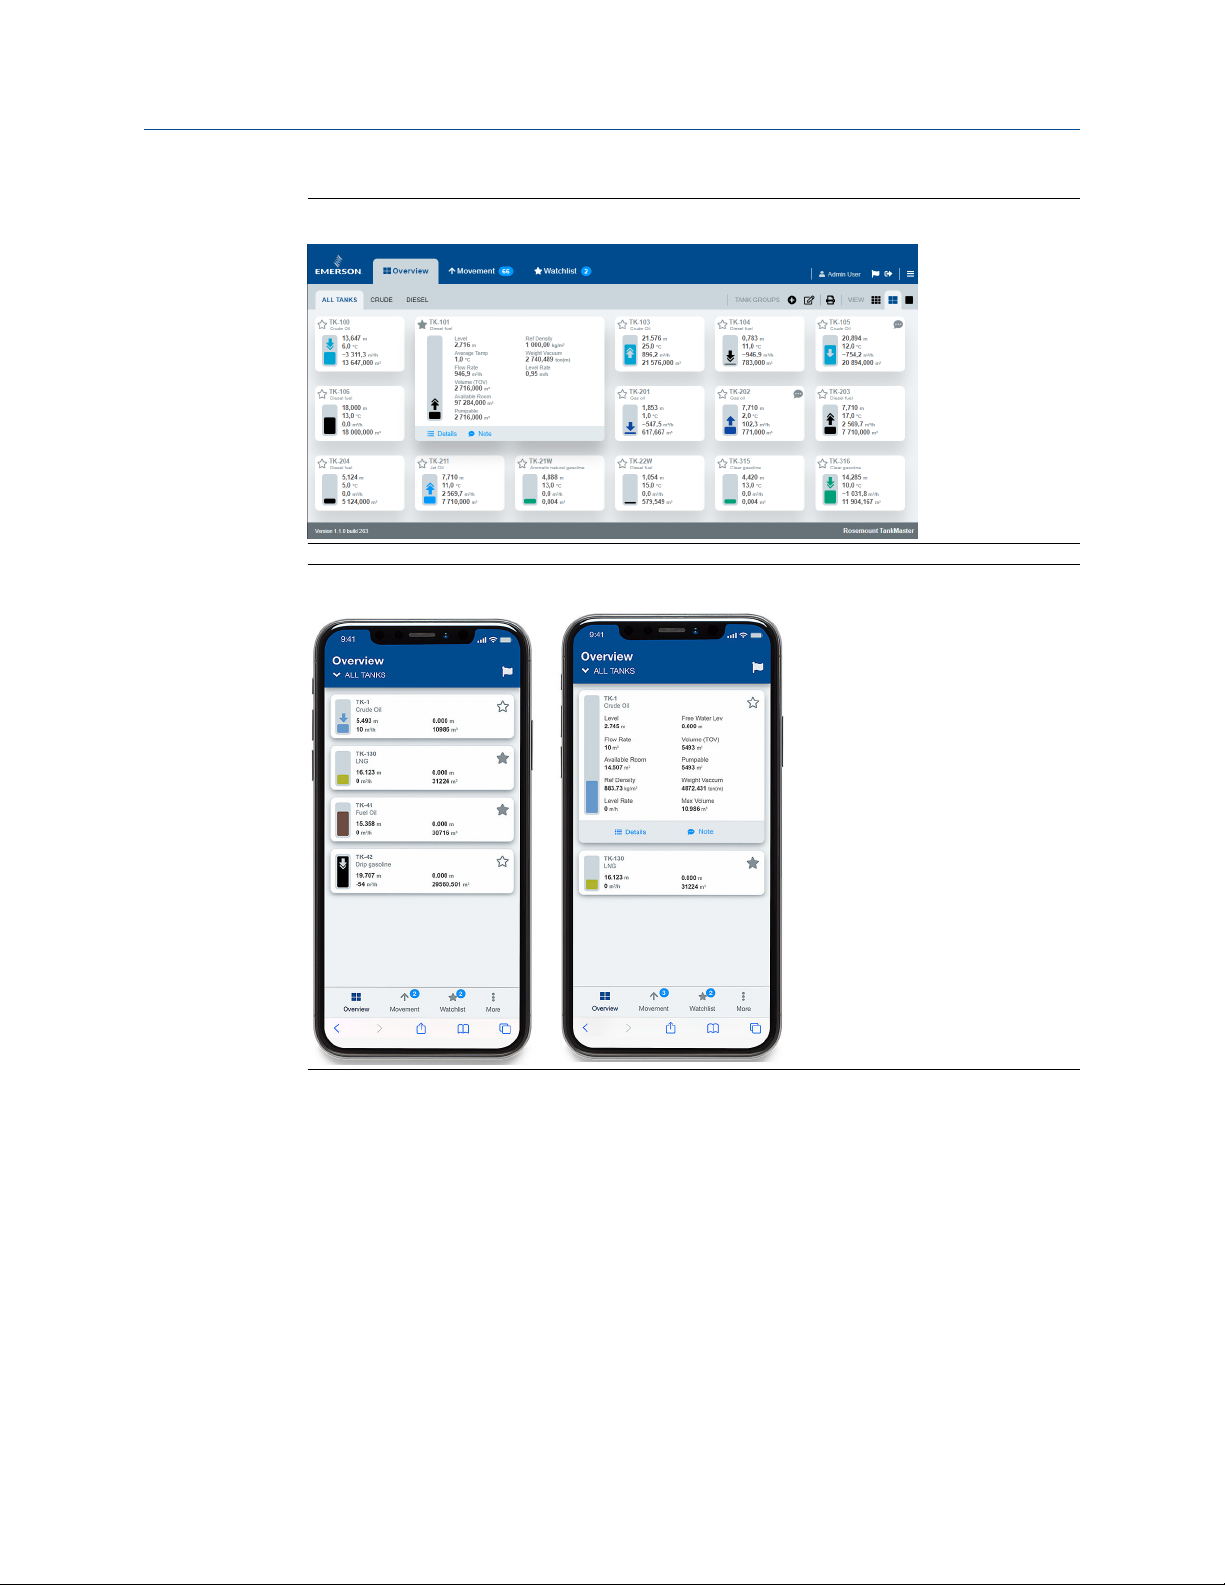
This is a brief introduction of what you can do in TankMaster Mobile Web app.
TankMaster Mobile provides you with several tools for efficient tank monitoring:
• Clear overview of tanks
• Use watchlists to monitor tanks of special interest
• Tank movements based on desired flow rate limits
• Each tank presented with a card
• Tanks can be organized in groups
Sign in to the TankMaster Mobile application as described in Sign in procedure. The
Overview page will appear showing tanks and tank data.
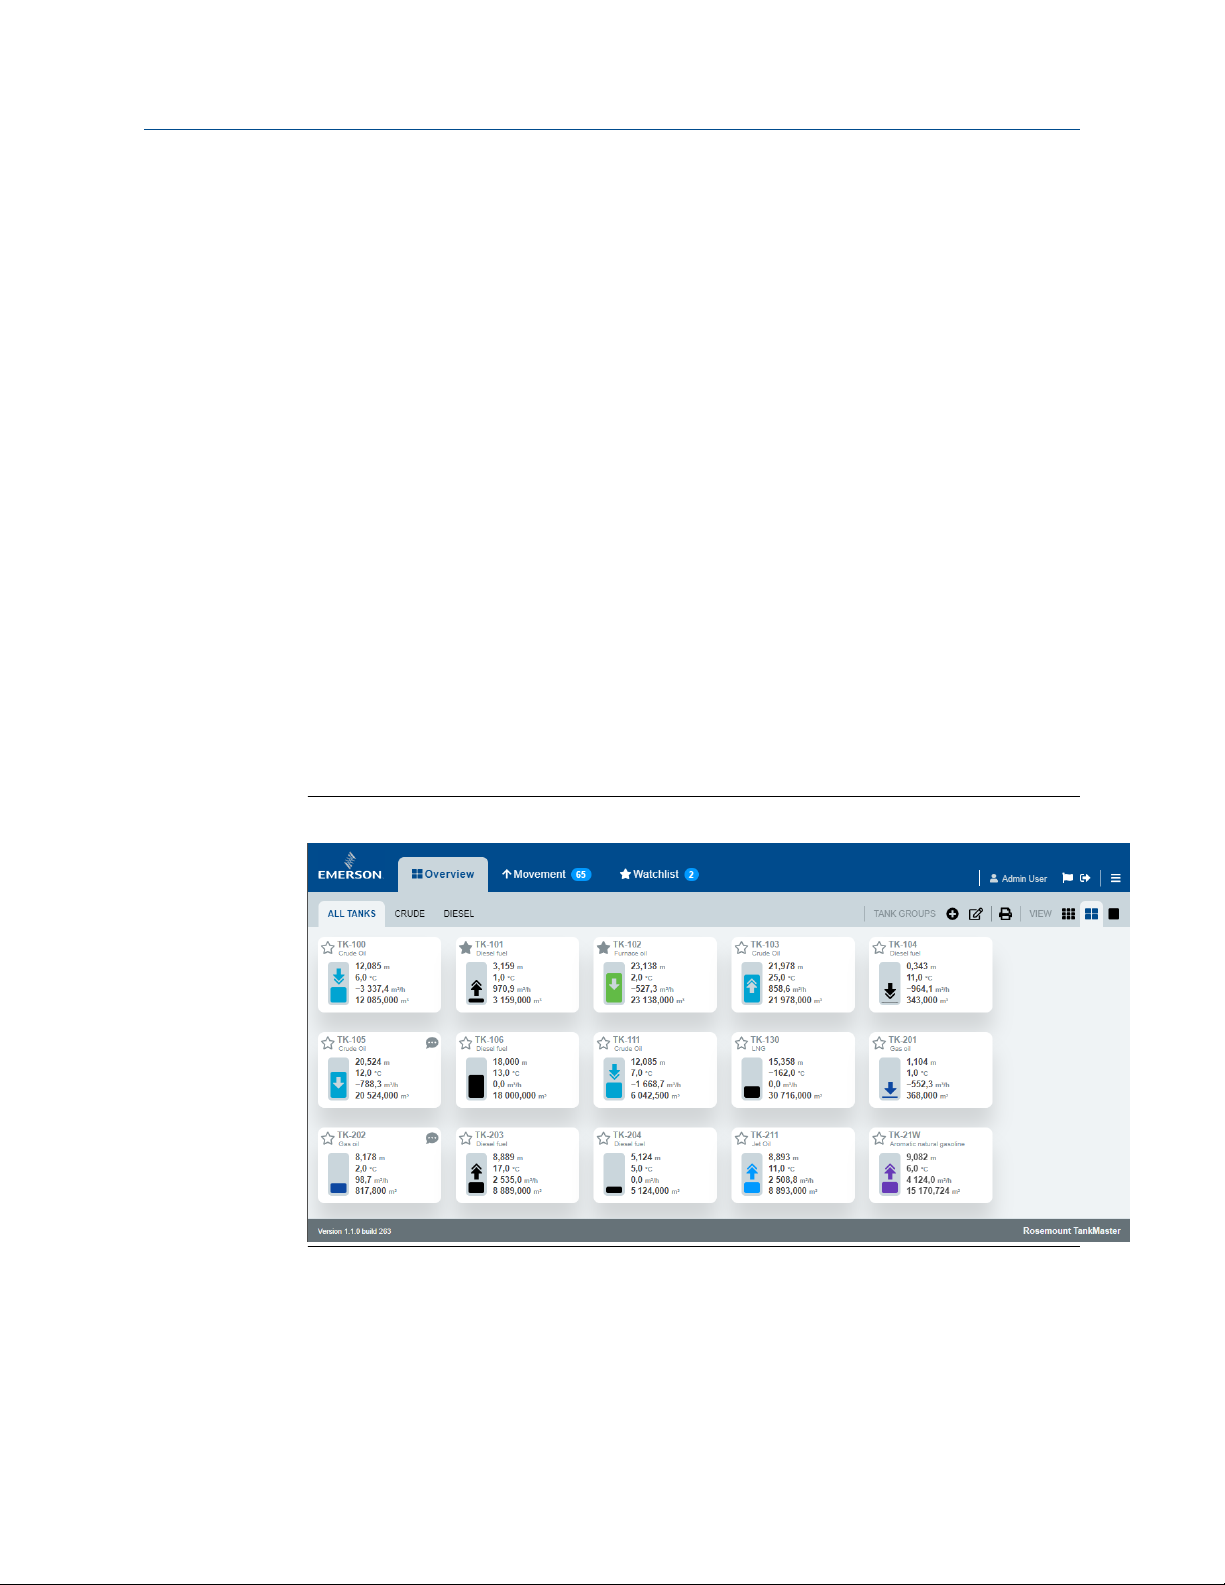
In the All Tanks tab each tank is presented with a tank card. You may change view to larger
tank cards with more information.
Figure 2-1: Overview Page All Tanks
Rosemount TankMaster Mobile 11
Page 12
What is Rosemount™ TankMaster™ Mobile? User Guide
April 2021 00809-0100-5120
Tank groups
You may organize tanks in various tank groups that suit your product portfolio or other
requirements.
Figure 2-2: Overview All Tanks
Figure 2-3: Overview Tank Groups
12 User Guide
Page 13
User Guide What is Rosemount™ TankMaster™ Mobile?
00809-0100-5120 April 2021
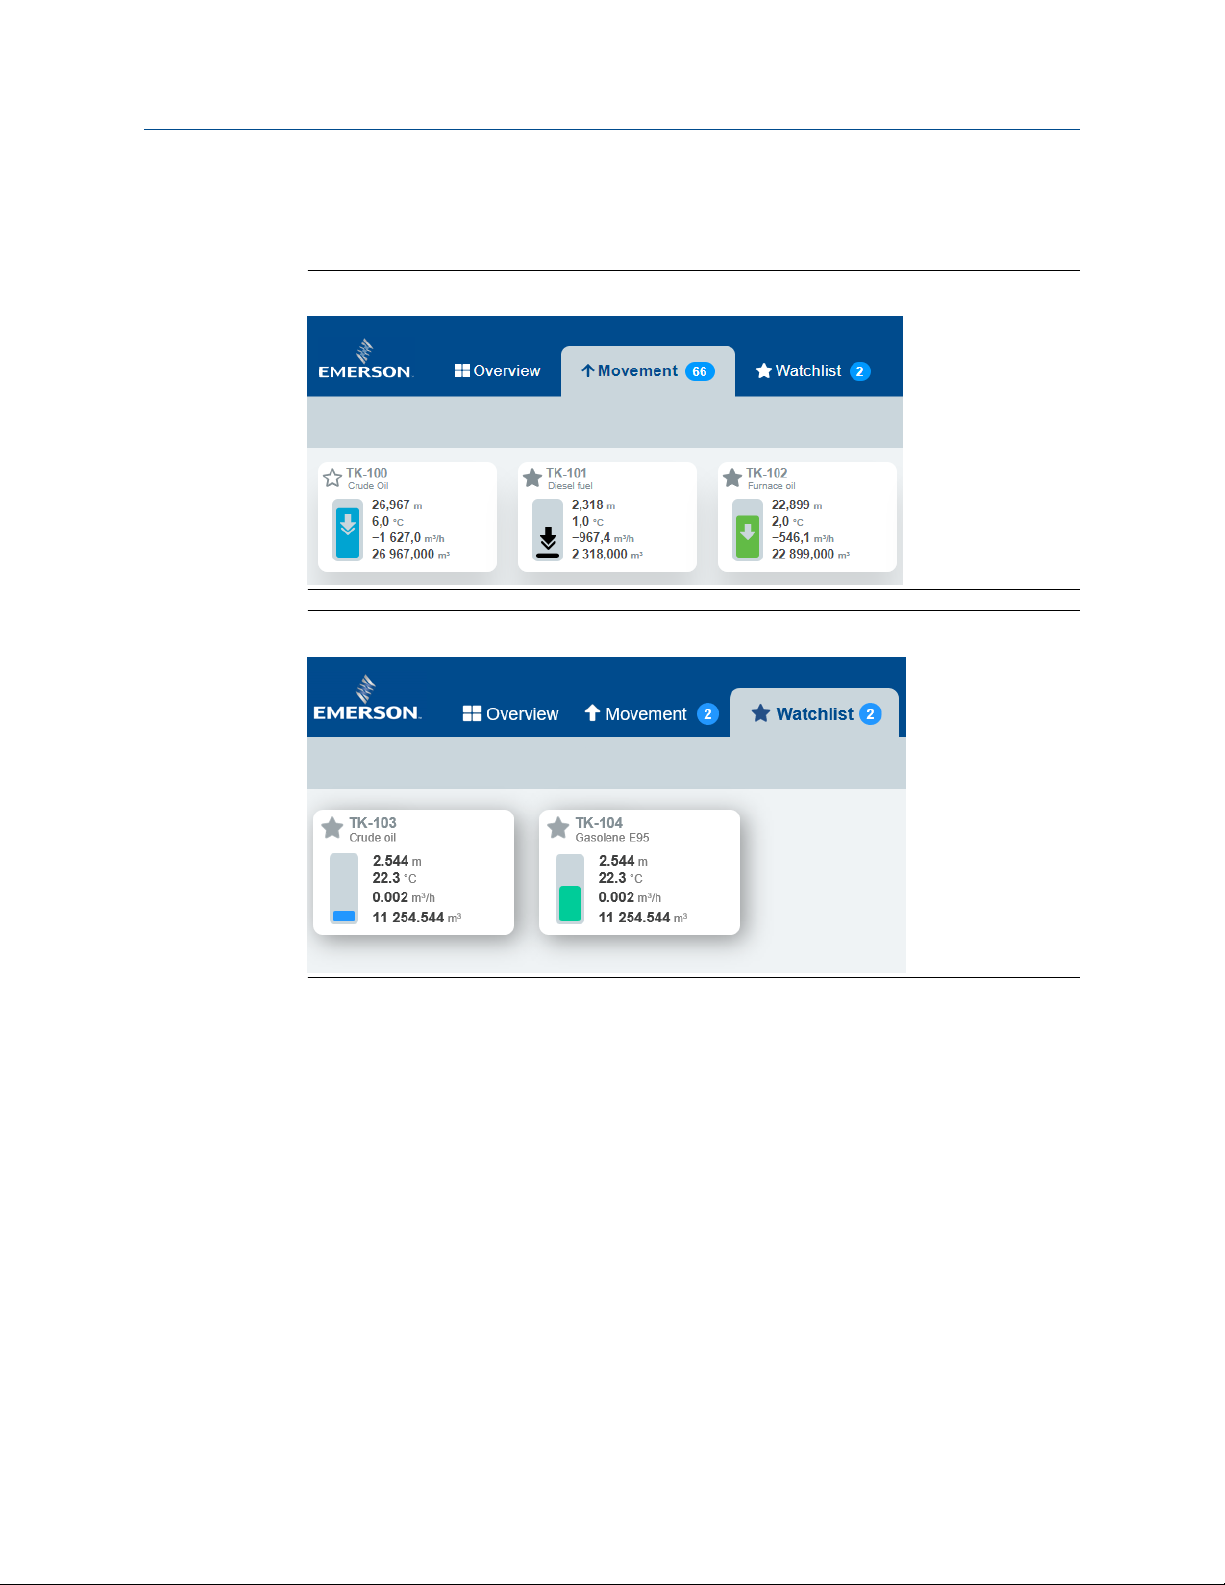
Movement and Watchlists
There are dedicated tabs for tank movement and watchlist.
Figure 2-4: Movement
Figure 2-5: Watchlist
Rosemount TankMaster Mobile 13
Page 14
M
A
L
K
CB
E
G
FD
H
I
J
What is Rosemount™ TankMaster™ Mobile? User Guide
April 2021 00809-0100-5120
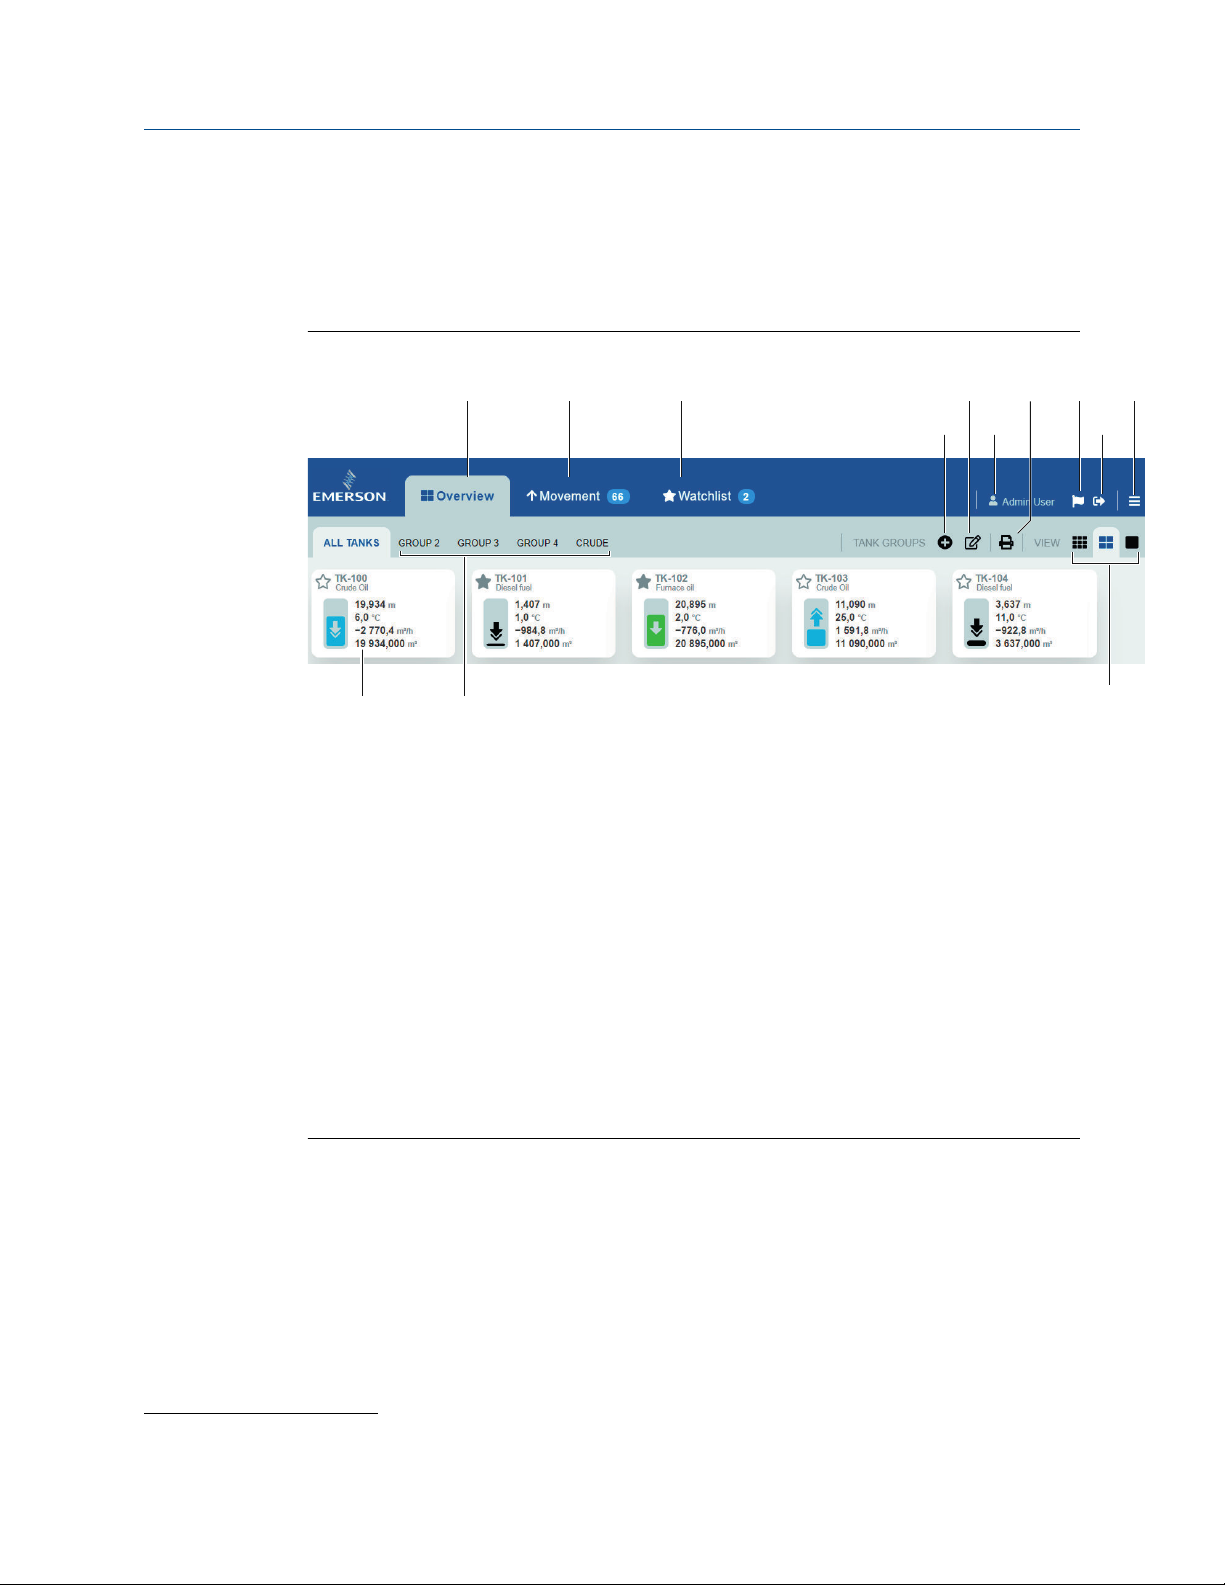
2.2 Workspace
TankMaster Mobile web application start page has menus and icons for easy navigation to
the various TankMaster functions.
Figure 2-6: Menus and Icons on the Start Page
A. Overview tab
B. Movement
C.
Watchlist
D. Add tank group
E. Shortcut to My Profile
F. User account ("Administration Mode" appears to the left when signed in as
administrator)
G. Print
H. Message
I. Sign out
J. Menu options (Administration Mode
TankMaster)
K. Tank card
L. Tank groups
M. Tank card size (small, medium, large)
(1)
, My Profile, Sign Out, Help Center, About
(1) Available for administrator accounts
14 User Guide
Page 15
User Guide What is Rosemount™ TankMaster™ Mobile?
00809-0100-5120 April 2021
Administration Mode
New menu options appear when you sign in to Administration Mode .
Figure 2-7: Menus in Administration Mode
Rosemount TankMaster Mobile 15
Page 16

What is Rosemount™ TankMaster™ Mobile? User Guide
April 2021 00809-0100-5120
16 User Guide
Page 17

User Guide Getting started
00809-0100-5120 April 2021
3 Getting started
3.1 Preparations
This section shows how to navigate and sign in to the TankMaster Mobile web application.
Prior to start using the TankMaster Mobile web app you need to make sure that a valid user
account is available. An account can be created by the system administrator. The
administrator grants access to view tanks and tank data. Note that you also need an
approved device in order to access the web app. Device approval is part of first time sign in
with a new device.
This is what you need to start using the TankMaster Mobile web app:
• Enabled user Id and password
Sign in with new device
In case you are going to sign in with a new device, it needs to be registered in the
TankMaster Mobile system. You may register a device by using one of the following
methods:
• As part of the log in procedure when signing in to the TankMaster Web app. Once
registered, you will receive an email with a six digit registration code. Use this code as
requested in the log in procedure.
• By contacting the system administrator.
Device registration can be turned off. However, for security reasons we recommend using
this function as the standard option.
Note
In case you clear the web browser's history and cookies you need to register the device
again.
Related information
Sign in procedure
Security settings
Rosemount TankMaster Mobile 17
Page 18

Getting started User Guide
April 2021 00809-0100-5120
3.2 Preparations for mobile device users
For best user experience it is recommended that you:
• install the Emerson TankMaster CA digital root certificate on your mobile device
• add TankMaster Mobile to the home screen
By adding the start page to the Home screen you will ensure that TankMaster Mobile can
be accessed as any other mobile device app.
TankMaster Mobile app is a Progressive Web Application (PWA) and is not downloaded
from any app store. PWAs work across many devices and platforms. Once the TankMaster
Mobile digital certificate is installed, the app acts and feels like a regular app without any
web browser fields or buttons.
Related information
TankMaster Mobile
Install certificate and app on Android device
Install certificate and app on iOS device
18 User Guide
Page 19
User Guide Getting started
00809-0100-5120 April 2021
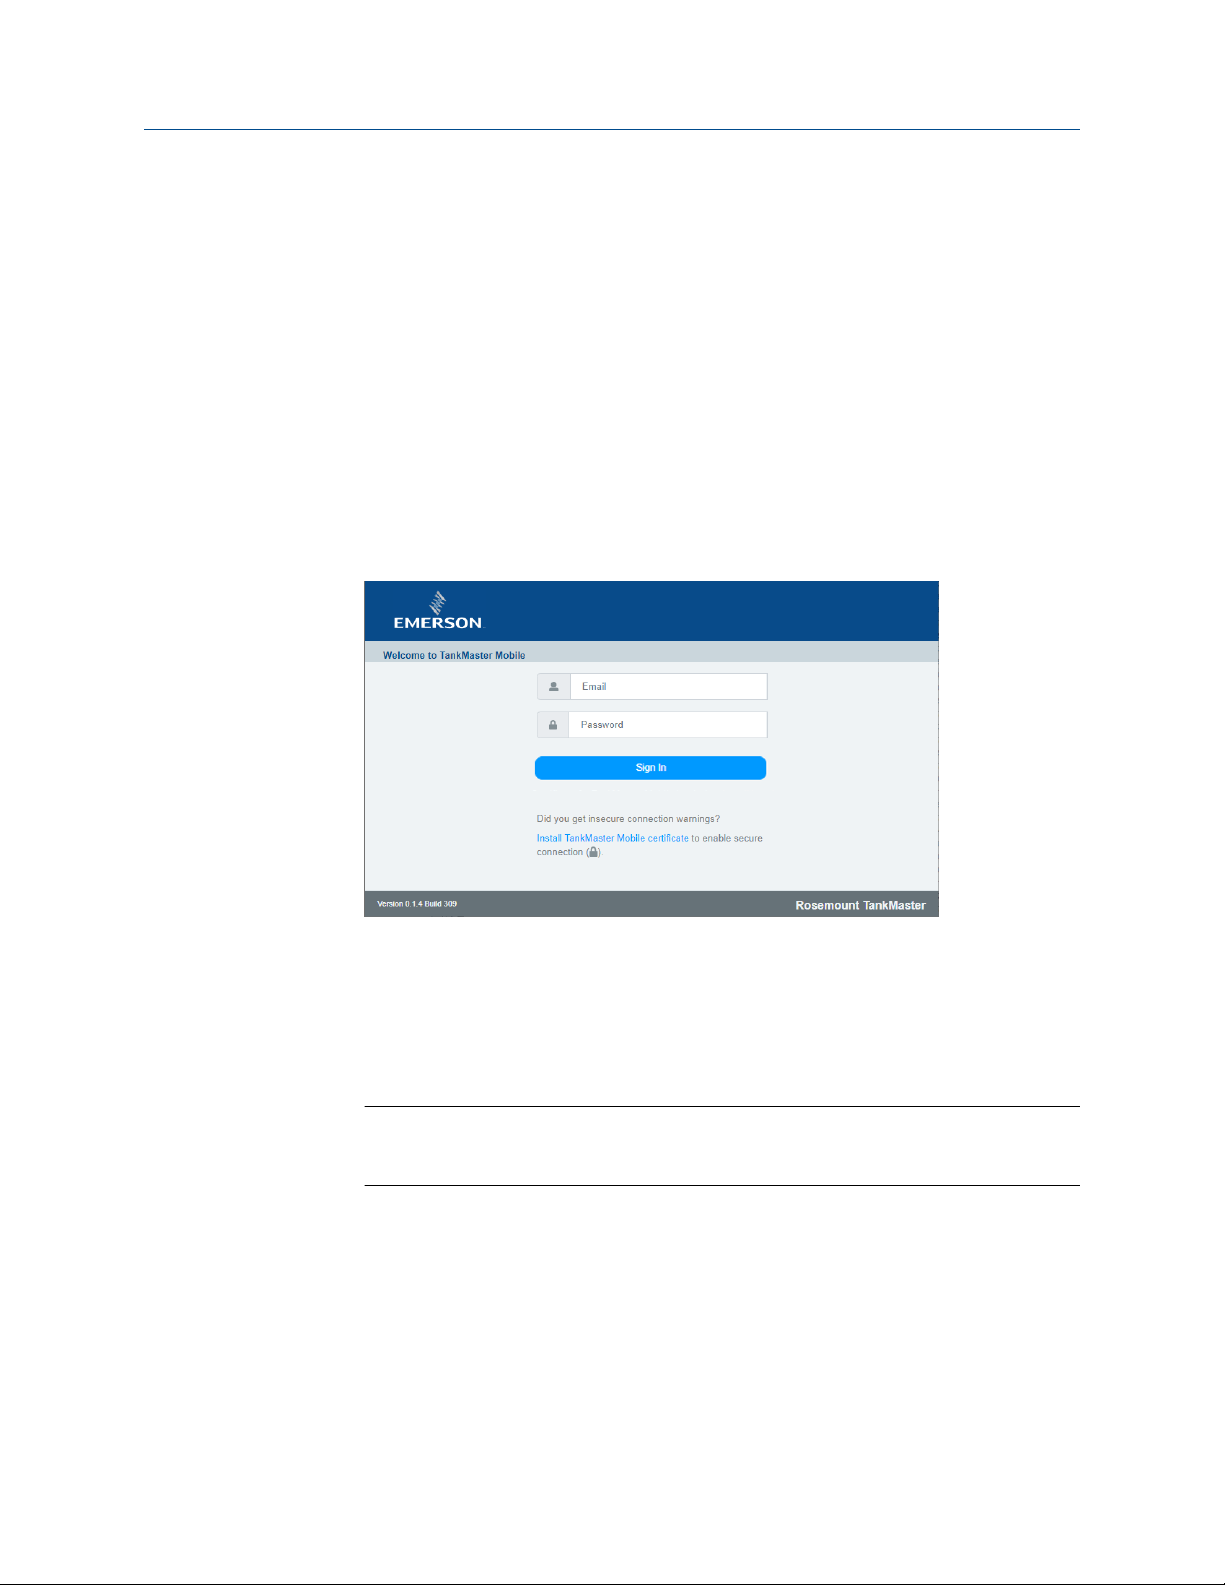
3.3 Sign in procedure
The sign in procedure may differ slightly depending on whether you are signing in with a
new device or not.
3.3.1 Sign in
Follow this procedure to sign in to the TankMaster Mobile web application.
This is the standard sign in procedure when using a registered device.
Procedure
1. Navigate to the TankMaster Mobile web page. Use the IP address (or URL) that was
entered when installing the TankMaster Mobile program.
2. Optional: If a root certificate is not installed, you will be prompted the option to
download a certificate prior to signing in. The root certificate allows your client
machine to authenticate the TankMaster Mobile server. Even without a root
certificate you will have a secure connection.
3. Enter your credentials.
4.
Select Sign In.
Note
First time you sign in you will be prompted to register your device and change your
password.
5. Now you are signed in.
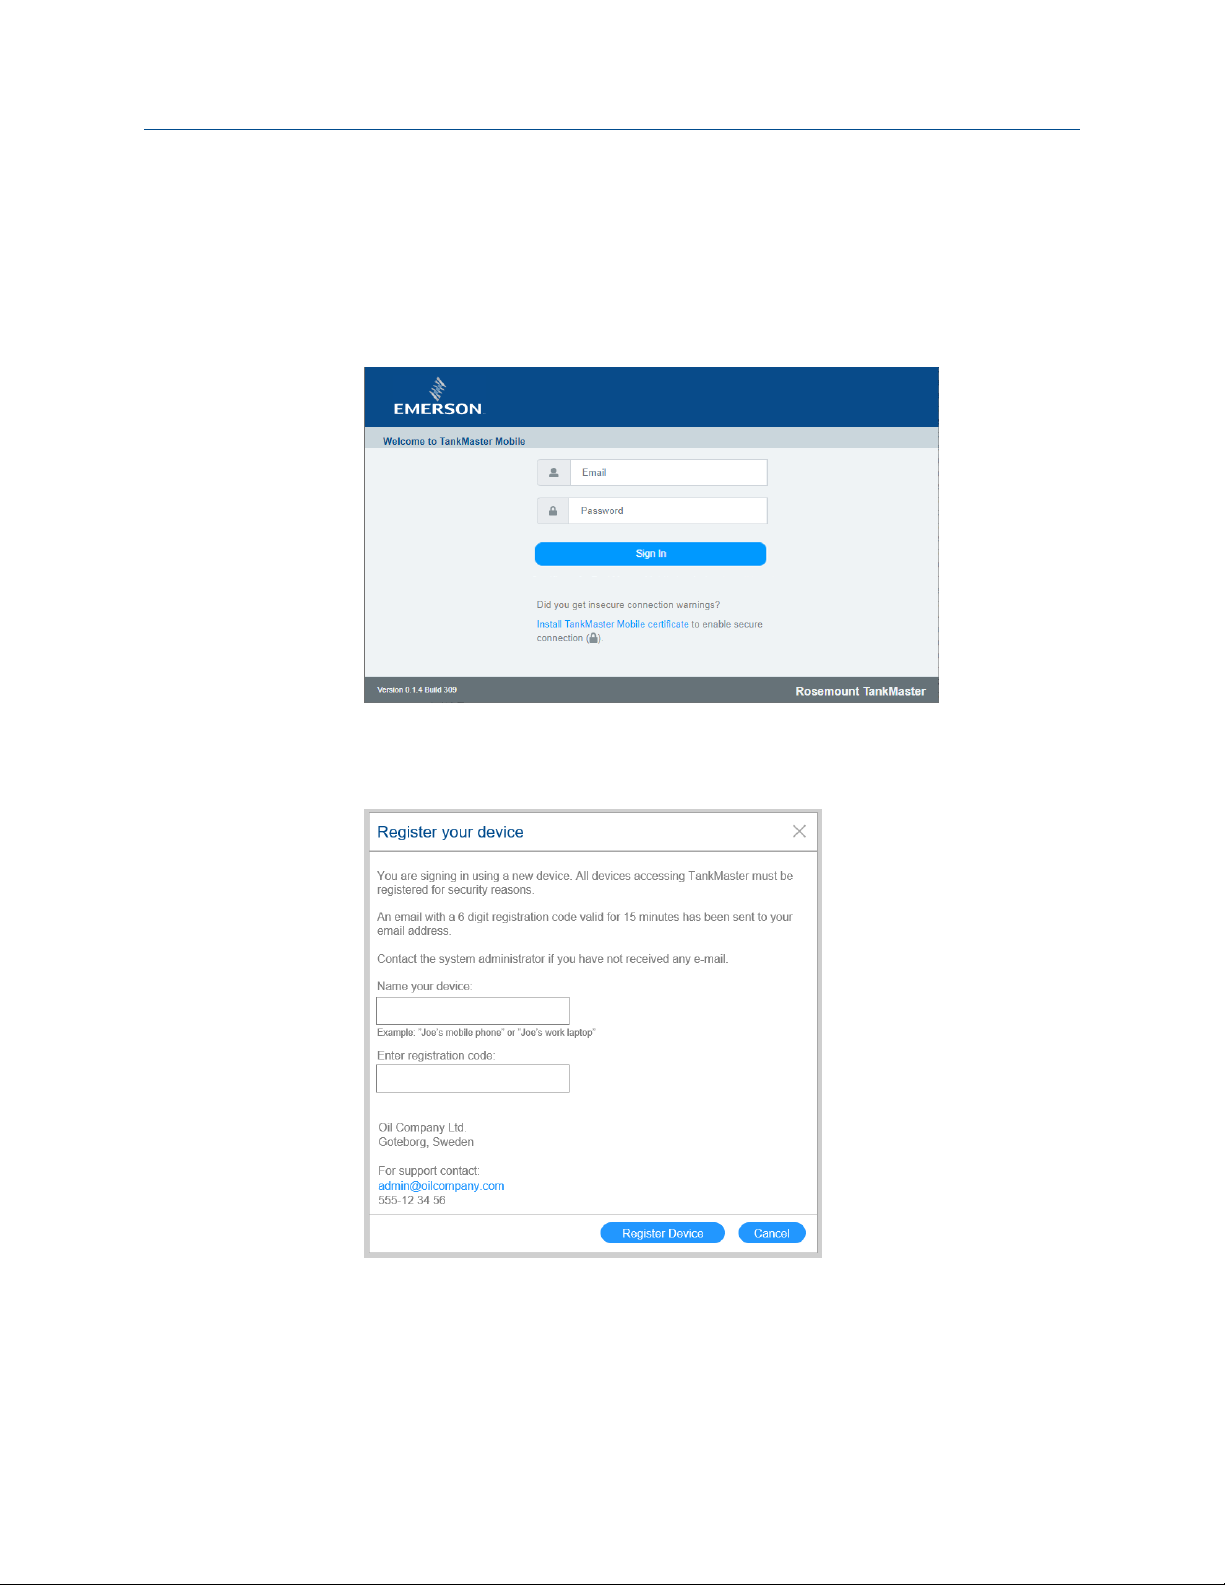
3.3.2 Sign in with new device
In case you sign in to the TankMaster Mobile web application with a new device, it needs to
be registered in the TankMaster Mobile system. This must be done each time you sign in
to your TankMaster Mobile account on a device for the first time, even in case other
TankMaster Mobile users have signed in on that particular device on previous occasions.
Rosemount TankMaster Mobile 19
Page 20
Getting started User Guide
April 2021 00809-0100-5120
For security reasons your account must be associated with each device that you sign in
from.
This section describes how to sign in and register a new device.
Procedure
1. Navigate to the TankMaster Mobile web page.
2. Enter your credentials.
3. Click the
Sign In button.
The device registration dialog appears.
4. Open your mailbox and note the registration code.
5. Enter the registration code and a device name.
Click the Register Device button.
6.
7. Now you are signed in.
20 User Guide
Page 21
User Guide Getting started
00809-0100-5120 April 2021
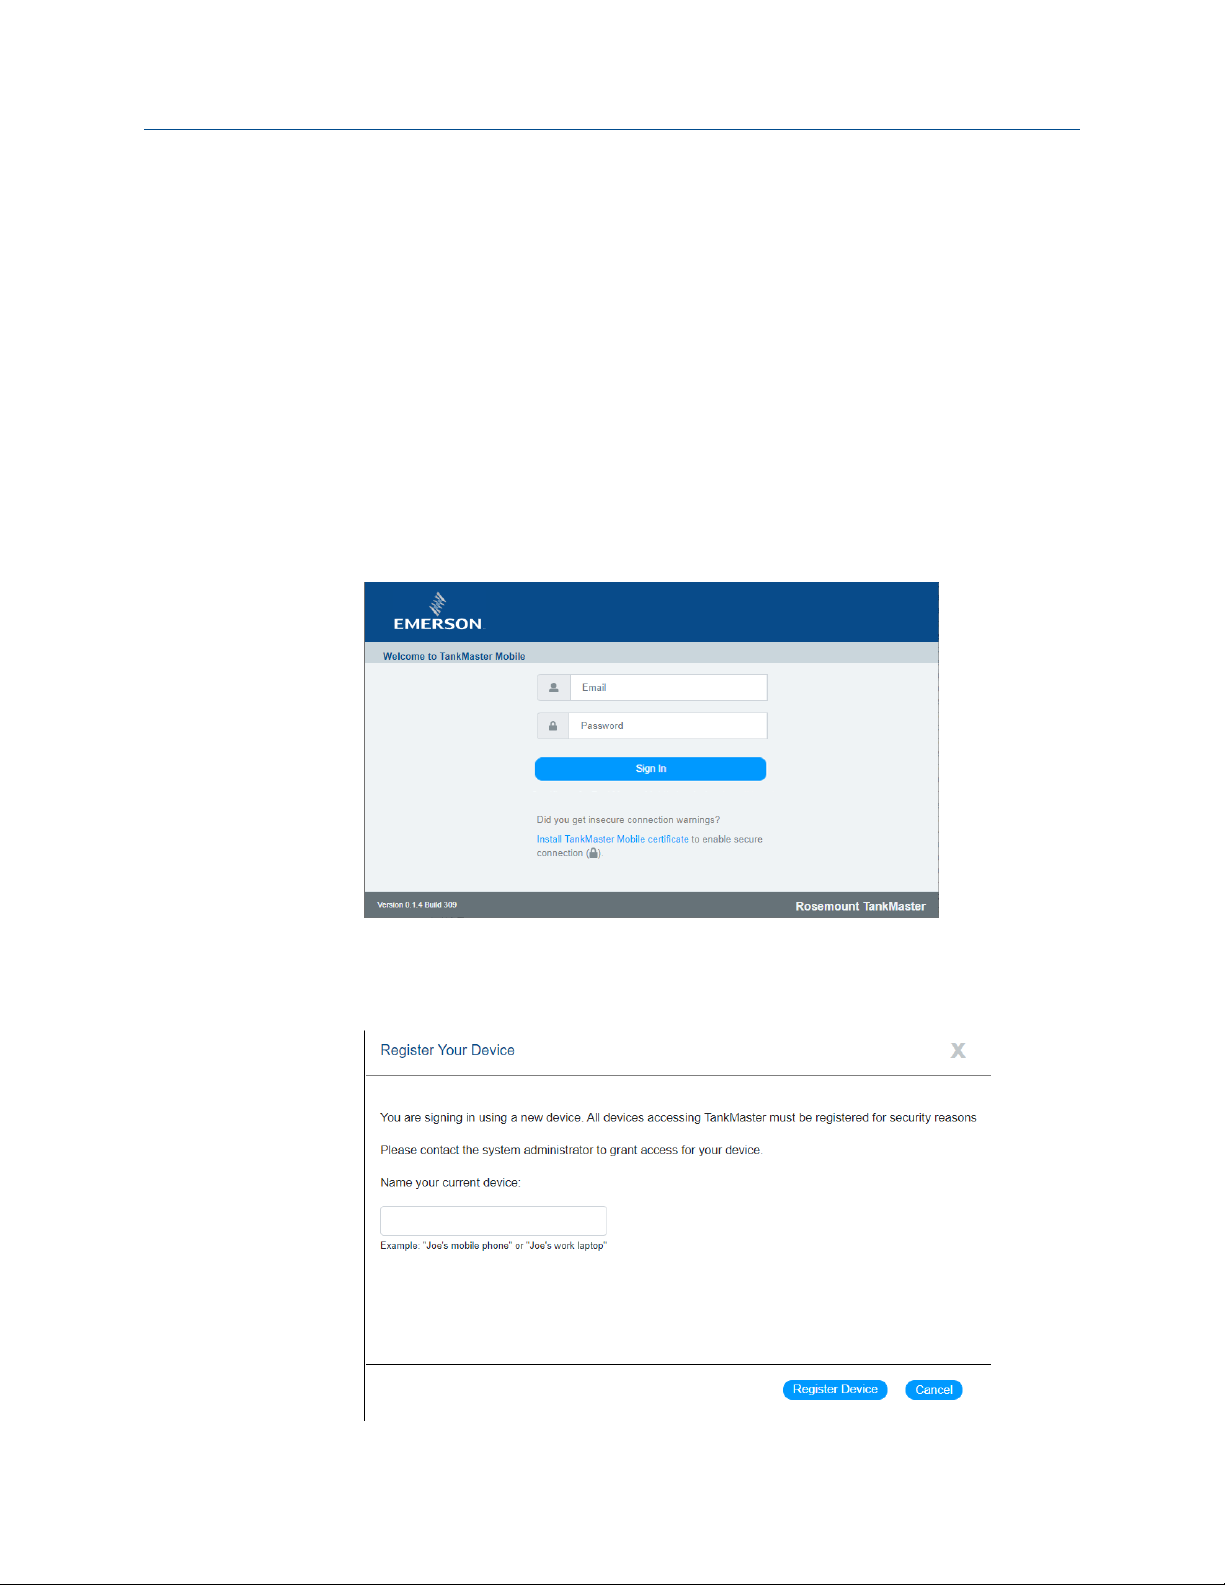
3.3.3 Sign in with new device and manual administrator approval
In case you sign in to the TankMaster Mobile web application with a new device, it needs to
be registered in the TankMaster Mobile system. This must be done each time you sign in
to your TankMaster Mobile account on a device for the first time, even in case other
TankMaster Mobile users have signed in on that particular device on previous occasions.
For security reasons your account must be associated with each device that you sign in
from.
This section describes how to sign in and register a new device with administrator
manually granting device access.
Procedure
1. Navigate to the TankMaster Mobile web page.
2. Enter your credentials.
3. Click the
The device registration dialog appears.
Rosemount TankMaster Mobile 21
Sign In button.
Page 22
Getting started User Guide
April 2021 00809-0100-5120
4. Enter a device name.
5. Click the
Register Device button.
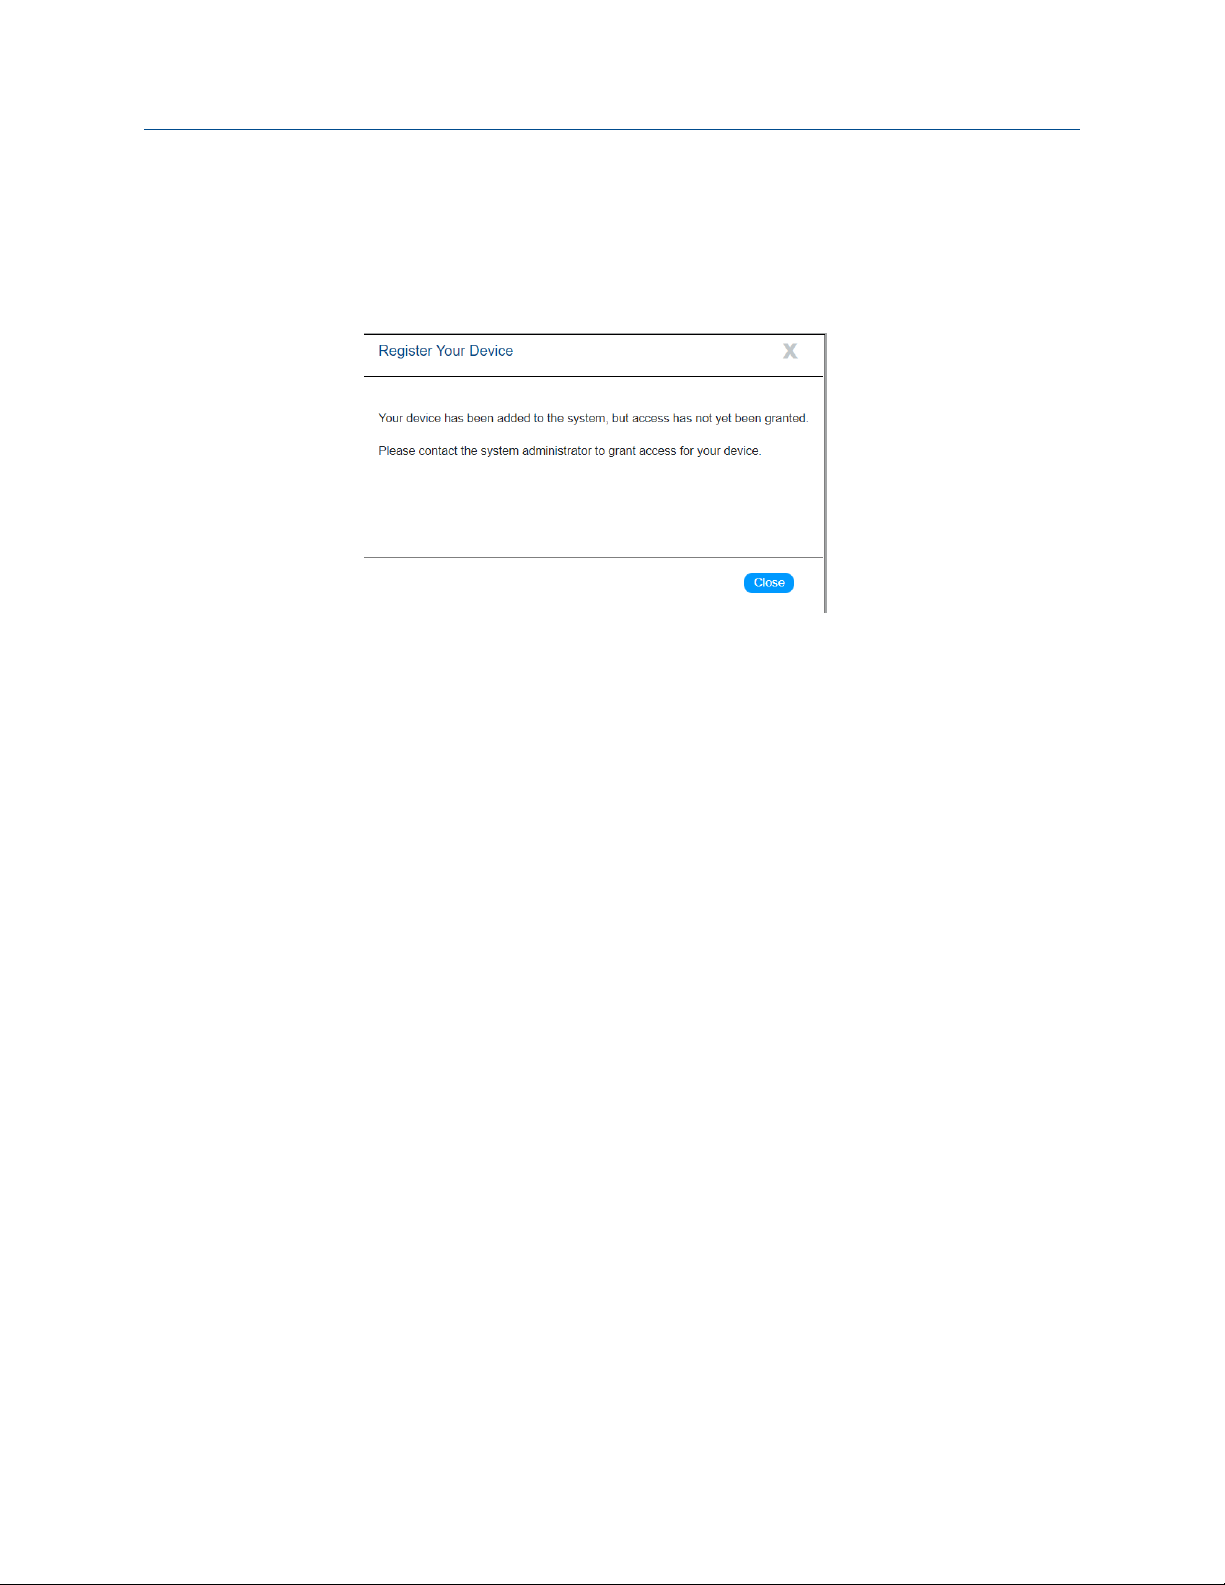
6. Now the system will verify that your device is added to the system.
You will be prompted to contact the system administrator for granting access.
7. Click the Close button.
Once your device is granted access you will be able to sign in.
22 User Guide
Page 23
User Guide Getting started
00809-0100-5120 April 2021
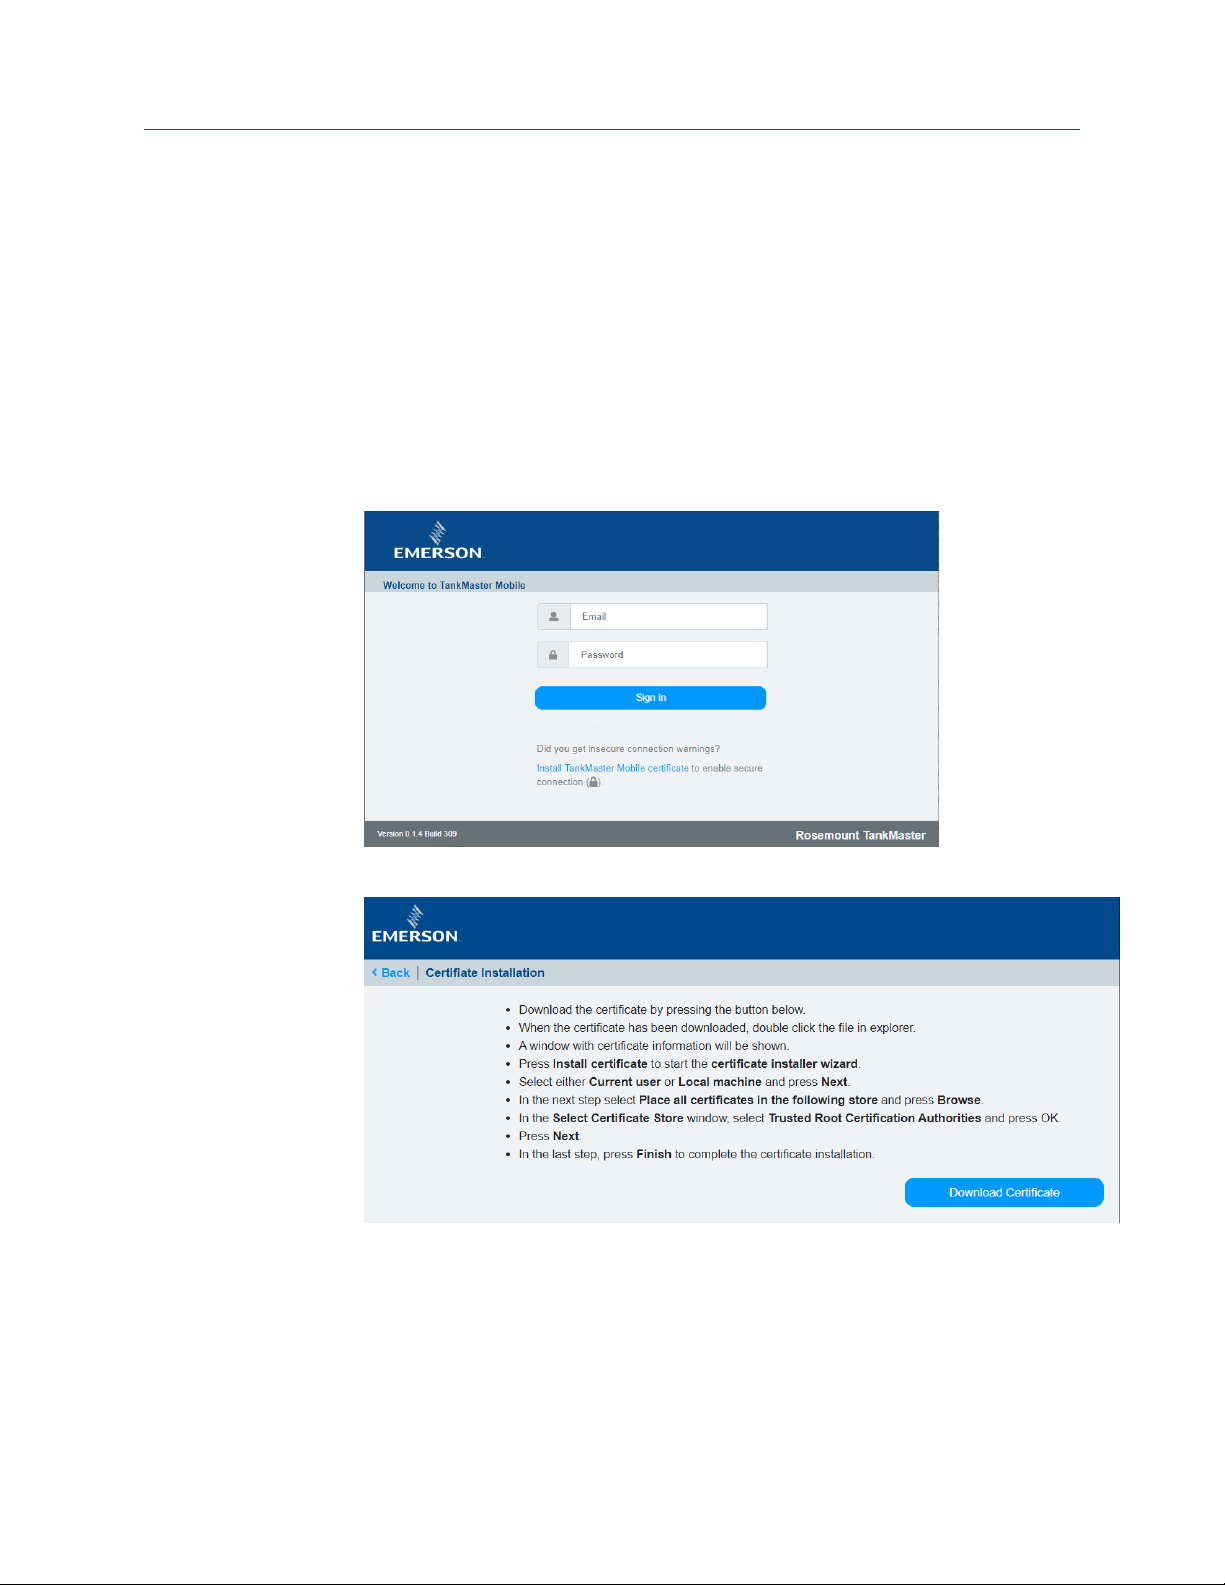
3.4 Install digital certificate
This is a description of how to install digital certificates for Rosemount™ TankMaster
Mobile.
A digital certificate allows your client machine to authenticate the TankMaster Mobile
server.
Procedure
™
1. Open
2. Click Install TankMaster Mobile certificate for instructions how to download and
3. Read the instructions and select Download Certificate.
TankMaster Mobile.
install the TankMaster Mobile digital certificate.
Rosemount TankMaster Mobile 23
Page 24
Getting started User Guide
April 2021 00809-0100-5120
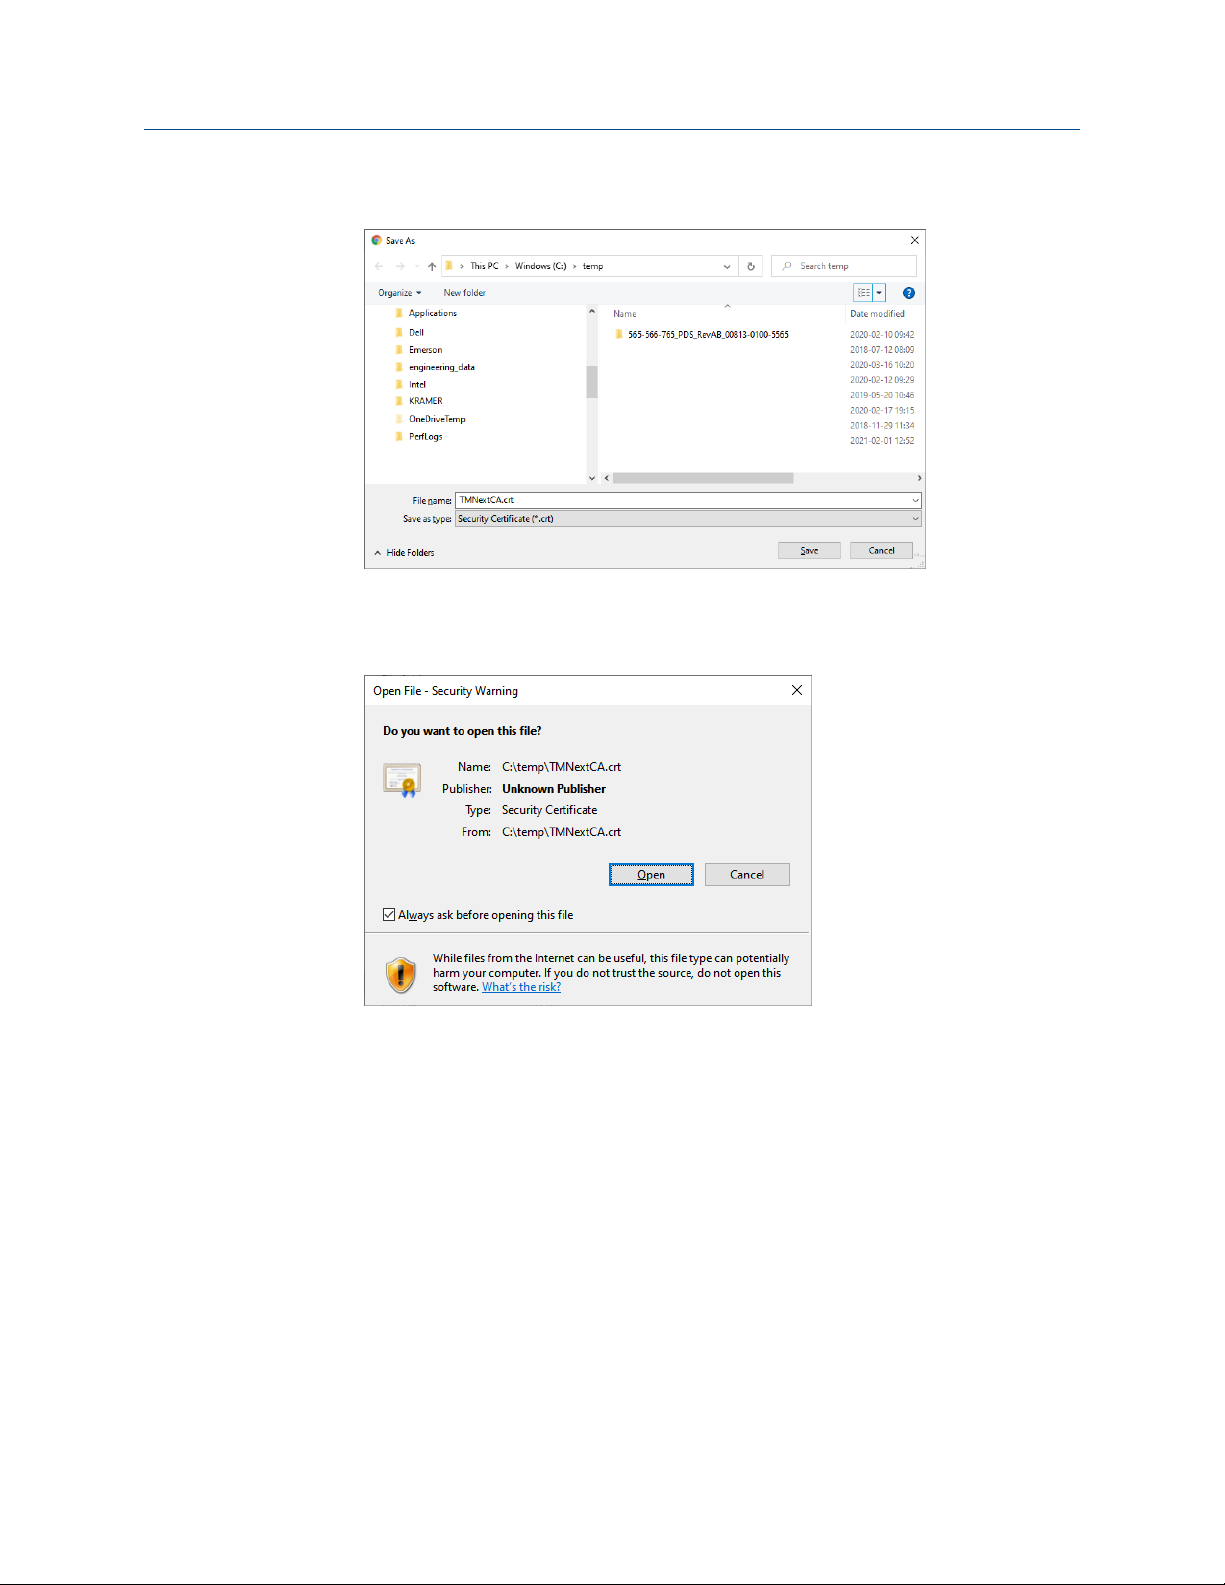
4. Choose an appropriate folder to store the certificate file.
5. Once downloaded, double-click the certificate file.
A security message appears.
6. Select
Open.
24 User Guide
Page 25
User Guide Getting started
00809-0100-5120 April 2021
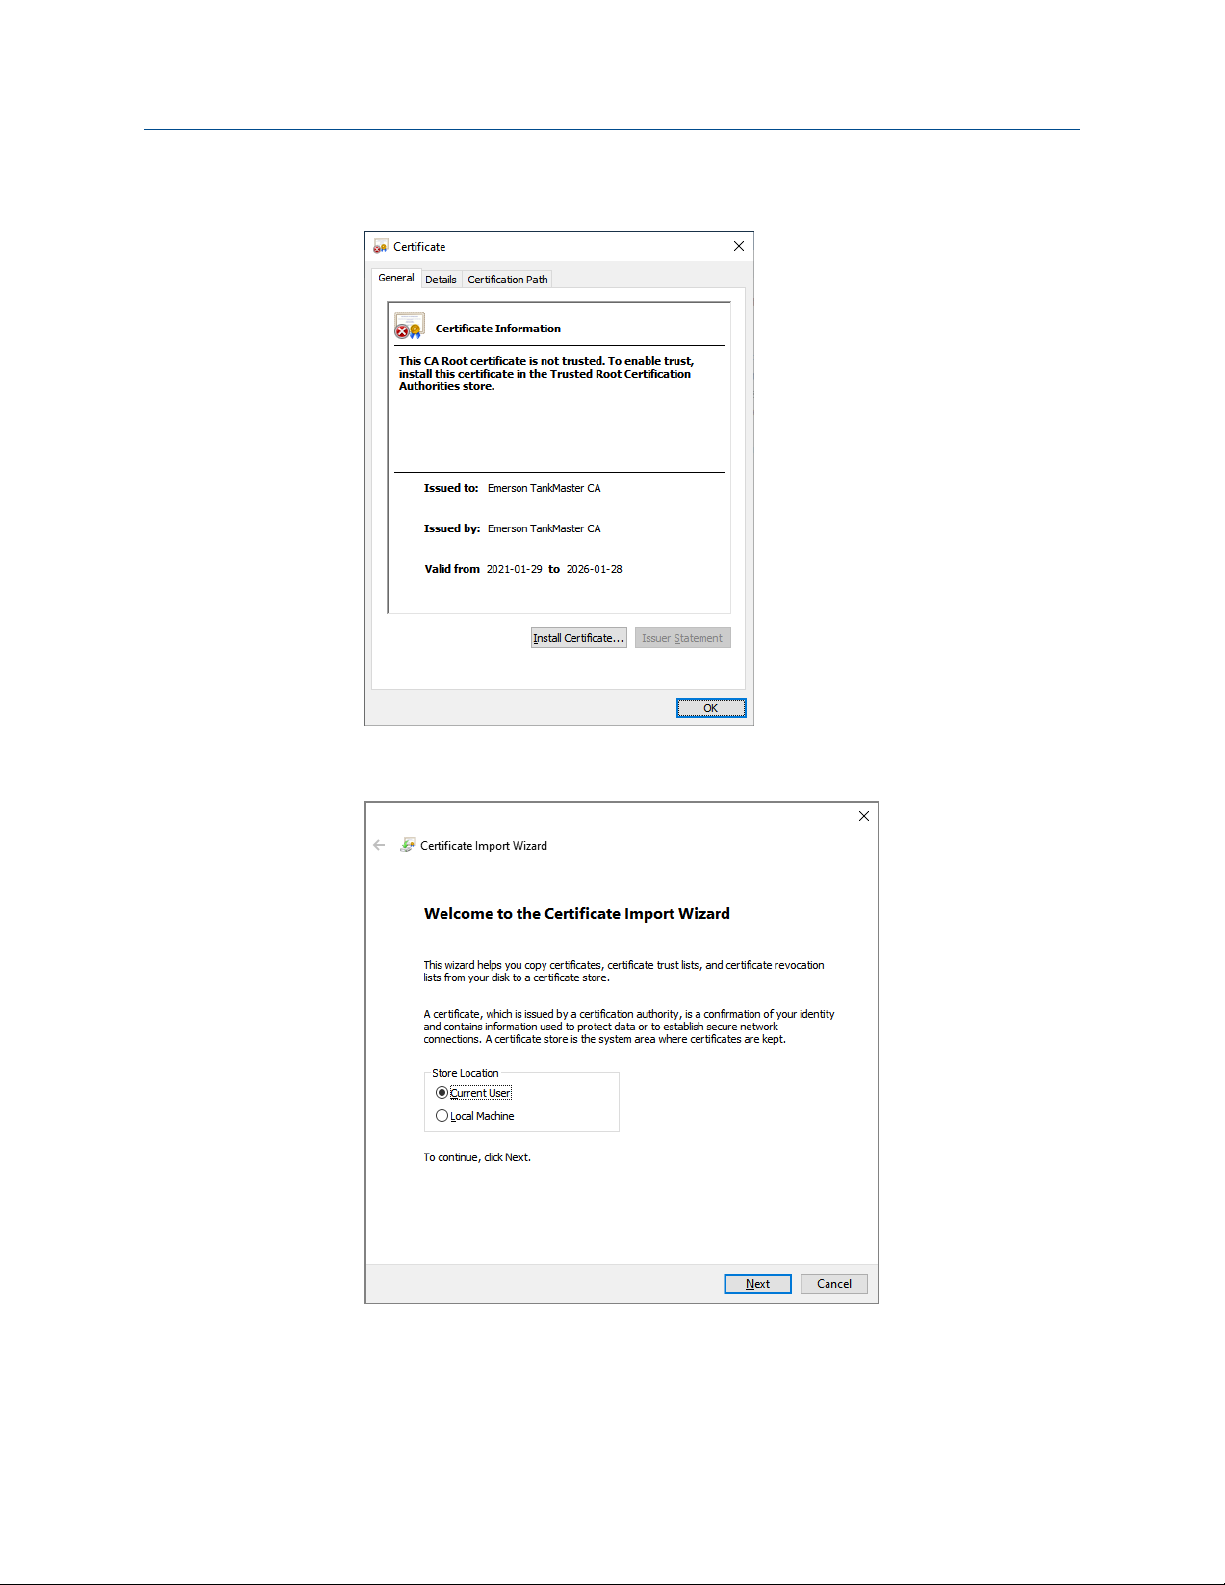
7. Select Install Certificate.
Now the certificate installation wizard will start.
8. Select
Current User or Local Machine.
Rosemount TankMaster Mobile 25
Page 26
Getting started User Guide
April 2021 00809-0100-5120
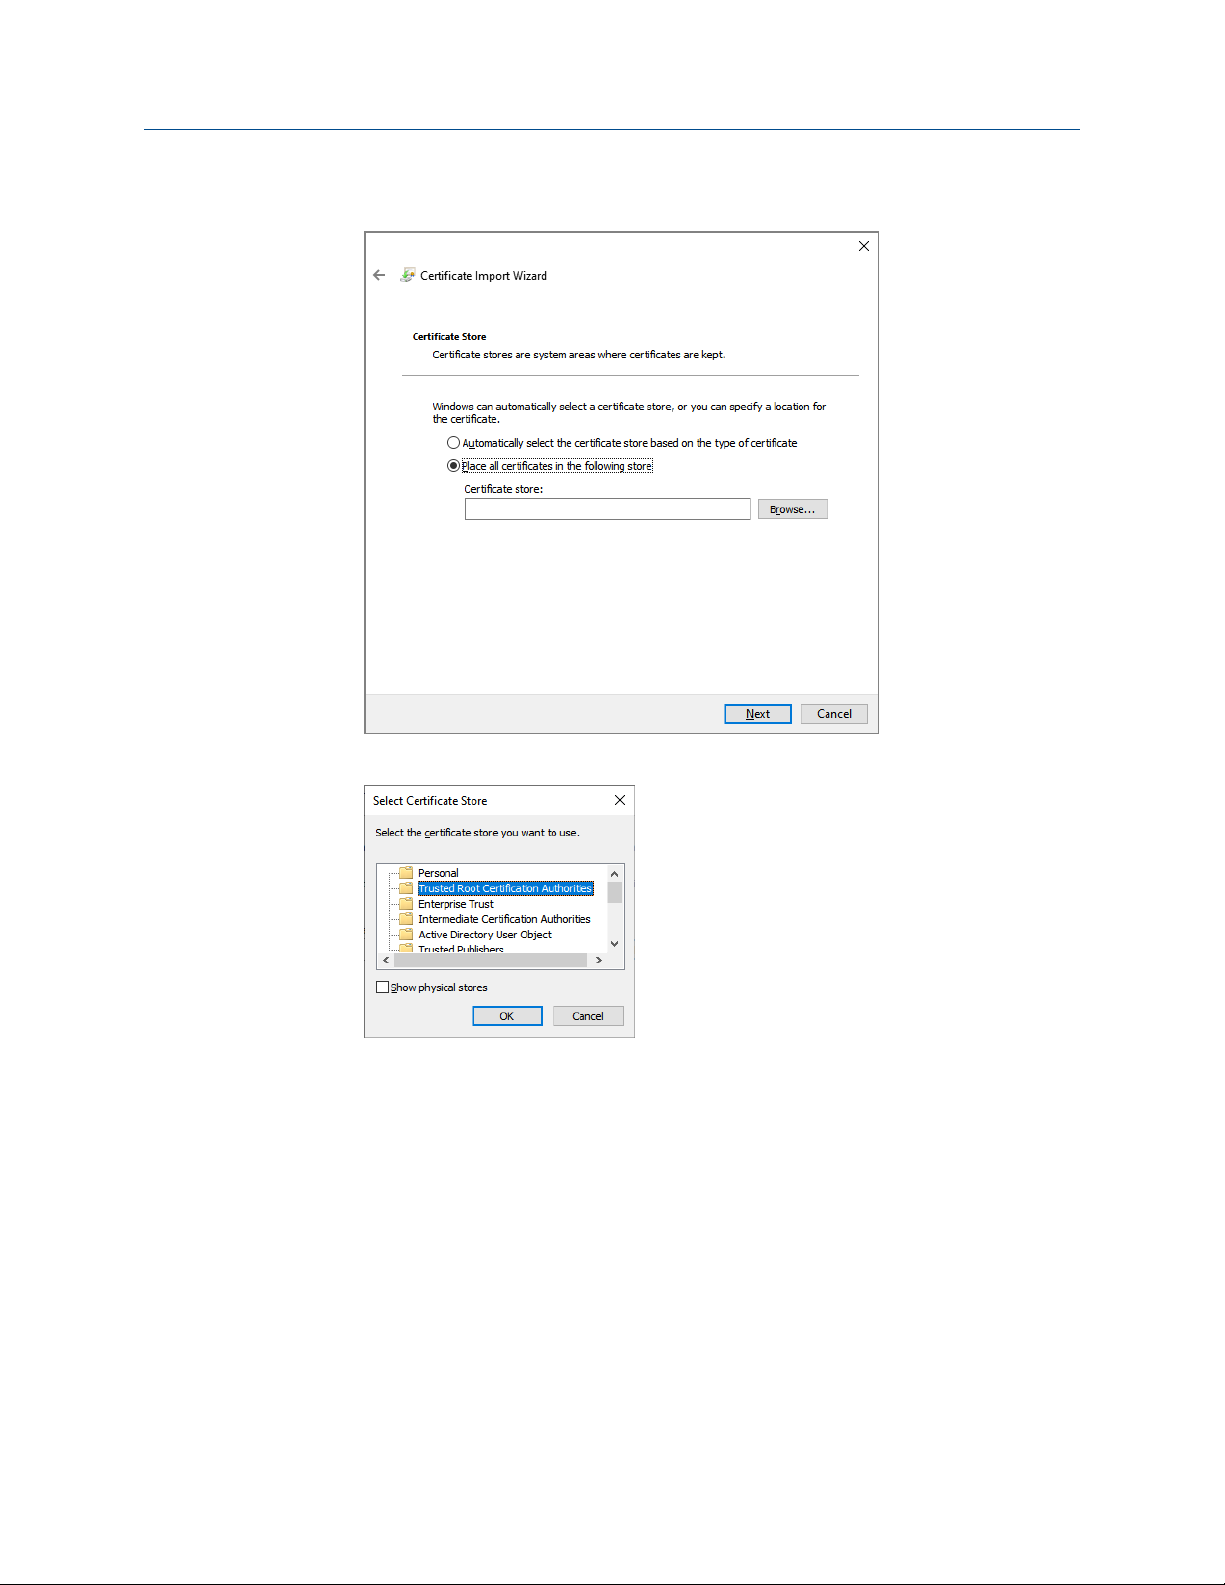
9. Select option Place all certificates in the following store and select Browse.
10. Select Trusted Root Certification Authorities and then OK.
26 User Guide
Page 27
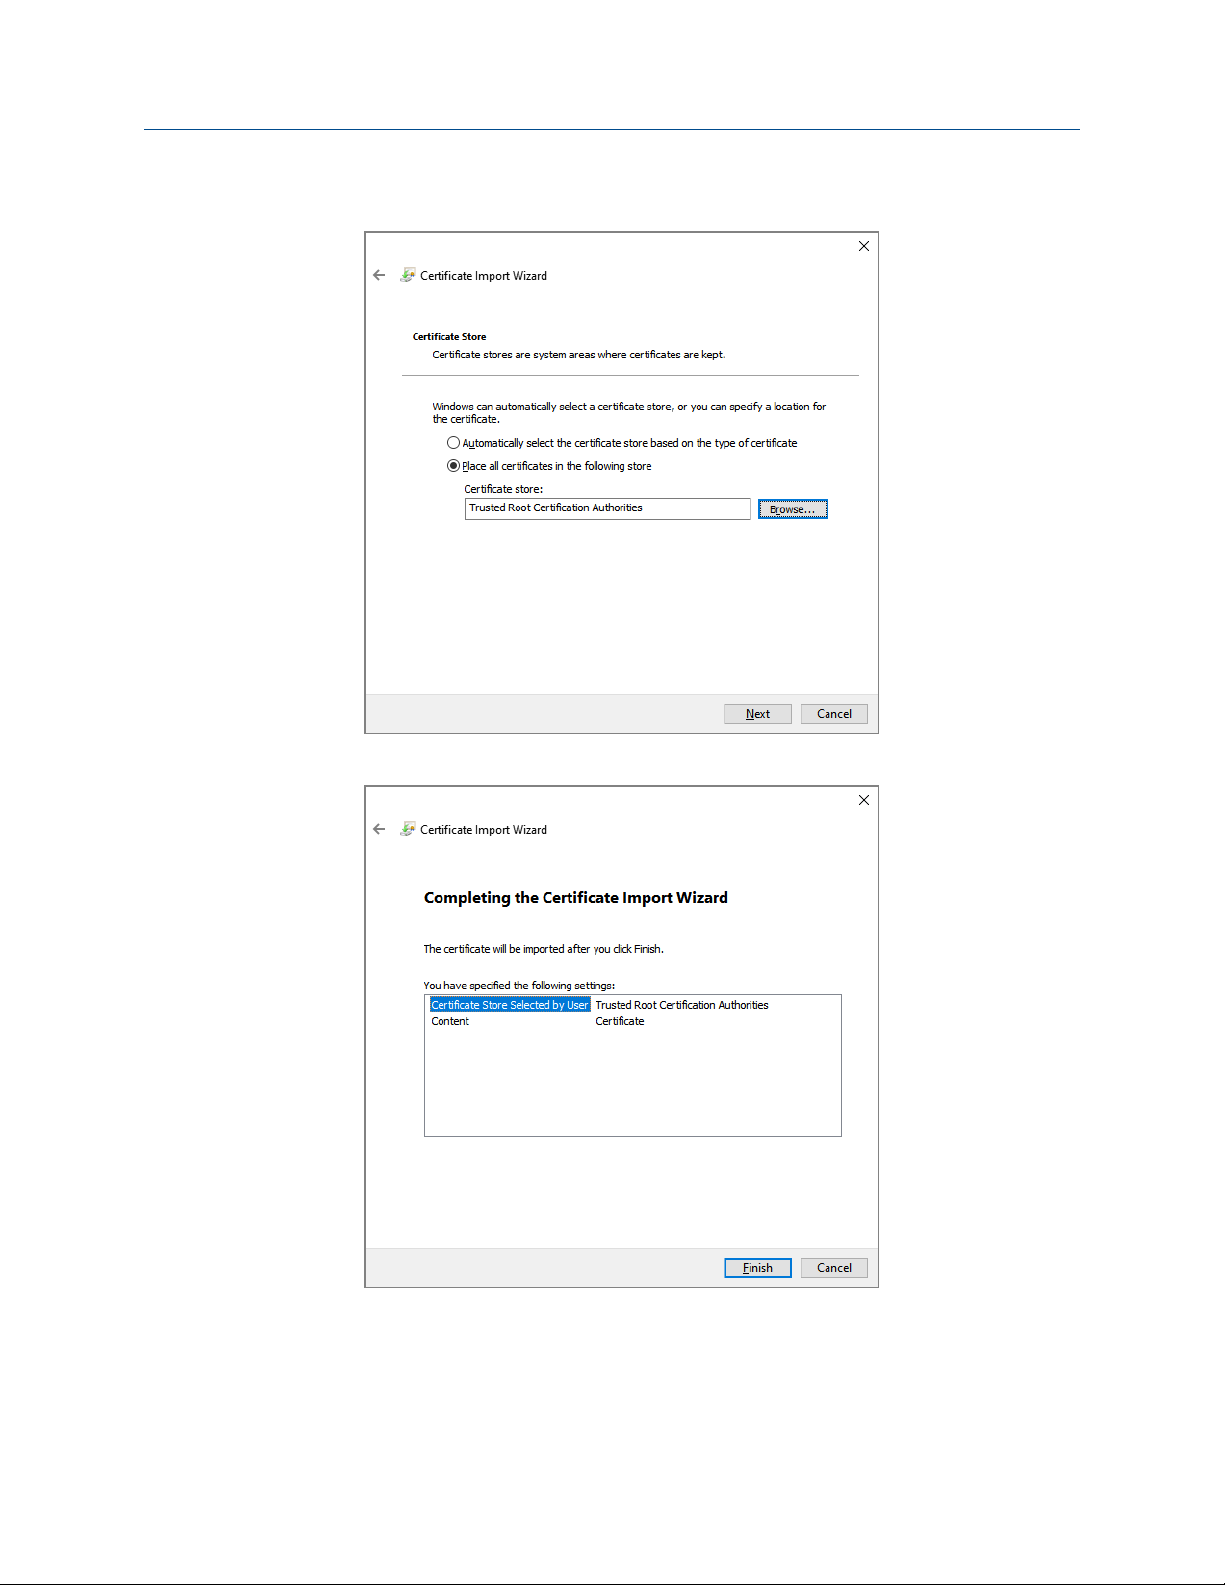
User Guide Getting started
00809-0100-5120 April 2021
11. Verify Certificate store and select Next.
12. Select Finish to complete certificate installation.
Rosemount TankMaster Mobile 27
Page 28
Getting started User Guide
April 2021 00809-0100-5120
3.5 Install certificate and app on Android device
This is a description on how to install the Rosemount™ TankMaster™ Mobile certificate on
Android phones and tablets. The description also includes how to add a TankMaster
Mobile icon to the Home screen. TankMaster Mobile uses the Progressive Web App (PWA)
technology which means that the app is not downloaded from Google Play store. PWA
requires a certificate to be installed, then the PWA acts and feels like an app.
Procedure
1. Open the
2. In the address field enter the IP address (or URL) for the Rosemount TankMaster
Mobile server.
Note
The IP address in this instruction is just an example and cannot be used for your
server.
Chrome app.
28 User Guide
Page 29
User Guide Getting started
00809-0100-5120 April 2021
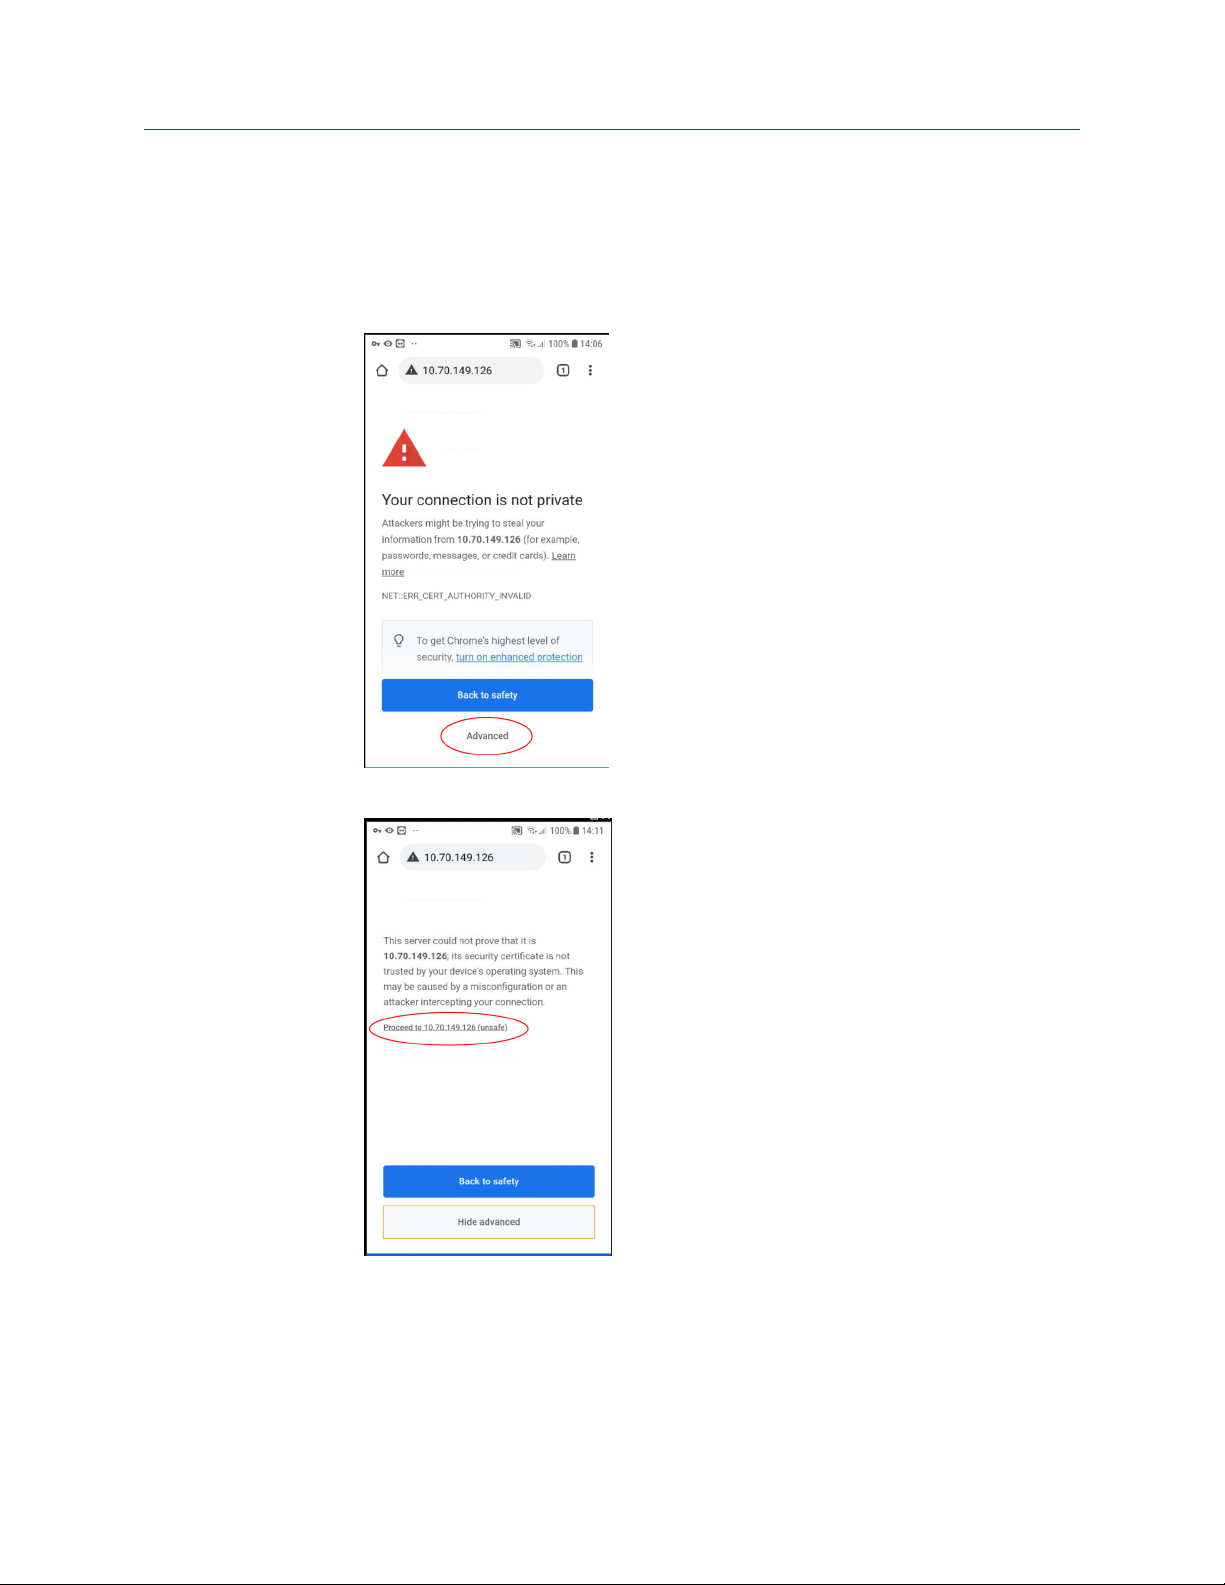
3. In case it is the first time you visit this page, a warning message will appear since
your device has no TankMaster Mobile certificate installed. Select Advanced to
continue.
The warning is a standard text that appears for unknown web sites without valid
digital certificate.
4. Select the link Proceed to … (unsafe) .
Rosemount TankMaster Mobile 29
Page 30
Getting started User Guide
April 2021 00809-0100-5120
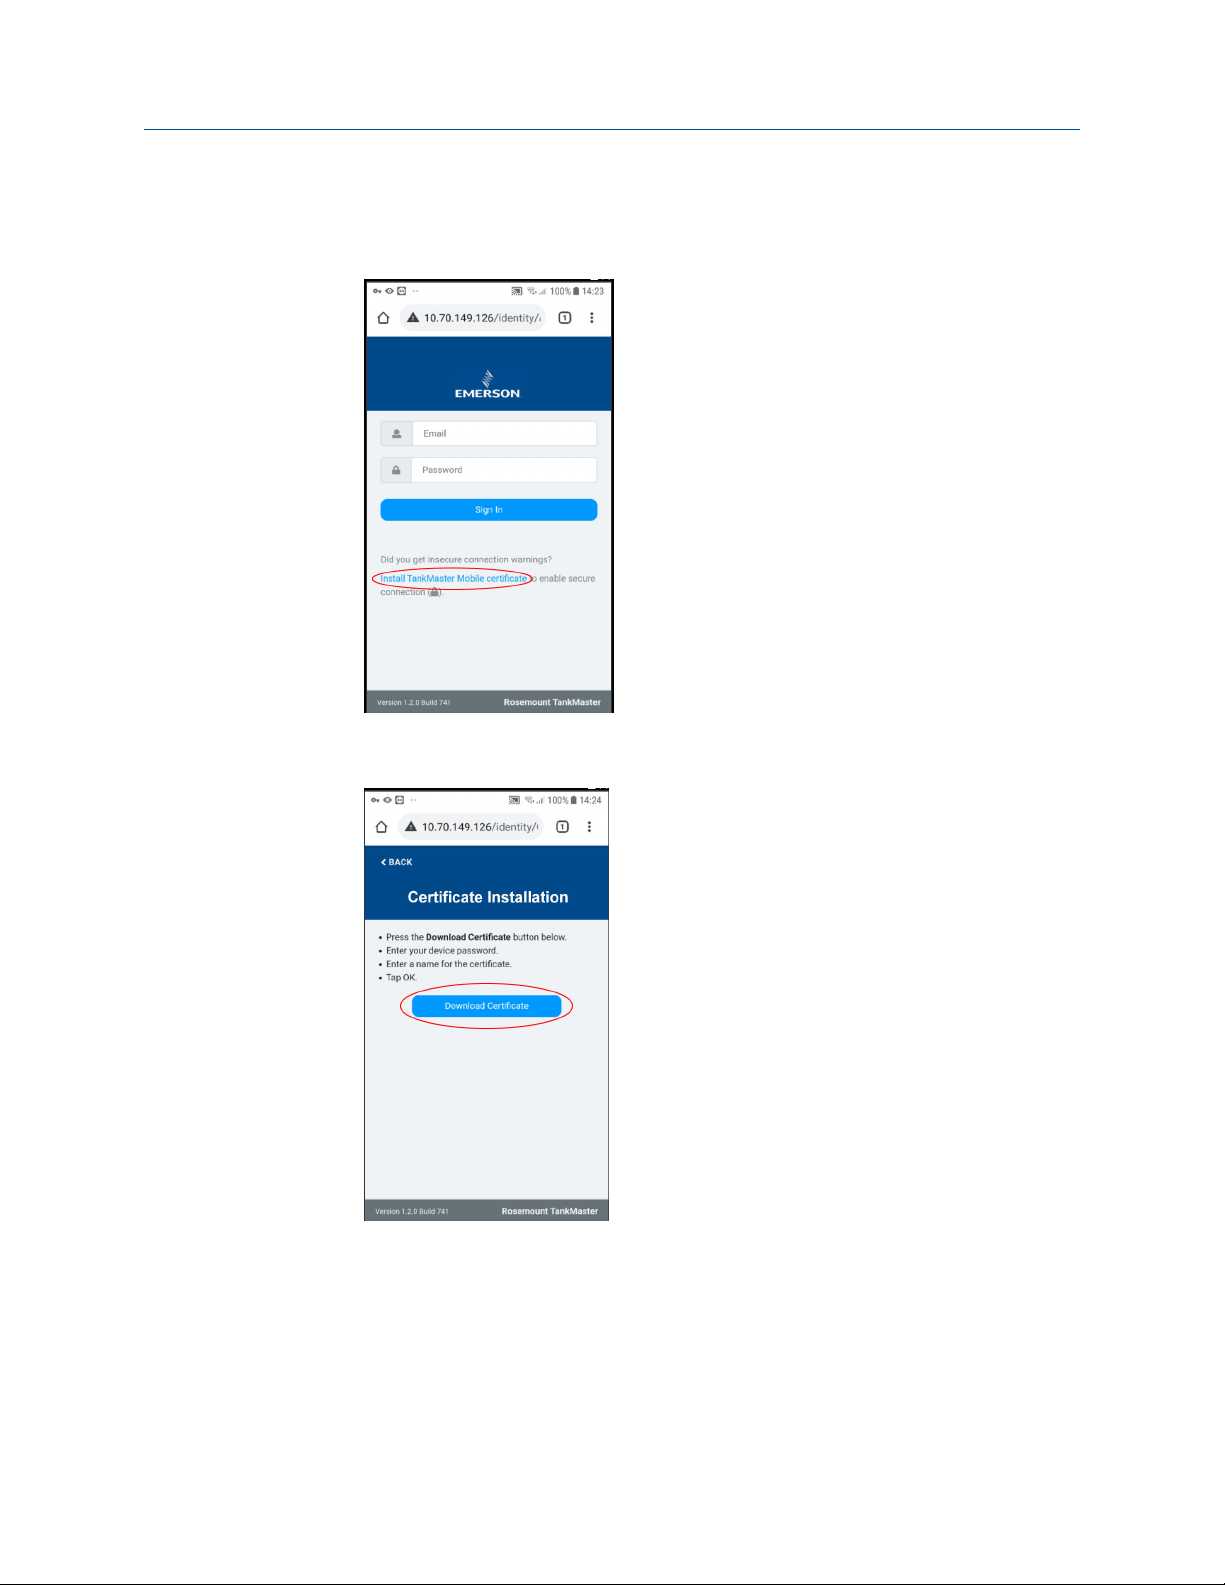
5. On the sign in page, select Install TankMaster Mobile certificate. This will open a
page that allows you to download a digital root certificate for your mobile phone/
tablet client.
6. Select Download Certificate to download a root certificate for your mobile phone/
tablet client.
30 User Guide
Page 31

User Guide Getting started
00809-0100-5120 April 2021
7. Select Download to start downloading the certificate.
8. Name your certificate and click OK.
Rosemount TankMaster Mobile 31
Page 32

Getting started User Guide
April 2021 00809-0100-5120
9. Now the certificate is installed. Close and restart the Chrome app to ensure that the
certificate is properly loaded.
10. Enter the IP address to the TankMaster Mobile start page if it does not appear
automatically. Add TankMaster Mobile to Home screen should appear at the
bottom of the screen. Select this option if you would like to install TankMaster
Mobile as an app on the Home screen.
32 User Guide
Page 33

User Guide Getting started
00809-0100-5120 April 2021
11. Select Install.
12. Now the TankMaster Mobile icon appears on the Home screen.
Rosemount TankMaster Mobile 33
Page 34

Getting started User Guide
April 2021 00809-0100-5120
13. Optional: In case you chose not to install the TankMaster Mobile icon on the Home
screen, it can be installed at a later occasion. In the Chrome web browser, open
Settings in the upper right-hand corner of the web browser and select Install app.
34 User Guide
Page 35

User Guide Getting started
00809-0100-5120 April 2021
3.6 Install certificate and app on iOS device
This is a description on how to install the Rosemount™ TankMaster™ Mobile certificate on
iOS phones and tablets. The description also includes how to add a TankMaster Mobile
icon to the Home screen. TankMaster Mobile uses the Progressive Web App (PWA)
technology which means that the app is not downloaded from Apple App store. PWA
requires a certificate to be installed, then the PWA acts and feels like an app.
Procedure
1. Open the
2. In the address field, enter the IP address (or URL) to the Rosemount TankMaster
Mobile server.
Note
The IP address in this instruction is just an example and cannot be used for your
server.
Safari app.
Rosemount TankMaster Mobile 35
Page 36

Getting started User Guide
April 2021 00809-0100-5120
3. In case it is the first time you visit this page, a warning message will appear since
your device has no TankMaster Mobile certificate installed. Select Show Details to
continue.
The warning is a standard text that appears for unknown web sites without valid
digital certificate.
4. Select visit this website to proceed.
36 User Guide
Page 37

User Guide Getting started
00809-0100-5120 April 2021
5. Select Visit Website.
6. On the sign in page, select Install TankMaster Mobile certificate. This will open a
page that allows you to download a digital root certificate for your mobile phone/
tablet client.
Rosemount TankMaster Mobile 37
Page 38

Getting started User Guide
April 2021 00809-0100-5120
7. Select Download Certificate to download a root certificate for your mobile phone/
tablet client.
8. Select Allow to start downloading the certificate.
38 User Guide
Page 39

User Guide Getting started
00809-0100-5120 April 2021
9. Once the certificate is downloaded you will have to open Settings in order to install
it. Select Close to proceed.
10. Open Settings and navigate to General. As another option, you may select Profile
Downloaded and proceed to step Step 13.
Rosemount TankMaster Mobile 39
Page 40

Getting started User Guide
April 2021 00809-0100-5120
11. Select General → Profiles &Device Management.
12. Select the Emerson TankMaster CA profile.
40 User Guide
Page 41

User Guide Getting started
00809-0100-5120 April 2021
13. Select Install.
You will be prompted to enter your pass code.
14. Select
Install to add the certificate to the list of trusted certificates.
Rosemount TankMaster Mobile 41
Page 42

Getting started User Guide
April 2021 00809-0100-5120
15. Now the certificate is installed. Click Done to return to Profiles & Device Management
to see the installed certificate.
16. Once installed you will have to enable the certificate in order to allow the web
browser to recognize TankMaster Mobile as a trusted site. Return to General and
open About → Certificate Trust Settings.
42 User Guide
Page 43

User Guide Getting started
00809-0100-5120 April 2021
17. To enable the certificate:
a) Locate the
Emerson TankMaster CA certificate and select the enable button.
b) Click Continue.
c) Verify that the certificate is enabled.
18. Return to the sign in page and select the Share button at the bottom of the page if
you what to install TankMaster Mobile as an App.
Rosemount TankMaster Mobile 43
Page 44

Getting started User Guide
April 2021 00809-0100-5120
19. Scroll down to Add to Home Screen and select this option.
20. Edit the text to the desired title for the app, and click Add to install it on your Home
screen.
44 User Guide
Page 45

User Guide Getting started
00809-0100-5120 April 2021
21. Now the TankMaster Mobile page will appear as an app icon on the Home Screen.
Rosemount TankMaster Mobile 45
Page 46

Getting started User Guide
April 2021 00809-0100-5120
46 User Guide
Page 47

User Guide View Tank Data
00809-0100-5120 April 2021
4 View Tank Data
This section presents the concept of tank cards.
Tank data is presented on tank cards of various size. Small tank cards show tank name and
a bar graph that represents current product level. Product movement is indicated by a
symbol showing direction and minor or major flow rate. A symbol indicates if the tank is
included in the watch list.
More data such as product level, level rate, temperature, and volume is presented on
medium size tank cards. The large tank cards present extended information including up
to 12 tank parameters.
Related information
Tank cards
Tank details
Tank movement
4.1 Tank data
There are several categories of tank variables that can can be configured for presentation
in the TankMaster Mobile app.
Each tank is presented with a tank card that shows tank variables and current inventory
status. A specific set of variables available for a user group is configured by the system
administrator. Standard variables such as Level, Temperature, Level rate and many more
can be added to the list.
In medium size cards the first four variables are shown . Large size tank cards can show up
to 12 variables.
Figure Figure 4-1 illustrates configuration of first five variables and resulting tank card.
Rosemount TankMaster Mobile 47
Page 48

A B
View Tank Data User Guide
April 2021 00809-0100-5120
Figure 4-1: Tank Data Setup
A. Configuration of variables
Tank card
B.
Related information
Tank details
Tank groups
Map tanks and tank data to a user group
48 User Guide
Page 49

A
B
C
A
B
D
User Guide View Tank Data
00809-0100-5120 April 2021
4.2 Tank cards
TankMaster Mobile supports tank cards of various design for presentation of tank data.
Figure 4-2: Tank Cards
A. Select tank card size
B. Medium size tank cards
4.2.1 Small size tank cards
Small size tank cards provide and overview of a large number of tanks; product level, tank
name, and watchlist symbol. Product movement, up or down, is indicated by arrows. The
arrow size indicates level rate.
Figure 4-3: Small Size Tank Cards
A. Watch list
B. Tank name
C.
Bar graph
D. Tank movement
Related information
Product color
Tank movement limits
Expanded tank card
Rosemount TankMaster Mobile 49
Page 50

A
F
E
B DC
View Tank Data User Guide
April 2021 00809-0100-5120
4.2.2 Medium size tank cards
Medium size cards provide an overview of tanks, and a limited set of tank variables and
measurement data such as:
• Product level
• Average temperature
• Level rate
• Volume
The actual data that is presented can be configured specifically for each user group by
mapping tanks and tank data.
Medium size cards also show whether the tank is on a watch list, and indicate if there is a
tank note.
Figure 4-4: Tank Card Description
A. Watch list
B. Tank name
C.
First four parameters from the list of tank parameters available for this user group
D. Tank note
E. Product name
F. Bar graph shows product level related to maximum level. Min/max levels are provided by
the Tank Server.
Related information
Product color
Tank movement limits
Map tanks and tank data to a user group
Tank movement
Expanded tank card
50 User Guide
Page 51

A
B
C
D
GF FE
User Guide View Tank Data
00809-0100-5120 April 2021
4.2.3 Large size tank cards
Large size tank cards can show up to 12 tank variables. Variables can be configured by
selecting from a wide range of variables such as:
• Product level
• Average temperature
• Free Water Level
• Volume
• Level rate
Figure 4-5: Tank Card Description
A. Watch list symbol
B. Product name
Bar graph
C.
D. Tank movement indication
E. Tank name
F. Tank parameters
G. Tank note
Related information
Product color
Tank movement limits
Map tanks and tank data to a user group
Tank movement
Rosemount TankMaster Mobile 51
Page 52

A
D
DB
C
View Tank Data User Guide
April 2021 00809-0100-5120
4.2.4 Expanded tank card
You may expand a tank card by clicking on it. Then more information will be displayed
about the tank. The expanded card shows tank variables and a menu bar with extra
features.
At the bottom of the tank card you will find menu options such as Details and Note.
Available options depend on license and system setup.
Note that an expanded tank card temporarily covers the nearest small or medium size
cards. The hidden cards appear as soon as the expanded card returns to its normal state.
Figure 4-6: Expanded Tank Card
A. Tank card
B. Expanded tank card
C. Details
D. Note
Related information
Tank details
52 User Guide
Page 53

User Guide View Tank Data
00809-0100-5120 April 2021
4.3 Tank details
The Tank details page lets you view a comprehensive summary of tank data.
The Details option opens the Tank Details view which lets you view different categories of
information for a specific tank:
• Inventory
• Level
• Temperature and pressure
The following example shows details for the Inventory option:
Figure 4-7: Tank Details Inventory
The Tank Details view is available from the menu bar at the bottom of large size tank cards
(see Figure 4-8 and Figure 4-9).
Rosemount TankMaster Mobile 53
Page 54

View Tank Data User Guide
April 2021 00809-0100-5120
Figure 4-8: Tank Details Option in Web Browser
Figure 4-9: Tank Details Option on Tablet
Related information
Tank data
54 User Guide
Page 55

User Guide View Tank Data
00809-0100-5120 April 2021
4.4 Tank groups
The Overview page presents all available tanks and tank groups.
The menu bar shows the selected tank group.
Figure 4-10: Overview Page
You may organize tanks in groups based on product or any other suitable concept.
Figure 4-11: Example of Tank Group for a Product Type
Related information
Tank groups
Rosemount TankMaster Mobile 55
Page 56

A
B
View Tank Data User Guide
April 2021 00809-0100-5120
4.5 Tank movement
The Overview tank view shows all tanks including tank movements. The Movement menu
lets you view only those tanks in which the product level is moving.
The Movement view is dynamic and tanks may appear and disappear depending on the
current status. The number of moving tanks is indicated on the Movement menu
regardless if the menu is selected or not.
Figure 4-12: Tank Movement View
The arrow size that indicates movement changes in case movement rate exceeds a
specified limit.
There is a Minor Limit and a Major Limit that can be set by a System Administrator.
The tank starts indicating tank movement when movement rate exceeds the Minor Limit.
For rates exceeding the Major Limit, the arrow size and appearance changes to indicate a
high movement rate.
Figure 4-13: Tank Movement Rate
a
A. Level rate above lower limit.
Level rate above upper limit
B.
Related information
Tank movement limits
56 User Guide
Page 57

A
User Guide View Tank Data
00809-0100-5120 April 2021
4.6 Tank notes
You may attach an editable tank note on each tank card.
When a tank card has a tank note, an indicator appears in the upper right-hand corner of
the card. By clicking the icon you may view and edit the tank note.
Figure 4-14: Tank Card with Tank Note
A. Tank note icon
When clicking the tank note icon a dialog appears that allows you type a text message.
Tank notes are visible for all users.
Figure 4-15: Tank Note Window
Rosemount TankMaster Mobile 57
Page 58

A
B
View Tank Data User Guide
April 2021 00809-0100-5120
4.7 Watchlists
Watchlist symbols indicate whether the tank is included in a watchlist or not. Tanks can be
added to the watchlist in any view or tank card.
Figure 4-16: Watch List Symbols
A. Watchlist cleared
B. Tank is included in Watchlist
The Watchlist menu lets you view all tanks included in the watchlist.
Figure 4-17: Watchlist Menu
58 User Guide
Page 59

User Guide System Administration
00809-0100-5120 April 2021
5 System Administration
5.1 Administration mode
In administration mode you can manage system settings such as connecting to tank
servers and application servers. In addition to that, administration mode allows you to
create user accounts and user groups as well as manage security settings and various
other system related tasks.
5.1.1 Enter administration mode
To enter Administration Mode:
Procedure
1. On the right-hand side of the menu bar, click
Administration Mode.
Rosemount TankMaster Mobile 59
Page 60

System Administration User Guide
April 2021 00809-0100-5120
2. Enter your password.
The Users menu will open automatically in case a tank server is available. Otherwise
the Servers menu will open.
3. Configure user accounts, servers, or system settings.
4. Exit Administration mode when finished.
Postrequisites
Verify that new users, user groups, tank servers, and application servers are accessible.
60 User Guide
Page 61

User Guide System Administration
00809-0100-5120 April 2021
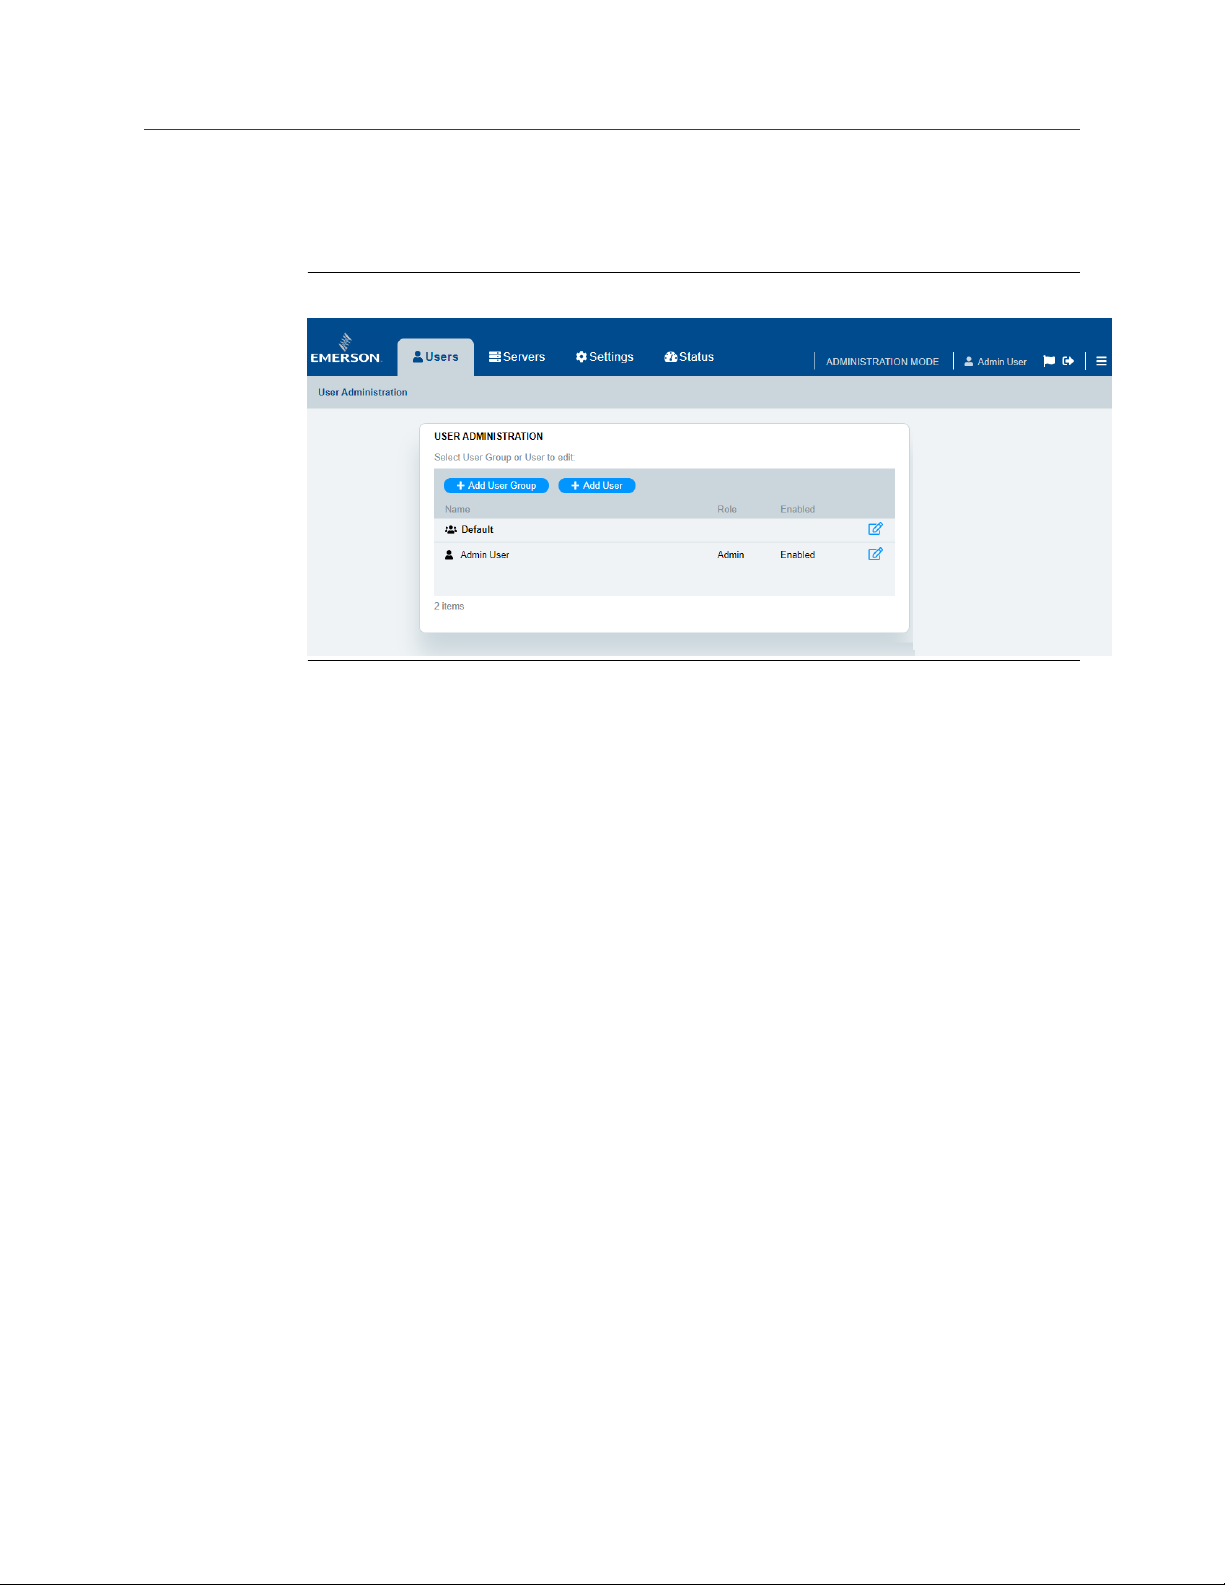
5.2 User administration
This section provides information on adding users and user groups. It also covers how to
specify access to tanks and variables for different users.
A user group can be given access to certain tanks and tank groups. In addition to that, a
selection of specific features such as Movement View, Reports, Tank Details, and Tank
Notes can be made available for the group.
For each user group a set of variables such as Level, Average Temperature, and more can
be made available.
Figure 5-1: Adding and Editing User Groups
Rosemount TankMaster Mobile 61
Page 62

System Administration User Guide
April 2021 00809-0100-5120
5.2.1 Add user groups and users
This section describes how to add and edit user groups and users.
A user group can be given access to tanks, tank groups, and a selection of specific features
such as Movement View, Reports, Tank Details, and Tank Notes. Also, a set of variables
such as Level, Average Temperature, and more can be made available. Tanks and variables
must be mapped to the user group in order to be available in tank cards.
Related information
Map tanks and tank data to a user group
Tank cards
Configure user groups and users
Procedure
1. Make sure that you are logged in as
2. Select the Users menu.
3. Click the Add User Group or the Add User button.
4. Select the General option.
5. Enter the required information.
For a user group you need to configure the following:
• Name
• Tanks
• Variables
• Features such as Movement view, Reports, Tank details, and Tank Notes.
For users you need to configure:
• Name and contact information
• Role (Admin or Operator)
• User group
• How long this user account will be enabled
• Register device
6. Click Save when finished.
Administrator.
Related information
Enter administration mode
62 User Guide
Page 63

User Guide System Administration
00809-0100-5120 April 2021
5.2.2 Map tanks and tank data to a user group
This section describes how to map tanks and parameters to be accessible for a user group.
Map tanks to a user group
Follow this procedure to map tanks to a user group.
Procedure
1. Make sure that you are logged in as
2. Open the Users menu.
3. Select a user group.
4. Click the Edit button.
5. Select the Tanks option.
6. Select the desired tanks to be accessible for the user group.
7. Click Save.
Administrator. See Administration mode.
Map tank data to a user group
Follow this procedure to map tank data to a user group.
Procedure
1. Make sure that you are logged in as Administrator. See Administration mode.
2. Open the Users menu.
3. Select a user group.
4. Click the Edit button.
5. Select the Variables option. Now you may specify up to 12 tank variables to be used
for tank card presentations.
Rosemount TankMaster Mobile 63
Page 64

System Administration User Guide
April 2021 00809-0100-5120
6. For each row there is an Edit icon on the right-hand side. Select the edit icon to find
a complete list of available variables. For each position 1 -12 you may select the
desired variable from this list.
7. Configure the desired variables to be accessible for the user group. Up to 12
variables can be configured.
8. Use
Move Up or Move Down to put a selected variable in the desired position.
9. Optional: Click Select available variables in case you would like to limit or extend
the list of variables that can be selected for each position.
10. Click Save once you are finished.
64 User Guide
Page 65

User Guide System Administration
00809-0100-5120 April 2021
5.2.3 Map features to a user group
Follow this procedure to map features to a user group.
Procedure
1. Make sure that you are logged in as
2. Open the Users menu.
3. Select the desired user group.
4. Click the Edit button.
5. Select the Features option.
6. Select features to be available for this user group.
Note
In order to make features available for user groups they need to be made available
in the Application Server as well.
Administrator. See Administration mode.
7. Click Save once you are finished.
Rosemount TankMaster Mobile 65
Page 66

System Administration User Guide
April 2021 00809-0100-5120
5.3 System settings
This section describes how to configure system settings, servers, and user accounts.
5.3.1 System settings menu
Procedure
1. Enter
2. Select the Settings menu.
3. In the left-hand menu bar, select a menu option and do the required configuration.
4. Click
Related information
Enter administration mode
Administration mode.
Save when finished.
66 User Guide
Page 67

User Guide System Administration
00809-0100-5120 April 2021
5.3.2 Company information
You may specify name, logotype, and contact information for your company. This
information will appear on the sign in page.
Figure 5-2: Company Information
Company information
Follow this procedure to add company information:
Procedure
1. Enter
2. Open the Settings menu.
3. Select Company Information.
4. Add the desired information.
5. You may upload a company logotype by drag and drop to the Company Logo
6. Click Save once your are finished.
Related information
Enter administration mode
Administration mode.
frame. Standard file formats such as PNG and JPG are supported. Note that file size
may not exceed 1 MB.
Rosemount TankMaster Mobile 67
Page 68

System Administration User Guide
April 2021 00809-0100-5120
5.3.3 Tank movement limits
Movement is indicated when flow rate exceeds certain limits. Default values are
automatically set unless you change to other limits.
Minor and Major limits for tank movement can be configured for each tank. Product
movement is indicated in tank cards based on the specified limits.
You may return to default limits by selecting Set all to Default.
Figure 5-3: Tank Movement Limits
Related information
Tank movement
Tank movement configuration
Follow this procedure to configure limits for tank movement presentation.
Procedure
1. Enter Administration mode.
2. Open the Settings menu.
3. Select Tank Movement.
4. Start by setting the desired Measurement Unit; m3/h, bbl/h etc.
5. Set the desired Default Major Limit and Default Minor Limit. You can use the
default values to set the same movement limits for all tanks. They can also be used
as a starting point before you specify limits for individual some tanks.
6. Click Set all to Default in case you like to use common limits for all tanks. You may
also use this function to set a starting point before configuring individual
movement limits.
7. Configure desired Minor Limits and Major Limits for individual tanks if desired.
Individual limits will override default values.
8. Click Save.
Related information
Enter administration mode
68 User Guide
Page 69

User Guide System Administration
00809-0100-5120 April 2021
5.3.4 Product color
The Product Color page lets you configure colors to facilitate tracking of different products.
These colors will be used for presentation of tanks and products. You can configure
product colors regardless of the current color configuration on the Tank Server.
Note
A product will disappear from the list in case the product name is changed in the Tank
Server.
Figure 5-4: Product Colors
Product color configuration
You may specify a color for each product to be used in various bar graph presentations.
Procedure
1. Enter
2. Open the Settings menu.
3. Select Product Color.
4. Assign colors for the desired products.
5. Click Save once your are finished.
Related information
Enter administration mode
Rosemount TankMaster Mobile 69
Administration mode.
Page 70

System Administration User Guide
April 2021 00809-0100-5120
5.3.5 Security settings
The Security menu offers several options for security related configuration.
A number of security related settings can be configured:
• Number of failed sign in attempts
• Account lockout duration
• Password renewal interval
• Minimum password length
• Required password characters
• Sign out inactivity option and time period
• Device access - procedure to register new devices
• Email server configuration
Grant access for new devices
Each new device needs to be granted access to TankMaster Mobile.
Figure 5-5: Device Access
There are three different options for registration of new devices:
• Granted by user via email.
The user automatically receives a code via email to register a new device.
• Granted by administrator manually.
The administrator must manually grant access for a new device.
• Always granted.
This option does not require any code or manual approval by administrator.
Configure security settings
This procedure describes how to configure security settings.
Procedure
1. Open TankMaster Mobile.
Sign in to Administration mode.
2.
3. Open the Settings menu.
4. Select Security.
70 User Guide
Page 71

User Guide System Administration
00809-0100-5120 April 2021
5. Configure the security settings as required.
6. Click Save when finished.
Related information
Enter administration mode
Rosemount TankMaster Mobile 71
Page 72

System Administration User Guide
April 2021 00809-0100-5120
5.3.6 Logging
You may specify the number of events to store in the event log. Once the maximum
number of events is reached, the oldest item will be removed.
Figure 5-6: Logging
Configure logging
Follow this procedure to configure the number of logging events.
Procedure
1. Enter
2. Open the Settings menu.
3. Select Logging.
4. Configure the number of events to store in the log file.
5. Click Save.
Related information
Enter administration mode
Event log
Administration mode.
Event log can be viewed on the Status page.
72 User Guide
Page 73

User Guide System Administration
00809-0100-5120 April 2021
5.3.7 Licensing
The License page allows you to view the current status of your TankMaster Mobile license.
This page lets you enter a new product key or transfer the current license to another
server.
Figure 5-7: Licensing Page
Related information
Enter administration mode
License management
License information
Follow this procedure to view current license information.
Procedure
1. Enter
2. Open the Settings menu.
3. Select Licensing.
4. View the desired license information.
5. Click Save.
Rosemount TankMaster Mobile 73
Administration mode.
Page 74

System Administration User Guide
April 2021 00809-0100-5120
5.3.8 Connect to Tank Servers
This section describes how to connect to Tank Servers.
Related information
Enter administration mode
Connect to a Tank Server
Follow this procedure to connect to a tank server.
Procedure
1. Open TankMaster Mobile web application.
2.
Sign in and enter Administration mode.
3. Open the Servers menu.
4. Select Tank Servers.
5. Click the Add Tank Server button.
6. Under General enter the required information for:
• Tank Server name.
• Description (optional)
• Network location (IP address) of the Tank Server Connector machine
• Port number. Default is 5805.
You can change to other port in case you need to align with site policies.
• Tank Server connector key.
Use the key that was provided during installation of Tank Server Connector.
• Server Alias (optional).
The Alias is used as prefix to tank names for this server.
Example: Alias "A-" for tank TK-101 results in tank name "A-TK-101".
It is recommended to leave server alias blank if only one Tank Server is
connected.
Click
7.
8. Click Close to return to the Servers menu.
74 User Guide
Save.
Page 75

User Guide System Administration
00809-0100-5120 April 2021
5.4 Status information
This section describes how to view system status such as server status, active users, and
event log.
The Status page is available when you are signed in as administrator in Administration
Mode.
Figure 5-8: Status Menu
Related information
Administration mode
System health
Active users
Event log
Rosemount TankMaster Mobile 75
Page 76

System Administration User Guide
April 2021 00809-0100-5120
5.4.1 System health
The System Health page shows the current status of servers that communicate with the
TankMaster Mobile application.
Figure 5-9: System Health
76 User Guide
Page 77

User Guide System Administration
00809-0100-5120 April 2021
5.4.2 Active users
This option shows the currently signed in users.
Select Refresh to update the list.
Figure 5-10: Active Users
Rosemount TankMaster Mobile 77
Page 78

System Administration User Guide
April 2021 00809-0100-5120
5.4.3 Event log
The Event log shows various types of events such as:
• Access control
• Audit log
• Backup and restore
• Configuration changes
• System events
The list of events can be filtered by date, status, and category.
Extended information is available by selecting Details on the right-hand side of the Event
Log pane.
Figure 5-11: Event Log
Related information
Configure logging
78 User Guide
Page 79

User Guide User Settings
00809-0100-5120 April 2021
6 User Settings
This section presents options that are available under My Profile.
My Profile lets you edit your personal account information as well as change your
password. You may also add tank groups, or edit existing tank groups.
6.1 Account
The Account page shows personal information for your TankMaster Mobile account.
6.1.1 Configure account
The Account option allows you to change personal information for you account.
This procedure describes how to edit your Account settings.
Procedure
Navigate to the TankMaster Mobile web page and sign in.
1.
Open the menu for administration and user settings.
2.
3. Click My Profile.
Rosemount TankMaster Mobile 79
Page 80

User Settings User Guide
April 2021 00809-0100-5120
4. Select the Account option.
5. When editing is finished, click the Save button.
6. Click the
Close button to return to Overview.
80 User Guide
Page 81

User Guide User Settings
00809-0100-5120 April 2021
6.2 Password
You can easily change password at any time on the Accounts page.
6.2.1 Change password
This procedure describes how to change Password for your account.
Procedure
1. Navigate to the TankMaster Mobile web page and sign in.
Open the menu for administration and user settings.
2.
3. Click My Profile.
4. Select the
5. Click Change Password.
Account option.
Rosemount TankMaster Mobile 81
Page 82

User Settings User Guide
April 2021 00809-0100-5120
6. Enter the old and new passwords.
7. Enter the new password again in the
Confirm Password field.
8. Click Change Password to finish.
82 User Guide
Page 83

User Guide User Settings
00809-0100-5120 April 2021
6.3 Tank groups
Tanks can be organized in groups for a clear overview. You can easily add or remove tank
groups whenever needed.
Related information
Configure account
6.3.1 Add a tank group
You can easily add tank groups if needed. This option allows you to organize tanks for a
clear overview.
Procedure
1. Select the
A dialog appears that lets you create a new tank group with the desired tanks.
You may also add tank groups via My Profile:
a) Open
b) Select Tank Groups in the left-hand menu.
Add Tank Group button.
My Profile.
c) Click the Add Tank Group button to open a dialog for a new tank group.
Rosemount TankMaster Mobile 83
Page 84

User Settings User Guide
April 2021 00809-0100-5120
2. Select General.
3. Enter a tank group name and a short description.
4. Select
Tanks.
5. Select the desired tanks to be included in the group. The tank group can be edited
at a later occasion in case you like to add or remove tanks
6. Click
84 User Guide
Save once you are finished.
Page 85

User Guide User Settings
00809-0100-5120 April 2021
6.3.2 Remove a tank group
You can easily remove tank groups whenever needed.
Procedure
1. Open
2. In the left-hand menu, select Tank Groups.
3. Select the tank group to be removed.
4. Click
My Profile.
The Remove option will appear.
Remove to delete the selected tank group.
Rosemount TankMaster Mobile 85
Page 86

User Settings User Guide
April 2021 00809-0100-5120
86 User Guide
Page 87

A
B
C
D
E
User Guide Data Presentation
00809-0100-5120 April 2021
7 Data Presentation
7.1 Data presentation
This section shows how data is presented to indicate current status.
Current status is indicated by color and status message:
• Good value
• Bad value
• Old value
• Manual value
Figure 7-1: Data Presentation in Tank Cards
A. Manual value
B. Indicates bad data for hidden variables
C.
Bad data (unreliable data)
D. Old data (measurement value not updated within the last 60 seconds)
E. Tank details with current status presentation
Rosemount TankMaster Mobile 87
Page 88

Data Presentation User Guide
April 2021 00809-0100-5120
88 User Guide
Page 89

User Guide License management
00809-0100-5120 April 2021
8 License management
8.1 License management
This section describes how to add a new Rosemount™ TankMaster™ Mobile license and
various license management tasks.
The Rosemount TankMaster Mobile software can be used for a trial period of 90 days. After
90 days you need to activate your license.
A notification is displayed on the start page on the remaining number of days until the trial
period expires.
You will find information on license updates and TankMaster Mobile subscriptions on the
TankMaster.Rosemount.com/ServiceCenter web site.
Related information
Tank Gauging System
8.1.1 Add and activate new license
This procedure describes how to add and activate a new Rosemount™ TankMaster™ Mobile
license.
Prerequisites
Prior to managing your TankMaster Mobile license, you need to ensure that:
• TankMaster Mobile is installed and up and running
• Serial number and Product key are available. You will find them in the DVD box that
was shipped with the TankMaster Mobile software package.
Procedure
1. Open the TankMaster Mobile web app and sign in.
2.
Enter Administration mode.
3. Open the Settings menu.
4. Navigate to the Licensing page.
5. Click Enter New Product Key.
Rosemount TankMaster Mobile 89
Page 90

License management User Guide
April 2021 00809-0100-5120
6. Enter the Product Key. You will find it in the DVD box that was shipped with the
product.
Once the Product key is entered, the System Key will automatically appear.
7. Copy or make a note of the System Key.
8. Navigate to
TankMaster.Rosemount.com/ServiceCenter and sign in to your account
or create a new account if you are a new user.
9. Under My Licenses click Add New License.
10. Enter Serial No., Product key and Country of Use.
11. Click
Add License.
A message appears saying: "License with serial number xxxx has been added".
12. Enter the System Key that was shown on the TM Mobile Licensing page.
13. Click Activate License.
90 User Guide
Page 91

User Guide License management
00809-0100-5120 April 2021
14. Select option Download or Email activation key.
In case you select the email option, note that the Activation key must be
downloaded to the server.
15. Return to the TankMaster Mobile web app.
16.
Navigate to the Licensing page.
17. Click Activate License.
18. Browse to the appropriate folder, select the Activation key, and click OK.
A response appears showing the TankMaster Mobile license options.
19. Verify that license options are correct according to model code.
Rosemount TankMaster Mobile 91
Page 92

License management User Guide
April 2021 00809-0100-5120
8.1.2 Upgrade license with new options
This procedure describes how to upgrade a Rosemount™ TankMaster™ Mobile license with
new options.
Prerequisites
Prior to managing your TankMaster Mobile license, you need to ensure that:
• TankMaster Mobile is up and running
• Serial number and Product key are available. You will find them on the DVD that was
shipped with the TankMaster Mobile software package.
Procedure
1. Navigate to
account.
2. Open My Licenses.
3. Under Actions, select Upgrade options.
4. Select desired options for:
• Features
• Number of tanks
• Concurrent users
5. Click Continue.
6. Verify ordering info.
7. Click Create pdf to create an order with new model code.
8. Send the order to Emerson.
A new Product key will be shipped as soon as the order is confirmed.
9. Open the TankMaster Mobile web app and sign in.
10. Enter Administration mode.
11. Open the Settings menu.
12. Navigate to the Licensing page.
13. Click Enter New Product Key.
14. Enter the Product Key. You will find it on the DVD box that was shipped with the
product.
Once the Product key is entered, the System Key will automatically appear.
TankMaster.Rosemount.com/ServiceCenter and sign in to your
15. Copy or make a note of the System Key.
16. Navigate to the Rosemount TankMaster Service Center and sign in to your
account.
17. Under My Licenses click Re-activate.
18. Enter the new System Key that was shown on the TM Mobile Licensing page.
19. Click Activate License.
92 User Guide
Page 93

User Guide License management
00809-0100-5120 April 2021
20. Select option Download or Email Activation key.
In case you select the email option, note that the Activation key must be
downloaded to the server.
21. Return to the TankMaster Mobile web app.
22.
Navigate to the Licensing page.
23. Click Activate License.
24. Browse to the appropriate folder, select the Activation key, and click OK.
A response appears showing the TankMaster Mobile license options.
25. Verify that license options are correct according to model code.
Rosemount TankMaster Mobile 93
Page 94

License management User Guide
April 2021 00809-0100-5120
8.1.3 Transfer license to a new server
This procedure describes how to move a Rosemount™ TankMaster™ Mobile license to a
new server.
Prerequisites
Prior to managing your TankMaster Mobile license, you need to ensure that:
• TankMaster Mobile is up and running
• Serial number and Product key are available. You will find them on the DVD that was
shipped with the TankMaster Mobile software package.
Procedure
1. Start by installing
2. On the new server, open the TankMaster Mobile web app and sign in.
3. Enter Administration mode.
4. Open the Settings menu.
5. Navigate to the Licensing page.
6. Click Enter New Product Key.
Use the Product Key from the old server installation.
A System Key for the new server is generated.
7. Copy or make a note of the System Key.
8. On the old server, open the TankMaster Mobile web app and sign in.
9. Enter Administration mode.
10. Open the Settings menu.
11. Navigate to the Licensing page.
12. Click Transfer license to a different server.
A dialog appears with information on the transfer option.
13. Click Transfer.
A Transfer Key is generated.
Note
Generating a Transfer Key will disable the license on the current server.
Rosemount TankMaster Mobile on the new server machine.
14. Copy the Transfer key.
15. Navigate to
account.
16. Select My licenses → Actions → Transfer.
17. Enter the Transfer Key and click the Transfer License button.
The Activate License dialog appears.
18. Enter the System Key that was generated on the Licensing page on the new TM
Mobile server.
19. Click Activate License.
94 User Guide
TankMaster.Rosemount.com/ServiceCenter and sign in to your
Page 95

User Guide License management
00809-0100-5120 April 2021
20. Select one of the options Download or Email Activation Key.
21. On the
new TM Mobile server, make sure that the Activation Key is stored in the
appropriate folder.
22. Return to the TankMaster Mobile web app.
23. Navigate to the Licensing page.
24. Click Activate License.
25. Browse to the appropriate folder, select the Activation key, and click OK.
A response appears showing the TankMaster Mobile license options.
26. Verify that license options are correct according to model code.
Rosemount TankMaster Mobile 95
Page 96

License management User Guide
April 2021 00809-0100-5120
8.1.4 Update license subscription/software update period
This procedure describes how to update a Rosemount™ TankMaster™ Mobile license
subscription.
Procedure
1. Navigate to
account.
2. Open My Licenses.
3. Under Actions, select Renew software update period.
4. From the drop-down list, select the desired software update period: 1 year, 3 year,
or 5 years.
In case the current software update period is still valid, then the new period will be
added after the current period expires.
Note
By renewing the update period you will get access to new software versions. The
current version will still work regardless if the update period is renewed or not
5. Click Continue.
6. Verify that Serial number is correct.
Click Create pdf to create an order for the new software update period.
7.
The pdf file will include the license serial number and an item number.
8. Send the order to your local sales representative.
Your software update period extension will be confirmed via email.
TankMaster.Rosemount.com/ServiceCenter and sign in to your
96 User Guide
Page 97

User Guide License management
00809-0100-5120 April 2021
8.1.5 Update software revision
This procedure describes how to update the Rosemount™ TankMaster™ Mobile software to
a new revision.
Prerequisites
Prior to managing your TankMaster Mobile license, you need to ensure that:
• TankMaster Mobile is up and running
• Your license has an active software update period.
Procedure
1. Navigate to
account.
2. Open My Licenses.
3. Under Actions, select Downloads.
4. Download the appropriate software revision.
5. Install the new software revision on the TankMaster Mobile server.
TankMaster.Rosemount.com/ServiceCenter and sign in to your
Rosemount TankMaster Mobile 97
Page 98

00809-0100-5120
Rev. AA
2021
For more information:
©
2021 Emerson. All rights reserved.
www.emerson.com
Emerson Terms and Conditions of Sale are available upon
request. The Emerson logo is a trademark and service mark of
Emerson Electric Co. Rosemount is a mark of one of the
Emerson family of companies. All other marks are the property
of their respective owners.
 Loading...