

Page 1
Uninterruptible Power Systems
SDU DC Series
Instruction Manual
Page 2

While every precaution has been taken to ensure accuracy and completeness in this
manual, SolaHD assumes no responsibility, and disclaims all liability for damages resulting
from use of this information or for any errors or omissions.
©2008 SolaHD. All rights reserved throughout the world. Specications are subject to
change without notice.
®SolaHD name and logo are registered trademarks of EGS Electrical Group, LLC. All
names referred to are trademarks or registered trademarks of their respective owners.
SDU DC Series Instruction Manual • ii
Page 3

Table of Contents
1.0 Important Safety Instructions ...................................................................................................... 4–5
1.1 Safety Precautions ............................................................................................................................................ 4–5
1.2 Conditions of Use .................................................................................................................................................. 5
2.0 Warnings Dened ............................................................................................................................. 5
3.0 Introduction ....................................................................................................................................... 6
4.0 What’s Included ................................................................................................................................ 7
5.0 Battery Options ................................................................................................................................. 7
6.0 Optional Accessories ....................................................................................................................... 7
7.0 Installation Instructions ............................................................................................................. 8–11
7.1 Placement ............................................................................................................................................................. 8
7.2 DIN Rail Mounting ................................................................................................................................................. 8
7.3 Chassis Mounting ................................................................................................................................................. 8
7.4 SDU DC UPS with SDU 24-BAT Wiring Diagram ................................................................................................. 9
7.5 SDU DC UPS with SDU 24-BATEM Wiring Diagram .......................................................................................... 10
7.6 Connections ........................................................................................................................................................ 10
7.7 Charge the Battery .............................................................................................................................................. 10
7.8 Turn “ON” the UPS (Normal Mode) ..................................................................................................................... 11
7.9 Turn “ON” the UPS (Green Mode) ...................................................................................................................... 11
7.10 Remote ON/OFF ............................................................................................................................................... 11
8.0 Operating Instructions ............................................................................................................. 12–13
9.0 Alarms ............................................................................................................................................. 14
9.1 ON Battery .......................................................................................................................................................... 14
9.2 Low Battery ......................................................................................................................................................... 14
9.3 Overload ............................................................................................................................................................. 14
9.4 Alarm & LED Status Table ................................................................................................................................... 14
10.0 Replacing the Battery ............................................................................................................. 15–22
10.1 SDU 24-BAT Replacement Batteries ................................................................................................................ 15
10.2 SDU 24-BATEM Replacement Batteries ........................................................................................................... 15
10.3 SDU 24-BAT Battery Replacement Instructions ......................................................................................... 16–18
10.4 SDU 24-BATEM Battery Replacement Instructions .................................................................................... 19–22
11.0 Battery Backup Times .................................................................................................................. 23
11.1 SDU 10-24 with SDU 24-BAT ............................................................................................................................ 23
11.2 SDU 20-24 with SDU 24-BAT ............................................................................................................................ 23
11.3 SDU 10-24 with SDU 24-BATEM ...................................................................................................................... 23
11.4 SDU 20-24 with SDU 24-BATEM ...................................................................................................................... 23
12.0 Power Module Specications ...................................................................................................... 24
13.0 Battery Module Specications .................................................................................................... 25
14.0 Troubleshooting ........................................................................................................................... 26
15.0 Storage .......................................................................................................................................... 27
15.1 Storage Conditions ........................................................................................................................................... 27
15.2 Extended Storage ............................................................................................................................................. 27
16.0 Product Registration & Warranty ................................................................................................ 28
16.1 Product Registration ......................................................................................................................................... 28
16.2 Warranty Information ........................................................................................................................................ 28
SDU DC Series Instruction Manual • iii
Page 4

1.0 Important Safety Instructions
This manual contains important safety instructions that should be followed during
the installation of the Uninterruptible Power System (UPS). Please read all safety,
installation, and operating instructions before attempting to install or operate the
UPS. Please adhere to all warnings on the unit and in this manual during installation and operation.
The UPS is designed for Industrial or Commercial use and can be installed and
operated by individuals without previous training.
1.1 Safety Precautions — Warnings
• To prevent the risk of re or electric shock, install the UPS in a temperature
and humidity controlled ventilated enclosure, free of conductive contaminants,
moisture, flammable liquids, gases, and corrosive substances.
• Operate the UPS only from a properly grounded (earthed) dc supply.
• To reduce the risk of electric shock, do not remove the cover. For service,
contact a qualied technician.
• The UPS contains its own energy source (batteries). The output terminals may
carry live voltage, even when the UPS is not connected to a dc source.
Although your UPS has been designed and manufactured to assure personal
safety, improper use can result in electrical shock or re. To ensure safety, please
observe the following rules:
• Turn OFF the UPS and disconnect the dc supply before cleaning. Do not use
liquid or aerosol cleaners. A dry cloth is recommended to remove dust from the
surface of your UPS.
• Do not install or operate the UPS in or near water.
• Do not place the UPS on an unstable cart, stand, or table.
• Do not place the UPS under direct sunlight or close to heat-emitting sources.
• To allow proper ventilation of the UPS, do not block or cover the top and bottom
sides of the unit.
• Never block or insert any objects into the ventilation holes or other openings of
the UPS. Keep all vents free of dust accumulation that could restrict airflow.
SDU DC Series Instruction Manual • 4
Page 5

• Follow all warnings and instructions marked on the UPS. Do not attempt to
2.0 Warnings Dened
service the UPS, as it has no user-serviceable parts inside. Refer all repairs to
a qualied technician.
• Do not dispose of batteries in a re; they may explode.
• Do not open or damage the batteries. Released electrolyte is harmful to the skin
and eyes and may be toxic.
If your UPS demonstrates any of the following conditions, turn OFF the UPS,
disconnect the dc supply and contact your SolaHD representative or SolaHD
Technical Support at 1-800-377-4384.
• Liquid has been spilled on the UPS.
• The UPS does not operate in accordance with the instruction manual.
1.2 Conditions of Use
Your UPS provides conditioned power to connected equipment. The maximum
load must not exceed that shown on UPS rating label. If uncertain, contact your
SolaHD representative or SolaHD Technical Support at 1-800-377-4384.
Danger: Indicates an imminently hazardous situation
that, if not avoided, will result in death or serious injury.
This signal word is limited to the most extreme situations.
Warning: Indicates a potentially hazardous situation that,
if not avoided, could result in death or serious injury.
Caution: Indicates a potentially hazardous situation that,
if not avoided, may result in minor or moderate injury. It
may also be used to alert against unsafe practices.
SDU DC Series Instruction Manual • 5
Page 6

3.0 Introduction
Congratulations on your choice of the SDU DC Uninterruptible Power System
(UPS). The SDU DC UPS is an advanced 24 V dc Uninterruptible Power System
that combines an industry leading design with a wide operational temperature
range and unique installation options.
The SDU DC UPS is a powerful microprocessor-controlled UPS which provides
protection from power interruptions. With an input voltage range of 22.5 to
30 V dc, the SDU DC UPS is the ideal power backup solution for your critical
connected loads.
NOTE: This equipment has been tested and found to comply with the limits for
a Class A digital device, pursuant to Part 15 of the FCC Rules. These limits are
designed to provide reasonable protection against harmful interference in an
industrial installation. This equipment uses, generates and can radiate radio
frequency energy and, if not installed and used in accordance with the instruc-
tions, may cause harmful interference with radio communications. However, there
is no guarantee that interference will not occur in a particular installation. If this
equipment does cause harmful interference to radio or television reception, which
can be determined by turning the equipment OFF and ON, the user is encour-
aged to try to correct the interference by one or more of the following measures:
• Reorient or relocate the receiving antenna.
• Increase the separation between the UPS and the receiver.
• Connect the UPS into a circuit different from that which the receiver is
connected.
• Consult the dealer or an experienced radio/TV technician for help.
SDU DC Series Instruction Manual • 6
Page 7

4.0 What’s Included
• SDU 10-24 or SDU 20-24
6.0 Optional Accessories
5.0 Battery Options
• Instruction manual
Two battery modules* are available:
• SDU 24-BAT: 24 V DIN rail/panel mount battery module (cable included)
NOTE: Up to 4 SDU 24-BAT battery modules can be connected to the UPS
• SDU 24-BATEM: 24 V external mount battery module (cable included)
NOTE: Only 1 SDU 24-BATEM can be connected to the UPS
*A combination of both modules cannot be used with the UPS
• SDU 24EXTBC6: 6 ft. battery module cable
• SDU 24-DB9: Interface kit to convert relay contact signals to DB9 signals
• SDU-PMBRK: Chassis mounting brackets to secure the UPS to the wall, back
of the panel, or enclosure
SDU DC Series Instruction Manual • 7
Page 8
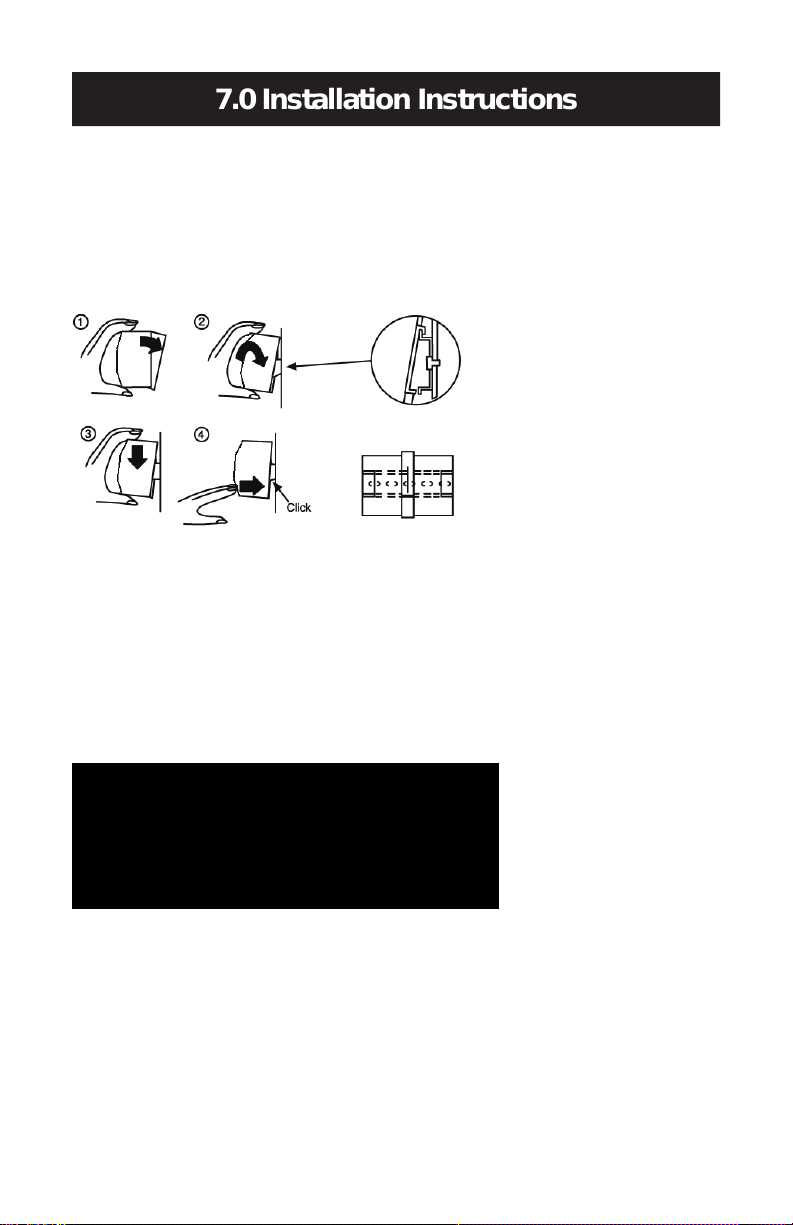
7.0 Installation Instructions
7.1 Placement
Install the power module and battery module in a protected area with adequate
airflow and free of excessive dust. Do not operate the UPS outdoors.
7.2 DIN Rail Mounting
1. Tilt the unit as illustrated above.
2. Put the unit onto the DIN rail.
3. Push the unit downward until it stops.
4. Push at the lower front edge to lock. Gently shake the unit to ensure that the
retainer has locked.
7.2.1 Removing the Unit from the DIN Rail
1. Push the button and swing the bottom up and out.
7.3 Chassis Mounting
Use the optional chassis mounting brackets (SDU-PMBRK). Please refer to the
installation instructions supplied with the chassis mounting brackets.
NOTE: If you will be shipping the UPS already mounted, we recommend using
the chassis mounting brackets (SDU-PMBRK) to secure the UPS.
SDU DC Series Instruction Manual • 8
Page 9
7.4 SDU DC UPS with SDU 24-BAT Wiring Diagram
Power Supply
SDN 10-24-100C
O
A
L
S
22.5-28.5 Vdc
100-240V~3.5A 50/60 Hz
24Vdc / 10A
IND.CONT.EQ.
9HA0
BAT 2
Up to 4 SDU 24-BAT modules
can be connected in parallel with
the power modules SDU 10-24 or SDU 20-24
INPUT LOAD
ON/OFF/TEST
BATTERY FAULT
BATTERY MODE/
BATTERY CHARGE
INPUT POWER OK
Industrial DC UPS
SDU 10-24
OUTPUT DC
24V/35mA
REMOTE
ON/OFF
NC C NO
BATTERY FAULT
NC C NO
ON BATTERY
NC C NO
LOW BATTERY
24Vdc/10A
24Vdc/10A
IND.CONT.EQ.
3MCG
R
AC Source
SDU 24-DB9
DC Load
+
-
RS232-DB9
Battery Polarized Cable Assembly
BAT 2BAT 1
O
A
L
S
SDU 24-BAT
Industrial DC UPS
Battery Module
BAT 2BAT 1
O
A
L
S
SDU 24-BAT
Industrial DC UPS
Battery Module
1 2 3
3
1
AC/DC Power Supply
2
Power Module: SDU 10-24 or SDU 20-24
3
Battery Module: SDU 24-BAT
SDU DC Series Instruction Manual • 9
Page 10

7.5 SDU DC UPS with SDU 24-BATEM Wiring Diagram
Power Supply
SDN 10-24-100C
O
A
L
S
22.5-28.5 Vdc
100-240V~3.5A 50/60 Hz
24Vdc / 10A
IND.CONT.EQ.
9HA0
BAT 1
INPUT LO AD
ON/OFF/TEST
BATTERY FAULT
BATTERY MODE/
BATTERY CHARGE
INPUT POWER OK
Industrial DC UPS
SDU 10-24
OUTPUT DC
24V/35mA
REMOTE
ON/OFF
NC C NO
BATTERY FAULT
NC C NO
ON BATTERY
NC C NO
LOW BATTERY
24Vdc/10A
24Vdc/10A
IND.CONT.EQ.
3MCG
R
SDU 24-DB9
DC Load
+
-
DB9
See Connection Diagram on Page 23
Battery Polarized
Cable Assembly
O
A
L
S
SDU 24-BATEM
Industrial DC UPS
External Battery Module
AC Source
1 2 3
1
AC/DC Power Supply
2
Power Module: SDU 10-24 or SDU 20-24
3
Battery Module: SDU 24-BATEM
Only 1 SDU 24-BATEM module
can be connected in parallel with the
power modules SDU 10-24 or SDU 20-24
7.6 Connections
1. Use the polarized cable to connect the power module to the battery module.
2. Connect the power module dc input connector to the 24 V dc input power
source.
3. Hardwire the load to the power module output terminal connector.
7.7 Charge the Battery
The UPS charges the battery whenever it is connected to 24 V dc input power.
For best results, charge the battery for 4 hours during initial use.
SDU DC Series Instruction Manual • 10
Page 11

7.8 Turn “ON” the UPS (Normal Mode)
OUTPUT DC
24V/35mA
REMOTE
ON/OFF
Remote push-button switch
To start the UPS, press and hold the ON/OFF/TEST button until a short “beep” is
heard. (This should take less than 3 seconds.) Immediately release the ON/OFF/
TEST button; the UPS is now “ON” and the green LED is continuously lit.
Depressing the ON/OFF/TEST button for 5 seconds will turn the UPS OFF.
7.9 Turn “ON” the UPS (Green Mode)
With the UPS OFF, depress the ON/OFF/TEST button until 2 short “beeps”
are heard. (This should take about 4 seconds.) Release the ON/OFF/TEST
button; the UPS is now “ON” with the Green Mode enabled. The green LED will
now double flash for a period of 5 seconds and then remain solid green for 55
seconds. This pattern will be repeated every minute.
To deactivate the Green Mode, the UPS must be turned OFF using the ON/OFF/
TEST button and restarted using the Normal Mode sequence (See 7.8).
7.9.1 About the Green Mode
The Green Mode is an energy saving feature that prevents the UPS battery from
being deeply discharged in the case of an extended power outage.
If during a power outage the UPS detects a battery load power of less than 15
watts, the UPS will shut down after 3 minutes of low power operation. The UPS
will then beep every 30 seconds indicating that it is now in the power saving
mode. When power is restored to the system, the UPS will automatically restart
in the Green Mode.
Note that if the power outage lasts longer than 72 hours the UPS will completely
turn OFF and will have to be manually restarted in the selected “ON” Mode using
the ON/OFF/TEST button.
7.10 Remote ON/OFF
To activate the Remote ON/OFF function, connect a remote push-button switch
to the ON/OFF terminal as shown below.
The Remote ON/OFF switch provides the same functions as the front panel
switch, including the ON/OFF/TEST functions with the Green Mode enabled or
disabled. If the Green Mode is not needed, a remote toggle switch can be used.
SDU DC Series Instruction Manual • 11
Page 12

8.0 Operating Instructions
INPUT LOAD
ON/OFF/TEST
BATTERY FAULT
BATTERY MODE/
BATTERY CHARGE
INPUT POWER OK
Industrial DC UPS
OUTPUT DC
24V/35 mA
REMOTE
ON/OFF
NC C NO
BATTERY FAU LT
NC C NO
ON BATTE RY
NC C NO
LOW BATTER Y
IND.CONT.EQ.
3MCG
R
6
1
2
3
4
5
1. ON/OFF/TEST: This button controls output power to the connected load(s) and
has 4 functions:
(1) ON: When the UPS is OFF, press and release the ON/OFF/TEST button to
start the UPS (an audible alarm sounds briefly). The UPS is capable of starting
on battery (cold start).
(2) OFF: When the UPS is ON (in either Normal or Battery Mode), press the
ON/OFF/Test button for 5 seconds to shut down the output dc power (an
audible alarm sounds briefly).
(3) TEST: In the Normal Mode, press the ON/OFF/TEST button for 1 second
to initiate the self-test function. When the unit passes the test, it will return to
Normal Mode.
NOTE: The self-test function is disabled when the BATTERY FAULT LED is
illuminated.
(4) Alarm Silence: When an alarm is activated, press and release the ON/
OFF/TEST button to silence it (whether input dc power is present or not). Once
the alarm is silenced, all active alarms, except for low battery, overload, or
over-temperature, will remain silenced until a new alarm condition is detected.
SDU DC Series Instruction Manual • 12
Page 13

2. BATTERY FAULT (Red LED): The red LED illuminates when the UPS is expe-
-
+
-
+
Output DCInput DC
24V 24V
OUTPUT DC
24V/35mA
REMOTE
ON / OFF
NC C NO
BATTERY FA ULT
NC C NO
ON BATTERY
NC C NO
LOW BATTERY
13 12 11 10 987654321
Bottom View
7
riencing an overload condition. The LED flashes when the battery is no longer
useful or not connected.
3. BATTERY MODE/BATTERY CHARGE (Amber LED): The amber LED illumi-
nates when the UPS is supplying battery power to the loads. The LED flashes
when the battery is charging.
4. INPUT POWER OK (Green LED): The green LED will illuminate when the dc
input power is normal.
5. Dc Input/Output Screw Terminal Connections: IP20 rated input and output
screw terminals; acceptable wiring: 16–12 AWG, copper conductor, 90°C.
NOTE: The maximum length of the connection between the power module and
battery is 6 ft. (1.85 m).
6. Dry Contact Relay Terminals: The power module incorporates dry relay
contacts for remote signaling of the battery status, terminal connection for
remote ON/OFF, and output dc 24 V/35 mA for powering the auxiliary circuit.
Acceptable wiring: 16–12 AWG, copper conductor, 90°C.
7. Polarized Terminal Connections for the Battery (+ red color; - black color):
Composed of two PP 15/45 Anderson contacts and two PP 15/45 Anderson
powerpole housings to ensure a keyed connection between the power module
and the battery module.
SDU DC Series Instruction Manual • 13
Page 14

9.0 Alarms
9.1 ON Battery (Slow Beeping)
When in ON Battery Mode, the amber LED illuminates and a slow beep occurs.
The alarm is silenced when the UPS returns to Normal Mode.
9.2 Low Battery (Rapid Beeping)
When in Backup Mode, if the battery capacity reaches 20% – 30%, the UPS will
beep rapidly until it shuts down from battery depletion. When dc input power is
restored, the UPS will return to Normal Mode.
NOTE: The alarm will sound every 30 seconds when the battery capacity is low.
9.3 Overload (Continuous Beeping)
When the UPS is subjected to an overload condition, the UPS will continuously
beep, the red LED will illuminate, and the UPS will automatically shut down.
Restart the UPS by pressing the ON/OFF/TEST button. Reduce the load to eliminate the overload condition.
9.4 Alarm & LED Status Table
Status Green LED Amber LED Red LED Alarm
Normal Mode ON OFF OFF OFF
Green Mode
Backup Mode OFF ON OFF
Battery Fault (Normal Mode) ON OFF
Battery Charging (Normal Mode) ON
Battery Charging (Power Off) OFF
Battery Low (Backup Mode) OFF ON OFF
Overload ON (Normal Mode)
Flash for 5 s
Solid for 55 s
OFF OFF OFF
ON for 1 s
OFF for 2 s
ON for 1 s
OFF for 2 s
ON for 1 s
OFF for 2 s
ON (Backup
Mode)
OFF OFF
OFF OFF
ON ON
ON for 1 s
OFF for 2 s
OFF
ON for 0.3 s
OFF for 0.3 s
SDU DC Series Instruction Manual • 14
Page 15

10.0 Replacing the Battery
10.1 SDU 24-BAT Replacement Batteries
The following battery types can be used as a replacement:
Manufacturer Type Rating
CSB
B & B Battery (USA) Inc.
Kung Long Batteries Industrial
Co. Ltd.
Taiwan Yuasa Battery Co. Ltd.
Japan Storage Battery PE12V5
Toplite NP5-12
HR1221W
HR1221WF2
BP 5-12
HR 5.5-12
WP1221W
WP5-12
NP5-12 FR
NPH5-12
10.2 SDU 24-BATEM Replacement Batteries
The following battery types can be used as a replacement:
Manufacturer Type Rating
GP1272
CSB
Taiwan Yuasa Battery Co. Ltd. NP7-12
Kung Long Batteries Industrial
Co. Ltd.
First Power FP1272
Japan Storage Battery PXL12072
Toplite NP7.2-12
Shimastu Electronic NP7.2-12
GP1272F2
EVX1272F2
WP7.2-12
WP1234W
12 V dc, 5.0 Ah
12 V dc, 7.2 Ah
SDU DC Series Instruction Manual • 15
Page 16

10.3 SDU 24-BAT Battery Replacement Instructions
1
When removing and installing new batteries, extreme care
must be used not to short the metal chassis parts across
the battery terminals and not to short the batteries to each
other; personal injury may result.
Caution should be exercised when replacing the batteries,
as the load is unprotected from disturbances and power
outages during this procedure.
The battery can present a risk of electrical shock and high
short circuit current. The following precautions should be
observed when working on batteries:
• Remove watches, rings, and other metal objects.
• Use tools with insulated handles.
• Do not lay tools or other metal objects on top of the batteries.
• If the battery replacement kit is damaged in any way or
shows signs of leakage, contact your SolaHD representative immediately.
• Do not dispose of batteries in a re; they may explode.
• Dispose of old batteries according to local codes.
Electrical safety precautions must be followed when
installing or servicing this equipment. To prevent risk of
electrical shock, turn off and lock out all power sources to
the unit before making electrical connections or servicing.
1. Remove four screws from the right and left sides of the enclosure.
2. Remove eight screws from the top and bottom sides of the enclosure.
SDU DC Series Instruction Manual • 16
Page 17

3. Carefully slide the front cover forward and off the enclosure. Do not disconnect
R R
B
+ +
-
B
Fuse
Bat 1 Bat 2
-
Bat 1 = Polarized terminal 1
Bat 2 = Polarized terminal 2
R = Red terminal
B = Black terminal
the wires from the polarized terminals.
4. Remove the wires from the battery posts.
5. Remove the failed battery/batteries. Insert the new battery/batteries.
6. Use the following connection diagram to ensure a proper connection to the
fuse protection board and polarized terminals.
7. Slide the battery/batteries into their respective positions.
SDU DC Series Instruction Manual • 17
Page 18

10.3 SDU 24-BAT Battery Replacement Instructions continued
8. Using four screws, secure the protection fuse board.
9. Slide the front cover onto the enclosure.
10. Secure the assembly with eight screws.
SDU DC Series Instruction Manual • 18
Page 19

10.4 SDU 24-BATEM Battery Replacement Instructions
When removing and installing new batteries, extreme care
must be used not to short the metal chassis parts across
the battery terminals and not to short the batteries to each
other; personal injury may result.
Caution should be exercised when replacing the battery,
as the load is unprotected from disturbances and power
outages during this procedure.
The battery can present a risk of electrical shock and high
short circuit current. The following precautions should be
observed when working on batteries:
• Remove watches, rings, and other metal objects.
• Use tools with insulated handles.
• Do not lay tools or other metal objects on top of the batteries.
• If the battery replacement kit is damaged in any way or
shows signs of leakage, contact your SolaHD representative immediately.
• Do not dispose of batteries in a re; they may explode.
• Dispose of old batteries according to local codes.
Electrical safety precautions must be followed when
installing or servicing this equipment. To prevent risk of
electrical shock, turn off and lock out all power sources to
the unit before making electrical connections or servicing.
1. Remove four screws from the cover. Slide the cover forward and off the
enclosure.
SDU DC Series Instruction Manual • 19
Page 20

10.4 SDU 24-BATEM Battery Replacement Instructions continued
2. Remove the wires from the battery posts.
3. Secure the bracket in place. Remove four screws from the enclosure. Slide the
bracket forward and off the enclosure.
SDU DC Series Instruction Manual • 20
Page 21

4. Remove the failed battery and insert the new battery.
R R
B
+ +
+
-
B
CB
-
-
Polarized
Terminal
5. Slide the bracket forward inside the enclosure. Secure the bracket in place.
Use four screws to mount the bracket onto the enclosure.
6. Use the following connection diagram to ensure a proper connection to the
circuit breaker and polarized terminals.
SDU DC Series Instruction Manual • 21
Page 22

10.4 SDU 24-BATEM Battery Replacement Instructions continued
7. Slide the cover onto the enclosure. Secure the cover with four screws.
SDU DC Series Instruction Manual • 22
Page 23

11.0 Battery Backup Times (in minutes vs. load percentage)
NOTE: Resistive loads were used to measure the battery run times. Using other
types of loads may result in different battery run times.
11.1 SDU 10-24 with SDU 24-BAT
Load 20% (2 A) 40% (4 A) 60% (6 A) 80% (8 A) 100% (10 A)
1 unit 113 45 30 21 14
2 units 247 114 74 48 38
3 units 396 178 117 80 58
4 units 531 233 148 111 81
11.2 SDU 20-24 with SDU 24-BAT
Load 20% (4 A) 40% (8 A) 60% (12 A) 80% (16 A) 100% (20 A)
1 unit 46 21 10 6 4
2 units 116 50 28 17 10
3 units 178 80 46 31 20
4 units 237 113 65 43 31
11.3 SDU 10-24 with SDU 24-BATEM
Load 20% (2 A) 40% (4 A) 60% (6 A) 80% (8 A) 100% (10 A)
1 unit 135 52 28 19 14
11.4 SDU 20-24 with SDU 24-BATEM
Load 20% (4 A) 40% (8 A) 60% (12 A) 80% (16 A) 100% (20 A)
1 unit 48 17 9 6 4
SDU DC Series Instruction Manual • 23
Page 24

12.0 Power Module Specications
Parameter
INPUT
Nominal Input Voltage 24 V dc
Input Voltage Range 22.5 – 30 V dc
Input Fuse Dc fuse 30 A
OUTPUT
Nominal Output Voltage 24 V dc
Output Voltage Range 22.5 – 30 V dc
Output Current 10 A 20 A
Current Limit 12 A 22 A
PROTECTION
Input Protection Fuse for overload and short circuit protection
Overload Protection Electrical circuit protection
Short Circuit UPS output cuts off immediately
ENVIRONMENT
Audible Noise <40 dBA (1 m from surface)
Operating Temperature -20°C to +50°C
Storage Temperature -20°C to +70°C
Humidity 0 to 95%, non-condensing
Pollution Degree 2
Maximum Elevation 3500 m (11,483 ft.)
Shock & Vibration According to ISTA 2A
INSTALLATION
MTBF > 200,000 hours
Outputs are capable of providing high currents for short periods of time for inductive load
Output
rating cannot be tolerated. Continuous current overload allows for reliable fuse tripping.
Mounting
Connections
Relay Contact Terminal
Connections
Case Fully enclosed metal housing with ne ventilation grid to keep out small particles
Free Space 20 mm above, 35 mm below, 20 mm left and right, 10 mm in front
SDU 10-24 SDU 20-24
startup or switching. Fusing may be required for wire/loads if 2x nominal O/P current
Simple snap-on system for DIN rail TS35/7.5 or TS35/15; or
Input & Output: IP20-rated screw terminals; connector size range: 16 – 12 AWG
IP20 screw terminals; connector size range: 24 – 16 AWG (0.34 – 4 mm
Catalog Number
Chassis mounting brackets (SDU-PMBRK)
2
(0.5 – 4 mm
) for copper conductors rated 90°C
2
)
SDU DC Series Instruction Manual • 24
Page 25

WEIGHT & DIMENSIONS
13.0 Battery Module Specications
Net Weight, lb. (kg) 1.65 (0.75)
H x W x D, in. (mm) 4.88 x 3.02 x 4.55 (124 x 76.7 x 116)
SAFETY/APPROVALS
UL60950-1, UL508, FCC Class A; CAN/CSA C22.2 No. 107.1-01, CAN/CSA C22.2
SDU DC UPS System
*The SDU DC UPS system includes a power module (SDU 10-24 or SDU 20-24) and a battery module (SDU 24-BAT or SDU 24-BATEM).
*
No. 60950-1; Low voltage directive: IEC 60950-1 (CB Scheme); Directive 2004/108/
EC: EN 62040-2 Category C2, EN 55022 Class A + A1 + A2, CISPR 22 Class A (2005),
IEC 61000-3-2, IEC 61000-4-2, IEC 61000-4-3, IEC 61000-4-4, IEC 61000-4-5, IEC
61000-4-6 + A1, IEC 61000-4-8, IEC 61000-2-2
Parameter
Nominal Voltage 24 V dc
Protection Fuse: 30 A Circuit Breaker: 24 V, 25 A
Charging Current 0.5 A 0.8 A
Battery Type Sealed, maintenance-free lead acid batteries
Enclosure Type IP20 NEMA 1
Terminal Connector Type Polarized powerpole connectors
Operating Temperature -20°C to +50°C
Charge Temperature 0°C to +40°C
Storage Temperature -20°C to +40°C
Humidity 95%, non-condensing
Typical Recharge Time
(to 90% of full capacity)
Backup Times Refer to tables on page 23
Weight, lbs. (kg) 12 (5.33) 16 (7.26)
Enclosure Dimensions, in. (mm) 4.88 x 8.31 x 4.55 (124 x 211 x 116) 11.5 x 5.57 x 4.57 (292 x 142 x 116)
Mounting
Accessories 1 ft. polarized battery cable 6 ft. polarized battery cable
Safety Standard for SDU DC
UPS System
*The SDU DC UPS system includes a power module (SDU 10-24 or SDU 20-24) and a battery module (SDU 24-BAT or SDU 24-BATEM).
*
SDU 24-BAT SDU 24-BATEM
8 hours for 1 battery module; 24 hours for 2 battery modules; 12 hours for each
Simple snap-on system for DIN rail
TS35/7.5 or TS35/15; or Chassis
mounting brackets (SDU-PMBRK)
UL60950-1, UL508, IEC 60950-1, CAN/CSA C22.2 No. 107-1-01,
Catalog Number
additional battery module
Chassis mounting brackets (SDU-PMBRK)
CAN/CSA C22.2 No. 60950-1
SDU DC Series Instruction Manual • 25
Page 26

14.0 Troubleshooting
Problem Probable Cause Required Action
UPS is OFF or the ON/OFF/Test button
was not pushed for 1+ seconds
UPS is not ON; LED will not light
UPS in Backup Mode and will not
switch to dc input
Backup time is too short
Continuous beep & LED overload
indication
Red LED is ashing
UPS turns off after 5 transfer-tobattery cycles
For further assistance, please contact SolaHD Technical Support at:
(800) 377-4384 U.S.
(847) 268-6651 International
E-mail: tech@solahd.com
Battery voltage is less than 22 V
Load is less than 1.4 A in Backup
Mode
Other failure Call SolaHD Technical Support
Loose dc input power connection Tighten the dc input power connection
Input voltage is too high, too low, or
exceeds the specications
Other failure Call SolaHD Technical Support
Battery is not fully charged Recharge the UPS for at least 8 hours
Other failure Call SolaHD Technical Support
Overload condition
Battery discharged
Battery disconnected Check battery connections
Battery failure Replace the battery
Load short-circuited Remove short-circuited load
Press the ON/OFF/Test button for
more than 2 seconds
Recharge the UPS for at least 8 hours.
If the unit still does not start, check the
input fuse.
Normal condition; disable Green Mode
Adjust dc input voltage to an appropriate level
Remove the overload. Refer to the
output specications.
Recharge the battery for at least 8
hours. Perform UPS self-test.
SDU DC Series Instruction Manual • 26
Page 27

15.0 Storage
15.1 Storage Conditions
16.0 Product Registration & Warranty
• Before storing, charge the UPS for at least 4 hours.
• Store the UPS covered and upright in a cool, dry location, with the battery fully
charged.
• Remove any accessories in the accessory slot and disconnect any cables
connected to the computer interface port to avoid unnecessary draining of the
battery.
15.2 Extended Storage
During extended storage in environments where the ambient temperature is
-20°C to +30°C (+5°F to +86°F), charge the UPS battery every 6 months.
During extended storage in environments where the ambient temperature is +30°C
to +45°C (+86°F to +113°F), charge the UPS battery every 3 months.
16.1 Product Registration
To register your product for updates and information on service and support:
• Visit the Technical Support section of our Web site at:
http://www.solahd.com/support/registration.htm
• Click on the Product Registration link and ll in the form. This will register your
product with SolaHD.
16.2 Warranty Information
Please see “Terms & Conditions of Sale”.
SDU DC Series Instruction Manual • 27
Page 28

Technical Support
U.S.: (800) 377-4384
International: (847) 268-6651
E-mail: www.solahd.com
Part Number: A272-134 Rev 6
September 9, 2008
 Loading...