

Page 1
Plantweb™ Optics v1.5
Plantweb™ Optics System Guide
System Guide
MHM-97911, Rev 10
April 2020
Page 2

Copyright
©
2019 by Emerson. All rights reserved.
No part of this publication may be reproduced, transmitted, transcribed, stored in a retrieval system, or translated into any
language in any form by any means without the written permission of Emerson.
Disclaimer
This manual is provided for informational purposes. EMERSON MAKES NO WARRANTY OF ANY KIND WITH REGARD TO THIS
MATERIAL, INCLUDING, BUT NOT LIMITED TO, THE IMPLIED WARRANTIES OF MERCHANTABILITY AND FITNESS FOR A PARTICULAR
PURPOSE. Emerson shall not be liable for errors, omissions, or inconsistencies that may be contained herein or for incidental or
consequential damages in connection with the furnishing, performance, or use of this material. Information in this document is
subject to change without notice and does not represent a commitment on the part of Emerson. The information in this manual is
not all-inclusive and cannot cover all unique situations.
Patents
The product(s) described in this manual are covered under existing and pending patents.
Where to get help
Emerson provides a variety of ways to reach your Product Support team to get the answers you need when you need them:
Phone
Toll free 800.833.8314 (U.S. and Canada)
+1.512.832.3774 (Latin America)
+63.2 702.1111 (Asia Pacific, Europe, and Middle East)
Email
Web
ap-sms@emerson.com
http://www.emerson.com/en-us/contact-us
To search for documentation, visit http://www.emerson.com.
To view toll free numbers for specific countries, visit http://www.emerson.com/technicalsupport.
2
Page 3

System Guide Contents
MHM-97911, Rev 10
April 2020
Contents
Chapter 1 Introduction.................................................................................................................. 9
Chapter 2 Quick start................................................................................................................... 11
2.1 Preparing for installation................................................................................................................ 11
2.2 Installing Plantweb Optics.............................................................................................................. 11
2.3 Installing optional services..............................................................................................................12
2.4 Installing Push Model ASIs.............................................................................................................. 12
2.5 Completing post-installation steps.................................................................................................14
Chapter 3 Planning your system...................................................................................................17
3.1 Guidelines for planning your system...............................................................................................17
3.2 System components.......................................................................................................................18
3.3 Deployment scenarios....................................................................................................................19
3.3.1 Scenario 1: Two-server setup deployed on four levels..................................................................19
3.3.2 Scenario 2: Two-server setup deployed on three levels................................................................ 22
3.3.3 Scenario 3: One-server setup deployed on three levels................................................................ 24
3.3.4 Scenario 4: One-server setup deployed on two levels.................................................................. 28
3.4 Database deployment.................................................................................................................... 29
3.5 Internet Information Services (IIS).................................................................................................. 31
3.6 System requirements..................................................................................................................... 31
3.7 System scalability........................................................................................................................... 37
Chapter 4 Plantweb Optics security..............................................................................................39
4.1 Firewall considerations................................................................................................................... 39
4.1.1 Ports............................................................................................................................................39
4.2 SSL/TLS certificates.........................................................................................................................42
4.2.1 System components with certificates..........................................................................................44
4.2.2 Certificate installation checklist...................................................................................................45
4.2.3 Install the Plantweb Optics certificate on clients and servers........................................................47
4.2.4 Export the public key certificate for an ASI station....................................................................... 51
4.2.5 Install an ASI Station certificate on clients and servers................................................................. 55
4.3 Additional security considerations..................................................................................................57
Chapter 5 Pre-installation configurations.....................................................................................59
5.1 Configure AMS Machinery Manager before importing databases ...................................................59
5.2 Configure Plantweb Insight before joining to Plantweb Optics........................................................60
Chapter 6 Server installation procedures......................................................................................63
6.1 Install the Plantweb Optics Historian.............................................................................................. 63
6.2 Install Plantweb Optics Web Services..............................................................................................64
6.3 Acquire licenses..............................................................................................................................67
6.4 Register licenses.............................................................................................................................68
Plantweb™ Optics System Guide iii
Page 4

Contents System Guide
April 2020
6.4.1 Manually register an Optics Mobile license when using Azure Mobile Services............................. 69
6.5 View license summary.................................................................................................................... 69
6.6 Install the Connector Service.......................................................................................................... 69
6.7 Install the Proxy.............................................................................................................................. 71
6.8 Configure the Proxy........................................................................................................................73
6.9 Install the Emerson Wireless Gateway ASI.......................................................................................74
6.9.1 Register Emerson Wireless Gateway ASI on Plantweb Optics Server.............................................74
6.9.2 Install the Emerson Wireless Gateway ASI....................................................................................76
6.9.3 Enable secure communication with an Emerson Wireless Gateway............................................. 77
6.10 Install the AMS Asset Monitor ASI................................................................................................. 79
6.10.1 AMS Asset Monitor ASI deployment scenarios........................................................................... 80
6.10.2 Register the AMS Asset Monitor ASI with Plantweb Optics.........................................................81
6.10.3 Install the AMS Asset Monitor Data Collector.............................................................................82
6.10.4 Add an asset source to the AMS Asset Monitor Data Collector................................................... 83
6.11 Install the AMS Device Manager ASI..............................................................................................84
6.11.1 AMS Device Manager ASI deployment scenarios........................................................................85
6.11.2 Register the AMS Device Manager ASI with Plantweb Optics..................................................... 87
6.11.3 Install the AMS Device Manager Data Collector......................................................................... 88
6.11.4 Add an asset source to the AMS Device Manager Data Collector................................................89
6.11.5 Opt-In to Device Parameters..................................................................................................... 90
6.12 Install the DeltaV Control Loop ASI............................................................................................... 93
6.12.1 DeltaV Control Loop ASI deployment scenarios......................................................................... 95
6.12.2 Register the DeltaV Control Loop ASI with Plantweb Optics.......................................................97
6.12.3 Install the DeltaV Control Loop Data Collector...........................................................................97
6.12.4 Add an asset source to the DeltaV Control Loop Data Collector............................................... 100
6.12.5 Change the ControlLoopSvc Windows user password..............................................................101
6.13 Install the KNet ASI..................................................................................................................... 102
6.13.1 KNet ASI deployment scenarios...............................................................................................103
6.13.2 Register the KNet ASI with Plantweb Optics.............................................................................104
6.13.3 Install the KNet Data Collector.................................................................................................105
6.13.4 Add an asset source to the KNet Data Collector.......................................................................106
6.14 Install the Plantweb Insight ASI...................................................................................................107
6.14.1 Register AMS Plantweb Insight ASI on Plantweb Optics Server.................................................108
6.14.2 Install the Plantweb Insight ASI................................................................................................108
6.15 Install the AMS Machinery Manager ASI...................................................................................... 109
6.15.1 Install AMS Machinery Manager ASI components on separate PCs...........................................110
6.15.2 Install AMS Machinery Manager ASI components on a single PC ............................................. 110
6.15.3 Install AMS Machinery Manager ASI web application service....................................................110
6.15.4 Install AMS Machinery Manager ASI IO service......................................................................... 111
6.15.5 Register AMS Machinery Manager ASI on Plantweb Optics Server............................................113
6.16 Install CMMS Interface................................................................................................................114
MHM-97911, Rev 10
iv Plantweb™ Optics System Guide
Page 5

System Guide Contents
MHM-97911, Rev 10
6.17 Install the Plantweb Optics OPC UA Server..................................................................................116
6.18 Configure Active Directory for Plantweb Optics..........................................................................117
6.19 Configure Plantweb Optics OIDC settings...................................................................................118
6.20 Install certificates....................................................................................................................... 119
6.20.1 Install certificates on Windows Server 2008 R2........................................................................123
6.20.2 Export a security certificate..................................................................................................... 124
6.20.3 Import a security certificate.....................................................................................................125
6.21 Connect to OPC server................................................................................................................125
6.22 Configure how emails are sent to Plantweb Optics..................................................................... 125
April 2020
Chapter 7 Client installation procedures.....................................................................................129
7.1 Install the AMS Device Manager Launcher.................................................................................... 129
7.2 Install the AMS Machinery Manager Launcher...............................................................................130
Chapter 8 Mobile installation procedures...................................................................................133
8.1 Install the Plantweb Optics Mobile App ........................................................................................133
Chapter 9 Uninstall Plantweb Optics.......................................................................................... 135
Chapter 10 Upgrade from a previous version................................................................................137
10.1 Plantweb Optics upgrade path................................................................................................... 137
10.2 Upgrade Plantweb Optics...........................................................................................................138
10.3 Upgrade AMS Machinery Manager ASI Web Service....................................................................139
10.4 Upgrade AMS Machinery Manager ASI IO Service........................................................................140
10.5 Execute Machinery Manager ASI Registration on Plantweb Optics Server................................... 140
10.6 Upgrade Emerson Wireless Gateway ASI.................................................................................... 141
10.7 Upgrade AMS Device Manager ASI..............................................................................................141
10.8 Upgrade Plantweb Insight ASI.....................................................................................................143
10.9 Upgrade Plantweb Optics OPC UA server....................................................................................143
10.10 Upgrade AMS Device Manager Launcher.................................................................................. 144
Chapter 11 User Manager.............................................................................................................145
11.1 Add a new user........................................................................................................................... 145
11.2 Delete a user.............................................................................................................................. 146
11.3 Change a user name................................................................................................................... 146
11.4 Disable a user account................................................................................................................146
11.5 Lock a user account.................................................................................................................... 147
11.6 Force a user to log out................................................................................................................ 147
11.7 Edit user login information......................................................................................................... 147
11.8 Reset a user password................................................................................................................ 148
11.9 Refresh the users list...................................................................................................................148
11.10 Export the users list to a .csv file............................................................................................... 149
11.11 Assign permissions and locations to a user............................................................................... 149
11.12 Create a user template............................................................................................................. 150
11.13 Apply a user template...............................................................................................................150
Plantweb™ Optics System Guide v
Page 6

Contents System Guide
April 2020
11.14 Delete a user template............................................................................................................. 151
11.15 Display mobile tokens for a user............................................................................................... 151
11.16 Issue a mobile token.................................................................................................................152
11.17 Disable a mobile token............................................................................................................. 152
11.18 Export the mobile tokens list for all users..................................................................................152
11.19 Register licenses.......................................................................................................................153
11.20 Request a license proposal....................................................................................................... 153
11.21 View Guardian information.......................................................................................................154
11.22 Change user settings................................................................................................................154
11.23 Change password settings........................................................................................................155
11.24 Change lockout settings...........................................................................................................155
11.25 Change OIDC settings.............................................................................................................. 156
11.26 Change language settings........................................................................................................ 157
MHM-97911, Rev 10
Chapter 12 Asset Explorer............................................................................................................ 159
12.1 Join an Emerson Wireless Gateway to Plantweb Optics............................................................... 159
12.2 Add locations to your site........................................................................................................... 161
12.3 Add assets to your site................................................................................................................161
12.4 Add asset source locations......................................................................................................... 162
12.5 Bind an asset source location to a device on the network............................................................162
12.6 Unbind an asset source location from a device on the network...................................................163
12.7 Join an AMS Machinery Manager system to Plantweb Optics...................................................... 164
12.8 Import AMS Machinery Manager databases to Plantweb Optics................................................. 164
12.9 Join a Plantweb Insight system to Plantweb Optics..................................................................... 166
12.10 Rebuild the Plantweb Insight hierarchy ....................................................................................166
Chapter 13 Launch Plantweb Optics utilities.................................................................................169
Chapter 14 Asset View................................................................................................................. 171
14.1 Plantweb Optics Mobile App.......................................................................................................172
14.1.1 Claim a mobile token for Plantweb Optics Mobile App on your device..................................... 172
14.1.2 Set up on-premises mobile service.......................................................................................... 173
14.1.3 Switch Plantweb Optics mobile device relay between Microsoft Azure and on-premises
connection.................................................................................................................................... 174
Chapter 15 Event Viewer utility....................................................................................................175
15.1 View events................................................................................................................................176
15.2 Archive events............................................................................................................................176
Chapter 16 Plantweb Optics OPC UA server ................................................................................. 177
16.1 Manage certificates.................................................................................................................... 177
16.2 Connect an OPC UA client...........................................................................................................177
16.3 Security settings on an OPC UA Server........................................................................................178
16.4 Hierarchy filtering.......................................................................................................................179
16.5 OPC tag information and data tree structure ............................................................................. 180
vi Plantweb™ Optics System Guide
Page 7

System Guide Contents
MHM-97911, Rev 10
April 2020
Chapter 17 CMMS Interface..........................................................................................................183
17.1 Configure CMMS Interface settings............................................................................................ 183
17.2 Map assets to CMMS Interface individually................................................................................. 184
17.3 Map assets to CMMS Interface in bulk.........................................................................................185
17.4 Create CMMS Interface work notifications manually...................................................................185
17.5 Create CMMS Interface work notifications automatically............................................................186
17.6 View CMMS Interface work notifications.....................................................................................187
17.7 Manage undelivered work notifications......................................................................................188
Chapter 18 Plantweb Optics Historian..........................................................................................189
18.1 Plantweb Optics Historian user interface.................................................................................... 189
18.2 Use Latest Values for quick trend charts......................................................................................192
18.3 View asset health using Health Details charts............................................................................. 192
18.4 Enable history collection for multiple assets............................................................................... 192
18.5 Disable history collection for an asset......................................................................................... 193
18.6 Back up trend data..................................................................................................................... 194
Chapter 19 Databases.................................................................................................................. 197
19.1 Back up and restore....................................................................................................................197
19.2 Automatic backup for Tier-1 installations................................................................................... 198
Chapter 20 Troubleshooting........................................................................................................ 199
Appendix A Requirements for separate server (Tier-2) installations...............................................205
A.1 Separate server (Tier-2) installation ............................................................................................. 205
A.2 Set up a separate SQL server for a Tier-2 installation.....................................................................205
A.3 Set up the Plantweb Optics server before a Tier-2 installation.......................................................208
A.4 Tier-2 post-installation setup .......................................................................................................208
A.5 Set up the ASI server before installing the ASI on a Tier-2 system..................................................211
Appendix B Internet Information Services (IIS) Reference..............................................................213
Appendix C Windows services...................................................................................................... 215
Appendix D Device compatibility.................................................................................................. 217
Appendix E Component and system compatibility........................................................................ 219
Appendix F Security compliance................................................................................................... 221
Index .................................................................................................................................. 223
Plantweb™ Optics System Guide vii
Page 8

Contents System Guide
April 2020
MHM-97911, Rev 10
viii Plantweb™ Optics System Guide
Page 9

System Guide Introduction
MHM-97911, Rev 10
April 2020
1 Introduction
Plantweb™ Optics
Plantweb Optics is the Emerson software application for managing asset health across the
enterprise. Plantweb Optics combines the data from multiple applications into assetcentric information, then delivers persona-based alerts and Key Performance Indicators
(KPIs) for improving the reliability of your rotating equipment, instruments, and valves.
The Plantweb Optics asset performance platform improves reliability and availability by
enhancing the visibility to the health of your assets. Experts in your facility are always
connected to assets they care about most. Through open protocols, operational data is
centralized and contextualized from disparate data sources. The data is delivered to your
experts with personalized content and dashboards. Plantweb Optics provides the
information you need in a collaborative environment to enhance your workflow and drive
corrective actions.
Plantweb Optics supports receiving data from a number of asset sources including AMS
Device Manager, AMS Machinery Manager, Emerson WirelessHART gateways, and
Plantweb Insight. In addition, Plantweb Optics interfaces with enterprise CMMS systems
and data can be read from the system via the OPC UA server.
Configuration and interaction with Plantweb Optics happen through these utilities, which
can be launched from a web browser:
• Asset Explorer—access and manage assets in your plant.
• Asset View—send, receive, and view messages in Plantweb Optics.
You can access the same messages from a mobile device by installing the Plantweb
Optics Mobile App.
• User Manager—control and monitor access to various areas of Plantweb Optics.
• Event Viewer—view system generated events.
About this manual
The Plantweb Optics System Guide is intended for system administrators to help plan,
install, and set up the software. Emerson recommends that system administrators
reference this document when setting up the Plantweb Optics system.
™
NOTICE
Installing AMS Machine Works? AMS Machine Works installation information has been
removed from the Plantweb Optics System Guide. Please contact Emerson Product
Support for details.
Other relevant documents
• Plantweb Optics Online Help—provides instructions and reference information for
using Plantweb Optics after installation. This is built into the software and accessed by
clicking in the user toolbar.
• Release Notes—contains what is new and notes pertaining to the release.
Plantweb™ Optics System Guide 9
Page 10

Introduction System Guide
April 2020
MHM-97911, Rev 10
• Knowledge Base Articles—documents released to address known issues, frequently
asked questions, history traces, system requirements, how-to information, and
application-specific content.
10 Plantweb™ Optics System Guide
Page 11

System Guide Quick start
MHM-97911, Rev 10
April 2020
2 Quick start
For an optimum system, follow this recommended installation order for a new system.
Note
Some components must be installed, and some are optional depending on the user's
needs and licensing.
Prerequisites
Emerson recommends that all applications that will be connected to the system should be
configured and running before starting your installation.
2.1 Preparing for installation
Procedure
1. Design and plan your system. See
2. Ensure all of the system requirements are met for the Plantweb Optics server,
Plantweb Optics Asset Source Interface server, and any other required components.
See System requirements.
3. Ensure all security requirements have been met. See Plantweb Optics security.
4. Acquire your Plantweb Optics licenses prior to installation. See Acquire licenses.
Planning your system.
2.2 Installing Plantweb Optics
Note
These steps are required for every Plantweb Optics installation.
Procedure
1. Complete pre-installation steps required before obtaining data from other systems.
See Pre-installation configurations
2. Install Plantweb Optics Historian. Run the Plantweb Optics installer (A48OPTICS-
SYSTEM0.Plantweb_Optics.1.5.X.X) on the Plantweb Optics Server. See Install the
Plantweb Optics Historian.
3. Install Plantweb Optics Web Services by running the Plantweb Optics Installer
(A48OPTICS-SYSTEM0.Plantweb_Optics.1.5.X.X) on the Plantweb Optics Server.
See Install Plantweb Optics Web Services.
4. Register your Plantweb Optics License from the Plantweb Optics User Manager
utility. See Register licenses.
5. View License Summary from the User Manager. See View license summary.
.
Plantweb™ Optics System Guide 11
Page 12

Quick start System Guide
April 2020
MHM-97911, Rev 10
2.3 Installing optional services
Each of the services below are available within Plantweb Optics. Only licensed services
should be installed. Licensed components are displayed in the Plantweb Optics User
Manager utility under the
Procedure
Licenses tab.
1. Register and install all licensed push model ASIs. See
quickly get started. Push model ASIs include:
• AMS Asset Monitor ASI
• AMS Device Manager ASI
• DeltaV Control Loop ASI
• KNet ASI
2. Install the Emerson Wireless Gateway ASI on the ASI server and proceed using the
default settings. See Emerson Wireless Gateway ASI.
3. Install the Plantweb Insight ASI on the ASI server and proceed using the default
settings. See Plantweb Insight ASI.
4. Install the AMS Machinery Manager ASI Web Service on the ASI server. See Install
AMS Machinery Manager ASI web application service.
5. Install the AMS Machinery Manager ASI IO Service on the AMS Machinery
Manager server with default settings. During MMASI IO Services installation, when
prompted for MM Admin Password, enter Emerson#1 or the password set by the
Administrator. See Install AMS Machinery Manager ASI IO service.
6. Install the
7. Install the Plantweb Optics OPC UA Server by running the Plantweb Optics
installer on the Plantweb Optics Server and selecting Plantweb Optics OPC UA
Server. Proceed using the default settings. See Install the Plantweb Optics OPC UA
Server.
CMMS Interface on the CMMS Server. See Install CMMS Interface.
Installing Push Model ASIs to
2.4 Installing Push Model ASIs
Push model ASIs consist of a Data Collector, a Connector Service, and an optional Proxy to
provide asset source data to Plantweb Optics.
Prerequisites
• Plantweb Optics is installed and licensed for the ASIs you want to install.
Procedure
Run registration scripts on Plantweb Optics
1. On the Plantweb Optics server, run the installer for the Data Collector you want to
connect to Plantweb Optics and select the registration option in the installer.
2. In Plantweb Optics, verify the Data Collector folder is listed in the Network tab.
3. Export the Plantweb Optics self-signed security certificate bound to port 443
(configurable default) in IIS: Export a security certificate.
12 Plantweb™ Optics System Guide
Page 13

System Guide Quick start
MHM-97911, Rev 10
April 2020
Install the Connector Service
4. On the server where the Connector Service will be installed, import the Plantweb
Optics self-signed certificate that was previously exported: Import a security
certificate. After importing a certificate, close any open browsers to ensure that the
certificate is applied to your browsing session.
5.
Ensure that the connection to Plantweb Optics is secure by navigating to https://
<OpticsServerMachineName>/AssetExplorer in your web browser.
If the connection is secure, Asset Explorer will appear – proceed to the next step. If
the connection is not secure, a warning will display in your browser – complete the
certificate export-import process again.
6. Install the Connector Service.
7. Ensure the Connector Service is running by navigating to https://
<ConnectorServiceMachineName>/ConnectorService in your web browser
on the Connector Service PC. A web page displaying Connector Service
indicates the connector service is running.
8. Export the Connector Service self-signed certificate bound to port 443
(configurable default) in IIS: Export a security certificate.
(Optional) Install a Proxy and connect it to a Connector Service
9. On the server where the Proxy will be installed, import the Connector Service self-
signed certificate that was previously exported: Import a security certificate. After
importing a certificate, close any open browsers to ensure that the certificate is
applied to your browsing session.
10. Ensure that the connection to the Connector Service is secure by navigating to
https://<ConnectorServiceMachineName>/ConnectorService in your
web browser.
If the connection is secure, Connector Service will display in the top left corner
of the web page – proceed to the next step. If the connection is not secure, a
warning will display in your browser – complete the certificate export-import
process again.
11. Install the Proxy.
12. Ensure the Proxy is running by navigating to https://<ProxyMachineName>/
Proxy in your web browser.
The Proxy UI will appear, indicating the Proxy is running.
13. Export the Proxy self-signed certificate bound to port 443 (configurable default) in
IIS:
Export a security certificate.
(Optional) Install a Proxy and connect it to another Proxy
14.
On the server where the new Proxy will be installed, import the Proxy self-signed
certificate that was previously exported: Import a security certificate. After
importing a certificate, close any open browsers to ensure that the certificate is
applied to your browsing session.
15. Ensure that the connection to the existing Proxy is secure by navigating to
https://<ExistingProxyMachineName>/Proxy in your web browser.
If the connection is secure, the Proxy UI will appear – proceed to the next step. If the
connection is not secure, a warning will display in your browser – complete the
certificate export-import process again.
16. Install the Proxy.
Plantweb™ Optics System Guide 13
Page 14

Quick start System Guide
April 2020
17. Ensure the new Proxy is running properly by navigating to https://
<NewProxyMachineName>/Proxy in your web browser.
The Proxy UI will appear, indicating the Proxy is running.
18.
Export the Proxy self-signed certificate bound to port 443 (configurable default) in
IIS: Export a security certificate.
19. Configure the new Proxy. You must change the routing table of this Proxy to route
incoming requests to point to the next Proxy. In the Proxy user interface, modify the
destination route to https://<ProxyDestinationIP>/Proxy/
ConnectorService/API as described in Configure the Proxy.
Install a Data Collector and connect it to a Connector Service
Note
Multiple Data Collectors can connect to a single Connector Service
20. On the server where the Data Collector will be installed, import the Connector
Service self-signed certificate that was previously exported:
certificate. After importing a certificate, close any open browsers to ensure that the
certificate is applied to your browsing session.
21. Ensure that the connection to the Connector Service is secure by navigating to
https://<ConnectorServiceMachineName>/ConnectorService in your
web browser.
If the connection is secure, Connector Service will display in the top left corner
of the web page – proceed to the next step. If the connection is not secure, a
warning will display in your browser – complete the certificate export-import
process again.
22. Run the Data Collector installer.
Install a Data Collector and connect it to a Proxy
23. On the server where the Data Collector will be installed, import the Proxy selfsigned certificate that was previously exported: Import a security certificate
importing a certificate, close any open browsers to ensure that the certificate is
applied to your browsing session.
24. Ensure that the connection to the Proxy is secure by navigating to https://
<ProxyMachineName>/Proxy in your web browser.
If the connection is secure, the Proxy UI will appear – proceed to the next step. If the
connection is not secure, a warning will display in your browser – complete the
certificate export-import process again.
25. Run the Data Collector installer. When prompted for the Connector Service IP
address or PC name, enter the IP address or PC name of the Proxy.
MHM-97911, Rev 10
Import a security
. After
2.5 Completing post-installation steps
Next, complete some configuration and setup changes before wrapping up your Plantweb
Optics installation.
Procedure
1. Make post-installation configuration changes. These may include:
a) Configure Active Directory for Plantweb Optics. See Configure Active
Directory for Plantweb Optics.
14 Plantweb™ Optics System Guide
Page 15

System Guide Quick start
MHM-97911, Rev 10
April 2020
b) Configure Plantweb Optics OIDC settings. See Configure Plantweb Optics
OIDC settings
.
c) Configure the AMS Device Manager ASI. See Opt-In to Device Parameters.
2. Install certificates. See Install certificates.
3. Launch Asset Explorer and select Add Emerson Wireless Gateway Asset Source
(1420 Wireless Gateway). See Launch Plantweb Optics.
4. Launch Asset Explorer and select Add AMS Machinery Manager ASI Asset Source
to the Plantweb Optics server. See Launch Plantweb Optics.
Launch Asset Explorer and select Add Plantweb Insight Asset Source using IP
5.
Address or Machine Name. See Launch Plantweb Optics.
Run OPC Client (UaExpert) and select Connect to OPC Server. See Connect to OPC
6.
server.
Congratulations, you are now ready to start using Plantweb Optics.
Plantweb™ Optics System Guide 15
Page 16

Quick start System Guide
April 2020
MHM-97911, Rev 10
16 Plantweb™ Optics System Guide
Page 17

System Guide
MHM-97911, Rev 10
3 Planning your system
Plantweb Optics is comprised of different components, and each component has its own
installation that may be deployed on separate computers. Deployment depends on your
network requirements and setup.
Before you install any of the system components, plan your installation using the system
requirements, recommended system deployment scenarios, and the guidelines provided
in this chapter.
Planning your system
April 2020
After designing and planning your system, return to Step 1
topic and continue your installation.
of the Preparing for installation
3.1 Guidelines for planning your system
Procedure
1. Determine the data that you want to bring into Plantweb Optics.
Data can be brought in by the installation of asset source interfaces (ASIs). See
18.
2. Evaluate the systems and assets that you want to integrate into Plantweb Optics.
a) Check if these systems are compatible with Plantweb Optics. See page 217.
b) Check the number of assets, databases, and parameters in the system. See
page 37.
3. Determine your network setup.
Your network setup affects the deployment of the Plantweb Optics components.
See page 19.
4. Determine any network architecture restrictions in your network.
Your network architecture affects whether you can receive messages outside of
your plant's network or not. See page 172 and page 39.
page
5. Determine your database requirements.
The Plantweb Optics database can either reside on the Plantweb Optics server
(Tier-1) or on a separate server (Tier-2). See page 29.
6. Check the system requirements and system capacity recommendations. See page
31 and page 37.
7. Check IIS requirements. See page 31.
8. Plan to integrate security certificate installation with software installation. See page
42.
9. Ensure any systems you plan to interface with Plantweb Optics are ready.
a) Before interfacing with AMS Machinery Manager databases, see page 59 for
important instructions for the system administrator.
10. Determine if you need to read data from Plantweb Optics using an OPC UA client.
There are prerequisites in Asset Explorer before installation. See page 116.
Plantweb™ Optics System Guide 17
Page 18
April 2020
3.2 System components
Plantweb Optics must be installed on a computer with a server-class operating system.
Typically, an ASI installation consists of two parts, installation of the Web Application and
the Service. The Web Applications are recommended to be deployed on a separate server
referred to as the ASI server station.
Client stations access Plantweb Optics utilities from a web browser. They are optionally
installed with AMS Machinery Manager Launcher and AMS Device Manager Launcher.
On a mobile device, the Plantweb Optics Mobile App can be installed to enable users to
send and receive alerts from a mobile device.
Plantweb Optics is comprised of many components, described in the table below.
Tip
Follow the recommended installation and setup order on page 11.
Table 3-1: System components
Component Description
System GuidePlanning your system
MHM-97911, Rev 10
Plantweb Optics Web Services The main software application.
Plantweb Optics is always installed on the Plantweb Optics
server.
Note
Install Plantweb Optics Historian and then Plantweb Optics
Web Services before installing and integrating all other
system components. This is a prerequisite to all other
component installations.
Connector Service Facilitates communication between Plantweb Optics and
Data Collectors.
Proxy Provides secure communication between Data Collectors
and the Connector Service across an arbitrary number of
networks.
Data Collector Gathers data, such as parameter values, asset health, and
events, from a configured asset source to provide to
Plantweb Optics.
Data Collector ASIs:
• AMS Asset Monitor
• AMS Device Manager
• DeltaV Control Loop
• KNet
Computerized Maintenance
Management System (CMMS)
Interface
Plantweb Optics Historian Allows you to view the assets' historical data so that you can
18 Plantweb™ Optics System Guide
Allows you to work with other applications, such as IBM's
Maximo or SAP's Plant Maintenance Module, to keep track of
assets, schedule and track maintenance tasks, and keep
records of the maintenance tasks.
analyze trends in the data.
Page 19

System Guide
MHM-97911, Rev 10
Planning your system
April 2020
Table 3-1: System components
Component Description
Plantweb Optics OPC UA server Allows you to read Plantweb Optics data from an OPC UA
Emerson Wireless Gateway ASI Allows you to connect and display information from an
AMS Machinery Manager ASI Allows you to bring AMS Machinery Manager alerts, data,
Plantweb Insight ASI Allows you to connect and display analytics from Plantweb
AMS Device Manager Launcher Launches AMS Device Manager in context from the Asset
AMS Machinery Manager Launcher Launches AMS Machinery Manager in context from the Asset
(continued)
client.
Emerson Wireless Gateway and from devices on the
gateway.
KPIs, and hierarchy into Plantweb Optics.
The AMS Machinery Manager ASI has two components: the
Service and the Web Application (Web App).
Insight assets.
Explorer utility when AMS Device Manager is installed on the
computer.
AMS Device Manager Launcher must only be installed on an
AMS Device Manager client station.
Explorer utility when AMS Machinery Manager is installed on
the computer.
AMS Machinery Manager Launcher must only be installed on
a computer where an AMS Machinery Manager client is
installed.
Plantweb Optics Mobile App Allows you to display, send, and receive Plantweb Optics
messages and notifications from your mobile device.
Install this on your mobile device.
Important
Emerson recommends installing only the components you are licensed to use.
If you install nonessential components, it will unnecessarily use system resources.
3.3 Deployment scenarios
When determining the type of deployment, equipment, and components for your system,
Emerson recommends these guidelines for performance and scalability:
• Use recommended hardware.
• Use a separate ASI server.
• Install only the components you need.
• Use server-class operating systems.
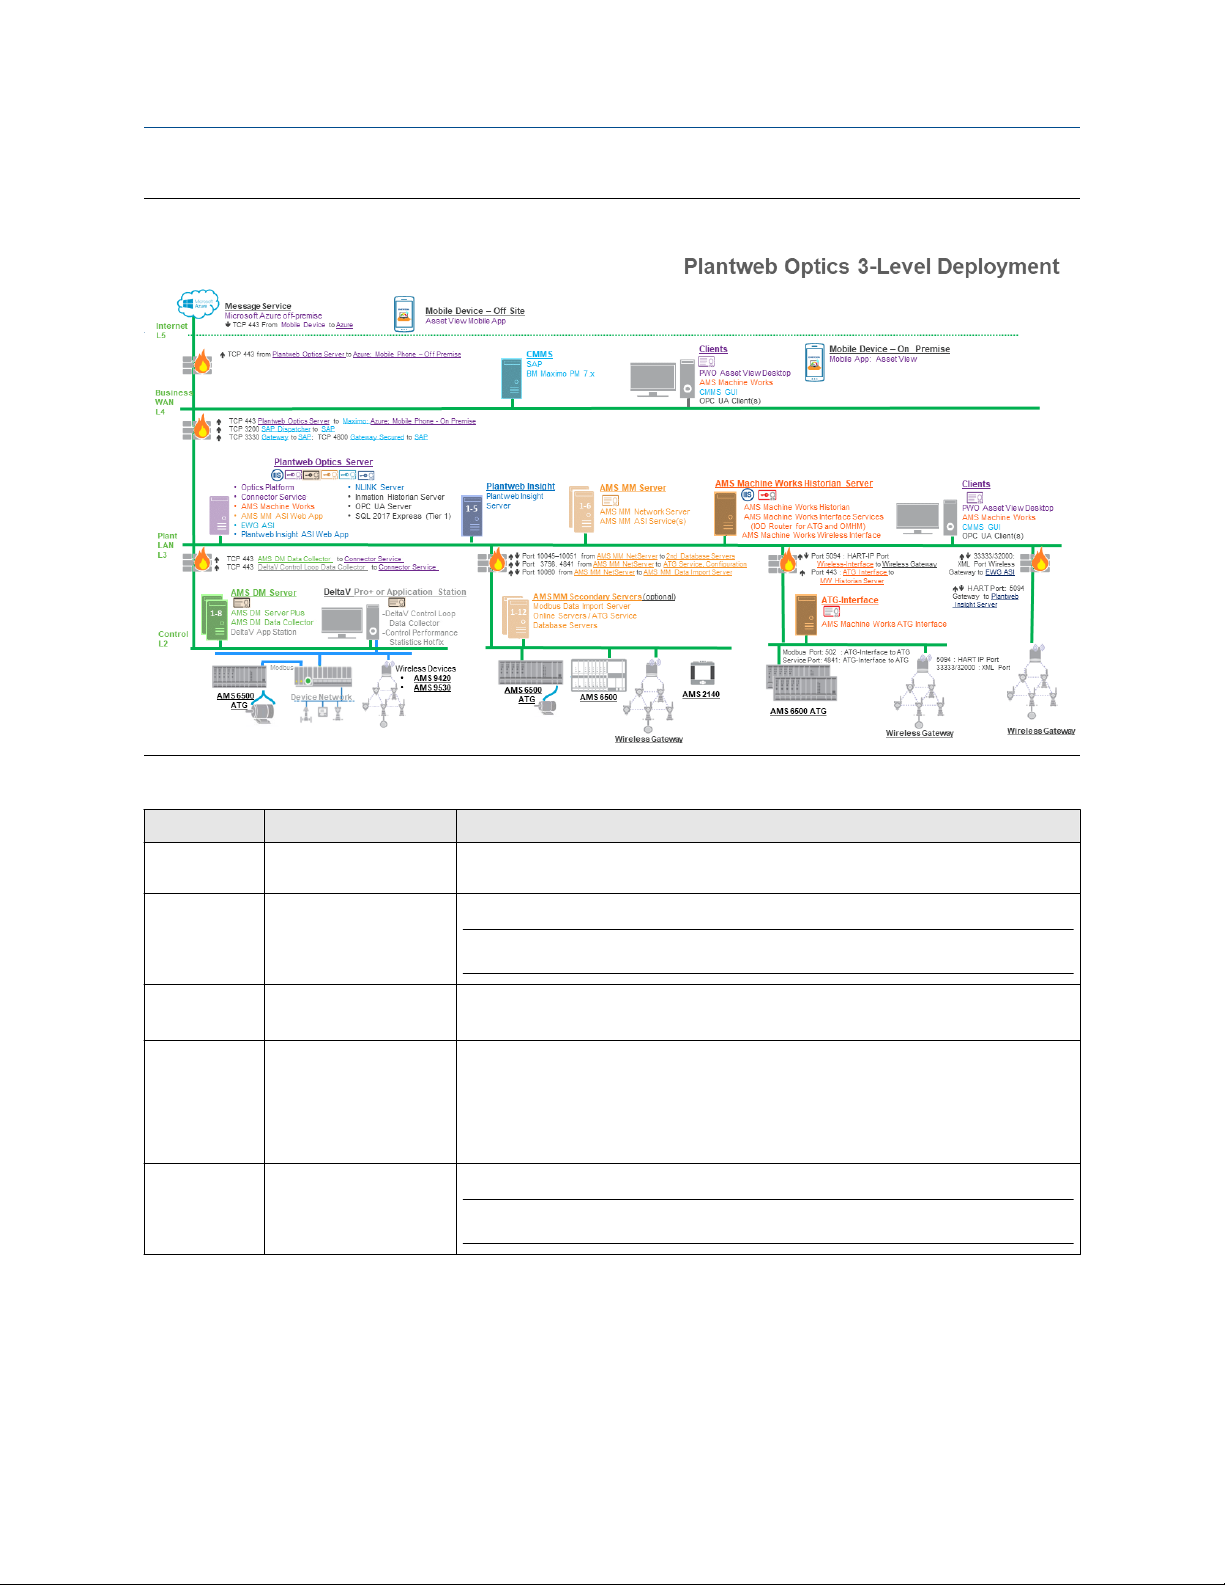
3.3.1 Scenario 1: Two-server setup deployed on four levels
Emerson recommends using a two-server setup for best system performance and high
system capacity.
Plantweb™ Optics System Guide 19
Page 20
April 2020
In this deployment, the Plantweb Optics Server is located on Level 4 and the ASI server is
located on Level 3. Note that components such as SQL Server 2017 Express, OPC UA
Server, NLINK Server, and Plantweb Optics Historian are co-deployed with Plantweb Optics
Server. However, these components can be deployed in a separate machine depending on
the overall system asset count or load. The system diagram and certificate installation
notes are shown below.
Figure 3-1: Scenario 1: Two-server setup deployed on four levels
System GuidePlanning your system
MHM-97911, Rev 10
Table 3-2: Scenario 1: Two-server setup deployed on four levels
Station Component Certificate installation notes
Message
Service
Mobile Device
– Off Site
Plantweb
Optics Server
20 Plantweb™ Optics System Guide
Microsoft Azure off
premises
Asset View Mobile
Application
Plantweb Optics
AMS Machine Works
NLINK Server
Plantweb Optics Historian
OPC UA Server
SQL 2017 Express
None.
None.
Note
You can deploy mobile devices either on premises or off-site, but not both.
Plantweb Optics server certificate with private key is automatically generated during
software installation.
Plantweb Insight ASI certificate allows communication to Plantweb Insight ASI. Install
from a file.
AMS Device Manager ASI certificate allows communication to AMS Device Manager ASI.
Install from a file.
AMS Machinery Manager ASI certificate allows communication to AMS Machinery
Manager ASI. Install from a file.
Emerson Wireless Gateway ASI certificate allows communication to Emerson Wireless
Gateway ASI. Install from a file.
AMS Machine Works certificate allows communication to AMS Machine Works. Install
from a file.
Page 21

System Guide
MHM-97911, Rev 10
Planning your system
April 2020
Table 3-2: Scenario 1: Two-server setup deployed on four levels
Station Component Certificate installation notes
CMMS
Clients
Mobile Device
– On Premises
Plantweb
Optics ASI
Server/
Connector
Service
Plantweb
Insight
AMS
Machinery
Manager
Server
AMS Machine
Works
Historian
Server
AMS Device
Manager
Server
6500 Data
Import Server
(optional)
ATG Interface
SAP
IBM Maximo PM
Plantweb Optics Asset
View Desktop
AMS Machine Works
Vibration Analyzer
CMMS GUI
OPC UA Client(s)
Mobile Application: Asset
View
Connector Service
AMS Machinery Manager
ASI Web Application
Emerson Wireless
Gateway ASI
Plantweb Insight ASI Web
App
Plantweb Insight None.
AMS Machinery Manager
Network Server
AMS Machinery Manager
ASI Service(s)
AMS Machine Works
Historian
AMS Machine Works
Interface Services
(Interface Router for ATG
and OMHM)
AMS Machine Works
Wireless Interface
AMS Device Manager
AMS Device Manager
Data Collector
Modbus Data Import
Server
Online Servers/ATG
Service
AMS Machine Works ATG
Interface
None.
Plantweb Optics server certificate allows communication to Plantweb Optics. Install from
a web browser.
None.
Note
You can deploy mobile devices either on premises or off-site, but not both.
Plantweb Optics server certificate allows communication to Plantweb Optics. Install from
a web browser.
AMS Machinery Manager ASI certificate with private key is generated during ASI
installation.
Emerson Wireless Gateway ASI certificate with private key is generated during ASI
installation.
Plantweb Insight ASI certificate allows communication to Plantweb Insight ASI. Install
from a file.
Plantweb Optics server certificate allows communication to Plantweb Optics. Install from
a web browser.
AMS Machinery Manager ASI certificate allows communication to AMS Machinery
Manager ASI. Install from a file.
None.
AMS Machine Works certificate with private key is generated during ASI installation.
Install from a file.
Data Collector certificate with private key is generated during Data Collector installation.
No action required.
Connector Service certificate allows communication to Connector Service. Install from a
file.
None.
AMS Machine Works certificate allows communication to AMS Machine Works. Install
from a file.
Note
The ATG Interface server typically does not require the Plantweb Optics certificate since it
does not communicate directly with any aspect of Plantweb Optics. However, if the ATG
Machine Works Wireless Interface is on the same server, then it does require the
Plantweb Optics certificate.
(continued)
Plantweb™ Optics System Guide 21
Page 22
April 2020
System GuidePlanning your system
MHM-97911, Rev 10
Table 3-2: Scenario 1: Two-server setup deployed on four levels
Station Component Certificate installation notes
AMS Device
Manager
Client(s)
DeltaV Pro+ or
Application
Station
Proxy Server
None. None.
DeltaV Control Loop Data
Collector
Control Performance
Statistics Hotifx (Pro+
only)
Data Collector Proxy Connector Service certificate allows communication to Connector Service. Install from a
Data Collector certificate with private key is generated during Data Collector installation.
No action required.
Proxy certificate allows communication to the Connector Service. Install from a file.
file.
(continued)
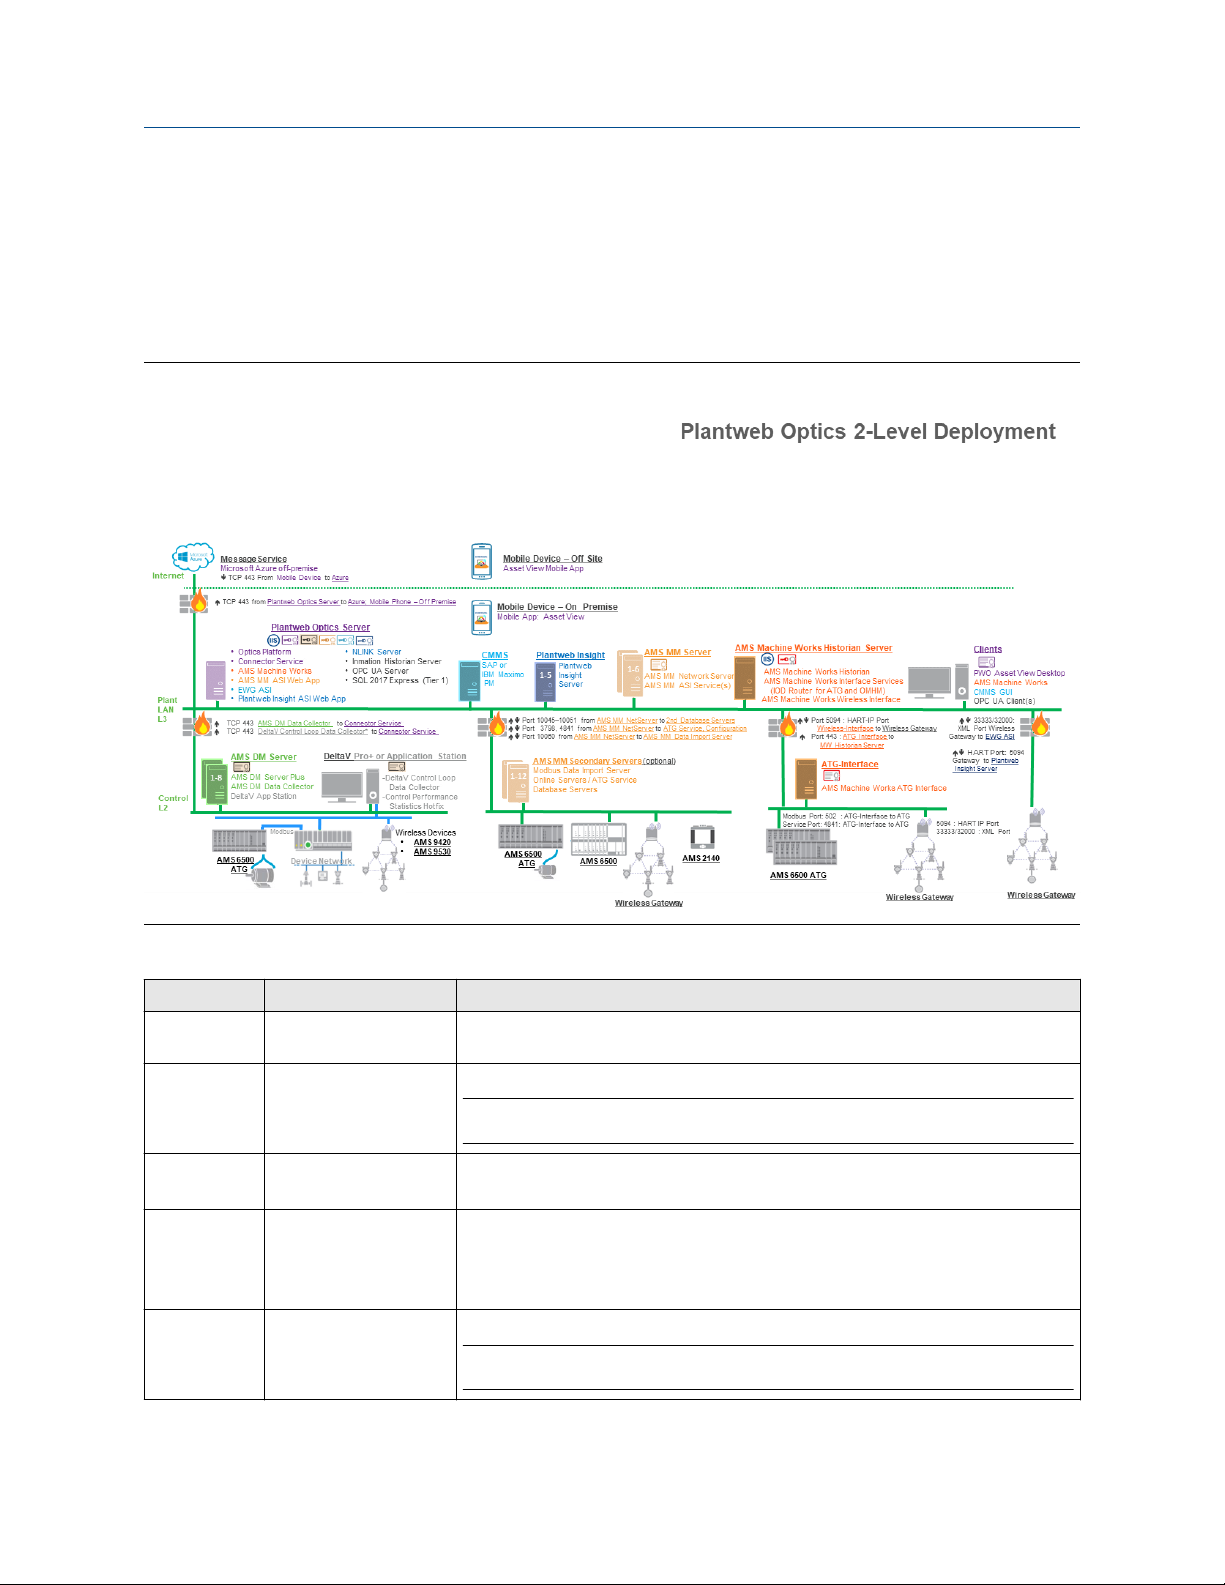
3.3.2 Scenario 2: Two-server setup deployed on three levels
In this deployment, the Plantweb Optics Server is on network Level 4 and the ASI server is
located on network Level 3. Note that components such as SQL Server 2017 Express, OPC
UA Server, NLINK Server, and Plantweb Optics Historian are co-deployed with Plantweb
Optics Server. However, they can be deployed in a separate machine depending on the
overall system asset count or load. The system diagram and certificate installation notes
are shown below.
Figure 3-2: Scenario 2: Two-server setup deployed on three levels
22 Plantweb™ Optics System Guide
Page 23

System Guide
MHM-97911, Rev 10
Table 3-3: Scenario 2: Two-server setup deployed on three levels
Station Component Certificate installation notes
Message
Service
Mobile Device
– Off Site
Microsoft Azure off
premises
Asset View Mobile
Application
None.
None.
Note
You can deploy mobile devices either on premises or off-site, but not both.
Planning your system
April 2020
Plantweb
Optics Server
CMMS
Clients
Mobile Device
– On Premises
Plantweb
Optics ASI
Server/
Connector
Service
Plantweb
Insight
AMS
Machinery
Manager
Server
AMS Machine
Works
Historian
Server
Plantweb Optics
AMS Machine Works
NLINK Server
Plantweb Optics Historian
OPC UA Server
SQL 2017 Express
SAP
IBM Maximo PM
Plantweb Optics Asset
View Desktop
AMS Machine Works
Vibration Analyzer
CMMS GUI
OPC UA Client(s)
Mobile Application: Asset
View
AMS Machinery Manager
ASI Web Application
Emerson Wireless
Gateway ASI
Plantweb Insight ASI Web
App
Connector Service
Plantweb Insight None.
AMS Machinery Manager
Network Server
AMS Machinery Manager
ASI Service(s)
AMS Machine Works
Historian
AMS Machine Works
Interface Services
(Interface Router for ATG
and OMHM)
AMS Machine Works
Wireless Interface
Plantweb Optics server certificate with private key is automatically generated during
software installation.
Plantweb Insight ASI certificate allows communication to Plantweb Insight ASI. Install
from a file.
AMS Machinery Manager ASI certificate allows communication to AMS Machinery
Manager ASI. Install from a file.
Emerson Wireless Gateway ASI certificate allows communication to Emerson Wireless
Gateway ASI. Install from a file.
AMS Machine Works certificate allows communication to AMS Machine Works. Install
from a file.
Plantweb Optics server certificate allows communication to Plantweb Optics. Install from
a web browser.
Plantweb Optics server certificate allows communication to Plantweb Optics. Install from
a web browser.
None.
Note
You can deploy mobile devices either on premises or off-site, but not both.
Plantweb Optics server certificate allows communication to Plantweb Optics. Install from
a web browser.
AMS Machinery Manager ASI certificate with private key is generated during ASI
installation.
Emerson Wireless Gateway ASI certificate with private key is generated during ASI
installation.
Plantweb Insight ASI certificate allows communication to Plantweb Insight ASI. Install
from a file.
None.
AMS Machinery Manager ASI certificate allows communication to AMS Machinery
Manager ASI. Install from a file.
AMS Machine Works certificate with private key is generated during ASI installation.
Install from a file.
Plantweb™ Optics System Guide 23
Page 24

April 2020
System GuidePlanning your system
MHM-97911, Rev 10
Table 3-3: Scenario 2: Two-server setup deployed on three levels
Station Component Certificate installation notes
AMS Device
Manager
Server
AMS
Machinery
Manager
Secondary
Servers
(optional)
ATG- Interface
DeltaV Pro+ or
Application
Station
AMS Device Manager
AMS Device Manager
Data Collector
DeltaV App Station
Modbus Data Import
Server
Online Servers/ATG
Service
Database Servers
AMS Machine Works ATG
Interface
DeltaV Control Loop Data
Collector
Control Performance
Statistics Hotifx (Pro+
only)
Data Collector certificate with private key is generated during Data Collector installation.
No action required.
Connector Service certificate allows communication to Connector Service. Install from a
file.
None.
AMS Machine Works certificate allows communication to AMS Machine Works. Install
from a file.
Note
The ATG Interface server does not require the Plantweb Optics certificate since it does
not communicate directly with any aspect of Plantweb Optics. However, there is one
exception to this. If the ATG Machine Works Wireless Interface is on the same server, then
it does require the Plantweb Optics certificate.
Data Collector certificate with private key is generated during Data Collector installation.
No action required.
Connector Service certificate allows communication to the Connector Service. Install
from a file.
(continued)
3.3.3 Scenario 3: One-server setup deployed on three levels
In this deployment, Plantweb Optics and one or more ASIs are installed on one server on
Level 3. When using only one server, ensure it has a server-class operating system and the
recommended hardware specified in the system requirements. The system diagram and
certificate installation notes are shown below.
24 Plantweb™ Optics System Guide
Page 25
System Guide
MHM-97911, Rev 10
Figure 3-3: Scenario 3: One-server setup deployed on three levels
Planning your system
April 2020
Table 3-4: Scenario 3: One-server setup deployed on three levels
Station Component Certificate installation notes
Message
Service
Mobile Device
– Off Site
CMMS
Clients
Mobile Device
– On Premises
Microsoft Azure off
premises
Asset View Mobile
Application
SAP
IBM Maximo PM
Plantweb Optics Asset
View Desktop
AMS Machine Works
CMMS GUI
OPC UA Client(s)
Mobile Application: Asset
View
None.
None.
Note
You can deploy mobile devices either on premises or off-site, but not both.
None.
Plantweb Optics server certificate allows communication to Plantweb Optics. Install from
a web browser.
None.
Note
You can deploy mobile devices either on premises or off-site, but not both.
Plantweb™ Optics System Guide 25
Page 26

April 2020
System GuidePlanning your system
MHM-97911, Rev 10
Table 3-4: Scenario 3: One-server setup deployed on three levels
Station Component Certificate installation notes
Plantweb
Optics Server
Plantweb
Insight
AMS
Machinery
Manager
Server
AMS Machine
Works
Historian
Server
Clients
AMS Device
Manager
Server
AMS
Machinery
Manager
Secondary
(optional)
ATG Interface
Plantweb Optics
AMS Machine Works
AMS Machinery Manager
ASI Web Application
Emerson Wireless
Gateway ASI
Plantweb Insight ASI Web
App
NLINK Server
Inmation Historian Server
OPC UA Server
SQL 2017 Express
Connector Service
Plantweb Insight Server None.
AMS Machinery Manager
Network Server
AMS Machinery Manager
ASI Service(s)
AMS Machine Works
Historian
AMS Machine Works
Interface Services (IOD
Router for ATG and
OMHM)
AMS Machine Works
Wireless Interface
Plantweb Optics Asset
View Desktop
AMS Machine Works
CMMS GUI
OPC UA Client(s)
AMS Device Manager
Server
AMS Device Manager
Data Collector
Modbus Data Import
Server
Online Servers/ATG
Service
Database Servers
AMS Machine Works ATG
Interface
Plantweb Optics server certificate with private key is automatically generated during
software installation.
AMS Machinery Manager ASI certificate allows communication to AMS Machinery
Manager ASI. Install from a file.
Emerson Wireless Gateway ASI certificate allows communication to Emerson Wireless
Gateway ASI. Install from a file.
Plantweb Insight ASI certificate allows communication to Plantweb Insight ASI. Install
from a file.
AMS Machinery Manager ASI certificate allows communication to AMS Machinery
Manager ASI. Install from a file.
AMS Machine Works certificate with private key is generated during ASI installation.
Install from a file.
Plantweb Optics server certificate allows communication to Plantweb Optics. Install from
a web browser.
Data Collector certificate with private key is generated during Data Collector installation.
No action required.
Connector Service certificate allows communication to the Connector Service. Install
from a file.
None.
AMS Machine Works certificate allows communication to AMS Machine Works. Install
from a file.
Note
The ATG Interface server does not require the Plantweb Optics certificate because it does
not communicate directly with any aspect of Plantweb Optics. However, there is one
exception to this. If the ATG Machine Works Wireless Interface is on the same server, then
it does require the Plantweb Optics certificate.
(continued)
26 Plantweb™ Optics System Guide
Page 27

System Guide
MHM-97911, Rev 10
Planning your system
April 2020
Table 3-4: Scenario 3: One-server setup deployed on three levels
Station Component Certificate installation notes
DeltaV Pro+ or
Application
Station
DeltaV Control Loop Data
Collector
Control Performance
Statistics Hotifx (Pro+
only)
Data Collector certificate with private key is generated during Data Collector installation.
No action required.
Connector Service certificate allows communication to the Connector Service. Install
from a file.
(continued)
Plantweb™ Optics System Guide 27
Page 28
System GuidePlanning your system
April 2020
MHM-97911, Rev 10
3.3.4 Scenario 4: One-server setup deployed on two levels
In this deployment, the Plantweb Optics server is installed on network Level 3 and one or
more ASIs are installed on network Level 2. When using only one server, ensure it has a
server-class operating system and the recommended hardware specified in the system
requirements. The system diagram and certificate installation notes are shown below.
Figure 3-4: Scenario 4: One-server setup deployed on two levels
Table 3-5: Scenario 4: One-server setup deployed on two levels
Station Component Certificate installation notes
Message
Service
Mobile Device
– Off Site
CMMS
Clients
Mobile Device
– On Premises
28 Plantweb™ Optics System Guide
Microsoft Azure off
premises
Asset View Mobile
Application
SAP
IBM Maximo PM
Plantweb Optics Asset
View Desktop
CMMS GUI
OPC UA Client(s)
Mobile Application: Asset
View
None.
None.
Note
You can deploy mobile devices either on premises or off-site, but not both.
Plantweb Optics server certificate allows communication to Plantweb Optics. Install from
a web browser.
Plantweb Optics server certificate allows communication to Plantweb Optics. Install from
a web browser.
None.
Note
You can deploy mobile devices either on premises or off-site, but not both.
Page 29

System Guide
MHM-97911, Rev 10
Planning your system
April 2020
Table 3-5: Scenario 4: One-server setup deployed on two levels
Station Component Certificate installation notes
Plantweb
Optics Server
Plantweb
Insight
AMS Device
Manager
Server
AMS
Machinery
Manager
Server
AMS Machine
Works
Historian
Server
Clients
DeltaV Pro+ or
Application
Station
Plantweb Optics
AMS Machine Works
AMS Machinery Manager
ASI Web Application
Emerson Wireless
Gateway ASI
Plantweb Insight ASI Web
App
NLINK Server
Inmation Historian Server
OPC UA Server
SQL 2017 Express
Connector Service
Plantweb Insight Plantweb Optics server certificate allows communication to Plantweb Optics. Install from
AMS Device Manager
Server
AMS Device Manager
Data Collector
AMS Machinery Manager
Network Server
AMS Machinery Manager
ASI Service(s)
AMS Machine Works
Historian
AMS Machine Works
Interface Services
AMS Machine Works
Wireless Interface
AMS ATG-interface
Plantweb Optics Asset
View Desktop
AMS Machine Works
CMMS GUI
OPC UA Client(s)
DeltaV Control Loop Data
Collector
Control Performance
Statistics Hotifx
Plantweb Optics server certificate with private key is automatically generated during
software installation.
AMS Device Manager ASI certificate allows communication to AMS Device Manager ASI.
Install from a file.
AMS Machinery Manager ASI certificate allows communication to AMS Machinery
Manager ASI. Install from a file.
Emerson Wireless Gateway ASI certificate allows communication to Emerson Wireless
Gateway ASI. Install from a file.
Plantweb Insight ASI certificate allows communication to Plantweb Insight ASI. Install
from a file.
a web browser.
Plantweb Insight ASI certificate allows communication to Plantweb Insight ASI. Install
from a file.
Data Collector certificate with private key is generated during Data Collector installation.
No action required.
Connector Service certificate allows communication to the Connector Service. Install
from a file.
Plantweb Optics server certificate allows communication to Plantweb Optics. Install from
a web browser.
AMS Machinery Manager ASI certificate allows communication to AMS Machinery
Manager ASI. Install from a file.
Plantweb Optics server certificate allows communication to Plantweb Optics. Install from
a web browser.
AMS Machine Works certificate with private key is generated during ASI installation.
Install from a file.
Plantweb Optics server certificate allows communication to Plantweb Optics. Install from
a web browser.
Data Collector certificate with private key is generated during Data Collector installation.
No action required.
Connector Service certificate allows communication to the Connector Service. Install
from a file.
(continued)
3.4 Database deployment
During installation, the system databases are configured and the user performing the
installation is set up as the SQL database administrator.
By default, the user installing the software is set up as the SQL administrator for the
EmersonCSI instance. As a best practice, immediately after installation, work with your IT
Plantweb™ Optics System Guide 29
Page 30

April 2020
System GuidePlanning your system
MHM-97911, Rev 10
department to add a second SQL administrator for the EmersonCSI instance. If there is
only one administrator, and their Windows account becomes deactivated, it will not be
possible to perform maintenance or make changes to the database instance.
The two database installation choices are described in the sections below.
Tier-1 installation
In a Tier 1 installation, the databases are deployed on the same server as the software and
Microsoft SQL Server 2017 Express is automatically during installation. Tier-1 is the default
configuration and represents the typical network server system. Automatic backup
processing is available for this installation. See page 198 for more information.
• Check Windows Programs and Features to verify that Microsoft SQL Server is not
currently installed. During default installation, Microsoft SQL Server 2017 Express is
automatically installed and configured for Plantweb Optics.
Note
There is a 10 GB database limit on Microsoft SQL Server 2017 Express. Consider this
limitation when deciding your database setup.
• The EmersonCSI named instance is automatically created with the Plantweb Optics
installation when there is no existing Microsoft SQL Server installation.
• If Microsoft SQL Server is currently installed, create the EmersonCSI named instance
before beginning the Plantweb Optics installation. The user installing Plantweb Optics
should be a system administrator for the EmersonCSI named instance.
• The EmersonCSI named instance needs to be set up for mixed authentication—
Windows and SQL accounts.
• If you are manually installing SQL Server 2017 Express, make sure the account running
the SQL Server setup has rights to back up files and directories, rights to manage
auditing and security log, and rights to debug programs. See Troubleshooting.
Tier-2 installation
In a Tier 2 installation, the databases are deployed on a separate server where Microsoft
SQL Server 2017 is already installed. A Tier-2 installation requires specific server
configuration and database management by a database administrator. Automatic backup
processing is not available for this installation; the database, including backups, should be
managed by a database administrator. See page 205 for more information.
• The database must be Microsoft SQL Server 2017.
• Create the EmersonCSI named instance before beginning the Plantweb Optics
installation. The user installing Plantweb Optics should be a system administrator for
the EmersonCSI named instance.
• The EmersonCSI named instance needs to be set up for mixed authentication—
Windows and SQL accounts.
• Enable TCP/IP protocol for EmersonCSI SQL Server Network Configuration.
• Ensure the SQL Browser service is running and set it to auto-start.
30 Plantweb™ Optics System Guide
Page 31

System Guide
MHM-97911, Rev 10
3.5 Internet Information Services (IIS)
• During default installation, IIS is automatically installed and configured to use the
Default Site (port 80 and 443).
• If port 80 and 443 are already in use by a previous installation of IIS, you can delete the
Default Site (if unused) or configure it to use other ports. See page 199 for instructions.
• You can also use non-default ports if your existing system and network requires it. Your
network administrator must configure firewall rules to allow traffic to pass through the
non-default ports. It is best practice to use ports above 1024 and to use non-restricted
ports.
3.6 System requirements
After ensuring that all of the following system requirements are met, return to Step 2 of
the Preparing for installation topic and continue your installation.
Plantweb Optics server requirements
Planning your system
April 2020
Operating system
CPU architecture
Internet Information
Services (IIS)
Microsoft SQL Server
Browsers
Processor
Memory
Hard drive
Available disk space
Windows Server 2016 Datacenter
Windows Server 2016 Standard
Windows Server 2012 R2 Datacenter
Windows Server 2012 R2 Standard
64-bit
v8.5, v10 (supplied with OS)
MS SQL Server 2017 (recommended)
MS SQL Server 2017 Express Edition (supported)
Google Chrome (latest version)
Internet Explorer v11 or later (supported)
3.2 GHz, 8-core processor, Intel Xeon-scalable (Gold) or faster
(recommended)
2.4 GHz, 4-core processor, Intel Xeon-scalable (Gold) or faster
(minimum)
32 GB (recommended)
16 GB (minimum)
SSD hard drive (recommended)
SAS hard drive (10K RPM) (minimum)
100 GB (minimum)
Screen resolution
Network
Plantweb™ Optics System Guide 31
Full HD (1920 x 1080 pixels) (maximum)
SXGA (1280 x 1024 pixels) (minimum)
2 x 1 GB NIC (use 2 NICs to isolate Tier 3 traffic from Tier 2 traffic)
(recommended)
1 x 1 GB NIC (supported)
Page 32

April 2020
System GuidePlanning your system
MHM-97911, Rev 10
Inmation Historian/OPC UA Server Station
Operating system
CPU architecture
Internet Information
Services (IIS)
Microsoft SQL Server
Browsers
Processor
Memory
Hard drive
Available disk space
Screen resolution
Network
Windows Server 2016 Datacenter
Windows Server 2016 Standard
Windows Server 2012 R2 Datacenter
Windows Server 2012 R2 Standard
64-bit
v8.5, v10 (supplied with OS)
MS SQL Server 2017 Express Edition
Google Chrome (latest version)
Internet Explorer v11 or later (supported)
2.4 GHz, 4-core processor, Intel Xeon-scalable (Gold) or faster
32 GB (recommended)
SAS hard drive (10K RPM)
100 GB (minimum)
Full HD (1920 x 1080 pixels) (maximum)
SXGA (1280 x 1024 pixels) (minimum)
2 x 1 GB NIC (use 2 NICs to isolate Tier 3 traffic from Tier 2 traffic)
(recommended)
1 x 1 GB NIC (supported)
NLINK Server
Operating system
CPU architecture
Internet Information
Services (IIS)
Microsoft SQL Server
Browsers
Processor
Memory
Hard drive
Available disk space
Screen resolution
Windows 10 Pro
Windows Server 2016 Datacenter
Windows Server 2016 Standard
Windows Server 2012 R2 Datacenter
Windows Server 2012 R2 Standard
64-bit
v8.5, v10 (supplied with OS)
MS SQL Server 2017 Express Edition
Google Chrome (latest version)
Internet Explorer v11 or later (supported)
2.2 GHz, 4-core processor, Intel Xeon-scalable or faster
4 GB
SAS hard drive (10K RPM)
100 GB
Full HD (1920 x 1080 pixels) (maximum)
SXGA (1280 x 1024 pixels) (minimum)
32 Plantweb™ Optics System Guide
Page 33

System Guide
MHM-97911, Rev 10
Planning your system
April 2020
Network
1 x 1 GB NIC
Plantweb Optics Client Station
Operating system
CPU architecture
Processor
Memory
Hard drive
Available disk space
Browsers
Screen resolution
Windows Server 2016 Standard
Windows Server 2012 R2 Standard
Windows 10 Pro
64-bit
2.2 GHz, 4-core processor
Intel Xeon, Intel Core i5 6th Gen (i5 6400T) or better
4 GB
SAS hard drive (10K RPM)
100 GB
Google Chrome (latest version)
Internet Explorer v11 or later (supported)
4K UHD (3840 x 2160 pixels) (maximum)
SXGA (1280 x 1024 pixels) (minimum)
OPC UA Client Station
Operating system
Windows Server 2016 Standard
Windows Server 2012 R2 Standard
Windows 10 Pro
CPU architecture
Processor
Memory
Hard drive
Available disk space
Browsers
Screen resolution
Third party applications
64-bit
2.2 GHz, 4-core processor
Intel Xeon, Intel Core i5 6th Gen (i5 6400T) or better
4 GB
SAS hard drive (10K RPM)
100 GB
Google Chrome (latest version)
Internet Explorer v11 or later (supported)
4K UHD (3840 x 2160 pixels) (maximum)
SXGA (1280 x 1024 pixels) (minimum)
OPC UA Experts
Integration Objects
Prosys
Plantweb™ Optics System Guide 33
Page 34

April 2020
System GuidePlanning your system
MHM-97911, Rev 10
Proxy or Connector Service Requirements
Operating system
CPU architecture
Processor
Memory
Hard Drive
Available disk space
Internet Information
Services (IIS)
Network
ASI server requirements
Operating system
Windows Server 2016 Datacenter
Windows Server 2016 Standard
Windows Server 2012 R2 Datacenter
Windows Server 2012 R2 Standard
Windows 10 Pro
Windows 10 Enterprise
Windows 10 IoT Enterprise 2016 LTSB (64-bit)
x64
2.4 GHz, 4-core processor or faster
16 GB (recommended)
8 GB (minimum)
SAS Hard Drive (10K RPM)
100 GB
v8.5, v10 (supplied with OS)
1 x 1GB NIC
Windows Server 2016 Standard
Windows Server 2012 R2 Standard
CPU architecture
Processor
Memory
Available disk space
Additional specifications
Ethernet
Internet connectivity
Supported virtualization
Software
x64
2.4 GHz, 4-core processor or faster
16 GB (recommended)
8 GB (minimum)
150 GB
One or more Ethernet ports
An internet connection is required to download installations and
patches, register software, and receive alerts and messages on the
mobile application.
• VMware 6
• Hyper-V 2012
Microsoft .NET 3.5, SP1
Microsoft .NET Framework 3.5 is required to install Plantweb
Optics. See KBA NK-1600-0300 for instructions.
34 Plantweb™ Optics System Guide
Page 35

System Guide
MHM-97911, Rev 10
Planning your system
April 2020
Supported antivirus
software
• Symantec™ Endpoint Protection
• McAfee™ Endpoint
• Norton™ Security with Backup
Notes
Computers with Plantweb Optics components installed must have:
• system clocks synchronized.
• date/time in the same 12-hr or 24-hr format.
System clock discrepancies can block communication. (Many third-party tools are
available to synchronize system clocks.) System clocks do not need to be synchronized for
Mobile applications or PCs with browser-only access.
Anti-virus exclusion list
To optimize performance, it is recommended to exclude the following applications, files,
and extensions in the anti-virus software.
Component Item Path (default locations)
Applications
(*.exe)
Program Files C:\EMERSONCSI\*
Optics Web
C:\Windows\System32\inetsrv\w3wp.exe
C:\Windows\SysWOW64\inetsrv\w3wp.exe
C:\Program Files (x86)\Emerson\*
C:\inetpub\wwwroot\EmersonCSI\*
SQL
Inmation
Junot (NLINK)
Log files C:\inetpub\wwwroot\EmersonCSI\Logs\*
C:\inetpub\wwwroot\EmersonCSI\WebLogs\*
Cachecow C:\Windows\Temp\ARES\Cache\*
Applications
(*.exe)
Program Files C:\Program Files (x86)\Microsoft SQL Server\*
Applications
(*.exe)
Program files C:\inmation.root\*
Applications
(*.exe)
Program files C:\Program Files\Junot Systems\*
C:\Program Files\Microsoft SQL Server
\MSSQL14.EMERSONCSI\MSSQL\Binn\sqlservr.exe
C:\Program Files\Microsoft SQL Server\*
C:\inmation.root\bin\inmation.exe
C:\inmation.root\webapi\inmationWebAPI.exe
C:\inmation.root\MongoDB\bin\mongod.exe
C:\inmation.root\MongoDB\bin\mongo.exe
C:\Program Files\Junot Systems\NLINK Modules\NLINK
Management Module.exe
C:\Program Files\Junot Systems\NLINK Server\NLINK.exe
Plantweb™ Optics System Guide 35
Page 36

April 2020
System GuidePlanning your system
MHM-97911, Rev 10
Component Item Path (default locations)
Applications
(*.exe)
OPC UA
Program files C:\Program Files (x86)\Emerson\Plantweb Optics OPC UA
File extensions File extensions bak, bcp, c, cft, chk, cmtx, csv, dll, dri, edb, idx, jrs, ldf, log,
AMS MM ASI IO
Interface
Windows Windows
Applications
(*.exe)
exclusion for
Windows Update
C:\Program Files (x86)\Emerson\Plantweb Optics OPC UA
Server\OPCUA\Emerson.Opc.Ua.Server.exe
C:\Program Files (x86)\Emerson\Plantweb Optics OPC UA
Server\OPCUA\sqlite3.exe
C:\Program Files (x86)\Emerson\Plantweb Optics OPC UA
Server\OPCUA\Emerson.OPC.UA.Server.Tool.exe
Server\
mdf, ndf, obj, out, pdb, pol, prc, pre, sch, sql, sqlaudit, sdb,
trc, trg, trn, xel, xem, xml
C:\RBMNET\RBMsuite\sys\ IOService\
Emerson.CSI.MMASI.IOService.exe
C:\Windows\SoftwareDistribution\DataStore\*
C:\Windows\System32\GroupPolicy\User\*
C:\Windows\System32\GroupPolicy\Machine\*
Mobile client requirements
iOS iOS 11.3 or later with Safari
Android 8.0 (Oreo) or later with Chrome
Memory 2 GB (minimum)
Internal memory 64 GB
Screen resolution 750 x 1334 pixels (minimum)
1440 x 2960 pixels (maximum)
Communications WLAN—802.11 a/b/g/n/ac
Network 4G network or higher
Tablet client requirements
iOS iOS 11.3 or later with Safari
Android 8.0 (Oreo) or later with Chrome
Memory 2 GB (minimum)
Internal memory 64 GB
Screen resolution 1668 x 2224
1536 x 2048
Communications WLAN—802.11 a/b/g/n/ac
Network 4G network or higher
36 Plantweb™ Optics System Guide
Page 37

System Guide
MHM-97911, Rev 10
3.7 System scalability
The system is scalable, supporting up to the following maximums based on the system
components, deployment type, hardware, and operating system specifications. Use the
tables below as a guide to help you select the best server setup for your expected system
scale.
Table 3-6: Plantweb Optics scalability
Planning your system
April 2020
Setup 1: Three-server setup recommended
Components
Server specifications
Plantweb Optics
ASI Web
Assets
Historized assets
Configured users
Concurrent users
AMS Asset Monitor Data Collector
CHARMs
AMS Device Manager Data Collector
Devices
DeltaV Control Loop Data Collector
Plantweb Optics server
ASI server/Connector Service
Plantweb Optics Historian Server, OPC UA
Server
1 Emerson Wireless Gateway ASI
1 AMS Machinery Manager ASI
1 Plantweb Insight ASI
20,000 20,000
20,000 10,000
25 total users 25 total users
10 5
3072 3072
10,000 10,000
hardware
Setup 2: Two-server setup recommended
hardware
Plantweb Optics server
ASI server/Connector Service
1 Emerson Wireless Gateway ASI
1 AMS Machinery Manager ASI
1 Plantweb Insight ASI
Control Loops
KNet Data Collector
Assets
Emerson Wireless Gateway ASI
ASIs
Devices
AMS Machinery Manager ASI
ASIs
Offline databases,
machines,
parameters
Plantweb™ Optics System Guide 37
5,000 5,000
2,000 2,000
1 (Up to 20 Emerson Wireless Gateways) 1 (Up to 20 Emerson Wireless Gateways)
500 500
1 (Up to 6 AMS Machinery Manager Network
Servers per ASI)
50 databases or 10,000 machines
1,000,000 parameters
1 (Up to 6 AMS Machinery Manager Network
Servers per ASI)
50 databases or 10,000 machines
1,000,000 parameters
Page 38

April 2020
System GuidePlanning your system
MHM-97911, Rev 10
Table 3-6: Plantweb Optics scalability
Setup 1: Three-server setup recommended
Components
Online inputs,
parameters
Plantweb Insight ASI
ASIs
Assets
OPC UA
OPC UA Deployment
Number of Assets
Number of Total
Monitored Tags
Number of Clients
10 AMS 6500 Prediction units
50 AMS 6500 ATG units
40 AMS 9420s
15,000 total parameters
1 (up to 5 Plantweb Insight Servers per ASI) 1 (up to 5 Plantweb Insight Servers per ASI)
350 per asset source or 1,000 assets total 350 per asset source or 1,000 assets total
UA Server and Plantweb Optics Server
deployed separately
2,000 assets 1,000 Assets
8,000 Monitored Tags 4,000 Monitored Tags
5 Clients 2 Clients
Maximum concurrent users
(continued)
hardware
Setup 2: Two-server setup recommended
hardware
10 AMS 6500 Prediction units
50 AMS 6500 ATG units
40 AMS 9420s
15,000 total parameters
OPC UA Server and Plantweb Optics Server on
same machine
Configured users
Mobile device users
Plantweb Optics
concurrent users
Users configured in the User Manager utility.
Users issued with mobile tokens.
Users accessing the Plantweb Optics utilities and users using the
Plantweb Optics Mobile App.
Each browser session a user has open counts in the concurrent
user's total.
Tip
For optimum system performance, close any unused browser
sessions.
38 Plantweb™ Optics System Guide
Page 39

System Guide
MHM-97911, Rev 10
4 Plantweb Optics security
After verifying all of the security and communication requirements below are met, return
to Step 3 of the Preparing for installation portion of the Quick start chapter and continue
your installation.
4.1 Firewall considerations
Plantweb Optics components require firewall exceptions for a user-defined port. Port 443
is used by default.
Before installing the Plantweb Optics components, ensure you have the firewall
exceptions set in place for each computer with ASI Web Applications. See Deployment
scenarios to determine which servers need the firewall exceptions. Obtain the DNS names
and IP addresses of the computers, and the ports that need to be open between them.
Plantweb Optics requires other ports for communication. See page 39 for more
information. Your IT department will determine what, if any, intermediary firewall also
needs the exceptions.
Plantweb Optics security
April 2020
Note
Before installing an ASI, you must have TCP/IP ports configured to allow communication
between all ASI components in addition to opening any required firewall ports. See Ports
for more information.
Firewall Considerations for Connector Service and Proxy Deployment
If any components are separated by a firewall, you must configure the firewall to allow
communication on port 443 (default) or the port configured during component
installation.
Firewall Considerations for Data Collector Deployments
If a Data Collector is separated by a firewall, you must configure the firewall to allow
communication on port 443 (default) or the port configured during installation.
Firewall considerations for Plantweb Insight ASI deployment
If the Plantweb Insight ASI and the Plantweb Insight System are separated by a firewall,
configure the firewall to allow communication on port 443. Ports 443 and 80 need to be
open if the Plantweb Insight ASI and Plantweb Optics are separated by a firewall.
Firewall considerations for AMS Machinery Manager ASI deployment
If the AMS Machinery Manager ASI Service and Web App are separated by a firewall,
configure the firewall to allow communication on port 443 and port 80. The same firewall
ports need to be open if the AMS Machinery Manager ASI Web App and Plantweb Optics
are separated by a firewall.
4.1.1 Ports
These ports must be available and need to be open through firewalls.
Plantweb™ Optics System Guide 39
Page 40

April 2020
System GuidePlantweb Optics security
MHM-97911, Rev 10
Below are the ports and firewall configurations that need to be configured for SQL Server,
Plantweb Optics, and ASI server stations for a Tier-2 database server deployment.
Table 4-1: Ports and firewall rule on SQL Server station
Item Direction Firewall rule
Distributed Transaction
Coordinator (RPC)
Distributed Transaction
Coordinator (RPC-EPMAP)
Distributed Transaction
Coordinator (TCP-In)
EMERSONCSI SQL instance TCP
port
UDP Port 1434 Inbound / Outbound SQL browser
TCP Port 1433 Inbound / Outbound SQL
Inbound Predefined firewall in Server
2012 R2
Inbound Predefined firewall in Server
2012 R2
Inbound Predefined firewall in Server
2012 R2
Inbound / Outbound SQL
Table 4-2: Ports and firewall rule on Plantweb Optics and ASI Server stations
Item Direction Firewall rule
EMERSONCSI SQL instance TCP
port
UDP Port 1434 Inbound / Outbound SQL browser
TCP Port 1433 Inbound / Outbound SQL
Inbound / Outbound SQL
Table 4-3: Ports used by Plantweb Optics Server
Item Direction
TCP 443 (default, configurable) HTTPS, bidirectional
TCP 139 SQL Server
TCP 445 SQL Server—Filestream
TCP 135 Remote Procedure Call
Microsoft Distributed Transaction Coordinator
Microsoft Message Queue
TCP 1801 Microsoft Message Queue
TCP 4840 OPC
Table 4-4: Ports used by Connector Service
Item Direction Notes
TCP 443 (default, configurable) Outbound Connector Service to Plantweb
Optics
TCP 443 (default, configurable) Inbound Proxy or Data Collector to
Connector Service
40 Plantweb™ Optics System Guide
Page 41

System Guide
MHM-97911, Rev 10
Plantweb Optics security
April 2020
Table 4-5: Ports used by Proxy
Item Direction Notes
TCP 443 (default, configurable) Outbound Proxy to Connector Service
TCP 443 (default, configurable) Inbound Data Collector/Proxy to Proxy
Table 4-6: Ports used by Emerson Wireless Gateway ASI
Item Direction Notes
TCP 443 (default, configurable) Inbound Emerson Wireless Gateway ASI
to Plantweb Optics
TCP 33333 Bidirectional, secure
connection
TCP 32000 Bidirectional, default
connection
Wireless Gateways to Emerson
Wireless Gateway ASI
Wireless Gateways to Emerson
Wireless Gateway ASI
Table 4-7: Ports used by AMS Asset Monitor Data Collector, AMS Device Manager
Data Collector, DeltaV Control Loop Data Collector, and KNet Data Collector
Item Direction Notes
TCP 443 (default, configurable) Outbound Data Collector to Connector
Service or Proxy
Table 4-8: Ports used by AMS Machinery Manager ASI
Item Direction Notes
TCP 443 (default, configurable) Inbound AMS Machinery Manager ASI to
Plantweb Optics Web Services
Table 4-9: Ports used by Plantweb Insight ASI
Item Direction Notes
443 (default, configurable) Bidirectional Plantweb Insight ASI to
Plantweb Optics Web Services
443 (default, configurable) Bidirectional Plantweb Insight to Plantweb
Insight ASI
Table 4-10: Ports used by Inmation Historian
Item Direction Notes
TCP 27017 Bidirectional Mongo DB (default)
TCP 6510-6514 (default,
configurable)
TCP 8002 (default,
configurable)
Plantweb™ Optics System Guide 41
Bidirectional Core Service, Connector
Service, Relay Service
Bidirectional Web Service
Page 42

Plantweb Optics security
April 2020
Table 4-11: Ports used by CMMS Interface (SAP PM, IBM Maximo PM)
Item Direction Notes
TCP 443 Bidirectional Plantweb Optics to NLINK
TCP 443 Outbound • NLINK (CMMS-MW) to
TCP 3200 (3200–3299) Outbound Dispatcher, CMMS GUI to
TCP 3300 (3300–3399) Outbound Gateway to CMMS (SAP-PM)
TCP 4800 (4800–4899) Outbound Gateway-secured to CMMS
System Guide
MHM-97911, Rev 10
(CMMS-MW)
CMMS (IBM Maximo PM)
• CMMS GUI to CMMS (IBM
Maximo PM)
• NLINK Server
CMMS (SAP PM)
1 TCP port on this range
1 TCP port on this range
TCP 3260, 3360 Outbound NLINK to CMMS (SAP ECC 6.0)
Table 4-12: Ports used by Plantweb Optics Mobile App (via Azure)
Item Direction Notes
TCP 443, non-configurable Outbound TCP 443 outbound to
4.2 SSL/TLS certificates
Secure Sockets Layer (SSL)/Transport Layer Security (TLS) is required for all web
communications. The following sections describe which components require certificates,
examples of deployments with certificates, and basic instructions to export and import
certificates. However, Emerson recommends working with qualified IT personnel to
ensure your installation complies with your plant's network security policy and industry
best practices.
SSL/TLS allows applications to establish a secure communication between web servers and
web browsers.
browsers using SSL/TLS certificates. Each server is identified by a private key. If the client
has the public key, it can connect securely to the server. In the example, the servers can
communicate with each other. The client is only allowed to connect to Server 1. It does
not have a certificate for Server 2.
Figure 4-1 shows an example relationship between web servers and
*.azurewebsites.net should be
open to the internet for the
Plantweb Optics Mobile App to
work.
42 Plantweb™ Optics System Guide
Page 43

System Guide
MHM-97911, Rev 10
Plantweb Optics security
April 2020
Figure 4-1: Example web servers and browsers using SSL/TLS certificates
Note
SSL/TLS requires TCP port 443.
During the Plantweb Optics installation, certificates are automatically generated and
installed for components that use web applications. The certificate is unique to the server.
The
private key certificate must be kept safe on the server. Never export (or share) the
private key certificate. Only share the public key with any computers in your network
that need to connect to the server.
Plantweb™ Optics System Guide 43
Page 44

April 2020
4.2.1 System components with certificates
Each computer communicating with an ASI Web Application, Connector Service, or Proxy
must exchange public key certificates. The table below shows which components of
Plantweb Optics have certificates. See Install certificates for certificate installation
instructions.
Table 4-13: System Components with Certificates
Component Certificate
Plantweb Optics Server OPTICS1.5
Connector Service ConnectorService
Proxy Proxy
Emerson Wireless Gateway ASI AMSEWG1.5
AMS Asset Monitor Data Collector AMS Asset Monitor Data Collector
AMS Device Manager Data Collector AMS Device Manager Data Collector
DeltaV Control Loop Data Collector DeltaV Control Loop Data Collector
System GuidePlantweb Optics security
MHM-97911, Rev 10
KNet Data Collector KNet Data Collector
AMS Machinery Manager ASI Web Application AMSMMASI1.5
Plantweb Insight ASI INSIGHTASI
Inmation Historian Not applicable.
Junot NLINK Server Not applicable. Supports SSL certificates.
The Certificates Deployment table lists each security certificate and the servers where
the listed certificate must be installed.
Table 4-14: Certificates Deployment
Certificate
Name
OPTICS1.5 Yes Yes Yes Yes No No
Connector
Service
Proxy No No No No Yes* Yes*
AMSEWG1.5 Yes Yes No Yes No No
AMSMMASI1.5Yes Yes No Yes No No
INSIGHTASI Yes Yes No Yes No
Plantweb
Optics PC
No No N/A No Yes* Yes*
ASI Server Connector
Service PC
Clients Proxy PC Data
Collector PC
AMSMWHIS
T1.5
AMSMWWI
ODI1.5
AMSMWIOD
R1.5
44 Plantweb™ Optics System Guide
Yes Yes No No No No
Yes Yes No No No No
Yes Yes No No No No
Page 45

System Guide
MHM-97911, Rev 10
Plantweb Optics security
April 2020
* indicates certificate installation is dependent on your network configuration. Note that:
• The Proxy requires the certificate of the component it directly sends data to. A Proxy
requires either the Connector Service or Proxy certificate, depending on which
component the Proxy communicates directly with.
• A Data Collector requires the certificate of the component it directly sends data to. A
Data Collector requires either a Connector Service or Proxy certificate, depending on
which server the Data Collector communicates directly with.
In deployments such as in the Level 4 network diagram, the Web Application is installed on
a separate computer than the Service.
ASI Web Applications must have certificates to communicate with each relevant part of
the system. For example, a Plantweb Optics Client computer requires the Plantweb Optics
server certificate to use the Asset Explorer utility. The Plantweb Optics server certificate
normally does not need the ASI server certificate, except when a new asset source is added
(not required for DeltaV Control Loop ASI v1.5 and AMS Device Manager ASI v1.5.1). In the
Asset Explorer utility, when you add a new asset source, the utility contacts the ASI to get
information about the asset source. If you try adding an asset source, and the relevant ASI
certificate is not installed, an error message lets you know there is a problem connecting
to the ASI.
See Deployment scenarios for diagrams that show where the certificates must be installed
based on the type of deployment.
4.2.2 Certificate installation checklist
The following tasks show the recommended order of installation on each computer in the
system, with emphasis on certificate export and how it relates to installation tasks. This
shows all the components, assuming each station is a separate computer, such as a fourlevel deployment. See Deployment scenarios for diagrams that show where the
certificates must be installed based on the type of deployment.
Note
You cannot reuse a certificate from a previous installation. Perform the certificate export
and installation tasks after any install, reinstall, or upgrade.
Procedure
1. On the Plantweb Optics Server:
□ Install Plantweb Optics
□ Export Plantweb Optics server certificate
2. On the ASI Server:
□ Install Plantweb Optics server certificate
□ Install Emerson Wireless Gateway ASI
□ Install Connector Service
□ Install AMS Machinery Manager ASI Web Application
Plantweb™ Optics System Guide 45
Page 46

Plantweb Optics security
April 2020
3. On the Plantweb Optics Server:
4. On the AMS Asset Monitor Server:
System Guide
MHM-97911, Rev 10
□ Install Plantweb Insight ASI
□ Export the Emerson Wireless Gateway ASI certificate
□ Export the AMS Machinery Manager ASI certificate
□ Export the Plantweb Insight ASI certificate
Note
The ASIs can be installed on the ASI server in any order. However, the first ASI
certificate that is installed on the ASI Server needs to be exported and installed on
the Plantweb Optics Server and the Plantweb Optics client.
□ Install each of the ASI certificates
• Install the AMS Asset Monitor Data Collector
5. On the AMS Device Manager Server:
□ Install AMS Device Manager Data Collector
□ Install upstream ASI component certificate (either Connector Service or Proxy)
6. On the DeltaV Server:
□ Install the DeltaV Control Loop Data Collector
□ Install upstream ASI component certificate (either Connector Service or Proxy)
7. On the KNet Server:
□ Install the KNet Data Collector
□ Install upstream ASI component certificate (either Connector Service or Proxy)
8. On the AMS Machinery Manager Network Server:
□ Install AMS Machinery Manager ASI Service
□ Install Plantweb Optics server certificate
□ Install the ASI certificate
9. On the Plantweb Optics client where users will add asset sources from ASIs:
□ Install Plantweb Optics server certificate
□ Install the certificate of the ASI needed for the asset source to be added
46 Plantweb™ Optics System Guide
Page 47

System Guide
MHM-97911, Rev 10
Note
If users will not add asset sources from this client PC, only the Plantweb Optics
server certificate needs to be installed. Each time a new ASI is added to the
platform, it will overwrite the current certificate with the new ASI certificate. All
client PCs must then import a new certificate.
Plantweb Optics security
4.2.3 Install the Plantweb Optics certificate on clients and servers
You need to install the Plantweb Optics public key certificate before you can use the
utilities. You can export the certificate from the server and install it on each client from a
file. However, Internet Explorer allows you to easily install the Plantweb Optics public key
certificate when you try to log on for the first time.
Prerequisites
• Internet Explorer is required for installing certificates from a browser.
• On a client PC, log in using an account with administrator privilege
April 2020
• Port 443 must be open between the client and the server
Procedure
1. In Internet Explorer, enter the URL of a utility, such as Asset Explorer.
Example
http://[server]/AssetExplorer
The URL automatically redirects to use secure HTTPS. Internet Explorer displays a
warning in the address bar and a message such as "This site is not secure."
2. Expand More information, and click Go on to the webpage.
The message may be different depending on your browser version. Select the
option to continue to the website.
Plantweb™ Optics System Guide 47
Page 48

April 2020
System GuidePlantweb Optics security
MHM-97911, Rev 10
3. On the Sign in page, do not sign in. Click Certificate error in the browser's address
bar.
4. In the Untrusted Certificate dialog, click View certificates.
48 Plantweb™ Optics System Guide
Page 49

System Guide
MHM-97911, Rev 10
Plantweb Optics security
April 2020
5. On the Certificate dialog, click Install Certificate.
The Certificate Import Wizard displays.
6. In the Certificate Import Wizard
Plantweb™ Optics System Guide 49
, select Local Machine.
Page 50

Plantweb Optics security
April 2020
System Guide
MHM-97911, Rev 10
7. For Certificate Store, select Place all certificates in the following store, click
Browse
50 Plantweb™ Optics System Guide
, and select Trusted Root Certification Authorities.
Page 51

System Guide
MHM-97911, Rev 10
Plantweb Optics security
April 2020
8. Complete the steps in the wizard.
Close the Certificate dialog.
9.
The Sign in page still shows the certificate error in the address bar.
10. Restart Internet Explorer and launch the same utility.
4.2.4 Export the public key certificate for an ASI station
If you have ASIs installed on computers other than the Plantweb Optics server, you need to
export the ASI's public key certificate from that station and install it on the Plantweb
Optics server and any client computers that will be accessing information provided
through the ASI.
If you have multiple ASIs installed on a server, export the certificate of the ASI that was
installed first. In some cases, you may need to export both certificates, such as for the AMS
Machinery Manager ASI.
Note
The following instructions use Windows 10 and the certlm.msc utility, and are included
as a guide. You can also use the certmgr.msc utility with the Certificates snap-in. Refer to
Microsoft's documentation for more information.
Plantweb™ Optics System Guide 51
Page 52

Plantweb Optics security
April 2020
Prerequisites
• On the ASI station, log in using an account with administrator privileges.
• Install the Plantweb Optics certificate on the ASI Station. To confirm, launch a Plantweb
Optics utility and sign in without seeing a certificate error.
Procedure
1.
2. In the MMC console, add the Certificates Snap-in.
System Guide
MHM-97911, Rev 10
From the command prompt, type MMC.exe to launch Microsoft Management
Console (MMC).
Always refer to Microsoft's documentation for more information.
Note
You can type certlm.msc to launch Microsoft Management Console (MMC) and
display the local machine level certificates. If you have certlm.msc, launch it and
skip to Step 8.
If Console Root already contains the Certificates Snap-in, the Console Root node
already contains Certificates. Skip to Step 8.
3. To add the Certificates Snap-in, select File
52 Plantweb™ Optics System Guide
→ Add/Remove Snap-in.
Page 53

System Guide
MHM-97911, Rev 10
Plantweb Optics security
April 2020
4. In the Add or Remove Snap-ins window, double-click Certificates, and click Add.
5.
Select Computer Account and click Finish.
6. Select
Plantweb™ Optics System Guide 53
Local computer and click Finish.
Page 54

Plantweb Optics security
April 2020
System Guide
MHM-97911, Rev 10
In the Add or Remove Snap-ins dialog, the Selected snap-ins list contains
Certificates (Local Computer).
7. Click OK to exit the wizard.
8.
In the MMC console, expand the nodes to Certificates (Local Computer) →
Personal → Certificates.
9. Right-click the certificate to export, and select All Tasks → Personal → Export.
The Certificate Export Wizard opens.
10. Select No, do not export the private key (default).
CAUTION
Do not export the private key file.
Export File Format, select the default format DER encoded binary X.509 (.CER),
11. In
and click Next. (You can use another format if required.)
54 Plantweb™ Optics System Guide
Page 55

System Guide
MHM-97911, Rev 10
Plantweb Optics security
April 2020
12. In File to export, specify the name and location of the file to be created, and click
Save.
• Browse to a secure location where you want to export the certificate as a file.
• Enter a file name that identifies the component and the server name.
Note
Unique filenames can help if you need to export and install certificates for multiple
servers.
13. Click Next, then click Finish to complete the export.
Copy the file to a secure location or device that you can access from the target server.
4.2.5 Install an ASI Station certificate on clients and servers
Install a certificate that has been exported to a file.
Installing the ASI station certificate is a manual process. The system administrator needs
to export the certificate first and securely transfer the certificate to the client or server
where it can be installed using the Windows Certificate Import Wizard.
Plantweb™ Optics System Guide 55
Page 56

April 2020
System GuidePlantweb Optics security
MHM-97911, Rev 10
Note
The ASIs can be installed on the ASI server in any order. However, the first ASI certificate
that is installed on the ASI Server needs to be exported and installed on the Plantweb
Optics and the Plantweb Optics client.
The following are some examples of where you will need to install the certificate that is
manually exported from an ASI station:
• Install the ASIs according to the installation instructions. See Server installation
procedures.
• On the Plantweb Optics server, install the certificate exported from the ASI station.
• On the AMS Machinery Manager station, install the AMS Machinery Manager ASI
certificate.
• On the client computer where you are using the Asset Explorer utility, install the
Optics1.5 and ASI certificate if you need to add a new asset source from that client.
Prerequisites
• Install the Plantweb Optics certificate on the ASI Station. To confirm, launch a Plantweb
Optics utility and sign in without seeing a certificate error.
• Export the public key certificate for an ASI station.
• Log in using an account with administrator privileges.
Procedure
1.
Copy the certificate file to the target server. For example, copy it to the desktop.
2. Double-click the certificate.
The Certificate properties dialog opens.
Note
The example shows the certificate for Plantweb Optics. The ASI certificate will have
a different name in Issued To and Issued By that identifies the ASI.
56 Plantweb™ Optics System Guide
Page 57

System Guide
MHM-97911, Rev 10
Plantweb Optics security
April 2020
3. Click
4. Select
5. Specify the
6. Click
Install Certificate.
The Certificate Import Wizard opens.
Local Machine and click Next.
Trusted Root Certification Authorities store.
Finish.
The certificate is installed.
4.3 Additional security considerations
Responsibilities and permissions
Assign responsibilities and permissions according to job functions. This strategy ensures
that appropriate persons in the plant see relevant alarms and health changes.
Responsibilities restrict the user's view in the Asset Explorer utility according to the
locations assigned to that user. Permissions assigned to the user would either enable or
prevent the user from performing tasks related to assets, messages, and plant
management.
Plantweb™ Optics System Guide 57
Page 58

April 2020
System GuidePlantweb Optics security
MHM-97911, Rev 10
User accounts
The User Manager utility controls user account security. Consider setting account
lockouts, password complexity requirements, and session length before adding users in
Plantweb Optics.
58 Plantweb™ Optics System Guide
Page 59

System Guide
MHM-97911, Rev 10
Pre-installation configurations
5 Pre-installation configurations
Other systems that interact with Plantweb Optics, such as AMS Machinery Manager and
AMS Device Manager, need to be configured before joining to Plantweb Optics or before
obtaining data from these systems.
After completing pre-installation configuration steps, return to Step 1 of the Installing
optional services portion of the Quick start chapter and continue your installation.
5.1 Configure AMS Machinery Manager before importing databases
The following configurations in AMS Machinery Manager are prerequisites to successfully
import databases into Plantweb Optics.
Prerequisites
• You must run the Database Converter Tool before you can import the AMS Machinery
Manager database into Plantweb Optics or use it with AMS Machinery Manager 6.3.
April 2020
• AMS Machinery Manager 6.3 or later must be installed.
• Any database you import must already be operational in AMS Machinery Manager 6.3.
Procedure
1. Do the following in AMS Machinery Manager RBMadmin:
a) Click the Tools → RBM Network Administration to launch RBMadmin.
b) Check that all the databases you want to import into Plantweb Optics are
listed in the
steps:
1. Click the Database menu and select Add Database.
2. On the Add Database to Master Database List dialog, select the
3. In Database Name, browse to the database.
4. Click
2. Check that no data collection is currently in progress on the server and on all client
machines.
Databases pane. If the database is not listed, perform these
Database Server and Data Locker from the drop-down menus.
See the AMS Machinery Manager Online Help for more information on
data lockers.
AMS Machinery Manager databases use the .rbm file extension. If the
database is in a zip folder, you need to extract it first.
OK.
Data collection can either happen in Data Import or in the Online Configuration
module. You need to stop all data collections that are in progress before importing
databases into Plantweb Optics.
Plantweb™ Optics System Guide 59
Page 60

Pre-installation configurations
April 2020
3. Make sure there are no changes to the database hierarchy while importing
databases to Plantweb Optics.
These activities in the AMS Machinery Manager system introduce changes to the
database hierarchy:
• Data dump from portable devices (such as from an AMS 2140, IR devices, etc.)
to AMS Machinery Manager
• Data collection from devices connected to the Data Import Server or Online
Server
• Upgrade of AMS Machinery Manager
• Any changes to the database hierarchy through RBM Wizard, Database Setup,
Online Config, and Data Import
• Creation and update of alarm parameter (AP) sets and alarm limit (AL) sets
• Creation and update of routes
• Data deletion through Data Management
Important
If there are other users in your system, Emerson recommends you communicate
your intent to import databases in advance with the date and time details before
the actual database import.
System Guide
MHM-97911, Rev 10
4. Make sure Data Collections Sets (DCSs) are configured with Analysis Parameter (AP)
sets before importing Online databases.
Only parameters inside DCSs are imported into Plantweb Optics. See the AMS
Machinery Manager Online Help for more information on data collections sets.
5. Install the latest AMS Machinery Manager patches and updates.
Postrequisites
Import AMS Machinery Manager databases into Plantweb Optics.
5.2 Configure Plantweb Insight before joining to Plantweb Optics
The following configurations in Plantweb Insight are prerequisites before joining Plantweb
Insight to Plantweb Optics.
Prerequisites
Make sure your host system interface containing assets whose alerts you want to see is
configured in Plantweb Insight Network Configuration.
Procedure
1. Log in to the Plantweb Insight System.
2. Select System settings
3. Select the API Keys you want to configure.
→ Users.
60 Plantweb™ Optics System Guide
Page 61

System Guide
MHM-97911, Rev 10
Pre-installation configurations
April 2020
4. If no API Key is listed, click Add API Key. In the
name for the new API Key. Click
5. Note the App Name and the
Save and the new API Key is displayed.
API Key. Enter this same information in the Add Asset
Add API Keys dialog box, enter a
Source dialog box in Plantweb Optics and in the Plantweb Insight ASI. The Add
Asset Source button is only displayed if the user has MANAGEASSETSOURCE
permission.
Plantweb™ Optics System Guide 61
Page 62

April 2020
System GuidePre-installation configurations
MHM-97911, Rev 10
62 Plantweb™ Optics System Guide
Page 63

System Guide
MHM-97911, Rev 10
Server installation procedures
6 Server installation procedures
This chapter walks through each of the installations available for your system. Emerson
recommends reviewing these procedures during the system planning stage to learn what
information you must provide during each installation. Follow these procedures during
installation to review notes about each installation step.
Tip
Follow the recommended installation and setup order on page 11.
Note
If a server has multiple components installed, the same user with administrator privileges
must perform the installations. A different administrator user can install the components
on a different server.
SQL is only available to the user who installed it even if the user who installed it is a local
administrator and subsequent users are also members of the local administrator group.
April 2020
6.1 Install the Plantweb Optics Historian
Plantweb Optics Historian provides the user with a way to interact with historical data
associated with assets, such as health and other parameters, and allows the user to
perform trend analysis on that data.
Prerequisites
• You need the A48OPTICS-SYSTEM0.Plantweb_Optics.1.5.X.X.zip file.
• Turn off automatic Windows updates during installation or upgrade.
Procedure
1.
Extract the A48OPTICS-SYSTEM0.Plantweb_Optics.1.5.X.X.zip file.
Note
Extract the zip file on a root directory. For example, drive C.
2. Right-click
3. Select Install Plantweb Optics Historian and click Next.
4. Read and accept the license agreement, and click Next
5. On the
MongoDB database.
This account and password is only used by Plantweb Optics Historian.
install.exe and select Run as administrator.
.
Plantweb Optics Historian Database screen, enter a password for the
The default user account name is MongoUserAdmin.
6. Select Install Now to install with default options or Customize to change the path
for installation and data.
7. On the Installation is successful
Return to
continue your installation.
Plantweb™ Optics System Guide 63
Step 2 of the Installing Plantweb Optics portion of the Quick start chapter and
page, click Done.
Page 64

Server installation procedures
April 2020
6.2 Install Plantweb Optics Web Services
Prerequisites
• You need the A48OPTICS-SYSTEM0.Plantweb_Optics.1.5.X.X.zip file.
• Turn off automatic Windows updates during installation or upgrade.
• You may need to change your computer name before installing the software. Special
characters (< > ; : " * + = \ | ? , _ !), accented characters, and other multibyte characters
in a computer name can cause problems and interfere with a successful installation. A
valid computer name can have numbers 0-9, uppercase and lowercase letters A-Z, and
the hyphen (-). Computer names cannot have only numbers, nor can they contain
spaces.
• Determine if you will use the server name or IP address to launch the Plantweb Optics
utilities. Emerson recommends using the server name.
— If you use an IP address, use a static address.
— If you use the server name, ensure the computer name is valid with no special,
accented, or multibyte characters.
System Guide
MHM-97911, Rev 10
— Only make changes to the IP address or server name before installing Plantweb
Optics.
Procedure
1.
Extract the A48OPTICS-SYSTEM0.Plantweb_Optics.1.5.X.X.zip file.
Note
Extract the zip file on a root directory. For example, drive C.
2. Right-click install.exe and select Run as administrator.
Select Install Plantweb Optics Web Services and click Next.
3.
Note
Plantweb Optics will run a test to ensure your system is compliant with installation
requirements. Any unmet minimum requirements that could impact overall system
performance will be shown.
4. Read and accept the license agreement. Click
5. Select the database setup and click Next:
• Choose Plantweb Optics and DB on the same server (Tier-1) to install
Plantweb Optics and the SQL database on the same server.
When you choose Tier-1, you have the option to include an automated SQL
maintenance task that will back up the Plantweb Optics database daily. The
backup is set to simple recovery. See page 198 for more information.
To automatically schedule daily backups of your Plantweb Optics database,
ensure
option, you can manually set up a task in Task Scheduler to automate database
backups.
If you choose Tier-1, skip to Step 7.
Include Automated SQL Maintenance is checked. If you uncheck this
Next.
64 Plantweb™ Optics System Guide
Page 65

System Guide
MHM-97911, Rev 10
Server installation procedures
April 2020
• Choose Plantweb Optics and a separate DB server (Tier-2) to install Plantweb
Optics with its database on a separate SQL Server.
Important
In a Tier-2 installation, you need to connect to a separate SQL Server that needs
preliminary setup prior to installation. See page 205 for instructions.
6. If you chose Tier-2 in the previous step, enter the following to point to the separate
database server:
Server name The computer name of the database server.
Note
All connected computers with SQL databases will show up in the list. If
your database server has been set up to requirements, it will show as a
computer name with \EMERSONCSI appended to it.
Authentication Choose Windows Authentication or SQL Server Authentication.
Select Windows Authentication to use the current Windows logged in
user account for database authentication. Select SQL Server
Authentication to use the user specifically created by the database
administrator when creating the EmersonCSI named instance.
If you select Windows Authentication, you will still need to use the SQL
Server Authentication user name and password when accessing the
database server.
User name The user name used for database authentication.
Password The password associated with the user name used for authentication.
7. If necessary, edit fields in the Server and Port Binding Configuration screen, and
click Next:
Server Configuration
Use Server
Name
Use IP Address Choose Use IP Address if you want to access or launch Plantweb Optics
Note
The IP address column in the Server and Port Binding Configuration screen should be
blank. The site binding does not bind to a specific IP address.
Note
Your choice becomes the only allowed setting when launching Plantweb Optics and when
installing ASIs and extensions.
Failure to use the same configuration when installing ASIs and extensions may cause the
installation to fail and you will need to uninstall and reinstall Plantweb Optics or any
associated ASIs and extensions to use the same server setting.
Choose Use Server Name if you want to access or launch Plantweb
Optics using the server name.
This is the default and recommended option.
using the server IP address.
Plantweb™ Optics System Guide 65
Page 66

Server installation procedures
April 2020
Site Binding Information
Port The port number when accessing Plantweb Optics. Port 443 is the
8. On the Plantweb Optics Mobile App Settings page, choose whether the Plantweb
Optics Mobile App will use Azure Mobile services to receive messages anywhere a
mobile device has an internet connection, or the on-premises solution that provides
access to your plant network only. Click Next after selecting a mobile service.
• (Default: Azure Mobile Services) The Plantweb Optics Mobile App can receive
messages anywhere it has an internet connection. The server and mobile device
require an internet connection. This option requires a license file to enable the
full features of this mobile application. Click Browse... to navigate to your
mobile license file MobileConfig.json. The mobile license file can be found in
the Plantweb Optics license zip file (Serial#License.zip). If a mobile license
is not available at this time, see Manually register an Optics Mobile license when
using Azure Mobile Services when a mobile license file is available.
System Guide
MHM-97911, Rev 10
default port.
If a port is already in use, there is a red square around the port number.
You must change any port binding that is being used by another
website.
See page 199 to free up port 443 if it is being used by another
application.
• (On-premises Mobile Service) The mobile app can only receive messages while
connected to your plant network. The server and mobile device require
connection to your plant network.
9.
On the Default Install Directory page, change the location where the product will
be installed or select the default path provided. Click Next.
10. Select Install Now to install with default options or Customize to change the
database location and database user passwords.
If you choose Customize, follow these steps:
a) Modify the password for FWK_Admin SQL Server user account and click Next.
CAUTION
When you modify passwords, make a note of the new passwords for each
user account.
b) Modify the password for FWK_Reader SQL Server user account and click
Next.
c) Modify the password for FWK_Writer SQL Server user account and click Next.
d) Click Browse and select where you want to place the database and click
Next.
11. .Net 4.7.1 installs automatically if it is not already installed. After .Net 4.7.1 installs,
the Installation is pending page displays.
12. On the Installation is pending page, click Restart Now.
66 Plantweb™ Optics System Guide
Page 67

System Guide
MHM-97911, Rev 10
13. After the system restarts, log in with the same user credentials that you used
before. After you log in as the same user, the system installation continues
automatically.
14.
On the Installation is successful page, click Restart Now. After the system restarts,
the Plantweb Optics installation is completed. After installation, the desktop
contains shortcuts for Asset Explorer and Asset View, and the Programs list
includes a Plantweb Optics folder also with the shortcuts. Access Plantweb Optics
by launching the Asset Explorer icon on your desktop.
Return to Step 3 of the Installing Plantweb Optics portion of the Quick start chapter and
continue your installation.
6.3 Acquire licenses
The machine fingerprint, or lock code, of the server where Plantweb Optics will be
installed must be retrieved before a license file can be generated. The echoid
in the Plantweb Optics installation zip file is used to retrieve the machine fingerprint or
lock code.
Server installation procedures
April 2020
tool found
Prerequisites
• A48OPTICS-SYSTEM0.Plantweb_Optics.1.X.X.XXX.zip file.
Procedure
1. Extract the A48OPTICS-SYSTEM0.Plantweb_Optics.1.X.X.XXX.zip file to
the Plantweb Optics server.
Note
Extract the zip file on a root directory. For example, drive C.
2. Start a command prompt with administrator privileges.
3. Change directories to the following directory in the Plantweb Optics installer zip
A48OPTICS-SYSTEM0.Plantweb_Optics.1.X.X.XXX\_Support
file:
\Gemalto
4. Run echoid -d -p from the command prompt window to generate your locking
code:
Plantweb™ Optics System Guide 67
Page 68

Server installation procedures
April 2020
5. Copy the 16-character locking code displayed in your command prompt starting
with *. To receive your license file, send this code and your Plantweb Optics serial
number to:
wwcs.custserv@emerson.com. For a faster response, call toll-free 888.367.3774,
option 2 (US and Canada) or +63.702.1111 (rest of world).
System Guide
MHM-97911, Rev 10
Postrequisites
After acquiring your license file, return to Installing Plantweb Optics.
6.4 Register licenses
Plantweb Optics must be registered when it is installed.
Note
A separate license file is required for those using the Plantweb Optics Mobile App through
Microsoft Azure Mobile Services. Plantweb Optics installation has an optional screen to
import a separate MobileConfig.json license file when configuring Plantweb Optics
Mobile. If a license file is not available at the time of installation, follow Manually register
an Optics Mobile license when using Azure Mobile Services to manually install a mobile
license file at a later time.
Follow these steps to register the product license.
Procedure
1. From your browser window, enter this URL: https://<OPTICSservername>/
usermanager.
2. At the bottom of the screen, this message is displayed:
Emerson sales representative for a licensed version of the Plantweb Optics. To
install license, click HERE. Click the HERE prompt to register the license. The Please
Upload the License File
3. Click Choose File and select the License File to activate. Plantweb Optics license files
have a .lic file extension.
Please contact your local
window displays.
68 Plantweb™ Optics System Guide
Page 69

System Guide
MHM-97911, Rev 10
4. Click Activate Product.
5.
After registering the license(s), reboot the server.
Return to Step 4 and continue your installation. If using Plantweb Optics Mobile via Azure
Mobile Services and you did not register a mobile license file during initial installation,
follow Manually register an Optics Mobile license when using Azure Mobile Services.
Server installation procedures
April 2020
6.4.1 Manually register an Optics Mobile license when using Azure Mobile Services
A license file is required to enable the full features of the Plantweb Optics Mobile App
when using Microsoft Azure Mobile Services. Follow this procedure to manually install a
mobile license file if a license was not installed when configuring Plantweb Optics Mobile
App Settings in Install Plantweb Optics Web Services.
Procedure
Unzip the file Serial#License.zip containing the Plantweb Optics Mobile App
1.
license file. If Plantweb Optics is licensed for Mobile, this folder will contain both
a .lic file for Plantweb Optics and a MobileConfig.json Plantweb Optics
Mobile App license file.
2. Copy MobileConfig.json to \inetpub\wwwroot\EmersonCSI
\OpticsIdSrv
3. Restart the Plantweb Optics server.
6.5 View license summary
Check on the status of your Plantweb Optics licenses from User Manager.
Procedure
1.
Using Google Chrome, enter this URL: https://<OPTICSserverName>/
usermanager.
2. Click on the LICENSES tab.
3. The LICENSES screen displays the Status, Source, Feature, and expiration date for
each license. You can also register other licenses from this screen.
Return to Step 5 of the Installing Plantweb Optics portion of the Quick start chapter and
continue your installation.
6.6 Install the Connector Service
The Connector Service provides common functionality required by the following ASIs:
Table 6-1: ASI Compatibility
ASI Supported ASI Versions
AMS Asset Monitor 1.5
AMS Device Manager 1.5.1
Plantweb™ Optics System Guide 69
Page 70

Server installation procedures
April 2020
System Guide
MHM-97911, Rev 10
Table 6-1: ASI Compatibility
ASI Supported ASI Versions
DeltaV Control Loop 1.5
KNet 1.5
(continued)
The Connector Service passes information from one or multiple Data Collectors, using
Microsoft Internet Information Services through HTTPS, to Plantweb Optics when an asset
source is configured in each Data Collector.
The Connector Service can be installed on the same PC as the Data Collector, on a
standalone PC (such as an ASI server station), or on a Plantweb Optics server. Only one
Connector Service can be installed on any PC. The Connector Service can send data to only
one Plantweb Optics system. Plantweb Optics can receive data from multiple Connector
Services. Emerson recommends installing the Connector Service on the Plantweb Optics
ASI server station.
Prerequisites
• A48ConnectorSvc.1.5.X.X.zip file.
• Turn off automatic Windows updates during installation or upgrade.
• The PC name or IP Address where Plantweb Optics is installed.
Procedure
1.
Extract the A48ConnectorSvc.1.5.X.X.zip file to the computer designated for
the Connector Service.
Note
Extract the zip file on a root directory. For example, drive C.
2. Right-click ConnectorService_Setup.exe and click Run as administrator.
3. Click
Next.
4. Read the license agreement. If you accept, click Next.
5. Verify the installation destination folder. Click Next.
6. Enter the Plantweb Optics IP address/PC name and port number. The default port is
443. Click Next.
7. Enter the local port number the Connector Service will be bound to. The default
port is 443.
8. Click
Next to begin installation of the third-party components listed in the install
dialog.
9. Click Reboot
. Select Yes, I want to restart my computer now to reboot your PC
and continue Connector Service installation.
10. Connector Service installation will automatically resume after your PC reboots. Click
Next to continue installation of any remaining third-party components listed in the
install dialog.
11. After installation is complete, click Finish.
70 Plantweb™ Optics System Guide
Page 71

System Guide
MHM-97911, Rev 10
6.7 Install the Proxy
A Proxy allows Data Collectors to send asset source data to a Connector Service across
multiple network levels. Multiple Proxies can be deployed on a network, facilitating data
from either Data Collectors to a Connector Service, from Proxy to Proxy, or from a Proxy to
a Connector Service.
A Proxy must be deployed on each network level that exists between a Data Collector and
the Connector Service it communicates with. If only one firewall exists between a Data
Collector and a Connector Service, a Proxy is not required. The diagram below
demonstrates deploying a Proxy to connect a DeltaV Control Loop Data Collector with a
Connector Service:
Figure 6-1: Deploying a Proxy to Connect a Data Collector with a Connector Service
Server installation procedures
April 2020
The Proxy is compatible with the following ASI versions:
Plantweb™ Optics System Guide 71
Page 72

Server installation procedures
April 2020
Table 6-2: ASI Compatibility
ASI Supported ASI Versions
AMS Asset Monitor 1.5
AMS Device Manager 1.5.1
DeltaV Control Loop 1.5
KNet 1.5
Prerequisites
• A48PWOProxy.1.5.X.X.zip file.
• Turn off automatic Windows updates during installation or upgrade.
• The PC name or IP address of the Proxy or Connector Service this Proxy will send data
to.
Procedure
1.
Extract the A48PWOProxy.1.5.X.X.zip file on the computer designated for the
Proxy.
System Guide
MHM-97911, Rev 10
Note
Extract the zip file on a root directory. For example, drive C.
2. Right-click Proxy_Setup.exe and select Run as administrator.
Click Next.
3.
4. Read the license agreement. If you accept, click Next.
5. Verify the installation destination folder.
6. Enter the PC name/IP address and port number of the Connector Service that this
Proxy will send data to. Port 443 is the default port.
Note
If multiple Proxies are being deployed on your network, enter the PC name or IP
address of the Proxy that this Proxy will send data to.
7. Enter the local port number that this Proxy will be bound to. The default port is 443.
8. Click
Next to being installation of the third-party components listed in the install
dialog.
9. On the Installation is successful
page, click Finish.
Postrequisites
After installation completes, the Proxy user interface will launch in your browser.
Configure the newly installed Proxy service: Configure the Proxy
.
72 Plantweb™ Optics System Guide
Page 73

System Guide
MHM-97911, Rev 10
6.8 Configure the Proxy
After completing the Proxy installation process, the IP address of the Proxy or Data
Collector that will send data to the newly installed Proxy must be added to the white list.
This process must be completed for each Proxy intended to be used on your network.
Additionally, if multiple proxies are being deployed on your network, each Proxy that
sends data directly to another Proxy must modify the destination route as outlined below.
Prerequisites
• A Proxy has been installed on the server where this process will be completed.
• The IP addresses of all servers where a Proxy will be installed.
• The IP address or PC name where the Connector Service is installed.
Procedure
1.
Launch the Proxy service user interface and log in.
a) Launch Google Chrome or Internet Explorer.
Server installation procedures
April 2020
b) Navigate to https://<Proxy_PC_Name>/proxy.
If the Proxy is bound to a port other than the default port 443, navigate to
https://<Proxy_PC_Name>:<PortNumber>/proxy.
Replace <PortNumber> with the port the Data Collector is bound to and
<Proxy_PC_Name> with the name of the PC where the Proxy is installed
c) Log in to with your Proxy user account credentials. If a user account has not
been created, you will be prompted to create a new account. The username
and password are both case-sensitive.
Note
Proxy user accounts are bound only to the individual Proxy the account is
created on. User accounts are not shared between proxies.
Add the Incoming Proxy or Data Collector IP Address to White List
Navigate to the User White List tab.
2.
3. Click the + icon to add a new IP address.
4. Enter the IP address of the Data Collector or Proxy where the newly installed Proxy
will receive data from. Click the check mark icon when finished.
5. Click Save to add the IP address to the white list.
Modify Destination Route If Sending Data to Another Proxy
Complete these additional steps if this Proxy will send data directly to another Proxy. This
process is not necessary if this Proxy will communicate directly with a Connector Service.
6. Navigate to the Proxy Routes tab.
7. Click the edit icon
route is automatically added during Proxy installation.
Plantweb™ Optics System Guide 73
to edit the Proxy route sending data to another Proxy. This
Page 74

April 2020
System GuideServer installation procedures
MHM-97911, Rev 10
8. Under the Route Pattern To Destination field, add /proxy/ to the destination
route pattern:
Example
https://<ProxyDestinationIP>/proxy/connectorservice/api
Note
It is not necessary to edit the Route Pattern Into Proxy field.
9. Click the check mark icon to save route changes.
Click Save to apply the configured route.
10.
Postrequisites
Depending on your network, additional Proxies may be required to allow the Data
Collector to communicate with the Connector Service. If additional Proxy servers are
required, repeat the Proxy installation and setup process on each PC that will serve as a
Proxy.
6.9 Install the Emerson Wireless Gateway ASI
The Emerson Wireless Gateway ASI lets you connect and display information from an
Emerson Wireless Gateway and connected AMS 9420 transmitters.
There are three procedures that must be completed in order to install the Emerson
Wireless Gateway ASI. These are:
Registering the Emerson Wireless Gateway ASI on the Plantweb Optics server.
1.
2. Installing the Emerson Wireless Gateway ASI.
3. Enabling secure communication with an Emerson Wireless Gateway. This step is
only required if you are using secure communication to the gateway. If using
unsecured communication, it is not required.
After completing these procedures, return to Step 2 of the Installing optional services
portion of the Quick start chapter and continue your installation.
6.9.1 Register Emerson Wireless Gateway ASI on Plantweb Optics Server
Before the Emerson Wireless Gateway ASI can be installed, you must register the ASI on
the Plantweb Optics Server.
Note
The registration steps must be completed using the same user account that installed
Plantweb Optics previously.
Prerequisites
• Ensure Plantweb Optics is already installed on the computer you designate as the
Plantweb Optics server.
74 Plantweb™ Optics System Guide
Page 75

System Guide
MHM-97911, Rev 10
Server installation procedures
• The A481420-DS0.EWG_ASI.1.5.X.X.zip file is needed.
• Turn off automatic Windows updates during installation or upgrade.
Procedure
1.
Copy the Emerson Wireless Gateway installer to the Plantweb Optics Server.
2. Extract A481420-DS0.EWG_ASI.1.5.X.X.zip.
Note
Extract the zip file on a root directory. For example, drive C.
3. Right-click install.exe and select Run as administrator.
On the Setup screen, select Register Emerson Wireless Gateway ASI (on
4.
Plantweb Optics Server).
5. Read and accept the license agreement. Click Next.
6. On the Emerson Wireless Gateway ASI Server Configuration screen, enter the
server name or IP address of the server where the ASI is installed. Click Next.
Note
Customize may be displayed as an option, but it has no effect on this registration
procedure.
April 2020
7. Click
Done.
Plantweb™ Optics System Guide 75
Page 76

April 2020
6.9.2 Install the Emerson Wireless Gateway ASI
The Emerson Wireless Gateway ASI lets you connect and display information from an
Emerson Wireless Gateway and connected AMS 9420 transmitters.
Emerson Wireless Gateway ASI is recommended to be installed on a separate ASI server
station.
CAUTION
When you install AMS Device Manager ASI and Emerson Wireless Gateway ASI, there is a
risk of adding an Emerson Wireless Gateway that is already in Plantweb Optics. Do not
connect the same Emerson Wireless Gateway to multiple AMS Device Manager systems. If
this happens, duplicate devices, events, and process variables will display in Plantweb
Optics.
If your system gets into this unsupported state, contact Emerson Product Support. There
is no automated or user-facing methodology available to recover from this condition.
Prerequisites
System GuideServer installation procedures
MHM-97911, Rev 10
• Ensure Plantweb Optics is already installed on the computer you designate as the
Plantweb Optics server.
• The A481420-DS0.EWG_ASI.1.5.X.X.zip file is needed.
• Turn off automatic Windows updates during installation or upgrade.
• If you install this ASI on a separate server, that server must be configured to
requirements before installation. The requirements vary depending on whether a
Tier-1 or Tier-2 database setup is used.
Procedure
1.
Extract the A481420-DS0.EWG_ASI.1.5.X.X.zip file on the server.
Note
Extract the zip file on a root directory. For example, drive C.
2. Right-click install.exe and select Run as administrator.
Read and accept the license agreement. Click Next.
3.
4. If necessary, edit fields in the Server and Port Binding Configuration screen, and
click Next.
Plantweb Optics Server
Server Name/IP
Address
Enter the Plantweb Optics server name or IP address. Be sure not to
enter the ASI server.
76 Plantweb™ Optics System Guide
Page 77

System Guide
MHM-97911, Rev 10
Server installation procedures
Note
The IP address column in the Server and Port Binding Configuration screen should be
blank. The site binding does not bind to a specific IP address.
Note
Failure to use the same configuration when installing ASIs and extensions may cause the
installation to fail and you will need to uninstall and reinstall the software or any associated
ASIs and extensions to use the same server setting.
Site Binding Information
Port The port number when accessing Plantweb Optics. Port 443 is the
default port.
If a port is already in use, there is a red square around the port number.
You must change any port binding that is being used by another
website.
See page 199 to free up port 443, if it is being used by another
application.
5. Select Install Now to install with default options.
6.
On the Installation is successful page, click Restart Now. After the system restarts,
the Emerson Wireless Gateway ASI installation is completed.
April 2020
6.9.3 Enable secure communication with an Emerson Wireless Gateway
If the gateway is configured to use secure communication, follow this procedure to enable
connections to the gateway.
Perform these steps on the Emerson Wireless Gateway ASI server only after installing the
1420 Security Setup Utility.
Prerequisites
Install the latest version of 1420 Security Setup Utility (v1.5.7 or later) on the server where
the Emerson Wireless Gateway ASI is installed.
For more information on the 1420 Security Setup Utility, see the Emerson Wireless
Gateway Reference Manual.
Procedure
Launch IIS Manager and expand the server name.
1.
2. Click Application Pools and right-click EWGASI.
3. Select Advanced Settings.
The Advanced Settings dialog is displayed.
4. Under the Process Model tree, select Identity, and click
.
Plantweb™ Optics System Guide 77
Page 78

Server installation procedures
April 2020
Figure 6-2: Advanced Settings—Identity
System Guide
MHM-97911, Rev 10
5. From the Application Pool Identity dialog, select Custom account and click Set.
6. Enter the administrator username and password and click OK.
The Emerson Wireless Gateway ASI is now set up to run as an administrator.
7. Click
OK to close the dialogs.
8. From the list of Application Pools, right-click EWGASI, and select Recycle.
9. Launch the Security Setup Utility and create a new proxy:
a) Select Edit → New → Add AMS Access Proxy.
b) Right-click the new proxy and select Properties.
c) Enter the IP address of your Emerson Wireless Gateway.
d) Click OK.
78 Plantweb™ Optics System Guide
Page 79

System Guide
MHM-97911, Rev 10
e) Select File → Save.
f) If you are prompted for authentication, enter the admin password for the
target Gateway.
g) Click OK.
Server installation procedures
6.10 Install the AMS Asset Monitor ASI
AMS Asset Monitor ASI Features
The AMS Asset Monitor Data Collector gathers data from AMS Asset Monitor assets and
reports key information to Plantweb Optics. After an asset source is configured,
information is automatically populated and updated in Plantweb Optics. You can display:
April 2020
• Asset hierarchy
network and machine hierarchy are displayed in Plantweb Optics Asset Explorer.
• Asset parameters—all asset and CHARM parameters are displayed in Plantweb Optics.
Each asset may have specific parameters that are measured based on its configuration
in AMS Asset Monitor. Each parameter and value displayed in AMS Asset Monitor will
have a corresponding parameter and value in Plantweb Optics.
• Asset health—CHARM and asset health are displayed in Plantweb Optics. The Asset
health score is the lowest health score of all asset parameters. Unhealthy assets (health
score less than 100) are added to the unhealthy dashboard in Asset View.
• Events and messages—AMS Asset Monitor events and messages are displayed in
Plantweb Optics. Any alert generated by AMS Asset Monitor with an Advise, Warning,
or Danger state is interpreted by Plantweb Optics as a message-able event.
AMS Asset Monitor ASI Components
Three components allow the AMS Asset Monitor ASI to provide data to Plantweb Optics:
the Data Collector, the Connector Service, and the (optional) Proxy. The Data Collector
gathers asset source data to send to the Connector Service. The Connector Service then
passes information received from the Data Collector, using Microsoft Internet Information
Services through HTTPS, to Plantweb Optics. The Proxy facilitates communication
between the Data Collector and Connector Service when these components are separated
by multiple network levels.
Note the following regarding the Data Collector, Connector Service, and Proxy:
—asset hierarchy as defined in AMS Asset Monitor. The physical
• The Data Collector and Connector Service can be installed on one or two PCs
depending on your network requirements.
• Each Data Collector can communicate with only one Connector Service.
• A Connector Service can receive data from multiple Data Collectors. However, each
Connector Service can communicate with only one Plantweb Optics system.
• There can be more than one Data Collector per Plantweb Optics server.
Plantweb™ Optics System Guide 79
Page 80

System GuideServer installation procedures
April 2020 MHM-97911, Rev 10
6.10.1 AMS Asset Monitor ASI deployment scenarios
Compatibility
The AMS Asset Monitor Data Collector can be deployed with the following AMS Asset
Monitor and Plantweb Optics systems:
Table 6-3: AMS Asset Monitor ASI Compatibility
Data Collector Version Plantweb Optics Version AMS Asset Monitor Version
1.5.1 22.18
1.5 Supported Supported
Install AMS Asset Monitor ASI Components on Separate PCs
If Plantweb Optics and AMS Asset Monitor are on different networks, or are separated by a
firewall, you must deploy the AMS Asset Monitor Data Collector and the Connector Service
on different servers. The machine the Data Collector is installed on must reside on the
same network level as AMS Asset Monitor. If the Data Collector and Connector Service are
separated by more than one network level, a Proxy must be deployed on each network
level that exists between the Connector Service and the Data Collector. The figure below
demonstrates deploying the AMS Asset Monitor ASI components with three Data
Collectors sending data to Plantweb Optics through a single Connector Service:
80 Plantweb™ Optics System Guide
Page 81

System Guide
MHM-97911, Rev 10
Server installation procedures
April 2020
Figure 6-3: AMS Asset Monitor ASI Components
If a Connector Service is already installed and communicating with a Plantweb Optics
system, the AMS Asset Monitor Data Collector can be configured during installation to
communicate with the existing Connector Service.
Install AMS Asset Monitor ASI components on a single PC
For a single PC installation, install the AMS Asset Monitor Data Collector and Connector
Service on the same server. The server must reside on the same network level as AMS
Asset Monitor.
6.10.2 Register the AMS Asset Monitor ASI with Plantweb Optics
Before installing the AMS Asset Monitor ASI, register the AMS Asset Monitor ASI on the
Plantweb Optics server. This process allows the ASI to properly create assets in Plantweb
Optics.
Prerequisites
• Plantweb Optics is installed on the computer designated as the Plantweb Optics server.
• A488500-DS0.AMS_AM_ASI.1.5.0.zip file.
Plantweb™ Optics System Guide 81
Page 82

Server installation procedures
April 2020 MHM-97911, Rev 10
Procedure
1. Extract A488500-DS0.AMS_AM_ASI.1.5.0.zip.
Note
Extract the zip file to a root directory on the Plantweb Optics server. For example,
drive C:
2. Right-click install.exe and select Run as administrator.
3. Click Next.
4. Read and accept the license agreement. If you accept, click Next.
5. Select
6. Verify the installation destination folder and click
7. Click
Postrequisites
After the registration process is complete, install the AMS Asset Monitor Data Collector:
Install the AMS Asset Monitor Data Collector
Registration and click Next.
Next.
Finish to complete the registration process.
.
System Guide
6.10.3
Install the AMS Asset Monitor Data Collector
Prerequisites
• A488500-DS0.AMS_AM_ASI.1.5.0.zip file.
• The Data Collector must be installed on a machine that resides on the same network
level as AMS Asset Monitor.
• If installing on a Windows Server 2008 R2 or a Windows 7 operating system, enable
Windows automatic updates.
• The PC name or IP address where the Connector Service is installed.
• If deploying the Proxy, the PC name or IP address where the Proxy is installed.
• The AMS Asset Monitor ASI registration process has been completed on the Plantweb
Optics server: Register the AMS Asset Monitor ASI with Plantweb Optics.
Procedure
1. Extract the A488500-DS0.AMS_AM_ASI.1.5.0.zip file on the computer designated for
the Data Collector.
Note
Extract the zip file on a root directory. For example, drive C.
2. Right-click AMSAssetMonitorDataCollector_Setup.exe and select Run as
administrator.
Click Next
3.
4. Read the license agreement. If you accept, click Next.
5. Select Data Collector and click Next.
6. Verify the installation destination folder and click Next.
.
82 Plantweb™ Optics System Guide
Page 83

System Guide
MHM-97911, Rev 10
Server installation procedures
April 2020
7. Enter the PC name/IP address and port number where the Connector Service is
installed. Port 443 is the default port. Click Next.
Note
If using the Proxy service, enter the Proxy server PC name/IP address and port
number instead.
8. Enter the local port number the Data Collector will be bound to. Port 443 is the
default port.
9. Click Next to begin installation of any third-party components listed in the install
dialog. Reboot your PC as indicated in the installer dialog. Data Collector installation
resumes automatically after your PC reboots.
10. Click Next to continue installation of third-party components. Click Finish to
complete the installation.
Postrequisites
After installation, the AMS Asset Monitor Data Collector user interface opens in your
browser. Ensure that the Connector Service and (if applicable) Proxy security certificates
are installed on the appropriate servers before adding an asset source. Additionally, the
security certificate of each AMS Asset Monitor asset source must be installed on the Data
Collector the asset source will communicate with:
Install certificates.
6.10.4 Add an asset source to the AMS Asset Monitor Data Collector
Prerequisites
• The Connector Service is installed.
• (Optional) The Proxy is installed.
• The Connector Service and (if applicable) Proxy security certificates are installed on the
appropriate servers.
• The Asset Monitor security certificate is installed on the Data Collector server where
the asset source will be added.
• An asset source is not configured in the Data Collector.
Procedure
1. Launch the AMS Asset Monitor Data Collector user interface.
a) Launch Google Chrome or Internet Explorer.
b) Navigate to https://<Data_Collector_PC_Name>/
AMSAssetMonitorDataCollector to launch the Data Collector user
interface.
If the Data Collector is bound to a port other than the default port 443,
navigate to
AMSAssetMonitorDataCollector.
https://<Data_Collector_PC_Name>:<PortNumber>/
Plantweb™ Optics System Guide 83
Page 84

Server installation procedures
April 2020
System Guide
MHM-97911, Rev 10
Replace
<PortNumber> with the port the Data Collector is bound to and
<Data_Collector_PC_Name> with the name of the PC where the Data
Collector is installed.
2. Click the + icon to add a new asset source.
The add a new asset source menu appears.
3. In the Site selection box, select the site you want associated with the new asset
source.
4. Enter a
Display Name for the new asset source. Assets will appear under this name
in Plantweb Optics.
5. Enter the full Connection URL of your AMS Asset Monitor web interface.
6. Enter the
Username and Password used to connect to your AMS Asset Monitor web
interface.
7. (Optional) Enter a description for the asset source.
8. Click
Add to begin sending asset source data to Plantweb Optics.
6.11 Install the AMS Device Manager ASI
AMS Device Manager ASI Features
The AMS Device Manager ASI allows you to gather data from AMS Device Manager and
report key information to Plantweb Optics. After an asset source is configured,
information is automatically populated in Plantweb Optics with automatic updates. You
can display:
• Physical networks—all the system interfaces you configure on Server Plus and all its
connected Client SCs. This includes all hardware under supported control and
automation systems, multiplexers, wireless gateways, or systems that support HART,
OUNDATION
F
™
Fieldbus or PROFIBUS DP or PA devices, as well as to a connected HART
modem. Calibrators and Field Communicators are not included.
• Asset class—Transmitter, Final Control Element, or Industrial Interface.
• Measurement type—examples include temperature, pressure, and level.
• Asset properties—AMS Tag, as well as the following device attributes: Device
Description, Manufacturer, Model, Serial Number (final assembly number), Device
Revision, and Next Calibration Date.
• SIS device attribute—indicates whether the device is marked as a safety device.
• Asset health—based on NE-107 Device Alert category.
• Device events—device alert description, help text accompanying the Alert, and Status
(whether the alert has been set or cleared). Devices must be configured in Alert
Monitor. This does not include Configuration Changed events.
• Device information (optional)—device variables PV, SV, TV, and QV (not available for
PROFIBUS devices), and device-specific variables for select Emerson devices.
• Overdue calibrations—overdue calibrations KPI is displayed in Asset View.
84 Plantweb™ Optics System Guide
Page 85

System Guide
MHM-97911, Rev 10
Server installation procedures
April 2020
CAUTION
When you install AMS Device Manager ASI and Emerson Wireless Gateway ASI, there is a
risk of adding an Emerson Wireless Gateway that is already in Plantweb Optics. Do not
connect the same Emerson Wireless Gateway to multiple AMS Device Manager systems. If
this happens, duplicate devices, events, and process variables will display in Plantweb
Optics.
If your system gets into this unsupported state, contact Emerson Product Support. There
is no automated or user-facing methodology available to recover from this condition.
AMS Device Manager ASI Components
There are three components that allow the AMS Device Manager ASI to provide data to
Plantweb Optics: the Data Collector, the Connector Service, and the optional Proxy. The
Data Collector and Connector Service components must be installed as part of the AMS
Device Manager ASI. The optional Proxy facilitates communication between the Data
Collector and the Connector Service when the ASI components are separated by multiple
network levels. The Data Collector gathers asset source data to send to the Connector
Service. The Connector Service then passes information received from the Data Collector,
using Microsoft Internet Information Services through HTTPS, to Plantweb Optics.
Note the following regarding the Data Collector, Connector Service, and Proxy:
• The Data Collector and Connector Service can be installed on one or two PCs
depending on your network requirements.
• Each Data Collector can communicate with only one Connector Service.
• A Connector Service can receive data from multiple Data Collectors. However, each
Connector Service can communicate with only one Plantweb Optics system.
• There can be more than one Data Collector per Plantweb Optics server.
6.11.1 AMS Device Manager ASI deployment scenarios
Compatibility
The Data Collector gathers AMS Device Manager data from the AMS Device Manager
database and must be installed on an AMS Device Manager station. Emerson recommends
a Client SC station. The AMS Device Manager ASI can be deployed on the following AMS
Device Manager and Plantweb Optics systems:
Table 6-4:
Data
Collector
Version
1.5 Not
1.5.1 Not
Plantweb Optics Version AMS Device Manager Version
<1.5 1.5 1.5.1 <13.1.1 13.1.1 13.5 14.0 14.1.1
Supported
Supported
Supported Supported Not
Supported
Supported Supported Not
Supported
Not
Supported
Supported Supported Supported Supported
Supported Supported Not
Supported
Plantweb™ Optics System Guide 85
Page 86

April 2020
System GuideServer installation procedures
MHM-97911, Rev 10
Note
The Data Collector requires a 64-bit operating system and does not support Windows
Server 2008 (32-bit). Windows Server 2008 R2 is supported.
Note
Machine Works customers using Passthrough transport protocol must use AMS Device
Manager ASI v1.5. Refer to the Plantweb Optics 1.5 Rev 7 System Guide for ASI v1.5
installation instructions.
Install AMS Device Manager ASI Components on Separate PCs
If the Plantweb Optics server and the AMS Device Manager PC are on different networks,
or are separated by a firewall, you must deploy the AMS Device Manager Data Collector on
the AMS Device Manager server station, and the Connector Service on a different server. If
the Data Collector and Connector Service are separated by more than one network level, a
Proxy must be deployed on each network level that exists between the Connector Service
and the Data Collector. The figure below demonstrates deploying the AMS Device
Manager ASI components with a Proxy facilitating communication between the Data
Collector and Connector Service:
Figure 6-4: AMS Device Manager ASI Components
If a Connector Service is already installed and communicating with a Plantweb Optics
system, the Data Collector can be configured to communicate with the existing Connector
86 Plantweb™ Optics System Guide
Page 87

System Guide
MHM-97911, Rev 10
Service, eliminating the need for a new Connector Service installation. Additionally,
multiple AMS Device Manager versions can work with a single Connector Service to feed
data to Plantweb Optics. Each AMS Device Manager must have a separate Data Collector
installed.
Install AMS Device Manager ASI Components on a Single PC
For a single PC installation, install the AMS Device Manager Data Collector and Connector
Service on the AMS Device Manager station.
Upgrade AMS Device Manager ASI
If you have an existing AMS Device Manager ASI installation, refer to Upgrade AMS Device
Manager ASI for the AMS Device Manager ASI upgrade procedure. This process will allow
you to upgrade existing AMS Device Manager ASIs while maintaining asset source data
and history in Plantweb Optics.
Server installation procedures
April 2020
6.11.2 Register the AMS Device Manager ASI with Plantweb Optics
Before installing the AMS Device Manager Data Collector, register the AMS Device
Manager ASI on the Plantweb Optics server. This process allows the ASI to properly create
assets in Plantweb Optics.
Prerequisites
• Plantweb Optics is installed on the computer you designate as the Plantweb Optics
server.
• A488000-DS0.AMS_DM_ASI.1.5.X.X.zip file.
Procedure
1.
Extract A488000-DS0.AMS_DM_ASI.1.5.X.X.zip.
Note
Extract the zip file to a root directory on the Plantweb Optics server. For example,
drive C:
2. Right-click AMSDeviceManagerDataCollector_Setup.exe and select Run as
administrator.
3. Click
4. Read and accept the license agreement. If you accept, click Next
5. Select
6. Verify the installation destination folder and click Next.
7. Click
Next.
.
Registration and click Next.
Finish to complete the registration process.
Postrequisites
After the registration process is complete, install the AMS Device Manager Data Collector:
Install the AMS Device Manager Data Collector
Plantweb™ Optics System Guide 87
.
Page 88

Server installation procedures
April 2020
MHM-97911, Rev 10
6.11.3 Install the AMS Device Manager Data Collector
Follow this procedure on the AMS Device Manager server to install the AMS Device
Manager Data Collector.
Prerequisites
• A488000-DS0.AMS_DM_ASI.1.5.X.X.zip file.
• If installing on a Windows Server 2008 R2 or a Windows 7 operating system, Windows
automatic updates must be enabled.
• The Data Collector must be installed on an AMS Device Manager Server Plus or ClientSC
station, version 13.1.1, 13.5, 14, or 14.1.1.
• The PC name or IP address where the Connector Service is installed.
• If deploying the Proxy, the PC name or IP address where the Proxy is installed.
• The latest available AMS Device Manager hotfix bundle has been installed on the AMS
Device Manager server.
• The AMS Device Manager ASI registration process has been completed on the
Plantweb Optics server. See Register the AMS Device Manager ASI with Plantweb
Optics.
System Guide
CAUTION
When you install AMS Device Manager ASI and Emerson Wireless Gateway ASI, there is a
risk of adding an Emerson Wireless Gateway that is already in Plantweb Optics. Do not
connect the same Emerson Wireless Gateway to multiple AMS Device Manager systems. If
this happens, duplicate devices, events, and process variables will display in Plantweb
Optics.
If your system gets into this unsupported state, contact Emerson Product Support. There
is no automated or user-facing methodology available to recover from this condition.
Procedure
1.
Extract the A488000-DS0.AMS_DM_ASI.1.5.X.X.zip file on the computer
designated for the Data Collector.
Note
Extract the zip file on a root directory. For example, drive C.
2. Right-click AMSDeviceManagerDataCollector_Setup.exe and select Run as
administrator.
3. Click Next.
4. Read the license agreement. If you accept, click Next.
5. Select Data Collector and click
6. Verify the installation destination folder and click Next
7. Enter the PC name/IP address and port number where the Connector Service is
installed. Port 443 is the default port. Click Next.
Next.
.
88 Plantweb™ Optics System Guide
Page 89

System Guide
MHM-97911, Rev 10
Note
If using the Proxy service, enter the Proxy server PC name/IP address and port
number instead.
8. Enter the local port number the Data Collector will be bound to. Port 443 is the
default port.
9. Click
10. Click Next to continue installation of third-party components. Click
Postrequisites
After installation, the AMS Device Manager Data Collector user interface will open in your
browser. Ensure that the Connector Service and (if applicable) Proxy security certificates
are installed on the appropriate servers before adding an asset source: Install certificates.
Next to being installation of any third-party components listed in the install
dialog. Reboot your PC as indicated in the install dialog. Data Collector installation
will automatically resume after your PC reboots.
complete the installation.
Server installation procedures
April 2020
Finish to
6.11.4 Add an asset source to the AMS Device Manager Data Collector
Prerequisites
• The Connector Service is installed.
• (Optional) The Proxy is installed.
• The Connector Service and (if applicable) Proxy security certificates have been installed
on the appropriate servers.
• In AMS Device Manager, Rebuild Hierarchy
networks.
• In AMS Device Manager,
physical networks.
• An asset source is not currently configured. If an asset source is currently configured, it
must be removed before adding a new asset source.
Procedure
1. Launch the AMS Device Manager Data Collector user interface.
a) Launch Google Chrome or Internet Explorer.
b) Navigate to https://<Data_Collector_PC_Name>/
AMSDeviceManagerDataCollector.
If the Data Collector is bound to a port other than the default port 443,
navigate to https://<Data_Collector_PC_Name>:<PortNumber>/
AMSDeviceManagerDataCollector.
Scan → New Devices has been run on the appropriate
has been run on the appropriate physical
Replace <PortNumber> with the port the Data Collector is bound to and
<Data_Collector_PC_Name> with the name of the PC where the Data
Collector is installed.
Plantweb™ Optics System Guide 89
Page 90

Server installation procedures
April 2020
2. Click the + icon to add a new asset source.
3. Configure the new asset source.
a) In the
asset source.
System Guide
MHM-97911, Rev 10
Site selection box, select the site you want associated with the new
b) Enter a
Name for the new asset source. Assets will appear under this name in
Plantweb Optics.
c) (Optional) Enter a description for the asset source.
d) (Optional) Select
Add Logical Hierarchy to display the AMS Device Manager
Plant Locations hierarchy in the Asset Explorer Location navigator.
When not selected, the hierarchy is only displayed in the Network navigator.
The asset source locations displayed in the location navigator are already
bound to the corresponding devices in the Network navigator. To change
this setting, you will need to remove and add the asset source again.
e) Click Add to add the asset source.
Postrequisites
The Data Collector will begin sending asset source data from the locally installed AMS
Device Manager to the Connector Service or Proxy IP address entered during Data
Collector installation. Alert notifications and asset health will automatically be displayed in
Asset Explorer.
Opt-in to process variables from HART and F
Device Parameters for more information.
6.11.5 Opt-In to Device Parameters
OUNDATION
™
Fieldbus devices. See Opt-In to
The
AMS Device Manager Data Collector Param Read Configuration application allows you to
opt-in to device parameters from your AMS Device Manager system and pass it through to
Plantweb Optics, where you can then configure and monitor those devices.
In addition to the standard data about an asset's properties, alerts, and health—included
after installing the AMS Device Manager ASI and configuring it—the configuration
application can help you get process variables (sometimes known as measured variables
or primary variables) from all HART and FOUNDATION™ Fieldbus devices, and device specific
variables from select Emerson HART and FOUNDATION™ Fieldbus devices. To do this, the
Data Collector requires a .csv file with the device's AMS Tag, as well as an indication of
whether that device's key process variable information and other device-specific
parameters can be imported. A value of 1 indicates the column's data will be returned, 0
indicates it is not returned.
To import process and device-specific variables into Plantweb Optics, the structure of
the .csv file must contain at least the following exact three column headings:
AMSTag,Process Variables,Device Specific Variables
Currently, device-specific variables can be imported for Fisher and Micro Motion devices.
The device manufacturer is included below in the name of the AMSTag. In the example
below, "amstag4fisher" represents a Fisher brand valve that is importing its device-specific
90 Plantweb™ Optics System Guide
Page 91

System Guide
MHM-97911, Rev 10
Server installation procedures
April 2020
variables, and "amstag5micromotion" is importing its process variables and device-specific
variables.
AMSTag,Process Variables,Device Specific Variables
amstag3device,1,0
amstag4fisher,0,1
amstag5micromotion,1,1
Device-Specific variables
When selected in the .csv file, the following device-specific information is returned by the
ASI Service.
Fisher Controls HART and F
OUNDATION
™
Fieldbus devices:
• Drive Signal
• In Service
• Port A Pressure
• Port B Pressure
• Relay Adjust
• Supply Pressure
• Travel
• Travel Deviation
• Cycle Count
Micro Motion HART and FOUNDATION™ Fieldbus devices:
• Mass Flow
• Live Zero
• Density
• Live Temp
• Case Temp
• Vol Flow
• Tube Freq
• Drive Gain
• LPO (filt and raw)
• RPO (filt)
• Electronics Temp
• Input Voltage
• Special Parameters (contact your Emerson Impact Partner)
Plantweb™ Optics System Guide 91
Page 92

Server installation procedures
April 2020
CAUTION
Renaming a device tag in AMS Device Manager after the parameter opt-in process has
been completed will prevent the associated device parameters from automatically
updating in Plantweb Optics. If a device tag is renamed in AMS Device Manager, the
parameter opt-in process must be completed again to continue receiving parameter
updated in Plantweb Optics.
Get configuration data from AMS Device Manager
Prerequisites
You will need AMS Device Manager DVD2 to complete this procedure.
Procedure
1. Open AMS Device Manager. In Device Explorer, right click on the AMS Device
Manager
2. Click
3. On the
all the devices in AMS Device Manager, choose Select next to the
checkbox, and select the devices of interest. Click OK. The screen displays how
many devices are selected. The default is All selected. If you do not need to filter
your list of devices by the Device Group in Alert Monitor, skip to step 14.
4. Open AMS Device Manager Alert Monitor, and select Configure.
5. In the toolbar, click Print Preview.
6. In the
7. Open the file, and filter the desired tags by Group.
8. Save the resulting XML file in Microsoft Excel.
9. Insert AMS Device Manager DVD2 into the DVD drive. Navigate to Supplemental
Tools > Reporting Tools
10. Open the file in Microsoft Excel, and select Enable Content
necessary.
11. Select the LoadXML button, and navigate to the Device List XML file you saved
previously.
12. Rename the AMS Tag column to AMSTag.
13. Filter the devices as necessary, adding any Group column data from previous steps,
making sure any AMSTag fields match.
14. In Excel, choose File > Save As... and select
System Guide
MHM-97911, Rev 10
server.
Export > To Generic Export File.
Generic Export page, click the Device List checkbox. If you want a subset of
Device List
Print Preview toolbar, click Export and choose Excel.
and open the file DeviceList.xltm.
and Trust Document, if
CSV UTF-8 .csv (comma delimited).
To import process variables and device-specific variables, see Add process variables and
device-specific variables to the .csv file.
92 Plantweb™ Optics System Guide
Page 93

System Guide
MHM-97911, Rev 10
Server installation procedures
April 2020
Add process variables and device-specific variables to the .csv file
No parameters or process variables will be read until this procedure is done. If you have
entered AMSTag names manually, make sure they are 32 characters or less, and do not
contain the following symbols: (? ' " \ * ! |). An AMSTag is not case-sensitive.
Procedure
1. In Excel, add columns with the exact names Process Variables
Variables.
2. For each AMSTag that represents a Fisher or Micro Motion device for which you
want to import process or device-specific variables, enter 1 in the cell. Entering a 0
will stop collecting the data if it has been previously collected.
3. Save the file as
Manager Data Collector Param Read Configuration application.
Postrequisites
Complete Validate and import .csv file.
UTF-8 .csv. You can now import the .csv file using the AMS Device
and Device Specific
Validate and import .csv file
Follow these steps to validate and import the .csv file created to add process variables and
device-specific variables.
Prerequisites
• The AMS Device Manager Data Collector is installed.
Procedure
1. Launch
Windows Start menu.
2. Select Import.
3. Select Browse to locate the .csv file.
4. Change the header row value to the row containing the header. The names must
match exactly.
5. Select Validate and correct any errors in parsing the .csv file.
6. Select Import.
7. To view the
AMS Tags in the AMS Device Manager ASI pipeline, and whether Process Variable
and Device-Specific Variables are being collected (1) or not (0).
AMS Device Manager Data Collector Param Read Configuration from the
Device Parameter Options report, press the button to display the list of all
6.12 Install the DeltaV Control Loop ASI
DeltaV Control Loop ASI Features
The DeltaV Control Loop ASI gathers control loop data from control modules configured
on a DeltaV system.
Plantweb™ Optics System Guide 93
Page 94

Server installation procedures
April 2020
DeltaV Control Loop ASI Components
Two components allow the DeltaV Control Loop ASI to provide data to Plantweb Optics:
the Data Collector and the Connector Service. Both components must be installed as part
of the DeltaV Control Loop ASI. The Data Collector gathers asset source data to send to
the Connector Service. The Connector Service then passes information received from the
Data Collector, using Microsoft Internet Information Services through HTTPS, to Plantweb
Optics. An optional third component, the Proxy, allows communication between the Data
Collector and the Connector Service across an arbitrary number of networks to provide
network independence and security.
Note the following regarding the Data Collector, Connector Service, and Proxy:
• The Data Collector and Connector Service can be installed on one or two PCs
depending on your network requirements.
• Each Data Collector can communicate with only one Connector Service.
• A Connector Service can receive data from multiple Data Collectors. However, each
Connector Service can communicate with only one Plantweb Optics system.
• There can be more than one Data Collector per Plantweb Optics server.
System Guide
MHM-97911, Rev 10
New
ControlLoopSvc
Windows user considerations
A new Windows group Managed User Account (gMSA) ControlLoopSvc is created on the
ProfessionalPlus server when installing the DeltaV Control Loop Data Collector. This user is
also created on the Application Station depending on your deployment as outlined below.
Note the following regarding the new ControlLoopSvc user:
If the PC where the Data Collector will be installed is part of a Windows domain (excluding
Windows 2008 R2 and Windows 7 operating systems):
• A new user ControlLoopSvc is created on the ProfessionalPlus server, regardless of
whether the Data Collector is installed on a ProfessionalPlus server or an Application
Station.
• A new user is not created on the Application Station, regardless of where the Data
Collector is installed. If the Data Collector is installed on an Application Station, the user
account created on the ProfessionalPlus server will have access to the Application
Station.
• Password management of the ControlLoopSvc user is handled automatically by the
Windows domain.
If the PC where the Data Collector is installed is not part of a Windows domain, or the Data
Collector is installed on a Windows 2008 R2 or Windows 7 operating system:
• A new user ControlLoopSvc is created on the ProfessionalPlus server, regardless of
whether the Data Collector is installed on a ProfessionalPlus server or an Application
Station.
• If the Data Collector is installed on an Application Station, a new Windows user
ControlLoopSvc is created on the Application Station in addition to the user created on
the ProfessionalPlus server.
• The ControlLoopSvc user password must be updated manually as desired or in
accordance with your site's password policy. See Change the ControlLoopSvc Windows
94 Plantweb™ Optics System Guide
Page 95

System Guide
MHM-97911, Rev 10
Server installation procedures
user password to manually change the ControlLoopSvc user password on either the
ProfessionalPlus server or the Application Station.
6.12.1 DeltaV Control Loop ASI deployment scenarios
Compatibility
The DeltaV Control Loop ASI can be deployed on the following DeltaV ProfessionalPlus and
Application Station systems. The Control Performance Statistics (CPS) hotfix must be
installed on the DeltaV ProfessionalPlus server prior to DeltaV Control Loop Data Collector
installation:
Table 6-5: DeltaV ASI Version Compatibility
April 2020
Data
Collector
Version
1.5 Not
Plantweb Optics Version DeltaV Version
<1.5.1 1.5.1 <12.3.1 12.3.1 13.3.1 14.3.1
Supported
Supported Not
Supported
Supported Supported Supported
Note
The Data Collector requires a 64-bit operating system and does not support Windows
Server 2008 (32-bit). Windows Server 2008 R2 is supported.
Install DeltaV Control Loop ASI Components on Separate PCs
If the Plantweb Optics and the DeltaV servers are on different networks, or are separated
by a firewall, you must deploy the DeltaV Data Collector on the DeltaV Control Loop server
and the Connector Service on a different server. If the Data Collector and Connector
Service are separated by more than one network level, a Proxy must be deployed on each
network level that exists between the Connector Service and the Data Collector. The
figure below demonstrates deploying the DeltaV ASI components with a Proxy facilitating
communication between the Data Collector and Connector Service:
Plantweb™ Optics System Guide 95
Page 96

System GuideServer installation procedures
April 2020 MHM-97911, Rev 10
Figure 6-5: DeltaV ASI Components
If a Connector Service is already installed and communicating with a Plantweb Optics
system, the DeltaV Control Loop Data Collector can be configured to communicate with
the existing Connector Service, eliminating the need for a new Connector Service
installation.
The DeltaV Data Collector must be deployed on either a DeltaV ProfessionalPlus or
Application Station, and have access to the DeltaV-generated CPM files. By default, CPM
files are placed in the DVData folder on the DeltaV ProfessionalPlus server. Refer to the
DeltaV documentation for more information on modifying this location.
Install DeltaV Control Loop ASI components on a single PC
For a single PC installation, install the DeltaV Control Loop Data Collector and Connector
Service on the DeltaV ProfessionalPlus or Application Station PC.
96 Plantweb™ Optics System Guide
Page 97

System Guide
MHM-97911, Rev 10
Server installation procedures
6.12.2 Register the DeltaV Control Loop ASI with Plantweb Optics
Before installing the DeltaV Control Loop ASI, register the DeltaV Control Loop ASI on the
Plantweb Optics server. This process allows the ASI to properly create assets in Plantweb
Optics.
Prerequisites
• Plantweb Optics is installed on the computer you designate as the Plantweb Optics
server.
• A48CtrlLoop-DS-0.1.5.X.X.zip file.
Procedure
1. Extract A48CtrlLoop-DS-0.1.5.X.X.zip.
Note
Extract the zip file to a root directory on the Plantweb Optics server. For example,
drive C:
April 2020
6.12.3
2. Right-click DeltaVControlLoopDataCollector_Setup.exe and select Run as
administrator.
3. Click
4. Read and accept the license agreement. If you accept, click Next.
5. Select
6. Verify the installation destination folder and click Next.
7. Click
Postrequisites
After the registration process is complete, install the Data Collector.
Next.
Registration and click Next.
Finish to complete the registration process.
Install the DeltaV Control Loop Data Collector
The DeltaV Control Loop Data Collector must be installed on a DeltaV ProfessionalPLUS or
Application Station. If installing the Data Collector on an Application Station, additional
installation steps must be performed on the ProfessionalPLUS server to grant the Data
Collector access to control loop data.
Prerequisites
• A48CtrlLoop-DS-0.1.5.X.X.zip file.
• If installing on a Windows Server 2008 R2 or a Windows 7 operating system, Windows
automatic updates must be enabled.
• If installing in a Windows 2012 or 2016 domain environment, the user installing the
Data Collector must be part of the Domain Admins (DA) group.
Plantweb™ Optics System Guide 97
Page 98

April 2020
System GuideServer installation procedures
MHM-97911, Rev 10
• The DeltaV Control Loop Data Collector must be installed on either a DeltaV
ProfessionalPLUS server or Application Station, version 12.3.1, 13.3.1, or 14.3.1.
• The PC name or IP address where the Connector Service is installed.
• If deploying the Proxy, the PC name or IP address where the Proxy is installed.
• The DeltaV Control Loop ASI registration process has been completed on the Plantweb
Optics server. See Register the DeltaV Control Loop ASI with Plantweb Optics.
Procedure
Application Station Deployment Pre-Installation
If installing the DeltaV Control Loop Data Collector on an Application Station, the
following installation steps must be performed on the DeltaV ProfessionalPLUS server.
1.
Extract the A48CtrlLoop-DS-0.1.5.X.X.zip file on the DeltaV
ProfessionalPLUS server.
Note
Extract the zip file on a root directory. For example, drive C.
2. Right-click DeltaVControlLoopDataCollector_Setup.exe and select Run as
administrator.
Click Next.
3.
4. Read and accept the license agreement. If you accept, click Next.
5. Select Data Collector and click Next.
6. Select Distributed Deployment. Click Next.
A notification will display informing you that the distributed deployment setup is
complete on the DeltaV ProfessionalPLUS station. Proceed with installing the Data
Collector on the Application Station.
Install the Data Collector
7. Extract the A48CtrlLoop-DS-0.1.5.X.X.zip file on the computer designated
for the Data Collector.
Note
Extract the zip file on a root directory. For example, drive C.
8. If installing on a Windows Server 2008 R2 operating system, TLS 1.2 must be
enabled. To enable TLS 1.2, right-click Enable TLS1.2.reg. Click Merge.
9.
Right-click DeltaVControlLoopDataCollector.exe and select Run as administrator.
10. Click Next.
11. Read and accept the license agreement. Click Next.
12. Select Data Collector and click Next.
13. If installing the Data Collector on a ProfessionalPLUS server, select Single Station
and click Next.
Note
If installing the Data Collector on an Application Station, this dialog will not be
displayed.
98 Plantweb™ Optics System Guide
Page 99

System Guide
MHM-97911, Rev 10
Server installation procedures
April 2020
14. Verify the Data Collector installation destination folder and click Next.
15.
Enter the Connector Service PC name/IP address and port number. Port 443 is the
default port assigned during Connector Service installation.
Note
If using the Proxy service, enter the Proxy server PC name/IP address and port
number.
16. Enter the local port number that the Data Collector will be bound to and click Next.
Port 443 is the default port.
17. Click
18. Click Next to continue installation of third-party components. Click
Postrequisites
After the system restarts, the DeltaV Control Loop Data Collector user interface will open
in your browser. Ensure that the Connector Service and (if applicable) Proxy security
certificates are installed on the appropriate servers before adding an asset source: Install
certificates.
Next to being installation of any third-party components listed in the install
dialog. Reboot your PC as indicated in the install dialog. Data Collector installation
will automatically resume after your PC reboots.
Finish to
complete the installation.
If using Internet Explorer, a blank screen may appear when the Data Collector user
interface launches. If this occurs, continue the installation with
for use with a Data Collector
Configure Internet Explorer
Configure Internet Explorer for use with a Data Collector
A blank screen may occur when launching the DeltaV Control Loop Data Collector user
interface in Internet Explorer. If this occurs, configure Internet Explorer with the required
settings outlined below.
Procedure
1. In Internet Explorer, open Tools → Internet Options
2. Click the Security tab in the dialog that appears.
3. Click Custom level...
4. Under
5. Under Scripting, select Active Scripting → Enable.
6. Click OK.
Postrequisites
After applying the above settings, relaunch Internet Explorer and continue with adding an
asset source: Add an asset source to the DeltaV Control Loop Data Collector
Downloads, select Font Download → Enable.
Plantweb™ Optics System Guide 99
Page 100

Server installation procedures
April 2020
System Guide
MHM-97911, Rev 10
6.12.4 Add an asset source to the DeltaV Control Loop Data Collector
Prerequisites
• The Connector Service is installed.
• (Optional) The Proxy is installed.
• The Connector Service and (if applicable) Proxy security certificates have been installed
on the appropriate servers.
• The Control Performance Monitor (CPM) hotfix with Control Performance Statistics
(CPS) has been installed on the DeltaV ProfessionalPLUS server. Refer to Knowledge
Base Article NK-1900-0820 for more information.
• An asset source is not configured.
Procedure
1. Launch the DeltaV Control Loop Data Collector user interface.
a) Launch Google Chrome or Internet Explorer.
b) Navigate to https://<Data_Collector_PC_Name>/
DeltaVControlLoopDataCollector to launch the Data Collector user
interface.
If the Data Collector is bound to a port other than the default port 443,
navigate to https://<Data_Collector_PC_Name>:<PortNumber>/
DeltaVControlLoopDataCollector.
Replace
<Data_Collector_PC_Name> with the name of the PC where the Data
Collector is installed.
2. Click Add Asset Source.
3. Configure the new asset source.
a) In the Site selection box, select the site you want associated with the new
asset source.
b) Enter a Display Name. Assets will appear under this name in Plantweb
Optics.
c) Enter the destination folder where DeltaV Control Performance Statistics
(CPS) deposits CPM files, such as D:\DeltaV\DVData\InSight\Data.
Postrequisites
<PortNumber> with the port the Data Collector is bound to and
The Data Collector will begin sending asset source data from the newest CPM file to the
Proxy or Connector Service identified during Data Collector installation. Alert notifications
and health data will automatically be displayed in Asset Explorer with asset data pulled
from the newest CPM file.
100 Plantweb™ Optics System Guide
 Loading...