

Page 1
PORTABLE CD, CD-R/RW PLAYER
with AM/FM DIGITAL TUNER
and CASSETTE RECORDER
OWNER’S MANUAL
PD3500RD
Visit our web site at www.emersonradio.com
PD3500RD_102904.p65 29/10/2004, 15:3635
Page 2
!
CAUTION
TO PREVENT FIRE OR SHOCK HAZARD, DO NOT USE THIS PLUG WITH AN
EXTENSION CORD, RECEPTACLE OR OTHER OUTLET UNLESS THE BLADES
CAN BE FULLY INSERTED TO PREVENT BLADE EXPOSURE. TO PREVENT FIRE
OR SHOCK HAZARD, DO NOT EXPOSE THIS APPLIANCE TO RAIN OR MOISTURE.
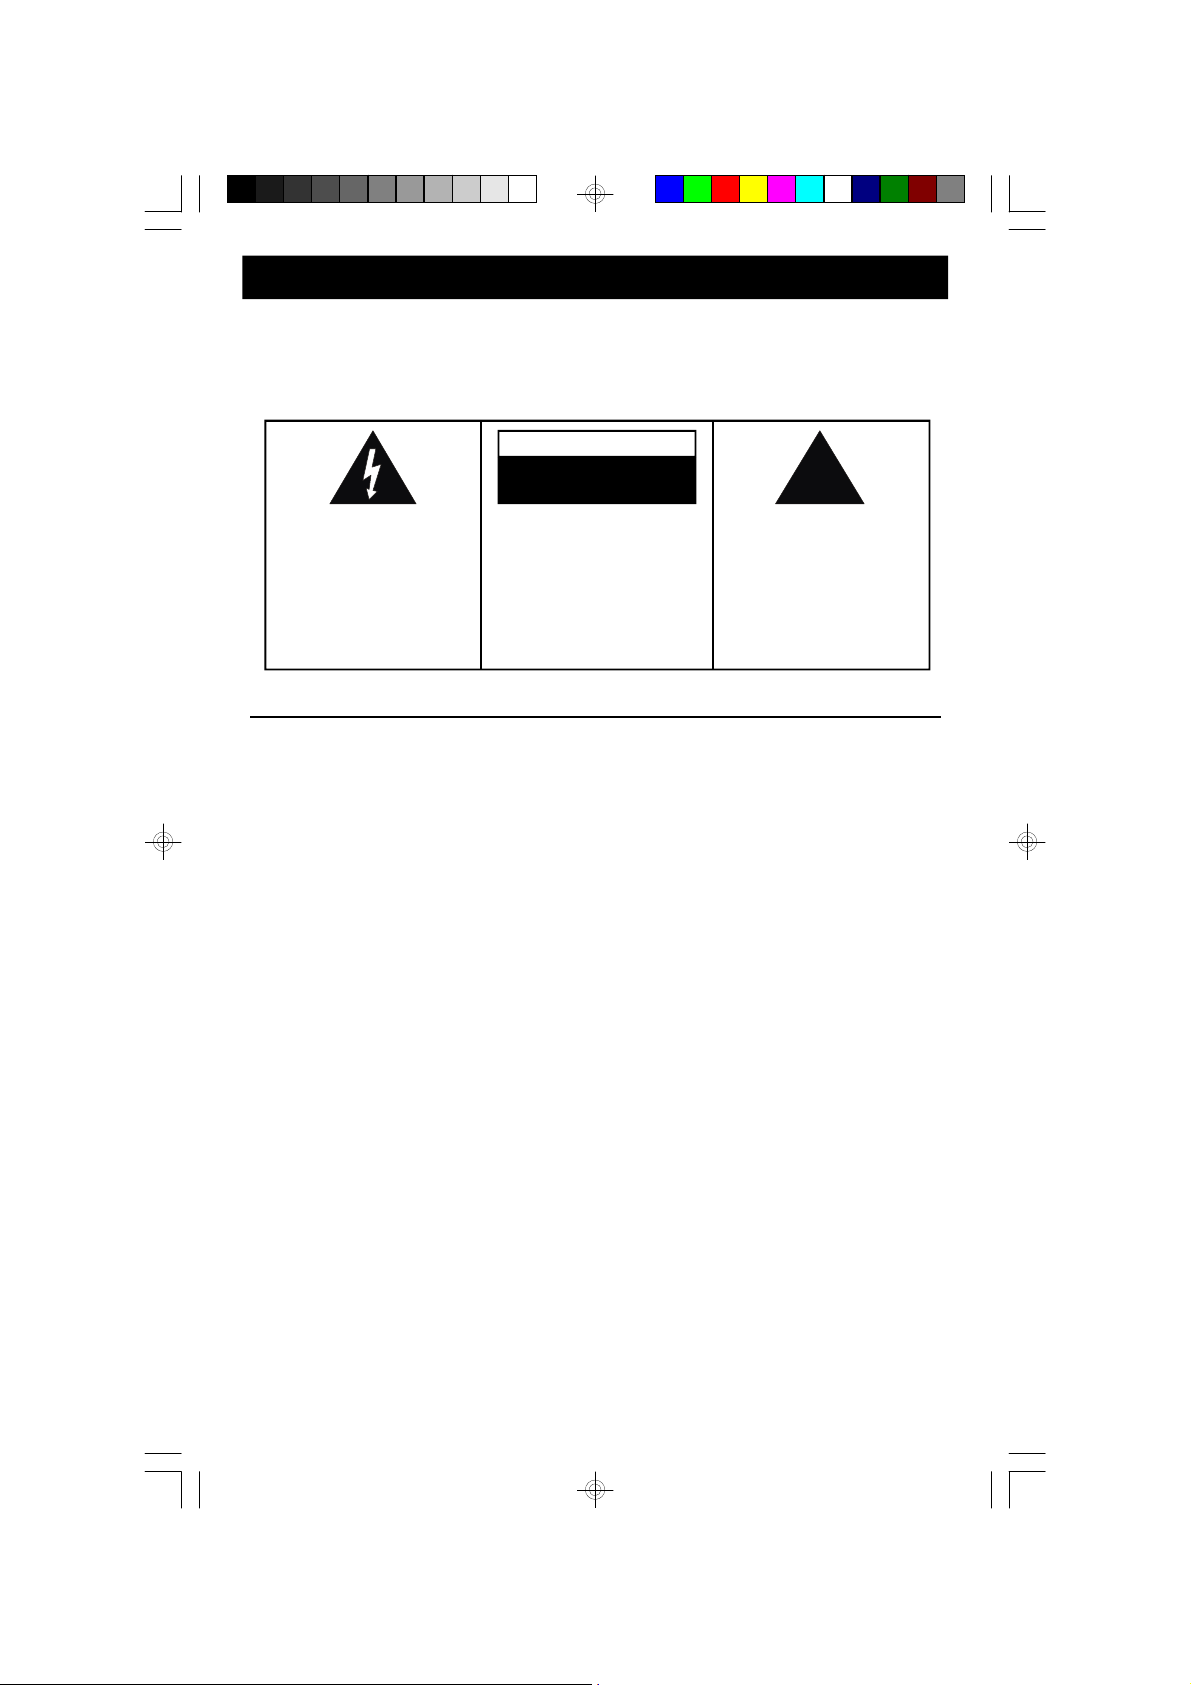
CAUTION
RISK OF ELECTRIC SHOCK
DO NOT OPEN
The lightning flash with arrowhead symbol, within an equilateral triangle is intended to
alert the user to the presence
of uninsulated ‘dangerous voltage’
within the product’s enclosure
that may be of sufficient
magnitude to constitute a risk
of electric shock to persons.
WARNING: TO REDUCE THE
RISK OF ELECTRIC SHOCK
DO NOT REMOVE COVER
(OR BACK ) , N O U SER
SERVICEABLE PARTS INSIDE
REFER SERVICING TO
Q U A LI F IE D S E R V IC E
PERSONNEL.
The exclamation point within
an equilateral triangle is intended to alert the user to
the presence of important
operating and maintenance
(servicing) instructions in
the literature accompanying the appliance.
IMPORTANT SAFETY INSTRUCTIONS
1.) Read these instructions.
2.) Keep these instructions.
3.) Heed all warnings.
4.) Follow all instructions.
5.) Do not use this apparatus near water.
6.) Clean only with dry cloth.
7.) Do not block any ventilation openings. Install in accordance with the manufacturer’s
instructions.
8.) Do not install near any heat sources such as radiators, heat registers, stoves, or other
apparatus (including amplifiers) that produce heat.
9.) Do not defeat the safety purpose of the polarized or grounding-type plug. A polarized plug has
two blades with one wider than the other. A grounding type plug has two blades and a third
grounding prong. The wide blade or the third prong is provided for your safety. If the provided
plug does not fit into your outlet, consult an electrician for replacement of the obsolete outlet.
10.) Protect the power cord from being walked on or pinched particularly at plugs, convenience
receptacles, and the point where they exit from the apparatus.
11.) Only use attachments / accessories specified by the manufacturer.
12.) Unplug this apparatus during lightning storms or when unused for long periods of time.
13.) Refer all servicing to qualified service personnel. Servicing is required when the apparatus
has been damaged in any way, such as power-supply cord or plug is damaged, liquid has
been spilled or objects have fallen into the apparatus, the apparatus has been exposed to rain
or moisture, does not operate normally, or has been dropped.
14.) This appliance shall not be exposed to dripping or splashing water and no object filled with
liquids such as vases shall be placed on the apparatus.
15.) Do not overload wall outlet. Use only power source as indicated.
16.) Use replacement parts as specified by the manufacturer.
17.) The product may be mounted to a wall only if recommended by the manufacturer.
18.) Upon completion of any service or repairs to this product, ask the service technician to
perform safety checks.
1
PD3500RD_102904.p65 29/10/2004, 15:361
Page 3
Thank you ..............
for purchasing this Emerson audio product. The Emerson brand is your assurance
of quality, performance and value.
Our engineers have included many useful and convenient features in this product.
Please be sure to read this Owner’s Manual completely to make sure you are
getting the maximum benefit from each feature.
This product was manufactured using the highest quality components and standards
of workmanship. It was tested by Emerson inspectors and found to be in perfect
working order before it left our factory. However, there is always the chance that
some problem may occur because of rough handling during shipment to the retail
store or to the final consumer.
If, after reading this Manual, you experience any problems with the operation of
this product, please refer to the instructions for obtaining service at the end of this
Manual. Emerson and Emerson retailers are committed to your satisfaction.
Once again, thanks for purchasing this Emerson audio product.
For future reference, record the serial number in the space provided.
Model No: PD3500RD
Serial No:
2
PD3500RD_102904.p65 29/10/2004, 15:362
Page 4
IMPORTANT NOTES
•Avoid instal ling this unit in places
exposed to di rect sunlight or close to
heat radiating appli ances such as
electric heaters, on top of other stereo
equipment that radiates too much heat,
places lacking ventilation or dusty areas,
places subject to constant vibration and/
or humid or moist areas.
•Do not attempt to cl ean this unit with
chemical solvents as this might damage
•Operate controls and swi tches as
described in the manual.
•Before turning ‘On’ the power, make
certain that power cord is properly
installed.
•Store your CDs, cassettes in a cool area
to avoid damage from heat.
•When moving the set, be sure to first
disconnect the power cord.
the finish. Use a clean dry cloth.
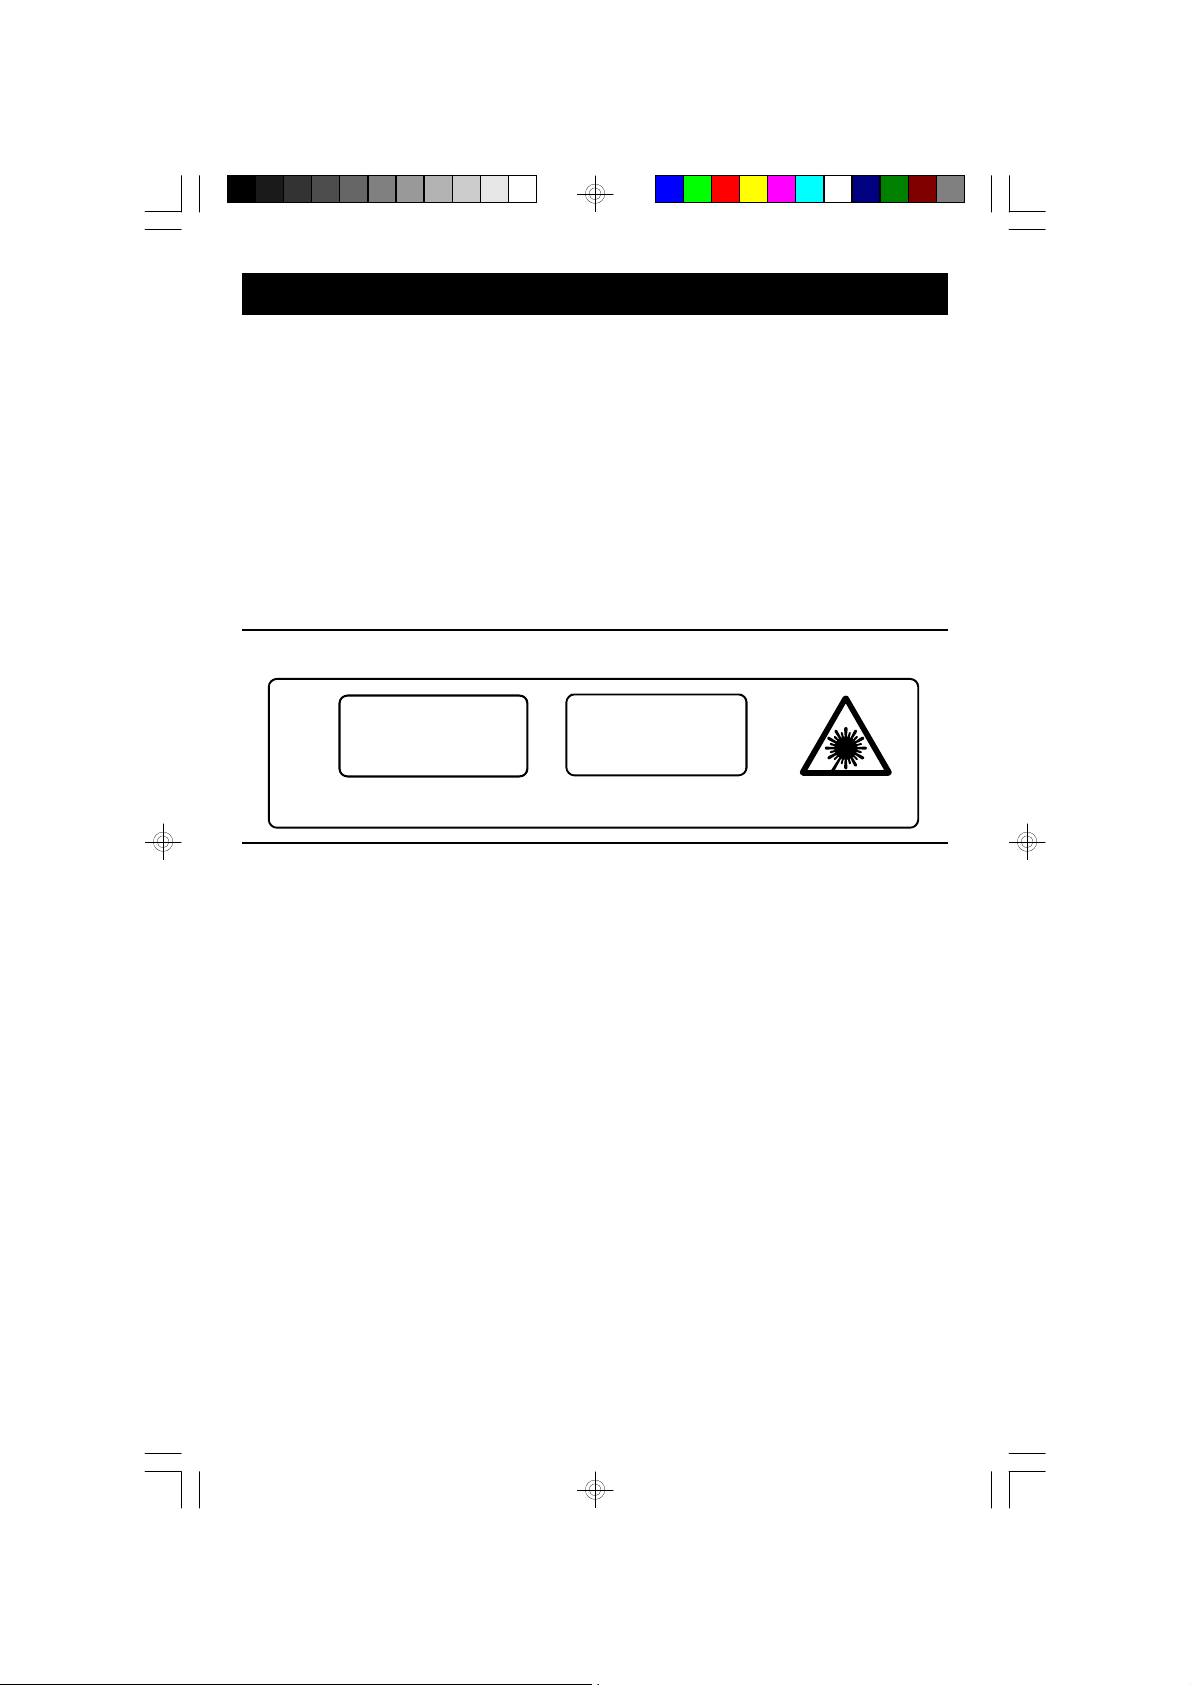
CLASS 1 LASER PRODUCT
CLASS 1 LASER PRODUCT
APPAREIL Á LASER DE CLASSE 1
PRODUCTO LASER DE CLASE 1
This product contains a low power Laser Device.
FCC INFORMATION
This equipment has been tested and found to comply with the limits for a Class B digital
device, pursuant to Part 15 of the FCC Rules. These limits are designed to provide
reasonable protection against harmful interference in a residential installation. This
equipment generates, uses, and can radiate radio frequency energy and, if not installed
and used in accordance with the instructions, may cause harmful interference to radio
communications. However, there is no guarantee that interference will not occur in a
particular installation. If this equipment does cause harmful interference to radio or television
reception, which can be determined by turning the equipment off and on, the user is
encouraged to try to correct the interference by one or more of the following measures:
• Reorient or relocate the receiving antenna.
• Increase the separation between the equipment and receiver.
• Connect the equipment into an outlet on a circuit different from that to which the receiver
is connected.
• Consult the dealer or an experienced radio/TV technician for help.
This device complies with Part 15 of the FCC Rules. Operation is subject to the following
two conditions:
(1) This device may not cause harmful interference, and
(2) This device must accept any interference received, including interference that
may cause undesired operation.
CAUTION
INVISIBLE LASER RADIATION
WHEN OPEN AND INTERLOCKS
DEFEATED.
AVOID EXPOSURE TO BEAM
PD3500RD_102904.p65 29/10/2004, 15:363
3
Page 5
PREPARATION FOR USE
UNPACKING AND SET UP
• Carefully remove the unit from the carton and remove all the packing material
from the unit.
• Carefully remove any small strips of tape which may have been used to keep
the CD/Cassette door closed during shipment.
• Open the CD/cassette compartment by lifting the PULL OPEN tab at front of top
cover. Inside the CD compartment you will see a white transit card which is
used to prevent the laser pick-up from moving during shipment. Carefully remove
this card and close the CD/cassette door.
• Please save the carton and packing materials in the event that your unit ever
needs to be returned for service. The original carton and packing materials are
the only way to protect the unit from damage during shipment.
• The AC power cord is inside the polyfoam packing material. Make sure that you
do not accidentally discard the AC cord with the packing material.
PROTECT YOUR FURNITURE
This model is equipped with non-skid rubber 'feet' to prevent the product from
moving when you operate the controls. These 'feet' are made from non-migrating
rubber material specially formulated to avoid leaving any marks or stains on your
furniture. However certain types of oil based furniture polishes, wood preservatives,
or c leaning sprays may cause the rubber 'feet' to soften, and leave marks or a
rubber residue on the furniture. To prevent any damage to your furniture we strongly
recommend that you purchase small self-adhesive felt pads, available at hardware
stores and home improvement centers everywhere, and apply these pads to the
bottom of the rubber 'feet' before you place the product on fine wooden furniture.
POWER SOURCES
This unit is designed to operate on 8 “D” batteries, not included, or on normal 120V
60Hz AC house current. Operating this unit from any other power source may
cause damage to the unit, and such damage is not covered by your warranty.
4
PD3500RD_102904.p65 29/10/2004, 15:364
Page 6
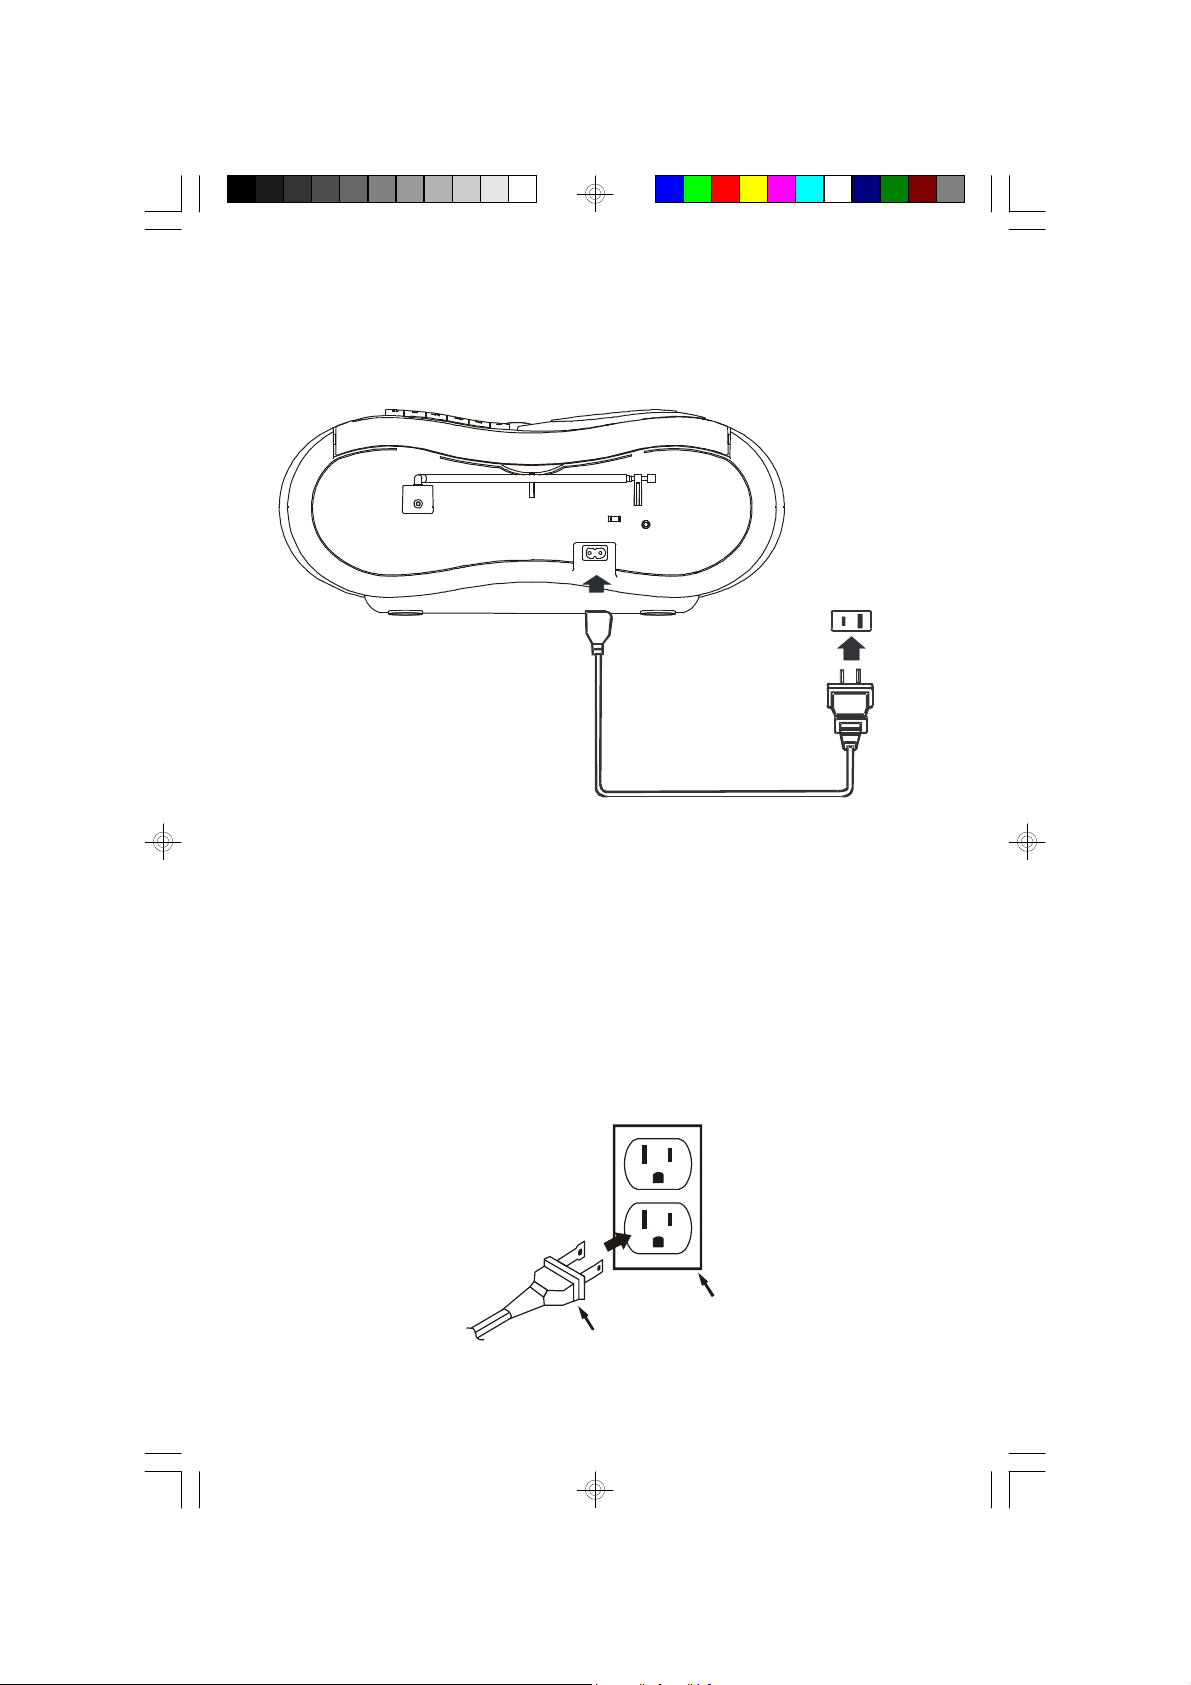
AC Operation
AC Outlet
Connect the small end of the AC Power Cord to the AC socket on the back cabinet,
then insert the plug in any convenient household 120V 60Hz AC outlet.
Note:
This unit has a polarized AC plug with one wide blade and one narrow blade. This
plug will only fit into a matching polarized AC outlet. This is a safety feature to
reduce the possibility of electric shock. If this plug will not fit in your AC outlet, you
probably have an outdated non-polarized outlet. You should have your outdated
outlet changed by a qualified, licensed electrician. Do not file the wide blade on the
plug, or use an adapter to make the plug fit into your outlet. This defeats the safety
feature and could expose you to electric shock.
AC Plug
5
PD3500RD_102904.p65 29/10/2004, 15:365
Page 7
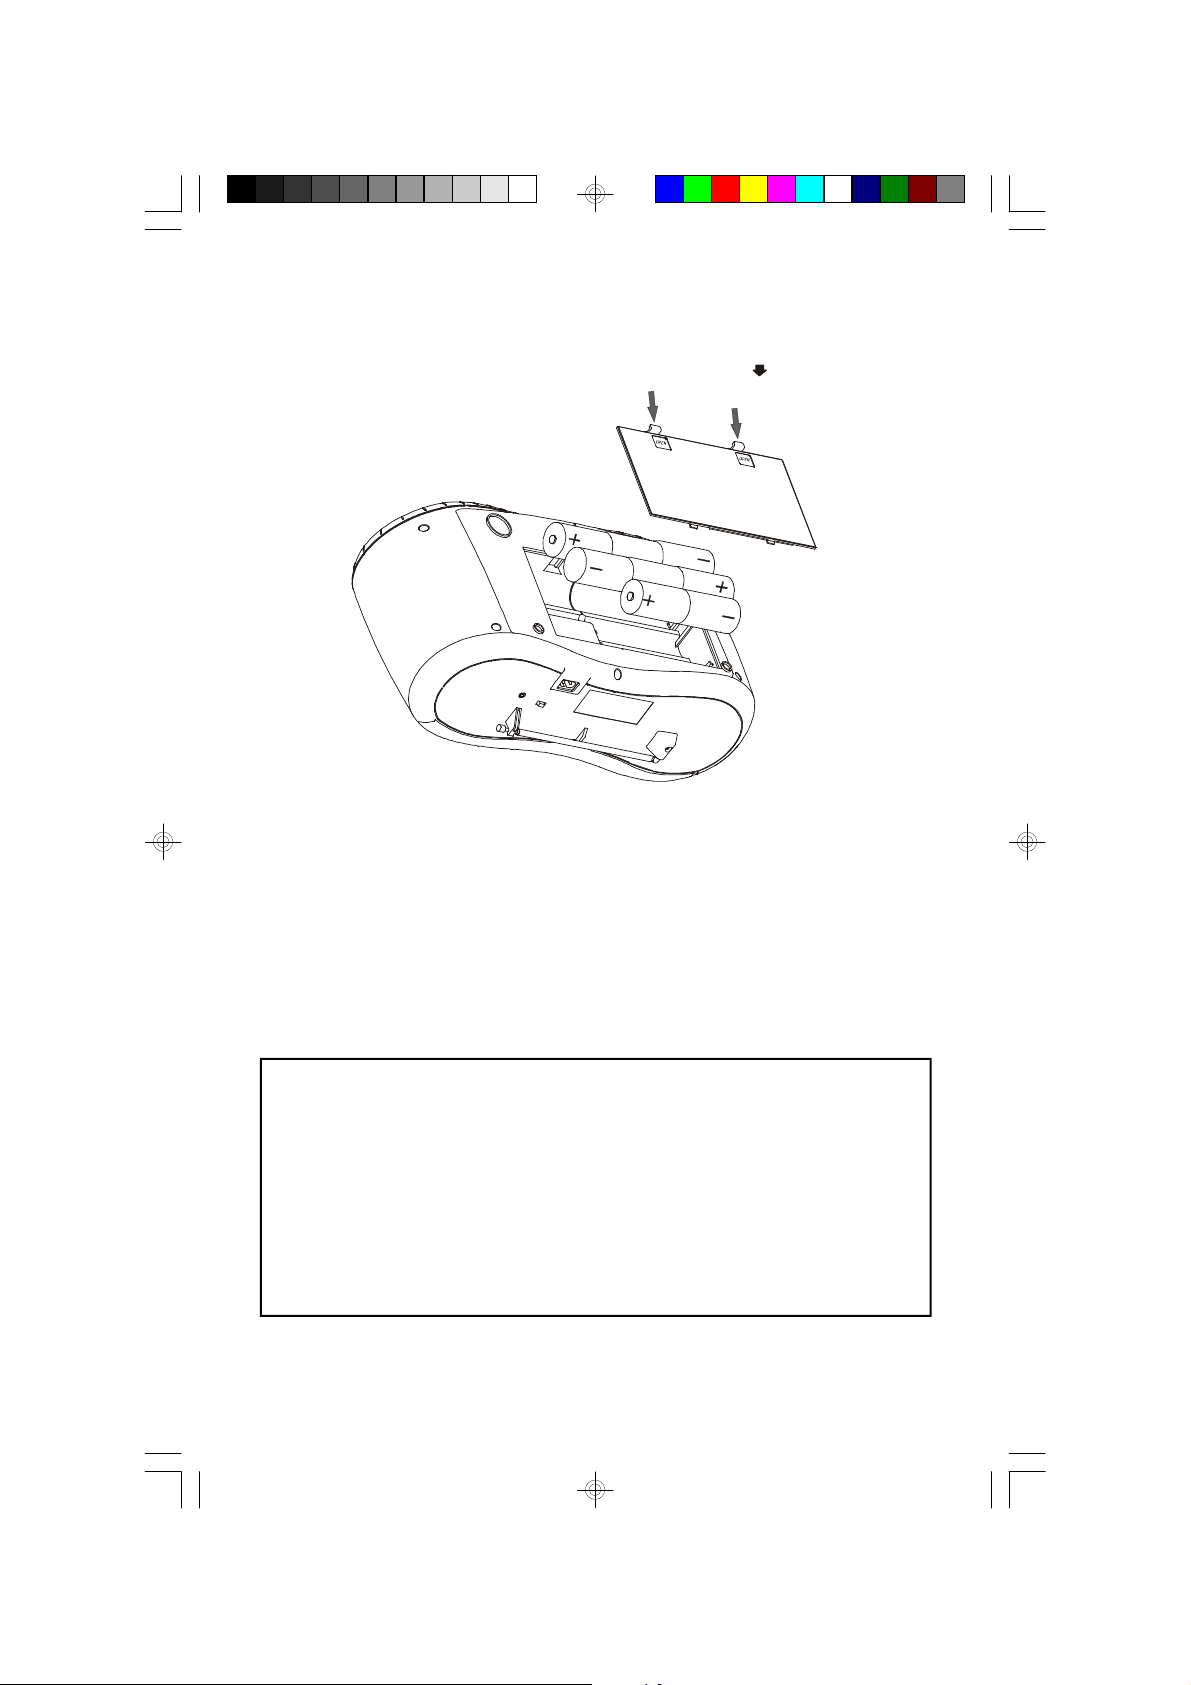
Battery Operation
OPEN
1.) Remove the battery compartment door on the bottom of the cabinet by pressing
on the two tabs in the direction of the arrow below the “
2.) Insert 8 “D” size batteries into the battery compartment according to the polarity
diagram engrav ed inside the compartment. If the batteries are inserted
incorrectly the unit will not work.
” marks and lift it up.
3.) Replace the battery compartment door.
NOTE: In order to operate the unit on battery power the AC cord must be
disconnected from the AC socket on the back cabinet.
BATTERY PRECAUTIONS
Follow these precautions when using batteries in this device:
1. Use only the size and type of batteries specified.
2. Be sure to follow the correct polarity when installing the batteries as indicated in the battery
compartment. Reversed batteries may cause damage to the device.
3. Do not mix different types of batteries together (e.g. Alkaline and Carbon-Zinc) or old batteries
with fresh ones.
4. If the device is not to be used for a long period of time, remove the batteries to prevent
damage or injury from possible battery leakage.
5. Do not try to recharge batteries not intended to be recharged; they can overheat and rupture.
(Follow battery manufacturer’s directions.)
6
PD3500RD_102904.p65 29/10/2004, 15:366
Page 8
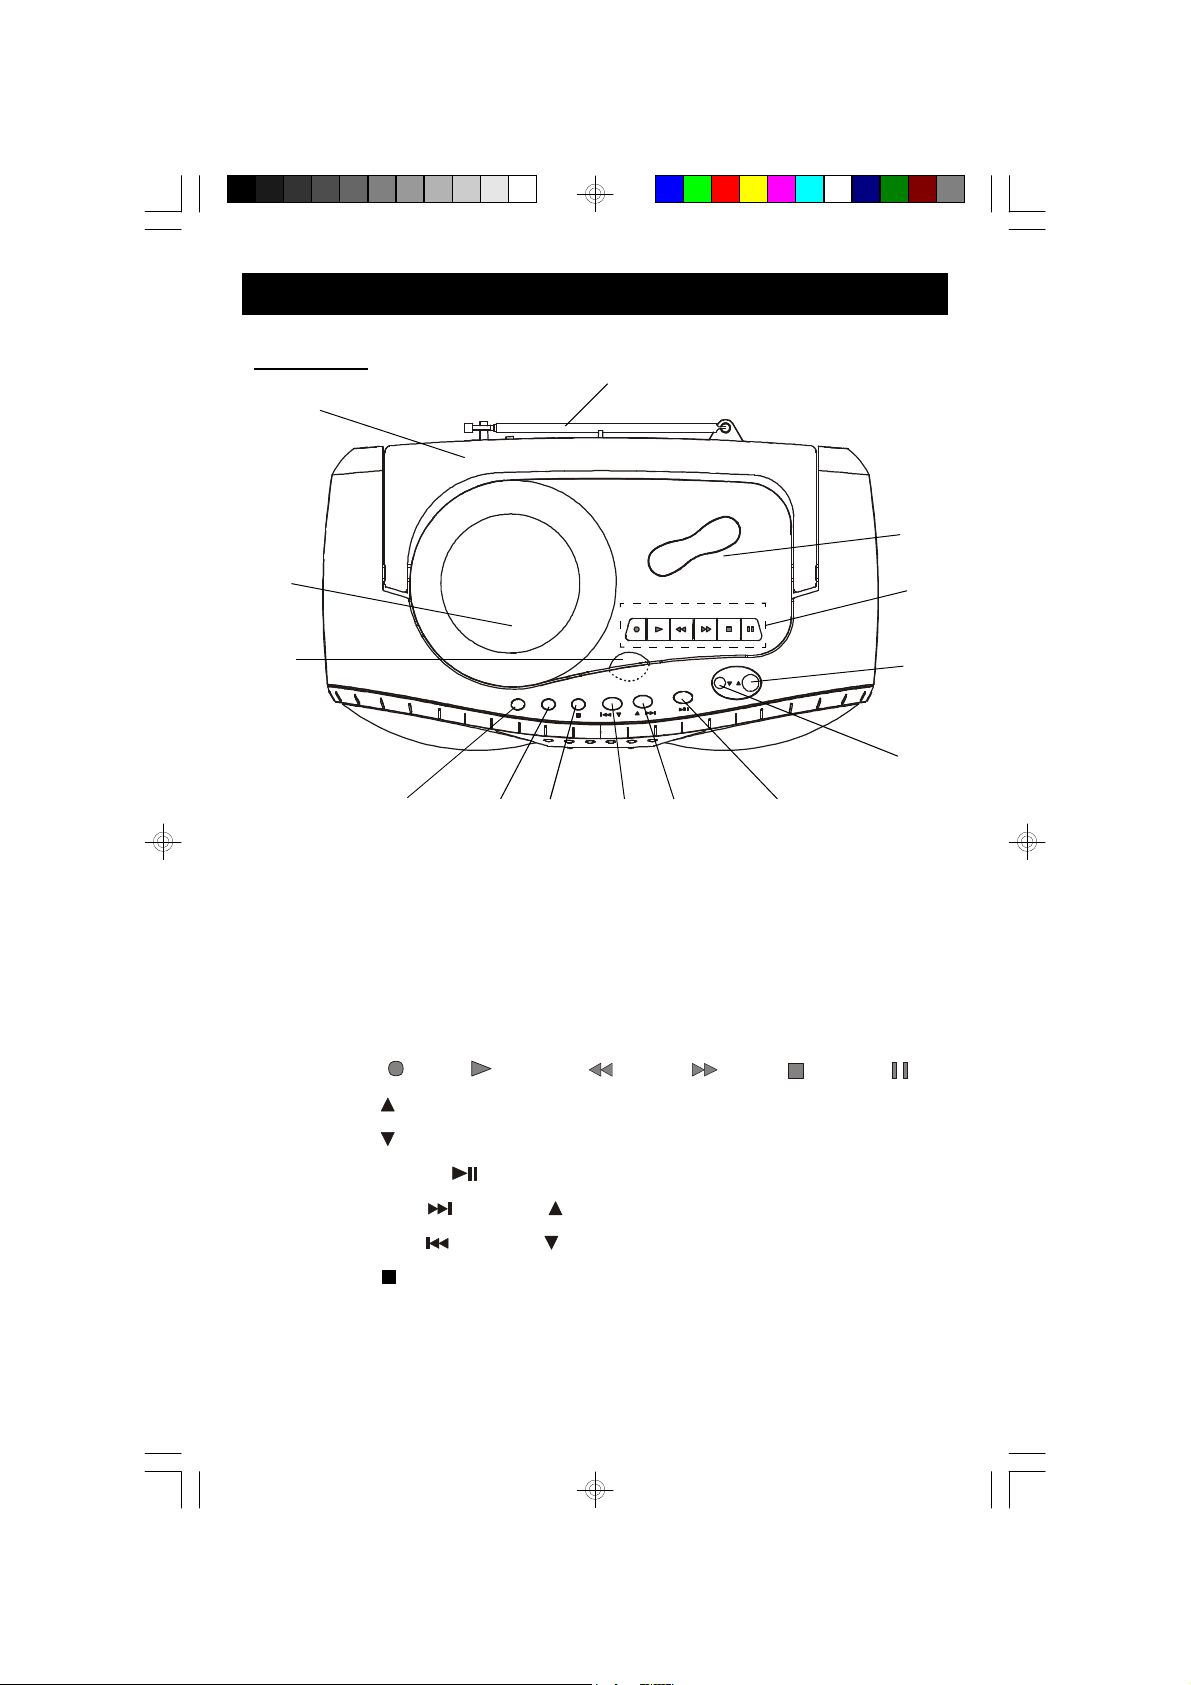
LOCATION OF CONTROLS AND INDICATORS
PULL OPEN
PLAY/PAUSE
TOP VIEW
3
2
1
EQ FUNCTION STOP/BAND
14
1.) CD/Cassette Door PULL OPEN Tab.
2.) CD Door.
3.) Carrying Handle.
4.) FM Telescopic Antenna.
5.) Cassette Door.
6.) Cassette Control Keys.
13
4
K
.
S
REV
1112
PLAYRECORD REWIND F. FWD PAUSESTOP
D
.
F
W
N
G
UNI
P/T
I
10
VOLUME
5
6
7
8
9
(RECORD /PLAYY /REWIND /F. FWDD /STOPOP /PAUSE
7.) VOLUME Button.
8.) VOLUME Button.
9.) CD PLAY/PAUSE Button.
10.) CD FWD. SKIP /TUNING Button.
11.) CD REV. SKIP /TUNING Button.
12.) CD STOP /BAND Button.
13.) FUNCTION Button.
14.) Preset EQ Button.
PD3500RD_102904.p65 29/10/2004, 15:367
7
Page 9
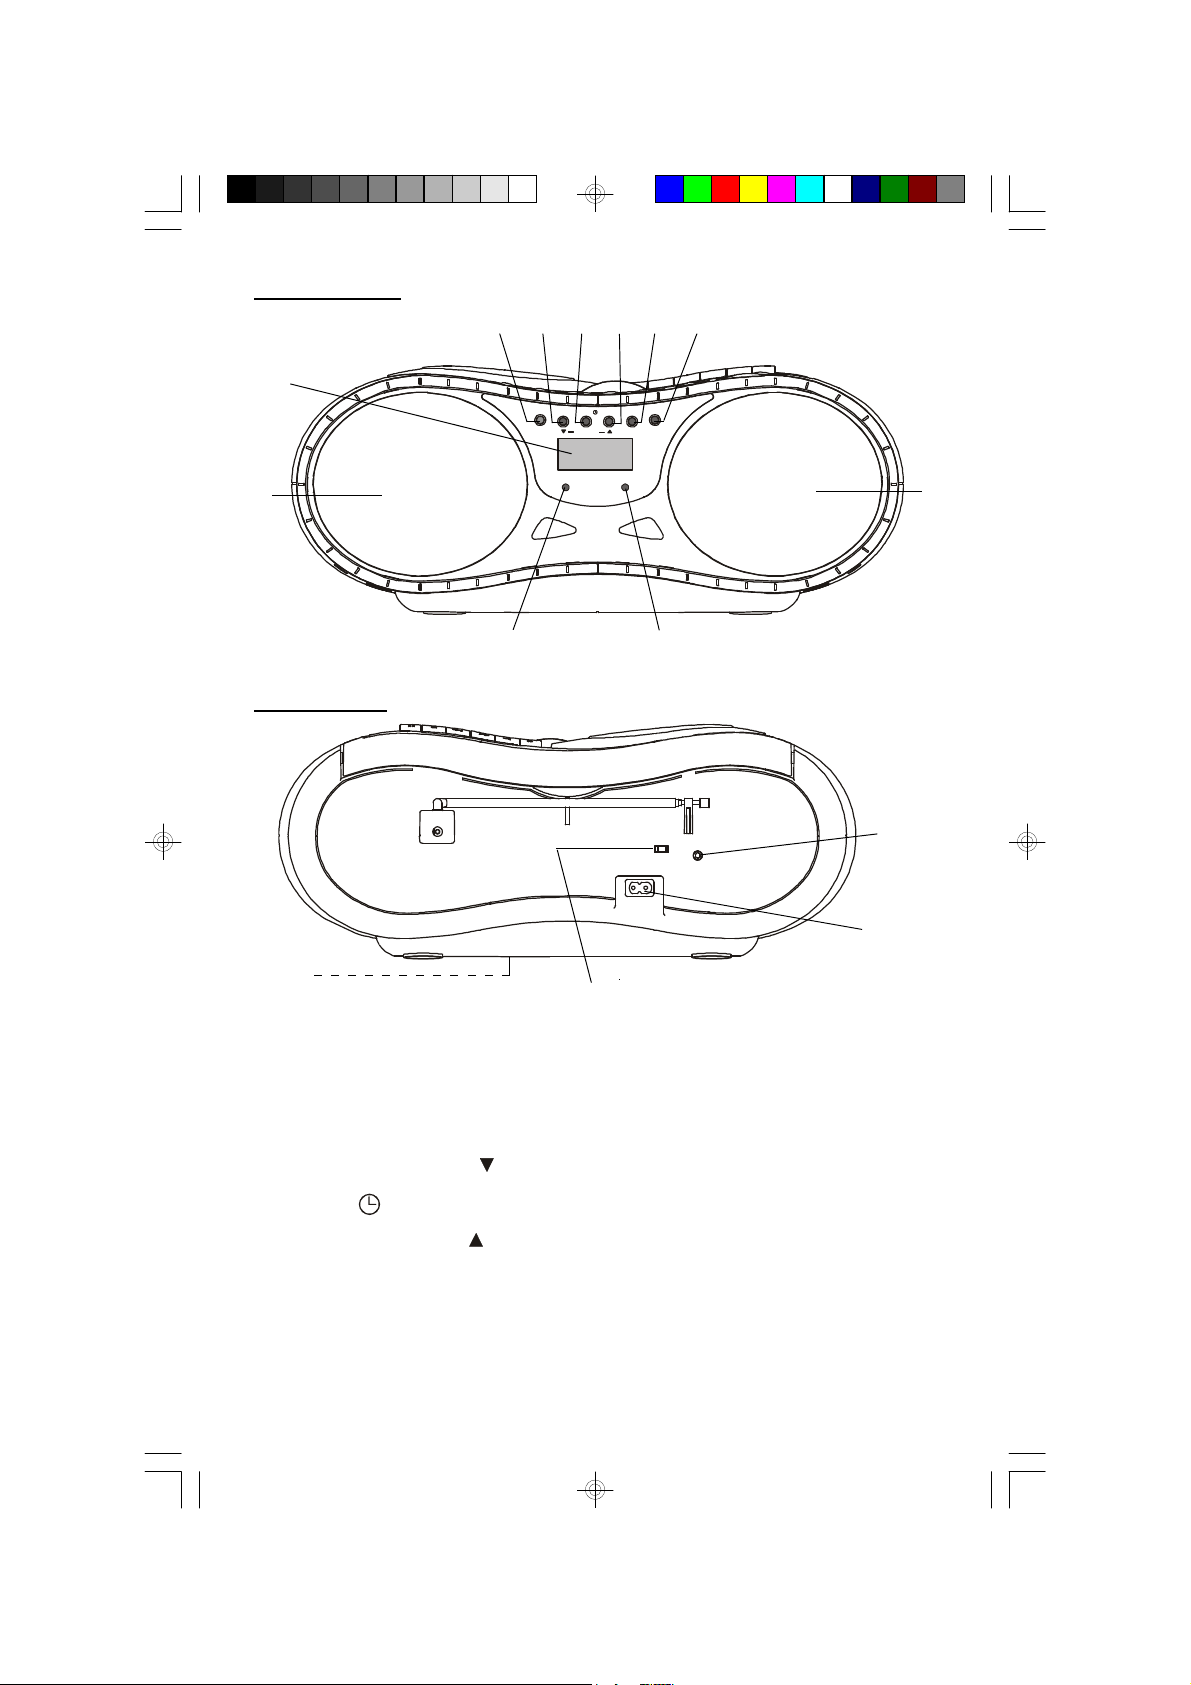
FRONT VIEW
TIMER
BEAT CUT
16
17
POWER
RANDOM
20
1918
PROG.
MEMORY
21 22
INTROREPEAT
STEREO
15
BACK VIEW
25
24
SLEEP SNOOZE
28
23
15
26
1 2
PHONES
27
15.) Speakers.
16.) Multifunction LCD Display.
17.) POWER Button.
18.) RANDOM/MEMORY Button.
19.) PROG. Button.
20.) REPEAT/MEMORY Button.
21.) INTRO/STEREO Button.
22.) TIMER Button.
PD3500RD_102904.p65 29/10/2004, 15:368
23.) SNOOZE Button.
24.) SLEEP Button.
25.) Battery Compartment
(Bottom Cabinet).
26.) PHONES Jack.
27.) AC Power Cord Socket.
28.) BEAT CUT (1/2) Switch.
8
Page 10
OPERATING INSTRUCTIONS
GENERAL CONTROLS
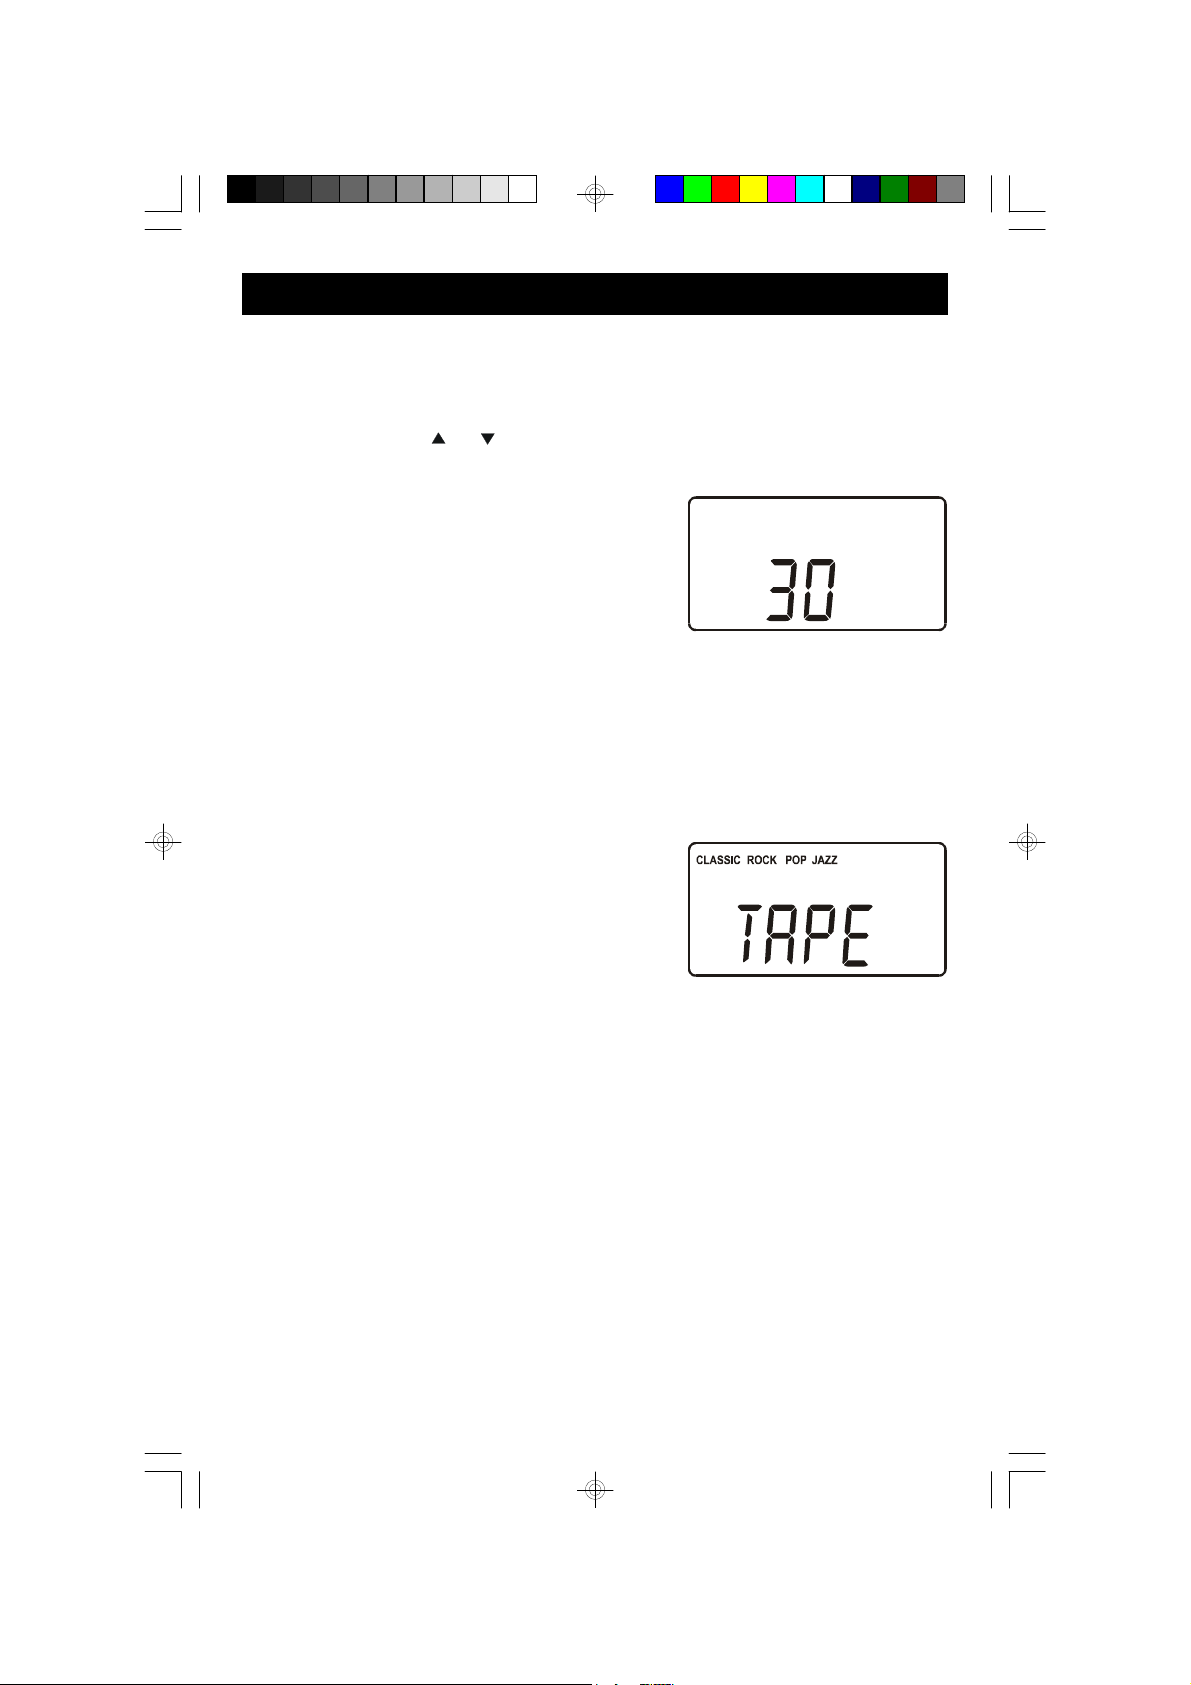
Volume Adjustments
Press the VOLUME or buttons on top panel to increase or decrease the
volume. The volume level indicator appears in the display.
The range is from “00” (Minimum) to “30”
(Maximum).
The system remembers the volume level when the power is switched ‘Off’ and
returns to the same level when the power is switched ‘On’ again.
EQ (Preset Equalizer)
This system has a 4-Band Preset Electronic Equalizer that allows you to adjust the
tone output for the most popular types of music.
The settings are “CLASSIC”, “ROCK”, “POP”,
“JAZZ” or flat (no EQ).
To change the EQ setting press the EQ button on the top panel until the desired
setting appears in the display.
PHONES Jack
Connect a set of stereo headphones (not included) with a 3.5mm mini plug to the
PHONES jack (located at back cabinet) for private listening without disturbing others.
Before putting on the headphones reduce the VOLUME control to a low level, then
put the headphones on and gradually increase the VOLUME control to a comfortable
listening level. The built in speakers are automatically disconnected when
headphones are connected to the PHONES jack.
9
PD3500RD_102904.p65 29/10/2004, 15:369
Page 11
SETTING THE CLOCK
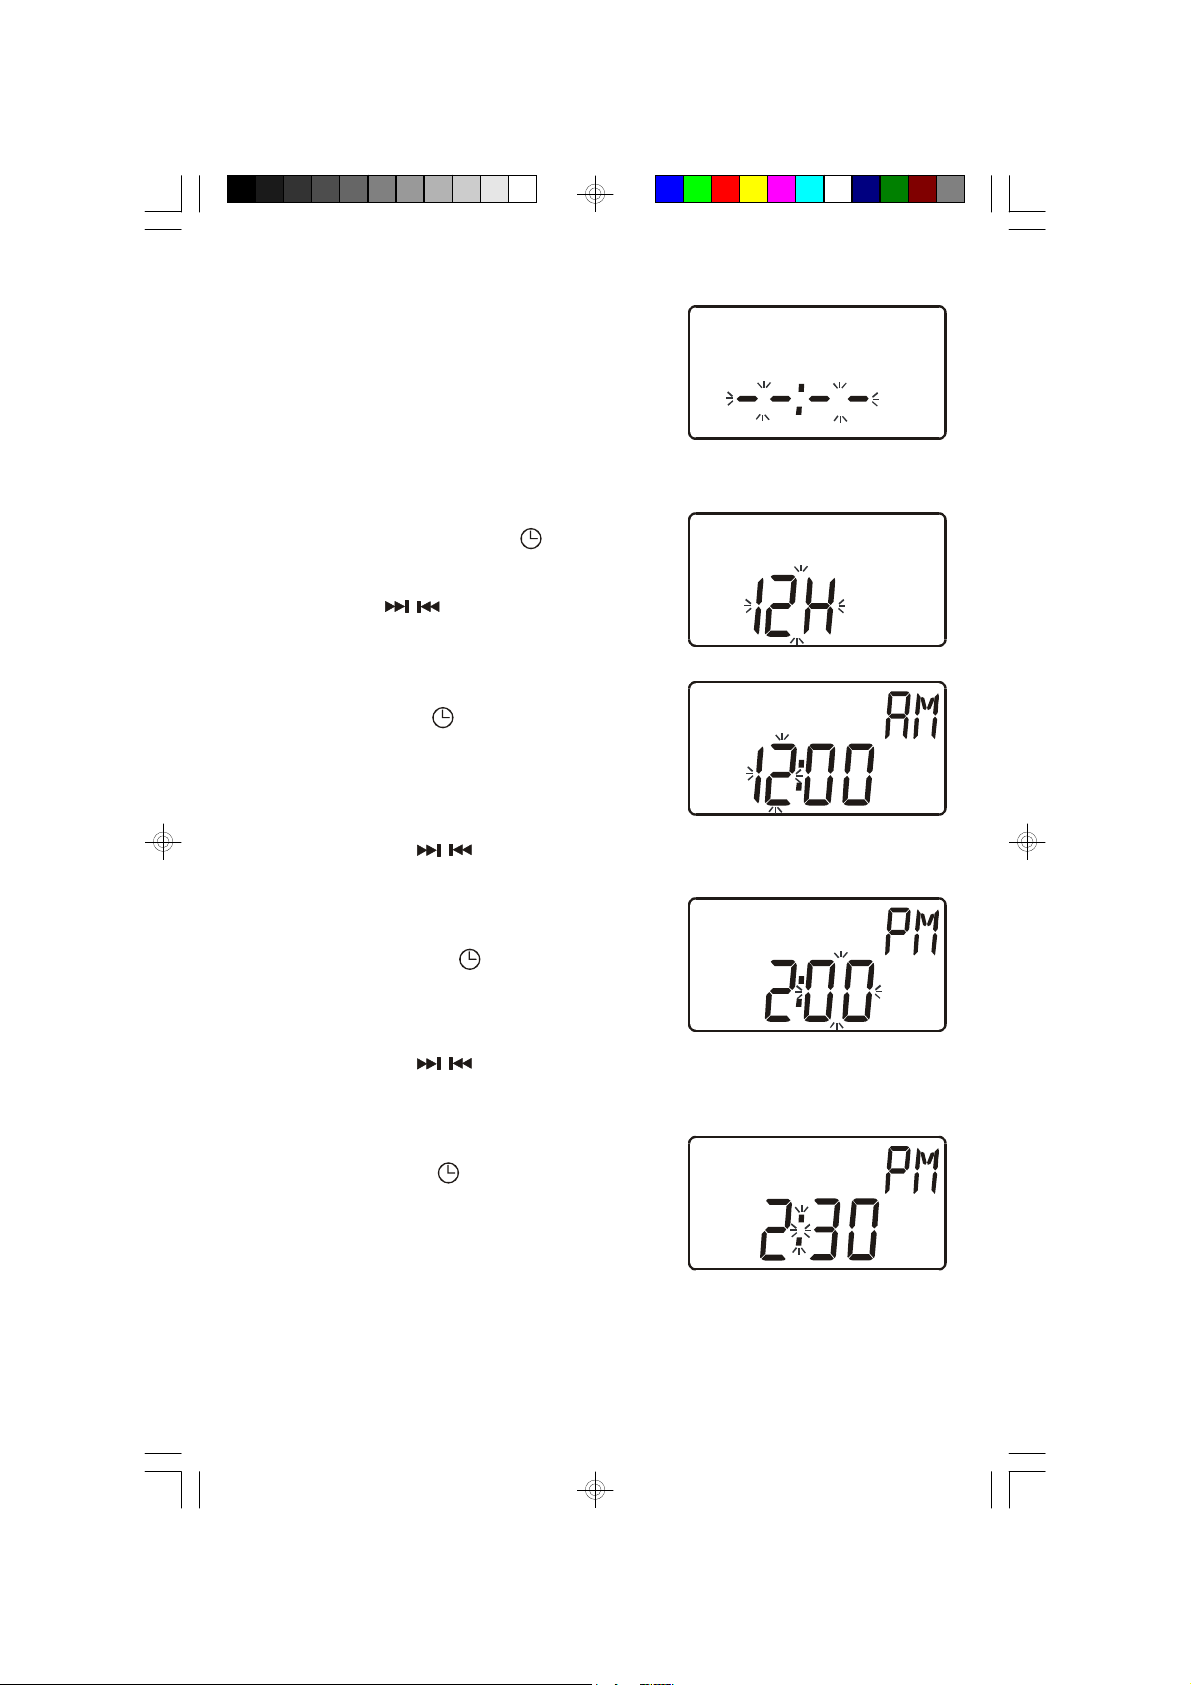
When the unit is connected to the AC outlet for
the first time the “– –:– –” flashes on the display.
Note: Do not turn the main unit power ‘On’. The clock can only be set while the
main unit power is ‘Off’.
1.) Press and hold the PROG. button on the
front panel. “12H” flashes on display.
Press SKIP / buttons to select between
“24H” 24 hour or “12H” 12 hour modes.
2.) Press the PROG. button on the front panel
again. Just the Hour digits will continue
flashing.
3.) Press the SKIP / buttons on the top panel to set the display to the correct
hour, AM or PM.
4.) Press the PROG. button again. The
Minute digits will begin flashing.
5.) Press the SKIP / buttons on the top panel to set the display to the correct
minutes.
6.) Press the PROG. button once more. The
time display stops flashing and the clock
begins to run.
10
PD3500RD_102904.p65 29/10/2004, 15:3610
Page 12
LISTENING TO THE RADIO
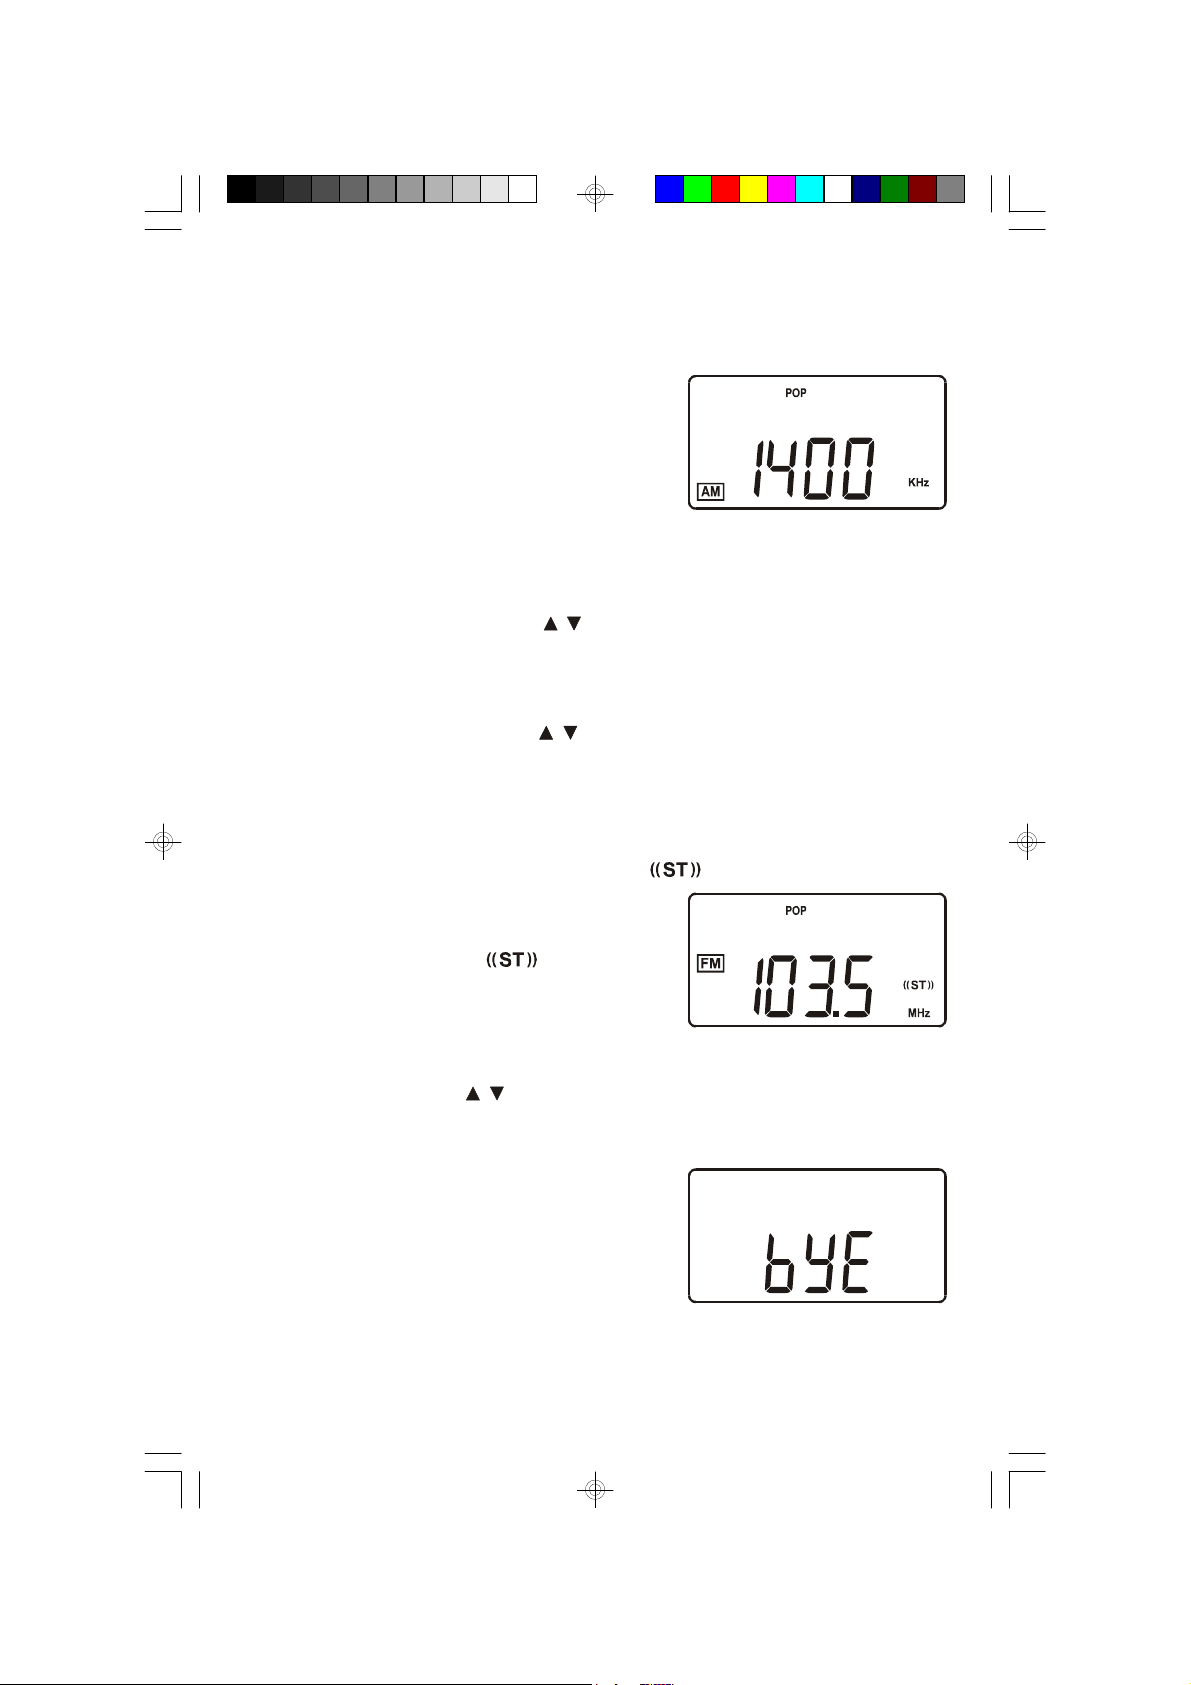
1.) Press the POWER button on the front panel. The main display turns on.
2.) If necessary, press the FUNCTION button on
the top panel to select the Tuner function. The
display will show an AM or FM station
frequency. To select a different band, press
the STOP/BAND button.
3.) Tune to the desired frequency as follows:
• Manual Tuning
Repeatedly press the TUNING / buttons on the top panel until the frequency
of the desired station appears on the display.
• Automatic Tuning
Press and hold the TUNING / buttons on the top panel until the display
begins to move, then release the buttons. The tuner will search up or down the
band for the next strong station and stop on that station. Repeat this procedure
until the tuner stops on your desired station.
4.) If you tuned to an FM Stereo station the indicator will appear in the
display. If the reception is noisy or weak, press
the STEREO button on front panel to select
FM Mono mode. The indicator will
disappear. The reception will normally
improve although the sound will no longer be
in stereo.
5.) Adjust the VOLUME / and EQ controls as desired.
6.) When you are finished listening press the POWER button to return to the
Standby (Power Off) mode.
The display shows bye briefly then goes off
and the time display reappears.
11
PD3500RD_102904.p65 29/10/2004, 15:3611
Page 13
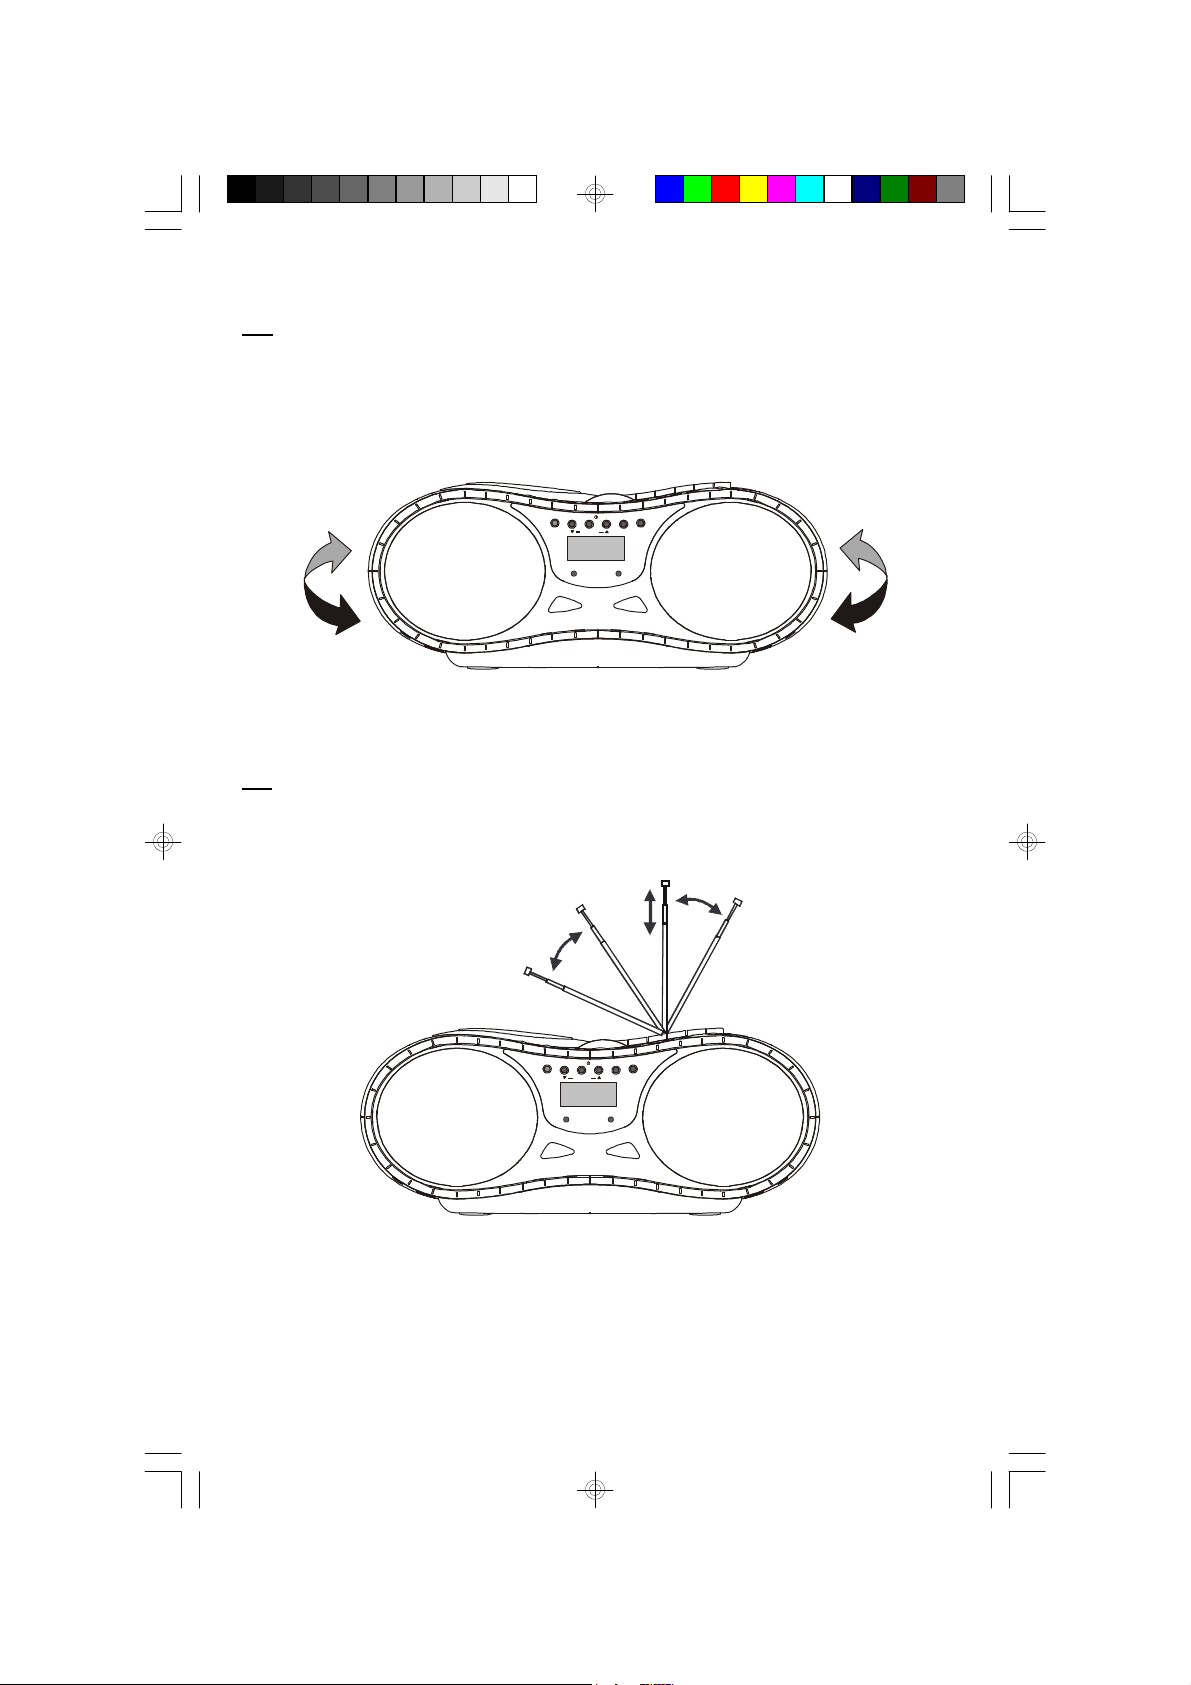
ANTENNA INFORMATION
TIMER
PROG.
TIMER
AM
The AM antenna is inside the cabinet. If AM reception is unsatisfactory try rotating
the entire unit until you find the position that provides the best reception.
POWER
RANDOM
INTROREPEAT
MEMORY
STEREO
SLEEP SNOOZE
FM
Vary the direction of the FM antenna to find the position that provides the best
reception.
PD3500RD_102904.p65 29/10/2004, 15:3612
POWER
INTRO
RANDOM
REPEAT
PROG.
MEMORY
STEREO
SLEEP
SNOOZE
12
Page 14
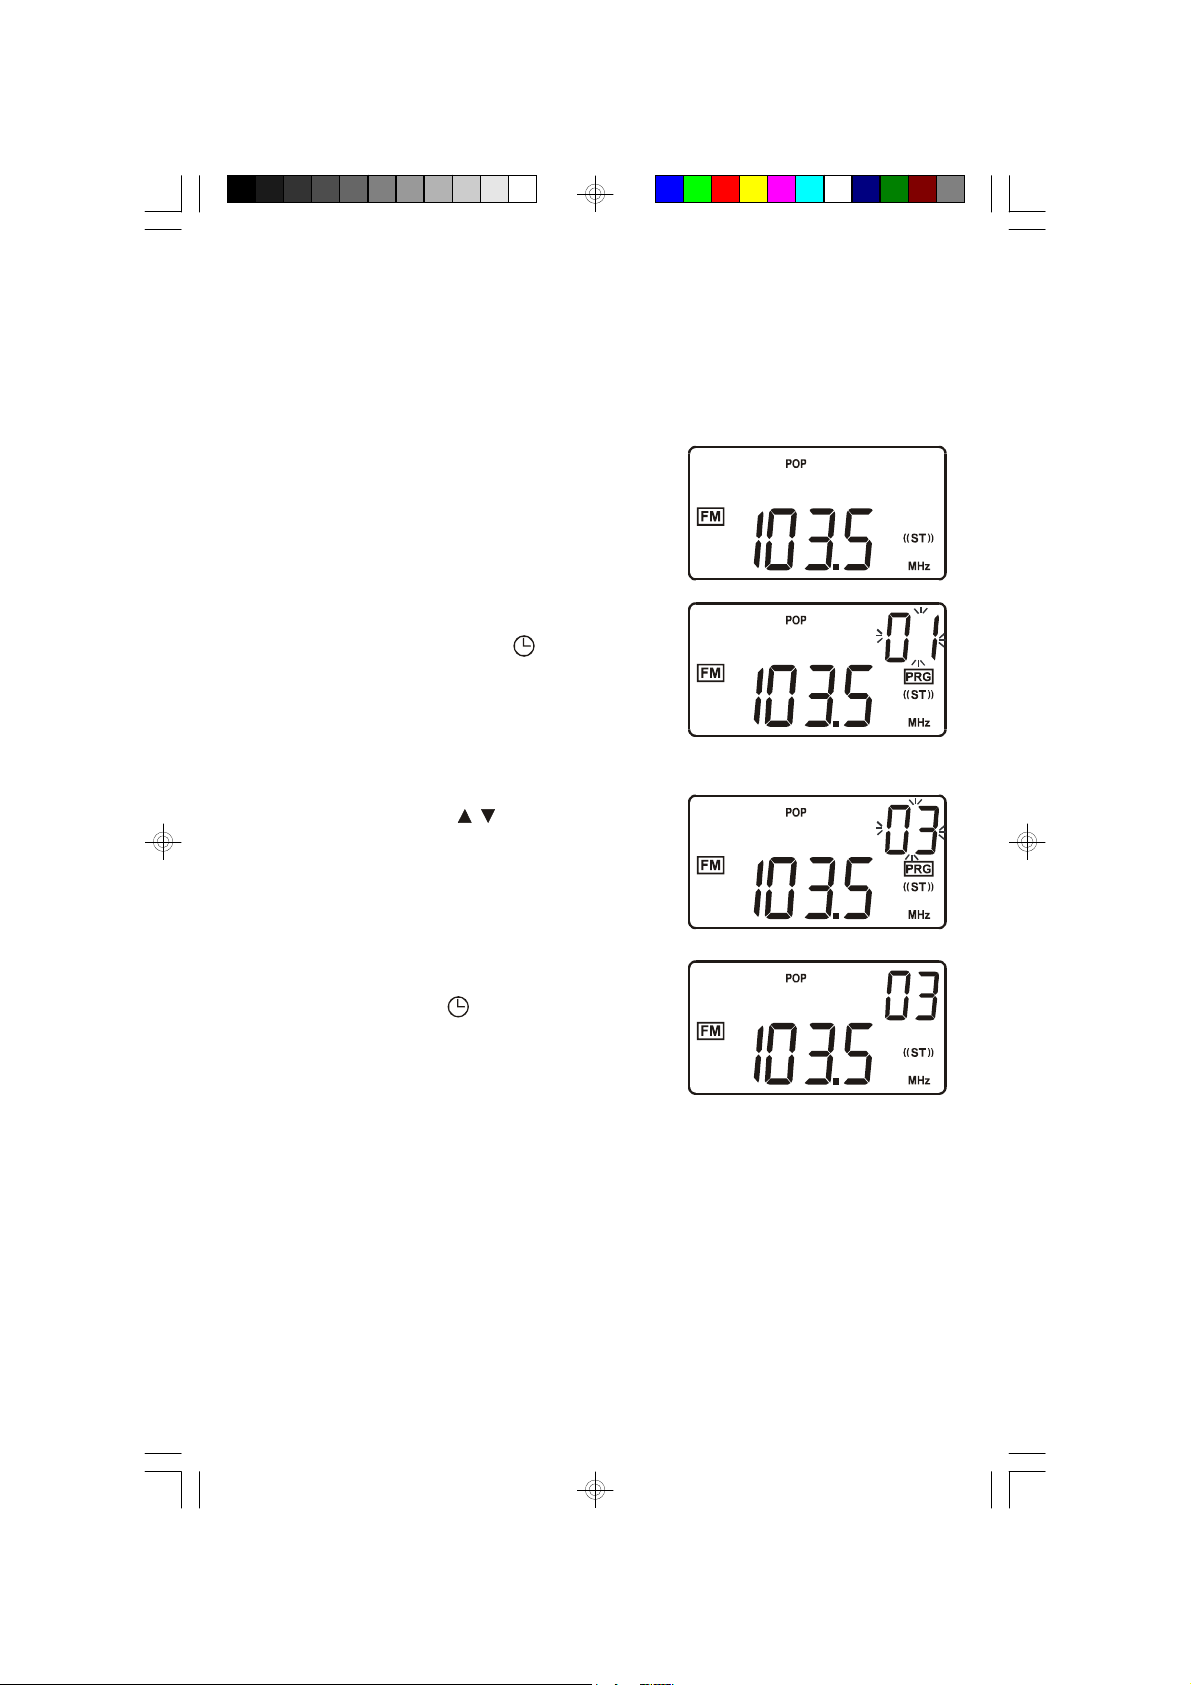
PRE-SETTING STATIONS IN THE TUNER MEMORY
This system includes a 20 station preset memory. You can store up to 10 FM
stations and 10 AM stations in the tuner memory for immediate recall. The procedure
for storing stations in memory is as follows:
1.) Follow step 3 under LISTENING TO THE RADIO in page 11 to select the first
station you wish to memorize.
Example: FM 103.5 MHz.
2.) When the desired station appears on the
display press the PROG. button on the
front panel. The Channel # “01” indicator
flashes and the “PRG” indicator appears in
the display.
3.) Press the MEMORY / buttons on the front
panel to select a preset channel number.
Example: Preset channel # 03.
4.) Press the PROG. button once more to
enter the station in preset memory number
03.
5.) Repeat steps 1 through 4, selecting a different preset number in Step 3 each
time until you have entered up to 10 FM stations in the tuner memory.
6.) Press the STOP/BAND button to select the AM band and follow the same
procedure to enter up to 10 AM stations in the tuner memory.
13
PD3500RD_102904.p65 29/10/2004, 15:3613
Page 15
RECALLING PRESET STATIONS
Turn the unit ‘On’ and select the desired band. Press the MEMORY / button
on the front panel repeatedly to scroll through the preset memories until the display
shows the desired station.
CHANGING PRESET STATIONS
To change any preset station memory select the desired band and tune to the new
station you wish to memorize.
Press the PROG. button and then press the MEMORYY / buttons to display
the memory number you wish to change.
Press the PROG. button again to enter the new station in the memory. The
new station is memorized and the previous station is deleted from the memory.
s
PD3500RD_102904.p65 29/10/2004, 15:3614
14
Page 16
PLAYING COMPACT DISCS
IMPORTANT: This CD player can play normal CDs plus CD Recordable (CD-R)
and CD Rewriteable (CD-RW) discs. However the playability of CD-R/RW discs
may be affected by the type of software that was used in ‘ripping’ the tracks from
the original discs and ‘burning’ the tracks onto the blank media. Playability may
also be affected by the quality and condition of the blank media you use for
recording. 100% compatibility cannot be guaranteed. This is not an indication of
any problems with your player.
1.) Press the POWER button to turn the system ‘On’.
2.) Press the FUNCTION button on the top panel to select the CD function.
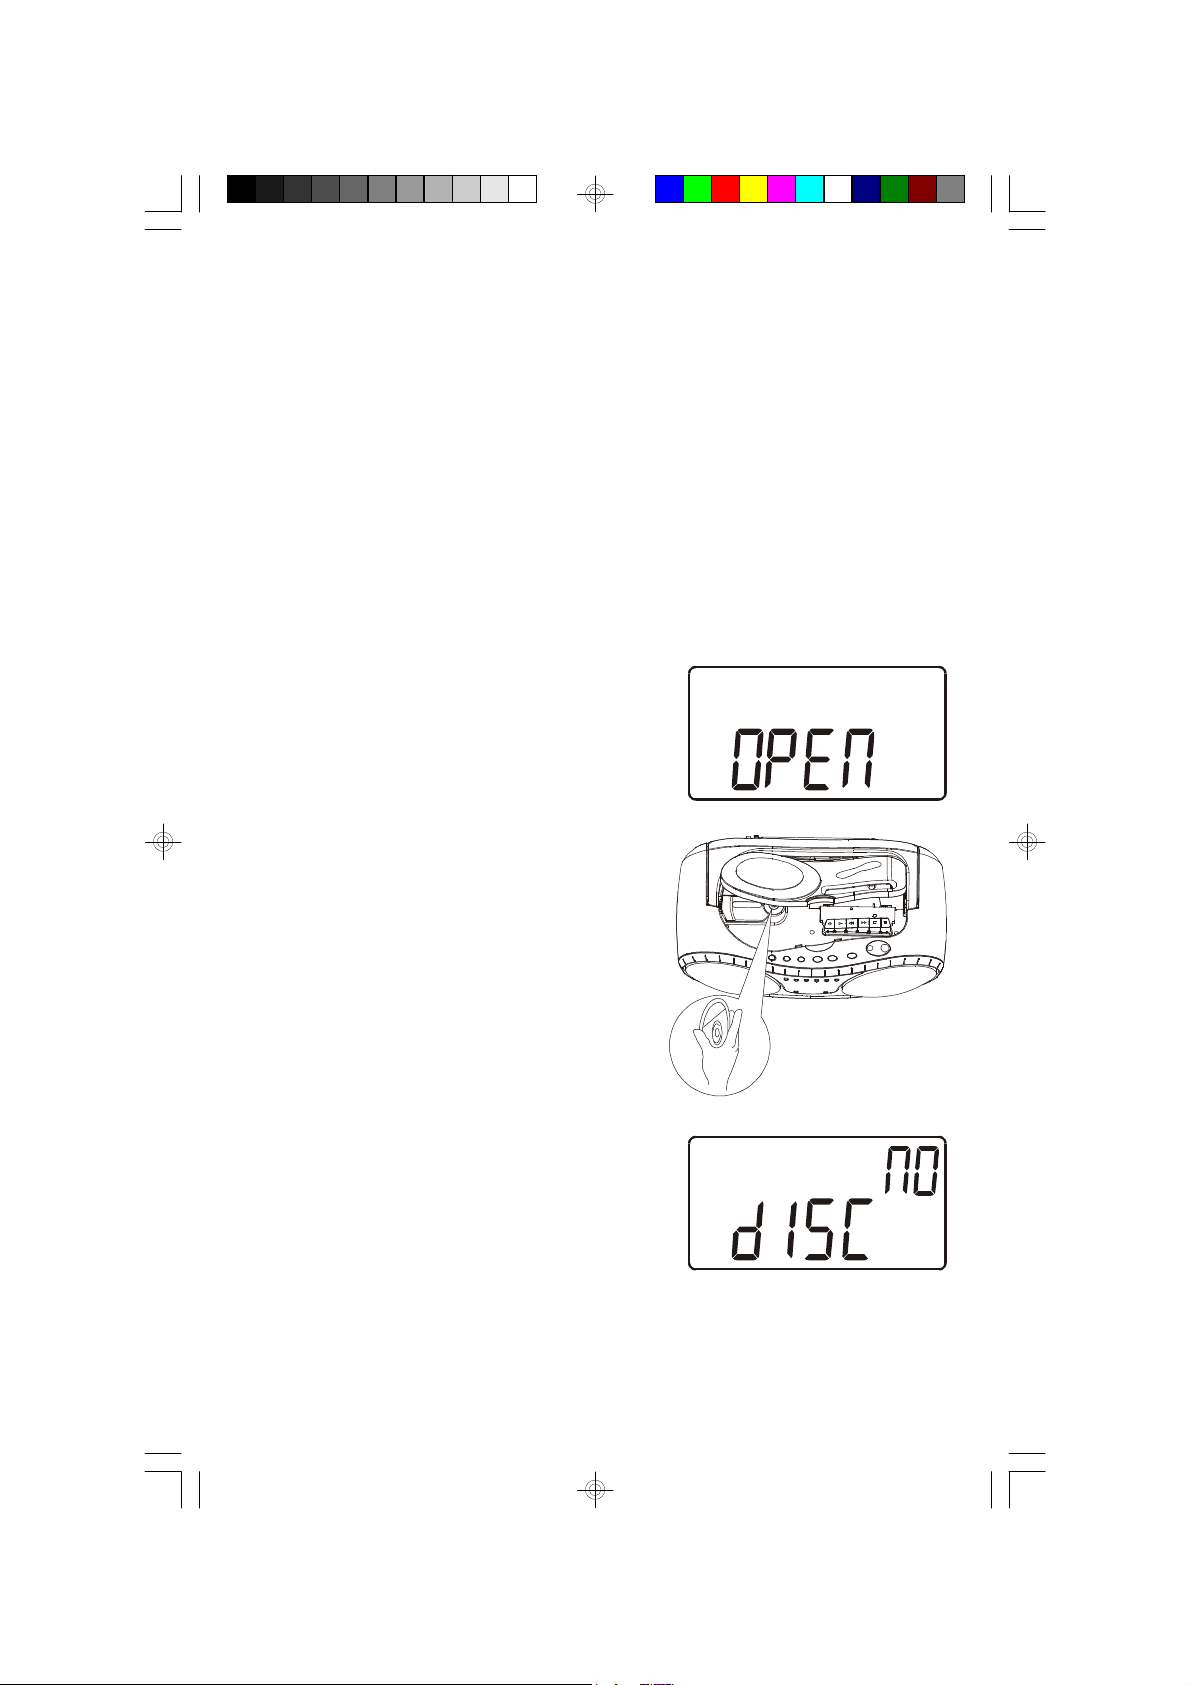
3.) Lift the PULL OPEN tab on the top cover to
open the CD door. The display shows
“OPEN”. If you have not already done so,
remove the ‘dummy CD’ from the player and
discard it.
4.) Place a CD on the center spindle with the
printed label side facing upward.
5.) Close the CD door. The disc will spin and
‘00 00:00’ will flash in the display as the
player reads the table of contents on the
disc. Within a few seconds the disc will stop
spinning and the display will show the total
playing time and total tracks on the disc.
Note: If the disc is inserted upside down
or if the disc is badly scratched and
unreadable, playback will not be possible.
In this case the main display will show “no
dISC”. Remove the disc and re insert it
properly, or try another disc.
15
PD3500RD_102904.p65 29/10/2004, 15:3615
Page 17
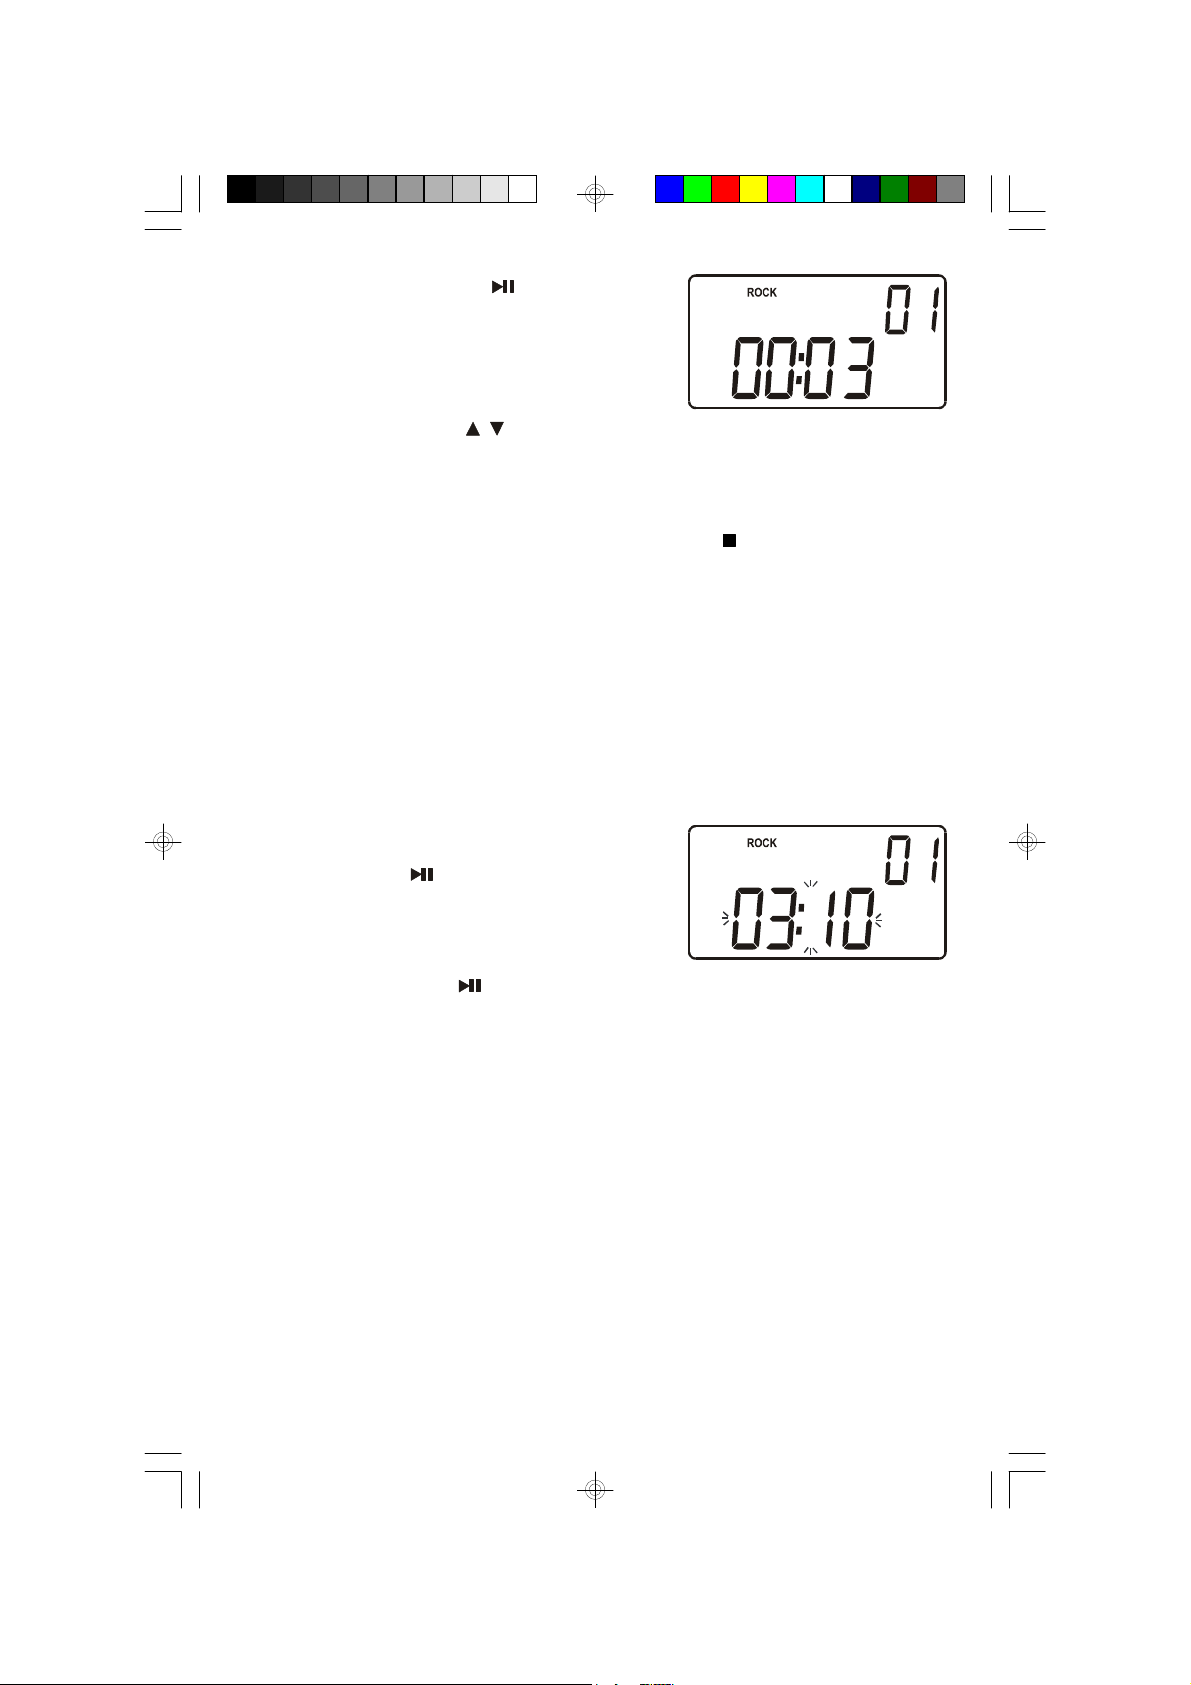
6.) Press the PLAY/PAUSE button on the top
panel to begin playback on track 1. The
display will show the elapsed playing time of
each track as it plays.
7.) Adjust the VOLUME / and EQ controls as desired.
8.) When the last track has played the player stops automatically and the display
again shows the total playing time and tracks on the disc. You may also stop
playback at any time by pressing the STOP/BAND button on the top panel.
9.) When you are finished listening lift the PULL OPEN tab to open the CD door
and remove the disc.
10.)Press the POWER button to return the system to the Standby (Power Off)
mode.
PAUSE Control
To pause momentarily during CD playback press
the PLAY/PAUSE button again. The sound
stops and the elapsed time display flashes but
the disc continues to spin.
Press the PLAY/PAUSE button once more to cancel Pause mode and resume
playback. The elapsed time display stops flashing.
16
PD3500RD_102904.p65 29/10/2004, 15:3616
Page 18
SKIP/Search ( / ) Controls
To skip to higher or lower numbered tracks during playback repeatedly press the
SKIP / buttons on the top panel until the desired track number appears in
the display. Playback will begin on the desired track.
To perform high speed search within a track to locate a specific musical passage
depress and hold the SKIP / buttons. The player will move rapidly forward or
backward as long as the buttons are depressed.
When you hear the desired passage release the buttons and normal playback will
resume at that point.
To Start Playback On A Specific Track
Load the disc as usual and wait until the total playing time and track numbers
appear on the display.
Press the SKIP / buttons on the top panel until the desired track number
appears in the display, then press the PLAY/PAUSE button to begin playback
on that track.
PD3500RD_102904.p65 29/10/2004, 15:3617
17
Page 19
REPEAT Playback
You can program the player to continuously repeat a single track or the entire disc.
The Repeat function can be activated while a disc is playing or while the disc is
stopped.
One Track Repeat
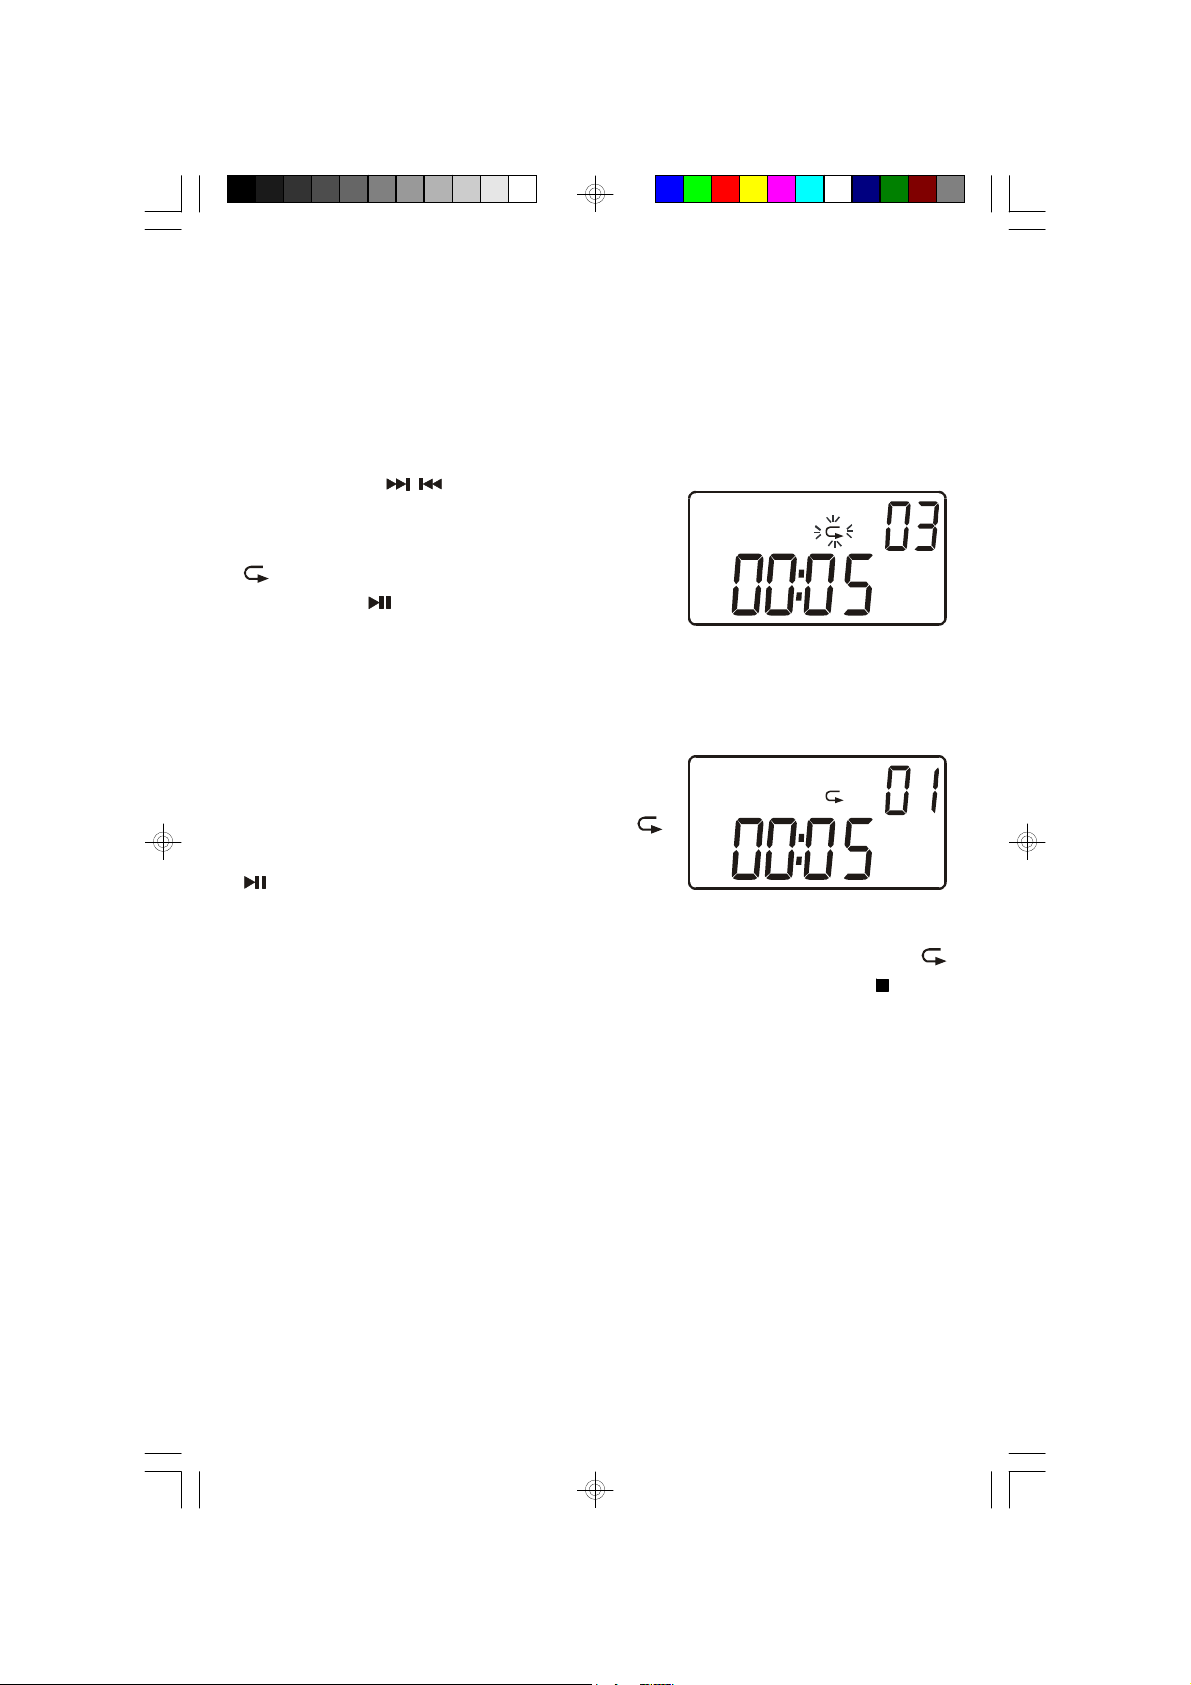
Press the SKIP / buttons on the top panel
until the desired track number appears in the
display, then press the REPEAT button once. The
indicator flashes in the display. Press the
PLAY/PAUSE button to begin playback on that
track. The selected track will be repeated
continuously.
All Tracks Repeat
Load the disc as usual and wait until the total
playing time and track numbers appear on the
display. Press the REPEAT button twice. The
indicator remains ‘On’. Press the PLAY/PAUSE
button to begin playback. The entire disc will
be repeated continuously.
To cancel Repeat Playback continue pressing the REPEAT button until the
indicator disappears. Repeat is also canceled by pressing the STOP/BAND button
or changing to other function.
18
PD3500RD_102904.p65 29/10/2004, 15:3618
Page 20
INTRO Scan Playback
This feature allows you to play just the first 10 seconds of each track on the disc.
This may be useful when you are trying to locate a specific song but you do not
remember the title.
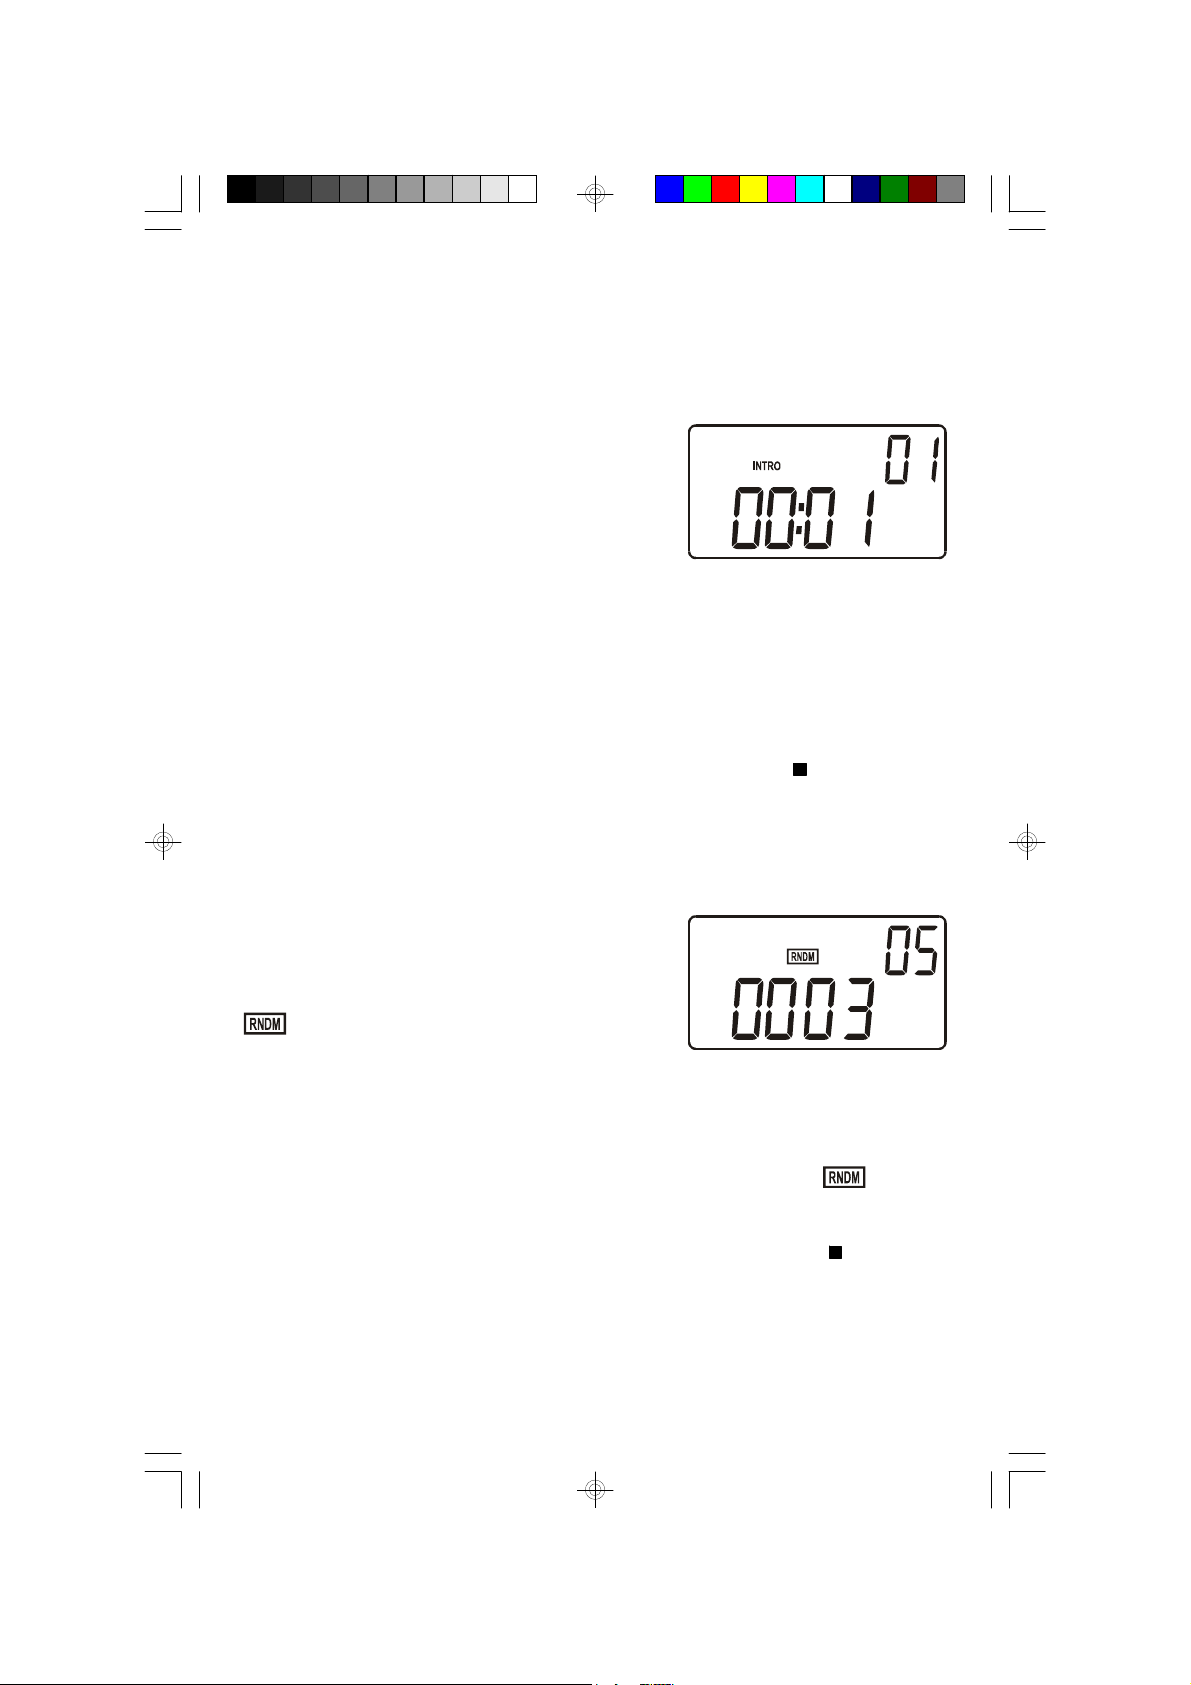
Load the disc as usual and wait until the display
shows the total playing time and number of tracks.
Press the INTRO button on front panel. The
INTRO indicator will appear in the display. The
player will play the first 10 seconds of each track
automatically.
When the first 10 seconds of the last track has played the player stops and the
display again shows the total playing time and number of tracks on the disc.
To cancel the Intro mode press the INTRO button once more until the INTRO
indicator disappears.
Intro mode can also be canceled by pressing the STOP/BAND button.
RANDOM Playback
This feature allows you to play all the tracks on a disc in random order.
Load the disc as usual and wait until the display
shows the total playing time and number of tracks.
Press the RANDOM button on front panel. The
indicator appears in the display. The tracks
will be played in random order.
After all tracks have played the player stops and the display again shows the total
playing time and number of tracks.
To cancel the Random mode press the RANDOM button until the indicator
disappears.
Random mode can also be canceled by pressing the STOP/BAND button.
19
PD3500RD_102904.p65 29/10/2004, 15:3619
Page 21
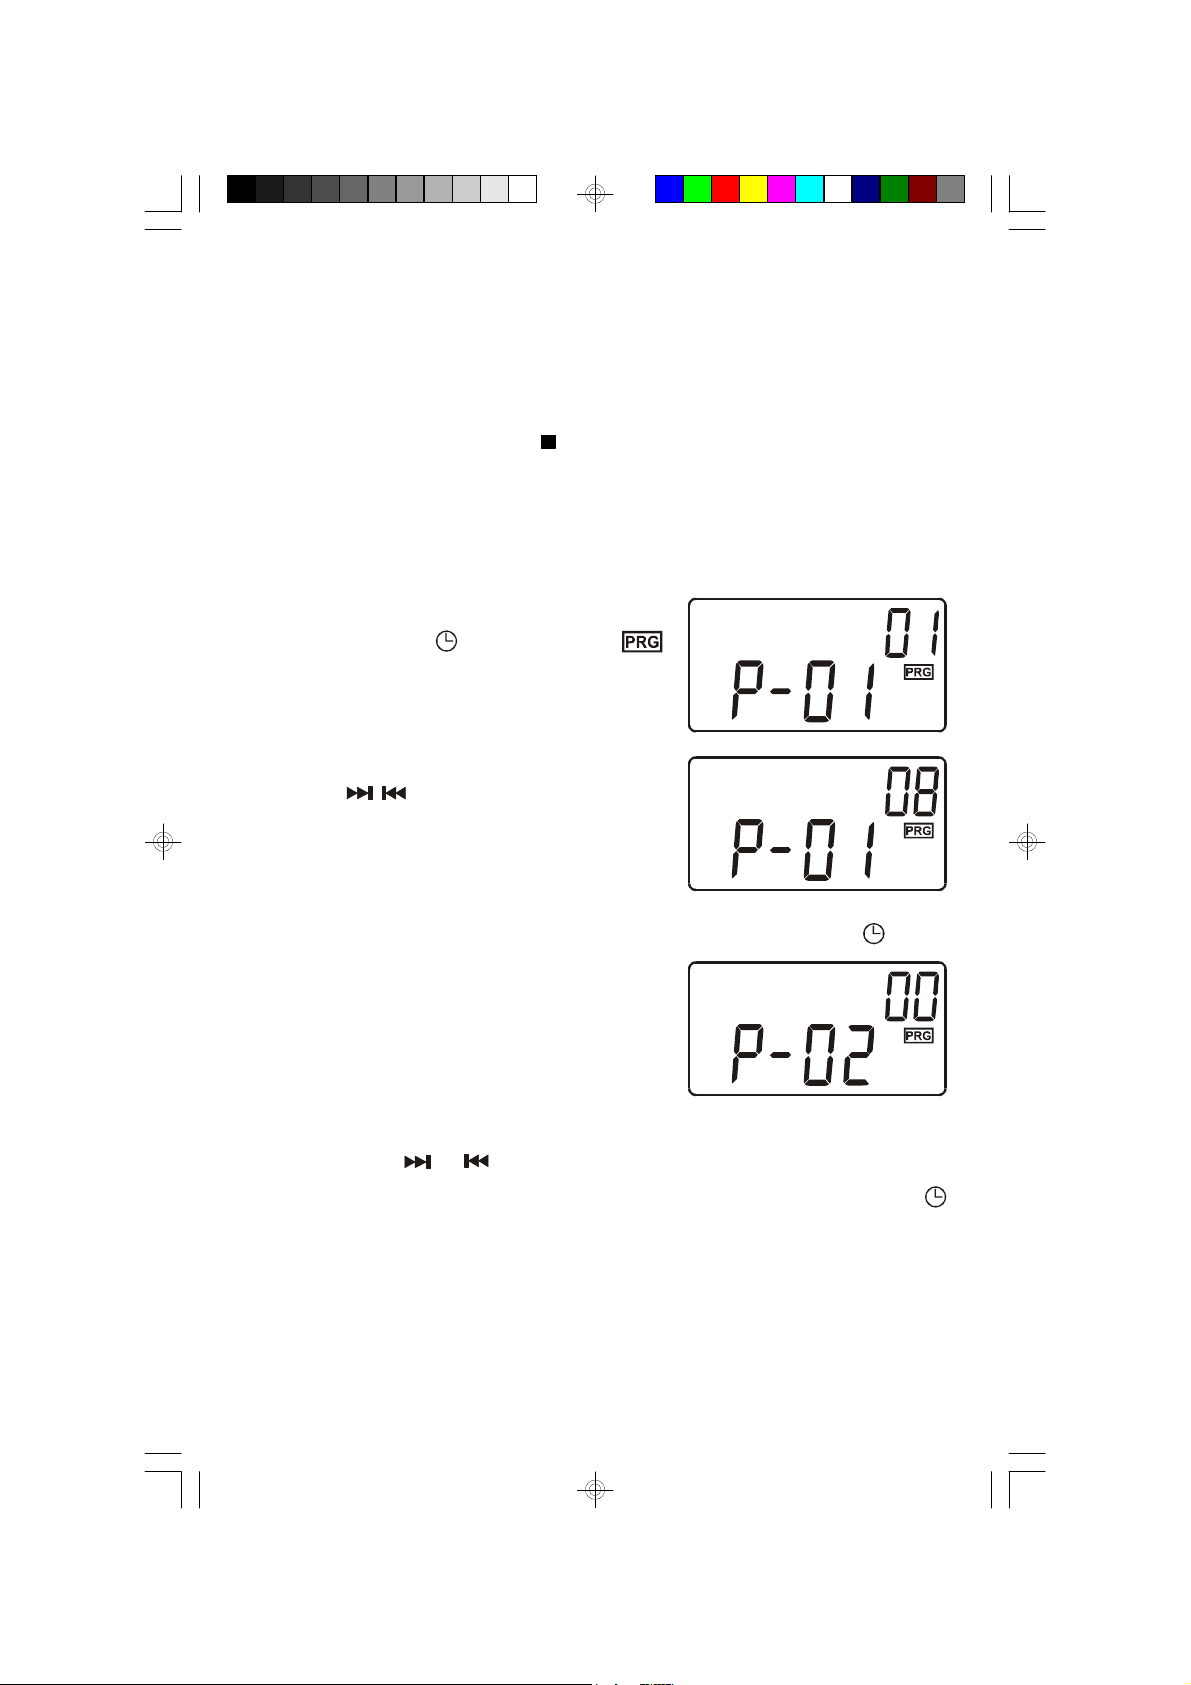
PROGRAMMED PLAYBACK
You can program up to 32 tracks on a disc to playback in any desired order. You
may also program a specific track to play several times within the same program.
Note: The player cannot be programmed while a dis c is playing. If a disc is
playing press the STOP/BAND button to stop playback before you begin
the programming steps below.
1.) Press the FUNCTION button to select CD, insert your disc in the player, close
the door, and wait until the total track number appears in the display.
2.) Press the PROG. button once. The
Indicator, program memory “P-01”, and Track
number “00” appear in the display.
3.) Use the / buttons to select the first trackck
to be programmed.
Example: Track 08.
4.) When track number “08” appears in the display, press the PROG. button
once again to enter the track “08” in program
memory number “01”. The track number
returns to “00” and the program memory
advances to “P-02” indicating that you may
now select a track to be entered in program
memory number “02”.
5.) Us e the SKIP or buttons to select the next track to be programmed.
When the desired track number appears in the display press the PROG.
button again to enter that track in the program memory.
6.) Repeat Step 5 until you have entered up to 32 tracks in the program memory.
20
PD3500RD_102904.p65 29/10/2004, 15:3620
Page 22
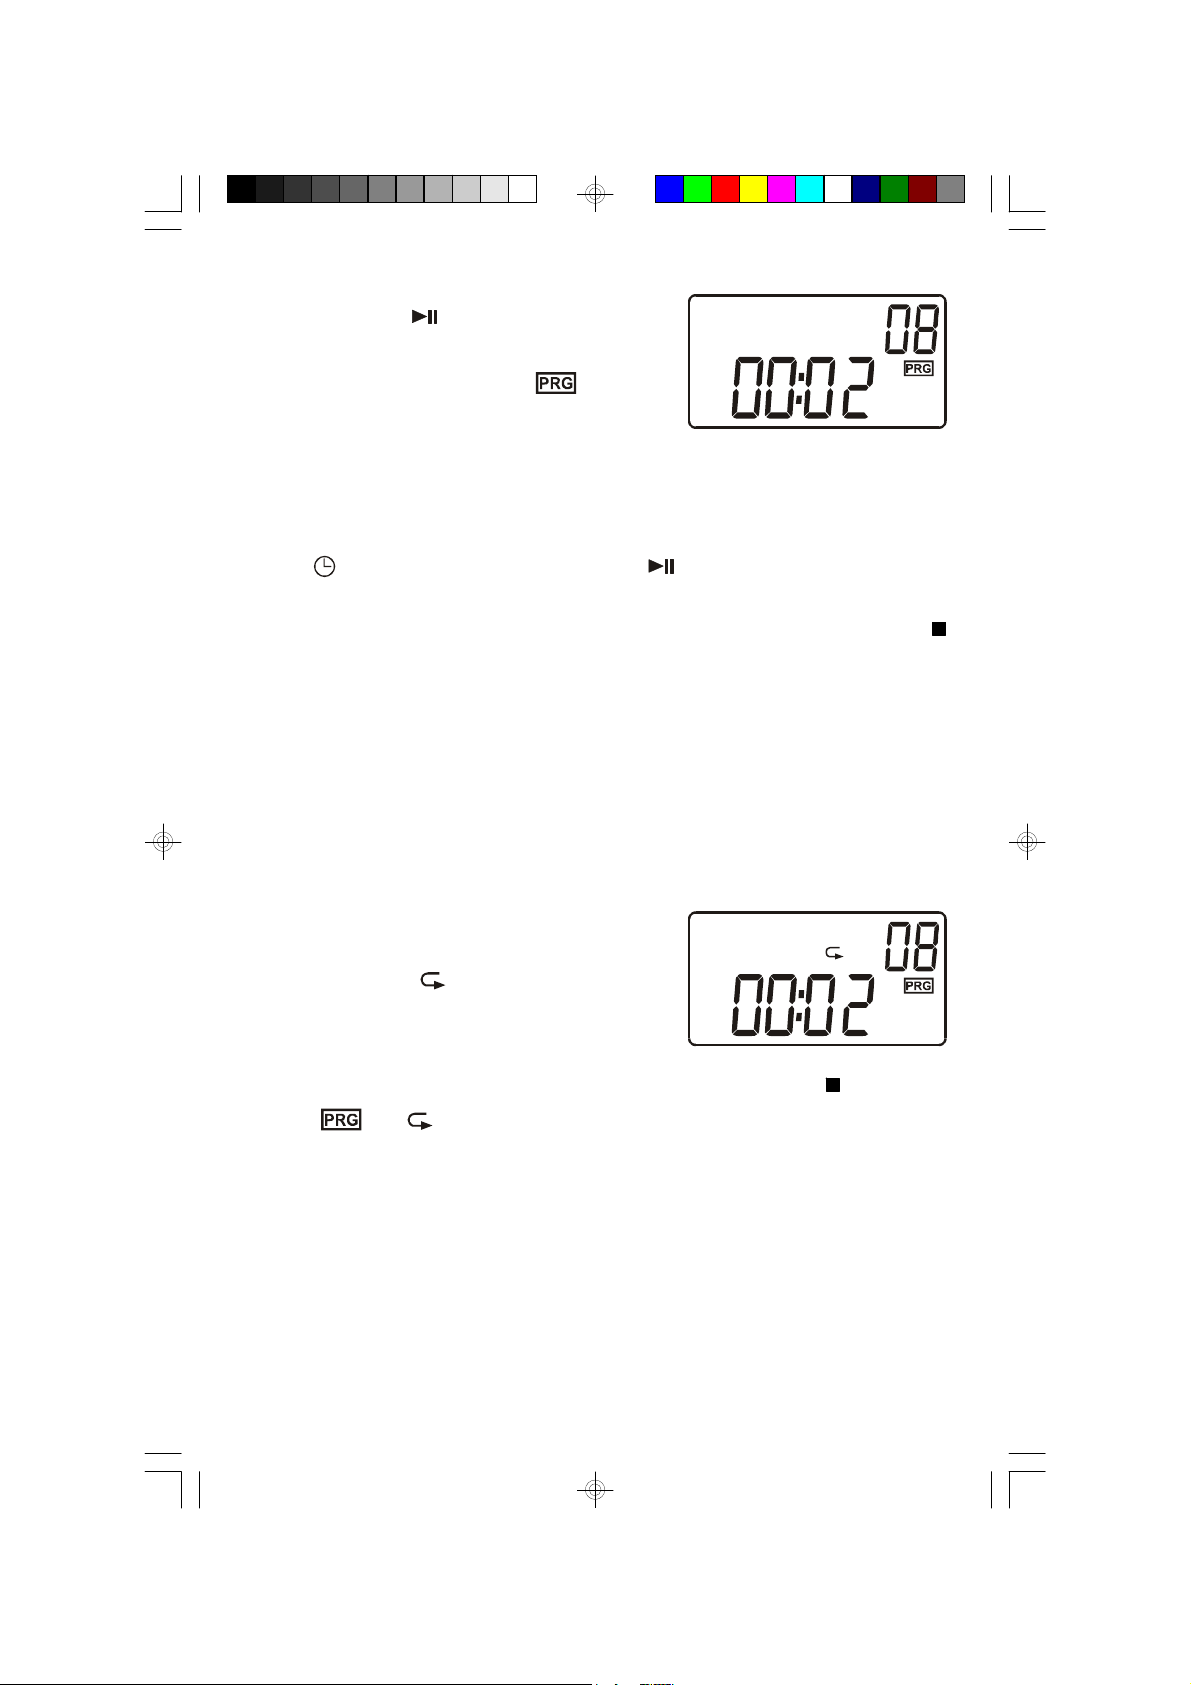
7.) To begin programmed playback pres s the
PLAY/PAUSE button. The display will
show the first programmed track and playback
will begin on that track. The Indic ator
remains in the display.
After the last programmed track has played the player stops but the programmed
tracks remain in the memory. To play the programmed tracks again, press the
PROG. button and then the PLAY/PAUSE button.
To cancel the programmed sequence from memory, press the STOP/BAND
button at programming mode or open the CD door.
PROGRAMMED REPEAT Playback
You can use the Program and Repeat features together to continuously repeat a
programmed sequence of tracks.
First, program the desired tracks according to Steps 1 through 7 on the previous
page.
When Programmed Playbac k begins press the
REPEAT button twice to activate the All Tracks
Repeat feature. The Indicator appears in LCD
display and all the track s in your programmed
sequence will be repeated continuously.
To cancel Programmed Repeat Playback press the STOP/BAND button until
both the and Indicators go ‘Off’.
21
PD3500RD_102904.p65 29/10/2004, 15:3621
Page 23
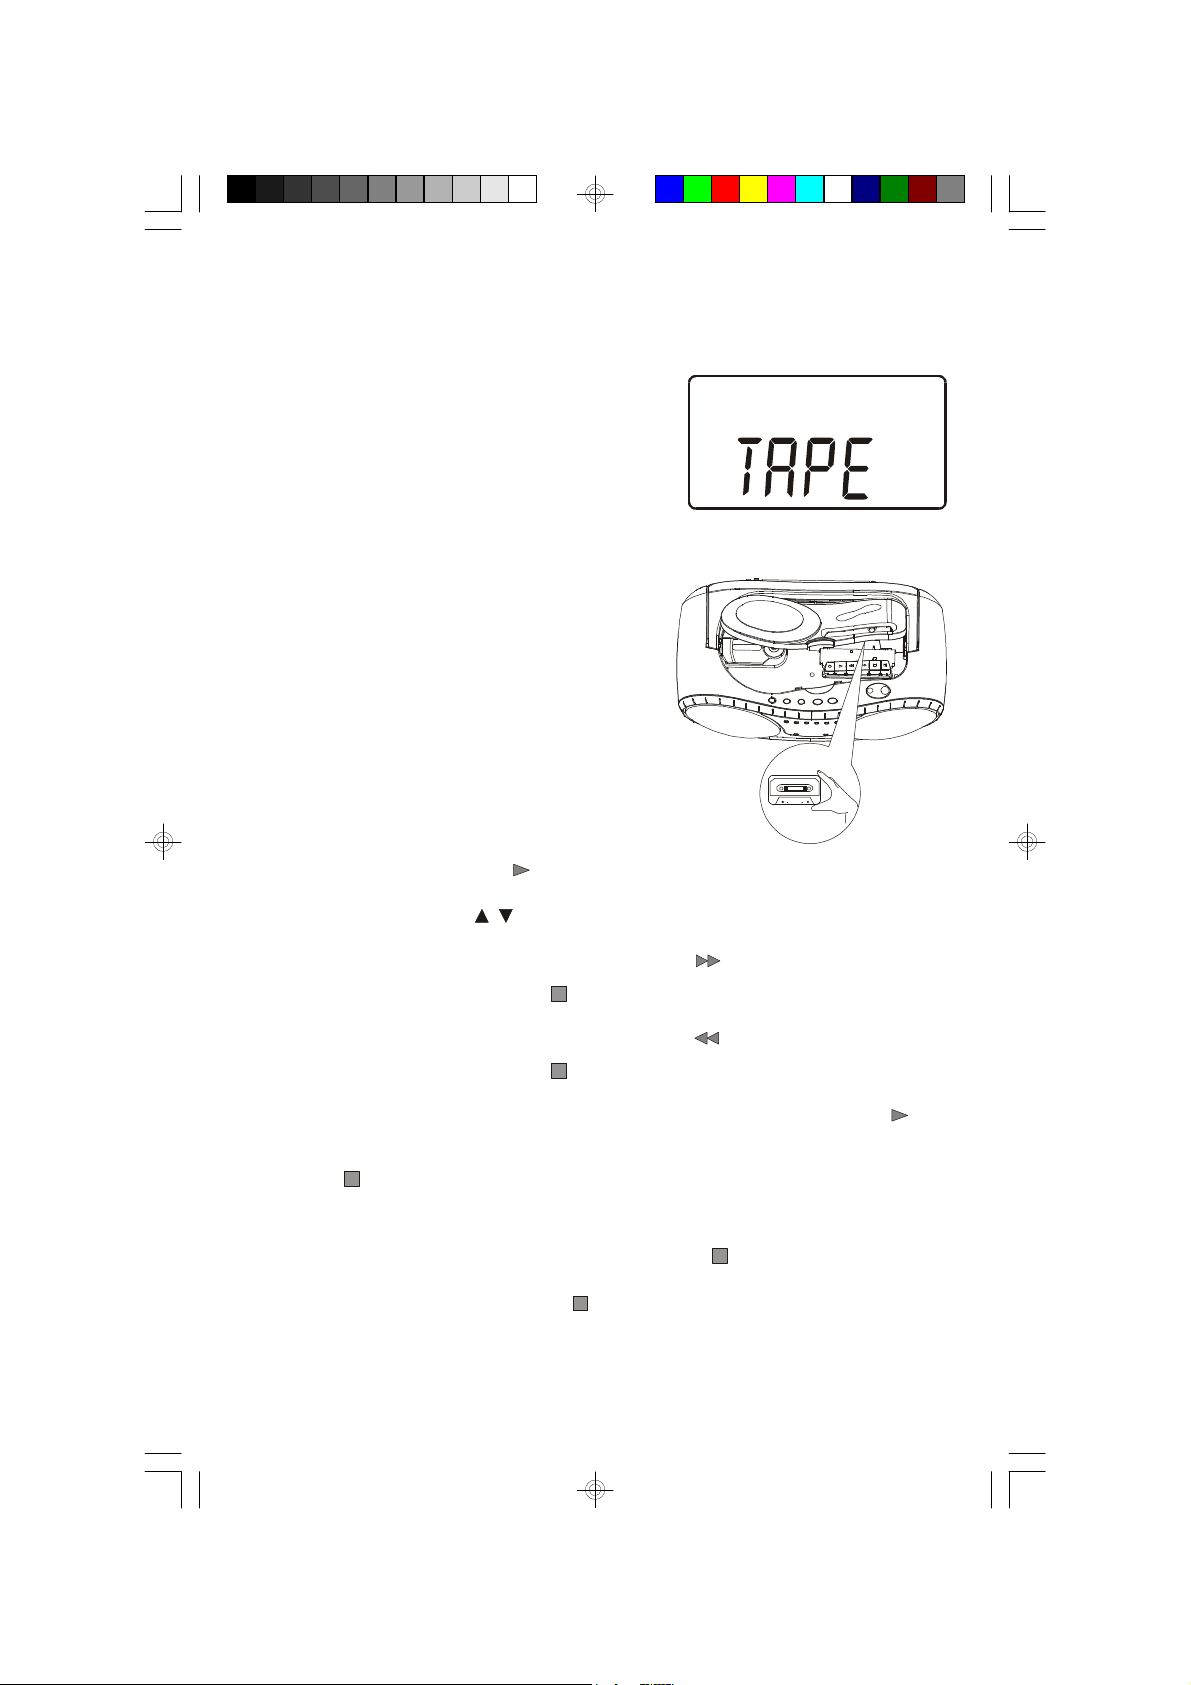
PLAYING CASSETTE TAPES
1.) Press the POWER button to turn the system ‘On’.
2.) Press the FUNCTION button to select TAPE
mode. The TAPE indicator appears.
3.) Open the cassette door by lifting the PULL OPEN tab on the top cover.
4.) Place a pre-recorded cassette tape onto the
cassette compartment as shown and the
full reel on the left side.
Close the cassette door.
5.) Press the cassette PLAY key to begin playback.
6.) Adjust the VOLUME / and EQ controls as desired.
7.) To advance the tape rapidly press the F. FWD key. When you reach the
desired point press the STOP key..
8.) To rewind the tape rapidly press the REWIND key. When you reach the
desired point press the STOP key..
9.) When the tape ends the Automatic Stop System releases the PLAY key
and shuts off the tape motor. You may then open the cassette door, press the
STOP button again to eject your tape, turn it over and play the other side if
desired.
10.) When you are finished listening press the STOP k ey to stop.
Open the door, press the STOP key again to eject and remove the tape,
then close the door.
22
PD3500RD_102904.p65 29/10/2004, 15:3622
Page 24
IMPORTANT:
• If you are playing a tape and then change to the Tuner or CD function, be
sure to press the STOP key to disengage the tape mechanis m. This
prevents excess wear and tear on the mechanism.
• Always press the STOP key to s hut off the tape motor before opening the
cass ette door to remove your tape. The Automatic Stop System does not
function in the F. FWD and REWIND modes.s.
• When the tape ends in the F. FWD and REWIND modes the motor
continues to run. You mus t press the STOP key to shut off the motor
before opening the door to remove your tape.
PD3500RD_102904.p65 29/10/2004, 15:3623
23
Page 25
MAKING A TAPE RECORDING
This model allows you to make tape recordings directly from the CD player, or the
radio.
• Refer to “PLAYING COMPACT DISCS” if necessary to operate the CD
player.
• Refer to “LISTENING TO THE RADIO” if necessary to tune in the
station you wish to record from radio.
1.) Open the cassette door by lifting the PULL OPEN tab on the top cover.
2.) Insert a good quality blank cassette tape onto the cassette compartment with
the open end facing out and the full reel on the left side.
• Use normal tape only. Do not use tape identified as “CrO2” (Chrome) or “Metal”
tape formulations.
• For best results use tapes of 60 minutes (C-60) or less. Do not use 90 minute
or 120 minute tapes as thes e thinner tapes are more likely to jam in the
mechanism.
3.) Close the cassette door.
4.) When you are ready to start recording press the RECORD key. The PLAYY
key will also engage. The CD you are playing, or radio program you selected
will be recorded directly on to the tape.
5.) Press the PAUSE k ey during recording to stop the tape temporarily and
avoid recording unwanted material such as radio commercials.
6.) When you have finished recording press the STOP key to stop. Open the
top cover, press the STOP key again and remove the tape.
BEAT CUT Switch (On back Cabinet)
Occasionally when recording from the AM radio a repetitive whistle or ‘beat’ sound
may be heard. If this occurs slide the BEAT CUT switch to its other position to
eliminate the unwanted sound.
24
PD3500RD_102904.p65 29/10/2004, 15:3624
Page 26
CD CASSETTE SYNCHRO RECORDING
When recording from CD to cassette, the CD cassette synchro recording feature in
this unit allows you to start both the CD player and the cassette recorder with the
push of a single button.
1.) Open the CD door and place the CD to be recorded in the CD player as usual.
Close the CD door.
2.) Open the cassette compartment and insert a blank cassette tape.
3.) Press the FUNCTION button to select the CD mode.
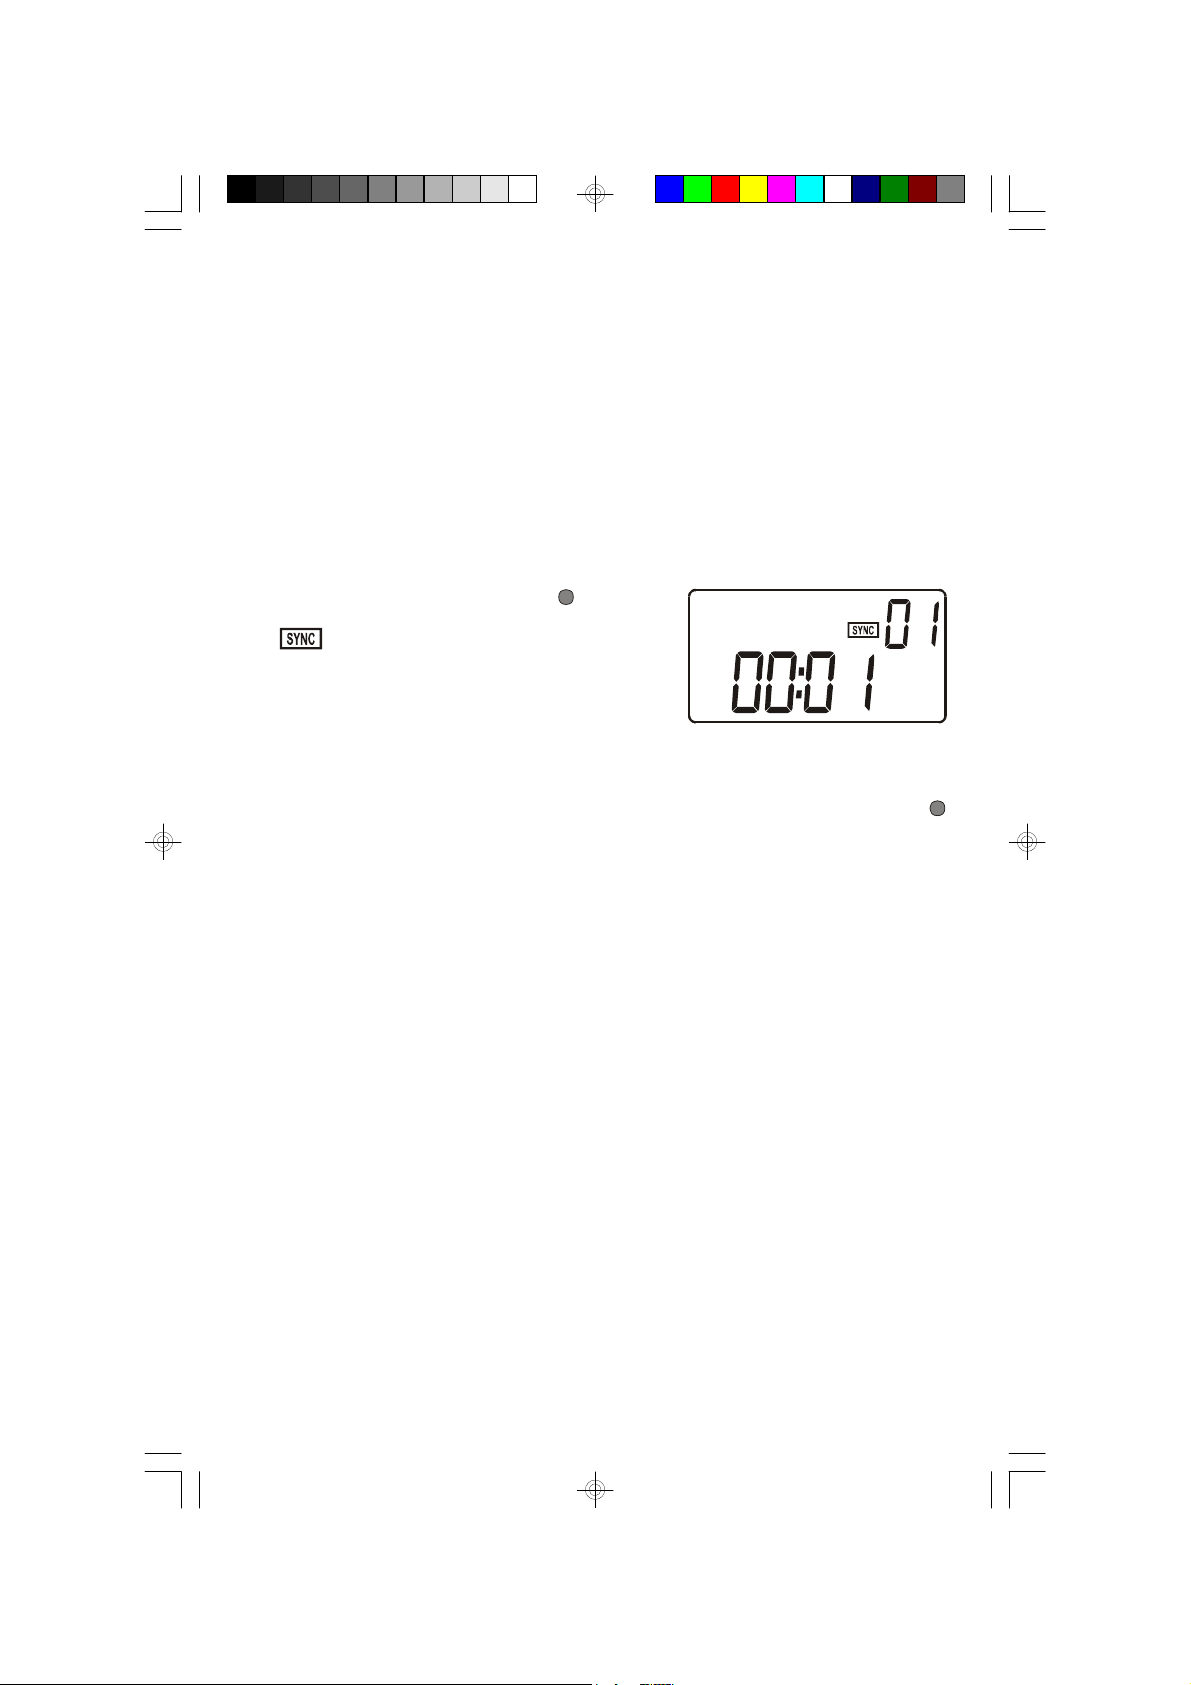
4.) Pres s the cassette RECORD key. The
indicator appears in the dis play. The
cassette recorder and the CD player will start
simutaneously and all of the material on your
CD will be recorder directly onto the blank
cassette.
Note: If a CD is already playing and you press the cas sette RECORD
key, the CD player will back up to the beginning of the track being played
and c assette will begin recording at that point automatically.
Automatic Recording Volume Level Control
This unit has an Automatic Level Control (ALC) circuit which controls the recording
volume level and prevents overloaded and distorted recordings. The VOLUME,
EQ control has no effect on recording volume level. You may change the controls
setting during the recording or even reduce the volume level to “Minimum”. This
will not effect the level of the recording.
25
PD3500RD_102904.p65 29/10/2004, 15:3625
Page 27
OTHER FUNCTIONS
TIMER Button
This system includes a programmable Timer function. You can use the timer to
wake you up to the Tuner or to your favorite CD. The timer can be programmed
while the unit is in the Standby (Power Off) mode, the Tuner mode or the CD
mode.
To Set The TIMER The 1ST Time
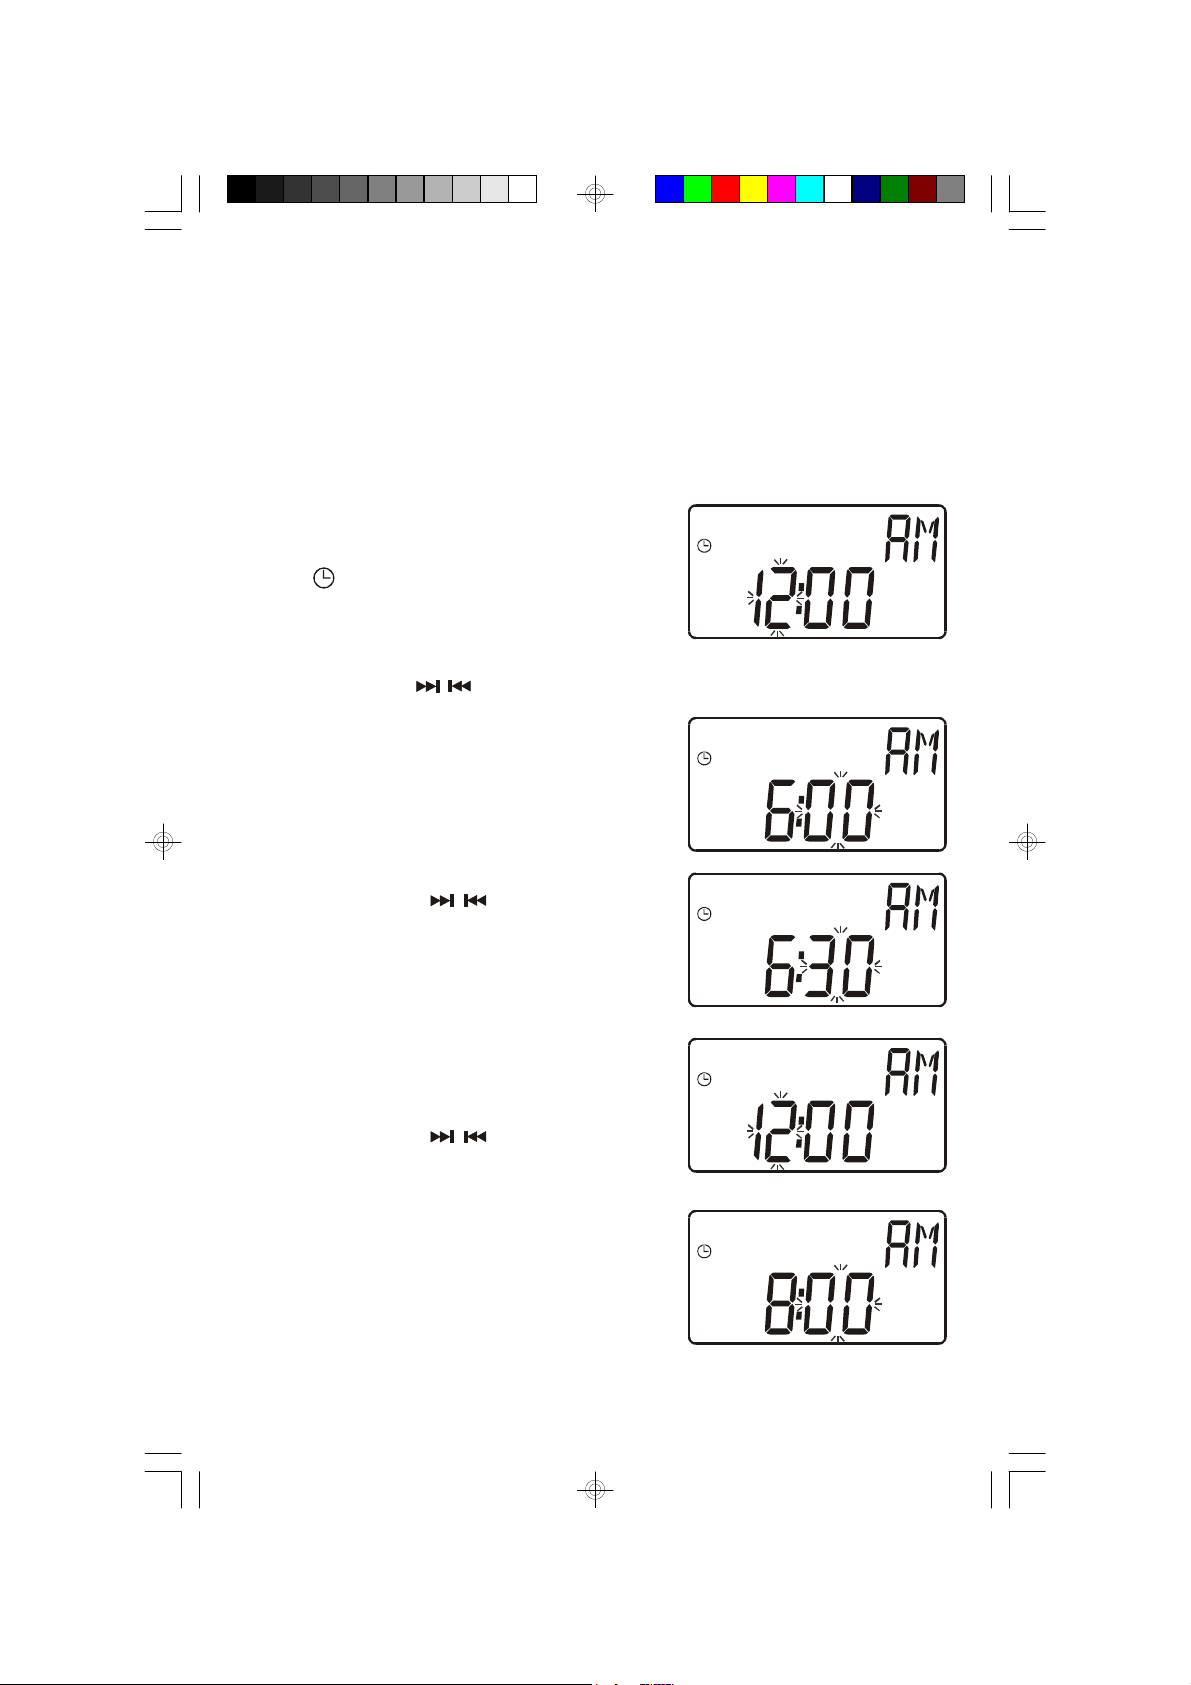
1.) Press the TIMER button on the front panel,
the indicator appears and the Hour digits
will begin flashing in the display.
2.) Press the SKIP / buttons on the top panel to set the display to the desired
turn ‘On’ hour, AM or PM.
3.) Press the TIMER button on the front panel.
The Minute digits begin flashing.
4.) Press the SKIP / buttons on the top
panel to set the display to the desired turn
‘On’ minute.
5.) Press TIMER button again, OFF briefly
appears in the display, the Hour digits begins
flashing.
Press the SKIP / buttons on the top
panel to set the display to the desired turn
‘Off’ hour, AM or PM.
6.) Press the TIMER button. The Minute digits
begin flashing.
26
PD3500RD_102904.p65 29/10/2004, 15:3626
Page 28
7.) Press the SKIP / buttons on the top
panel to set the display to the desired turn
‘Off’ minute.
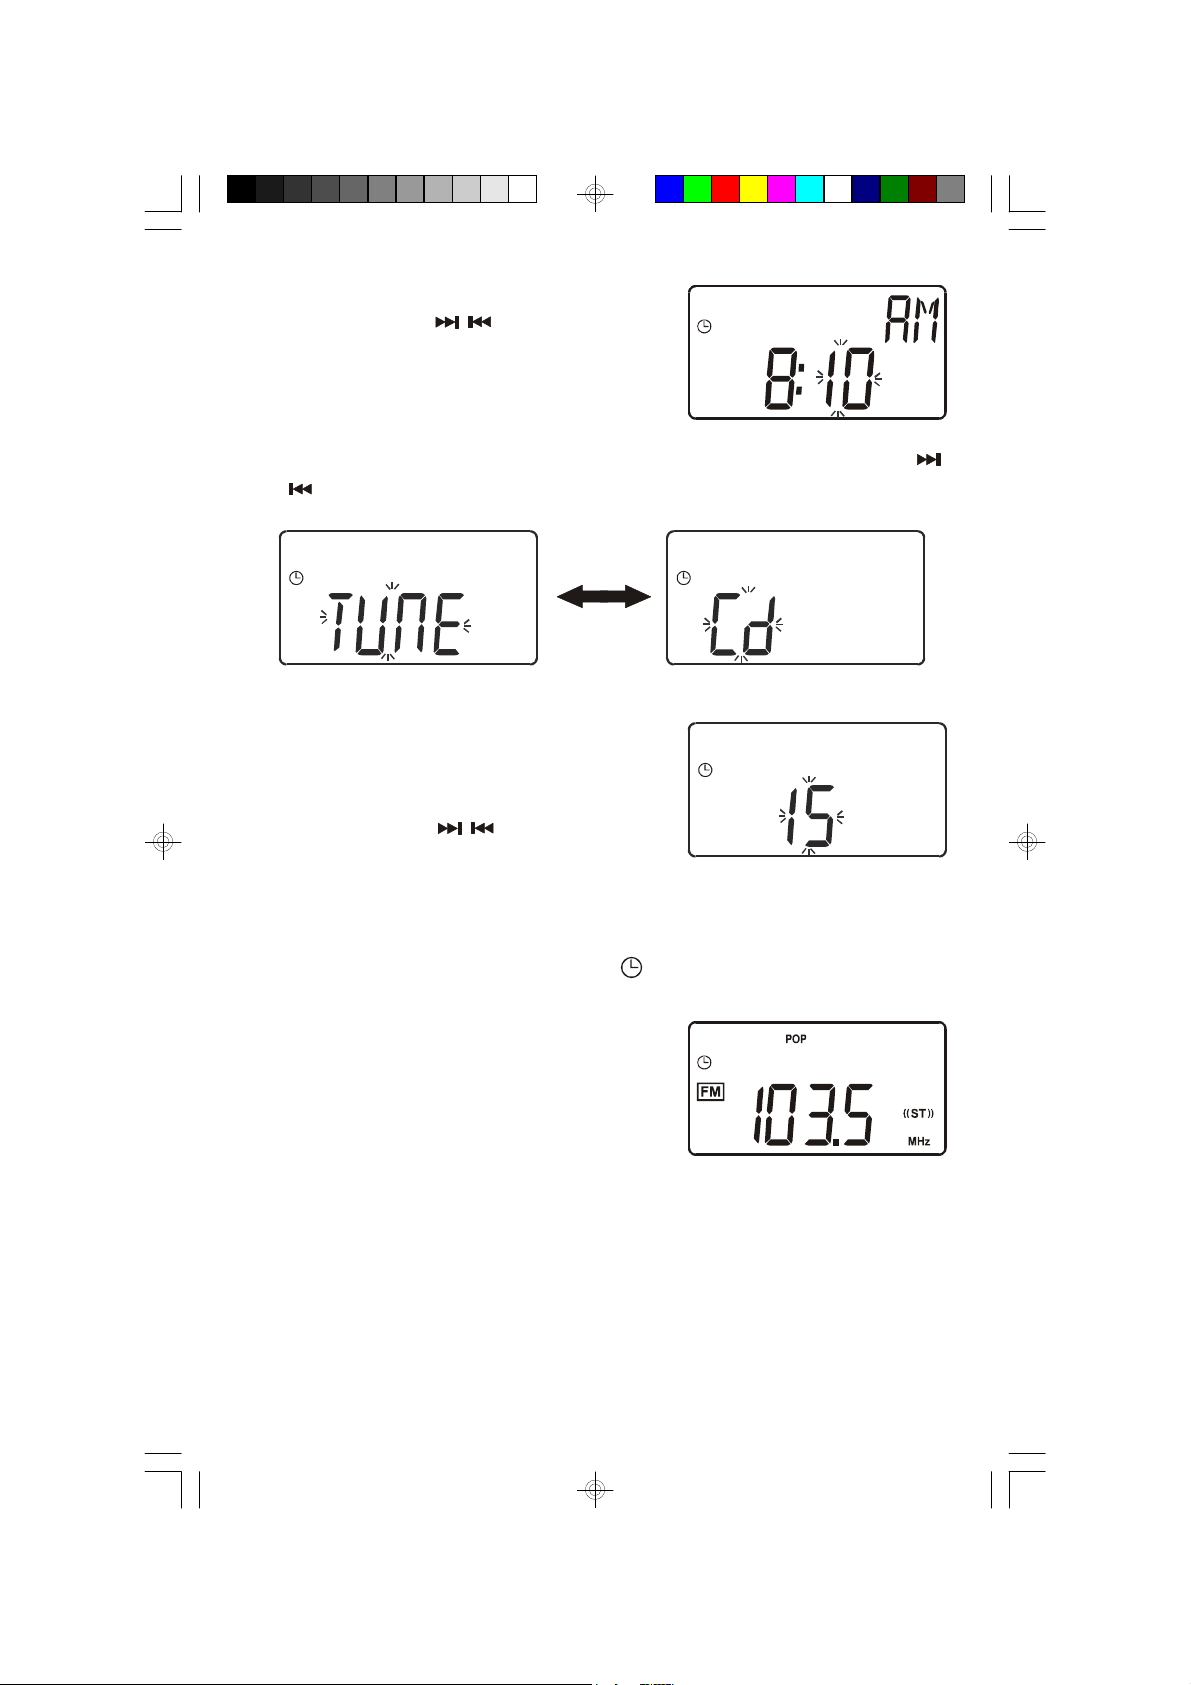
8.) Press the TIMER button. TUNE flashes in the display. Press the SKIP /
buttons to select turn “On” between Tuner or CD modes.
9.) Press the TIMER button.
15 flashes in the display indicating you may
now adjust the turn ‘On’ Volume level.
Press the SKIP / buttons to set the
turn “On” Volume as desired.
10.) Press the TIMER button again to confirm. The display will show the Timer
settings in sequence once more. The indicator remains “On”.
11.) At the selected Timer ‘On’ time, the unit will
turn on. The volume increases gradually to
the preset level. It will sound until the turn
“Off’ time is reached.
12.) To stop the unit sooner, press the POWER button. The radio will stop but the
Timer remains set and will turn the unit on again at the same time on the
following day.
27
PD3500RD_102904.p65 29/10/2004, 15:3627
Page 29
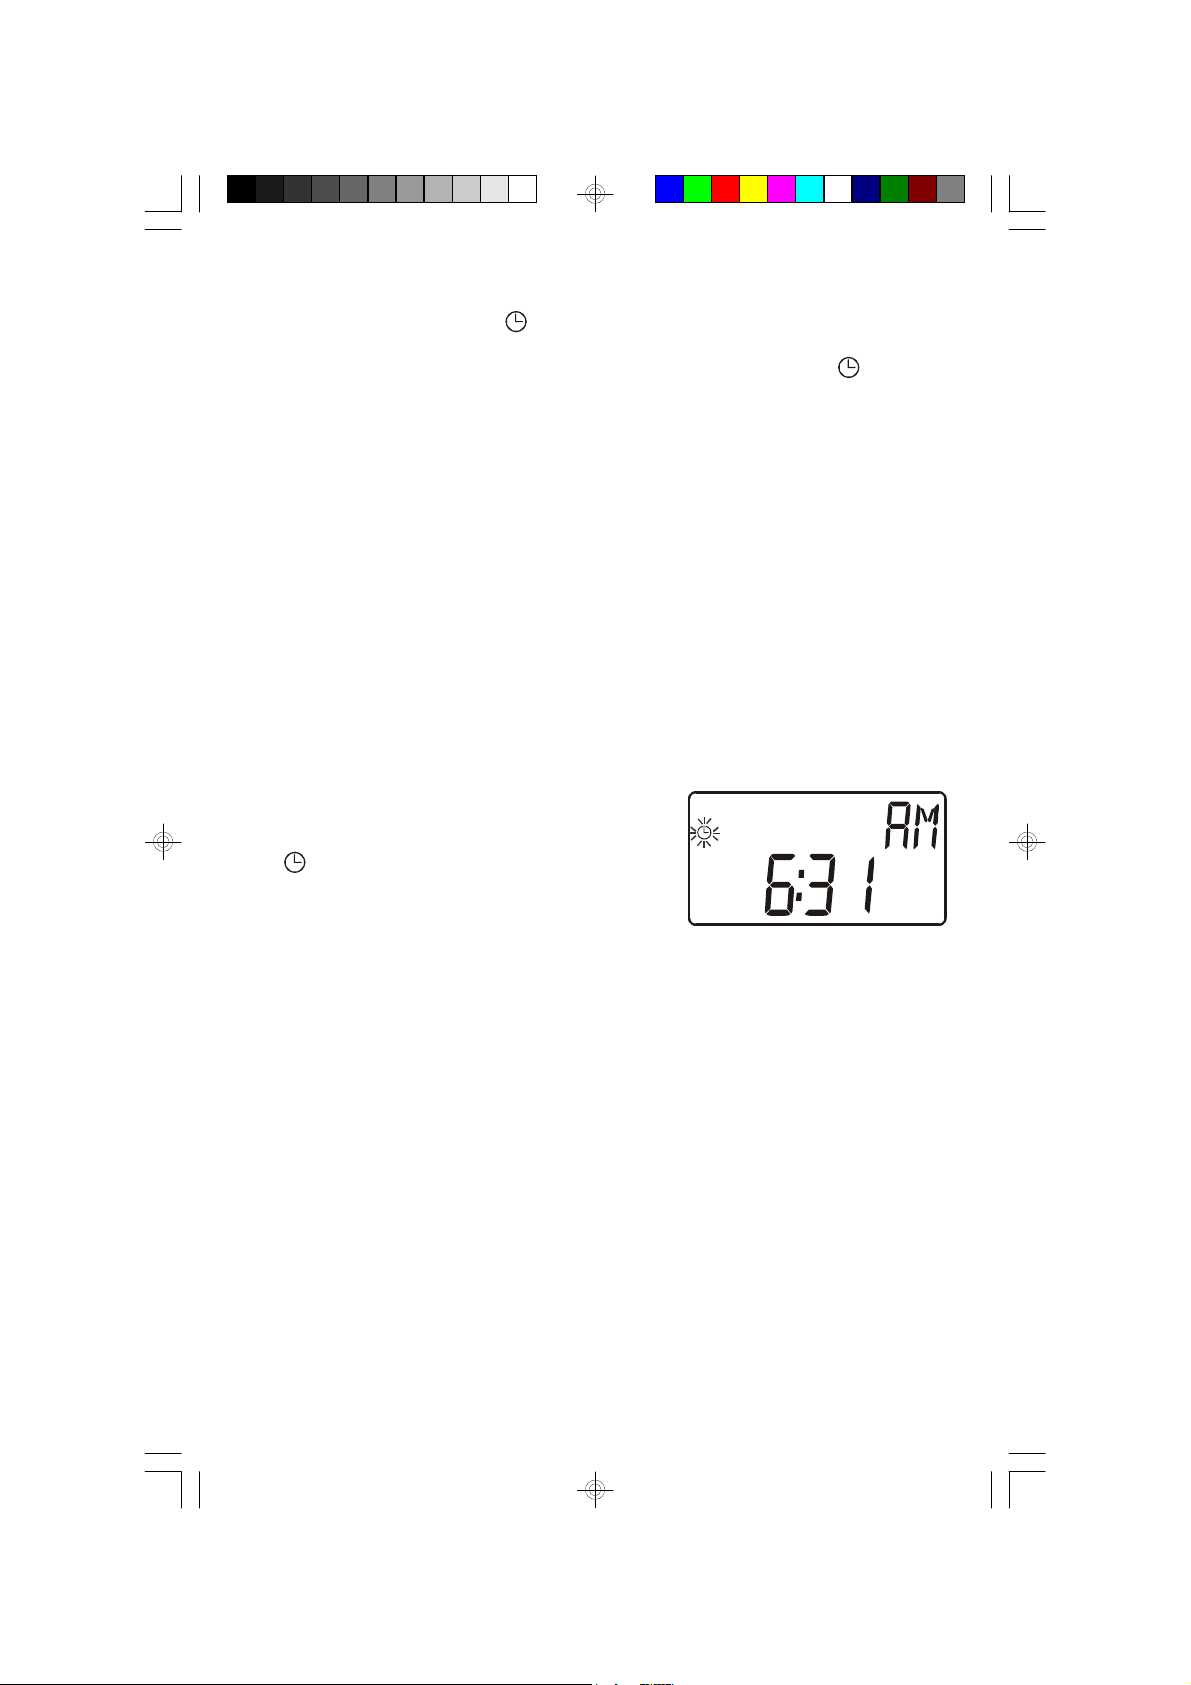
13.) If you do not want the Timer to turn the unit on the following day, press the
TIMER button once, the indicator disappears in the display..
Press the TIMER button again to reactivate the Timer, the indicator
resappears.
Notes:
• If the unit turns on to CD function it will only play until the end of the disc
and then stop. If your CD is only 45 minutes, the unit will only play for 45
minutes but the power will remain ‘On’ until turn ‘Off’ time is reached.
• To re-program the Timer, press and hold the TIMER button until the Hour
digits begins flashing. Then repeat the steps 2-10 on pages 26-27.
SNOOZE Button
After the system sounds, you may press the SNOOZE button for a few more minutes
sleep. The “bye” briefly appears, then the power turns ‘Off’.
The indicator flashes in the display..
The sound will stop for approximately 6 minutes and then turn ‘On’ again.
28
PD3500RD_102904.p65 29/10/2004, 15:3628
Page 30
SLEEP Timer
This unit includes a programmable Sleep Timer that allows you to fall asleep to
between 10 and 90 minutes of music and then shuts the power ‘Off’ automatically.
To operate the sleep timer:
1.) Turn the unit ‘On’ and operate either the Radio or CD function as usual.
2.) Adjust the VOLUME / and EQ controls as desired.
3.) Press the SLEEP button on the remote control.
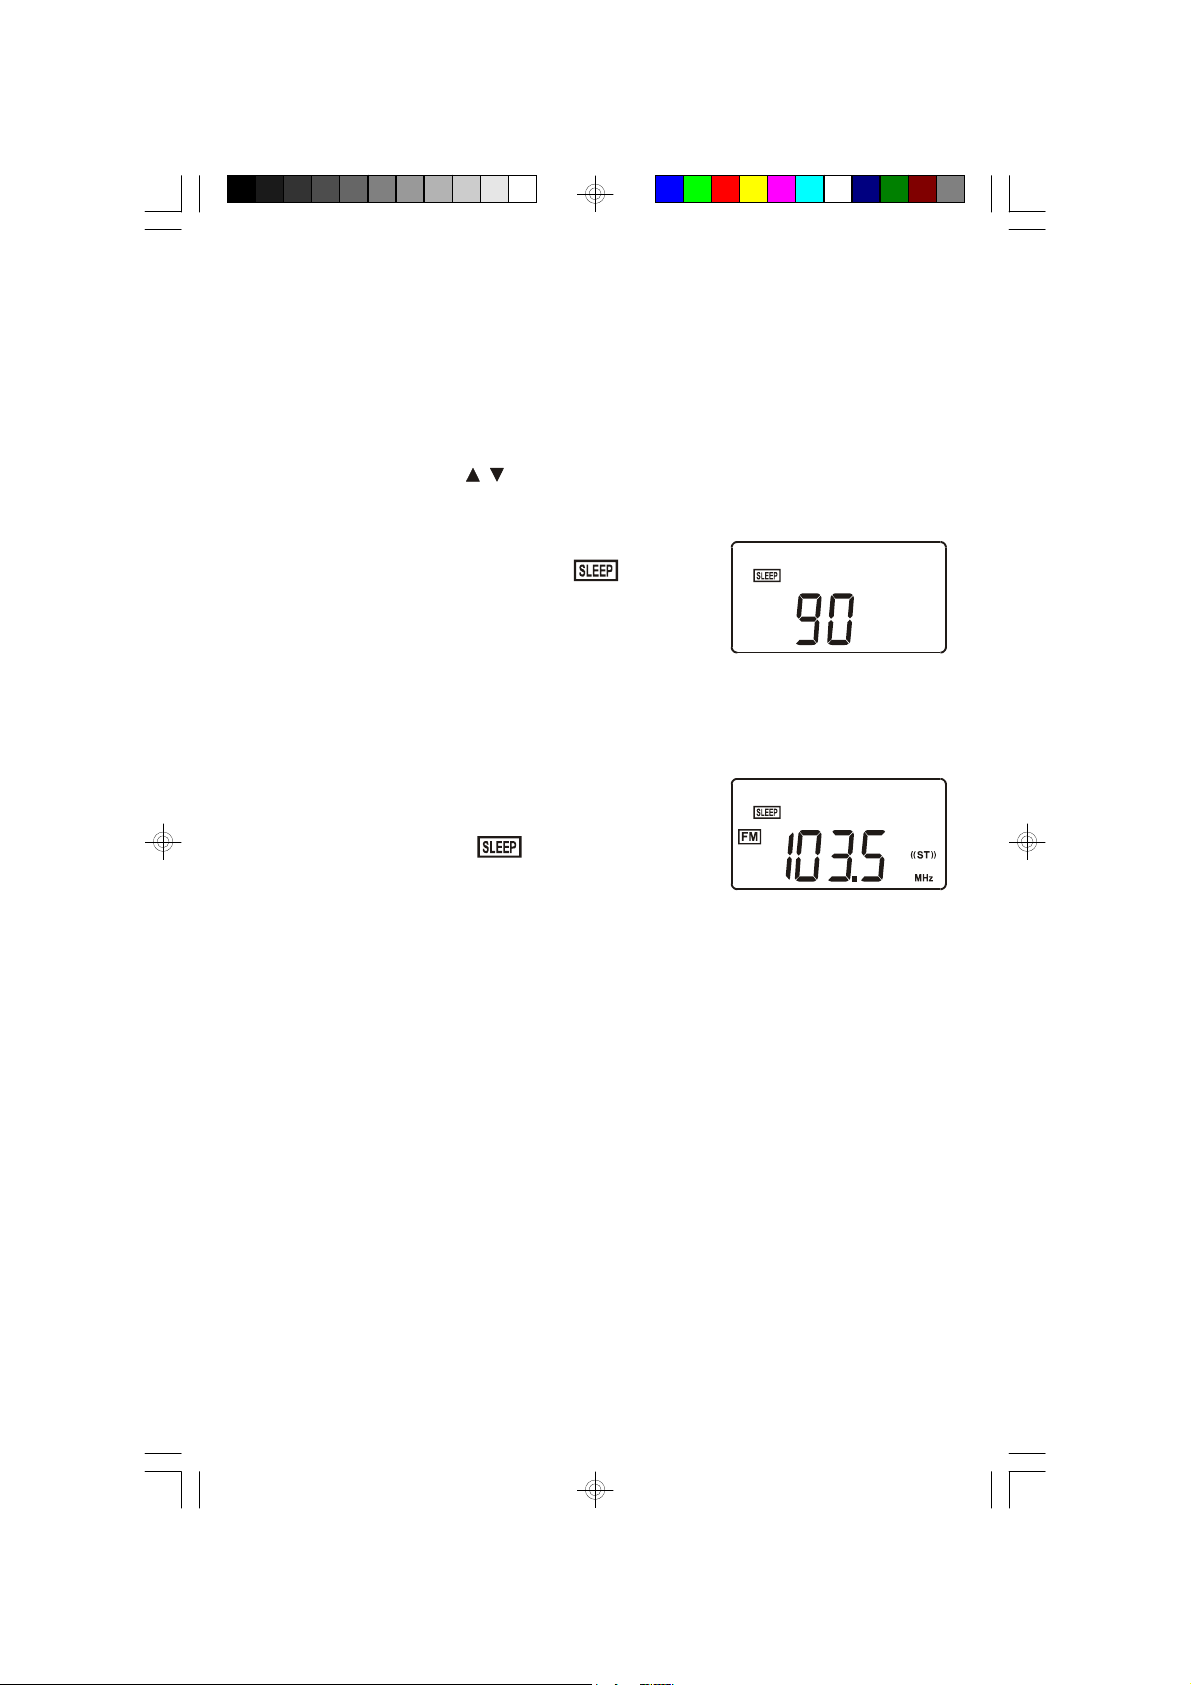
4.) The display will show “90” and indicator
appears indicating that the sleep timer will shut
the power off after 90 minutes.
Continue pressing the SLEEP button to decrease the amount of sleep timer
operation. Each time you press the SLEEP button you decrease the sleep
time by 10 minutes. The minimum sleep timer operation is 10 minutes.
5.) After a few seconds the Sleep Time display
disappears and the normal Tuner or CD display
returns, but the small indicator remains in
the display. When the Sleep Timer counts down
to “00”, the power shuts off automatically.
Notes:
• You can shut the unit ‘Off’ manually before the Sleep Timer counts down to
‘00’ by pressing the POWER button at any time.
• If you are falling asleep to CD the unit will only operate until the CD ends. If
you set the Sleep Timer for 90 minutes but your CD is only 45 minutes long,
the music will stop after 45 minutes.
29
PD3500RD_102904.p65 29/10/2004, 15:3629
Page 31
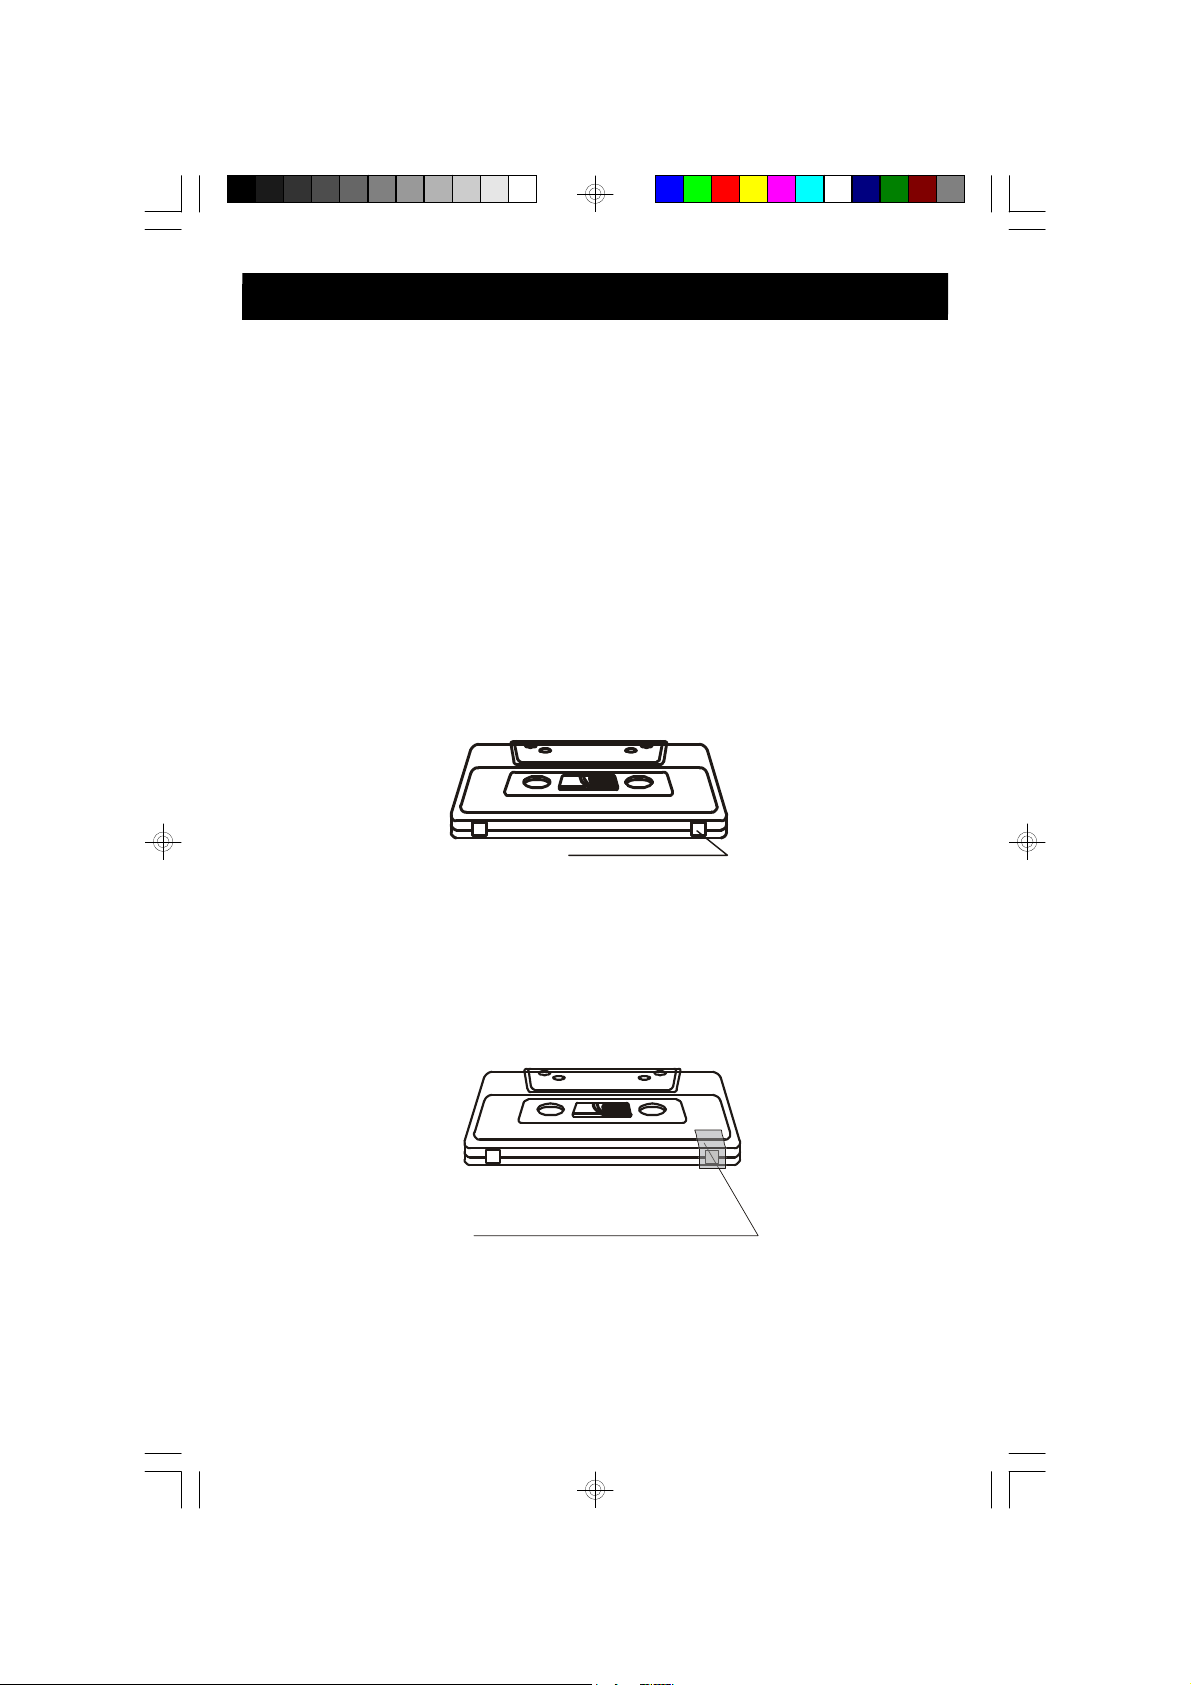
CARE AND MAINTENANCE
COVER OPENING WITH TAPE
BREAK OUT TO PREVENT RECORDING
ABOUT CASSETTE TAPES
Whenever you record on a cassette any previously recorded material is erased as
the new material is recorded. To prevent you from accidentally erasing material
which you wish to save, blank cassettes are equipped with erase prevention tabs
for each s ide of the tape. If the erase prevention tab for side A is removed, you
cannot accidentally record on side A. The record key cannot be depressed if the
erase prevention tab on the cassette has been removed.
To prevent accidental erasing on side A of a cassette use a small screw driver or
similar tool to break off the erase prevention tab for s ide A. This prevents the
record key from locking.
A
TAB FOR SIDE A
If later you do wish to record on side A of the cassette, cover the tab opening with
a piece of cellophane tape. This will allow the record key to function again.
A
IN ORDER TO RECORD AGAIN.
30
PD3500RD_102904.p65 29/10/2004, 15:3630
Page 32
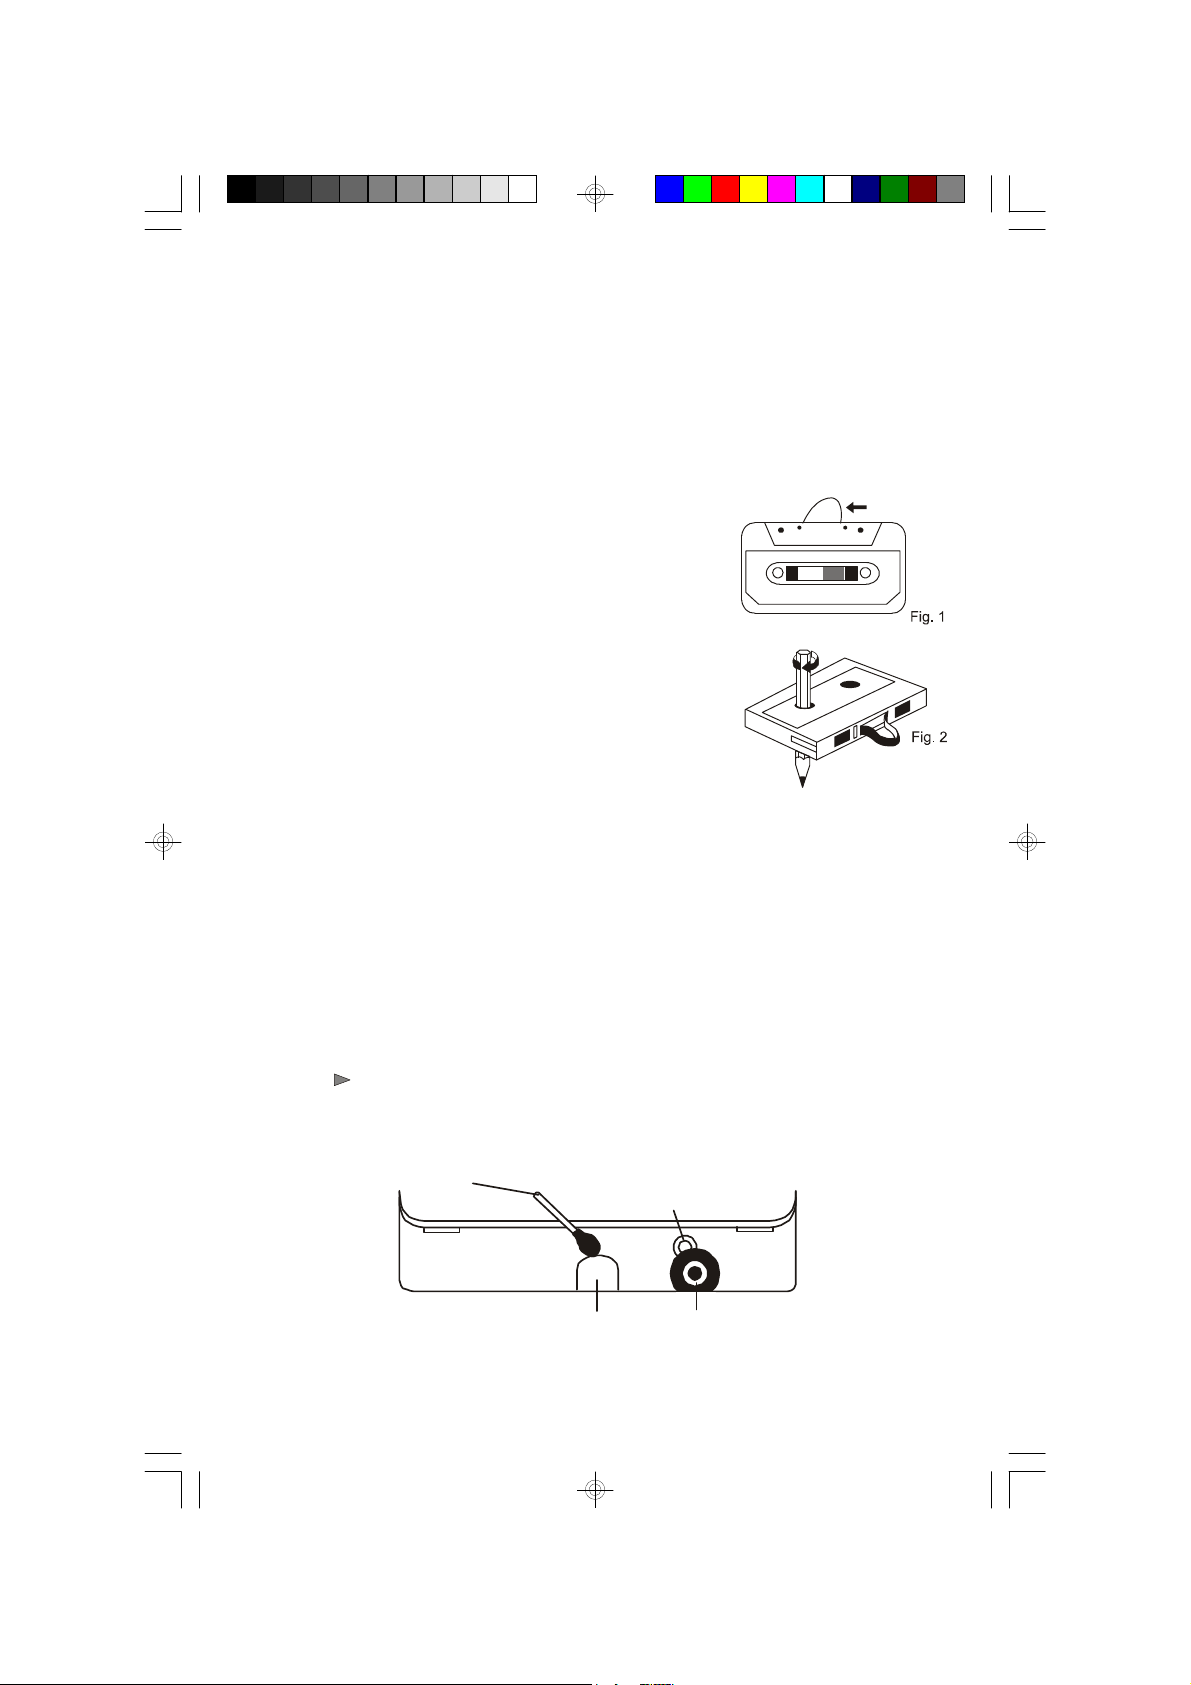
CASSETTE CARE
Cotton Swab
Head
Pinch Roller
Two common causes of trouble experienced when using cassettes are:
1.)Tape jamming — Leading to uneven speed in playback, and
2.)Tape tangling — Where the tape wraps itsel f around vital parts of themechanism.
To reduc e the likelihood of these problems occurring, the following precautions
should be observed:
• Check that there are no loose layers of tape visible
through the cassette center window (see Fig. 1). Take
up any loose layers, using a pencil or hexagonal
barrelled ballpoint pen, before inserting the cassette
into the machine (see Fig. 2).
• If the cassette feels “tight” while performing operation
shown (see Fig. 2), the tape may be jamming due to
“ridges” formed in the winding of the tape (visible
through the center window). These may be removed,
in most cases, by fast winding of the cassette from one
end to the other and back again.
• Use only well-known brands of tape. Avoid use of C-120 cassettes.
Furthermore, do not expose cassettes to direct sunlight, dust or oil, and do not touch
the tape surfaces.
HEAD CLEANING
The tape heads, pinch roller and capstan require periodic cleaning. This removes
particles of the metal oxide coating that wear off the tape and accumulate on these
parts and impair performance. Switch off the power, open the cassette door, and press
the PLAY key. Clean the tape heads, pinch roller and capstan with a soft cloth or
cotton pad dampened in isopropyl alcohol or special tape head cleaner.
Capstan
31
PD3500RD_102904.p65 29/10/2004, 15:3631
Page 33
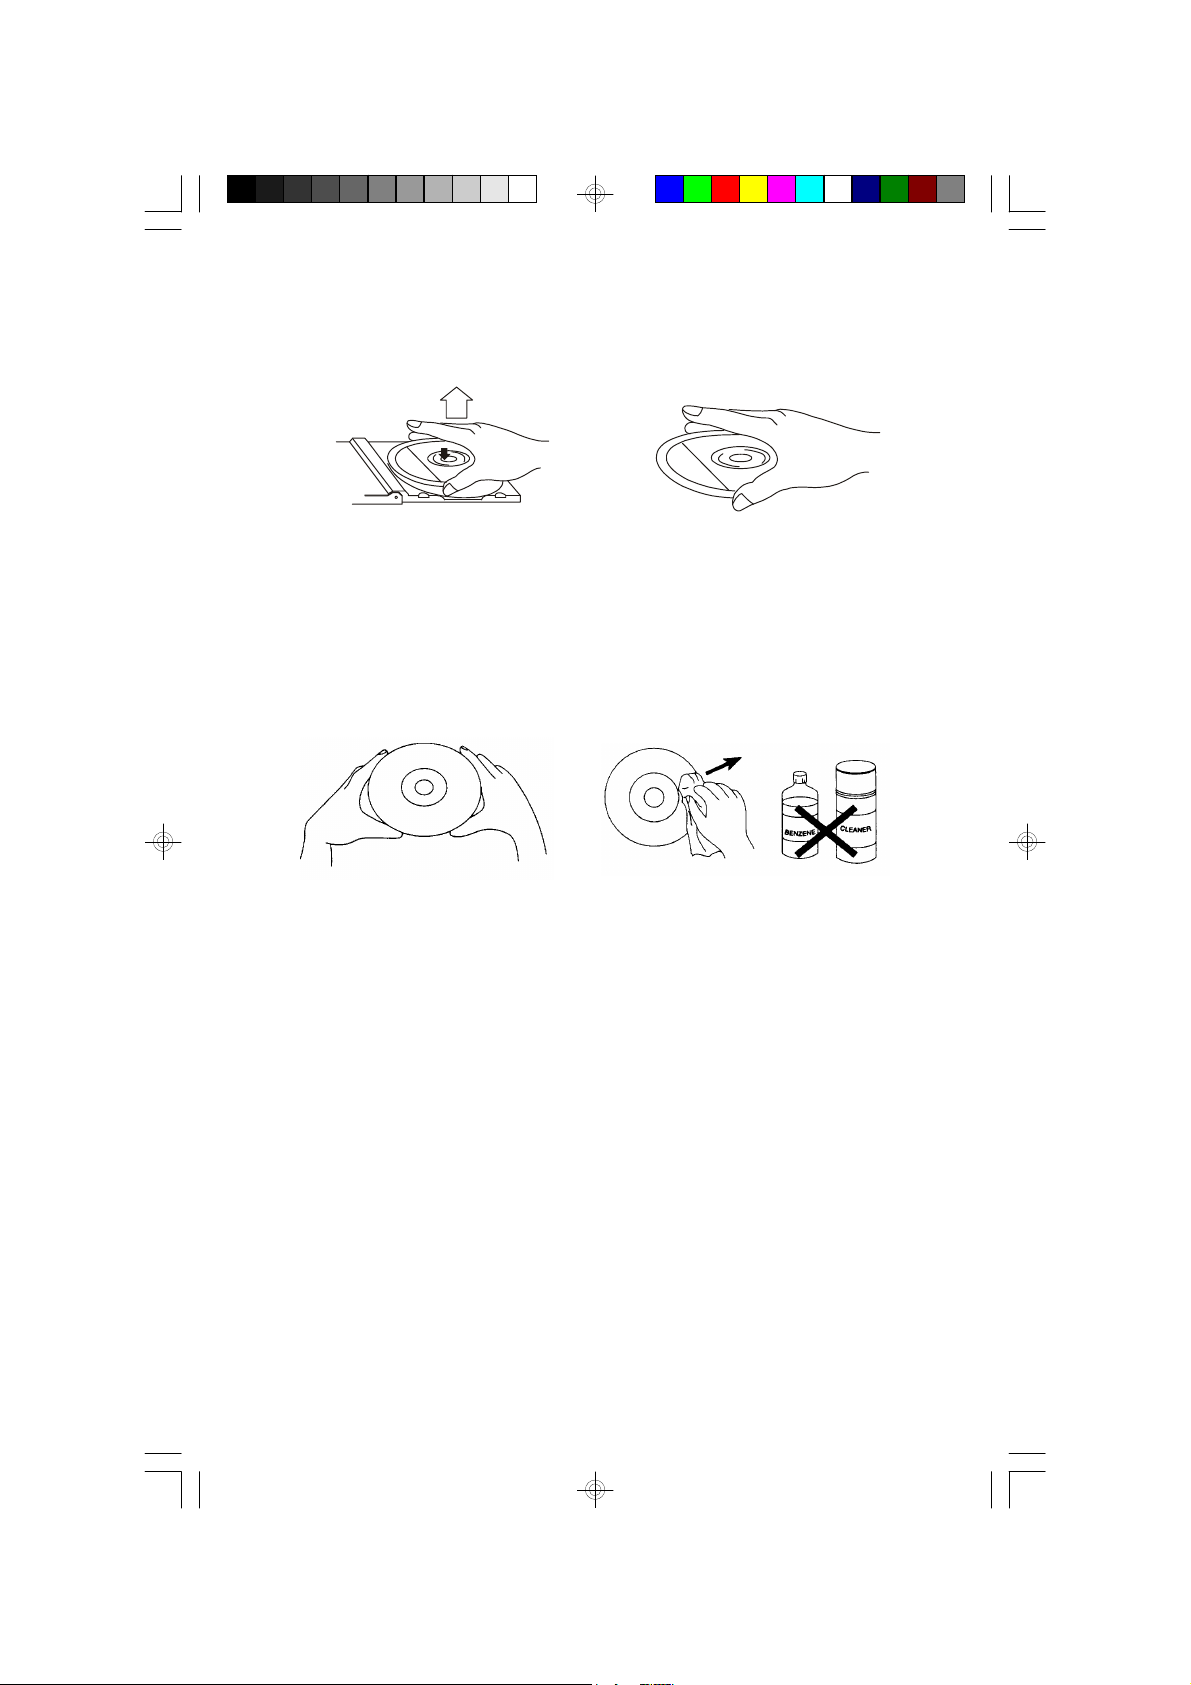
COMPACT DISC CARE
• To remove a disc from its storage case, press down on the center of the case
and lift the disc out, holding it carefully by the edges.
• Fingerprints and dust should be carefully wiped off the disc’s recorded surface
with a soft cloth.Unlike conventional records, compact discs have no grooves
to collect dust and microscopic debris, so gently wiping with a soft cloth should
remove most particles. Wipe in a straight line from the inside to the outside of
the disc. Small dust particles and light stains will have absolutely no effect on
reproduction quality.
• Clean the disc periodically with a soft, lint-free, dry cloth. Never use detergents
or abrasive cleaners to clean the disc. If necessary, use a CD cleaning kit.
• Never write on or affix labels to the surface of compact discs.
CARE OF THE CABINET
If the cabinet becomes dusty wipe it with a soft dry dust cloth. Do not use any wax,
polish sprays, or abrasive cleaners on the cabinet.
CAUTION
Never allow any water or other liquids to get inside the unit while cleaning.
32
PD3500RD_102904.p65 29/10/2004, 15:3632
Page 34
LIMITED WARRANTY
R
Emerson Radio Corp. warrants manufacturing defects in original material, including
original parts and workmanship, under normal use and conditions, for a period of
ninety (90) days from the date of original purchase in the U.S. With your dated
proof of purchase, we will provide repair service at no charge for labor and parts at
an authorized Depot Repair Facility, or replace the product in our discretion. For
repair or replacement, pack your unit in a padded box, enclose your check or
money order payable to Emerson Radio Corp. in the amount of $9.00 (not required
by California residents) to cover shipping and handling costs, and enclose a copy
of your proof of purchase. Send your unit to:
Emerson Radio Corp.
1901 Diplomat Drive.
Farmers Branch, TX 75234.
This warranty does not cover damage from negligence, misuse, abuse, accident,
failure to follow operating instructions, commercial use, rental, repairs by an
unauthorized facility, or products purchased, used, serviced or damaged outside
of the United States.
THIS WARRANTY GIVES YOU SPECIFIC LEGAL RIGHTS, AND YOU MAY
ALSO HAVE OTHER RIGHTS WHICH VARY FROM STATE TO STATE.
AU898M
TO FIND THE LOCATION AND PHONE
NUMBER OF YOUR NEAREST SERVICE
SERVICE
CALL TOLL FREE: 1-800-695-0098
FOR ADDITIONAL SET-UP OR OPERATING ASSISTANCE
FOR CUSTOMER SERVICE, PLEASE WRITE TO:
PD3500RD_102904.p65 29/10/2004, 15:3633
CENTER PERMITTED TO PERFORM
WARRANTY...
PLEASE CALL:
1-800-898-9020
Emerson Radio Corp.
Consumer Affairs Dept.
1901 Diplomat Drive,
Farmers Branch, TX 75234.
33
Page 35
EMERSON
R
Part No.: 16-2955
410-02
PD3500RD_102904.p65 29/10/2004, 15:3634
Printed in China
 Loading...