

Page 1
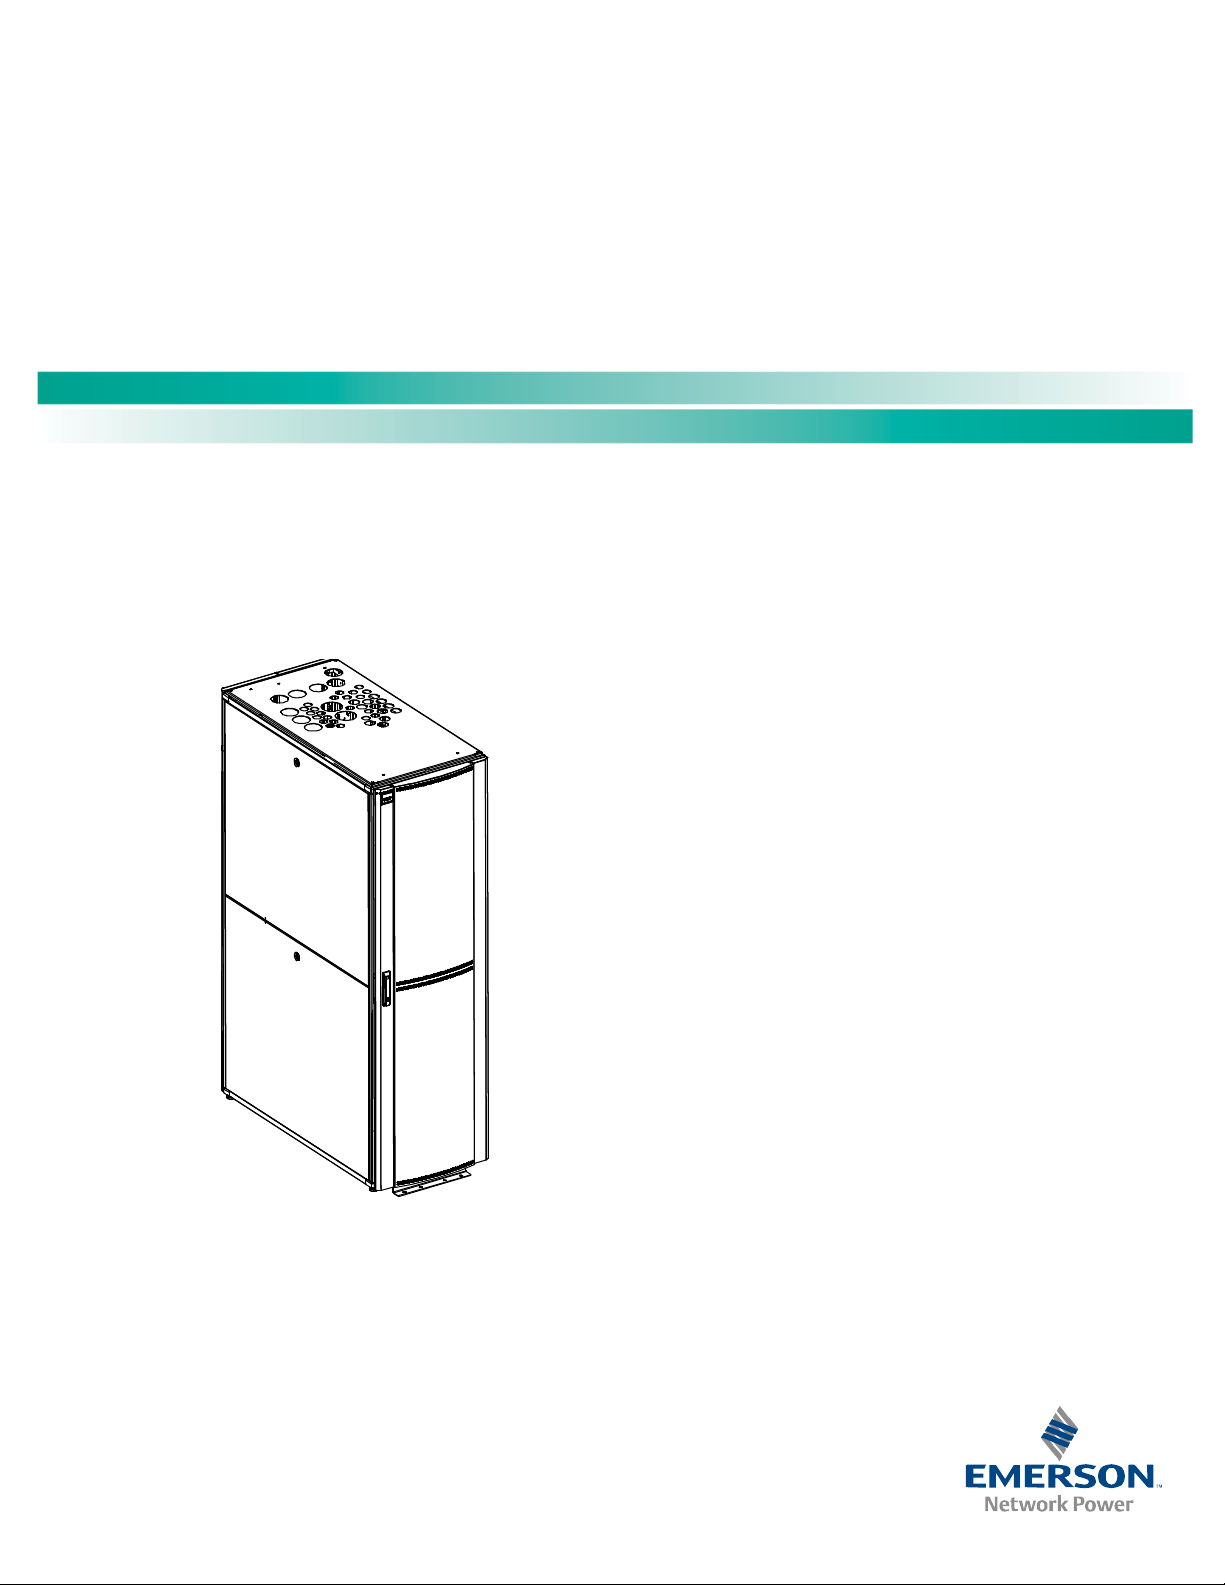
NetSure™ 9500 120kW 400V DC Power System
Installation Manual, IM584001200 (Issue AA, April 14, 2014)
Specification Number: 584001200
Model Number: 9500
Page 2

NetSure™ 9500 120kW 400V DC Power System
Installation Manual, IM584001200 (Issue AA, April 14, 2014)
This page is intentionally blank.
Spec. No: 584001200 Code: IM584001200
Model No: 9500 Issue AA, April 14, 2014
Page 3

NetSure™ 9500 120kW 400V DC Power System
[i]
Installation Manual, IM584001200 (Issue AA, April 14, 2014)
Table of Contents
Admonishments Used in this Document ............................................................................................................... iii
Important Safety Instructions .............................................................................................................................. iv
General Safety ............................................................................................................................................................ iv
Voltages ..................................................................................................................................................................... iv
AC Input Voltages ............................................................................................................................................... iv
DC Output and Battery Voltages ......................................................................................................................... iv
Battery (if equipped) .................................................................................................................................................. iv
Personal Protective Equipment (PPE) .......................................................................................................................... v
Maintenance and Servicing Procedures ....................................................................................................................... v
General ................................................................................................................................................................ v
Dual Hazardous Input Power Sources .................................................................................................................. vi
Hazardous Voltage ..................................................................................................................................................... vi
Handling Equipment Containing Static Sensitive Components .................................................................................. vi
Static Warning .................................................................................................................................................... vii
General Information and Installation Checklist ...................................................................................................... 1
Customer Documentation Package ........................................................................................................................... 1
NetSure™ 9500 120kW 400V DC Power System Installation Manual ................................................................... 1
NetSure™ 9500 120kW 400V DC Power System Operation Manual ..................................................................... 1
NetSure™ 9500 400V DC Battery Cabinet Installation and Operation Manual ...................................................... 1
NetSure™ ACU+ Controller User Manual .............................................................................................................. 1
USB Drive with All Customer Documentation ..................................................................................................... 1
Recommended Tools and Test Equipment ................................................................................................................. 1
Installation Acceptance Checklist ............................................................................................................................... 1
Installing the System .......................................................................................................................................... 2
Making Electrical Connections ............................................................................................................................ 2
Installing the Rectifiers ....................................................................................................................................... 2
System Startup ................................................................................................................................................... 2
Installing the System ............................................................................................................................................. 2
General Requirements ............................................................................................................................................... 2
Inspecting the Equipment and Storing for Delayed Installations ................................................................................. 2
Inspecting the Equipment ................................................................................................................................... 2
Storing for Delayed Installation ........................................................................................................................... 2
Positioning and Securing the Power Module/Bay (584001200 List 01) and Distribution Module/Bay
(584001200 List 07) to the Floor ................................................................................................................................ 3
Positioning and Securing the Battery Cabinet (584001200 List 90, 91, 92, 93) to the Floor ........................................ 4
Making Electrical Connections .............................................................................................................................. 4
Important Safety Instructions .................................................................................................................................... 4
Wiring Considerations ................................................................................................................................................ 4
General Grounding/Earthing Guidelines ..................................................................................................................... 4
Output Ground Configuration .................................................................................................................................... 4
Spec. No: 584001200 Code: IM584001200
Model No: 9500 Issue AA, April 14, 2014
Page 4

NetSure™ 9500 120kW 400V DC Power System
[ii]
Installation Manual, IM584001200 (Issue AA, April 14, 2014)
Cable Routing ............................................................................................................................................................. 4
Torque ........................................................................................................................................................................ 4
Electrical Connections to Power Module/Bay (584001200 List 01) .............................................................................. 4
Power Module/Bay Rack Frame Grounding/Earthing Connection ........................................................................ 4
Power Module/Bay HRMG Connection ................................................................................................................ 4
Power Module/Bay AC Input Power and AC Input Equipment Grounding/Earthing Connections.......................... 5
Power Module/Bay DC Load Distribution Connections (if DC distribution panel installed) ................................... 5
Power Module/Bay IB2 (ACU+ Controller Interface Board P/N MA4C5U31) Connections ..................................... 6
Power Module/Bay Temperature Probe Connections .......................................................................................... 6
ACU+ Controller Ethernet Connection ............................................................................................................... 11
Power Module/Bay External EPO (Emergency Power Off) Connections .............................................................. 11
Power Module/Bay Battery Breaker Alarm/Shunt Trip Connections ................................................................... 12
Power Module/Bay Battery Shunt Connections ................................................................................................. 12
Power Module/Bay Battery Connections ........................................................................................................... 12
Electrical Connections to Distribution Module/Bay (584001200 List 07) ................................................................... 15
Distribution Module/Bay Rack Frame Grounding/Earthing Connection ............................................................. 15
Distribution Module/Bay Distribution Panel List 21HA Connections .................................................................. 15
Electrical Connections to Battery Cabinet (584001200 List 90, 91, 92, 93) ............................................................... 17
Installing the Rectifier Module ............................................................................................................................. 17
System Startup .................................................................................................................................................... 18
Important Safety Instructions ................................................................................................................................... 18
Initial Preparation ..................................................................................................................................................... 18
Initially Starting the System ...................................................................................................................................... 18
ACU+ Controller Initialization ................................................................................................................................... 20
Verifying the Configuration File ................................................................................................................................ 21
Changing Battery Capacity Rating in the ACU+ ......................................................................................................... 21
Checking Basic System Settings ................................................................................................................................ 21
Configuring the ACU+ Identification of Rectifiers ...................................................................................................... 22
Checking the EPO (Emergency Power Off) Circuit (if connected) .............................................................................. 23
EPO (Emergency Power Off) Function ................................................................................................................ 23
Checking System Status ........................................................................................................................................... 23
Final Steps ................................................................................................................................................................ 23
NetPerform™ Optimization Services (North America) ......................................................................................... 24
NetPerform™ Optimization Services (EMEA) ....................................................................................................... 25
Spec. No: 584001200 Code: IM584001200
Model No: 9500 Issue AA, April 14, 2014
Page 5
NetSure™ 9500 120kW 400V DC Power System
[iii]
DANGER!
if not avoided. (ANSI, OSHA)
WARNING!
serious injury if not avoided. This admonition is not used for situations that pose a risk only to
equipment, software, data, or service. (ANSI)
CAUTION!
moderate injury if not avoided. (ANSI, OSHA) This admonition is not used for situations that pose a risk
only to equipment, data, or service, even if such use appears to be permitted in some of the applicable
standards. (OSHA)
ALERT!
data, or service. (ISO)
ALERT!
software corruption, data loss, or service inter
FIRE SAFETY!
locations of fire
SAFETY!
to a particular source of hazard or to fire safety. (ISO, ANSI, OSHA)
Installation Manual, IM584001200 (Issue AA, April 14, 2014)
Admonishments Used in this Document
Warns of a hazard the reader will be exposed to that will likely result in death or serious injury
D
an
g
er
Warns of a potential hazard the reader may be exposed to that could result in death or
W
ar
Caution
Alert
Alert
Fi
re Safet
n
in
g
Warns of a potential hazard the reader may be exposed to that could result in minor or
Alerts the reader to an action that must be avoided in order to protect equipment, software,
Alerts the reader to an action that must be performed in order to prevent equipment damage,
ruption. (ISO)
Informs the reader of fire safety information, reminders, precautions, or policies, or of the
-fighting and fire-safety equipment. (ISO)
y
Informs the reader of general safety information, reminders, precautions, or policies not related
S
afety
Spec. No: 584001200 Code: IM584001200
Model No: 9500 Issue AA, April 14, 2014
Page 6
NetSure™ 9500 120kW 400V DC Power System
[iv]
Danger
D
an
g
er
Warning
Wa
rning
Dange
r
Danger
Dang
er
Installation Manual, IM584001200 (Issue AA, April 14, 2014)
Important Safety Instructions
General Safety
DANGER!
YOU MUST FOLLOW APPROVED SAFETY PROCEDURES.
Performing the following procedures may expose you to
hazards. These procedures should be performed by
qualified technicians familiar with the hazards
associated with this type of equipment. These hazards
may include shock, energy, and/or burns. To avoid
these hazards:
a) The tasks should be performed in the order
indicated.
b) Remove watches, rings, and other metal objects.
c) Prior to contacting any uninsulated surface or
termination, use a voltmeter to verify that no
voltage or the expected voltage is present. Check
for voltage with both AC and DC voltmeters prior to
making contact.
d) Wear eye protection.
e) Use certified and well maintained insulated tools.
Use double insulated tools appropriately rated for
the work to be performed.
DC Output and Battery Voltages
DANGER! This system produces DC Power and may have
a battery source connected to it. The DC voltage IS
hazardously high and the rectifiers and/or battery can
deliver large amounts of current. Exercise extreme
caution not to inadvertently contact or have any tool
inadvertently contact an output terminal or battery
terminal or exposed wire connected to an output
terminal or battery terminal. NEVER allow a metal
object, such as a tool, to contact more than one
termination or battery terminal at a time, or to
simultaneously contact a termination or battery
terminal and a grounded object. Even a momentary
short circuit can cause sparking, explosion, and injury.
Follow local lockout/tagout procedures to ensure DC
branch circuit breakers remain de-energized during
installation at loads, as required.
Extreme caution is required when performing
maintenance. Be constantly aware that this system
contains high DC as well as AC voltages.
The maximum output voltage is 400V DC and is
potentially lethal.
f) Do not work on an energized system without full arc
flash and PPE protection.
DANGER! All power and control wiring should be
installed by a qualified electrician. All power and control
wiring must comply with the National Electrical Code
(NEC) and applicable local codes. For operation in
countries where the NEC is not recognized, follow
applicable codes.
Voltages
AC Input Voltages
DANGER! This system operates from AC input voltage
capable of producing fatal electrical shock. AC input
power must be completely disconnected from the
branch circuits wiring used to provide power to the
system before any AC electrical connections are made.
Follow local lockout/tagout procedures to ensure
upstream branch circuit breakers remain de-energized
during installation. DO NOT apply AC input power to
the system until all electrical connections have been
completed and checked.
Check for voltage with both AC and DC voltmeters prior
to making contact.
Battery (if equipped)
DANGER! When connected together, the battery
terminal voltage is 400V DC and is potentially lethal.
Battery strings should be isolated from the power
system before servicing.
WARNING! Correct polarity must be observed when
connecting battery leads.
WARNING! Special safety precautions are required for
procedures involving handling, installing, and servicing
batteries. Observe all battery safety precautions in this
manual and in the battery instruction manual. These
precautions should be followed implicitly at all times.
Spec. No: 584001200 Code: IM584001200
Model No: 9500 Issue AA, April 14, 2014
Page 7
NetSure™ 9500 120kW 400V DC Power System
[v]
W
a
rn
in
g
Dang
er
Alert
Danger
Wa
rning
Installation Manual, IM584001200 (Issue AA, April 14, 2014)
WARNING! A battery can present a risk of electrical
shock and high short circuit current. Servicing of
batteries should be performed or supervised only by
properly trained and qualified personnel knowledgeable
about batteries and the required precautions.
The following precautions should be observed when
working on batteries:
• Remove watches, rings, and other metal objects.
• Eye protection should be worn to prevent injury
from accidental electrical arcs.
• Use certified and well maintained insulated tools.
Use double insulated tools appropriately rated for
the work to be performed. Ensure that wrenches
with more than one working end have only one end
exposed.
• Do not lay tools or metal parts on top of batteries.
• Disconnect charging source prior to connecting or
disconnecting battery terminals.
• Risk of explosion if battery is replaced with an
incorrect type or if polarity is reversed. When
replacing batteries, replace with the same
manufacturer and type, or equivalent.
FOR THESE REASONS, IT IS OF CRITICAL IMPORTANCE
THAT YOU READ THESE INSTRUCTIONS AND FOLLOW
THEM EXACTLY.
WHEN WORKING WITH LEAD-ACID BATTERIES:
• Wear complete protection for eyes, face, hands,
and clothing. Examples are safety goggles or face
shield, a rubber apron and gloves.
• If battery acid enters your eye, immediately flush
your eye with running cold water for at least 15
minutes. Get medical attention immediately.
• If battery acid contacts skin or clothing, wash
immediately with soap and water.
ALERT! Performing maintenance and/or
troubleshooting procedures may interrupt power to the
loads, if battery reserve is not sufficient.
Personal Protective Equipment (PPE)
DANGER! ARC FLASH AND SHOCK HAZARD.
Appropriate PPE and tools required
this equipment. An appropriate flash protection
boundary analysis should be done determine the
“hazard/risk” category, and to select proper PPE. Notice
that PPE is applicable for both AC and DC voltages.
when working on
• Dispose of used batteries according to the
instructions provided with the batteries. Do not
dispose of batteries in a fire. They may explode.
• ALWAYS FOLLOW THE BATTERY MANUFACTURER’S
RECOMMENDATIONS AND SAFETY INSTRUCTIONS.
In addition to the hazard of electric shock, gas produced
by batteries can be explosive and sulfuric acid can cause
severe burns. Do not open or mutilate batteries.
Released electrolyte is harmful to the skin and eyes, and
is toxic. If electrolyte comes into contact with skin, the
affected area should be washed immediately with large
amounts of water.
DANGER! This equipment may be used in conjunction
with lead-acid batteries. Working near lead-acid
batteries is dangerous!
• Batteries contain sulfuric acid.
• Batteries generate explosive gases during normal
operation. Systems containing batteries should
never be installed in an airtight room or space.
Only install in a ventilated environment.
• Batteries are an energy source that can produce
high amounts of electrical current.
This product is intended only for installation in a
restricted access location.
Only authorized and properly trained personnel should
be allowed to install, inspect, operate, or maintain the
rack/equipment.
Do not work on LIVE parts. If required to work or
operate live parts, obtain appropriate Energized Work
Permits as required by the local authority, per NFPA 70E
“Standard for Electrical Safety in the Workplace” or
applicable local codes.
Maintenance and Servicing Procedures
General
WARNING! All equipment maintenance and servicing
procedures involve internal access and should be carried
out only by trained personnel on a de-energized system.
Extreme caution is required when performing
maintenance and servicing procedures. Be constantly
aware that this system contains high DC as well as AC
voltages. Check for voltage with both AC and DC
voltmeters prior to making contact.
Special safety precautions are required for procedures
involving maintenance of this system and the batteries.
Spec. No: 584001200 Code: IM584001200
Model No: 9500 Issue AA, April 14, 2014
Page 8
NetSure™ 9500 120kW 400V DC Power System
[vi]
Da
ng
e
r
Alert
W
a
rn
in
g
Installation Manual, IM584001200 (Issue AA, April 14, 2014)
Observe all safety precautions in this manual and in the
battery instruction manual before as well as during
performance of all maintenance procedures. Observe
all battery safety precautions before working on or near
the batteries. Service personnel and test equipment
should be standing on rubber mats. Service personnel
should wear insulating shoes for isolation from direct
contact with the floor (earth ground).
This equipment contains several circuits that are
energized with dangerous voltage. Only test equipment
designed for troubleshooting should be used. This is
particularly true for oscilloscopes. Always check with an
AC and DC voltmeter to ensure safety before making
contact or using tools. Even when the power is turned
OFF, dangerously high electric charges may exist within
the system.
Never work alone, even if all power is removed from the
equipment. A second person should be standing by to
assist and summon help in case an accident should
occur.
Dual Hazardous Input Power Sources
WARNING! The system may be powered from dual
hazardous input power sources simultaneously:
Commercial AC and Battery DC. Disconnect both
sources of power before servicing.
Hazardous Voltage
DANGER! Hazard of electrical shock. More than one
disconnect may be required to de-energize the system
before servicing.
Handling Equipment Containing Static Sensitive Components
ALERT! Installation or removal of equipment containing
static sensitive components requires careful handling.
Before handling any equipment containing static
sensitive components, read and follow the instructions
contained on the Static Warning Page.
Spec. No: 584001200 Code: IM584001200
Model No: 9500 Issue AA, April 14, 2014
Page 9

NetSure™ 9500 120kW 400V DC Power System
[vii]
Installation Manual, IM584001200 (Issue AA, April 14, 2014)
Static Warning
This equipment contains static sensitive components. The warnings listed below must be observed to prevent damage to these
components. Disregarding any of these warnings may result in personal injury or damage to the equipment.
1. Strictly adhere to the procedures provided in this document.
2. Before touching any equipment containing static sensitive components, discharge all static electricity from yourself by wearing
a wrist strap grounded through a one megohm resistor. Some wrist straps, such as Emerson Network Power Part Number
631810600, have a built-in one megohm resistor; no external resistor is necessary. Read and follow wrist strap manufacturer’s
instructions outlining use of a specific wrist strap.
3. Do not touch traces or components on equipment containing static sensitive components.
Handle equipment containing static sensitive components only by the edges that do not have connector pads.
4. After removing equipment containing static sensitive components, place the equipment only on conductive or anti-static
material such as conductive foam, conductive plastic, or aluminum foil. Do not use ordinary Styrofoam
5. Store and ship equipment containing static sensitive components only in static shielding containers.
6. If necessary to repair equipment containing static sensitive components, wear an appropriately grounded wrist strap, work on a
conductive surface, use a grounded soldering iron, and use grounded test equipment.
™
or ordinary plastic.
Spec. No: 584001200 Code: IM584001200
Model No: 9500 Issue AA, April 14, 2014
Page 10

NetSure™ 9500 120kW 400V DC Power System
[viii]
Installation Manual, IM584001200 (Issue AA, April 14, 2014)
This page is intentionally blank.
Spec. No: 584001200 Code: IM584001200
Model No: 9500 Issue AA, April 14, 2014
Page 11

NetSure™ 9500 120kW 400V DC Power System
[1 of 25]
Installation Manual, IM584001200 (Issue AA, April 14, 2014)
General Information and Installation Checklist
Customer Documentation Package
This document (IM584001200) provides Installation Instructions for
NetSure™ 9500 120kW 400V DC Power System Model 9500, Spec.
No. 584001200.
The complete Customer Documentation Package consists of…
NetSure
Manual
NetSure™ 9500 120kW 400V DC Power System Operation
Manual
NetSure
Operation Manual
NetSure
USB Drive with All Customer Documentation
™
9500 120kW 400V DC Power System Installation
• Power System Installation Instructions: IM584001200
• Power System Operation Instructions: UM584001200
• Rectifier Instructions: UM1R40015000e
• Power System “System Application Guide”:
SAG584001200
™
9500 400V DC Battery Cabinet Installation and
• Battery Cabinet Installation and Operation Instructions:
IM58400120090
™
ACU+ Controller User Manual
• ACU+ Controller User Instructions: UM1M820NNB-2
• Power System Installation Instructions: IM584001200
• Power System Operation Instructions: UM584001200
• Battery Cabinet Installation and Operation Instructions:
IM58400120090
• Rectifier Instructions: UM1R40015000e
• Power System “System Application Guide”:
SAG584001200
• ACU+ Controller User Instructions: UM1M820NNB-2
• Engineering Drawings
• Also provided on the USB drive is an ACU+ configuration
drawing and the ACU+ configuration files loaded into the
ACU+ as shipped.
Recommended Tools and Test Equipment
The following tools and test equipment are recommended to
install the DC Power System.
Contact Emerson for a full turn key installation quote.
• Non-Contact Voltage Detector
• Digital Multimeter (DMM), Capable of Measuring System
AC Input and DC Output Voltages, 600V AC/DC Rated
• NO-OX-ID-A or Approved Equivalent
• Lineman's Scissors
• Lineman's Strippers
• Lineman's Cutters
• Electrician's Insulated Screwdrivers, Phillips, No. 1 and 2
• Electrician's Insulated Screwdrivers, Flat-Blade, Small and
Large
• Insulated Nut Driver Set
• Hexagonal Bit Set
• Ratchet, 1/2" (13mm) Drive
• 10mm Socket, 13mm Socket, 14mm Socket or 14mm
Wrench
• Adjustable Torque Wrench, 1/2" (13mm) Drive, 0 in-lb. (0
Nm) to 125 in-lb. (14 Nm)
• Lug Compression Crimp Tool, for Field Provided Battery
Power Cable Terminations (as required)
• Pallet Jack or Forklift, Required to Move the Power
Module/Bay (367 Kg / 810 lbs.), Distribution Module/Bay
(204 Kg / 450 lbs.), and Battery Cabinet (1500 Kg / 3300
lbs.) in Place
• Tools Required for Rack/Cabinet Floor Fastening
Hardware
Installation Acceptance Checklist
Provided in this section is an Installation Acceptance Checklist.
This checklist helps ensure proper installation and initial operation
of the system. As the procedures presented in this document are
completed, check the appropriate box in this list. If the procedure
is not required to be performed for your installation site, also
check the box in this list to indicate that the procedure was read.
When installation is done, ensure that each block in this list has
been checked. Some of these procedures may have been factory
performed for you.
Note:
The system is not powered up until the end of the Installation
Acceptance Checklist.
Spec. No: 584001200 Code: IM584001200
Model No: 9500 Issue AA, April 14, 2014
Page 12

NetSure™ 9500 120kW 400V DC Power System
[2 of 25]
Installation Manual, IM584001200 (Issue AA, April 14, 2014)
Note:
Some of these procedures may have been performed at the
factory for you.
Installing the System
Equipment Inspection Completed
Rack(s) / Cabinet(s) Secured to Floor
Making Electrical Connections
POWER MODULE/BAY (584001200 LIST 01)
Rack Frame Grounding/Earthing Connection Made
HRMG Connection Made
AC Input Power and AC Input Equipment
Grounding/Earthing Connections Made
DC Load Distribution Connections Made (if DC
distribution panel installed)
System Startup
System Started, Configured, and Checked
Installing the System
General Requirements
• This product is intended only for installation in a
• The installer should be familiar with the installation
• Temperature of air entering the system must not exceed
restricted access location on or above a non-combustible
surface.
requirements and techniques to be used in securing the
rack(s) cabinet(s) to the floor.
rated operating ambient temperature range found in
SAG584001200.
IB2 (ACU+ Controller Interface Board) Connections Made
(if required)
Temperature Probe Connections Made (if required)
ACU+ Controller Ethernet Connection Made
External EPO (Emergency Power Off) Connections Made
(if required)
Battery Breaker Alarm/Shunt Trip Connections Made (if
required)
Battery Connections Made (if required)
DISTRIBUTION MODULE/BAY (584001200 LIST 07)
Rack Frame Grounding/Earthing Connection Made
DC Load Distribution Connections Made
DC Distribution Panels Interconnected (if required)
DC Input Connections Made
BATTERY CABINET (584001200 LIST 90, 91, 92, 93)
Battery Cabinet Frame Grounding/Earthing Connection
Made
48V Battery Breaker Shunt Trip Connection Made
Battery Breaker Alarm Connections Made
Battery Connections to the Power Module/Bay Made
(positive and negative leads)
Installing the Rectifiers
Rectifiers Installed
• Front and rear access is required for installation.
Inspecting the Equipment and Storing for Delayed Installations
Inspecting the Equipment
Compare the contents of the shipment with the bill of lading.
Report any missing items to the carrier and your local Emerson
representative immediately.
While the system is still on the truck, inspect the equipment and
shipping container(s) for any signs of damage or mishandling.
As the equipment is moved off the truck and unpacked, visually
examine the system for transit damage.
Do not attempt to install the system if damage is apparent.
If any damage is noted, file a damage claim with the shipping
agency within 24 hours and contact Emerson Network Power (see
“NetPerform™ Optimization Services (North America)” on page24
or “NetPerform™ Optimization Services (EMEA)” on page25 for
contact information) to inform them of the damage claim and the
condition of the equipment.
Storing for Delayed Installation
If the equipment will not be installed immediately, it must be
stored indoors where the humidity is no higher than 95%, noncondensing. The storage area must protect the system from
excessive moisture.
Note:
For optimal battery life, store Battery Cabinet at a temperature
between -4°F to +77°F (-20°C to +25°C).
Spec. No: 584001200 Code: IM584001200
Model No: 9500 Issue AA, April 14, 2014
Page 13

NetSure™ 9500 120kW 400V DC Power System
[3 of 25]
Rack will rest on casters wh
en
re
moving the shipping/bolt-down bracket.
Shippi
ng/
Anch
or
Br
ac
ke
t
Remove lag bo
lts
from
brackets on front and rear of
the
rack to free the shipping bracket
from
the p
allet.
Leave brackets
bolted to the rack
if theywill be use
d
to secure
the rack
to the
floor.
Notes:
1. Dimensions are in mm (inches).
Bottom View
441
(17.37)
84
(3.314)
84
(3.314)
898
(35.37)
Installation Manual, IM584001200 (Issue AA, April 14, 2014)
Positioning and Securing the Power Module/Bay (584001200 List 01) and Distribution Module/Bay (584001200 List 07) to the Floor
Position and secure the Power Module/Bay and/or Distribution
Module/Bay to the floor per site requirements. Refer also to
“General Requirements” on page 2.
The Power Module/Bay and Distribution Module/Bay consists of
rack P/N 557861 (standard) or P/N 557858 (Seismic). Refer to the
following procedures.
STANDARD RACK (P/N 557861) INSTALLATION PROCEDURE
1. Use at least two people when moving the rack.
2. Using a pallet jack or forklift, move the rack on its pallet
to the installation location.
3. Cut the shrink wrap and remove all packaging.
4. Use a 14mm socket or a 14mm wrench to remove the lag
bolts securing each shipping bracket to the shipping
pallet. There are two brackets, one in the front and one
at the rear of the rack. Each bracket is secured by four
bolts (see Figure 1).
Note:
Shipping brackets can also be used as an anchor
bracket once unit is at final resting place. Leave the
shipping brackets attached if they will be used to
secure the rack to the floor.
6. Use a pallet jack or forklift to raise the rack off the
shipping pallet.
7. Slide the shipping pallet out from under the rack.
8. Position the rack for installation with the pallet jack or
forklift.
9. Bolt the rack to the floor per site requirements.
Figure 1. Removing Rack P/N 557861 from Shipping Pallet
5. Use a pallet jack or forklift to raise the rack off the
shipping pallet.
6. Slide the shipping pallet out from under the rack.
7. The rack may be positioned for installation either with
the pallet jack or forklift or by rolling the rack on its
casters. If the casters are to be used to move the rack,
the leveling feet must be raised. Position the rack and
either lower the leveling feet or bolt the rack to the floor
with the shipping/anchoring brackets.
SEISMIC RACK (P/N 557858) INSTALLATION PROCEDURE
1. Use at least two people when moving the rack.
2. Refer to Figure 2 and prepare the floor for the anchors
being used to secure the rack.
3. Using a pallet jack or forklift, move the rack on its pallet
to the installation location.
4. Cut the shrink wrap and remove all packaging.
5. Remove the bolts securing the rack to the shipping
pallet.
Figure 2. Rack P/N 557858 Floor Hole Drilling Pattern
Spec. No: 584001200 Code: IM584001200
Model No: 9500 Issue AA, April 14, 2014
Page 14

NetSure™ 9500 120kW 400V DC Power System
[4 of 25]
Rear Rear
Ground Bar
(M6 studs on
16mm [5/8”]
centers)
(Recommended
Torque:
84 in-lbs [9.5 Nm])
Ground Bar
(M6 studs on
16mm [5/8”]
centers)
(Recommended
Torque:
84 in-lbs [9.5 Nm])
120kW Power Module/Bay
584001200 List 01
Da
n
ge
r
CautionDang
er
Installation Manual, IM584001200 (Issue AA, April 14, 2014)
Positioning and Securing the Battery Cabinet (584001200 List 90, 91, 92, 93) to the Floor
Position and secure the Battery Cabinet to the floor per site
requirements. Refer also to “General Requirements” on page 2.
The Battery Cabinet is furnished with separate installation and
operation instructions. Refer to these instructions
(IM58400120090) to position and secure the Battery Cabinet to
the floor.
A pallet jack or forklift is required to install the Battery Cabinet
(3500 lb capacity; batteries shipped installed in the cabinet).
Making Electrical Connections
Important Safety Instructions
Danger! Adhere to the “Important Safety Instructions”
presented at the front of this document.
Wiring Considerations
All AC input and 400V DC output wiring, branch circuit protection,
and grounding/earthing should follow the current edition of the
American National Standards Institute (ANSI) approved National
Fire Protection Association's (NFPA) National Electrical Code (NEC),
and applicable local codes. For operation in countries where the
NEC is not recognized, follow applicable codes.
Cable Routing
The Power Module/Bay and Distribution Module/Bay are provided
with top plates that have cable routing holes that either accept
conduit fittings or corded connections.
Torque
Torque all connections as specified in the illustrations presented in
this section.
Electrical Connections to Power Module/Bay (584001200 List 01)
Power Module/Bay Rack Frame Grounding/Earthing
Connection
Refer also to “General Grounding/Earthing Guidelines” on page 4.
Supply a grounding/earthing lead from site ground/earth to the
rack ground bar. Refer to Figure 3 for connection point.
Figure 3. Power Module/Bay Rack Frame Grounding/Earthing
For wire size, branch circuit protection, crimp lug, and general
wiring recommendations; refer to System Application Guide
SAG584001200 and the Battery Cabinet manual
(IM58400120090).
General Grounding/Earthing Guidelines
Danger! Failure to follow proper grounding/earthing
For grounding/earthing requirements, refer to the current edition
of the American National Standards Institute (ANSI) approved
National Fire Protection Association's (NFPA) National Electrical
Code (NEC), applicable local codes, and your specific site
requirements. For operation in countries where the NEC is not
recognized, follow applicable codes.
Refer also to the grounding/earthing procedures in this document.
Output Ground Configuration
This system is configured for High Resistance Midpoint Ground
(HRMG). Ensure the HRMG lead is properly connected to
ground/earth per the instructions that follow.
procedures can result in electric shock hazard to
personnel and the risk of fire, should a ground fault
occur.
Power Module/Bay HRMG Connection
Refer also to “General Grounding/Earthing Guidelines” on page 4.
A ground lead exits the rear of the power and control section in the
Power Module/Bay. This lead MUST be connected to ground/earth
for proper operation of the HRMG circuit and the ground fault
detection circuit. Refer to Figure 4 for location. THIS LEAD IS
FACTORY CONNECTED TO THE RACK’S GROUND BAR.
Caution! Failure to terminate this conductor to
ground/earth will render the system ground fault
detection circuit and the ±200V DC voltage reference
inoperable. It is essential to properly bond this lead to
ground/earth.
Spec. No: 584001200 Code: IM584001200
Model No: 9500 Issue AA, April 14, 2014
Page 15

NetSure™ 9500 120kW 400V DC Power System
[5 of 25]
Rear
Rear
Power and Control Section
HRMG Ground Connection
(M
UST BE PROPERLY CONNECTED TO GROUND)
120kW Power Module/Bay
584001200 List 01
AC Input Ground Lead Studs
(M8 studs on 25mm [1”] centers)
(Recommended Torque:
108 in-lbs [12 Nm])
Rear
Rear
AC Input
Leads Opening
for 51mm (2”)
Conduit
AC Input
Terminals
(M8 studs
on 25mm [1”]
centers)
(Recommended
Torque:
108 in-lbs [12 Nm])
Power and
Control Section
L1
L2 L3
AC Input
Nominal 380V/400V/480V AC,
Three-Phase, 50/60 Hz.
Rear
120kW Power Module/Bay
584001200 List 01
Da
ng
e
r
Danger
War
ning
Installation Manual, IM584001200 (Issue AA, April 14, 2014)
Figure 4. Power Module/Bay HRMG Connection
Power Module/Bay AC Input Power and AC Input Equipment
Grounding/Earthing Connections
Figure 5. Power Module/Bay AC Input Power Connections
Danger! Adhere to the “Important Safety Instructions”
AC input connections are made to AC input terminals located
behind an access panel located on the rear of the power and
control section. Studs are also provided for the AC input
ground/earth lead. Refer to Figure 5 for location and connection
details.
Power Module/Bay DC Load Distribution Connections
(if DC distribution panel installed)
Danger! Adhere to the “Important Safety Instructions”
Warning! Check for correct polarity before making
Load distribution leads are connected to the load distribution
panel(s) as shown in Figure 6 and Figure 7.
presented at the front of this document. DO NOT
attempt to work on an energized system.
presented at the front of this document. DO NOT
attempt to work on an energized system.
connections.
Spec. No: 584001200 Code: IM584001200
Model No: 9500 Issue AA, April 14, 2014
Page 16

NetSure™ 9500 120kW 400V DC Power System
[6 of 25]
Rear
Positive (+ )
Negative (-)
Positive (+ )
Bus
Negative (-)
Bus
Recomended Torque:
84 in-lbs (9.5 Nm)
±200V DC
120kW Power Module/Bay
584001200 List 01
Distribution
Panel
Front door removed in
illustration for clarity only.
Customer
Load Connections
to DC Dist ribution
Circuit Breakers
(M6 studs on
16mm [5/8”] centers)
(left and right sides)
Rear
Negative (-)
Positive (+ )
120kW Power Module/Bay
584001200 List 01
Distribution
Panel
Distribution
Panel
Distribution
Panel
Positive (+ )
Bus
Negative (-)
Bus
Recomended
Torque:
108 in-lbs (12 Nm)
±200V DC
Front door removed in
illustration for clarity only.
Customer
Load Connection
(M8 studs on
25mm [1”] centers)
Installation Manual, IM584001200 (Issue AA, April 14, 2014)
Figure 6. Power Module/Bay DC Load Distribution Connections to
Distribution Panel List 21HA
Figure 7. Power Module/Bay DC Load Distribution Connections to
Distribution Panel List 23HA
these connections is 2.2 in-lbs (0.25 Nm). Refer to Figure 8 for
terminal locations. Refer to Table 1 and Table 2 for pin-out
information.
•
Digital Inputs
Connect up to eight (8) digital inputs to the IB2. Note
that you must supply both paths for the digital input
(either a positive or negative signal and the opposite
polarity return path). Observe proper polarity. Refer to
Figure 8 for terminal locations and Table 1 for pin-out
information.
Note:
+48V is available on terminal J5-5 and Return (RTN)
is available on terminal J5-6 for customer connection
to digital inputs.
The digital inputs can be programmed to provide an
alarm when the signal is applied (HIGH) or removed
(LOW). Refer to the ACU+ Controller Operation
Instructions (UM1M820NNB-2) for programming
information.
Digital Input Ratings: Refer to the following.
a. Maximum Voltage Rating: 60V DC.
b. Active High: > 19V DC.
c. Active Low: < 1V DC.
• Programmable Relay Outputs
The IB2 provides eight (8) programmable alarm relays
with dry Form-C contacts. Connect up to eight (8) relay
outputs to the IB2. Refer to Figure 8 for terminal
locations and Table 2 for pin-out information.
Refer to the ACU+ Controller Operation Instructions
(UM1M820NNB-2) for programming information.
Power Module/Bay IB2 (ACU+ Controller Interface Board P/N
Relay Ratings: Refer to the following.
a. 1A Steady State @ 30V DC.
MA4C5U31) Connections
b. 3A Peak @ 30V DC.
The IB2 (ACU+ Controller Interface Board) provides connection
points for digital inputs and programmable relay outputs. The IB2
interface board is accessed from the rear of the power and control
section of the Power Module/Bay. Loosen the two captive
fasteners and slide the tray the IB2 assembly is mounted to out far
enough to make the electrical connections. Refer to Figure 8.
When connecting input and output wires to the IB2 board, route
the leads through the opening provided in the tray the IB2
assembly is mounted to (see Figure 8).
DIGITAL INPUTS AND PROGRAMMABLE RELAY OUTPUTS
Digital input and relay output leads are connected to screw-type
terminal blocks located on the IB2. Recommended torque for
Spec. No: 584001200 Code: IM584001200
Model No: 9500 Issue AA, April 14, 2014
Power Module/Bay Temperature Probe Connections
Note:
Each temperature probe consists of two pieces that plug
together to make a complete probe. See SAG584001200 for
part numbers and descriptions.
Temperature probes are connected to connectors located on the
rear of the power and control section of the Power Module/Bay.
See Figure 9.
Up to six (6) temperature probes can be connected to the power
and control section of the Power Module/Bay. Any combination of
the six (6) temperature probes can be programmed to monitor
Page 17

NetSure™ 9500 120kW 400V DC Power System
[7 of 25]
Power and
Control Section
IB2 (ACU+ Controller
Interface Board) Assembly
(located behing panel)
IB2 I/O Wiring Opening
Rear
Rear door removed in
illustration for clarity only.
Rear
120kW Power Module/Bay
584001200 List 01
IB2 (ACU+ Controller Interface Board P/N MA4C5U31)
J1
SW1
J11
J12
Relay O
utput
Term. Blocks Digital Input Term.
Blocks
J9 J8 J7 J6 J5 J4 J3
J2
Switch sections must be set to this position
to interface with the ACU+ controller.
Relay
No.
18 7 6 5 4 3 2
18 7 6
5 4 3 2
Input
No
. (
–
)
Input
No. (+)
NO C NC
NO NOC NC
NO C NC
C NC
NO C
NC
NO C NC
NO C NC
NO C NC
5 3 1
46 2
5 3 1
46 2
5 3 1
46 2
5
3
1
46 2
531
46 2
5 3 1
46 2
5
3
1
4
6 2
8 6
4
2
7 5 3 1
Relay
No.
J3-J9:
Wire Size Capacity: 16-26 AWG (1.5-0.5mm2).
Recommended Torque: 2.2 in-lbs (0.25 Nm).
Installation Manual, IM584001200 (Issue AA, April 14, 2014)
ambient air temperature and/or battery temperature. A
temperature probe set to monitor battery temperature can also be
used for the rectifier battery charge temperature compensation
feature. The battery charge temperature compensation feature
allows the controller to automatically increase or decrease the
output voltage of the system to maintain battery float current as
battery temperature decreases or increases, respectively. Battery
life can be extended when an optimum charge voltage to the
battery with respect to temperature is maintained. A temperature
probe set to monitor battery temperature can also be used for the
BTRM (Battery Thermal Runaway Management) feature. The
BTRM feature lowers output voltage when a high temperature
condition exist to control against battery thermal runaway.
A temperature probe programmed to monitor battery
temperature, battery charge temperature compensation, and/or
BTRM (Battery Thermal Runaway Management) should be
mounted to the center of the battery cell closest to the center of
the cabinet to sense battery temperature. A temperature probe
programmed to monitor ambient temperature should be
mounted in a convenient location, away from direct sources of
heat or cold. To mount a temperature probe, peel the backing
from the self-adhesive surface and affix the probe to a clean and
dry surface.
Refer to the ACU+ Controller Operation Instructions
(UM1M820NNB-2) for programming information.
Figure 8. Power Module/Bay IB2 (ACU+ Controller Interface Board) Connections
Spec. No: 584001200 Code: IM584001200
Model No: 9500 Issue AA, April 14, 2014
Page 18

NetSure™ 9500 120kW 400V DC Power System
[8 of 25]
Installation Manual, IM584001200 (Issue AA, April 14, 2014)
Table 1. Programmable Digital Inputs – IB2
Programmable
Digital Input
1
2
3
4
5
6
7
8
-- J5-5 +48V * --
-- J5-6 RTN * --
IB2
Pin No.
J3-2 +
J3-1 –
J3-4 +
J3-3 –
J3-6 +
J3-5 –
J4-2 +
J4-1 –
J4-4 +
J4-3 –
J4-6 +
J4-5 –
J5-2 +
J5-1 –
J5-4 +
J5-3 –
Default Digital
Input Function
none
none
none
none
none
none
none
none
Customer Defined
Digital Input Function
* +48V is available on terminal J5-5 and Return (RTN) is available on terminal J5-6 for customer
connection to digital inputs.
Spec. No: 584001200 Code: IM584001200
Model No: 9500 Issue AA, April 14, 2014
Page 19

NetSure™ 9500 120kW 400V DC Power System
[9 of 25]
Installation Manual, IM584001200 (Issue AA, April 14, 2014)
Table 2. Programmable Relay Outputs – IB2
Programmable
Relay Output
NO J6-5
1
2
3
4
5
6
7
8
COM J6-3
NC J6-1
NO J6-6
NC J6-2
NO J7-5
NC J7-1
NO J7-6
NC J7-2
NO J8-5
NC J8-1
NO J8-6
NC J8-2
NO J9-5
NC J9-1
NO J9-6
NC J9-2
IB2
Pin No.
Alarms Assigned to this Relay
(Default)
Factory Connected
(factory use only)
none COM J6-4
none COM J7-3
none COM J7-4
none COM J8-3
none COM J8-4
none COM J9-3
none COM J9-4
Alarms Assigned to this Relay
(Custom)
Not Available
Spec. No: 584001200 Code: IM584001200
Model No: 9500 Issue AA, April 14, 2014
Page 20

NetSure™ 9500 120kW 400V DC Power System
[10 of 25]
Rear
Rear
Power and Control Section
BATT1
CTRL
BATT2
CTRL
BATT3
CTRL
BATT4
CTRL
AC INPUT
CTRL
CAN
BATT SHUNT 4
BATT SHUNT 3
BATT SHUNT 2
400VDC
CTRL INPUT
BATT SHUNT 1
TEMP1EPO
HRMG WIRE:
THIS WIRE MUST BE
CONNECTED TO GROUND
TEMP2 TEMP3 TEMP4 TEMP5 TEM P6
120kW Power Module/Bay
584001200 List 01
Temperature Probe
Connectors
Installation Manual, IM584001200 (Issue AA, April 14, 2014)
Figure 9. Power Module/Bay Temperature Probe Connections
Spec. No: 584001200 Code: IM584001200
Model No: 9500 Issue AA, April 14, 2014
Page 21

NetSure™ 9500 120kW 400V DC Power System
[11 of 25]
ACU+ Controller
ESC ENT
10/100M Ethernet
Port (RJ-45)
120kW Power Module/Bay
584001200 List 01
Power and
Control Section
ACU+ Controller
Front door removed in
illustration for clarity only.
Rear
Rear
Power and Control Section
BATT1
CTRL
BATT2
CTRL
BATT3
CTRL
BATT4
CTRL
AC INPUT
CTRL
CAN
BATT SHUNT 4
BATT SHUNT 3
BATT SHUNT 2
400VDC
CTRL INPUT
BATT SHUNT 1
TEMP1EPO
HRMG WIRE:
THIS WIRE MUST BE
CONNECTED TO GROUND
TEMP2 TEMP3 TEMP4 TEMP5 TEMP6
120kW Power Module/Bay
584001200 List 01
EPO Connector
(Emergency Pow
er Off)
Warning
Installation Manual, IM584001200 (Issue AA, April 14, 2014)
ACU+ Controller Ethernet Connection
The ACU+ controller provides a Web interface via an Ethernet
connection. This interface can be accessed locally on a computer
or remotely through a network. An RJ-45 10BaseT jack is provided
on the front of the ACU+ controller for connection to a computer
or into a customer's network. This jack has a standard Ethernet pin
configuration scheme, twisted pair. Refer to Figure 10 for location.
Use shielded Ethernet cable (grounded at both ends). Note that
the ACU+ RJ-45 jack is connected to chassis ground. Refer to the
ACU+ Controller Operation Instructions (UM1M820NNB-2) for
operational details.
Warning! The intra-building port(s) of the equipment or
subassembly is suitable for connection to intra-building
or unexposed wiring or cabling only. The intra-building
port(s) of the equipment or subassembly MUST NOT be
metallically connected to the interfaces that connect to
the OSP or its wiring. These interfaces are designed for
use as intra-building interfaces only (Type 2 or Type 4
ports as described in GR-1089-CORE, Issue 4) and
require isolation from the exposed OSP cabling. The
addition of Primary Protectors is not sufficient
protection in order to connect these interfaces
metallically to OSP wiring.
The intra-building port (RJ-45) of the equipment or
subassembly must use shielded intra-building
cabling/wiring that is grounded at both ends.
Power Module/Bay External EPO (Emergency Power Off)
Connections
The Power Module/Bay has an Emergency Power Off (EPO)
function operated by a remote contact provided by the User.
Note:
The external EPO switch wiring must be double-insulated. The
wire must be 600V, 18-16 AWG stranded for maximum runs
between 82 and 197 feet (25-60m).
When the EPO switch is momentarily closed, the main AC input
circuit breaker located on the power and control section of the
Power Module/Bay and the battery disconnect circuit breakers (if
connected to the BATT1 CTRL, BATT2 CTRL, BATT3 CTRL, and/or
BATT4 CTRL connectors located on the rear of the power and
control section of the Power Module/Bay) are tripped open to
isolate the system from all electrical sources. Manual intervention
is required to restart the system. Restart the system by first
turning ON the main AC input circuit breaker then the battery
circuit breaker(s).
PROCEDURE
1. Connect a customer provided external normally open
switch between the EPO terminals provided on the rear
of the power and control section of the Power
Module/Bay. Refer to Figure 11 for location.
Figure 11. Power Module/Bay EPO (Emergency Power Off) Terminals
Figure 10. ACU+ Ethernet Port
Spec. No: 584001200 Code: IM584001200
Model No: 9500 Issue AA, April 14, 2014
Page 22

NetSure™ 9500 120kW 400V DC Power System
[12 of 25]
Wa
rn
i
ng
D
a
n
g
e
r
Installation Manual, IM584001200 (Issue AA, April 14, 2014)
Power Module/Bay Battery Breaker Alarm/Shunt Trip
Connections
For Emerson provided Battery Cabinet, a battery breaker
alarm/shunt trip cable (P/N 557867) is provided with the system.
This cable connects between the power and control section of the
Power Module/Bay (see Figure 12) and the Battery Cabinet (see
Battery Cabinet instructions IM58400120090).
Customer battery solutions must utilize a compatible battery
breaker. Also one (1) Battery Breaker Alarm/Shunt Trip cable (P/N
557867) must be ordered for each battery string. Battery breaker
requirements are as follows.
• Battery breaker must contain a 48V shunt trip with the
following specifications.
a. Rated Voltage: 48 to 60 VDC.
b. Maximum Release Duration: 15ms.
c. Minimum Resistance: >15 ohm.
• Battery breaker must contain auxiliary contacts that are
normally closed if the breaker is closed. Minimum
contact rating is 48V DC at 2A.
• It is recommended that the battery breaker have a lockout/tag-out feature to allow for maintenance safety.
Power Module/Bay Battery Connections
Danger! Adhere to the “Important Safety Instructions”
presented at the front of this document. DO NOT
attempt to work on an energized system.
Warning! Observe proper polarity when making battery
connections.
Note:
The maximum short circuit capacity of the circuit breakers in
the system is 25kAIC. Therefore, the maximum number of
Emerson provided Battery Cabinets is limited to a maximum of
three (3). The use of a fourth Battery Cabinet will exceed the
short circuit rating of the circuit breakers in the system.
Note:
The short circuit current generated by a customer provided
battery option cannot exceed 25kAIC.
Up to four battery strings can be connected to the battery
terminals located in the Power Module/Bay. Connect the battery
strings to the positive and negative battery connection points per
Figure 13. Refer to SAG584001200 for wire size and crimp lug
information. See separate Battery Cabinet instructions
(IM58400120090) for connection points in the Battery Cabinet.
Power Module/Bay Battery Shunt Connections
The battery shunt connectors on the power and control section of
the Power Module/Bay are factory connected to the battery shunts
also located in the Power Module/Bay. See Figure 12.
Spec. No: 584001200 Code: IM584001200
Model No: 9500 Issue AA, April 14, 2014
Page 23

NetSure™ 9500 120kW 400V DC Power System
[13 of 25]
3
12
4
Battery Alarm
+48V Battery Alarm
+48V Shunt Trip
Shunt Trip RTN
(Use cable P/N 557867)
Factory Connected
BATT1
CTRL
BATT2
CTRL
BATT3
CTRL
BATT4
CTRL
AC INPUT
CTRL
CAN
BATT SHUNT 4
BATT SHUNT 3
BATT SHUNT 2
400VDC
CTRL INPUT
BATT SHUNT 1
TEMP1EPO
HRMG WIRE:
THIS WIRE MUST BE
CONNECTED TO GROUND
TEMP2 TEMP3 TEMP4 TEMP5 TEM P6
Battery Breaker (1-4)
Alarm/Shunt Trip
Connector Pinouts
Battery
Shunt (1-4)
Connector
+Battery
Shunt
-Battery
Shunt
Battery Breaker (1-4)
Alarm/Shunt Trip
Connector
Rear
Rear
Power and Control Section
120kW Power Module/Bay
584001200 List 01
Installation Manual, IM584001200 (Issue AA, April 14, 2014)
Figure 12. Power Module/Bay Battery Breaker Alarm/Shunt Trip and Battery Shunt Connections
Spec. No: 584001200 Code: IM584001200
Model No: 9500 Issue AA, April 14, 2014
Page 24

NetSure™ 9500 120kW 400V DC Power System
[14 of 25]
Rear
Positive (+)
Battery Busbar
+
Negative (-)
Battery Busbars
-+-
+-+
-
Positive (+)
Bus this Side
Negative (-)
Bus this Side
Main
DC Bus
CUSTOMER CONNECTION
TO BATTERY STRINGS
Battery Terminals for 400V DC Battery Strings
Recommended Torque:
108 in-lbs [12 Nm]
Rear
120kW Power Module/Bay
584001200 List 01
Power and
Control Section
Battery Terminations
(M8 studs on 25mm [1”] centers)
Batt.
String
1
Batt.
String
2
Batt.
String
3
Batt.
String
4
Installation Manual, IM584001200 (Issue AA, April 14, 2014)
Figure 13. Power Module/Bay Battery Connections
Spec. No: 584001200 Code: IM584001200
Model No: 9500 Issue AA, April 14, 2014
Page 25

NetSure™ 9500 120kW 400V DC Power System
[15 of 25]
Rear
Rear
Ground Bar
(M6 studs on
16mm [5/8”]
centers)
(Recommended
T
orqu
e:
84 in-lbs [9.5 Nm])
Ground Bar
(M6 studs on
16mm [5/8”]
centers)
(Recommended
Tor
qu
e:
84 in-lbs [9.5 Nm])
Distribution Module/Bay
584001200 List 07
D
a
n
g
e
r
Wa
r
ni
ng
Installation Manual, IM584001200 (Issue AA, April 14, 2014)
Electrical Connections to Distribution Module/Bay (584001200 List 07)
Distribution Module/Bay Rack Frame Grounding/Earthing
Connection
Refer also to “General Grounding/Earthing Guidelines” on page 4.
Supply a grounding/earthing lead from site ground/earth to the
rack ground bar. Refer to Figure 14 for connection point.
Figure 14. Distribution Module/Bay Rack Frame Grounding/Earthing
Distribution Module/Bay Distribution Panel List 21HA
Connections
Danger! Adhere to the “Important Safety Instructions”
presented at the front of this document. DO NOT
attempt to work on an energized system.
Warning! Check for correct polarity before making
connections.
OUTPUT CONNECTIONS
Load distribution leads are connected to the load distribution
panel(s) as shown in Figure 15.
INTERCONNECTING DC DISTRIBUTION PANELS (IF REQUIRED)
DC distribution panels can be interconnected as shown in Figure
15.
INPUT CONNECTIONS
DC distribution panel DC input leads are connected to the
distribution panel(s) as shown in Figure 15.
Spec. No: 584001200 Code: IM584001200
Model No: 9500 Issue AA, April 14, 2014
Page 26

NetSure™ 9500 120kW 400V DC Power System
[16 of 25]
Rear
Front
Positive (+)
Bus
Negative (-)
Bus
Distribution
Panel
Distribution
Panel
Front door removed in
illustration for clarity only.
Distribution Module/Bay
584001200 List 07
Positive (+)
Negative (-)
Recommended Torque:
84 in-lbs (9.5 Nm)
±200V DC
Customer
Load Connections
to DC Distribution
Circuit Breakers
(M6 studs on
16mm [5/8”] centers)
(left and right sides)
Torque these
Connections:
108 in-lbs (12 Nm)
Customer DC Input Connections
to Load Distribution Panels
(M8 studs on 25mm [1”] centers)
Recommended Torque: 108 in-lbs (12 Nm)
Interconnecting Two (2)
Load Distribution Panels
Positive (+) Bus
Negative (-) Bus
±200V DC
Distribution
Panel
Distribution
Panel
Distribution Module/Bay
584001200 List 07
Rear
List 21HA
Distribution Panels
Rear
Positive (+) Bus
Negative (-) Bus
±200V DC
P/N 558103 List 21HA
Interconnect Busbar
(two required)
(M8 studs on
1” [25mm] centers)
Installation Manual, IM584001200 (Issue AA, April 14, 2014)
Figure 15. Distribution Module/Bay DC Load Connections, DC Input Connections, and Interconnecting Two (2) DC Load Distribution Panels
Spec. No: 584001200 Code: IM584001200
Model No: 9500 Issue AA, April 14, 2014
Page 27

NetSure™ 9500 120kW 400V DC Power System
[17 of 25]
D
a
n
g
e
r
W
a
rn
in
g
Installation Manual, IM584001200 (Issue AA, April 14, 2014)
Electrical Connections to Battery Cabinet (584001200 List 90, 91, 92, 93)
Danger! Adhere to the “Important Safety Instructions”
presented at the front of this document. DO NOT
attempt to work on an energized system.
Warning! Check for correct polarity before making
battery connections.
Note:
The maximum short circuit capacity of the circuit breakers in
the system is 25kAIC. Therefore, the maximum number of
Emerson provided Battery Cabinets is limited to a maximum of
three (3). The use of a fourth Battery Cabinet will exceed the
short circuit rating of the circuit breakers in the system.
Batteries are factory installed and connected in the Battery
Cabinet.
Note:
Batteries are physically factory installed, but require one series
strap connection to complete the string wiring. The batteries
as shipped are connected with one wire disconnected in the
middle of the string, for shipping safety.
The Battery Cabinet is furnished with separate installation
instructions (IM58400120090). Refer to these instructions to
make the follow connections to the Battery Cabinet.
• Battery Cabinet Frame Grounding/Earthing Connection
(see also “General Grounding/Earthing Guidelines” on
page 4)
• 48V Battery Breaker Shunt Trip Connection (see also
“Power Module/Bay Battery Breaker Alarm/Shunt Trip
Connections” on page 12)
• Battery Breaker Alarm Connections (see also “Power
Module/Bay Battery Breaker Alarm/Shunt Trip
Connections” on page 12)
• Battery Connections to the Power Module/Bay (see also
“Power Module/Bay Battery Connections” on page 12)
Installing the Rectifier Module
The rectifier module is hot swappable. It can be installed with the
system operating if these instructions are carefully followed.
Note:
There is a two-step insertion process.
PROCEDURE
1. Unpack the rectifier module.
2. If present, remove the blank cover panel from the
rectifier module mounting position.
3. Open the respective rectifier module’s AC input circuit
breaker on the front of the power and control section of
the Power Module/Bay. Refer to Figure 17 for circuit
breaker location.
4. Place the “Latch Release” located on the front of the
rectifier module to the LEFT position. See Figure 16.
5. Place the rectifier module into an unoccupied mounting
slot without sliding it in completely. Gently push the
rectifier module into the mounting slot until it stops.
Note that the rectifier module will NOT be completely
seated in the mounting slot until the next step is
performed.
6. Live Systems: Wait for the green power indicator to
illuminate. Ensuring the green power indicator stays on,
slide the “Latch Release” located on the front of the
rectifier module to the RIGHT position. Gently push the
rectifier module into the mounting slot until it is
completely seated.
De-energized Systems: Slide the “Latch Release” located
on the front of the rectifier module to the RIGHT position.
Gently push the rectifier module into the mounting slot
until it is completely seated.
7. Secure the rectifier module to the power and control
section of the Power Module/Bay by tightening the
retaining screw.
8. Repeat the above steps for each rectifier module being
installed in the system.
9. After the rectifier modules are physically installed in their
mounting slots, they are ready for operation immediately
after power is supplied to them.
10. Close the respective rectifier module’s AC input circuit
breaker on the front of the power and control section of
the Power Module/Bay.
Spec. No: 584001200 Code: IM584001200
Model No: 9500 Issue AA, April 14, 2014
Page 28

NetSure™ 9500 120kW 400V DC Power System
[18 of 25]
Power Indicator (Green)
Protection Indicator (Y
ellow)
Alarm Indicator (Red)
Front V
iew
Latch Release
Retaining Screw
C
aut
ion
Installation Manual, IM584001200 (Issue AA, April 14, 2014)
Figure 16. Installing a Rectifier Module into a Power Module/Bay
System Startup
Important Safety Instructions
Caution! Performing various steps in the following
procedures may cause a service interruption and/or
result in the extension of alarms. Notify any appropriate
personnel before starting these procedures. Also, notify
personnel when these procedures are completed.
Note:
Contact Emerson Services for startup assistance.
Initial Preparation
Refer to Figure 17 for circuit breaker locations.
• Ensure that all blocks (except the last one) in the
“Installation Acceptance Checklist” starting on page 1
have been checked.
• Ensure the main AC input circuit breaker located on the
power and control section of the Power Module/Bay is in
the OFF position.
• Ensure each rectifier module AC input circuit breaker
located on the power and control section of the Power
Module/Bay is in the OFF position.
• Ensure that a rectifier module or a blank cover panel is
installed in all rectifier mounting positions.
• Ensure each load distribution circuit breaker in the Power
Module/Bay (if distribution panel is installed) and
Distribution Module/Bay(s) is in the OFF position.
• Ensure each battery string circuit breaker is in the OFF
position.
Initially Starting the System
PROCEDURE
1. Close the external AC disconnect or protective device
that supplies AC power to the system.
2. Place the main AC input circuit breaker located on the
front of the power and control section of the Power
Module/Bay to the ON position.
3. Place each rectifier module AC input circuit breaker
located on the front of the power and control section of
the Power Module/Bay to the ON position. Rectifiers
automatically start.
4. Place each battery string circuit breaker to the ON
position.
5. Place each load distribution circuit breaker in the Power
Module/Bay (if distribution panel is installed) and
Distribution Module/Bay(s) to the ON position.
Spec. No: 584001200 Code: IM584001200
Model No: 9500 Issue AA, April 14, 2014
Page 29

NetSure™ 9500 120kW 400V DC Power System
[19 of 25]
Load Distribution
Circuit Breakers
120kW Power Module/Bay
584001200 List 01
Front
Front Front
Rectifier Module
AC Input Circuit Breakers
(40A, 380V/400V/480V AC)
Main AC Input
Circuit Breaker
(250A,
380V/400V/480V AC)
Load Distribution
Circuit Breakers
Load Distribution
Circuit Breakers
Load Distribution
Circuit Breakers
Load Distribution
Circuit Breakers
Distribution Module/Bay
584001200 List 07
120kW Power Module/Bay
584001200 List 01
Front door removed in
illustrations for clarity only.
Installation Manual, IM584001200 (Issue AA, April 14, 2014)
Figure 17. Circuit Breaker Locations
Spec. No: 584001200 Code: IM584001200
Model No: 9500 Issue AA, April 14, 2014
Page 30

NetSure™ 9500 120kW 400V DC Power System
[20 of 25]
ESC ENT
Menu Navigation Keys
USB Port
10/100M Ethernet
Port (RJ-45)
Status
Indicator
(Green)
Information Alarm
Indicator (Yellow)
Warning or Critical
Alarm Indicator
(Red)
Installation Manual, IM584001200 (Issue AA, April 14, 2014)
ACU+ Controller Initialization
Note:
Your ACU+ controller was programmed with a configuration
file that provides initial settings for all adjustable parameters.
Provided on a USB drive furnished with the system is an ACU+
configuration drawing (C-drawing) and the ACU+
configuration files loaded into the ACU+ as shipped
Refer to the ACU+ Controller Operation Instructions
(UM1M820NNB-2) for detailed instructions.
Refer to Figure 18 for locations of the ACU+ local indicators and
navigation keys.
Figure 18. ACU+ Controller Local Indicators and Navigation Keys
3. As initialization continues, the Main screen is displayed,
but with zero volts. Initialization is not complete.
4. When initialization is complete, the Main screen displays
voltage and current normally, and no alarms are active.
5. System information is displayed in multiple screens.
Repetitively press the up or down arrow key to view other
system information screens one by one.
6. From the Main screen, press
ENT to go to the “Main
Menu” screen.
PROCEDURE
Note:
Spec. No: 584001200 Code: IM584001200
Model No: 9500 Issue AA, April 14, 2014
The initialization routine takes several minutes. During that
time various alarm indicators may illuminate on the ACU+
front panel and an audible alarm may sound. Disregard all
alarms. An audible alarm can be silenced at any time by
momentarily depressing the
ENT
key on the ACU+ Controller.
1. After the ACU+ is powered on, the display alternates
between the “
screen displaying “
***** Starting…”.
2. Next, the language screen appears. Press the up or down
arrow key to select the desired language. Press the
key to confirm the selection. If no key is pressed within
10 seconds, the ACU+ selects the displayed language
Emerson Network Power” screen and a
Advanced Control Unit Plus Version
ENT
automatically.
7. From the Main Menu, select a sub-menu by repetitively
pressing the up or down arrow key. The selected submenu will be indicated by the cursor. Press
ENT to open
the sub-menu.
Note:
Repeatedly press the “ESC” key to return in reverse order
level by level from any sub-menu until the Main screen
appears.
8. Verify and set the ACU+ Controller as required for your
application. Refer to the ACU+ Controller Operation
Instructions (UM1M820NNB-2) for procedures. Note
that you will have to program the ACU+ for any of the
following.
a. Battery capacity if different then the factory default
of 120 Ah per battery string for the Emerson
provided Battery Cabinet.
b. Number of battery strings connected to the system.
This is set in the Module 1 Distribution menu.
Depending on the ACU+ configuration installed in
your system (1 battery shunt or 4 battery shunts),
the menu item displayed is “Battery Breaker 1
Installed” or “Battery String 1 Installed”. For a 1shunt system, this sets the number of battery
breakers being used in the system. For a 4-shunt
Page 31

NetSure™ 9500 120kW 400V DC Power System
[21 of 25]
Installation Manual, IM584001200 (Issue AA, April 14, 2014)
system, this sets the number of shunts being used in
the system and the number of battery breakers
being used in the system.
c. Temperature probes connected to the temperature
probe inputs located on the power and control
section of the Power Module/Bay.
d. External inputs/outputs connected to the IB2 (ACU+
Interface Board) located on the power and control
section of the Power Module/Bay.
Verifying the Configuration File
Your ACU+ controller was programmed with a configuration file
that provides initial settings for all adjustable parameters. The
version number of the configuration file can be found on the
configuration drawing (C-drawing) that is supplied with your
power system documentation, and on a label located on the ACU+.
You can verify that the correct configuration file has been loaded
into your ACU+ by performing the following procedure.
PROCEDURE
Note:
When viewing any of the following screens, if a key is not
depressed within approximately 10 seconds, the ACU+ will
automatically return to the Main screen.
1. With the Main screen displayed, press
displays the serial number and software version.
2. Press
3. Press
4. Press
ENT. A screen displays the hardware version and
MAC address.
ENT. A screen displays the configuration version
number.
ESC, or wait approximately 10 seconds, to return to
the Main screen.
ESC. A screen
Changing Battery Capacity Rating in the ACU+
To change the battery capacity setting of the ACU+ to match the
battery connected to the power system, perform the following
procedure.
(default password is “1”), then press ENT twice. (
you have been assigned a unique User Name and password,
follow this procedure to enter these.)
3. With the Settings menu screen displayed, navigate to
and select “
4. Navigate to “Rated Capacity”. Press ENT. Use the up or
down keys to adjust the value as required. Press
Note:
The default capacity value is 120 Ah per battery string for
the Emerson provided Battery Cabinet. For customer
provided batteries, enter the C10 battery capacity rating
in Ah.
5. Return to the Main screen by repeatedly pressing
(escape).
Battery” (ENT) / “Basic” (ENT).
Note:
ENT.
ESC
If
Checking Basic System Settings
Navigate through the controller menus and sub-menus to check
system settings. You can adjust any parameter as required. Note
that these settings can also be checked (and changed if required)
via the WEB Interface.
Note:
Repeatedly press the “ESC” key to return in reverse order level
by level from any sub-menu until the Main screen appears.
PROCEDURE
To Select a Sub-Menu:
Press the up or down arrow keys to move the cursor up and down
the list of sub-menus in the menu screen (selects the sub-menu),
then press
To Enter a Password:
If a password screen opens, a password must be entered to allow
the User to make adjustments. To enter a password, with the
cursor at the User Name field (default is “Admin”), press the down
arrow key to move cursor down to the password line. Press
“0” is highlighted. Press the up arrow key once to change the “0”
to”1” (default password is “1”), then press
have been assigned a unique User Name and password, follow this
procedure to enter these.)
ENT to enter the selected sub-menu.
ENT twice. (
Note:
ENT.
If you
PROCEDURE
1. With the Main screen displayed, press
Main Menu. Navigate to and select “
2. If a password screen opens, a password must be entered
to allow the User to make adjustments. If a password was
previously entered and has not yet timed out, skip this
step and proceed to step 3). Otherwise, to enter a
password, with the cursor at the User Name field (default
is “Admin”), press the down arrow key to move cursor
down to the password line. Press
Press the up arrow key once to change the “0” to”1”
Spec. No: 584001200 Code: IM584001200
Model No: 9500 Issue AA, April 14, 2014
ENT to go to the
Settings” (ENT).
ENT. “0” is highlighted.
To Change a Parameter:
Press the up or down arrow keys to move the cursor up and down
the list of parameters in the menu screen (selects the parameter to
change), then press
parameter field highlights. Press the up or down arrow keys to
change the parameter value. Press
Table 3 shows the menu navigation for some basic settings. (Refer
to the ACU+ Controller Operation Instructions (UM1M820NNB-2)
for details and additional settings.)
ENT to change the selected parameter. The
ENT to confirm the change.
Page 32

NetSure™ 9500 120kW 400V DC Power System
[22 of 25]
Date
Main Menu / Settings / Controller / Date
Time
Main Menu / Settings / Controller / Time
IP Communications Parameters
gateway address)
Float Voltage
Main Menu / Settings / Battery / Charge / Output Voltage
Equalize Voltage
Main Menu / Settings / Battery / Charge / EQ Voltage
Battery Capacity
Main Menu / Settings / Battery / Basic / Ttl Rated Capac
Main Menu / Settings / Battery / Basic / BTRM Voltage
Temperature Compensation
Center Temperature
Temperature Compensation Slope
Main Menu / Settings / Battery / Temp Comp / Temp Comp Coeff
Temperature Compensation Sensor
Main Menu / Settings / Battery / Temp Comp / Temp Comp Probe
HVSD Limit
Main Menu / Settings / Rectifier / All Rect Set / HVSD Limit
Rectifier Current Limit
Main Menu / Settings / Rectifier / All Rect Set / Input Current Lmt
Over Voltage Alarm 1
Main Menu / Settings / Power System / Over Voltage 1
Over Voltage Alarm 2
Main Menu / Settings / Power System / Over Voltage 2
Under Voltage Alarm 1
Main Menu / Settings / Power System / Under Voltage 1
Under Voltage Alarm 2
Main Menu / Settings / Power System / Under Voltage 2
Installation Manual, IM584001200 (Issue AA, April 14, 2014)
Table 3. ACU+ Controller Basic Settings Local Menu Navigation
Parameter Menu Navigation
(IP address, subnet mask address,
BTRM Feature
Main Menu / Settings / Communication
Main Menu / Settings / Battery / Basic / BTRM Action
Main Menu / Settings / Battery / Temp Comp / Temp Comp Ref.
Configuring the ACU+ Identification of Rectifiers
When rectifier modules are all installed prior to applying power
and starting the system, the order in which the ACU+ identifies the
rectifiers is by serial number (lowest serial number is Rect 1, next
lowest is Rect 2, etc.). If you prefer the ACU+ to identify the
rectifiers by position in the system, perform the following
procedure.
PROCEDURE
1. With the Main screen displayed, press
Main Menu. Navigate to and select “
2. If a password screen opens, a password must be entered
to allow the User to make adjustments. If a password was
previously entered and has not yet timed out, skip this
step and proceed to step 3). Otherwise, to enter a
password, with the cursor at the User Name field (default
is “Admin”), press the down arrow key to move cursor
down to the password line. Press
Press the up arrow key once to change the “0” to”1”
(default password is “1”), then press
ENT to go to the
Settings” (ENT).
ENT. “0” is highlighted.
ENT twice. (
Note:
If
you have been assigned a unique User Name and password,
follow this procedure to enter these.)
3. With the Settings menu screen displayed, navigate to
and select “
4. Navigate to “
rectifier identification number). Press
# menu screen is displayed, and the green LED on one
rectifier starts flashing. This is the rectifier currently
identified by the ACU+ as rectifier #. (If this is not the
rectifier you want, press
screen and select a different rectifier.)
5. Navigate to and select “
up or down keys to change the ACU+ identification
number for the flashing rectifier. Press
6. Press ESC to return to rectifier menu screen.
7. Repeat steps 4) through 6) for each of the remaining
rectifiers in the system.
Rectifier” (ENT).
Rect #” (# is used here to represent the
ENT. The rectifier
ESC to return to rectifier menu
Rectifier ID”. Press ENT. Use the
ENT.
Spec. No: 584001200 Code: IM584001200
Model No: 9500 Issue AA, April 14, 2014
Page 33

NetSure™ 9500 120kW 400V DC Power System
[23 of 25]
Installation Manual, IM584001200 (Issue AA, April 14, 2014)
8. When you have finished selecting identification numbers
for all rectifiers, repeatedly press
Main Menu.
9. Navigate to and select “
/ “
All Rect Ctrl” (ENT).
10. Navigate to “Confirm ID/PH”. Press ENT. “Yes”
highlights.
11. Press
Note:
12. Return to the Main screen by repeatedly pressing
ENT to select the operation. Press ENT again to
confirm.
Check your numbering to be sure it is correct. If there
where conflicts in your numbering, rectifiers with conflicts
will be assigned the next available sequential number.
(escape).
Manual” (ENT) / “Rectifier” (ENT)
ESC to return to the
ESC
Checking the EPO (Emergency Power Off) Circuit (if connected)
EPO (Emergency Power Off) Function
The Power Module/Bay has an Emergency Power Off (EPO)
function operated by a remote contact provided by the User.
When the EPO switch is momentarily closed, the main AC input
circuit breaker located on the power and control section of the
Power Module/Bay and the battery disconnect circuit breakers (if
connected to the BATT1 CTRL, BATT2 CTRL, BATT3 CTRL, and/or
BATT4 CTRL connectors located on the rear of the power and
control section of the Power Module/Bay) are tripped open to
isolate the system from all electrical sources. Manual intervention
is required to restart the system. Restart the system by first
turning ON the main AC input circuit breaker then the battery
circuit breaker(s).
PROCEDURE
1. With the system operating, momentarily depress the
customer furnished Emergency Power Off switch.
2. Verify that the main AC input circuit breaker located on
the power and control section of the Power Module/Bay
and any connected battery circuit breakers open.
3. Restart the system by first turning ON the main AC input
circuit breaker then the battery circuit breaker(s).
section of the Power Module/Bay. If the system is
operating normally, the status of these is as shown in
Table 4.
Table 4. Status and Alarm Indicators
Component Indicator Normal State
ACU+
Controller
Rectifier
Modules
Power and
Control Section
of Power
Module/Bay
Status
(Green)
Information
(Yellow)
Warning or
Critical
Alarm
(Red)
Power
(Green)
Protection
(Yellow)
Alarm
(Red)
Output Voltage
Present (Green)
Control Voltage
Present Indicator (Green)
Ground/Insulation Fault
Alarm (Red)
On
Off
Off
On
Off
Off
On
On
Off
Final Steps
PROCEDURE
1. If any ACU+ Controller configuration settings were
changed, refer to the ACU+ User Instructions
(UM1M820NNB-2) and save a copy of the configuration
file. This file can be used to restore the ACU+ Controller
settings, if required, at a later date.
• Note that provided on a USB drive furnished with the
system is an ACU+ configuration drawing
(C-drawing) and the ACU+ configuration files loaded
into the ACU+ as shipped.
2. Verify there are no external alarms and the local
indicators are as shown in Table 4.
Checking System Status
PROCEDURE
1. Observe the status of the indicators located on the ACU+
controller, rectifier modules, and power and control
Spec. No: 584001200 Code: IM584001200
Model No: 9500 Issue AA, April 14, 2014
Page 34

NetSure™ 9500 120kW 400V DC Power System
[24 of 25]
Customer Service (Pre-Shipment)
Email
CustomerService.ESNA@Emerson.com
Pricing and availability
, purchase orders, expediting requests
Associate.
Customer Support Center (Post-Shipment)
Email
ESNACustomerSupportCenter@Emerson.com
Phone
1.956.661.6867
Account Management
Email
AccountManagement.ESNA@Emerson.com
Provides quotes and bid responses for custom configured
[2]
DC power
(Reps, VARs & Distributors).
Spare Parts
DCpower.Spares@Emerson.com
OSP.Spares@Emerson.com
Phone
1.800.800.1280 option 5
DC Power Depot Repair
Technical Support
DCpower.TAC@Emerson.com
OSP.TAC@Emerson.com
Phone
1.800.800.5260
[1]
Contact Account Management for custom-configurations.
Contact Spare Parts for parts and accessories.
Installation Manual, IM584001200 (Issue AA, April 14, 2014)
NetPerform™ Optimization Services (North America)
At Emerson Network Power, we understand the importance of reliable equipment – it’s critical to both your business and your bottom
line. That is why we offer a wide array of services to meet all of your network infrastructure needs.
[1,2]
Phone 1.800.800.1280 option 2
and order tracking. Ask for your company’s dedicated Customer Service
After an order has shipped, contact our Customer Support Center
with related questions, concerns or claims.
Phone 1.800.800.1280 option 3
Email
Email DCpower.Repair@Emerson.com
Phone 1.800.800.1280 option 6
Email
[2]
systems and outside plant enclosures for customers and channel partners
Pricing and purchase orders for spare parts, including but not limited to
breakers, cables, fuses, rectifier fans, misc. breaker and fuse panels,
enclosure fans, doors and switches, etc.
Creates and processes RMAs for depot repair and refurbishment.
Determines repair and refurbishment lead times and pricing based on
warranties/contractual agreements. Provides repair shipping information
and status.
Answers technical product and system questions; determines status of
warranties and contractual agreements for repair.
For More Information
To learn more about service offerings from Emerson Network Power, please contact your sales representative,
call 1-800-800-1280 option 7, email ES.Services@Emerson.com or visit EmersonNetworkPower.com/EnergySystems.
Spec. No: 584001200 Code: IM584001200
Model No: 9500 Issue AA, April 14, 2014
Page 35

NetSure™ 9500 120kW 400V DC Power System
[25 of 25]
Technical Support
Contact your sales representative.
Freedom
Care
EMEA Customer Support Center
ESEMEACustomerSupportCenter@
Emerson.com
Dealing with customer problems related to:
•
Quality and product support
Order DC Power & OSP, Order Status
Email
OPC.EES@EmersonNetworkPower.com
Phone
+421 32 7700 706
Request DC Power Repair Service RMA
Email
EMEA.HWServices@Emerson.com
Phone
+421 32 7700 191
Spare Parts
DC Power Product Training
Installation Manual, IM584001200 (Issue AA, April 14, 2014)
NetPerform™ Optimization Services (EMEA)
At Emerson Network Power, we understand the importance of reliable equipment – it’s critical to both your business and your bottom
line. That is why we offer a wide array of services to meet all of your network infrastructure needs.
Provides quotes and bid responses, order placement and scheduling
EmersonNetworkPower.com
for design, and deployment and optimization services. Download
service & maintenance reports online.
Email
Phone +421 32 7700 888
Email EMEA.HWServices@Emerson.com
Phone +421 32 7700 881
Product field performance
•
Product quality defects
•
Product dead on arrival
•
Incomplete or incorrect deliveries
•
Creates and processes orders, determines lead times and pricing,
provides order shipping information and status.
Creates and processes RMAs, determines lead times and pricing,
provides repair shipping information and status.
Pricing and PO processing of spare parts, including but not limited to
breakers, cables, fuses, rectifier fans, misc. breaker and fuse panels,
enclosure fans, doors & switches, etc.
Email EMEA.Training@emersonenergy.com Requests for quotes, order placement and scheduling.
For More Information
To learn more about service offerings from Emerson Network Power, please contact your sales representative, or visit
EmersonNetworkPower.eu/EnergySystems.
Spec. No: 584001200 Code: IM584001200
Model No: 9500 Issue AA, April 14, 2014
Page 36

NetSure™ 9500 120kW 400V DC Power System
Emer
sonNet workPower.com/EnergySystem s (North
America)
EmersonNetwork Power.eu/Energ
ySystems (EMEA)
© Emerson Network Power, Energy Systems, North America, Inc. 2014.
Business -Critical Co ntinuity™, Emer son Netw ork Powe r™, the Em erso n Networ k Power logo , Emer so n™ and Conside r it Sol
ved are serv ice marks and
trademar ks of Emer son Electric Co. Ener gyMaster™, eSur
e™, NetPer form™, NetR each™, NetS pan™, NetSur e™ and N etXten d™ are tradema rks of Emers on
Net work Powe r, Energy Syste ms, Nor th America, Inc . Any other product, brand, or company names or logos are the property of the respective owner.
While every precaution has been taken to ensure accuracy and
completeness herein, E merson Electric Co. assumes no r esponsibility,
and disclaims all liability, for damages resulting from use of this
information o r for any errors or omi ssions. Specifications subject to
change without notice.
The information contained in this document is subject to change without notice and may
not be suitable for all applications. While every precaution has be
en take
n to ensure the
accuracy and completeness of this document, Emerson Network Power, Energy Systems,
North America, Inc. assumes no responsibility and
disclaims all liability for damages result-
ing from use of this information or for any
errors or omissions. Refer to other local
pr
actices or building cod
es as applicable for the correct methods, tools, and materials to
be used in performing procedur es not specifically described in this document.
The products covered by this instruction manual are manufactured and/or sold by Emerson
N
etwork Power, Ene
rgy Systems, North America, Inc. This document is the property of
Emerson Ne
twork Power, Energy Syste
ms, North America, Inc. and contains confidential and
propri
etary information owned by Emerson Ne
twork Powe
r, Energy Systems, North
America, Inc. Any copying, use or disclosure of it without the written pe
rmission of Emerson
Network Power, Energy Syste
ms, North Ame
rica, Inc. is strictly prohibited.
Nam
es of companies and products are trad
emarks or registered trad
emarks of the
respective companies. Any questions regard
ing usage of tra
demark nam
es should be
directed to the original manuf
acturer.
Installation Manual, IM584001200 (Issue AA, April 14, 2014)
Spec. No: 584001200 Code: IM584001200
Model No: 9500 Issue AA, April 14, 2014
 Loading...