

Page 1

Installation Manual
20002273, Rev. AA
Micro Motion® MVD™ Direct Connect™
Meters
July 2014
Page 2

Safety and approval information
This Micro Motion product complies with all applicable European directives when properly installed in accordance with the
instructions in this manual. Refer to the EC declaration of conformity for directives that apply to this product. The EC declaration of
conformity, with all applicable European directives, and the complete ATEX Installation Drawings and Instructions are available on
the internet at www.micromotion.com or through your local Micro Motion support center.
Information affixed to equipment that complies with the Pressure Equipment Directive can be found on the internet at
www.micromotion.com/documentation.
For hazardous installations in Europe, refer to standard EN 60079-14 if national standards do not apply.
Other information
Full product specifications can be found in the product data sheet. Troubleshooting information can be found in the transmitter
configuration manual. Product data sheets and manuals are available from the Micro Motion web site at www.micromotion.com/
documentation.
Return policy
Micro Motion procedures must be followed when returning equipment. These procedures ensure legal compliance with government
transportation agencies and help provide a safe working environment for Micro Motion employees. Failure to follow Micro Motion
procedures will result in your equipment being refused delivery.
Information on return procedures and forms is available on our web support system at www.micromotion.com, or by phoning the
Micro Motion Customer Service department.
Micro Motion customer service
Email:
• Worldwide: flow.support@emerson.com
• Asia-Pacific: APflow.support@emerson.com
Telephone:
North and South America Europe and Middle East Asia Pacific
United States 800-522-6277 U.K. 0870 240 1978 Australia 800 158 727
Canada +1 303-527-5200 The Netherlands +31 (0) 318 495 555 New Zealand 099 128 804
Mexico +41 (0) 41 7686 111 France 0800917901 India 800 440 1468
Argentina +54 11 4837 7000 Germany 0800 182 5347 Pakistan 888 550 2682
Brazil +55 15 3413 8000 Italy 8008 77334 China +86 21 2892 9000
Venezuela +58 26 1731 3446 Central & Eastern +41 (0) 41 7686 111 Japan +81 3 5769 6803
Russia/CIS +7 495 981 9811 South Korea +82 2 3438 4600
Egypt 0800 000 0015 Singapore +65 6 777 8211
Oman 800 70101 Thailand 001 800 441 6426
Qatar 431 0044 Malaysia 800 814 008
Kuwait 663 299 01
South Africa 800 991 390
Saudia Arabia 800 844 9564
UAE 800 0444 0684
Page 3

Contents
Chapter 1 Before you begin .......................................................................................................... 5
1.1 Safety .................................................................................................................................... 5
Chapter 2 Product overview and architecture .............................................................................. 7
2.1 Installation options ................................................................................................................ 7
2.2 Multidrop installation............................................................................................................. 10
Chapter 3 Installation................................................................................................................... 11
3.1 Supplying power .................................................................................................................... 11
3.1.1 MVD Direct Connect installations without the MVD Direct Connect I.S. barrier ....... 11
3.1.2 MVD Direct Connect installations with the MVD Direct Connect I.S. barrier ............. 12
3.2 Locating the components ......................................................................................................13
3.3 Installing the core processor .................................................................................................. 14
3.4 Wiring the core processor to the sensor ................................................................................. 18
3.5 4-wire cable preparation and core processor wiring ............................................................... 18
3.6 Installing the MVD Direct Connect I.S. barrier......................................................................... 21
3.7 Wiring at the MVD Direct Connect I.S. barrier ........................................................................ 22
3.8 Wiring to the remote host...................................................................................................... 23
3.9 Wiring to the power supply .................................................................................................... 24
3.10 Grounding ............................................................................................................................. 24
Chapter 4 MVD Direct Connect communications .......................................................................... 27
4.1 Addresses .............................................................................................................................. 27
4.2 Response time ....................................................................................................................... 27
4.3 Byte order in floating-point values ......................................................................................... 27
4.4 Additional information........................................................................................................... 28
Installation Manual 3
Page 4

4 Direct Connect Meters
Page 5

Before you begin
1 Before you begin
This manual provides installation information for Micro Motion®MVD™ Direct Connect
meters. MVD Direct Connect meters may or may not include the MVD Direct Connect I.S.
barrier. Both installation types are discussed here.
Additionally, this manual provides basic information for establishing communication
between the MVD Direct Connect meter and the remote host system.
1.1 Safety
For information on I.S. applications, refer to Micro Motion ATEX, UL, or CSA installation
instructions.
WARNING!
Improper installation in a hazardous area can cause an explosion. For information about
hazardous applications, refer to the appropriate Micro Motion approval documentation,
shipped with the meter or available from the Micro Motion web site.
CAUTION!
Excess voltage can damage the core processor. To avoid damaging the core processor, use only
low-voltage DC power.
Installation Manual 5
Page 6

Before you begin
6 Direct Connect Meters
Page 7
Product overview and architecture
Core processor
Remote host
User-supplied power cable
User-supplied RS-485 cable
DC power supply
Sensor
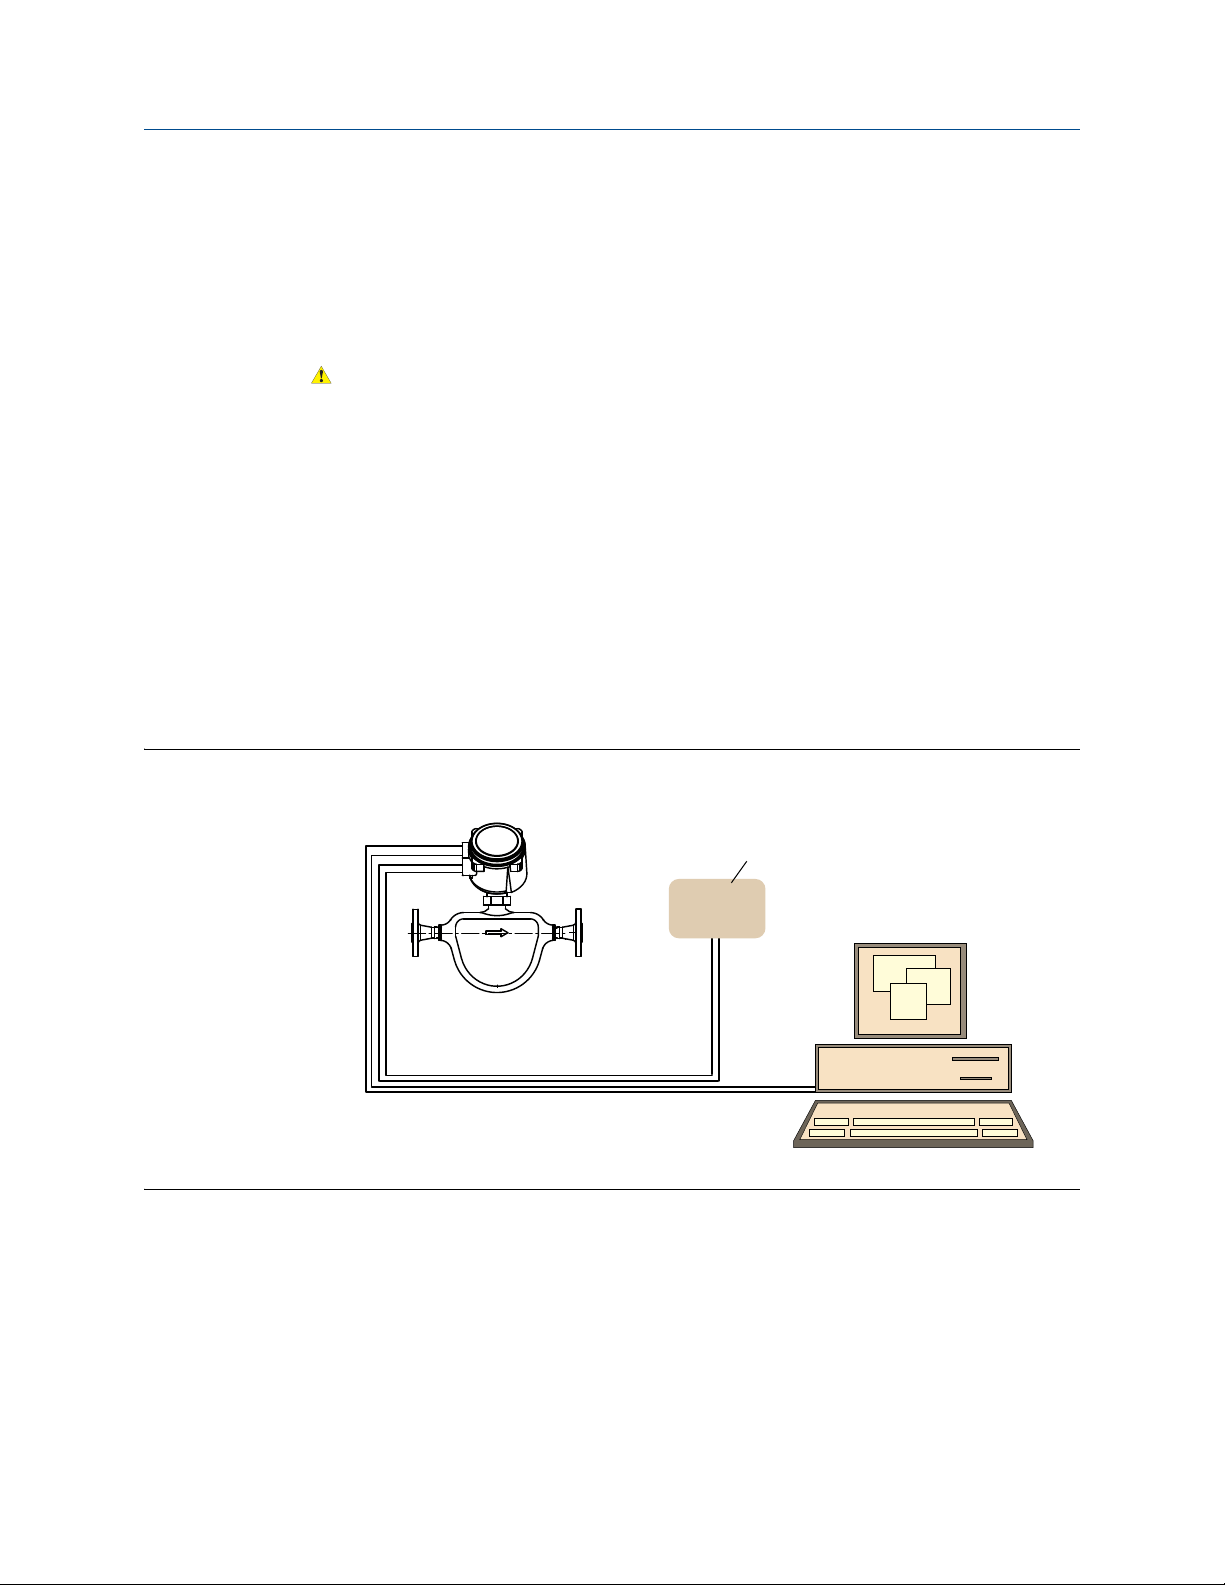
2 Product overview and architecture
MVD Direct Connect meters are used to supply Micro Motion sensor data directly to a
remote Modbus-capable host, rather than to a Micro Motion transmitter. Because there is
no transmitter component, MVD Direct Connect systems are not intrinsically safe unless
the MVD Direct Connect I.S. barrier is included in the installation.
WARNING!
MVD Direct Connect systems without the MVD Direct Connect I.S. barrier are not intrinsically
safe.
2.1 Installation options
All MVD Direct Connect systems include a sensor and a core processor. Either the standard
core processor or the enhanced core processor may be installed. The core processor
(standard or enhanced) can be mounted integrally with the sensor or remotely.
If the MVD Direct Connect I.S. barrier is installed, a separate barrier is required for each
core processor.
See Figure 2-1 and Figure 2-2 for illustrations of MVD Direct Connect installations without
the MVD Direct Connect I.S. barrier. See Figure 2-3 and Figure 2-4 for illustrations of
MVD Direct Connect installations with the MVD Direct Connect I.S. barrier.
Figure 2-1 MVD Direct Connect installations – Integral core processor, no I.S. barrier
Installation Manual 7
Page 8
Product overview and architecture
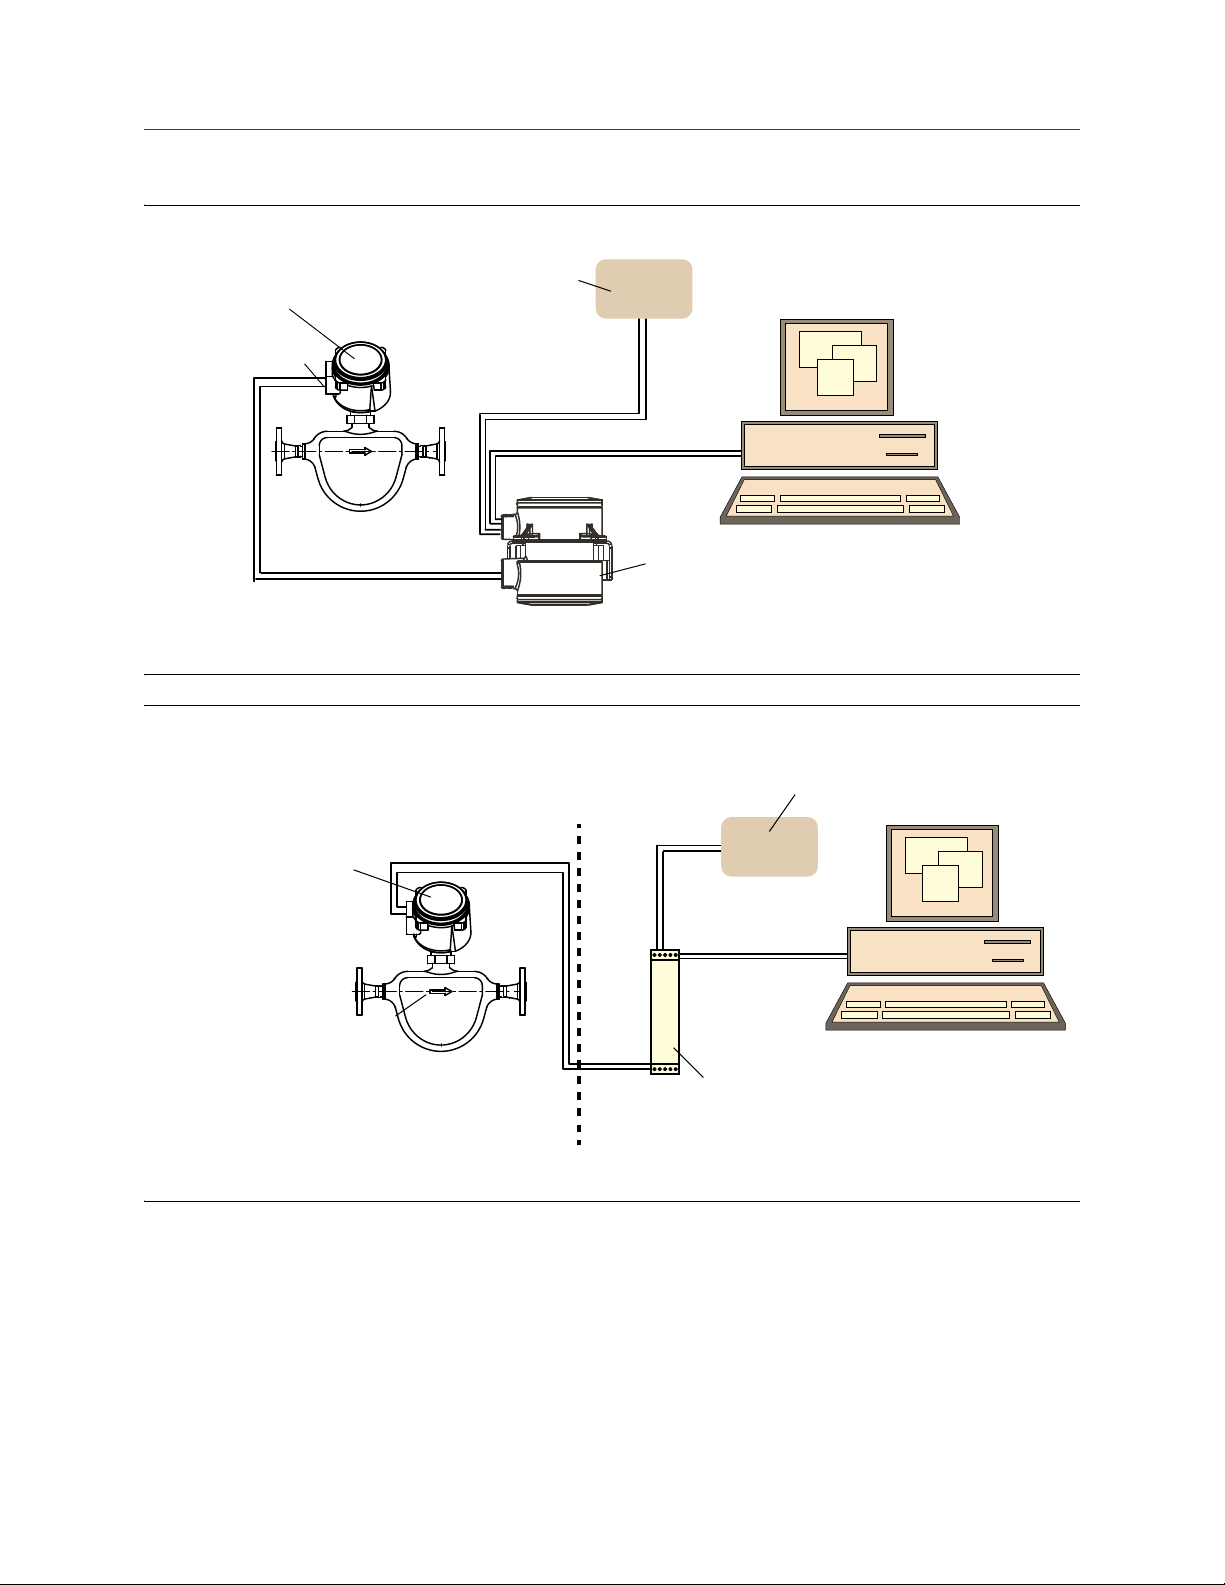
User-supplied
power cable
User-supplied RS-485 cable
Sensor
Core processor
Junction box
Micro Motion 9-wire cable
Remote host
DC power supply
Remote host
User-supplied power
cable
User-supplied
RS-485 cable
4-wire cable
Core processor
Sensor
DC power supply
Safe areaHazardous area
Barrier
Figure 2-2 MVD Direct Connect installations – Remote core processor, no I.S. barrier
Figure 2-3 MVD Direct Connect installations – Integral core processor, I.S. barrier
8 Direct Connect Meters
Page 9

Product overview and architecture
4-wire cable
User-supplied power
cable
User-supplied
RS-485 cable
Sensor
Micro Motion
9-wire cable
DC power supply
Remote host
Safe areaHazardous area
Barrier
Core processor
Junction box
Figure 2-4 MVD Direct Connect installations – Remote core processor, I.S. barrier
Installation Manual 9
Page 10

2.2 Multidrop installation
Safe area
Hazardous area
Up to fifteen MVD Direct Connect installations can be networked to a single remote host. If
I.S. barriers are used, one barrier is required for each core processor. Figure 2-5 shows the
four options for a multidrop installation.
Figure 2-5 Multidrop installation options
Product overview and architecture
10 Direct Connect Meters
Page 11

Installation
MinimumSupplyVoltage 15V CableResistance CableLength 0.15A+=
3 Installation
3.1 Supplying power
Power supply requirements depend on your installation type:
• MVD Direct Connect without the MVD Direct Connect I.S. barrier (see Figure 2-1 and
Figure 2-2)
• MVD Direct Connect with the MVD Direct Connect I.S. barrier (see Figure 2-3 and Figure
2-4)
3.1.1 MVD Direct Connect installations without the
MVD Direct Connect I.S. barrier
In MVD Direct Connect installations without the I.S. barrier, power is supplied directly to
the core processor. The core processor supplies power to the sensor. The power supply
must meet the following requirements:
• Power must be supplied from a common floating regulated power supply with the
correct voltage.
• The voltage requirement for a single core processor is 15–26 VDC. The maximum
power consumption of a single core processor is approximately 3 W.
• The power supply may be used to power any number of core processors, but must not
be used to power other devices.
• Use shielded wiring.
• The power supply must not allow power surges or conducted radio frequency
interference (RFI) to propagate through to its output.
• The power supply must not be grounded.
CAUTION!
Grounding the power supply to the core processor can cause damage to the core processor or
the remote host. To avoid damaging the core processor or the remote host, ensure that the
power supply to the core processor is not grounded.
• In EU countries, the power supply must meet the requirements of the EMC directive.
• The power supply cable must comply with the size and length requirements listed in
Table 3-2. A minimum DC input of 15 V is required for each core processor. At startup,
the power source must provide a minimum of 0.2 A of short-term current per core
processor. The maximum steady state current is 0.15 A. For assistance in sizing the
power supply cable, refer to Table 3-1 and use the equation below:
Installation Manual 11
Page 12

Installation
MinimumSupplyVoltage 15V 0.0128 ohms/ft 350 ft 0.15A+=
MinimumSupplyVoltage 15V CableResistance CableLength 0.15 A+=
MinimumSupplyVoltage 15.7V=
MinimumSupplyVoltage 19.2V CableResistance CableLength 0.15A+=
Example
The core processor is mounted 350 feet from a DC power supply. If you want to use 18 AWG cable,
calculate the required voltage at the DC power supply as follows:
Table 3-1 Typical power cable resistances at 68 °F (20 °C)
Gauge Resistance
14 AWG 0.0050 /foot
16 AWG 0.0080 /foot
18 AWG 0.0128 /foot
20 AWG 0.0204 /foot
22 AWG 0.0328 /foot
2,5 mm
1,5 mm
1 mm
0,75 mm
0,5 mm
2
2
2
2
2
0,0136 /meter
0,0228 /meter
0,0340 /meter
0,0460 /meter
0,0680 /meter
Note
These values include the resistance of both high and low conductors in a cable.
3.1.2 MVD Direct Connect installations with the
MVD Direct Connect I.S. barrier
In MVD Direct Connect installations with the I.S. barrier, power is supplied to the barrier.
The barrier supplies power to the core processor, and the core processor supplies power to
the sensor. The power supply must meet the following requirements:
• The power supply can be either floating or grounded.
• The voltage requirement for a single barrier is 24 VDC ±20%. The maximum power
consumption of a single barrier plus core processor is approximately 3.5 W.
• The power supply cable must comply with the size and length requirements listed in
Table 3-3. A minimum DC input of 19.2 V is required at the barrier terminals. At
startup, the power source must provide a minimum of 0.2 A of short-term current per
core processor. The maximum steady state current is 0.15 A. For assistance in sizing
the power supply cable, refer to Table 3-1 and use the equation below:
12 Direct Connect Meters
Page 13

Installation
MinimumSupplyVoltage 19.9V=
MinimumSupplyVoltage 19.2V CableResistance CableLength 0.15A+=
MinimumSupplyVoltage 19.2V 0.0128 ohms/ft 350 ft 0.15A+=
Example
A single MVD Direct Connect I.S. barrier is mounted 350 feet from a DC power supply. If you want to
use 18 AWG cable, calculate the required voltage at the DC power supply as follows:
3.2 Locating the components
See the sensor installation manual for information on locating the sensor or the sensor/
core processor assembly. If the core processor is installed remotely from the sensor, see
the sensor installation manual for information on the maximum distance between these
two components.
Maximum distance between the core processor, the power supply, the remote host, and
the I.S. barrier (if your installation includes the barrier) depends on the wire size and type.
Ensure that your installation complies with these requirements.
• Table 3-2 lists the wire size and length requirements for MVD Direct Connect
installations without the I.S. barrier.
• Table 3-3 lists the wire size and length requirements for MVD Direct Connect
installations with the I.S. barrier.
Table 3-2 Wire sizes and lengths – MVD Direct Connect installations without I.S.
barrier
Span Cable type Wire size Max length
Core processor to
remote host
Core processor to
power supply
Note
Power wires must be sized to provide a minimum of 15 V at the core processor. See the discussion in
the preceding section.
RS-485 22 AWG (0,35 mm2) or
Power 22 AWG (0,35 mm
larger
20 AWG (0,5 mm
18 AWG (0,8 mm
2
) 300 feet (90 meters)
2
) 500 feet (150 meters)
2
) 500 feet (150 meters)
500 feet (150 meters)
Installation Manual 13
Page 14

Installation
Mounting bracket
(wall mount)
Mounting bracket
(pipe mount)
Table 3-3 Wire sizes and lengths – MVD Direct Connect installations with I.S. barrier
Span Cable type Wire size Max length
Core processor
to barrier
Barrier to host RS-485 22 – 18 AWG
Barrier to power
supply
Notes
• Core processor to barrier wire must be sized to provide a minimum of 15 V at the core processor.
See the discussion in the preceding section.
• Barrier to power supply wiring must be sized to provide a minimum of 19.2 V at the barrier. See
the discussion in the preceding section
RS-485 22 AWG (0,35 mm2) or larger 500 feet (150 meters)
Power 22 AWG (0,35 mm
2
) 300 feet (90 meters)
20 AWG (0,5 mm2) 500 feet (150 meters)
18 AWG (0,8 mm
(0,35 – 0,8 mm
2
) 500 feet (150 meters)
2)
1000 ft (300 meters)
Power 22 AWG (0,35 mm2) 300 feet (90 meters)
20 AWG (0,5 mm
18 AWG (0,8 mm
2
) 500 feet (150 meters)
2
) 500 feet (150 meters)
3.3 Installing the core processor
Note
This step is required only if the core processor is mounted separately from the sensor. Refer to Figure
2-2 and Figure 2-4.
See Figure 3-1 for a diagram of the mounting bracket supplied with the core processor.
Both pipe mounting and wall mounting are shown.
Figure 3-1 Remote core processor – Wall mount or pipe mount
14 Direct Connect Meters
Page 15

Installation
End-cap (to 9-wire ground screw)
Mounting bracket
Core processor cover
Core processor housing
Conduit opening
for 4-wire cable
Conduit opening
for 9-wire cable
4 X Cap screws (4 mm)
To mount the core processor:
1. Identify the components shown in Figure 3-2. For dimensions, see Figure 3-3.
2. If desired, reorient the core processor housing on the bracket.
a. Loosen each of the four cap screws (4 mm).
b. Rotate the bracket so that the core processor is oriented as desired.
c. Tighten the cap screws, torquing to 30 to 38 in-lbs (3 to 4 N-m).
3. Attach the mounting bracket to an instrument pole or wall. For pipe mount, two
user-supplied U-bolts are required. Contact Micro Motion to obtain a pipe-mount
installation kit if required.
Figure 3-2 Remote core processor components
Installation Manual 15
Page 16

Figure 3-3 Dimensions – Remote core processor
1/2˝–14 NPT
or
M20 X 1.5
2 13/16
(71)
2 1/4 (57)
4 1/2
(114)
3 5/16 (84)
1 11/16 (43)
To centerline
of 2˝ pipe
5 1/2
(140)
Pipe mount
2 1/2
(64)
2X 3 (76)
2 5/8 (67)
4X Ø3/8
(10)
4 9/16
(116)
Wall mount
2 13/16 (71)
5 11/16 (144)
3/4˝–14 NPT
2 3/8
(61)
Ø4 3/8
(111)
Dimensions in
inches
(mm)
6 3/16
(158)
Installation
16 Direct Connect Meters
Page 17

Installation
1/2˝–14 NPT
or
M20 X 1.5
2 13/16
(71)
3 13/16
(97)
4 1/2
(114)
2 5/16
(58)
4 9/16
(116)
To centerline
of 2˝ pipe
5 1/2
(140)
Pipe mount
2 1/2
(64)
2X 3
(76)
5 7/16
(67)
4X Ø3/8
(10)
4 9/16
(116)
Wall mount
2 13/16
(71)
5 11/16
(144)
3/4˝–14 NPT
3 7/8
(99)
Ø4 3/8
(111)
Dimensions in
inches
(mm)
6 3/16
(158)
Figure 3-4 Dimensions – Remote enhanced core processor
Installation Manual 17
Page 18

Installation
3.4 Wiring the core processor to the sensor
Note
This step is required only if the core processor is mounted separately from the sensor. Refer to Figure
2-2 and Figure 2-4.
Wire the core processor to the sensor using a Micro Motion 9-wire cable. See the sensor
installation manual for instructions.
3.5 4-wire cable preparation and core processor wiring
Note
This step is required for all MVD Direct Connect installations
1. Ensure that the cables meet the following requirements:
- Twisted-pair construction
- The size and length requirements described in the preceding sections
2. Use one of the following methods to shield the wiring from the core processor:
- If you are installing unshielded cable, the cable must be installed in continuous metallic
conduit that provides 360° termination shielding for the enclosed wiring. Go to Step 7.
- If you are installing shielded or armored cable with a user-supplied cable gland, terminate
the shield or braid and drain wires in the cable gland. Never connect the drain wires to the
internal ground screw of the core processor. Go to Step 7.
- If you are installing shielded or armored cable with a Micro Motion-supplied cable gland:
• With shielded cable (where the shield consists of foil), prepare the cable and apply
shielded heat shrink as described in Steps 3 through 6. The shielded heat shrink provides a
shield termination suitable for use in the gland.
• With armored cable (where the shield consists of braid), prepare the cable as described
as described in Steps 3 through 6. Do not apply heat shrink (omit Steps 5d through 5g).
3. Remove the cover from the core processor.
4. Slide the gland nut and the clamping insert over the cable.
18 Direct Connect Meters
Page 19

Installation
4 1/2 in
(114 mm)
3/4 in
(19 mm)
7/8 in
(22 mm)
7/8 in
(22 mm)
Shielded
heat shrink
Gland body
Gland nut
Gland clamping
insert
Shield drain wire(s) wrapped twice around exposed shield foil
Figure 3-5 Micro Motion cable gland and heat shrink
5. For connection at the core processor housing, prepare cable as follows (for armored
cable, omit Steps 5d through 5g):
a. Strip 4 1/2 inches (114 mm) of cable jacket.
b. Remove the clear wrap that is inside the cable jacket, and remove the filler material
between the wires.
c. Remove the foil shield that is around the insulated wires, leaving 3/4 inch (19 mm)
of foil or braid and drain wires exposed, and separate the wires.
d. Wrap the shield drain wire(s) around the exposed foil twice. Cut off the excess wire.
Figure 3-6 Wrapping the shield drain wires
e. Place the shielded heat shrink over the exposed shield drain wire(s). The tubing
should completely cover the drain wires.
f. Without burning the cable, apply heat (250 °F or 120 °C) to shrink the tubing.
Installation Manual 19
Page 20

Figure 3-7 Applying the heat shrink
Shielded heat shrink completely covers exposed drain wires
g. Position gland clamping insert so the interior end is flush with the heat shrink.
h. Fold the cloth shield or braid and drain wires over the clamping insert and
approximately 1/8 inch (3 mm) past the O-ring.
Figure 3-8 Folding the cloth shield
Installation
i. Install the gland body into the core processor housing conduit opening.
Figure 3-9 Gland body and core processor housing
6. Insert the wires through the gland body and assemble the gland by tightening the
gland nut.
7. Connect signal wires to the RS-485 terminals on the core processor (see Figure 3-10). If
you are using Micro Motion 4-wire cable, use the green and white wires.
20 Direct Connect Meters
Page 21

Installation
RS-485/B
(Green)
4-wire ground screw
(do not use)
VDC –
(Black)
VDC +
(Red)
RS-485/A
(White)
RS-485/B (Green)
RS-485/A (White)
VDC+ (Red)
VDC– (Black)
Standard core processor Enhanced core processor
Figure 3-10 Connecting the wires at the core processor
8. Connect power supply wires to the VDC terminals on the core processor (see Figure
3-10). If you are using Micro Motion 4-wire cable, use the red and black wires.
9. Reattach the core processor cover.
CAUTION!
If the core processor is mounted integrally with the sensor, twisting the core processor will
damage the sensor. To avoid damaging the sensor, do not twist the core processor.
CAUTION!
Damaging the RS-485 wires can cause measurement error or meter failure. Damaging the
power supply wires can cause meter failure. When replacing the core processor cover, make
sure that the wires are not caught or pinched.
Installation Manual 21
Page 22

Installation
1.39
(35)
for mounting on
35 mm DIN rail
4.095
(104)
0.925
(23,5)
Dimensions in
inches
(mm)
4.291
(109)
3.6 Installing the MVD Direct Connect I.S. barrier
Note
This step is required only for installations that include the MVD Direct Connect I.S. barrier. Refer to
Figure 2-3 and Figure 2-4.
The barrier is designed to snap onto a 35 mm DIN rail. Dimensions are shown in Figure 3-11.
To remove the barrier from the rail, lift the bottom lock.
Figure 3-11 Barrier dimensions
22 Direct Connect Meters
Page 23

Installation
44 (RS-485 B)
43 (RS-485 A)
41 (VDC –)
42 (VDC +)
14 (RS-485 B)
13 (RS-485 A)
11 (VDC –)
12 (VDC +)
I.S. terminals
for connection to core processor
Non-I.S. terminals
for connection to remote host and power supply
3.7 Wiring at the MVD Direct Connect I.S. barrier
Note
This step applies only to installations that include the MVD Direct Connect I.S. barrier. Refer to Figure
2-3 and Figure 2-4.
1. Connect the core processor to the barrier:
a. Connect the RS-485 wires from the core processor to the I.S. RS-485 terminals at
the barrier (terminals 43 and 44), matching A and B. See Table 3-4 and Figure 3-12. If
you are using Micro Motion 4-wire cable, you can identify the wires by color.
b. Connect the power supply wires from the core processor to the I.S. VDC terminals
at the barrier (terminals 42 and 41), matching positive and negative (+ and –). See
Table 3-4 and Figure 3-12. Do not terminate the shields at the barrier.
Table 3-4 Core processor terminals and barrier I.S. terminals
Function
RS-485 A White 3 43
RS-485 B Green 4 44
VDC + Red 1 42
VDC – Black 2 41
Wire color (Micro Motion 4-wire
cable)
Core processor
terminals
Barrier I.S.
terminals
2. Connect RS-485 wires to the non-I.S. RS-485 terminals at the barrier (terminals 13 and
14). See Figure 3-12. These wires will be used in the next step to connect the barrier to
the remote host. Do not terminate the shields at the barrier.
3. Connect power supply wires to the non-I.S. VDC terminals at the barrier (terminals 11
and 12). See Figure 3-12. These wires will be used in the next step to connect the barrier
to the power supply.
Figure 3-12 Barrier terminals
Installation Manual 23
Page 24

3.8 Wiring to the remote host
Note
This step is required for all MVD Direct Connect installations.
1. At the remote host, open the wiring compartment and identify the RS-485 terminals.
Refer to the vendor documentation if required.
2. If you are connecting the RS-485 wires directly from the core processor (see Figures
2-1 and 2-2):
a. Connect the RS-485 wires from the core processor (see Figure 3-10) to the RS-485
terminals at the remote host.
b. Do not terminate the shield, braid, or drain wire(s) at the remote host.
c. Do not terminate the RS-485 lines using the standard 60-ohm termination resistor.
If possible, do not terminate the RS-485 lines at all. If the RS-485 cable is 1000 feet
(300 meters) long or longer, and termination is required, the total termination
must be 175 ohm or above.
3. If you are connecting the RS-485 wires from the I.S. barrier (see Figures 2-3 and 2-4):
a. Connect the RS-485 wires from the barrier (see Figure 3-12) to the RS-485 terminals
at the remote host.
Installation
b. Terminate the shields at the remote host.
c. The barrier contains internal pull-up/pull-down and termination resistors. Do not
add external resistors.
4. Close the wiring compartment.
3.9 Wiring to the power supply
Note
This step is required for all MVD Direct Connect installations.
1. You may connect multiple MVD Direct Connect installations to a single power supply,
as long as each installation receives sufficient power.
2. If you are connecting the power supply wires directly from the core processor (see
Figures 2-1 and 2-2):
a. Do not connect any other equipment to the power supply used for
MVD Direct Connect installations.
b. Connect the power supply wires from the core processor (see Figure 3-10),
matching positive and negative (+ and –).
If you are connecting the power supply wires from the I.S. barrier (see Figure 2-3 and
Figure 2-4):
a. The power supply may be used to power other equipment.
b. Connect the power supply wires from the barrier (see Figure 3-12), matching
positive and negative (+ and –).
24 Direct Connect Meters
Page 25

Installation
9-wire ground screw
3.10 Grounding
Note
This step is required for all MVD Direct Connect installations.
CAUTION!
Improper grounding could cause measurement error. To reduce the risk of measurement
error:
• Ground the meter to earth, or follow ground network requirements for the facility.
• For installation in an area that requires intrinsic safety, refer to the appropriate Micro
Motion approval documentation.
• For hazardous area installations in Europe, refer to standard EN 60079-14 if national
standards do not apply.
The sensor/core processor assembly (see Figure 2-1 and Figure 2-3) or the sensor alone (see
Figure 2-2 and Figure 2-4) must be grounded. To ground these components, see the sensor
installation manual.
If your installation includes a remote core processor (see Figure 2-2 and Figure 2-4), it must
be grounded. To ground the remote core processor:
• The core processor has two internal ground screws: one 4-wire ground screw and one
9-wire ground screw. Do not use the 4-wire ground screw. The 9-wire ground screw
may be used (see Figure 3-13). To access the 9-wire ground screw, remove the core
processor end-cap (see Figure 3-2).
• Use copper wire, 14 AWG (2,0 mm
• Keep all ground leads as short as possible, less than 1 ohm impedance.
• Connect ground leads directly to earth, or follow plant standards.
If your installation includes the MVD Direct Connect I.S. barrier (see Figure 2-3 and Figure
2-4), the barrier is not grounded. Do not ground the barrier.
2
) or larger, for grounding.
Figure 3-13 Core processor 9-wire ground screw
Installation Manual 25
Page 26

Installation
26 Direct Connect Meters
Page 27

MVD Direct Connect communications
4 MVD Direct Connect
communications
For communication with the remote host, the core processor uses an industry-standard
RS-485 half-duplex communication line driver. Supported communication settings are
described in Table 4-1. The remote host can use any supported setting and the core
processor will automatically detect and switch.
Table 4-1 Supported communication settings
Parameter Option
Protocol Modbus RTU (8-bit)
Modbus ASCII (7-bit)
Baud rate Standard rates between 1200 and 38,400
Parity Even, odd, none
Stop bits 1, 2
4.1 Addresses
When addressing specific registers in the core processor, certain remote hosts require the
program to subtract 1 from the address. For more information, see the manual entitled
Modbus Mapping Assignments for Micro Motion Transmitters.
4.2 Response time
The core processor’s default response time to a valid query is 1.2 milliseconds. If required,
a delay may be programmed into the core processor (see the manual entitled Modbus
Mapping Assignments for Micro Motion Transmitters).
The core processor may be queried as often as once every 10 milliseconds. If you are
sending queries at this rate at 38,400 baud, a maximum of three floating-point values can
be returned per query.
Core processors may be multidropped, with a maximum of 15 per segment.
Communication throughput is improved with fewer units per segment.
4.3 Byte order in floating-point values
Four bytes are used to transmit floating-point values. When the core processor leaves the
Micro Motion factory, its default byte order is either 1–2–3–4 (typical) or 3–4–1–2. For
contents of bytes, see Table 4-2.
Installation Manual 27
Page 28

MVD Direct Connect communications
Table 4-2 Byte contents in Modbus commands and responses
Byte Bits Definitions
1 S E E E E E E E S = Sign
E = Exponent
2 E M M M M M M M E = Exponent
M = Mantissa
3 M M M M M M M M M = Mantissa
4 M M M M M M M M M = Mantissa
If the core processor is attached to a transmitter for any reason (for example, for field
testing), the byte order is automatically set to 1–2–3–4. It may be necessary to reset the
byte order before resuming MVD Direct Connect operation. Byte order is controlled by the
value in register 521. The byte order codes and associated byte orders are listed in Table
4-3.
Table 4-3 Byte order codes and byte orders
Byte order code Byte order
01
13–4–1–2
22
34
–2–3–4
–1–4–3
–3–2–1
4.4 Additional information
For more information on programming a remote host for use with MVD Direct Connect
systems, see the manual entitled Modbus Mapping Assignments for Micro Motion
Transmitters.
28 Direct Connect Meters
Page 29

MVD Direct Connect communications
Installation Manual 29
Page 30

Micro Motion Inc. USA
Worldwide Headquarters
7070 Winchester Circle
Boulder, Colorado 80301
T +1 303-527-5200
T +1 800-522-6277
F +1 303-530-8459
www.micromotion.com
Micro Motion Europe
Emerson Process Management
Neonstraat 1
6718 WX Ede
The Netherlands
T +31 (0) 318 495 555
F +31 (0) 318 495 556
www.micromotion.nl
*20002273*
20002273
Rev. AA
2014
Micro Motion Asia
Emerson Process Management
1 Pandan Crescent
Singapore 128461
Republic of Singapore
T +65 6777-8211
F +65 6770-8003
Micro Motion United Kingdom
Emerson Process Management Limited
Horsfield Way
Bredbury Industrial Estate
Stockport SK6 2SU U.K.
T +44 0870 240 1978
F +44 0800 966 181
Micro Motion Japan
Emerson Process Management
1-2-5, Higashi Shinagawa
Shinagawa-ku
Tokyo 140-0002 Japan
T +81 3 5769-6803
F +81 3 5769-6844
©2014 Micro Motion, Inc. All rights reserved.
The Emerson logo is a trademark and service mark of Emerson
Electric Co. Micro Motion, ELITE, ProLink, MVD and MVD Direct
Connect marks are marks of one of the Emerson Process
Management family of companies. All other marks are property of
their respective owners.
 Loading...