

Page 1
CLARKSON KNIFE GATE VALVE MODEL ZP3OO
INSTALLATION AND MAINTENANCE INSTRUCTIONS
Before installation these instructions must be fully read and understood
GENERAL INFORMATION
The Clarkson ZP300 knife gate valve is
designed to meet extremely rugged and
challenging requirements of expansible fluid
applications in the oil sands processes.
Please take note of specific installation tags
provided with each ZP300 series valve.
1. Compliance to ASME B16.34 Class 300,
Valves-Flanged, Threaded, and Welding End
and MSS SP 135 (Long Face-to-Face).
2. Bi-directional valve, no special concerns
in relation to direction of flow are required
when installing the valve.
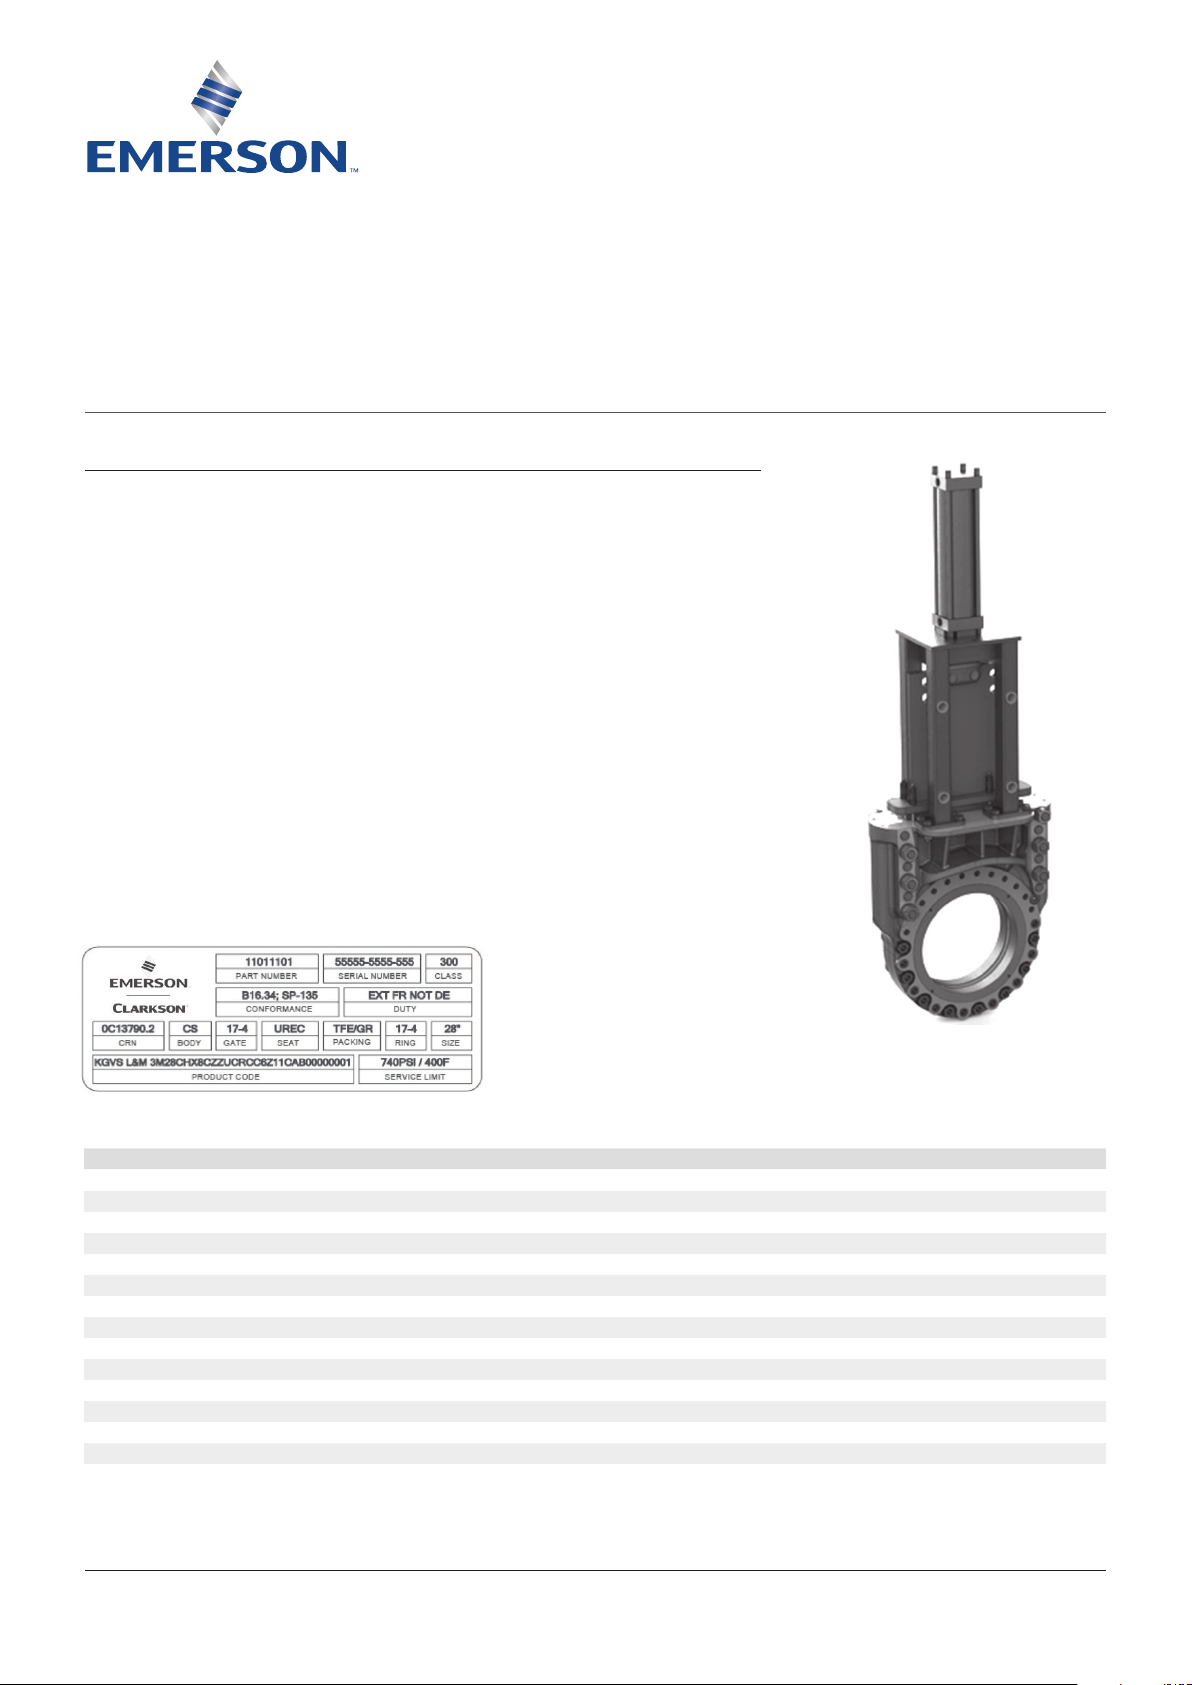
COMPLIANCE LABEL
3. Mating line flanges must be properly
aligned. Slip-on or weld flanges can be used.
Never try to make up for misaligned pipe
flanges by the line bolting.
4. Flange fasteners should be tightened in a
uniform manner using a cross-pattern to
prevent distortion of the valve.
5.
Pipe supports and/or expansion joints should
be used to minimize pipe loads on valves.
ZP300 valves are suitable for use in either
vertical or horizontal lines. If installation is
other than vertical, additional support will be
required for cylinder actuated valves.
LABEL CONTENTS
Item Description Example
Product code Manufacturer’s model/code
Part number Manufacturer’s pn 11011101
Serial number Manufacturer’s sn 55555-5555-555
Size NPS valve size 28
Class Pressure rating per conforming standard 300
Duty
Ring material Compliance standard for flow ring material 17-4
Service limit Limits in pressure and temperature operation 740psi/100F
Conformance Standard used for design and manufacture ASME B16.34, MSS SP-135
Crn Canadian registration number 0C13790.2
Body material Compliance standard for body material WCB/LCB
Gate material Compliance standard for gate material 17-4
Seat material Seat material URET
Packing material Packing material TPE/GR
Type of service depending on valve configuration (ext or int mounted flow ring will change duty)
© 2017 Emerson. All Rights Reserved.Emerson.com/FinalControl VCTDS-03757-EN 16/12
KGVS Clarkson 3M28CHX8CZZUCRCC6Z11CAB00000001
EXT FR NOT DE or INT FR DE
Page 2
CLARKSON KNIFE GATE VALVE MODEL ZP3OO
INSTALLATION AND MAINTENANCE INSTRUCTIONS
INITIAL INSPECTION
1. Examine entire valve and report any damage
or discrepancies immediately.
2. Accessories, if any, including solenoids,
limit switches, positioners, etc., are tested
for functionality prior to shipment. Examine
carefully for damage which may occur
during shipment.
3. Operators: standard manual hand wheels
may be shipped loose for field installation.
4. Packing assembly: the packing gland bolts
should be checked and adjusted to obtain
a first time packing seal. Packing gland
nuts may become slightly loose when valve
is shipped. Field adjustment is expected
and desired. (Figure 1. Tighten just enough
to stop any leakage. Overtightening may
increase valve operating torque and shorten
packing life).
FIGURE 1
It is necessary to use a pipe wrench or large
crescent wrench to properly tighten the
hand wheel retaining nut. Be sure to fully
tighten.
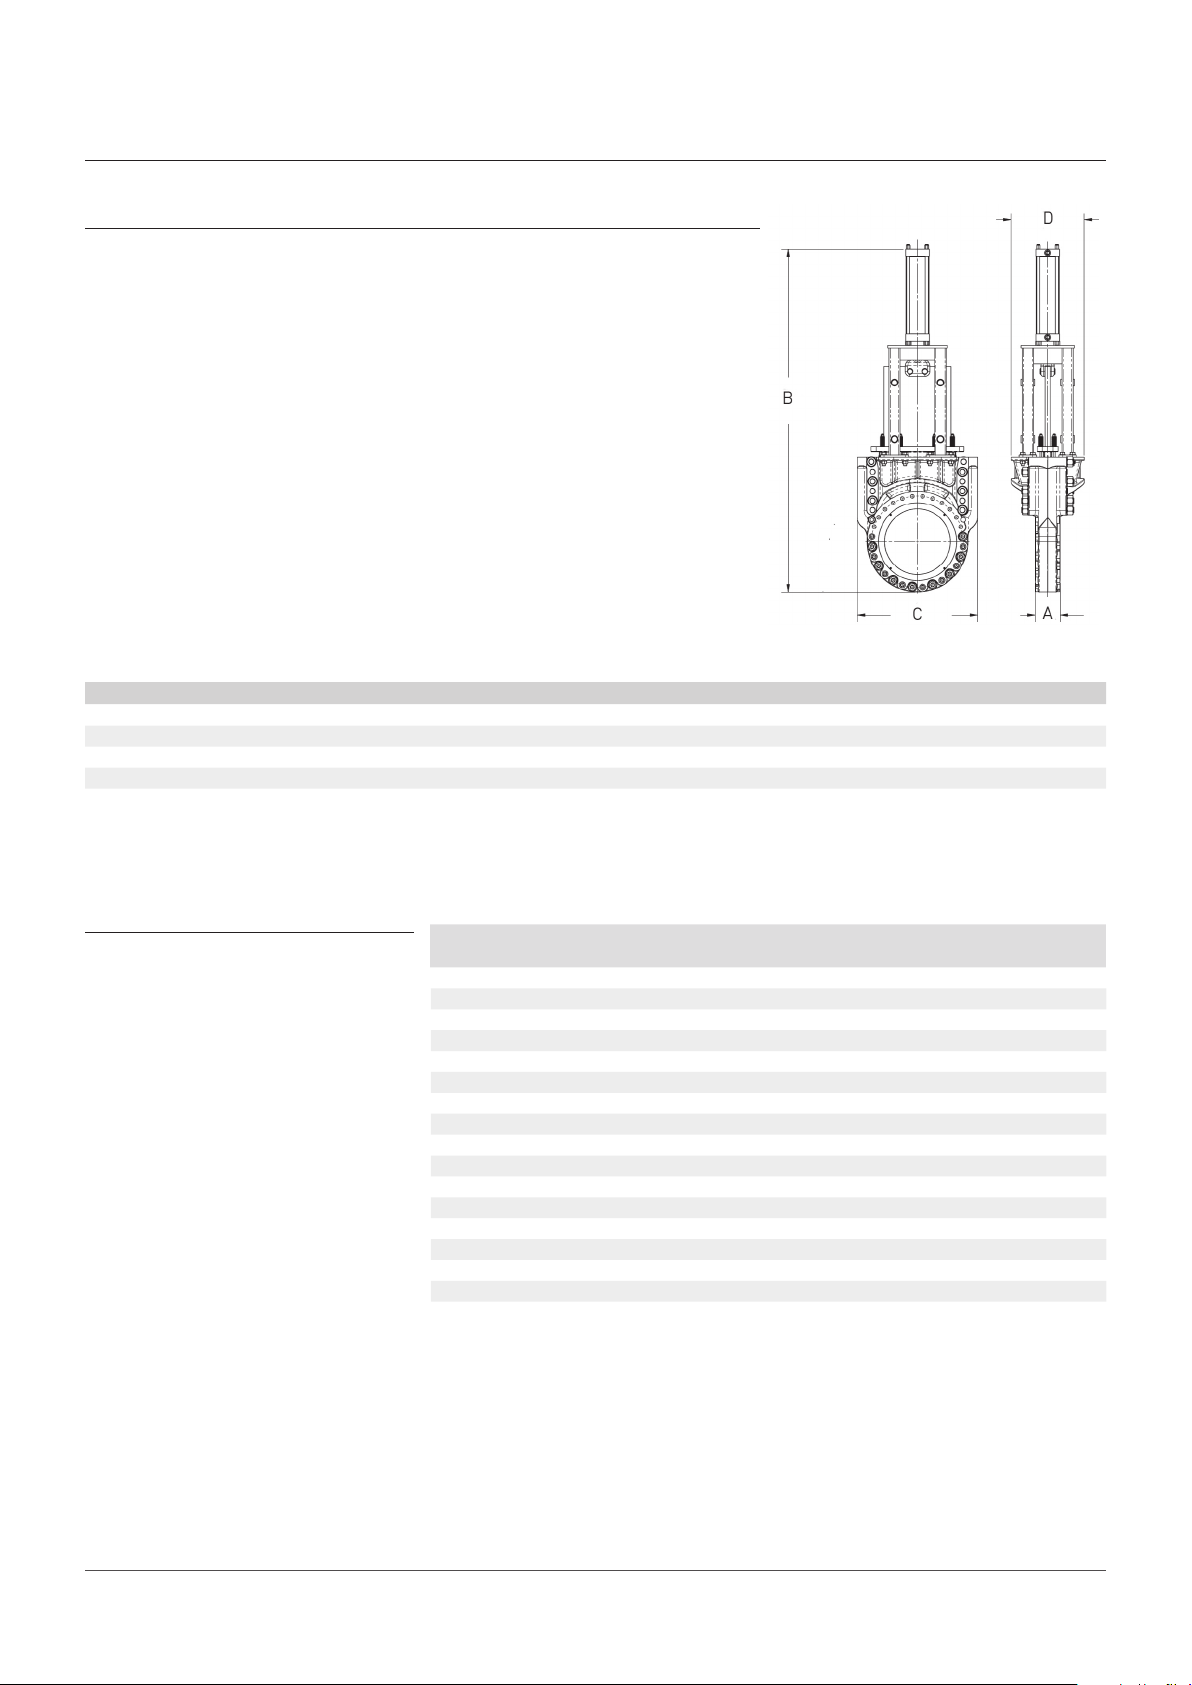
OVERALL ENVELOPE DIMENSIONS FOR ZP300 WITH HC ACTUATOR
Size NPS 3 4 6 8 10 12 14 16 18 20 24 26 28 30 32 36
A* 4.00 4.12 4.12 4.63 5.38 5.63 6.25 6.63 7.00 7.44 8.50 8.50 10.00 10.50 11.50 12.00
B 26.74 30.84 38.83 46.56 57.81 66.50 72.00 80.13 91.63 99.88 119.94 128.06 138.94 147.44 159.25 175.63
C 5.00 6.19 8.50 10.62 12.75 15.00 16.25 18.50 21.00 23.00 27.25 29.50 31.50 33.75 36.00 40.25
D 11.50 11.86 11.86 13.39 15.64 16.39 18.25 19.39 20.50 21.82 25.00 25.00 29.50 31.00 34.00 35.50
* Face to face dimensions per MSS SP-135 long pattern
BOLTING AND INSTALLATION INSTRUCTIONS
ZP300 standard flange configuration is
“flanged” where port flange mounting holes are
drilled and tapped. Flange mounting holes in
chest area are limited to a depth of 1 x flange
bolt diameter. It is recommended that studs
be used on all flange mounting holes in chest
area.
WARNING
Care must be taken when installing studs or bolts
in tapped flange holes in chest area to prevent
damage to internal wall profile.
NOTE
Optional through bolting configurations are also
available.
ZP300 Series valves are design to suit flanges
compliant to ASME B16.5 and B16.47, and
gaskets designed to ASME VIII-1 Appendix
2, and ASME B16.20 and B16.21. Torque on
Flange bolt should not exceed values shown in
Table 1.
TABLE 1 - MAXIMUM TORQUE ON FLANGE BOLT/STUD
Valve size
NPS Bolt size
3 ⁄ 200 2.00 3.250
4 ⁄ 200 2.25 3.375
6 ⁄ 200 2.50 3.625
8 ⁄ 318 2.75 4.000
10 1 473 3.00 4.500
12 1⁄ 684 3.25 5.000
14 1⁄ 684 3.50 5.125
16 1⁄ 952 3.75 5.250
18 1⁄ 952 3.75 5.625
20 1⁄ 952 4.00 5.750
24 1⁄ 1675 4.50 6.500
26 1⁄ 2150 5.00 7.375
28 1⁄ 2150 5.25 7.625
30 1⁄ 2690 5.75 8.125
32 1⁄ 3323 6.00 8.500
36 2 4056 6.50 9.250
NOTES
1. Maximum torque should not be exceeded to insure threaded flange holes in valve body are not damaged.
2. The recommended bolt length assumes; final gasket Thickness = .125", Min F436 Flatwasher Thickness 1x
bolt diameter thread depth, and common heavy hex bolt lengths. Use the below equation to calculate flange
bolt length per your application. It is strongly recommended stud to be used to achieve maximum thread
engagement length.
Torque
(ft⋅lb)
Recommended bolt
length (in)
Recommended stud
length (in)
2
Page 3
A
A
CLARKSON KNIFE GATE VALVE MODEL ZP3OO
INSTALLATION AND MAINTENANCE INSTRUCTIONS
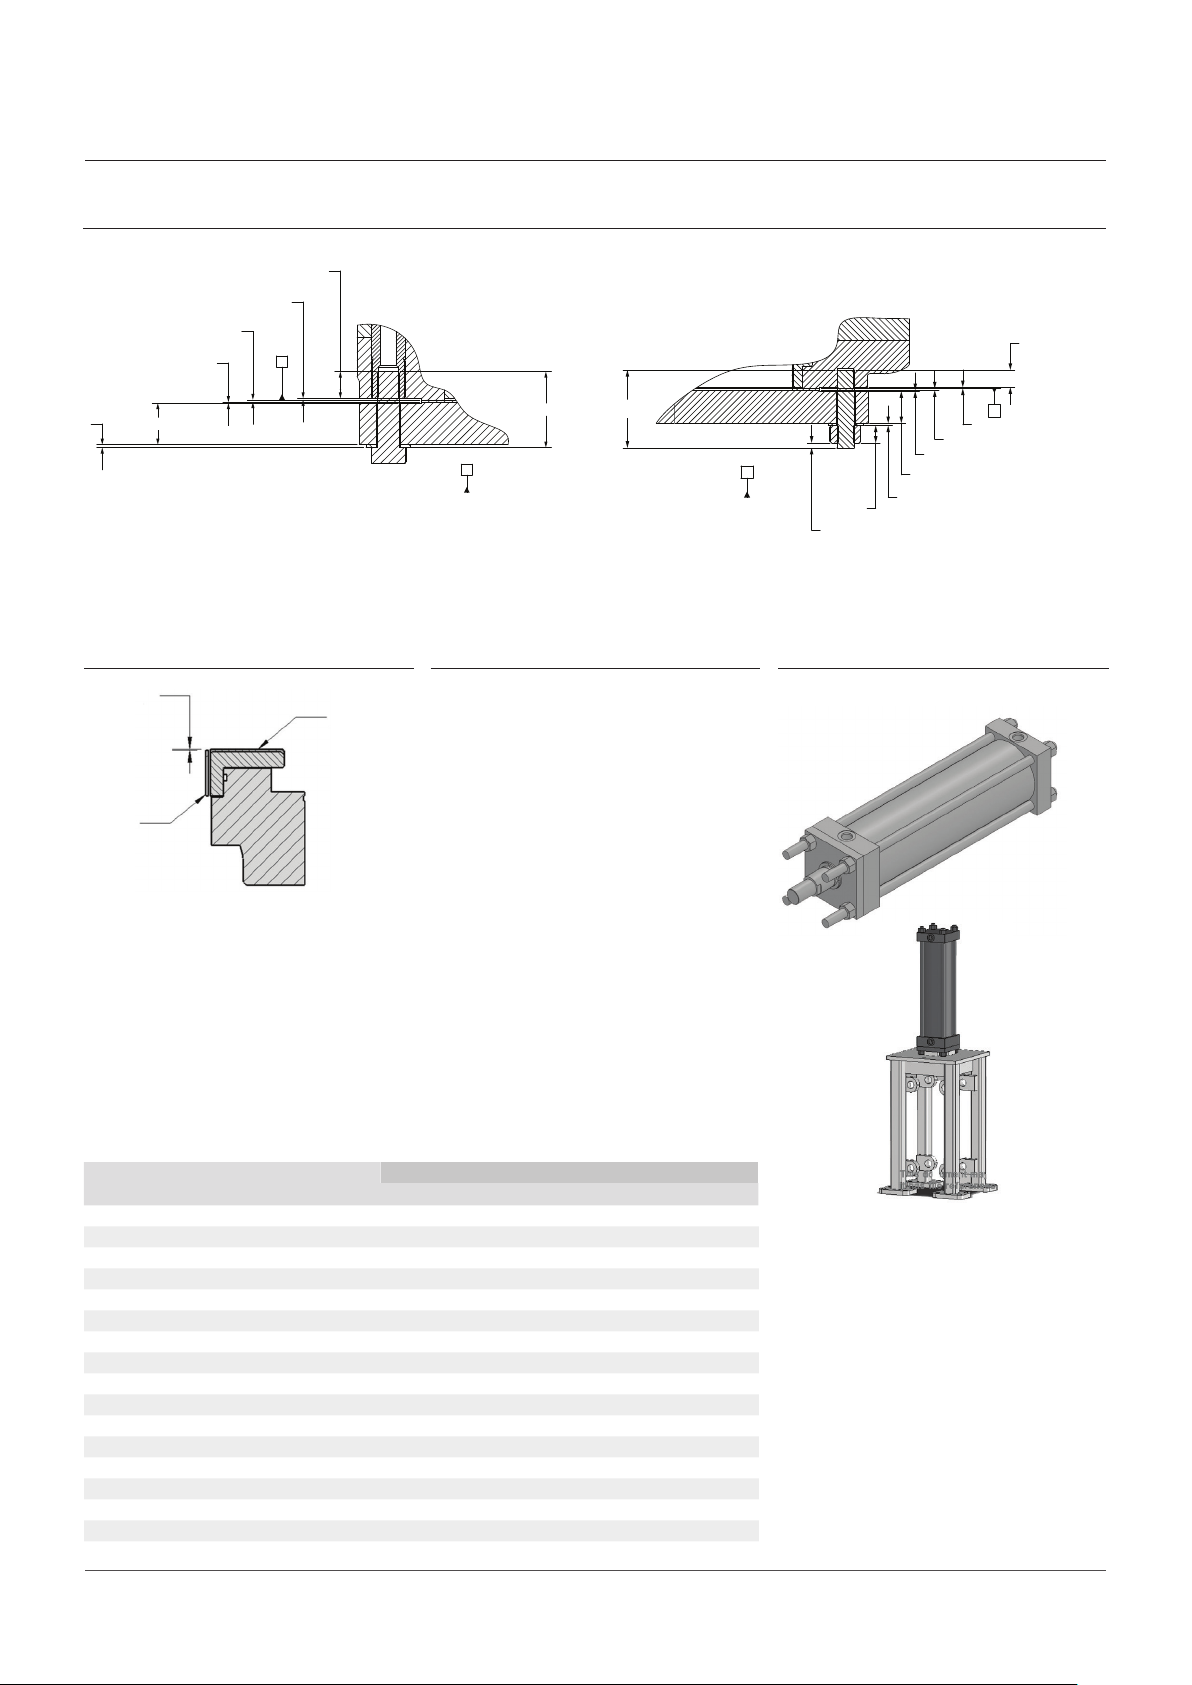
BASIS OF BOLT LENGTH AND STUD LENGTH CALCULATION
Valve body recess
(flowring raised face)
Gasket thickness
.06 Nominal
flange raised face
Flange thickness
Washer thickness
(F436)
Bolt length = Washer thickness + Flange thickness + Flange raised face + Gasket thickness + Valve body recess + 1 x Bolt dia
GASKET DETAIL
Gasket ID
matched to
flow ring ID
1x Bolt dia.
A
A
Is the raised face on the body
ACTUATION
Flow ring
with overlay
ZP300 has two options for actuation: Hydraulic
Cylinder (HC) and Bevel Gearbox (BG) with
Bolt length
Stud oval
A
Is the raised face on the body
Extra length
HYDRAULIC CYLINDER ACTUATION
manual hand wheel. The HC option is designed
to operate with a hydraulic fluid pressure of
<2000 psi and the BG with a rim-pull of < 80 lb.
Gasket
Gasket thickness
.060 Flange raised face
Flange thickness
Washer thickness (F436)
Nut height (heavy hex)
1x Bolt dia. deep
A
Valve body recess
FIGURE 2
WARNING
To minimize stress concentration in flow ring
ensure flange gasket ID is matched with flow ring
ID as shown in Figure 2.
HYDRAULIC CYLINDER SIZE AND REQUIRED FLOW RATE
Valve size
NPS
3 1⁄ ⁄ 1.8 1.5
4 1⁄ ⁄ 1.8 1.5
6 2½ 1 4.9 4.1
8 2⁄ 1 4.9 4.1
10 4 1⁄ 12.6 10.2
12 4 1⁄ 12.6 10.2
14 4 1⁄ 12.6 10.2
16 5 2 19.6 16.5
18 5 2 19.6 16.5
20 6 2⁄ 28.3 23.4
24 7 3 38.5 31.4
26 8 3½ 50.3 40.6
28 8 3⁄ 50.3 40.6
30 10 4⁄ 78.5 62.6
32 10 4⁄ 78.5 62.6
36 12 5⁄ 113.1 89.3
HC size Rod size
1 in/s Max (close) 1 in/s Max (open)
Fluid flow rate (in
3
/sec)
FIGURE 3
Hydraulic cylinder design and mounting arrangement
3
Page 4

CLARKSON KNIFE GATE VALVE MODEL ZP3OO
INSTALLATION AND MAINTENANCE INSTRUCTIONS
OPERATIONAL CONSIDERATIONS
1. All valves should be operated within their
design pressure and temperature ranges.
Under no circumstances should the valves
be operated at conditions outside these
parameters.
2. The operator should have an understanding
of the effects of opening/closing the valve
with regards to its role in the overall piping
system. Take caution to ensure that the
valve is in good operating condition prior to
operating it under pressure.
3. Care should be taken when processes
contain hazardous and/or otherwise
unstable media to ensure the operator is
aware of the specific health and safety risks
associated with that medium.
4. Stand clear of any moving parts such as the
stem and/or gate assembly when operating,
use of gloves is suggested when operating
manual valves to minimize the risk of injury.
5. All manual handwheel operated valves
are designed for hand input. Do not apply
excessive input torque via pipe wrenches,
'cheater bars', or other devices. If a manual
handwheel actuated valve is difficult to
LOCKOUT DESIGN
operate due to torque requirements, it is
recommended that the valve be supplied
with or converted to a bevel gear, air/
hydraulic cylinder or electric motor
actuator.
6. Electric motor actuated valves should be
left in their factory set condition unless
the system operating parameters dictate
a change. If changes are necessary, they
should be performed in small increments
using the lightest/lowest setting possible
to achieve the desired performance and
then the valve/actuator function inspected.
Excess torque and/or thrust in the motor
settings may damage or lockup the valve.
7. The ZP300 valve is position seated and
should never be torque seated. Do not use
the motor torque settings to seat the valve.
8. Care should be taken to ensure that
electrical motors are wired correctly.
Incorrect phasing of 3-phase wiring may
cause valve/motor damage.
BEVEL GEARBOX ACTUATION
BEVEL GEARBOX SELECTION WITH HANDWHEEL
Valve size
NPS BG size BG ratio HW (in)
3 3 3 12
4 3 3 12
6 3 3 16
8 4 4 12
10 42 8 24
12 44 16 24
14 44 16 24
16 44 16 24
18 44 16 24
20 64 24 24
24 624 48 24
For sizes NPS 26 and above consult sales for detail
FIGURE 4
Yoke with bevel gear actuator and manual
handwheel
Options
1. Cable lockout standard for manual hand
wheel.
2. Bevel gear lockout is standard for use on
BG actuators.
3. Lockout pin on both open and closed
positions standard on hydraulic cylinder
actuators
4. Lockout pin style for open and closed
positions are optional for MH valves.
5. Energy lockouts for hydraulic cylinder
actuators.
Safety
1. Pin-style lockouts will assume potential
energy of actuator has been removed
through other means and are designed
to prevent gate movement caused by
line pressure. They are not designed to
overcome or resist an energized hydraulic
cylinder actuator.
2. Pin-style lockouts positions will be designed
to resist unauthorized manual unassisted
operation of the valve and prevent gate
movement caused by line pressure.
3. Pin style lockouts not available on BG
actuated valves.
FIGURE 6 - Lockout design for ZP300-28
NOTE
Lockout design may vary between sizes. All lockouts
include a pin to secure lockout in position and lanyard
to tie lockout pin to valve body.
FIGURE 7 - Lockout design for ZP300-8FIGURE 5 - Lockout design for ZP300-18
FIGURE 8 - Lockout design for ZP300-3
NOTE
Lockout pin may differ from illustration
4
Page 5

CLARKSON KNIFE GATE VALVE MODEL ZP3OO
INSTALLATION AND MAINTENANCE INSTRUCTIONS
FLOW RING ROTATION
An external flow ring can be rotated three
times (3 x 90˚) after original installation. Four
ASTM A574 steel, zinc plated socket head
cap screws (SHCS) are required to position
a ring and compress an o-ring gasket that
seals the flow ring to the valve body. Sufficient
tapped holes are provided in the valve body so
that positioning holes are only used once per
rotational position of a flow ring.
FIGURE 9
Mounting/sealing external flow ring
SIZE AND LENGTH OF ASTM A574 ZC PLTD
SHCS TO SECURE FLOW RING
Valve size
NPS
3 8-32 0.500
4 8-32 0.500
6 ⁄ 0.500
8 ⁄ 0.500
10 ⁄ 0.500
12 ⁄ 0.500
14 ⁄ 0.750
16 ⁄ 0.750
18 ⁄ 0.750
20 ⁄ 0.625
24 ⁄ 1.000
26 ⁄ 1.000
28 ⁄ 1.000
30 ⁄ 1.000
32 ⁄ 1.000
36 ⁄ 1.000
External flow ring fastener
Size (in) Length (in)
GENERAL MAINTENANCE
Emerson recommends that all Clarkson ZP300
series valves be inspected every 60 days.
The following points should be examined and
corrected as required:
WARNING
If valve is not in line the gate must be open or
partially open to avoid damage to valve and flow
ring.
2. Packing gland: check for leaks or worn
packing. If leakage is occurring around the
packing gland, tighten the packing gland
bolts evenly at all points, being careful not to
overstress the bolting. (On some valves this
will require two wrenches, one to tighten
the nut and the other to hold the packing
bolt from turning.) If the valve requires
repacking, see additional instructions for
repacking on page 6.
3. Flow rings: the valve must be out of line
to properly examine flow rings. Look for
erosion of hard surfacing and base metal.
If base metal is exposed under the hard
surfacing, ring should be replaced. If no
erosion of base metal, ring may be rotated
so worn area is moved from wear path to
gain additional service life.
4. Resilient seats: examine seat for cracks,
cuts, corrosion, erosion or swelling.
Evidence of any above defects may justify
replacement if seat has recorded evidence
of leaking when closed, or condition is
assessed by maintenance engineer to be
at risk of pending failure. To replace a seat
disassembly of valve is required.
5. If possible stroke the valve through the full
open and closed position to make sure it is
functioning properly.
FIGURE 10
Assembly of external flow ring
1. Cylinder rods, rod boots: look for excessive
corrosion, bitumen build-up, tears in rod
boot, etc. Check rod boot connections.
Check for cylinder rod seal blow-by.
FIGURE 11
Major components
Packing
Gate scraper
Flow ring
O-ring
Flow ring
Cast body
17.4PH gate
Packing gland
Body O-ring
Polyurethane seat
Polymer liner (UHMPW-PE)
5
Page 6

CLARKSON KNIFE GATE VALVE MODEL ZP3OO
INSTALLATION AND MAINTENANCE INSTRUCTIONS
REPACKING INSTRUCTIONS
1. Each packing piece is cut a bit longer to add
some compression within each layer and to
accommodate for fraying strands of packing
at each end. The size, length, and quantity
of each piece can be found in the relevant
Table. Each layer shall alternate between
both the packing width pieces and the
position of the smaller end pieces, as shown
in Figure 12. Smaller end pieces will always
be the piece to deform into remaining cavity.
Note: ensure body O-ring remains
protruding from packing box after
installation of packing.
2. Method of installing packing is shown in
Figure 13. Place one end of packing to side
of packing box. The other end should touch
other packing pieces once installation of
packing commences.
3. Start at the hump of each packing piece
and pack the packing with a packing tool,
as shown in Figure 14. Once the pieces are
together to form the first layer, prepacking
with a packing tool is required to fill in any
gaps that can or cannot be seen. Each layer
will require prepacking.
Note: do not let packing pieces to twist
during installation.
4. Alternate packing layers, as shown in
Figures 12 and 15.
5. If packed properly, the smaller pieces
should fill in the cavity. Each layer of end
pieces should be stacked in a specific way
so that a piece of packing is sitting on top
of a split line from the previous layer, as
shown in Figure 16.To get the smaller
pieces to fill in the cavity, opposite sides
will have to be compressed to obtain an
elongated smaller piece.
Note: not all sizes have smaller end pieces;
some will have equal size end pieces.
6. Install packing gland with studs, Bellville
Washers, and nuts as shown in Figure 17.
For initial tightening of packing gland,
tighten packing gland to achieve a
compression between 0.125-0.375”. Use
Loctite 262 (Red) on studs to secure in body.
Note: ensure each stack is facing the
opposite direction and the final stack is
cupped downward before adding the nut.
7. Tension must be placed on the nut to
prevent the nut from backing out. First
stack starts on the bottom, cupped down on
the packing gland, as shown in Figure 18.
Stacking method is provided on Table 2
FIGURE 12
Installation of packing (ZP300-24 shown)
Use packing tool for packing,
starting at the hump of each
piece of packing
Packing width piece
Packing end piece
Alternating layers
Smaller end piece
FIGURE 14
Installation of packing (ZP300-24 shown)
FIGURE 13
Installation of packing (ZP300-24 shown)
FIGURE 15
Packing layers alternating (ZP300-24 shown)
Smaller piece
NOTES
1. Stop all small leaks as soon as possible as
considerable damage can be done to the valve
and the surrounding area if leakage is allowed to
continue.
2. Replacement parts including replacement liners,
hand wheel and yoke assemblies, gates, packing
glands, and packing can be provided from our
factory. If valve requires further repair, please
contact our office for an estimate of feasibility and
cost of repair.
Compress
FIGURE 16
Alternating packing end pieces (ZP300-24 shown)
Elongate
TABLE 2 - BELLEVILLE WASHER STACK - Alternative method: regular heavy hex nut
Valve size
NPS
3 2 Down 2 Up 1 Down 1 Up 1 Down 1 Up 1 Down - 4 3 Down 3 Up 3 Down 1 Up 1 Down 1 Up 1 Down 1 Up 1 Down
6 5 Down 5 Up 5 Down 1 Up 1 Down 1 Up 1 Down 1 Up 1 Down
8 2 Down 2 Up 2 Down 1 Up 1 Down 1 Up 1 Down - 10 3 Down 3 Up 3 Down 1 Up 1 Down 1 Up 1 Down - 12 4 Down 4 Up 1 Down 1 Up 1 Down 1 Up 1 Down - 14 3 Down 3 Up 1 Down 1 Up 1 Down 1 Up 1 Down - 16 7 Down 7 Up 7 Down 7 Up 1 Down 1 Up 1 Down 1 Up 1 Down
18 7 Down 7 Up 7 Down 7 Up 1 Down 1 Up 1 Down 1 Up 1 Down
20 16 Down 16 Up 1 Down 1 Up 1 Down 1 Up 1 Down - 24 6 Down 6 Up 1 Down 1 Up 1 Down 1 Up 1 Down - 26 8 Down 8 Up 1 Down 1 Up 1 Down 1 Up 1 Down - 28 8 Down 8 Up 8 Down 1 Up 1 Down 1 Up 1 Down 1 Up 1 Down
30 9 Down 9 Up 9 Down 1 Up 1 Down 1 Up 1 Down - 32 8 Down 8 Up 1 Down 1 Up 1 Down 1 Up 1 Down - 36 7 Down 7 Up 1 Down 1 Up 1 Down 1 Up 1 Down - 42 5 Down 5 Up 1 Down 1 Up 1 Down 1 Up 1 Down - 48 10 Down 10 Up 1 Down 1 Up 1 Down 1 Up 1 Down - -
1st 2nd 3rd 4th 5th 6th 7th 8th 9th
Stack
6
Page 7

CLARKSON KNIFE GATE VALVE MODEL ZP3OO
INSTALLATION AND MAINTENANCE INSTRUCTIONS
FIGURE 17
Installation of Packing Gland (ZP300-28 shown)
FIGURE 18
Stacking of Belleville Washers (ZP300-20 shown)
PACKING SIZES
Width piece End piece
Valve size
NPS
3 4 2.75 ⅜ - - - - - - -
4 4 3.63 ⅜ 5.250 ½ 8 0.79 ⅜ 8 0.79
6 4 5.38 ½ 7.380 ⅝ 8 1.05 ½ - 1.05
8 4 7.25 ½ - - - - - - -
10 4 9.00 ½ 11.130 ⅝ 8 1.31 ½ 8 1.31
12 4 10.75 ⅝ 13.500 ⅝ 16 1.58 ½ 8 1.58
14 4 11.88 ⅝ 15.000 ⅝ 24 1.71 - - -
16 4 13.75 ⅝ 17.000 ⅝ 24 1.84 - - -
18 4 15.25 ⅝ 18.750 ⅝ 16 1.97 ¾ 8 1.97
20 4 17.13 ¾ 20.630 ¾ 24 2.23 - - -
24 4 21.00 ¾ 25.130 ¾ 16 2.63 ⅝ 16 2.63
26 4 23.00 ¾ 27.000 ¾ 16 2.78 ⅝ 16 2.76
28 4 25.00 ¾ - - - - - - -
30 4 27.00 1 32.000 1 8 3.22 ¾ 24 2.95
32 4 29.00 1 34.500 1 24 3.41 - - -
36 4 33.00 1 38.500 3x1 24 3.68 - - -
42 4 38.50 1 44.500 1 8 4.07 ¾ 32 4.07
48 4 44.50 1 50.000 1 8 4.59 ¾ 32 4.59
No. of
rows Port dia.
- ⅜ - - - - - - -
3.00 ⅜ 4.125 ½ 8 0.66 - - -
- ⅜ - - - - - - -
4.00 ⅜ 5.380 ⅜ 16 0.79 - - -
5.76 ½ 7.500 ½ 16 1.05 - 8 -
6.00 ½ 7.630 ½ 16 1.05 - - -
7.63 ½ 9.380 ⅝ 8 1.18 ½ 8 1.18
8.00 ½ 9.630 ½ 16 1.18 - - -
- ½ - - - - - - -
10.00 ½ 11.630 ½ 16 1.31 - - -
11.75 ⅝ 14.000 ⅝ 16 1.58 - - -
12.00 ⅝ 14.130 ⅝ 16 1.58 - - -
13.00 ⅝ 15.500 ¾ 8 1.71 ⅝ 8 1.71
13.25 ⅝ 15.630 ⅝ 16 1.71 - - -
15.00 ⅝ 17.630 ¾ 8 1.84 ⅝ 8 1.84
15.25 ⅝ 17.750 ⅝ 16 1.84 - - -
- ⅝ - - - - - - -
17.00 ⅝ 19.380 ⅝ 16 1.97 - - -
18.50 ¾ 21.250 ¾ 16 2.23 - - -
19.00 ¾ 21.380 ¾ 8 2.23 ⅝ 8 2.31
22.75 ¾ 26.000 ¾ 8 2.63 ⅝ 16 2.63
23.00 ¾ 26.130 ¾ 16 2.63 ½ 8 2.63
24.50 ¾ 27.630 ¾ 16 2.78 ⅝ 8 2.76
25.00 ¾ 28.000 ¾ 8 2.78 ⅝ 16 2.76
26.50 ¾ 30.000 ¾ 24 3.00 - - -
27.00 ¾ 30.130 ¾ 8 3.00 ⅝ 16 2.95
28.50 1 32.500 1 16 3.22 - - -
29.00 1 32.750
- 1 - - - - - - -
31.00 1 35.380 1 8 3.41 ¾ 16 3.41
34.50 1 39.000 1 16 3.68 ⅝ 8 3.68
35.00 1 39.375 1 8 3.68 ¾ 16 3.68
- 1 - - - - - - -
40.00 1 45.000 1 8 4.07 ¾ 24 4.07
- 1 - - - - - - -
46.00 1 51.000 1 8 4.59 ¾ 24 4.59
Packing size
Packing length
(in) Packing size Qty
¾ 24 3.22 - - -
Length per piece
(in)
Additional packing
size Qty
Length per piece
(in)
7
Page 8

CLARKSON KNIFE GATE VALVE MODEL ZP3OO
INSTALLATION AND MAINTENANCE INSTRUCTIONS
INSTALLATION A
Appropriate tie-in capable of supporting load.
Turnbuckle for adjustment
Saddle style hanger
INSTALLATION B
Saddle style support
Appropriate tie-in capable of supporting load.
INSTALLATION C
Appropriate tie-in capable of supporting load.
Turnbuckle for adjustment
Alternate head-support,
saddle style preferred
HANDWHEEL OR BEVEL GEAR OPERATED
VALVES
Equipment orientation
Valves may be stored in the vertical or
horizontal position.
Preparation for storage
Valves may be stored as shipped, provided
the storage facility and equipment orientation
instructions above are followed. If valve
packaging is altered or removed for receiving
inspection, repackage valve as originally
received. Standard packaging materials cannot
be considered sufficient for outdoor storage.
Storage inspection
Visual inspection shall be performed on a semiannual basis and results recorded. Inspection
as a minimum shall include reviewing the
following:
• Packaging
• Flange covers
• Dryness
• Cleanliness
Maintenance
Maintenance shall consist of correcting
deficiencies noted during inspection. All
maintenance shall be recorded. Contact factory
prior to performing any maintenance if valve is
still covered under warranty.
CYLINDER SUPPORT METHODS FOR
HORIZONTALLY OR OFF-VERTICAL MOUNTING
Cylinders may require additional support when
mounted other than in vertical position. Failure
to do so could lead to premature failure of
cylinder and/or valve. The following illustrations
are suggestions; specific details will have to
be determined by customer so support best
suits surrounding area. It is important that the
cylinder/gate alignment be maintained during
valve operation. Supports should be designed
to maintain alignment and support bulk of
cylinder weight.
RECOMMENDED LONG TERM STORAGE
The following are recommendations for storage
procedures to retain maximum product integrity
during long term storage of 1 to 5 years.
Storage facility
The preferred storage location is a clean, dry
protected warehouse. If valves are to be stored
outside, precautions should be taken to keep valves
clean and dry. Standard packaging materials
cannot be considered sufficient for outdoor storage.
8
Page 9

CLARKSON KNIFE GATE VALVE MODEL ZP3OO
INSTALLATION AND MAINTENANCE INSTRUCTIONS
CYLINDER OPERATED VALVES
Equipment orientation
The preferred orientation for optimum protection
is with the cylinder in the vertical position. This
position gives the best support to the cylinder
rod and helps reduces the chance of a “flat spot”
developing on the cylinder seals. An acceptable
alternate position for valves with cylinder
diameters of less than 6 inches (150 mm) is with
the cylinder in the horizontal position.
Preparation for storage
Valves may be stored as shipped, provided
the storage facility and equipment orientation
instructions above are followed. If valve
packaging is altered or removed for receiving
inspection, repackage valve as originally
received. Standard packaging materials cannot
be considered sufficient for outdoor storage.
Cylinder storage
These cylinder storage instructions are not
intended to replace the instructions of the
specific cylinder manufacturer and are to be
used as a guide only. If specific instructions
are required, please contact our office. For
storage of up to 3 years; Squirt a high quality
grade of hydraulic oil or synthetic lubricant into
the cylinder ports and operate cylinder 6-12
times on a yearly basis. For storage 3-5 years;
Lubricate as above. Additionally, extend cylinder
rod until the valve is fully closed. Coat cylinder
rod with high quality heavy grease or synthetic
lubricant. Retract cylinder rod until valve is fully
open, drawing lubricant into rod end of cylinder.
Securely plug cylinder ports with pipe plugs, if
cylinder is not prepiped to control accessories.
If cylinder is prepiped to accessories, plug all
input and output ports of accessories.
Storage inspection
Visual inspection shall be performed on a semiannual basis and results recorded. Inspection as
a minimum shall include reviewing the following:
• Packaging
• Flange covers
• Dryness
• Cleanliness
Maintenance
Maintenance shall consist of correcting
deficiencies noted during inspection.
All maintenance shall be recorded.
Contact factory prior to performing any
maintenance if valve is still covered under
warranty.
Neither Emerson, Emerson Automation Solutions, nor any of their affiliated entities assumes responsibility for the selection, use or maintenance of any product.
Responsibility for proper selection, use, and maintenance of any product remains solely with the purchaser and end user.
Clarkson is a mark owned by one of the companies in the Emerson Automation Solutions business unit of Emerson Electric Co. Emerson Automation Solutions, Emerson
and the Emerson logo are trademarks and service marks of Emerson Electric Co. All other marks are the property of their respective owners.
The contents of this publication are presented for informational purposes only, and while every effort has been made to ensure their accuracy, they are not to be construed
as warranties or guarantees, express or implied, regarding the products or services described herein or their use or applicability. All sales are governed by our terms and
conditions, which are available upon request. We reserve the right to modify or improve the designs or specifications of such products at any time without notice.
Emerson.com/FinalControl
9
 Loading...