

Page 1
CLARKSON SERIES KGF AND KGF-HP SLURRY VALVES
InstallatIon and maIntenance InstructIons
Before installation these instructions must be fully read and understood
This instruction manual provides installation,
operation and maintenance recommendations
for both the Clarkson KGF and Clarkson
KGF-HP slurry knife gate valves. The standard
KGF is a 300psi CWP valve with optional
pressure ratings up to 450psi cwp and the
KGF-HP is rated to Class300 (740psi CWP).
Both products are very similar, however,
theKGF-HP has a higher pressure rating
andcritical parts are not interchangeable.
The KGF and KGF-HP are identified by
thevalvetag.
1 GENERAL INFORMATION
1. The KGF and KGF-HP are packingless,
slurry knife gate valves. All the sealing is
accomplished by the elastomeric sleeves
in the valve housing. The sleeves also form
the wear section for the valve. The gate is
INDEX
1. General information ...................................... 1
2. Initial inspection ............................................ 2
3. Installation instructions ................................ 2
4. Operation ....................................................... 5
5. Lockouts ....................................................... 6
6. General maintenance ................................... 7
7. Spare parts ................................................... 8
8. Storage .......................................................... 9
9. Sleeve replacement .................................... 10
10. Gate support replacement .......................... 12
11. Secondary seal replacement ...................... 12
12. Disassembly and assembly instructions ... 13
13. Field replacement of gates ......................... 16
14. Body flushing and discharge ...................... 17
15. Installation instructions for splash
guardbucket ................................................ 18
16. Installation instructions for splash
guardplate ................................................... 18
17. Lifting ........................................................... 18
18. Manual handwheel actuator assembly ...... 19
19. Bevel gear actuator assembly .................... 19
20. Air cylinder actuator assembly................... 20
21. Hydraulic cylinder actuator assembly ....... 20
removable for inspection or replacement
while the valve is in service. Refer to
Section 13 for gate removal cautions
andinstructions.
2. The KGF and KGF-HP are BIDIRECTIONAL
(two-way shut-off) product and can be
installed without concern over direction of
flow. Since they will shut-off equally with
in either direction, you will find no arrows
or other indicators of a direction of flow or
seatside.
3. Clarkson slurry knife gate valves are
suitable for on-off service only. They are
notto be used in a throttling application.
4. The style, size, pressure rating and material
selection are the responsibility of the piping
system designer.
5. All valves should be operated within the
design pressure and temperature ranges.
Under no circumstances should the valves
be operated at conditions outside these
parameters. Do not exceed 100% of the
maximum pressure rating of the valve at
anytime during its operation. Pressure
spikes beyond the valve’s pressure rating
are solely the responsibility of the user.
© 2017 Emerson. All Rights Reserved.Emerson.com/FinalControl VCIOM-06613-EN 17/08
Page 2
CLARKSON SERIES KGF AND KGF-HP SLURRY VALVES
InstallatIon and maIntenance InstructIons
2 INITIAL INSPECTION
1. Examine entire valve and report any
damageor discrepancies immediately.
2. Sleeves: visually examine the sleeves
interior, looking for chunking, irregularities
or other damage. It is not recommended
you remove the retainer flanges. Visually
examine the retainer flanges surfaces,
looking for tears, irregularities or other
damage. Check tightness of retainer
flangebolting.
3. Operators: standard manual handwheels
may be shipped loose for field installation,
be sure to fully tighten.
4. Valves are normally shipped with gate in
open position, the recommended position
for installation. Valves supplied with spring
to extend (fail close) cylinder actuators are
shipped with the gate in the closed position.
The KGF and KGF-HP should be installed
with the gate in the open position, exercise
caution when applying air to open this valve
and ensure that it is locked in the open
position when installing in the line.
5. Accessories: if provided, including
solenoids, limit switches, etc., are tested
for functionality prior to shipment. Examine
carefully for damage which may occur
during shipment.
6. Refer to lockouts Section 5 for additional
cautions on spring cylinders
3 INSTALLATION INSTRUCTIONS
Please take note of the specific installation
tagsprovided with each valve.
1. The KGF and KGF-HP are to be installed
with the gate in the fully open position with
the sleeves inserted into the housing halves.
2. KGF: standard mating flanges 3” (DN80)
through24” (DN600) match ASME
B16.5/300, sizes30” and larger are per
MSS-SP44/300 (see Table 4). Optional
drilling to ASME B16.5/150 is available
in certain circumstances. Other flange
drillings including PN10 or PN16 are
available depending on rated pressure of
valve.
KGF-HP: standard mating flanges 3”
(DN80) through 24” (DN600) match ASME
B16.5/300, sizes30” and larger are per
MSS-SP44/300 (see Table 4). Other flange
drillings are available depending on rated
pressure ofvalve.
CAUTION
Valves are normally shipped with gate in
open position, the recommended position for
installation. Valves supplied with spring to extend
(fail close) cylinder actuators are shipped with
the gate in the closed position. Gate should be
actuated to the open position prior to installation,
exercise extreme caution when applying air to
open this valve and ensure that gate is locked
in the open position for installation. Refer to
lockouts section 5 for additional cautions on
spring cylinders.
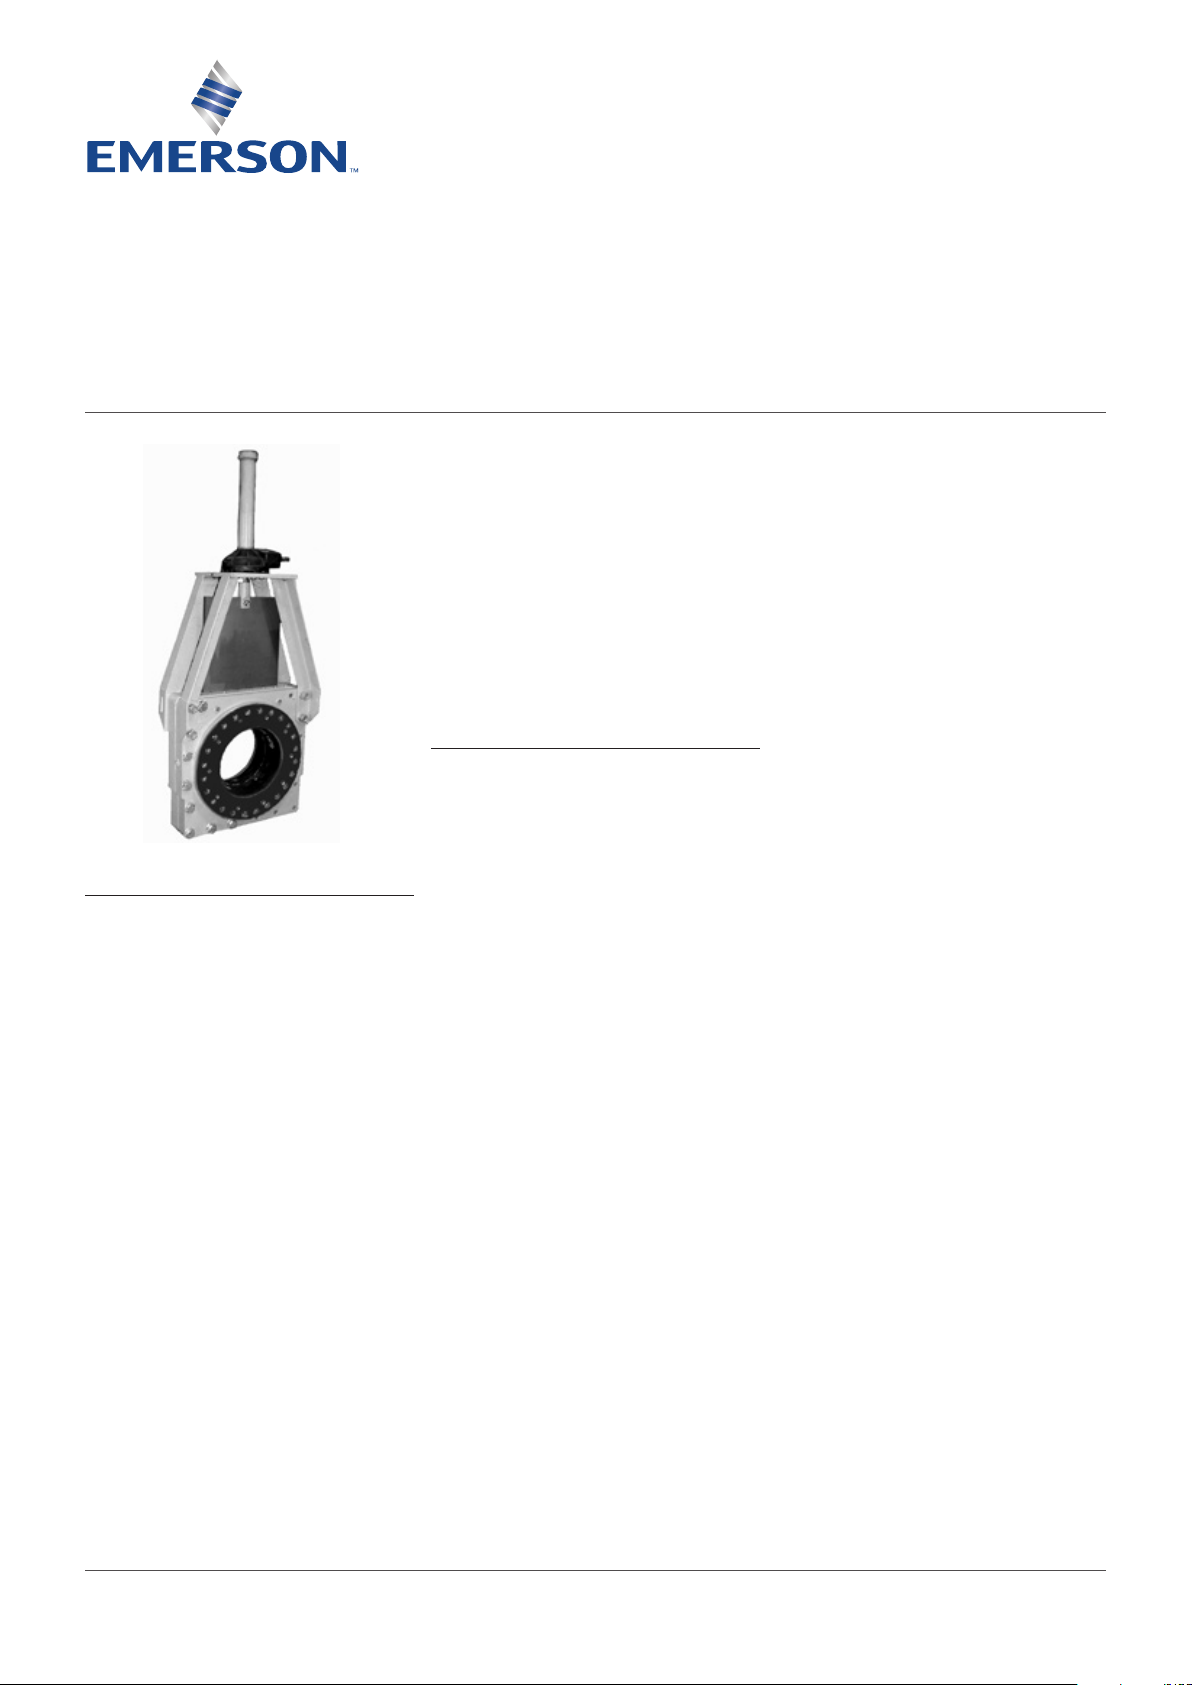
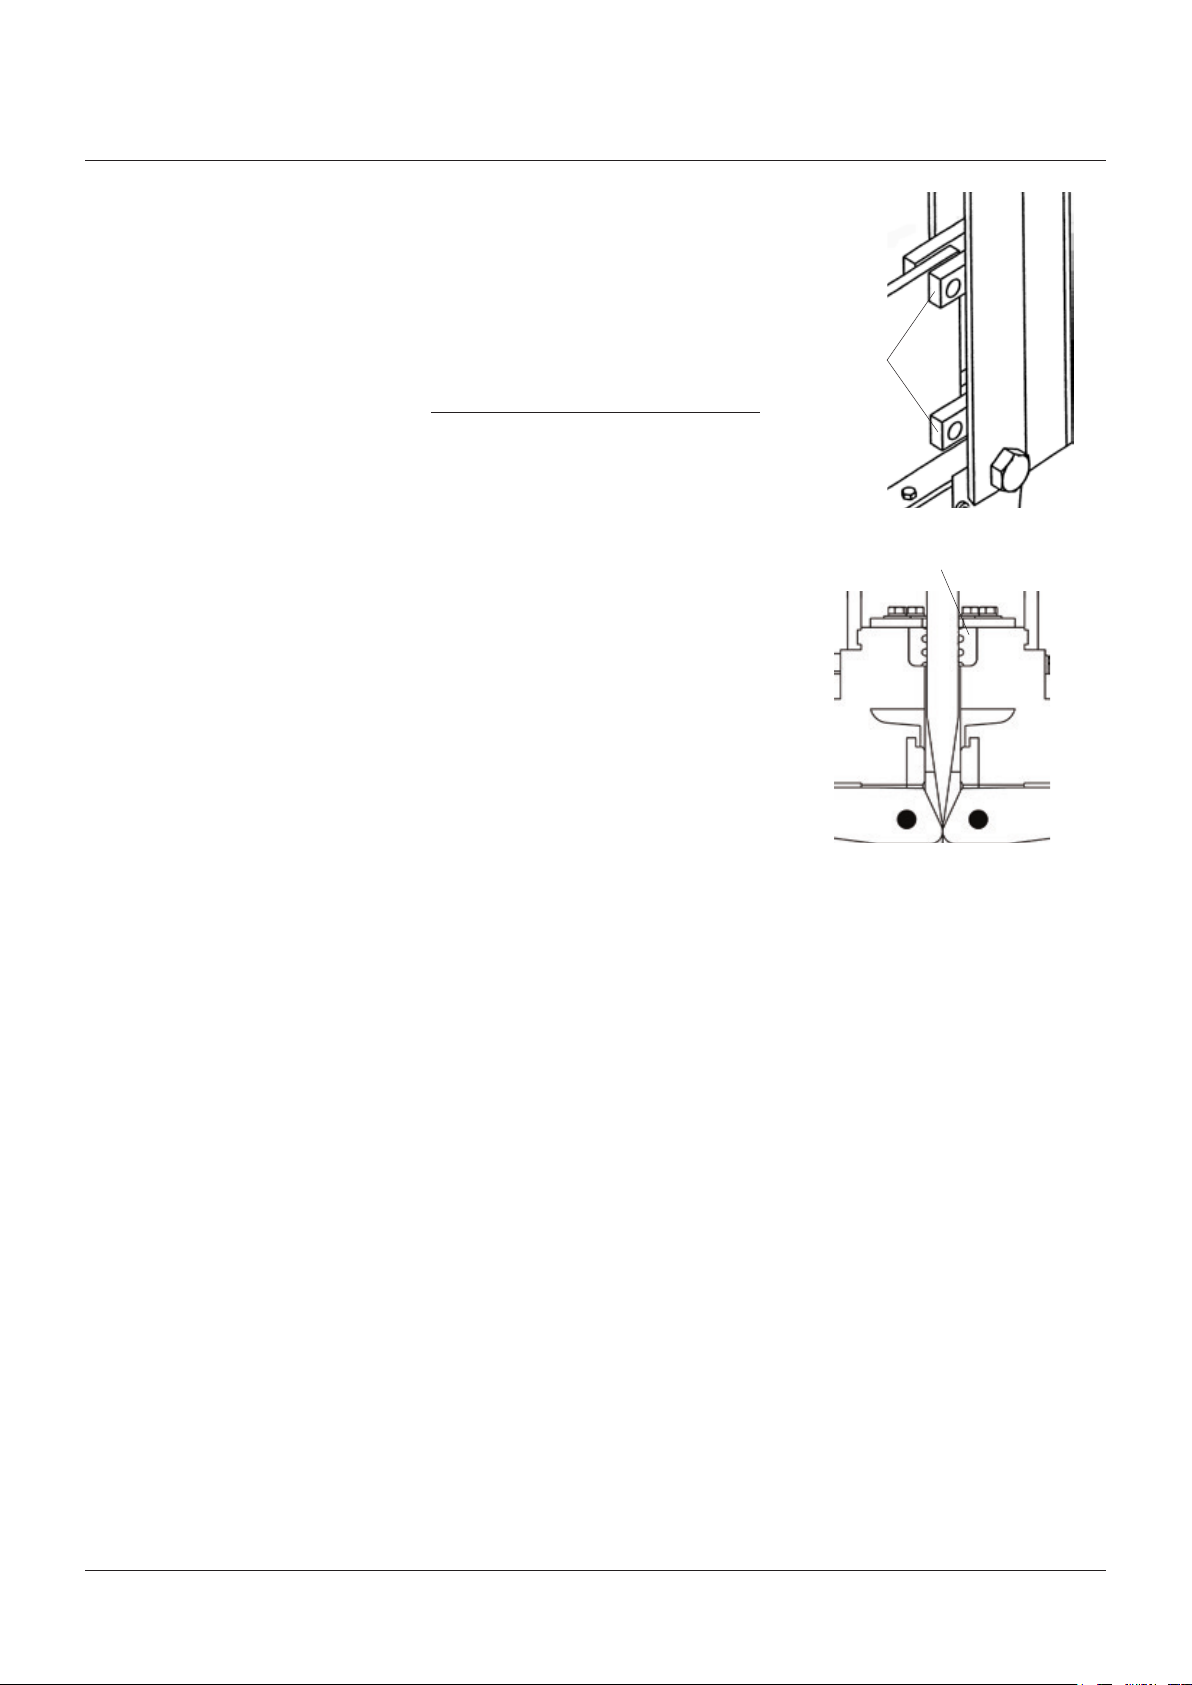
FIGURE 1
Operators
Retainer flanges
Sleeves
2
Page 3
CLARKSON SERIES KGF AND KGF-HP SLURRY VALVES
InstallatIon and maIntenance InstructIons
3. Tables 1 and 2 state the maximum flange
bolt tightening torques for standard flange
patterns. While the KGF and KGF-HP are
provided with flange bolt patterns that
match ASME B16.5/150 or ASME B16.5/300
flange bolt patterns, they are not designed
to handle the same torque requirements
as an all-metal Class150 or Class300 gate
valve. The KGF and KGF-HP are specialty
valves with a specified maximum flange
torque. Exceeding recommended torque
values will reduce overall valve performance
and may permanently damage the sleeves
and or other components.
4. The KGF and KGF-HP are configured for
installation in conventional bolted flange
connections. Slip on or weld flanges can
be used. The pipeline companion flanges
should be raised or flat face type to insure
full sleeve support and a continuous,
unvarying I.D. If slip-on flanges are used,
the pipe should be cut square and welded
in position with the pipe end matched
evenly with the flange face. Studded flanges
are not compatible with these valves.
Use of other flange connections should
be reviewed and verified by the factory
forcompatibility prior to installation.
5. The mating line flanges must be properly
aligned prior to attempting installation.
Never try to make up for misaligned pipe
flanges by the line bolting.
6. Optimum performance of the valve sleeves
may be achieved if the mating pipe I.D. is no
larger than +0.25” (6.5mm) of the retainer
flange I.D. (Refer to Table 4 for retainer
flange dimensions.) Oversized mating pipe
I.D. may subject retainer flange and sleeve
to additional wear.
7. Listed in Table 4 are the fasteners required
for installation.
8. Pipe supports and/or expansion joints
should be used to minimize pipe loads
onvalves.
9. The elastomer coated retainer flange
functions as the gasket for installation
into the pipeline, no additional gaskets
arerequired.
10. Valve is suitable for use in either vertical or
horizontal lines. The valve can be installed
in any position in vertical or horizontal
pipelines. However, valves installed in
an orientation with the actuator below
horizontal may require flushing to prevent
the buildup of solids in the housing and
mayrequire additional actuator support.
Installation notes
A) All slurry knife gate valves are designed and
manufactured to be installed in applications
where no more than 1g of force In excess
of gravity is applied to the valve in any
direction. This 1g force can be an effect
of traffic, wind, or earthquake, etc. Valves
should not be used in applications that
exceed 1g.
B) If valve stem or topworks protrude into
walkways or work areas, valve should
beflagged per company safety policy.
C) All piping systems should contain
independent support mechanisms and
should not utilize the valve as a sole
meansof support.
D) Do not install valve over walkways, electrical
or other critical equipment without the use
of a splash guard device (refer to section 14)
or similar considerations.
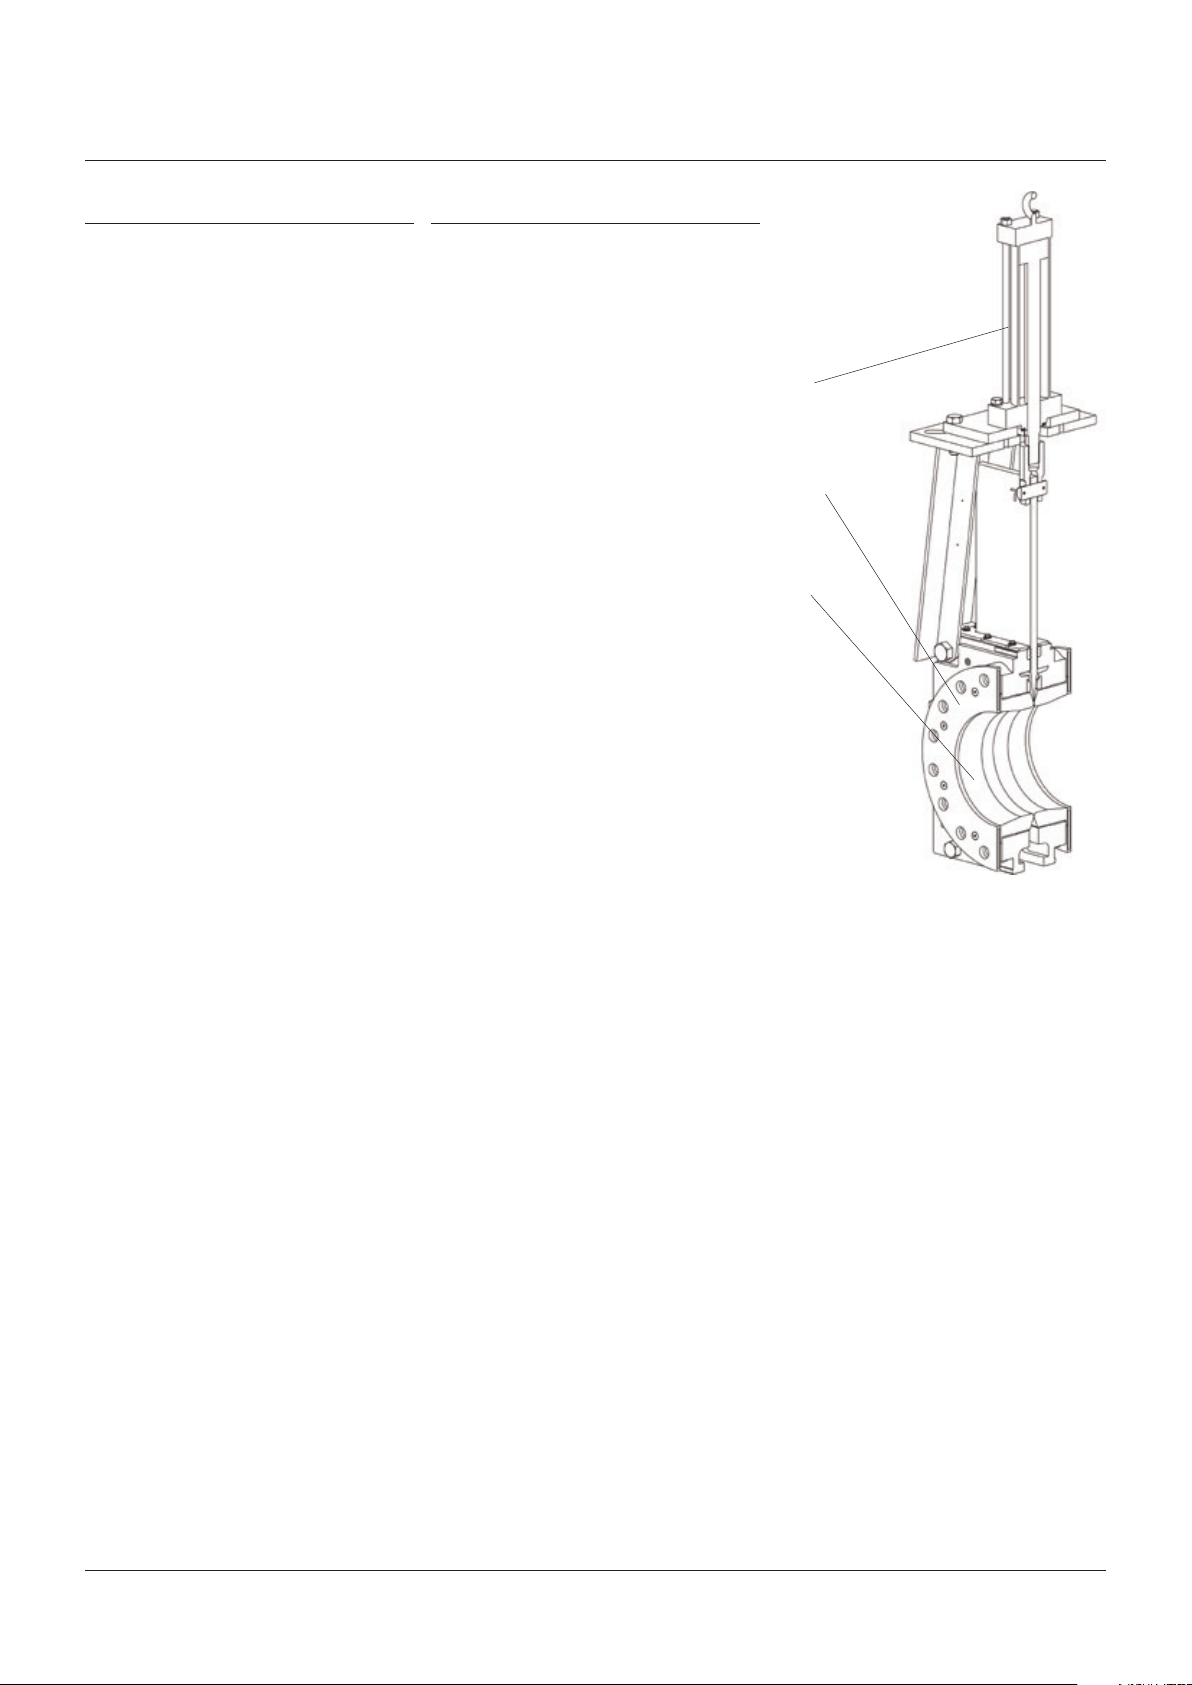
FIGURE 2
Retainer flange I.D.
TABLE 1 - MAXIMUM TIGHTENING TORQUE
STANDARD CLASS150 FLANGES
Valve size ft·lbs Nm
3 37 50
4 37 50
6 69 64
8 69 64
10 113 153
12 113 153
14 169 229
16 169 229
18 238 324
20 238 324
24 345 467
30 345 467
36 610 827
TABLE 2 - MAXIMUM TIGHTENING TORQUE
STANDARD CLASS300 FLANGES
Valve size ft·lbs Nm
3 69 94
4 69 94
6 69 94
8 113 153
10 169 229
12 238 324
14 238 324
16 345 467
18 345 467
20 345 467
24 610 827
30 1000 1355
36 1500 2035
3
Page 4

CLARKSON SERIES KGF AND KGF-HP SLURRY VALVES
InstallatIon and maIntenance InstructIons
TABLE 3 - BOLTING DIMENSIONS CLASS150 FLANGES
Bolt size/
Valve size Retainer inlet diameter Flange diameter Bolt circle diameter Bolt holes
inch/mm inch mm inch mm inch mm UNC inch mm
3” / 80 2.81 71.4 7½ 190.5 6 152.40 4 ⅝-11 3 76.2
4” / 100 3.88 98.6 9 228.6 7½ 190.50 8 ⅝-11 3 76.2
6” / 150 5.81 147.6 11 279.4 9½ 241.30 8 ¾-10 3 76.2
8” / 200 7.75 196.9 13½ 342.9 11¾ 298.50 8 ¾-10 4 101.6
10” / 250 9.81 249.2 16 406.4 14¼ 362.00 12 ⅞-9 4 101.6
12” / 300 11.50 292.1 19 482.6 17 431.80 12 ⅞-9 4½ 114.3
14” / 350 13.25 336.6 21 533.4 18¾ 476.30 12 1-8 4½ 114.3
16” / 400 14.75 374.7 23½ 596.9 21¼ 539.80 16 1-8 4½ 114.3
18” / 450 16.75 425.5 25 635.0 22¾ 577.90 16 1⅛-7 5 127.0
20” / 500 18.50 469.9 27½ 698.5 25 635.00 20 1⅛-7 6 152.4
24” / 600 23.00 584.2 32 812.8 29½ 749.30 20 1¼-7 6½ 165.1
30” / 750 29.00 736.6 38¾ 984.3 36 914.40 28 1¼-7 9 228.6
36” / 900 35.00 889.0 46 1168.4 42¾ 1085.85 32 1½-6 9 228.6
NOTES
• Flange dimensions per ANSI B16.5/150 for 3”-24” and MSS SP44/150 for 30”-36”.
• Type B standard washers are not included in stud lenghts.
• Mating flange thickness assumed to match ANSI B16.5/150 for 3”-24” and MSS SP44/150 for 30”-36”.
• Flange drilled and tapped holes in body over 1” in diameter are normally provided with course threads.
• Stud lengths supplied are minimum for full thread engagement into tapped holes and stud lengths are rounded to nearest 0.5inch.
• Stud lengths are supplied rather than bolt lengths.
• Bolt hole quantity shown below is per side of valve.
no.
thread Stud length (see note)
TABLE 4 - BOLTING DIMENSIONS CLASS300 FLANGES
Bolt size/
Valve size Retainer inlet diameter Flange diameter Bolt circle diameter Bolt holes
inch/mm inch mm inch mm inch mm UNC inch mm
3” ⁄ 80 2.81 71.4 8¼ 209.6 6⅝ 168.30 8 ¾-10 3½ 88.9
4” ⁄ 100 3.88 98.6 10 254.0 7⅞ 200.00 8 ¾-10 3½ 88.9
6” ⁄ 150 5.83 148.1 12½ 317.5 10⅝ 269.90 12 ¾-10 3½ 88.9
8” ⁄ 200 7.86 199.6 15 381.0 13 330.20 12 ⅞-9 4 101.6
10” ⁄ 250 9.80 248.9 17½ 444.5 15¼ 387.40 16 1-8 4½ 114.3
12” ⁄ 300 11.50 292.1 20½ 520.7 17¾ 450.90 16 1⅛-7 5½ 139.7
14” ⁄ 350 13.30 337.8 23 584.2 20¼ 514.40 20 1⅛-7 5½ 139.7
16” ⁄ 400 14.75 374.7 25½ 647.7 22½ 571.50 20 1¼-7 6 152.4
18” ⁄ 450 17.00 431.8 28 711.2 24¾ 628.70 24 1¼-7 6 152.4
20” ⁄ 500 18.50 469.9 30½ 774.7 27 685.80 24 1¼-7 7 177.8
24” ⁄ 600 23.50 596.9 36 914.4 32 812.80 24 1½-6 7½ 190.5
30” ⁄ 750 29.00 736.6 43 1092.2 39¼ 996.95 28 1¾-5 10 254.0
36” ⁄ 900 35.00 889.0 50 1270.0 46 1168.40 32 2-4.5 11 279.4
NOTES
• Flange dimensions per ANSI B16.5/300 for 3”-24” and MSS SP44/300 for 30”-36”.
• Type B standard washers are not included in stud lenghts.
• Mating flange thickness assumed to match ANSI B16.5/300 for 3”-24” and MSS SP44/300 for 30”-36”.
• Flange drilled and tapped holes in body over 1” in diameter are normally provided with course threads.
• Stud lengths supplied are minimum for full thread engagement into tapped holes and stud lengths are rounded to nearest 0.5inch.
• Stud lengths are supplied rather than bolt lengths.
• Bolt hole quantity shown below is per side of valve.
no.
thread Stud length (see note)
4
Page 5
CLARKSON SERIES KGF AND KGF-HP SLURRY VALVES
InstallatIon and maIntenance InstructIons
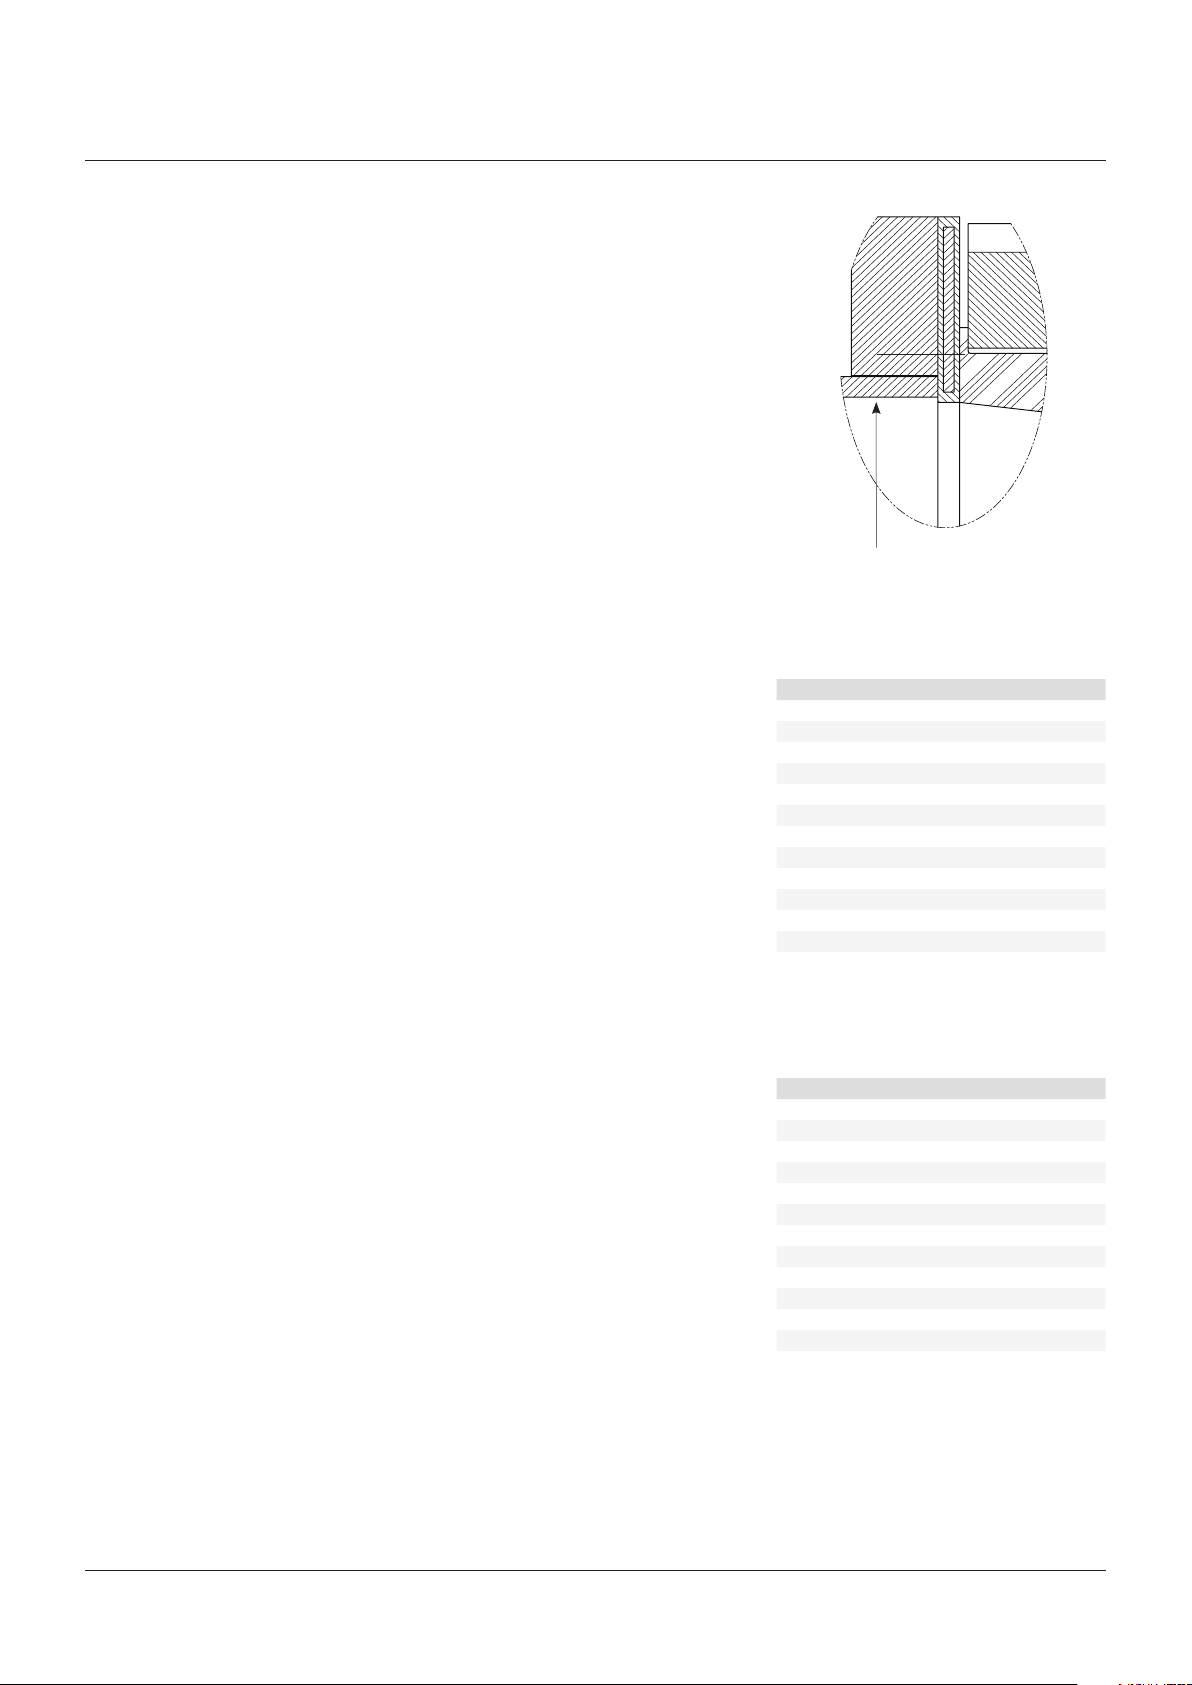
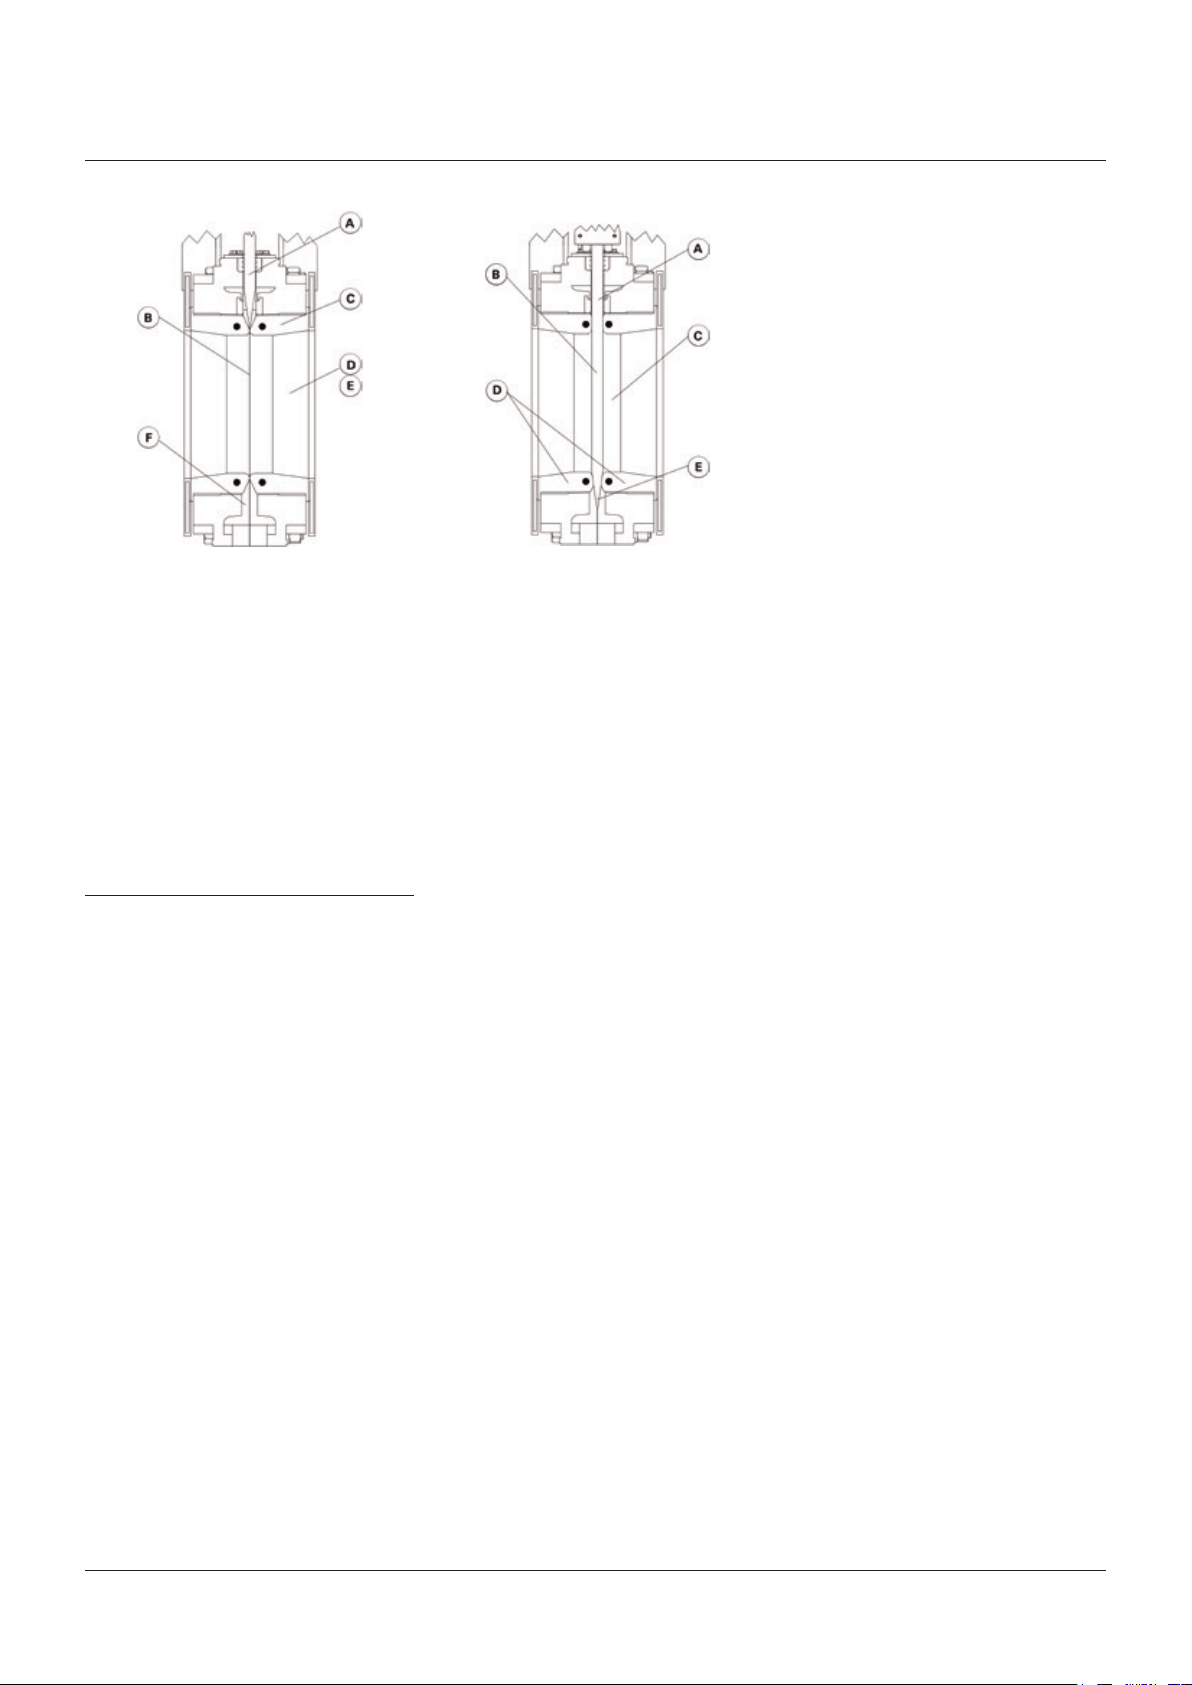
FIGURE 3 - OPEN POSITION FIGURE 4 - CLOSED POSITION
Open position
A) Gate positioned above seals, out of flow.
B) Matching elastomer sleeves seal against
each other under a high compression load.
C) Sleeves act as pressure vessel.
D) No metal parts in contact with slurry.
E) Unobstructed port area eliminates
turbulence, minimizes pressure drop
acrossvalve.
F) No seat cavity where solids can collect
andprevent full gate closure.
4 OPERATION
1. Clarkson slurry knife gate valves are
suitable for on-off service only. They are
notto be used in a throttling application.
2. To close the valve and provide isolation,
the actuator (handwheel, bevel gear,
air/hydraulic cylinder or electric motor
actuator) moves the metal gate in a linear
motion between the elastomeric sleeves
to shut off the flow. To open, reverse the
operation and the gate moves up and out
from between the sleeves, opening the
valveport.
3. Matching elastomer sleeves seal against
each under a high compression load
when the valve is open, creating the valve
pressure vessel. When the valve is closed,
the sleeves seal against the gate face,
isolating upstream from downstream.
SeeFigures 3 and 4.
It is normal for the KGF and KGF-HP
to discharge media during opening and
closing cycles. Some additional discharge
may continue for a time after completion
of the open cycle. This helps prevent
any solids from building up between the
sleeves that would prevent a tight seal
when the valve is fully open or closed.
Dischargecanbecontrolled with the use of
a splash guarddevice (refertosection 14).
Closed position
A) Gate travels through sleeves to provide
blindflange shut-off, allowing opportunity
for media to expel to atmosphere.
B) 100% Isolation-bubble tight shut-off results
in absolutely zero downstream leakage.
C) When properly installed and maintained,
the KGF is designed to provide
man-safeisolation.
D) Double-seated design provides bidirectional
flow and shut-off.
E) Controlled stroke prevents gate from
penetrating too far, minimizing stress
onsleeve.
Depending on the pressure rating, some
models of the KGF and KGF-HP include
a splash guard device as standard. Do
not install valve over walkways, electrical
or other critical equipment without the
use of a splash guard device or similar
considerations.
4. As the gate strokes, a gap is created
between the facing sleeves, allowing any
media that could potentially clog or jam
thevalve to be purged out from between
thesleeves, and potentially expelled
outsidethe valve housing to atmosphere.
5. The KGF and KGF-HP incorporate a
built-in clean-out area at the base of the
housing assembly. The clean-out area
may be enclosed by a removable splash
guard device. Depending on the pressure
rating, some models of the KGF and
KGF-HP include a splash guard device
as standard. This splash guard device
will allow controlled drainage of any
accumulated solids that may prevent full
gate closure. Flush water can be used to
improve the drainage efficiency. With the
splash guard device in place, any solids,
slurry, or flush water ejected from the valve
can be handled in a controlled manner.
See Section14forsplash guard device
installation instructions.
5
Page 6
CLARKSON SERIES KGF AND KGF-HP SLURRY VALVES
InstallatIon and maIntenance InstructIons
6. All valves should be operated within the
design pressure and temperature ranges.
Under no circumstances should the
valves be operated at conditions outside
theseparameters.
Note: actuated Clarkson valves have a
maximum recommend stroke speed
of1”per second. Exceeding this speed can
shorten sleeve life and may void warranty.
Speed controls provided by factory will
require adjustment in the field to obtain
proper stroke speed against actual
operating conditions. Refer to Section 14
foradditional inormation on discharge.
7. The operator of any valve should have an
understanding of the effects of opening/
closing the valve with regards to its role
in the overall piping system. Operators
of valves under pressure should take
caution to ensure that the valve is in good
operatingcondition prior to operating it
under pressure.
8. Certain processes contain hazardous and/or
otherwise unstable media. Care should be
taken in these circumstances to ensure the
operator is aware of the specific health and
safety risks associated with that medium.
9. When operating the valve stand clear of any
moving parts such as the stem and/or gate
assembly, use of gloves is suggested when
operating manual valves to minimize the
risk of injury.
10. All manually operated valves are designed
for hand input. Do not apply excessive input
torque via pipe wrenches, ‘cheater bars’,
or other devices. If a manual handwheel
actuated valve is difficult to operate due to
torque requirements, it is recommended
that the valve be supplied with or converted
to a bevel gear, air/hydraulic cylinder or
electric motor actuator.
11. Electric motor actuated valves should be
left in their factory set condition, unless
the system operating parameters dictate
a change. If changes are necessary, they
should be performed in small increments
using the lightest/lowest setting possible
to achieve the desired performance and
then the valve/actuator function inspected.
Excess torque and/or thrust in the motor
settings may damage or lockup the valve.
12. Clarkson KGF and KGF-HP valves are
position seated and should never be
torqueseated. Do not use the motor
torquesettings to seat the valve.
13. Care should be taken to ensure that
electrical motors are wired correctly to the
power source. Incorrect phasing of 3-phase
wiring may cause valve/motor damage.
5 LOCKOUTS
Open and closed lockout positions are optional
on the KGF and KGF-HP. Optional lockout pins
may be supplied by Emerson or customer may
use their own suitable pin. (Contact factory
forpin specifications.)
CAUTION
If lockout pins are used on automated valves, the
open & closed lockout brackets are designed to
resist the normal valve operating thrust. In order
to assure complete lockout compliance, any
double acting air cylinder, hydraulic cylinder or
electric motor actuated valve must be placed in
a ZERO ENERGY STATE by isolating all potential
energy sources including electricity, operator air
supply or hydraulic fluids.
In the case of a single acting spring to close
or spring to open cylinder with the spring
compressed, the mechanical energy cannot
be placed in the ZERO ENERGY STATE. When
compressed, the spring will cause unwanted
gate movement if inlet air pressure is not
maintained on the non-spring side of the
actuator. Specific care must be taken to insert
or remove lockout pins. To insert or remove
lockout pins.
- Spring extended (uncompressed): isolate air
supply from cylinder actuator.
- Spring retracted (compressed): maintain
air pressure on the non-spring side of
theactuator.
Take great care when inserting and removing the
lockout pin. If the gate moves during the insertion
or removal process, injury may occur.
FIGURE 5
brackets
FIGURE 6
Lockout
Secondary seal
6
Page 7

CLARKSON SERIES KGF AND KGF-HP SLURRY VALVES
InstallatIon and maIntenance InstructIons
6 GENERAL MAINTENANCE
We recommend that all Clarkson products be
inspected at least every 60 days. The following
points should be examined and corrected
asrequired:
1. Exterior overview: piping system
components are subject to certain levels of
erosion and corrosion. Periodic inspections
should be made as valves/components
may wear over time. Regular inspection
of the housing assembly and gate should
be performed, check for general signs
of corrosion, component wear and/or
damage caused by process media. Severe
applications may require additional
inspection types and/or frequency.
2. Valve stems, extension stems, and stem
nut: look for excessive corrosion, galling or
lack of lubrication. If valve stem requires
lubrication, utilize the grease fitting provided
and pump standard bearing grease through
the yoke hub to lubricate the stem and
stem nut assembly. Additional lubrication
may be applied directly onto stem or
stem threads. (Use material which meets
ASTM4950GBLB.)
3. If possible stroke the valve through the full
open and closed position to make sure it is
functioning properly.
Note: it is normal for the KGF and KGF-HP
valve to discharge media during opening and
closing cycles. Some additional discharge
may continue for a time after completion
ofthe open cycle.
4. Sleeve lubrication (See below for approved
lubrication)
A) The KGF and KGF-HP valve has no body
or sleeve lubrication fittings. Lubrication
is provided to the gate by the secondary
seal. When secondary seal is replaced
or inspected, it should be lubricated as
described in Section 11.
B) The gate may also be lubricated by
applying lubricant directly onto the
exposed gate surface.
C) As a minimum, the Clarkson KGF and
KGF-HP valves should be lubricated every
100 strokes for 3” through 10” sizes and
every 50 strokes for 12” - 36” sizes. An
individual application may require more
or less frequent lubrication depending
onthe process and chemistry.
D) If a valve cycles very infrequently, less
than once per month, lubrication prior
toeach stroke is recommended.
E) Sleeve wear can be minimized if the
valve gate is scraped or wiped clean
occasionally.
NOTE
Failure to use the recommended type of
lubricant will considerably reduce the life
ofboth the sleeves and secondary seal.
Under no circumstances should a
hydrocarbon-based lubricant be used.
The use of improper lubrication will void
anyremaining warranty.
APPROVED SILICON BASED LUBRICANTS
Dow III - Dow Corning Complex 821 - NFO
Dow 44 - Dow Corning Dow 7 - Dow Corning
Rhodorsil 111 - Rhone-Poulenc Compound G661 - G E
Sil Glyde - AGS Company
For compatibility of other lubricants, consult Emerson Engineering.
7
Page 8

CLARKSON SERIES KGF AND KGF-HP SLURRY VALVES
InstallatIon and maIntenance InstructIons
7 SPARE PARTS
Recommended spare parts (see Figure 7)
Valves:
2-replacement sleeves
1-replacement secondary seal
x-gate supports (quantity varies
withvalvesize)
2-body gaskets
Cylinder operator (if applicable):
1-repair kit
1. When ordering replacement parts for a
Clarkson product or cylinder operator,
please include valve or cylinder size and
complete description including serial
number with your request.
2. Additional replacement parts such as
handwheels, stem nut assemblies,
retainers, frames (yoke), stems and gates
are available from factory. Again, please
provide complete description with serial
number when ordering.
3. Spare sleeve storage: molded elastomer
sleeves have a practical recommended
shelf-life. Genuine Clarkson sleeves are
laser etched on the outside surface with
date of manufacture to use in calculating
estimated shelf-life.
Natural Rubber - 2 years; EPDM - 4 years;
NBR/HNBR - 4 years
Contact factory for additional elastomers.
The shelf life listed is guideline data and is not
a substitute for examination of cured material
at the time of intended use.
To maintain shelf-life, spare sleeves should be
stored in accordance with the following.
1. Store at ambient temperature up to 80°F,
with 60 - 90% relative humidity away from
direct sunlight and at a minimum distance
of 15 feet away from electric motors is
mandatory.
2. Care must be taken to avoid storage in a
stressed condition such as piled too high or
on a plain pallet overhanging a sharp edge.
3. First in - first out inventory control should
be practiced.
4. The above elastomer shelf life guidelines
are for components that are not already
installed in a valve.
FIGURE 7
Secondary seal
Sleeve (2)
Gasket (2)
Gate support
(quantity depends on valve size)
8
Page 9

CLARKSON SERIES KGF AND KGF-HP SLURRY VALVES
InstallatIon and maIntenance InstructIons
Note: Emerson recommends customers always
use genuine Clarkson OEM sleeves, secondary
seals and other replacement parts to maintain
the expected, superior, performance of their
KGF and KGF-HP. Genuine Clarkson sleeves
and secondary seals from Emerson are easily
recognized by the laser etched identifying
marks found on the outside surface. These
marks include the size, part number, applicable
patent number, elastomer batch compound
and date of manufacture; all of which allow
complete traceability of the part. Clarkson
replacement sleeves, secondary seals and
other parts from TFC are the only ones
authorized for use and offer the best fit and
continued performance that non-OEM parts
simply cannot give. The use of copycat parts
may invalidate any remaining warranty. If valve
requires further repair, please contact our
office for an estimate of feasibility and cost
ofrepair.
8 STORAGE
The following are the factory’s
recommendations for storage procedures to
retain maximum product integrity during long
term storage of 1 to 5 years.
1. Valves are normally shipped with gate in
open position, the recommended position
for storage. During storage, the gate should
always be in the open position. Storage
should be in an area out of direct sunlight,
away from heat, ozone and extreme weather
conditions. Freezing is not considered
detrimental as long as the valve is kept
dry. High voltage rectifiers and other ozone
generating equipment and sources should
not be near the storage area.
CAUTION
Valves supplied with spring to extend (fail close)
cylinder actuators are shipped with the gate in
the closed position. DO NOT store a KGF and
KGF-HP with a spring to extend (fail close) in
the open position. This would put the spring in a
compressed, fully energized position. For storage,
it is recommended the valve sleeves be removed
from the valve housing and stored separately from
the valve. Reinsert sleeves prior to installation.
3. If outdoor storage is required, the
equipment should be totally covered with
a heavy, light colored, plastic covering.
It is essential that the plastic be opaque
to eliminate sunlight, and light colored
to minimize heat buildup. The covering
should be spread in a manner that allows
underside ventilation. To insure proper
ventilation the equipment should be
elevated 2” - 4” above the ground.
4. Manual actuated valves may be stored in
the vertical or horizontal position. For air
or hydraulic actuated valves, the preferred
orientation for optimum protection is with
the valve fully opened and the cylinder in
the vertical position. This position gives
the best support to the cylinder rod and
helps reduces the chance of a ‘flat spot’
developing on the cylinder seals. An
acceptable alternate position for valves
with cylinder diameters of less than 6” is
with the cylinder in the horizontal position.
Motor actuated valves should be oriented
in the direction as preferred by the actuator
manufacturer.
5. Valves with cylinder and motor actuators
should be stored in accordance with
actuator manufacturer’s recommendations.
Access ports or panels should be secured
to prevent unauthorized entry and prevent
contamination.
6. Where auxiliary equipment is included,
such as limit switches, solenoid valves, etc.,
care must be taken to avoid moisture and
condensation conditions on the equipment.
7. Storage inspection: visual inspection shall
be performed on a semiannual basis and
results recorded. Inspection as a minimum
shall include reviewing the following:
- Packaging
- Flange covers
- Dryness
- Cleanliness
8. Maintenance shall consist of correcting
deficiencies noted during inspection. All
maintenance shall be recorded. Contact
factory prior to performing any maintenance
if valve is still covered under warranty.
2. The preferred storage location is a clean,
dry protected warehouse. If valves are to
be stored outside, precautions should be
taken to keep valves clean and dry. Standard
packaging materials provided in valve
shipment cannot be considered sufficient
for outdoor storage.
9
Page 10

CLARKSON SERIES KGF AND KGF-HP SLURRY VALVES
InstallatIon and maIntenance InstructIons
9 SLEEVE REPLACEMENT
Inspection of components
1. Verify that for each valve there are two (2)
sleeves, two (2) retainer flanges (if required),
retainer flange bolts and nuts (if required).
Refer to the Clarkson certified parts list
for the appropriate valve size to determine
the quantity of retainer flange nuts and
boltsrequired.
2. Visually inspect each sleeve and retainer
flange for damage to surfaces resulting
from shipping or post-shipping handling.
The sealing surfaces (nose) must be free
ofdepressions, slits or gouges.
NOTE
Certified Clarkson elastomer parts from
Emerson are laser-etched with part number,
date of manufacture, the Clarkson brand
name and other appropriate information to
assure you have a genuine Clarkson part.
The use of non-OEM parts will void any
remainingwarranty.
Disassembly
1. Before working on the KGF and KGF-HP
valve, verify that the valve is in the
open position. If it is not, move it to the
openposition.
CAUTION
Assure line is not pressurized before removing
valve. Valve assembly and parts may be heavy,
use proper lifting and support techniques.
SeeSection17, Lifting.
2. Remove the valve from the piping.
3. Visually inspect and verify that the sleeve
bore is clear of all debris, scale and
elastomer residue.
4. Remove the retainer flange bolts taking
caution to prevent retainer flanges from
falling free if in vertical position. Remove
theretainer flanges from the valve.
5. For valves with segmented retainer
flanges, loosen retainer bolts and pull each
individual segment straight up away from
the valve, do not remove more than one
section at a time.
6. Remove the two elastomer sleeves by
simply pulling each sleeve out of the
housing assembly. (Sometimes a putty knife,
large screwdriver or pry bar is necessary to
pry the retainer flange away from the sleeve
and the sleeve from the valve flange.)
Installation
1. It is recommended to replace the gate
supports whenever new sleeves are
installed, refer to section 10; Gate support
replacement prior to reinstalling sleeves.
2. Lay valve down in a horizontal position, on
a flat surface. (While it is possible to install
valve sleeves with assembly in vertical
position, this may make it more difficult
to properly align the retainer flanges and
sleeves, especially on larger valves.)
3. Check the bore diameter for unusual or
excessive wear. If found, valve housing
mayrequire replacement.
4. Lubricate the O.D. of the seal end of
thesleeve.
5. Install the sleeve, being careful to center
theflange end in the bore of the housing.
6. Place a retainer flange on the top of the
sleeve. Align the retainer flange bolt holes
with the matching holes in the round
flange. Align the I.D. of the sleeve and
retainerflange.
7. Install the retainer bolts. Only tighten
sufficiently to allow installation of the
next bolt. Continue this until all bolts
areinstalled.
8. Once all bolts are in place, tighten the
retainer flange bolts using a cross pattern
until there is a 0” to ⅛” gap between the
retainer flange and the housing. Do not
cycle valve with only one sleeve in place.
FIGURE 8
Retainer bolts/nuts
Sleeve
Retainer
10
Page 11

CLARKSON SERIES KGF AND KGF-HP SLURRY VALVES
InstallatIon and maIntenance InstructIons
9. Turn the valve over so the installed sleeve
is on the flat surface.
10. Apply a silicone base lubricant to the
sealing-nose radius of the installed sleeve.
Also apply it to the second sleeve sealing
nose and O.D. of seal end.
11. Install the second sleeve, following steps
1through 5.
12. Install second retainer per following steps,
depending on valve size.
13A. Smaller valves:
a. Place second retainer flange on the top
of the sleeve. Align the retainer flange
bolt holes with the matching holes in
the round flange. Align the I.D. of the
sleeve and retainer flange.
b. Check the sleeve bores for
concentricity; using a straight edge,
check the sleeve position in four (4)
places, 90 degrees apart in relation to
the installed sleeve bore I.D. Adjust as
required to make the sleeve concentric
with the other sleeve.
c. Install the retainer bolts, do not fully
tighten. Only tighten sufficiently to allow
installation of the next bolt. Continue
this until all bolts areinstalled.
d. Once all bolts are in place and
concentricity has been checked,
tighten the retainer flange bolts using
a cross pattern until there is a 0” to ⅛”
gap between the retainer flange and
thehousing.
13B. Larger valves (see paragraph 13C for
alternate method):
a. Place second retainer flange on the top
of the sleeve. Align the retainer flange
bolt holes with the matching holes in
the round flange. Align the I.D. of the
sleeve and retainer flange.
b. Check the sleeve bores for
concentricity; using a straight edge,
check the sleeve position in four (4)
places, 90 degrees apart in relation to
the installed sleeve bore I.D. Adjust as
required to make the sleeve concentric
with the other sleeve.
c. Using two or more C-clamps, pull down
the second retainer flange.
d. Install the retainer bolts, do not fully
tighten. Only tighten sufficiently to allow
installation of the next bolt. Continue
this until all bolts areinstalled.
e. Once all bolts are in place and
concentricity has been checked,
tighten the retainer flange bolts
using a cross pattern until there is
a 0” to ⅛” gap between the retainer
flangeandthehousing.
f. Remove C-clamps.
13C. Larger valves, alternate method.
a. Install threaded studs (at least one or
two studs per 90 deg of bolt circle) into
the drilled and tapped flange boltholes.
b. Studs should be of sufficient length
to fully engage in valve body and
extend beyond the stack up of the
uncompressed sleeve and retainer
flange, plus nut height.
c. Place second retainer flange on the top
of the sleeve, over the installed flange
studs while aligning the retainer flange
bolt holes with the matching holes in
the round flange. Align the I.D. of the
sleeve and retainerflange.
d. Check the sleeve bores for
concentricity; using a straight edge,
check the sleeve position in four (4)
places, 90 degrees apart in relation to
the installed sleeve bore I.D. Adjust as
required to make the sleeve concentric
with the other sleeve.
e. Place a nut/washer on each installed
flange stud and using an alternating,
cross flange pattern, draw the retainer
flange toward the valve body.
f. Install the retainer bolts, do not fully
tighten. Only tighten sufficiently to allow
installation of the next bolt. Continue
this until all bolts areinstalled.
g. Once all bolts are in place and
concentricity has been checked,
tighten the retainer flange bolts using
a cross pattern until there is a 0” to ⅛”
gap between the retainer flange and
thehousing.
h. Remove installed flange studs andnuts.
14. The valve is now ready for installation.
Keep gate in the open position until
valveis installed.
11
Page 12

CLARKSON SERIES KGF AND KGF-HP SLURRY VALVES
InstallatIon and maIntenance InstructIons
10 GATE SUPPORT REPLACEMENT
It is recommended to replace the gate
supports whenever new sleeves are installed.
The valve body assembly does not have to
be disassembled to remove and replace the
gatesupports.
1. Remove sleeves from valves (refer to
Section 9, Sleeve replacement).
2. Remove old gate supports from housings.
(A small pry-bar, flat screw driver or
similar tool may be required to pry the
gatesupports out).
3. Inspect the gate support pockets to assure
they are clean and free of debris; clean
debris from pockets as necessary.
4. All supplied gate supports are the same
dimensions per valve size and can be
installed in any pocket.
5. Gate supports have a specific orientation
and must be installed with the wider area
up against the body half, the narrower
areaagainst the gate.
6. The use of adhesives is not required;
supports are press fit into body housing.
7. Install new gate supports; slipping them into
the pocket from the valve body I.D. toward
the O.D. Use a rubber mallet to tap the gate
support into the pocket until it flushes with
the I.D. of the housing, taking care not to
damage the support.
CAUTION
This procedure may be performed with the valve
in an active pipeline. If it is suspected that either
one or both of the elastomer sleeves have failed,
or if any continual weeping or discharge from
valve housing is apparent, isolate the pipeline
valve and or remove the valve from the line or
before secondary seal removal. Use of personal
protective equipment, tag out or other plant
standard safety procedures must be followed.
Procedure MUST NOT be done with valve in
closed position. If valve is removed for this service,
assure line is not pressurized before removing
valve. Valve assembly and parts may be heavy,
use proper lifting and support techniques, refer
toLifting, Section 17.
11 SECONDARY SEAL REPLACEMENT
Disassembly
1. Open the valve, so the gate is in the fully
raised position.
2. For ease of reassembly, using a permanent
marker, draw a line on the gate face along
the top of the secondary retainer plate. If
marking gate is not an option, make note of
the dimension from top of valve housing to
top of gate in full open position.
3. Remove the cotter pin from the clevis pin
and remove the clevis pin from the gate. It
may be necessary to actuate the valve down
slightly in order to relieve pressure on the
clevis pin to facilitate removal.
4. Actuator assembly removal:
Smaller valves (valves with one bolt
used on frame leg): remove the frame to
housing bolts of one side except for the
lowest bolt on the opposite side of the
frame. This bolt will act as a pivot point
for the frame / actuator assembly. While
supporting the actuator assembly, pivot the
frame / actuator assembly away from the
valve. Continue to provide support while
actuatoris in this position.
Larger valves (valves with more than one
bolt used on frame leg): remove the frame
to housing bolts. Lift the frame and actuator
assembly off the housing assembly to allow
secondary seal and gate removal.
5. Loosen the secondary seal retainer
platebolts.
6. Remove the gate by lifting it out of the
secondary seal.
7. Remove all fasteners and lockwashers that
retain the secondary seal retainer plate in
position.
8. Remove the secondary seal retainer plate
bylifting it up.
9. Remove the secondary seal by inserting a
flat blade screwdriver midway along the
outside of the seal, between the seal and the
valve housing. Pry the seal up and remove.
10. Inspect the gate for sharp edges or
excessive damage. Refer to ‘Gate
replacement’ section if gate requires
replacement.
FIGURE 9
Illustration does not show the guides at 12:00
position under the gate.
12
Page 13

CLARKSON SERIES KGF AND KGF-HP SLURRY VALVES
InstallatIon and maIntenance InstructIons
Reassembly
1. If valve has been removed from pipe, lift
valve to vertical position, refer to Lifting,
Section 17.
2. Using DOW III or approved alternate,
completely fill all internal cavities of the
newsecondary seal.
3. Paying attention to the top and bottom
of thesecondary seal, insert the new
lubricated secondary seal into the valve
housing assembly. (The bottom of the
sealhas radiused edges.)
4. Place the secondary seal retainer plate
intoposition.
5. Replace and hand tighten all the retainer
plate fasteners and lockwashers.
6. Apply a small amount of recommended
lubricant to the two tapered faces of the
‘sharp end’ of the gate.
7. Press the gate firmly through the secondary
seal into the valve housing assembly until
the mark drawn on the gate reaches the
top of the retainer plate or gate reaches
previously recorded dimension.
8. Fully tighten all the retainer plate fasteners.
9. Reinstall the actuator / frame assembly with
the housing / frame fasteners loosely.
10. Reconnect the gate to the actuator. (In order
to facilitate installation and future removal,
a coating or anti-seize compound should be
applied to the outside of the clevis pin over
the yoke contact area.)
11. ‘Stretch’ the frame / actuator assembly
with respect to the housing by pulling (not
lifting) the frame / actuator assembly to
its maximum movement away from the
housing assembly (holding housing in
place if valve is removed from pipeline).
Tightenthe frame/ housing bolts and verify
the tightness of the actuator to frame bolts.
12. Cycle valve to full open position and check
the gate position.
13. Rattle the gate. It should be mostly
disengaged from the sleeves. The outboard
edges of the gate should be free and the
center still partially engaged in between
thesleeves.
14. Cycle gate full closed and full open.
15. Inspect gate for pieces of rubber. If
significant amount of rubber is present, a
sharp edge(s) on the gate may be causing
seal damage or the gate is extending too
far on the up stroke. The ends of the gate
should be free and the center still engaged.
If the sleeve / gate is misaligned, loosen the
frame actuator bolts and/or adjust the yoke
until the proper position, open and closed,
isobtained.
16. If out of pipeline, reinstall the valve, refer
toLifting, Section 17.
12 DISASSEMBLY AND ASSEMBLY
INSTRUCTIONS
CAUTION
Valve assembly and parts may be heavy, use
proper lifting and support techniques, refer to
Lifting, Section 17. Use of personal protective
equipment and other plant standard safety
procedures must be followed.
Disassembly
1. Before working on the KGF and KGF-HP
valve, verify that the valve is in the open
position. If it is not, move it to the open
position.
2. Remove the valve from the piping.
3. For ease of reassembly, using a permanent
marker, draw a line on the gate face along
the top of the secondary retainer plate. If
marking gate is not an option, make note of
the dimension from top of valve housing to
top of gate in full open position.
4. Visually inspect and verify that the sleeve
bore is clear of all debris, scale and
elastomer residue.
5. Remove the retainer flange bolts taking
caution to prevent retainer flanges from
falling free if in vertical position. Remove
theretainer flanges from the valve.
6. For valves with purge control assemblies,
remove assembly from valve body.
7. Remove the two elastomer sleeves by
simply pulling each sleeve out of the
housing assembly. (Sometimes a putty knife,
large screwdriver or pry bar is necessary to
pry the retainer flange away from the sleeve
and the sleeve from the valve flange.)
FIGURE 10
Secondary
sealretainer
Secondary
seal
13
Page 14

CLARKSON SERIES KGF AND KGF-HP SLURRY VALVES
InstallatIon and maIntenance InstructIons
8. Remove the cotter pin from the clevis pin
and remove the clevis pin from the gate. It
may be necessary to actuate the valve down
slightly in order to relieve pressure on the
clevis pin to facilitate removal.
9. Remove the actuator/frame subassembly at
one time by removing the frame bolts that
fasten the frames to the housing and pulling
it away from the housing assembly.
10. Loosen the secondary seal retainer
platebolts.
11. Remove the gate by lifting it out of the
secondary seal.
12. Remove all fasteners and lockwashers that
retain the secondary seal retainer plate in
position.
13. Remove the secondary seal retainer plate
bylifting it up.
14. Remove the secondary seal by inserting a
flat blade screwdriver midway along the
outside of the seal, between the seal and the
valve housing. Pry the seal up and remove.
15. Remove housing bolts, and pull
halvesapart.
16. Remove old housing gaskets (two).
Visual inspection of parts prior to reassembly
1. Check and ensure all housing interior
surfaces and drain ports are free and clear
of hardened slurry or other obstructions.
Clean as required.
2. Inspect the valve housing ensuring that the
bores at the center of the valve are aligned
with each other. Replace if there are signs
of excessive or unusual wear.
3. Inspect gate supports for wear,
mushrooming, chemical attack, etc. Replace
if in doubt; supports should be replaced as a
set and are recommended for replacement
if sleeves are replaced.
4. Examine exterior housing surfaces for
buildup of hardened slurry or other
contamination, clean as required.
5. Examine sleeves for signs of wear, cracking,
chunking, deep cuts, severe abrasion or
chemical attack (softening or gumming).
Replace if in doubt; sleeves must be replaced
as a set.
6. Examine secondary seal for signs of wear
or cracking, severe abrasion or chemical
attack (softening or gumming). Replace if
indoubt.
FIGURE 11
Retainer flange
Housing gasket
Retainer flange bolts/nuts
Secondary seal retainer
Secondary seal
Housing
Sleeve
Gate
Housing bolts/nuts bolts
Gasket (2)
Gate support
(quantity depends on valve size)
14
Page 15

CLARKSON SERIES KGF AND KGF-HP SLURRY VALVES
InstallatIon and maIntenance InstructIons
7. Inspect the gate for sharp edges or
excessive damage. Some scoring will
occurin normal use. If the gate has been
1
bent beyond
/
16” permanent deflection at the
center, straighten or replace.
If straightening is performed, use
considerable care to minimize marks on
gate surface. Scores or other distress
marks may be cleaned up with a belt
sander. Machining the gate surface is not
recommended. Light scale buildup may
be removed with a putty knife or gasket
scraper. Inspect the gate for wear and
roughness. Use a disc grinder or belt sander
to remove rough surfaces. Take particular
care on the leading and beveled edge to
remove burrs and other sharp edges.
8. Examine frame for signs of corrosion,
damage or other potential problems.
9. Check all bolting hardware for thread
integrity, signs of corrosion, straightness,
etc. Replace as required.
10. For valves with purge control assemblies,
examine major components, look for signs
of corrosion and material build-up. Clean
any visible build-up, replace if necessary.
Examine gasket and replace if necessary.
11. Examine actuator assembly.
A) Manual valves: check stem for
corrosion, straightness, etc. Look for
signs of wear on brass stem nut.
B) Air or hydraulic: check for seal leaks
around cylinder rod seal, heads and
caps. Examine cylinder rod for signs of
corrosion, straightness, etc. Service per
manufacturer’s instructions.
C) Electric motor: service per
manufacturer’s instructions.
Reassembly
1. Lay the first housing half face down on a
suitable flat surface.
2. Replace gate supports if required, refer
to Section 10 Gate support replacement;
supports should be replaced as a set and
are recommended for replacement if
sleeves are replaced.
3. Carefully lay two new housing gaskets
on face of housings. Gaskets may be
held in place with a small amount of
silicone lubricant placed between gasket
andhousing.
4. Take second housing and place into position
on the first housing, and properly align bolt
holes making gaskets remain in place.
5. Insert most of the housing bolts, leaving
out the top bolts that are used to hold
the actuator assembly to the housing
and loosely tighten. Tap the edges of the
housings to align the internal sleeve bores
1
to within
/
16”, at the same time maintaining
bolt hole alignment in the square flanges.
6. Install new sleeves and retainer flanges
(if used) per instruction in Section ‘Sleeve
replacement’.
7. Lift the valve assembly to vertical position.
Refer to Lifting, Section 17.
8. Using DOW III or approved alternate,
completely fill all internal cavities of the
newsecondary seal.
9. Paying attention to the top and bottom of the
secondary seal, insert the new lubricated
secondary seal into the valve housing
assembly. (The bottom of the seal has
radiused edges.)
10. Place the secondary seal retainer plate
intoposition.
11. Replace and hand tighten all the retainer
plate fasteners and lockwashers.
12. Apply a small amount of recommended
lubricant to the two tapered faces of the
‘sharp end’ of the gate.
13. Press the gate firmly through the secondary
seal into the valve housing assembly until
the mark drawn on the gate reaches the
top of the retainer plate or gate reaches
previously recorded dimension.
14. Fully tighten all the retainer fasteners.
15. Reinstall the actuator / frame assembly
withthe housing / frame fasteners loosely.
16. Reconnect the gate to the actuator. (In order
to facilitate installation and future removal,
a coating or anti-seize compound should be
applied to the outside of the clevis pin over
the yoke contact area.)
17. ‘Stretch’ the frame / actuator assembly
with respect to the housing by pulling (not
lifting) the frame / actuator assembly to
its maximum movement away from the
housing assembly (holding housing in place
if valve is removed from pipeline). Tighten
the frame/ housing bolts and verify the
tightness of the actuator to frame bolts.
18. Cycle valve to full open position and check
the gate position.
19. Rattle the gate. It should be mostly
disengaged from the sleeves. The outboard
edges of the gate should be free and the
center still partially engaged in between
thesleeves.
20. Cycle gate full closed and full open.
21. Inspect gate for pieces of rubber. If
significant amount of rubber is present, a
sharp edge(s) on the gate may be causing
seal damage or the gate is extending too
far on the up stroke. The ends of the gate
should be free and the center still engaged.
If the sleeve / gate is misaligned, loosen the
frame actuator bolts and/or adjust the yoke
until the proper position, open and closed,
isobtained.
22. Reinstall the valve, refer to
Section 17 Lifting.
15
Page 16

CLARKSON SERIES KGF AND KGF-HP SLURRY VALVES
InstallatIon and maIntenance InstructIons
13 FIELD REPLACEMENT OF GATES
Disassembly
CAUTION
This procedure may be performed with the valve
in an active pipeline. If it is suspected that either
one or both of the elastomer sleeves or secondary
seal have failed, or if any continual weeping or
discharge from valve housing is apparent, isolate
the pipeline valve and or remove the valve from
the line before gate removal. Use of personal
protective equipment, tag out or other plant
standard safety procedures must be followed.
Procedure MUST NOT be done with valve in
closed position. If valve is removed for this service,
assure line is not pressurized before removing
valve. Valve assembly and parts may be heavy,
use proper lifting and support techniques, refer
toLifting, Section 17.
1. Open the valve, so the gate is in the fully
raised position.
2. Remove the cotter pin and clevis pin
from the gate. It may be necessary to
actuate the valve down slightly in order
to relieve pressure on the clevis pin to
facilitateremoval.
3. Actuator assembly removal:
Smaller valves (valves with one bolt used
on frame leg): remove the frame to housing
bolts of one side except for the lowest bolt
on the opposite side of the frame. This
bolt will act as a pivot point for the frame/
actuator assembly. Pivot the frame/
actuator assembly away from the valve
andtemporarily support.
Larger valves (valves with more than one
bolt used on frame leg): remove the frame
to housing bolts. Lift the frame and actuator
assembly off the housing assembly to allow
gate removal.
4. Loosen the secondary seal retainer
platebolts.
5. Remove the gate by lifting it out of the
secondary seal.
Visual inspection of parts prior to reassembly
1. Examine secondary seal for signs of wear
or cracking, severe abrasion or chemical
attack (softening or gumming). Replace if
indoubt.
2. Inspect the gate for sharp edges or
excessive damage. Some scoring will
occurin normal use.
If the gate has been bent beyond
1
/
16” permanent deflection at the
center, straighten or replace.
Ifstraighteningisperformed, use
considerable care to minimize marks on
gate surface. Scores or other distress
marks may be cleaned up with a belt
sander. Machining the gate surface is not
recommended. Light scale buildup may
be removed with a putty knife or gasket
scraper. Inspect the gate for wear and
roughness. Use a disc grinder or belt sander
to remove rough surfaces. Take particular
care on the leading and beveled edge to
remove burrs and other sharp edges.
Reassembly
1. Apply a small amount of recommended
lubricant to the two tapered faces of the
‘sharp end’ of the gate.
2. Press the gate firmly through the secondary
seal into the valve housing assembly until
the gate beveled edge reaches the sleeve
bore I.D.
3. Fully tighten all the retainer fasteners.
4. Reinstall the actuator / frame assembly with
the housing / frame fasteners loosely.
5. Reconnect the gate to the actuator. (In order
to facilitate installation and future removal,
a coating or anti-seize compound should be
applied to the outside of the clevis pin over
the yoke contact area.)
6. ‘Stretch’ the frame / actuator assembly
with respect to the housing by pulling (not
lifting) the frame / actuator assembly to
its maximum movement away from the
housing assembly (holding housing in place
if valve is removed from pipeline). Tighten
the frame/ housing bolts and verify the
tightness of the actuator to frame bolts.
7. Cycle valve to full open position and check
the gate position
8. Rattle the gate. It should be mostly
disengaged from the sleeves. The outboard
edges of the gate should be free and the
center still partially engaged in between
thesleeves.
9. Cycle gate full closed and full open.
10. Inspect gate for pieces of rubber. If
significant amount of rubber is present, a
sharp edge(s) on the gate may be causing
seal damage or the gate is extending too
far on the up stroke. The ends of the gate
should be free and the center still engaged.
If the sleeve / gate is misaligned, loosen the
frame actuator bolts and/or adjust the yoke
until the proper position, open and closed,
isobtained.
11. If out of pipeline, reinstall the valve, refer
toLifting, Section 17.
16
Page 17

CLARKSON SERIES KGF AND KGF-HP SLURRY VALVES
InstallatIon and maIntenance InstructIons
14 BODY FLUSHING AND DISCHARGE
MANAGEMENT
It is normal for the KGF and KGF-HP to
discharge media during opening and closing
cycles. This helps prevent any solids from
building up between the sleeves that would
prevent a tight seal when the valve is fully
openor closed.
Discharge can be managed (not contained)
with the use of a splash guard device such as
a bucket or plate. Splash guard devices are
optional on 300psi rated KGF valves. KGF
valves rated above 300psi are to be provided
with either a splash guard plate or splash guard
bucket. KGF-HP valves are to be providedwith
splash guard buckets.
These splash guard devices can be connected
to a customer supplied piping system to provide
a means of carrying the discharge away, to a
permanent drain or other collection point. Any
additional piping system must not be capped or
otherwise prevented to flow freely as this may
cause eventual clogging of valve.
The use of body flush ports will assist in
purging body housing of build-up. Splash
guarddevices are recommended if valve
bodyisflushed.
General recommendations for discharge
control:
• Take care to avoid splash of discharge
ontopersonnel at all times.
• Wear appropriate personal protective
equipment as required.
• When operating a manual valve, beware
ofand avoid the splash of the discharge.
• Do not install valve over walkways, electrical
or other critical equipment without the
use of a splash guard device or similar
considerations.
• Do not cap or close-off both ends of the
splash guard device. This can result in
valvefailure.
• One end of splash guard device be used as a
flush inlet. On the splash guard bucket, the
small port is intended as a flush inlet.
• Additional drain piping may be attached
to the splash guard device to direct
discharge to collection or drain point. Use of
non-collapsible, rigid, pipe is recommended.
Using a hose or other collapsible type of pipe
extensions is not recommended.
• Keep pipe extensions clear of build-up by
regular flushing or cleaning.
FIGURE 12
Flush port
FIGURE 13
FIGURE 14
17
Page 18

CLARKSON SERIES KGF AND KGF-HP SLURRY VALVES
InstallatIon and maIntenance InstructIons
15 INSTALLATION INSTRUCTIONS FOR
SPLASH GUARD BUCKET
1. Verify that the proper number of mounting
bolts, washers, nuts, along with the guard,
end plug, and gasket material are present.
2. Clean the flat machined surface of the
splash guard bucket so that there is no dirt,
grit, grease, or other debris present.
3. Clean mating surface of body housing so
that there is no dirt, grit, grease, or other
debris present.
4. Remove the adhesive backing from the
gasket material and apply to the splash
guard bucket on the machined flat mating
surface (adhesive back strip). If a cut
sheet gasket is used, it should be attached
to the splash guard bucket with an RTV
type adhesive compound to hold it during
installation. Attach gasket material to
the flat surface along the edge of the
machinedslot.
5. If small pipe port is not to be used as a
flush, install pipe plug.
6. Position the bucket and loosely fit the
fasteners.
7. Verify the position of the gasket material
and the bottom of the housing and tighten
the installed fasteners.
8. Connect drain piping (if used) to the large
NPT port as required.
16 INSTALLATION INSTRUCTIONS FOR
SPLASH GUARD PLATE
1. Verify that the proper number of mounting
bolts, washers, nuts, along with the plate
and gasket material are present.
2. Clean the flat machined surface of the
splash guard plate so that there is no dirt,
grit, grease, or other debris present.
3. Clean mating surface of body housing so
that there is no dirt, grit, grease, or other
debris present.
4. Remove the adhesive backing from the
gasket material and apply to the splash
guard plate on the machined flat mating
surface (adhesive back strip). If a cut sheet
gasket is used, it should be attached to
the splash guard plate with an RTV type
adhesive compound to hold it during
installation. Attach gasket material to
the flat surface along the edge of the
machinedslot.
5. Position the bucket and loosely fit the
fasteners.
6. Verify the position of the gasket material
and the bottom of the housing and tighten
the installed fasteners.
7. Connect drain piping (if used) to NPT port
as required. If desired, one NPT port may
be used to flush and one to drain. If both
NPT ports are to be used as drains, make
sure they do not clog and are cleaned of
build-up regularly.
17 LIFTING
CAUTION
Valve assembly and parts may be heavy, use
proper lifting and support techniques. DO NOT
attempt to lift valve together with any adjoining
pipe or other equipment. DO NOT attempt to lift
valve if full of media. Lifting techniques may vary
depending on valve size/weight. Small Clarkson
KGF and KGF-HP air and or hydraulic actuated
valves may be equipped with eyebolts. DO NOT
use these eyebolts to lift any size valve.
For shipment, large KGF and KGF-HP valves
are normally palletized in the flat or horizontal
position with the bore oriented vertically,
flange faces down on pallet. The palletized
valves are loaded on to trucks with a forklift.
It is recommended unloading should also be
donewith a forklift.
A crane can be used; however the weight must
be supported by the pallet and not the valve.
Small Clarkson KGF and KGF-HP air and or
hydraulic actuated valves may be equipped with
eyebolts. DO NOT use these eyebolts to lift any
size valve. Insert a properly rated strap and
or lifting hook through eye of eyebolt and lift,
taking care as center of gravity shifts. Do not
drag the base of the valve during lifting as this
can peel the rubber from the retaining flanges.
All valves can be lifted using the frame (yoke)
assembly as the lift point. DO NOT USE
LOCKOUT BRACKETS TO LIFT VALVE. Insert
properly rated straps under the frame top plate,
one for each leg, and lift, taking care as center
of gravity shifts. Do not drag the base of the
valve during lifting as this can peel the rubber
from the retaining flanges.
For larger valves, all lifting should be done with
chains. Shackles and straps, regardless of their
weight ratings should never be used. Take care
to not drag the base of the valve during lifting
as this can peel the rubber from the sleeve
retaining flanges.
18
Page 19

CLARKSON SERIES KGF AND KGF-HP SLURRY VALVES
InstallatIon and maIntenance InstructIons
18 MANUAL HANDWHEEL ACTUATOR ASSEMBLY - MH
Travel limit hex screw
Travel limit
Stem assembly
Cap nut
Set screw
Stem nut
Handwheel
Woodruff key
Thrust washer
Base mounting screw/washer/nut
Stem nut base
Clevis
Clevis pin w/cotter pin
19 BEVEL GEAR ACTUATOR ASSEMBLY - BG
Frame (yoke)
Housing/frame (yoke) screw/washer/nut
End nut
Stem cover
Travel limit hex screw
Travel limit
Stem assembly
Bevel gear actuator
Handwheel pin
Stem nut
Handwheel
Stem nut mounting screw
Clevis
Clevis pin w/cotter pin
Frame (yoke)
Housing/frame (yoke) screw/washer/nut
19
Page 20

CLARKSON SERIES KGF AND KGF-HP SLURRY VALVES
InstallatIon and maIntenance InstructIons
20 AIR CYLINDER ACTUATOR ASSEMBLY - AC
Air cylinder actuator
Cylinder mounting washer/nut
Clevis
Clevis pin w/cotter pin
Frame (yoke)
Housing/frame (yoke) screw/washer/nut
21 HYDRAULIC CYLINDER ACTUATOR ASSEMBLY - HC
Hydraulic cylinder actuator
Cylinder mounting washer/nut
Adaptor plate
Clevis
Clevis pin w/cotter pin
Frame (yoke)
Housing/frame (yoke) screw/washer/nut
©2017 Emerson Automation Solutions. All rights reserved.
Penberthy is a mark owned by one of the companies in the Emerson Automation Solutions business unit of Emerson Electric Co. The Emerson logo is a trade mark and service mark of Emerson Electric Co. All other marks are property of
their respective owners.
The contents of this publication are presented for information purposes only, and while effort has been made to ensure their accuracy, they are not to be construed as warranties or guarantees, express or implied, regarding the products
or services described herein or their use or applicability. All sales are governed by our terms and conditions, which are available on request. We reserve the right to modify or improve the designs or specications of our products at any
time without notice. Responsibility for proper selection, use and maintenance of any product or service remains solely with the purchaser and end user.
20
 Loading...