

Page 1
The Avocent® HMX High Performance KVM Extender System
Next Generation
Installer/User Guide
Page 2

For important safety information, visit:
www.emersonnetworkpower.com/ComplianceRegulatoryInfo
Emerson, Emerson Network Power and the Emerson Network Power logo are trademarks or service marks of Emerson Electric
Co. Avocent, the Avocent logo and Trellis are trademarks or service marks of Avocent Corporation. Liebert is a trademark and
service mark of Liebert Corporation. All other marks are the property of their respective owners. This document may contain
confidential and/or proprietary information of Avocent Corporation, and its receipt or possession does not convey any right to
reproduce, disclose its contents, or to manufacture or sell anything that it may describe. Reproduction, disclosure, or use without
specific authorization from Avocent Corporation is strictly prohibited. ©2014 Avocent Corporation. Allrights reserved.
NOTE: This document supports versions up to and including release 4.1.
Page 3

TABLE OF CONTENTS
i
Product Overview
Features and Benefits
Additional video features
USB support
Transport Layer Security (TLS)
The Avocent® HMX Advanced Manager software
Extender System Devices
Extender interfaces
Firmware upgrades
Device ports
Device status indicators
Installation and Configuration
Configuration Options
System Recommendations
Factory reset
Basic Configuration
Firmware upgrade
System Configuration Utility
General Operations
Locating an extender within a rack or data center
Enabling system messages
Enabling HMX Advanced Manager server control
Recording bandwidth statistics
Rebooting and factory resetting the extender
Advanced Transmitter Configuration
Configuring transmitter video
Viewing video snapshots and reports
Configuring transmitter USB and security settings
Configuring the HMX 6210T transmitter
Advanced Receiver Configuration
Configuring receiver video
Configuring receiver USB and security settings
Appendices
Appendix A:Technical Specifications
Appendix B:Pinout Information
Connecting device consoles or modems to serial ports
Appendix C:On-Screen Display
Setting OSD alerts
Using a remote OSD
Hotkeys
Favorites and shortcuts
1
1
1
2
2
2
3
3
3
3
6
7
7
8
9
9
12
15
15
15
15
16
16
17
17
17
19
19
20
21
22
22
25
25
31
31
32
34
34
35
35
Page 4

ii.....The Avocent® HMX High Performance KVM Extender System Installer/User Guide
Appendix D:Troubleshooting
Video image of the HMX receiver has horizontal lines across the screen
Mouse pointer of the receiver is slow
Monitor displays pink screen
Audio output of the receiver sounds scratched
HMX Advanced Manager cannot locate HMX extenders
37
37
38
38
39
39
Page 5

Product Overview
The Avocent®HMX Advanced High Performance KVM extender system is the next generation of
Avocent keyboard, video and mouse (KVM) products. The system offers flexible ways to link
receivers, transmitters and systems via standard networks.
Features and Benefits
The HMX 5000 and 6000 series extenders provide a high performance, reliable desktop extension
experience by converting high quality DVI video, audio and USB data into Internet Protocol (IP)
messages. Via a web-based System Configuration utility, you can customize and enable audio
options for the transmitters and receivers throughout your system. All models support copper-
based Gigabit Ethernet cabling and Fiber Channel over Ethernet (FCoE). Dual models allow these
to be used in parallel to provide additional Gigabit connection speeds as well as link redundancy
that maintains operation in the event of a failed connection.
The HMX high performance extenders support single-head video at single-link resolutions, but the
dual models of both series also support dual-head video at two single or one dual-link resolution.
Within the HMX 6000 extender series, the HMX 6210T extender also has a built-in Virtual Network
Computing (VNC) server allowing it to stream low-bandwidth versions of high-resolution output (via
a dedicated Ethernet port). This allows remote access via a VNC viewer, through any standard
network.
Model Descriptions
Options
Primary video Single-link Single-link Dual-link Dual-link
Secondary video No Single-link Single-link Single-link
VNC support No No No Yes
Copper cable
support
Fiber cable support Yes Yes Yes Yes
HMX 5100
Extenders
Yes Yes Yes Yes
HMX 5200
Extenders
HMX 6200
Extenders
HMX 6210T
Transmitter
Additional video features
The HMX extender system allows you to choose how to compress video transmission across your
network. The system is automatically loaded with a lossless codec compression Run-Length
Encoding (RLE) scheme which encodes or decodes a digital data stream or signal to improve the
appearance of natural images, gradients or shadows. If you do not need "pixel perfect" results for
Page 6

2.....The Avocent® HMX High Performance KVM Extender System Installer/User Guide
your images, an AVCT compression scheme can be added and configured to provide increased
system speed.
Anti-dither capability
While the dithering process smooths the appearance of gradually shaded areas in video images, it
can slow down system performance. If using Apple®Mac®or other computers with dithered video
output in your network, the HMX extender system provides an anti-dither capability to increase
performance and reduce network traffic.
NOTE: Enabling the anit-dither feature may produce slight color inaccuracies on the monitor.
Extended Display Identification Data (EDID) management
The EDID is used to provide details to the monitor graphics card so it uses the optimal video
resolution. With the HMX extender system, you can use the EDID of the monitor connected to the
receiver or use a fixed EDID that is stored on the transmitter.
USB support
The HMX extender system transmitters use USB Emulation technology, which enables faster
keyboard and mouse switching for up to 13 different USB devices or an infinite amount of the same
devices. This technology emulates certain USB peripheral signals to the computer, causing those
peripherals to appear permanently connected to the computer, even when the receivers are
switched elsewhere. Other supported USB devices include Human Interface Devices (HID),
storage devices such as flash drives and various printers, scanners and serial adaptors.
NOTE: The HMX extender system does not support isochronous USB devices such as microphones,
speakers, webcams and television receivers.
Transport Layer Security (TLS)
The HMXextender system supports the industry standard TLS protocol which offers protection
against third party monitoring and tampering when data is transferred across networks.
The Avocent®HMX Advanced Manager software
The HMX Advanced Manager software is a secure, web browser-based, centralized enterprise
management solution that provides remote management and monitoring of the extender system.
The software handles all administration, access control, monitoring and firmware upgrades across
the extender system. For more information on the HMX Advanced Manager software, see The
Avocent®HMX Advanced Manager Software Installer/User Guide.
Page 7

Product Overview.....3
NOTE: When using the HMX Advanced Manager software server to configure your HMX extender system,
ensure that all transmitters and receivers are set to their factory defaults. Otherwise, they will not be located
by the HMX Advanced Manager server.
Extender System Devices
Within the HMX extender system, transmitters and receivers allow you to seamlessly access and
share one or more remote computers that are physically separated from your local work
environment.
Extender interfaces
Administrators and users can manage and configure transmitters and receivers in the extender
system through a web-based System Configuration utility. Receivers within the system also have
an On-Screen Display (OSD) that allows users to establish target connections from a local
keyboard and mouse.
Firmware upgrades
Transmitters and receivers are flash upgradable at any time to ensure that your system is running
the most current version available. If your system is running the most current firmware version and
is managed by the HMX Advanced Manager software, then that same version must be used across
all units in your system. Firmware versions can be mixed in configurations not using the HMX
Advanced Manager software, but it is always recommended to use the most current version.
Device ports
Transmitters and receivers in the HMX extender system share similar port layouts and functionality.
After the general descriptions provided in this section, the following graphics illustrate where these
ports and other features are located on the transmitters and receivers. For more information on
configuring and working with these ports, see the System Configuration Utility on page 15.
System and Teaming ports
The System port on transmitters and receivers is the default location to connect devices in either a
direct connect configuration or a matrix configuration. On HMX extender dual-head models, the
Teaming port can be used in conjunction with the System port to provide immediately increased
connection speeds of up to 2 Gigabits per second. Using these ports together also improves video,
audio and peripheral feed quality, increases bandwidth in your system and creates link redundancy
that can maintain operation in the event of a failed connection. The web-based System
Page 8
4.....The Avocent® HMX High Performance KVM Extender System Installer/User Guide
Configuration utility can be accessed from either port, although the System port is the default
location.
Serial port
The AUX serial port on transmitters and receivers allows RS-232 signals to be extended up to a
baud rate of 115200.
Management and VNC ports
HMX extender dual-head transmitters and receivers have a port on the left side of the front panel.
For the HMX 6210T transmitter, this port is a VNC port that transmits low-bandwidth video output to
authorized remote viewers. On the remaining dual-head models, this port is a Management port
that allows you to access the System Configuration utility if the System port is already in use due to
the extenders operating in a direct connect configuration.
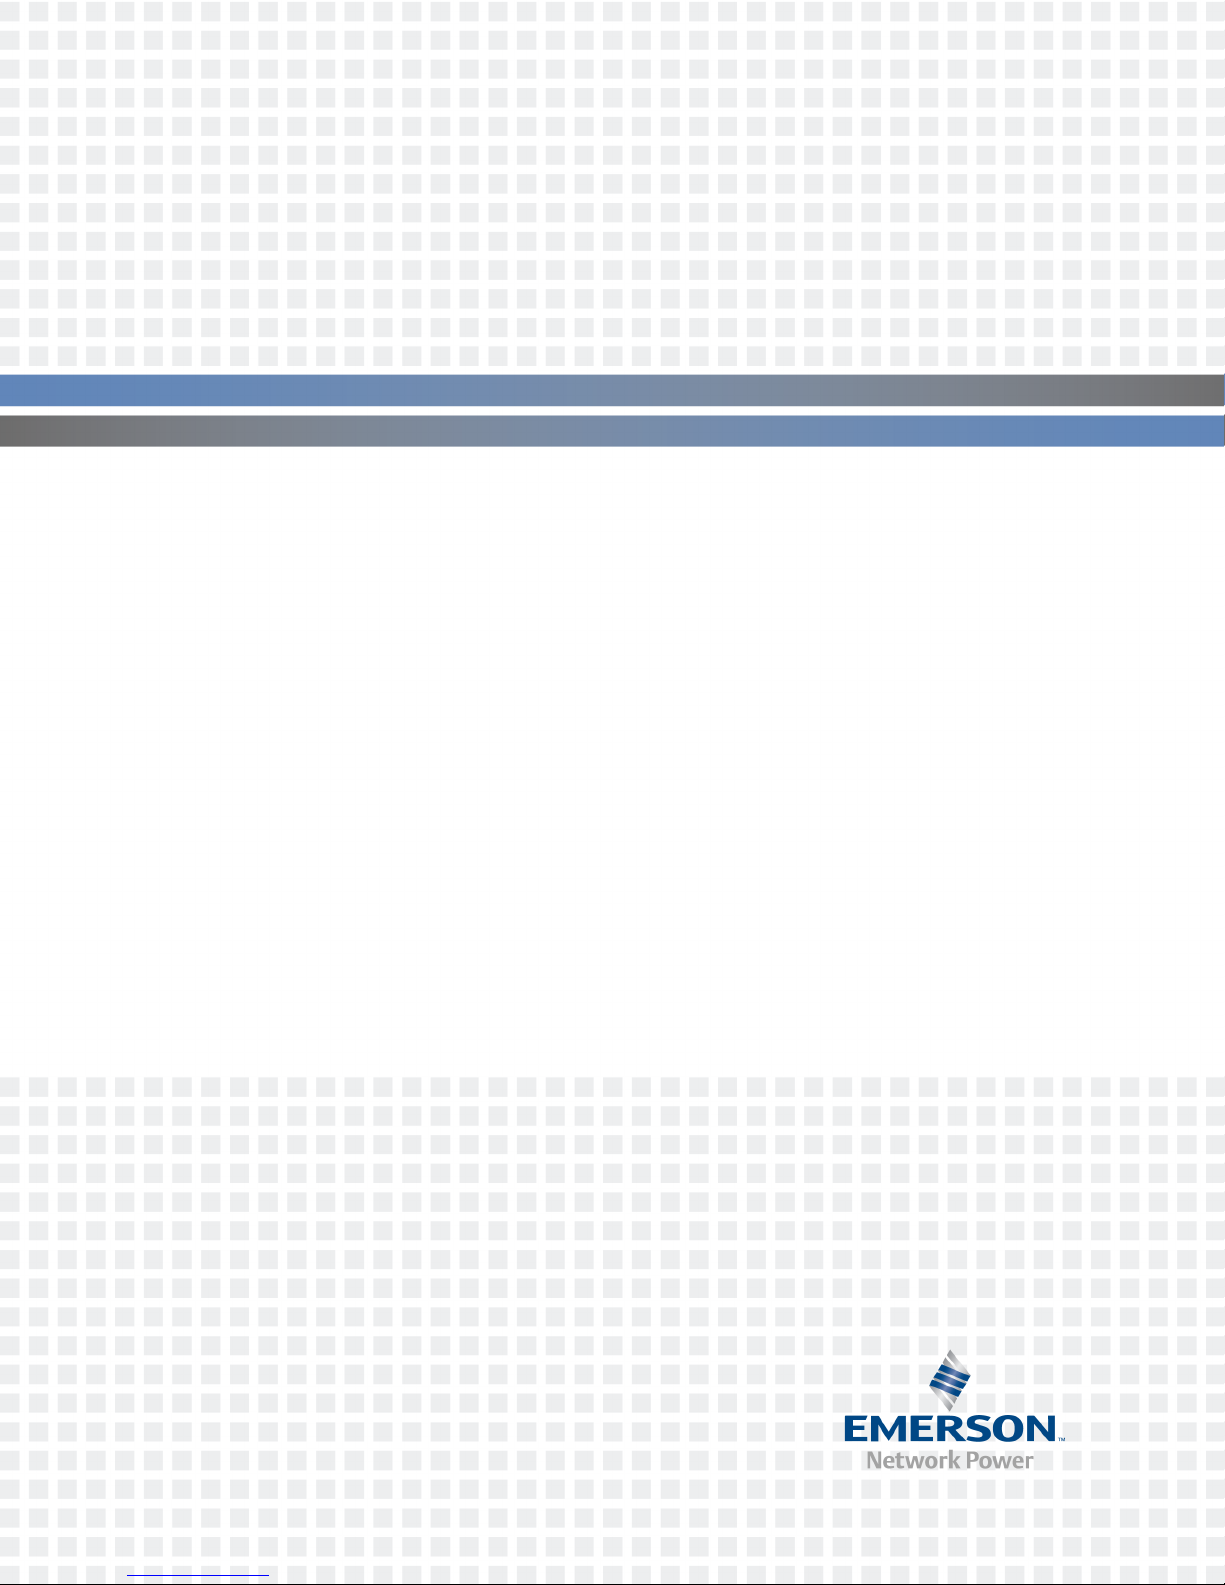
Avocent®HMX Receiver Overview (Dual Head HMX 6200 Receiver Shown)
Avocent® HMX Receiver Descriptions
Number Description
1 HMX 5200/6200 receivers: Management port. This port appears on dual-head models only.
2 Device status indicators.
3 Teaming port.
4 System port.
5 Power input.
6 Option switches.
Page 9
Product Overview.....5
Number Description
7 USB peripheral device connection, such as keyboard or mouse.
8 Video output on single-head receivers; secondary port on dual-head receivers.
9 Primary video output on dual-head receivers.
10 Audio in.
11 Audio out.
12 Serial (AUX) port.
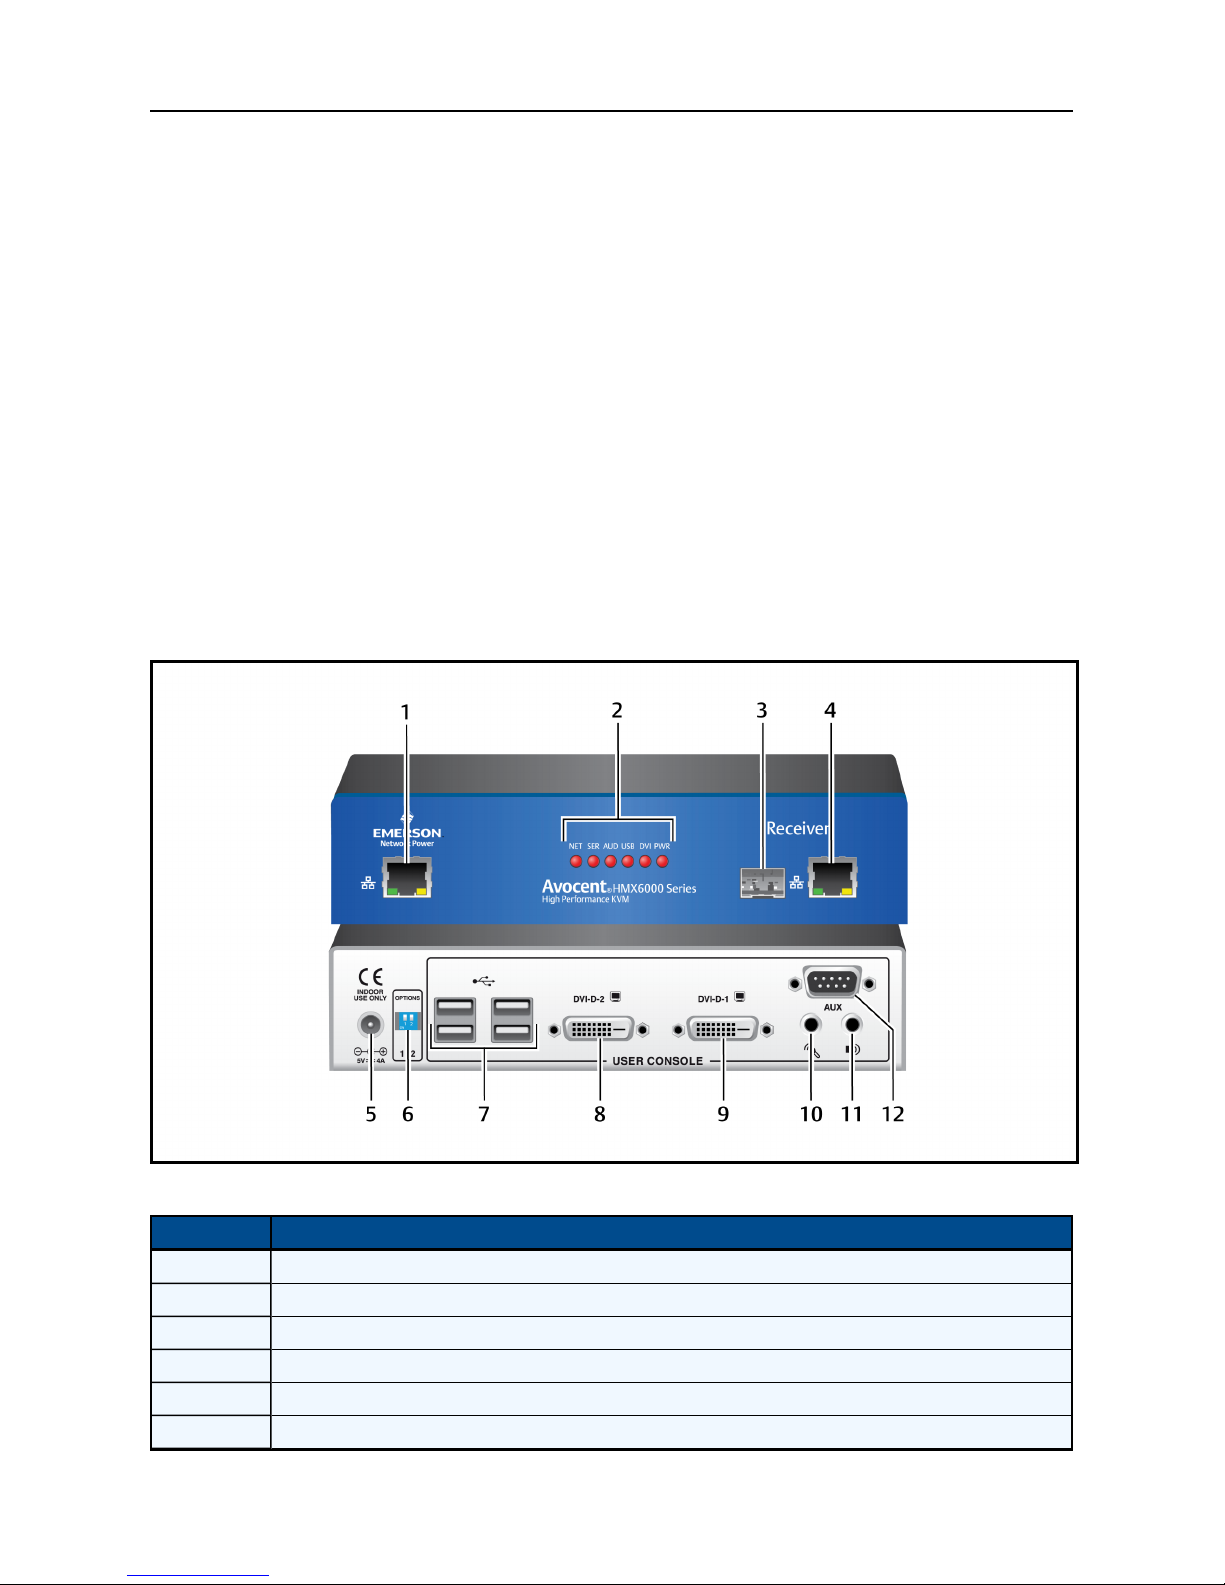
Avocent®HMX Transmitter Overview (Dual Head HMX 6200 Transmitter Shown)
Avocent® HMX Transmitter Descriptions
Number Description
1
2
3 Teaming port.
4 System port.
5 Power input.
6 Option switches.
7 USBport connection.
8
9 On dual-head receivers, this is the secondary video output.
10 Audio in.
This port appears on dual-head models only. HMX 5200/6200 transmitters: Management port.
HMX 6210T transmitters: VNC port.
Device status indicators. On the HMX 6210T transmitter, the NET indicator is replaced with a VNC
indicator.
Single head models only have one video output option. On dual-head transmitters, this is the
primary video output. NOTE: The order of the primary (left) and secondary (right) video output on
transmitters is the opposite of the order of the primary (right) and secondary (left) video output on
receivers.
Page 10

6.....The Avocent® HMX High Performance KVM Extender System Installer/User Guide
Number Description
11 Audio out.
12 Serial AUX port.
Device status indicators
Transmitters and receivers in the HMX extender system have six device status LED indicators on
their front panels. Indicator color and behavior (static or flashing) varies, depending on the activities
you are performing with the HMX extender. As a general rule, if the LED stays lit, the function is
active.
Device Indicators
Display Indicator Descriptions
Number Description
NET LED: network link status; a flashing LED indicates a network error. For HMX 6210T
1
2 SER LED: serial AUX port status.
3 AUD LED: audio status.
4 USB LED: USB port connection status.
5 DVI LED: video channel status.
6 PWR LED: power status.
transmitters, the NET LED is replaced with a VNC LED. A static lit VNC LED indicates a valid
network link on the System or Teaming port; a flashing LED indicates a valid VNC network
connection.
Page 11
Installation and Configuration
At this point you should have already completed the installation instructions outlined in the
Avocent® HMX High Performance KVM Extender System Quick Installation Guide. For important
safety information on your system, visit:
http://www.emersonnetworkpower.com/ComplianceRegulatoryInfo.
Additional information on your physical configuration options is highlighted in the following sections,
as well as basic steps that need to be completed prior to any advanced configuration on your
transmitters and receivers. Configuration for the HMX extender system is performed within a web
browser-based user interface known as the System Configuration utility. See System
Configuration Utility on page 15 for more information on this utility as well as advanced system
configuration details.
Configuration Options
The HMX extender system can be configured in a direct connect or matrix configuration. In a direct
connect configuration, one transmitter connects directly to one receiver via the System port on
each unit. In an unmanaged matrix configuration, a transmitter and multiple receivers can connect
directly to a Gigabit Ethernet switch. If you wish to add transmitters to your system, the HMX
Advanced Manager server must be added to the system to manage your matrix configuration. See
the Avocent® HMX Advanced Manager Software Installer/User Guide for more information.
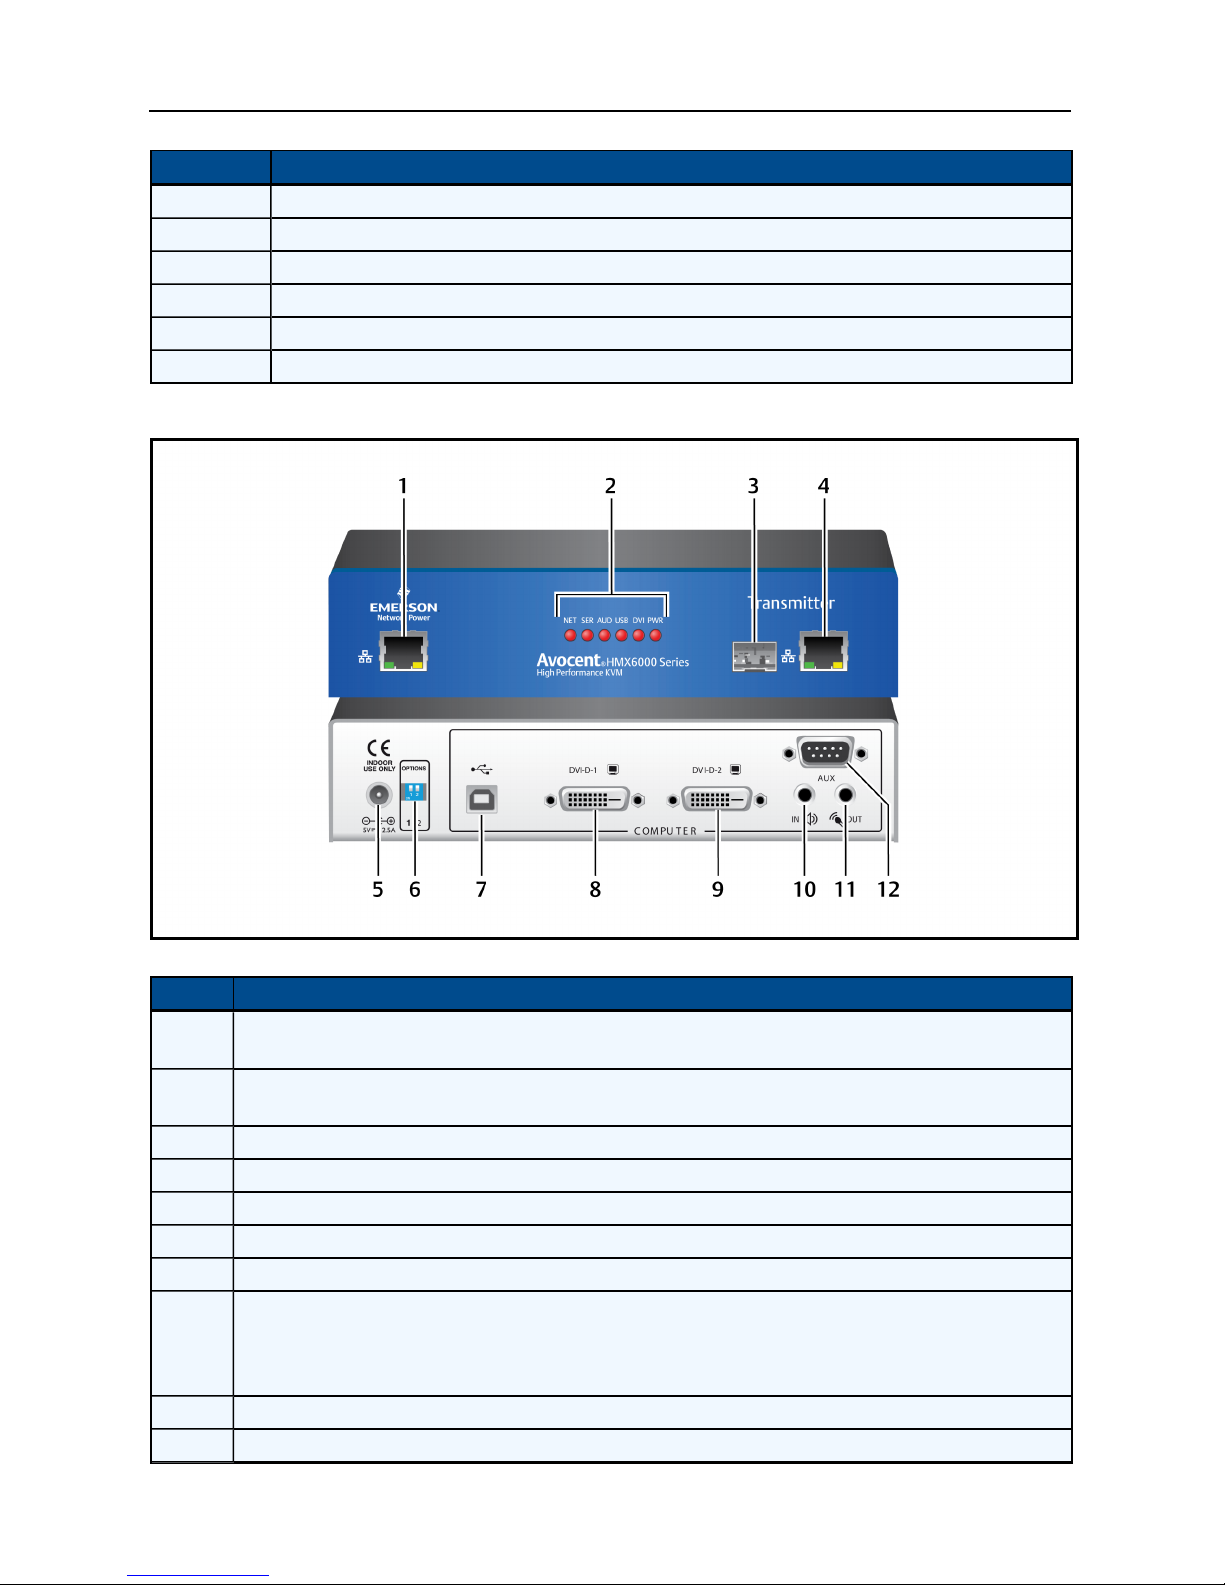
Example Direct Connect Configuration
Example Direct Connect Configuration Description
Number Description
1 Remote computer
2 HMX transmitter
3 Link via the System port
4 HMX receiver
5 Local computer
Page 12
8.....The Avocent® HMX High Performance KVM Extender System Installer/User Guide
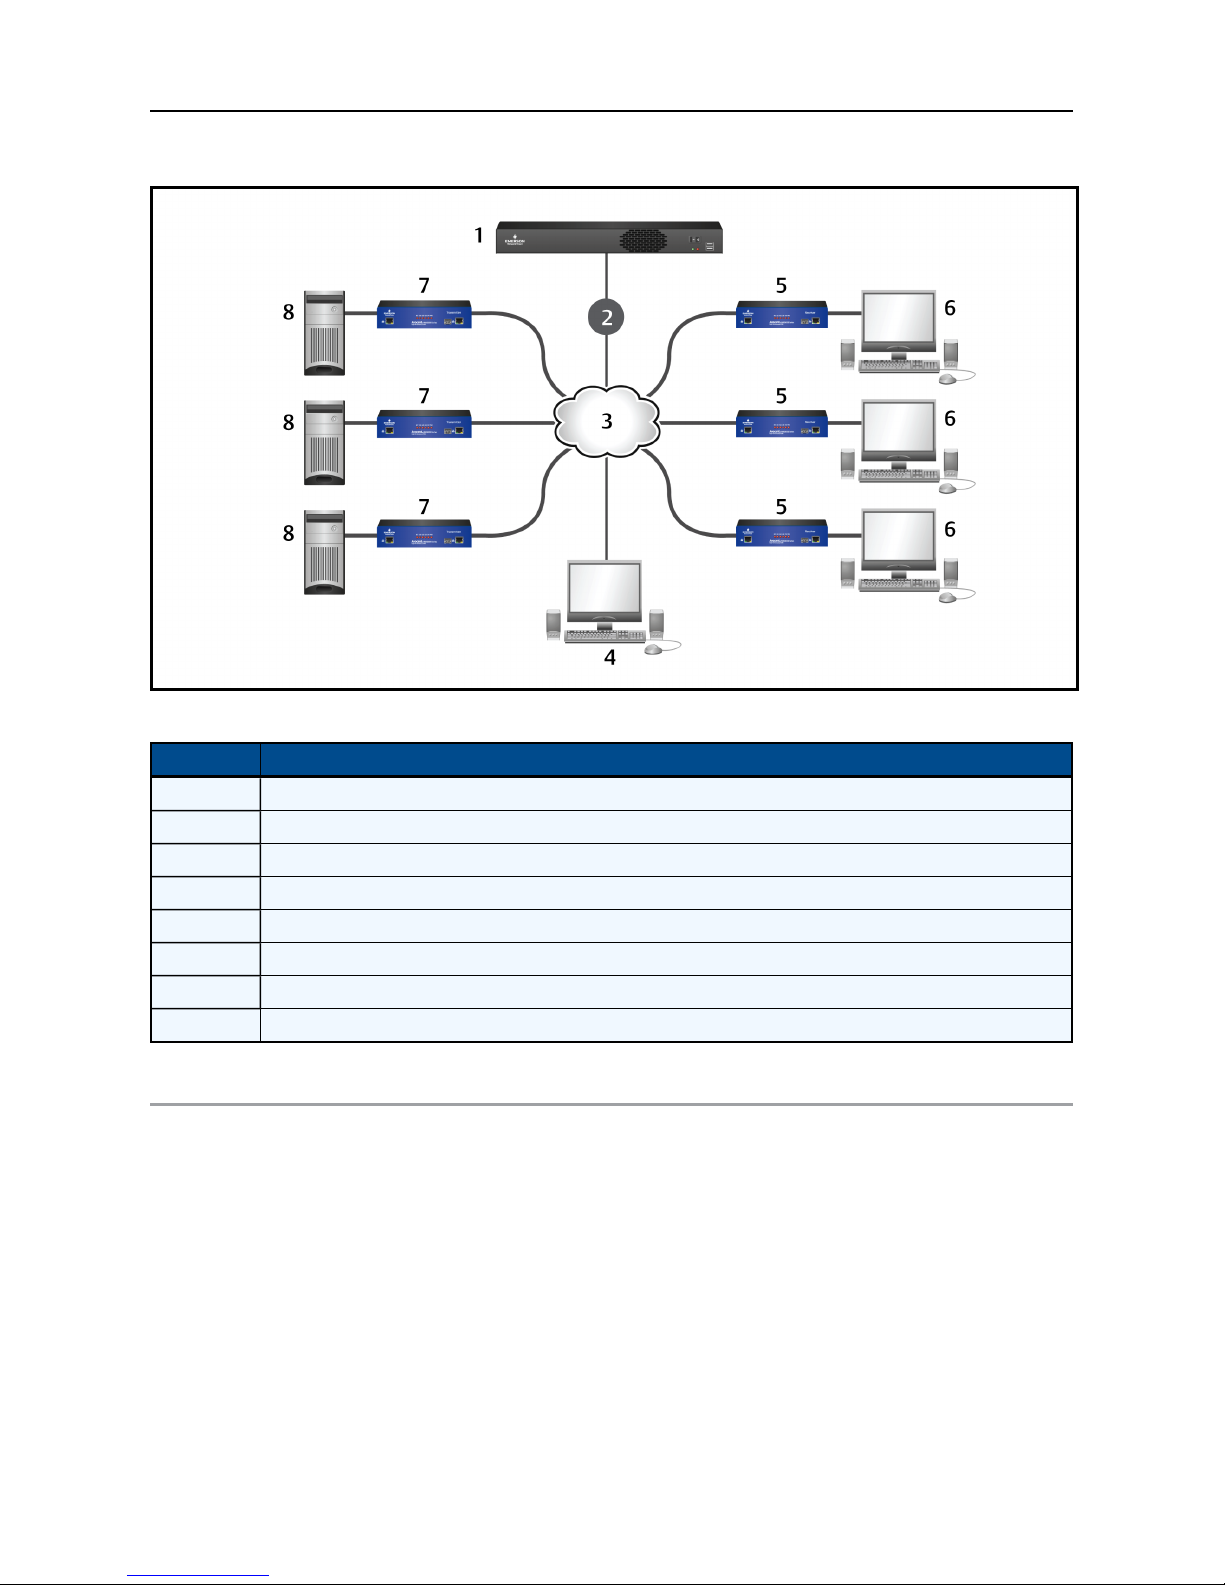
Example Managed Matrix Configuration
Managed Matrix Configuration Components
Number Description
1 HMX Manage server (hosts the HMX Advanced Manager software)
2 10/100 link
3 Gigabit Ethernet connection to a switch
4 Administrator computer
5 HMX receivers
6 Local user computers
7 HMX transmitters
8 Remote computers
System Recommendations
For optimal performance, it is recommended that your HMX extender system has the following:
• Ethernet ports that support Gigabit (1000 Mbps) or faster speeds
• IGMP v2 or v3 support
• Jumbo frame that supports up to 9216 bytes
• Fiber channel or other high bandwidth connections between switches
• Layer 3 switches with full duplex, 1 Gbps up and downstream speeds and multiple dedicated
processors (ASICS)
Page 13

Installation and Configuration.....9
Factory reset
If the standard settings within your HMX extender system are changed in an installation and you
need to change the current configuration, a reset must be performed to restore the transmitters
and receivers to the factory default settings before proceeding. This factory reset must also be
performed if using an HMX Advanced Manager server to configure your system. Otherwise, the
transmitters and receivers in the managed system will not be located.
To perform a factory reset:
NOTE: A factory reset can also be performed from the System Configuration utility. For more information,
see System Configuration Utility on page 15.
1. Ensure the extender you are resetting is turned off.
2. On the extender front panel, locate the small hole that houses the recessed reset button.
3. Insert a narrow tool such as a straightened paper clip into the hole, then press and hold it while
also pressing the power button on the extender.
4. Five of the front panel device status indicators quickly flash to indicate a successful reset.
5. Remove the tool from the hole and press the extender power button again to restart the unit.
Basic Configuration
After your system is installed and turned on, you may need to re-configure the IP address for your
network. In a direct connect configuration, the factory default address may be acceptable for
immediate use in your network. However, if you wish to change the default address, this should be
the only basic configuration needed to begin using your transmitter and receiver. In an unmanaged
matrix configuration, the IP address of the transmitter and each receiver must be specified so the
units can locate each other within the HMX extender system. Re-configuring the IP addresses of
extenders in a managed matrix configuration is completed in the HMX Advanced Manager
software. See the HMX Advanced Manager Software Installer/User Guide for basic configuration
procedures. The default port IPaddresses are listed in the following table.
Default Port IP Addresses
Port Name Transmitter Default IP Address Receiver Default IPAddress
Management or VNC port 192.168.1.42 192.168.1.42
System port 169.254.1.33 169.254.1.32
Teaming port 169.254.1.43 169.254.1.42
To configure the transmitter:
1. From a web browser on your local computer, enter the transmitter IP address. The default IP
address is: http://169.254.1.33.
Page 14

10.....The Avocent® HMX High Performance KVM Extender System Installer/User Guide
NOTE: If the IP address of the transmitter is not known, perform a manual factory reset to restore the
default IP address.
2. Log in to the System Configuration utility. The default username is admin and the default
password is password.
3. The first time that you log in to the utility using the administrator account, you are required to
reset the password. Select Security on the left side of the page.
4. Enter your old password, enter your new password twice to verify and click Save.
5. Select System Configuration on the left side of the page. On the displayed page, enter the
name and a description of the transmitter in the applicable fields.
6. Ensure that the Enable System Port checkbox is selected. Then, change the IP address to an
address in the private IP range 192.168.xxx.xxx.
NOTE: In an un-managed matrix configuration, the IP address for the System port must be changed before
the Teaming port can be used for network connections.
7. In the System Netmask field, change the netmask to 255.255.255.0.
8. In the System Gateway field, change the System Gateway to an appropriate address.
9. If using an HMX 5200 or 6200 transmitter, ensure the Enable Management Port checkbox is
selected. Then, enter 192.168.1.42 as the IP address.
NOTE: It is recommended that the IP address of this port remains the same. If you wish to change it, use
the new address for all dual-head extenders in the system.
-or-
If using an HMX 6210T transmitter, ensure the Enable VNC Port checkbox is selected and enter
192.168.1.42 as the IP address.
10. Depending on the transmitter model, enter the netmask and gateway information of either the
Management or VNC port.
11. If using the Teaming port, ensure the Enable Teaming Port checkbox is selected. Then,
change the Teaming Port IP Address to an address in the private IP range 192.168.xxx.xxx.
12. In the Teaming Port Netmask field, change the netmask to 255.255.255.0.
13. In the Teaming Port Gateway field, change the Teaming Gateway to an appropriate address.
14. Verify the data streams Enable Video, Enable Audio, Enable USB and Enable Serial are
enabled as appropriate.
NOTE: It is important that the settings in the transmitter and receiver are the same. If one option is enabled
on the transmitter, but disabled on the receiver, the data stream remains disabled.
Page 15

Installation and Configuration.....11
15. If you selected the Enable Serial checkbox, enter the baud rate, data bits, stop bits and parity
information.
16. Click Update Now.
To configure the receiver:
1. From a web browser on your local computer, enter the receiver IP address. The default IP
address is: http://169.254.1.32.
NOTE: If the IPaddress of the receiver is not known, perform a manual factory reset to restore the default
IP address.
2. Log in to the System Configuration utility. The default username is admin and the default
password is password.
3. The first time that you log in to the utility using the administrator account, you are required to
reset the password. Select Security on the left side of the page.
4. In the appropriate fields, enter the old password. Then, enter your new password twice to
verify and click Save.
5. Select System Configuration on the left side of the page. On the page that appears, enter the
name and a description of the transmitter in the appropriate fields.
6. Ensure that the Enable System Port checkbox is selected. Then, change the IP address to an
address in the private IP range 192.168.xxx.xxx.
7. Change the netmask to 255.255.255.0.
8. Change the System Gateway to an appropriate address.
9. If using a dual-head receiver, ensure the Enable Management Port checkbox is selected.
Then, enter 192.168.1.42 as the IP address.
NOTE: It is recommended that the IP address of this port remains the same. If you wish to change it, use
the new address for all dual-head extenders in the system.
10. If using the Teaming port, ensure the Enable Teaming Port checkbox is selected. Then,
change the Teaming Port IP Address to an appropriate address in the private IP range
192.168.xxx.xxx.
11. In the Teaming Port Netmask field, change the netmask to 255.255.255.0.
12. In the Teaming Port Gateway field, change the Teaming Gateway to an appropriate address.
13. Verify the data streams Enable Video, Enable Audio, Enable USB and Enable Serial are
enabled as appropriate. Select your applicable keyboard country code.
Page 16

12.....The Avocent® HMX High Performance KVM Extender System Installer/User Guide
14. Select the mic (standard) or mic boost (+20 dB) radio button, depending on the type of
microphone used in your system.
15. Configure the transmitter IP address details in the Target Transmitter Unit Settings section.
a. In the IP Address field, enter the IP address of the System port on the transmitter
providing the video, audio and data streams.
b. If the transmitter is configured to use the Teaming port, enter the IP address of the
transmitter Teaming port in the IP Address 2 field.
c. Click the down arrow to expand the transmitter settings.
d. Enter the IP address for each of the data streams.
16. Click Update Now.
17. In an un-managed matrix (multicast) configuration, follow these steps to configure the
multicast settings:
a. Log in to the transmitter System Configuration utility and select System Configuration on
the left side of the page.
b. In the Target Multicast Configuration section, enter the appropriate IP address for each
video and audio stream. The Multicast IP entries are for the System port and Multicast
IP2 entries are for the Teaming port.
c. Click the up arrow in this section to repeat steps a and b for each receiver.
d. Click Update Now.
18. Repeat this procedure for each receiver in your HMX extender system.
For additional information on the System Configuration utility, see System Configuration Utility on
page 15.
Firmware upgrade
It is recommended that the HMX extender system use the most current firmware version available,
and transmitters and receivers are Flash upgradable at any time. Regardless of your configuration,
the same firmware version must be used across all units in your system.
In a managed matrix configuration, it is recommended that you use the HMX Advanced Manager
software to quickly upgrade the firmware across multiple transmitters and receivers. The HMX
5100 and 5200 extenders are not downgradable, so the HMX Advanced Manager server must be
upgraded to the same version as the extenders to be compatible. See the Avocent® HMX
Advanced Manager Installer/User Guide for more information on upgrading the HMX Advanced
Manager server. If the extender does not operate properly after the HMX Advanced Manager
server is upgraded, a factory reset may need to be performed on the extender.
Page 17

Installation and Configuration.....13
To locate the transmitter and receiver firmware version:
1. From a web browser on your local computer, enter the IP address of the extender.
2. Log in to the System Configuration utility using the admin default username. Depending on
whether you are using the receiver or the transmitter, enter the corresponding password.
3. Select About on the left side of the screen. The build number listed under the Main System
heading is the current firmware version.
To upgrade your firmware:
WARNING: Ensure that power is not interrupted during the upgrade process. Otherwise, the extender may
become inoperable and require you to switch to the backup firmware image to regain operation. To switch to
the backup firmware image, move Option Switch 1 on the extender back panel to the On/Down position.
1. Visit the Emerson Network Power Technical Support page at
http://www.emersonnetworkpower.com/en-US/Support/Technical-
Support/Pages/default.aspx.
2. Select Software Downloads on the left-hand side of the page, then search for the Avocent
®
HMX High Performance KVM Extender System transmitter and receiver firmware upgrade
files.
NOTE: The remaining steps need to be completed for each transmitter and receiver that you wish to
upgrade.
3. Log in to the System Configuration utility.
4. Select Firmware Upgrade on the left side of the screen.
5. Click Browse and select the firmware upgrade file you wish to upgrade.
NOTE: The file contains main and backup firmware images you can choose to upgrade.
6. Select Upgrade Now. The indicators on the extender front panel flash while the upgrade is in
process.
7. After the firmware upgrade is complete, the extender automatically reboots.
Page 18

14.....The Avocent® HMX High Performance KVM Extender System Installer/User Guide
Page 19

System Configuration Utility
After installing your HMX extender, log in to the System Configuration utility to perform basic
configuration of your extenders. Additional general operations and advanced configuration tasks
can also be performed through this streamlined user interface. Although the System Configuration
utility is the primary interface used to make changes to your extenders, there is an additional On-
Screen Display (OSD) interface located on HMX receivers.
NOTE: For the steps to log in to the utility, see Basic Configuration on page 9. For more information on the
OSD interface, see the On-Screen Display on page 32.
General Operations
After initial configuration, other general tasks can be performed through the System Configuration
utility to customize and streamline common system operations.
NOTE: The following procedures are performed the same way regardless of whether you are using a
transmitter or receiver. Choose the extender you wish to update, then log in to the System Configuration
utility. All steps begin on the main System Configuration page.
Locating an extender within a rack or data center
If you have a complex HMX extender system configuration, it may be difficult to quickly identify a
specific transmitter or receiver in a rack or a data center. The System Configuration page within the
System Configuration utility provides options to activate the front panel LEDs to assist with
identifying the extender you are trying to locate.
To activate the front panel LEDs:
1. Select System Configuration on the left side of the page.
2. Select Identify Unit (short) to prompt the front panel LEDs to flash for five seconds.
-or-
Select Identify Unit (long) to prompt the front panel LEDs to flash for one hour. This setting
can be overridden at any time by selecting the short option.
Enabling system messages
Through the System Configuration utility, you can choose to receive general status information
about your HMX extender system, including any error messages that may occur.
Page 20

16.....The Avocent® HMX High Performance KVM Extender System Installer/User Guide
To enable system messages:
1. Select System Messages on the left side of the page, then select the Enable system
messages checkbox.
2. If you enable the Send system messages to remote Log Server checkbox, also provide the IP
address of a suitable remote server.
NOTE: The User Datagram Protocol (UDP) is used for all Syslog traffic.
3. Enable the Store system messages in unit checkbox to keep system messages within the
memory of the extender. If you wish to view the messages or delete them, click the
appropriate button.
4. Click Update Now to apply your settings.
Enabling HMX Advanced Manager server control
If you wish to have more than one transmitter within your HMX extender system, the HMX
Advanced Manager server must be added to the system to manage your matrix configuration. You
must also ensure that each extender is set to allow the HMX Advanced Manager server to take
control of it.
To enable HMX Advanced Manager server control:
1. Select the link to the HMX Advanced Manager on the left side of the page.
2. On the displayed page, enable HMX Advanced Manager server control.
Recording bandwidth statistics
The HMX extender system provides bandwidth statistics that can be recorded, transferred and
used for system optimization and troubleshooting, if needed. With the System Configuration utility,
you can choose the type of bandwidth statistics you wish to gather from an extender System port
and then transfer it to a graph. In configurations where both the System and Teaming ports are
used, only the System port is measured and shown on the graph, but the illustrated bandwidth is
the same for both ports. For example, if the statistics graph shows 500 MB of bandwidth on the
System port, then it is assumed that there is also 500 MB of bandwidth on the Teaming port. In this
scenario, the total bandwidth across ports is 1 GB.
To generate a statistics graph:
1. Select Statistics on the left side of the page, then select the Enable collection of bandwidth
statistics checkbox.
2. A pop-up box appears and allows you to select what data bandwidth aspects you wish to show
on the graph.
Page 21

System Configuration Utility.....17
3. Click Submit to generate a pop-up graph of the information.
Rebooting and factory resetting the extender
If the power to your HMX extender needs to be turned off, then turned back on again, a reboot can
be performed via the extender System Configuration utility. Also, if a factory reset is needed and
does not have to be manually performed from the extender front panel, the reset may be done in
the utility as well.
To perform a standard reboot on your extender:
Select Reboot on the left side of the page, then click Reboot on the displayed page.
To factory reset and reboot your extender:
1. Select Reboot on the left side of the page, then select the Perform Factory Reset checkbox.
2. Click the Reboot button at the bottom of the page.
Advanced Transmitter Configuration
Although basic configuration of your transmitter should already be complete, advanced procedures
are available via the System Configuration Utility that allow you to further customize your
transmitter video, USB and security settings. If you are using an HMX 6210T transmitter within your
extender system, additional unique procedures must also be performed to utilize the VNC port on
the front panel.
NOTE: Log in to the transmitter System Configuration utility before completing the following procedures.
All steps begin on the main System Configuration page.
Configuring transmitter video
Options are available that allow you to control and configure the video transmitting across the HMX
extender system.
NOTE: When using an HMX extender system with dual-head extenders linked via two Gigabit links with
sufficient bandwidth available, there may be no need to alter the default settings on the Video Configuration
page of the System Configuration utility.
Details about the specific settings are provided in the next procedure, but the following best
practices are recommended:
• If moving video images are shown frequently on an HMX 6210T transmitter, lower the Frame
skipping percentage and reduce the color depth.
Page 22

18.....The Avocent® HMX High Performance KVM Extender System Installer/User Guide
• If video screens in your system are relatively static, increase the Background Refresh interval
and the Frame skipping percentage.
• As you apply each setting, you may wish to view video images with typical adjustments.
To configure transmitter video settings:
1. Select Video Configuration on the left side of the page, then adjust the following settings to
meet the needs of your system.
• Peak bandwidth limiter percentage: Select the percentage of bandwidth (0-95%) allowed
for the transmitter to prevent the transmitter from utilizing too much network capacity
when sending video and data over the IP network.
• Background Refresh: Select the frame rate to control bandwidth used by the transmitter
when sending the complete video image in the background. Any rate higher than 32
frames reduces bandwidth. The transmitter also sends the affected changes in the
image.
• Color Depth (HMX 6210T transmitter only): Select the color depth that best applies to
your system.
• Enable Anti Dither: Enable this checkbox to reduce the effects of dithering. While
dithering improves images by diffusing and altering pixel colors between video frames, it
slows down system performance. The Anti Dither feature ignores color dithering, which
increases the frame rate and eliminates unnecessary network traffic.
• Default DDC options: Disable the Use Default DDC checkbox to use the EDID reported
by the monitor that is connected to the receiver. Enabling the checkbox, however,
activates the Choose Default DDC drop-down list, allowing you to select from a range of
preset video resolutions.
NOTE: After a resolution is selected, the transmitter only supports that video resolution. All listed
resolutions are single-link DVI with a maximum pixel clock of 165 MHz and a refresh rate of 60 Hz .
• Hot Plug options: Select the Enable Hot Plug Detect…option to send a message to the
graphics card of the computer attached to the transmitter every time the monitor located
at the receiver is changed. Select the length of time that a hot plug detect signal is
applied from the options in the Period of Hot Plug Detect signal drop-down list. Most
graphics card operate efficiently at the 100 mS default.
• Frame skipping percentage: Select the percentage (0-100%) of captured video frames
that can be skipped to reduce the overall bandwidth consumed by the system. This
Page 23

System Configuration Utility.....19
process works best for video sources that either infrequently update or frequently update
but do not require high fidelity.
• Compression: From the drop-down list, choose the compression method you wish to use
for video transmission.
• Select Pixel Perfect to use the standard HMX extender system RLE compression
scheme.
• Select Adaptive to use the standard compression and also guarantee the frame
rate.
• Select Smoothest Video to force the maximum compression.
• Select Advanced to choose a fixed compression mode and select the amount of
compression that accompanies the AVCT scheme. The compression level
determines how much the system speed is increased.
2. Select Update Now to apply your settings.
Viewing video snapshots and reports
Snapshots of connected video feeds, as well as reports of detected video resolutions and color
depths for your HMX extender system, can be generated from the System Configuration page on
the transmitter.
To generate a snapshot and report about connected video feeds:
1. Select System Configuration on the left side of the page.
2. Select Thumbnail at the bottom for the video feed snapshot and resolution/color depth report.
3. Select the Refresh Thumbnail button to update the information.
Configuring transmitter USB and security settings
The local transmitter System Configuration utility allows you to configure specific USB and security
settings within the HMX extender system.
To configure transmitter USB settings:
1. Select USB Setting on the left side of the page.
2. Select the Enable Dummy Boot Keyboard checkbox if you want to ensure that a keyboard is
always reported when the computer is turned on. This dummy boot keyboard is virtual and
uses one of the USB endpoints. You must disable this option if all endpoints are required
elsewhere for other USB devices.
3. Select the Disable Hi-Speed checkbox to force the system to run at the low/full USB speed of
12 Mbps. This forces USB 2.0 high speed devices to adapt to a lower rate.
Page 24

20.....The Avocent® HMX High Performance KVM Extender System Installer/User Guide
4. From the Hub Size drop-down list, select the amount of USB hubs to be supported by the
transmitter.
5. From the Reserved Port Range drop-down list, select the number of ports to reserve for
devices. The devices are assigned the reserved ports from the receiver.
NOTE: Use this list for devices that must always report to the same USB port number in order to assist the
USB driver with easily locating the device. By default, a zero value disables this option, but if you choose to
change it, the dummy boot keyboard must be disabled.
6. Click Update Now to apply your changes.
To configure transmitter security settings:
1. Select Security on the left side of the page.
2. Click the desired radio button next to the USB and Control Encryption fields to set the
encryption frequency.
NOTE: Data passed across the system can be USB data or control data (video data is not encrypted).
3. If you wish to require your password to open configuration pages, select the Secure web
pages with password checkbox.
4. In the event that your password needs to be changed, select the Change password checkbox.
5. Enter the old password once, then enter the new password twice to verify.
6. Click Save to confirm your changes.
Configuring the HMX 6210T transmitter
The HMX 6210T transmitter contains a VNC server that allows you to transmit a low-bandwidth
version of the video output across standard networks to authorized remote viewers. The VNC link
can either be made over the same network as the main HMX extender output or via a separate one.
Basic set up and configuration on the transmitter front panel VNC port was completed earlier in this
guide. However, further configuration of the VNC port is completed through the use of a third party
VNC Viewer program running on a computer or mobile device. By utilizing a VNC Viewer, up to
sixteen remote users can log in over standard networks to view the output of the HMX 6210T
transmitter.
NOTE: Instructions on using a third party VNC Viewer vary depending on which one you choose. See the
help sections or other documentation supplied by the specific program if you need more information.
Selecting a third party viewer
If you do not already have a VNC Viewer, you can choose one of the following options:
Page 25

System Configuration Utility.....21
• Download the latest VNC Viewers from the RealVNC web site. If using a tablet or smartphone,
you can download a viewer from the app store.
• Download a Microsoft® Windows® VNC Viewer from the transmitter.
• Run a Java version of the VNC Viewer in your web browser.
NOTE: The V5 viewers support a newer 256-bit encryption technique. However, virtual media functionality
is not supported in a V5 viewer.
To download a Windows VNC Viewer from the transmitter:
1. Connect the transmitter to an IP network where a computer is available on the same subnet.
2. Open an internet browser and enter http://192.168.1.42 as the default local IP address of the
transmitter.
3. After the welcome page is displayed, click the Download the Windows VNC Viewer from Unit
link.
4. Open the executable file and follow the on-screen instructions.
To use the Java VNC Viewer:
1. Connect the transmitter to an IP network where a computer is available on the same subnet.
2. Open an internet browser and enter http://192.168.1.42 as the default local IP address of the
transmitter.
3. Click the link Connect using built-in Java VNC Viewer. The Java viewer loads and runs inside
the browser.
Using the Virtual Media feature
On HMX 6210T transmitters, an additional Virtual Media (VM) feature can be used if you need to
make information available remotely. Disk drives, single files or collections of files and folders up to
2 GB in size can be posted as read-only files on the host computer through the VNC Viewer. To use
the virtual media feature, a VM link must be made from the HMX 6210T transmitter and a host
computer USB port. Additional instructions are available within your specific VNC Viewer.
NOTE: File transfers in this configuration move in one direction only, from the Viewer to the host computer.
This feature is not supported by Apple®Mac®systems.
Advanced Receiver Configuration
Although basic configuration of your receiver should already be complete, advanced procedures
are available via the System Configuration Utility that allow you to further customize your receiver
video, USB and security settings.
Page 26

22.....The Avocent® HMX High Performance KVM Extender System Installer/User Guide
NOTE: Log in to the receiver System Configuration utility before completing the following procedures. All
steps begin on the main System Configuration page.
Configuring receiver video
If your system is using dual-head extenders, you can verify that the monitor connected to the
receiver can support and properly display the chosen video resolution.
To verify that the connected monitor supports a chosen resolution:
On the System Configuration page, select the Enable Video Compatibility Check checkbox to
prompt a verification using the EDID reported by the computer graphics card. An error message is
displayed and no connection is made if the monitor cannot support the video resolution.
By default, receivers are configured for Fast Switching, which means that the extender video
retains the same frame rate at either 50 or 60 Hz, depending on which resolution was displayed
first. If you prefer to adjust this setting, the Match Frame Rate option follows the source frame rate
(50 Hz) and causes any variation to automatically return to that rate, even if the video resolution
does not change. For example, if you have a receiver switching between 1920 x 1080 at 60 Hz and
1920 x 1080 at 50 Hz, enabling the Match Frame Rate option changes the frame rate back to 50 Hz
every time you switch. For your specific configuration, 60 Hz may be the frame rate that you prefer.
By enabling the Force Video Refresh Rate to 60 Hz checkbox, the receiver frame rate is held at 60
Hz regardless of the video input frame rate.
To select your preferred video frame rate:
Select System Configuration on the left side of the page, then select the Fast Switching (50 or 60
Hz frame rate) or the Match Frame Rate (50 Hz) radio button.
-or-
Enable the Force Video Refresh Rate to 60 Hz checkbox, which prevents the previous video
switching options from being altered.
Configuring receiver USB and security settings
The local receiver System Configuration utility allows you to configure specific USB and security
settings within the HMX extender system.
To configure receiver USB settings:
1. Select USB Setting on the left side of the page.
2. Select each of the following checkboxes if you wish to enable the setting:
a. Select to allow HIDs to restrict supported USB devices to keyboards and mice only, and
disables all other types of USB devices.
Page 27

System Configuration Utility.....23
b. Since isochronous USB devices are not supported in an HMX extender system, select to
receive Isochronous Endpoint OSD Alerts if one is connected.
c. Select to allow an isochronous endpoint to be attached to the system to allow control
information to be exchanged with that device.
3. In the Port Reservation section, map the four receiver USB connections to a specific USB port
reserved on the transmitter.
4. In the Advanced features section, select the Enable advanced features checkbox if you wish
to add information to this area of the page. This section allows you to enter special codes that
may be needed to resolve an issue if a USB device fails.
5. Click Update Now to apply your changes.
To configure receiver security settings:
1. Select Security on the left side of the page.
2. Data passed across the system can be USB data or control data (video data is not encrypted).
Click the desired radio button next to the Encryption field.
3. If you wish to require your password to open configuration pages, select the Secure web
pages with password checkbox.
4. If your password needs to be changed, select the Change password checkbox.
5. Enter the old password once, then enter the new password twice to verify.
6. Click Save to confirm your changes.
Page 28

24.....The Avocent® HMX High Performance KVM Extender System Installer/User Guide
Page 29

Appendices
Appendix A:Technical Specifications
Avocent®HMX 5100 Transmitter Technical Specifications
Category Value
Mechanical
Dimensions (D x W x H) 6 inches x 7.92 inches x 1.76 inches
Weight (without cables) 2.4 pounds
Ports/Connectors
Teaming Port 1 x SFP (Fiber Channel SFP module or Active Copper SFP module)
System Port 1 x RJ-45 (1 x 8-pin modular for a direct connect configuration)
USB 1 x USB 2.0 type B
AUX (Serial) Port 1 x RS-232 9-pin type D
Video Port 1 x DVI-I
Audio Ports 2 x 3.5 mm audio jack
Direct Connect 1 x 8-pin modular
Maximum Resolution 1920 x 1200 at 60 Hz
Maximum Pixel Rate 165 MHz
Supported Video Modes All VESA and CEA video modes
Power Supply
Connector 1 x IEC
AC Input Range 100-240 VAC
AC Frequency 50/60 Hz
AC Input Current Rating 0.8A
Operating Temperature
Temperature 0-40° Celsius (32-104° Fahrenheit)
Avocent®HMX 5100 Receiver Technical Specifications
Category Value
Mechanical
Dimensions (D x W x H) 6 inches x 7.92 inches x 1.76 inches
Weight (without cables) 2.4 pounds
Ports/Connectors
Teaming Port 1 x SFP (Fiber Channel SFP module or Active Copper SFP module)
System Port 1 x RJ-45 (1 x 8-pin modular for a direct connect configuration)
USB 4 x USB 2.0 type A
AUX (Serial) Port 1 x RS-232 9-pin type D
Page 30

26.....The Avocent® HMX High Performance KVM Extender System Installer/User Guide
Category Value
Video Port 1 x DVI-I
Audio Ports 2 x 3.5 mm audio jack
Maximum Resolution 1920 x 1200 at 60 Hz
Maximum Pixel Rate 165 MHz
Supported Video Modes All VESA and CEA video modes
Power Supply
Connector 1 x IEC
AC Input Range 100-240 VAC
AC Frequency 50/60 Hz
AC Input Current Rating 0.8A
Operating Temperature
Temperature 0-40° Celsius (32-104° Fahrenheit)
Avocent®HMX 5200 Transmitter Technical Specifications
Category Value
Mechanical
Dimensions (D x W x H) 6 inches x 7.92 inches x 1.76 inches
Weight (without cables) 2.4 pounds
Ports/Connectors
Teaming Port 1 x SFP (Fiber Channel SFP module or Active Copper SFP module)
System Port 1 x RJ-45 (1 x 8-pin modular for a direct connect configuration)
Management Port 1 x RJ-45
USB 1 x USB 2.0 type B
AUX (Serial) Port 1 x RS-232 9-pin type D
Video Port 2 x DVI-I
Audio Ports 2 x 3.5 mm audio jack
Direct Connect 1 x 8-pin modular
Maximum Single
Resolution
Maximum Dual
Resolution
Maximum Single Pixel
Rate
Maximum Dual Pixel
Rate
Supported Video Modes All VESA and CEA video modes
1920 x 1200 at 60 Hz (supports two single-link displays)
2560 x 1600 at 60 Hz (supports one dual-link display)
165 MHz
330 MHz
Power Supply
Connector 1 x IEC
AC Input Range 100-240 VAC
AC Frequency 50/60 Hz
Page 31

Category Value
AC Input Current Rating 0.8A
Operating Temperature
Temperature 0-40° Celsius (32-104° Fahrenheit)
Avocent®HMX 5200 Receiver Technical Specifications
Category Value
Mechanical
Dimensions (D x W x H) 6 inches x 7.92 inches x 1.76 inches
Weight (without cables) 2.4 pounds
Ports/Connectors
Teaming Port 1 x SFP (Fiber Channel SFP module or Active Copper SFP module)
System Port 1 x RJ-45 (1 x 8-pin modular for a direct connect configuration)
Management Port 1 x RJ-45
USB 4 x USB 2.0 type A
AUX (Serial) Port 1 x RS-232 9-pin type D
Video Port 2 x DVI-I
Audio Ports 2 x 3.5 mm audio jack
Maximum Single
Resolution
Maximum Dual
Resolution
Maximum Single Pixel
Rate
Maximum Dual Pixel
Rate
Supported Video Modes All VESA and CEA video modes
Power Supply
Connector 1 x IEC
AC Input Range 100-240 VAC
AC Frequency 50/60 Hz
AC Input Current Rating 0.8A
Operating Temperature
Temperature 0-40° Celsius (32-104° Fahrenheit)
1920 x 1200 at 60 Hz (supports two single-link displays)
2560 x 1600 at 60 Hz (supports one dual-link display)
165 MHz
330 MHz
Appendices.....27
Avocent®HMX 6200 Transmitter Technical Specifications
Category Value
Mechanical
Dimensions (D x W x H) 6 inches x 7.92 inches x 1.76 inches
Weight (without cables) 2.4 pounds
Ports/Connectors
Page 32

28.....The Avocent® HMX High Performance KVM Extender System Installer/User Guide
Category Value
Teaming Port 1 x SFP (Fiber Channel SFP module or Active Copper SFP module)
System Port 1 x RJ-45 (1 x 8-pin modular for a direct connect configuration)
Management Port 1 x RJ-45
USB 1 x USB 2.0 type B
AUX (Serial) Port 1 x RS-232 9-pin type D
Video Port 2 x DVI-I
Audio Ports 2 x 3.5 mm audio jack
Maximum Single
Resolution
Maximum Dual
Resolution
Maximum Single Pixel
Rate
Maximum Dual Pixel
Rate
Supported Video Modes All VESA and CEA video modes
1920 x 1200 at 60 Hz (supports two single-link displays)
2560 x 1600 at 60 Hz (supports one dual-link display)
165 MHz
330 MHz
Power Supply
Connector 1 x IEC
AC Input Range 100-240 VAC
AC Frequency 50/60 Hz
AC Input Current Rating 0.8A
Operating Temperature
Temperature 0-40° Celsius (32-104° Fahrenheit)
Avocent®HMX 6200 Receiver Technical Specifications
Category Value
Mechanical
Dimensions (D x W x H) 6 inches x 7.92 inches x 1.76 inches
Weight (without cables) 2.4 pounds
Ports/Connectors
Teaming Port 1 x SFP (Fiber Channel SFP module or Active Copper SFP module)
System Port 1 x RJ-45 (1 x 8-pin modular for a direct connect configuration)
Management Port 1 x RJ-45
USB 4 x USB 2.0 type A
AUX (Serial) Port 1 x RS-232 9-pin type D
Video Port 2 x DVI-I
Audio Ports 2 x 3.5 mm audio jack
Maximum Single
Resolution
Maximum Dual
Resolution
1920 x 1200 at 60 Hz (supports two single-link displays)
2560 x 1600 at 60 Hz (supports one dual-link display)
Page 33

Category Value
Appendices.....29
Maximum Single Pixel
Rate
Maximum Dual Pixel
Rate
Supported Video Modes All VESA and CEA video modes
165 MHz
330 MHz
Power Supply
Connector 1 x IEC
AC Input Range 100-240 VAC
AC Frequency 50/60 Hz
AC Input Current Rating 0.8A
Operating Temperature
Temperature 0-40° Celsius (32-104° Fahrenheit)
Avocent®HMX 6210 Transmitter Technical Specifications
Category Value
Mechanical
Dimensions (D x W x H) 6 inches x 7.92 inches x 1.76 inches
Weight (without cables) 2.4 pounds
Ports/Connectors
Teaming Port 1 x SFP (Fiber Channel SFP module or Active Copper SFP module)
System Port 1 x RJ-45 (1 x 8-pin modular for a direct connect configuration)
VNC Port 1 x RJ-45
USB 1 x USB 2.0 type B
AUX (Serial) Port
Video Port 2 x DVI-I
Audio Ports 2 x 3.5 mm audio jack
Maximum Single
Resolution
Maximum Dual
Resolution
Maximum Single Pixel
Rate
Maximum Dual Pixel
Rate
Supported Video Modes All VESA and CEA video modes
Power Supply
Connector 1 x IEC
AC Input Range 100-240 VAC
AC Frequency 50/60 Hz
AC Input Current Rating 0.8A
1 x RS-232 9-pin type D, signal extension up to a baud rate of 115200, software
flow control, no hardware flow control
1920 x 1200 at 60 Hz (supports two single-link displays)
2560 x 1600 at 60 Hz (supports one dual-link display)
165 MHz
330 MHz
Page 34

30.....The Avocent® HMX High Performance KVM Extender System Installer/User Guide
Category Value
Operating Temperature
Temperature 0-40° Celsius (32-104° Fahrenheit)
Page 35

Appendices.....31
Appendix B: Pinout Information
Connecting device consoles or modems to serial ports
RS-232, 9-pin, type D adaptors can be used to connect remote computers or modems to HMX
extender serial ports. The following pinout configurations are supported.
Pinout Configuration
Pin Number Signal Name Input/Output
1 Data Carrier Detect (DCD) IN
2 Receiver Data (RxD) IN
3 Transmit Data (TxD) OUT
4 Data Terminal Ready (DTR) OUT
5 Ground (GND) N/A
6 Data Set Ready (DSR) IN
7 Request to Send (RTS) OUT
8 Clear to Send (CTS) IN
Page 36

32.....The Avocent® HMX High Performance KVM Extender System Installer/User Guide
Appendix C: On-Screen Display
In addition to the System Configuration utility user interface, the HMX extender system
incorporates an On-Screen Display (OSD) interface, allowing you to access the transmitter from
the local keyboard and mouse. The OSD is displayed on a monitor connected to a receiver and has
a list of available targets to which you can connect. The OSD also supports user defined hotkeys
and favorites for frequently used actions.
The OSD is positioned in the center of the screen and can be one of two sizes depending on current
receiver resolution. The resolution used is the preferred resolution of the monitor as identified by
the monitor EDID. If there is no video connection to a target, the OSD uses the display resolution on
the receiver.
Icon Descriptions
Icon Description
Favorites
Sorting
Currently showing all channels/presets
Currently showing only favorites
Currently showing only numbered shortcuts
Click to add this channel as a favorite
This channel is a numbered shortcut
Currently showing channels and presets. Click to change
Currently showing only channels. Click to change
Currently showing only presets. Click to change
Filter this column using the specified term
Page 37

Icon Description
Remove the search filter
Click to sort the list in ascending order via this column
The list is sorted in ascending order via this column
Top Corner
Enter Remote OSD mode
Exit Remote OSD mode
Display the help pages
Appendices.....33
Connection Buttons
View Mode
Shared mode
Exclusive mode
View mode
Shared mode
Exit from the help pages
Refresh the current page
Close the OSD
Click to connect to the channel/preset
You are currently connected to the channel/preset
Exclusive mode
Another user is connected to the channel/preset
View mode
Page 38

34.....The Avocent® HMX High Performance KVM Extender System Installer/User Guide
Icon Description
Shared mode
Exclusive mode
View mode
You are unable to connect to the channel/preset
Shared mode
Exclusive mode
Blank icons
Connection mode is not permitted by the administrator (for example, a channel
does not allow exclusive connections and a user does not have exclusive rights)
End this connection
To access the OSD:
1. From a receiver, press Ctrl +Alt +C to access the OSD. The default hotkey can be
configured at the system level and for each user.
2. When the OSD launches, enter your receiver username and password.
3. Click Login.
Setting OSD alerts
Alerts can be set within the receiver System Configuration utility to ensure that notifications are
generated when changes are made in the OSD.
To set OSD alerts:
1. From the receiver System Configuration utility, select System Configuration on the left side of
the page.
2. Select the Enable OSD alerts checkbox.
Using a remote OSD
The Remote OSD feature allows authorized users to access and take control of remote receivers if
necessary.
NOTE: The remote OSD has a yellow background to distinguish it from the standard local OSD.
Page 39

Appendices.....35
To use the Remote OSD feature:
1. Log in to the OSD and select a remote receiver from the list.
NOTE: You cannot log out or log in while in a remote OSD.
2. After using the displayed remote OSD, click X to exit.
Hotkeys
The OSD supports user-defined hotkeys and favorites for frequently used actions. These default
hotkey combinations can be altered within the HMX Advanced Manager software.
Key Combination Description
Key Combination Description
Left Ctrl + Left Alt + C
Left Ctrl + Left Alt + X
Left Ctrl + Left Alt + 3
Left Ctrl + Left Alt + A
Left Ctrl + Left Alt + V
Left Ctrl + Left Alt + S
Left Ctrl + Left Alt + E
Launch the OSD
Disconnect the current receiver
Connect to the channel/preset saved in shortcut slot 3
Re-connect to the last channel
Change the current connection to the view-only mode
Change the current connection to the shared mode
Change the current connection to the exclusive mode
Favorites and shortcuts
When the OSD contains many possible channels and presets, you can mark the most commonly
visited ones as favorites. For those channels that you access by keyboard shortcut, there are also
ten assignable hotkeys.
To create a new favorite:
1. Log in to the OSD.
2. Click the favorites icon next to the channel or preset you choose.
3. Click Save.
To create a new hotkey:
1. Log in to the OSD.
2. Click the favorites icon next to the channel or preset.
3. Click the 1 or 0 number prefix from an available slot.
4. Click View Only, Shared or Exclusive.
5. Click Save.
To remove a hotkey:
1. Click the favorites icon.
Page 40

36.....The Avocent® HMX High Performance KVM Extender System Installer/User Guide
2. Click the number prefix from 1 to 0 of an available slot.
3. To remove a previous channel from a slot, click the X icon on the right side of the slot.
Page 41

Appendices.....37
Appendix D:Troubleshooting
Video image of the HMX receiver has horizontal lines across the
screen
When video is transmitted by extenders, the various lines of each screen are divided up and
transmitted as separate data packets. If the reception of those packets is disturbed, blinding
occurs, which means lines are displayed in place of the missing video data packets.
There are several possible causes for the loss of data packets:
• Incorrect switch configuration. The problem could be caused by multicast flooding, which
causes unnecessary network traffic. IGMP snooping is designed to combat this, however,
there can be numerous causes of the flooding.
• Speed/memory bandwidth issues within one or more switches. The speed and capabilities of
different switch models varies greatly. If a switch cannot maintain pace with the quantity of
data being sent through it, it inevitably starts dropping packets.
• One or more HMX units may output jumbo frames due to the video resolution (2048 horizontal
pixels) being used. If jumbo frames are output by an HMX unit, but the network switches are
configured to use jumbo frames, the switches attempt to break the large packets into standard
packets. This process introduces a certain latency and could cause dropped packets.
Solutions
• Ensure that IGMP snooping is enabled on all switches within the subnet.
• Where each HMX unit is connected as the sole device on a port connection to a switch, enable
IGMP Fast-Leave (also called Immediate Leave) to reduce unnecessary processing on each
switch.
• Check the video resolutions provided to the HMX transmitters. If resolutions using 2048
horizontal pixels are unavoidable, ensure the Jumbo frames are enabled on all switches.
• Check the forwarding mode on the switches. If Store and forward is being used, try selecting
Cut-through to reduce latency on lesser switch designs.
• Ensure that one device within the subnet is correctly configured as an IGMP Querier. This is
usually a layer three switch or multicast router.
• Try adjusting the transmitter settings on each HMX to make the output data stream as efficient
as possible.
Page 42

38.....The Avocent® HMX High Performance KVM Extender System Installer/User Guide
Mouse pointer of the receiver is slow
A slow mouse pointer is often related to either using dithering on the video output of one or more
transmitting computers or using VGA-to-DVI video converters.
Dithering is used to improve the perceived quality and color depth of images by diffusing or altering
the color of pixels between video frames. This practice is commonly used on Apple Mac computers
using ATI or Nvidia graphics cards. VGA-to-DVI converters unwittingly produce a similar issue by
creating high levels of pixel background noise.
HMX units attempt to considerably reduce network traffic by transmitting only the pixels that change
between successive video frames. When dithering is enabled and/or VGA-to-DVI converters are
used, this can have the effect of changing almost every pixel between each frame, thus forcing the
HMX transmitter to send each entire frame, resulting in greatly increased network traffic and
sluggish performance.
Solutions
• For Linux, check the video settings on the computer. If the dither video box option is enabled,
disable it.
• Apple Mac with NVIDIA graphics use the Avocent utility for Mac – Contact Technical Support.
Apple Mac with ATI graphics
• Enable the anti-dither removal feature.
Windows PCs
• If you suspect these issues with computers, contact Technical Support for assistance.
Replace old VGA adapters on host computers with DVI video cards.
Monitor displays pink screen
It is possible that the source computer and HMX transmitter are sending a high resolution dual-link
signal in response to a request from your dual-link monitor. However, your HMX receiver is unable
to correctly process the signal, causing the pink screen issue (DVI resolutions above 1920 x 1200
are generally dual-link).
HMX 6200T and 6210T transmitters are able to send dual-link video when requested, however, an
HMX 6200R receiver is required to process the higher resolution signal fully at the other end. Other
receivers, such as the HMX1000R, 5100R and 5200R, cannot process dual-link DVI because they
are single-link devices.
Page 43

Appendices.....39
Solutions
Ensure that the HMX transmitter is set to supply a single-link EDID to the graphics card. When the
video source is changed to a single-link video resolution, the pink screen should disappear and the
video should be displayed normally. Alternatively, change the monitor to a single-link DVI monitor.
It is important not to mix dual-link transmitters with single-link receivers.
On an HMX Advanced Manager controlled system, verify the Video compatibility checkbox is
enabled to ensure the correct video mode is displayed for the monitor being used.
Audio output of the receiver sounds scratched
Audio crackle, like blinding, is a symptom of missing packets.
Solutions
See Solutions under blinding.
HMX Advanced Manager cannot locate HMX extenders
The following are possible causes:
• The HMX units must be reset to their zero config IP addresses for HMX Advanced Manager
discovery. If you have a working network of HMX units without HMX Advanced Manager and
then add HMX Advanced Manager to the network, the HMX Advanced Manager will not
discover the HMXs until they are reset to the zero config IP addresses.
• Layer 2 Cisco switches may have Spanning Tree Protocol (STP) enabled but not have
portfast enabled on the ports to which HMX units are connected. Without portfast enabled,
HMX units are assigned the same zero config IP address at reboot and HMX Advanced
Manager only acquires them one at a time on a random basis.
You can easily tell whether portfast is enabled on a switch that is running STP. When you plug
the link cable from a working HMX unit into the switch port, check how long it takes for the port
indicator to change from orange to green. If it takes roughly one second, portfast is on; if it
takes roughly thirty seconds, portfast is disabled.
Solutions
• Ensure the HMX units and the HMX Advanced Manager server are located in the same
subnet. HMX Advanced Manager cannot cross subnet boundaries.
• Manually reset the HMX units to their zero config IP addresses.
• Enable portfast on all switch ports that have HMX units attached to them, or try temporarily
disabling STP on the switches while HMX Advanced Manager attempts to locate HMX units.
Page 44

40.....The Avocent® HMX High Performance KVM Extender System Installer/User Guide
Page 45

Technical Support Site
If you encounter any installation or operational issues with your product, check the pertinent section
of this manual to see if the issue can be resolved by following outlined procedures. For additional
assistance, visit www.avocent.com/support.
Avocent Community Support Site
To search product knowledge content,
visit community.emerson.com/networkpower/support/avocent.
Page 46

About Emerson Network Power
Emerson Network Power, a business of Emerson (NYSE:EMR), delivers software, hardwareand services that maximize
availability, capacity andefficiency for data centers, healthcare and industrialfacilities. A trusted industry leader in smart
infrastructure technologies, Emerson Network Power provides innovative data center infrastructure management solutions
that bridge the gapbetweenIT and facility management anddeliver efficiency and uncompromisedavailability regardless of
capacity demands. Our solutions are supportedglobally by localEmerson Network Power service technicians. Learn more
about Emerson Network Power products and services at www.EmersonNetworkPower.com.
590-1271-501A
 Loading...