

Page 1
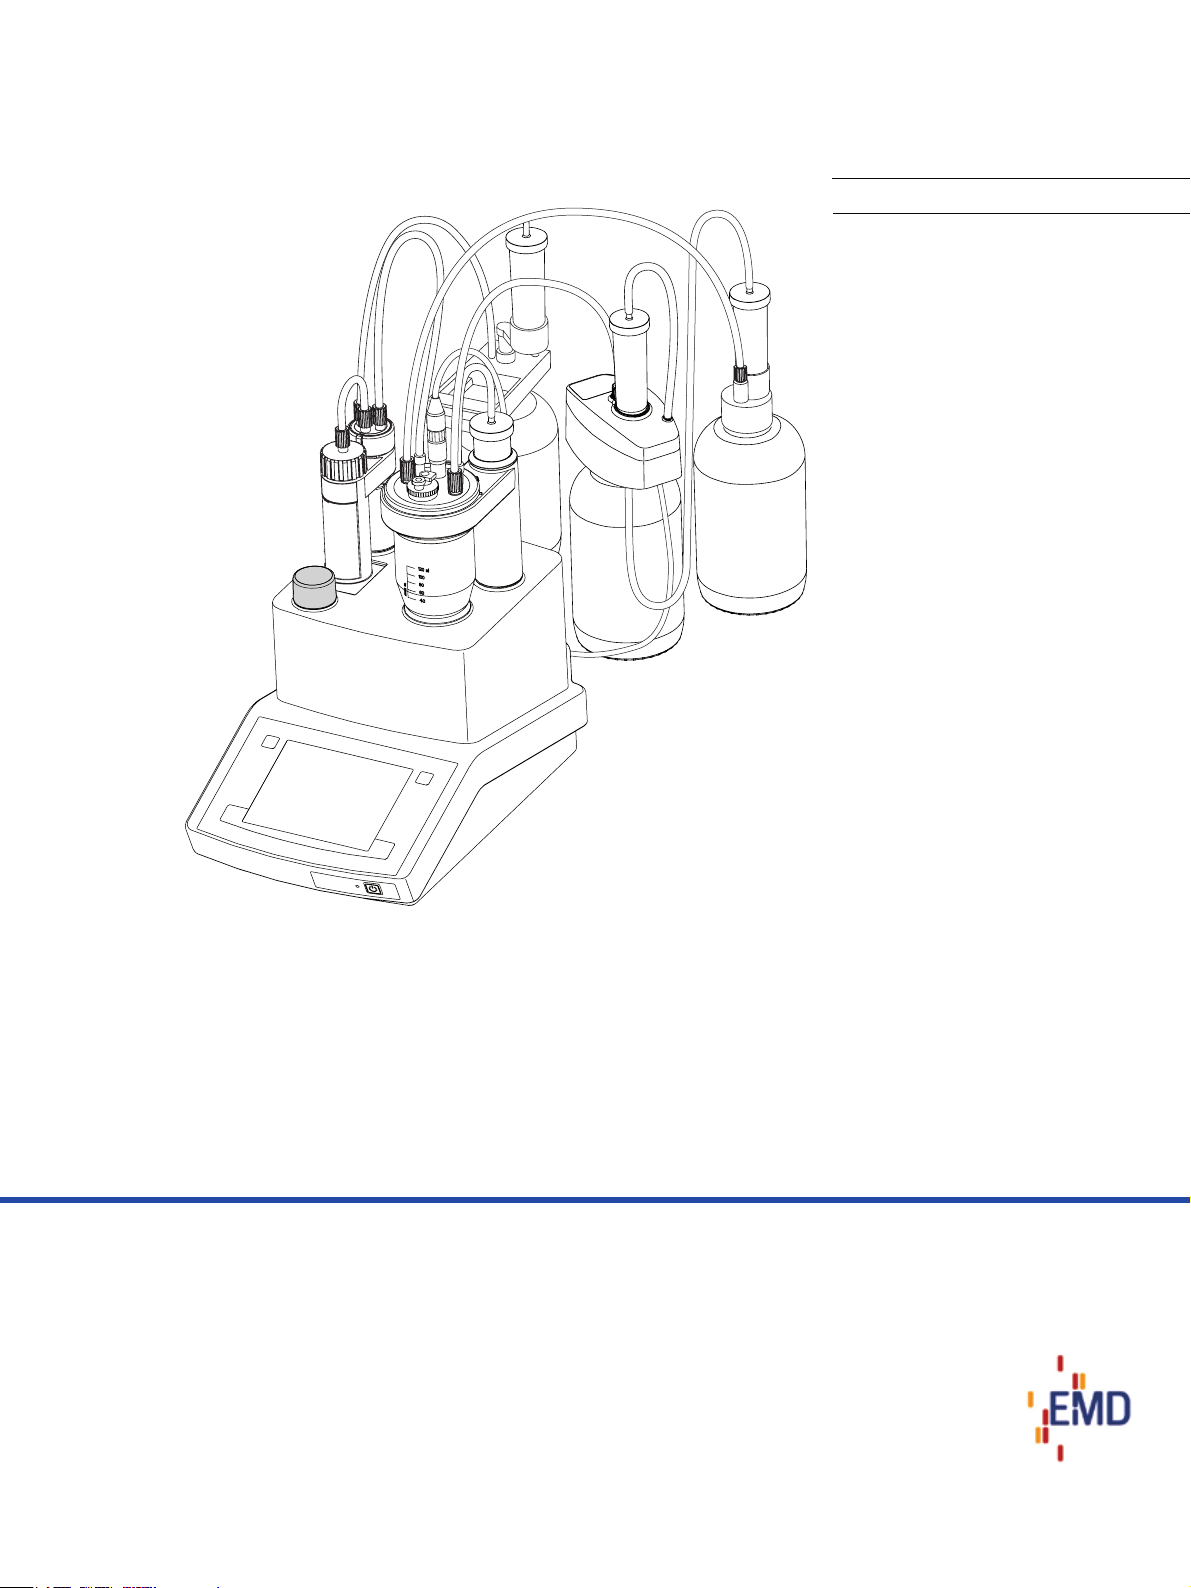
Installation Information
AQUASTAR® AQV21
Volumetric Titrator
Page 2

Page 3

Table of contents
Table of contents
1 Introduction 5
2 Measures for your protection 6
3 Standard equipment 7
4 The titrator 10
4.1 Titrator conguration 10
4.2 Titrator rear panel connections 11
4.3 Openings on the titration vessel 11
5 Installation (components) 13
5.1 Connecting the power supply 13
5.2 Titration stand 14
5.2.1 Installing the titration stand 14
5.2.2 Installing the solvent bottle 15
5.2.3 Installing the waste bottle 16
5.2.4 Connecting the measuring electrode 17
5.3 Inserting a burette 17
5.4 Internal magnetic stirrer 17
6 Optional accessories 18
7 Technical data 24
7.1 Titrator 24
7.2 Supported devices (periphery) 27
8 Service and maintenance 29
8.1 Cleaning 29
8.2 Transporting the titrator 29
9 Declaration of system validation 30
10 Product life cycle model 31
Volumetric Titrator 3
Page 4

Page 5

Introduction
1 Introduction
Simple and compact
The AQUASTAR® Compact Titrators are modern, titrators for use in a wide variety of application areas.
They can be used, for example, in quality control as well as in research and development and satisfy the
most demanding of requirements.
The AQUASTAR® titrators perfectly combine simple, easy-to-understand operation with an extremely high
lev el of precision and outstanding reliability. Thanks to automatic titrant recognition (Plug & Play burettes), the titrator independently identies which titrant is required without intervention from the oper a tor.
Settings no longer need to be adjusted manually, even when connecting a printer.
The instruments can either be controlled by Touchscreen or by using LabX PC software. The large color
Touch screen allows intuitive control by the user and exibility in its adjustment options. All functions can
be activated directly from the Homescreen via Shortcuts which can be freely created, making everyday
use extremely easier. Controlling the titrator by Touchscreen and all adjustable parameters are described
sep a rate ly and in detail in the operating instructions on the Tutorial CD.
This installation information explains all the steps necessary for installing and commissioning your device. The "Quick Guide" will then guide you through the rst titration process using a practical exam ple. If
you have any additional questions, EMD is always available to assist you.
Volumetric Titrator 5
Page 6
Measures for your protection
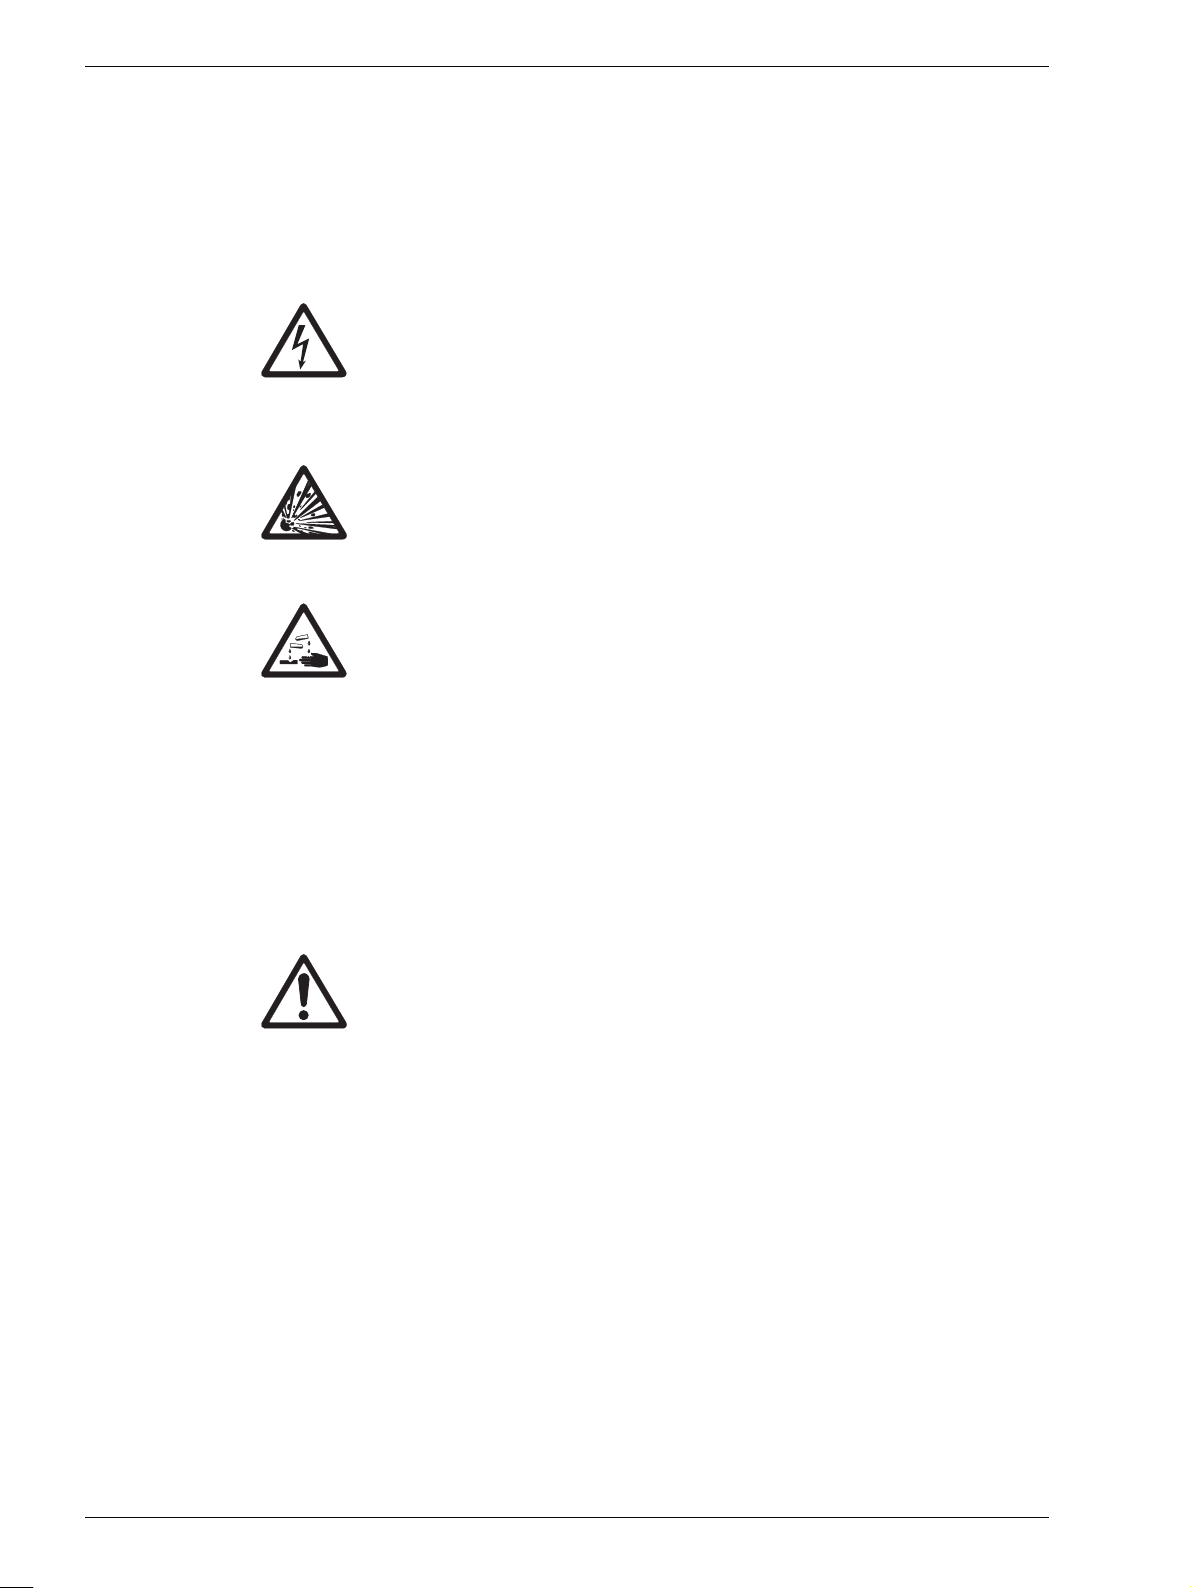
2 Measures for your protection
The instruments have been tested for the experiments and intended purposes documented in the appropri ate Operating Instructions. However, this does not absolve you from the responsibility of performing
your own tests of the products supplied by us regarding their suitability for the methods and purposes
you intend to use them for. You should therefore observe the following safety measures.
Measures for your protection
Risk of electric
shock
Risk of explosion
●
Only use the power supply unit that was included with the instrument.
●
Ensure that you plug the power cable supplied into a receptacle outlet that is
ground ed. In the absence of grounding, a technical fault could be lethal.
●
Never work in an environment subject to explosion hazards! The housing of
the instrument is not gas tight (explosion hazard due to spark formation, corro sion caused by the ingress of gases).
●
Always test the titration vessel for rm seating in the titration head. If it falls off,
you could injure yourself if working with toxic titrants and solvents or strong
acids or bases.
●
Risk of corrosion
When using chemicals and solvents, comply with the instructions of the produc er and the general lab safety rules!
All Karl Fischer reagents are readily ammable and toxic.
●
In the case of skin contact, immediately wash off with copious amounts of water!
●
If eye contact occurs, rinse intensively with copious amounts of water and
con sult a physician!
Measures for your operational safety
●
Have the instrument serviced only by METTLER TOLEDO Service!
●
Any spillage should be wiped off immediately! Some solvents might cause corro sion of the housing.
Caution
●
Exclude the following environmental inuences:
•
Powerful vibrations,
•
direct sunlight,
•
atmospheric humidity greater than 80%,
•
temperatures below 5 °C and above 40 °C,
•
powerful electric or magnetic elds!
Volumetric Titrator6
Page 7
Standard equipment
3 Standard equipment
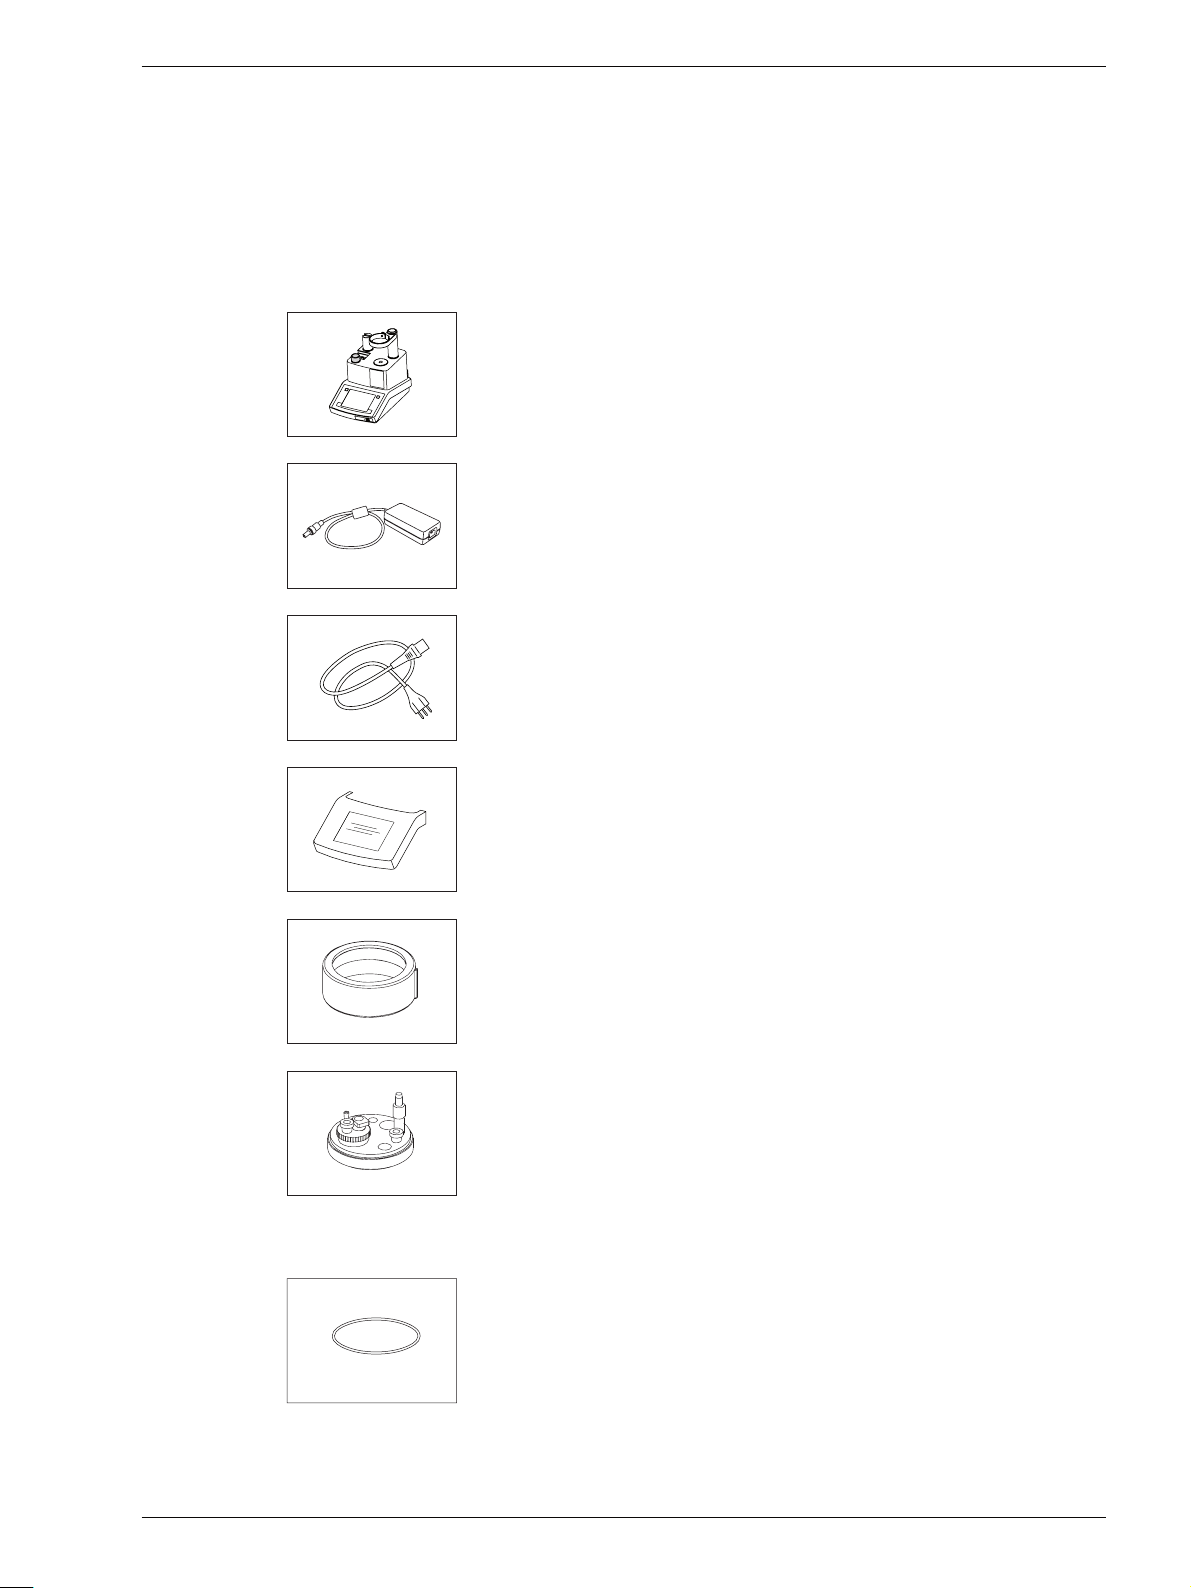
All parts are specied with their ordering code and quantity in cases where more than one part is included. When ordering, some parts are only available in a minimum order quantity. In such cases, the cor respond ing minimum order quantity is quoted. The standard equipment and optional accessories are listed
in the appropriate operating instructions.
Description Order number
Karl Fischer titrator -
Separate power supply (100 – 240 Volt) 51105795
Power cable (country-specic) -
Protective cover for touchscreen 51105567
Threaded ring 51107459
Cover with:
●
Three hole adapter (23982) incl. NS 10, NS 7.5 and
pin hole stopper
●
NS 7.5 stopper (23452) (minimum order quantity 5
pcs.)
●
Connecting piece (23957)
O-ring 51190366
51107462
Volumetric Titrator 7
Page 8
Standard equipment
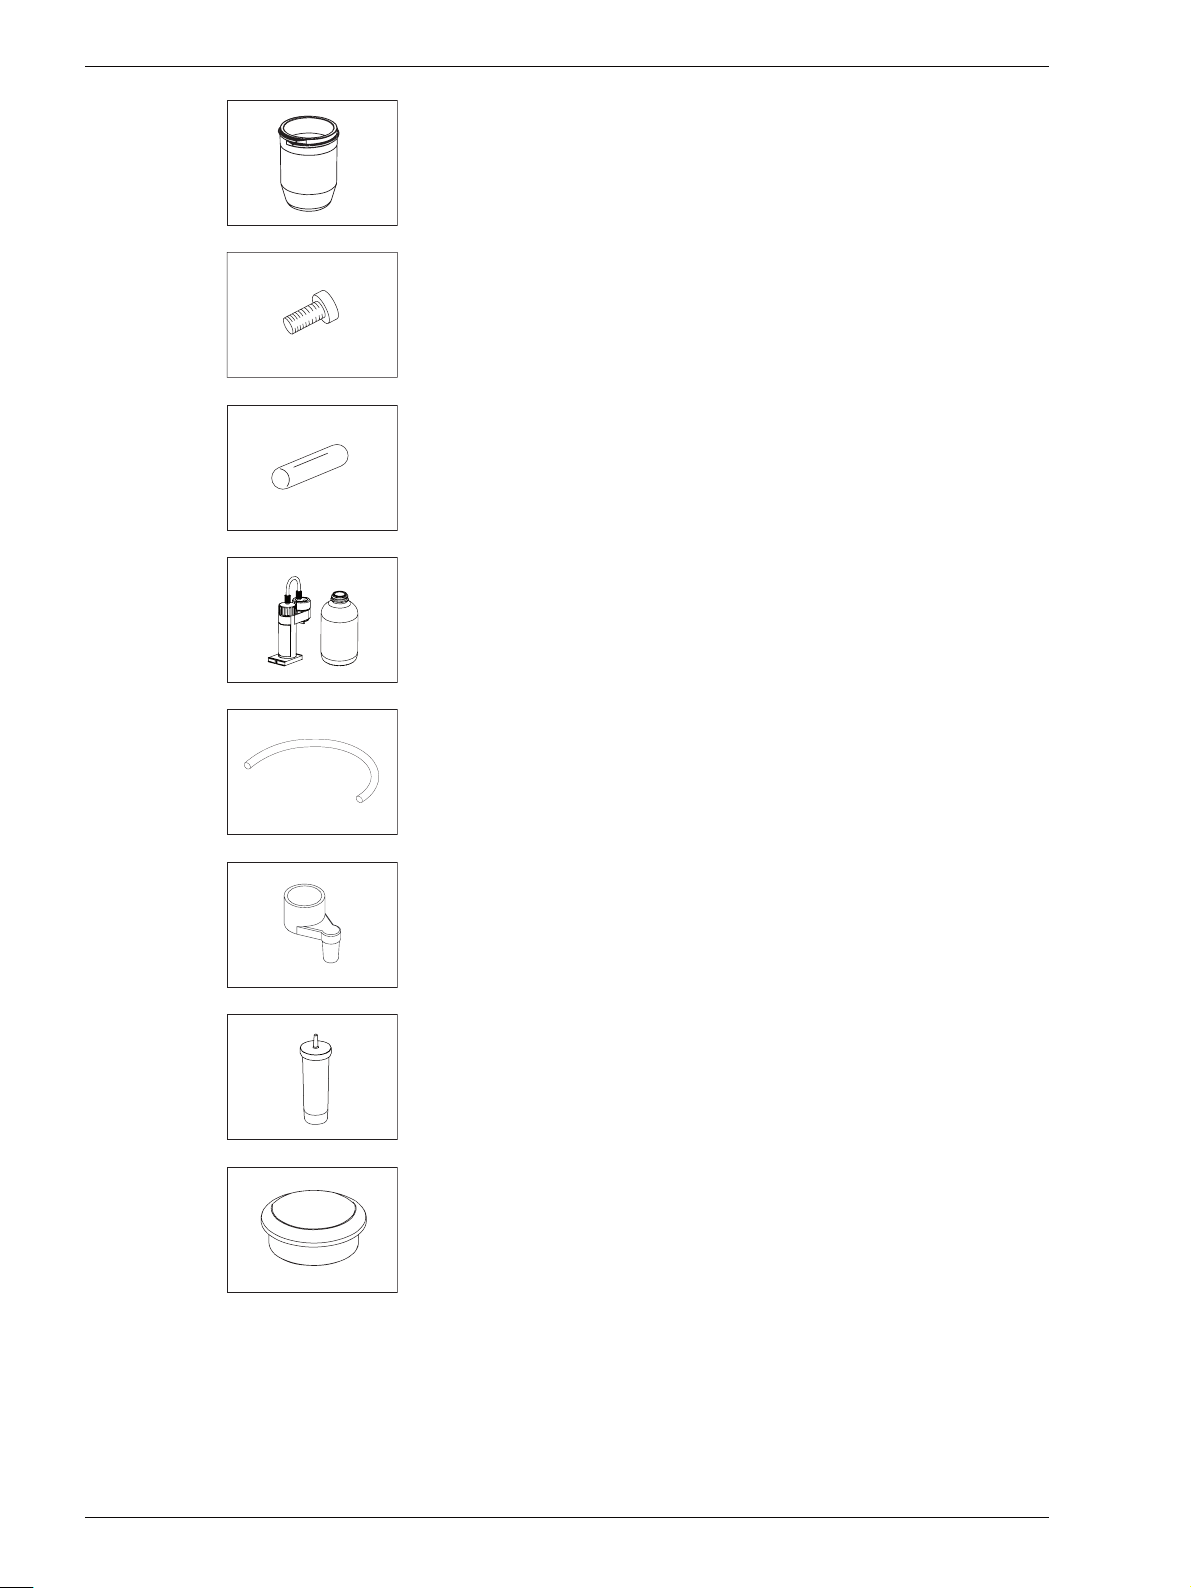
Titration vessel 51107463
Fastening screw (for measuring cell) 51107474
Magnetic stirrer bar 51191159
5 ml interchangeable burette set DV1005
Silicone tube
133 mm
Drying tube holder 23915
3 Drying tube with cover 23961
Seal (titration stand drying tube) 51107492
51107480
Volumetric Titrator8
Page 9
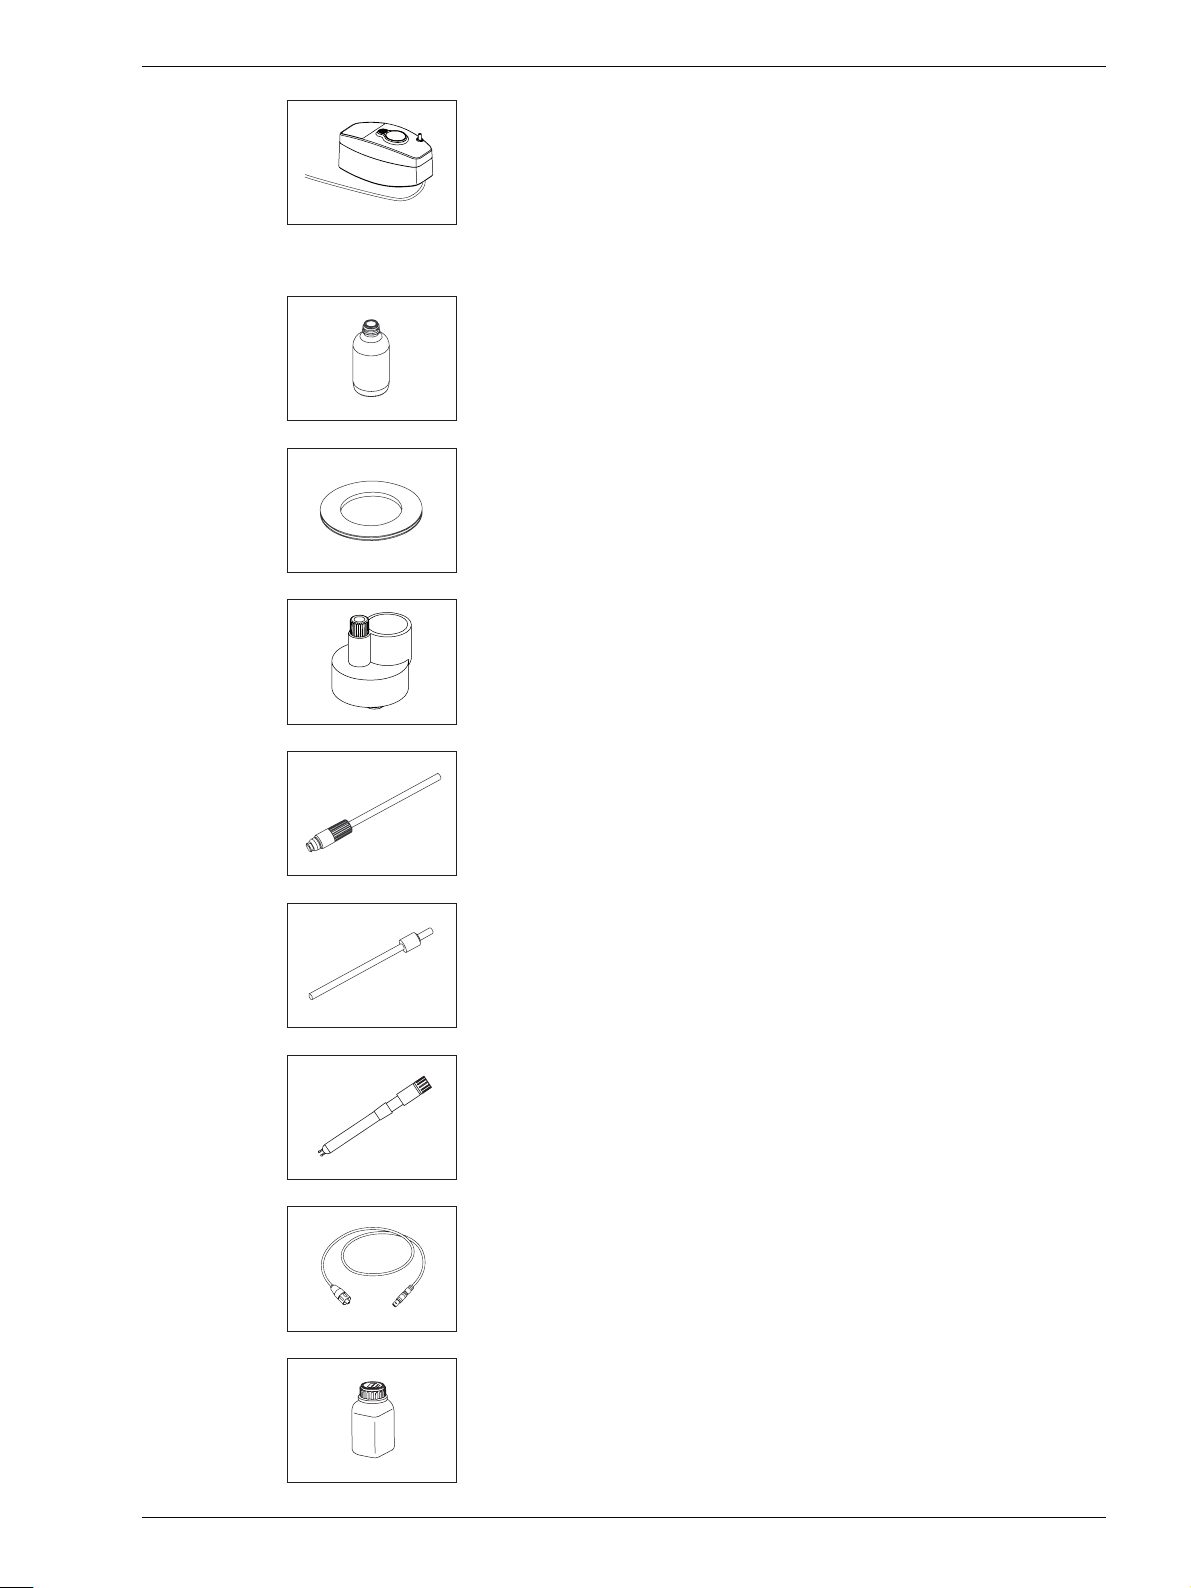
Standard equipment
Solvent Manager set with:
●
Silicone tube 850 mm (51105581)
●
Silicone tube 170 mm
●
Drying tube with cover (23961)
●
2 at seals (23981) (minimum order quantity 5 pcs)
Brown glass bottle
51105600
71296
1 l
2 Flat seals (minimum order quantity 5 pcs.) 23981
Screw top (for bottles) 23937
2 Draining tube / Dispensing tube 51107481
Adapter for immediate draining 51105594
Dual platinum pin electrode
51109299
DM143-SC
Triaxial SC LEMO cable
89601
72 cm
Molecular sieve
71478
250 g
Volumetric Titrator 9
Page 10
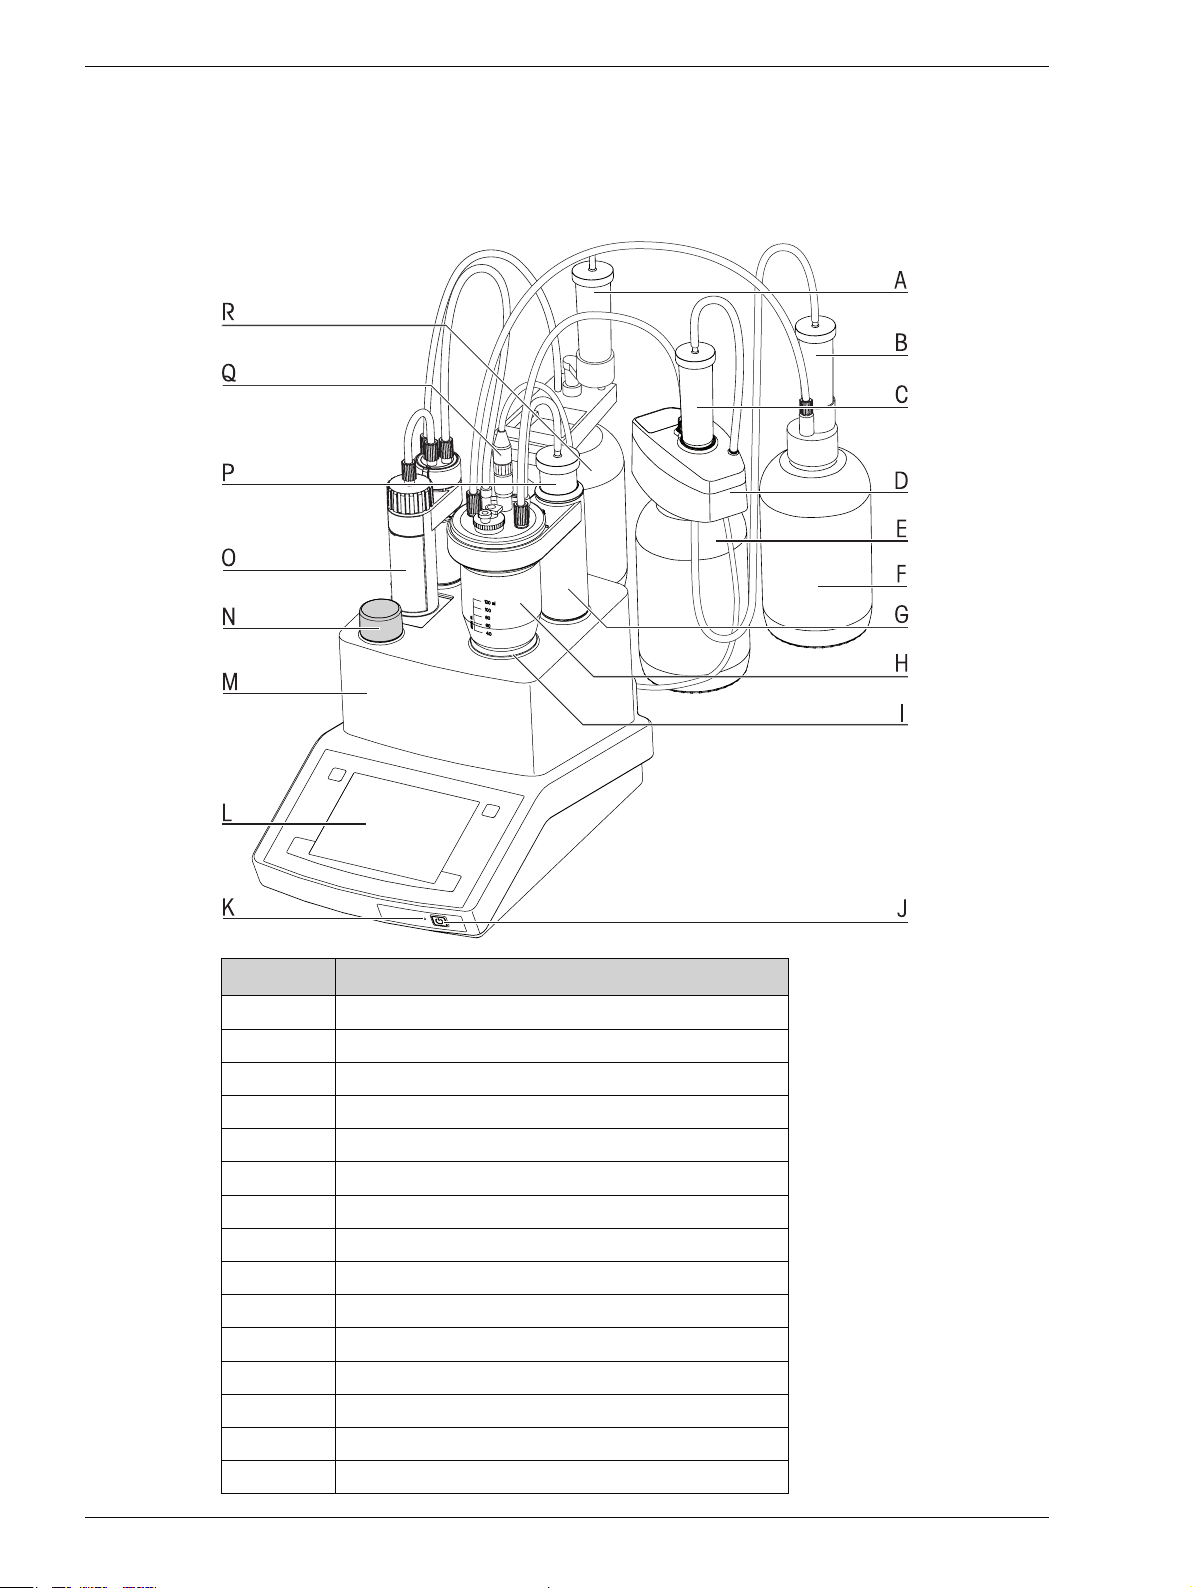
The titrator
4 The titrator
4.1 Titrator conguration
Part Description
A Titrant bottle drying tube
B Solvent bottle drying tube
C Waste bottle drying tube
D Solvent manager
E Waste bottle
F Solvent bottle
G Titration arm
H Titration beaker
I Internal magnetic stirrer
J On/Off button
K Indicator light (LED)
L Touchscreen
M Burette drive
n Burette arrestment knob
o Burette 5 mL
Volumetric Titrator10
Page 11
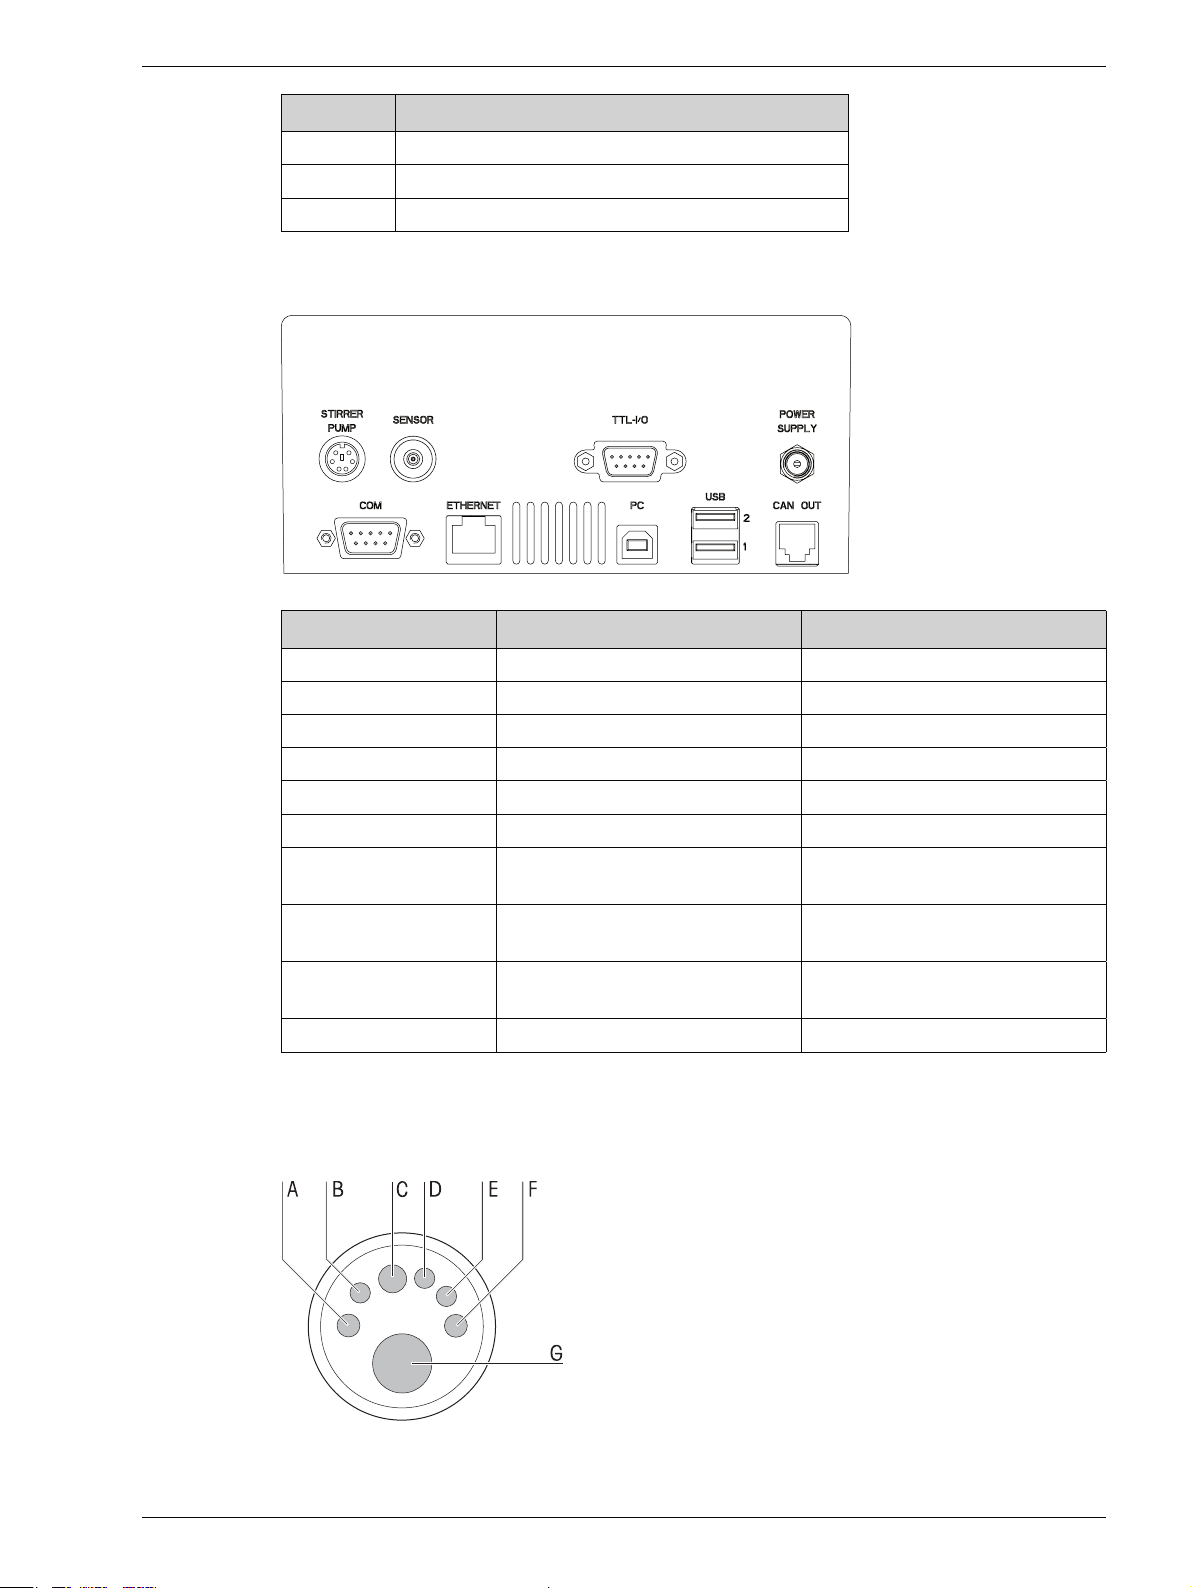
Part Description
p Drying tube for the titration beaker
Q Double platinum pin electrode
R Titrant bottle
4.2 Titrator rear panel connections
Socket Use Example
The titrator
STIRRER PUMP Stirrer / pump Solvent manager/stirrer
SENSOR Measuring electrode DM143-SC
TTL-I/O
POWER SUPPLY Power supply Power supply
COM Balance XS analytical balance
ETHERNET Network Link to LabX PC software via network
PC PC connection via USB Link to LabX PC software via USB
inter face
USB1 Printer / barcode reader / memory
stick / USB hub
USB2 Printer / barcode reader / memory
stick / USB hub
CAN OUT CAN connection For service use
USB-P25 compact printer
Barcode reader
4.3 Openings on the titration vessel
The titration vessel lid is normally connected as illustrated.
Volumetric Titrator 11
Page 12

The titrator
Part Connection
A Solvent bottle dispensing tube
B Burette dispensing tube
C Measuring electrode
D Stopper
E Silicone tube of drying tube
F Waste bottle draining tube
G Three hole adapter
Volumetric Titrator12
Page 13
Installation (components)
5 Installation (components)
Installation for all titrator types is described in this chapter. Standard equipment for the various types of
titra tors varies and also depends on the optional accessories. For this reason, installation steps may
vary.
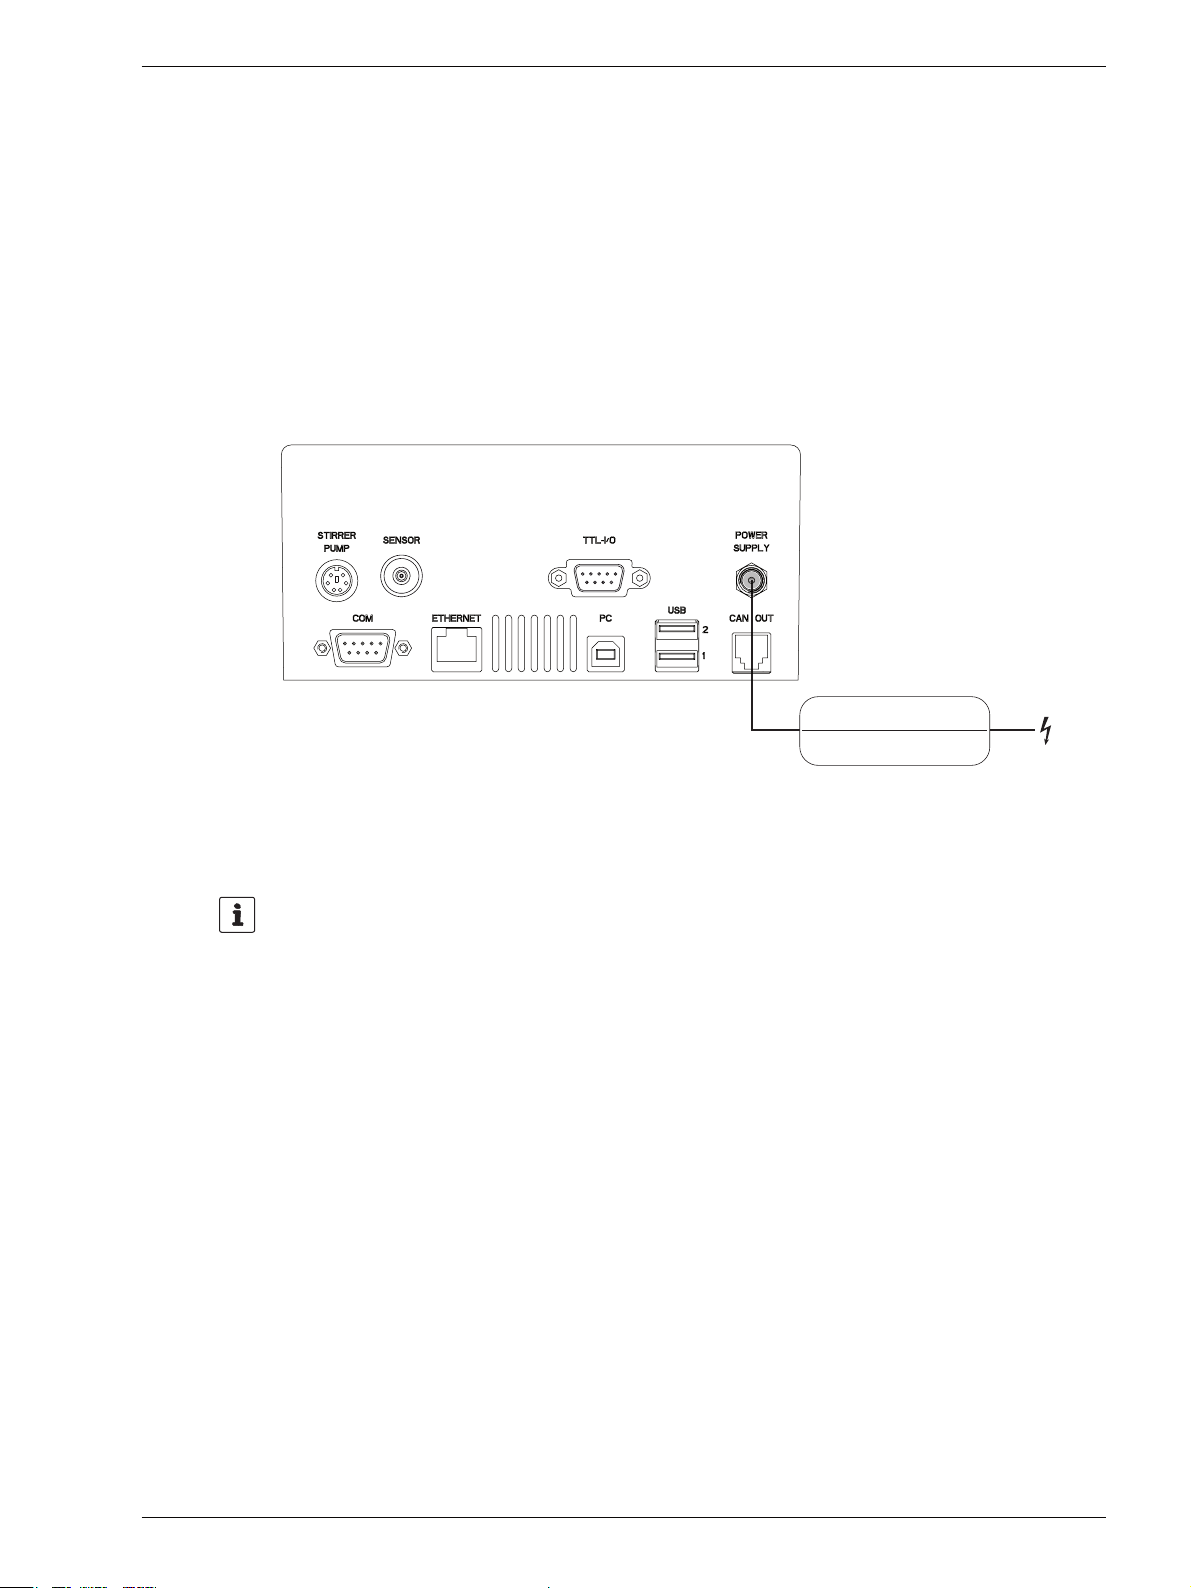
5.1 Connecting the power supply
The titrator is operated by a separate power supply. The On/Off switch is tted with an LED and mounted
on the front of the titrator. The LED displays the operating status. The titrator is switched on by pressing
the On/Off button. The LED ashes as the system starts up and then remains permanently lit. The titrator
is switched off by pressing the On/Off button again. All current tasks are interrupted and the LED starts to
ash until the system has shut down, which can take up to 60 seconds. The LED then goes out.
a) Connect the power supply unit to the "POWER SUPPLY" socket on the rear of the titrator and to the
mains supply.
b) Secure the connection at the titrator by screwing the plug connector rmly into place.
The power supply is suitable for all supply voltages ranging from 100–240 VAC ±10% and 50–60 Hz.
Volumetric Titrator 13
Page 14
Installation (components)
5.2 Titration stand
5.2.1 Installing the titration stand
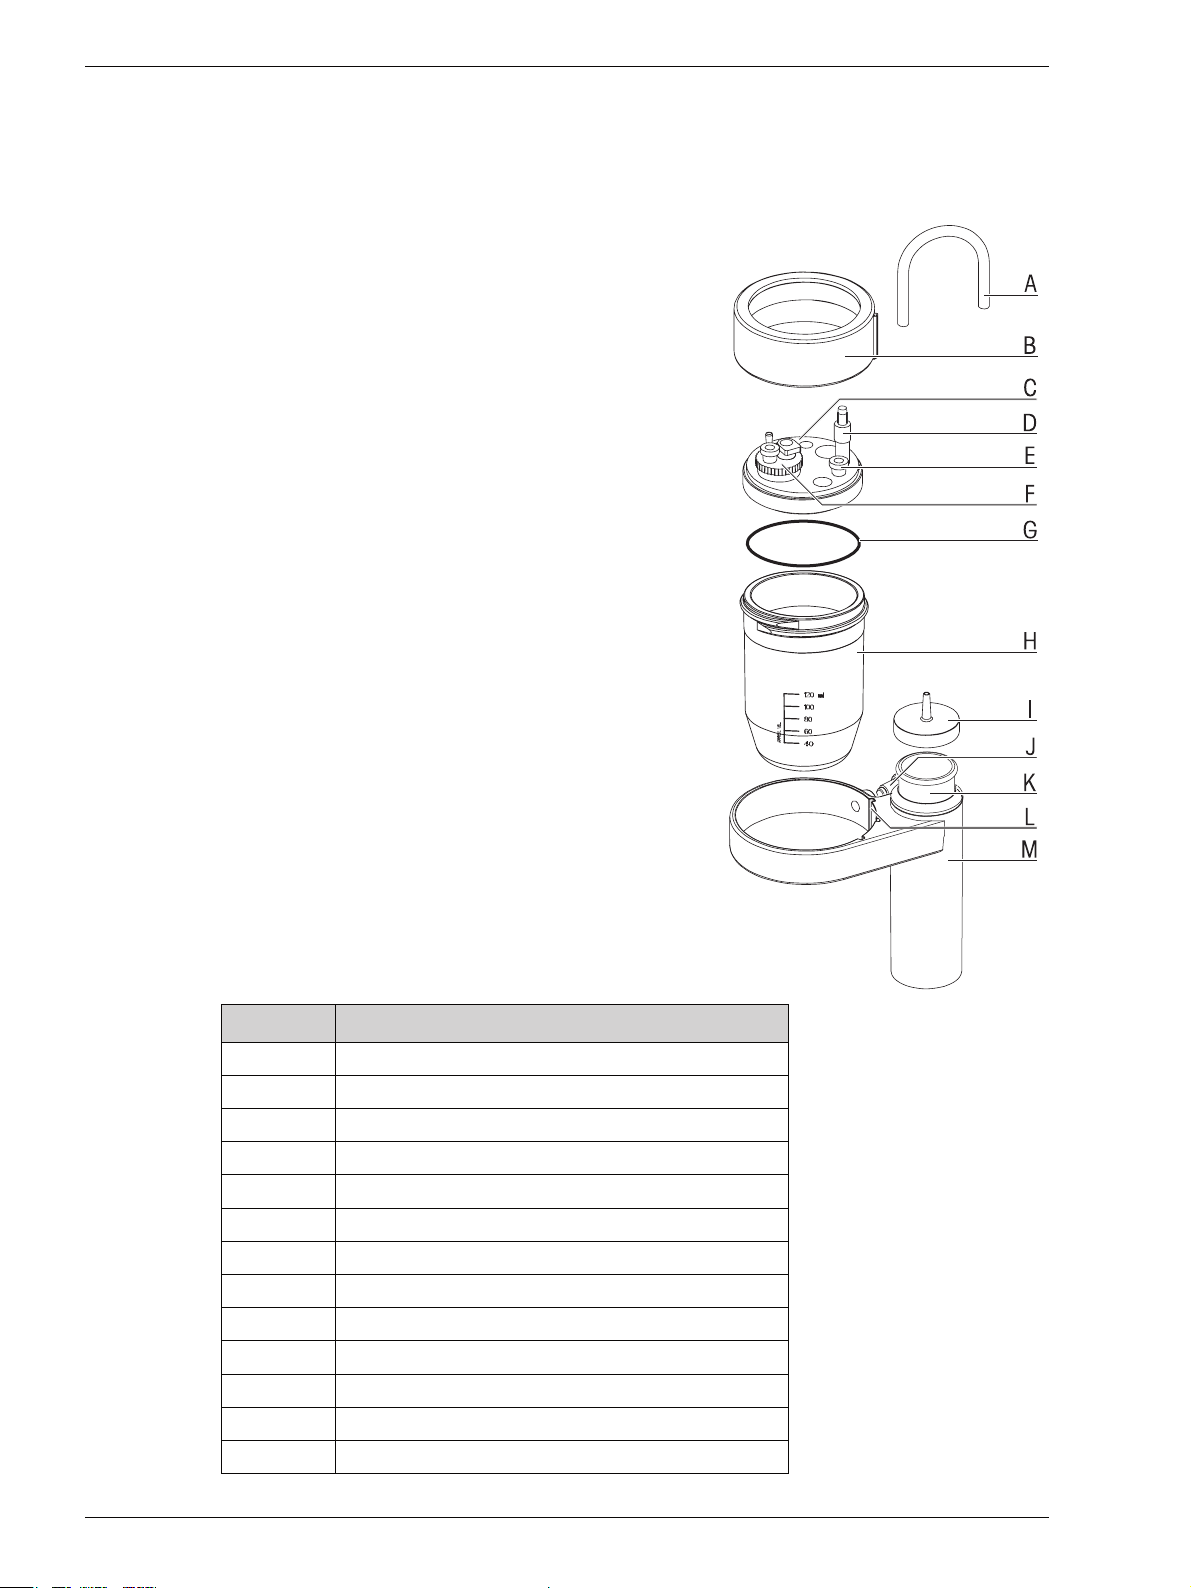
When delivered, the titration vessel is already assembled
com plete with O-ring, lid and threaded ring. The seal is secured in the titration stand. If you wish to change the lid or replace the O-ring, the illustration can be used as a guide. The
titration arm can be pivoted in both directions.
a) Carefully slide the magnetic stirring rod supplied into the
titra tion vessel.
b) Place the titration vessel in position by inserting the lobe
on the threaded ring into the center groove of the titration
arm and then pressing down onto the magnetic stirrer.
Tight en the fastening screw.
c) Place the three hole adapter, NS stopper and connecting
piece into the lid openings.
d) Fill a drying tube tted with a molecular sieve, close with
the lid and press into the titration stand so that leak tightness is ensured. Use the silicone tube to connect the lid
to the connecting piece.
Part Description
a Silicone tube (133 mm)
B Threaded ring
C Lid
D Connecting piece
E NS 7.5 stopper
F Three hole adapter
G O-ring
H Titration vessel
I Lid
J Fastening screw
K Drying tube
L Groove in the titration arm
M Titration arm
Volumetric Titrator14
Page 15
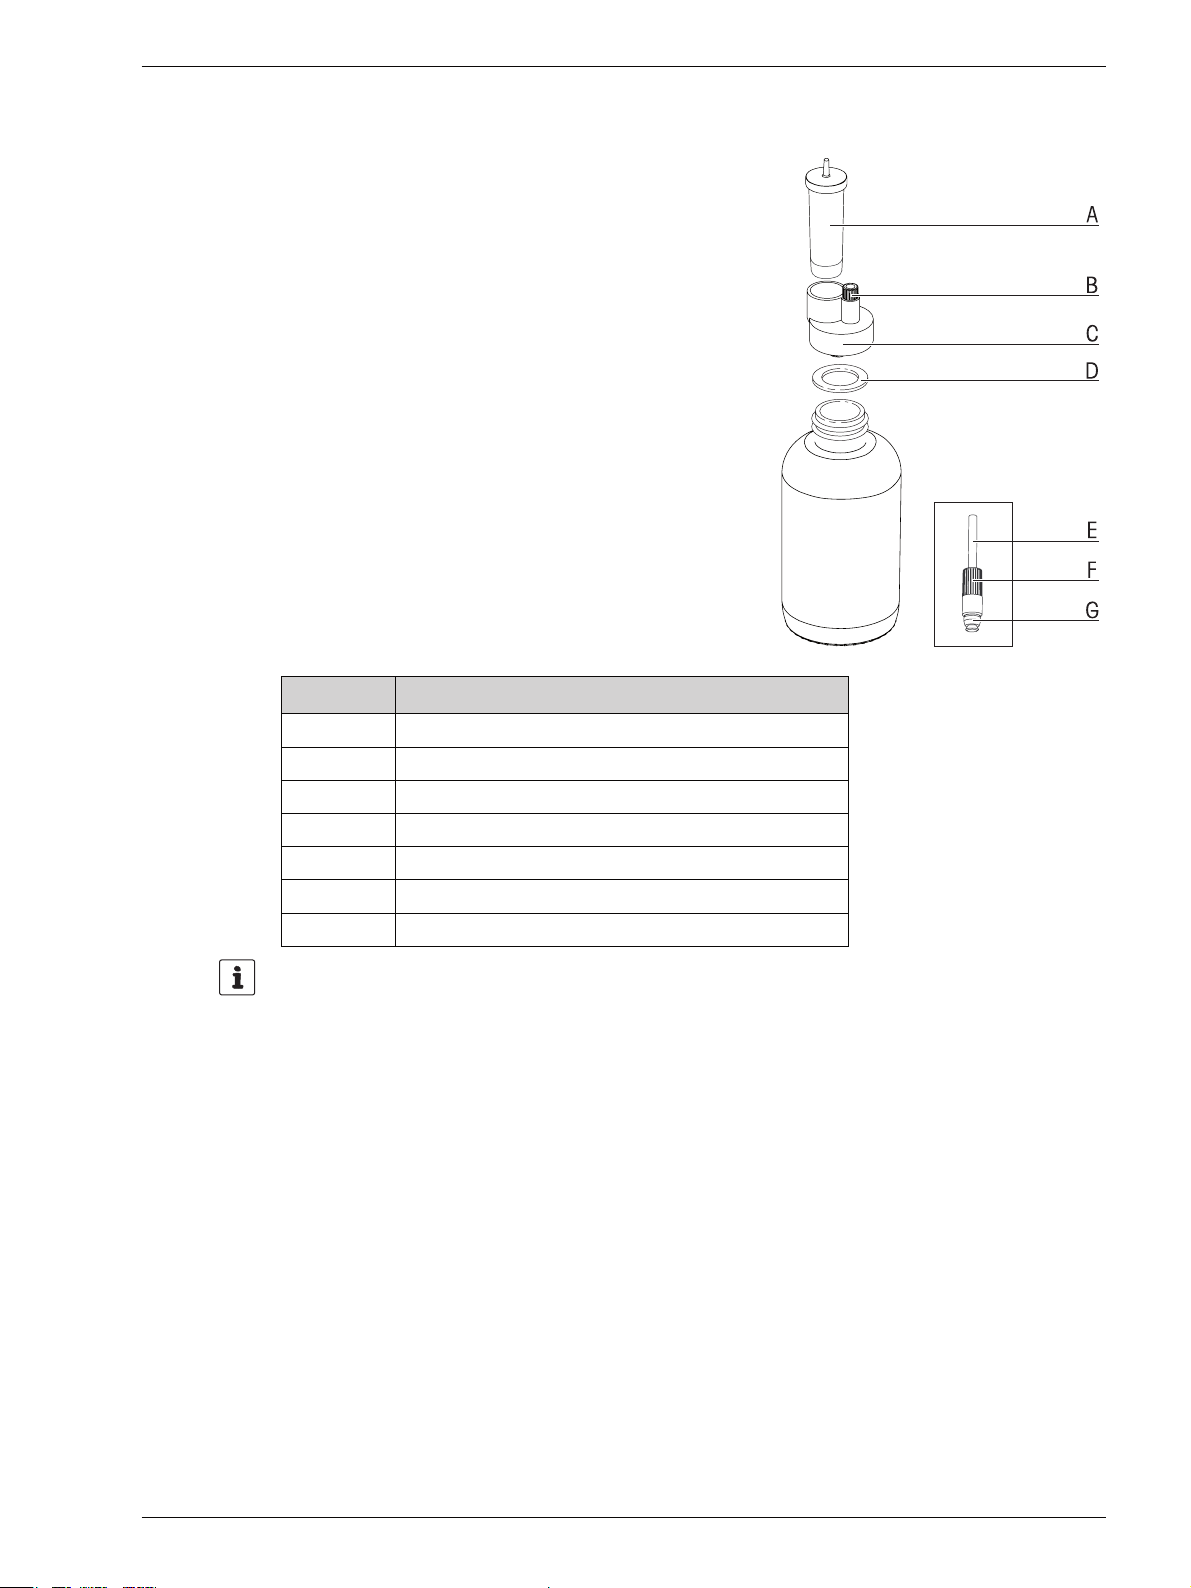
5.2.2 Installing the solvent bottle
a) Open the solvent bottle, place the at seal in position
and screw on the screw top.
b) Loosen the threaded sleeve on the screw top, push the
dis pens ing tube through the screw top and down to the
bot tom of the bottle and tighten the threaded sleeve. (An
O-ring is located in the bushing to guarantee leak tightness.)
c) Screw the other end of the dispensing tube with the
adjust ing sleeve into the left-hand opening of the three
hole adapter, at the titration stand.
d) Fill a drying tube tted with a molecular sieve and press
into the screw top of the bottle.
Installation (components)
Part Description
A Drying tube
B Threaded sleeve
C Screw top
D Flat seal
E Dispensing tube
F Adjusting sleeve
G Teon seal
Check all drying tubes and closing points once again for rm seating in order to ensure that the system
is leaktight.
Volumetric Titrator 15
Page 16
Installation (components)
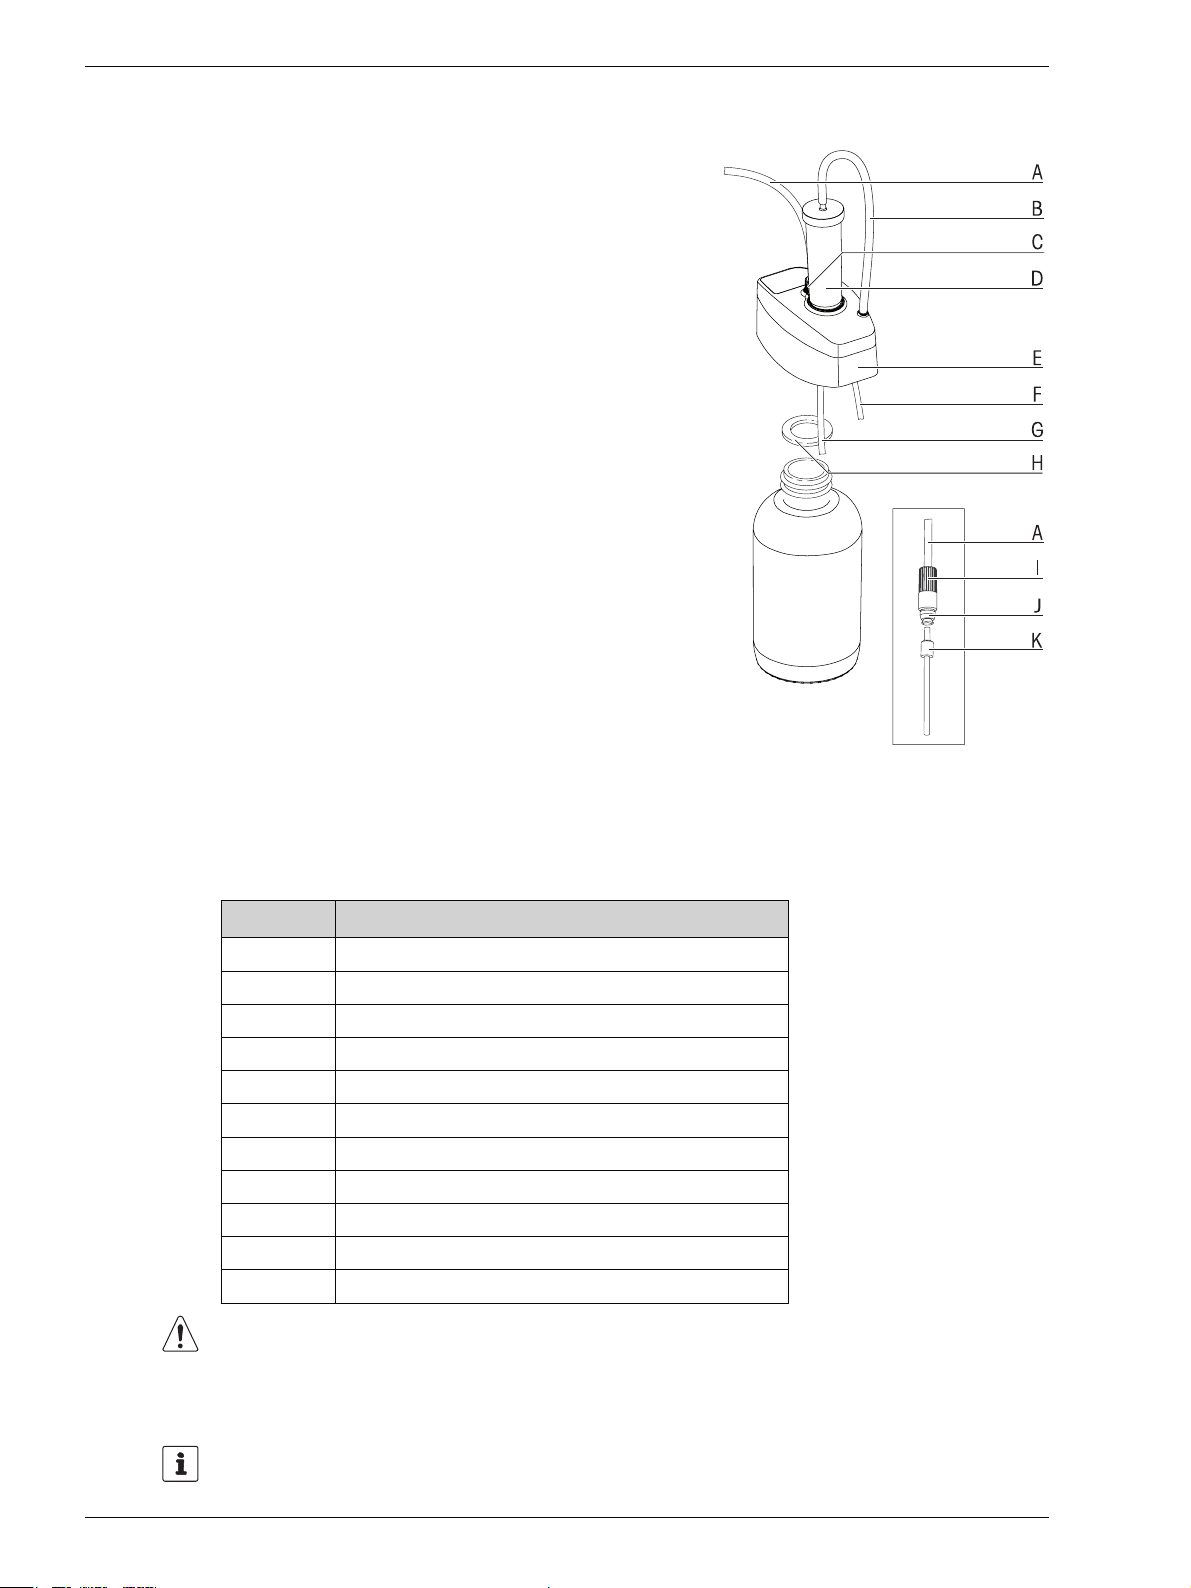
5.2.3 Installing the waste bottle
a) Place the at seal in position and screw the solvent man-
ag er onto the waste bottle.
b) Loosen the threaded sleeve on the Solvent Manager,
push in the extraction tube so that it is just below the
screw top and tighten the threaded sleeve. (An O-ring is
locat ed in the bushing to guarantee leaktightness.)
c) Push the adjusting sleeve and teon ring back a little on
the other end of the extraction tube. Take the adapter for
imme di ate draining and carefully insert it into the draining tube. (The instrument can also be operated without this adapter. When emptying the titration beaker, you
must push the draining tube to the bottom of the con tainer in this case.)
d) Screw the draining tube into the right-hand opening of
the three hole adapter and adjust the height so that the
adapter just touches the bottom of the titration beaker.
e) Fill a drying tube tted with a molecular sieve and press
into the appropriate opening of the solvent manager.
f) Using the silicone tube (170 mm), connect the drying
tube to the appropriate connection on the Solvent Manag er.
g) Using the silicone tube (850 mm), connect the drying
tube of the solvent bottle to the appropriate adapter of the
Sol vent Manager. The silicone tube can be shortened to
any length, if required, using a pair a scissors.
h) Connect the cable of the Solvent Manager to the "STIR-
RER/PUMP" socket on the rear of the titrator.
Part Description
A Draining tube
B Silicone tube (170 mm)
C Threaded sleeve
D Drying tube
E Solvent Manager
F Connecting cable
G Silicone tube (850 mm)
H Flat seal
I Adjusting sleeve
J Teon seal
K Adapter for immediate draining
●
Do not use the adapter for immediate draining in connection with samples which cannot be fully dissolved. Risk of blockage.
●
Do not use the adapter for immediate draining in connection with a homogenizer. This could destroy
the adapter.
●
Check all drying tubes and closing points once again for rm seating in order to ensure that the system is leaktight.
Volumetric Titrator16
Page 17
Installation (components)
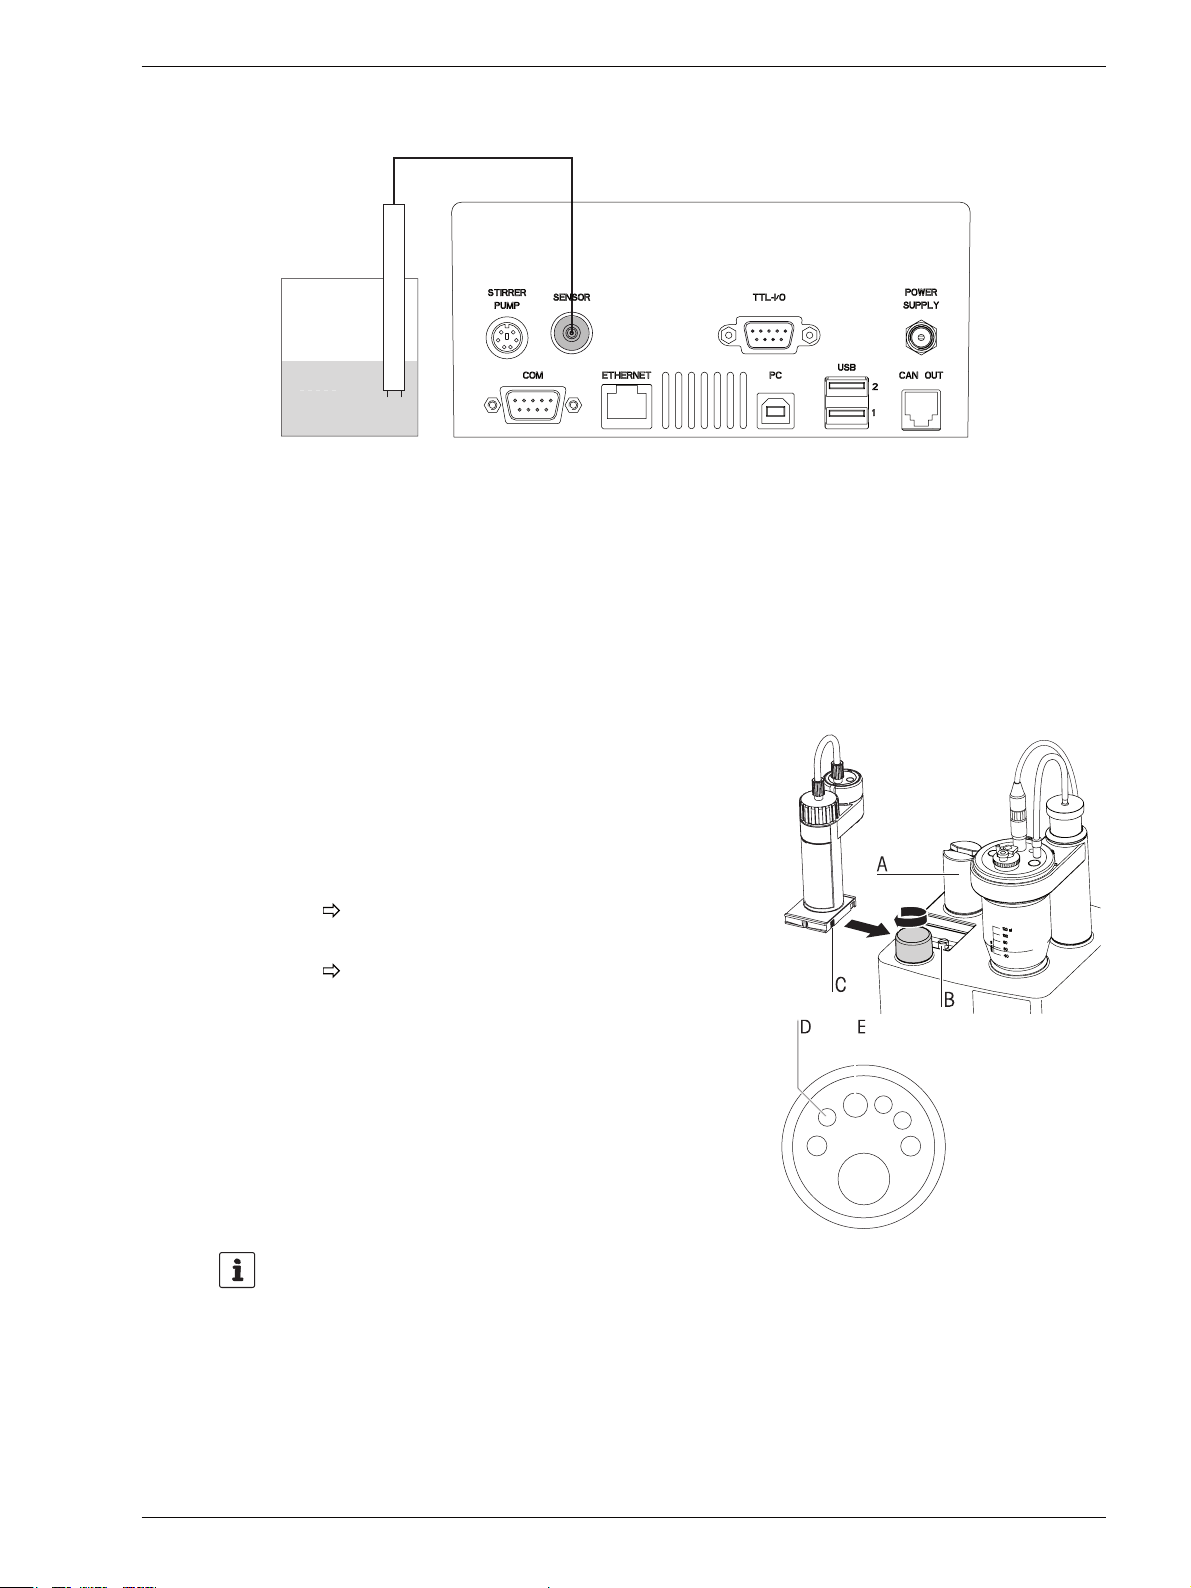
5.2.4 Connecting the measuring electrode
a) Place the measuring electrode into the appropriate opening of the cell
b) Using the triaxial cable, connect the measuring electrode to the "SENSOR" socket on the rear of the
titra tor.
5.3 Inserting a burette
Current generation burettes are tted with a RFID transponder chip on the holder (can be recognized by
the small cover C, represented in black). This chip is used for reading and writing properties such as
titrate name, concentration or usable life.
a) Install the burette with holder on the titrant bottle (see bu-
rette operating instructions).
b) Turn the arrestment knob in the opposite direction to the
arrow.
c) Take the burette from the holder and push it onto the
titra tor from the left hand-side, as illustrated:
The recesses on the driver arm A must be parallel to
the slide-on part of the burette.
The piston rod B must be in the home position.
d) Turn the arrestment knob in the direction of the arrow to
secure the burette.
e) Insert the dispensing tube into the next available opening
in the titration stand D, which is located coun ter clockwise from the electrode E.
When rinsing burettes and tubes, place the tips of dispensing tubes into a waste container.
5.4 Internal magnetic stirrer
A magnetic stirrer is standard on all models and tted at the top of the housing, underneath the pivoted
titra tion arm. Both On/Off switching and the stirrer speed are controlled by the software.
Volumetric Titrator 17
Page 18
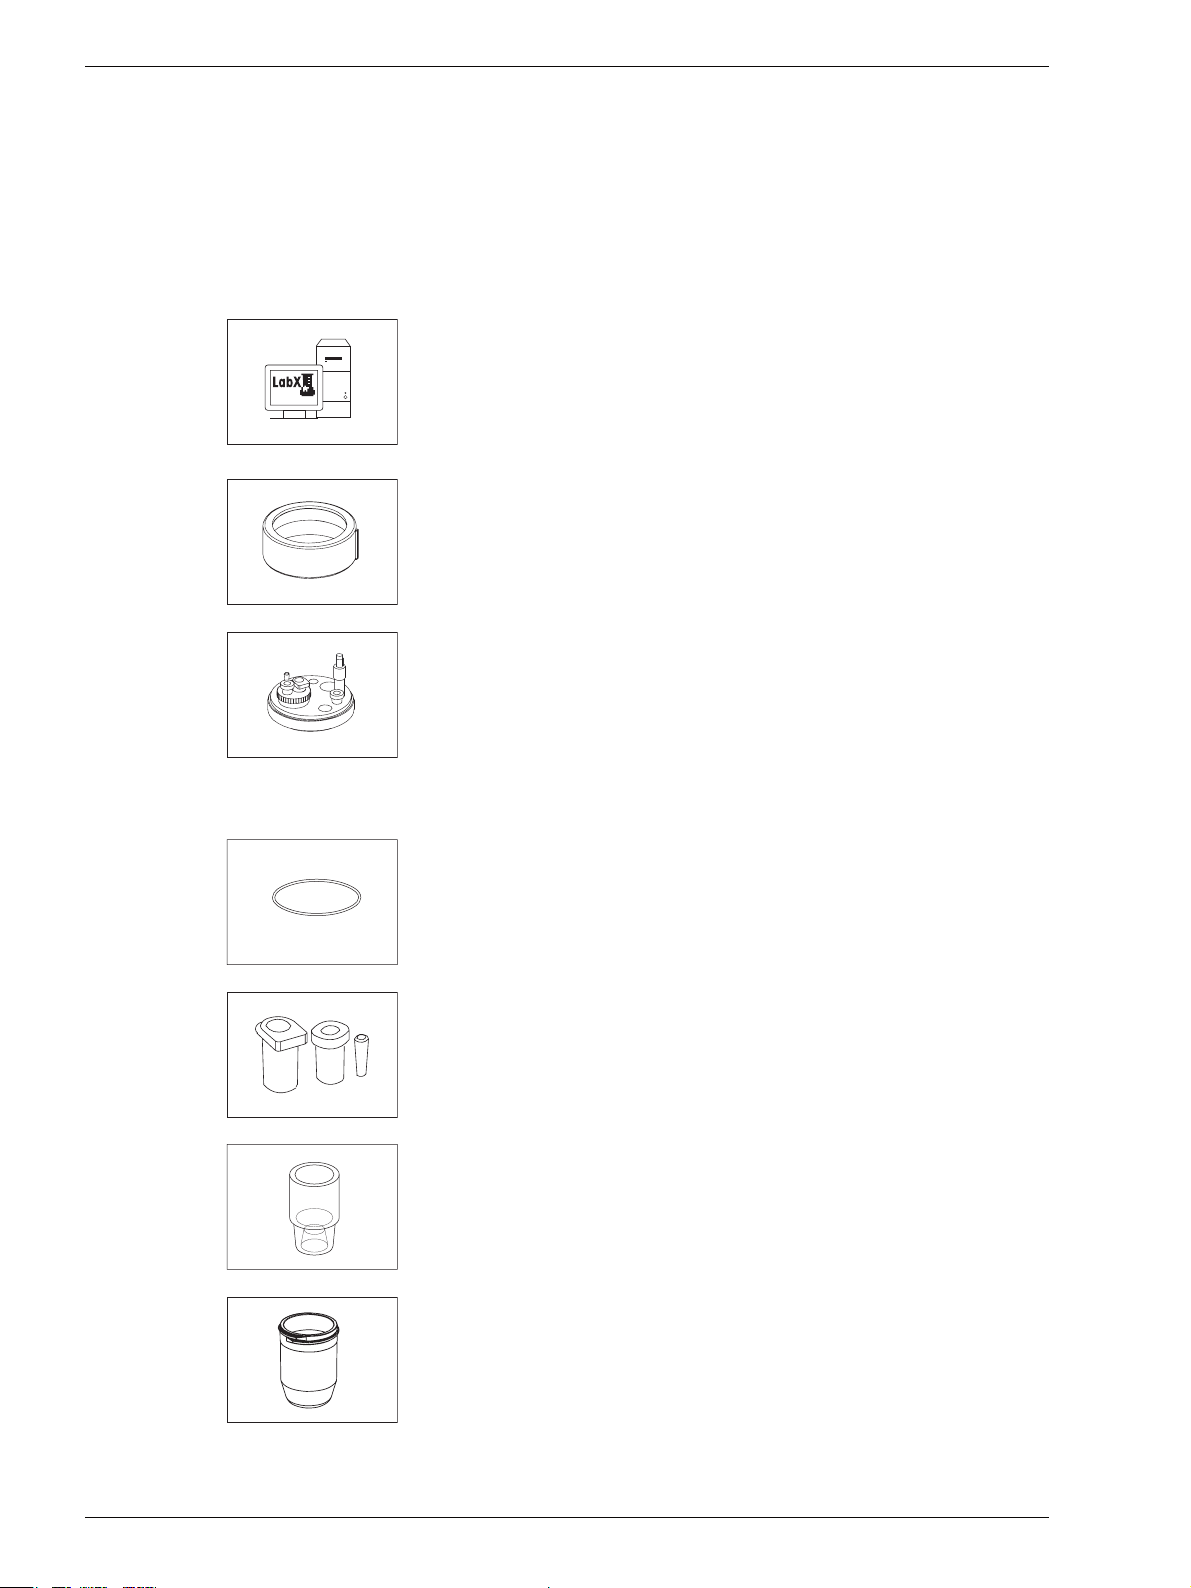
Optional accessories
6 Optional accessories
All parts are specied with their ordering code and quantity in cases where more than one part is included. When ordering, some parts are only available in a minimum order quantity. In such cases, the cor respond ing minimum order quantity is quoted. The standard equipment and optional accessories are listed
in the appropriate operating instructions.
Description Order number
Titration software
●
LabX light titration
●
LabX pro titration
●
Instrument licenses for titrators
Threaded ring 51107459
Cover with:
●
Three hole adapter (23982) incl. NS 10, NS 7.5 and
pin hole stopper
●
NS 7.5 stopper (23452) (minimum order quantity 5
pcs.)
●
Connecting piece (23957)
O-ring 51190366
LabX
51107462
Stopper for three hole adapter
(1 set: 1 NS 10, 1 NS 7.5, 6 pin hole stopper)
Septum stopper (10 pcs.)
NS 10
NS 24
Titration vessel 51107463
25883
23949
23950
Volumetric Titrator18
Page 19
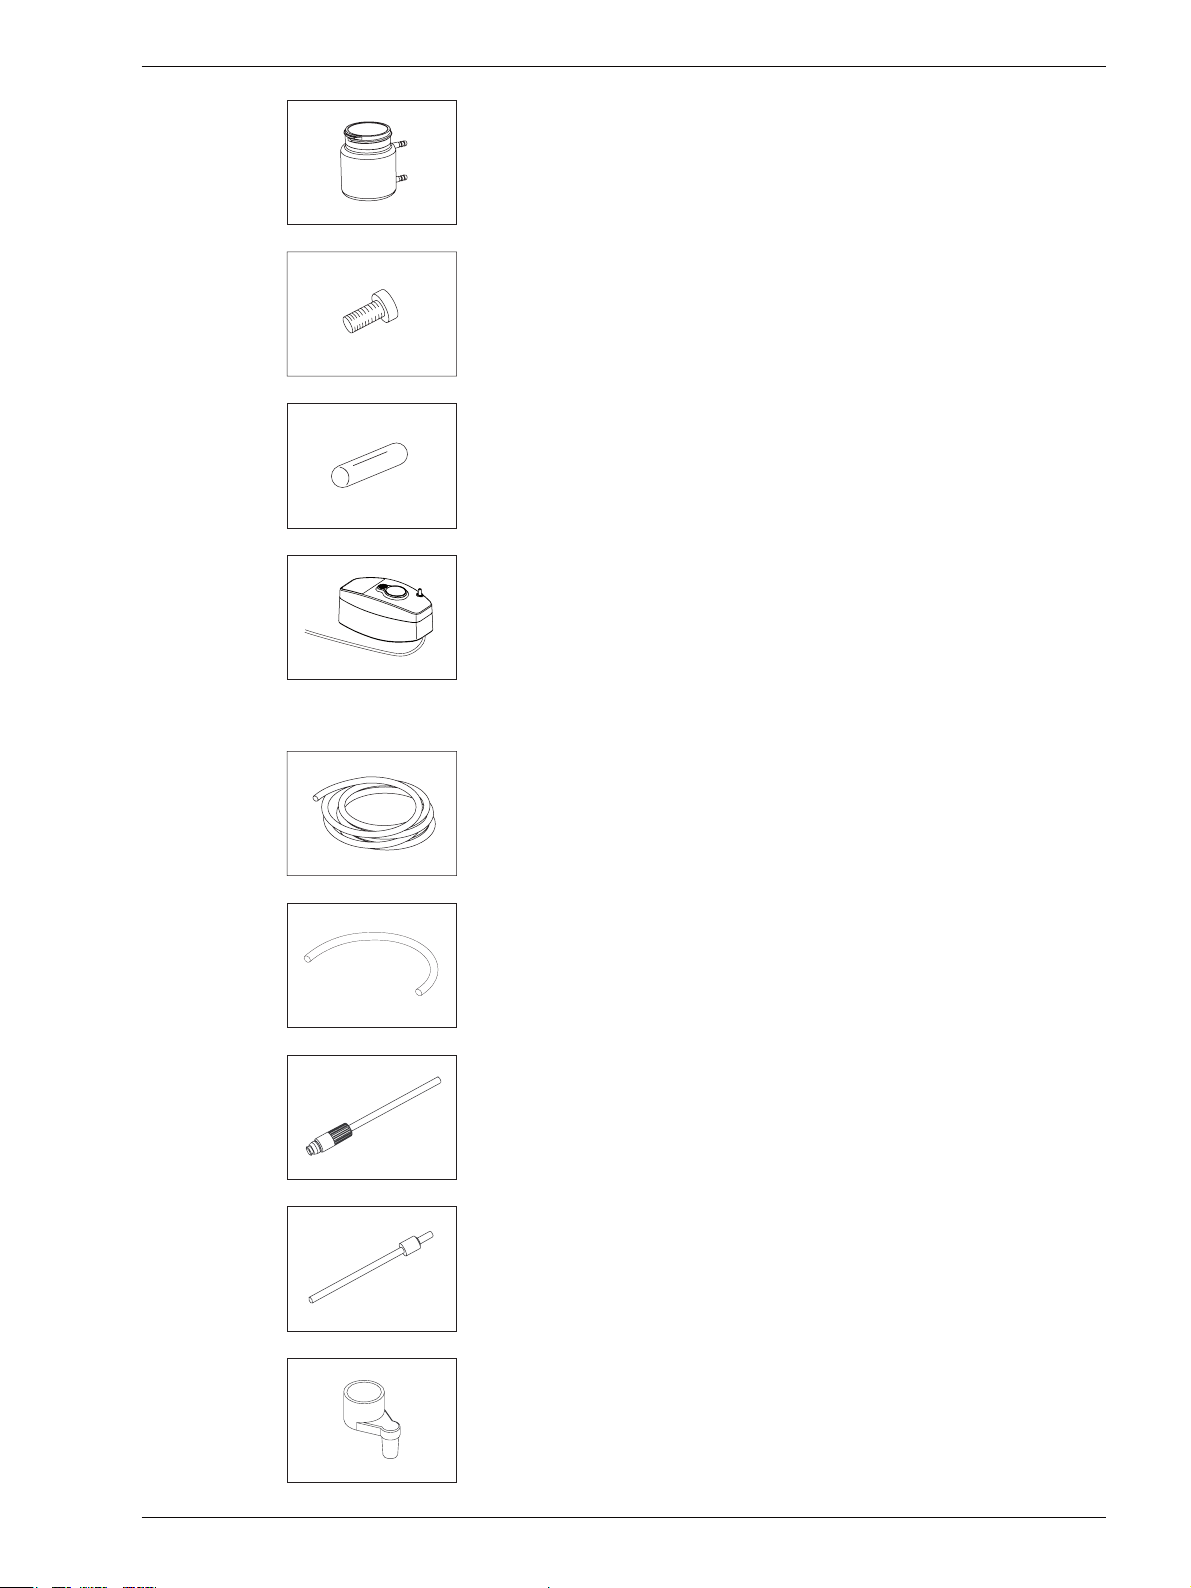
Optional accessories
Tempering beaker 51107497
Fastening screw (for measuring cell) 51107474
Magnetic stirrer bar 51191159
Solvent Manager set with:
●
Silicone tube 850 mm (51105581)
●
Silicone tube 170 mm
●
Drying tube with cover (23961)
●
2 at seals (23981) (minimum order quantity 5 pcs)
Silicone tube (pressure tube to solvent manager)
51105600
51105581
850 mm
Silicone tube
51105578
170 mm
Draining tube / Dispensing tube 51107481
Adapter for immediate draining 51105594
Drying tube holder 23915
Volumetric Titrator 19
Page 20
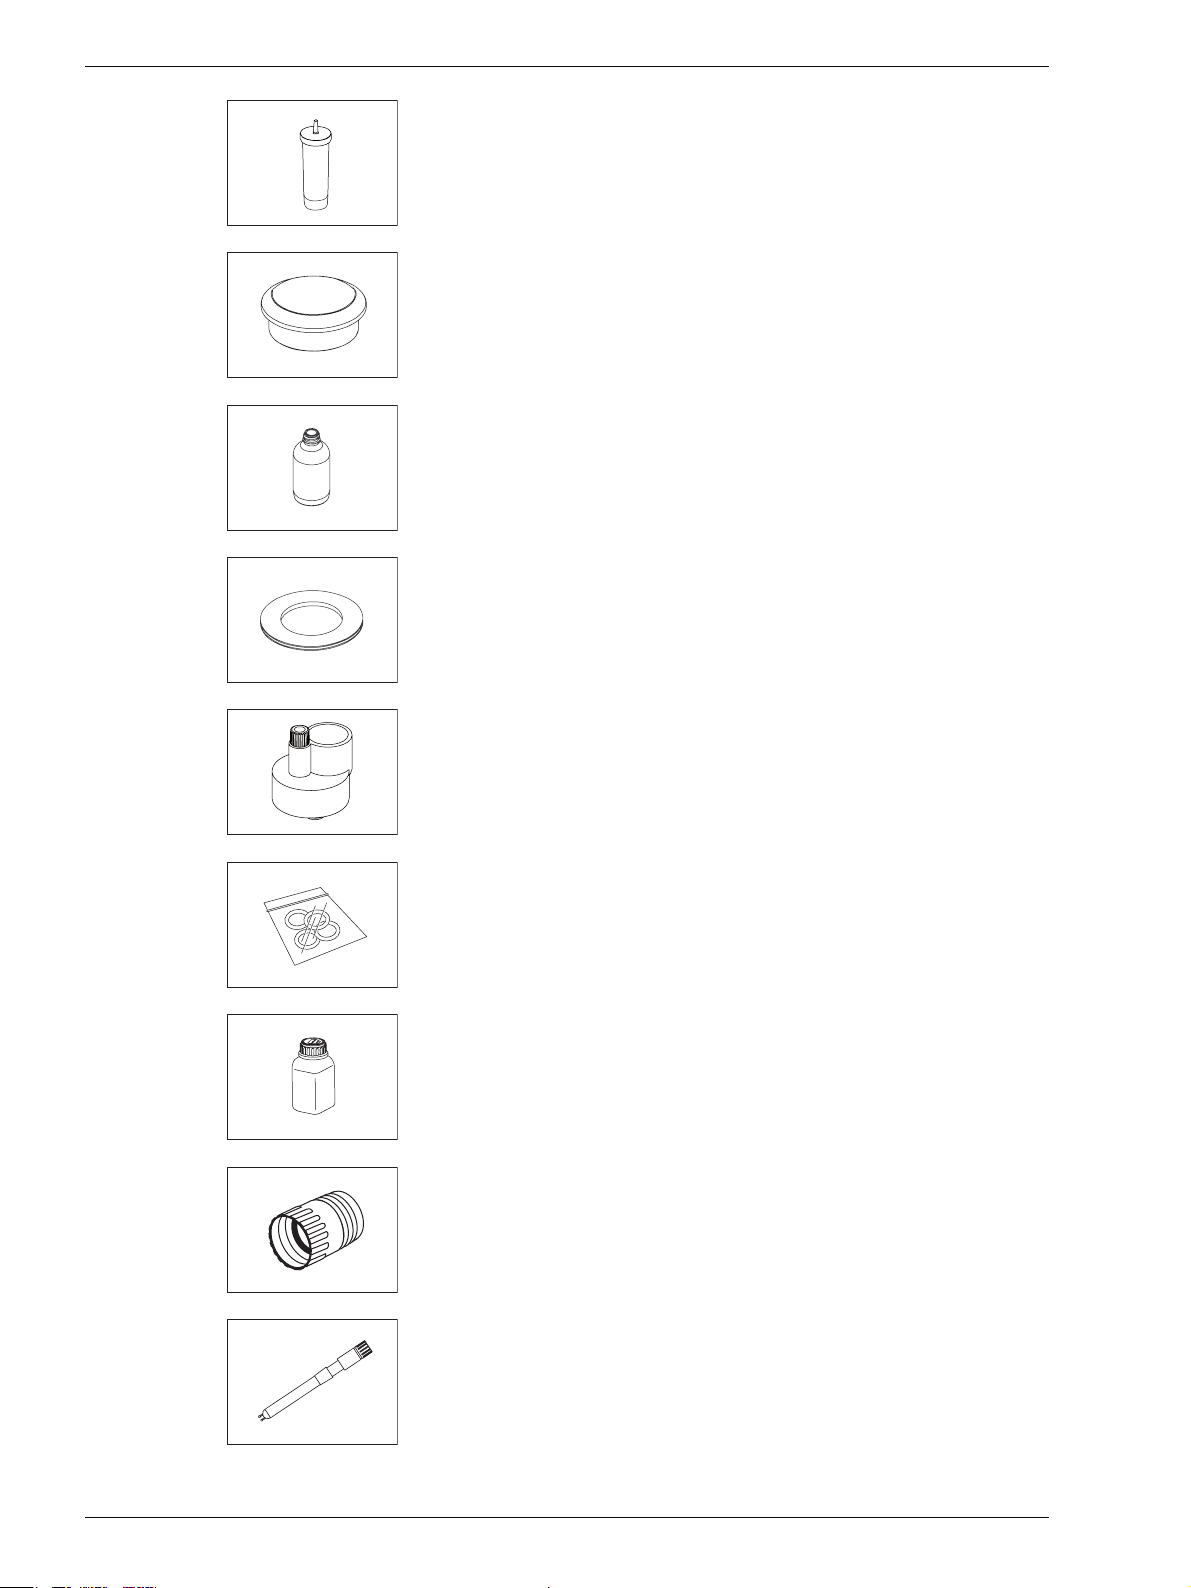
Optional accessories
Drying tube with cover 23961
Seal (titration stand drying tube) 51107492
Brown glass bottle
1 l
Flat seal (minimum order quantity 5 pcs.) 23981
Screw top (for bottles) 23937
O-ring (4 pcs.)
for screw tops
71296
51107496
Molecular sieve
250 g
Adapter for bottles made by
Merck, Germany
Fisher, USA
Dual platinum pin electrode
DM143-SC
71478
23774
23787
51109299
Volumetric Titrator20
Page 21
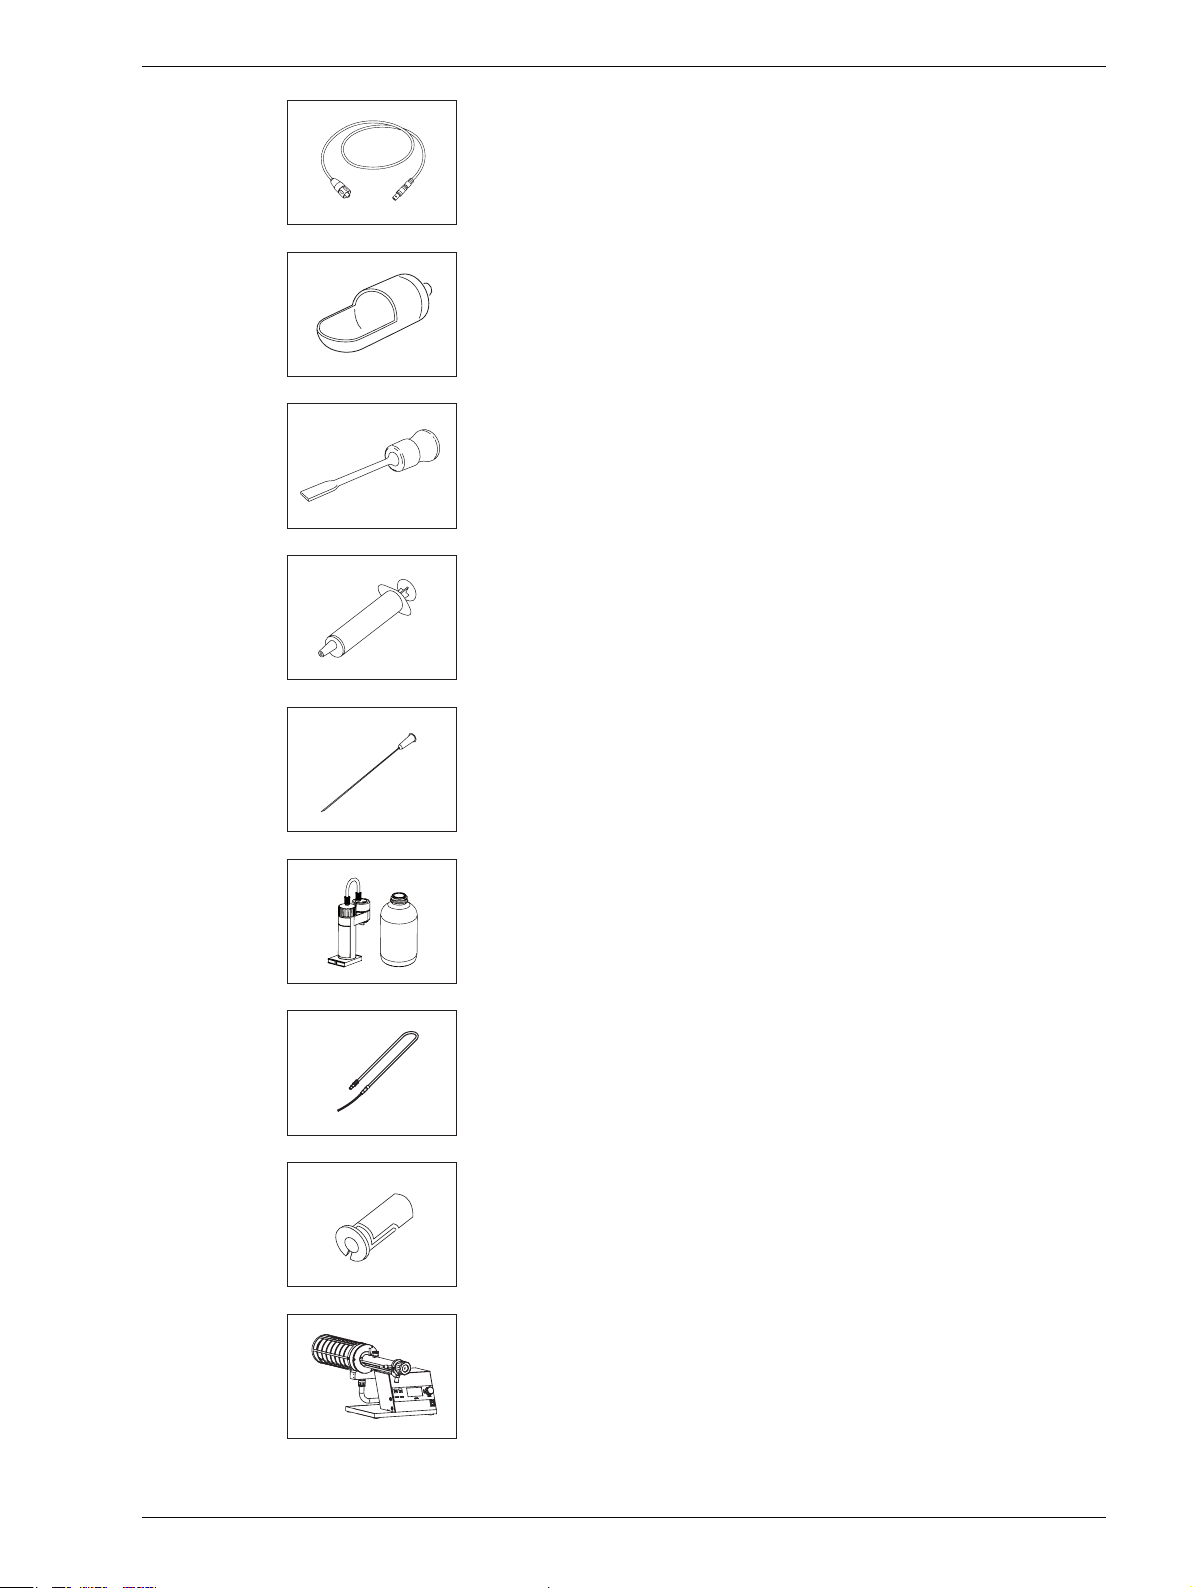
Optional accessories
Triaxial SC LEMO cable
Length: 72 cm
Length: 100 cm
Length: 160 cm
(For Plug & Play – and traditional titration electrodes)
Weighing boats (5 pieces.)
Glass dia. 20 x 60
Glass dia. 30 x 80
PE dia. 38 x 100
Visco-Spoon™ 51107668
Syringes (100 pcs.)
1 ml
10 ml
89601
89602
51108034
23951
23952
23954
71492
71482
Injection needle
80 x 0.8 mm for 1 ml injections (100 pcs)
80 x 1.2 mm for 10 ml injections) (12 pcs)
Interchangeable burette set
1 ml
5 ml
10 ml
20 ml
Dispensing tube with siphon tip 100 cm 25961
Siphon tips (5 pcs.) 23240
71484
71483
DV1001
DV1005
DV1010
DV1020
DO308 drying oven DO308
Volumetric Titrator 21
Page 22
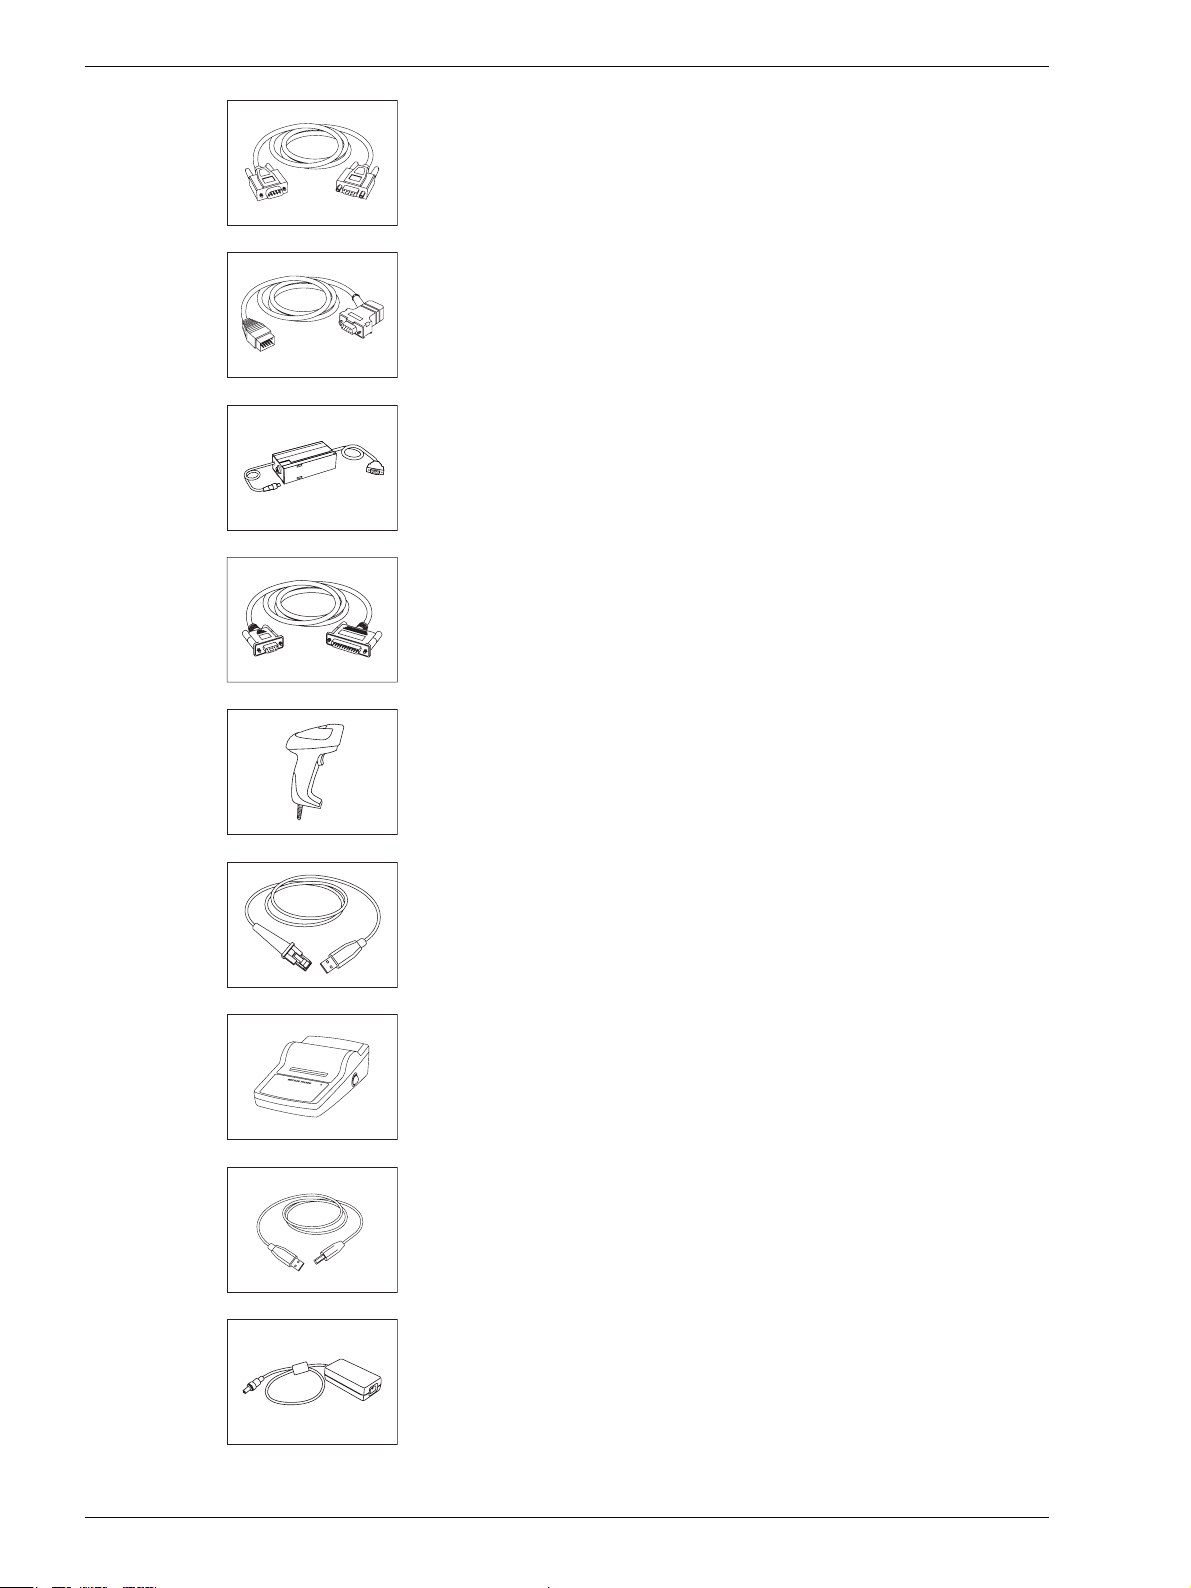
Optional accessories
Connection cable for METTLER TOLEDO balance
(RS9 interface)
Connection cable for METTLER TOLEDO balance
(MiniMettler)
Connection cable for METTLER TOLEDO balance
(LC interface)
Connection cable for SARTORIUS balances
(RS9-RS25)
11101051
229029
229065
51190363
Barcode reader with USB interface 21901297
USB cable to barcode reader 21901309
USB-P25 compact printer (including USB-cable) USB-P25
USB cable A-B (for PC or printer)
180 cm
51191926
Separate power supply (100 – 240 Volt) 51105795
Volumetric Titrator22
Page 23

Optional accessories
Protective cover for touchscreen 51105567
Volumetric Titrator 23
Page 24

Technical data
7 Technical data
7.1 Titrator
Power supply Input voltage 100–240 VAC ±10 %
Input frequency 50–60 Hz
Power consumption 30 VA
Primary connection socket 3 pin, IEC C14
Connected loads 24 V AC, 1.0 A
Secondary connection plug 2 pin, DC plug
CPU Processor XScale
SDRAM 64 MB
Flash memory 256 MB (industrial CF card)
Dimensions Width 210 mm
Depth 333 mm
Height 308 mm (with titration stand)
320 mm (ready-to-operate device)
weight 4.2 kg
Materials Titrator housing Crastin
Cover sheet PET
Protective cover Copolymer
Chassis Stainless steel
Titration stand Crastin® PBT
Lid (titration beaker) Polypropylene
Threaded ring Polypropylene
Three hole adapter Polypropylene
Dispensing tube / extraction tube FEP
Air tubes Silicone
O-ring (screw top) EPDM
O-ring (threaded ring) FEP / silicone
Sealing ring (bottle) PTFE / silicone
Seal (dispensing tube / extraction tube)
Connecting piece Polypropylene
Ambient conditions Ambient temperature +5 °C – 40 °C
Relative humidity Max. 80 % (non-condensing)
Use In interior spaces
Overvoltage category II
Pollution degree 2
COM Socket 9-pin male D-sub
®
PBT
PTFE
at 31 °C, linear fall to 50 % at
40 °C
Volumetric Titrator24
Page 25

Conguration Full-duplex
Baud rate 1200…19200
Handshake X-On / X-Off
Galvanic isolation No
ESD stability Min. 1000 V
Short-circuit protection Yes
USB1 / USB2 USB host USB full/low speed
Max. power load 400 mA (total, both connections)
PC USB client USB 1.1
Ethernet Socket RJ45
Speed 10/100 MBit/s
TTL-I/O Socket 9-pin female D-sub
Inputs 2
Outputs 4
Galvanic isolation No
CAN OUT Socket RJ12
Speed 500 kBit/s
Voltage 24 VDC ±10%
Current Max. 500 mA
Stirrer / pump Socket 5-pin mini-DIN
Pump detection Yes
Stirrer detection Yes
Pump voltage 24 V DC ±5 % (max. 400 mA)
Stirrer voltage range 0 to 18 V DC ±10 % (max. 300
mA)
SENSOR Socket LEMO triaxial, 9 mm
Current range 0 to 24 µA AC
Steps 0.1 µA
Limits of error 1 µA
Measuring range ± 2000 mV
Resolution 0.1 mV
Limits of error 2 mV
Burette drive Drive Stepping motor
Resolution 1/20000 of the burette volume
Limits of error At 10% 15 µm
At 30% 15 µm
At 50% 25 µm
At 100% 50 µm
Filling time Minimum 20 sec at 100% ll-
ing rate
Discharge time Minimum 20 sec
Burette detection Yes (RFID)
Technical data
Volumetric Titrator 25
Page 26
Technical data
Thread length 50 mm
Thread pitch 1 mm
Resolver (magnetic) 32 pulse/360°
Pulse / full stroke 1600
Monitoring resolution 1/1600 = 0.06%
Interchangeable burettes Volume 1, 5, 10 and 20 ml
Drive and burette limits of error According to ISO 8655-3
Materials that come into contact
with titrants
Internal magnetic stirrer Drive Stepping motor
Max. speed 1050 rpm
Display Technology Color TFT
Size 5.7"
Resolution 320 x 240 pixels
Backlighting LED
Brightness control Per software 50–100%
Input Technology Full-coverage touchscreen
Fluoroplastic, borsilicate glass,
ceram ic
Contains runtime modules from decNumber (c) Copyright IBM Corporation 2001, 2004. All rights reserved.
Power Management
The devices have a power management system which prevents the titrator from switching off unex pected ly in the event of a power overload. Tasks which would cause a power overload, because a number
of pumps, stirrers and burette drives are already in use, cannot be started at all. A notication brings the
start attempt to the attention of the user. It is advisable, if possible, to connect pumps and stirrers directly to sample changers or other devices which have their own power supply, such as a TBox, instead of to
the titrator itself.
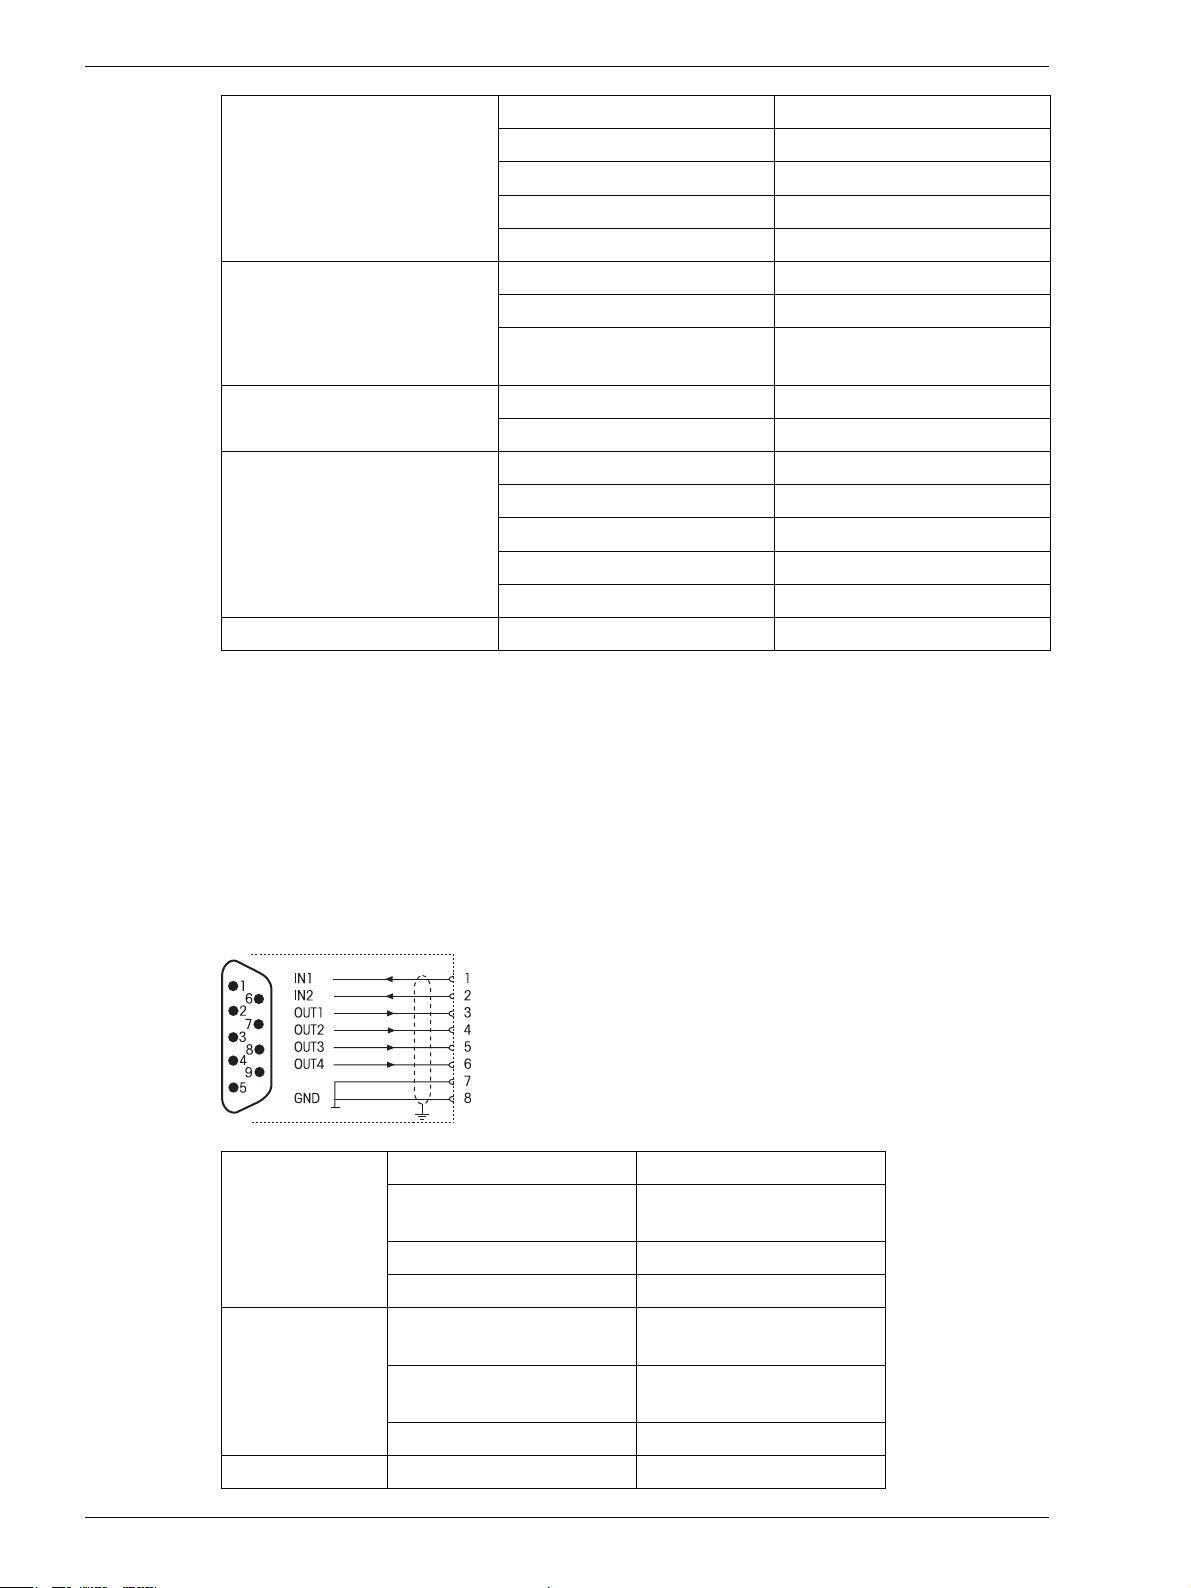
TTL-I / O Port Pin Assignment
General Socket 9-pin female D-sub
GND Signal ground, connected to
titra tor's electronic system
Galvanic isolation No
Plug & Play support No
In Type Pullup at 5 V, with over volt-
age protection
Voltage VIL max. 1 V
VIH min. 3.5 V
Current Max. 4.5 mA
Out Type Open collector
Volumetric Titrator26
Page 27

Voltage Min. 0.25 V
Current Max. 20 mA
Stirrer/Pump Pin Assignment
3
Stirrer +
1
Stirrer -
4
Pump +
5
Pump -
2
Pump 2 +
5
Pump 2 -
7.2 Supported devices (periphery)
Technical data
Max. 24 V
VOL max. 0.33 V
Balances
Balances can connect to the COM interface of the titrator. METTLER TOLEDO balances must be equipped
with an RS-232 interface or an appropriate adapter. For a list of connection cables, see Optional acces-
sories.
Manufacturer Type RS LocalCAN Note
METTLER TOLEDO AB / PB • • COM interfaces
AB-S / PB-S • COM interfaces
AG / PG / PR • COM interfaces
AT / MT / UMT • COM interfaces
AX / MX / UMX • - COM interfaces
PG-S • - COM interfaces
XP • - COM interfaces
XS • - COM interfaces
Sartorius Various • COM interfaces
• Standard - Option
Printer
Printers can be connected to the USB1 or USB2 interface of the titrator. PCL-compatible printers from vari ous manufacturers are supported. The METTLER TOLEDO USB-P25 is a robust and easy-to-operate matrix printer which prints onto standard quality paper. A current list of supported printers can be found on
the Internet at: http://www.mt.com/titration-printers.
Manufacturer Type Note
Various Generic PCL printers Connection via USB1 or USB2
METTLER TOLEDO USB-P25 Connection via USB1 or USB2
A standard USB hub can be used if more than two devices are to be connected to the USB connections of
the titrator.
Volumetric Titrator 27
Page 28

Technical data
Barcode reader
Sample data can be read in via an appropriate barcode. The barcode reader can also be used to enter
text in open input elds. Barcode readers can be connected to the USB1 or USB2 interface of the titrator.
A standard USB hub can be used if more than two devices are to be connected to the USB connections of
the titrator.
Volumetric Titrator28
Page 29
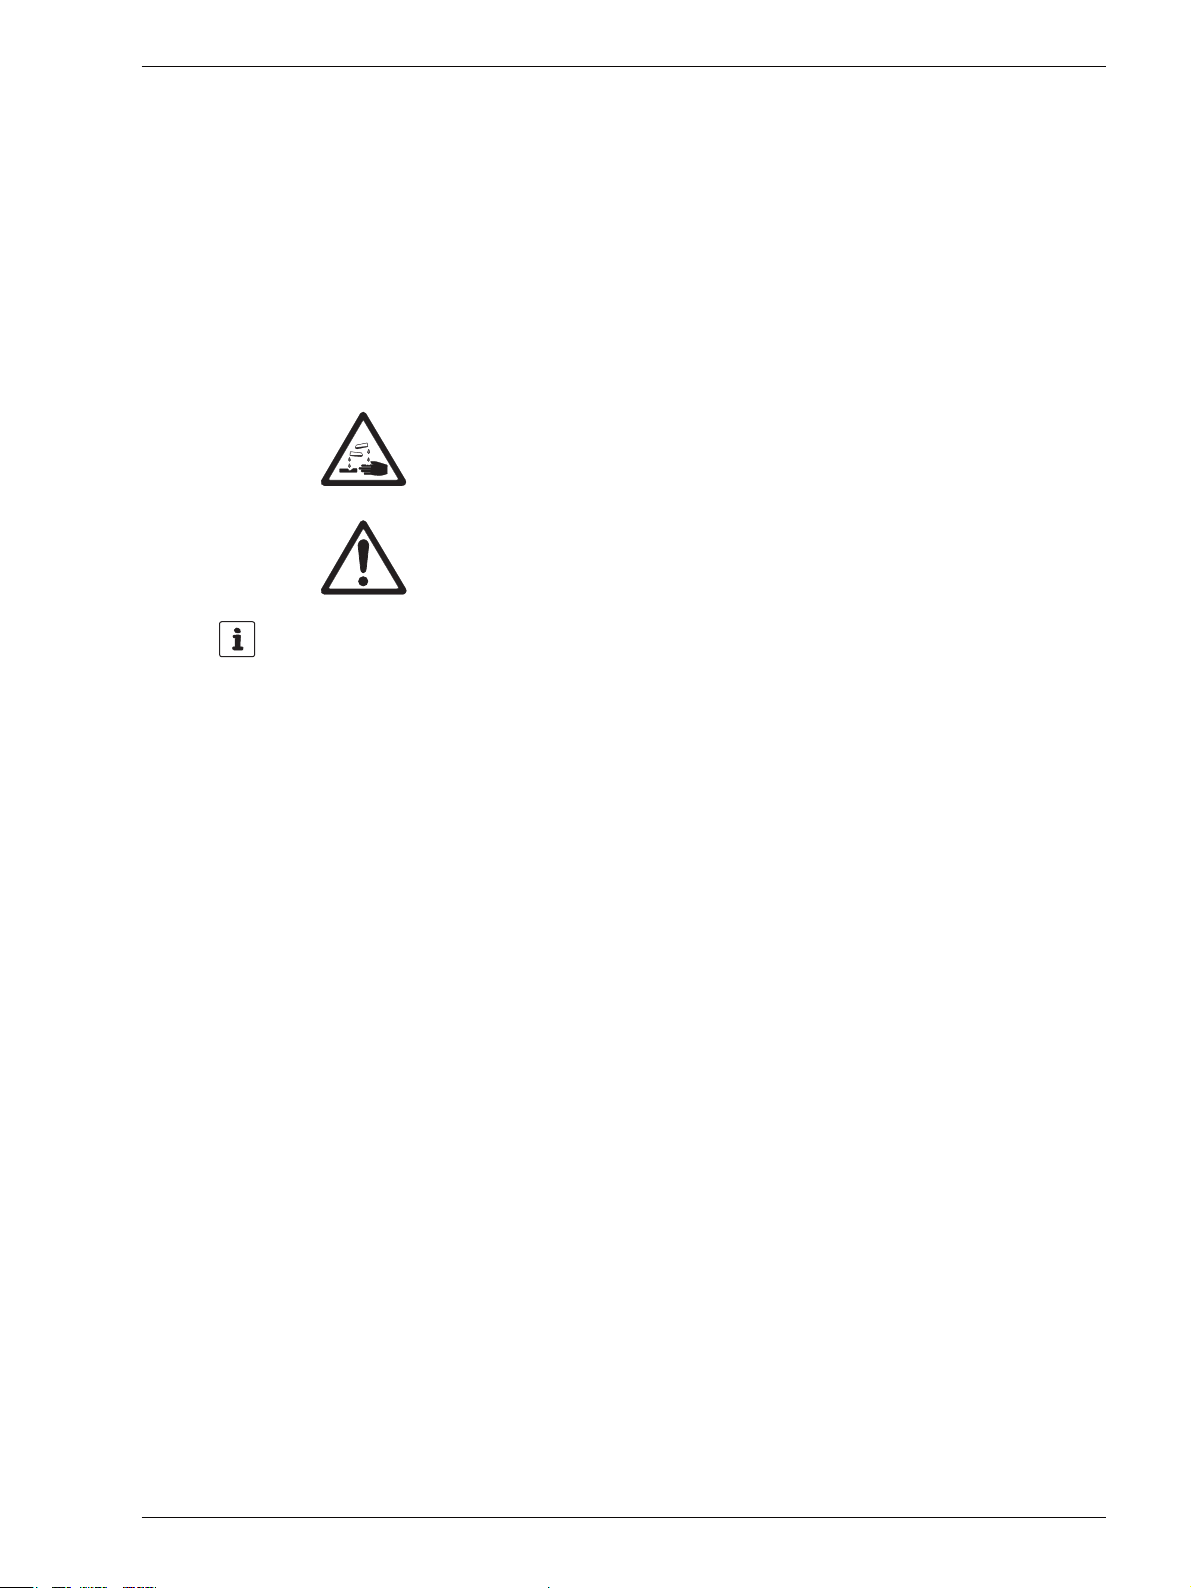
Service and maintenance
8 Service and maintenance
8.1 Cleaning
●
Clean the housing of the titrator using a cloth moistened with alcohol.
●
The titration stand can be fully dismantled in order to clean it.
8.2 Transporting the titrator
Note the following instructions when transporting the titrator to a new location.
●
Empty the titration beaker and remove it from the titration stand.
●
Remove all burettes and tube connections.
●
Remove all cable connections.
When sending or transporting the titrator over long distances, please use all of the original packaging.
Volumetric Titrator 29
Page 30

Declaration of system validation
9 Declaration of system validation
We hereby give notice that this product / system and its software and accessories, were developed, tested and successfully certied on the basis of the product life-cycle policies of Mettler-Toledo AG, Ana lyt ical. These policies are based on ISO Standard 9001:1994. Life-cycle checkpoint details were reviewed
and approved by the Project Supervisory Group (PSG). The products / systems were tested in respect of
func tion al i ty and specication prior to shipment. In order to support GLP and validation requirements, we
will make the following documents available to authorized persons for inspection:
AQCV21
●
Performance specications
●
Software specications
●
Quality plan
●
Project management system
●
Test Plan
●
Customer requirements
●
Review reports
●
Source code
Mettler-Toledo AG, Analytical will retain possession of all documents and their reproductions and may
wish to conclude a nondisclosure agreement with those requesting access to these documents.
Schwerzenbach,
December 2008
Dr. Chris Radloff
General Manager
Business Unit Analytical
Dr. Christof Bircher
Manager Business Area
Analytical Chemistry
ISO 9001 certication for METTLER TOLEDO
Mettler-Toledo AG, Greifensee, was reviewed and evaluated in 1991 by the Swiss Association for Quali ty and Management Systems (SQS), and was awarded the ISO 9001 certicate. This certicate veries
that Mettler-Toledo AG, Greifensee, has a quality management system in place which meets the requirements of the ISO 9000 series of international standards. Repeat audits are carried out by the SQS at
inter vals to verify that the quality management system is properly administered and continuously updated in relation to operational changes.
Volumetric Titrator30
Page 31
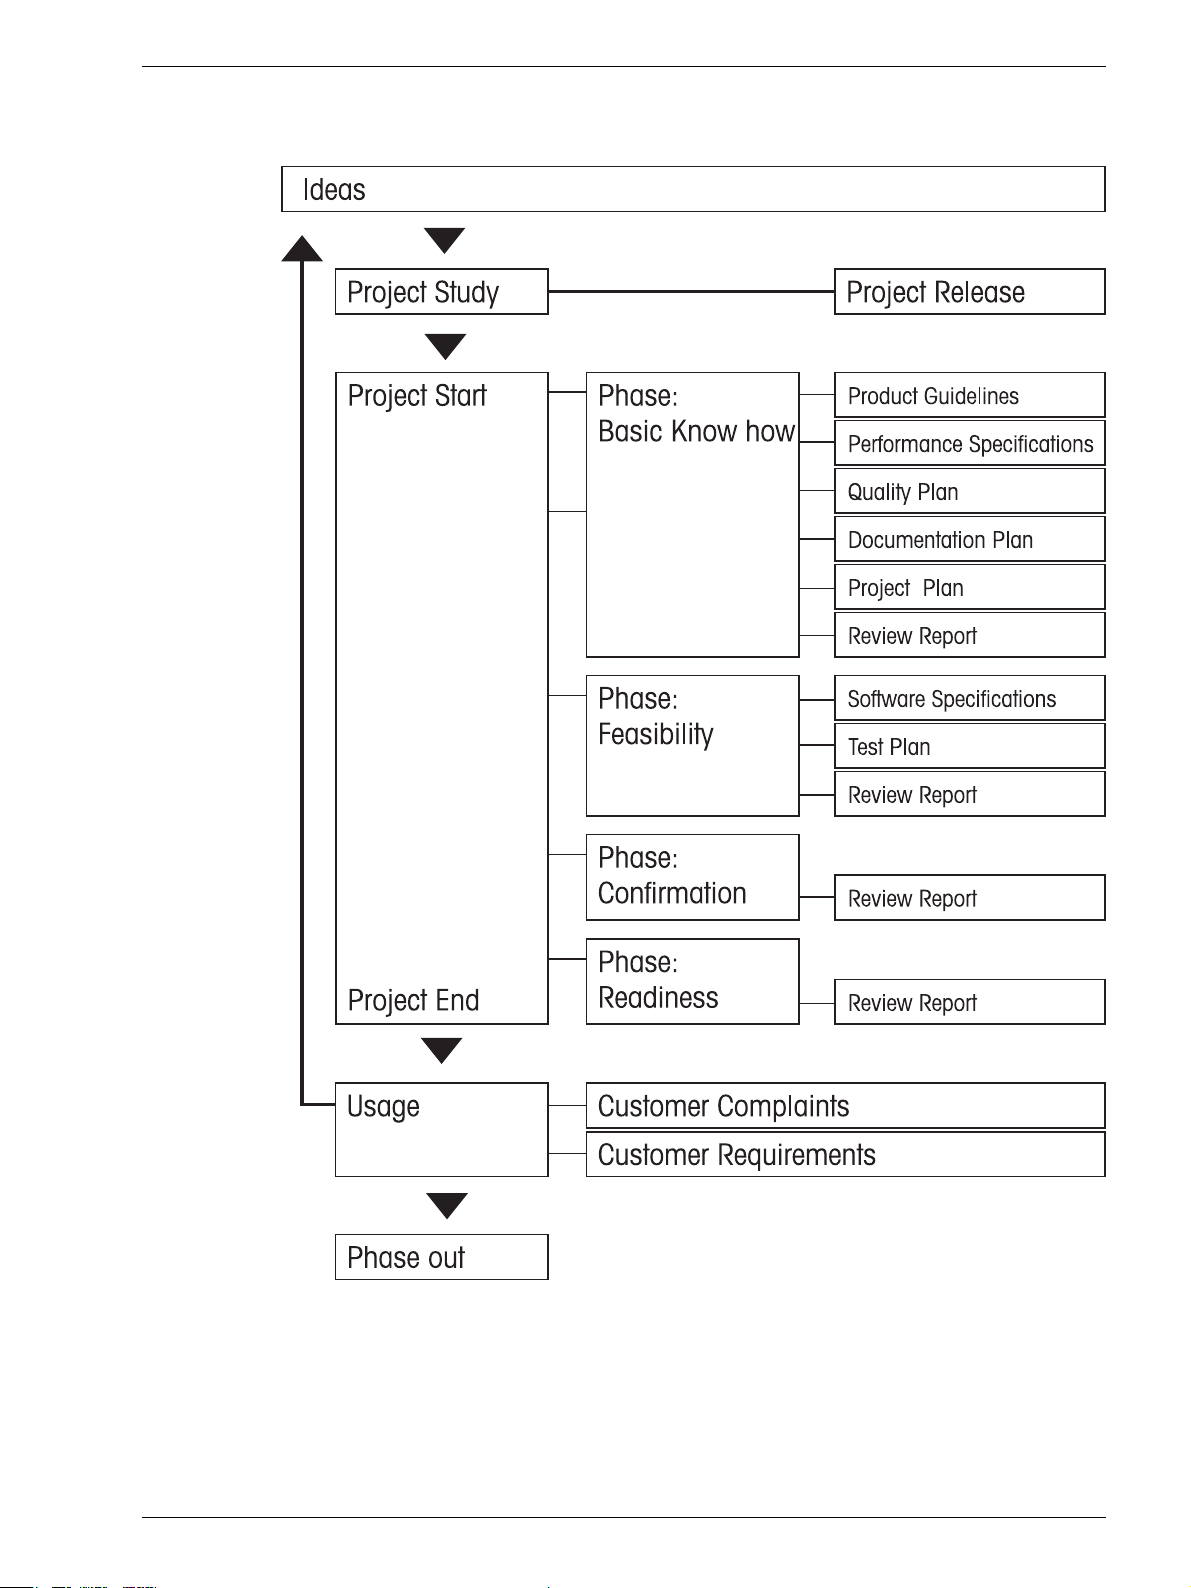
10 Product life cycle model
Product life cycle model
Volumetric Titrator 31
Page 32

Page 33

Page 34

Page 35

Page 36

For AQUASTAR® titrator Troubleshooting and Technical Support call: 1-888-871-3535
For a listing of our North American Distributors, please visit www.emdchemicals.com
© EMD Chemicals Inc. 2008
EMD Chemicals Inc., 480 South Democrat Road, Gibbstown, NJ08027
Phone: 856-423-6300, Fax: 856-423-4389, Internet: www.emdchemicals.com
ME-51710714 0812/6.12
 Loading...