

Page 1
Disk-Array Processor Enclosure (DPE)
Upgrade
From Model FC 55XX/57XX to
Model FC 45XX
Installation Guide
P/N 014002956-03
This document explains how to upgrade a Model 5600/5700 or
5400/5500 disk-array processor enclosure (DPE) to a Model 4500
DPE by replacing its storage processors (SPs), and by loading an
upgrade revision and a new revision of Core Software (previously
known as Licensed Internal Code, LIC).
Topic s are
• Requirements ............................................................................................. 2
• Upgrade procedure................................................................................... 4
The procedure described in this document is to be performed by an authorized
EMC service provider only.
1
Page 2

Requirements
Requirements
• The DPE to upgrade, and each connected DAE enclosure, must
have two LCCs. (The upgrade assembly includes two Model 4400
SPs and two 800-watt SPS units.)
• If you want to upgrade to shared storage with the Access Logix™
option, you must have ordered the Access Logix option. Access
Logix Core Software ships on its own CD-ROM.
• Shared storage with Access Logix requires two Fibre Channel
switches.
• You must have the latest Interface kit to provide required
revisions of Navisphere Agent/CLI and ATF (Application
Transparent Failover).
• The operating system disk, Navisphere
® Agent, and Navisphere
Manager cannot reside on the storage system being upgraded;
that is, there must be a system disk independent of the storage
system.
• The Core Software for Model 4400 SPs does not support disks
with part number 005-44614 or 005-44299. (These are Seagate
ST19171FC 9-Gbyte half-height disks.) If the storage system you
want to convert has any such disks, replace them with a
supported model before starting the upgrade. The new Core
Software will not recognize and power up any such disks. To
verify the disk model, stop and prevent I/O to the storage
system, and then remove one disk at a time and read the part
number label on the side of the disk carrier. Then reinsert the
disk.
• If the DPE to upgrade is connected to a server running HP/UX
and it is either any FC54XX/55XX or it is an FC56XX/FC57XX
that uses Core Software earlier than version 5.11.08, then the
hardware paths to the LUNs must have been redefined. The paths
must be redefined because the newer version of Core Software
you will install supports more than eight LUNs with HP-UX. The
procedure for redefining the paths to LUNs with HP/UX is
explained in CLARiiON support note S000309A.
2
DPE Model 54XX/56XX Upgrade to Model 45XX
Page 3
Upgrade
CD-ROM
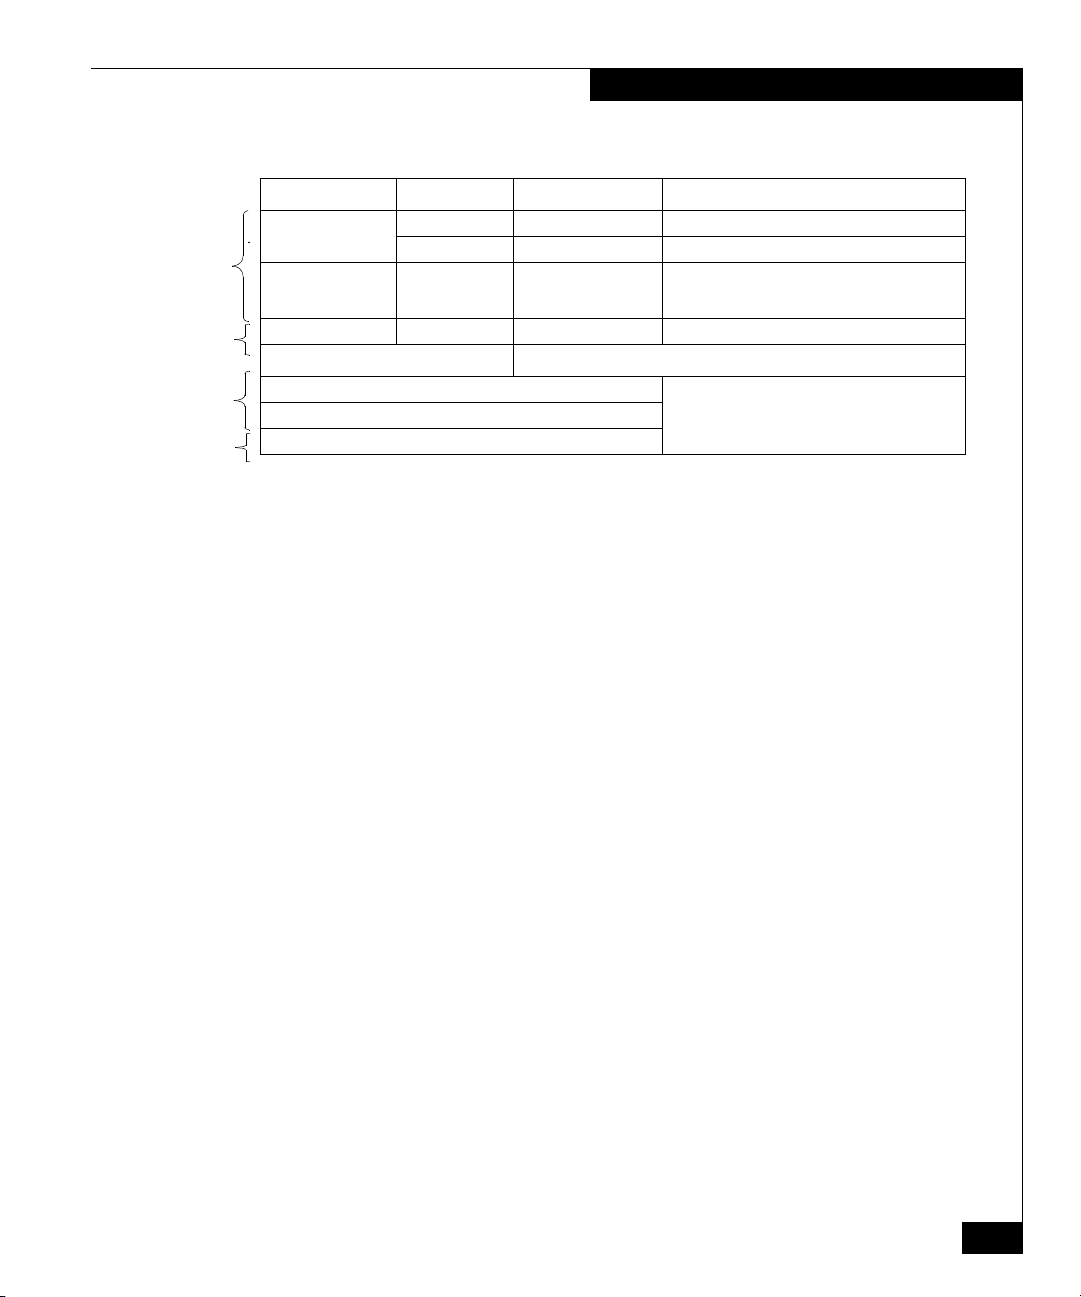
Requirements
Table 1 Minimum revisions of Core Software and Navisphere
SP Model Part Number Core Software revisions
Old 5400 005-045189 2.04.26
5600 118-027130 5.11.08
New 4400 118-030563 5.32.XX
Access
Logix CD-ROM
Interface
kit CD-ROMs
Other CD-ROM
New n/a 068-090454 6.32.XX
Navisphere software Minimum revision
Agent/CLI, ATF, HBA drivers
CLARalert event monitor
4.2.2
Manager or Supervisor
For the latest revision information, consult the Open Systems Support
Matrix, accessible through URL
www.cs.isus.emc.com/csweb2/index.htm.
DPE Model 54XX/56XX Upgrade to Model 45XX
3
Page 4

Upgrade Procedure
Upgrade Procedure
If you are upgrading from a Model 5600/5700 with Core Software
4.xx or Model 5400/5500 SP (with Core Software 2.XX), be aware that
Core Software 2.XX and 4.XX do not support the feature known as
RAID groups. The RAID group feature lets you create more than one
LUN on any group of disks bound together as a RAID group.
The Core Software that runs on Model 4400 SPs does support RAID
groups, which means that the upgrade will automatically create a
RAID group for any LUN bound on Core Software 4.XX or 2.XX. The
new RAID group-to-LUN relationship will be the same as the old
one. After the upgrade, when you want to examine or manage any
LUN using Navisphere, you must access the RAID Groups dialog to
find the LUN.
If you are upgrading from Model 5600/5700 with Core Software
5.XX, your RAID group and LUN structure will not be affected by the
upgrade.
The upgrade does not require unbinding of LUNs in the storage system.
However, as a precaution, you may want to back up the information on all
LUNs before starting the upgrade.
1. Verify that you have the correct CD-ROMs with the required
revisions of Core Software and Navisphere products (shown in
the table above).
2. If the server is not running the minimum revision of Navisphere
products, ATF, and HBA drivers (shown in the table above), load
the new products from CD-ROM as explained in the server setup
manual.
3. Stop and prevent all I/O and let all processes complete.
4. Use Navisphere Manager to disable the read cache on each SP
and disable the write cache.
5. Set read cache memory size to zero.
6. Set write cache memory size to zero.
7. If the DPE is running the minimum revision of Core Software
(shown as “Old” in the previous table), skip to step 11.
4
DPE Model 54XX/56XX Upgrade to Model 45XX
Page 5

Upgrade Procedure
8. If the DPE is not running the minimum revision of Core Software,
then use Navisphere to download the minimum revision from the
CD-ROM in the upgrade kit.
Make sure the Auto Reboot option is selected.
9. The minimum revision of Core Software downloads to the
database drives and the storage system restarts. Ignore any
polling error messages that say “Requested RAID Group does not
exist.” Wait until the disk lights stop flashing.
10. In the next step, make sure the Auto Reboot option is not selected.
11. Using Navisphere Manager, with the Auto Reboot option not
selected, download the upgrade revision of Core Software
(revision 5.3X or 6.3X) from the upgrade CD-ROM.
12. The upgrade revision of Core Software downloads to database
drive 0.
13. Stop Navisphere Manager and the Agent.
14. Power off the DPE enclosure.
15. Label and disconnect all cables connected to the SP(s).
16. Remove the old SP(s) from the DPE enclosure.
17. On the Model 4400 SPs, install the correct memory DIMMs. Be
sure to use proper anti-static (ESD control) procedures when you
install the DIMMs.
Do not move memory DIMMs from a Model 5600 or 5400 SP to a Model 4400
SP. The DIMMs are not compatible.
a. Place the SP and the memory modules (DIMMs) on a
static-free work surface.
b. On the SP, install the DIMMs in the appropriate connectors as
shown next.
A memory module has a notch on its edge near pin 1 so that you can insert it
only one way. Install memory modules one at a time and in order starting
with connectors 1 and 3 (refer to Figure 1 following).
DPE Model 54XX/56XX Upgrade to Model 45XX
5
Page 6

Upgrade Procedure
A. Lift the module out of
its antistatic packaging
and place the module
into the connector.
B. Ensure that the
alignment notch is
correctly oriented.
C. Use your fingers to
push out on the locking
tabs, and use your
thumbs to push the
module in until seated.
Then engage the tabs.
Connector 1
Connector 2
Alignment
Notch
Connector 3
A
Port without GBIC
Locking tabs
Locking tabs
Connector 4
B
Green LED
Port with GBIC
Figure 1 DIMM and GBIC positions on a Model FC 4400 SP
18. If any of the two Fibre Channel ports on an SP does not have an
optical GBIC (gigabit interface converter), then insert a GBIC in
that port. The figure above shows a port with and without a
GBIC. You can find GBICs in the Upgrade kit.
19. Install the new Model 4400 SPs.
20. Remove any existing SPS units and insert the new SPS units from
the upgrade kit. Removing, inserting, and cabling SPS units is
explained in the manual CLARiiON DC Power Supply Installation
and Replacement, part number 014002887. Then return here.
After installing and cabling the SPS units, power up the DPE
chassis.
The new SPs boot the new Core Software from database drive 0
and then copy the software to database drives 1 and 2. The LEDs
6
DPE Model 54XX/56XX Upgrade to Model 45XX
Page 7

Upgrade Procedure
on the drives flicker as the copy occurs. SP PROM code is
updated at this time. Wait for all drives to become ready
(disk-drive ready lights on).
21. Verify that the status LED on the front of each SP shows normal
green (not amber).
You have finished the storage-system part of the upgrade. The
next steps involve server hardware.
22. If you are upgrading to a shared storage system with Access
Logix (Core Software 6.32.02), go to the shared storage
installation and service manual, 014002737.
If you are upgrading without Access Logix (Core Software
5.32.00), go to the direct attach installation manual, 014002967.
If the customer and sales representative agreed that the customer
would return the old SPs (that is, the old SPs are listed as line items
on the Sales Order Worksheet), then you can arrange to return the
old SPs to EMC. You can either ship the old SPs by Federal Express
(for two or four SPs), or call the sales organization to have the Sales
RMA (Return Materials Authorization) group pick up the old SPs (for
many SPs).
LICENSED MATERIAL – PROPERTY OF EMC CORPORATION
This document and the related software product are the exclusive property of EMC Corporation
and may be used only by users properly licensed to use the software product and only according
to the terms of that license. Use of the software product constitutes acceptance of those license
terms.
2
, EMC and Navisphere are registered trademarks and Access Logix is a trademark of EMC
EMC
Corporation.
Other trademarks are the property of their respective owners.
Copyright © 2000 EMC Corporation
Revision 00, August 2000
DPE Model 54XX/56XX Upgrade to Model 45XX
7
Page 8

Upgrade Procedure
8
DPE Model 54XX/56XX Upgrade to Model 45XX
 Loading...