

Page 1
Installation and Setup Guide
EMC DATA DOMAIN DD STORAGE SYSTEM
Installation and Setup Steps
The steps for a complete installation and configuration are:
1
1. Install Hardware
2
2. Define the Data Domain system information for your site
3
3. Perform initial system configuration
1
Install Hardware
4
4. Configure the system for data access
5
5. Configure optional software
6
6. Perform optional additional system configuration
1. Unpack the Data Domain system. A system consists of a DD660
controller with 12 TB internal storage and up to 24 TB raw storage in
optional ES20 expansion shelves.
4Open the packing boxes for the controller and optional expansion shelf
or shelves.
4Remove the accessories and rack mount kits for all system components.
2. Install the appropriate rack mounting hardware for the
controller and ES20s into a 19-inch, four-post rack. Ensure that the rack is
securely anchored to prevent tipping. Load the rack or cabinet, beginning
at the bottom to prevent the rack from becoming top-heavy. Be sure to
plan appropriate vertical space to accommodate the 2U controller and 3U
for each ES20 expansion shelf.
4See the instructions included with the slide rails. See Figure 1.
4The ES20 slide rails also include rack installation instructions.
3. Install the controller and expansion shelves in the rack.
4Remove the controller and ES20s from the shipping boxes.
4Remove the bezel from each component.
4Install each component horizontally on the corresponding slide rails
and slide in the rack in the order described in the Expansion Shelf
Hardware Guide. Be sure one person is at each side of each of the
component to guide it into the rail ends.
4Secure the components in the rack with the thumb screws.
4. Connect ES20 shelves to the controller. Connect the controller’s
SAS ports to the ES20 shelves based on the cabling diagrams for expansion shelf connectivity. See Figures 6 and 7. Use the cable management
hardware provided to organize all cables.
5. Connect an administrative console. Attach a serial console to the
controller’s serial port, or use KVM connections to connect monitor (VGA
port), keyboard and mouse. See Figure 2.
6. Enable data transfer connectivity. Repeat for each connection.
4Ethernet connection: To use 1 Gb copper Ethernet, attach a Cat
5e or Cat 6 copper Ethernet cable to an RJ45 Ethernet network port
(start with eth0 and go up) on the controller. Attach the other end
to an Ethernet switch or to an Ethernet port on your server. For 1 Gb
fiber Ethernet, use multimode fiber cables with LC connectors. For 10
Gb copper Ethernet with a CX4 connector, use an IEEE draft standard
802.3ak / D5.3 compliant cable or a Data Domain CX4 cable. Not all
CX4 cables qualify. For 10 Gb copper Ethernet with SFP+ connectors,
use a qualified SFP+ copper cable. For 10 Gb fiber Ethernet, use MMF850nm cables with LC duplex connectors. See Figure 2.
4Fibre Channel connection: Attach a Fibre Channel fiber optical
cable (LC connector) to a VTL HBA port on the controller, and attach
the other end (LC connector) to a Fibre Channel switch or to a Fibre
Channel port on your server. See Figure 2 for PCI card locations for the
VTL HBAs.
7. Provide redundant power to the system.
4Controller power: Connect power cables to both receptacles and set
the power cable retention clips. See Figure 2.
4ES20 power: Connect power cables to both receptacles and set the
power cable retention clips. See Figure 5.
8. Turn the system on. Power on any ES20s before the controller.
4ES20 power: Turn the power switch to on for each of the two power
supplies for each ES20 expansion shelf. See Figure 5.
4Wait approximately 3 minutes after all expansion shelves are turned on.
4Controller power: Push the power button. See Figure 3.
4Attach the bezels.
9. Collect the information needed for installation. Enter the
information in section 2 on the other side of this sheet.
Safety
All plug-in modules and blank plates are part of the
fire enclosure and must be removed only when a
replacement can be added immediately. The system
must not be run without all parts in place.
4A controller or a shelf must be operated only
from a power supply input voltage range of
100–240 VAC, 50–60 Hz.
4Each component is intended to operate with
two working power supplies installed.
4Provide a suitable power source with electrical
overload protection.
4A safe electrical earth connection must be pro-
vided to the power cord. Check the grounding
of the power sources before applying power.
4The plug on each power supply cord is used
as the main disconnect device. Ensure that the
socket outlets are located near the equipment
and are easily accessible.
4Permanently unplug the unit if you think it is
damaged in any way and before moving it. If
the unit is powered by multiple sources, disconnect all supplied power for complete isolation.
4The power connections must always be
disconnected prior to removal or replacement
of a power supply module from any of the
components in the system.
4A faulty power supply module must be replaced
within 24 hours.
4Do not lift system components by yourself. A
controller weighs 66 lbs (30 kg) and an ES20
expansion shelf weighs 78 lbs (35.5 kg).
4Do not lift an ES20 by the handles on the PSU/
cooling module. The handles are not designed
to support the weight of the populated shelf.
4To comply with applicable safety, emission,
and thermal requirements, covers must not
be removed and all bays must be fitted with
plug-in modules.
4Load the rack beginning at the bottom to
prevent the rack from becoming top-heavy.
4Do not extend components on slide rails until
you have loaded at least three or more similarly
weighted items in the rack, or unless the rack
is bolted to the floor or overhead structure to
prevent tipping.
Warning: When the system is in normal use, the
system controller top cover must be secured by
rotating the lock 90° to the locked position to prevent
users or operators from accessing the service areas.
Caution: If the system is used in a manner not
specified by the manufacturer, the protection provided
by the equipment may be impaired.
Caution: The RJ45 sockets on the motherboard/PCI
cards are for Ethernet connection only and must not be
connected to a telecommunications network.
ESD PRECAUTIONS
Data Domain recommends that you fit and check a
suitable antistatic wrist or ankle strap and observe
all conventional ESD precautions when handling
plug-in modules and components.
Page 2
Data Domain DD660 Storage System
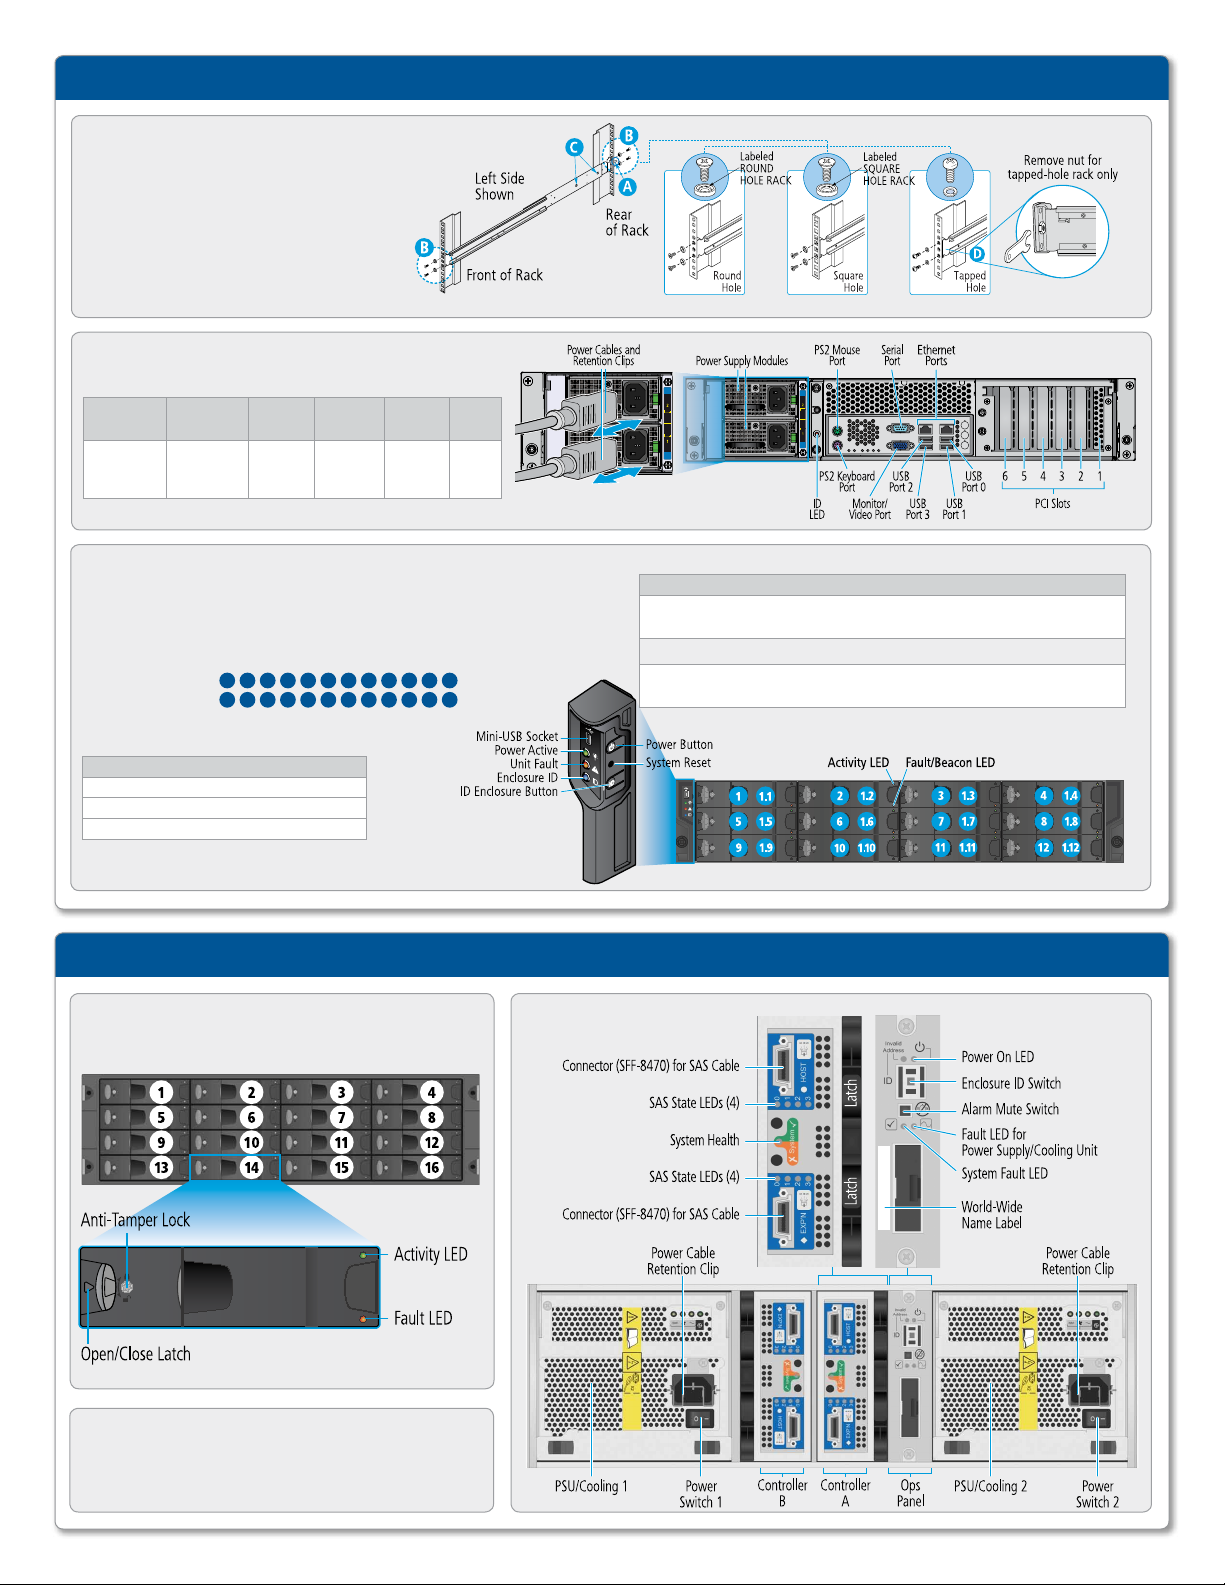
FIGURE : RACK MOUNTING PROCEDURE
1. Align locating pin (A) with rear rack post.
2. Extend rails to front of rack.
3. Secure front and rear rails to rack posts with
screws and washers (B). Ensure locating
pin (A) is centered in rear rack post hole.
4. Tighten clamp screws (C).
5. Repeat for other side of unit.
FIGURE :
REAR PANEL AND INPUT/OUTPUT CONNECTIVITY
Slot 6
PCI-e (x8)
GbE #2 or
10 GbE #2
or VTL #1
Slot 5
PCI-e (x8)
GbE #1 or
10 GbE #1
or VTL #2
Slot 4
PCI-e (x4)
SAS #1 SAS #2 1024 MB
Slot 3
PCI-e (x4)
Slot 2
PCI-X
NVRAM
Slot 1
PCI-X
Empty
FIGURE :
FRONT PANEL AND DISK LOCATIONS
Blue circles illustrate the locations of the hot-swap disks.
Hot-swap disks
Physical location:
Logical numbering:
Front Operator Panel LEDs
LED Status
Power Active Steady Green: Good
Unit Fault Steady Amber: Fault
Enclosure ID Blue: Only when activated
1 2 3 54 6 7 8 9 1110 12
1.1 1.5 1.91.2 1.6
1.3 1.7
1.4 1.8
1.10
1.11
1.12
Data Domain ES20 Expansion Shelf
Front Operator Panel Buttons
Push Button Definition
Power Press to start boot (if system is not running).
Never shut down the system by pressing the power button.
System Reset Resets hardware and firmware. Use ballpoint pen to activate.
Enclosure ID Press to light a blue LED front and rear to ID chassis in a stack.
Mutes audible alarm, if active.
FIGURE :
ES20 Shelf disk-drive numbering and components:
RACK MOUNTING PROCEDURE
Use the rack installation instructions that are included with
the slide rails in the ES20 Expansion Shelf shipping crate.
FIGURE :
ES20 Shelf rear panel
Page 3

Connecting Multiple Expansion Shelves
EXPANSION SHELF CABLING
Multiple expansion shelves are connected together and to the controller with
qualified SAS cables. See the illustrations in this section that show the cabling
for several system configurations.
4Use a SAS cable with a SFF-8088 (mini-SAS) connector to connect to the
SAS port on the controller and use a SFF-8470 connector to connect to
the ES20.
4Use a SAS cable with two SFF-8470 connectors to connect one ES20 to
another ES20.
NOTE: The SFF-8470 supports a combination of 8 TB and 16 TB shelves, with a
maximum of 24 TB of externally attached raw storage, plus 12 TB of internal raw
storage.
IMPORTANT: The SAS connectors must be secured with their screw lock assem-
blies. The screw locks ensure a robust mechanical connection and are essential to
avoid cable stress at the solder joints of the connector.
The following configurations are possible:
4No expansion shelf
4Up to three 8 TB ES20s
4One 16 TB ES20
4One 16 TB ES20 and one 8 TB ES20
The order of connectivity does not matter.
HOT ADDITION OF EXPANSION SHELVES
The system supports the hot addition of expansion shelves. Use the following
steps to add expansion shelves.
4Install the new expansion shelf or shelves using the instructions in the
Install Hardware section, steps 1, 2, and 3.
Addition of One ES20
4Connect a SAS cable with a mini-SAS connector from slot 4A to the ES20
Controller A HOST port.
4Connect a SAS cable with a mini-SAS connector from slot 3A to the ES20
Controller B HOST port.
Addition of a Second ES20 (See Figure 6)
4Connect a SAS cable with a mini-SAS connector from slot 3B to the ES20
#2 Controller A HOST port.
4Connect a SAS cable with a mini-SAS connector from slot 4B to the ES20
#2 Controller B HOST port.
Addition of a Third ES20 (See Figure 7)
4Disconnect the SAS cable from Controller B HOST port on the ES20 #1
and connect it to Controller A HOST port on ES20 #3.
4Using a SAS cable with SFF-8470 connectors, connect one end to
Controller A EXP’N port on ES20 #3 and the other end to Controller B
HOST port on the ES20 #1.
4Using a SAS cable with SFF-8470 connectors, connect one end to
Controller A EXP’N port on ES20 #1 and the other end to Controller B
HOST port on the ES20 #3.
Power Up and Final Configuration
4Power on the expansion shelf or shelves using the instructions in the
Install Hardware section.
4Use the disk add enclosure command when ready to put the
enclosure into use and expand the capacity of the system. The enclosureid is always 2 for the first added shelf, and 3 for the second. The Data
Domain controller always has the enclosure-id of 1 (one).
disk add enclosure enclosure-id
FIGURE :
MULTIPATHING
WITH TWO SHELVES
FIGURE :
MULTIPATHING
WITH THREE SHELVES
Controller B Controller A
Controller B Controller A
Shelf Installation Order
Controller
Set 1Set 2
Shelf Installation Order
Set 1Set 2
1
2
Controller
3
1
2
EMC DATA DOMAIN DD660 INSTALLATION AND SETUP GUIDE | SIDE 1
Page 4

2
Define the Data Domain System Information for Your Site
SYSTEM SETUP WORKSHEET
An installation requires information unique to your site. Before starting the
installation, provide values for the system information listed below.
1. A fully qualified host name for the system:
2. The DNS domain name:
3. Use Table 1 (below) to enter Ethernet connectivity information.
4. A routing gateway IP address (if no DHCP):
5. DNS server IP addresses (if no DHCP) (fill in below):
Primary Secondary Tertiary
6. Select the CIFS authentication method:
Workgroup Active Directory
Workgroup name: Realm name:
WINS servers: WINS servers:
Backup user
name:
Password: Password:
Domain admin
name:
7. Backup servers (or * for all):
8. Administrator’s password:
9. Host name from which to administer the system:
10. Administrator’s email address (or admin group alias):
11. (Optional) Description of the system’s physical location:
12. Mail server (SMTP) host name:
13. Time zone name (default is US/Pacific):
14. System Controller ID from the License Code document provided in
the accessory kit. Use this ID to obtain the unique WWPN for this
controller using the WWPN tool at
https://my.datadomain.com/us/en/wwpn.jsp
Table 1:
Ethernet Connectivity eth0 eth1 eth2 eth3 eth4 eth5
Enable (circle one)
Use DHCP (circle one)
IP address (if no DHCP)
Netmask (if no DHCP)
Yes / No Yes / No Yes / No Yes / No Yes / No Yes / No
Yes / No Yes / No Yes / No Yes / No Yes / No Yes / No
3
Perform Initial System Configuration
NOTE: The system might not be usable for up to three hours if the NVRAM batteries
are discharged. Refer to the NVRAM Battery Charging Instructions for more
information.
Log into the system with the user name of sysadmin. The password is the
system’s serial number. A Configuration Wizard is provided. There are six
sections to the configuration: Licenses, Network, File System, System, CIFS,
and NFS.
Complete each of the six sections.
USING THE CLI CONFIGURATION WIZARD
At the first login, the configuration utility starts. The list entries in the utility
can be comma-separated, space-separated, or both.
4At each prompt, enter a value, OR
4Enter a question mark (?) for more details, OR
4Press Enter to accept the value displayed in braces.
The Configuration Wizard guides you through the configuration steps, one
section at a time. Follow the Configuration Wizard instructions for entering
appropriate values.
At the end of each configuration section, you can choose to:
4Save – Save the displayed configuration.
4Cancel – Delete all new values and go to the next section.
4Retry – Restart the input entry at the beginning of the current section.
The value entered previously appears as the default value at each prompt.
Page 5

4
Configure the System for Data Access
The Data Domain system provides multiple protocols for data access: NFS,
CIFS, VTL, and OST (OpenStorage). You need to configure one or more
protocols for data access, depending on your environment. You also need to
configure the clients for accessing the Data Domain system with the protocol
of your choice.
NFS
The NFS configuration section in the Perform Initial System Configuration sec-
tion sets up the NFS clients to allow access to /backup on the Data Domain
system. You also need to set up the NFS clients to allow access to /backup on
the Data Domain system. This can be done using the following steps:
4Create a mount point (directory) such as /dd/rstr01/backup and
create an administrative mount point such as /dd/rstr01/ddvar.
4NFS mount the directories on the new mount points. For example:
mount -F nfs -o hard,intr,vers=3,proto=tcp,rsize=327
68,wsize=32768 rstr01:/backup /dd/rstr01/backup
mount -F nfs -o hard,intr,vers=3,proto=tcp,rsize=327
68,wsize=32768 rstr01:/ddvar /dd/rstr01/ddvar
4Add the following lines to the file /etc/vfstab (the file name may be
different depending on your UNIX-based system). The lines mount the
directories at every reboot. For example:
system:/backup - /dd/rstr01/backup nfs - yes
hard,intr,vers=3,proto=tcp, rsize=32768,wsize=32768
system:/ddvar - /dd/rstr01/ddvar nfs - yes
hard,intr,vers=3,proto=tcp, rsize=32768,wsize=32768
4To cause backup software to abort when the system is not mounted,
create a backup directory within the mounted file system, such as
/dd/rstr01/backup/disk1.
4For more configuration information, see the specific Data Domain Integration
Documentation at https://my.datadomain.com/US/en/integration.jsp.
CIFS
The CIFS configuration section in the Perform Initial System Configuration sec-
tion sets up the CIFS clients to allow access to /backup on the Data Domain
system. You also need to set up the CIFS clients to allow access to /backup
on the Data Domain system. For additional configuration information, see the
specific Data Domain Integration Documentation at
https://my.datadomain.com/US/en/integration.jsp.
VTL
For the VTL software option, see the Data Domain technical note Integrating
the Data Domain Appliance VTL with SANs. See the specific Data Domain
Integration Documentation for setting up backup software from other
vendors: https://my.datadomain.com/US/en/integration.jsp.
OPENSTORAGE OPTIONAL LICENSE REQUIRED
For setting up the Data Domain OST feature, see the Data Domain
OpenStorage (OST) Administration Guide available at
https://my.datadomain.com/US/en/platform.jsp.
APPLICATION INTEGRATION
For information about how to integrate the Data Domain system with backup
software, see the documentation for the applicable application at the Data
Domain Integration Documentation section on the Data Domain Support web
site https://my.datadomain.com/US/en/integration.jsp.
5
Configure Optional Software
If you purchased optional software for the Data Domain system such as
Replicator or Retention Lock, the licenses are enabled on your Data Domain
system prior to shipment. You need to configure them for use. Details on
6
Perform Optional Additional System Configuration
ADDITIONAL SYSTEM CONFIGURATION
Any system command that accepts a list, such as a list of IP addresses, accepts
entries separated by either commas or spaces. See the DD OS Commmand
Reference Guide for command details.
Give access to additional backup servers:
# nfs add /backup {*|client-list}
[options]
Add users to the email list that reports system problems:
# alerts add email-list
Add users to the system report email list:
# autosupport add email-list
Enable FTP or TELNET:
# adminaccess enable {ftp|telnet}
configuring the optional software can be found in the DD OS Administration
Guide. Access the latest documents at
https://my.datadomain.com/US/en/platform.jsp.
Add remote hosts to use FTP or TELNET:
# adminaccess add {ftp|telnet}
fqdn-host-list
Add a user:
# user add name [priv {admin|user}]
Change a user’s password:
# user change password username
TO SHUT DOWN THE SYSTEM
Important: Never shut down the system by pressing the power button.
Instead, use:
# system poweroff
Troubleshooting Tips
For troubleshooting information see the Data Domain Support web site https://my.datadomain.com.
Page 6

Where to Go for More Information
For information about Go to https://my.datadomain.com/US/en/documentation.jsp for
How to configure the system Initial Configuration Guide
New features, enhancements, known issues, and late-breaking news
about your Data Domain software release
How to manage the Data Domain operating system DD OS Administration Guide for your software release
How to install and use the OpenStorage (OST) software and plug-in OpenStorage (OST) Administration Guide for your platform
How to replace Data Domain hardware components Part Installation Guides
How to use third-party applications Integration Documentation and Compatibility Matrices
Release Notes for your software release
Specifications
Model Watts BTU/hr 100-120 / 200-240 V~ lb / kg WxDxH in (cm)
DD660 575 1962 575 66 / 30 19 (48.3) 29.5 (74.9) 3.5 (8.9)
ES20 450 1536 450 78 / 35.5 19 (48.3) 23.25 (59) 5.16 (13.1)
Operating Temperature 50° to 95° F (10° to 35° C)
Operating Humidity 20% to 80%, non-condensing
Non-operating Temperature -40° to +149° F (-40° to +65° C)
Operating Acoustic Noise DD660: Max 7.0 BA Sound Power at rear of unit when all drives seek simultaneously;
System Heat Output Power (VA) Weight Rack Mounted Dimensions
ES20: Max 58 dB LpA average measured at bystander positions
Site Requirements
Requirement Description and Specification
Vertical Space in Standard
19”, Four Post Rack
Air Conditioning Use air conditioning that can cope with the maximum BTU/hr thermal rating.
Temperature Controls Use adequate temperature control with a gradient (change) not to exceed 30° C in an hour.
Ventilation and Airflow In a closed or multi-unit rack, ensure that the unit has adequate airflow through the front bezel and back panel and that the
Front Bezel Clearance 1.56 inches (4.0 cm) of unobstructed clearance.
Back Panel Clearance 5 inches (12.7 cm) of unobstructed clearance.
Power / Grounding Two AC power outlets with an earth ground conductor (safety ground). A safe electrical earth connection must be provided
DD660 Controller: 2U. ES20 Expansion Shelf: 3U.
Do not use a two-post rack. See the included slide rail and installation documentation instructions for installing in a rack.
ambient air temperature requirements are met. Ensure that the front bezel and back panel clearances are met. If installing in
a closed cabinet, ensure that the front and rear doors have at least 65% open area to ensure adequate airflow for cooling.
to each power cord. Voltage: 100-120 V~ or 200-240 V~. Frequency: 50 to 60 Hz.
Contact Information
TECHNICAL CONTACTS
To resolve issues with Data Domain products, contact your contracted support
provider or visit us online at https://my.datadomain.com.
Copyright © 2009 - 2010 EMC Corporation. All Rights Reserved.
EMC believes the information in this publication is accurate as of its publication date. The information is subject to change without notice.
THE INFORMATION IN THIS PUBLICATION IS PROVIDED “AS IS.” EMC CORPORATION MAKES NO REPRESENTATIONS OR WARRANTIES
OF ANY KIND WITH RESPECT TO THE INFORMATION IN THIS PUBLICATION, AND SPECIFICALLY DISCLAIMS IMPLIED WARRANTIES OF
MERCHANTABILITY OR FITNESS FOR A PARTICULAR PURPOSE.
CORPORATE CONTACTS
2421 Mission College Blvd.
Santa Clara, CA 95054
866.WE.DDUPE (866.933.3873) or 408.980.4800
sales@datadomain.com
Use, copying, and distribution of any EMC software described in this publication requires an applicable software license.
EMC, Data Domain, and Global Compression are registered trademarks or trademarks of EMC Corporation in the United States and/or
other countries. All other trademarks used herein are the property of their respective owners.
761-0005-0004 Revision B
 Loading...