

Page 1

EMC® Avamar® 6.1 for VMware
User Guide
P/N 300-013-353
REV 07
Page 2

Copyright © 2001- 2012 EMC Corporation. All rights reserved. Published in the USA.
Published December, 2012
EMC believes the information in this publication is accurate as of its publication date. The information is subject to change without
notice.
The information in this publication is provided as is. EMC Corporation makes no representations or warranties of any kind with respect
to the information in this publication, and specifically disclaims implied warranties of merchantability or fitness for a particular
purpose. Use, copying, and distribution of any EMC software described in this publication requires an applicable software license.
2
, EMC, and the EMC logo are registered trademarks or trademarks of EMC Corporation in the United States and other countries.
EMC
All other trademarks used herein are the property of their respective owners.
For the most up-to-date regulatory document for your product line, go to the technical documentation and advisories section on the
EMC online support website.
2
EMC Avamar 6.1 for VMware User Guide
Page 3

CONTENTS
Preface
Chapter 1 Introduction
Chapter 2 Configuration and Setup
Avamar for VMware image backup and restore ............................................ 14
Guest backup and restore ........................................................................... 15
Choosing a data protection method ............................................................ 16
Changed block tracking............................................................................... 18
Additional VMware resources...................................................................... 18
Task road map ............................................................................................ 20
Enable support for multiple vCenters........................................................... 21
Download and install vSphere client software ............................................. 21
Download and install Avamar Administrator software.................................. 22
Configure vCenter-to-Avamar authentication ............................................... 24
Option 1: Install an authentication certificate on the Avamar MCS......... 24
Option 2: Turn off certificate authentication for all vCenter-to-Avamar MCS
communications ................................................................................... 25
Create dedicated vCenter user account........................................................ 26
Add vCenter client in Avamar Administrator................................................. 28
Deploy proxy clients.................................................................................... 30
Add DNS Entries.................................................................................... 30
Download proxy appliance template file................................................ 31
Deploy proxy appliance in vCenter......................................................... 32
Configure proxy virtual machine network settings in vCenter ................. 40
Configure proxy settings in Avamar Administrator ................................. 42
Upgrading Avamar proxy software ............................................................... 44
Protecting virtual machines with both guest and image backup................... 47
Chapter 3 Administration
Basic client administration.......................................................................... 50
How VMware clients appear in Avamar Administrator............................ 50
Adding virtual machine clients .............................................................. 51
Editing existing VMware clients............................................................. 56
Renaming a vCenter client..................................................................... 56
Viewing protected virtual machines....................................................... 58
Viewing replicated virtual machine name .............................................. 58
vCenter connection monitor .................................................................. 59
Groups and policy management.................................................................. 60
Groups and group behavior................................................................... 60
Adding a vCenter group......................................................................... 62
Editing a vCenter group ......................................................................... 65
Editing proxy datastore and group settings............................................ 66
VMware Image Dataset.......................................................................... 68
Best practices ............................................................................................. 69
Troubleshooting.......................................................................................... 70
EMC Avamar 6.1 for VMware User Guide
3
Page 4

Contents
Chapter 4 Backup
Limitations.................................................................................................. 74
Performing an on-demand image backup .................................................... 74
Scheduling backups.................................................................................... 76
Chapter 5 Restore
Overview..................................................................................................... 78
Limitations.................................................................................................. 78
Guidelines for performing image restores versus file-level restores.............. 80
Restoring the full image or selected drives to the original virtual machine ... 80
Restoring the full image or selected drives to a different (existing) virtual
machine ...................................................................................................... 83
Restoring the full image or selected drives to a new virtual machine............ 86
Restoring specific folders or files................................................................. 89
Chapter 6 Protecting the vCenter Management Infrastructure
Overview..................................................................................................... 92
Backing up the vCenter management infrastructure..................................... 92
Task list ................................................................................................ 93
Task 1: Implement guest backups or VMware image backups................ 93
Task 2: Define a custom dataset for vCenter backups............................ 93
Task 3: Add a backup client for vCenter database hosts ........................ 94
Recovering vCenter management infrastructure from Avamar backups......... 95
Appendix A vSphere Data Ports
Communication ports.................................................................................. 98
Listen ports................................................................................................. 98
Appendix B Plug-in Options
How to set plug-in options ........................................................................ 100
Linux VMware Image plug-in options......................................................... 100
Windows VMware Image plug-in options ................................................... 101
Linux VMware File-level Restore plug-in options ........................................ 101
Windows VMware File-level Restore plug-in options................................... 101
Index
4
EMC Avamar 6.1 for VMware User Guide
Page 5

TABLES
Title Page
1 Revision history ............................................................................................................ 8
2 Avamar client guides................................................................................................... 15
3 Minimum required vCenter user account privileges ..................................................... 26
4 New vCenter client settings ......................................................................................... 29
5 Proxy Network Property Settings.................................................................................. 38
6 New proxy client settings ............................................................................................ 43
7 How VMware clients appear in Avamar Administrator .................................................. 50
8 Virtual machine information in Avamar Administrator.................................................. 52
9 Select Virtual Machine dialog box functions................................................................ 53
10 New virtual machine client settings............................................................................. 53
11 Virtual machine information in Avamar Administrator.................................................. 55
12 Select Virtual Machine dialog box functions................................................................ 55
13 New vCenter group settings......................................................................................... 63
14 On-demand backup options........................................................................................ 75
15 Important vCenter management infrastructure components ........................................ 93
16 vSphere communication ports..................................................................................... 98
17 vSphere listen ports .................................................................................................... 98
18 Linux VMware image backup options ........................................................................ 100
19 Linux VMware image restore options......................................................................... 100
20 Windows VMware image backup options .................................................................. 101
21 Windows VMware image restore options ................................................................... 101
EMC Avamar 6.1 for VMware User Guide
5
Page 6

Tabl eses
6
EMC Avamar 6.1 for VMware User Guide
Page 7

PREFACE
Purpose
As part of an effort to improve its product lines, EMC periodically releases revisions of its
software, and hardware. Therefore, some functions described in this document might not
be supported by all versions of the software, or hardware currently in use. The product
release notes provide the most up-to-date information on product features.
Contact your EMC representative if a product does not function properly, or does not
function as described in this document.
Note: This document was accurate at publication time. New versions of this document
might be released on the EMC online support website. Check the EMC online support
website to ensure that you are using the latest version of this document.
This publication describes various methods and strategies for protecting VMware virtual
machines.
Audience
The information in this publication is intended for system administrators familiar with:
◆ Basic Avamar system administration principles, and procedures found in the
EMC
Avamar Administration Guide
◆ Other Avamar client software information (primarily installation, and configuration
procedures) found in various Avamar client guides
A comprehensive discussion of basic Avamar system administration concepts and
principles, such as clients, datasets, schedules, retention policies, groups, and group
policy, is beyond the scope of this publication. The
provides detailed information.
EMC Avamar Administration Guide
EMC Avamar 6.1 for VMware User Guide
7
Page 8

Preface
Revision history
The following table presents the revision history of this document.
Table 1 Revision history
Revision Date Description
07 December 13,
06 November 1, 2012 Revised
05 October 25, 2012 Updates for release 6.1 Service Pack 1.
Revised the list of minimum required user account privileges in
2012
“Create dedicated vCenter user account” on page 26.
“File-level restore limitations” on page 79 to clarify
that ACLs are not restored.
Revised:
• “File-level restore limitations” on page 79 to clarify lack of
support for extended partitions.
“Restoring the full image or selected drives to a different
•
(existing) virtual machine” on page 83
post-restore options.
“Restoring the full image or selected drives to a new
•
virtual machine” on page 86
options.
• “Restoring specific folders or files” on page 89 to include
new post-restore options.
04 July 31, 2012 Revised:
“Where to get help” on page 10.
•
• “Create dedicated vCenter user account” on page 26 to
include Virtual machine > Provisioning > Allow disk access
permission.
“File-level restore limitations” on page 79 to include
•
partitioning limitations.
to include new post-restore
to include new
Related documentation
A03 June 30, 2012 Added “Enable support for multiple vCenters” on page 21.
Revised
Logical Volume Manager (LVM) limitations.
A02 June 15, 2012 Added the following topics:
•
“File-level restore limitations” on page 79 to include
“Server software upgrades require proxy reboots” on
page 78
• “Guidelines for performing image restores versus
file-level restores” on page 80
Updated “File-level restore limitations” on page 79 to note
that symbolic links cannot be restored or browsed.
A01 April 25, 2012 First release of Avamar 6.1.
The following EMC publications provide additional information:
◆
EMC Avamar Compatibility and Interoperability Matrix
◆
EMC Avamar Release Notes
◆
EMC Avamar Administration Guide
◆
EMC Avamar Operational Best Practices
◆
EMC Avamar Product Security Guide
8
EMC Avamar 6.1 for VMware User Guide
Page 9
◆
IMPORTANT
EMC Avamar Backup Clients User Guide
◆
EMC Avamar for Exchange Guide
◆
EMC Avamar for IBM DB2 User Guide
◆
EMC Avamar for Lotus Domino User Guide
◆
EMC Avamar for Microsoft SharePoint Guide
◆
EMC Avamar for Oracle User Guide
◆
EMC Avamar for SQL Server User Guide
Conventions used in this document
EMC uses the following conventions for special notices:
DANGER indicates a hazardous situation which, if not avoided, will result in death, or
serious injury.
Preface
WARNING indicates a hazardous situation which, if not avoided, could result in death, or
serious injury.
CAUTION, used with the safety alert symbol, indicates a hazardous situation which, if not
avoided, could result in minor, or moderate injury.
NOTICE is used to address practices not related to personal injury.
Note: A note presents information that is important, but not hazard-related.
An important notice contains information essential to software, or hardware operation.
EMC Avamar 6.1 for VMware User Guide
9
Page 10

Preface
Typographical conventions
EMC uses the following type style conventions in this document:
Normal
Bold
Italic
Courier Used for:
Courier bold Used for specific user input, such as commands
Courier italic Used in procedures for:
< >
[ ]
|
{ }
...
Used in running (nonprocedural) text for:
• Names of interface elements, such as names of windows, dialog boxes,
buttons, fields, and menus
• Names of resources, attributes, pools, Boolean expressions, buttons,
SQL statements, keywords, clauses, environment variables, functions,
and utilities
• URLs, pathnames, filenames, directory names, computer names, links,
groups, service keys, file systems, and notifications
Used in running (nonprocedural) text for names of commands, daemons,
options, programs, processes, services, applications, utilities, kernels,
notifications, system calls, and man pages
Used in procedures for:
• Names of interface elements, such as names of windows, dialog boxes,
buttons, fields, and menus
• What the user specifically selects, clicks, presses, or types
Used in all text (including procedures) for:
• Full titles of publications referenced in text
• Emphasis, for example, a new term
•Variables
• System output, such as an error message, or script
• URLs, complete paths, filenames, prompts, and syntax when shown
outside of running text
• Variables on the command line
• User input variables
Angle brackets enclose parameter, or variable values supplied by the user
Square brackets enclose optional values
Vertical bar indicates alternate selections — the bar means “or”
Braces enclose content that the user must specify, such as x, or y, or z
Ellipses indicate nonessential information omitted from the example
Where to get help
10
EMC Avamar 6.1 for VMware User Guide
The Avamar support page provides access to licensing information, product
documentation, advisories, and downloads, as well as how-to and troubleshooting
information. This information may enable you to resolve a product issue before you
contact EMC Customer Service.
To access the Avamar support page:
1. Go to https://support.EMC.com/products.
2. Type a product name in the Find a Product box.
3. Select the product from the list that appears.
4. Click the arrow next to the Find a Product box.
5. (Optional) Add the product to the My Products list by clicking Add to my products in
the top right corner of the Support by Product page.
Page 11

Preface
Documentation
The Avamar product documentation provides a comprehensive set of feature overview,
operational task, and technical reference information. Review the following documents in
addition to product administration and user guides:
◆ Release notes provide an overview of new features and known limitations for a
release.
◆ Technical notes provide technical details about specific product features, including
step-by-step tasks, where necessary.
◆ White papers provide an in-depth technical perspective of a product or products as
applied to critical business issues or requirements.
Knowledgebase
The EMC Knowledgebase contains applicable solutions that you can search for either by
solution number (for example, esgxxxxxx) or by keyword.
To search the EMC Knowledgebase:
1. Click the Search link at the top of the page.
2. Type either the solution number or keywords in the search box.
3. (Optional) Limit the search to specific products by typing a product name in the Scope
by product box and then selecting the product from the list that appears.
4. Select Knowledgebase from the Scope by resource list.
5. (Optional) Specify advanced options by clicking Advanced options and specifying
values in the available fields.
6. Click the search button.
Live chat
To engage EMC Customer Service by using live interactive chat, click Join Live Chat on the
Service Center panel of the Avamar support page.
Service Requests
For in-depth help from EMC Customer Service, submit a service request by clicking Create
Service Requests on the Service Center panel of the Avamar support page.
Note: To open a service request, you must have a valid support agreement. Contact your
EMC sales representative for details about obtaining a valid support agreement or with
questions about your account.
To review an open service request, click the Service Center link on the Service Center
panel, and then click View and manage service requests.
Facilitating support
EMC recommends that you enable ConnectEMC and Email Home on all Avamar systems:
◆ ConnectEMC automatically generates service requests for high priority events.
◆ Email Home emails configuration, capacity, and general system information to EMC
Customer Service.
EMC Avamar 6.1 for VMware User Guide
11
Page 12

Preface
Your comments
Your suggestions help us to continue to improve the accuracy, organization, and overall
quality of the user publications. Send your opinions of this document to:
BSGDocumentation@emc.com
Please include the following information:
◆ Product name and version
◆ Document name, part number, and revision (for example, 01)
◆ Page numbers
◆ Other details that will help us address the documentation issue
12
EMC Avamar 6.1 for VMware User Guide
Page 13

CHAPTER 1
Introduction
This chapter discusses the following:
◆ Avamar for VMware image backup and restore ........................................................ 14
◆ Guest backup and restore ....................................................................................... 15
◆ Choosing a data protection method ........................................................................ 16
◆ Changed block tracking........................................................................................... 18
◆ Additional VMware resources.................................................................................. 18
Introduction
13
Page 14
Introduction
Avamar for VMware image backup and restore
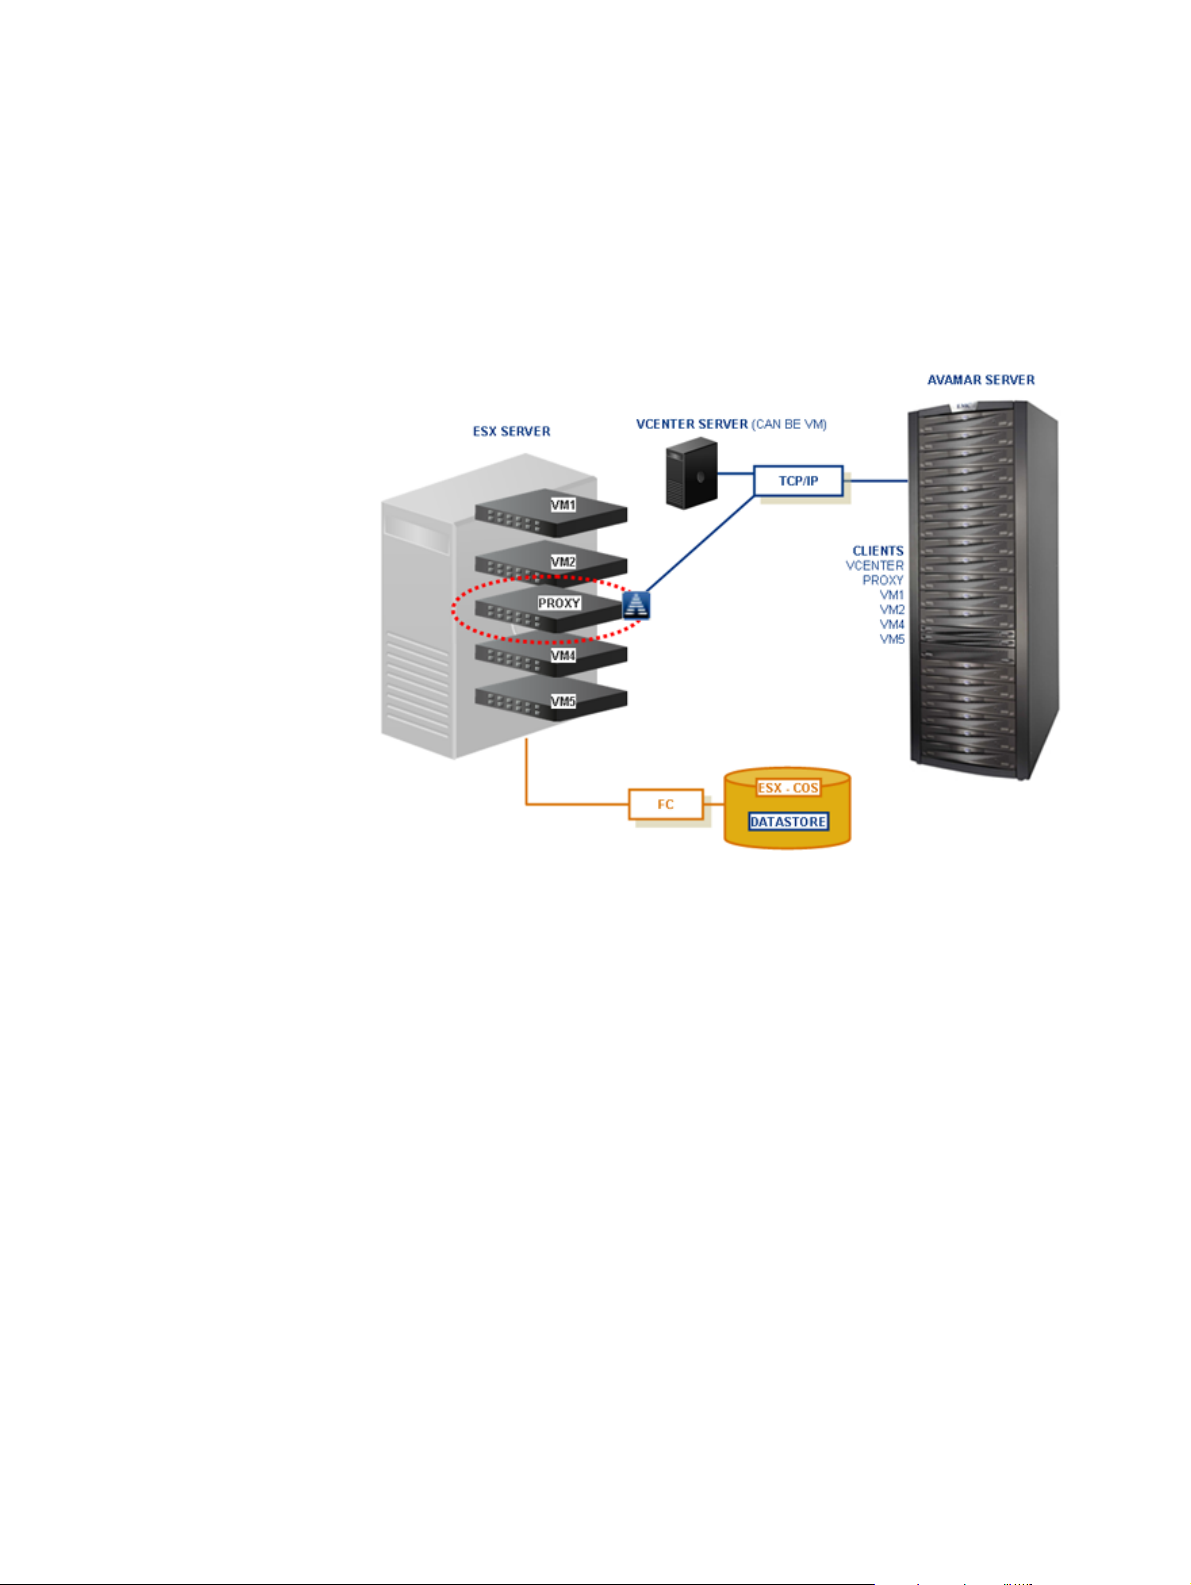
Avamar for VMware image backup and restore is built on the VMware vStorage API for Data
Protection (VADP).
Avamar for VMware image backup and restore is fully integrated with VMware vCenter
Server to provide easy detection of virtual machine clients within the vCenter, and enable
efficient centralized management of backup jobs.
Backups and restores require the use of proxy virtual machine clients. Each proxy virtual
machine client provides all of the following capabilities:
◆ Backup of Microsoft Windows and Linux virtual machines (entire images or specific
drives)
◆ Restore of Microsoft Windows and Linux virtual machines (entire images or specific
drives)
◆ Selective restore of individual folders and files to Microsoft Windows and Linux virtual
machines
Proxies run Avamar software inside a Linux virtual machine, and are deployed using an
appliance template (.ova) file.
14
EMC Avamar 6.1 for VMware User Guide
Page 15

Guest backup and restore
Guest backup and restore is another way to protect virtual machine data. It is
implemented by installing Avamar client software in a virtual machine just as if it were a
physical machine, then registering and activating that client with an Avamar server. No
special configuration is required.
When registering virtual machine clients protected by guest backup, do not register them
to a vCenter domain. Doing so will prevent you from locating or managing that virtual
machine in Avamar Administrator. Instead register any virtual machine clients protected
by guest backup to some other domain or subdomain (for example, /clients).
The following Avamar client guides provide details about installing Avamar client software
in virtual machines:
Table 2 Avamar client guides
Client Client guide
Introduction
IBM AIX filesystems
Linux filesystems:
•CentOS
•Debian
• Red Hat
•SUSE
•Ubuntu
Novell NetWare filesystems
UNIX filesystems:
•FreeBSD
•HP-UX
• SCO Open Server and UnixWare
•Sun Solaris
IBM DB2 databases hosted on IBM AIX, Red Hat
and SUSE Linux, and Microsoft Windows
Lotus Domino databases
Mac OS X filesystems
Microsoft Exchange databases
Microsoft Office SharePoint implementations
Microsoft SQL Server databases
EMC Avamar Backup Clients User Guide
EMC Avamar Backup Clients User Guide
EMC Avamar Backup Clients User Guide
EMC Avamar Backup Clients User Guide
EMC Avamar for IBM DB2 User Guide
EMC Avamar for Lotus Domino User Guide
EMC Avamar Backup Clients User Guide
EMC Avamar for Exchange Guide
EMC Avamar for Microsoft SharePoint Guide
EMC Avamar for SQL Server User Guide
Microsoft Windows filesystems
Oracle databases hosted on IBM AIX, Red Hat, and
SUSE Linux, Sun Solaris, and Microsoft Windows
EMC Avamar Backup Clients User Guide
EMC Avamar for Oracle User Guide
Guest backup and restore
15
Page 16

Introduction
Choosing a data protection method
This topic explores the various advantages and considerations associated with image
backup and restore versus guest backup and restore.
Note: A virtual machine can be protected by both guest backup and image backup. For
example, a daily guest backup might be used to protect selective files, and a less frequent
or on-demand full image backup might be used to protect the full machine. This scheme
accommodates scenarios with limited backup windows.
Types of virtual machines
Guest backup is generally the preferred strategy for protecting application servers such as
Microsoft Exchange, Microsoft Office SharePoint, Microsoft SQL Server, and Oracle. The
reason that guest backup is particularly suited for this is that the Avamar agent gracefully
quiesces applications prior to backup, ensuring a true “application consistent” backup.
Guest backup and restore is also the only way to back up virtual machines, such as
desktops and laptops, that are not hosted within a vCenter.
Avamar for VMware image backup and restore is generally the preferred strategy for
protecting any non-application intensive virtual machines that are hosted within a
vCenter. Avamar's integration with vCenter enables multiple virtual machines to be
protected with the least amount of effort. Managing backups from these virtual machines
is exceptionally easy.
Ease of implementation
Guest backup and restore:
◆ Supports any virtual machine running an operating system for which Avamar client
software is available
◆ Supports applications such as DB2, Exchange, Oracle, and SQL Server databases
◆ Easily fits into most existing backup schemes; day-to-day backup procedures do not
change
◆ Avamar client software must be individually installed, and managed inside each
virtual machine
Avamar for VMware image backup and restore:
◆ Can leverage vCenter to discover virtual machines, and add them to the Avamar server
in batches
◆ Requires moderate amount of initial setup and configuration
16
EMC Avamar 6.1 for VMware User Guide
Page 17

Efficiency
Backup and restore
Introduction
Guest backup and restore:
◆ Offers highest level of data deduplication efficiency
◆ Backups do not consume ESX server CPU, RAM, and disk resources
◆ Backups consume small amounts of guest virtual machine CPU, RAM, and disk
resources when backups are occurring
Avamar for VMware Image backup and restore:
◆ Moderate deduplication efficiency
◆ Backups do not consume guest virtual machine CPU, RAM, and disk resources
◆ Backups consume ESX server CPU, RAM, and disk resources when backups are
occurring
Guest backup and restore:
◆ Applications are gracefully quiesced prior to each backup, ensuring a true “application
consistent” backup
◆ Backups are highly optimized (temp files, swap files, and so forth not included)
◆ Backups are highly customizable (supports full range of include and exclude features)
◆ Database backups support transaction log truncation, and other advanced features
◆ Unused filesystem space is not backed up
◆ Individual file and directory (folder) restores supported
◆ Backup and restore jobs can execute pre- and post-processing scripts
◆ Virtual machines must have a network connection to Avamar server
◆ Virtual machines must be running for backups to occur
Avamar for VMware Image backup and restore:
◆ Image backups are supported for all machines that are currently supported by VMware
◆ Individual file and directory (folder) restores supported for both Windows and Linux
virtual machines
◆ Virtual machines need not have a network connection to Avamar server
◆ Virtual machines need not be running for backups to occur
◆ Unused filesystem space is backed up
◆ Backups not optimized (temp files, swap files, and so forth are included)
◆ Backups can comprise an entire virtual machine image (all drives) or selected drives
(vmdk files)
Choosing a data protection method
17
Page 18

Introduction
Required VMware knowledge
Guest backup and restore requires no advanced scripting or VMware knowledge.
Avamar for VMware Image backup and restore requires moderate VMware knowledge.
Integrators should have working knowledge of actual vCenter topology in use at that
customer site (that is, which ESX servers host each datastore, and which datastores store
each virtual machine’s data), and the ability to log in to vCenter with administrator
privileges.
Changed block tracking
Changed block tracking is a VMware feature that tracks which specific filesystem blocks on
a virtual machine have changed between backups.
Changed block tracking identifies unused space on a virtual disk during the initial backup
of the virtual machine, and also empty space that has not changed since the previous
backup. Avamar data deduplication performs a similar function. However, using this
feature provides valuable I/O reduction earlier in the backup process. Changed block
tracking dramatically improves performance if SAN connectivity is not available.
If changed block tracking is not enabled, each virtual machine filesystem image must be
fully processed for each backup, possibly resulting in unacceptably long backup windows,
and excessive back-end storage read/write activity.
Changed block tracking can also reduce the time required to restore (“roll back”) a virtual
machine to a recent backup image by automatically eliminating unnecessary writes during
the restore process.
Additional VMware resources
A comprehensive discussion of VMware technology is beyond the scope of this
publication. The following VMware documentation provides additional details:
◆
Introduction to VMware vSphere
◆
Getting Started with ESX
◆
ESX, and vCenter Server Installation Guide
◆
Basic System Administration
◆
vSphere Web Access Administrator's Guide
◆
ESX Configuration Guide
◆
Resource Management Guide
18
EMC Avamar 6.1 for VMware User Guide
Page 19

CHAPTER 2
Configuration and Setup
This chapter provides essential configuration and setup procedures for both vCenter and
Avamar environments that must be performed before Avamar for VMware image backup
and restore can be used to protect virtual machine data. Topics in this chapter include:
◆ Task road map ........................................................................................................ 20
◆ Enable support for multiple vCenters....................................................................... 21
◆ Download and install vSphere client software ......................................................... 21
◆ Download and install Avamar Administrator software.............................................. 22
◆ Configure vCenter-to-Avamar authentication ........................................................... 24
◆ Create dedicated vCenter user account.................................................................... 26
◆ Add vCenter client in Avamar Administrator............................................................. 28
◆ Deploy proxy clients................................................................................................ 30
◆ Upgrading Avamar proxy software ........................................................................... 44
◆ Protecting virtual machines with both guest and image backup............................... 47
Configuration and Setup
19
Page 20

Configuration and Setup
Task road map
Successfully configuring Avamar for VMware image backup and restore comprises the
following tasks, which must be performed in this specific order:
◆ “Enable support for multiple vCenters” on page 21 only required if Avamar server was
upgraded from a previous version)
◆ “Download and install vSphere client software” on page 21
◆ “Download and install Avamar Administrator software” on page 22
◆ For each vCenter, “Configure vCenter-to-Avamar authentication” on page 24, one of
the following:
• “Option 1: Install an authentication certificate on the Avamar MCS” on page 24
• “Option 2: Turn off certificate authentication for all vCenter-to-Avamar MCS
communications” on page 25
◆ For each vCenter, “Create dedicated vCenter user account” on page 26
◆ For each vCenter, “Add vCenter client in Avamar Administrator” on page 28
◆ “Deploy proxy clients” on page 30, all of the following:
• “Add DNS Entries” on page 30
• “Download proxy appliance template file” on page 31
• “Deploy proxy appliance in vCenter” on page 32
• “Configure proxy virtual machine network settings in vCenter” on page 40
• “Configure proxy settings in Avamar Administrator” on page 42
20
EMC Avamar 6.1 for VMware User Guide
Page 21

Enable support for multiple vCenters
Avamar for VMware image backup and restore supports protecting up to 5 vCenters from a
single Avamar server. Beginning with Avamar 6.0, support for multiple vCenters is enabled
by default during new Avamar server software installations. However, if your Avamar
server was upgraded to from the previous version, you might need to perform the
following manual configuration in order to enable support for multiple vCenters.
To enable support for multiple vCenters, perform the following:
1. Open a command shell and log in using one of the following methods:
• To log in to a single-node server, log in to the server as admin.
• To log in to a multi-node server, log in to the utility node as admin.
2. Change directories by typing:
cd /usr/local/avamar/var/mc/server_data/prefs
3. Open mcserver.xml in a UNIX text editor.
4. Find the com.avamar.mc.vmware.max_number_of_vcenters node, as shown below:
Configuration and Setup
<root type="system">
<node name="com">
<node name="avamar">
<node name="mc">
<node name="vmware">
<entry key="max_number_of_vcenters" value="1" />
Note: Substantial portions of mcserver.xml have been omitted for clarity.
5. Change the max_number_of_vcenters entry to an integer value between 2 and 5.
This value must be equal to or greater than the maximum number of vCenters you will
be using with this Avamar server. Currently, the absolute maximum number of
vCenters that can be supported by a single MCS is 5.
6. Save your changes.
7. Restart the MCS by typing:
dpnctl stop mcs
dpnctl start mcs
8. Close the command shell.
Download and install vSphere client software
If you have not already done so, download and install vSphere client software by
performing the following:
1. From a Windows computer, point your web browser at the vSphere server by typing the
following URL:
HTTPS://VSPHERE
where VSPHERE is your actual vSphere server network hostname as defined in DNS, or
IP address.
Enable support for multiple vCenters
21
Page 22

Configuration and Setup
Note: This URL must be a secure (HTTPS) web address.
The vSphere Welcome page appears.
2. Click Download vSphere Client.
Your browser might prompt you to either open the file “in-place” (on the server) or
save it to your local computer. Either method is acceptable. However, if you save the
file to your local computer, you must open (double-click) that installation file to
continue with this procedure.
3. Either open the installation file in place (on the server), or double-click the
downloaded installation file.
The installation wizard appears.
4. Follow the on-screen instructions.
5. When prompted, click Finish to complete the installation procedure.
The installation wizard closes.
Download and install Avamar Administrator software
If you have not already done so, download and install Avamar Administrator software by
performing the following:
1. From a Windows computer, point your web browser at the Avamar server by typing the
following URL:
http://AVAMARSERVER
where AVAMARSERVER is your actual Avamar server network hostname as defined in
DNS, or IP address.
You will be automatically redirected to the Avamar secure web server.
Depending on your browser security settings, a security alert dialog box might appear.
2. If a security alert dialog box appears, click Yes, or OK to allow redirection to the
Avamar secure web server.
The Secure Log On page appears.
3. Page down until the Documents and Downloads link is visible.
4. Click Documents and Downloads.
The Documents and Downloads page appears.
5. Page down until the Windows for x86 (32 bit) section is visible.
22
6. Click the Microsoft Windows XP, 2003, Vista, 2008, 7 link.
The Downloads for Microsoft Windows XP, 2003, Vista, 2008, 7 page appears.
7. Click the AvamarConsoleMultiple install package.
EMC Avamar 6.1 for VMware User Guide
Page 23

Configuration and Setup
Your browser might prompt you to either open the file “in-place” (on the server) or
save it to your local computer. Either method is acceptable. However, if you save the
file to your local computer, you must open (double-click) that installation file to
continue with this procedure.
8. Either open the installation file in place (on the server), or double-click the
downloaded installation file.
The installation wizard appears.
9. Follow the on-screen instructions.
10. When prompted, click Finish to complete the installation procedure.
The installation wizard closes.
Download and install Avamar Administrator software
23
Page 24

Configuration and Setup
Configure vCenter-to-Avamar authentication
Avamar VMware Image Backup will not work unless:
◆ A valid authentication certificate is present on the Avamar Management Console
Server (MCS).
◆ Certificate authentication for all MCS-to-vCenter communications is turned off.
You must perform this task for each vCenter you intend to protect.
Option 1: Install an authentication certificate on the Avamar MCS
Avamar VMware Image Backup will not work unless a valid authentication certificate is
present on the MCS. For security reasons, Avamar intentionally does not provide one. You
must either obtain your own authentication certificate, or use the default certificate
provided with vCenter, then install either certificate using this procedure.
This procedure assumes that you are installing the default certificate provided with
vCenter.
The procedure uses the java keytool command, a utility that manages certificate keys. The
keytool command is located in the Java bin directory (/usr/java/jreVERSION/bin), where
VERSION is the specific Java Runtime Environment (JRE) version currently installed on the
MCS. If this directory is not in your path, you can either add it to the path, or specify the
complete path when using keytool.
1. Open a command shell, and log in:
• If logging into a single-node server, log in to the server as admin.
• If logging into a multi-node server, log in to the utility node as admin.
2. Stop the MCS by typing:
dpnctl stop mcs
3. Switch user to root by typing:
su -
4. Copy rui.crt from the vCenter machine to /tmp on the utility node or single-node
server.
The default certificate provided with vCenter is:
• Windows 2008: C:\ProgramData\VMware\VMware VirtualCenter\SSL\rui.crt
• Other Windows versions: C:\Documents and Settings\All Users\Application
Data\VMware\VMware VirtualCenter\SSL\rui.crt
24
• Linux: /etc/vmware-vpx/ssl/rui.crt
5. Create a temporary version of the MCS keystore by copying the live keystore to /tmp by
typing:
cp /usr/local/avamar/lib/rmi_ssl_keystore /tmp/
EMC Avamar 6.1 for VMware User Guide
Page 25

Configuration and Setup
6. Add the default vCenter certificate to the temporary MCS keystore file by typing:
cd /tmp
$JAVA_HOME/bin/keytool –import –file rui.crt -alias ALIAS
-keystore rmi_ssl_keystore
where ALIAS is a user-defined name for this certificate, which can often be the file
name.
7. When prompted for a password, type the root password.
The following appears in the command shell:
Trust this certificate?
8. Type yes, and press Enter.
9. Back up the live MCS keystore by typing:
cd /usr/local/avamar/lib
cp rmi_ssl_keystore rmi_ssl_keystore.DATE
where DATE is today’s date.
10. Copy the temporary MCS keystore to the live location by typing:
cp /tmp/rmi_ssl_keystore /usr/local/avamar/lib/
11. Exit the root subshell, and restart the MCS by typing:
exit
dpnctl start mcs
Option 2: Turn off certificate authentication for all vCenter-to-Avamar MCS communications
1. Open a command shell, and log in:
• If logging into a single-node server, log in to the server as admin.
• If logging into a multi-node server, log in to the utility node as admin.
2. Stop the MCS by typing:
dpnctl stop mcs
3. Open /usr/local/avamar/var/mc/server_data/prefs/mcserver.xml in a UNIX text
editor.
4. Locate the ignore_vc_cert preference.
5. Change the ignore_vc_cert preference setting to true.
For example:
<entry key="ignore_vc_cert" value="true" />
6. Save your changes.
7. Restart the MCS by typing:
dpnctl start mcs
Configure vCenter-to-Avamar authentication
25
Page 26

Configuration and Setup
Create dedicated vCenter user account
EMC strongly recommends that you set up a separate vCenter user account that is strictly
dedicated for use with Avamar. Use of a generic user account such as “Administrator”
might hamper future troubleshooting efforts because it might not be clear which
“Administrator” actions are actually interfacing, or communicating with the Avamar server.
Using a separate vCenter user account ensures maximum clarity if it becomes necessary to
examine vCenter logs.
You must perform this task for each vCenter you intend to protect.
This vCenter user account must have the following minimum privileges:
Table 3 Minimum required vCenter user account privileges (page 1 of 2)
Setting Minimum required privileges
Datastore • Allocate space
• Browse datastore
• Low level file operations
• Move datastore
•Remove datastore
•Remove file
• Rename datastore
Folder • Create Folder
Global • Cancel task
• Disable methods
•Enable methods
• Licenses
• Log event
•Settings
Network • Assign network
•Configure
Resource • Assign virtual machine to resource pool
Sessions • Validate session
Tasks • Create task
• Update task
vApp • Export
26
EMC Avamar 6.1 for VMware User Guide
Page 27

Table 3 Minimum required vCenter user account privileges (page 2 of 2)
Setting Minimum required privileges
Virtual machine > Configuration • Add existing disk
• Add new disk
• Add or Remove device
• Advanced
•Change CPU count
• Change Resource
• Disk change Tracking
•Disk Lease
• Host USB device
•Memory
• Modify device setting
•Raw device
• Reload from path
• Remove disk
• Rename
• Reset guest information
•Settings
• Swapfile placement
• Upgrade virtual hardware
• Extend Virtual disk
Configuration and Setup
Virtual machine > Interaction • Acquire guest control ticket
• Console interaction
•Power Off
• Power On
• Reset
• VMware Tools install
Virtual machine > Inventory • Create new
•Register
•Remove
•Unregister
Virtual machine > Provisioning • Allow disk access
• Allow read-only disk access
• Allow virtual machine download
• Mark as Template
Virtual machine > State • Create snapshot
• Remove Snapshot
• Revert to snapshot
Create dedicated vCenter user account
27
Page 28

Configuration and Setup
Add vCenter client in Avamar Administrator
The vCenter must exist, and be operational before this type of client can be added. Avamar
Administrator attempts to make a connection with the vCenter.
If the vCenter client is already registered as a normal client (for example, to support guest
level backup), adding that same vCenter client again will fail because the system will not
allow you to register the same client twice. If this occurs, you must retire the existing client
instance in Avamar Administrator, add the vCenter client (using the following procedure),
then re-invite the vCenter client as a normal client to support guest level backup from the
vCenter server.
You must perform this task for each vCenter you intend to protect.
Adding a vCenter client in Avamar Administrator automatically:
◆ Adds the vCenter client to the Default Group.
However, this client is not activated as normal Avamar clients are. Therefore, no
backups are performed for it on behalf of the Default Group.
◆ Creates a default vCenter server with the same name as the vCenter's fully qualified
hostname.
◆ Creates a VirtualMachines subdomain within that vCenter server.
◆ Creates a Default Virtual Machine Group.
This group performs scheduled backups for the target virtual machines. This group
cannot be deleted without first deleting the virtual center domain.
To add a vCenter client:
1. In Avamar Administrator, click the Administration launcher button.
The Administration window appears.
2. Click the Account Management tab.
3. In the tree, select the top-level (root) domain.
4. Select Actions > Account Management > New Client…
The New Client dialog box appears.
28
EMC Avamar 6.1 for VMware User Guide
Page 29
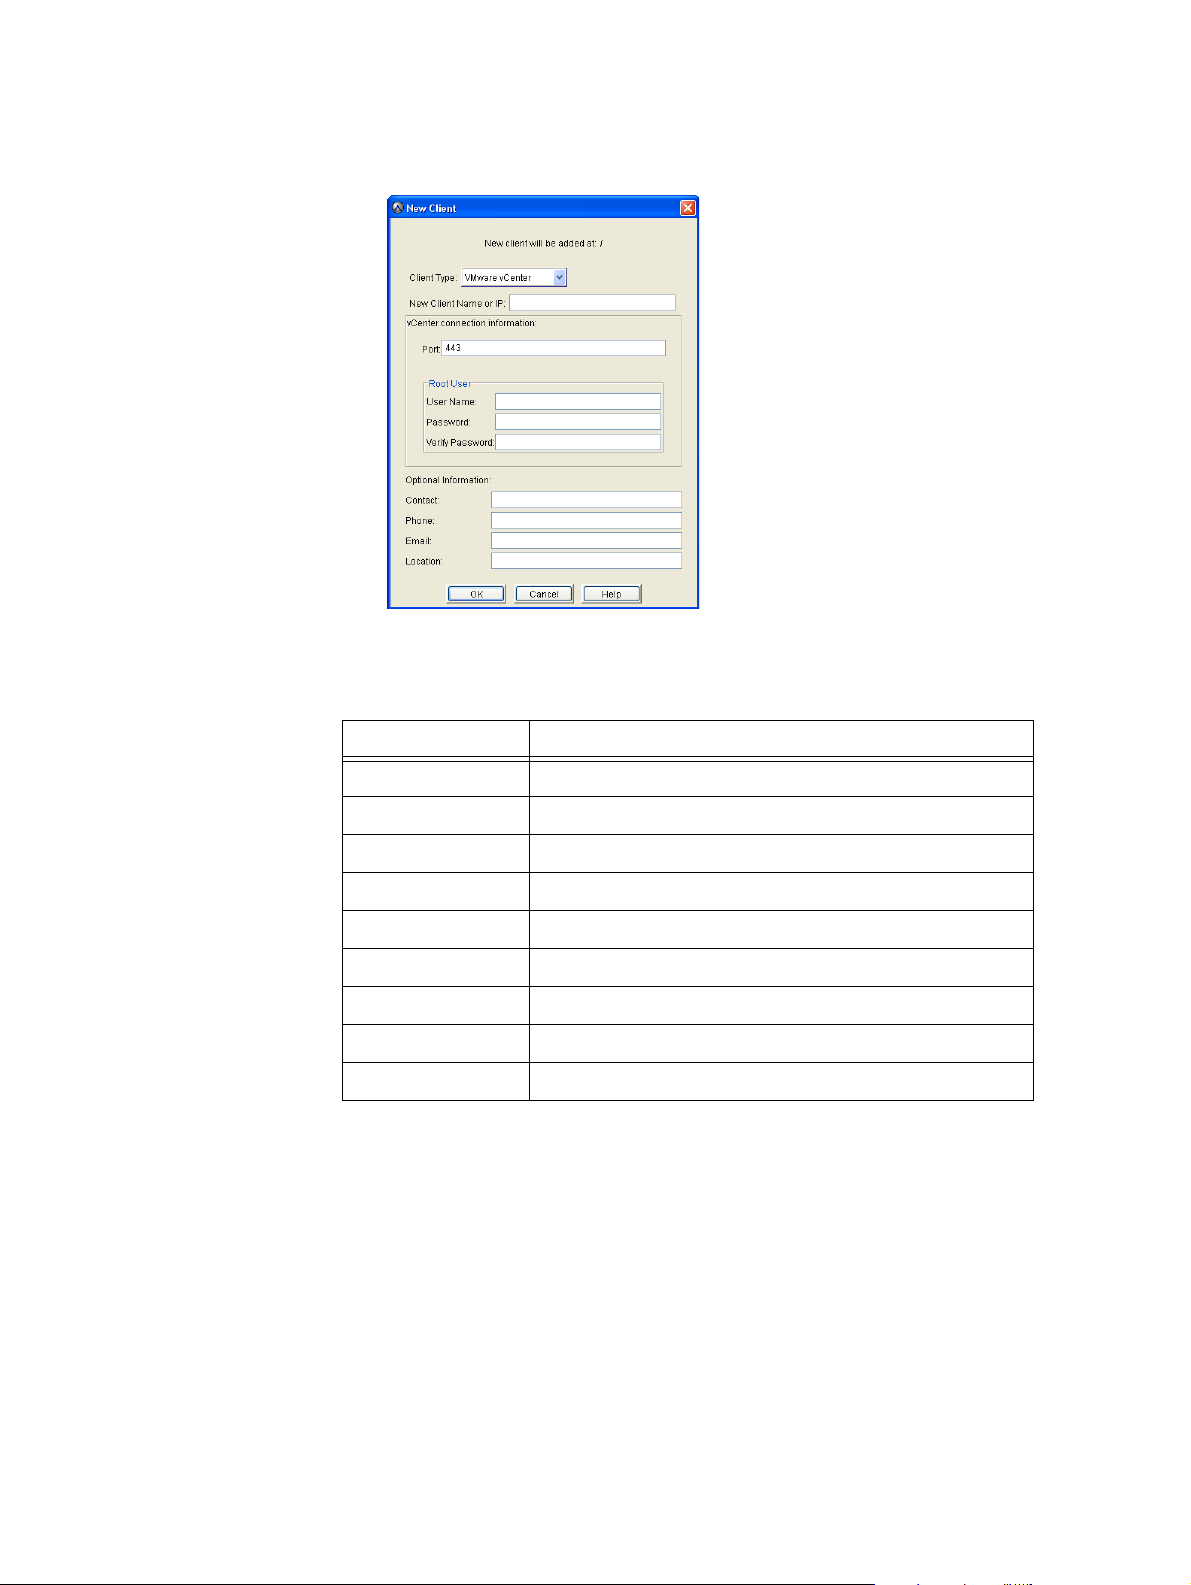
5. For Client Type, select VMware vCenter.
6. Complete the following settings:
Configuration and Setup
Table 4 New vCenter client settings
Setting Description
New Client Name or IP Fully-qualified DNS name, or IP address of the vCenter.
Port vCenter web services listener port. Default setting is port 443.
User Name vCenter user account name you previously created.
Password Password for the vCenter user account you previously created.
Verify Password Type the password again.
Contact Optional contact name.
Phone Optional contact telephone number.
Email Optional contact email address.
Location Optional contact location.
7. Click OK.
The New Client dialog box closes.
Add vCenter client in Avamar Administrator
29
Page 30

Configuration and Setup
Deploy proxy clients
Backups and restores require deployment of proxy virtual machine clients. Once
deployed, each proxy virtual machine client provides all of the following capabilities:
◆ Backup of Microsoft Windows and Linux virtual machines (entire images or specific
drives)
◆ Restore of Microsoft Windows and Linux virtual machines (entire images or specific
drives)
◆ Selective restore of individual folders and files to Microsoft Windows and Linux virtual
machines
Proxies run Avamar software inside a Linux virtual machine, and are deployed using an
appliance template (.ova) file.
Proxy clients are allowed in any part of Avamar Administrator account management tree
except the vCenter server domain or subdomains.
Although it is possible to restore across datacenters (that is, use a proxy deployed in one
datacenter to restore files to a virtual machine in another datacenter), restores will take
noticeably longer than if the proxy and the target virtual machine are both located in the
same datacenter. Therefore, for best performance, deploy at least one proxy on each
datacenter you are protecting.
Add DNS Entries
For best results, always register and activate proxies from the client during deployment (as
described in “Configure proxy virtual machine network settings in vCenter” on page 40).
Using the alternative method of inviting the proxy client to register with the Avamar server
from Avamar Administrator is known to have unpredictable results.
During “Deploy proxy appliance in vCenter” on page 32, you will be asked to assign a
unique IP address to each proxy. vCenter performs a reverse DNS lookup of that IP address
to ensure that it is resolvable to a hostname. For best results, configure all required DNS
entries for proxies you plan to deploy before proceeding with the remainder of this
procedure.
30
EMC Avamar 6.1 for VMware User Guide
Page 31

Download proxy appliance template file
If adding more than one proxy, you only need to perform this task once.
Download the proxy appliance template file by performing the following:
1. From your Windows computer, point your web browser at the Avamar server by typing
the following URL:
http://AVAMARSERVER
where AVAMARSERVER is your actual Avamar server network hostname as defined in
DNS, or IP address.
You are automatically redirected to the Avamar secure web server.
Depending on your browser security settings, a security alert dialog box might appear.
2. If a security alert dialog box appears, click Yes, or OK to allow redirection to the
Avamar secure web server.
The Secure Log On page appears.
Configuration and Setup
3. Page down until the Documents and Downloads link is visible.
4. Click Documents and Downloads.
The Documents and Downloads page appears.
5. Page down until the VMware vSphere section is visible.
6. Click the EMC Avamar VMware Image Backup/FLR Appliance link.
The Downloads for EMC Avamar VMware Image Backup Appliance page appears.
7. Click the AvamarCombinedProxy-linux-sles11_64-VERSION.ova link.
where VERSION is the specific version Avamar software you are installing.
The File Download dialog box appears.
8. Click Save to save the appliance template file to a convenient location on your
computer (for example, your desktop or C:\Temp).
Deploy proxy clients
31
Page 32

Configuration and Setup
Deploy proxy appliance in vCenter
Deploy the proxy appliance in the vCenter as follows:
1. From your Windows computer, launch the vSphere client application and log in to the
vCenter server.
The vSphere Client window appears.
2. Switch to Hosts and Clusters view by clicking View > Inventory > Hosts and Clusters.
3. Select File > Deploy OVF Template.
The Deploy OVF Template wizard appears.
4. In the Source screen, complete the following:
32
a. Select Deploy from file or URL and click Browse.
The Open dialog box appears.
b. Select Ova files (*.ova) from the Files of Type list.
c. Browse to the appliance template file that was previously downloaded in
“Download proxy appliance template file” on page 31.
d. Select the appliance template file and click Open.
The Open dialog box closes.
The full path to the appliance template file appears in the Deploy from file field.
e. Click Next.
The OVF Template Details screen appears.
EMC Avamar 6.1 for VMware User Guide
Page 33

5. In the OVF Template Details screen, complete the following:
Configuration and Setup
a. Ensure that the template information is correct.
b. Click Next.
The Name and Location screen appears.
6. In the Name and Location screen, complete the following:
Deploy proxy clients
33
Page 34

Configuration and Setup
a. Type a unique fully-qualified hostname in the Name field.
A proxy can potentially have three different names:
– The name of the virtual machine on which the proxy runs. This is also the name
managed and visible within vCenter.
– The DNS name assigned to the proxy virtual machine.
– The Avamar client name after the proxy registers and activates with server.
In order to avoid confusion and potential problems, EMC strongly recommends
that you consistently use the same fully-qualified hostname for this proxy in all
contexts.
b. Select a datacenter and folder location for this proxy in the Inventory tree.
c. Click Next.
The Host / Cluster screen appears.
7. In the Host / Cluster screen, complete the following:
34
a. Select an ESX server or cluster.
b. Click Next.
If you selected a cluster, the Specific Host screen appears.
EMC Avamar 6.1 for VMware User Guide
Page 35

8. In the Specific Host screen, complete the following:
Configuration and Setup
a. Select a specific ESX server from the Host Name list.
b. Click Next.
The Storage screen appears.
9. In the Storage screen, complete the following:
Deploy proxy clients
35
Page 36

Configuration and Setup
a. Select a storage location for this proxy.
b. Click Next.
The Disk Format screen appears.
10. In the Disk Format screen, complete the following:
a. Accept the suggested default setting for Available Space (GB).
b. Accept the suggested default provisioning setting (Thin Provision).
c. Click Next.
36
EMC Avamar 6.1 for VMware User Guide
Page 37

The Network Mapping screen appears.
Configuration and Setup
11. In the Network Mapping screen, complete the following:
a. Select a destination network from list.
b. Click Next.
The networking Properties screen appears.
Deploy proxy clients
37
Page 38

Configuration and Setup
12. In the networking Properties screen, complete the following:
Table 5 Proxy Network Property Settings
Field Setting/Description
Default Gateway Enter the default gateway IP address for your network.
DNS If not using DHCP, enter one or more Domain Name Server (DNS)
hostnames or IP addresses. Separate multiple entries with commas.
Network IP Address If not using DHCP, enter a valid routable IP address on your network.
Network Netmask Set to 255.255.255.0.
38
EMC Avamar 6.1 for VMware User Guide
Page 39

a. Click Next.
The Ready To Complete screen appears.
Configuration and Setup
b. Ensure that the information is correct.
c. Click Finish.
The Deploy OVF Template wizard closes.
13. Wait for the deployment operation to complete.
This might take several minutes.
A confirmation message appears.
14. Click Close to dismiss the confirmation message.
Deploy proxy clients
39
Page 40

Configuration and Setup
Configure proxy virtual machine network settings in vCenter
1. From the vSphere Client window, locate and select a Avamar image backup proxy that
was previously deployed in “Deploy proxy appliance in vCenter” on page 32.
2. Power on the new proxy virtual machine by right-clicking the proxy and selecting
Power > Power On.
3. Open a console to the proxy by right-clicking it and selecting Open Console.
The Console window appears.
4. Wait for the Main Menu to appear.
40
For best results, always register and activate proxies from the client during
deployment as described in steps 5—8. Using the alternative method of inviting the
proxy client to register with the Avamar server from Avamar Administrator is known to
have unpredictable results.
EMC Avamar 6.1 for VMware User Guide
Page 41

Configuration and Setup
5. Register the proxy with an Avamar server by typing 1.
The following appears in the console window:
Enter the Administrator server address (DNS text name, or numeric IP
address, DNS name preferred):
6. Type the actual network hostname as defined in DNS of the Avamar server from which
you want to initiate, and manage backups and restores.
7. Press Enter.
The following appears in the console window:
Enter the Avamar server domain [clients]:
The default domain is “clients.” However, your Avamar system administrator may have
defined other domains, and subdomains. Consult your Avamar system administrator
for the specific domain you should use when registering this client.
Note: If typing a subdomain (for example, clients/MyClients), do not include a slash
(/) as the first character. Including a slash as the first character will cause an error, and
prevent you from registering this client.
8. Press Enter to accept the default domain (clients).
In order to implement file-level restore, this proxy requires the Avamar server root
password.
The following appears in the console window:
Has the Avamar server software root password changed since last
running this utility? [no]
9. Do one of the following:
• If the Avamar server software root password has not changed since you last ran
this utility, press Enter and go directly to step 11.
• If the Avamar server software root password has changed since you last ran this
utility, type y and press Enter, then go to step 10.
The following appears in the console window:
Enter the Avamar server software root password:
10. Enter the Avamar server software root password and press Enter.
Deploy proxy clients
41
Page 42

Configuration and Setup
11. Wait for the Main Menu to appear.
12. Type 2 and press Enter to quit.
Configure proxy settings in Avamar Administrator
1. In Avamar Administrator, click the Administration launcher button.
The Administration window appears.
2. Click the Account Management tab.
Proxy names in Avamar Administrator have “proxy-1” appended to the hostname you
defined in “Deploy proxy appliance in vCenter” on page 32. For example, the example
vCenter proxy hostname “avamar-proxy” appears as “avamar-proxy-proxy-1” in
Avamar Administrator.
3. In the tree, select the proxy you registered in the “Configure proxy virtual machine
network settings in vCenter” on page 40 and select Actions > Account Management >
Client Edit…
42
EMC Avamar 6.1 for VMware User Guide
Page 43

The Edit Client dialog box appears.
Configuration and Setup
4. Click the Datastores tab, then select all vCenter datastores that host virtual machines
you want to protect with this proxy.
5. Click the Groups tab, then assign this proxy to one, or more existing groups by
selecting the Select checkbox next to each group.
6. (Optional) complete the following settings:
Table 6 New proxy client settings
Setting Description
Contact Optional contact name.
Phone Optional contact telephone number.
Email Optional contact email address.
Location Optional contact location.
7. Click OK.
The Edit Client dialog box closes.
Deploy proxy clients
43
Page 44

Configuration and Setup
Upgrading Avamar proxy software
Perform the following procedure when a newer version of the Avamar 6.1 proxy software is
available for download from the Avamar server.
This procedure cannot be used to upgrade an Avamar 6.0 proxy. Instead, use the upgrade
procedure in the
1. From your Windows computer, point your web browser at the Avamar server by typing
the following URL:
http://AVAMARSERVER
where AVAMARSERVER is your actual Avamar server network hostname as defined in
DNS, or IP address.
You are automatically redirected to the Avamar secure web server.
Depending on your browser security settings, a security alert dialog box might appear.
2. If a security alert dialog box appears, click Yes or OK to allow redirection to the Avamar
secure web server.
EMC Avamar 6.0 for VMware Guide
.
The Secure Log On page appears.
3. Page down until the Documents and Downloads link is visible.
4. Click Documents and Downloads.
The Documents and Downloads page appears.
5. Page down until the VMware vSphere section is visible.
6. Click the EMC Avamar VMware Image Backup/FLR Appliance link.
The Downloads for EMC Avamar VMware Image Backup Appliance page appears.
7. Click the AvamarCombinedProxy-linux-x86-VERSION.iso link.
where VERSION is the specific version Avamar software you are installing.
The File Download dialog box appears.
8. Click Save to save the ISO file to a convenient location on your computer (for example,
your desktop, or C:\Temp).
9. From your Windows computer, launch the vSphere client application, and log in to the
vCenter server.
The vSphere Client window appears.
10. Switch to Hosts and Clusters view by clicking View > Inventory > Hosts and Clusters.
44
11. Locate and select the ESX server that hosts the proxy you want to update.
12. Click the Summary tab.
EMC Avamar 6.1 for VMware User Guide
Page 45

Configuration and Setup
13. In the Resources pane, select a datastore in the Datastore list.
This datastore is where you will upload the ISO file.
Note: If you are performing multiple upgrades, you should select a datastore that is
accessible to the greatest number of proxies.
14. Right click the datastore and select Browse Datastore.
The Datastore Browser window appears.
15. In the Folder tree, select a folder.
This folder is where you will upload the ISO file.
16. Click Upload files to this datastore, then select Upload file.
The Upload Items dialog box appears.
17. Browse to the ISO file that you downloaded in step 8.
18. Select the ISO file and click Open.
The Upload Items dialog box closes.
19. If an Upload/Download Operation Warning appears, click Yes to dismiss the warning
and continue with the upload.
20. Wait for the upload to complete.
21. Switch to vSphere Client window VMs and Templates view by clicking View > Inventory
> VMs and Templates.
22. In the left pane, locate and select the proxy you want to upgrade.
23. Right click Edit Settings.
The Virtual Machine Properties dialog box appears.
24. In the Hardware list, select CD/DVD Drive 1.
25. Set the following options:
a. In Device Status, select Connected.
b. In Device Status, select Connect at power on.
Upgrading Avamar proxy software
45
Page 46

Configuration and Setup
c. In Device Type, select Datastore ISO File.
26. Click Browse.
The Browse Datastores dialog box appears.
27. Locate and select the ISO file you uploaded in steps 11–20.
28. Click Open.
The Browse Datastores dialog box closes.
29. Switch to Virtual Machine Properties dialog box and click OK.
The Virtual Machine Properties dialog box closes.
The ISO file is mounted on the proxy.
The proxy automatically waits until no backups are running, then updates itself.
Because the polling interval is set to 30 minutes, it make take up to 30 minutes after
the last backup completes for the upgrade to begin.
When you reboot the proxy VM, it updates its software. Backups that are running
during the reboot fail. You should only reboot when you are absolutely certain the
proxy is not being used for backups.
30. Switch to vSphere Client window VMs and Templates view by clicking View > Inventory
> VMs and Templates.
46
31. In the left pane, locate and select the proxy you just upgraded.
32. Right click Edit Settings.
The Virtual Machine Properties dialog box appears.
33. In the Hardware list, select CD/DVD Drive 1.
EMC Avamar 6.1 for VMware User Guide
Page 47

Configuration and Setup
34. In Device Status, clear the Connected option.
35. Click OK.
The Virtual Machine Properties dialog box closes.
36. Repeat steps 21–35 to upgrade additional proxies.
Protecting virtual machines with both guest and image backup
You can protect a virtual machine using both guest backup and image backup. For
example, a daily guest backup to frequently protect selective files, and an infrequent or
on-demand full image backup protects the full machine. This scheme accommodates
scenarios with limited backup windows.
However, if you decide to use both methods simultaneously on one or more virtual
machines, complete the following configuration steps:
1. Open a command shell, and log in:
• If logging into a single-node server, log in to the server as admin.
• If logging into a multi-node server, log in to the utility node as admin.
2. Stop the MCS by typing:
dpnctl stop mcs
3. Open /usr/local/avamar/var/mc/server_data/prefs/mcserver.xml in a UNIX text
editor.
4. Locate the allow_duplicate_client_names preference.
5. Change the allow_duplicate_client_names preference setting to true.
For example:
<entry key="allow_duplicate_client_names" value="true" />
6. Save your changes.
7. Restart the MCS by typing:
dpnctl start mcs
Protecting virtual machines with both guest and image backup
47
Page 48

Configuration and Setup
48
EMC Avamar 6.1 for VMware User Guide
Page 49

CHAPTER 3
Administration
This chapter provides instructions for administering an operational Avamar for VMware
image backup and restore environment. Topics in this chapter include:
◆ Basic client administration...................................................................................... 50
◆ Groups and policy management.............................................................................. 60
◆ Best practices ......................................................................................................... 69
◆ Troubleshooting...................................................................................................... 70
Administration
49
Page 50

Administration
Basic client administration
This topic describes how to add and manage VMware image proxy, and virtual machine
clients.
Although this publication makes every attempt to present complete and relevant
information for every topic, a comprehensive discussion of basic system administration
concepts and principles is beyond the scope of this publication. The
Administration Guide
How VMware clients appear in Avamar Administrator
In order to differentiate between the various types of clients in a typical vCenter
environment, Avamar Administrator uses the following icons to communicate client type
and state:
Table 7 How VMware clients appear in Avamar Administrator (page 1 of 2)
Icon Description
provides detailed information.
EMC Avamar
vCenter server
Activated.
This is the same icon used to show nonvirtual machine clients.
Replicated.
This icon is only visible in REPLICATE domain.
Unactivated.
Note: Unless you are also protecting the vCenter server with
guest backup (which is highly recommended), vCenter servers
are not typically activated as normal Avamar clients. Therefore,
in some circumstances, this is the normal state for a vCenter
server.
Proxy
Notice: Proxy names in Avamar Administrator have “proxy-1” appended
to the hostname you defined in “Deploy proxy appliance in vCenter” on
page 32. For example, the example vCenter proxy hostname
“avamar-proxy” appears as “
Administrator.
Activated and enabled.
avamar-proxy-proxy-1” in Avamar
50
Disabled.
Replicated.
This icon is only visible in REPLICATE domain.
Unactivated.
EMC Avamar 6.1 for VMware User Guide
Page 51

Table 7 How VMware clients appear in Avamar Administrator (page 2 of 2)
Icon Description
Virtual machines
Virtual machine.
Powered on.
Tem plate.
Adding virtual machine clients
Adding virtual machine clients to a vCenter server or a lower subdomain automatically
adds the client to the Default Virtual Machine Group.
You can add either a single virtual machine client or multiple virtual machine clients.
Adding a single virtual machine client
1. In Avamar Administrator, click the Administration launcher button.
The Administration window appears.
Administration
2. Click the Account Management tab.
3. In the tree, select a vCenter server or a lower subdomain.
4. Select Actions > Account Management > New Client…
The New Client dialog box appears.
5. Select VMware Virtual Machine from the Client Type list.
Basic client administration
51
Page 52

Administration
6. Click Browse.
The Select Virtual Machine dialog box appears.
7. Expand the tree until you can view the desired virtual machine node.
The Virtual Machines tab at right displays all available virtual machines administered
by vCenter.
Virtual machines for which a client already exists in Avamar are disabled.
Proxy client virtual machines cannot be selected because they are prevented from
backing themselves up with VMware Image plug-in.
For each virtual machine, the following information is shown:
Table 8 Virtual machine information in Avamar Administrator
Column Description
Name Virtual machine name.
Guest OS Virtual machine operating system.
Server ESX Server or cluster hostname.
Location Folder location.
Template Whether or not the virtual machine is a template.
Powered On Whether or not the virtual machine is currently powered on.
Change Block Whether or not changed block tracking is turned on for this virtual machine.
52
EMC Avamar 6.1 for VMware User Guide
Page 53

Administration
The options at the top of the Select Virtual Machine dialog box perform the following
functions:
Table 9 Select Virtual Machine dialog box functions
Option Description
vSphere View - Virtual machines and
template views
vSphere View - Hosts and Clusters
view
Show sub-domain virtual machines Displays all virtual machines in the vCenter.
Virtual Machine Properties - Enable
changed block tracking
The view is representative of vCenter's Virtual Machines
and Template views.
The view is representative of vCenter's Hosts and Clusters
view.
If a virtual machine is already being protected with guest
backup, it is shown as disabled in this view.
If selected, the changed block tracking is enabled.
Note: If changed block tracking is not enabled, the virtual
machine image must be fully processed for each backup,
which might result in unacceptably long backup windows,
and excessive back-end storage read/write activity.
This feature is enabled by default. EMC strongly
recommends that you leave this feature enabled for all
virtual machines you will be protecting with Avamar
VMware image backup.
8. Select a virtual machine.
9. To enable changed block tracking for this client, select Enable changed block tracking.
Turning on changed block tracking will not take effect until any of the following actions
occur: power on, resume after suspend, migrate, snapshot create, delete, or revert.
10. Click OK.
The new client name apears in the New Client dialog box with the fully-qualified name
of the selected virtual machine.
11. If desired, type the following optional information:
Table 10 New virtual machine client settings
Setting Description
Contact Optional contact name.
Phone Optional contact telephone number.
Email Optional contact email address.
Location Optional contact location.
Basic client administration
53
Page 54

Administration
12. Click OK.
The New Client dialog box closes and a Client added confirmation message appears.
13. Click OK.
The Client added confirmation message closes.
Adding multiple virtual machine clients
1. In Avamar Administrator, click the Administration launcher button.
The Administration window appears.
2. Click the Account Management tab.
3. In the tree, select the location (that is, the vCenter server or a lower subdomain) to
which you want to add the new clients.
4. Select Actions > Account Management > Import Multiple Clients.
The Select Virtual Machine dialog box appears.
54
5. Expand the tree until you can view the desired virtual machine nodes.
The Virtual Machines tab displays all available virtual machines administered by
vCenter.
Virtual machines for which a client already exists in Avamar are disabled.
Proxy client virtual machines cannot be selected because they are prevented from
backing themselves up with VMware Image plug-in.
EMC Avamar 6.1 for VMware User Guide
Page 55

Administration
For each virtual machine, the following information is shown:
Table 11 Virtual machine information in Avamar Administrator
Column Description
Name Virtual machine name.
Guest OS Virtual machine operating system.
Server ESX Server or cluster hostname.
Location Folder location.
Template Whether or not the virtual machine is a template.
Powered On Whether or not the virtual machine is currently powered on.
Change Block Whether or not changed block tracking is turned on for this virtual machine.
The options at the top of the Select Virtual Machine dialog box perform the following
functions:
Table 12 Select Virtual Machine dialog box functions
Option Description
vSphere View - Virtual machines and
template views
vSphere View - Hosts and Clusters
view
Show sub-domain virtual machines Displays all virtual machines in the vCenter.
Virtual Machine Properties - Enable
changed block tracking
The view is representative of vCenter's Virtual Machines
and Template views.
The view is representative of vCenter's Hosts and Clusters
view.
If a virtual machine is already being protected with guest
backup, it is shown as disabled in this view.
If selected, the changed block tracking is enabled.
Note: If changed block tracking is not enabled, the virtual
machine image must be fully processed for each backup,
which might result in unacceptably long backup windows,
and excessive back-end storage read/write activity.
This feature is enabled by default. EMC strongly
recommends that you leave this feature enabled for all
virtual machines you will be protecting with Avamar
VMware image backup.
6. Select one or more virtual machines.
7. To enable changed block tracking, select Enable changed block tracking.
Turning on changed block tracking will not take effect until any of the following actions
occur: power on, resume after suspend, migrate, snapshot create, delete, or revert.
8. Click OK.
9. Confirm the number of virtual machines selected.
10. Click OK.
Basic client administration
55
Page 56

Administration
The Progress and Adding Virtual Machine Clients dialog boxes appear.
11. Wait for the Progress dialog box to close.
12. Switch to Adding Virtual Machine Clients dialog box.
Click Save As to save the displayed results in a text file.
13. Click Close.
The Adding Virtual Machine Clients dialog box closes.
Editing existing VMware clients
Editing VMware clients is similar to editing other Avamar clients. The primary difference is
that when editing client properties from the Policy window, each Edit Client dialog box
includes an additional VMware tab that contains client properties relating to vCenter,
proxy, or virtual machine clients. This tab is not shown for nonvirtual clients.
Contents of the VMware tab differ according to the type of client:
◆ When editing a vCenter server, editable credentials are shown.
◆ When editing a proxy client, two tabs are shown:
• The Datstores tab is used to select all vCenter datastores that host virtual
• The Groups tab is used to assign an image proxy client to one or more existing
“Editing proxy datastore and group settings” on page 66 provides detailed
information.
◆ When editing a virtual machine client, datastores on which that virtual machine
resides are shown.
Renaming a vCenter client
If an existing vCenter client’s DNS name changes, the Avamar server will lose its
connection to that vCenter. This will prevent any interaction with that vCenter, including
scheduled backups, from occurring. If this occurs, you must manually rename that vCenter
client in Avamar Administrator.
This is the only context in which you should ever rename a vCenter client. In Avamar
Administrator, the vCenter client name must always be the fully qualified DNS name or a
valid IP address.
machines you want to protect with this image proxy client.
groups.
56
To rename an existing vCenter client:
1. Ensure that vCenter-to-Avamar authentication is working as described in “Configure
vCenter-to-Avamar authentication” on page 24.
2. In Avamar Administrator, click the Administration launcher button.
EMC Avamar 6.1 for VMware User Guide
Page 57

The Administration window appears.
3. Click the Account Management tab.
4. In the tree, select the vCenter client.
5. Select Actions > Account Management > Edit Client.
The Edit Client dialog box appears.
6. In the New Client Name or IP field, enter the new fully qualified DNS name.
7. Click OK.
The Edit Client dialog box closes.
8. Open a command shell and log in using one of the following methods:
• To log in to a single-node server, log in to the server as admin.
• To log in to a multi-node server:
a. Log in to the utility node as admin, and then load the admin OpenSSH key by
typing:
ssh-agent bash
ssh-add ~admin/.ssh/admin_key
Administration
b. When prompted, type the admin_key passphrase and press Enter.
9. Restart the MCS by typing:
dpnctl stop mcs
dpnctl start mcs
10. Reboot Avamar proxies as follows:
a. From your Windows computer, launch the vSphere client application and log in to
the vCenter server.
The vSphere Client window appears.
b. Switch to Hosts and Clusters view by clicking View > Inventory > Hosts and Clusters.
c. Locate an Avamar proxy.
d. Right-click Power > Power Off.
e. Right-click Power > Power On.
f. Repeat step c – step e for each Avamar proxy.
Basic client administration
57
Page 58

Administration
Viewing protected virtual machines
To view protected virtual machines:
1. In Avamar Administrator, click the Administration launcher button.
The Administration window appears.
2. Click the Account Management tab.
3. Click the Protection tab.
You can view the backup protection state for all virtual machines from the Protection tab.
You cannot take any actions on this tab.
All the virtual machines in the vCenter are listed on the Protection tab.
Virtual machines protected by guest have Avamar client software installed and are running
backup agents in the guest operating system.
Virtual machines protected by image backup are backed up using the Avamar VMware
Image Backup feature.
Those protected by both are protected by using both methods.
Viewing replicated virtual machine name
The View Information feature is used to view the virtual machine name of any virtual
machine in the REPLICATE domain.
This feature is disabled anywhere other than in the REPLICATE domain.
If you try to view information for a nonvirtual machine client, the following message
appears: No Information.
1. In Avamar Administrator, click the Administration launcher button.
The Administration window appears.
2. Click the Account Management tab.
58
3. In the tree, browse to the REPLICATE domain and select a client.
4. Select Actions > Account Management > View Information.
EMC Avamar 6.1 for VMware User Guide
Page 59

A dialog box appears, which shows the virtual machine name.
If you selected a nonvirtual machine client in step 4, the following message appears:
No Information.
5. Click OK.
The dialog box closes.
vCenter connection monitor
Avamar Administrator maintains a pool of connections to the vCenter. As with other
essential services, the Administration window Services Administration tab provides
continuous status for the vCenter connection.
Administration
To open the VMware vCenter Connection Monitor dialog box, double-click the VMware
vCenter Connection Monitor.
Basic client administration
59
Page 60

Administration
Valid connection states are Active and Idle.
Connections to the vCenter can be stopped, started, and restarted. Stop the connections
for vCenter upgrades, and start them when the upgrade has completed. If vCenter is
shutdown, connections become invalid and must be reestablished. If this occurs,
windows such as the New Client dialog box do not display vCenter structure or virtual
machines.
Groups and policy management
This topic discusses how to use Avamar groups, and policy management features to
manage the Avamar for VMware Image backup and restore feature.
Groups and group behavior
This topic discusses special groups and important behavioral differences related to
Avamar for VMware image backup and restore.
Default Proxy Group
By default, the Default Proxy Group is where proxies reside. This group cannot be deleted.
Enabling the Default Proxy Group does not conflict with scheduled backups performed by
other plug-ins configured on the proxy client.
Default Virtual Machine Group
By default, the Default Virtual Machine Group is where new virtual machine clients are
automatically added when they are registered. This group cannot be manually deleted but
is automatically deleted if the vCenter domain is deleted.
vCenter groups
Any group created under a vCenter server automatically becomes a “vCenter” group. This
group behaves similar to non-vCenter groups except that it also provides to ability to
specify which proxies are assigned to perform backups on behalf of its group members.
60
EMC Avamar 6.1 for VMware User Guide
Page 61

Virtual machine and proxy client relationships within vCenter groups
Consider the following simplified example configuration:
Virtual machines VM-1 and VM-2 store their data in DATASTORE-1 and DATASTORE-2,
respectively.
Administration
Within Avamar Administrator, proxies have been assigned to protect vCenter datastores as
follows:
◆ PROXY-1 has been assigned to DATASTORE-1 and DATASTORE-2
◆ PROXY-2 has been assigned to DATASTORE-2
◆ PROXY-3 has been assigned to DATASTORE-3
Datastore assignments are made at the proxy client level in the Edit Client dialog box.
A vCenter is group (GROUP-1) is created, to which virtual machine clients VM-1 and VM-2
are added.
In order to protect these Virtual machines, proxy clients must also be added to the vCenter
group as follows:
◆ PROXY-1, by way of its assignment to both DATASTORE-1 and DATASTORE-2, can
protect both VM-1 and VM-2 virtual machine clients.
◆ PROXY-2, because it is only assigned to DATASTORE-2, is optional as long as Proxy-1
exists in the vCenter group.
◆ PROXY-3, because it is only assigned to DATASTORE-3, cannot protect either VM-1 or
VM-2.
Every vCenter group must include enough proxies to support all the datastores assigned to
every client. Otherwise, when a backup is initiated and a proxy cannot be located to
perform the backup, the backup will fail with an Activity monitor status of “no proxy.”
Groups and policy management
61
Page 62

Administration
Adding a vCenter group
1. In Avamar Administrator, click the Policy launcher button.
2. Click the Policy Management tab.
3. Click the Groups tab.
4. In the tree, select a vCenter server.
The Policy window appears.
The data table lists the Default Virtual Machine Group, as well as any other vCenter
groups that have been added.
5. Select Actions > New Group.
The New Group dialog box appears.
62
EMC Avamar 6.1 for VMware User Guide
Page 63

6. Complete the settings as described in the following table.
Table 13 New vCenter group settings
Setting Description
Name Type a name for the group.
Do not use any of the following characters in the group name:
~!@$^%(){}[]|,`;#\/:*?<>'"&.
Administration
Disabled This option is selected by default. Clear this option to immediately enable
Encryption Method Encryption method used for client/server data transfer. Choices are:
Override Schedule Select this option to override the assigned schedule for the group.
Domain vCenter server name. This field is read-only.
regularly scheduled group backups.
•High —
• Medium — Medium strength encryption.
• None — No encryption.
The exact encryption technology and bit strength used for any specific
client-server connection depends on a number of factors, including the
client platform and Avamar server version. The
Security Guide
You can also skip the next scheduled backup entirely (Skip Next Backup) or
perform the next scheduled backup one time only (Run Next Backup Once).
Strongest available encryption setting for that specific client
platform.
EMC Avamar Product
provides detailed information.
The remaining wizard screens are used to select a dataset, schedule, and retention
policy, as well as build a client list, and assign proxies for this vCenter group.
You can click Finish at any time. Doing so will cause the new group to be created using
system default settings, empty client, and proxy lists. You can change those settings
by editing the vCenter group.
7. Click Next.
The next New Group wizard screen appears.
8. Select a dataset from the Select An Existing Dataset list.
You cannot edit dataset properties from this screen. Detailed dataset properties are
shown so that you can review them before you make a selection. The
Administration Guide
provides detailed information about editing datasets.
EMC Avamar
9. Click Next.
The next New Group wizard screen appears.
10. Select a schedule from the Select An Existing Schedule list.
You cannot edit schedules from this screen. Detailed schedule properties are shown
so that you can review them before you make a selection. The
Administration Guide
provides detailed information about editing schedules.
Groups and policy management
EMC Avamar
63
Page 64

Administration
11. Click Next.
The next New Group wizard screen appears.
12. Select a retention policy from the Select An Existing Retention Policy list.
You cannot edit retention policies from this screen. Detailed retention policy
properties are shown so that you can review them before you make a selection. The
EMC Avamar Administration Guide
retention policies.
13. Click Next.
The next New Group wizard screen appears.
provides detailed information about editing
64
14. Select one or more virtual machine clients in the data table.
Note: If you have created additional domains below your vCenter server, click Show
sub-domain clients to show all available virtual machine clients.
EMC Avamar 6.1 for VMware User Guide
Page 65

15. Click Next.
The next New Group wizard screen appears.
Administration
16. Select one or more proxies in the data table.
17. Click Finish.
Editing a vCenter group
1. In Avamar Administrator, click the Policy launcher button.
2. Click the Policy Management tab.
3. Click the Groups tab.
4. Select a vCenter group and click Edit.
5. Edit the group settings.
6. Click OK.
The New Group dialog box closes.
The Policy window appears.
The Edit Group dialog box appears.
“Adding a vCenter group” on page 62 provides detailed information about vCenter
group settings.
The Edit Group dialog box closes.
Groups and policy management
65
Page 66

Administration
Editing proxy datastore and group settings
This topic describes how to change datastore and group settings for proxies. The
Avamar Administration Guide
policy settings.
1. In Avamar Administrator, click the Policy launcher button.
The Policy window appears.
2. Click the Policy Management tab.
3. Click the Clients tab.
provides detailed information about editing other client
EMC
Note: Click Show sub-domain clients to show all available clients regardless of which
domain you have selected.
4. Select a proxy and click Edit.
The Edit Client dialog box appears.
5. Click the VMware tab.
66
EMC Avamar 6.1 for VMware User Guide
Page 67

6. Click the Datastores tab.
Administration
7. Select one or more datastores.
8. Click the Groups tab.
9. Select one or more groups containing virtual machine clients residing in the
datastores selected in step 7.
10. Click OK.
The Edit Client dialog box closes.
Groups and policy management
67
Page 68

Administration
VMware Image Dataset
The VMware Image Dataset is the default dataset that is assigned to the Default Virtual
Machine Group, and other vCenter groups when they are first added.
For the VMware Image Dataset:
◆ The only source data plug-ins shown are Linux and Windows virtual disks. Both are
selected by default.
◆ The Select Files and/or Folders option, as well as the Exclusions and Inclusions tabs
are disabled.
◆ Changed block tracking is enabled by default using an embedded
utilize_changed_block_list=true plug-in option statement.
Note: When creating other datasets for use with the Avamar VMware image backup
feature, copy this dataset so that you can reuse these recommended settings as the
basis for other datasets. The
EMC Avamar Administration Guide
provides detailed
information about adding and copying datasets.
68
EMC Avamar 6.1 for VMware User Guide
Page 69

Best practices
The following topics describe best practices to follow when configuring and using Avamar
for VMware image backup and restore.
EMC Avamar Compatibility and Interoperability Matrix
Before upgrading the vCenter infrastructure, refer to the
Interoperability Matrix
Use 64-bit VMware vCenter
For best resuts, use 64-bit VMware vCenter whenever possible.
Verify ESX and vCenter certificates
Use properly registered certificates from a trusted provider that matches DNS names for
ESX and vCenter.
Use fully-qualified ESX server hostnames
When adding new ESX servers to your vCenter environments, you should adhere to the
VMware recommended practice of naming your ESX servers with fully-qualified hostnames
(not an IP address, or simple hostname). Using anything other than a fully-qualified
hostname can result in network connection failures due to incorrect SSL certificate
handling.
to ensure that Avamar supports that version.
Administration
EMC Avamar Compatibility and
Recommendations for high change-rate clients
Use the guest backup or Data Domain backend for high change-rate clients.
Changed block tracking recomendations
If a virtual machine contains over 10,000 changed blocks, it is generally faster to back up
that client with changed block tracking disabled.
Use throttling parameters for group guest backups
When performing scheduled guest backups of virtual machines on the same ESX server,
add throttling parameters to the Avamar dataset. The reason for doing this is that Avamar
tries to initiate as many backups as possible, subject to certain load restrictions on the
Avamar MCS. However, if multiple guest backups are attempted on virtual machines on
the same ESX server, this can spike CPU usage, which will have an adverse effect on
overall ESX server performance.
Edit the dataset as follows:
1. Start Avamar Administrator.
2. Select Tool s > Manage Datasets…
The Manage All Datasets window appears.
3. Select a dataset from the list and click Edit.
The Edit Dataset dialog box appears.
4. Click the Options tab.
5. Click Show Advanced Options.
Best practices
69
Page 70

Administration
6. Type a non-zero in the Network usage throttle (Mbps) field.
Begin with a low value such as 20. Then monitor your next backup session to verify
that this has resolved any ESX server CPU usage issues.
7. Click OK.
The Edit Dataset dialog box closes.
Troubleshooting
This topic describes how to resolve issues that might arise with Avamar for VMware image
backup and restore.
Problems adding vCenter server as Avamar client
If you encounter problems adding a vCenter server as an Avamar client, ensure that:
◆ vCenter hostname, username, and password are correct.
◆ Port 443 is open between the Avamar server and vCenter system.
If that does not resolve the problem, try turning off certificate authentication for all
vCenter-to-Avamar MCS communications as described on “Option 2: Turn off certificate
authentication for all vCenter-to-Avamar MCS communications” on page 25.
Backup does not start
If a backup activity fails to start:
◆ Ensure that an Avamar Image Backup Proxy has been properly deployed as described
in “Deploy proxy clients” on page 30.
◆ The datastore for the source virtual machine has been selected on a running proxy
server.
If that does not resolve the problem, the account used to connect to vCenter might not
have sufficient privileges. To verify account privileges, log in to the vSphere client with that
username and password. Ensure that you can access datastores on that client. If you
cannot, that account does not have the required privileges.
Pre-existing snapshots cause restores to fail
Virtual machine restores will fail if a snapshot for that virtual machine already exists.
When this occurs, the restore operation will return an error message similar to the
following:
2011-12-07 09:30:26 avvcbimage FATAL <0000>: The pre-existing
snapshots from VMX '[VNXe3300-Datastore1]
vm-example/vm-example.vmx' will not permit a restore.
2011-12-07 09:30:26 avvcbimage FATAL <0000>: If necessary, use the
'--skip_snapshot_check' flag to override this pre-existing snapshot
check.
70
2011-12-07 09:30:26 avvcbimage Error <9759>: createSnapshot: snapshot
creation failed
EMC Avamar 6.1 for VMware User Guide
Page 71

Administration
To resolve this condition, you must perform a new restore of the affected virtual machine
and include the skip_snapshot_check plug-in option in the Restore Options dialog box.
This will force that restore operation to overwrite the existing snapshot, which will allow
the restore to successfully complete.
To perform a restore using the skip_snapshot_check plug-in option:
1. Initiate an image restore of the affected virtual machine as described in one of the
following procedures:
• “Restoring the full image or selected drives to the original virtual machine” on
page 80
• “Restoring the full image or selected drives to a different (existing) virtual
machine” on page 83
• “Restoring the full image or selected drives to a new virtual machine” on page 86
2. When you reach the point in the procedure that instructs you to set your restore
options in the Restore Options dialog box, perform the following additional steps to
add the skip_snapshot_check plug-in option in the Restore Options dialog box:
a. Click More Options.
The Restore Command Line Options dialog box appears.
a. Click More.
The Enter Attribute and Enter Attribute Value fields appear.
b. Type [avvcbimage]skip_snapshot_check in the Enter Attribute field.
c. Type true in the Enter Attribute Value field.
d. Click +.
[avvcbimage]skip_snapshot_check=true appears in the plug-in options list.
e. Click OK.
The Restore Command Line Options dialog box closes.
3. Proceed with the remainder of the restore procedure.
Troubleshooting
71
Page 72

Administration
72
EMC Avamar 6.1 for VMware User Guide
Page 73

CHAPTER 4
Backup
This chapter provides instructions for backing up virtual machines. Topics in this chapter
include:
◆ Limitations.............................................................................................................. 74
◆ Performing an on-demand image backup ................................................................ 74
◆ Scheduling backups................................................................................................ 76
Backup
73
Page 74

Backup
Limitations
All VMware image backups must be initiated from Avamar Administrator. You cannot
initiate backups from the virtual machine or proxy client virtual machine.
Changing a virtual machine’s disk configuration (either adding or removing a disk), causes
the next entire image backup to be processed as a full backup (that is, all virtual disks are
processed and changed block tracking is not used), which will require additional time to
complete. Backups of specific disks are not affected, unless that disk is previously
unknown to Avamar.
Performing an on-demand image backup
1. In Avamar Administrator, click the Backup & Restore launcher button.
The Backup and Restore window appears.
2. Click the Select for Backup tab.
3. Select a virtual machine client in the clients tree.
4. In the Browse for File, Folders, or Directories pane, do one of the following:
• Select the top (root) folder to back up the entire image.
• Select one or more disks to only back up those specific virtual disks.
74
EMC Avamar 6.1 for VMware User Guide
Page 75

5. Select Actions > Backup Now.
The On Demand Backup Options dialog box appears.
6. Review your backup settings.
Backup
Clicking Cancel returns you to the Backup and Restore window where you can modify
your backup selections.
7. Complete the settings as described in the following table:
Table 14 On-demand backup options
Setting Description
Retention policy
settings
Encryption Select one of the following encryption methods for client/server data transfer
Select one of the following retention policies for this backup:
• Retention period — Automatically delete this backup from the Avamar server
after a specific number of days, weeks, months, or years. Select this option,
and type the number of days, weeks, months, or years.
• End date — Automatically delete this backup from the Avamar server on a
specific calendar date. Select this option and browse to that date on the
calendar.
• No end date — Keep this backup for as long as this client remains active in
the Avamar server.
during this backup:
• High — Strongest available encryption setting for that specific client
platform.
• Medium — Medium strength encryption.
• None — No encryption.
Note: The exact encryption technology and bit strength used for any given
client/server connection is dependent on a number of factors, including the
client platform and Avamar server version. The
Guide
provides additional information.
EMC Avamar Product Security
Performing an on-demand image backup
75
Page 76

Backup
8. Click OK.
The On Demand Backup Options dialog box closes and the following status message
appears: Backup initiated.
9. Click Close.
Scheduling backups
To schedule recurring VMware image backups:
1. Create a dataset for the backups.
2. Create a group for the backups. During the group creation process, you:
a. Assign the new dataset to the new group.
b. Assign a schedule to the new group.
c. Assign a retention policy to the new group.
d. Add virtual machine clients to the new group.
3. Enable scheduling for the group.
A thorough discussion of groups, group policy, datasets, schedules, and retention policies
is beyond the scope of this guide. The
additional information.
EMC Avamar Administration Guide
provides
76
EMC Avamar 6.1 for VMware User Guide
Page 77

CHAPTER 5
Restore
This chapter provides instructions for restoring a complete image, selected drives, or
specific folders or files from an Avamar backup. Topics in this chapter include:
◆ Overview................................................................................................................. 78
◆ Limitations.............................................................................................................. 78
◆ Guidelines for performing image restores versus file-level restores.......................... 80
◆ Restoring the full image or selected drives to the original virtual machine ............... 80
◆ Restoring the full image or selected drives to a different (existing) virtual machine .. 83
◆ Restoring the full image or selected drives to a new virtual machine........................ 86
◆ Restoring specific folders or files............................................................................. 89
Restore
77
Page 78

Restore
Overview
Avamar offers two levels of restore functionality:
◆ Image restore — restores an entire backup image or selected drives to the original
virtual machine, another existing virtual machine, or a new virtual machine (which is
created during the restore operation).
◆ File level restore — restores specific folders or files from an image backup.
The Avamar Administrator Backup and Restore window Restore tab displays two buttons
above the Select for Restore contents pane, which are not shown if a normal (non-VMware
Image) backup is selected:
Clicking the Browse for Image Restore button initiates an image restore,
which enables you to restore an entire backup image, or selected drives to
the original virtual machine, another existing virtual machine or a new
virtual machine.
Clicking the Browse for Granular Restore button initiates a file level restore,
which enables you to restore selected folders and files from an image
backup.
When performing a VMware image restore, the Restore Options dialog box is slightly
different from the normal (non-VMware Image) Restore Options dialog box. The primary
differences are that virtual machine information is shown and three choices for restore
destinations are offered:
◆ Original virtual machine
◆ Different (existing) virtual machine
◆ New virtual machine
Once the destination selection is made, each procedure varies slightly from that point
forward.
When performing a file level restore, the procedure is substantially the same as restoring
selected folders or files from a normal (non-VMware Image) backup.
Limitations
The following limitations apply to restore operations:
Server software upgrades require proxy reboots
All Avamar server software upgrades require that all proxies be rebooted. The server
software upgrades primarily affect file-level restores (which will not complete until the
proxy is rebooted), but is a good practice to immediately reboot all proxies following any
server software upgrade.
All restores must be initiated from Avamar Administrator
All VMware image restores must be initiated from Avamar Administrator. It is not possible
to initiate restores from the virtual machine or proxy client virtual machine.
78
EMC Avamar 6.1 for VMware User Guide
Page 79

Virtual machine power state
When performing an image restore, as described in “Restoring the full image or selected
drives to the original virtual machine” on page 80, “Restoring the full image or selected
drives to a different (existing) virtual machine” on page 83, and “Restoring the full image
or selected drives to a new virtual machine” on page 86, the target virtual machine must
be powered off.
When performing an file-level restore, as described in “Restoring specific folders or files”
on page 89, the target virtual machine must be powered on.
File-level restore limitations
The following limitations apply to file-level restore as described in “Restoring specific
folders or files” on page 89:
◆ The following virtual disk configurations are not supported:
Restore
•Unformatted disks
•Dynamic disks
• GUID Partition Table (GPT) disks
•Ext4 filesystems
• FAT16 filesystems
• FAT32 filesystems
•Extended partitions
• Virtual disk with more than one partition
• Two or more virtual disks mapped to single partition
• Encrypted partitions
• Compressed partitions
◆ ACLs are not restored
◆ Symbolic links cannot be restored or browsed
◆ You cannot restore more than 5,000 folders or files in the same restore operation
◆ The following limitations apply to logical volumes managed by Logical Volume
Manager (LVM):
• One physical volume (.vmdk) must be mapped to exactly one logical volume
• Only ext2 and ext3 formatting is supported
◆ When partitions are created, the lower ordered indices must be filled first. That is, you
cannot create a single partition and place it in the partition index 2, 3, or 4. That
single partition must be at partition index 1.
Note: In some cases (most notably extended partitions), it may be possible to restore the
entire backup image to a temporary virtual machine as described in “Restoring the full
image or selected drives to a different (existing) virtual machine” on page 83 or
“Restoring the full image or selected drives to a new virtual machine” on page 86, then
selectively copy the folders or files you need.
Limitations
79
Page 80

Restore
Guidelines for performing image restores versus file-level restores
Avamar provides two distinct mechanisms for restoring virtual machine data:
◆ Image restores, which allow you to restore an entire image or selected drives
◆ File-level restores, which allow you to restore specific folders or files
Image restores are less resource intensive and are generally of restoring large amounts of
data quickly.
File-level restores are more resource intensive and are best used to restore a relatively
small amounts of data. Also, when performing any file-level restore, you cannot restore
more than 5,000 folders or files in the same restore operation.
Therefore, if you must restore large numbers of folders or files, you will experience better
performance if you restore an entire image or selected drives to a temporary location (for
example, a new temporary virtual machine), then copy those files to the desired location
following the restore.
Restoring the full image or selected drives to the original virtual machine
If restoring from a template backup, the Restore to original virtual machine destination is
disabled.
To restore the full image or selected drives to the original virtual machine:
1. In the vSphere Client, ensure that the target virtual machine is powered off.
2. In Avamar Administrator, click the Backup & Restore launcher button.
The Backup and Restore window appears.
3. Click the Select for Restore tab.
4. Select the original virtual machine in the clients tree.
5. Locate and select a backup.
6. Click the Browse for Image Restore button directly above the contents pane.
7. In the contents pane, do one of the following:
• Select the All virtual disks folder checkbox to restore the entire image.
80
• Select one or more drives to only restore those specific drives.
EMC Avamar 6.1 for VMware User Guide
Page 81

Restore
8. Select Actions > Restore Now.
The Restore Options dialog box appears.
9. Select Restore to original virtual machine as the restore destination.
Note: When restoring an image backup to the original virtual machine, the Configure
Destination button is disabled.
10. (Optional) If you want to restore VMware configuration files, select Restore virtual
machine configuration.
Restoring the full image or selected drives to the original virtual machine
81
Page 82

Restore
11. Select one of the following encryption methods for client/server data transfer during
this restore:
• High — Strongest available encryption setting for that specific client platform.
• Medium — Medium strength encryption.
• None — No encryption.
Note: The exact encryption technology and bit strength used for any given
client/server connection is dependent on a number of factors, including the client
platform and Avamar server version. The
EMC Avamar Product Security Guide
provides
additional information.
12. Click More Options.
The Restore Command Line Options dialog box appears.
13. Select or clear Use changed block tracking to increase performance.
14. Select one of the following settings in the Select Post Restore Options list:
• Do not power on VM after restore.
• Power on VM with NICs enabled.
• Power on VM with NICs disabled.
15. (Optional) To include plug-in options with this restore, configure the settings. “Plug-in
Options” on page 99 provides detailed information.
16. Click OK.
The Restore Options dialog box closes, and the following warning message appears:
Hardware compatibility issues between source, and target
destinations may result in a non-operational restored virtual
machine.
This message is advising you that the restored virtual machine might not boot if the
virtual machine configuration has changed since the backup was taken.
17. Click OK.
The previous message dialog box closes, and the following message appears:
Restore initiated.
18. Click Close to dismiss the message.
82
EMC Avamar 6.1 for VMware User Guide
Page 83

Restore
Restoring the full image or selected drives to a different (existing) virtual machine
1. In the vSphere Client, ensure that the target virtual machine is powered off.
2. In Avamar Administrator, click the Backup & Restore launcher button.
The Backup and Restore window appears.
3. Click the Select for Restore tab.
4. Select a virtual machine in the clients tree.
5. Locate and select a backup.
6. Click the Browse for Image Restore button directly above the contents pane.
7. In the contents pane:
• Select the All virtual disks folder checkbox to restore the entire image.
• Select one or more drives to only restore those specific drives.
Restoring the full image or selected drives to a different (existing) virtual machine
83
Page 84

Restore
8. Select Actions > Restore Now.
The Restore Options dialog box appears.
9. Select Restore to a different (existing) virtual machine as the restore destination.
Note: When restoring an image backup to a different (existing) virtual machine, the
Restore virtual machine configuration option is disabled.
10. Click Configure Destination.
The Configure Virtual Machine dialog box appears.
84
EMC Avamar 6.1 for VMware User Guide
Page 85

11. Click Browse.
The Select Virtual Machine dialog box appears.
Note: Only virtual machines that are powered off can be selected from the list; all
others are disabled. You are also prevented from selecting the original virtual
machine.
12. Select the destination virtual machine and click OK.
Restore
The Select Virtual Machine dialog box closes.
13. Switch to Configure Virtual Machine dialog box and click OK.
The Configure Virtual Machine dialog box closes.
14. Switch to Restore Options dialog box.
15. Select one of the following encryption methods for client/server data transfer during
this restore:
• High — Strongest available encryption setting for that specific client platform.
• Medium — Medium strength encryption.
• None — No encryption.
Note: The exact encryption technology and bit strength used for any given
client/server connection is dependent on a number of factors, including the client
platform and Avamar server version. The
EMC Avamar Product Security Guide
provides
additional information.
16. Click More Options.
The Restore Command Line Options dialog box appears.
17. Select or clear Use changed block tracking to increase performance.
18. Select one of the following settings in the Select Post Restore Options list:
• Do not power on VM after restore.
• Power on VM with NICs enabled.
• Power on VM with NICs disabled.
19. (Optional) To include plug-in options with this restore, configure the settings. “Plug-in
Options” on page 99 provides detailed information.
Restoring the full image or selected drives to a different (existing) virtual machine
85
Page 86

Restore
20. Click OK.
The Restore Options dialog box closes, and the following warning message appears:
Hardware compatibility issues between source, and target
destinations may result in a non-operational restored virtual
machine.
This message is advising you that the restored virtual machine might not boot if the
target virtual machine configuration is incompatible with the backup.
21. Click OK.
The previous message dialog box closes, and the following message appears:
Restore initiated.
22. Click Close.
Restoring the full image or selected drives to a new virtual machine
1. In Avamar Administrator, click the Backup & Restore launcher button.
The Backup and Restore window appears.
2. Click the Select for Restore tab.
3. Select a client in the clients tree.
4. Locate and select a backup.
5. Click the Browse for Image Restore button directly above the contents pane.
6. In the contents pane:
• Select the All virtual disks folder checkbox to restore the entire image.
• Select one or more drives to only restore those specific drives.
7. Select Actions > Restore Now.
The Restore Options dialog box appears.
86
8. Select Restore to a new virtual machine as the restore destination.
EMC Avamar 6.1 for VMware User Guide
Page 87

Note: When restoring an image backup to a new virtual machine, the Restore virtual
machine configuration option is selected and disabled becuase these configuration
files are always required to configure the new virtual machine.
9. Click Configure Destination.
The Configure Virtual Machine dialog box appears.
Restore
10. Click Browse.
The New Virtual Machine wizard appears.
11. Type a name for the new virtual machine in the Virtual Machine Name field.
12. In the tree, select a datacenter and folder location for this new virtual machine.
Restoring the full image or selected drives to a new virtual machine
87
Page 88

Restore
13. Click Next.
The next New Virtual Machine wizard screen appears.
14. In the tree, select a host/cluster location for this new virtual machine.
15. Click Finish.
The New Virtual Machine wizard screen closes.
16. Switch to Configure Virtual Machine dialog box and click OK.
The Configure Virtual Machine dialog box closes.
17. Switch to Restore Options dialog box.
18. Select one of the following encryption methods for client/server data transfer during
this restore:
• High — Strongest available encryption setting for that specific client platform.
• Medium — Medium strength encryption.
• None — No encryption.
Note: The exact encryption technology and bit strength used for any given
client/server connection is dependent on a number of factors, including the client
platform and Avamar server version. The
EMC Avamar Product Security Guide
provides
additional information.
19. Click More Options.
The Restore Command Line Options dialog box appears.
88
20. Select or clear Use changed block tracking to increase performance.
21. Select one of the following settings in the Select Post Restore Options list:
• Do not power on VM after restore.
• Power on VM with NICs enabled.
• Power on VM with NICs disabled.
EMC Avamar 6.1 for VMware User Guide
Page 89

22. (Optional) To include plug-in options with this restore, configure the settings. “Plug-in
Options” on page 99 provides detailed information.
23. Click OK.
The Restore Options dialog box closes and the following message appears:
Restore initiated.
24. Click Close.
Restoring specific folders or files
You cannot restore more than 5,000 folders or files in the same file-level restore
operation. “Guidelines for performing image restores versus file-level restores” on
page 80 provides details.
To selectively restore folders, and files from an existing VMware image backup:
1. In the vSphere Client, ensure that the target virtual machine is powered on and fully
operational.
Restore
2. In Avamar Administrator, click the Backup & Restore launcher button.
The Backup and Restore window appears.
3. Click the Select for Restore tab.
4. Select a client in the clients tree.
5. Locate and select a backup.
6. Click the Browse for Granular Restore button.
7. Select one or more folders or files you want to restore.
8. Select Actions > Restore Now.
The Restore Options dialog box appears.
9. Select the target location for the restored data:
a. Click Browse next to the Absolute Destination box.
The Browse for Restore Client dialog box appears.
b. Browse to and select the destination client.
c. In the Browse for Folders or Directories pane, expand the tree by clicking +.
The Log into Virtual Machine dialog box appears.
d. Type virtual machine client login credentials in the User name and Password
boxes.
Note: These login credentials must have administration privileges on the virtual
machine guest operating system.
e. Click Log On.
Restoring specific folders or files
89
Page 90

Restore
The Log into Virtual Machine dialog box closes.
f. In the Browse for Restore Client dialog box, browse to and select the destination
folder that will receive the restored data.
g. Click OK.
The Browse for Restore Client dialog box closes.
10. Switch to the Restore Options dialog box.
11. Select one of the following encryption methods for client/server data transfer during
this restore:
• High — Strongest available encryption setting for that specific client platform.
• Medium — Medium strength encryption.
• None — No encryption.
Note: The exact encryption technology and bit strength used for any given
client/server connection is dependent on a number of factors, including the client
platform and Avamar server version. The
EMC Avamar Product Security Guide
provides
additional information.
12. Click More Options.
The Restore Command Line Options dialog box appears.
13. Select or clear Use changed block tracking to increase performance.
14. Select one of the following settings in the Select Post Restore Options list:
• Do not power on VM after restore.
• Power on VM with NICs enabled.
• Power on VM with NICs disabled.
15. (Optional) To include plug-in options with this restore, configure the settings. “Plug-in
Options” on page 99 provides detailed information.
16. Click OK.
The Restore Options dialog box closes.
The Restore Request dialog box appears and shows that a restore request has been
initiated.
17. Click Close.
The Restore Request dialog box closes.
90
EMC Avamar 6.1 for VMware User Guide
Page 91

CHAPTER 6
Protecting the vCenter Management Infrastructure
This chapter describes how to protect the vCenter management infrastructure with
Avamar. Topics in this chapter include:
◆ Overview................................................................................................................. 92
◆ Backing up the vCenter management infrastructure................................................. 92
◆ Recovering vCenter management infrastructure from Avamar backups..................... 95
Protecting the vCenter Management Infrastructure
91
Page 92

Protecting the vCenter Management Infrastructure
Overview
This chapter covers how to protect the actual vCenter management infrastructure (not the
virtual machines within that environment).
Avamar provides support for backing up the following vCenter management infrastructure
components:
◆ License files
◆ SSL certificates
◆ Audit logs
◆ Windows guest customization (sysprep) files
◆ Database-hosted configuration settings
◆ UpdateManager database
◆ Site Recovery Manager (SRM) database
The vCenter runs on a 32- or 64-bit Windows host. It also comprises a database server
which can run on a different host. Some optional vSphere components require additional
databases that can be hosted on the same host as vCenter or on different database server
hosts.
The basic methodology for protecting vCenter management infrastructure is to implement
either guest backup or VMware image backup on each virtual host using a custom dataset
that only backs up important vCenter management infrastructure components.
Recovering vCenter management infrastructure using Avamar backups is a two-step
process in which you first create a restore target virtual machine with a fresh operating
system image, then restore the vCenter management infrastructure components from the
latest Avamar backup.
One advantage to protecting your vCenter management infrastructure with Avamar is that
you can also use the Avamar backup to facilitate vCenter upgrades (for example,
upgrading the vCenter host from a 32-bit to a 64-bit Windows virtual machine).
Backing up the vCenter management infrastructure
As previously mentioned, the basic methodology for protecting vCenter management
infrastructure is to implement either guest backup or VMware image backup on each
virtual host using a custom dataset that only backs up important vCenter management
infrastructure components.
You should then add the vCenter Avamar clients to a group and schedule these backups at
regular intervals.
A comprehensive discussion of groups, group policy, datasets, schedules, and retention
policies is beyond the scope of this publication. The
provides detailed information.
EMC Avamar Administration Guide
92
EMC Avamar 6.1 for VMware User Guide
Page 93

Protecting the vCenter Management Infrastructure
Task list
Protecting the vCenter management infrastructure comprises the following tasks, which
should be performed in the following order:
◆ “Task 1: Implement guest backups or VMware image backups” on page 93
◆ “Task 2: Define a custom dataset for vCenter backups” on page 93
◆ “Task 3: Add a backup client for vCenter database hosts” on page 94
Task 1: Implement guest backups or VMware image backups
To protect the vCenter management infrastructure:
◆ Install and register Avamar Client for Windows software on the vCenter host as
described in the
◆ Install and register the correct Avamar database software on each database host as
described in various database-specific documentation such as the
SQL Server User Guide
EMC Avamar Backup Clients User Guide
.
.
EMC Avamar for
Task 2: Define a custom dataset for vCenter backups
For best results, define a custom dataset strictly for use in backing up the following
vCenter management infrastructure components:
Table 15 Important vCenter management infrastructure components
Component Default Location
License files The exact location depends on the specific VMware and Windows version, but
is typically one of the following folders:
• C:\Program Files(x86)\VMware\Infrastructure\VirtualCenter
Server\licenses\site
• C:\Program Files\VMware\VMware License Server\Licenses
SSL certificates The exact location depends on the specific VMware and Windows version, but
is typically one of the following folders:
• C:\Documents and Settings\All Users\Application Data\VMware\VMware
VirtualCenter\SSL
• C:\ProgramData\VMWare\VMware VirtualCenter\SSL
Audit logs The exact location depends on the specific VMware and Windows version, but
is typically one of the following folders:
• C:\Documents and Settings\All Users\Application Data\VMware\VMware
VirtualCenter\Logs
• C:\ProgramData\VMWare\VMware VirtualCenter\Logs
Windows guest
customization
(sysprep) files
The exact location depends on the specific VMware and Windows version, but
is typically one of the following folders:
• C:\Documents and Settings\All Users\Application Data\VMware\VMware
VirtualCenter\sysprep
• C:\ProgramData\VMWare\VMware VirtualCenter\sysprep
Backing up the vCenter management infrastructure
93
Page 94

Protecting the vCenter Management Infrastructure
Use of a custom dataset will not only shorten backup and restore times, but will also allow
you to use Avamar backups to facilitate vCenter upgrades (for example, upgrading the
vCenter host from a 32-bit to a 64-bit Windows virtual machine).
1. Start Avamar Administrator.
2. Select Tool s > Manage Datasets.
The Manage All Datasets window appears.
3. Click New.
The New Dataset dialog box appears.
4. Type a name for this new dataset (for example, vCenter).
Note: Do not use any of the following characters in your dataset name:
~!@$^%(){}[]|,`;#\/:*?<>'"&.
5. Click the Source Data tab.
The Source Data tab is where you define a list of source data plug-ins that contribute
data to this dataset.
6. Select Enter Explicitly and select the Windows File System plug-in from the Select
Plug-In Type list.
7. In the list of backup targets at the bottom of the dialog box, delete every entry except
for the Windows File System plug-in by selecting an entry and clicking -.
8. Add each vCenter management infrastructure component to the dataset as follows:
a. Select Files and/or Folders and click ...
The Select Files And/Or Folders dialog box appears.
b. Browse to the correct license file folder and select it.
c. Click OK.
The Select Files And/Or Folders dialog box closes. The license file folder appears in
the list of backup targets at the bottom of the New Dataset dialog box.
d. Repeat step a –step c for the remaining important vCenter management
infrastructure components (that is, the SSL certificates, audit logs, and windows
guest customization (sysprep) files).
9. Click OK.
The New Dataset dialog box closes.
Task 3: Add a backup client for vCenter database hosts
94
The location of the database used by vCenter, UpdateManage, SRM, and so forth can be
determined by running the Windows Data Sources (ODBC) administrative tool.
Install Avamar database backup agents on the database hosts as described in the
database-specific documentation, such as the
Configure a scheduled backup to protect the databases.
EMC Avamar 6.1 for VMware User Guide
EMC Avamar for SQL Server User Guide
.
Page 95

Protecting the vCenter Management Infrastructure
You should truncate vCenter database transaction logs after each backup. This can be
done by selecting the SQL Server plug-in Truncate database log option. Truncating
database transaction logs ensures that logs will not grow too large, and consume
excessive amounts of space on the Avamar server.
Recovering vCenter management infrastructure from Avamar backups
Recovering vCenter management infrastructure from Avamar backups is a two-step
process in which you first create a restore target virtual machine with a fresh operating
system image, then restore the vCenter management infrastructure components from the
latest Avamar backup. The
information.
EMC Avamar Administration Guide
provides detailed
Recovering vCenter management infrastructure from Avamar backups
95
Page 96

Protecting the vCenter Management Infrastructure
96
EMC Avamar 6.1 for VMware User Guide
Page 97

APPENDIX A
vSphere Data Ports
This appendix lists Avamar port usage in a typical vSphere environment. Topics in this
chapter include:
◆ Communication ports.............................................................................................. 98
◆ Listen ports............................................................................................................. 98
vSphere Data Ports
97
Page 98

vSphere Data Ports
Communication ports
All ports are TCP.
Table 16 vSphere communication ports
VMware Avamar
Listen ports
ESX
vCenter
vCenter n/a *V 443< n/a
ESX Server *V n/a 902< n/a
VMware
Proxy Clients n/a n/a n/a n/a
MCS >443 n/a >28002
Avamar
Server
Proxy
Clients
28001<
Legend:
*V= Defined by VMware
< or > indicates port direction
All ports are TCP unless specifically designated as UDP.
Table 17 vSphere listen ports
Initiator
VMware Avamar
ESX
vCenter
Server Proxy
Backup
Clients
>28002
28001<
Utility
Node
98
vCenter n/a *V 443 443
ESX Server *V n/a 902 n/a
VMware
Proxy n/a n/a n/a 28002
Utility Node n/a n/a 137 (UDP)
Avamar
Legend:
*V= Defined by VMware
EMC Avamar 6.1 for VMware User Guide
n/a
138 (UDP)
139
445
27000
28001
29000
Page 99

APPENDIX B
Plug-in Options
The following topics provide information about backup and restore plug-in options for
various Avamar for VMware image backup and restore plug-ins:
◆ How to set plug-in options .................................................................................... 100
◆ Linux VMware Image plug-in options..................................................................... 100
◆ Windows VMware Image plug-in options ............................................................... 101
◆ Linux VMware File-level Restore plug-in options .................................................... 101
◆ Windows VMware File-level Restore plug-in options............................................... 101
Plug-in Options
99
Page 100

Plug-in Options
How to set plug-in options
Plug-in options enable you to control specific actions for on-demand backups, restores,
and scheduled backups. The plug-in options that are available depend on the operation
type and client plug-in type.
You specify plug-in options for on-demand backup or restore operations or when you
create a dataset for a scheduled backup. You can set options by using the graphical
controls and by typing options and values in the Enter Attribute and Enter Attribute Value
fields.
No error checking or validation is performed on free text entries. In addition, free text
entries override settings made using the graphical controls.
Detailed instructions on how to access and set plug-in options during a backup or restore
are available in “Backup” on page 73 and “Restore” on page 77.
Linux VMware Image plug-in options
This topic describes the available options for the Avamar Linux VMware Image plug-in.
Table 18 Linux VMware image backup options
Setting Description
Use changed block tracking
to increase performance
Use Data Domain system If this Avamar server is configured to support storing backups on a
Table 19 Linux VMware image restore options
Setting Description
Use changed block tracking
to increase performance
If selected, the VMware changed block tracking feature is used to
identify areas of the virtual machine filesystem that have changed
since the last backup and only process those changed areas during
the next backup.
Note: Changed block tracking must be enabled at the virtual
machine level in order for this feature to work.
Data Domain system, selecting this option directs this backup to
the selected Data Domain system.
If selected, the VMware changed block tracking feature is used to
identify areas of the virtual machine filesystem that have changed
since the last backup and only process those changed areas during
this restore operation.
Note: Changed block tracking must enabled at the virtual machine
level in order for this feature to work.
100
EMC Avamar 6.1 for VMware User Guide
 Loading...