

Page 1

EMC Installation Roadmap
for CX-Series and FC-Series Storage Systems
P/N 069001166
REV A17
EMC Corporation
Corporate Headquarters
Hopkinton, MA 01748 -9103
1
-508 -435 -1000
www.EMC.com
:
Page 2

Copyright © 2002-2005, EMC Corporation. All rights reserved.
Published January, 2005
EMC believes the information in this publication is accurate as of its publication date. The
information is subject to change without notice.
THE INFORMATION IN THIS PUBLICATION IS PROVIDED "AS IS." EMC CORPORATION
MAKES NO REPRESENTATIONS OR WARRANTIES OF ANY KIND WITH RESPECT TO THE
INFORMATION IN THIS PUBLICATION, AND SPECIFICALLY DISCLAIMS IMPLIED
WARRANTIES OF MERCHANTABILITY OR FITNESS FOR A PARTICULAR PURPOSE.
Use, copying, and distribution of any EMC software described in this publication requires an
applicable software license.
Trademark Information
EMC2, EMC, CLARiiON, Navisphere, PowerPath, Symmetrix are registered trademarks and Access Logix, FLARE, MirrorView, Powerlink, SAN Copy,
and SnapView are trademarks of EMC Corporation.
All other trademarks used herein are the property of their respective owners.
ii
EMC Installation Roadmap for CX-Series and FC-Series Storage Systems
Page 3

Chapter 1 AIX Installation Checklists
PowerPath Configurations for AIX............................................... 1-2
Required Host Software Revisions......................................... 1-2
Prerequisites .............................................................................. 1-3
Documentation.......................................................................... 1-4
PowerPath Checklist — New AIX Server and New Storage
System................................................................................................ 1-6
PowerPath Checklist — New AIX Server and Existing Storage
System.............................................................................................. 1-12
PowerPath Checklist — Existing AIX Server and New Storage
System.............................................................................................. 1-22
PowerPath Checklist — Existing AIX Server and Existing Storage
System.............................................................................................. 1-29
Contents
Chapter 2 HP-UX Installation Checklist
PowerPath Configurations for HP-UX ......................................... 2-2
Required Host Software Revisions......................................... 2-3
Prerequisites .............................................................................. 2-3
Documentation.......................................................................... 2-4
PowerPath Checklist - New HP-UX Server and New Storage
System................................................................................................ 2-7
PowerPath Checklist - New HP-UX Server and Existing Storage
System.............................................................................................. 2-13
PowerPath Checklist - Existing HP-UX Server and New Storage
System.............................................................................................. 2-26
PowerPath Checklist - Existing HP-UX Server and Existing
Storage System ............................................................................... 2-33
DMP Configurations for HP-UX ................................................. 2-45
EMC Installation Roadmap for CX-Series and FC-Series Storage Systems
iii
Page 4

Contents
Required Host Software Revisions ...................................... 2-46
Prerequisites............................................................................ 2-46
Documentation ....................................................................... 2-47
DMP Checklist - New HP-UX Server and New Storage
System ............................................................................................. 2-48
Configurations for HP-UX Without EMC Failover Software.. 2-53
Prerequisites............................................................................ 2-53
Documentation ....................................................................... 2-54
Without EMC Failover Software Checklist - New HP-UX Server
and New Storage System.............................................................. 2-55
Chapter 3 Linux Installation Checklist
PowerPath Configurations for Linux ........................................... 3-2
Required Host Software Revisions ........................................ 3-3
Prerequisites.............................................................................. 3-3
Documentation ......................................................................... 3-4
PowerPath Checklist — New Linux Server and New Storage
System ............................................................................................... 3-7
PowerPath Checklist — New Linux Server and Existing Storage
System ............................................................................................. 3-13
PowerPath Checklist — Existing Linux Server and New Storage
System ............................................................................................. 3-23
PowerPath Checklist — Existing Linux Server and Existing
Storage System............................................................................... 3-29
DMP Configurations for Linux.................................................... 3-39
Required Host Software Revisions ...................................... 3-39
Prerequisites............................................................................ 3-39
Documentation ....................................................................... 3-40
DMP Checklist - New Linux Server and New Storage
System ............................................................................................. 3-42
Configurations for Linux Without EMC Failover Software.... 3-47
Prerequisites............................................................................ 3-47
Documentation ....................................................................... 3-48
Without EMC Failover Software Checklist — New Linux Server
and New Storage System.............................................................. 3-49
iv
EMC Installation Roadmap for CX-Series and FC-Series Storage Systems
Page 5

Chapter 4 NetWare Installation Checklists
PowerPath Configurations for NetWare...................................... 4-2
Required Host Software Revisions........................................ 4-3
Prerequisites.............................................................................. 4-3
Documentation......................................................................... 4-4
PowerPath Checklist — New NetWare Server and New Storage
System............................................................................................... 4-7
PowerPath Checklist — New NetWare Server and Existing
Storage System............................................................................... 4-12
PowerPath Checklist — Existing NetWare Server and New
Storage System............................................................................... 4-21
PowerPath Checklist — Existing NetWare Server and Existing
Storage System............................................................................... 4-28
Chapter 5 Solaris Installation Checklists
PowerPath Configurations for Solaris ......................................... 5-2
Required Host Software Revisions........................................ 5-3
Prerequisites.............................................................................. 5-3
Documentation......................................................................... 5-4
PowerPath Checklist — New Solaris Server and New Storage
System............................................................................................... 5-8
PowerPath Checklist — New Solaris Server and Existing Storage
System............................................................................................. 5-14
PowerPath Checklist — Existing Solaris Server and New Storage
System............................................................................................. 5-25
PowerPath Checklist — Existing Solaris Server and Existing
Storage System............................................................................... 5-32
DMP Configurations for Solaris.................................................. 5-45
Required Host Software Revisions...................................... 5-45
Prerequisites ........................................................................... 5-45
Documentation....................................................................... 5-46
DMP Checklist - New Solaris Server and New Storage
System............................................................................................. 5-48
Contents
EMC Installation Roadmap for CX-Series and FC-Series Storage Systems
v
Page 6

Contents
Chapter 6 Tru64 UNIX Installation Checklist
Tru64 UNIX Configurations........................................................... 6-2
Prerequisites.............................................................................. 6-2
Documentation ......................................................................... 6-3
Checklist - New Tru64 UNIX Server and New Storage System
Without Boot Disk ........................................................................... 6-4
Checklist - New Tru64 UNIX Server and New Storage System
With Boot Disk ................................................................................. 6-6
Chapter 7 Windows Installation Checklists
PowerPath Configurations for Windows..................................... 7-2
Required Host Software Revisions ........................................ 7-3
Prerequisites.............................................................................. 7-4
Documentation ......................................................................... 7-5
PowerPath Checklist — New Windows Server and New Storage
System ............................................................................................... 7-7
PowerPath Checklist — New Windows Server and Existing
Storage System Without Boot Disk ............................................. 7-14
PowerPath Checklist — New Windows Server and Existing
Storage System With Boot Disk ................................................... 7-25
PowerPath Checklist — Existing Windows Server and New
Storage System............................................................................... 7-37
PowerPath Checklist — Existing Windows Server and Existing
Storage System............................................................................... 7-45
DMP Configurations for Windows............................................. 7-57
Required Host Software Revisions ...................................... 7-57
Prerequisites............................................................................ 7-58
Documentation ....................................................................... 7-59
DMP Checklist — New Windows Server and New Storage
System ............................................................................................. 7-60
Using Windows DMP ............................................................ 7-64
Appendix A Customer Support
Overview of Detecting and Resolving Problems ...................... A-2
Troubleshooting the Problem ....................................................... A-3
Before Calling the Customer Support Center ............................ A-4
Documenting the Problem ........................................................... A-5
Reporting a New Problem ............................................................ A-6
Sending Problem Documentation ............................................... A-7
vi
EMC Installation Roadmap for CX-Series and FC-Series Storage Systems
Page 7

Preface
This manual contains checklists of the tasks required to install an
EMC CX-Series or FC4700-Series storage system in a configuration
with a server running the AIX
NetWare
Windows
®
, Solaris™, Tru64® UNIX®, Windows Server™ 2003, or
®
2000 operating system.
As part of an effort to improve and enhance the performance and capabilities
of its product line, EMC from time to time releases revisions of its hardware
and software. Therefore, some functions described in this roadmap may not
be supported by all revisions of the software or hardware currently in use.
For the most up-to-date information on product features, refer to your
product release notes.
®
, HP-UX®, IRIX®, Linux®, Novell®
If a product does not function properly or does not function as described in
this roadmap, please contact your EMC representative.
Audience This roadmap is intended for use by system administrators and/or
service personnel during installation of CLARiiON
®
Fibre Channel
storage systems.
Readers of this roadmap should be familiar with the following topics:
◆ The operating system running on the server that you are
installing.
◆ How the operating system handles the device names of physical
disks (LUNs).
EMC Installation Roadmap for CX-Series and FC-Series Storage Systems
vii
Page 8

Preface
Organization
Conventions Used in
This Guide
Chapter 1 Installation checklist for an AIX server with EMC
®
PowerPath
software.
Chapter 2 Installation checklist for an HP-UX server with and
®
without EMC PowerPath or VERITAS
DMP.
Chapter 3 Installation checklist for a Linux server with and
without EMC PowerPath or VERITAS
®
DMP.
Chapter 4 Installation checklist for a NetWare server with EMC
PowerPath software.
Chapter 5 Installation checklists for a Solaris server with EMC
PowerPath or VERITAS DMP software.
Chapter 6 Installation checklist for a Tru64 UNIX server.
Chapter 7 Installation checklists for a Microsoft Windows Server
2003 or Windows 2000 server with EMC PowerPath or
VERITAS
®
DMP software.
Appendix A Reviews the EMC process for detecting and resolving
software problems, and provides essential questions
that you should answer before contacting the EMC
Customer Support Center.
EMC uses the following conventions for notes and cautions.
A note presents information that is important, but not hazard-related.
viii
!
CAUTION
A caution contains information essential to avoid damage to the
system or equipment. The caution may apply to hardware or
software.
EMC Installation Roadmap for CX-Series and FC-Series Storage Systems
Page 9

Typographical Conventions
This manual uses the following format conventions
Preface
Finding Current
Information
This
typeface
◆ Specific filenames or complete paths.
◆ Dialog box names and menu items in text.
◆ Selections you can make from the user interface,
including buttons, icons, options, and field
names.
◆ Emphasis in cautions and warnings.
This typeface
This
typeface
x > y
◆ New terms or unique word usage in text.
◆ Command line arguments when used in text.
◆ Represents a system response (such as a
message or prompt), a file or program listing.
Represents a menu path. For example, Operations
> Poll All Storage Systems tells you to select Poll
All Storage Systems on the Operations menu.
The most up-to-date information about the CX-Series and FC-Series
storage systems is posted on the EMC Powerlink
™
website. We
recommend that you download the latest information before you
install one of these storage systems. If you purchased your storage
system from an EMC reseller and you cannot access Powerlink, the
latest product information should be available from your reseller.
To access EMC Powerlink, use the following link:
http://powerlink.emc.com
After you log in, select Support > Document Library and find the
documents you want.
Where to Get Help For questions about technical support, call your local sales office or
service provider.
If you have a valid EMC service contract, contact EMC Customer
Service at:
United States: (800) 782-4362 (SVC-4EMC)
Canada: (800) 543-4782 (543-4SVC)
Worldwide: (508) 497-7901
Follow the voice menu prompts to open a service call and select the
applicable product support.
EMC Installation Roadmap for CX-Series and FC-Series Storage Systems
ix
Page 10

Preface
Sales and Customer
Service Contacts
For the list of EMC sales locations, please access the EMC home page
at:
http://www.EMC.com/contact/
For additional information on the EMC products and services
available to customers and partners, refer to the EMC Powerlink™
website:
http://powerlink.EMC.com
Your C omments Your suggestions will help us continue to improve the accuracy,
organization, and overall quality of the user publications. Please send
a message to techpub_comments@EMC.com with your opinions of
this guide.
x
EMC Installation Roadmap for CX-Series and FC-Series Storage Systems
Page 11

Invisible Body Tag
1
AIX Installation
Checklists
This chapter contains checklists of the tasks required to install a
CLARiiON storage system in a configuration with an IBM AIX
server and PowerPath
®
failover software. The sections for the
®
different configurations are
◆ PowerPath Configurations for AIX.................................................1-2
◆ PowerPath Checklist — New AIX Server and New Storage
System..................................................................................................1-6
◆ PowerPath Checklist — New AIX Server and Existing Storage
System................................................................................................1-12
◆ PowerPath Checklist — Existing AIX Server and New Storage
System................................................................................................1-22
◆ PowerPath Checklist — Existing AIX Server and Existing Storage
System................................................................................................1-29
AIX Installation Checklists
1-1
Page 12

AIX Installation Checklists
PowerPath Configurations for AIX
Read this section if you are installing a AIX PowerPath configuration
with a new or existing server and a new or existing storage system. A
new and existing server and a new and existing storage system are
defined as follows:
new server - A server running AIX and not connected to any storage
system.
existing server - A server running AIX and that is already connected
to one or more storage systems.
new storage system - A CX300, CX500, or CX700 storage system that
has the factory default settings and has never been connected to a
server.
existing storage system - A CX300, CX400, CX500, CX600, CX700, or
FC4700-Series storage system that is already connected to one or
more servers and is in a EMC Navisphere
All CLARiiON storage systems connected to the server must be CX300,
CX400, CX500, CX600, CX700, or FC4700-Series storage systems. If any other
type of CLARiiON storage system is connected to the server, the server
cannot run AIX PowerPath.
®
domain.
Required Host Software Revisions
1-2
EMC Installation Roadmap for CX-Series and FC-Series Storage Systems
◆ AIX operating system revision listed in the EMC Support Matrix
on the Powerlink website (http://powerlink.emc.com)
◆ HBA driver revision listed in the EMC Support Matrix on the
Powerlink website (http://powerlink.emc.com)
◆ AIX PowerPath
• For CX400, CX600, and FC-Series storage systems
Version 3.0.0 with patch 3.0.2 or higher
• For CX300, CX500, and CX700 storage systems
Version 3.0.4 or higher
Refer to the EMC Support Matrix and the EMC PowerPath Release Notes for
UNIX on the Powerlink website (http://powerlink.emc.com) for the
specific revision required for your AIX version.
Page 13

AIX Installation Checklists
Prerequisites
◆ You must have a host that is
• Running an operating system that can support the Navisphere
Manager 6.X browser-based client. For an up-to-date list of
such operating systems, refer to the Navisphere Manager 6.X
release notes on http://powerlink.emc.com).
• On a network that is connected to the storage-system server
and that you will connect to the SPs in the storage system.
◆ For most configurations, you must also have a host that is
• Running Navisphere CLI version 6.X.
• On a network that is connected to the storage-system server
and that you will connect to SPs in the storage system.
◆ You must have planned your LUNs and RAID Groups, and
Storage Groups if you have Access Logix. Be sure to consider
requirements for SnapView
™
and MirrorView™ software if you
have this software. The following documents will help you with
this planning:
• EMC Storage Systems CX400-Series and CX600-Series
Configuration Planning Guide (P/N 014003113)
• EMC CLARiiON CX300, CX500, CX500i, and CX700 Storage
Systems Configuration Planning Guide (P/N 300-001-273)
• EMC Fibre Channel Storage System Model FC4700-2
Configuration Planning Guide (P/N 014003087)
PowerPath Configurations for AIX
1-3
Page 14

AIX Installation Checklists
Documentation
Each checklist refers to some or all of the documents listed below. We
recommend that you load these documents on your service laptop
before starting the installation.
◆ Documentation that ships with
• PCI HBA and native IBM HBA driver
• Switches and switch management software
• AIX operating system and HACMP (if using HACMP)
◆ Removing ATF or CDE Software Before Installing Other Failover
Software (P/N 069001173)
◆ PowerPath Version 4.3 Product Guide (P/N 300-001-673)
or
PowerPath Version 4.2 Product Guide (P/N 300-001-521)
or
PowerPath Version 3.0 Product Guide (P/N 300-001-047)
◆ PowerPath for AIX Version 4.3 Installation and Administration Guide
(P/N 300-000-683)
or
PowerPath for AIX Version 4.2 Installation and Administration Guide
(P/N 300-000-530)
or
PowerPath Version 3.0 for UNIX Installation and Administration
Guide (P/N 300-000-511)
1-4
◆ EMC CX-Series Server Software for AIX Installation Guide
(P/N 300-002-044)
or
EMC Navisphere Host Agent and CLI for AIX Version 6.X Installation
Guide (P/N 069001145)
◆ EMC Navisphere Command Line Interface (CLI) Version 6.X Reference
(P/N 069001038)
◆ EMC Storage-System Host Utilities for AIX Administrator’s Guide
(P/N 069001137)
◆ EMC Rails and Enclosures Field Installation Guide
(P/N 300-001-799)
◆ EMC Rails and Enclosures Installation Guide for 19-Inch NEMA
Cabinets (P/N 014003082) - for SPS installation only
EMC Installation Roadmap for CX-Series and FC-Series Storage Systems
Page 15

AIX Installation Checklists
◆ EMC CX300 2-Gigabit Disk Processor Enclosure (DPE) Setup Guide
(P/N 300-001-276, rev A02 or higher)
or
EMC CLARiiON CX300 2-Gigabit Disk Processor Enclosure (DPE2)
Setup and Cabling Guide (P/N 300-001-276, rev A01) and EMC
CLARiiON CX300, CX500, and CX700 Storage Systems Initialization
Guide (P/N 300-001-272)
◆ EMC 2-Gigabit Disk Processor Enclosure (DPE2) CX400-Series Setup
and Cabling Guide (P/N 014003105) and EMC Storage Systems
CX400-Series and CX600-Series Initialization Guide
(P/N 014003112)
◆ EMC CLARiiON CX500 2-Gigabit Disk Processor Enclosure (DPE2)
Setup Guide (P/N 300-001-275, rev A02 or higher)
or
EMC CLARiiON CX500 2-Gigabit Disk Processor Enclosure (DPE2)
Setup and Cabling Guide (P/N 300-001-275, rev A01) and EMC
CLARiiON CX300, CX500, and CX700 Storage Systems Initialization
Guide (P/N 300-001-272)
◆ EMC Storage Processor Enclosure (SPE) CX600-Series Setup and
Cabling Guide (P/N 014003078) and EMC Storage Systems
CX400-Series and CX600-Series Initialization Guide
(P/N 014003112)
◆ EMC CLARiiON CX700 Storage Processor Enclosure (SPE) Setup
Guide (P/N 300-001-274, rev A02 or higher)
or
EMC CLARiiON CX700 Storage Processor Enclosure (SPE) Setup and
Cabling Guide (P/N 300-001-274), rev A01) and EMC CLARiiON
CX300, CX500, and CX700 Storage Systems Initialization Guide
(P/N 300-001-272)
◆ EMC CLARiiON 2-Gigabit Disk-Array Enclosure (DAE2) Setup and
Cabling Guide (P/N 014003104)
◆ FC4700-2 Setup Guide (P/N 0140373)
◆ EMC Navisphere Manager Administrator’s Guide (P/N 069001125)
◆ EMC Navisphere Security Administrator’s Guide (P/N 069001124)
◆ EMC Host Connectivity Guide for IBM AIX (P/N 300-000-608)
PowerPath Configurations for AIX
1-5
Page 16

AIX Installation Checklists
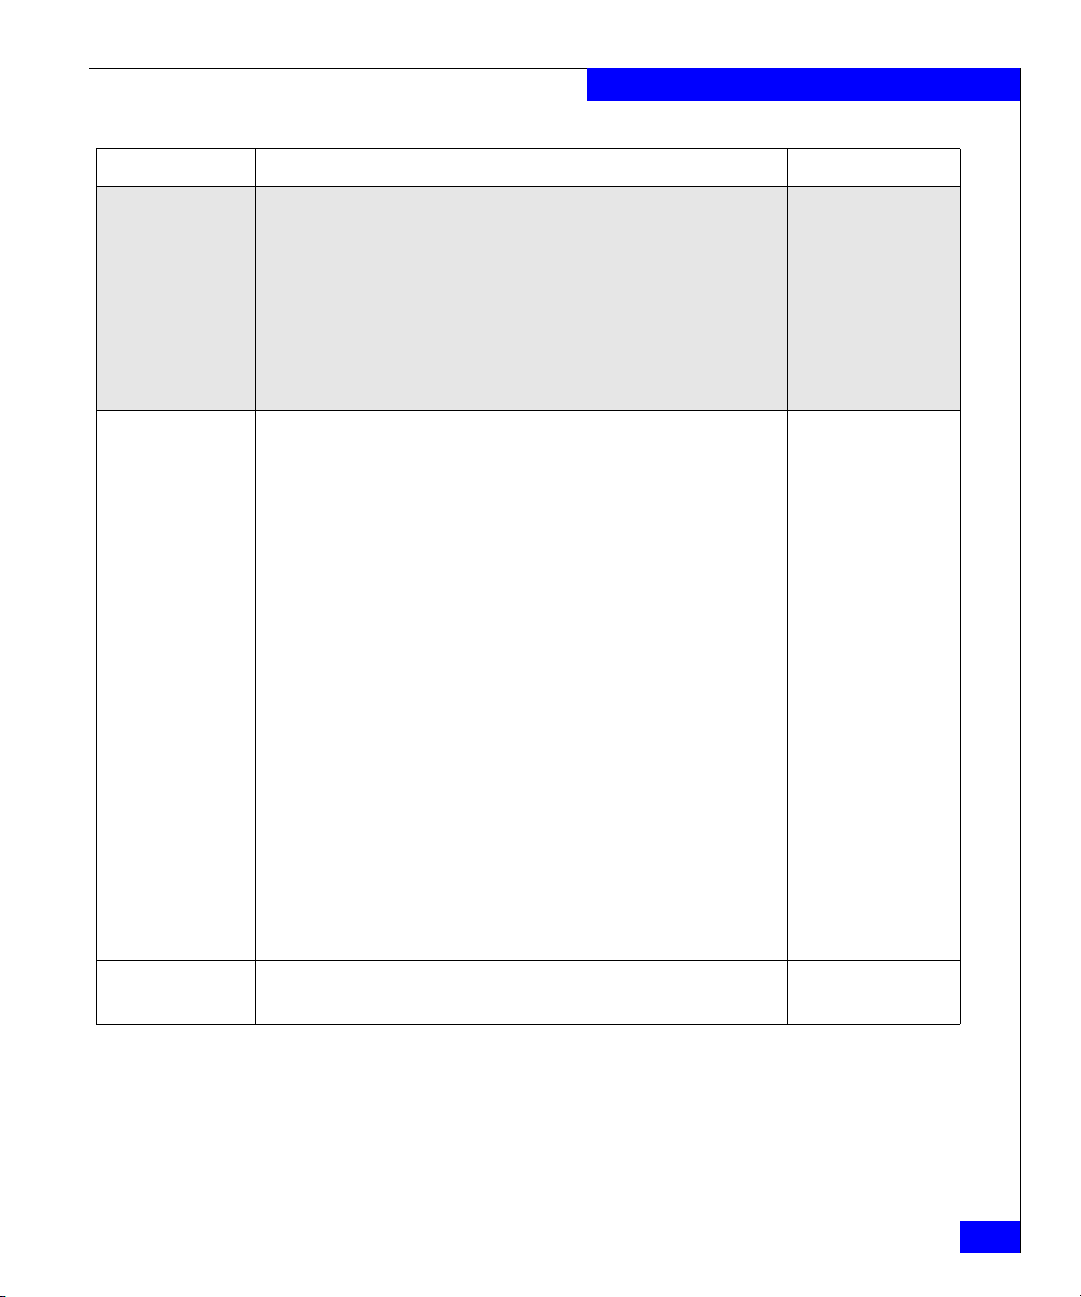
PowerPath Checklist — New AIX Server and New Storage System
Tasks highlighted with grey in the checklist should be completed
before the service provider arrives.
Tas k
1 Server
Install HBAs and
driver
2 Server
Set HBA driver
parameters
3 Server
Install EMC ODM
Support
software
4 Server
I
nstall Host
Agent or Server
Utility
With Access Logix Reference Document
❑
Install HBAs.
CAUTION Do not connect cables to the HBAs until you are told to do so
later in this procedure.
❑
Install HBA driver.
❑
Execute the following command:
cfgmgr
❑
Set the HBA driver parameters to the values required for CLARiiON and
PowerPath.
CAUTION Using improper settings can cause erratic failover behavior,
such as greatly increased I/O delays.
❑
Insert the AIX Utilities Kit CD and mount it. AIX utilities
❑
Install EMC ODM Support using SMIT or the command line.
• Note: The EMC ODM Support package is available on the ftp site
ftp://ftp.emc.com/pub/elab/aix/ODM_DEFINITIONS
❑
Install the Navisphere Host Agent or Navisphere Server Utility and the
Navisphere CLI.
❑
If you installed the Host Agent, edit the Navisphere Host Agent
configuration file agent.config file as follows:
• Add the following entry if it does not already exist:
device auto auto
• Add at least one privileged user.
HBA documentation
AIX documentation
Host connectivity guide
administrator’s guide
CX-Series Server
Software for AIX
Installation Guide
1-6
5 Server
Install admsnap
EMC Installation Roadmap for CX-Series and FC-Series Storage Systems
❑
If the server will be a SnapView production or secondary host, install the
admsnap utility.
CX-Series Server
Software for AIX
installation Guide
Page 17
AIX Installation Checklists
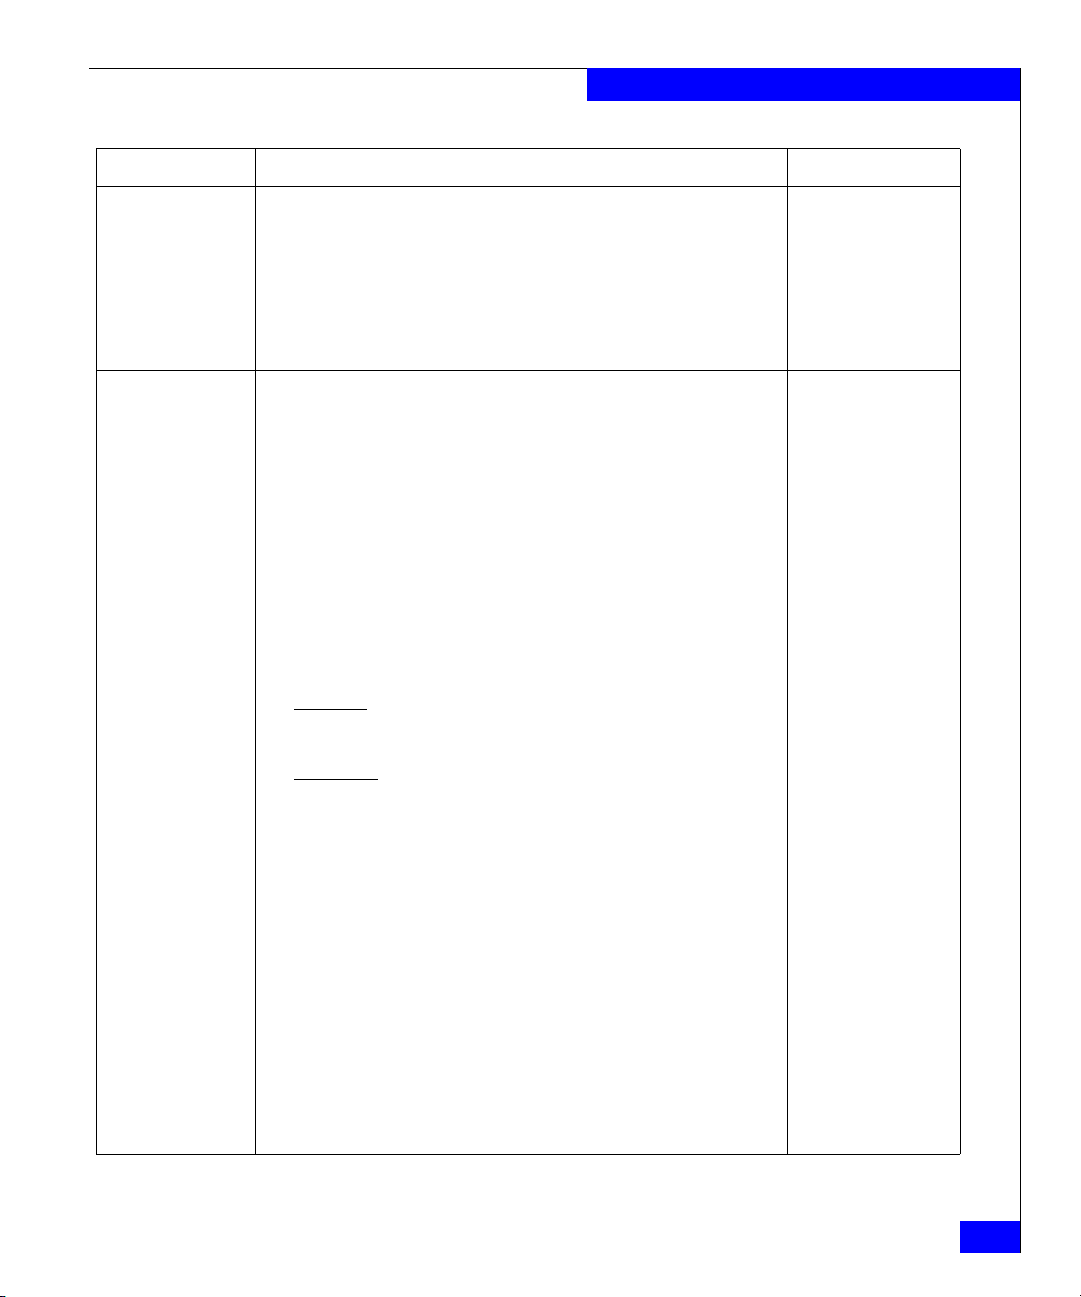
Tas k
6 Server
Install
PowerPath
7Switches
Install
With Access Logix Reference Document
❑
Insert the PowerPath installation CD and mount it. PowerPath Release
❑
Install PowerPath using SMIT or from the command line.
❑
Register PowerPath.
❑
Install any PowerPath patches from the Software downloads page on the
EMC Powerlink website:
http://powerlink.emc.com
For a SAN
❑
Install switches, if not already installed.
❑
Connect a cable from each host HBA port to a switch port.
❑
On the server:
• Download emc_cfgmgr.sh from ftp://ftp.emc.com/pub/elab/
powerpath/aix.
• Execute the following commands
cfgmgr
❑
Checkpoint - Verify the HBA connection to the switch by checking the
LED(s) for the switch port connected to the HBA port.
For a 1-Gbit switch - LED is green, which indicates that the HBA is logged
in to the switch port.
Notes and PowerPath
for UNIX installation and
administrator’s guide
Rails, cabinet, and
switch documentation
AIX documentation
Switch documentation
8Storage System
❑
Install
For a 2-Gbit switch - One of the following:
• The left LED is green and the right LED is off, which indicates that a
1-Gbit SP port is logged in to the switch port.
• For a DS-xxB2 switch, both LEDs are green, which indicates that a
2-Gbit HBA port is logged in to the switch port.
• For a DS-xxM2 switch, the left LED is blue and the right LED is off, which
indicates that a 2-Gbit HBA port is logged in to the switch port.
Install the storage system in the cabinet, if not already installed. Rails and cabinet
documentation
PowerPath Checklist — New AIX Server and New Storage System
1-7
Page 18

AIX Installation Checklists
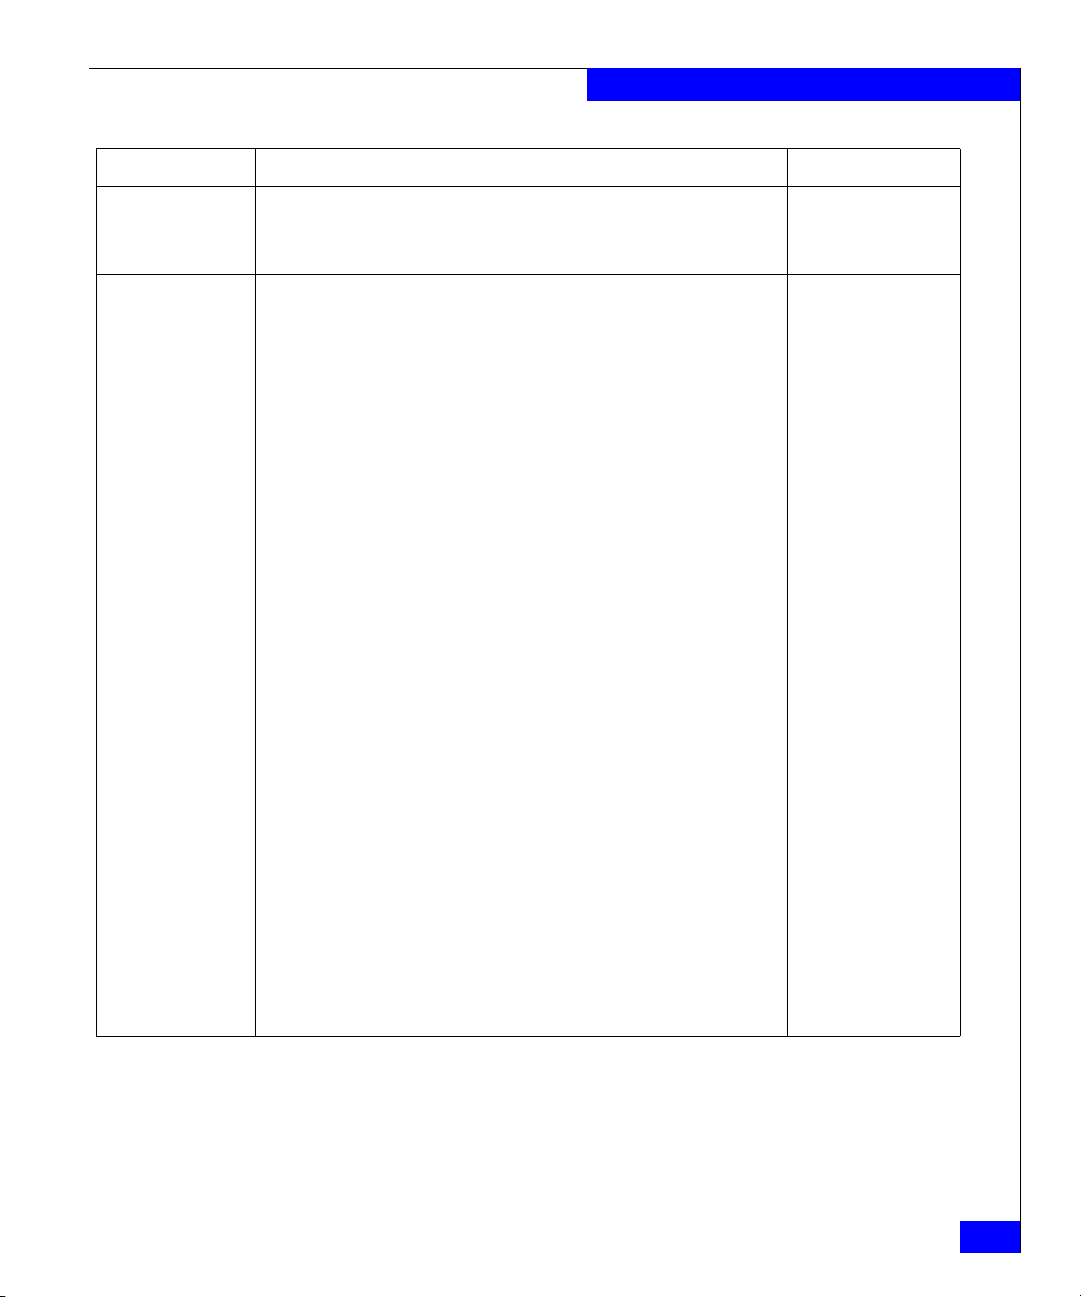
Tas k
9Storage System
With Access Logix Reference Document
❑
Initialize and
install software
enablers
❑
❑
10 Storage System
Cable
❑
❑
Install the Navisphere Initialization Utility on a
as the storage-system management ports.
subnet
Use the Navisphere Initialization Utility to initialize the storage system.
If you have SAN Copy, SnapView, and/or MirrorView software, install their
enablers.
Connect the storage system to the switch or HBA ports. Storage-system setup
Checkpoint - For a SAN, verify the storage-system connections to the
switch by checking the LED(s) for the switch port connected to each SP
port.
For a 1-Gbit switch - LED is green, which indicates that the SP is logged
in to the switch port.
For a 2-Gbit switch - One of the following:
• The left LED is green and the right LED is off, which indicates that a
1-Gbit SP port is logged in to the switch port.
• For a DS-xxB2 switch, both LEDs are green, which indicates that a
2-Gbit HBA port is logged in to the switch port.
• For a DS-xxM2 switch, the left LED is blue and the right LED is off, which
indicates that a 2-Gbit HBA port is logged in to the switch port.
non-AIX
host on the
same
Storage-system setup
guide
Navisphere Manager
administrator’s guide
and online help
guide.
Switch documentation
11 Storage System
12 Storage System
1-8
EMC Installation Roadmap for CX-Series and FC-Series Storage Systems
Set up security
Set properties
for PowerPath
❑
Cable each SP to the LAN connected to the hosts from which you will
manage the storage system.
❑
Use Navisphere Manager to define a global administrator and domain (if
not already defined) and any additional users.
❑
Use the following Navisphere CLI commands to set the storage system’s
default system type, failover mode, and array commpath values:
navicli -h
navicli -h
navicli -h
where
system.
Note: Setting the array commpath property to 1 (enabled) creates LUNZ
devices.
where
system.
hostname
hostname
hostname
hostname
hostname
systemtype -config 3
failovermode 1
arraycommpath 1
is the IP address or network name of an SP in the storage
is the IP address or network name of an SP in the storage
Storage-system setup
guide.
Navisphere security
administrator’s guide
and Navisphere
Manager online help
Navisphere CLI
reference
Page 19
AIX Installation Checklists
Tas k
13 Switches
Zone
14 Server
Make target SPs
available
With Access Logix Reference Document
For a SAN
❑
Zone the switches to provide a path from each HBA port (host initiator) to
the appropriate SPs.
❑
If MirrorView is installed, create any required zones for it.
❑
Checkpoint - Use switch management software to verify the switch
connections to the storage system.
❑
Execute the following AIX command:
emc_cfgmgr.sh
❑
Checkpoint - Verify that AIX sees LUNZ devices with the following AIX
command:
lscfg | grep LUNZ
If AIX does not see LUNZ devices
• Verify that arraycommpath is set to 1 as described in step 12.
• Execute the following AIX command:
emc_cfgmgr.sh
❑
Restart the Navisphere Host Agent or run the Navisphere Server Utility
with the following AIX commands:
Host Agent
etc/rc.agent stop
/etc/rc.agent start
Server Utility
/usr/lpp/HOSTUTIL/naviserverutil
/
Switch management
documentation
AIX documentation
CX-Series Server
Software for AIX
Installation Guide
❑
Checkpoint - Use Navisphere Manager’s Connectivity Status dialog box
to verify that each HBA is registered with the storage system.
❑
List the LUNZ devices with the following AIX command:
lscfg | grep LUNZ
❑
Remove each LUNZ device with the following AIX command:
rmdev -dl hdisk
where n is the hdisk number for the LUNZ device.
❑
Execute the following AIX command:
emc_cfgmg.sh
n
PowerPath Checklist — New AIX Server and New Storage System
Navisphere Manager
administrator’s guide
and online help
AIX documentation
1-9
Page 20

AIX Installation Checklists
Tas k
15 Storage System
Configure
16 Storage System
Set up Event
Monito
r
17 Server
Configure
devices
With Access Logix Reference Document
❑
Use Navisphere Manager to set general storage-system properties.
❑
Use Navisphere Manager to create RAID Groups, bind LUNs, create
Storage Groups, and assign LUNs to Storage Groups.
❑
Use Navisphere Manager to connect the server to a Storage Group
❑
Plan your monitoring configuration.
❑
Use Navisphere Manager to set user options, create templates, and set up
your monitoring configuration.
❑
Download the following command from ftp://ftp.emc.com/pub/elab/
powerpath/aix and execute it:
emc_cfgmgr.sh
❑
Execute the following PowerPath command:
powermt config
❑
Checkpoint - Verify that the server sees hdisk devices for the LUNs. AIX documentation
❑
Checkpoint - Verify that PowerPath sees all the paths to the LUNs with the
following PowerPath command:
powermt display dev=all class=clariion
If PowerPath does not see the LUNs
• Verify the server’s connection to the Storage Group.
• Verify that you registered your PowerPath license key if you have one.
• Verify that the storage-system properties are as defined in step 12.
Navisphere Manager
administrator’s guide
and online help
Navisphere Manager
administrator’s guide
and online help
AIX documentation
PowerPath product
guide
PowerPath product
guide
1-10
❑
Restart the Navisphere Host Agent or run the Navisphere Server Utility
with the following AIX commands:
Host Agent
etc/rc.agent stop
/etc/rc.agent start
Server Utility
/usr/lpp/HOSTUTIL/naviserverutil
❑
Checkpoint if the Host Agent is installed - Use Navisphere Manager to
verify that the LUNs are mapped to hdiskpower devices.
EMC Installation Roadmap for CX-Series and FC-Series Storage Systems
/
CX-Series Server
Software for AIX
Installation Guide
Navisphere Manager
administrator’s guide
and online help
Page 21
AIX Installation Checklists
Tas k
18 Serve
Make LUNs
available to AIX
19 Server
Test PowerPath
with a license
y
ke
With Access Logix Reference Document
❑
Create partitions or the pertinent database file systems on the LUNs.
If AIX does not recognize any LUNs, verify the connection to the Storage
Group.
If you have a PowerPath license key
If your PowerPath license key is not registered, the load balancing policy is
restricted to basic failover.
❑
Stop all applications accessing the storage system and disable user logins
to the server.
❑
View the LUNs available to the server using the following PowerPath
command:
powermt display dev=all class=clariion
❑
Choose one available LUN to receive I/O for the test.
❑
View the paths to the chosen LUN using the following PowerPath
command:
x
powermt display dev=
x
is pseudo device that represents the chosen LUN.
where
❑
Start I/O to the LUN.
❑
Identify the HBA sending I/O to LUN by viewing the output of the powermt
display dev=x every=2 command, and disconnect the cable to that HBA.
every=2
Host connectivity guide
or AIX documentation
AIX documentation
PowerPath product
guide
❑
View the output of the powermt display dev=x every=2 command, and
verify that
• The state of the uncabled paths becomes “dead.”
,
• I/O continues to the remaining path(s) to the LUN
path failover was successful, and PowerPath is working properly.
❑
Reconnect the cable that you disconnected from the HBA.
❑
If you did not follow the above steps exactly and caused any LUNs to
trespass, restore the LUNs to their original SP with the following PowerPath
command:
powermt restore
indicating that the
You are now ready to set up any optional software, such as SnapView
or MirrorView, on the storage system.
PowerPath Checklist — New AIX Server and New Storage System
1-11
Page 22

AIX Installation Checklists
PowerPath Checklist — New AIX Server and Existing Storage
System
Tasks highlighted with grey in the checklist should be completed
before the service provider arrives.
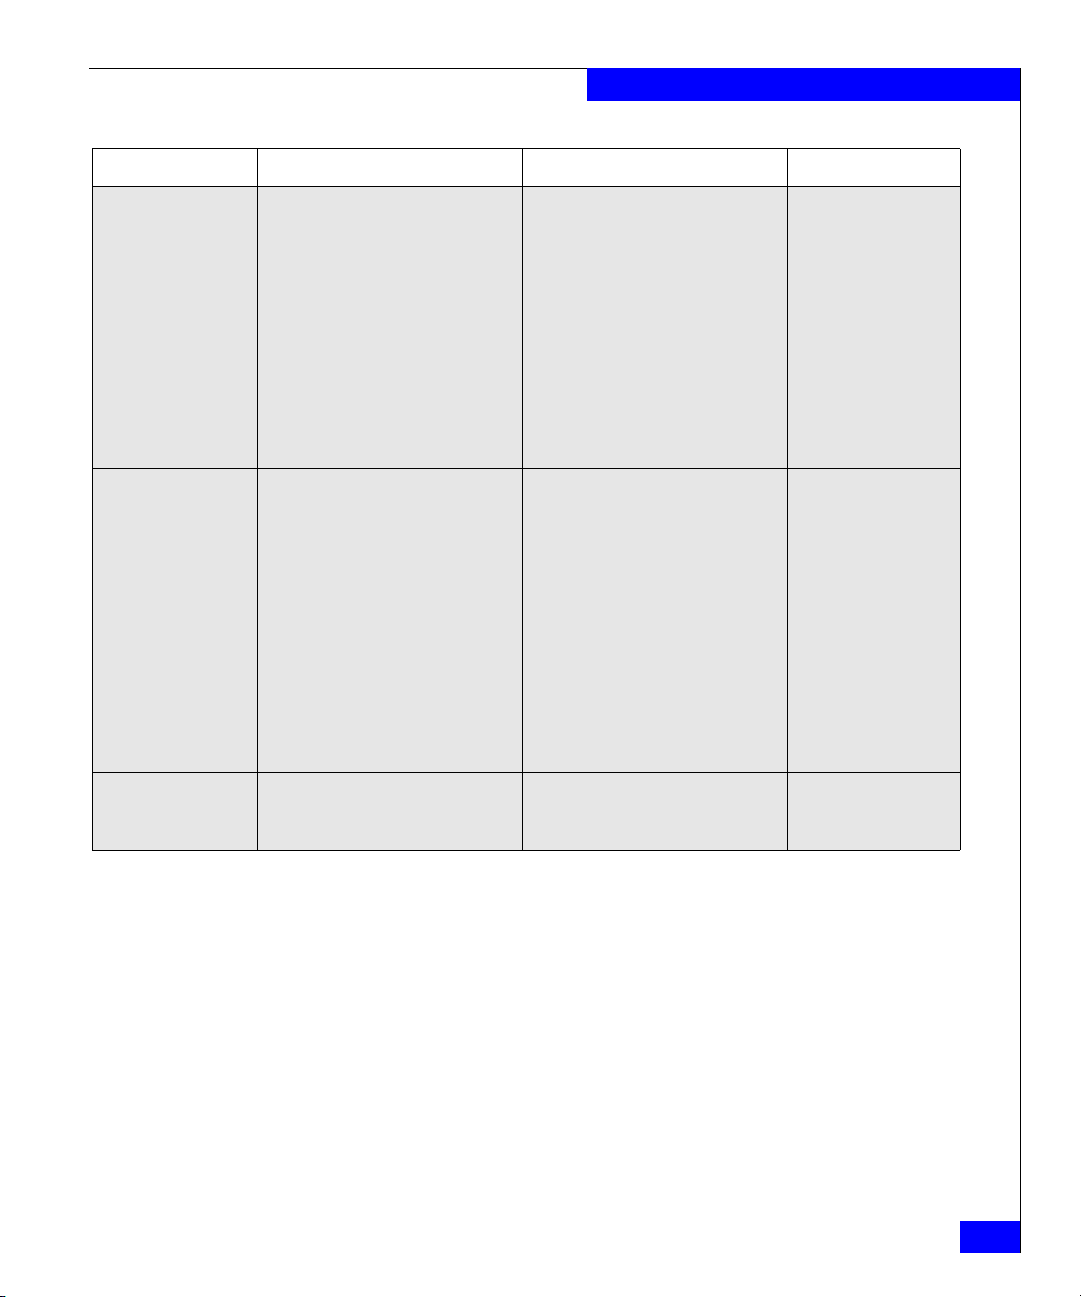
Task
1 Server
Install HBAs and
driver
2 Server
Set HBA driver
parameters
3 Server
Install EMC ODM
Support software
With Access Logix Without Access Logix Reference Document
❑
Install HBAs.
CAUTION Do not connect cables
to the HBAs until you are told to
do so later in this procedure.
❑
Install HBA driver.
❑
Execute the following command:
cfgmgr
❑
Set the HBA driver parameters to
the values required for CLARiiON
and PowerPath.
CAUTION Using improper
settings can cause erratic failover
behavior, such as greatly
increased I/O delays.
❑
Insert the AIX Utilities Kit CD and
mount it.
❑
Install EMC ODM Support using
SMIT or the command line.
Note: The EMC ODM Support
package is available on the ftp site
ftp://ftp.emc.com/pub/elab/aix/ODM_D
EFINITIONS
❑
Install HBAs.
CAUTION Do not connect cables
to the HBAs until you are told to
do so later in this procedure.
❑
Install HBA driver.
❑
Execute the following command:
cfgmgr
❑
Set the HBA driver parameters to
the values required for CLARiiON
and PowerPath.
CAUTION Using improper
settings can cause erratic failover
behavior, such as greatly
increased I/O delays.
❑
Insert the AIX Utilities Kit CD, and
mount it
❑
Install EMC ODM Support using
SMIT or the command line.
Note: The EMC ODM Support
package is available on the ftp site
ftp://ftp.emc.com/pub/elab/aix/ODM_D
EFINITIONS
HBA documentation
AIX documentation
Host connectivity guide
AIX utilities
administrator’s guide
1-12
EMC Installation Roadmap for CX-Series and FC-Series Storage Systems
Page 23
AIX Installation Checklists
Task
4 Server
Install PowerPath
5 Server
I
nstall Host
Agent or Server
Utility
With Access Logix Without Access Logix Reference Document
❑
Insert the PowerPath installation
CD and mount it.
❑
Install PowerPath using SMIT or
from the command line.
❑
Register PowerPath.
❑
Install any PowerPath patches
from the Software downloads
page on the EMC Powerlink
website:
http://powerlink.emc.com
❑
Install the Navisphere Host Agent
or Navisphere Server Utility and
the Navisphere CLI.
❑
If you installed the Host Agent,
edit the Navisphere Host Agent
configuration file agent.config
file as follows:
• Add the following entry if it
does not already exist:
device auto auto
• Add at least one privileged
user.
❑
Insert the PowerPath installation
CD and mount it.
❑
Install PowerPath using SMIT or
from the command line
❑
Register PowerPath.
❑
Install any PowerPath patches
from the Software downloads
page on the EMC Powerlink
website:
http://powerlink.emc.com
❑
Install the Navisphere Host Agent
or Navisphere Server Utility and
the Navisphere CLI.
❑
If you installed the Host Agent,
edit the Navisphere Host Agent
configuration file agent.config
file as follows:
• Add the following entry if it
does not already exist:
device auto auto
• Add at least one privileged
user.
PowerPath Release
Notes and PowerPath
for UNIX installation and
administrator’s guide
CX-Series Server
Software for AIX
Installation Guide
6 Server
Install admsnap
❑
If the server will be a SnapView
production or secondary host,
install the admsnap utility.
PowerPath Checklist — New AIX Server and Existing Storage System
N/A CX-Series Server
Software for AIX
Installation Guide
1-13
Page 24

AIX Installation Checklists
Task
7Storage System
Update software
With Access Logix Without Access Logix Reference Document
❑
If the following software is
currently installed and not at the
required minimum revision,
update it:
• Access Logix
• Navisphere SP Agent
• Navisphere Storage
Management Server Software
• Navisphere Manager UI
• SAN Copy driver and UI
• SnapView driver and UI
• MirrorView driver and UI
CAUTION During the software
update, hosts connected to the
❑
If the following software is
currently installed and not at the
required minimum revision,
update it:
•FLARE
• Navisphere SP Agent
• Navisphere Storage
Management Server Software
• Navisphere Manager UI
CAUTION During the software
update, hosts connected to the
storage system will lose access to
data if they do not have failover
software or all paths to an SP are
down.
Navisphere Manager
administrator’s guide
and online help
storage system will lose access to
data if they do not have failover
software or all paths to an SP are
down.
1-14
EMC Installation Roadmap for CX-Series and FC-Series Storage Systems
Page 25
AIX Installation Checklists
Task
8Storage System
Set properties for
PowerPath
With Access Logix Without Access Logix Reference Document
❑
Use Navisphere Manager’s
Failover Setup Wizard (selected
from the Tools menu on the
toolbar) to set the initiator type,
failover mode, and array
commpath properties for the
server’s HBA ports (initiators):
Initiator Type to CLARiiON Open
Failover mode to 1
Array commpath to Enabled
Note: Setting the array
commpath property to 1
(enabled) creates LUNZ devices.
❑
Use Navisphere Manager’s
Failover Setup Wizard (selected
from the Too ls menu on the
toolbar) to set the initiator type,
failover mode, and array
commpath properties for the
server’s HBA ports (initiators):
navicli -h
-config 3
navicli -h
failovermode 1
navicli -h
arraycommpath 1
where
address or network name of an
SP in the storage system.
Note: Setting the array
commpath property to 1
(enabled) creates LUNZ devices.
hostname
hostname
hostname
hostname
systemtype
is the IP
Navisphere Manager
administrator’s guide
and online help
or
Navisphere CLI
reference
PowerPath Checklist — New AIX Server and Existing Storage System
1-15
Page 26

AIX Installation Checklists
Task
9Server
Cable to switches
or storage
system
With Access Logix Without Access Logix Reference Document
❑
Cable the HBA ports to the switch
connected to the storage system
or to SP ports.
❑
Execute the following AIX
command:
cfgmgr
❑
Checkpoint - For a SAN, verify
the HBA connection to the switch
by checking the LED(s) for the
switch port connected to the HBA
port.
For a 1-Gbit switch - LED is
green, which indicates that the
HBA is logged in to the switch
port.
For a 2-Gbit switch - One of the
following:
• The left LED is green and the
right LED is off, which indicates
that a 1-Gbit SP port is logged
in to the switch port.
• For a DS-xxB2 switch, both
LEDs are green, which
indicates that a 2-Gbit HBA
port is logged in to the switch
port.
• For a DS-xxM2 switch, the left
LED is blue and the right LED
is off, which indicates that a
2-Gbit HBA port is logged in to
the switch port.
❑
Cable the HBA ports to the switch
connected to the storage system
or to SP ports.
❑
Execute the following AIX
command:
cfgmgr
❑
Checkpoint - For a SAN, verify
the HBA connection to the switch
by checking the LED(s) for the
switch port connected to the HBA
port.
For a 1-Gbit switch - LED is
green, which indicates that the
HBA is logged in to the switch
port.
For a 2-Gbit switch - One of the
following:
• The left LED is green and the
right LED is off, which indicates
that a 1-Gbit SP port is logged
in to the switch port.
• For a DS-xxB2 switch, both
LEDs are green, which
indicates that a 2-Gbit HBA
port is logged in to the switch
port.
• For a DS-xxM2 switch, the left
LED is blue and the right LED
is off, which indicates that a
2-Gbit HBA port is logged in to
the switch port.
Storage-system setup
guide.
AIX documentation
Switch documentation
1-16
10 Switches
Zone
EMC Installation Roadmap for CX-Series and FC-Series Storage Systems
For a SAN
❑
Zone the switches to provide a
path from each HBA port (host
initiator) to the appropriate SPs.
❑
If MirrorView is installed, create
any required zones for it.
❑
Checkpoint - Use switch
management software to verify
the switch connections to the
storage system.
For a SAN
❑
Zone the switches to provide a
path from each HBA port (host
initiator) to the appropriate SPs.
❑
Checkpoint - Use switch
management software to verify
the switch connections to the
storage system.
Switch management
documentation
Page 27
AIX Installation Checklists
Task
11 Server
Make target SPs
available
With Access Logix Without Access Logix Reference Document
❑
On the server:
• Download emc_cfgmgr.sh
from
ftp://ftp.emc.com/pub/elab/
powerpath/aix.
• Execute the following
commands
cfgmgr
❑
Checkpoint - Verify that each
HBA sees only the targets (SPs)
to which it is zoned with the
following AIX command:
lsdev -Cc array
❑
Checkpoint - Verify that AIX sees
LUNZ devices with the following
AIX command:
lscfg | grep LUNZ
If AIX does not see LUNZ devices
• Verify that arraycommpath is
set to 1 as described in
step 12.
• Execute the following AIX
command:
emc_cfgmgr.sh
❑
On the server:
• Download emc_cfgmgr.sh
from
ftp://ftp.emc.com/pub/elab/
powerpath/aix.
• Execute the following
commands
cfgmgr
❑
Checkpoint - Verify that each
HBA sees only the targets (SPs)
to which it is zoned with the
following AIX command:
lsdev -Cc array
❑
Checkpoint - Verify that AIX sees
LUNZ devices with the following
AIX command:
lscfg | grep LUNZ
If AIX does not see LUNZ devices
• Verify that arraycommpath is
set to 1 as described in
step 12.
• Execute the following AIX
command:
emc_cfgmgr.sh
AIX documentation
❑
Restart the Navisphere Host
Agent or run the Navisphere
Server Utility with the following
AIX commands:
Host Agent
etc/rc.agent stop
/etc/rc.agent start
Server Utility
/usr/lpp/HOSTUTIL/naviserverutil
❑
Checkpoint - Use Navisphere
Manager’s Connectivity Status
dialog box to verify that each HBA
is registered with the storage
system.
/
PowerPath Checklist — New AIX Server and Existing Storage System
❑
Restart the Navisphere Host
Agent or run the Navisphere
Server Utility with the following
AIX commands:
Host Agent
etc/rc.agent stop
/etc/rc.agent start
Server Utility
/usr/lpp/HOSTUTIL/naviserverutil
❑
Checkpoint - Use Navisphere
Manager’s Connectivity Status
dialog box to verify that each HBA
is registered with the storage
system.
/
CX-Series Server
Software for AIX
Installation Guide
Navisphere Manager
administrator’s guide
and online help
1-17
Page 28

AIX Installation Checklists
Task
11 Server
Make target SPs
available (cont.)
12 Storage System
Configure
With Access Logix Without Access Logix Reference Document
❑
List the LUNZ devices with the
following AIX command:
lscfg | grep LUNZ
❑
Remove each LUNZ device with
the following AIX command:
rmdev -dl hdisk
where n is the hdisk number for
the LUNZ device.
❑
Use the following Navisphere CLI
command to set the array
commpath property to 0:
navicli -h
arraycommpath 0
hostname
where
address or network name of an
SP in the storage system.
❑
Execute the following AIX
command:
cfgmgr
❑
If the server will use an
Storage Group, use Navisphere
Manager to connect the server to
the Storage Group.
n
hostname
is the IP
existing
❑
List the LUNZ devices with the
following AIX command:
lscfg | grep LUNZ
❑
Remove each LUNZ device with
the following AIX command:
rmdev -dl hdisk
where n is the hdisk number for
the LUNZ device.
❑
Use the following Navisphere CLI
command to set the array
commpath property to 0:
navicli -h
arraycommpath 0
hostname
where
address or network name of an
SP in the storage system.
❑
Execute the following AIX
command:
cfgmgr
N/A Navisphere Manager
n
hostname
is the IP
AIX documentation
Navisphere CLI
reference
AIX documentation
administrator’s guide
and online help
13 Storage System
1-18
❑
If the server will use a
Storage Group, use Navisphere
Manager to create RAID Groups,
bind LUNs, create the Storage
Group, and assign LUNs to the
Storage Group.
❑
Use Navisphere Manager to
connect the server to the Storage
Group.
❑
Plan your monitoring
Set up Event
r
Monito
EMC Installation Roadmap for CX-Series and FC-Series Storage Systems
configuration.
❑
Use Navisphere Manager to set
user options, create templates,
and set up your monitoring
configuration.
new
❑
Plan your monitoring
configuration.
❑
Use Navisphere Manager to set
user options, create templates,
and set up your monitoring
configuration.
Navisphere Manager
administrator’s guide
and online help
Page 29

AIX Installation Checklists
Task
14 Server
Configure
devices
With Access Logix Without Access Logix Reference Document
❑
Execute the following command:
emc_cfgmgr.sh
❑
Execute the following PowerPath
command:
powermt config
❑
Checkpoint - Verify that the
servers see hdisk devices for the
LUNs.
❑
Checkpoint - Verify that
PowerPath sees all the paths to
the LUNs with the following
PowerPath command:
powermt display dev=all
class=clariion
If PowerPath does not see the
LUNs
• Verify the server’s connection
to the Storage Group.
• Verify that you registered your
PowerPath license key if you
have one.
• Verify that the storage-system
properties are as defined in
step 8.
❑
Execute the following command:
emc_cfgmgr.sh
❑
Execute the following PowerPath
command:
powermt config
❑
Checkpoint - Verify that the
servers see hdisk devices for the
LUNs.
❑
Checkpoint - Verify that
PowerPath sees all the paths to
the LUNs with the following
PowerPath command:
powermt display dev=all
class=clariion
If PowerPath does not see the
LUNs
• Verify that you registered your
PowerPath license key if you
have one.
• Verify that the storage-system
properties are as defined in
step 8.
AIX documentation
PowerPath product
guide
AIX documentation
PowerPath product
guide
❑
Restart the Navisphere Host
Agent or run the Navisphere
Server Utility with the following
AIX commands:
Host Agent
etc/rc.agent stop
/etc/rc.agent start
Server Utility
/usr/lpp/HOSTUTIL/naviserverutil
❑
Checkpoint if the Host Agent is
installed - Use Navisphere
Manager to verify that the LUNs
are mapped to hdiskpower
devices.
/
PowerPath Checklist — New AIX Server and Existing Storage System
❑
Restart the Navisphere Host
Agent or run the Navisphere
Server Utility with the following
AIX commands:
Host Agent
etc/rc.agent stop
/etc/rc.agent start
Server Utility
/usr/lpp/HOSTUTIL/naviserverutil
❑
Checkpoint if the Host Agent is
installed - Use Navisphere
Manager to verify that the LUNs
are mapped to hdiskpower
devices.
/
CX-Series Server
Software for AIX
Installation Guide
Navisphere Manager
administrator’s guide
and online help
1-19
Page 30

AIX Installation Checklists
Task
15 Server
Make LUNs
available to AIX
16 Server
Test PowerPath
with a license ke
With Access Logix Without Access Logix Reference Document
❑
Create partitions or the pertinent
database file systems on the
LUNs.
If AIX does not recognize any
LUNs, verify the connection to the
Storage Group.
If you have a PowerPath license key
If your PowerPath license key is not
y
registered, the load balancing policy is
restricted to basic failover.
❑
Stop all applications accessing
the storage system and disable
user logins to the server.
❑
View the LUNs available to the
server using the following
PowerPath command:
powermt display dev=all
class=clariion
❑
Choose one available LUN to
receive I/O for the test.
❑
View the paths to the chosen
LUN using the following
PowerPath command:
x
powermt display dev=
x
is pseudo device that
where
represents the chosen LUN.
every=2
❑
Create partitions or the pertinent
database file systems on the
LUNs.
If you have a PowerPath license key
If your PowerPath license key is not
registered, the load balancing policy is
restricted to basic failover.
❑
Stop all applications accessing
the storage system and disable
user logins to the server.
❑
View the LUNs available to the
server using the following
PowerPath command:
powermt display dev=all
class=clariion
❑
Choose one available LUN to
receive I/O for the test.
❑
View the paths to the chosen
LUN using the following
PowerPath command:
x
powermt display dev=
x
is pseudo device that
where
represents the chosen LUN.
every=2
Host connectivity guide
or AIX documentation
AIX documentation
PowerPath product
guide
1-20
❑
Start I/O to the LUN.
❑
Identify the HBA sending I/O to
LUN by viewing the output of the
x
powermt display dev=
command, and disconnect the
cable to that HBA.
EMC Installation Roadmap for CX-Series and FC-Series Storage Systems
every=2
❑
Start I/O to the LUN.
❑
Identify the HBA sending I/O to
LUN by viewing the output of the
powermt display dev=
command, and disconnect the
cable to that HBA.
x
every=2
Page 31

AIX Installation Checklists
Task
16 Server
Test PowerPath
with a license ke
(cont.)
With Access Logix Without Access Logix Reference Document
❑
View the output of the powermt
display dev=
command, and verify that
y
• The state of the uncabled
paths becomes “dead.”
• I/O continues to the remaining
path(s) to the LUN
that the path failover was
successful, and PowerPath is
working properly.
❑
Reconnect the cable that you
disconnected from the HBA.
❑
If you did not follow the above
steps exactly and caused any
LUNs to trespass, restore the
LUNs to their original state with
the following PowerPath
command:
powermt restore
x
every=2
,
indicating
❑
View the output of the powermt
display dev=
command, and verify that
• The state of the uncabled
paths becomes “dead.”
• I/O continues to the remaining
path(s) to the LUN
that the path failover was
successful, and PowerPath is
working properly.
❑
Reconnect the cable that you
disconnected from the HBA.
❑
If you did not follow the above
steps exactly and caused any
LUNs to trespass, restore the
LUNs to their original state with
the following PowerPath
command:
powermt restore
x
every=2
,
PowerPath product
guide
indicating
You are now ready to set up any optional software, such as SnapView
or MirrorView, on the storage system.
PowerPath Checklist — New AIX Server and Existing Storage System
1-21
Page 32

AIX Installation Checklists
PowerPath Checklist — Existing AIX Server and New Storage
System
Tasks highlighted with grey in the checklist should be performed
before the service provider arrives, except for the removal of
Application Transparent Failover (ATF) or CDE, which you can have
done by EMC Professional Services.
!
CAUTION
EMC no longer supports ATF or CDE. Before you transition your
server from ATF or CDE to PowerPath, you must
◆ Back up your server configurations.
◆ Back up data on all storage systems connected to the server.
◆ Remove ATF or CDE, which EMC recommends that EMC
Professional Services do, especially if your server configuration
is complex. If you want to remove it yourself, you must use the
procedure in the Removing ATF or CDE Software Before
Installing Other Failover Software document (P/N 069001173),
which is on the Powerlink website with this roadmap.
Simply removing ATF or CDE using the uninstall procedure in
the AIX ATF administrator’s guide or the AIX utilities
administrator’s guide may not return the server to it original
state, and may result in lost data.
1-22
EMC Installation Roadmap for CX-Series and FC-Series Storage Systems
Page 33

AIX Installation Checklists
Task
1 Server
Unmount file
systems and vary
off volumes
2 Server
Replace
CLARiiON HBA
driver
3 Server
Remove ATF or
CDE
4 Server
Install EMC ODM
Support software
5 Server
Replace IBM
HBAs and/or
Install additional
HBAs
6 Server
Update Software
With Access Logix Reference Document
❑
Unmount any file systems that reside on the storage system. AIX documentation
❑
Vary off any volume groups that reside on the storage systems.
If the CLARiiON HBA driver is installed
❑
Remove the hdisk devices for LUNs in the storage system. AIX documentation
❑
Replace it with the IBM HBA driver. HBA driver
documentation
❑
If ATF or CDE is installed, then before continuing either remove it yourself
(see caution before this checklist) or arrange to have EMC Professional
Services remove it.
❑
Remove the DiskArray software,.
CAUTION Do not reboot the server.
❑
Disconnect any non-FC4700 or non-CX-Series storage systems.
PowerPath does not support these storage systems.
❑
Insert the AIX Utilities Kit CD and mount it.
❑
Install EMC ODM Support using SMIT or ODM or the command line.
Note: The EMC ODM Support package is available on the ftp site
ftp://ftp.emc.com/pub/elab/aix/ODM_DEFINITIONS
❑
Reboot the server.
Note: PowerPath requires IBM PCI HBAs and the driver supported by IBM for
AIX.
❑
If the server has IBM HBAs connected to the storage system, replace them
with the IBM HBAs.
❑
If you need additional HBAs to provide more paths to the storage system,
install these HBAs.
CAUTION Do not connect cables to the HBAs until you are told to do so
later in this procedure.
❑
If the following software is currently installed and not at the required
minimum revision, update it:
• HBA driver
• Navisphere Host Agent and CLI
• admsnap
❑
Execute the following command:
cfgmgr
Removing ATF or CDE
AIX utilities
administrator’s guide
HBA documentation
HBA driver
documentation
CX-Series Server
Software for AIX
installation Guide
AIX documentation
PowerPath Checklist — Existing AIX Server and New Storage System
1-23
Page 34

AIX Installation Checklists
Task
7 Server
Set HBA driver
parameters
8 Server
Install PowerPath
9 Storage System
Install
10 Storage System
Initialize and
install software
enablers
11 Storage System
Cable to switch
or server and
LAN
With Access Logix Reference Document
❑
Make sure the HBA driver parameters are set to the values required for
CLARiiON and PowerPath.
CAUTION Using improper settings can cause erratic failover behavior,
such as greatly increased I/O delays.
❑
Insert the PowerPath installation CD and mount it. PowerPath Release
❑
Install PowerPath from the command line or using SMIT.
❑
Register PowerPath.
❑
Install any PowerPath patches from the Software downloads page on the
EMC Powerlink website:
http://powerlink.emc.com
❑
Install the storage system in the cabinet, if not already installed. Rails and cabinet
❑
Install the Navisphere Initialization Utility on a
as the storage-system management ports.
subnet
❑
Use the Navisphere Initialization Utility to initialize the storage system.
❑
If you have SAN Copy, SnapView, and/or MirrorView software, install their
enablers.
❑
Connect the storage system to the switch or HBA ports. Storage-system setup
❑
Checkpoint - For a SAN, verify the storage-system connections to the
switch by checking the LED(s) for the switch port connected to each SP
port.
For a 1-Gbit switch - LED is green, which indicates that the SP is logged
in to the switch port.
For a 2-Gbit switch - One of the following:
• The left LED is green and the right LED is off, which indicates that a
1-Gbit SP port is logged in to the switch port.
• For a DS-xxB2 switch, both LEDs are green, which indicates that a
2-Gbit HBA port is logged in to the switch port.
• For a DS-xxM2 switch, the left LED is blue and the right LED is off,
which indicates that a 2-Gbit HBA port is logged in to the switch port.
❑
Cable each SP to the LAN connected to the hosts from which you will
manage the storage system.
non-AIX
host on the
same
Host connectivity guide
Notes and PowerPath
for UNIX installation and
administrator’s guide
documentation
Storage-system setup
guide
Navisphere Manager
administrator’s guide
and online help
guide.
Switch documentation
Storage-system setup
guide.
1-24
EMC Installation Roadmap for CX-Series and FC-Series Storage Systems
Page 35

AIX Installation Checklists
Task
12 Storage System
Set up security
13 Storage System
Set properties for
PowerPath
14 Server
Cable additional
or replacement
HBAs to switches
or storage
system
15 Switches
Zone
With Access Logix Reference Document
❑
Use Navisphere Manager to define a global administrator and domain (if
not already defined) and any additional users.
❑
Use the following Navisphere CLI commands to set the storage system’s,
and array commpath properties:
navicli -h
navicli -h
navicli -h
where
storage system.
Note: Setting the array commpath property to 1 (enabled) creates LUNZ
devices.
❑
Cable any additional or replacement HBA ports to the switch connected to
the storage system or to SP ports.
❑
Execute the following AIX command:
cfgmgr
❑
Checkpoint - For a SAN, verify the HBA connections to the switch by
checking the LED(s) for the switch port connected to each additional HBA
port.
For a 1-Gbit switch - LED is green, which indicates that the HBA port is
logged in to the switch port.
For a 2-Gbit switch - One of the following:
• The left LED is green and the right LED is off, which indicates that a
• For a DS-xxB2 switch, both LEDs are green, which indicates that a
• For a DS-xxM2 switch, the left LED is blue and the right LED is off,
For a SAN
❑
Zone the switches to provide a path from each new HBA port (host
initiator) to the appropriate SPs.
❑
Checkpoint - Use switch management software to verify the switch
connections to the storage system.
hostname
hostname
hostname
hostname
1-Gbit SP port is logged in to the switch port.
2-Gbit HBA port is logged in to the switch port.
which indicates that a 2-Gbit HBA port is logged in to the switch port.
systemtype -config 3
failovermode 1
arraycommpath 1
is the IP address or network name of an SP in the
Navisphere security
administrator’s guide
and Navisphere
Manager online help
Navisphere CLI
reference
Storage-system setup
guide.
AIX documentation
Switch documentation
Switch management
documentation
PowerPath Checklist — Existing AIX Server and New Storage System
1-25
Page 36

AIX Installation Checklists
Task
16 Server
Make target SPs
available
17 Storage System
Configure
18 Storage System
Set up Event
r
Monito
With Access Logix Reference Document
❑
Download the following command from ftp://ftp.emc.com/pub/elab/
powerpath/aix and execute it:
emc_cfgmgr.sh
❑
Checkpoint - Verify that AIX sees LUNZ devices with the following AIX
command:
lscfg | grep LUNZ
If AIX does not see LUNZ devices
• Verify that arraycommpath is set to 1 as described in step 12.
• Execute the following AIX command:
emc_cfgmgr.sh
❑
Restart the Navisphere Host Agent or run the Navisphere Server Utility
with the following AIX commands:
Host Agent
etc/rc.agent stop
/etc/rc.agent start
Server Utility
/usr/lpp/HOSTUTIL/naviserverutil
❑
Checkpoint - Use Navisphere Manager’s Connectivity Status dialog box
to verify that each HBA is registered with the storage system.
❑
List the LUNZ devices with the following AIX command:
lscfg | grep LUNZ
❑
Remove each LUNZ device with the following AIX command:
rmdev -dl hdisk
where n is the hdisk number for the LUNZ device.
❑
Use Navisphere Manager to set general storage-system properties.
❑
Use Navisphere Manager to create RAID Groups, bind LUNs, create
Storage Groups, and assign LUNs to Storage Groups.
❑
Use Navisphere Manager to connect the server to a Storage Group
❑
Plan your monitoring configuration.
❑
Use Navisphere Manager to set user options, create templates, and set up
your monitoring configuration.
/
n
AIX documentation
CX-Series Server
Software for AIX
installation guide
Navisphere Manager
administrator’s guide
and online help
AIX documentation
Navisphere Manager
administrator’s guide
and online help
Navisphere Manager
administrator’s guide
and online help
1-26
EMC Installation Roadmap for CX-Series and FC-Series Storage Systems
Page 37

AIX Installation Checklists
Task
19 Server
Configure
devices
20 Server
Make LUNs
available to AIX
21 Server
Test PowerPath
with a license key
With Access Logix Reference Document
❑
Execute the following command:
emc_cfgmgr.sh
❑
Execute the following PowerPath command:
powermt config
❑
Checkpoint - Verify that the server sees hdiskpower devices for the
LUNs.
❑
Checkpoint - Verify that PowerPath sees all the paths to the LUNs with the
following PowerPath command:
powermt display dev=all class=clariion
If PowerPath does not see the LUNs
• Verify the server’s connection to the Storage Group.
• Verify that you registered your PowerPath license key if you have one.
• Verify that the storage-system properties are as defined in step 13.
❑
Restart the Navisphere Host Agent or run the Navisphere Server Utility
with the following AIX commands:
Host Agent
etc/rc.agent stop
/etc/rc.agent start
Server Utility
/usr/lpp/HOSTUTIL/naviserverutil
❑
Checkpoint if the Host Agent is installed - Use Navisphere Manager to
verify that the LUNs are mapped to hdiskpower devices.
❑
Create partitions or the pertinent database file systems on the LUNs.
If AIX does not recognize any LUNs, verify the connection to the Storage
Group.
If you have a PowerPath license key
Note If your PowerPath license key is not registered, the load balancing policy is
restricted to basic failover.
❑
View the LUNs available to the server using the following PowerPath
command:
powermt display dev=all class=clariion
❑
Choose one available LUN to receive I/O for the test.
❑
View the paths to the chosen LUN using the following PowerPath
command:
powermt display dev=
where
/
x
every=2
x
is pseudo device that represents the chosen LUN.
AIX documentation
PowerPath product
guide
CX-Series Server
Software for AIX
installation guide
Navisphere Manager
administrator’s guide
and online help
Host connectivity guide
or AIX documentation
PowerPath product
guide
PowerPath Checklist — Existing AIX Server and New Storage System
1-27
Page 38

AIX Installation Checklists
Task
21 Server
Test PowerPath
with a license key
(cont.)
With Access Logix Reference Document
❑
Start I/O to the LUN.
❑
Identify the HBA sending I/O to LUN by viewing the output of the powermt
display dev=x every=2 command, and disconnect the cable to that HBA.
❑
View the output of the powermt display dev=x every=2 command, and
verify that
• The state of the uncabled path(s) becomes “dead.”
,
• I/O continues to the remaining path(s) to the LUN
path failover was successful, and PowerPath is working properly.
❑
Reconnect the cable that you disconnected from the HBA.
❑
If you did not follow the previous steps exactly and caused any LUNs to
trespass, restore the LUNs to their original state with the following
PowerPath command:
powermt restore
indicating that the
PowerPath product
guide
You are now ready to set up any optional software, such as SnapView
or MirrorView, on the storage system.
1-28
EMC Installation Roadmap for CX-Series and FC-Series Storage Systems
Page 39

AIX Installation Checklists
PowerPath Checklist — Existing AIX Server and Existing Storage
System
This checklist assumes that the existing AIX server and existing
storage system are already connected in a SAN or direct attach
configuration. Tasks highlighted with grey in the checklist should be
performed before the service provider arrives, except for the removal
of ATF or CDE, which you can have done by EMC Professional
Services.
!
CAUTION
EMC no longer supports ATF or CDE. Before you transition your
server from ATF or CDE to PowerPath, you must
◆ Back up your server configurations.
◆ Back up data on all storage systems connected to the server.
◆ Remove ATF or CDE, which EMC recommends that EMC
Professional Services do, especially if your server configuration
is complex. If you want to remove it yourself, you must use the
procedure in the Removing ATF or CDE Software Before
Installing Other Failover Software document (P/N 069001173),
which is on the Powerlink website with this roadmap.
Simply removing ATF or CDE using the uninstall procedure in
the AIX ATF administrator’s guide or the AIX utilities
administrator’s guide may not return the server to it original
state, and may result in lost data.
PowerPath Checklist — Existing AIX Server and Existing Storage System
1-29
Page 40

AIX Installation Checklists
Task
1 Server
Unmount file
systems and vary
off volumes
2 Server
Replace
CLARiiON HBA
r
drive
3 Server
Remove ATF or
CDE
4 Server
Install EMC ODM
Support software
With Access Logix Without Access Logix Reference Document
❑
Unmount any file systems that
reside on the storage system.
❑
Vary off any volume groups that
reside on the storage systems.
If the CLARiiON HBA driver is
installed
❑
Remove the hdisk devices for
LUNs in the storage system.
❑
Remove CLArray or
CLARiiON.fcp.
❑
Install the IBM HBA driver.
❑
If ATF or CDE is installed, then
before continuing either remove it
yourself (see caution before this
checklist) or arrange to have EMC
Professional Services remove it.
❑
Remove the DiskArray software.
CAUTION Do not reboot the
server.
❑
Unmount any file systems that
reside on the storage system.
❑
Vary off any volume groups that
reside on the storage systems.
If the CLARiiON HBA driver is
installed
❑
Remove the hdisk devices for
LUNs in the storage system.
❑
Remove CLArray or
CLARiiON.fcp.
❑
Replace it with the IBM HBA
driver
❑
If ATF or CDE is installed, then
before continuing either remove it
yourself (see caution before this
checklist) or arrange to have EMC
Professional Services remove it.
❑
Remove the DiskArray software.
CAUTION Do not reboot the
server.
AIX documentation
AIX documentation
HBA driver
documentation
Removing ATF or CDE
AIX utilities
administrator’s guide
1-30
❑
Disconnect any non-FC4700 or
non-CX-Series storage systems.
PowerPath does not support
these storage systems.
❑
Insert the AIX Utilities Kit CD and
mount it.
❑
Install ODM using SMIT or ODM
or the command line.
Note: The EMC ODM Support
package is available on the ftp site
ftp://ftp.emc.com/pub/elab/aix/ODM_D
EFINITIONS
❑
Reboot the server.
EMC Installation Roadmap for CX-Series and FC-Series Storage Systems
❑
Disconnect any non-FC4700 or
non-CX-Series storage systems.
PowerPath does not support
these storage systems.
❑
Insert the AIX Utilities Kit CD and
mount it.
❑
Install ODM using SMIT or ODM
or the command line.
Note: The EMC ODM Support
package is available on the ftp site
ftp://ftp.emc.com/pub/elab/aix/ODM_D
EFINITIONS
❑
Reboot the server.
Page 41

AIX Installation Checklists
Task
5 Server
Replace IBM
HBAs and/or
Install additional
HBAs
6 Server
Update Software
With Access Logix Without Access Logix Reference Document
Note: PowerPath requires IBM PCI
HBAs and the driver supported by IBM
for AIX.
❑
If the server has IBM HBAs
connected to the storage system,
replace them with the IBM HBAs.
❑
If you need additional HBAs to
provide more paths to the storage
system, install these HBAs.
CAUTION Do not connect cables
to the HBAs until you are told to
do so later in this procedure.
❑
If the following software is
currently installed and not at the
required minimum revision,
update it:
• HBA driver
• Navisphere Host Agent
• admsnap
❑
Execute the following command:
cfgmgr
Note: PowerPath requires IBM PCI
HBAs and the driver supported by IBM
for AIX.
❑
If the server has IBM HBAs
connected to the storage system,
replace them with the IBM HBAs.
❑
If you need additional HBAs to
provide more paths to the storage
system, install these HBAs.
CAUTION Do not connect cables
to the HBAs until you are told to
do so later in this procedure
❑
If the following software is
currently installed and not at the
required minimum revision,
update it:
• HBA driver
• Navisphere Host Agent
❑
Execute the following command:
cfgmgr
HBA documentation
HBA driver
documentation
CX-Series Server
Software for AIX
Installation Guide
AIX documentation
7 Server
Set HBA driver
parameters
❑
Make sure the HBA driver
parameters are set to the values
required for CLARiiON and
PowerPath.
CAUTION Using improper
settings can cause erratic failover
behavior, such as greatly
increased I/O delays.
PowerPath Checklist — Existing AIX Server and Existing Storage System
❑
Make sure the HBA driver
parameters are set to the values
required for CLARiiON and
PowerPath.
CAUTION Using improper
settings can cause erratic failover
behavior, such as greatly
increased I/O delays.
Host connectivity guide
1-31
Page 42

AIX Installation Checklists
Task
8Storage System
Update software
With Access Logix Without Access Logix Reference Document
❑
If the following software is
currently installed and not at the
required minimum revision,
update it:
• Access Logix
• Navisphere SP Agent
• Navisphere Storage
Management Server Software
• Navisphere Manager UI
• SAN Copy driver and UI
• SnapView driver and UI
• MirrorView driver and UI
CAUTION During the software
update, hosts connected to the
❑
If the following software is
currently installed and not at the
required minimum revision,
update it:
•FLARE
• Navisphere SP Agent
• Navisphere Storage
Management Server Software
• Navisphere Manager UI
CAUTION During the software
update, hosts connected to the
storage system will lose access to
data if they do not have failover
software or all paths to an SP are
down.
Navisphere Manager
administrator’s guide
and online help
storage system will lose access to
data if they do not have failover
software or all paths to an SP are
down.
1-32
EMC Installation Roadmap for CX-Series and FC-Series Storage Systems
Page 43

AIX Installation Checklists
Task
9Storage System
Set properties for
PowerPath
With Access Logix Without Access Logix Reference Document
For new or replacement HBAs
❑
Use the following Navisphere CLI
command to determine the
default storage-system type:
❑
Use the following Navisphere CLI
commands to set the following
storage-system properties for the
server’s new or replacement HBA
ports (initiators):
navicli -h
storagegroup -sethost
-host
-
type 3
navicli -h
storagegroup -sethost
-host
-
failovermode 1
navicli -h
storagegroup -setpath
-host
-arraycommpath 1
where
hostname
network name of an SP in the
storage system
servername
or network address
Note: Setting the array
commpath property to 1
(enabled) creates LUNZ devices.
You will have to remove the LUNZ
devices later in the procedure.
hostname
servername
hostname
servername
hostname
servername
is the IP address or
is the server’s name
For any HBAs
❑
Use the following Navisphere CLI
command to determine the
default storage-system type:
navicli -h
where
address or network name of an
SP in the storage system.
If the default storage-system
system type is
Open), use the following
Navisphere CLI command to set it
to 3:
navicli -h
-config 3
CAUTION The above command
reboots both SPs at the same
time.
hostname
hostname
hostname
systemtype
is the IP
not
3 (CLARiiON
systemtype
Navisphere CLI
reference
PowerPath Checklist — Existing AIX Server and Existing Storage System
1-33
Page 44

AIX Installation Checklists
Task
9Storage System
Set properties for
PowerPath (cont.)
With Access Logix Without Access Logix Reference Document
For any HBAs (cont.)
❑
Use the following Navisphere CLI
Navisphere CLI
reference
commands to set the storage
system’s default failover mode
and array commpath properties:
navicli -h
hostname
failovermode 1
navicli -h
hostname
arraycommpath 1
where
hostname
is the IP
address or network name of an
SP in the storage system.
Note: Setting the array
commpath property to 1
(enabled) creates LUNZ devices.
You will have to remove the LUNZ
devices later in the procedure.
For existing HBAs
❑
Use Navisphere Manager’s
Failover Setup Wizard (selected
Navisphere Manager
administrator’s guide
and online help
from the Tools menu on the
toolbar) to set the storage
system’s initiator type, failover
mode, and array commpath
properties for the server’s HBA
ports (initiators):
Initiator Type to CLARiiON Open
Failover mode to 1
1-34
Array commpath to Enabled
Note: Setting the array
commpath property to 1
(enabled) creates LUNZ devices.
You will have to remove the LUNZ
devices later in the procedure.
EMC Installation Roadmap for CX-Series and FC-Series Storage Systems
Page 45

AIX Installation Checklists
Task
10 Server
Install PowerPath
11 Server
Cable additional
or replacement
HBAs to switches
or storage
system
With Access Logix Without Access Logix Reference Document
❑
Insert the PowerPath installation
CD and mount it.
❑
Install PowerPath from the
command line or using SMIT.
❑
Register PowerPath.
❑
Install any PowerPath patches
from the Software downloads
page on the EMC Powerlink
website:
http://powerlink.emc.com
❑
Cable any additional or
replacement HBA ports to the
switch connected to the storage
system or to SP ports.
❑
Execute the following AIX
command:
cfgmgr
❑
Checkpoint - For a SAN, verify
the HBA connections to the
switch by checking the LED(s) for
the switch port connected to each
additional HBA port.
For a 1-Gbit switch - LED is
green, which indicates that the
HBA port is logged in to the
switch port.
❑
Insert the PowerPath installation
CD and mount it.
❑
Install PowerPath from the
command line or using SMIT.
❑
Register PowerPath.
❑
Install any PowerPath patches
from the Software downloads
page on the EMC Powerlink
website:
http://powerlink.emc.com
❑
Cable any additional or
replacement HBA ports to the
switch connected to the storage
system or to SP ports.
❑
Execute the following AIX
command:
cfgmgr
Checkpoint - For a SAN, verify
the HBA connections to the
switch by checking the LED(s) for
the switch port connected to each
additional HBA port.
For a 1-Gbit switch - LED is
green, which indicates that the
HBA port is logged in to the
switch port.
PowerPath Release
Notes and PowerPath
for UNIX installation and
administrator’s guide
Storage-system setup
guide.
AIX documentation
Switch documentation
PowerPath Checklist — Existing AIX Server and Existing Storage System
1-35
Page 46

AIX Installation Checklists
Task
11 Server
Cable additional
or replacement
HBAs to switches
or storage
system (cont.)
12 Switches
Zone for
additional HBAs
With Access Logix Without Access Logix Reference Document
For a 2-Gbit switch - One of the
following:
• The left LED is green and the
right LED is off, which indicates
that a 1-Gbit SP port is logged
in to the switch port.
• For a DS-xxB2 switch, both
LEDs are green, which
indicates that a 2-Gbit HBA
port is logged in to the switch
port.
• For a DS-xxM2 switch, the left
LED is blue and the right LED
is off, which indicates that a
2-Gbit HBA port is logged in to
the switch port.
For a SAN
❑
Zone the switches to provide a
path from each additional HBA
port (host initiator) to the
appropriate SPs.
❑
Checkpoint - Use switch
management software to verify
the switch connections to the
storage system.
For a 2-Gbit switch - One of the
following:
• The left LED is green and the
right LED is off, which indicates
that a 1-Gbit SP port is logged
in to the switch port.
• For a DS-xxB2 switch, both
LEDs are green, which
indicates that a 2-Gbit HBA
port is logged in to the switch
port.
• For a DS-xxM2 switch, the left
LED is blue and the right LED
is off, which indicates that a
2-Gbit HBA port is logged in to
the switch port.
For a SAN
❑
Zone the switches to provide a
path from each additional HBA
port (host initiator) to the
appropriate SPs.
❑
Checkpoint - Use switch
management software to verify
the switch connections to the
storage system
Switch management
documentation
1-36
13 Server
Make target SPs
available
EMC Installation Roadmap for CX-Series and FC-Series Storage Systems
❑
Download the following command
from ftp://ftp.emc.com/pub/elab/
powerpath/aix and execute it:
emc_cfgmgr.sh
❑
Checkpoint - Verify that AIX sees
LUNZ devices with the following
AIX command:
lscfg | grep LUNZ
If AIX does not see LUNZ devices
• Verify that arraycommpath is
set to 1 as described in step 9.
• Execute the following AIX
command:
emc_cfgmgr.sh
❑
Download the following command
from ftp://ftp.emc.com/pub/elab/
powerpath/aix and execute it:
emc_cfgmgr.sh
❑
Checkpoint - Verify that AIX sees
LUNZ devices with the following
AIX command:
lscfg | grep LUNZ
If AIX does not see LUNZ devices
• Verify that arraycommpath is
set to 1 as described in step 9.
• Execute the following AIX
command:
emc_cfgmgr.sh
AIX documentation
Page 47

AIX Installation Checklists
Task
13 Server
Make target SPs
available (cont.)
With Access Logix Without Access Logix Reference Document
❑
Checkpoint - Verify that each
HBA sees only the targets (SPs)
to which it is zoned with the
following AIX command:
lsdev -Cc array
❑
Restart the Navisphere Host
Agent or run the Navisphere
Server Utility with the following
AIX commands:
Host Agent
etc/rc.agent stop
/etc/rc.agent start
Server Utility
/usr/lpp/HOSTUTIL/naviserverutil
❑
Checkpoint - Use Navisphere
Manager’s Connectivity Status
dialog box to verify that each HBA
is registered with the storage
system.
❑
List the LUNZ devices with the
following AIX command:
lscfg | grep LUNZ
/
❑
Checkpoint - Verify that each
HBA sees only the targets (SPs)
to which it is zoned with the
following AIX command:
lsdev -Cc array
❑
Restart the Navisphere Host
Agent or run the Navisphere
Server Utility with the following
AIX commands:
Host Agent
etc/rc.agent stop
/etc/rc.agent start
Server Utility
/usr/lpp/HOSTUTIL/naviserverutil
❑
Checkpoint - Use Navisphere
Manager’s Connectivity Status
dialog box to verify that each HBA
is registered with the storage
system.
❑
List the LUNZ devices with the
following AIX command:
lscfg | grep LUNZ
/
AIX documentation
CX-Series Server
Software for AIX
installation guide
Navisphere Manager
administrator’s guide
and online help
AIX documentation
❑
Remove each LUNZ device with
the following AIX command:
rmdev -dl hdisk
where n is the hdisk number for
the LUNZ device.
❑
Execute the following AIX
command:
emc_cfgmg.sh
n
PowerPath Checklist — Existing AIX Server and Existing Storage System
❑
Remove each LUNZ device with
the following AIX command:
rmdev -dl hdisk
where n is the hdisk number for
the LUNZ device.
❑
Execute the following AIX
command:
emc_cfgmg.sh
n
1-37
Page 48

AIX Installation Checklists
Task
14 Server
Configure
devices
With Access Logix Without Access Logix Reference Document
❑
If you replaced HBAs or added
additional HBAs, use Navisphere
Manager to disconnect and then
reconnect the server and its
Storage Group.
❑
Execute the following command:
emc_cfgmgr.sh
❑
Execute the following PowerPath
command:
powermt config
❑
Checkpoint - Verify that the
server sees hdiskpower devices
for the LUNs.
❑
Checkpoint - Verify that
PowerPath sees all the paths to
the LUNs with the following
PowerPath command:
powermt display dev=all
class=clariion
If PowerPath does not see the
LUNs
• Verify the server’s connection
to the Storage Group.
• Verify that you registered your
PowerPath license key if you
have one.
• Verify that the storage-system
properties are as defined in
step 9.
❑
Execute the following command:
emc_cfgmgr.sh
❑
Execute the following PowerPath
command:
powermt config
❑
Checkpoint - Verify that the
server sees hdiskpower devices
for the LUNs.
❑
Checkpoint - Verify that
PowerPath sees all the paths to
the LUNs with the following
PowerPath command:
powermt display dev=all
class=clariion
If PowerPath does not see the
LUNs
• Verify that you registered your
PowerPath license key if you
have one.
• Verify that the storage-system
properties are as defined in
step 9.
Navisphere Manager
administrator’s guide
and online help
AIX documentation
PowerPath product
guide
PowerPath product
guide
1-38
EMC Installation Roadmap for CX-Series and FC-Series Storage Systems
Page 49

AIX Installation Checklists
Task
14 Server
Configure
devices (cont.)
15 Server
Test PowerPath
with a license key
With Access Logix Without Access Logix Reference Document
❑
Restart the Navisphere Host
Agent or run the Navisphere
Server Utility with the following
AIX commands:
Host Agent
etc/rc.agent stop
/etc/rc.agent start
Server Utility
/usr/lpp/HOSTUTIL/naviserverutil
❑
Checkpoint if the Host Agent is
Installed - Use Navisphere
Manager to verify that the LUNs
are mapped to hdiskpower
devices.
If you have a PowerPath license key
Note If your PowerPath license key is
not registered, the load balancing
policy is restricted to basic failover.
❑
Stop all applications accessing
the storage system and disable
user logins to the server.
❑
View the LUNs available to the
server using the following
PowerPath command:
powermt display dev=all
class=clariion
/
❑
Restart the Navisphere Host
Agent or run the Navisphere
Server Utility with the following
AIX commands:
Host Agent
etc/rc.agent stop
/etc/rc.agent start
Server Utility
/usr/lpp/HOSTUTIL/naviserverutil
❑
Checkpoint if the Host Agent is
installed - Use Navisphere
Manager to verify that the LUNs
are mapped to hdiskpower
devices.
If you have a PowerPath license key
Note If your PowerPath license key is
not registered, the load balancing
policy is restricted to basic failover.
❑
Stop all applications accessing
the storage system and disable
user logins to the server.
❑
View the LUNs available to the
server using the following
PowerPath command:
powermt display dev=all
class=clariion
/
CX-Series Server
Software for AIX
installation guide
Navisphere Manager
administrator’s guide
and online help
PowerPath product
guide
❑
Choose one available LUN to
receive I/O for the test.
❑
View the paths to the chosen
LUN using the following
PowerPath command:
powermt display dev=
x
is pseudo device that
where
represents the chosen LUN.
❑
Start I/O to the LUN.
PowerPath Checklist — Existing AIX Server and Existing Storage System
x
every=2
❑
Choose one available LUN to
receive I/O for the test.
❑
View the paths to the chosen
LUN using the following
PowerPath command:
powermt display dev=
x
is pseudo device that
where
represents the chosen LUN.
❑
Start I/O to the LUN.
x
every=2
1-39
Page 50

AIX Installation Checklists
Task
15 Server
Test PowerPath
with a license key
(cont.)
With Access Logix Without Access Logix Reference Document
❑
Identify the HBA sending I/O to
LUN by viewing the output of the
powermt display dev=
command, and disconnect the
cable to that HBA.
❑
View the output of the powermt
display dev=x every=2
command, and verify that
• The state of the uncabled
path(s) becomes “dead.”
• I/O continues to the remaining
path(s) to the LUN
that the path failover was
successful, and PowerPath is
working properly.
❑
Reconnect the cable that you
disconnected from the HBA.
❑
If you did not follow the previous
steps exactly and caused any
LUNs to trespass, restore the
LUNs to their original SP with the
following PowerPath command:
powermt restore
,
x
every=2
indicating
❑
Identify the HBA sending I/O to
LUN by viewing the output of the
powermt display dev=
command, and disconnect the
cable to that HBA.
❑
View the output of the powermt
display dev=x every=2
command, and verify that
• The state of the uncabled
path(s) becomes “dead.”
• I/O continues to the remaining
path(s) to the LUN
that the path failover was
successful, and PowerPath is
working properly.
❑
Reconnect the cable that you
disconnected from the HBA.
❑
If you did not follow the previous
steps exactly and caused any
LUNs to trespass, restore the
LUNs to their original SP with the
following PowerPath command:
powermt restore
,
x
every=2
indicating
PowerPath product
guide
1-40
You are now ready to set up any optional software, such as SnapView
or MirrorView, on the storage system.
EMC Installation Roadmap for CX-Series and FC-Series Storage Systems
Page 51

Invisible Body Tag
2
HP-UX Installation
Checklist
This chapter contains a checklist of the tasks required to install
CLARiiON storage in a configuration with PowerPath, VERITAS
DMP, or with no EMC failover software.
Topi cs are
◆ PowerPath Configurations for HP-UX ...........................................2-2
◆ DMP Configurations for HP-UX....................................................2-45
◆ Configurations for HP-UX Without EMC Failover Software....2-53
HP-UX Installation Checklist
2-1
Page 52

HP-UX Installation Checklist
PowerPath Configurations for HP-UX
Read this section if you are installing an HP-UX® PowerPath™
configuration with a new or existing server and a new or existing
storage system. A new and existing server and a new and existing
storage system are defined as follows:
new server - A server running HP-UX and not connected to any
storage system.
existing server - A server running HP-UX that is already connected
to one or more storage systems.
new storage system - A CX300, CX500, or CX700 storage system that
has the factory default settings and has never been connected to a
server.
existing storage system - A CX300, CX400, CX500, CX600, CX700,
FC4500, or FC4700-Series storage system that is already connected to
one or more servers and is in an EMC Navisphere® domain.
All CLARiiON storage systems connected to the server must be CX300,
CX400, CX500, CX600, CX700, FC4500, or FC4700-Series storage
systems. If any other type of CLARiiON storage system is connected to the
server, the server cannot run PowerPath.
2-2
Topics relating to the checklists for HP-UX PowerPath configurations
are
◆ Required Host Software Revisions..................................................2-3
◆ Prerequisites .......................................................................................2-3
◆ Documentation...................................................................................2-4
◆ PowerPath Checklist - New HP-UX Server and New Storage
System..................................................................................................2-7
◆ PowerPath Checklist - New HP-UX Server and Existing Storage
System................................................................................................2-13
◆ PowerPath Checklist - Existing HP-UX Server and New Storage
System................................................................................................2-26
◆ PowerPath Checklist - Existing HP-UX Server and Existing
Storage System .................................................................................2-33
EMC Installation Roadmap for CX-Series and FC-Series Storage Systems
Page 53

HP-UX Installation Checklist
Required Host Software Revisions
Prerequisites
◆ HP-UX operating system revision listed in the EMC Support
Matrix on the Powerlink website (http://powerlink.emc.com)
◆ HBA driver revision listed in the EMC Support Matrix on the
Powerlink website (http://powerlink.emc.com)
◆ HP-UX PowerPath
•For
CX300, CX400, CX600, C4500, and FC4700-Series storage
systems
Version 3.0.2 or higher
• For CX500 and CX700 storage systems
Version 3.0.3 or higher
Refer to the EMC Support Matrix and the EMC PowerPath for UNIX Release
Notes on the Powerlink website (http://powerlink.emc.com) for the
specific revision required for your HP-UX version.
◆ You must have a host that is
• Running an operating system that can support the Navisphere
Manager 6.X browser-based client. For an up-to-date list of
such operating systems, refer to the Navisphere Manager 6.X
release notes on http://powerlink.emc.com.
• On a network that is connected to the storage-system server
and that you will connect to the SPs in
CX300, CX400, CX600,
or FC4700-Series storage systems.
◆ For most configurations, you must also have a host that is
• Running Navisphere CLI version 6.X.
• On a network that is connected to the storage-system server
and that you will connect to SPs in
CX300, CX400, CX600, or
FC4700-Series storage systems.
PowerPath Configurations for HP-UX
2-3
Page 54

HP-UX Installation Checklist
◆ You must have planned your LUNs and RAID Groups, and
Storage Groups if you have Access Logix. Be sure to consider
requirements for SAN Copy, SnapView, MirrorView, and
MirrorView/A if you have this software. The following
documents will help you with this planning:
• EMC CLARiiON CX300, CX500, CX500i, and CX700 Storage
Systems Configuration Planning Guide (P/N 300-001-273)
• EMC CX400-Series and CX600-Series Storage Systems
Configuration Planning Guide (P/N 014003113)
• EMC Fibre Channel Storage System Model FC4700-2
Configuration Planning Guide (P/N 014003087)
• EMC Fibre Channel Storage System Model FC4700 Configuration
Planning Guide (P/N 014003016)
Documentation
This checklist refers to some or all of the documents listed below. We
recommend that you load these documents on your service laptop
before starting the installation.
◆ Documentation that ships with
• HBA and HBA driver
• Switches and switch management software
• HP-UX operating system
◆ PowerPath Version 4.3 Product Guide (P/N 300-001-673)
or
PowerPath Version 4.2 Product Guide (P/N 300-001-521)
or
PowerPath Version 4.1 Product Guide (P/N 300-001-290)
or
PowerPath Version 3.0 Product Guide (P/N 300-001-047)
◆ PowerPath for HP-UX Version 4.3 Installation and Administration
Guide (P/N 300-001-682)
or
PowerPath for HP-UX Version 4.2 Installation and Administration
Guide (P/N 300-001-529)
or
PowerPath Version 4.1 for HP-UX Installation and Administration
Guide (P/N 300-001-297)
or
2-4
EMC Installation Roadmap for CX-Series and FC-Series Storage Systems
Page 55

HP-UX Installation Checklist
PowerPath Version 3.0 for UNIX Installation and Administration
Guide (P/N 300-000-511)
◆ EMC PowerPath Version 4.1 Quick Reference (P/N) 300-001-204)
◆ EMC Navisphere Host Agent and CLI for HP-UX Version 6.X
Installation Guide (P/N 069001146)
or
EMC CX-Series Server Software for HP-UX Installation Guide
(P/N300-002-043)
◆ EMC SnapView Installation Guide (P/N 069001193, revision A02 or
higher)
◆ EMC SAN Copy Installation Guide (P/N 069001187)
◆ EMC Navisphere Command Line Interface (CLI) Reference
(P/N 069001038)
◆ EMC Rails and Enclosures Field Installation Guide
(P/N 300-001-799)
◆ EMC Rails and Enclosures Installation Guide for 19-Inch NEMA
Cabinets (P/N 014003082) - for SPS installation only
◆ EMC CX300 2-Gigabit Disk Processor Enclosure (DPE) Setup Guide
(P/N 300-001-276, rev A02 or higher)
or
EMC CLARiiON CX300 2-Gigabit Disk Processor Enclosure (DPE2)
Setup and Cabling Guide (P/N 300-001-276, rev A01) and EMC
CLARiiON CX300, CX500, and CX700 Storage Systems Initialization
Guide (P/N 300-001-272)
◆ EMC 2-Gigabit Disk Processor Enclosure (DPE2) CX400-Series Setup
and Cabling Guide (P/N 014003105) and EMC Storage Systems
CX400-Series and CX600-Series Initialization Guide
(P/N 014003112)
◆ EMC CLARiiON CX500 2-Gigabit Disk Processor Enclosure (DPE2)
Setup Guide (P/N 300-001-275, rev A02 or higher)
or
EMC CLARiiON CX500 2-Gigabit Disk Processor Enclosure (DPE2)
Setup and Cabling Guide (P/N 300-001-275, rev A01) and EMC
CLARiiON CX300, CX500, and CX700 Storage Systems Initialization
Guide (P/N 300-001-272)
PowerPath Configurations for HP-UX
2-5
Page 56

HP-UX Installation Checklist
◆ EMC Storage Processor Enclosure (SPE) CX600-Series Setup and
Cabling Guide (P/N 014003078) and EMC Storage Systems
CX400-Series and CX600-Series Initialization Guide
(P/N 014003112)
◆ EMC CLARiiON CX700 Storage Processor Enclosure (SPE) Setup
Guide (P/N 300-001-274, rev A02 or higher)
or
EMC CLARiiON CX700 Storage Processor Enclosure (SPE) Setup and
Cabling Guide (P/N 300-001-274), rev A01) and EMC CLARiiON
CX300, CX500, and CX700 Storage Systems Initialization Guide
(P/N 300-001-272)
◆ EMC 2-Gigabit Disk -Array Enclosure (DAE2) Setup and Cabling
Guide (P/N 014003104)
◆ FC4500 Setup Guide (P/N 014003102, revision A03 or higher)
◆ FC4700-2 Setup Guide (P/N 0140373)
◆ EMC Navisphere Manager Administrator’s Guide (P/N 069001125)
◆ EMC Navisphere Security Administrator’s Guide (P/N 069001124)
◆ EMC Host Connectivity Guide for HP-UX (P/N 300-000-614)
2-6
EMC Installation Roadmap for CX-Series and FC-Series Storage Systems
Page 57

HP-UX Installation Checklist
PowerPath Checklist - New HP-UX Server and New Storage System
Tasks highlighted with grey in the checklist should be completed
before the service provider arrives
Task
1 Server
Install HBAs,
drivers, cables
2 Server
Set HBA driver
parameters
3 Server
Install Host Agent
With Access Logix Reference Document
❑
Install the HBAs.
❑
Connect a cable from each host HBA port to a switch port or an SP port.
❑
Install the HBA driver.
❑
Set the HBA driver parameters to the values required for CLARiiON. Host connectivity
❑
Reboot the server to complete the installation of the drivers.
❑
Install the Navisphere Host Agent and CLI. CX-Series Server
❑
Modify user login scripts.
❑
Edit the Navisphere Host Agent configuration file agent.config file as
follows:
• Add the following entry if it does not already exist:
device auto auto
• Add at least one privileged user.
❑
Continue to edit the Navisphere Host Agent configuration file agent.config
file as follows:
• Comment the OptionsSupported Autotrespass entry as follows:
# OptionsSupported Autotrespass
The above entry will set the initiator type for the HBAs to no auto
trespass when they register with the storage system:
• Edit any other entries as desired.
HBA documentation
guide and HBA
documentation
Software for HP-UX
Installation Guide
CX-Series Server
Software for HP-UX
Installation Guide
4 Server
Install admsnap
❑
If the server will be a SnapView production or secondary host, install the
admsnap utility.
PowerPath Checklist - New HP-UX Server and New Storage System
CX-Series Server
Software for HP-UX
Installation Guide
2-7
Page 58

HP-UX Installation Checklist
Task
5Server
Install PowerPath
6Switches
Install
With Access Logix Reference Document
❑
Insert the PowerPath installation CD and mount it. PowerPath Release
❑
Install PowerPath.
❑
Register PowerPath.
❑
Install any PowerPath patches from the Software downloads page on the
EMC Powerlink website:
http://powerlink.emc.com
For a SAN
❑
Install switches, if not already installed.
❑
Connect a cable from each host HBA port to a switch port.
❑
Checkpoint - Verify the HBA connection to the switch by checking the
LED(s) for the switch port connected to the HBA port.
For a 1-Gbit switch - LED is green, which indicates that the HBA is logged
in to the switch port.
For a 2-Gbit switch - One of the following:
• The left LED is green and the right LED is off, which indicates that a
1-Gbit SP port is logged in to the switch port.
• For a DS-xxB2 switch, both LEDs are green, which indicates that a
2-Gbit HBA port is logged in to the switch port.
• For a DS-xxM2 switch, the left LED is blue and the right LED is off, which
indicates that a 2-Gbit HBA port is logged in to the switch port.
Notes and PowerPath
for UNIX installation
and administrator’s
guide
Rails, cabinet, and
switch documentation
Switch documentation
7Storage System
Install
8Storage System
Initialize and
install software
enablers
2-8
EMC Installation Roadmap for CX-Series and FC-Series Storage Systems
❑
Install the storage system in the cabinet, if not already installed. Rails and cabinet
❑
Install the Navisphere Initialization Utility on a host on the
the storage-system management ports.
❑
Use the Navisphere Initialization Utility to initialize the storage system.
❑
If you have SAN Copy, SnapView, MirrorView, and/or MirrorView/A
software, install the enabler for them.
same subnet
documentation
as
Storage-system setup
guide
Navisphere Manager
administrator’s guide
and online help
Page 59

HP-UX Installation Checklist
Task
9Storage System
Cable to switch or
server and LAN
10 Storage System
Set up security
Storage System
11
Set properties for
PowerPath
With Access Logix Reference Document
❑
Connect the storage system to the switch or HBA ports. Storage-system setup
❑
Checkpoint - For a SAN, verify the storage-system connections to the
switch by checking the LED(s) for the switch port connected to each SP
port.
For a 1-Gbit switch - LED is green, which indicates that the SP is logged in
to the switch port
For a 2-Gbit switch - One of the following:
• The left LED is green and the right LED is off, which indicates that a
1-Gbit SP port is logged in to the switch port.
• For a DS-xxB2 switch, both LEDs are green, which indicates that a
2-Gbit HBA port is logged in to the switch port.
• For a DS-xxM2 switch, the left LED is blue and the right LED is off, which
indicates that a 2-Gbit HBA port is logged in to the switch port.
❑
Cable each SP to the LAN connected to the hosts from which you will
manage the storage system.
❑
Use Navisphere Manager to define a global administrator and domain (if
not already defined) and any additional users.
❑
Use the following Navisphere CLI commands to set the storage-system
properties:
navicli -h
navicli -h
hostname
where
system.
hostname
hostname
failovermode 1
arraycommpath 1
is the IP address or network name of an SP in the storage
guide
Storage-system setup
guide
Navisphere security
administrator’s guide
and Navisphere
Manager online help
Navisphere CLI
reference
12 Switches
Zone
13 Server
Make target SPs
available
For a SAN
❑
Zone the switches to provide a path from each host initiator to an SP.
❑
Checkpoint - Use switch management software to verify the switch
connections to the storage system.
❑
Make sure that each HBA sees only the targets (SPs) to which it is zoned
with the following HP-UX commands:
ioscan -fnC disk
insf -e
❑
Verify that HP-UX sees device entries for all LUNS with the following
HP-UX command:
ioscan -fnC disk
PowerPath Checklist - New HP-UX Server and New Storage System
Switch management
documentation
HP-UX documentation
2-9
Page 60

HP-UX Installation Checklist
Task
13 Server
Make target SPs
available (cont.)
14 Storage System
Configure
15 Server
Make LUNs visible
With Access Logix Reference Document
❑
Log in as root and restart the Navisphere Host Agent with the following
HP-UX commands:
/sbin/init.d/agent stop
/sbin/init.d/agent start
❑
Make sure again that each HBA sees only the targets (SPs) to which it is
zoned with the following HP-UX commands:
ioscan -fnC disk
insf -e
❑
Reverify that HP-UX sees device entries for all LUNS with the following
HP-UX command:
ioscan -fnC disk
❑
Use Navisphere Manager to set general storage-system properties. Navisphere Manager
❑
Use Navisphere Manager to create RAID Groups, bind LUNs, create
Storage Groups, and assign LUNs to Storage Groups.
❑
Use Navisphere Manager to connect the server to a Storage Group.
❑
Log in as root and restart the Navisphere Host Agent with the following
HP-UX commands:
/sbin/init.d/agent stop
/sbin/init.d/agent start
CX-Series Server
Software for HP-UX
Installation Guide
HP-UX documentation
administrator’s guide
and online help
CX-Series Server
Software for HP-UX
Installation Guide
16 Storage System
2-10
❑
Checkpoint - Verify that HP-UX can recognize these LUNs with the
following HP-UX commands:
ioscan -fnC disk
insf -e
ioscan -fnC disk
If HP-UX does not recognize any LUNs, verify the connection to the
Storage Group.
❑
Plan your monitoring configuration. Navisphere Manager
Set up Event
Monitor
EMC Installation Roadmap for CX-Series and FC-Series Storage Systems
❑
Use Navisphere Manager to set user options, create templates, and set up
your monitoring configuration.
HP-UX documentation
administrator’s guide
and online help
Page 61

HP-UX Installation Checklist
Task
17 Server
Configure
PowerPath
devices
18 Server
Test PowerPath
with a license
key
With Access Logix Reference Document
❑
Use the following PowerPath command to configure PowerPath:
powermt config
❑
Checkpoint - Use the following PowerPath command to verify that
PowerPath sees all the paths to the LUNs:
powermt display dev=all class=clariion
If PowerPath cannot see all the paths, verify that
• you registered your PowerPath license key if you have one
• the OptionsSupported Autotrespass entry is defined as described in
step 3
• the storage-system properties are set as defined in step 11.
❑
If PowerPath can see all the path to the LUNs, save the PowerPath
configuration with the following command:
powermt save
The PowerPath configuration is saved in the following file:
/etc/powermt.custom
If you have a PowerPath license key
Note If your PowerPath license key is not registered, the load balancing policy is
restricted to basic failover.
❑
Stop all applications accessing the storage system and disable user logins
to the server.
PowerPath product
guide
PowerPath product
guide
❑
View the LUNs available to the server using the following PowerPath
command:
powermt display dev=all class=clariion
❑
Choose one available LUN to receive I/O for the test.
❑
View the paths to the chosen LUN using the following PowerPath
command:
x
powermt display dev=
x
is a device that represents the chosen LUN.
where
❑
Start I/O to the LUN.
❑
Identify the HBA sending I/O to LUN by viewing the output of the powermt
display dev=
x
every=2 command, and disconnect the cable to that HBA.
PowerPath Checklist - New HP-UX Server and New Storage System
every=2
2-11
Page 62

HP-UX Installation Checklist
Task
18 Server
Test PowerPath
with a license
key (cont.)
19 Server
Make LUNs
available to HP-UX
With Access Logix Reference Document
❑
View the output of the powermt display dev=x every=2 command, and
verify that
• The state of the uncabled paths becomes “dead.”
,
• I/O continues to the remaining path(s) to the LUN
path failover was successful, and PowerPath is working properly.
❑
Reconnect the cable that you disconnected from the HBA.
❑
If you did not follow the above steps exactly and caused any LUNs to
trespass, restore the LUNs to their original SP with the following PowerPath
command:
powermt restore
❑
Prepare the LUNs to receive data using the Logical Volume Manager
(LVM).
If HP-UX does not recognize any LUNs, verify the connection to the
Storage Group.
indicating that the
Host connectivity
guide and HP-UX
documentation
You are now ready to set up any optional software, such as SnapView
or MirrorView, on the storage system.
2-12
EMC Installation Roadmap for CX-Series and FC-Series Storage Systems
Page 63

HP-UX Installation Checklist
PowerPath Checklist - New HP-UX Server and Existing Storage System
Complete the tasks highlighted with grey in the checklist before the
service provider arrives
The Without Access Logix column does not apply to CX300, CX500, and
CX700 storage systems because they ship from the factory with the Access
Logix enabler installed.
Task
1 Server
Install HBAs,
drivers, cables
2 Server
Set HBA driver
parameters
3 Server
Install Host Agent
With Access Logix Without Access Logix Reference Document
❑
Install the HBAs.
❑
Connect a cable from each host
HBA port to a switch port or an SP
port.
❑
Install the HBA driver.
❑
Set the HBA driver parameters to
the values required for CLARiiON.
❑
Reboot the server to complete the
installation of the drivers.
❑
Install the Navisphere Host Agent
and CLI.
❑
Modify user login scripts.
❑
Install the HBAs.
❑
Connect a cable from each host
HBA port to a switch port or an SP
port.
❑
Install the HBA driver.
❑
Set the HBA driver parameters to
the values required for CLARiiON.
❑
Reboot the server to complete the
installation of the drivers.
❑
Install the Navisphere Host Agent
and CLI.
❑
Modify user login scripts.
HBA documentation
Host connectivity guide
and HBA
documentation
CX-Series Server
Software for HP-UX
Installation Guide
PowerPath Checklist - New HP-UX Server and Existing Storage System
2-13
Page 64

HP-UX Installation Checklist
Task
3 Server
Install Host Agent
(cont.)
With Access Logix Without Access Logix Reference Document
❑
Edit the Navisphere Host Agent
configuration file agent.config file
as follows:
• Add the following entry if it
does not already exist:
device auto auto
• Add at least one privileged
user.
• For FC4500 storage systems, if
you know the IP addresses of
the portal storage-system SPs,
add an entry with the following
format for each SP to the
agent.config file:
system@
where
address of the SP.
❑
Continue to edit the Navisphere
Host Agent configuration file
agent.config file as follows:
• Comment the
OptionsSupported
Autotrespass entry as follows:
# OptionsSupported
Autotrespass
The above entry will set the
initiator type for the HBAs to no
auto trespass when they
register with the storage
system:
• Edit any other entries as
desired.
SP_ip_address
SP_ip_address
is the
❑
Edit the Navisphere Host Agent
configuration file agent.config file
as follows:
• Add the following entry if it
does not already exist:
device auto auto
• Add at least one privileged
user.
• For FC4500 storage systems, if
you know the IP addresses of
the portal storage-system SPs,
add an entry with the following
format for each SP to the
agent.config file:
system@
where
address of the SP.
❑
Continue to edit other entries in
the Navisphere Host Agent
configuration file agent.config file
as desired.
For a CX300, CX500, CX700, or
FC4700-Series storage system, go to
step 5. For an FC4500 storage system,
go to 6.
SP_ip_address
SP_ip_address
is the
CX-Series Server
Software for HP-UX
Installation Guide
2-14
4 Server
Install admsnap
EMC Installation Roadmap for CX-Series and FC-Series Storage Systems
❑
If the server will be a SnapView
production or secondary host,
install the admsnap utility.
Go to step 7.
N/A CX-Series Server
Software for HP-UX
Installation Guide
Page 65

HP-UX Installation Checklist
Task
5
CX400, CX600, or
FC4700-Series
Storage-System
Without Access
Logix
Set
storage-system
type
6
FC4500
Storage-System
Without Access
Logix
Set
storage-system
type
With Access Logix Without Access Logix Reference Document
N/A Perform this task
• from an attached host or a host
networked to an attached host
• from a laptop connected to the
storage system, as described in the
storage-system initialization or
setup guide.
❑
Use the following Navisphere CLI
command to set the system type
to no auto trespass:
navicli -h
-config a
where
hostname
network name of an SP in the
storage system.
Go to step 7.
N/A Perform this task
• from an attached host or a host
networked to an attached host,
• from a laptop connected to a
storage-system serial port, as
described in the storage-system
setup guide.
either
hostname
is the IP address or
systemtype
either
Navisphere CLI
reference
or
Navisphere CLI
reference
or
From an attached or networked host
❑
Use the following Navisphere CLI
command to set the system type
to no auto trespass:
device
-h
navicli -d
systemtype -config a
where
device
is the storage system’s
name
hostname
network address.
PowerPath Checklist - New HP-UX Server and Existing Storage System
is the server’s name or
hostname
2-15
Page 66

HP-UX Installation Checklist
Task
6
FC4500
Storage-System
Without Access
Logix
Set
storage-system
type (cont.)
7 Storage System
Update software
8Server
Cable to switches
or storage system
With Access Logix Without Access Logix Reference Document
❑
If currently installed
storage-system software is not at
the required minimum revision
(see page 2-3), update it.
CAUTION During the software
update, hosts connected to the
storage system will lose access to
data if they do not have failover
software or if all paths to an SP
are down.
❑
Cable the HBA ports to the switch
connected to the storage system
or to SP ports.
❑
Checkpoint - For a SAN, verify
the HBA connections to the switch
by checking the LED(s) for the
switch port connected to each
HBA port.
For a 1-Gbit switch - LED is
green, which indicates that the
HBA port is logged in to the switch
port.
From a serially connected laptop
❑
Use the following Navisphere CLI
command to set the system type
to no auto trespass:
navicli -np -d
-config a
where
computer port connected to the
storage-system serial port (for
example, com1).
❑
If currently installed
storage-system software is not at
the required minimum revision
(see page 2-3), update it.
CAUTION During the software
update, hosts connected to the
storage system will lose access to
data if they do not have failover
software or if all paths to an SP
are down.
❑
Cable the HBA ports to the switch
connected to the storage system
or to SP ports.
❑
Checkpoint - For a SAN, verify
the storage-system connections
to the switch by checking the
LED(s) for the switch port
connected to each HBA port.
For a 1-Gbit switch - LED is
green, which indicates that the
HBA port is logged in to the switch
port.
device
device
is the name of the
systemtype
Navisphere CLI
reference
Navisphere Manager
administrator’s guide
and online help
Storage-system setup
guide
2-16
EMC Installation Roadmap for CX-Series and FC-Series Storage Systems
Page 67

HP-UX Installation Checklist
Task
8Server
Cable to switches
or storage system
(cont.)
9Switches
Zone
With Access Logix Without Access Logix Reference Document
For a 2-Gbit switch - One of the
following:
• The left LED is green and the
right LED is off, which indicates
that a 1-Gbit SP port is logged
in to the switch port.
• For a DS-xxB2 switch, both
LEDs are green, which
indicates that a 2-Gbit HBA
port is logged in to the switch
port.
• For a DS-xxM2 switch, the left
LED is blue and the right LED
is off, which indicates that a
2-Gbit HBA port is logged in to
the switch port.
For a SAN
❑
Zone the switches to provide a
path from each HBA port (host
initiator) to the appropriate SPs.
❑
If SAN Copy, MirrorView, or
MirrorView/A is installed, create
any required zones.
For a 2-Gbit switch - One of the
following:
• The left LED is green and the
right LED is off, which indicates
that a 1-Gbit SP port is logged
in to the switch port.
• For a DS-xxB2 switch, both
LEDs are green, which
indicates that a 2-Gbit HBA
port is logged in to the switch
port.
• For a DS-xxM2 switch, the left
LED is blue and the right LED
is off, which indicates that a
2-Gbit HBA port is logged in to
the switch port.
For a SAN
❑
Zone the switches to provide a
path from each HBA port (host
initiator) to the appropriate SPs.
Storage-system setup
guide
Switch management
documentation
❑
Checkpoint - Use switch
management software to verify
the switch connections to the
storage system.
PowerPath Checklist - New HP-UX Server and Existing Storage System
❑
Checkpoint - Use switch
management software to verify
the switch connections to the
storage system.
For a CX400, CX600, or
FC4700-Series storage system, go to
step 11; for an FC4500 storage
system, go to step 13.
2-17
Page 68

HP-UX Installation Checklist
Task
10 Storage System
Register HBAs
11 CX300, CX400,
CX500, CX600,
CX700, or
FC4700-Series
Storage System
Set up security
12 CX300, CX400,
CX500, CX600,
CX700, or
FC4700-Series
Storage System
Set properties for
PowerPath
With Access Logix Without Access Logix Reference Document
❑
Log in as root and restart the
Navisphere Host Agent with the
following HP-UX commands:
/sbin/init.d/agent stop
/sbin/init.d/agent start
❑
Checkpoint - Use Navisphere
Manager’s Connectivity Status
dialog box to verify that each HBA
is registered with the storage
system.
For an FC4500 storage system, go to
step 13.
❑
Use Navisphere Manager to
define a global administrator and
domain (if not already defined)
and any additional users.
Perform this task
• across the LAN connected to the
storage-system SPs
• from an attached host or a host
networked to an attached host
• from a laptop connected to the
storage system, as described in the
storage-system initialization or
setup guide.
either
or
❑
Log in as root and restart the
Navisphere Host Agent with the
following HP-UX commands:
/sbin/init.d/agent stop
/sbin/init.d/agent start
❑
Use Navisphere Manager to
define a global administrator (if
not already defined) and any
additional users.
CX400, CX600, or FC4700-Series
Perform this task
• from an attached host or a host
networked to an attached host
or
• from a laptop connected to the
storage system, as described in the
storage-system initialization or
setup guide.
either
CX-Series Server
Software for HP-UX
Installation Guide
Navisphere Manager
administrator’s guide
and online help
Navisphere security
administrator’s guide
and Navisphere
Manager online help
or
2-18
From the LAN
❑
Use Navisphere Manager’s
Failover Setup Wizard (selected
from the To ols menu on the
toolbar) to set the following
storage-system properties for the
server’s existing HBA ports
(initiators):
Failover mode to 1
Array commpath to Enabled
Go to step 14.
EMC Installation Roadmap for CX-Series and FC-Series Storage Systems
Navisphere Manager
administrator’s guide
and online help o
Page 69

HP-UX Installation Checklist
Task
12 CX300, CX400,
CX500, CX600,
CX700, or
FC4700-Series
Storage System
Set properties for
PowerPath (cont.)
13
FC4500
Storage
System
Set properties for
PowerPath
With Access Logix Without Access Logix Reference Document
From an attached or networked host or
laptop
❑
Use the following Navisphere CLI
commands to set the following
storage-system properties for the
server’s existing HBA existing
ports (initiators):
navicli -h
storagegroup -sethost
-host
failovermode 1
-
navicli -h
storagegroup -setpath
-host
-arraycommpath 1
where
hostname
network name of an SP in the
storage system
servername
or network address
Go to step 14.
Perform this task
• across the LAN connected to the
Navisphere portal for the storage
system,
• from an attached host or a host
networked to an attached host,
• from a laptop connected to a
storage-system serial port, as
described in the storage-system
setup guide.
hostname
servername
hostname
servername
is the IP address or
is the server’s name
either
or
From an attached or networked host or
laptop
❑
Use following Navisphere CLI
commands to set the following
default storage-system properties:
navicli -h
failovermode 1
navicli -h
arraycommpath 1
where
hostname
network name of an SP in the
storage system.
Go to step 14.
Perform this task
• from an attached host or a host
networked to an attached host,
• from a laptop connected to a
storage-system serial port, as
or
described in the storage-system
setup guide.
hostname
hostname
is the IP address or
either
Navisphere CLI
reference
or
Across LAN
❑
Use Navisphere Manager’s
Failover Setup Wizard (selected
from the To ols menu on the
toolbar) to set the following
storage-system properties for the
server’s existing HBA ports
(initiators):
Failover mode to 1
Array commpath to Enabled
PowerPath Checklist - New HP-UX Server and Existing Storage System
Navisphere Manager
administrator’s guide
and online help
2-19
Page 70

HP-UX Installation Checklist
Task
13
FC4500
System
Set properties for
PowerPath (cont.)
Storage
With Access Logix Without Access Logix Reference Document
From an attached host or networked
host
❑
Use the following Navisphere CLI
commands to set the following
default storage-system properties
for the server’s existing HBA
existing ports (initiators):
device
-h
navicli -d
storagegroup -sethost
failovermode 1
-
navicli -d
storagegroup -sethost
-arraycommpath 1
where
device
name
hostname
network address.
From a serially connected laptop
❑
Use the following Navisphere CLI
commands to set the following
default storage-system properties
for the server’s existing HBA
existing ports (initiators):
navicli -np -d
storagegroup -sethost -host
device
is the storage system’s
is the server’s name or
servername -
navicli -np -d
storagegroup -sethost -host
servername --
where
device
is the name of the
computer port connected to the
storage-system serial port (for
example, com1).
servername
server with the HBAs.
hostname
-h
hostname
device
failovermode 1
device
arraycommpath 1
is the name of the
From an attached or networked host
❑
Use the following Navisphere CLI
commands to set the following
default storage-system properties:
device
-h
navicli -d
failovermode 1
navicli -d
arraycommpath 1
where
device
name
hostname
network address.
From a serially connected laptop
❑
Use the following Navisphere CLI
commands to set the following
default storage-system properties:
navicli -np -d
failovermode 1
navicli -np -d
arraycommpath 1
where
computer port connected to the
storage-system serial port (for
example, com1).
device
is the storage system’s
is the server’s name or
device
hostname
-h
hostname
device
device
is the name of the
Navisphere CLI
reference
Storage-system setup
guide and Navisphere
CLI reference
2-20
EMC Installation Roadmap for CX-Series and FC-Series Storage Systems
Page 71

HP-UX Installation Checklist
Task
14 Server
Make target SPs
available
With Access Logix Without Access Logix Reference Document
❑
Make sure that each HBA sees
only the targets (SPs) to which it
is zoned with the following HP-UX
commands:
ioscan -fnC disk
insf -e
❑
Verify that HP-UX sees device
entries for all LUNS with the
following HP-UX command:
ioscan -fnC disk
❑
Log in as root and restart the
Navisphere Host Agent with the
following HP-UX commands:
/sbin/init.d/agent stop
/sbin/init.d/agent start
❑
Make sure again that each HBA
sees only the targets (SPs) to
which it is zoned with the following
HP-UX commands:
ioscan -fnC disk
insf -e
❑
Verify that each HBA sees only
the targets (SPs) to which it is
zoned with the HP-UX following
commands:
ioscan -fnC disk
insf -e
❑
Verify that HP-UX sees device
entries for all LUNS with the
following HP-UX command:
❑
ioscan -fnC disk
❑
Log in as root and restart the
Navisphere Host Agent with the
following HP-UX commands:
/sbin/init.d/agent stop
/sbin/init.d/agent start
❑
Reverify that each HBA sees only
the targets (SPs) to which it is
zoned with the HP-UX following
commands:
ioscan -fnC disk
insf -e
HP-UX documentation
CX-Series Server
Software for HP-UX
Installation Guide
HP-UX documentation
❑
Reverify that HP-UX sees device
entries for all LUNS with the
following HP-UX command:
ioscan -fnC disk
PowerPath Checklist - New HP-UX Server and Existing Storage System
❑
Reverify that HP-UX sees device
entries for all LUNS with the
following HP-UX command:
❑
ioscan -fnC disk
2-21
Page 72

HP-UX Installation Checklist
Task
15 Storage System
Configure
With Access Logix Without Access Logix Reference Document
If the server will use an
Storage Group
❑
Use Navisphere Manager to
connect the server to the Storage
Group.
❑
Checkpoint - Verify that HP-UX
can recognize these LUNs with
the following HP-UX commands:
ioscan -fnC disk
insf -e
If HP-UX does not recognize any
LUNs, verify the connection to the
Storage Group.
If the server will use a
Group
❑
Use Navisphere Manager to
create RAID Groups, bind LUNs,
create the Storage Group, and
assign LUNs to the Storage
Group.
❑
Use Navisphere Manager to
connect the server to the new
Storage Group.
existing
new
Storage
❑
Checkpoint - Verify that HP-UX
can recognize these LUNs with
the following HP-UX commands:
ioscan -fnC disk
insf -e
Navisphere Manager
administrator’s guide
and online help
HP-UX documentation
Navisphere Manager
administrator’s guide
and online help
2-22
EMC Installation Roadmap for CX-Series and FC-Series Storage Systems
Page 73

HP-UX Installation Checklist
Task
16 Server
Make new LUNs
visible
With Access Logix Without Access Logix Reference Document
❑
Log in as root and restart the
Navisphere Host Agent with the
following HP-UX commands:
/sbin/init.d/agent stop
/sbin/init.d/agent start
Now the LUNs in the Storage
Group look like any other disks in
the server.
❑
Checkpoint - Verify that HP-UX
can recognize these LUNs with
the following HP-UX commands:
ioscan -fnC disk
insf -e
If HP-UX does not recognize any
LUNs, verify the connection to the
Storage Group.
❑
Verify that HP-UX sees device
entries for all LUNS with the
following HP-UX command:
ioscan -fnC disk
❑
Checkpoint - Verify that
PowerPath sees all the paths to
the LUNs with the following
PowerPath command:
powermt display dev=all
class=clariion
If PowerPath does not see the
LUNs
• Verify the server’s connection
to the Storage Group.
• Verify that you registered your
PowerPath license key if you
have one.
• Verify that the storage-system
properties are set as defined in
steps 5 and 12 or steps 6 and
13.
❑
Log in as root and restart the
Navisphere Host Agent with the
following HP-UX commands:
/sbin/init.d/agent stop
/sbin/init.d/agent start
Now the LUNs look like any other
disks in the server.
❑
Checkpoint - Verify that HP-UX
can recognize these LUNs with
the following HP-UX commands:
ioscan -fnC disk
insf -e
❑
Verify that HP-UX sees device
entries for all LUNS with the
following HP-UX command:
❑
ioscan -fnC disk
❑
Checkpoint - Verify that
PowerPath sees all the paths to
the LUNs with the following
PowerPath command:
powermt display dev=all
class=clariion
If PowerPath does not see the
LUNs
• Verify that you registered your
PowerPath license key if you
have one.
• Verify that the storage-system
properties are set as defined in
steps 5 and 12 or steps 6 and
13.
CX-Series Server
Software for HP-UX
Installation Guide
HP-UX documentation
PowerPath product
guide
PowerPath Checklist - New HP-UX Server and Existing Storage System
2-23
Page 74

HP-UX Installation Checklist
Task
17 Storage System
Set up Event
Monitor
18
Server
Configure any
new PowerPath
devices
19 Server
Test PowerPath
with a license
key
With Access Logix Without Access Logix Reference Document
❑
Plan your monitoring
configuration.
❑
Configure PowerPath with the
following command:
powermt config
❑
Checkpoint - Verify that
PowerPath sees all the paths to
the LUNs with the following
PowerPath command:
powermt display dev=all
class=clariion
❑
If PowerPath can see all the path
to the LUNs, save the PowerPath
configuration with the following
command:
powermt save
The PowerPath configuration is
saved in the following file:
/etc/powermt.custom
If you have a PowerPath license key
Note If your PowerPath license key is
not registered, the load balancing
policy is restricted to basic failover.
❑
Stop all applications accessing
the storage system and disable
user logins to the server.
❑
Plan your monitoring
configuration.
❑
Configure PowerPath with the
following command:
powermt config
❑
Checkpoint - Verify that
PowerPath sees all the paths to
the LUNs with the following
PowerPath command:
powermt display dev=all
class=clariion
❑
If PowerPath can see all the path
to the LUNs, save the PowerPath
configuration with the following
command:
powermt save
The PowerPath configuration is
saved in the following file:
/etc/powermt.custom
If you have a PowerPath license key
Note If your PowerPath license key is
not registered, the load balancing
policy is restricted to basic failover.
❑
Stop all applications accessing
the storage system and disable
user logins to the server.
Navisphere Manager
administrator’s guide
and online help
PowerPath product
guide
2-24
❑
View the LUNs available to the
server using the following
PowerPath command:
powermt display dev=all
class=clariion
❑
Choose one available LUN to
receive I/O for the test.
EMC Installation Roadmap for CX-Series and FC-Series Storage Systems
❑
View the LUNs available to the
server using the following
PowerPath command:
powermt display dev=all
class=clariion
❑
Choose one available LUN to
receive I/O for the test.
PowerPath product
guide
Page 75

HP-UX Installation Checklist
Task
19 Server
Test PowerPath
with a license
key (cont.)
With Access Logix Without Access Logix Reference Document
❑
View the paths to the chosen LUN
using the following PowerPath
command:
powermt display dev=
x
is a device that
where
represents the chosen LUN.
❑
Start I/O to the LUN.
❑
Identify the HBA sending I/O to
LUN by viewing the output of the
powermt display dev=
command, and disconnect the
cable to that HBA.
❑
View the output of the powermt
display dev=
command, and verify that
• The state of the uncabled
path(s) becomes “dead.”
• I/O continues to the remaining
path(s) to the LUN
that the path failover was
successful, and PowerPath is
working properly.
x
every=2
,
x
every=2
x
every=2
indicating
❑
View the paths to the chosen LUN
using the following PowerPath
command:
powermt display dev=
x
is a device that
where
represents the chosen LUN
❑
Start I/O to the LUN.
❑
Identify the HBA sending I/O to
LUN by viewing the output of the
powermt display dev=
command, and disconnect the
cable to that HBA.
❑
View the output of the powermt
display dev=
command, and verify that
• The state of the uncabled
path(s) becomes “dead.”
• I/O continues to the remaining
path(s) to the LUN
that the path failover was
successful, and PowerPath is
working properly.
x
every=2
,
x
every=2
x
every=2
indicating
PowerPath product
guide
20
Server
Make LUNs
available to
HP-UX
❑
Reconnect the cable that you
disconnected from the HBA.
❑
If you did not follow the above
steps exactly and caused any
LUNs to trespass, restore the
LUNs to their original SP with the
following PowerPath command:
powermt restore
❑
Prepare the LUNs to receive data
using the Logical Volume
Manager (LVM).
If HP-UX does not recognize any
LUNs, verify the connection to the
Storage Group.
You are now ready to set up any optional software, such as SnapView
or MirrorView, on the storage system.
PowerPath Checklist - New HP-UX Server and Existing Storage System
❑
Reconnect the cable that you
disconnected from the HBA.
❑
If you did not follow the above
steps exactly and caused any
LUNs to trespass, restore the
LUNs to their original SP with the
following PowerPath command:
powermt restore
❑
Prepare the LUNs to receive data
using the Logical Volume
Manager (LVM).
Host connectivity guide
and HP-UX
documentation
2-25
Page 76

HP-UX Installation Checklist
PowerPath Checklist - Existing HP-UX Server and New Storage System
Complete the tasks highlighted with grey in the checklist before the
service provider arrives.
Tas k
1 Server
Install additional
HBAs
2 Server
Update Software
3 Storage System
Update softwar
4Server
Set HBA driver
parameters
5Server
Set
storage-system
type
e
With Access Logix Reference Document
❑
If you need additional HBAs to provide more paths to the storage system,
install these HBAs.
CAUTION Do not connect cables to the HBAs until you are told to do so
later in this procedure.
❑
If the following software is currently installed and not at the required
minimum revision (page 2-3), update it:
• HBA driver
• Navisphere Host Agent
• admsnap
❑
If currently installed storage-system software is not at the required
minimum revision (see page 2-3), update it.
CAUTION During the software update, hosts connected to the storage
system will lose access to data if they do not have failover software or if all
paths to an SP are down.
❑
Make sure the HBA driver parameters are set to the values required for
CLARiiON and PowerPath.
CAUTION Using improper settings can cause erratic failover behavior, such
as greatly increased I/O delays.
❑
Edit the Navisphere Host Agent configuration file agent.config to comment
the OptionsSupported Autotrespass entry as follows:
# OptionsSupported Autotrespass
The above entry will set the initiator type for the HBAs to no auto trespass
when they register with the storage system.
HBA documentation
HBA documentation
CX-Series Server
Software for HP-UX
installation guide
Navisphere Manager
administrator’s guide
and online help
HP-UX Host
connectivity guide and
HBA documentation
CX-Series Server
Software for HP-UX
Installation Guide
2-26
❑
Log in as root and restart the Navisphere Host Agent with the following
HP-UX commands:
/sbin/init.d/agent stop
/sbin/init.d/agent start
EMC Installation Roadmap for CX-Series and FC-Series Storage Systems
Page 77

HP-UX Installation Checklist
Tas k
6Server
Install PowerPath
With Access Logix Reference Document
❑
Insert the PowerPath installation CD and mount it. PowerPath Release
❑
Install PowerPath.
❑
Register PowerPath.
❑
Install any PowerPath patches from the Software downloads page on the
EMC Powerlink website:
http://powerlink.emc.com
❑
Execute the following PowerPath command:
powermt config
❑
Checkpoint - Use the following PowerPath command to verify that
PowerPath sees the paths to the LUNs:
powermt display dev=all class=clariion
If PowerPath does not see the LUNs
• Verify the server’s connection to the Storage Group.
• Verify that you registered your PowerPath license key if you have one.
❑
If you did not follow the above steps exactly and caused any LUNs to
trespass, restore the LUNs to their original SP with the following PowerPath
command:
powermt restore
Notes and PowerPath
for UNIX installation
and administrator’s
guide
PowerPath product
guide
7 Storage System
Install
8 Storage System
Initialize and
install software
enablers
❑
Install the storage system in the cabinet, if not already installed. Rails and cabinet
❑
Install the Navisphere Initialization Utility on a host on the
the storage-system management ports.
❑
Use the Navisphere Initialization Utility to initialize the storage system.
❑
If you have SAN Copy, SnapView, MirrorView, and/or MirrorView/A
software, install the enabler for them.
PowerPath Checklist - Existing HP-UX Server and New Storage System
same subnet
documentation
as
Storage-system setup
guide
Navisphere Manager
administrator’s guide
and online help
2-27
Page 78

HP-UX Installation Checklist
Tas k
9 Storage System
Cable to switch or
server and LAN
10 Storage System
Set up security
Storage System
11
Set properties for
PowerPath
With Access Logix Reference Document
❑
Connect the storage system to the switch or HBA ports. Storage-system setup
❑
Checkpoint - For a SAN, verify the storage-system connections to the
switch by checking the LED(s) for the switch port connected to each SP
port.
For a 1-Gbit switch - LED is green, which indicates that the SP is logged in
to the switch port.
For a 2-Gbit switch - One of the following:
• The left LED is green and the right LED is off, which indicates that a
1-Gbit SP port is logged in to the switch port.
• For a DS-xxB2 switch, both LEDs are green, which indicates that a
2-Gbit HBA port is logged in to the switch port.
• For a DS-xxM2 switch, the left LED is blue and the right LED is off, which
indicates that a 2-Gbit HBA port is logged in to the switch port.
❑
Cable each SP to the LAN connected to the hosts from which you will
manage the storage system.
❑
Use Navisphere Manager to define a global administrator and domain (if
not already defined) and any additional users.
❑
From a laptop connected to the storage system, as described in the
storage-system initialization or setup guide, use the following Navisphere
CLI commands to set the default storage-system properties:
navicli -h
navicli -h
hostname
where
system.
hostname
hostname
failovermode 1
arraycommpath 1
is the IP address or network name of an SP in the storage
guide
Navisphere security
administrator’s guide
and Navisphere
Manager online help
Storage-system
initialization guide and
Navisphere CLI
reference
2-28
EMC Installation Roadmap for CX-Series and FC-Series Storage Systems
Page 79

HP-UX Installation Checklist
Tas k
12 Server
Cable additional
HBAs to switches
or storage system
13 Switches
Zone
With Access Logix Reference Document
❑
Cable any additional HBA ports to the switch connected to the storage
system or to SP ports.
❑
Checkpoint - For a SAN, verify the HBA connections to the switch by
checking the LED(s) for the switch port connected to each additional HBA
port.
For a 1-Gbit switch - LED is green, which indicates that the HBA port is
logged in to the switch port.
For a 2-Gbit switch - One of the following:
• The left LED is green and the right LED is off, which indicates that a
1-Gbit SP port is logged in to the switch port.
• For a DS-xxB2 switch, both LEDs are green, which indicates that a
2-Gbit HBA port is logged in to the switch port.
• For a DS-xxM2 switch, the left LED is blue and the right LED is off, which
indicates that a 2-Gbit HBA port is logged in to the switch port.
For a SAN
❑
Zone the switches to provide a path from each additional HBA port (host
initiator) to the SPs.
❑
If SAN Copy, MIrrorView, or MirrorView/A is installed, create any required
zones.
❑
Checkpoint - Use switch management software to verify the switch
connections to the storage system.
Storage-system setup
guide
Switch management
documentation
14 Server
Make target SPs
available
❑
Make sure that each HBA sees only the targets (SPs) to which it is zoned
with the following HP-UX commands:
ioscan -fnC disk
insf -e
❑
Verify that HP-UX sees device entries for all LUNS with the following
HP-UX command:
ioscan -fnC disk
❑
Log in as root and restart the Navisphere Host Agent with the following
HP-UX commands:
/sbin/init.d/agent stop
/sbin/init.d/agent start
❑
Make sure again that each HBA sees only the targets (SPs) to which it is
zoned with the following HP-UX commands:
ioscan -fnC disk
insf -e
PowerPath Checklist - Existing HP-UX Server and New Storage System
HP-UX documentation
CX-Series Server
Software for HP-UX
Installation Guide
HP-UX documentation
2-29
Page 80

HP-UX Installation Checklist
Tas k
14 Server
Make target SPs
available (cont.)
15 Storage System
Configure
16 Server
Make LUNs
visible
With Access Logix Reference Document
❑
Reverify that HP-UX sees device entries for all LUNS with the following
HP-UX command:
ioscan -fnC disk
❑
Use Navisphere Manager to set general storage-system properties. Navisphere Manager
❑
Use Navisphere Manager to create RAID Groups, bind LUNs, create
Storage Groups, and assign LUNs to Storage Groups.
❑
Use Navisphere Manager to connect the server to a Storage Group.
❑
Log in as root and restart the Navisphere Host Agent with the following
HP-UX commands:
/sbin/init.d/agent stop
/sbin/init.d/agent start
❑
Checkpoint - Verify that HP-UX can recognize these LUNs with the
following HP-UX commands:
ioscan -fnC disk
insf -e
If HP-UX does not recognize any LUNs, verify the connection to the
Storage Group.
HP-UX documentation
administrator’s guide
and online help
CX-Series Server
Software for HP-UX
Installation Guide
HP-UX documentation
17 Storage System
2-30
❑
Verify that HP-UX sees device entries for all LUNS with the following
HP-UX command:
ioscan -fnC disk
❑
Plan your monitoring configuration. Navisphere Manager
Set up Event
Monitor
EMC Installation Roadmap for CX-Series and FC-Series Storage Systems
❑
Use Navisphere Manager to set user options, create templates, and set up
your monitoring configuration.
HP-UX documentation
administrator’s guide
and online help
Page 81

HP-UX Installation Checklist
Tas k
18 Server
Configure
PowerPath
devices
19 Server
Test PowerPath
with a license
key
With Access Logix Reference Document
❑
Use the following PowerPath command to configure PowerPath:
powermt config
❑
Checkpoint - Use the following PowerPath command to verify that
PowerPath sees all the paths to the LUNs:
powermt display dev=all class=clariion
If PowerPath cannot see all the paths, verify that
• you registered your PowerPath license key if you have one
• the OptionsSupported Autotrespass entry is defined as described in
step 5.
• the storage-system properties are set as defined in step 11.
❑
If PowerPath can see all the path to the LUNs, save the PowerPath
configuration with the following command:
powermt save
The PowerPath configuration is saved in the following file:
/etc/powermt.custom
If you have a PowerPath license key
Note If your PowerPath license key is not registered, the load balancing policy is
restricted to basic failover.
❑
View the LUNs available to the server using the following PowerPath
command:
powermt display dev=all class=clariion
PowerPath product
guide
PowerPath product
guide
❑
Choose one available LUN to receive I/O for the test.
❑
View the paths to the chosen LUN using the following PowerPath
command:
x
powermt display dev=
x
is a device that represents the chosen LUN.
where
❑
Start I/O to the LUN.
❑
Identify the HBA sending I/O to LUN by viewing the output of the powermt
display dev=x every=2 command, and disconnect the cable to that HBA.
PowerPath Checklist - Existing HP-UX Server and New Storage System
every=2
2-31
Page 82

HP-UX Installation Checklist
Tas k
19 Server
Test PowerPath
with a license
key (cont.)
20 Server
Make LUNs
available to
HP-UX
With Access Logix Reference Document
❑
View the output of the powermt display dev=x every=2 command, and
verify that
• The state of the uncabled path(s) becomes “dead.”
,
• I/O continues to the remaining path(s) to the LUN
path failover was successful, and PowerPath is working properly.
❑
Reconnect the cable that you disconnected from the HBA.
❑
If you did not follow the above steps exactly and caused any LUNs to
trespass, restore the LUNs to their original SP with the following PowerPath
command:
powermt restore
❑
Prepare the LUNs to receive data using the Logical Volume Manager
(LVM).
If HP-UX does not recognize any LUNs, verify the connection to the
Storage Group.
indicating that the
PowerPath product
guide
Host connectivity guide
and HP-UX
documentation
You are now ready to set up any optional software, such as SnapView
or MirrorView, on the storage system.
2-32
EMC Installation Roadmap for CX-Series and FC-Series Storage Systems
Page 83

HP-UX Installation Checklist
PowerPath Checklist - Existing HP-UX Server and Existing Storage System
Complete the tasks highlighted with grey in the checklist before the
service provider arrives.
The Without Access Logix column does not apply to CX300, CX500, and
CX700 storage systems because they ship from the factory with the Access
Logix enabler installed.
Tas k
1 Server
Unmount file
systems
2 Server
Install additional
HBAs
3 Server
Update Software
4 Storage System
Update softwar
e
With Access Logix Without Access Logix Reference Document
❑
Unmount any file systems that
reside on the storage system.
❑
If you need additional HBAs to
provide more paths to the storage
system, install these HBAs.
CAUTION Do not connect cables
to the HBAs until you are told to
do so later in this procedure.
❑
If the following software is
currently installed and not at the
required minimum revision
(page 2-3), update it:
• HBA driver
• Navisphere Host Agent
• admsnap
❑
If currently installed
storage-system software is not at
the required minimum revision
(see page 2-3), update it.
CAUTION During the software
update, hosts connected to the
storage system will lose access to
data if they do not have failover
software or if all paths to an SP
are down.
❑
Unmount any file systems that
reside on the storage system.
❑
If you need additional HBAs to
provide more paths to the storage
system, install these HBAs.
CAUTION Do not connect cables
to the HBAs until you are told to
do so later in this procedure.
❑
If the following software is
currently installed and not at the
required minimum revision
(page 2-3), update it:
• HBA driver (Navisphere Host
Agent
❑
If currently installed
storage-system software is not at
the required minimum revision
(see page 2-3), update it.
CAUTION During the software
update, hosts connected to the
storage system will lose access to
data if they do not have failover
software or if all paths to an SP
are down.
HP-UX documentation
HBA documentation
HBA documentation
Navisphere Host Agent
and CLI for HP-UX
installation guide
SnapView installation
guide (revision A02 or
higher)
Navisphere Manager
administrator’s guide
and online help
PowerPath Checklist - Existing HP-UX Server and Existing Storage System
2-33
Page 84

HP-UX Installation Checklist
Tas k
5 Server
Set HBA driver
parameters
6Server
Set
storage-system
type
With Access Logix Without Access Logix Reference Document
❑
Make sure the HBA driver
parameters are set to the values
required for CLARiiON and
PowerPath.
CAUTION Using improper
settings can cause erratic failover
behavior, such as greatly
increased I/O delays.
❑
Edit the Navisphere Host Agent
configuration file agent.config to
comment the OptionsSupported
Autotrespass entry as follows:
# OptionsSupported
Autotrespass
The above entry will set the
initiator type for the HBAs to no
auto trespass when Host Agent is
restarted in the next step.
❑
Log in as root and restart the
Navisphere Host Agent with the
following HP-UX commands:
/sbin/init.d/agent stop
/sbin/init.d/agent start
❑
Make sure the HBA driver
parameters are set to the values
required for CLARiiON and
PowerPath.
CAUTION Using improper
settings can cause erratic failover
behavior, such as greatly
increased I/O delays.
❑
Log in as root and restart the
Navisphere Host Agent with the
following HP-UX commands:
/sbin/init.d/agent stop
/sbin/init.d/agent start
HP-UX Host
connectivity guide and
HBS documentation
CX-Series Server
Software for HP-UX
Installation Guide
2-34
❑
For an FC4500 storage system, go to
step 8.
EMC Installation Roadmap for CX-Series and FC-Series Storage Systems
From the server, use the following
Navisphere CLI command to set
the system type to no auto
trespass:
For a CX400, CX600, or
FC4700-Series storage system
navicli -h
-config a
where
or network name of an SP in the
storage system.
hostname
hostname
is the IP address
Navisphere CLI
reference
systemtype
Page 85

HP-UX Installation Checklist
Tas k
6Server
Set
storage-system
type (cont.)
CX300, CX400,
7
CX500, CX600,
CX700, or
FC4700-Series
Storage System
Set properties for
PowerPath
With Access Logix Without Access Logix Reference Document
For a FC4500 storage system
navicli -d
device
systemtype
Navisphere CLI
reference
-config a
where
device
is the storage system’s
name.
For an FC4500 storage system,
go to step 8.
For a server with registered HBAs
Perform this task
either
• across the LAN connected to the
storage-system SPs
or
• from an attached host or a host
networked to an attached host
• from a laptop connected to the
storage system, as described in the
For a server with any HBAs
Perform this task
either
• from an attached host or a host
networked to an attached host
• from a laptop connected to the
or
storage system, as described in the
storage-system initialization or
setup guide.
or
storage-system initialization or
setup guide.
From the LAN
❑
Use Navisphere Manager’s
Failover Setup Wizard (selected
Navisphere Manager
administrator’s guide
and online help o
from the Tools menu on the
toolbar) to set the following
storage-system properties for the
server’s existing HBA ports
(initiators):
Failover mode to 1
Array commpath to Enabled
PowerPath Checklist - Existing HP-UX Server and Existing Storage System
2-35
Page 86

HP-UX Installation Checklist
Tas k
7
CX300, CX400,
CX500, CX600,
CX700, or
FC4700-Series
Storage System
Set properties for
PowerPath
(cont.)
With Access Logix Without Access Logix Reference Document
From an attached or networked host or
laptop
❑
Use the following Navisphere CLI
commands to set the following
storage-system properties for the
server’s existing HBA existing
ports (initiators):
navicli -h
storagegroup -sethost
-host
failovermode 1
-
navicli -h
storagegroup -setpath
-host
-arraycommpath 1
where
hostname
network name of an SP in the
storage system
servername
or network address
For a server with unregistered HBAs
Perform this task
• from an attached host or a host
networked to an attached host,
• from a laptop connected to the
storage system, as described in the
storage-system initialization or
setup guide.
hostname
servername
hostname
servername
is the IP address or
is the server’s name
either
From an attached or networked host or
laptop
❑
Use the following Navisphere CLI
commands to set the following
storage-system properties:
navicli -h
failovermode 1
navicli -h
arraycommpath 1
where
hostname
network name of an SP in the
storage system.
Go to step 9.
hostname
hostname
is the IP address or
or
Navisphere CLI
reference
2-36
❑
Use the following Navisphere CLI
commands to set the following
default storage-system properties:
navicli -h
failovermode 1
navicli -h
arraycommpath 1
where
or network name of an SP in the
storage system.
Go step 9.
EMC Installation Roadmap for CX-Series and FC-Series Storage Systems
hostname
hostname
hostname
is the IP address
Page 87

HP-UX Installation Checklist
Tas k
8 FC4500 Storage
System
Set properties for
PowerPath
With Access Logix Without Access Logix Reference Document
For a server with registered HBAs
Perform this task
• across the LAN connected to the
Navisphere portal for the storage
system,
• from an attached host or a host
networked to an attached host,
• from a laptop connected to a
storage-system serial port, as
described in the storage-system
setup guide.
Across LAN
❑
Use Navisphere Manager’s
Failover Setup Wizard (selected
from the Tools menu on the
toolbar) to set the following
storage-system properties for the
server’s existing HBA ports
(initiators):
Failover mode to 1
Array commpath to Enabled
From an attached host or networked
host
❑
Use the following Navisphere CLI
commands to set the following
storage-system properties for the
server’s existing HBA existing
ports (initiators):
navicli -d
storagegroup -sethost
failovermode 1
-
navicli -d
storagegroup -sethost
-arraycommpath 1
where
device
name
hostname
network address.
either
or
device
-h
hostname
device
-h
hostname
is the storage system’s
is the server’s name or
For a server with any HBAs
Perform this task
• from an attached host or a host
networked to an attached host,
• from a laptop connected to a
or
storage-system serial port, as
described in the storage-system
setup guide.
From an attached or networked host
❑
Use the following Navisphere CLI
commands to set the following
default storage-system properties:
navicli -d
failovermode 1
navicli -d
arraycommpath 1
where
device
name
hostname
network address.
either
device
device
is the storage system’s
is the server’s name or
-h
hostname
-h
hostname
or
Navisphere Manager
administrator’s guide
and online help
Navisphere CLI
reference
PowerPath Checklist - Existing HP-UX Server and Existing Storage System
2-37
Page 88

HP-UX Installation Checklist
Tas k
8 FC4500 Storage
System
Set properties for
PowerPath
(cont.)
With Access Logix Without Access Logix Reference Document
From a serially connected laptop
❑
Use the following Navisphere CLI
commands to set the following
storage-system properties for the
server’s existing HBA existing
ports (initiators):
device
navicli -np -d
storagegroup -sethost -host
servername -
navicli -np -d
storagegroup -sethost -host
servername -
where
device
is the name of the
computer port connected to the
storage-system serial port (for
example, com1).
servername
server with the HBAs.
For a server with unregistered HBAs
Perform this task
• from an attached host or a host
networked to an attached host,
• from at a laptop connected to a
storage-system serial port, as
described in the storage-system
setup guide.
failovermode 1
device
arraycommpath 1
is the name of the
either
From a serially connected laptop
❑
Use the following Navisphere CLI
commands to set the following
default storage-system properties:
navicli -np -d
failovermode 1
navicli -np -d
arraycommpath 1
device
is the name of the
or
where
computer port connected to the
storage-system serial port (for
example, com1).
device
device
Storage-system
initialization guide and
Navisphere CLI
reference
2-38
From an attached or networked host
❑
Use the following Navisphere CLI
commands to set the following
default storage-system properties:
device
-h
navicli -d
failovermode 1
navicli -h
arraycommpath 1
where
device
name
hostname
network address.
EMC Installation Roadmap for CX-Series and FC-Series Storage Systems
hostname
is the storage system’s
is the host’s name or
hostname
-d
device
Navisphere CLI
reference
Page 89

HP-UX Installation Checklist
Tas k
8 FC4500 Storage
System
Set properties for
PowerPath
(cont.)
9Server
Install PowerPath
With Access Logix Without Access Logix Reference Document
From a serially connected laptop
❑
Use the following Navisphere CLI
commands to set the following
default storage-system properties:
navicli -np -d
failovermode 1
navicli -np -d
arraycommpath 1
where
computer port connected to the
storage-system serial port (for
example, com1).
❑
Insert the PowerPath installation
CD and mount it.
❑
Install PowerPath.
❑
Register PowerPath.
❑
Install any PowerPath patches
from the Software downloads
page on the EMC Powerlink
website:
http://powerlink.emc.com
device
device
device
is the name of the
❑
Insert the PowerPath installation
CD and mount it.
❑
Install PowerPath.
❑
Register PowerPath.
❑
Install any PowerPath patches
from the Software downloads
page on the EMC Powerlink
website:
http://powerlink.emc.com
Storage-system setup
guide and Navisphere
CLI reference
PowerPath Release
Notes and PowerPath
for UNIX installation
and administrator’s
guide
❑
Execute the following PowerPath
command:
powermt config
PowerPath Checklist - Existing HP-UX Server and Existing Storage System
❑
Execute the following PowerPath
command:
powermt config
PowerPath product
guide
2-39
Page 90

HP-UX Installation Checklist
Tas k
9Server
Install PowerPath
(cont.)
With Access Logix Without Access Logix Reference Document
❑
Checkpoint - Use the following
PowerPath command to verify that
PowerPath sees the paths to the
LUNs:
powermt display dev=all
class=clariion
If PowerPath does not see the
LUNs
• Verify the server’s connection
to the Storage Group.
• Verify that you registered your
PowerPath license key if you
have one.
• Verify that the storage-system
properties are set as defined in
step 7 or 8.
If you did not install any additional
HBAs in the server, go to step 11.
❑
If PowerPath can see all the path
to the LUNs, save the PowerPath
configuration with the following
command:
powermt save
The PowerPath configuration is
saved in the following file:
/etc/powermt.custom
❑
Checkpoint - Use the following
PowerPath command to verify that
PowerPath sees the paths to the
LUNs:
powermt display dev=all
class=clariion
If PowerPath does not see the
LUNs
• Verify that you registered your
PowerPath license key if you
have one.
• Verify that the storage-system
properties are set as defined in
step 7 or 8.
If you did not install any additional
HBAs in the server, go to step 11.
❑
If PowerPath can see all the path
to the LUNs, save the PowerPath
configuration with the following
command:
powermt save
The PowerPath configuration is
saved in the following file:
/etc/powermt.custom
PowerPath product
guide
2-40
10 Server
Cable additional
HBAs to
switches or
storage system
EMC Installation Roadmap for CX-Series and FC-Series Storage Systems
❑
Cable any additional HBA ports to
the switch connected to the
storage system or to SP ports.
❑
Checkpoint - For a SAN, verify
the HBA connections to the switch
by checking the LED(s) for the
switch port connected to each
additional HBA port.
For a 1-Gbit switch - LED is
green, which indicates that the
HBA port is logged in to the switch
port.
❑
Cable any additional HBA ports to
the switch connected to the
storage system or to SP ports.
❑
Checkpoint - For a SAN, verify
the HBA connections to the switch
by checking the LED(s) for the
switch port connected to each
additional HBA port.
For a 1-Gbit switch - LED is
green, which indicates that the
HBA port is logged in to the switch
port.
Storage-system setup
guide.
Switch documentation
Page 91

HP-UX Installation Checklist
Tas k
10 Server
Cable additional
HBAs to
switches or
storage system
(cont.)
11 Switches
Zone
With Access Logix Without Access Logix Reference Document
For a 2-Gbit switch - One of the
following:
• The left LED is green and the
right LED is off, which indicates
that a 1-Gbit SP port is logged
in to the switch port.
• For a DS-xxB2 switch, both
LEDs are green, which
indicates that a 2-Gbit HBA
port is logged in to the switch
port.
• For a DS-xxM2 switch, the left
LED is blue and the right LED
is off, which indicates that a
2-Gbit HBA port is logged in to
the switch port.
For a SAN
❑
Zone the switches to provide a
path from each HBA port (host
initiator) to the appropriate SPs.
❑
Checkpoint - Use switch
management software to verify
the switch connections to the
storage system.
Switch documentation
Switch management
documentation
12 Server
Make target SPs
available
❑
Make sure that each HBA sees
only the targets (SPs) to which it
is zoned with the following HP-UX
commands:
ioscan -fnC disk
insf -e
❑
Verify that HP-UX sees device
entries for all LUNS with the
following HP-UX command:
ioscan -fnC disk
❑
Log in as root and restart the
Navisphere Host Agent with the
following HP-UX commands:
/sbin/init.d/agent stop
/sbin/init.d/agent start
PowerPath Checklist - Existing HP-UX Server and Existing Storage System
❑
Verify that each HBA sees only
the targets (SPs) to which it is
zoned with the HP-UX following
commands:
ioscan -fnC disk
insf -e
❑
Verify that HP-UX sees device
entries for all LUNS with the
following HP-UX command:
❑
ioscan -fnC disk
❑
Log in as root and restart the
Navisphere Host Agent with the
following HP-UX commands:
/sbin/init.d/agent stop
/sbin/init.d/agent start
HP-UX documentation
CX-Series Server
Software for HP-UX
Installation Guide
2-41
Page 92

HP-UX Installation Checklist
Tas k
12 Server
Make target SPs
available (cont.)
13 Server
Configure
PowerPath
devices
With Access Logix Without Access Logix Reference Document
❑
Make sure again that each HBA
sees only the targets (SPs) to
which it is zoned with the following
HP-UX commands:
ioscan -fnC disk
insf -e
❑
Reverify that HP-UX sees device
entries for all LUNS with the
following HP-UX command:
ioscan -fnC disk
❑
Checkpoint - Use Navisphere
Manager’s Connectivity Status
dialog box to verify that each HBA
is registered with the storage
system.
❑
Use the following PowerPath
command to configure
PowerPath:
powermt config
❑
Checkpoint - Use the following
PowerPath command to verify that
PowerPath sees all the paths to
the LUNs:
powermt display dev=all
class=clariion
If PowerPath cannot see all the
paths, verify that
• you registered your PowerPath
license key if you have one
• the OptionsSupported
Autotrespass entry is defined
as described in step 6
• the storage-system properties
are set as defined in step 7 or 8
❑
Reverify that each HBA sees only
the targets (SPs) to which it is
zoned with the HP-UX following
commands:
ioscan -fnC disk
insf -e
❑
Reverify that HP-UX sees device
entries for all LUNS with the
following HP-UX command:
❑
ioscan -fnC disk
❑
Use the following PowerPath
command to configure
PowerPath:
powermt config
❑
Checkpoint - Use the following
PowerPath command to verify that
PowerPath sees all the paths to
the LUNs:
powermt display dev=all
class=clariion
If PowerPath cannot see all the
paths, verify that
• you registered your PowerPath
license key if you have one
•the systemtype is defined as
described in step 6
• the storage-system properties
are set as defined in step 7 or 8
HP-UX documentation
Navisphere Manager
administrator’s guide
and online help
PowerPath product
guide
2-42
EMC Installation Roadmap for CX-Series and FC-Series Storage Systems
Page 93

HP-UX Installation Checklist
Tas k
13 Server
Configure
PowerPath
devices (cont.)
14 Server
Test PowerPath
with a license
key
With Access Logix Without Access Logix Reference Document
❑
If PowerPath can see all the path
to the LUNs, save the PowerPath
configuration with the following
command:
powermt save
The PowerPath configuration is
saved in the following file:
/etc/powermt.custom
If you have a PowerPath license key
Note If your PowerPath license key is
not registered, the load balancing
policy is restricted to basic failover.
❑
Stop all applications accessing
the storage system and disable
user logins to the server.
❑
View the LUNs available to the
server using the following
PowerPath command:
❑
powermt display dev=all
class=clariion
❑
Choose one available LUN to
receive I/O for the test.
❑
If PowerPath can see all the path
to the LUNs, save the PowerPath
configuration with the following
command:
powermt save
The PowerPath configuration is
saved in the following file:
/etc/powermt.custom
If you have a PowerPath license key
Note If your PowerPath license key is
not registered, the load balancing
policy is restricted to basic failover.
❑
Stop all applications accessing
the storage system and disable
user logins to the server.
❑
View the LUNs available to the
server using the following
PowerPath command:
powermt display dev=all
class=clariion
❑
Choose one available LUN to
receive I/O for the test.
PowerPath product
guide
PowerPath product
guide
❑
View the paths to the chosen LUN
using the following PowerPath
command:
powermt display dev=
x
is a device that
where
represents the chosen LUN.
❑
Start I/O to the LUN.
❑
Identify the HBA sending I/O to
LUN by viewing the output of the
powermt display dev=
command, and disconnect the
cable to that HBA.
PowerPath Checklist - Existing HP-UX Server and Existing Storage System
x
every=2
x
every=2
❑
View the paths to the chosen LUN
using the following PowerPath
command:
powermt display dev=
x
is a device that
where
represents the chosen LUN
❑
Start I/O to the LUN.
❑
Identify the HBA sending I/O to
LUN by viewing the output of the
powermt display dev=
command, and disconnect the
cable to that HBA.
x
every=2
x
every=2
2-43
Page 94

HP-UX Installation Checklist
Tas k
14 Server
Test PowerPath
with a license
key (cont.)
15 Server
Mount file
systems
With Access Logix Without Access Logix Reference Document
❑
View the output of the powermt
display dev=
command, and verify that
• The state of the uncabled
path(s) becomes “dead.”
• I/O continues to the remaining
path(s) to the LUN
that the path failover was
successful, and PowerPath is
working properly.
❑
Reconnect the cable that you
disconnected from the HBA.
❑
If you did not follow the above
steps exactly and caused any
LUNs to trespass, restore the
LUNs to their original SP with the
following PowerPath command:
powermt restore
❑
Mount any file systems
unmounted in step 1.
x
every=2
,
indicating
❑
View the output of the powermt
display dev=
command, and verify that
• The state of the uncabled
path(s) becomes “dead.”
• I/O continues to the remaining
path(s) to the LUN
that the path failover was
successful, and PowerPath is
working properly.
❑
Reconnect the cable that you
disconnected from the HBA.
❑
If you did not follow the above
steps exactly and caused any
LUNs to trespass, restore the
LUNs to their original SP with the
following PowerPath command:
powermt restore
❑
Mount any file systems
unmounted in step 1.
x
every=2
,
indicating
PowerPath product
guide
HP-UX documentation
2-44
EMC Installation Roadmap for CX-Series and FC-Series Storage Systems
Page 95

DMP Configurations for HP-UX
Read this section if you are installing an HP-UX VERITAS DMP
configuration with a new server and a new CX300, CX500, or CX700
storage system. A new server and storage system are defined as
follows:
New server - A server running HP-UX and not connected to any
storage system.
New storage system - A CX300, CX500, or CX700 storage system that
has the factory default settings and has never been connected to a
server.
Topics relating to the checklist for an HP-UX configuration with DMP
software are
◆ Required Host Software Revisions................................................ 2-46
◆ Prerequisites ..................................................................................... 2-46
◆ Documentation................................................................................. 2-47
◆ DMP Checklist - New HP-UX Server and New Storage
System ...............................................................................................2-48
HP-UX Installation Checklist
DMP Configurations for HP-UX
2-45
Page 96

HP-UX Installation Checklist
Required Host Software Revisions
Prerequisites
◆ HP-UX operating system revision listed in the EMC Support
Matrix on the Powerlink website (http://powerlink.emc.com)
◆ HBA driver revision listed in the EMC Support Matrix on the
Powerlink website (http://powerlink.emc.com)
◆ VxVM 3.5 or higher
Refer to the EMC Support Matrix and the EMC PowerPath for UNIX Release
Notes on the Powerlink website (http://powerlink.emc.com) for the
specific revision required for your HP-UX version.
◆ All switches must be installed.
◆ Storage systems must be set up, initialized (if required), and
connected to switches, and any optional storage-system software
(Access Logix, SnapView, MirrorView, MirrorView/A, SAN
Copy) must be installed.
◆ Navisphere Manager must be installed.
◆ If any storage systems have SnapView, the admsnap utility must
be installed on the servers that will be the SnapView production
and secondary hosts.
◆ You must have a host that is
• Running an operating system that can support the Navisphere
Manager 6.X browser-based client. For an up-to-date list of
such operating systems, refer to the Navisphere Manager 6.X
release notes on http://powerlink.emc.com.
• On a network that is connected to the storage-system servers
and that will be connected to the SPs in the storage system.
2-46
EMC Installation Roadmap for CX-Series and FC-Series Storage Systems
Page 97

HP-UX Installation Checklist
◆ You must have planned your LUNs and RAID Groups, and
Storage Groups if you have Access Logix. Be sure to consider
requirements for SnapView, SAN Copy, MirrorView, and
MirrorView/A if you have this software. The EMC CLARiiON
CX300, CX500, CX500i, and CX700 Storage Systems Configuration
Planning Guide (P/N 300-001-273) will help you with this
planning.
Documentation
This checklist refers to some or all of the documents listed below. We
recommend that you load these documents on your service laptop
before starting the installation.
◆ Documentation that ships with
• HBA and HBA driver
•Switches
• HP-UX operating system
• VERITAS Volume Manager
◆ EMC Navisphere Host Agent and CLI for HP-UX Version 6.X
Installation Guide (P/N 069001146)
or
EMC CX-Series Server Software for HP-UX Installation Guide
(P/N 300-002-043)
◆ EMC Navisphere Manager Administrator’s Guide (P/N 069001125)
◆ EMC Navisphere Security Administrator’s Guide (P/N 069001124)
◆ EMC Host Connectivity Guide for HP-UX (P/N 300-000-614)
DMP Configurations for HP-UX
2-47
Page 98

HP-UX Installation Checklist
DMP Checklist - New HP-UX Server and New Storage System
Complete the tasks highlighted with grey in the checklist before the
service provider arrives.
Tas k
1 Server
Install HBAs,
drivers, cables
2 Server
Set HBA driver
parameters
3Switches
Connect servers
and SPs
With Access Logix Reference Document
❑
Install the HBAs.
❑
Connect a cable from each host HBA port to a switch port or an SP port.
❑
Install the HBA driver.
❑
Set the HBA driver parameters to the values required for CLARiiON.
Caution Using improper settings can cause erratic failover behavior, such
as greatly increased I/O delays.
❑
Reboot the server to complete the installation of the drivers.
❑
Checkpoint — For a SAN, verify the server connections to the switch by
checking the LED(s) for the switch port connected to each HBA port.
For a 1-Gbit switch - LED is green, which indicates that the HBA is logged
in to the switch port.
For a 2-Gbit switch - One of the following:
• Only the left LED is green, which indicates that a 1-Gbit HBA port is
logged in to the switch port.
• Both LEDs are green, which indicates that a 2-Gbit HBA port is logged in
to the switch port.
❑
Verify that the servers and SPs are connected to the switch. Documentation that
HBA documentation
Host connectivity guide
and HBA
documentation
ships with the switches
4Switches
5Server
2-48
For a SAN
❑
Zone
Make target SPs
available
EMC Installation Roadmap for CX-Series and FC-Series Storage Systems
Zone the switches to provide a path from each host initiator to an SP.
❑
Make sure each HBA sees only the targets (SPs) to which it is zoned with
the following HP-UX commands:
ioscan -fnC disk
insf -e
❑
Checkpoint - Reverify that HP-UX sees device entries for all LUNS with
the following HP-UX command:
ioscan -fnC disk
Switch documentation
HP-UX documentation
Page 99

HP-UX Installation Checklist
Tas k
6Server
Install Host
Agent
7Storage System
Set up security
With Access Logix Reference Document
❑
Install the Navisphere Host Agent. CX-Series Server
❑
Modify user login scripts.
❑
Edit the Navisphere Host Agent configuration file (agent.config) as follows:
• Add the following entry if it does not already exist:
device auto auto
• Add at least one privileged user.
❑
Verify that the Navisphere Host Agent configuration file (agent.config) has
the following entry commented out:
# Options Supported Autotrespass
(leading # is present)
The above entry will set the initiator type for the HBAs to auto trespass
when Host Agent is restarted later in this procedure.
❑
Continue to edit other entries in the Navisphere Host Agent configuration
file (agent.config) as desired.
❑
Restart the Host Agent to register the HBAs with the storage system.
❑
Use Navisphere Manager to define a global administrator and domain (if
not already defined) and any additional users.
Software for HP-UX
Installation Guide
Navisphere security
administrator’s guide
and Navisphere
Manager online help
8Storage System
Set properties
9Storage System
Configure
❑
Use the following Navisphere CLI commands to set the default failover
mode and array commpath properties with the following commands:
navicli -h
navicli -h
where
system.
❑
Use Navisphere Manager to set general storage-system properties. Navisphere Manager
❑
Use Navisphere Manager to create RAID Groups, bind LUNs, create
Storage Groups, and assign LUNs to Storage Groups.
❑
Use Navisphere Manager to connect the host initiators to Storage Groups.
hostname
hostname
hostname
failovermode 2
arraycommpath 1
is the IP address or network name of an SP in the storage
DMP Checklist - New HP-UX Server and New Storage System
Navisphere CLI
reference
administrator’s guide
and online help
2-49
Page 100

HP-UX Installation Checklist
Tas k
10 Server
Make LUNs
visible
11 Storage System
Set up Event
Monitor
12 Server
Install the
CLARiiON DMP
driver
With Access Logix Reference Document
❑
Log in as root and restart the Navisphere Host Agent with the following
HP-UX commands:
/sbin/init.d/agent stop
/sbin/init.d/agent start
❑
Checkpoint - Verify that HP-UX can recognize these LUNs with the
following HP-UX commands:
ioscan -fnC disk
insf -e
If HP-UX does not recognize any LUNs, verify the connection to the
Storage Group.
❑
Checkpoint - Reverify that HP-UX sees device entries for all LUNS with
the following HP-UX command:
ioscan -fnC disk
❑
Plan your monitoring configuration. Navisphere Manager
❑
Use Navisphere Manager to set user options, create templates, and set up
your monitoring configuration.
❑
Download the CLARiiON DMP driver to the server from Services on the
VERITAS website.
❑
Use the swinstall command to install the CLARiiON DMP driver on the
server.
Note Until rootdg is created (part of vxinstall command) on at least one
disk, DMP displays an error message looking for the config daemon.
CX-Series Server
Software for HP-UX
Installation Guide
HP-UX documentation
administrator’s guide
and online help
VERITAS Volume
Navisphere Manager
documentation
2-50
❑
13 Server
Reboot
14 Server
Configure
Reboot the server using the reboot command
• to make LUNs available to the OS
• to make LUNs accessible via both SPs
Important If you do not set the failover mode to 2, you will see only half of the
expected paths to the SPs.
❑
Run vxinstall to configure Volume Manager and place at least one LUN
under VxVM control.
Vol ume Man age r
EMC Installation Roadmap for CX-Series and FC-Series Storage Systems
VERITAS Volume
Navisphere Manager
documentation
VERITAS Volume
Navisphere Manager
documentation
 Loading...