

Page 1

OM105J - OM124J
EF105J - EF124J
(STARJET)
SATR 15,5 H
SATR 17,5 H
SATR 18 H
GB
User‘s manual
D
Bedienungsanleitung
F
Manuel d’utilisation
IT
Manuale di istruzioni
CZ
Návod k použití
NL
Gebruikershandleiding
ES
Manual de usuario
SV
Bruksanvisning
PL
Instrukcja obsługi
Page 2

ENGLISH
1
CONTENTS ENGLISH
CONTENTS
EC DECLARATION OF CONFORMITY . . . . . . . . . . . . . . . . . . . . . .2
PREFACE . . . . . . . . . . . . . . . . . . . . . . . . . . . . . . . . . . . . . . . . . . . . .4
1. PROTECTION AND HEALTH SAFETY AT WORK . . . . . . . . . . .5
1.1 SAFETY INSTRUCTIONS . . . . . . . . . . . . . . . . . . . . . . . . . . . . . . . .5
1.1.1 WORK ON A SLOPE . . . . . . . . . . . . . . . . . . . . . . . . . . . . . . . . . .6
1.1.2 DO NOT PERFORM . . . . . . . . . . . . . . . . . . . . . . . . . . . . . . . . . .6
1.1.3 CHILDREN'S SAFETY . . . . . . . . . . . . . . . . . . . . . . . . . . . . . . . .6
1.1.4 FIRE SAFETY . . . . . . . . . . . . . . . . . . . . . . . . . . . . . . . . . . . . . . .6
2. USE AND TECHNICAL DESCRIPTION . . . . . . . . . . . . . . . . . . .7
2.1 MACHINE USE . . . . . . . . . . . . . . . . . . . . . . . . . . . . . . . . . . . . . . . . .7
2.2 TECHNICAL DESCRIPTION . . . . . . . . . . . . . . . . . . . . . . . . . . . . .7
2.2.1 MACHINE FRAME . . . . . . . . . . . . . . . . . . . . . . . . . . . . . . . . . . .7
2.2.2 ENGINE INCLUDING ELECTRICAL INSTALLATION . . .7
2.2.3 GEARBOX INCLUDING REAR WHEEL DRIVE . . . . . . . . .7
2.2.4 FRONT AXLE WITH WHEELS INCLUDING STEERING .7
2.2.5 BY-PASS . . . . . . . . . . . . . . . . . . . . . . . . . . . . . . . . . . . . . . . . . . . .7
2.2.6 BONNET AND PLACE OF OPERATOR . . . . . . . . . . . . . . . . .7
2.2.7 MOWING MECHANISM . . . . . . . . . . . . . . . . . . . . . . . . . . . . . .7
2.2.8 GRASS COLLECTION BIN . . . . . . . . . . . . . . . . . . . . . . . . . . . .7
2.3 MACHINE EQUIPMENT . . . . . . . . . . . . . . . . . . . . . . . . . . . . . . . . .7
2.4 MARKING . . . . . . . . . . . . . . . . . . . . . . . . . . . . . . . . . . . . . . . . . . . . .8
3. TECHNICAL PARAMETERS . . . . . . . . . . . . . . . . . . . . . . . . . . . .9
4. UNPACKING . . . . . . . . . . . . . . . . . . . . . . . . . . . . . . . . . . . . . . .12
4.1 CHECK AFTER UNPACKING . . . . . . . . . . . . . . . . . . . . . . . . . . .12
4.1.1 DISPOSAL OF PACKAGING . . . . . . . . . . . . . . . . . . . . . . . . . .12
4.2 PREPARATION FOR START UP . . . . . . . . . . . . . . . . . . . . . . . . .12
4.2.1 STEERING WHEEL ASSEMBLY . . . . . . . . . . . . . . . . . . . . . .12
4.2.2 SEAT ASSEMBLY . . . . . . . . . . . . . . . . . . . . . . . . . . . . . . . . . . .12
4.2.3 SEAT POSITION ADJUSTMENT . . . . . . . . . . . . . . . . . . . . . .12
4.2.4 ACCUMULATOR CONNECTION . . . . . . . . . . . . . . . . . . . . .12
4.2.5 SUSPENSION ASSEMBLY . . . . . . . . . . . . . . . . . . . . . . . . . . .13
4.2.6 GRASS COLLECTION BIN ASSEMBLY . . . . . . . . . . . . . . . .13
4.2.7 GRASS COLLECTION BIN SUSPENSION . . . . . . . . . . . . .13
5. START UP . . . . . . . . . . . . . . . . . . . . . . . . . . . . . . . . . . . . . . . . .14
5.1 ENGINE OIL LEVEL CHECK . . . . . . . . . . . . . . . . . . . . . . . . . . .14
5.2 ACCUMULATOR CHECK . . . . . . . . . . . . . . . . . . . . . . . . . . . . . . .14
5.3 FILLING THE TANK WITH PETROL . . . . . . . . . . . . . . . . . . . . .14
6 . MACHINE CONTROL . . . . . . . . . . . . . . . . . . . . . . . . . . . . . . . .15
6.1 DESCRIPTION AND FUNCTION OF CONTROLS . . . . . . . . .15
6.1.1 MOWING MECHANISM SWITCH . . . . . . . . . . . . . . . . . . . . .15
6.1.2 SWITCH BOX . . . . . . . . . . . . . . . . . . . . . . . . . . . . . . . . . . . . . . .15
6.1.3 GAS CONTROL LEVER . . . . . . . . . . . . . . . . . . . . . . . . . . . . . .15
6.1.4 CHOKE . . . . . . . . . . . . . . . . . . . . . . . . . . . . . . . . . . . . . . . . . . . .15
6.1.5 BUZZER . . . . . . . . . . . . . . . . . . . . . . . . . . . . . . . . . . . . . . . . . . .15
6.1.6 HEADLAMP SWITCH . . . . . . . . . . . . . . . . . . . . . . . . . . . . . . .15
6.1.7 ENGINE HOUR METER . . . . . . . . . . . . . . . . . . . . . . . . . . . . .15
6.1.8 CRUISE CONTROL DEVICE . . . . . . . . . . . . . . . . . . . . . . . . .16
6.1.9 AUT/MAN SWITCH . . . . . . . . . . . . . . . . . . . . . . . . . . . . . . . . .16
6.1.10 GRASS COLLECTION BIN EMPTYING SWITCH . . . . . .16
6.1.11 BRAKE . . . . . . . . . . . . . . . . . . . . . . . . . . . . . . . . . . . . . . . . . . . .16
6.1.12 PARKING BRAKE LEVER . . . . . . . . . . . . . . . . . . . . . . . . . . .16
6.1.13 TRAVEL PEDAL . . . . . . . . . . . . . . . . . . . . . . . . . . . . . . . . . . .16
6.1.14 BY-PASS LEVER . . . . . . . . . . . . . . . . . . . . . . . . . . . . . . . . . . . .17
6.1.15 DIFFERENTIAL LOCK PEDAL . . . . . . . . . . . . . . . . . . . . . .17
6.1.16 MOWING MECHANISM HEIGHT ADJUSTMENT LEVER .17
6.1.17 MULCHING FLAP LEVER . . . . . . . . . . . . . . . . . . . . . . . . . .17
6.1.18 FUEL SUPPLY CLOSURE . . . . . . . . . . . . . . . . . . . . . . . . . . .17
6.2 OPERATION AND ATTENDANCE . . . . . . . . . . . . . . . . . . . . . . .18
6.2.1 SUSPENSION OF GRASS COLLECTION BIN . . . . . . . . . .18
6.2.2 ENGINE START . . . . . . . . . . . . . . . . . . . . . . . . . . . . . . . . . . . .18
6.2.3 ENGINE STOP . . . . . . . . . . . . . . . . . . . . . . . . . . . . . . . . . . . . .18
6.2.4 MOWING MECHANISM TURN ON AND OFF . . . . . . . . .18
6.2.5 MOWING MECHANISM HEIGHT ADJUSTMENT . . . . . .19
6.3 TRAVEL . . . . . . . . . . . . . . . . . . . . . . . . . . . . . . . . . . . . . . . . . . . . . .19
6.4 TRAVEL SPEED AND GRASS MOWING . . . . . . . . . . . . . . . . .19
6.5 TRAVEL ON A SLOPE . . . . . . . . . . . . . . . . . . . . . . . . . . . . . . . . . .19
6.6 EMPTYING THEGRASS COLLECTION BIN . . . . . . . . . . . . . .19
7. MACHINE MAINTENANCE . . . . . . . . . . . . . . . . . . . . . . . . . . .20
7.1 SUMMARY OF CHECKS AND MAINTENANCE . . . . . . . . . . .20
7.2 TYRE PRESSURE CHECK . . . . . . . . . . . . . . . . . . . . . . . . . . . . . .20
7.3 MAINTENANCE AFTER WORK . . . . . . . . . . . . . . . . . . . . . . . . .20
7.3.1 CLEANING . . . . . . . . . . . . . . . . . . . . . . . . . . . . . . . . . . . . . . . .20
7.3.2 WASHING . . . . . . . . . . . . . . . . . . . . . . . . . . . . . . . . . . . . . . . . .21
7.4 ACCUMULATOR MAINTENANCE . . . . . . . . . . . . . . . . . . . . . .21
7.5 ENGINE MAINTENANCE . . . . . . . . . . . . . . . . . . . . . . . . . . . . . .21
7.5.1 ENGINE OIL LEVEL CHECK . . . . . . . . . . . . . . . . . . . . . . . . .21
7.5.2 CHANGING OIL . . . . . . . . . . . . . . . . . . . . . . . . . . . . . . . . . . . .21
7.5.3 FUEL FILTER REPLACEMENT . . . . . . . . . . . . . . . . . . . . . . .21
7.5.4 AIR FILTER MAINTENANCE . . . . . . . . . . . . . . . . . . . . . . . .21
7.5.5 SPARK PLUG MAINTENANCE . . . . . . . . . . . . . . . . . . . . . . .21
7.6 LUBRICATION . . . . . . . . . . . . . . . . . . . . . . . . . . . . . . . . . . . . . . . .21
7.7 BULB REPLACEMENT . . . . . . . . . . . . . . . . . . . . . . . . . . . . . . . . .22
7.8 FUSE REPLACEMENT . . . . . . . . . . . . . . . . . . . . . . . . . . . . . . . . .22
7.9 MACHINE JACK UP . . . . . . . . . . . . . . . . . . . . . . . . . . . . . . . . . . .22
7.10 REPLACEMENT OF MOWING MECHANISM BLADES . . .22
7.10.1 SHARPENING THE BLADES . . . . . . . . . . . . . . . . . . . . . . . .23
7.11 STEERING UNIT MAINTENANCE . . . . . . . . . . . . . . . . . . . . . .23
7.12 CHECK AND ADJUSTMENT OF TRAVEL DRIVE BELT . . .23
7.13 CHECK AND ADJUSTMENT OF MOWING MECHANISM
ADJUSTMENT . . . . . . . . . . . . . . . . . . . . . . . . . . . . . . . . . . . . . . . .23
7.14 CHECK AND ADJUSTMENT OF MOWING MECHANISM
DRIVE V-BELT . . . . . . . . . . . . . . . . . . . . . . . . . . . . . . . . . . . . . . . .23
7.15 REMOVAL OF MOWING MECHANISM FROM THE
MACHINE . . . . . . . . . . . . . . . . . . . . . . . . . . . . . . . . . . . . . . . . . . . .24
7.16 ADJUSTMENT OF BLADE DRIVE OF THE COGGED BELT . .24
7.17 REPLACEMENT OF BELTS . . . . . . . . . . . . . . . . . . . . . . . . . . . .24
7.18 WHEEL CHANGE . . . . . . . . . . . . . . . . . . . . . . . . . . . . . . . . . . . . .24
7.19 HYDROSTATIC GEARBOX MAINTENANCE . . . . . . . . . . . . .24
7.20 BRAKE ADJUSTMENT . . . . . . . . . . . . . . . . . . . . . . . . . . . . . . . .25
7.21 OVERVIEW OF TIGHTENING TORQUES OF SCREW
CONNECTIONS . . . . . . . . . . . . . . . . . . . . . . . . . . . . . . . . . . . . . .25
8. REMOVAL OF FAILURES AND DEFECTS . . . . . . . . . . . . . . . .26
8.1 ORDERING SPARE PARTS . . . . . . . . . . . . . . . . . . . . . . . . . . . . . .28
8.2 GUARANTEE . . . . . . . . . . . . . . . . . . . . . . . . . . . . . . . . . . . . . . . . .28
9. AFTER-SEASON MAINTENANCE, MACHINE STORAGE . . . . .28
10.MACHINE DISPOSAL . . . . . . . . . . . . . . . . . . . . . . . . . . . . . . .28
Page 3

INTRODUCTION ENGLISH
2
EC DECLARATION OF CONFORMITY
acc.: Council Directive no. 98/37/EC (amendatory act 24/2003 Coll. Government decree)
Council Directive no. 89/336/EEC (amendatory act 18/2003 Coll. Government decree)
Directive 2000/14/EC (amendatory act 9/2002 Coll. Government decree)
A. We: Seco GROUP a.s., Šaldova 408/30, Praha 8
Branch office 02 AGS Jičín, Jungmannova 11
IČO: 60193450
are issuing, on our own responsibility, this declaration:
B. Machine
- name: Self-propelled mowing machine
- type: AJ 102
Description: The AJ 102 is a four-wheel self-propelled mowing machine with Briggs & Stratton 15,5HP, 16HP, 18HP, 20HP, 22HP or TECUMSEH 17HP,
18HP, 20HP, 22HP, 25HP engine or Honda 16HP, 20HP. The drive from the engine is transmitted by V-belts via an electromagnetic clutch to
the mowing mechanism and transmission gearbox. The mowing mechanism is of a two-knife type driven by a double-sided cogged belt. The
mowed grass is collectedinto the collection bin or directed to the ground by means of a deflector. Instead of collecting grass, mulching can be
carried out by means of two auxiliary blades when the discharge tunnel is blinded.
C. Regulations applied in the judgement of conformity:
ČSN EN 836+A1;2;3, ČSN EN ISO 3767-1,2,3, ISO 11684, ČSN EN ISO 11201, ČSN EN ISO 12 100-2, Board directive No.: 97/68/EC
(2002/88/EC)
D. Judgment of conformity was carried out by means of the procedure definedin:
- Council Directive No. 98/37/EC, Article 8, par. 2 a), (eqv. §3, par. 1 a), amendatory act no. 24/2003 Coll.)
- Council Directive No. 89/336/EEC, Article 10, par.c 1, (eqv. §4, par. 1, amendatory act no. 18/2003 Coll.)
- Directive 2000/14/EC, Appendix VIII (eqv. appendix 7, amendatory act no. 9/2002 Coll.)
Supervised by notified person LRQA registration number 0088 Hiramford,
Middlemarch Office Village, Siskin Drive Coventry CV3 4FJ, United Kingdom
E. We confirm that:
- machine defined by the stated data is in conformity with the requirements specified in technical regulations stated above, and is the safe machine
under conditions of common use
- provisions have been accepted to ensure the conformity of all products presentedon the market with the technical documentation and require-
ments of technical regulations
- guaranteed acoustic power level is 100 dB(A).
Measured average values of acoustic power level according to the engine used:
The scope of technical documentation in accordance with appendix V of the directives 98/37/EC and 2000/14/EC is filed at the manufacturer at the place of
business:
Seco GROUP
Branch office 02 AGS
Jungmannova 11
506 48 Jičín
Ing. Jiří Pávek
Vice Chairman of the Board of Directors
In Jičín, 1. 9. 2007
Engine Speed (rpm) Acoustic power measured value [dB(A)]
Briggs & Stratton 15,5 HP I/C 2700 앐100 99,47
Briggs & Stratton 16 HP VANGUARD 2800 앐100 97,49
Briggs & Stratton 18 HP VANGUARD 2800 앐100 97,01
Briggs & Stratton 17,5 HP Intek 2700 앐100
Briggs & Stratton 18 HP Intek 2800 앐100 97,49
Briggs & Stratton 20 HP VANGUARD 2800 앐100 97,73
Briggs & Stratton 20 HP Intek 2800 앐100 99,25
Briggs & Stratton 22 HP Intek 2800 앐100
HONDA K1 20 HP 2800 앐100 97,58
HONDA 16 HP 2700 앐100 98,28
TECUMSEH ENDURO VT 17 HP 2700 앐100 99,32
TECUMSEH ENDURO VT 18 HP 2400 앐100 97,90
TECUMSEH ENDURO VT 20 HP 2400 앐100 98,33
TECUMSEH ENDURO VT 22 HP 2500 앐100 99,14
TECUMSEH ENDURO VT 25 HP 2500 앐100 98,24
Page 4

INTRODUCTION ENGLISH
3
EC DECLARATION OF CONFORMITY
acc.: Council Directive no. 98/37/EC (amendatory act 24/2003 Coll. Government decree)
Council Directive no. 89/336/EEC (amendatory act 18/2003 Coll. Government decree)
Directive 2000/14/EC (amendatory act 9/2002 Coll. Government decree)
A. We: Seco GROUP a.s., Šaldova 408/30, Praha 8
Branch office 02 AGS Jičín, Jungmannova 11
IČO: 60193450
are issuing, on our own responsibility, this declaration:
B. Machine
- name: Self-propelled mowing machine
- type: AG 122
Description: The AJ 102 is a four-wheel self-propelled mowing machine with Briggs & Stratton 18 HP, 20 HP or HONDA 20 HP engine. The drive from the
engine is transmitted by V-belts via an electromagnetic clutch to the mowing mechanism and transmission gearbox. The mowing mechanism is
of a two-knife type driven by a double-sided coggedbelt. The mowed grass is collected the collection bin or directed to the ground by means of
a deflector. Instead of collecting grass, mulching can be carried out by means of two auxiliary blades when the discharge tunnel is blinded.
C. Regulations applied in the judgement of conformity:
ČSN EN 836+A1;2;3, ČSN EN ISO 3767-1,2,3, ISO 11684, ČSN EN ISO 11201, ČSN EN ISO 12 100-2, Board directive No.: 97/68/EC
(2002/88/EC)
D. Judgment of conformity was carried out by means of the procedure definedin:
- Council Directive No. 98/37/EC, Article 8, par. 2 a), (eqv. §3, par. 1 a), amendatory act no. 24/2003 Coll.)
- Council Directive No. 89/336/EEC, Article 10, par. 1, (eqv. §4, par. 1, amendatory act no. 18/2003 Coll.)
- Directive 2000/14/EC, Appendix VIII (eqv. appendix 7, amendatory act no. 9/2002 Coll.)
Supervised by notified person LRQA registration number 0088 Hiramford,
Middlemarch Office Village, Siskin Drive Coventry CV3 4FJ, United Kingdom
E. We confirm that:
- machine defined by the stated data is in conformity with the requirements specified in technical regulations stated above, and is the safe machine
under conditions of common use
- provisions have been accepted to ensure theconformity of all products presentedon the market with the technical documentation and require-
ments of technical regulations
- guaranteed acoustic power level is 105 dB(A)
Measured average values of acoustic power level according to the engine used:
The scope of technical documentation in accordance withappendix V of the directives 98/37/EC and 2000/14/EC is filed at the manufacturer at the place of
business:
Seco GROUP
Branch office 02 AGS
Jungmannova 11
506 48 Jičín
Ing. Jiří Pávek
Vice Chairman of the Board of Directors
In Jičín, 1. 9. 2007
Engine Speed (rpm) Acoustic power measured value [dB(A)]
Briggs & Stratton 18 HP VANGUARD 3000 앐100 102,15
Briggs & Stratton 20 HP VANGUARD 3000 앐100 102,65
Briggs & Stratton 21 HP Intek 3000 앐100 101,87
Briggs & Stratton 22 HP Intek 3000 앐100 103,42
HONDA K1 20 HP 3000 앐100 102,57
Page 5

ENGLISH
4
INTRODUCTION ENGLISH
PREFACE
Dear customer,
we thank you very much for your decision and choice to buy our mowing machine. Seco GROUP a.s., being a succession owner of the Knotek a spol.,
Agrostroj and AGS Jičín companies, is well-known on both European and world markets as the manufacturer of AGS brand quality machines for the maintenance of grass areas.
Our object was to design and manufacture a high-quality, powerful lawn-mowing machine. We are sure you will agree that we succeeded and fulfilled our
task, provided you have had an opportunity to try the quality of our machine operation.
How you would like to use this machine to serve you and your satisfaction as long as possible is now your choice.
Study this manual carefully. Follow the instructions stated in it thoroughly in order to make the use of the purchased machine easy and to ensure its optimum utilization and long service life.
Use this self-propelled mowing machine only for the purpose it was manufactured for. Any use not specified in this manual may be dangerous and may cause
damages to the machine. This can result in the invalidation of the guarantee as, in such a case, the manufacturer disclaims any responsibility.
Service staff trained and tested in the manufacturing plant is available in more than 100 of our authorized services throughout Europe.
Page 6

ENGLISH
5
PROTECTION AND SAFETY ENGLISH
1. PROTECTION AND SAFETY OF HEALTH AT WORK
AJ 102 and AG 122 types of self-propelled mowing machines with the commercial name STARJET are manufactured in accordance with the effective European safety standards.
1.1 SAFETY INSTRUCTIONS
Before the first use of your mowing machine, study this User‘s manual thoroughly. When operating the mowing machine follow the safety instructions stated in this manual duly. In case the machine was used in conflictwith the instructions and information specified in this manual or legal regulations, the manufacturer bears no liability for the contingent damages and the user loses his right to the guaranteed repair.
Do not use the machine if any of its protective devices are damaged or missing.
All the covers and other protective devices must always bein place.
Therefore, do not remove or disablen any machine protective device.
Check the functions of these devices on a regular basis.
It is prohibited to performany technical modification on the machine without the manufacturer's approval in writing.
Unpermitted changes can lead to hazardous conditions of work safetyand thus to the cancellation of the guarantee.
Do not change the adjustment of the engine speed regulator or engine speed limit device.
Do not remove safety stickers or labels from the machine.
Before starting up the machine make sure you are thoroughly familiar with all of its control elements and their manipulation in such a way that you will be
able to stop the machine or turn the engine off immediately.
Always keep the machine and its equipment clean and in good technical condition.
The machine can only be driven by a person who is above 18 years of age and is acquainted with the instructions contained in this manual.
The machine must not be used for work on slopes with a gradient greater than 10° (17%).
The machine user is responsible for the safety of persons within the machine working area.
Do not move in the vicinity of the machine or under it if it is lifted and it is not properly secured against falling or turning over.
The machine user is responsible for the safety of persons within the machine working area.
Do not move in the vicinity of the machine or under it if it is lifted and it is not properly secured against falling or turning over.
Transport of other persons, animals or loads directly on the machine is prohibited.
The transport of loads is only allowed on a trailer whose type was approved by the machine manufacturer.
If you leave the machine unattended even for a short time, always removethe key from the ignition.
If you operate the machine outside the working area where the mowing is performed, always turn the mowing mechanism off and raise it to the transport
position.
If mowing is turned off, the mowing mechanism must always be in the transport position.
Always turn off the mowing mechanism as well as the engine and removethe key from the ignition if:
• you are cleaning the machine
• you are removing the grass clogging the mowing mechanism
• you have run over a foreign object and it is necessary to find out if the machine is not damaged, or to remove the damage
• the machine is vibrating unnaturally in a vigorous manner and it is necessary to find out the cause of vibrations
• you are repairing the engine or other movable parts (disconnect also the cables from the spark plugs)
Before you start t working with the machine, remove all stones, pieces of wood, wires, bones, fallen branches and other foreign objects from the area on
which the mowing will be performed as they can fly out whilemowing. Whenworking, avoid molehills, concrete posts, stumps, garden bed and pavement
curbs as these must not come into contact with the blades in order to prevent damage to the mowing mechanisms or the machine mechanism. In case of
hitting a solid object, stop, turn off the mowing mechanism as well as the engine and check the entire machine, primarily the steering mechanism. If need
be, carry out repairs before restarting the machine. Remove all defects before further use. Before starting the work, thoroughly check the tension of belts,
sharpness of blades and whether it is cleans inside the pressed piece of mowing mechanism. Rotary blades are sharp and can cause injury. Use protective
gloves or wrap the blades when handling them. Check the nuts and bolts fixing the blades on a regular basis and make sure they are tightened with the correct tightening torque (see sectionsection 7.21). Pay increased attention to self-locking nuts. The self-locking ability of the nut is reduced after its second loosening, therefore the nut has to be replaced with a new one. The components of the grass collector are subject to strains, they can be damaged, their functions worsened and objects may fall out from the bin. Check the components regularly and if needed, replace those components which need to be replaced
according to the recommendation of the machine manufacturer.
Where possible, avoid working with the machine on wet grass.
Avoid obstacles (e.g. a sudden change inslope gradient, ditches etc.) where the machine could turn over.
Operate the machine in day light or under conditions ofgood artificial lighting only.
It is forbidden to run the machine on the public roads.
Do not wear loose clothing and shorts when operating the machine. Use solid, fully closed shoes.
Do not operate the machine after consuming alcohol, drugs or medication affecting receptiveness.
Do not operate the machine if you suffer from dizziness, faintness or if you are otherwise weakened or unable to concentrate.
Do not let the engine run in closed spaces. Although odourless, exhaust fumes contain deadly, poisonous substances.
Do not start the engine without the exhaust pipe.
Observe all requirements concerning fire safety stated in the sectionsection 1.1.4.
Noise generated while mowing does not normally exceed the highest values of acoustic pressure and acoustic power which are stated in sectionsection 3.
of "Technical parameters" of this manual. However, the level of noise can be increased, in some cases, for a short time in certain conditions and due to the
property of ground. The machine manufacturer recommends wearing hearing protection as the exposure to extremely loud noise or long lasting noise may
cause permanent hearing damage.
Warning !
This self-propelled mowing machine can cut hands, legs or shoot out objects in case of not observing worksafety.
Do not place hands or legs under the cover of the mowing device. Always keep parts of your body away from the rotating or moving parts of the mower.
Page 7
ENGLISH
6
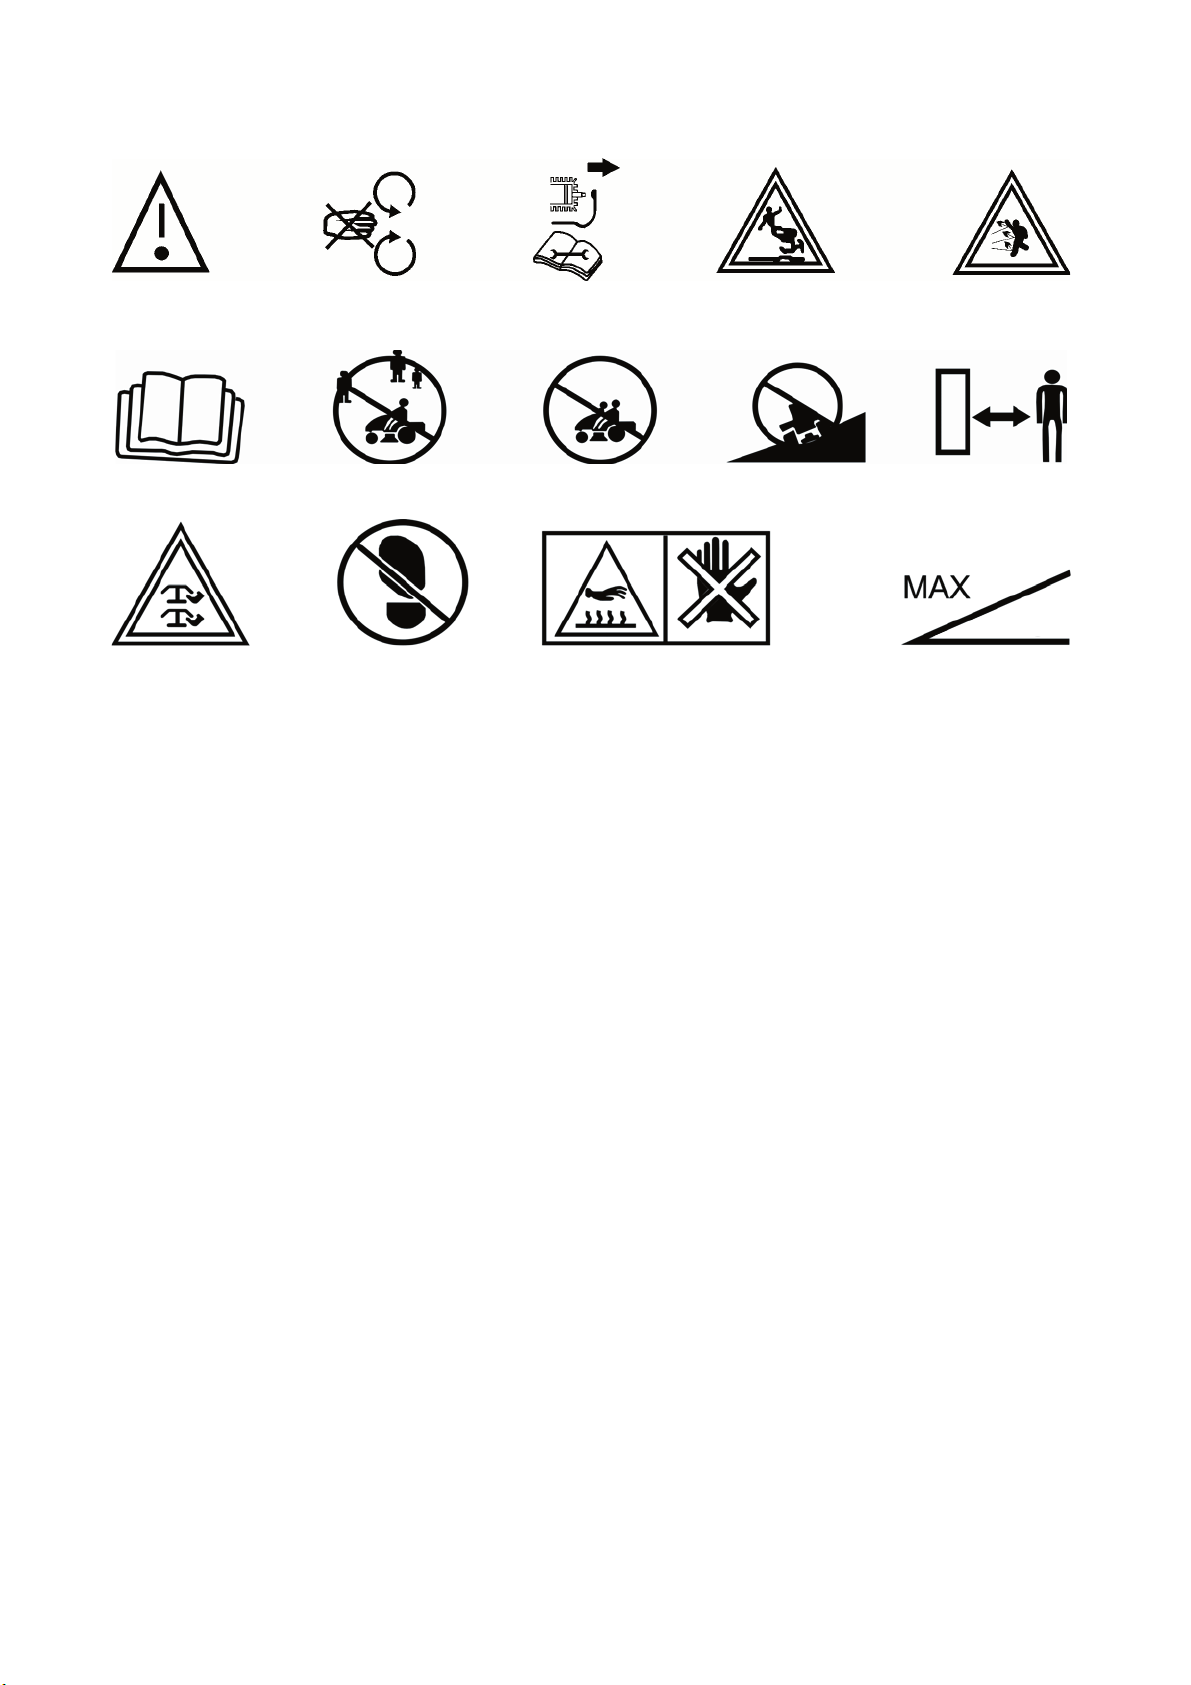
GRAPHICAL REPRESENTATION OF WARNINGS AND ADVICES ENGLISH
Danger Keep hands out
when machine is
running
At a repair proceed
acc. to the manual
Never leave the
mower unattaneded
when it is running
Flying-off objects
Read the User's
manual
Do not mow in the
vicinity of persons
Never carry other
persons
Never drive across a
slope
Keep unauthorized
persons in a safe
distance
Rotating knives Do not step on Do not touch – Risk of burn Max. working gradient 10°
10°
The above illustrated labels and stickers are affixed to the machine.
1.1.1 WORK ON A SLOPE
Slopes are the main cause of accidents, loss of control over the machine or subsequent turning over of the machine that can result in a serious injury or death.
Mowing on a slope always requires increased attention. If you are not sure, or it is above your capabilities, do not mow on a slope. The self-propelled mowing
machine may be used on slopes with a maximum gradient of up to 10°(17%) and only in the direction of the thalweg, i.e. up and down. Riding along the contour
line is not permitted. Changing directions requires increased caution. Do not turn on a slope unless it is necessary. Beware of holes, roots and uneven ground.
Uneven ground may cause the machine to overturn. High grass may cover hidden obstacles. For this reason, remove all obstructing objects beforehand (see previous section 1.1) from the area where the mowing will be performed. Choose such a speed that you will not have to stop on the slope. Perform all moves on the
slope slowly and smoothly. Do not perform any sudden changes in speed or direction. Avoid starting or stopping on a slope. In case the wheels are losing adhesion, stop the blade power and ride downwards slowly. When on a slope, be careful and set the mower in motion slowly to prevent from making a "jump." Always
reduce the machine travel speed when approaching a slope, especially when riding downwards. Reduce the travel speed to the minimum in order to utilize the
brake effect of the gearbox.
1.1.2 DO NOT PERFORM
Do not mow near a dump, hollow or banks. The mower may overturn suddenly if a wheel gets over the border of the hollow, ditch or edge, and can tear off.
Do not mow wet grass as the reduced adhesion may cause the machine toskid.
Do not try to maintain stability by stepping on the ground.
1.1.3 CHILDREN’S SAFETY
A tragic accident can happen if the mowing machine operator is not prepared for the presence of children.
The movement of the mowing machine attracts their attention. Never rely on the fact that the children have remainedin the place where you last sawt them
standing.
Do not leave children without supervision in the place where you are mowing the grass.
Be alert and turn off the machine in case the children are approaching it.
Before and during reverse look behind yourself and at the ground.
Never transport children as they can fall down and get seriously injured, or they could hazardously interfere in the machine control. Never permit children
to operate the machine.
Pay extra attention in places with limited visibility (in the vicinity of trees, bushes, walling, etc.).
1.1.4 FIRE SAFETY
With the use of the mowing machine it is necessary to follow the rules and regulations of work and fire safety related to work with this type of machine. Remove
inflammable substances (dry grass, leaves, and likewise) on a regular basis from the area of the exhaust, engine, accumulator and from all places where they
could come into contact with petrol or oil, consequently ignite and set the machine on fire.
Let the engine of the mowing machine cool down before You store it in a closed space.
Pay extra attention when working with petrol, oil and other combustibles. They are highly inflammable matters with explosive vapours. Do not smoke while
working . Never unscrew the cap of the tank and refill the petrol when the engine is running, or if the engine is hot or if the machine is in a closed space.
Check the petrol supply before use, do not fill the petrol up to the tank neck. The temperature of the engine and sun as well as fuel expansivity may result
in an overflow and ensuing fire.
To store combustibles, only use the vessels specified for this purpose. Never store any canister with petrol or the machine inside a building in the vicinity of
any source of heat.
Pay extra attention when handling the accumulator. The gas in the accumulator is highly explosive, therefore do not smoke or use an open fire in the vicnity of the accumulator in order to prevent serious injuries.
Page 8

ENGLISH
7
USE AND TECHNICAL DESCRIPTION ENGLISH
2. USE AND TECHNICAL DESCRIPTION
2.1 MACHINE USE
AJ 102 or AG 122 type machine with the commercial name STARJET is a two-axle self-propelled mowing machine intended for mowing flat maintained
grass areas with the maximum height of vegetation of 10 cm, e.g. in parks, gardens and playgrounds, or on gentle slopes on which there are no foreign
objects (fallen branches, stones, solid objects, etc.). The gradient of the slope must not exceed 10° (17%).
Always slow down when driving on uneven ground and use ramps when crossing local unevenness higher than 8 cm (curbs). There is a danger of serious
damage to the machine without the use of ramps.
Only the accessories whose utilisation is approved by the machine manufacturer may be connected to the mower.
The use of other accessories means the immediate loss of the guarantee.
2.2 TECHNICAL DESCRIPTION
AJ102 or AG122 type mowing machine consists of the following basic groups:
2.2.1 MACHINE FRAME
The machine frame is welded from steel tubes and metal sheets of 3 mm thickness. It is a supporting element of the engine, gearbox, front and rear axles,
steering, drives, mowing mechanism, accumulator, fuel tank and other essential equipment of the machine.
2.2.2 ENGINE INCLUDING ELECTRICAL INSTALLATION
The engines used in mowing machines are four-stroke petrol engines with a vertical output shaft. The engine is fastened firmly to the frame in the front part
of the machine. The drive from the engine is transmitted to the gearbox by a V-belt. The accumulator is positioned either in a box under the seat or under
the front bonnet depending on the machine model.
2.2.3 GEARBOX INCLUDING REAR WHEEL DRIVE
The gearbox is of a type with a hydrostatic transmission of power. The gear change is carried out by depressing the travel pedal smoothly forwards or backwards.
2.2.4 FRONT AXLE WITH WHEELS INCLUDING STEERING UNIT
The front axle is of a massive cast-iron construction. It is suspended on a hollow pivot enabling the swing of wheels. The steering is performed by means of
a steering wheel pinion meshed into a gear segment.
2.2.5 BY-PASS
The by-pass lever serves todisengage and engage the drive from the gearbox to the rear wheels. It is located close by the rear left wheel.
The position of its location in front of the wheel or behind the wheel depends on the machine model.
2.2.6 BONNET AND PLACE OF OPERATOR
The bonnet is made of plastics. The metal parts coherent with the bonnet are protected with powder paint coating. The place of the operator is ergonomically designed so that all control elements are easily accessible and easy tocontrol. The seat used ensures comfortable operation.
2.2.7 MOWING MECHANISM
The mowing mechanism consists of a cover, main plate, pulleys, shaft with bearings and two mowing blades. The drive of the mowing mechanism is carried
out by a V-belt from the engine via an electromagnetic clutch which is fixed on the output shaft of the engine. The cover made of a thick steel sheet is used
on machines with a mowing width of 102 cm, machines with a mowing width of 122 cm are equipped with a cover made as an aluminium casting.
2.2.8 GRASS COLLECTION BIN
The grass collection bin is constructed of a frame, lid and textile bag. The frame is made of steel tubes.
2.3 MACHINE EQUIPMENT
Hydrostatic gearbox TUFF-TORQ K46
Hydrostatic gearbox TUFF-TORQ K62
BUZZER
ENGINE HOUR METER
LOCK OF DIFFERENTIAL
MULCHING FLAP
CRUISE CONTROL
AUT/MAN SWITCH
TRIPLEX KNIFE
Page 9

ENGLISH
2.4 MARKING
Each self-propelled mowing machine is marked with an identification plate located under the seat.
It includes the following data:
1. Type of machine
2. Serial number
3. Year of production
4. Name and address of manufacturer
5. Engine power output
6. Engine speed in rpm
7. Weight
8. EC regulations product conformity was assessed by
9. Mark of product conformity
10. Guaranteed noise level acc. to 2000/14/EC directive
The serial number shall be recorded on the second page of this manual cover
by the dealer upon handing over the machine.
8
USE AND TECHNICAL DESCRIPTION ENGLISH
Page 10

ENGLISH
9
TECHNICAL PARAMETERS ENGLISH
3. TECHNICAL PARAMETERS
AJ102 type
* Total value of vibration acceleration ( m.s
-2
) according to EN 836+A1/A2, appendix G
- * total vibration avaccording to EN 1032
- ** vibrations transferred to an ahvarm according to EN 1033
AG122 type
The specificdata for your mowing machine can be found in the following tables according to the model number which is written down on the inner side of
this manual cover.
Note:
Engines:
BS15 Briggs&Stratton 15,5HP I/C AVS
BS16 Briggs&Stratton 16HP VANGUARD V-TWIN
BS17I Briggs&Stratton 17,5HP INTEK
BS18 Briggs&Stratton 18HP VANGUARD V-TWIN
BS20 Briggs&Stratton 20HP VANGUARD V-TWIN
BS18I Briggs&Stratton 18HP INTEK
BS20I Briggs&Stratton 20(21)HP INTEK
BS22I Briggs&Stratton 22HP INTEK
HO16 Honda 16HP GCV530
HO20 Honda 20HP GXV620
TE17 Tecumseh 17HP ENDURO
TE20 Tecumseh 20HP ENDURO EP
TE22 Tecumseh 20HP ENDURO EP
TE25 Tecumseh 20HP ENDURO EP
Gearboxes:
TT46 TUFF-TORQ K46
TT62 TUFF-TORQ K62
Engine
Revs 앐100
rpm
Declared emission level of
acoustic power in operator's
place L
pAd
(dB) EN ISO 11201
Guaranteed level
of acoustic power
L
WA
(dB)
Weighted effective value of vibration acceleration (min.s-2)
seat steering wheel floor
BS18 3000 84,6 105 0,14 2, 16 1,35
BS21I 3000 89,8 105 0,31 2,53 1,67
BS20 3000 86,6 105 0,19 2,75 1,34
BS22I 3000 87 105 0,9* 2,66**
HO20 3000 86,9 105 0,19 2,65 1,54
Engine
Revs 앐100
rpm
Declared emission level of
acoustic power in operator's
place L
pAd
(dB) EN ISO 11201
Guaranteed level
of acoustic power
L
WA
(dB)
Weighted effective value of vibration acceleration (min.s-2)
seat steering wheel floor
BS15 2600 85,0 100 0,16 2,48 1,72
BS16 2800 83,1 100 0,30 1,52 0,73
BS17I 2700 86 100 0,94* 3,34**
BS18 2800 83,3 100 0,50 1,38 1,20
BS18I 2800 83,1 100 0,41 1,75 1,19
BS21I 3000 84,5 100 0,17 2,07 1,59
BS20 3000 86,0 100 0,19 2,75 1,34
HO16 2800 85 100 0,93* <2,5**
HO20 2800 86,9 100 0,19 2,65 1,54
Page 11

10
TECHNICAL PARAMETERS ENGLISH
Page 12

TECHNICAL PARAMETERS ENGLISH
11
Page 13

UNPACKING ENGLISH
4 . UNPACKING
The self-propelled mowing machine is delivered in crates reinforced with cratewood. Some machine components have been dismantled in the manufacturing plant fortransport reasons. They will be reassembled before the machine is put into operation. Unpacking the machine and preparing it for operation is
performed by the vendor within the framework of service before sale.
4.1 CHECK AFTER UNPACKING
After removing the wrapping take the machine down carefully from the pallet - use the ramps to prevent damage to the machine.. Check if the machine was
not damaged during transport. Also unpack all dismantled components and check them.
The basic packaging includes:
• mowing machine
• steering wheel
• seat
• grass collection bin (it is partially dismantled and is in the cardboard box together with the suspension, connecting parts and two triangular selfadhesive yellow labels)
• documentation (packaging document, mowing machine user's manual, engine operating instructions, accumulator operating instructions, Service book)
4.1.1 DISPOSAL OF PACKAGING
After the unpacking the machine it is necessary to dispose of the wrapping. When disposing, observe the respective law on waste materials valid in the country of the machine user. Separate the packaging material according to the appropriate classification of packaging. This procedure can be entrusted to a specialized firm.
4.2 PREPARATION FOR START UP
With respect to the technical character of this work, the mowing machine preparation
for start up is carried out by your vendor (in accordance with the instructions of the machine
manufacturer).
4.2.1 STEERING WHEEL ASSEMBLY
Place the machine on an even surface and align the front wheels into a straight direction.
Mount the steering wheel and secure it by the supplied pin.
4.2.2 SEAT ASSEMBLY
Remove the seat wrapping cover.
Put the seat on its place in the machine and fasten itusing the screws just
as they are preassembled in the seat.
4.2.3 ADJUSTMENT OF SEAT POSITION
Adjust the position of the seat in the following way:
Loosen the screws with plastic roses.
Shift the seat forward or backward to the desired position.
Retighten the screws with plastic roses.
4.2.4 ACCUMULATOR CONNECTION
When starting up the accumulator, proceed according to the instructions stated in the Accumulator operating instructions.
The accumulator is placed in a box under the seat (at the SJ2... and SJ4... machine type) or under the front bonnet (at the SJ8... a SG8... machine type).
Loosen the screws on the accumulator pole outlets.
Connect the red wire to the (+) pole of the accumulator and retighten the screw.
Connect the brown wire to the (–) pole of the accumulator and retighten the screw.
WARNING:
Reverse connection of the wires than stated above will result in damage to the machine.
When disconnecting the accumulator, always disconnect the (–) pole first.
Follow the instructions for maintenance stated in the accumulator operating instructions.
12
Page 14

UNPACKING ENGLISH
4.2.5 SUSPENSION ASSEMBLY
Unscrew the two central screws on the rear plate of the mowing machine.
Place the suspension so that its fastening holes coincide with the threaded holes.
Fasten the suspension by means of the previously unscrewed screws.
4.2.6 GRASS COLLECTION BIN ASSEMBLY
The grass collection bin is preassembled, it is necessary to mount it to the machine and adjust it.
Take out the grass bin from the crate, open the bag 1, tilt down the front tube 2, insert the upper screws 3 and 4, and tighten them slightly.
Suspend the grass bin prepared in this way onto the rear part of the mowing machine, align it with the mudguards and tighten screws 3 and 4 firmly.
Removethe grass bin from the machine and put it on its rear handle with the inlet opening facing upwards. Unscrew the nuts from screws 20 under the lid
and insert corner reinforcements 5 under the upper and bottom tubes. Screw the nuts on screws 20 and tighten them firmly.
Tilt down left support 6 and right support 7. Insert the bottom tube 8 into the bag. Connect bottom tube 10 from outside of the grass bin usingscrews 11,
and tighten these screws firmly. Attach tube 8 to the front tube 2 and to the corner reinforcementsusing screws 9.
Grass collection bin 360 l:
Connect the second bottom tube 12 from outside of the grass bin using screws 13. Insert the upper handle into the holes in the lid, attach sheet 14 to the bottom
side of the lid and fasten the handle and sheet usingnuts 15.
Grasp the grass collection bin (300 l / 360 l), suspend it on the brackets on the rear plate of the mowing machine, and make sure it is aligned with the mudguards. If there is any deviation, loosen the screws, readjust the bin position and retighten the screws.
If it is not possible to align usingthe method stated above, perform the adjustment by shifting the brackets on the rear plate.
After adjusting, take down the grass bin from the machine, tighten all the screws and attach the bag to the frame using the plastic clips.
Pass lifting lever 18 through the upper hole in the lid and attachit with the M5x12 screw and nut.
Attach contact spring 19 of the safety switch.
Check the tightness of all screws and nuts.
300 l GRASS BIN 360 l GRASS BIN
4.2.7 GRASS COLLECTION BIN SUSPENSION
Grasp the assembled grass collection bin (300 l / 360 l) with both hands and lift it.
Tilt it so that is reclined inthe 40° angle and suspend it from the brackets on the machine rear plate.
After correct installation, stick the triangles (yellow self-adhesive labels) on the bin and machine so that their tops are opposite each other.
Check the correct function of the safety switch.
When the lid is closed,contact spring 19 of the safety switch must keep the switch in the switched on state.
13
Page 15

START UP ENGLISH
5. START UP
With respect to the technical character of this work, start up of the mowing machine is carried out by your vendor (in accordance with the instructions of
the machine manufacturer).
5.1 ENGINE OIL LEVEL CHECK
Proceed according to the engine operating instructions. Follow all the instructions stated in the section 7.1 "Summary of checks and maintenance".
5.2 ACCUMULATOR CHECK
Perform according to the accumulator operating instructions.
5.3 FILLING THE TANK WITH PETROL
The machine is delivered without fuel for safety reasons.
Fill the tank only if the engine is turned off and cold.
Only use petrol with the octane number as specified in the engine operating instructions.
Depending on the machine version, the tank is placed either under the front bonnet or in the left mudguard.
Open the tank cap slowly as there may be excessivepressure of petrol vapours in the tank.
When refuelling, use a canister with a funnel.
Do not overfill the tank.
The petrol level height in the tank can be controlled through a slot in the left-hand part of the seat column.
Always wipe the area around the tank cap dry as well as the cap.
Also, clean the entire tank regularly as the impurities contained in the fuel may cause failure.
When manipulating with the fuel, do not eat, smoke or use an open flame.
14
Page 16

MACHINE CONTROL ENGLISH
6 . MACHINE CONTROL
6.1 DESCRIPTION AND FUNCTION OF CONTROLS
6.1.1 MOWING MECHANISM SWITCH
The switch of the mowing mechanism switches on the electromagnetic clutch whose pulley transfers the drive from the engine by means of the V-belt to
the pulley of the mowing mechanism. The switch is locked in "OFF" position against unwanted switching on. To switch on, it is necessary to pull
the switch lever out a little and tip it to the "ON" position.
OFF
ON
6.1.2 SWITCH BOX
The key has 3 positions:
OFF - ignition switched off
ON - ignition switched on
START - engine start
6.1.3 GAS CONTROL LEVER
It controls the engine revolutions.
The individual positions of the lever are, as follows:
MIN Engine idle running
MAX Engine max. revolutions
CHOKE * Engine cold start
* This gas control lever is only provided in machines equipped with BS15, BS17, TE 17 and H 16 engine.
6.1.4 CHOKE
It enables a cold engine to be started. The machines equipped with the BS15, BS17, TE 17 and H 16 engine
are not provided with independent choke.
6.1.5 BUZZER
After the grass collection bin is full, the circuit is closed by means of a flap on the rear plate
of the bin and the buzzer sounds. However, the mowing mechanism drive is not disengaged.
6.1.6 HEADLAMP SWITCH
The headlamps placed in front on the bonnet are turned on and off by a switch positioned
together with other switches by the steering wheel.
6.1.7 ENGINE HOUR METER
The engine hour meter is installed dependending on the machine model.
It is only in operation when the ignition is switched on and the seat switch
is switched on (automatically by the weight of the operator).
Any manipulation with the engine hour meter means the loss of guarantee.
If a failure of the meter occurs, inform your service immediately.
15
Page 17

MACHINE CONTROL ENGLISH
6.1.8 CRUISE CONTROL SWITCH
The cruise control switch is installed in the machine depending on the model.
6.1.9 AUT/MAN SWITCH
The AUT/MAN (AUTOMATIC-MANUAL) switch is installed in the machine dependending on the model. When set to the "MAN" position, it is disengaged from operation and the mowed mass may accumulate in the discharge tunnel. This is why the "MAN" position is only intended for short-term use at
the end of mowing of very small remainders of area. When it is set to the "AUT" position, the function of mowing is automatically switched off once the
grass collection bin is full.
Position Grass collection bin is full Mowing mechanism
AUT NO ON
AUT YES OFF
MAN NO ON
MAN YES ON
6.1.10 GRASS COLLECTION BIN EMPTYING SWITCH
The switch of the grass collection bin dumping is installed in the machine depending on the model.
The switch has two positions:
- LIFTING
- LOWERING
The end positions of the bin in the lifted or normal position are secured with a safety clutch.
When lifting or lowering the bin, keep the switch pressed. As soon as the end position is reached,
release the switch immediately, otherwise the electrical installation can breakdown.
6.1.11 BRAKE
When the brake pedal is fully stepped on, the mowing machine is brought to a stop.
Never use the brake simultaneously with the travel function – threat of damage to the gearbox.
6.1.12 PARKING LEVER
The parking brake lever has 2 positions. Before shifting the lever into "B" position, step
on the brake pedal. Lock the lever in "B" position by rotating it slightly.
To disengage the parking brake, step on the brake pedal, which causes the the brake lever
latch to be automatically released.
A OFF
BON
6.1.13 TRAVEL PEDAL
It controls the drive of wheels and machine travel speed in both directions.
Forward drive: Step on the pedal slowly with the tip of the footin the "F“ direction.
The speed depends on the degree of stepping down on the pedal and vice versa.
Backward drive: Step on the pedal slowly with the heel in the "R“ direction.
The speed depends on the degree of stepping down on the pedal and vice versa.
As soon as the pedal is released, it automatically returns to the "N“ (neutral)
position and the machine stops. The travel pedal is equipped with a safety switch
which will prevent from starting the engine if the pedal is stepped on.
WARNING !!!
Change in the drive direction is only possible once the machine has stopped.
16
WARNING !!!
Cruise control only worksif the ignition is on. You may switch off cruise control by pressing
on the break pedal or by turning the switch off. Only use cruise control for long and direct travel only.
Before any change in travel direction, switch the cruise control off with the switch.
Page 18

MACHINE CONTROL ENGLISH
6.1.14 BY-PASS LEVER
The by-pass lever serves for disengaging the gear of rear wheel drive.
It has two positions:
Position Rear wheels drive Use
0 OFF machine push, engine in standstill
1 ON drive, engine running
* The location of the lever in the machine dependson the machine model.
6.1.15 DIFFERENTIAL LOCK PEDAL
This pedal is installed in the machinedepending on the model.
It has 2 positions. To engage the lock, step on the pedal with your heel,
it will be disengaged automatically once thepedal is released.
6.1.16 MOWING MECHANISM HEIGHT ADJUSTMENT LEVER
It serves to adjust the mowing mechanism height above the ground.
It has 7 working positions corresponding to the height of mowing of 3 to 9 cm.
The greater the number of the lever position the higher the vegetation remains after mowing.
When driving the machine without mowing, the lever must be set in position "7."
6.1.17 MULCHING FLAP LEVER
This lever is installed in the machine depending on the model. It has 2 positions.
When it is set in position "A", the discharge tunnel is closed. This enables the function of mulching
in the course of which the mowed grass is spread out under the mowing machine.
The vegetation can be mulched in a maximum of 1/3 of its height. The height of vegetation after
mowing must remain at a minimum of 5 cm. To collect the mowed grass into the bin, shift the lever
to position "B" in order to switch to the mulching flap. Before shifting the lever stop, let the mowing
mechanism clean out, shift the lever and carry on in driving. If this procedure is not observed, it can
result inthe improper functioning of the flap and clogging of the discharge tunnel. After finishing
the work, clean the mowing mechanism and discharge tunnel thoroughly to ensure the correct
functioning of the mulching flap.
6.1.18 FUEL SUPPLY CLOSURE
The AJ 102 machines equipped with the BS15 engine do not have a fuel pumpwhich is why they are provided with a closing tap.
The tap serves prevent spontaneous inflow of petrol into the engine in case the carburettor is untight as the tank is placed higher than the carburettor.
The tap should be closed upon any longer stopping engine time. The Exclusive model is equipped with fuel valves with “reserve” position.
Use this position only for emergency driving to the final location.
17
WARNING !!!
Use the differential lock only if driving directly forward, and only in case of necessity
(slippage). Never use the lock when changing the driving direction.
Not observing these rules may result in serious damage to the gearbox!
Page 19

MACHINE CONTROL ENGLISH
6.2 OPERATION AND ATTENDANCE
Machine safety protection
The mowing machine is equipped with safety contacts which are closed by:
- switch placed under the seat
- switch of the grass collection bin suspending, or deflector
- switch of the grass collection bin fill-up
- switch of the travel pedal
The engine will automatically stop if the driver leaves the seat. The engine can only be started up if the mowing mechanism is switched off and the grass
collection bin is suspended, or the deflector is attached, which prevents the mowed grass from the entering into the inlet tunnel of the collecting bin during mulching.
6.2.1 SUSPENSION OF GRASS COLLECTION BIN
Grasp the grass collection bin with both hands and lift it. Tilt it so that it is reclinedin the 40° angle and suspend it on two brackets located on the rear
side of the machine. The tops of yellow triangle labels must be opposite each other (see the section 4.2.7).
6.2.2 ENGINE START
• Check the petrol level in the tank.
• Open the petrol supply closure - valid only for BS15 engines with a power output of 15.5 HP
• Sit down on the machine seat comfortably, shift the mowing mechanism height adjustment lever 6.1.17 to position "7".
• Set the mowing mechanism switch 6.1.1 to the "OFF" position.
• Caution, do not step on the travel pedal 6.1.14.
• Set the gas control lever 6.1.3 to the "MAX“ position - only on machines with an engine that has apower output of 16 HP and higher.
• Set the gas control lever 6.1.3 to the "CHOKE“ position - only on machines with BS15 engines with a power output of 15.5 HP.
• Pull out choke 6.1.4 - only on machines with an engine that has a power output of 16 HP and higher.
• Do not manipulate the mowing mechanism height adjustmentlever 6.1.17.
• Turn the ignition key 6.1.2 to the "START“ position.
The time of start must not exceed 10 seconds – if this time is exceeded, damage to the battery may be caused.
• The engine "is running" - release the ignition key. The key will automatically return to the "ON" position.
• push choke 6.1.4 inwards gradually - only on machines with an engine with apower output of 16 HP and higher.
• Set the gas control lever 6.1.3 slowly to the "MIN" position (reduce the engine speed).
• Let the engine run for several minutes before turning on the mowing mechanism.
6.2.3 ENGINE STOP
• Set the gas control lever 6.1.3 to the "MIN" position.
• Turn off the mowing mechanism using switch 6.1.1 (see the section 6.2.4).
• If the engine is overheated, let it run for a while at minimum revolutions.
• Turn off the engine with key 6.1.2 rotation to the "STOP" position and remove the key from the ignition.
6.2.4 MOWING MECHANISM TURNING ON AND OFF
a) Turning on
• Set the gas control lever 6.1.3 to the "MAX" position.
• Set the working position of the mowing mechanism and with it also the height of mowing by the mowing mechanism height setting-up lever (see the
section 6.1.17 and 6.2.5).
• Set the mowing mechanism switch 6.1.1 to the "ON" position.
The mowing mechanism will be switched on provided:
- operator is sitting on the machine seat
- grass collection bin is suspended, contingently the deflector is put in
- switch AUT/MAN 6.1.9 (only for models equipped with switch AUT/MAN 6.1.9) is in the "AUT" position and the basket is empty.
- AUT/MAN switch 6.1.9 is in the "MAN" position - valid only for models equipped with the AUT/MAN switch
b) Turning off
• Set the mowing mechanism switch 6.1.1 to the "OFF" position.
• If the driver leaves the seat, the engine will stop automatically, as well as the rotation of the mowing blades.
WARNING !!!
Never switch off the mowing mechanism by just getting off the seat. Unless you switch the ignition key from the "ON" position
to the "OFF" (STOP) position, a part of the electrical installation is still live which may lead to damages.
IMPORTANT
Before turning the ignition off, reduce the engine revolutions to slow speed in the event ofself-ignition, not observing this instruction
may result in damage to the engine and exhaust.
WARNING !!!
Never stop the engine by just getting off the seat, as the key left in the ignition switch may cause a defect in electrical installation.
Always rotate the key to the "OFF" position and remove it from the switch box.
DANGER !
Never leave the engine running in a closed or poorly ventilated room. Exhaust fumes containing carbon monoxide are very dangerous.
Keep Your hands, legs and loose clothes out of the reach of moving parts and of the exhaust.
18
Page 20

MACHINE CONTROL ENGLISH
6.2.5 MOWING MECHANISM HEIGHT ADJUSTMENT
Shift the mowing mechanism height adjustment lever 6.1.17 upwards if you want to set up the mowing mechanism higher above the ground, or shift the
lever downwards if you want to set up the mowing mechanism closer to the ground. Position "1" is used to follow terrain unevenness. Do not use this
height adjustmentpermanently as there is danger of increased wear of mowing mechanism componentss. The mowing mechanism is equipped with 4
traversing wheels which lift the frame with mowing mechanism in case of terrain unevenness and thus they serve as protection of the mowing blades
against damage. If you want to lower the controlling force of the mowing system (type AG122)
change the mount of the auxiliary spring to the left side (see pic.).
This setting is applied to all machines by the manufacturer.
6.3 TRAVEL
Before the onsetof travelling, step on the brake pedal 6.1.12 to make sure that the parking brake is disengaged. The parking brake lever 6.1.13 must not remain
in position "B"! The by-pass lever 6.1.15 must be set in position "1", i.e. the by-pass of travel must be disengaged. When travelling to the place where mow-
ing is to be carried out, the mowing mechanism must be switched off and lifted to the highest position, i.e. the lever of the mowing mechanism height adjustment must be in position "7." When crossing obstacles higher than 8 cm (curbs, etc.) it is necessary to use ramps in order to prevent damage to the mowing mechanism and gearbox.
Perform the drive in the following way:
• Decrease the speed of the engine by shifting the gas control lever 6.1.3 to the "MIN" position.
• When getting started, step on travel pedal 6.1.14 slowly in accordance with the desired direction of the drive - abruptly stepping down on the pedal
increases thedanger of injury.
• Change in drive direction from forward to backward or vice versa is only possible once the machine has stopped. If the machine has not stopped there isdan-
ger of gearbox failure.
• Never use the travel pedal and brake pedal simultaneously - otherwise there is danger of gearbox failure.
6.4 TRAVEL SPEED AND GRASS MOWING
Set the gas control lever 6.1.3 to the "MAX“ position. Adjust the mowing mechanism height using lever 6.1.17 (see section 6.2.5). There is a generally accept-
ed rule that thewetter, higher and denser grass is the lower the speed to be used is. If the speed of the machine is too high, or in the case of a heavy load,
the turning speed of knives decreases, the quality of mowing goes down and the discharge tunnel may become clogged. In such conditions, always set the
motor rpm to maximum. If the grass is too high, the mowing should be done several times. The first cut in the maximum height, or with reduced width of
mowing, and the next cut in the required height. We recommend mowing in the lengthwise as well as crosswise direction. Machine overlapping of thepreceding cut enables an increase in the efficiency of knives, and also the look of the mowed area will be improved. Driving on an uneven surface may result in
the variation of speed. With respect to the conditions, we recommend the following speeds:
6.5 TRAVEL ON A SLOPE
This mowing machine may operate on slopes with a gradient of up to 10° (17%). When working on a slope always use a lower speed of travel. Only travel
vertically to the contour line, i.e. upwards and downwards. Travel along the contour line is not permitted. Control the speed of travelling using the gear change
lever. Travel downhill and across the obstacles at lower speed. Changing directions and turning around on a slope requires increased caution. When stopping
the machine on a slope, always use the parking brake. When the machine is being overloaded on slopes with a gradient greater than 10° (17%), it may result
in serious damage to the gearbox. The machine manufacturer does not bear any responsibility for a defect resulting from such use of the machine.
6.6 DISCHARGING OF GRASS COLLECTION BIN
• Stop, apply the brake, and use the parking brake if you are on a slope.
• Switch off the mowing mechanism by the toggle switch 6.1.1. If the AUT/MAN switch is installed in the machine, leave this switch in the "AUT" position.
• Set the gas control lever 6.1.3 to the "MIN" position.
• For machines equipped with manual lifting and lowering of the grass bin, shift the lifting lever 18 up fully (see section 4.2.6), and then use this lever to
tilt the bin. Leave the bin to discharge freely, release it gradually and return it to the initial position.
• For machines equipped with a device for mechanical lifting and lowering of the grass bin, press the switch to
the "LIFTING" position and keep it pressed until the bin is entirely tilted. After the desired position is
reached, release the switch and wait until the bin is discharged. Then switch the switch to the "LOWERING"
position and keep it pressed until the bin is entirely lowered. Once the initial position is reached, release the
switch.
• After lowering the bin into the initial position, switch on the mowing mechanism using the toggle switch
6.1.1. If the machine is equipped with the RESET switch (6.1.10), press this switch to activate the mowing
mechanism.
• The level of basket fullness is signalized by the flap (see pic.). Shift the moveable part of the flap to increase
or decrease the arm length to change the level of basket filling. This is primarily appreciated by persons with
a weaker physique. (The moveable part inserted = maximum level of basket filling and vice versa).
Vegetation condition Recommended speed
high, dense and wet 2 km/hour
average conditions 3 – 5 km/hour
low, dry vegetation < 5 km/hour
travel with disengaged mowing mechanism < 7 km/hour
WARNING !!!
Stopping the machine is only possible by gradually releasing the foot from the travel pedal and then by stepping on the brake pedal. When stepping
on the brake pedal, the travel pedal is automatically moved into neutral position. Upon this, the braking distance is shorter than 2 m. Avoid hard impacts
to the front wheels (hard obstacles etc.). You may damage the front axle, primarily if the impact happens at highspeed!
19
AG122
AJ102
Page 21

MACHINE MAINTENANCE ENGLISH
7 . MACHINE MAINTENANCE
7.1 SUMMARY OF CHECKS AND MAINTENANCE
20
After season - before machine storage
Before season
Every 100 hours
Every 50 hours
Every 25 hours
Monthly
Regularly after each use
After first 5 hours
After first 2 hours
Before each use
Oil level check (gearbox, engine)
Engine oil change
Fuel filter replacement
Accumulator maintenance (check of electrolyte level, cleaning)
Adjustment and check of travel drive belt
Check of brake control
Check of tyre pressures
Check of cable connections (loosened quick-clamping parts)
Mowing machine cleaning
Check of bolted joints
Check of blade drive tension indented belt
Check of tension accuracy of mowing mechanism drive V-belt
Check and adjustment of front axle and steering clearances
Check of function of safety switches and elements
Check and adjustment of engine running, gearbox, electromagnetic clutch
Check and maintenance of air filter, spark plugs, or replacement
Check of mowing mechanism condition (backlash, alignment of shafts,
check and sharpening of blades)
Explanatory notes to table:
1. Change the oil more frequently if the mowing machine is loaded more or if it works at outdoor temperatures of about 35°C or higher.
2. Carry out the checks more frequently if the machine works in a dusty environment.
3. Carry out the checking more frequently if the machine works in a sandy environment.
4. Carry out the checks more frequently if a new belt is put on.
7.2 TYRE PRESSURE CHECK
Maintain the specified pressures in the tyres and check them regularly. Different values of pressure can make the travel more difficult and can eventually
lead to the loss of control over the machine. Adherence to the prescribed pressure is also important for the evenness of mowing.
• Pressure in front tyres 80 - 140 kPa
• Pressure in rear tyres 80 - 140 kPa
7.3 MAINTENANCE AFTER WORK
After finishing the mowing, lift the mowing mechanism to the highest position and switch off the drive of blades. Switch off the ignition, step on the brake pedal
and secure the machine position with the parking brake. For machines with BS15 engines (15.5 HP), close the petrol supply.
7.3.1 CLEANING
Remove all impurities and remnants of grass from the machine surface as well as from the tunnel and grass collection bin. Maintain the cloth bag of the
basket clean. If the bag becomes dirty and clogged with grass, the ability of your machine to fill the basket is lowered.
WARNING !!!
Before cleaning, washing or repairing the machine, remove the keys from the ignition switch. Always work in solid shoes,
gloves and clothes designed for work. Avoid spilling fuel, oil or other harmful substances.
Page 22

MACHINE MAINTENANCE ENGLISH
7.3.2 WASHING
Avoid washing with water in the vicinity of the electrical equipment on the control panel, accumulator, etc. Do not use high-pressure devices.
Perform washing in the following way:
• Wash the mowing machine including the attached grass collection bin on an even surface.
• Wash the mowing mechanism from inside including the inner parts of the discharge tunnel.
• Remove the grass collection bin, wash it and leave it to dry freely.
• Sponge the plastic parts of the machine with soapy water.
• Slip a hose of the appropriate diameter onto the extension pieces placed on the cover of the mowing mechanism and rinse the mowing mechanism
with water for 10 minutes. Rinsing, which is carried out with the engine and mowing mechanism running, is to be carried out immediately after the
end of every mowing.
7.4 ACCUMULATOR MAINTENANCE
Perform accumulator maintenance according to the instructions included in the accumulator operating instructions.
7.5 ENGINE MAINTENANCE
Perform engine maintenance according to the instructions included in the engine operating instructions.
7.5.1 ENGINE OIL LEVEL CHECK
Perform the engine oil level check according to the instructions included in the engine operating instructions.
7.5.2 OIL CHANGE
The engine is provided with an oil drain screw.
• Place a flat vessel with the capacity of 2 litres at minimum and prop up the machine on the opposite side of
the drain screw in order for all of the oil to will flow out from the engine
• Unscrew the drain screw and release the oil filler cap in order for the oil l flow out better and faster from the
engine.
• Screw the drain screw back on, fill the engine with the correct amount of oil specified (see the engine operating instructions) and close the oil filler cap.
• Dispose of the drained oil at the appropriate waste disposal site for the liquidation of used oils.
7.5.3 FUEL FILTER REPLACEMENT
Perform the replacement of the fuel filter according to the instructions included in the engine operating
instructions.
7.5.4 AIR FILTER MAINTENANCE
Perform maintenance according to the instructions included in the engine operating instructions.
7.5.5 SPARK PLUG MAINTENANCE
Perform maintenance according to the instructions included in the engine operating instructions.
7.6 LUBRICATION
Perform lubrication according to the lubrication chart, the
checks of functions including maintenance according to the
summary in section 7.1.
Bearings of tightening rollers, guiding rollers and bearings
of the mowing mechanism are self-lubricating.
Prior to machine storage for a longer period of time, lubricate all places thoroughly which require the lubrication.
grease
SAE 30 oil
interval in hours
21
Page 23

MACHINE MAINTENANCE ENGLISH
Greasing is used for:
• angular joints of tie rods of travel - dismantle, grease
• screw of brake pull rod - apply grease close to the hole for the screw
• screw of pull rod of mowing mechanism lifting - apply grease close to the hole for the screw
• angular joints of steering connecting rod - dismantle, grease
• angular joints of wheels pins - dismantle, grease
• bearings of front wheels
• pins of wheels passing through the axle
• centric pivot of front axle - through the grease cup
• bearings of steering wheel shaft - grease
• gear segment of steering and eccentric - grease
Oil is used for lubricating the pivots of:
• differential lock pedal
• brake pedal
7.7 BULB REPLACEMENT
Lift off the bonnet.
The bulbs of K20, 12V / 10W type are inserted in a bayonet socket.
10 W / 12V type halogen light bulbs are mounted inside M Light type headlights HLRG-510F with
a diameter of 51 mm (socket GU5.3). If you need to change the bulb, use light bulb type M light
HSS-510, or another type from a different manufacture but with the same parameters and rating.
20 W / 12V type halogen light bulbs are mounted inside M Light type headlights HLRG-35/520F
with a diameter of 35 mm (socket GU4). If you need to change the bulb, use light bulb type M light
HSS-520, or another type from a different manufacture but with the same parameters and rating.
To remove the light bulb, flip open three iron sheet flaps, place the bulb in the socket and close the
flaps back.
7.8 FUSE REPLACEMENT
Lift the front bonnet and remove the protective cover. Remove the fuse and insert a new one withthe
same value as the original fuse, i.e. 15A or 20 A. If it is not possible to start the engine or put the
mowing mechanism into operation even after the fuse has been replaced, contact anauthorized
service.
7.9 MACHINE JACK UP
If you want to jack up the mowing machine, use a jack and supports.
When jacking up, proceed as follows:
• Place the jack under the gearbox on the rear axle and jack up the rear part of the machine.
• Put two supports under both ends of the axle inside the side of the rear wheels.
• Jack up the front part of the machine and put two supports under the ends of both front wheel pintles.
• Never try to tilt the machine on the carburettor side. Motor oil may get inside the air filter!
7.10 REPLACEMENT OF MOWING MECHANISM BLADES
The mowing blades must be sharp, statically balanced and straight. These conditions are important for the evenness of the height of mowing and the quality of the cut. A blunt cutting edge worsens both the quality of mowing and the result of mowed grass collection.
Replace the blades as follows:
• Tilt the machine toward the right side and support it. If necessary, dismantle the mowing mechanism.
• Unscrew both blades, clean them and sharpen them. Check the static balance of the blades (see the figure above).
• When reassembling, make sure the bendings of the blades are pointing upwards into the cassing of the mowing mechanism.
Do not confuse the left blade with the right one. The right blade is provided with the screw that has a left-hand thread.
• Check the condition of the shear pins which serve as the protection of the mowing mechanism against damage.
If the shear pins are damaged replace them immediately.
• Tighten the fixing screws of blades thoroughly with the specified tightening torque of 30앐3 Nm. This tightening torque is attained in the moment
when the spring washer under the blade fixing screw is fully pressed and the screw is not further tightened as of this moment.
CAUTION !!
When the blades hit a solid obstacle, stop the engine immediately and check the blades! The shear pins may be damaged or cut.
Replace the cut pins with new ones provided with the machine equipment.
Also check if the fixing screws of the blades are tightened with the tightening torque as specified.
22
Page 24

MACHINE MAINTENANCE ENGLISH
7.10.1 SHARPENING THE BLADES
a) The blade may be sharpened with a file or a grinder. Do not performthe sharpening directly on the mowing mechanism. Pay great attention to the align-
ment and balancing of the blades. The vibrations generated by unaligned and unbalanced blades can cause serious damage to the engine or mowing
mechanism. When balancing, insert a screwdriver into the centering hole and set the blade into the horizontal position (see figure 7.10). If the blade
remains in this position, it is balanced. If one of the blade ends is overbalancing, grind this side until the blade is balanced. The permitted static inbal-
ance may be 2g at maximum.
b) TRIPLEX knives
Dismantle the individual blades from the holder and sharpen them separately. Particular care should be taken whenreassembling in order not to confuse individual blades. The difference in weight of individual blades can be 2g at maximum.
7.11 STEERING UNIT MAINTENANCE
Check on a regular basis inadmissable clearance between the gear segment of steering and pinion of the steering wheel shaft. If bigger clearance
is detected, eliminate it. Negligence of this maintenance may result in
damage tosteering unit components. When eliminating the clearance, first,
loosen the two M12 nuts 1 on the screw of the eccentric. Apply a suitable
spanner to the eccentric hexagonal head 2 and turn it until the clearance
is eliminated to the minimum. Then, retighten both M12 nuts 1.
7.12 CHECK AND ADJUSTMENT OF TRAVEL DRIVE BELT
The belt is tensioned correctly if it sags approx. by 1.5 cm when the force of 4 kg
is applied in the mid distance between pulleys 1 and 2.
Designation of parts in the figure:
1. engine pulley
2. guiding pulley
3. tension pulley
4. gearbox pulley
Adjustment of belt tension is performed by tightening of nut on the screw tensioning the tension
spring, and then by readjusting screw 3 (fig. 7.11) so that the spring will be tensioned to the length
of 50앐1 mm. Do not overtighten the belt. Too much tension lowers the belt’s operational life!
7.13 CHECK AND ADJUSTMENT OF MOWING
MECHANISM ADJUSTMENT
The correct adjustmentof the mowing mechanism is important to ensurehigh quality mowing.
When checking and adjusting proceed, as follows:
• Place the machine on an even surface and check the tyre pressure.
• Set the mowing mechanism height adjustment lever 6.1.17 to the position "2".
• Check the height of the mowing mechanism front edge above the ground which must be
the same on both sides, 17 - 19 mm.
• Adjust the difference by turning nut 1 after loosening locking nut 2.
The nuts are accessible after removing the accumulator box
(for SJ2..., SJ3..., SJ4..., SJ5... type machines), or the tool box
(for SJ8..., SG8...machines).
• After adjustment retighten nut 2.
7.14 CHECK AND ADJUSTMENT OF MOWING
MECHANISM DRIVE V-BELT
The V-belt of the mowing mechanism is tensioned by means of a pulley with
a spring. If the tension releases due to the working stress of the belt, increase it
by displacing the suspension eye of spring 1 into the second hole in lever 2 of the
tension pulley.
23
50앐1 mm
Page 25

MACHINE MAINTENANCE ENGLISH
24
Gearbox type Oil specification Oil level
TUFF-TORQ K46 SAE 10W-30, API CD at half of equalization tank height at minimum
TUFF-TORQ K62 SAE 10W-30, API CD level mark 5-7 on the equalization tank
7.15 REMOVAL OF THE MOWING MECHANISM
FROM THE MACHINE
• Lower the mowing mechanism to the lowest position by shifting the height adjustment lever 6.1.17 to
position 1.
• Release the V-belt by pulling the tension pulley and
remove the belt.
• Removespring 3 from the arm of the tension pulley.
• Lift the tunnel a little in its front part and free it
from the two pins welded on the mowing mechanism frame. Then shift the tunnel backwards by
about 10 cm and secure it.
• Pull out the springcotter pins from front pin 2 and
both rear pins 1 of the mowing mechanism suspension.
Note: To shift out the mowing mechanism with safety and ease, we recommend releasing lifting spring 4.
• Release both rear pins 1 of the mowing mechanism suspension usingpliers.
When releasing be careful in order not to injure your hands or fingers.
• Release front pin 2 of the suspension.
• Pull the V-belt out of the electromagnetic clutch pulley.
• Slowly withdraw the mowing mechanism from the machine to either side.
7.16 ADJUSTMENT OF BLADE DRIVE
OF THE COGGED BELT
• Lower the mowing mechanism to the lowest position by shifting the height adjustment
lever 6.1.17 to position 1.
• Loosen the bolt of the plastic cover on the right-hand side in the driving direction and
lift the released cover.
• Loosen the nut of the tensioning mechanism with cogged pulley 3 under the metal-
sheet plate so that it will be possible to turn the washer under the nut with slight resistance.
• Loosen locking nut 2 and turn nut 1 in the clockwise direction and check the tension
of the belt. The belt is tensioned correctly if it sags approx. by 0.5 cm when the force of
4 kg is applied in the mid distance between pulleys 3 a 4.
• Retighten locking nut 2 of the tensioning device and retighten the nut of the tensioning
mechanism with cogged pulley 3.
• Mount the plastic cover and tighten its fixing bolt.
7.17 REPLACEMENT OF BELTS
It is a rather demanding operation, entrust it to an authorized service.
7.18 WHEEL CHANGING
• Before changing any of the wheels, stop the engine and remove the key from the ignition.
• Place the machine on the supports by the procedure stated in section 7.9.
• Remove the protective cover from the wheel.
• Remove the retaining ring, the washer and pull the wheel down from the shaft.
There is a key on the shaft of the rear wheels.
• The rear wheels of the machines equipped with the TUFF TORQ K62 hydrostatic gearbox
are attached by means of nuts. When changing the wheel, unscrew the nuts and pull the wheel down.
When reassembling the wheel use the reverse procedure of dismantling.
• Before putting the wheel on, clean all parts and lubricate the shaft slightly with grease.
• Whenmounting the rear wheel, pay special attention tothe mutual position of the key
on the shaft and the keyway in the wheel.
7.19 HYDROSTATIC GEARBOX MAINTENANCE
To ensure the reliable function of the gearbox it is necessary to keep the oil level at the correct level. The prescribed values are stated in the table below.
The filling holes of the gearboxes are accessible after removing the tunnel from the machine (see section 7.15). If problems with the gearbox occur, contact
an authorized service immediately, otherwise danger of serious damage to the gearboxmay be posed.
Page 26

MACHINE MAINTENANCE ENGLISH
7.20 BRAKE ADJUSTMENT
If the brakes start to lose their efficiency, entrust their adjustment to an authorized service.
7.21 OVERVIEW OF TIGHTENING TORQUES OF SCREW CONNECTIONS
Mowing mechanism: Section:
Centre screw of blade .............. 30 앐 3 Nm 7.10
M12 nut of tension pulley of mowing mechanism drive .............. 45 - 55 Nm 7.14
Screw 10x25 KL 100 RIPP of tension pulley arm of mowing mechanism drive belt .............. 55 - 65 Nm 7.14
Steering unit:
M8x30 screw of steering gear segment .............. 15 - 25 Nm 7.11
M12 nut of steering gear segment .............. 35 - 45 Nm 7.11
Engine:
Screw of electromagnetic clutch .............. 60 - 70 Nm 7.11
Screw of holder of tension pulley of travel drive belt …........... 25 - 35 Nm 7.11
WARNING!!!
If any of the self-locking nuts has been unscrewed, then at the reassembly, it is always necessary to replace it with a new one.
25
Page 27

REMOVAL OF FAILURES AND DEFECTS ENGLISH
8. REMOVAL OF FAILURES AND DEFECTS
Do not execute the service operations unless you have the appropriate technical equipment and qualification. The operations mentioned below may be executed
by the machine user. Other servicing operations not mentioned here but executed by the user invalidate the guarantee. The manufacturer disclaims any responsibility for damages arisen owing to the low-qualityperformance of unauthorized service operations by the user.
26
Failure, defect
Mowing blades are mowing
unevenly
Unmown strip remains between
rotors with blades
Blades of mowing mechanism are
tearing out sods
Mowing mechanism does not
throw out grass
Drive belt of mowing mechanism
stops during operation
Drive belt of mowing mechanism
is slipping
Drive belt of mowing mechanism
is being worn out excessively
Knives cannot be put into motion
Knives are stopping with delay
Removal
Remove the accumulated grass from bottom side of the mowing mechanism. Make sure the blades are sharp and
not deformed. Check the tightening of blades. Check if the mowing mechanism height adjustmentcorresponds to
the data in section 6.1.17 and 6.2.15. If not, perform a new adjustment. Check the tension of drive belts according
to the section 7.14 and 7.16. If need be, carry out the adjustment of tensioning. Check the blade shafts. If they are
damaged or excessively worn out, replace them. Check the bodies of bearings for possible damage. With respect
to the finding, carry out the repair or replace them.
An unmown strip may remain when mowing dense grass or grass with excessively wet surface.
The travel speed should be adjusted to the mowing conditions by selecting the suitable gear. The engine should
run with the gas control lever in the "MAX" position. Check to see whether the blades i are sharp and undamaged. If necessary, replace them. Check the tension of drive belts according to section 7.14 and 7.16. If need be,
performadjustment of the tensioning.Check the bodies of bearings for possible damage. With respect to the finding, carry out the repair or replace them.
Check the setup of the height of mowing, and if need be, adjust it.
Sods are torn out more often on uneven surfaces.
Check the bodies of bearings for possible damage.
With respect to the finding, carry out the repair or replace them.
Check if the blades are not bent. If need be, replace them.
Remove the accumulated grass from the bottom side of the mowing mechanism.
In wet weather, the tunnel and lower side at the outlet from the mowing mechanism may get clogged with grass.
Do not mow wet grass. The travel speed should be adjusted to the conditions of mowing by selecting the suitable
gear. The engine should run with the gas valve fully open. When mowing high grass, first, mow once with the
mowing mechanism in the high position, then mow again with the mowing mechanism in normal position.
Adhere to the data stated in section 6.4. Check the tension of the drive belts according to sections 7.14 and 7.16.
If need be, carry out the adjustment of the tensioning.
Make sure, prmiarily after replacing the blade, that the blade is mounted correctly.
Damage to the mowing mechanism drive belt may occur when it jumps out of the pulley while the machine
is running. If it jumps out even after the check according to the following steps, it has to be replaced.
- Check the tension of the drive belt according to section 7.14. If need be, carry out the adjustment of tensioning.
- Check the belt guide.
- Check the setup of the height of mowing, if need be, adjust it.
- Find out if a foreign object is not obstructing the running of the belt. If so, remove the foreign object.
- Check all the pulleys. Bent or cracked pulleys could cause problems. If need be, replace them.
- Check the inside surface of the pulley fixed to the engine. If it is rough or there are cracks on it, it is necessary
to replace the pulley.
- Check the wear of the tensioning mechanism components. If need be, replace the worn out components.
If the grass is too high or wet, the mowing mechanism drive belt may slip.
Check the belt for wear. If it is worn out, replace it.
Check the tension of the drive belt according to section 7.14. If need be, carry out the adjustment of tensioning.
Check the tension spring of the tightener of the mowing mechanism drive belt.
Replace the stretched or damaged spring.
Check all places of the belt guide.
Find out if a foreign object is not obstructing the running of the belt. If so, remove the foreign object.
Check the pulleys. If they are damaged, replace them.
Check the setup of the height of mowing, if need be, adjust it.
Check the tension of the drive belt according to section 7.14. If need be, carry out the adjustment of tensioning.
Check whether the belt is worn out or damaged. If so, replace it. If it is slack, increase the tension.
Check the spring of the tensioning mechanism. Replace the stretched or damaged spring.
Find out if a foreign object is not obstructing the running of the belt.
If it is so, remove the foreign object.
Check the tension of drive belt according to the section 7.14. If need be, carry out the adjustment of tensioning.
If it is not possible to tension the belt more due to its considerable wear, fit on the new belt.
Find out if a foreign object is not obstructing the running of the belt. If it is so, remove the foreign object.
Check the function of the electromagnetic clutch to see if its disengagement is correct. In case of defective
function have an authorized service replace or repair it.
Page 28

REMOVAL OF FAILURES AND DEFECTS ENGLISH
27
Extreme vibration occurs when
turning on the mowing mechanism
drive
Machine travel belt is slipping
Machine travel belt is squeaking
Machine travel belt jumps
out during operation
Machine does not move when the
travel pedal is stepped on
Extreme vibration
occurs when driving
Steering is slipping or is loose
Engine does not run
Engine rotates but does not start
Machine cannot be pushed or can
be with difficulties only
"Whistling" can be heard during
travel
Check to see if the blades are not uneven or twisted, also check if they are balanced. In case they are distorted,
replace them. Check if there are burned spots or irregularities on the belt as they can be the cause of vibrations.
Replace the damaged belt.
Check to see if the bladesare not worn out or damaged. If need be, replace them.
Check the function of the electromagnetic clutch to see if its engagement is correct. In case of improper function
have an authorized servicereplace or repair it.
Check the inside surface of the pulley fixed to the engine. If it is rough or there are cracks on it, it is necessary to
replace the pulley.
Check the bottom of mowing mechanism for grass. The deposit must be removed.
Check if there is not a fault in the attachment of the engine.
If need be, retighten or replace the engine attachment screws.
Check the tension of drive belt according to section 7.14. If need be, carry out the adjustment of tensioning.
Check the tension of the travel drive belt according to section 7.12. If need be, carry out the adjustment of its
tensioning. Check the belt fordamage or wear. Check to see if the travel clutch mechanism is not blocked by a
foreign object. If so, remove the object. Check if the pulley of the engine or gearbox is not damaged. Replace the
pulley according to need.
Check the tension of travel drive belt according to section 7.12, and the brake function. If need be, adjust the belt
tensioning. If the brake function is not correct, have an authorized service adjust the brakes.
Check the tension of the travel drive belt according to section 7.12. If need be, carry out the adjustment of its
tensioning. Check the belt guide. If need be, carry out the adjustment.
Check the pulleys to see if they are not damaged. If need be, replace them.
Check the gap of the travel clutch mechanism. In case of deviations, the bracket of the clutch pulleys may be
deflected. If need be, replace it.
Check the tension of travel drive belt according to section 7.12. If need be, carry out the adjustment
of its tensioning.
Check the pulleys of the engine and gearbox with regard to cut or damaged grooves.
If need be, replace them.
Check the pulleys to see if they are not damaged or distorted. If need be, replace them.
Check the belt for burned spots or other irregularities. If need be, replace the belt.
Check the tension of the travel drive belt according to section 7.12.
If need be, carry out the adjustment of its tensioning.
Check the balance of the mowing blades. If need be, balance or replace them.
Check if theclearance between the gear segment and pinion is not too big.
If so, carry out the adjustment of the gear segment.
Check the wear of the ball joints. Replace the joints according to need.
Check if there is petrol in the tank.
Check if the prescribed procedure of engine start was adhered to (see section 6.2.2).
Check the fuse.
Check if the voltage on the accumulator poles is 12 V. If the machine is new check if the accumulator has been
activated and charged.
With regards to new machines, remove the spark plug and check if oil has cumulated as a result of improper
manipulation.
Check if all connections of conductors are in order, and if the switches of the electric system are functional.
Test the engine thoroghly according to the Engine operating instructions elaborated by its manufacturer.
Have the machine electric system tested in a special workshop.
Check if the prescribed procedure of engine start was adhered to (see section 6.2.1).
Check if the petrol in the tank is clean.
Check if the fuel filter is not clogged.
Check if the fuel closing tap is open.
Make sure the gas control lever is in the "CHOKE" position.
Test the engine thoroughly according to the Engine operating instructions elaborated by its manufacturer.
Have the cabling and switches tested in a special workshop.
Check if the by-pass lever is in the "0“ position.
Check the condition of belts, and guide and tension pulleys.
If the problems persist, contact the authorized service immediately.
Page 29

ORDERING SPARE PARTS ENGLISH
8.1 ORDERING SPARE PARTS
We recommend only using original spare parts which ensure safety and replaceability. Always order spare parts at the authorized dealer or service organization
which is informed of the actual technical changes executed in the products during manufacturing. In the order, always state the serial number to enableeasy,
quick and exact identification of the needed spare part. You will find the serial number recorded on the second page of this manual cover. Also state the year
of machine production which is included on the identification plate located under the seat.
8.2 GUARANTEE
The conditions of guarantee are specified on the certificate of guarantee which is always handed over with the product by the dealer.
9. AFTER-SEASON MAINTENANCE, MACHINE STORAGE
After the end of the season, or if the machine is not used for more than 30 days, it is advisable to prepare it immediately for the storage.
If the fuel stays in the tank without motion for more than 30 days, sticky sediment may form.
This can have an adverse effect upon the carburettor and be a cause of improperfunction of the engine.
This is the reason for emptying the tank.
Recommended procedure of preparations for storing the mowing machine:
• Clean the whole machine thoroughly.
• Replace the faulty or worn out parts and tighten all loosened screws and nuts.
• Prepare the engine forstorage according to the engine operating and maintenance instructions.
• Lubricate all lubricating points according to the lubricating plan (see section 7.6).
• Slacken the V-belt of the mowing mechanism drive (see section 7.14)
• Take out the accumulator, clean it, refill it with distilled water up to the lower parts of filling holes rings and charge it fully.
An uncharged accumulator may freeze and burst. Store the accumulator, if need be, in a cold and dry place.
Charge the accumulator every 30 days and check its voltage regularly.
• Store the mowing machine covered in a clean and dry place.
The best way to ensure the maximum serviceability of the mowing machine for the next season is an annual check and adjustment by an authorized service.
10. MACHINE DISPOSAL
The mowing machine user is obliged to dispose of the machine after the end of its service life. This may be done in two ways:
a) To hand the machine over to a firm which is engaged in this activity (scrap yard, car yard, etc.)
You will receive the due document of handing the machine over to the disposal.
b) To dispose the machine by yourself. In this case we recommend proceeding in the following way:
• Carry out the disposal using secondary raw materials in accordance with the applicable regulations on waste materials.
• Dismantle the machine completely.
• Clean the parts which can be still utilized, conserve and store them for further use.
• Separate the other parts to parts which are ecologically harmless and to parts endangering the environment, e.g. the rubber parts (sealing rings),
residues of lubricants in bearings or gearings. Ecologically harmful components have to be treated in accordance with the applicable regulationson waste materials valid in the country of the machine user, e.g. in the Czech Republic it is the Law on waste materials no. 185/2001 Coll.
• Separate the disposed material according to Waste Classification in compliance with the applicable regulation. Ecologically harmless parts may
be treated as scrap.
WARNING !!!
Never store the mowing machine with the full tank inside buildings or in badly ventilated spaces where there are fuel vapours,
open fire, sparking or ignition flames, furnace, central heating, dry rags, etc.
Handle the fuels and lubricants carefully as they are highly combustible, and careless handling may cause serious burns to you or damage to the property.
Empty of the tank only into the approved vessel outdoor without open fire.
28
Seco GROUP a.s. continues to develop and improve all machines being manufactured, therefore the text and illustrations in this manual may vary from reality.
No claims may be deduced on that. Printing, reproduction, publishing and translation (even partial ones) are prohibited without the written consent of Seco GROUP
a.s. The changes are reserved.
Page 30

WARNING! - This owner’s manual must stay with the machine for all its life.
ACHTUNG! - Dieses Anweisungsheft muß das Gerät während seiner gesamten Lebensdauer
begleiten.
ATTENTION! - Le manuel doit accompagner la michine pour toute sa vie.
ATTENZIONE! - Questo manuale deve accompagnare la machina durante tutta la sua vita.
UPOZORNĚNÍ! - Tato uživatelská příručka musí doprovázet přístroj během celé své životnosti.
WAARSCHUWING! - Deze handleiding dient bij de maaier te blijven gedurende zijn gehele levensduur.
ATENCIÓN! - Este manual del propietario deberá permanecer junto a la máquina durante toda su
WARNING! - This owner’s manual must stay with the machine for all its life.
ACHTUNG! - Dieses Anweisungsheft muß das Gerät während seiner gesamten Lebensdauer begleiten.
VARNING! - Denna bruksanvisning måste förvaras tillsammans med maskinen hela dess
ATTENTION! - Le manuel doit accompagner la michine pour toute sa vie.
ATTENZIONE! - Questo manuale deve accompagnare la machina durante tutta la sua vita.
UWAGA - Niniejsza instrukcja obsługi musi być dostępna w pobliżu maszyny podczas całego
UPOZORNĚNÍ! - Tato uživatelská příručka musí doprovázet přístroj během celé své životnosti.
vida.
livslängd.
okresu eksploatacji.
Producer:
Seco GROUP a.s.
Pobřežní 44/362
Praha 8
division 02 AGS, Jičín
Jungmannova 11
50648 Jičín
CZECH REPUBLIC
Distributor:
EMAK s.p.a. - Via Fermi, 4
42011 Bagnolo in Piano (Reggio Emilia) Italy
Member of the YAMA group
Dic/2008
 Loading...