

Page 1

eMachines E720/E520 Series
Quick Guide
Page 2

Copyright © 2008. Acer Incorporated.
All Rights Reserved.
eMachines E720/E520 Series Quick Guide
Original Issue: 08/2008
Changes may be made periodically to the information in this publication without obligation
to notify any person of such revisions or changes. Such changes will be incorporated in new
editions of this manual or supplementary documents and publications. This company makes
no representations or warranties, either expressed or implied, with respect to the contents
hereof and specifically disclaims the implied warranties of merchantability or fitness for a
particular purpose.
Record the model number, serial number, purchase date and place of purchase information in
the space provided below. The serial number and model number are recorded on the label
affixed to your computer. All correspondence concerning your unit should include the serial
number, model number and purchase information.
No part of this publication may be reproduced, stored in a retrieval system, or transmitted, in
any form or by any means, electronically, mechanically, by photocopy, recording or otherwise,
without the prior written permission of Acer Incorporated.
eMachines E720/E520 Series Notebook PC
Model number: __________________________________
Serial number: ___________________________________
Date of purchase: ________________________________
Place of purchase: ________________________________
eMachines and the eMachines logo are registered trademarks of Acer Incorporated. Other
companies' product names or trademarks are used herein for identification purposes only and
belong to their respective companies.
Page 3

First things first
We would like to thank you for making an eMachines notebook your choice for
meeting your mobile computing needs.
Your guides
To help you use your eMachines notebook, we have designed a set of guides:
First off, the Just for Starters... poster helps you get started with setting up your
computer.
The eMachines Generic User Guide contains useful information applying to all
models in the eMachines product series. It covers basic topics such as eMachines
Recovery Management, using the keyboard, audio, etc. Please understand that
due to its nature, the Generic User Guide as well as the eMachinesSystem User
Guide mentioned below will occasionally refer to functions or features which
are only contained in certain models of the series, but not necessarily in the
model you purchased. Such instances are marked in the text with language such
as "only for certain models".
The Quick Guide introduces you to the basic features and functions of your new
computer. For more on how your computer can help you to be more productive,
please refer to the eMachinesSystem User Guide. This guide contains detailed
information on such subjects as system utilities, data recovery, expansion
options and troubleshooting. In addition it contains warranty information and
the general regulations and safety notices for your notebook. It is available in
Portable Document Format (PDF) and comes preloaded on your notebook.
Follow these steps to access it:
1 Click on Start, All Programs, eMachinesSystem.
2 Click on eMachinesSystem User Guide.
3
Note: Viewing the file requires Adobe Reader. If Adobe Reader is not
installed on your computer, clicking on eMachinesSystem User Guide will
run the Adobe Reader setup program first. Follow the instructions on the
screen to complete the installation. For instructions on how to use Adobe
Reader, access the Help and Support menu.
Page 4

4
English
Your eMachines notebook tour
After setting up your computer as illustrated in the Just for Starters... poster,
let us show you around your new eMachines notebook.
Top view
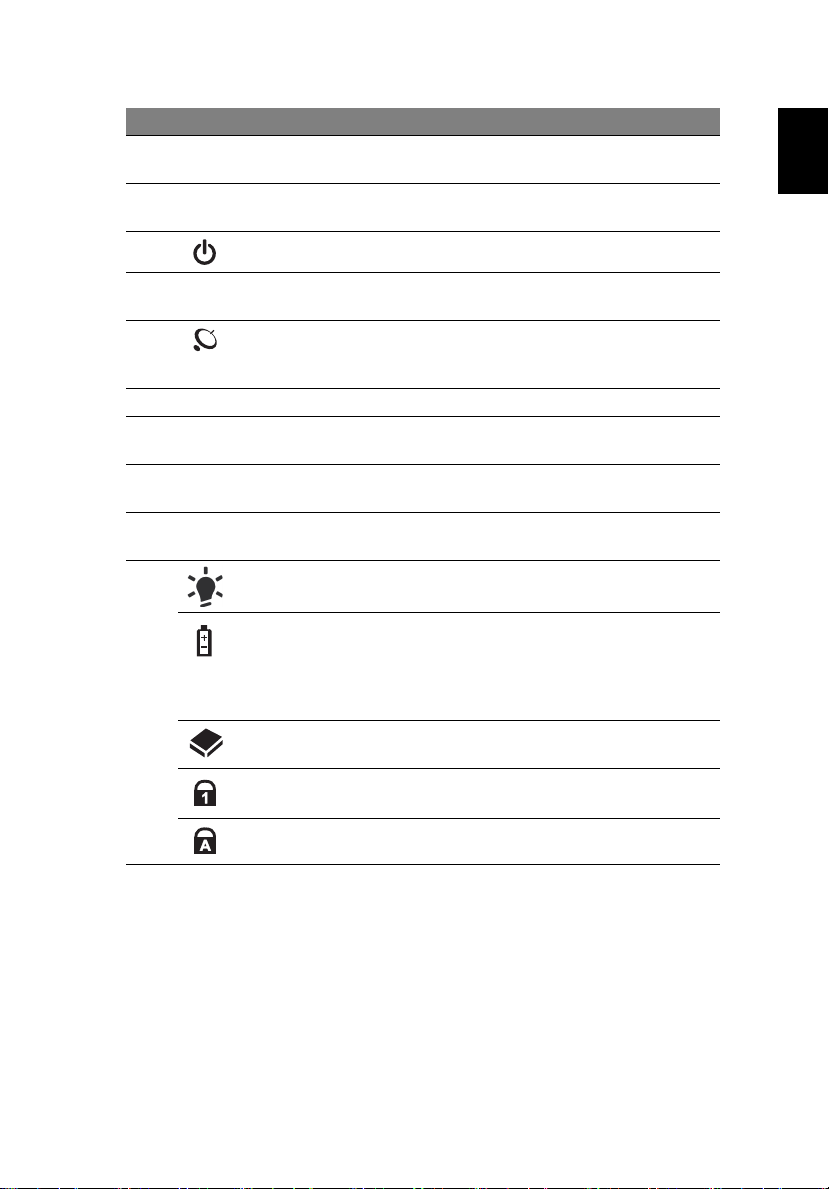
# Icon Item Description
1 Microphone Internal microphone for sound recording.
Page 5
English
# Icon Item Description
2 Integrated
webcam
Web camera for video communication.
(for selected models)
3 Display screen Also called Liquid-Crystal Display (LCD),
displays computer output.
4 Power button Turns the computer on and off.
5 Speakers Left and right speakers deliver stereo audio
output.
6 Wireless LAN
communication
button/indicator
Enables/disables the wireless LAN function.
Indicates the status of wireless LAN
communication.
7 Keyboard For entering data into your computer.
8 Palmrest Comfortable support area for your hands
when you use the computer.
9 Touchpad Touch-sensitive pointing device which
functions like a computer mouse.
10 Click buttons (left
and right)
11
Power
1
The left and right buttons function like the
left and right mouse buttons.
Indicates the computer's power status.
5
Battery
1
Indicates the computer's batttery status.
1. Charging: The light shows amber when
the battery is charging.
2. Fully charged: The light shows green
when in AC mode.
HDD Indicates when the hard disk drive is active.
Num Lock Lights up when Num Lock is activated.
Caps Lock Lights up when Caps Lock is activated.
1. The front panel indicators are visible even when the computer cover is closed
up.
Page 6
6
English
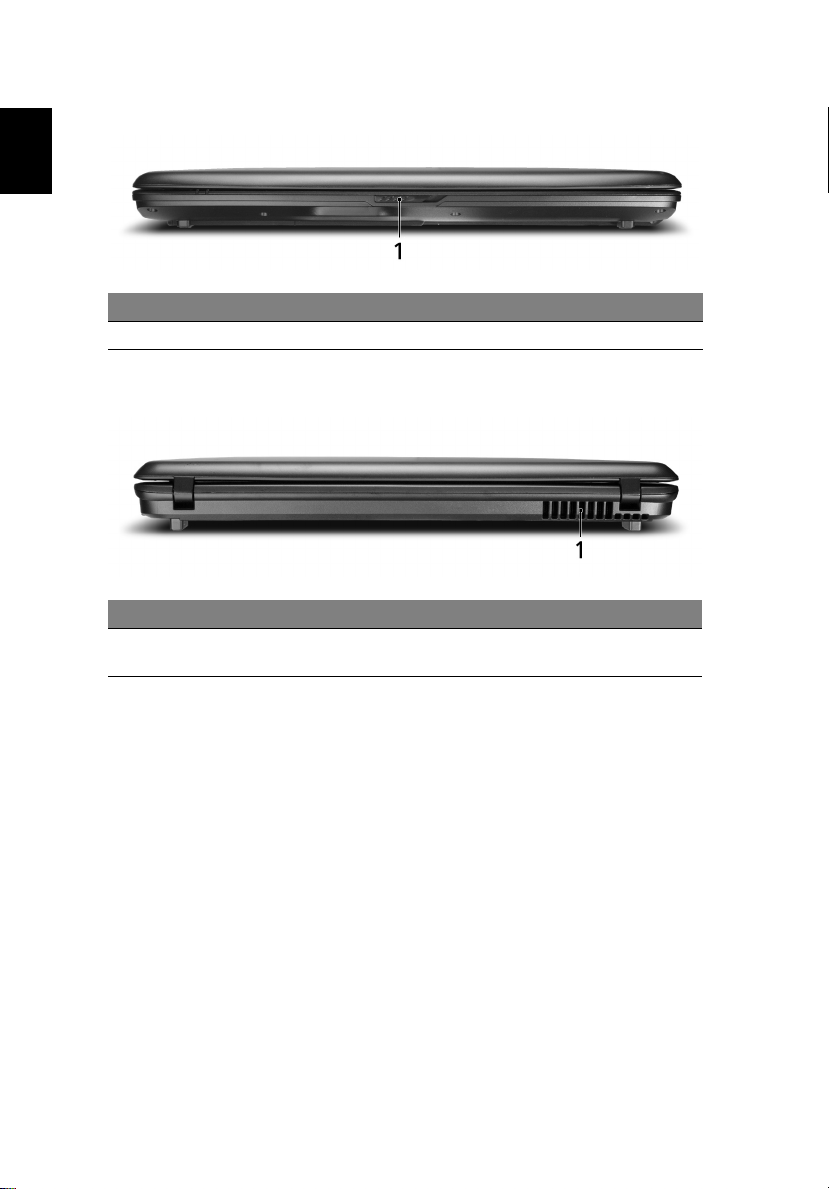
Closed front view
# Item Description
1 Latch Locks and releases the lid.
Rear view
# Item Description
1 Ventilation slots Enable the computer to stay cool, even after
prolonged use.
Page 7
English
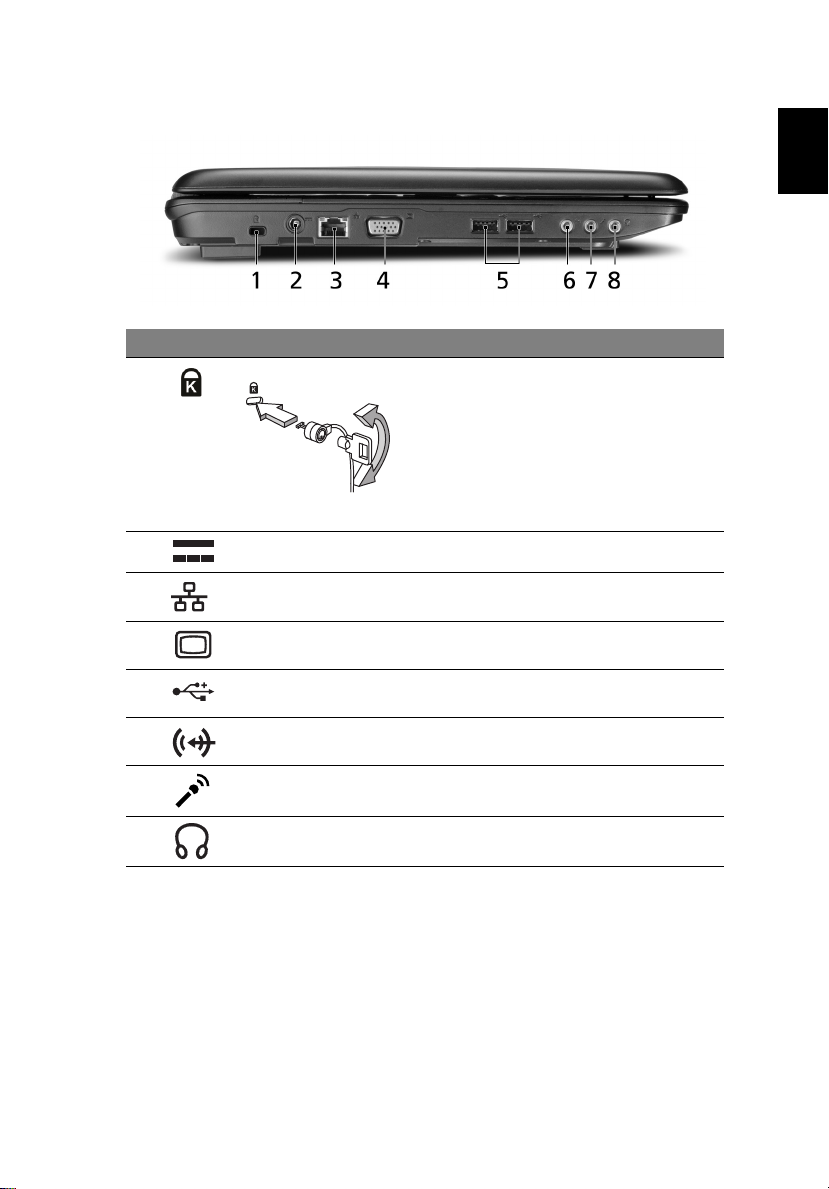
Left view
# Icon Item Description
1 Kensington lock slot Connects to a Kensington-compatible
2 DC-in jack Connects to an AC adapter.
3 Ethernet (RJ-45) port Connects to an Ethernet 10/100-based
4 External display
(VGA) port
5 USB 2.0 port Connect to USB 2.0 devices (e.g., USB
6 Line-in jack Accepts audio line-in devices (e.g., audio
7 Microphone-in jack Accepts input from external
8 Headphones/
speaker/line-out jack
computer security lock.
Note: Wrap the computer security lock
cable around an immovable object such
as a table or handle of a locked drawer.
Insert the lock into the notch and turn
the key to secure the lock. Some keyless
models are also available.
network.
Connects to a display device
(e.g., external monitor, LCD projector).
mouse, USB camera).
CD player, stereo walkman, mp3 player)
microphones.
Connects to audio line-out devices (e.g.,
speakers, headphones).
7
Page 8
8
English
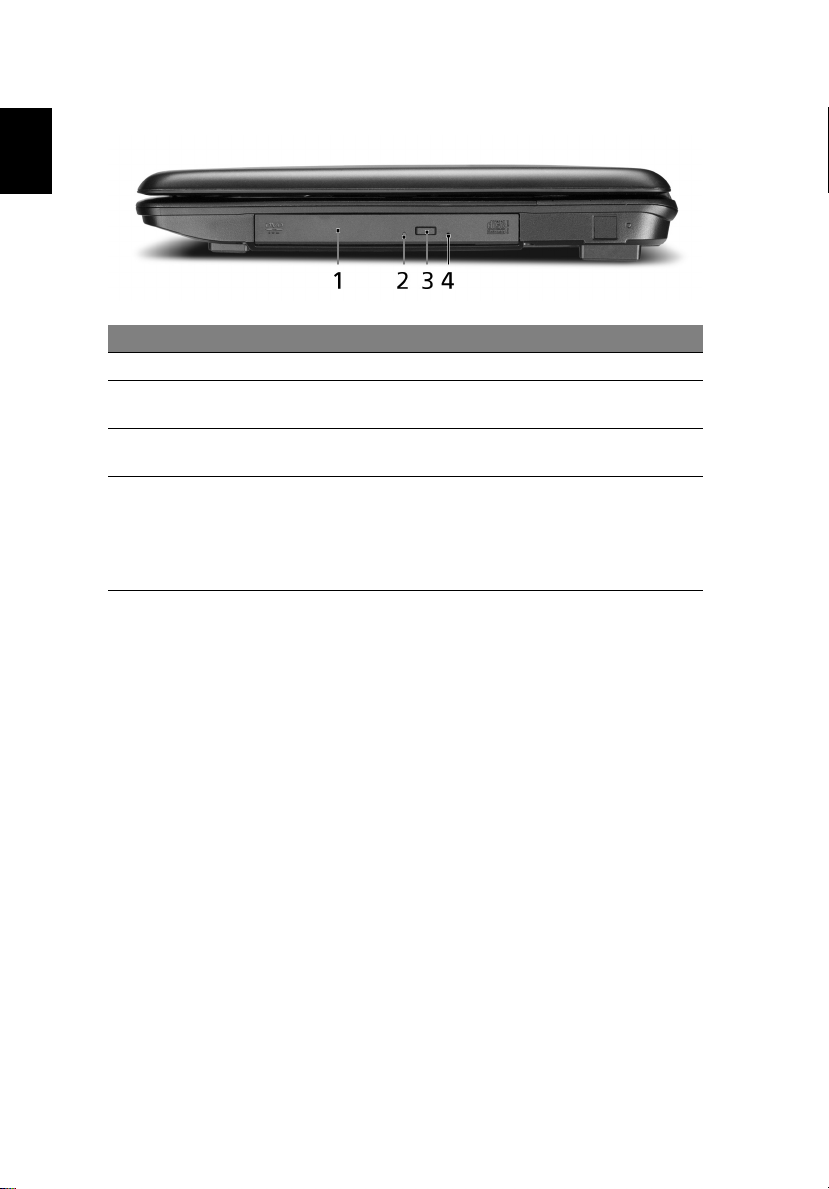
Right view
# Icon Item Description
1 Optical drive Internal optical drive; accepts CDs or DVDs
2 Optical disk
access indicator
3 Optical drive
eject button
4Emergency
eject hole
Lights up when the optical drive is active.
Ejects the optical disk from the drive.
Ejects the optical drive tray when the
computer is turned off.
Note: Insert a paper clip to the emergency
eject hole to eject the optical drive tray when
the computer is off.
Page 9
English
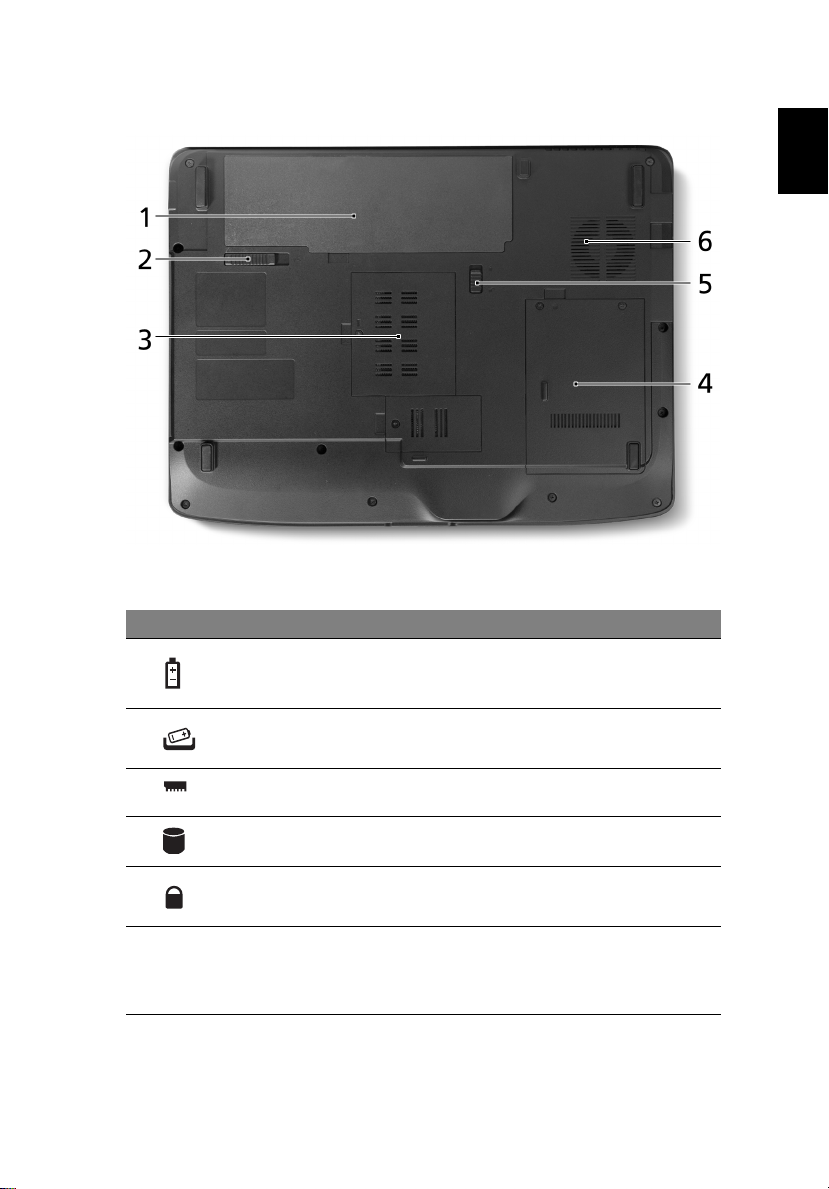
Base view
# Icon Item Description
1 Battery bay Houses the computer's battery pack.
9
2 Battery release latch Releases the battery for removal.
3Memory
compartment
4 Hard disk bay Houses the computer's hard disk (secured
5 Battery lock Locks the battery in position.
6 Ventilation slots and
cooling fan
Houses the computer's main memory.
with screws).
Enable the computer to stay cool, even after
prolonged use.
Note: Do not cover or obstruct the opening
of the fan.
Page 10

10
English
Specifications
Operating
system
Platform
System memory
Display
Graphics
Storage
subsystem
Audio
Communication
Dimensions and
weight
Privacy control
Power
subsystem
Special keys
and controls
• Genuine Windows Vista
• Intel
• Intel
• Mobile Intel
®
Pentium® dual-core processor*
®
Celeron® processor*
®
GL40 Express Chipset
®
• IEEE 802.11b/g
• Dual-channel support
• Up to 2 GB of DDR2 667 MHz memory, upgradeable
to 4 GB using two soDIMM modules
• 15.4" WXGA 1280 x 800
• Mobile Intel
®
GL40 Express Chipset
• 2.5" hard disk drive
• Optical drive option:
• DVD-Super Multi double-layer drive*
• DVD/CD-RW combo drive*
• Two built-in stereo speakers
• High-definition audio support
• MS-Sound compatible
• Built-in microphone
• Integrated webcam*
• WLAN: IEEE 802.11b/g
• LAN: Fast Ethernet; Wake-on-LAN ready
• 364.6 (W) x 273.6 (D) x 27.0/38.4 (H) mm
(14.4 x 10.8 x 1.1/1.5 inches)
• 2.80 kg (6.17 lbs.) with 6-cell battery pack
• BIOS user, supervisor, HDD passwords
• Kensington lock slot
• ACPI 3.0
• 48.8 W 4400 mAh
• 3-pin 65 W AC adapter
• ENERGY STAR
®
4.0*
• 88-/89-key keyboard
• Touchpad pointing device
Page 11
11
English
I/O interface
Environment
Note: * Only for certain models.
Note: The specifications listed above are for reference only. The
exact configuration of your PC depends on the model purchased.
• USB 2.0 port
• External display (VGA) port
• Headphones/speaker/line-out jack
• Microphone-in jack
• Line-in jack
• Ethernet (RJ-45) port
• DC-in jack for AC adapter
• Temperature:
• Operating: 5 °C to 35 °C
• Non-operating: -20 °C to 65 °C
• Humidity (non-condensing):
• Operating: 20% to 80%
• Non-operating: 20% to 80%
 Loading...