

Page 1
C904IP.2
GB WIFI NETWORK CAMERA
DE WIFI NETZWERK-KAMERA
PL BEZPRZEWODOWA KAMERA IP
NL WIFI NET WERKCAMERA
FR CAMÉRA EN RÉSEAU WIFI
ES CÁMARA IP WIFI
TR IP AĞI KAMERASI
GR ΔΙΚΤΥΑΚΗ ΚΑΜΕΡΑ
CZ IP SÍŤOVÁ KAMERA
HU IP HÁLÓZATI KAMERA
RO CAMERĂ VIDEO REŢEA IP
HR IP MREŽNA KAMERA
IT TELECAMERA RETE IP
Page 2

GB
D E
PL
NL
FR
ES
TR
GR
CZ
HU
RO
HR
IT
C904IP.2 Manual 17
Gebrauchsanweisung C904IP.2 26
Instrukcja obsługi C904IP.2 35
Handleiding C904IP.2 44
Guide d'utilisation C904IP.2 54
Manual C904IP.2 63
C904IP.2 kılavuzu 72
Εγχειρίδιο C904IP.2 81
Návod k obsluze C904IP.2 91
Kézikönyv C904IP.2 99
Manual de utilizare C904IP.2 109
Priručnik C904IP.2 118
Manuale C904IP.2 126
2
Page 3
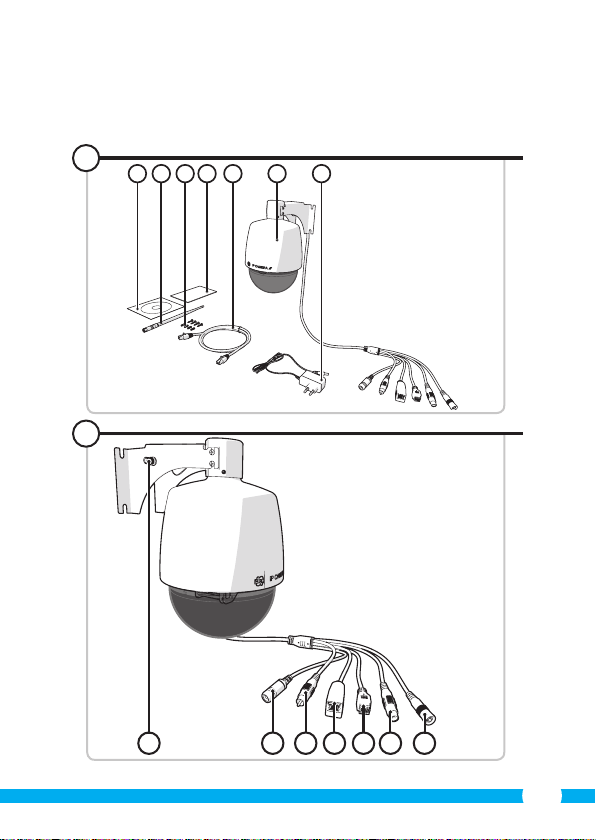
Illustration page
Abbildungsseite
Strona ze strumieniami obrazu
Afbeeldingenpagina
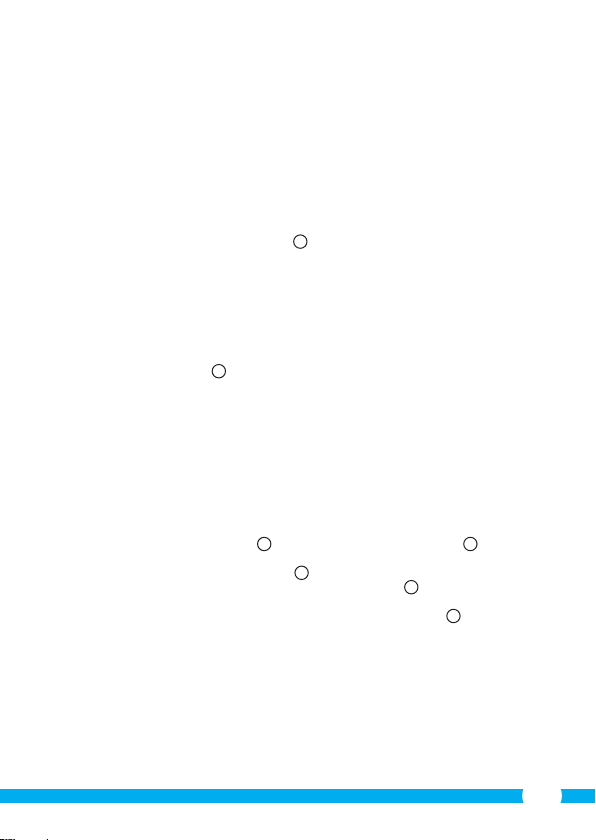
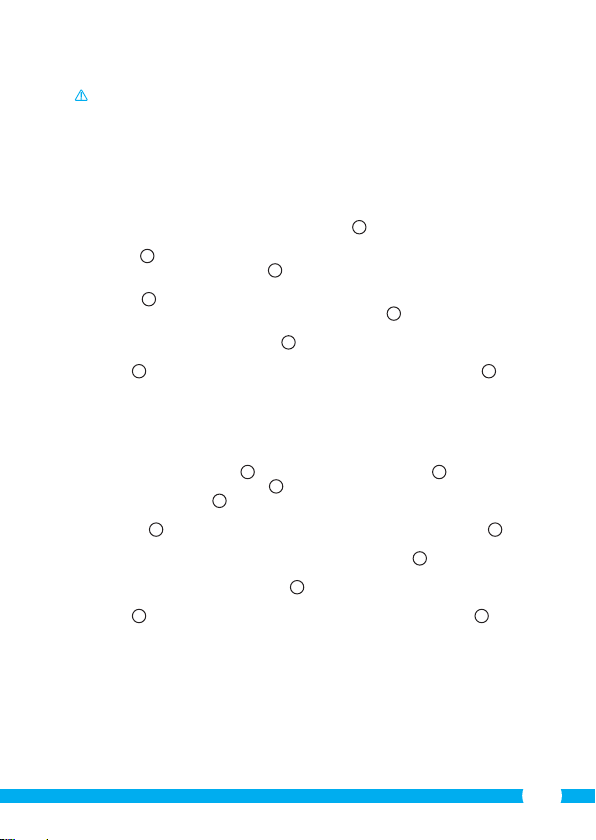
1
3 4 6 721 5
2
Page d’illustrations
Página de ilustraciones
Resim sayfası
Σελίδα εικόνων
Strana s nákresem
Oldal ábrákkal
Pagina cu imagini
Stranica sa slikama
Pagina immagini
4
321
75
6
3
Page 4
3
4
4
Page 5
5
6
5
Page 6
7
8
6
Page 7
9
7
Page 8
A
B
8
Page 9
C10E
1
2
3
4
5
D
!
9
Page 10
F
Page 11
G
H
!
11
Page 12
I
!
J K
!
!
12
!
Page 13
L M
N O
2
1
3
4
1
2
1 2
13
Page 14
P Q
R
1
2
14
Page 15
S T
1
2
3
U V
1
Place a barcode inside the
viewfinder rectangle to scan it.
C3S98H6Y9S6LHI6IPRE1
2
3
1
2
15
Page 16
W X
1
2
1
Y Z
16
2
Page 17

C904IP.2 Manual
Thank you for your purchase of the C904IP.2 net work camera. We recommend that you
carefully read this manual before use in order to use your camera as quickly and easily as
possible.
You can nd the illustrations from this manual prior to this chapter.
1. Preventive measures and safety
instructions
1.1. Safety symbols used
Warning! A warning indicates the risk of (serious) damage to the user or the product if
the user does not carry out the procedures with care.
Please note! A comment makes the user aware of possible problems.
!
Tip: A tip makes the user aware of convenient functions and additional options.
1.1.1. Notications
Warning! Do not install the product in any place that might be exposed to extreme
heat or cold.
Warning! Before beginning assembly, check to make sure there are no electrical wires
or water pipes running through the wall where you want to drill.
Warning! By removing the plug from the power outlet, you immediately cut o power
to the product; then contact the Smartwares service desk when:
• the product's hardware components are open, drilled through, damp or have
suered a hard fall;
• the adapter's power cable is frayed or open, so that the metal is showing;
• the adapter housing is damaged;
• the adapter has come in contact with moisture or liquid;
• the glass of the camera is cracked or broken;
Warning! It is not permitted to open the product yourself or to have it opened, neither
is it permitted to repair the product yourself or to have it repaired. This will void
the warranties. Please let any maintenance be carried out by certied maintenance
personnel.
Warning! Only use original accessories from the manufacturer.
Warning! Keep the product out of reach of children.
Warning! Disconnect the device from all power sources before cleaning it.
Warning! Use a clean, dry cloth to clean the product.
17
Page 18
Warning! Do not use any abrasive agents, corrosive cleaning products or any
substances that contain bleach or solvents to clean the product.
Warning! Remove the adapter from the power outlet during storms, lightning and
whenever the product will not be used for a longer period of time.
Please note! Install the product as indicated in this manual. If in doubt, consult
a recognised technician and always take account of local installation codes and
regulations.
Please note! The camera should be kept out of direct sunlight.
Please note! Do not point the camera at bushes, tree branches or other moving
objects.
Please note! The product must not be discarded as unsorted municipal waste, it must
be disposed of separately.
Please note! Find out about the options in your region for disposing of the product
after use. Do not throw away electrical appliances or components, but see whether the
product (components) can be turned in, recycled or reused.
Please note! Wireless systems can be aected by interference from wireless
telephones, microwave ovens and other wireless devices that operate in the 2.4
GHz range. Keep the product at least 3 metres away from any possible sources of
interference during installation and operation.
Please note! The camera is not able to view through glass at night. Keep this in mind
when positioning it.
2. Intended use
The C904IP.2 is a security camera that makes it possible to view surveillance images via a
local network, an Internet connection or the "ELRO Install" App on your smartphone. The
C904IP.2 can be connected either through an Ethernet cable or a Wi-Fi connection.
The camera can make video recordings during the day.
Two electrical rotary shafts let you rotate the camera 355 degrees remotely. You can also
choose for this to be done fully automatically.
The camera is also tted with motion detection and a circuit can be established using the
I/O port.
3. Technical specications
3.1. General product specications
Sensor: 1/4" Colour CMOS Sensor
Resolution: 640 x 480 pixels (300k pixels)
Lens: 4-9 mm
Optical zoom: 3x
Camera range: 355 degrees horizontal, 90 degrees vertical
Minimal brightness: 0.5Lux
Video compression: MJPEG
Images per second: 15fps(VGA), 30fps(QVGA)
Power source: 230VAC/5VDC/2A Adapter
Energy consumption: 5W (Max.)
Temperature: -10°C ~ 40°C (14°F~104°F)
18
Page 19
Minimal system requirements:
CPU: 2.0 GHZ or higher
Memory: 256 MB or higher
Video card: 64 MB or higher
Supported OS: Windows 98/ME/2000/XP/Vista/7/8
Supported browsers: IE6.0-10.0, Firefox, Safari, Google Chrome
Supported mobile OS: iOS 4.3 and higher / Android 2.1 and higher
Certication: CE, FCC, RoHS, R&TTE
Warranty: Limited 3-year warranty
3.2. Main component parts
1. Software CD-ROM
2. Removable antenna
3. 4 assembly screws and plugs
4. User's manual
5. Ethernet cable
6. C904IP.2 camera
7. DC supply
3.3. Connections
1. Antenna port
2. DC connection
3. Audio jack (output)
4. Ethernet port
5. I/O port
6. Audio jack (input)
7. Reset button
2
1
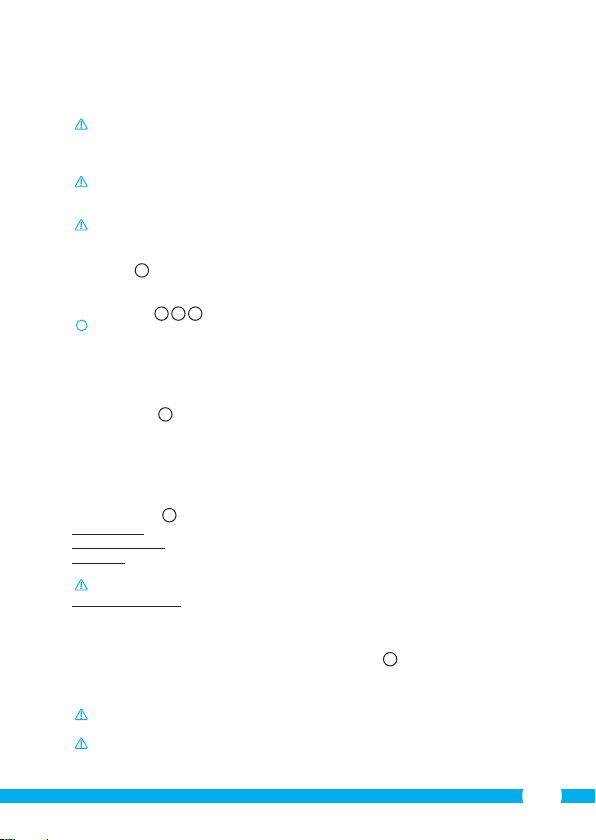
4. Camera installation
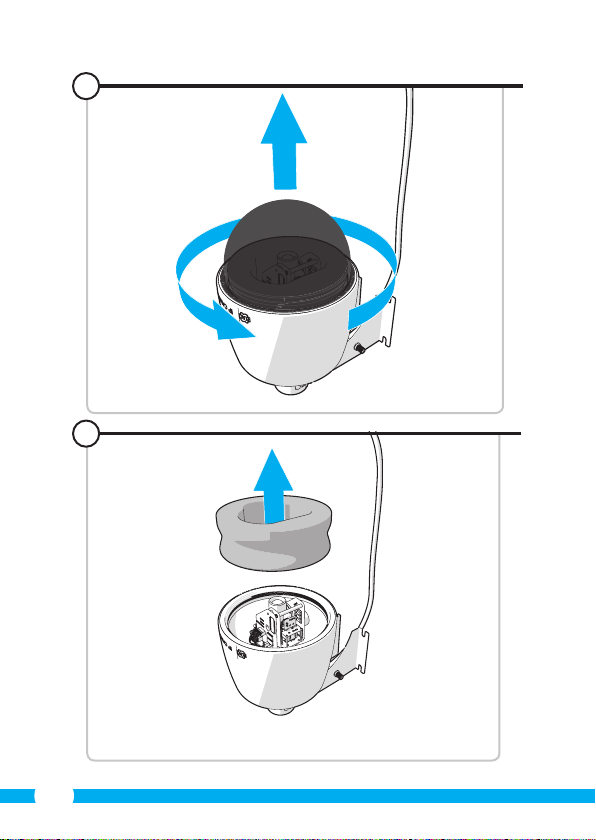
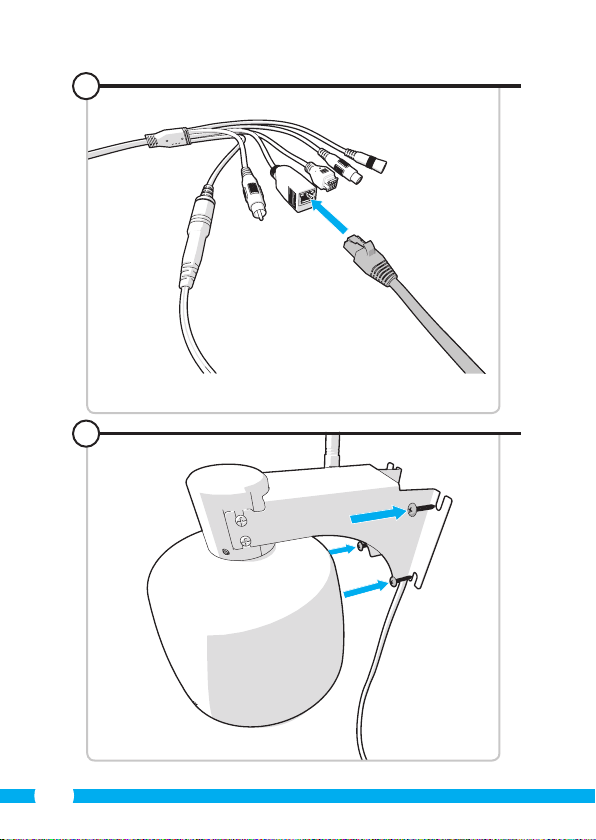
4.1. Connecting the camera
• Unscrew the dome of the camera 3. Next, remove the packaging material 4 and
screw the dome back on.
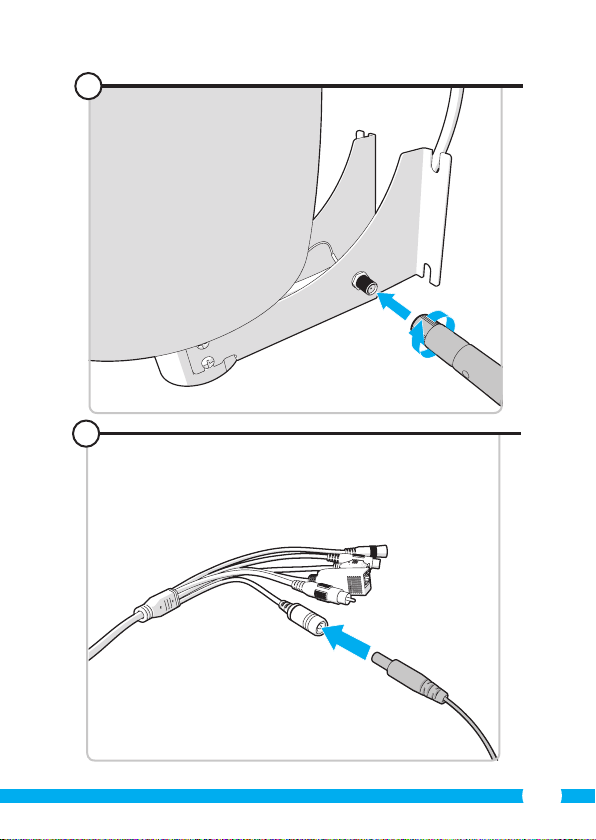
• Screw the antenna into the antenna port 5.
• Connect the adapter cable to the DC connection of the camera 6. Then insert the
adapter plug into the power outlet.
• Connect the included ethernet cable to the network port of the camera 7. Connect
the other end of the ethernet cable to your router. The green LED on the ethernet port
will light up when the camera is connected to the network.
You can now operate your IP Camera using your smartphone or PC. Go to section 4.2 for
use with smartphone and go to section 4.3 for installation on your PC.
19
Page 20

4.2. Settings for smartphone use
Attention! To use the "ELRO INSTALL" App, you need a smartphone with internet
access.
To set up your camera using Android, go to section 4.2.1.. To set up your camera using iOS,
go to section 4.2.2..
4.2.1. Android
• Download the App: "Elro Install" via Google Play and install it.
• Start the App. The start screen of the app appears.
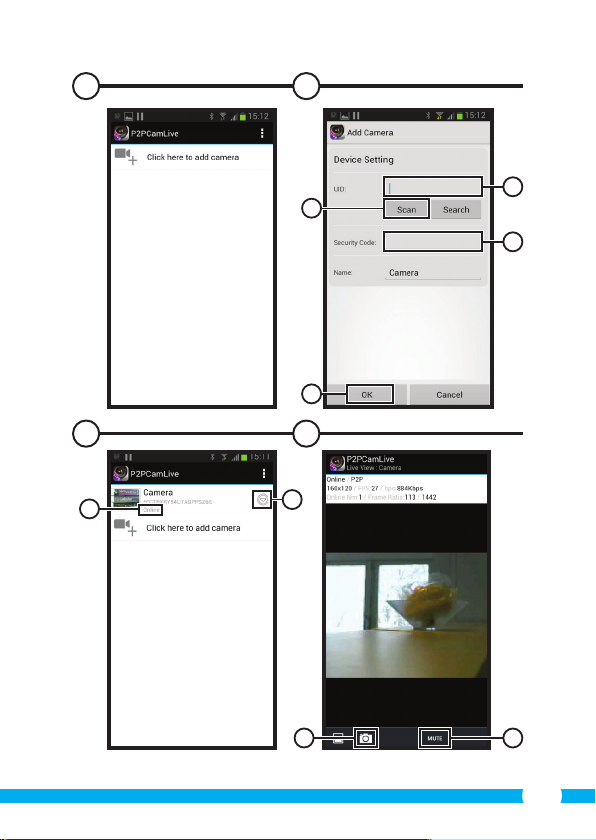
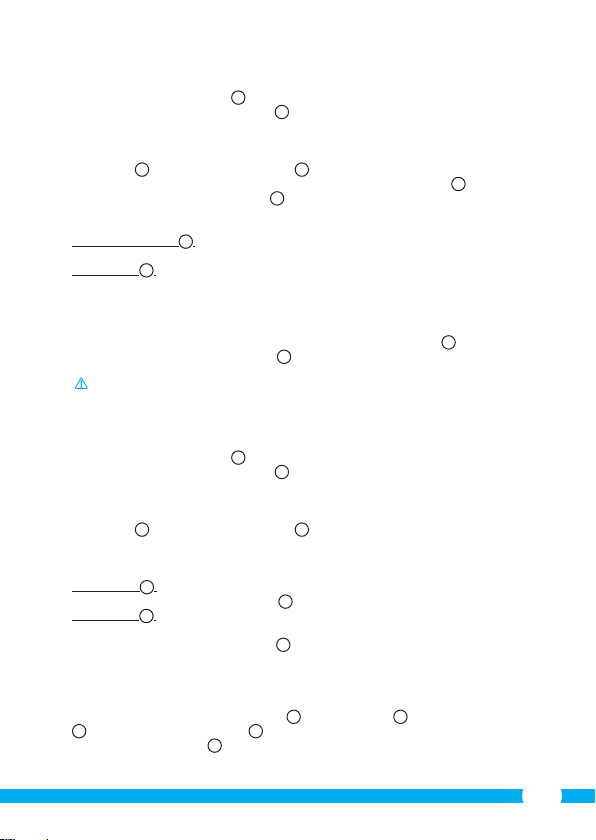
• Press the "Click here to add camera" option. The "Add camera" menu appears.
• Press the "Scan" button. M1 Next, scan the QR code on the bottom of your camera. You
can also choose to manually enter the code behind "UID". M2 You can nd this code
under the QR code on your IP camera.
• Next, enter the code: 000000 after "Security code".
• After "Name" enter the name you want to assign to the camera.
• Then press the "OK" button.
Your camera has been added to your phone and will appear on the start screen of
your App. N On this you can see if the camera is connected (ONLINE) N1 or if it is not
connected (OFFLINE).
4.2.2. iOS
• Download the App "Elro Install" from the App Store and install it.
• Start the App. The start screen of the app appears.
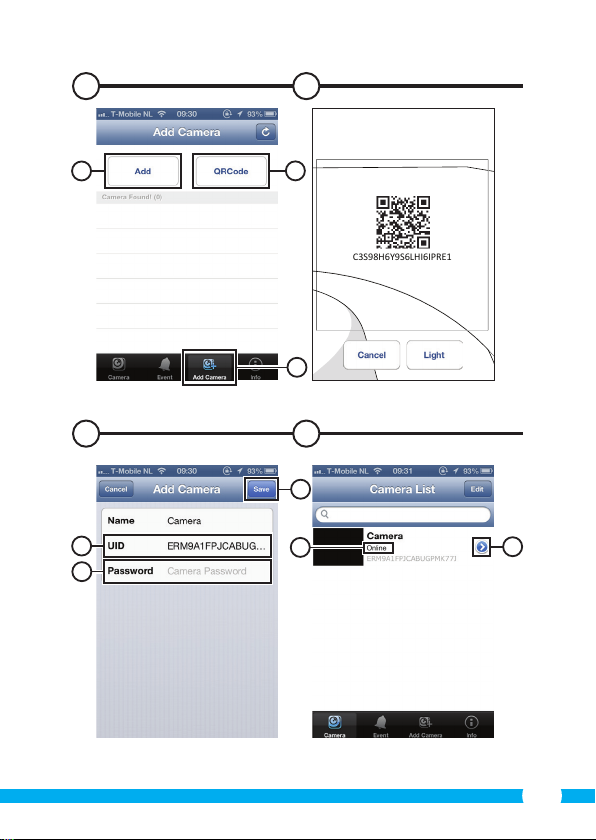
• Press "Add camera". S3 The "Add camera" menu appears.
• Press the "QR code" button. S2 Next, scan the QR code at the bottom of your camera.
T
• You can also choose to manually enter the code of your camera. To do this, press the
"Add" button. S1 Next, enter the code of your camera behind "UID". U2 You can nd
this code under the QR code on your IP camera.
• Next, enter the code behind "Password": 000000.
• After "Name" enter the name you want to assign to the camera.
• Then press the "Save" button.
Your camera has now been added to your App and will appear on the home screen of
your App. V Here you can see if the camera is connected ONLINE) V1 or not connected
(OFFLINE).
4.2.3. General
• For instructions on placing your camera go to section 4.6.
• For instructions on using your camera with the App go to chapter 5.
4.3. Install your camera on your PC
• Insert the included CD-ROM into your computer.
• Launch "IPCamSetup.exe" from the CD-ROM.
• Go through the installation by double clicking on "Next".
• Complete the installation by clicking on "Restart computer".
M4
U1
L
M3
S
U3
M
20
Page 21
The IP camera tool is now installed on your computer. You will nd the shortcut on your
desktop.
Please note! Do not remove this shortcut! You will have to re-install the IP camera tool
if you do.
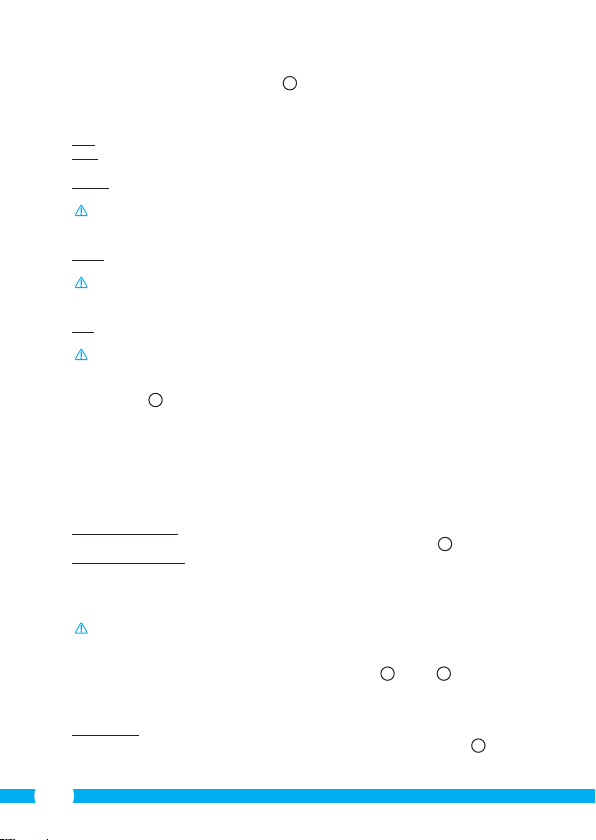
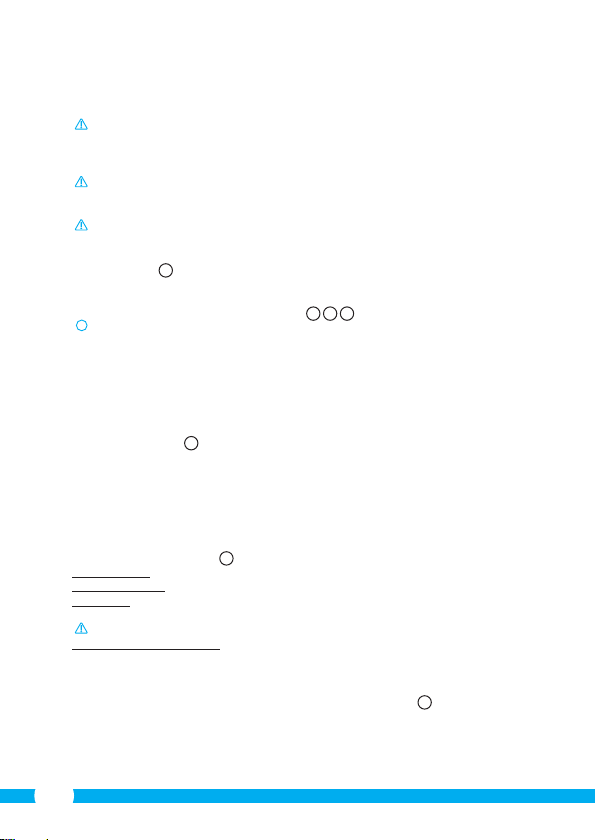
4.4. Linking to your camera
Please note! To be able to use the IP camera's full functionality, you have to use
Internet Explorer 6 or higher (32 bit) and select ActiveX Mode. It is not possible to
create audio or video recordings in other web browsers.
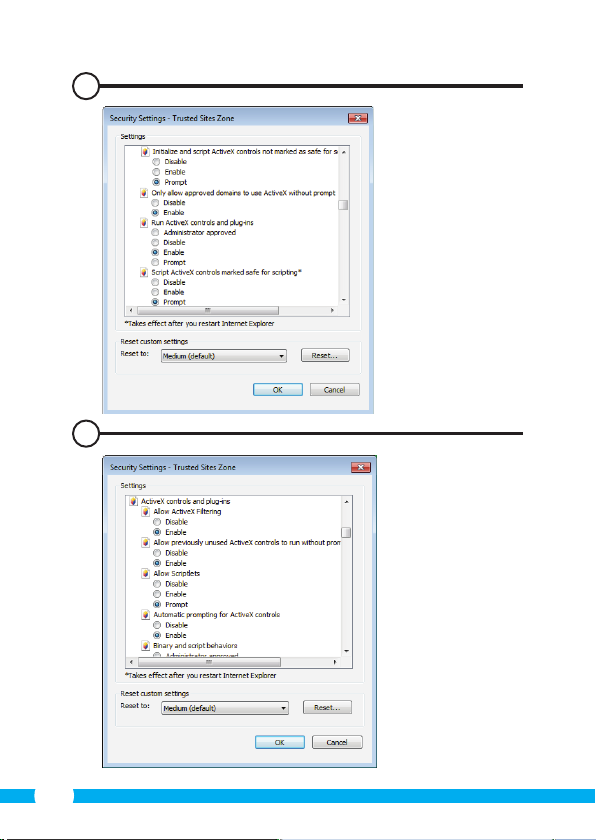
Please note! If you opt for the ActiveX mode there is a possibility that you will not have
any picture yet. If this is the case, perform the following steps:
• In Internet Explorer, go to: Tools-> Internet options-> Security settings ->Custom
level
D
• Change the deactivated options to "Questions" under the ActiveX control elements
and insertion applications. If the "Questions" option is not available, tick "Activate".
See also: E F
!
Tip: if you wish to use a dierent web browser than the standard browser, copy the link
from the open browser to a browser of your choice.
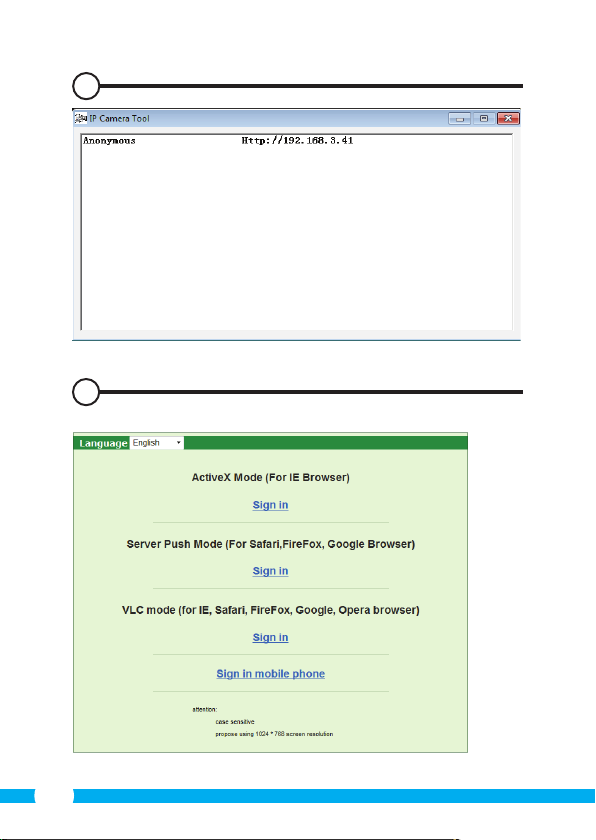
• Start the IP Camera Tool via the "IP camera tool" shortcut on your desktop. The IP
camera tool automatically searches for the IP camera(s) connected to your network.
A window opens A. This window displays all your IP cameras. If no cameras are
connected, the window will remain empty.
• Double click on the camera you want to use. In your standard web browser, an
identication window will open up asking for your user name.
• For the user name, enter "admin" and click on "sign in". You do not need to enter a
password.
A menu will open B. You can choose from the following options:
ActiveX Mode: Internet Explorer
Server Push Mode: Safari, Firefox and Google Chrome
VLC Mode: Internet Explorer, Safari, Firefox, Google Chrome and
Please note! You have to download the VLC player for VLC Mode.
Sign in mobile phone: Access with a mobile browser
• Click on "Sign In" under the option that applies to your web browser.
You are now logged in to the Network Camera browser screen C. You can manage your
camera and camera settings via this screen. (see chapter 6)
4.5. Linking to your camera wirelessly
Please note! In order to set up a wireless connection, your camera must be linked to
your network via the included ethernet cable during set-up.
Please note! You need a wireless router in order to establish a wireless connection with
your camera.
G
Opera
21
Page 22

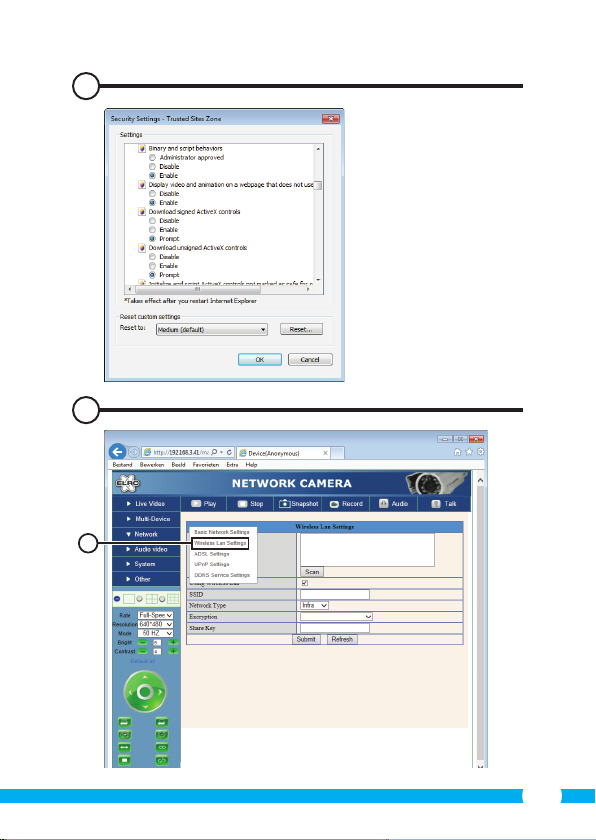
Please note! If your router is password protected, you will need to know the password.
• In the Network Camera browser screen
will appear H.
• Select the Wireless Lan Settings: the Wireless Lan Settings screen will appear.
• Double-click on "scan" in the Wireless Lan Settings screen. A list of available wireless
networks will appear.
• Click on your wireless network.
• If you do not require a password for your wireless network, just click on 'submit' after
this.
• If your wireless network does require a password, you will need to enter your password
after "Share Key" or "key1", depending on the encryption.
• Click on 'submit' after this.
The camera restarts automatically when you click 'submit'. This takes approximately 30
seconds.
• Close your browser and camera tool after the computer has restarted.
• Remove the network cable from the camera.
• Open the IP camera tool and click on your camera's address. You can now operate your
camera wirelessly.
• If your camera is not in the camera tool window, right click on the tool window, then
press the "refresh camera list" option.
4.6. Camera installation
Please note! Make sure that the camera functions properly in the chosen location
before starting installation.
• Attach the bracket of the camera to the wall using 4 screws supplied 8.
Please note! If the sur face is too hard for the screws (stone/concrete), you will need to
drill holes and use the screw plugs which are included.
click on the "Network" tab. A list of settings
C
5. Managing your camera using your
smartphone
Make sure your camera(s) is/are connected to your smartphone via the ELRO INSTALL App
(see section 4.1 and 4.2).
5.1. You can view your camera image on your Android
smartphone
• On the initial screen of the App press the camera you want to manage. N The camera
picture appears on your smartphone.
• Swipe your nger across the screen to zoom in and out and to move the camera image.
Attention! If you do not have a picture it is possible that your wireless connection is
not fast enough. In that case change the resolution of your camera image (see section
5.1.1)
O
22
Page 23
The camera screen provides a number of options:
• Press the "Snapshot" button
• Press the "mute/listen/speak" button O2 to adjust your sound settings.
5.1.1. Changing the settings of your camera on your Android smartphone
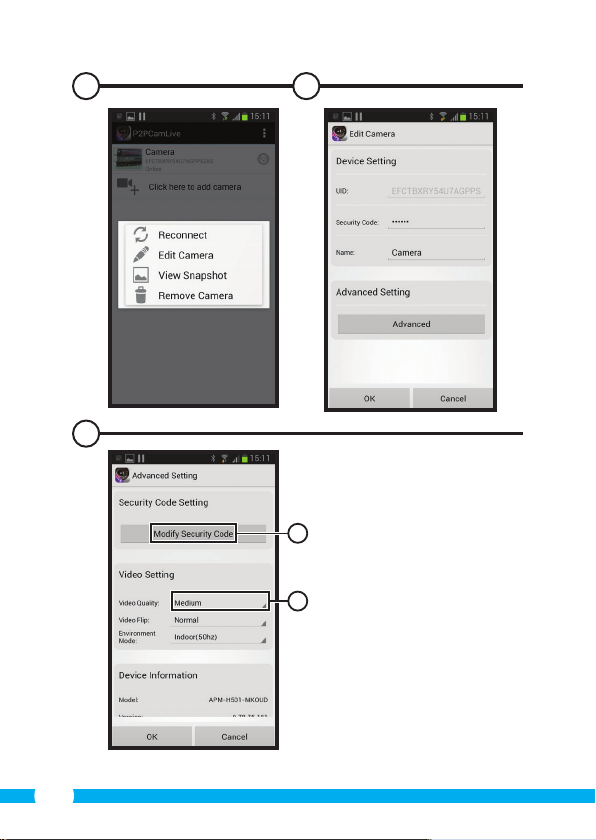
• On the start screen of your App press the arrow button next to the camera you want to
manage. N2 A menu with options opens.
• Press the "Edit camera" button and then the "Advanced settings" button. Q The
"Advanced settings" window opens.
change a number of properties of the camera.
The main functions are described below:
Modify security code R1: Adjust the code of your camera. The default code is:
Video QualityR2: Adjust the resolution of your camera. If you have a slow
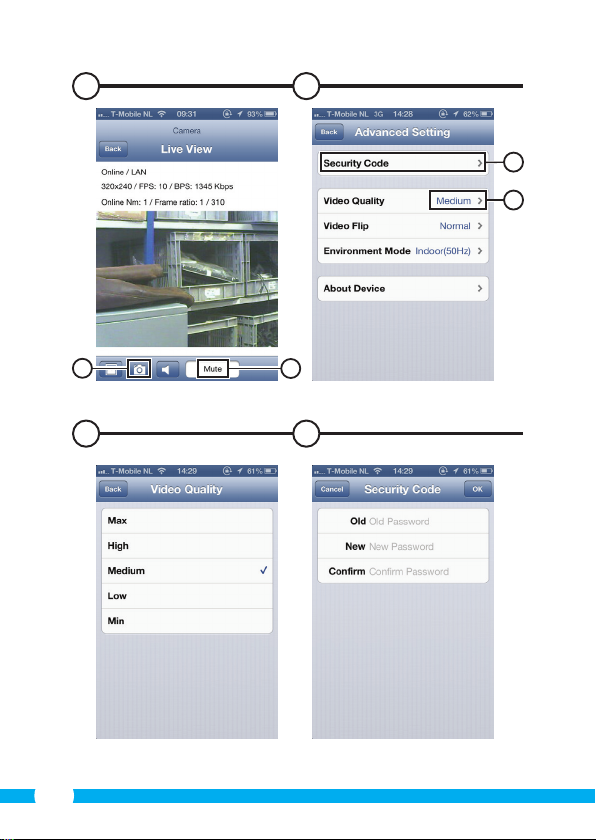
5.2. Viewing your camera image on your iPhone
• On the initial screen of the App press the camera you want to manage. V The camera
picture appears on your smartphone.
• Swipe your nger across the screen to zoom in and out and to move the camera image.
Attention! If you do not have a picture it is possible that your wireless connection is
not fast enough. In that case change the resolution of your camera image (see section
5.2.1.)
The camera screen provides a number of options:
• Press the "Snapshot" button W1 to make a snapshot of your camera image.
• Press the "mute/listen/speak" button W2 to adjust your sound settings.
5.2.1. Changing the settings of your camera on your iPhone
• On the start screen of your App press the arrow button next to the camera you want to
manage. V2 A menu with options opens.
• In the "Advanced settings" window you can change a number of properties of the
camera.
The main functions are described below:
Security codeX1: Adjust the code of your camera here. The default code is:
Video QualityX2: Adjust the resolution of your camera. If you have a slow
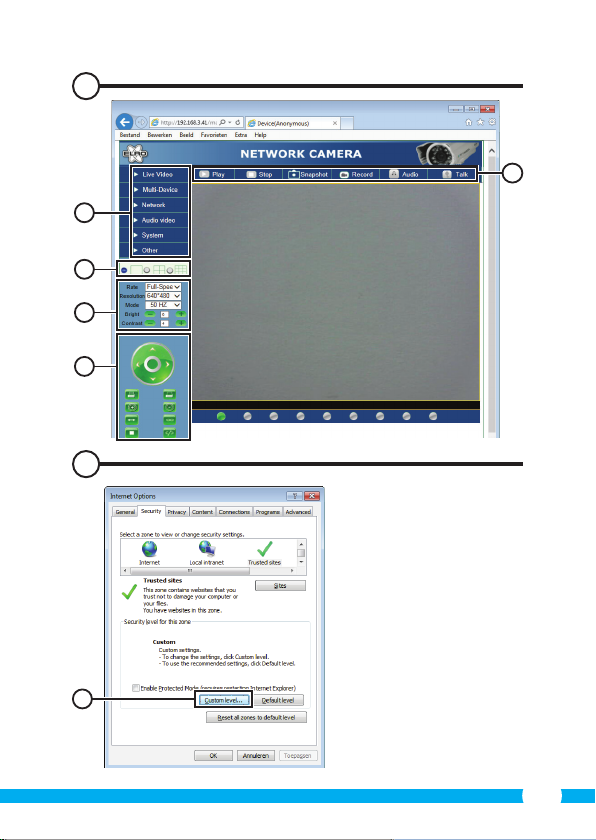
6. Managing your camera using your PC
To be able to manage your camera from your PC, you need to be logged in to the
"Network Camera" browser screen with the aid of your web browser (see section 4.4). This
screen contains the camera's control panel C1, a number of tabs C2, a channel overview
C3
, a settings menu for the camera C4 and the control panel that you use to determine
the rotation of the camera.
O1
to make a snapshot of your camera image.
P
In the "Advanced settings" window you can
R
000000.
wireless connection, change this setting to a lower
setting.
W
X
000000.
Z
wireless connection, change this setting to a lower
setting.
Y
C5
23
Page 24
6.1. Camera control panel
You can use the control panel when you have selected the "live video" tab. This control
panel provides the following options:
Play: Press "Play" to view your camera images live.
Stop: Press "Stop" to stop the live streaming of your camera
Record: Press "Record" to make a recording. Press record again to
Please note! To be able to make recordings, you have to indicate where to save the
recordings in the "Other" tab. This is explained in section 6.2.3.
Audio: Click on "Audio" to activate the sound. Click on audio
Please note! To use the "Audio" function, you need to connect a microphone to the
microphone jack of the camera.
Talk: Press "Talk" to talk via a loudspeaker connected to the
Please note! To use the "Talk" function, you need to connect a loudspeaker to the
audio output of the camera.
6.2. Tabs
The tabs oer many dierent options for managing your camera(s). This manual covers
the most important functions. If you would like to know more about specic settings, we
advise you to consult the manual on the CD-ROM.
6.2.1. Live video
Click on the live video tab to view images from the set camera.
6.2.2. Network
Wireless Lan settings: This lets you set the wireless access to your camera. You
DDNS Service settings: This lets you make your camera accessible via the
6.2.3. Other
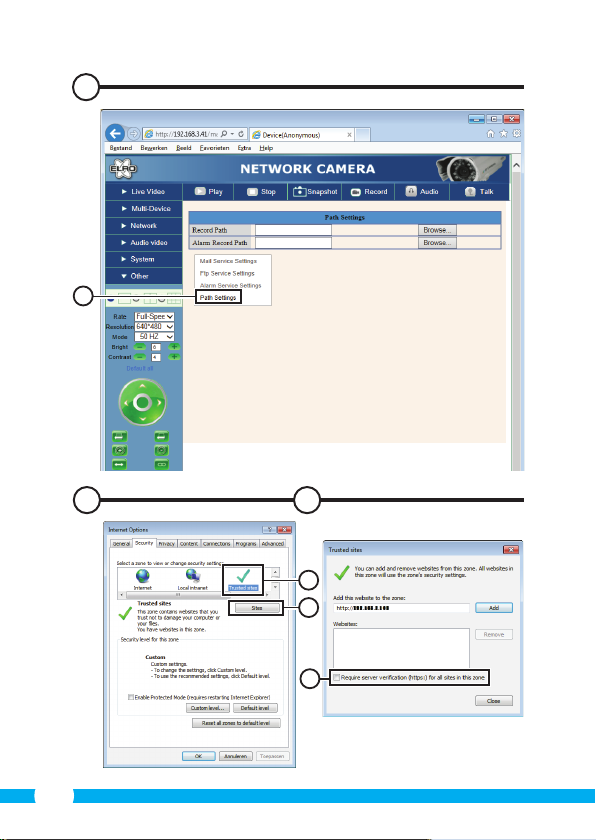
Please note! Before you can save recordings in Windows 7, 8 or Vista, you need to
make the following security setting changes in Internet Explorer. While changing these
settings, make sure that the Network Camera screen is open in Internet Explorer.
• Go to: Tools -> Internet Options -> Security-> Trusted Sites J -> Sites
• On the screen, turn o the Server Verication option (https:). Then click "Add".
• Restart Internet Explorer.
Path settings: Under the "Path settings" option, select where you want
C2
C1
images.
stop recording.
again to turn the sound o.
camera.
can nd more information in section 4.5 H.
Internet. Consult the manual on the CD-ROM for more
information about this.
K
to save the recordings that your camera makes I.
24
Page 25
6.3. The camera's channel overview
With the channel overview you have the option to view images from multiple connected
cameras simultaneously.
6.4. Camera menu settings
You can adjust the camera's image settings using this menu: resolution, image speed,
clarity and contrast.
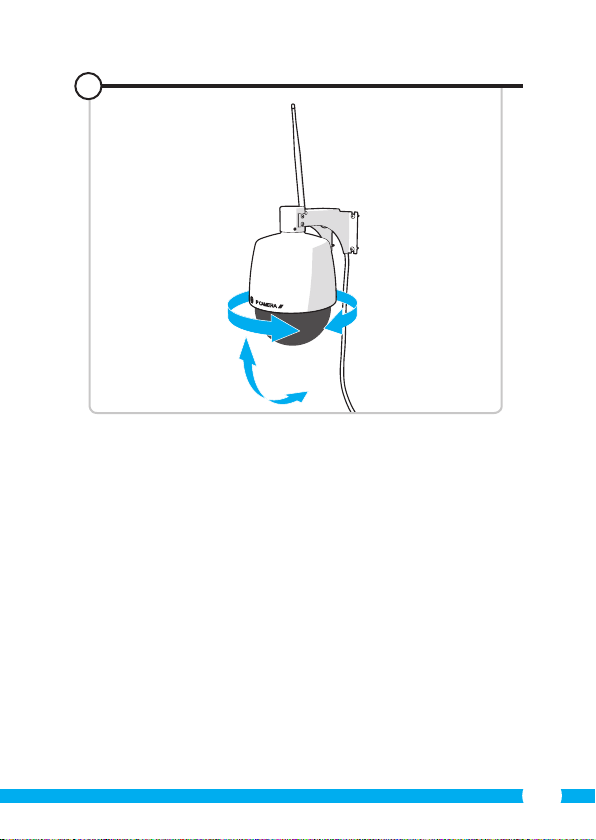
6.5. Camera rotation control panel C5
The camera's control panel lets you adjust the camera angle both manually and
automatically.
6.5.1. Manually adjusting the camera angle
• Use the arrow buttons to rotate the camera in any direction of your choice.
6.5.2. Automatically adjusting the camera angle
• Press the horizontal patrol button to automatically rotate the camera horizontally.
6.5.3. Manually zooming in and out
• Use the "+" button to zoom in and the "-" button to zoom out.
7. Cleaning and maintenance
Warning! Disconnect the device from all power sources before cleaning it.
The devices are maintenance-free, so do not open them. Opening the device will void the
warranty. Only clean the outside of the devices with a soft, dry cloth or brush
8. Environment and disposal
The symbol on the material, accessories or packaging indicates that this product
may not be discarded as household waste. Dispose of the equipment through a
recycling centre that handles electronics and electrical appliances within the EU
and in other European countries which use separate collection systems for used
electronics and electrical appliances. By disposing of the equipment in the
proper way, you will be helping to prevent possible risks to the environment and public
health, which might otherwise be caused by improper handling of the discarded
equipment. Recycling of materials contributes to the conservation of natural resources.
Therefore, please do not dispose of your old electronics and electrical appliances via
household waste.
9. Warranty
A limited 3 year warranty applies to this device. To view the warranty terms please go to:
www.elro.eu.
C4
C3
9
25
Page 26
Gebrauchsanweisung C904IP.2
Vielen Dank für den Kauf Ihrer C904IP.2 Netzwerkkamera. Damit Sie Ihre Kamera so
schnell und einfach wie möglich in Betrieb nehmen können, empfehlen wir Ihnen, diese
Bedienungsanleitung vor Gebrauch aufmerksam durchzulesen.
Die Abbildungen zu dieser Bedienungsanleitung nden Sie vor diesem Kapitel.
1. Vorsorgemaßnahmen und
Sicherheitsanweisungen
1.1. Verwendete Sicherheitssymbole
Warnung! Eine Warnung weist auf das Risiko von (ernsthaftem) Schaden für den
Benutzer bzw. am Produkt bei unsorgfältiger Beachtung der beschriebenen Verfahren
hin.
Achtung! Eine Anmerkung weist den Benutzer auf mögliche Probleme hin.
!
Tipp: Ein Tipp macht den Benutzer auf praktische Funktionen und zusätzliche
Möglichkeiten aufmerksam.
1.1.1. Benachrichtigungen
Warnung! Montieren Sie das Produkt nicht an Stellen, an denen es sehr warm oder
sehr kalt werden kann.
Warnung! Kontrollieren Sie vor Beginn der Montage, ob keine Stromkabel oder
Wasserrohre durch die Wand verlaufen, die Sie anbohren möchten.
Warnung! Trennen Sie das Gerät unverzüglich von der Stromversorgung, indem Sie
den Netzstecker ziehen, und wenden Sie sich an den Smartwares-Servicedesk, wenn:
• Hardware-Teile des Produktes oen liegen, durchbohrt sind, feucht sind oder zu
hart gefallen sind;
• die Stromversorgungskabel des Netzteils beschädigt ist und das Metall sichtbar ist
• das Gehäuse des Netzteils beschädigt ist
• das Netzteil mit Feuchtigkeit oder Flüssigkeiten in Berührung gekommen ist
• das Glas der Kamera geborsten oder gebrochen ist
Warnung! Es ist nicht zulässig, selbst das Produkt zu önen oder zu reparieren (bzw.
önen oder reparieren zu lassen). In diesem Fall werden sämtliche Garantien hinfällig.
Überlassen Sie die Wartung zertiziertem Wartungspersonal.
Warnung! Verwenden Sie ausschließlich Originalzubehör des Herstellers.
Warnung! Halten Sie das Produkt außer Reichweite von Kindern.
Warnung! Trennen Sie das Gerät vor einer Reinigung von sämtlichen
Spannungsquellen.
26
Page 27
Warnung! Verwenden Sie ein trockenes, sauberes Tuch, um das Produkt zu reinigen.
Warnung! Verwenden Sie keine Scheuermittel, aggressiven Reinigungsmittel oder
lösungsmittelhaltige Reinigungsprodukte zur Reinigung des Produktes..
Warnung! Entfernen Sie bei Sturm, Blitzschlag oder bei längerer Nichtbenutzung des
Produktes den Stecker aus der Steckdose.
Achtung! Montieren Sie das Produkt gemäß den Beschreibungen in dieser
Bedienungsanleitung. Bitte wenden Sie sich in Zweifelsfällen an einen anerkannten
Monteur und beachten Sie in jedem Fall die örtlich geltenden Montagevorschriften.
Achtung! Vermeiden Sie direktes Sonnenlicht auf der Kamera.
Achtung! Richten Sie die Kamera nicht auf Büsche, Zweige oder andere bewegliche
Gegenstände.
Achtung! Das Produkt darf nicht als unsortierter Hausmüll entsorgt werden, sondern
muss getrennt eingesammelt werden.
Achtung! Erkundigen Sie sich nach den innerhalb Ihrer Region bestehenden
Möglichkeiten, das Produkt nach Ausmusterung dem Recycling zuzuführen. Werfen Sie
elektrische Geräte und Komponenten nicht weg, sondern prüfen Sie, ob das Produkt
(oder Teile davon) abgegeben, recycelt oder wiederverwertet werden können.
Achtung! Drahtlose Systeme können gestört werden durch schnurlose Telefone,
Mikrowellengeräte und andere drahtlose Geräte, die im Frequenzbereich von 2,4
GHz arbeiten. Halten Sie das Produkt während der Installation und der Bedienung
mindestens 3 Meter von möglichen Störquellen entfernt.
Achtung! Die Kamera kann nachts nicht durch Glas hindurch schauen. Bitte beachten
Sie dies bei der Aufstellung.
2. Verwendungszweck
Die C904IP.2 ist eine Überwachungskamera, die es ermöglicht, die aufgenommenen Bilder
über ein lokales Netzwerk, eine Internetverbindung oder über die "ELRO Install" App auf
Ihrem Smartphone zu betrachten. Die C904IP.2 kann sowohl per Ethernetkabel als auch
per WLAN vernetzt werden.
Die Kamera kann tagsüber für Videoaufnahmen genutzt werden.
Zwei elektrische Drehachsen geben Ihnen die Möglichkeit, die Kamera ferngesteuert um
355 Grad zu drehen. Sie können dies auch vollautomatisch stattnden lassen.
Die Kamera ist außerdem mit einem Bewegungsmelder ausgerüstet und kann über einen
I/O-Port eine Schaltung herstellen.
3. Technische Spezikationen
3.1. Allgemeine Produktspezikation
Sensor: 1/4" Color CMOS Sensor
Auösung: 640 x 480 Pixel (300.000 Pixel)
Linse: 4-9 mm
Optischer Zoom: 3x
Kamerabereich: 355 Grad horizontal, 90 Grad vertikal
Minimale Lichtstärke: 0.5Lux
Videokompression: MJPEG
Bilder pro Sekunde: 15fps( VGA), 30fps(QVGA)
Spannungsquelle: 230VAC/5VDC./2A-Netzteil
Energieverbrauch: 5W (max.)
Temperatur: -10°C ~ 40°C (14°F~104°F)
27
Page 28
Mindestsystemanforderungen:
CPU: 2.0 GHZ oder höher
Speicher: 256 MB oder höher
Videokarte: 64 MB oder höher
Unterstützte Betriebssysteme: Windows 98/ME/2000/XP/Vista/7/8
Unterstützte Browser: IE6.0-10.0, Firefox, Safari, Google Chrome
Unterstützendes mobiles BS: iOS 4.3 und höher / Android 2.1 und höher
Zertizierung: CE, FCC, RoHS, R&TTE
Garantie: Beschränkte 3-jährige Garantie
3.2. Hauptbestandteile
1. Software auf CD-ROM
2. Entfernbare Antenne
3. 4 Montageschrauben und Dübel
4. Bedienungsanleitung
5. Ethernet-Kabel
6. C904IP.2 Kamera
7. Netzteil
3.3. Anschlüsse
1. Antennenanschluss
2. Netzteilanschluss
3. Audio-Anschluss (Ausgang)
4. Ethernet-Port
5. I/O-Port
6. Audio-Anschluss (Eingang)
7. Reset-Taste
2
1
4. Installation der Kamera
4.1. Anschluss der Kamera
• Lockern Sie die Kuppel der Kamera 3. Entfernen Sie anschließend das
Verpackungsmaterial 4 und schrauben Sie die Kuppel wieder an.
• Schrauben Sie die Antenne fest in den Antennenanschluss 5 ein.
• Schließen Sie das Netzteilkabel an den Netzteilanschluss der Kamera 6 an. Verbinden
Sie daraufhin den Stecker des Netzteils mit einer Steckdose.
• Schließen Sie das mitgelieferte Ethernet-Kabel an den Netzwerk-Port der Kamera 7
an. Verbinden Sie das andere Ende des Ethernet-Kabels mit Ihrem Router. Wenn die
Kamera mit dem Netzwerk verbunden ist, leuchtet die grüne LED des Ethernet-Ports
auf.
Sie können Ihre IP-Kamera mit Ihrem Smartphone oder mit Ihrem PC bedienen. Gehen
Sie zu Abschnitt 4.2 zur Verwendung über Ihr Smartphone und zu Abschnitt 4.3 für die
Installation auf Ihrem PC.
28
Page 29
4.2. Einstellen für Smartphone-Nutzung
Achtung! Um die "ELRO INSTALL"-App zu nutzen, benötigen Sie ein Smar tphone mit
Internetzugang.
Anweisungen für die Einstellung Ihrer Kamera über Android nden Sie in Abschnitt 4.2.1..
Anweisungen für die Einstellung Ihrer Kamera über iOS nden Sie in Abschnitt 4.2.2..
4.2.1. Android
• Laden Sie sich die App "Elro Install" über Google Play herunter und installieren Sie
diese.
• Starten Sie die App. Die Startseite der App erscheint.
• Drücken Sie auf die Option "Click here to add camera". Das Menü "Add camera"
erscheint.
• Drücken Sie die Schaltäche "Scan". M1 Dann scannen Sie den QR-Code auf der
• Geben Sie dann nach "Security code" den Code 000000 ein.
• Geben Sie dann nach "Name" den Namen ein, den Sie der Kamera geben.
• Drücken Sie danach auf die Taste "OK".
Ihre Kamera ist nun Ihrem Telefon hinzugefügt worden und die Startseite der App sollte
erscheinen. N Dadurch können Sie sehen, ob die Kamera verbunden ist (ONLINE) N1 oder
ob sie nicht verbunden ist (OFFLINE).
4.2.2. iOS
• Laden Sie sich die App "Elro Install" über den App Store herunter und installieren Sie
• Starten Sie die App. Die Startseite der App erscheint.
• Drücken Sie auf "Add camera". S3 Das "Add camera"-Menü erscheint.
• Drücken Sie auf die Taste "QR code". S2 Scannen Sie anschließend den QR-Code an der
• Sie können den Code Ihrer Kamera auch manuell eingeben. Drücken Sie dazu die
• Geben Sie anschließend hinter "Password" den Code 000000 ein.
• Geben Sie dann nach "Name" den Namen ein, den Sie der Kamera geben.
• Drücken Sie danach auf die Taste "Save".
Ihre Kamera wurde Ihrer App nun hinzugefügt und wird auf der Anfangsseite Ihrer App
erscheinen. V Sie können darauf erkennen, ob die Kamera verbunden (ONLINE) V1 oder
nicht verbunden (OFFLINE) ist.
4.2.3. Allgemeines
• Für Anleitungen zum Aufstellen Ihrer Kamera gehen Sie zu Abschnitt 4.6.
• Für Anleitungen zum Gebrauch Ihrer Kamera mit der App gehen Sie zu Kapitel 5.
4.3. Ihre Kamera auf Ihrem PC installieren
• Legen Sie die mitgelieferte CD-ROM in Ihren Computer ein.
• Starten Sie die Datei "IPCamSetup.exe" auf der CD-ROM.
• Durchlaufen Sie das Installationsverfahren, indem Sie zwei Mal auf "Weiter" klicken.
• Zum Abschluss der Installation klicken Sie auf "Computer neu starten".
M
Unterseite der Kamera. Sie können auch wahlweise den Code nach "UID" manuell
eingeben. M2 Sie nden diesen Code unter dem QR-Code auf Ihrer IP-Kamera.
M4
diese.
Unterseite Ihrer Kamera.
Taste "Add". S1 Geben Sie anschließend den Code Ihrer Kamera hinter "UID" ein. U2 Sie
nden diesen Code unter dem QR-Code auf Ihrer IP-Kamera.
T
U1
L
M3
S
U3
29
Page 30
Die IP-Kamera-Software ist nun auf Ihrem Rechner installiert. Sie nden die Verknüpfung
auf Ihrem Desktop.
Achtung! Entfernen Sie diese Verknüpfung nicht! Sollte dies dennoch notwendig sein,
müssen Sie die IP-Kamera-Software neu installieren.
4.4. Verbindung herstellen mit Ihrer Kamera
Achtung! Um den vollen Funktionsumfang der IP-Kamera nutzen zu können,
benötigen Sie Internet Explorer 6 oder höher (32 bit) im ActiveX-Modus. Es ist nicht
möglich, Bild- oder Tonaufnahmen in anderen Webbrowsern zu machen.
Achtung! Wenn Sie den ActiveX-Modus wählen, ist es möglich, dass Sie noch kein Bild
sehen. Gehen Sie in diesem Fall wie folgt vor:
• Klicken Sie im Internet Explorer auf Extras -> Internetoptionen -> Sicherheit ->Stufe
anpassen
• Ändern Sie unter ActiveX-Steuerelemente und Eingabeanwendungen die
!
Tipp: Wenn Sie einen anderen Webbrowser als Ihren Standard-Browser verwenden
möchten, kopieren Sie den Link aus dem oben angegebenen Browser in die Adresszeile
des Browsers Ihrer Wahl.
• Starten Sie die IP-Kamera-Software über die Verknüpfung "IP Camera Tool" auf Ihrem
Desktop. Die IP-Kamera-Software sucht automatisch nach sämtlichen IP-Kameras, die
an das Netzwerk angeschlossen sind.
Ein Fenster önet sich A. In diesem Fenster werden all Ihre IP-Kameras angezeigt. Wenn
keine Kameras angeschlossen sind, bleibt das Fenster leer.
• Doppelklicken Sie auf die Kamera, die Sie verwenden möchten. In Ihrem StandardWebbrowser önet sich nun ein Identikationsfenster, in dem Ihr Benutzername
verlangt wird.
• Geben Sie als Benutzernamen "admin" ein und klicken Sie auf "Anmelden". Sie
brauchen kein Kennwort einzugeben.
Ein Auswahlmenü önet sich B. Sie haben die Wahl zwischen folgenden Optionen:
ActiveX-Modus: Internet Explorer
Server Push Mode: Safari, Firefox und Google Chrome
VLC Modus: Internet Explorer, Safari, Firefox, Google Chrome und
Achtung! Zur Nutzung des VLC-Modus müssen Sie den VLC Player herunterladen.
Anmeldung per Mobiltelefon: Zugang mit einem mobilen Browser
• Klicken Sie auf "Sign in" unter der Option, die Ihrem Webbrowser entspricht.
Sie sind im Moment im Network Camera-Browserfenster angemeldet C. Über dieses
Fenster können Sie Ihre Kamera und die dazugehörigen Kameraeinstellungen verwalten.
(siehe Kapitel 6)
D
deaktivierten Optionen zu "Fragen". Wenn die Option "Fragen" nicht verfügbar ist,
kreuzen Sie "Aktivieren" an. Siehe auch: E F
Opera
G
30
Page 31

4.5. Eine drahtlose Verbindung mit Ihrer Kamera
herstellen
Achtung! Um eine drahtlose Verbindung herzustellen, muss Ihre Kamera während der
Einstellung über das mitgelieferte Ethernet -Kabel mit Ihrem Netzwerk verbunden sein.
Achtung! Um eine drahtlose Verbindung mit Ihrer Kamera herzustellen, benötigen Sie
einen WLAN-Router.
Achtung! Wenn Ihr Router mit einem Kennwort gesichert ist, müssen Sie dieses
Kennwort kennen.
• Klicken Sie im Browserfenster Network Camera
Liste mit Einstellungen (Settings) erscheint H.
• Geben Sie die WLAN-Einstellungen ein: Das Fenster für die WLAN-Einstellungen
(Wireless Lan Settings) erscheint.
• Klicken Sie im Fenster 'Wireless LAN Settings' zwei Mal auf "Scan". Eine Liste mit
verfügbaren drahtlosen Netzwerken wird erscheinen.
• Klicken Sie auf Ihr drahtloses Netzwerk.
• Wenn Sie Ihr WLAN nicht mit einem Kennwort gesichert haben, klicken Sie
anschließend auf 'Submit'.
• Ist Ihr WLAN kennwortgesichert, müssen Sie Ihr Kennwort unter "Share Key" oder "Key
1" (je nach Verschlüsselung) eingeben.
• Klicken Sie anschließend auf 'Submit'.
Die Kamera startet sich selbst neu, wenn Sie auf "Submit" geklickt haben. Dies dauert
ungefähr 30 Sekunden.
• Schließt Ihren Browser und die Kamerasoftware, nachdem die Kamera neu gestartet
wurde.
• Trennen Sie das Netzwerkkabel von der Kamera.
• Önen Sie die IP-Kamerasoftware und klicken Sie die Adresse Ihrer Kamera an. Sie
können Ihre Kamera nun drahtlos bedienen.
• Wenn Ihre Kamera nicht im Fenster der Kamerasoftware aufgeführt ist, klicken Sie mit
der rechten Maustaste in das Fenster der Kamerasoftware. Daraufhin erscheint die
Option "Refresh Camera List".
4.6. Montage der Kamera
Achtung! Achten Sie darauf, dass die Kamera am gewählten Standort ordnungsgemäß
funktioniert, bevor Sie mit der Montage beginnen.
• Schrauben Sie die Halterung der Kamera mit Hilfe der 4 mitgelieferten Schrauben an
der Wand fest 8.
Achtung! Wenn der Unterboden zu hart ist, um darauf etwas festzuschrauben (Stein-/
Porenbeton), müssen Sie Löcher vorbohren und die mitgelieferten Dübel verwenden.
die Registerkarte "Network" an. Eine
C
5. Ihre Kamera über Ihr Smartphone
verwalten
Stellen Sie sicher, dass Ihre Kamera(s) über die ELRO INSTALL-App mit Ihrem Smartphone
verbunden ist (sind) (siehe Abschnitt 4.1 und 4.2).
31
Page 32

5.1. Auf Ihrem Android-Smartphone Ihr Kamerabild
ansehen
• Drücken Sie auf der Startseite der App auf die Kamera, die Sie verwalten wollen. N Das
Kamerabild erscheint auf Ihrem Smartphone.
• Streichen Sie mit Ihrem Finger über den Bildschirm, um hinein- oder herauszuzoomen
und um Ihr Kamerabild zu verschieben.
Achtung! Wenn Sie kein Bild sehen, kann es sein, dass Ihre Funkverbindung nicht
schnell genug ist. Verändern Sie in diesem Fall die Auösung des Kamerabilds (siehe
Abschnitt 5.1.1)
Das Kameradisplay weist eine Reihe von Optionen auf:
• Drücken Sie auf die Schaltäche "Snapshot" O1, um eine Momentaufnahme von Ihrem
Kamerabild zu machen.
• Drücken Sie auf die Schaltäche "mute/listen/speak" O2, um Ihre Klangeinstellungen
einzustellen.
5.1.1. Einstellungen Ihrer Kamera auf Ihrem Android-Smartphone ändern
• Drücken Sie auf der Startseite Ihrer App auf die Pfeiltasten neben der Kamera, die Sie
verwalten wollen. N2 Ein Menü mit Optionen önet sich.
• Drücken Sie auf die Schaltäche "Edit camera" und danach auf die Schaltäche
"Advanced settings". Q Der Schirm "Advanced settings" önet sich. R Auf dem
"Advanced settings"-Schirm können Sie einige Eigenschaften der Kamera anpassen.
Die wichtigsten Funktionen werden untenstehend beschrieben:
Modify security code R1: Passen Sie hier den Code Ihrer Kamera an. Der
Video QualityR2: Passen Sie die Auösung an Ihre Kamera an. Wenn Sie
5.2. Auf Ihrem iPhone Ihr Kamerabild ansehen
• Drücken Sie auf der Startseite der App auf die Kamera, die Sie verwalten wollen. V Das
Kamerabild erscheint auf Ihrem Smartphone.
• Streichen Sie mit Ihrem Finger über den Bildschirm, um hinein- oder herauszuzoomen
und um Ihr Kamerabild zu verschieben.
Achtung! Wenn Sie kein Bild sehen, kann es sein, dass Ihre Funkverbindung nicht
schnell genug ist. Verändern Sie in diesem Fall die Auösung des Kamerabilds (siehe
Abschnitt 5.2.1.)
Das Kameradisplay weist eine Reihe von Optionen auf:
• Drücken Sie auf die Schaltäche "Snapshot" W1, um eine Momentaufnahme von Ihrem
Kamerabild zu machen.
• Drücken Sie auf die Schaltäche "mute/listen/speak" W2, um Ihre Klangeinstellungen
einzustellen.
5.2.1. Einstellungen Ihrer Kamera auf Ihrem iPhone ändern
• Drücken Sie auf der Startseite Ihrer App auf die Pfeiltasten neben der Kamera, die Sie
verwalten wollen. V2 Ein Menü mit Optionen önet sich.
voreingestellte Code ist: 000000.
eine langsame Funkverbindung haben, müssen Sie die
Auösung herabsetzen.
O
P
W
X
32
Page 33

• Auf dem "Advanced settings"-Schirm können Sie einige Eigenschaften der Kamera
anpassen.
Die wichtigsten Funktionen werden untenstehend beschrieben:
Security code
Video QualityX2: Passen Sie die Auösung an Ihre Kamera an. Wenn Sie
6. Ihre Kamera über Ihren PC verwalten
Um Ihre Kamera von Ihrem PC aus verwalten zu können, müssen Sie mit Hilfe Ihres
Webbrowsers im Network Camera-Browserfenster (siehe Abschnitt 4.4) angemeldet sein.
Dieses Fenster enthält die Bedienkonsole der Kamera C1, einige Registerkarten C2, eine
Kanalübersicht C3, ein Einstellungsmenü für die Kamera C4 und die Kamerasteuerung, mit
der Sie die Drehung der Kamera bestimmen.
6.1. Bedienkonsole der Kamera
Sie können die Bedienungsleiste verwenden, wenn Sie die Registerkarte "Live Video"
gewählt haben. Diese Bedienungsleiste umfasst die folgenden Optionen:
Wiedergabe: Klicken Sie auf "Play", um die Live-Bilder Ihrer Kamera zu
Stopp: Klicken Sie auf "Stop", um die Live-Wiedergabe Ihrer
Record: Klicken Sie auf "Record", um eine Aufnahme zu machen.
Audio: Klicken Sie auf "Audio", um die Audiowiedergabe zu
Talk: Drücken Sie auf "Talk", um über einen an die Kamera
6.2. Registerkarten
Die Registerkarten bieten eine Vielzahl von Möglichkeiten zur Verwaltung Ihrer Kamera(s).
In dieser Bedienungsanleitung werden die wichtigsten Funktionen beschrieben. Wenn
Sie mehr über spezische Einstellungen erfahren möchten, empfehlen wir Ihnen, im
Benutzerhandbuch auf der CD-ROM nachzuschlagen.
X1
: Passen Sie hier den Code Ihrer Kamera an. Der
Achtung! Um Aufnahmen machen zu können, müssen Sie in der Registerkarte "Other"
angeben, wo die Aufnahmen gespeichert werden sollen. In Abschnitt 6.2.3 wird dies
erläutert.
Achtung! Um die Funktion "Audio" verwenden zu können, muss ein Mikrofon an den
Mikrofonanschluss der Kamera angeschlossen werden.
Achtung! Um die Funktion "Talk" verwenden zu können, muss ein Lautsprecher an den
Audio-Ausgang der Kamera angeschlossen werden.
voreingestellte Code lautet: 000000.
eine langsame Funkverbindung haben, müssen Sie die
Auösung herabsetzen.
C5
betrachten.
Kamerabilder zu stoppen.
Klicken Sie nochmals auf Record, um die Aufnahme zu
beenden.
aktivieren. Klicken Sie nochmals auf "Audio", um die
Audiowiedergabe zu beenden.
angeschlossenen Lautsprecher sprechen zu können.
C2
Y
C1
Z
33
Page 34

6.2.1. Live video
Klicken Sie die Registerkarte 'Live Video' an, um Bilder der eingestellten Kamera zu
betrachten.
6.2.2. Network
Wireless Lan Settings: Hiermit können Sie den drahtlosen Zugang zu Ihrer
DDNS Service Settings: Hiermit können Sie Ihre Kamera über das I nternet
6.2.3. Other
Achtung! Bevor Sie Aufnahmen in Windows 7, 8 oder Vista speichern können, müssen
Sie in Internet Explorer zunächst folgende Sicherheitseinstellung anpassen. Achten Sie
darauf, dass während der Anpassung dieser Einstellung das Network Camara-Fenster in
Internet Explorer geönet ist.
• Klicken Sie auf: Extras -> Internetoptionen -> Sicherheit -> Vertrauenswürdige Sites J
-> Sites
• Deaktivieren Sie im Fenster die Serververikation (https:). Klicken Sie anschließend auf
• Starten Sie Internet Explorer neu.
Path settings: Wählen Sie unter "Path settings" den Ordner, in dem Sie
6.3. Kanalübersicht der Kamera
Mit der Kanalübersicht haben Sie die Möglichkeit, mehrere Bilder von mehreren
angeschlossenen Kameras gleichzeitig zu betrachten.
6.4. Menüeinstellungen der Kamera
Innerhalb dieses Menü können Sie die Bildeinstellungen der Kamera anpassen: Auösung,
Bildgeschwindigkeit, Helligkeit und Kontrast.
6.5. Steuerung der Kameradrehung C5
Die Kamerasteuerung gibt Ihnen die Möglichkeit, die Kamerarichtung von Hand oder
automatisch zu ändern.
6.5.1. Manuelle Anpassung des Kamerawinkels
• Verwenden Sie die Pfeiltasten, um die Kamera in die gewünschte Richtung zu drehen.
6.5.2. Automatische Anpassung des Kamerawinkels
• Drücken Sie den horizontalen Überwachungsknopf, um die Kamera automatisch
6.5.3. Manuelles Ein- und Auszoomen
• Verwenden Sie "+"-Knopf zum Einzoomen und den "-"-Knopf zum Auszoomen.
K
"Hinzufügen".
horizontal rotieren zu lassen.
Kamera einstellen. Weitere Informationen hierzu nden
Sie in Abschnitt 4.5
zugänglich machen. Weitere Informationen hierzu nden
Sie im Benutzerhandbuch auf CD-ROM.
die Aufnahmen der Kamera speichern möchten I.
.
H
C3
C4
9
34
Page 35

7. Reinigung und Wartung
Warnung! Trennen Sie das Gerät vor einer Reinigung von sämtlichen
Spannungsquellen.
Die Geräte sind wartungsfrei und dürfen daher keinesfalls geönet werden. Bei Önung
wird die Garantie hinfällig. Reinigen Sie das Gerät lediglich von außen mit einem weichen,
trockenen Tuch oder einer Bürste.
8. Umwelt und Entsorgung
Das Symbol auf dem Material, den Zubehörteilen oder der Verpackung gibt an,
dass dieses Produkt nicht als Haushaltsmüll entsorgt werden darf. Überlassen Sie
das Gerät einer Sammelstelle für das Recycling von Elektro- und Elektronikschrott
innerhalb der EU oder in anderen europäischen Ländern, die eigene
Sammelsysteme für gebrauchte Elektrogeräte und Elektronikteile kennen. Durch
Entsorgung des Gerätes auf korrekte Weise tragen Sie mit dazu bei, mögliche Gefahren für
die Umwelt oder die Gesundheit zu verhindern, die ansonsten bei unsachgemäßem
Umgang mit dem ausgemusterten Gerät entstanden wären. Die Wiederverwertung von
Materialien trägt zum Erhalt der natürlichen Ressourcen bei. Entsorgen Sie daher alte
Elektrogeräte oder Elektronikteile niemals in den Hausmüll.
9. Garantie
Für dieses Gerät gilt eine eingeschränkte Garantie von 3 Jahr(en). Die
Garantiebedingungen nden Sie auf: www.elro.eu.
Instrukcja obsługi C904IP.2
Dziękujemy za zakup kamery sieciowej C904IP.2. Aby jak najszybciej i w jak najprostszy
sposób móc korzystać z kamery, prosimy o dokładne zapoznanie się z niniejszą instrukcją.
Ilustracje do niniejszej instrukcji znajdują się we wcześniejszej części niniejszego rozdziału.
35
Page 36

1. Środki prewencyjne i instrukcje
bezpieczeństwa
1.1. Użyte symbole bezpieczeństwa
Ostrzeżenie! Ostrzeżenie wskazuje na ryzyko (poważnych) obrażeń użytkownika lub
uszkodzenia produktu, jeżeli użytkownik nie będzie postępował ściśle z procedurami.
Uwaga! Komunikaty Uwaga informują użytkownika o możliwości wystąpienia
problemów.
!
Rada: Komunikat Rada informuje użytkownika, że istnieją dodatkowe możliwości.
1.1.1. Powiadomienia
Ostrzeżenie! Nie montować produktu w miejscach, gdzie jest bardzo ciepło lub zimno.
Ostrzeżenie! Przed rozpoczęciem montażu sprawdzić, czy w ścianie w danym miejscu,
w którym nastąpi wiercenie, nie znajdują się żadne kable elektryczne lub rury.
Ostrzeżenie! Zasilanie urządzenia można wyłączyć wyciągając wtyczkę z kontaktu.
Następnie należy skontaktować się z działem wsparcia Smartwares, jeżeli:
• otwarcie części sprzętu, zmoczenie, lub upadek;
• kabel zasilający adaptera jest rozerwany lub otwarty w wyniku czego widoczny
jest metal;
• obudowa adaptera jest uszkodzona;
• adapter miał styczność z wilgocią lub cieczą;
• uszkodzone jest szkiełko kamery;
Ostrzeżenie! Nie wolno samodzielnie otwierać produktu ani go naprawiać. Spowoduje
to utratę gwarancji. Naprawę można zlecać wyłącznie certykowanym serwisantom.
Ostrzeżenie! Korzystać wyłącznie z oryginalnych akcesoriów.
Ostrzeżenie! Trzymać produkt poza zasięgiem dzieci.
Ostrzeżenie! Odłączyć urządzenie od wszelkich źródeł zasilania przed jego
czyszczeniem.
Ostrzeżenie! Do czyszczenia stosować suchą, czystą ściereczkę.
Ostrzeżenie! Nie używać żadnych środków do szorowania, żrących lub na bazie
rozpuszczalnika do czyszczenia produktu.
Ostrzeżenie! Wyciągnąć adapter z gniazdka w przypadku burzy, błyskawic i gdy
produkt przez dłuższy czas nie jest użytkowany.
Uwaga! Zamontuj produkt zgodnie z instrukcjami zawartymi w niniejszym
przewodniku. W razie wątpliwości skontaktuj się ze specjalistą -monterem i zawsze
przestrzegaj obowiązujących lokalnych przepisów dotyczących montażu.
Uwaga! Unikać bezpośredniego działania promieni słonecznych na kamerę.
Uwaga! Nie ustawiać kamery w kierunku gałęzi lub innych poruszających się obiektów.
Uwaga! Produktu nie wolno utylizować z innymi, nieposegregowanymi odpadami z
gospodarstw domowych, ale należy oddać do odpowiedniego punktu zbiórki.
Uwaga! Należy uzyskać informacje odnośnie lokalnych możliwości utylizacji produktu.
Nie wyrzucać części lub akcesoriów do urządzenia, ale najpierw sprawdzić czy mogą
zostać poddane recyklingowi lub zostać ponownie użyte.
Uwaga! Systemy bezprzewodowe mogą być zakłócane przez bezprzewodowe
telefony, kuchenki mikrofalowe oraz inne bezprzewodowe urządzenia, które działają
w zakresie 2,4 GHz. Trzymać urządzenia na co najmniej 3 metry z dala od możliwych
źródeł zakłóceń w trakcie instalacji i obsługi.
36
Page 37

Uwaga! Kamera w nocy nie działa przy założonym szkiełku. Należy to uwzględnić przy
montażu.
2. Eksploatacja zgodna z przeznaczeniem
C904IP.2 to kamera monitoringu umożliwiająca podgląd obrazów monitoringu
przez lokalną sieć, połączenie internetowe lub aplikację "ELRO Install" App na swoim
smartphonie. C904IP.2 może zostać podłączona przez kabel ethernetowy jak również
połączenie WIFI.
Kamera może nagrywać w ciągu dnia.
Dwie elektryczne osie obrotowe umożliwiają obrócenie anteny o 355 stopni. Można też
ustawić automatyczne obracanie.
Kamera jest ponadto wyposażona w czujnik ruchu i może być włączana przez port I/O.
3. Specykacja techniczna
3.1. Ogólna specykacja produktowa
Czujnik: 1/4” Czujnik koloru CMOS
Rozdzielczość: 640 x 480 pikseli (300k pikseli)
Soczewka: 4-9 mm
Zoom optyczny: 3x
Zasięg kamery: 355 stopni poziomo, 90 stopni pionowo
Minimalne natężenie światła: 0.5 Luks
Kompresja wideo: MJPEG
Klatki na sekundę: 15 kl./sek.(VGA), 30 kl./sek.(QVGA)
Źródło zasilania: adapter 230VAC/5VDC/2A
Zużycie energii: 5W (maks.)
Temperatura: -10°C ~ 40°C (14°F~104°F)
Minimalne wymogi systemowe:
CPU: 2.0 GHZ lub wyższy
Pamięć: 256 MB lub więcej
Karta wideo: 64 MB lub więcej
System operacyjny: Windows 98/ME/2000/XP/Vista/7/8
Obsługiwane przeglądarki: IE6.0-10.0, Firefox, Safari, Google chrome
Wspierany system mobilny OS: iOS 4.3 i wyższy / Android 2.1 i wyższy
Certykaty: CE, FCC, RoHS, R&TTE
Gwarancja: Ograniczona 3-letnia gwarancja
3.2. Główne części
1. Płyta CD-ROM z oprogramowaniem
2. Zdejmowana antena
3. 4 śruby montażowe i zaślepki
4. Instrukcja obsługi
5. Kabel Ethernetowy
6. C904IP.2 kamera
7. Zasilanie DC
1
37
Page 38

3.3. Podłączenia
1. Złącze anteny
2. Złącze DC
3. Podłączenie audio (wyjście)
4. Port Ethernet
5. wejście I/O
6. Podłączenie audio (wejście)
7. Przycisk reset
2
4. Instalacja kamery
4.1. Podłączenie kamery
• Odkręcić kopułę kamery 3. Następnie usunąć materiał opakowania 4 i ponownie
dokręcić kopułkę.
• Dokręcić antenę w złączu anteny
• Podłącz kabel adaptera do złącza DC kamery 6. Następnie włóż wtyczkę adaptera do
gniazdka.
• Podłącz załączony kabel ethernetowy do wejścia sieciowego kamery 7. Podłącz drugą
końcówkę kabla do routera. Gdy kamera połączy się z siecią, zielony wskaźnik LED
wejścia ethernet zapali się.
Teraz możesz sterować swoją kamerą sieciową za pomocą smartfonu lub komputera.
Używanie ze smartfonem opisano w rozdziale 4.2, natomiast instalację na komputerze
opisano w rozdziale 4.3.
4.2. Ustawienia dla użytku smartphona
Uwaga! Do instalacji aplikacji „ELRO INSTALL” wymagany jest smartfon z dostępem do
sieci Internet.
W celu ustawienia kamery przez system Android przejść do paragrafu 4.2.1.. W celu
ustawienia kamery przez system iOS przejść do paragrafu 4.2.2..
4.2.1. Android
• Pobrać aplikację "Elro install" przez Google Play i zainstalować ją.
• Uruchom aplikację. Pojawi się ekran startowy aplikacji.
• Naciśnij przycisk „Click here to add camera” (kliknij tutaj, aby dodać kamerę). Pojawi się
menu „Add camera” (dodaj kamerę).
• Naciśnij przycisk „Scan” (skanuj). M1 Następnie zeskanuj kod QR w dolnej części kamery.
Możesz również wprowadzić ręcznie kod występujący po znakach „UID”. M2 Kod ten
znajduje się poniżej kodu QR kamery sieciowej.
• Następnie wprowadź kod: 000000 przy napisie „Security code” (kod bezpieczeństwa).
M3
• W polu „Name” (nazwa) wprowadź swoją nazwę dla kamery.
• Następnie naciśnij przycisk „OK”.
Twoja kamera została dodana do Twojego telefonu i będzie dostępna na ekranie
startowym aplikacji. N Tutaj możesz sprawdzić, czy kamera jest podłączona (ONLINE) N1
lub niepodłączona (OFFLINE).
.
5
L
M
M4
38
Page 39

4.2.2. iOS
• Pobrać aplikację "Elro Install" przez App Store i ją zainstalować.
• Uruchom aplikację. Pojawi się ekran startowy aplikacji.
• Nacisnąć "Add camera".
• Nacisnąć przycisk "QR code". S2 Zeskanować kod QR na spodzie kamery.
• Można także wybrać opcję ręcznego wprowadzania kodu. W tym celu nacisnąć przycisk
S1
Wprowadzić następnie kod kamery w "UID". U2 Kod ten można znaleźć pod
"Add".
kodem QR na swojej kamerze IP.
• Następnie wprowadzić w polu "Password" kod: 000000.
• W polu „Name” (nazwa) wprowadź swoją nazwę dla kamery.
• Następnie naciśnij przycisk „Save”.
Kamera jest teraz powiązana z Twoją App'ką i pojawi się na ekranie początkowym aplikacji.
Tutaj można sprawdzić, czy kamera jest połączona (ONLINE) V1 czy też nie jest
V
połączona (OFFLINE).
4.2.3. Informacje ogólne
• Instrukcje dotyczące rozmieszczenia kamery znajdują się w rozdziale 4.6.
• Instrukcje dotyczące używania kamery wraz z aplikacją znajdują się w rozdziale 5.
4.3. Zainstaluj kamerę na komputerze
• Włóż płytę CD-ROM do komputera.
• Uruchom “IPCamSetup.exe” z płyty CD-ROM.
• Kontynuować instalację naciskając dwukrotnie przycisk "Dalej".
• Zakończyć instalację naciskając "Ponownie uruchom komputer".
Narzędzie kamery P zostało teraz zainstalowane na Twoim komputerze. Skrót znajduje się
na pulpicie.
Uwaga! Nie usuwaj tego skrótu! Jeżeli jednak tak zrobisz, konieczne będzie ponowne
zainstalowanie IP camera tool.
4.4. Połączenie z kamerą
Uwaga! Aby móc korzystać z pełnej funkcjonalności kamery IP należy korzystać z
przeglądarki Internet Explorer 6 lub wyższej wersji (32 bit) i wybrać tryb ActiveX.
Nie ma możliwości wykonywania nagrań wideo lub dźwięków przy pomocy innych
przeglądarek.
Uwaga! Jeżeli wybrałeś tryb ActiveX możesz nadal nie widzieć żadnego obrazu. W
takim przypadku postępuj zgodnie z poniższymi wskazówkami:
• Przejdź w Internet Explorer do: Narzędzia-> Opcje internetowe-> Prywatność ->
Przesuń suwak
• Zmień w elementach sterowania ActiveX włączone opcje na "Pytania". Jeżeli opcja
"Pytania" nie jest dostępna, zaznacz "Włącz". Patrz także: E F
!
Rada: korzystając z innej przeglądarki niż standardowa przeglądarka, skopiuj link z
otwartej przeglądarki do dowolnej przeglądarki.
• Uruchom IP Camera Tool przez skrót na pulpicie “IP camera tool”. IP camera tool
wyszuka automatycznie kamery IP podłączone do sieci.
S3
Pojawi się menu "Add camera".
U1
D
S
U3
T
G
39
Page 40

Otworzy się okno A. W tym oknie znajdują się wszystkie kamery IP. Jeżeli żadna z kamer
nie jest podłączona, wówczas okno to pozostaje puste.
• Kliknij dwukrotnie w kamerę, której chcesz użyć. W Twojej standardowej przeglądarce
otworzy się okno, w który konieczne będzie wprowadzenie nazwy użytkownika.
• W polu nazwa użytkownika wpisz "admin" i naciśnij "zaloguj". Nie musisz wprowadzać
hasła.
Otworzy się menu wyboru
Tryb ActiveX: Internet Explorer
Server Push Mode: Safari, Firefox i Google Chrome
Tryb VLC: Internet Explorer, Safari, Firefox, Google Chrome i Opera
Uwaga! Dla pracy w trybie VLC należy pobrać odtwarzacz VLC.
Sign in mobile phone: Dostęp z poziomu przeglądarki na telefonie
• Kliknij "Sign In" [Zaloguj] pod opcją, która pojawi się w oknie przeglądarki.
Teraz jesteś zalogowany na ekranie Netwerk Camera C. Z poziomu tego ekranu możesz
zarządzać ustawieniami kamery. (patrz rozdział 6).
. Możesz wybrać jedną z opcji:
B
4.5. Nawiązanie bezprzewodowego połączenia z
kamerą
Uwaga! Aby nawiązać bezprzewodowe połączenie w trakcie ustawiania kamera musi
być połączona z siecią przez dostarczony kabel ethernetowy.
Uwaga! Do nawiązania bezprzewodowego połączenia z kamerą potrzebny jest
bezprzewodowy router.
Uwaga! Jeżeli router posiada hasło, konieczne będzie podanie tego hasła.
• Naciśnij na ekranie przeglądarki Network Camera C zakładkę “Network”. Pojawi się
lista z ustawieniami (settings) H.
• Wybierz Wireless Lan Settings: na ekranie pojawią się Wireless Lan Settings.
• Na ekranie Wireless Lan Settings kliknij dwukrotnie “scan” [skanuj]. Pojawi się lista
dostępnych sieci bezprzewodowych.
• Kliknij na sieć bezprzewodową.
• Jeżeli nie posiadasz hasła do sieci bezprzewodowej, naciśnij na 'submit' [wyślij].
• Jeżeli sieć bezprzewodowa jest zabezpieczona hasłem, należy wprowadzić to hasło w
pozycji "Share Key" lub "key1", zależnie od kodowania.
• Następnie kliknij "wyślij".
Kamera uruchomi się ponownie po naciśnięciu przycisku 'submit'. Potrwa to około 30 sek.
• Po ponownym uruchomieniu kamery zamknąć przeglądarkę i camera tool.
• Wyciągnąć kabel sieciowy z kamery.
• Otwórz IP camera tool i kliknij na adres kamery. Teraz możesz bezprzewodowo
sterować swoją kamerą.
• Jeżeli kamera nie jest widoczna w oknie camera tool, kliknij prawym przyciskiem
myszy w okno narzędzia, następnie naciskając opcję "refresh camera list" [odśwież listę
kamer].
40
Page 41

4.6. Montaż kamery
Uwaga! Sprawdzić, czy kamera prawidłowo funkcjonuje w wybranej lokalizacji zanim
rozpoczniesz montaż.
• Przymocować wspornik kamery do ściany za pomocą 4 dostarczonych śrub 8.
Uwaga! Jeżeli podłoże jest zbyt twarde do przymocowania kamery (kamień/
gazobeton), należy najpierw nawiercić otwory i użyć załączonych kołków.
5. Zarządzanie kamerą za pomocą smartfonu
Upewnij się, że kamera/kamery jest/są podłączone do Twojego smartfonu za pomocą
aplikacji ELRO INSTALL (zob. rozdziały 4.1 i 4.2).
5.1. Na telefonie Android można zobaczyć obraz z
kamery
• Na ekranie początkowym aplikacji naciśnij kamerę, którą chcesz zarządzać. N Na
smartfonie pojawi się obraz z kamery.
• Przesuwaj palcem po ekranie, aby przybliżać i oddalać oraz przesuwać obraz z kamery.
Uwaga! Brak obrazu może oznaczać zbyt niską prędkość połączenia
bezprzewodowego. W takim wypadku zmniejsz rozdzielczość obrazu (zob. rozdział
5.1.1)
Na ekranie kamery dostępnych jest wiele opcji:
• Naciśnij przycisk „Snapshot” O1 (zdjęcie), aby wykonać zdjęcie za pomocą kamery.
• Naciśnij przycisk „mute/listen/speak” O2 (ścisz/słuchaj/mów), aby dostosować
ustawienia dźwiękowe.
5.1.1. Zmiana ustawień kamery na smartphonie z systemem Android
• Na ekranie startowym aplikacji naciśnij przycisk strzałki obok kamery, którą chcesz
zarządzać. N2 Pojawi się menu z dostępnymi opcjami.
• Naciśnij przycisk „Edit camera” (edytuj kamerę), a następnie „Advanced settings”
(ustawienia zaawansowane). Q Otworzy się okno „Advanced settings” (ustawienia
zaawansowane). R Okno „Advanced settings” pozwala zmieniać różne właściwości
kamery.
Główne funkcje są wymienione poniżej:
Modify security code (zmień kod zabezpieczeń) R1: Zmiana kodu kamer y. Domyślny
Video QualityR2: Ustawić rozdzielczość kamery. W przypadku wolnego
5.2. Oglądanie obrazu z kamery na iPhonie
• Na ekranie początkowym aplikacji naciśnij kamerę, którą chcesz zarządzać. V Na
smartfonie pojawi się obraz z kamery.
• Przesuwaj palcem po ekranie, aby przybliżać i oddalać oraz przesuwać obraz z kamery.
Uwaga! Brak obrazu może oznaczać zbyt niską prędkość połączenia
bezprzewodowego. W takim wypadku zmniejsz rozdzielczość obrazu (zob. rozdział
5.2.1.)
O
P
kod to: 000000.
połączenia bezprzewodowego, ustawienia te powinny
mieć niższą wartość.
W
41
Page 42

Na ekranie kamery dostępnych jest wiele opcji:
• Naciśnij przycisk „Snapshot”
• Naciśnij przycisk „mute/listen/speak” W2 (ścisz/słuchaj/mów), aby dostosować
ustawienia dźwiękowe.
5.2.1. Zmiana ustawień kamery na iPhonie
• Na ekranie startowym aplikacji naciśnij przycisk strzałki obok kamery, którą chcesz
zarządzać. V2 Pojawi się menu z dostępnymi opcjami.
• Okno „Advanced settings” pozwala zmieniać różne właściwości kamery.
Główne funkcje są wymienione poniżej:
Security codeX1: Wprowadzić tutaj kod kamery. Domyślny kod to: 000000.
Video QualityX2: Ustawić rozdzielczość kamery. W przypadku wolnego
W1
(zdjęcie), aby wykonać zdjęcie za pomocą kamery.
X
Z
połączenia bezprzewodowego, ustawienia te powinny
mieć niższą wartość.
Y
6. Zarządzanie kamerą za pomocą
komputera
Aby móc zarządzać kamerą z poziomu komputera, należy zalogować się przy pomocy
przeglądarki na ekranie “Network Camera” (patrz paragraf 4.4). Ekran ten obejmuje panel
sterowania kamerą C1, ilość zakładek C2, zestawienie kanałów C3, menu ustawień dla
kamery C4 oraz panel kontrolny, przy pomocy którego można ustawić rotację kamery.
6.1. Panel sterowania kamery
Z panelu sterowania można korzystać po wybraniu zakładki "live video". Panel sterowania
posiada następujące opcje:
Odtwarzanie: Naciśnij “Play”, aby odtworzyć obraz z kamery.
Stop: Nacisnąć “Stop”, aby zatrzymać odtwarzanie na żywo
Nagrywanie: Naciśnij “Record”, aby rozpocząć nagrywanie. Nacisnąć
Uwaga! Aby móc nagrywać w zakładce "Other" [Inne] należy wskazać, gdzie nagrania
mają być przechowywane. Objaśnienie znajduje się w paragrae 6.2.3.
Audio: Naciśnij “Audio”, aby aktywować nagrywanie dźwięku.
Uwaga! Aby móc korzystać z funkcji "Audio” należy podłączyć mikrofon do złącza
mikrofonu kamery.
Talk: Nacisnąć na “Talk”, aby móc rozmawiać przez głośnik
Uwaga! Aby móc korzystać z funkcji "Talk" należy podłączyć głośnik do wyjścia audio
kamery.
obrazu.
ponownie Record, aby zakończyć nagrywanie.
Naciśnij ponownie Audio, aby zakończyć nagrywanie
dźwięku.
podłączony do kamery.
C1
C5
42
Page 43

6.2. Zakładki
Zakładki oferują wiele możliwości sterowania kamerą (kamerami). W niniejszej instrukcji
omawiamy najważniejsze funkcje. Szczegółowe informacje dotyczące szczegółowych
ustawień znajdują się w instrukcji obsługi na płycie CD-ROM.
6.2.1. Live video
Kliknij zakładkę live video, aby zobaczyć obraz z ustawionej kamery.
6.2.2. Network
Wireless Lan settings: Tutaj można ustawić bezprzewodowy dostęp do kamery.
DDNS Service settings: Przy pomocy tych ustawień można uzyskać dostęp do
6.2.3. Other
Uwaga! Przed zapisaniem nagrań w systemie Windows 7, 8 lub Vista, należy
odpowiednio zmienić ustawienia zabezpieczeń przeglądarki Internet Explorer.
Przed zmianą tych ustawień, sprawdzić czy ekran Network Camera otworzył się w
przeglądarce Internet Explorer.
• Przejdź do: Dodatki -> Opcje internetowe -> Zabezpieczenia> Zaufane strony J ->
Strony
• Na ekranie wyłącz opcję Uwierzytelnianie serwera (https:). Następnie naciśnij "Dodaj".
• Ponownie uruchom przeglądarkę Internet Explorer.
Path settings: Wybierz w opcji “Path settings” miejsce, gdzie chcesz
6.3. Zestawienie kanałów kamery
Zestawienie kanałów umożliwia podgląd obrazu z kilku podłączonych kamer jednocześnie.
6.4. Ustawienia kamery menu
Z poziomu tego menu można zmienić ustawienia obrazu kamery: rozdzielczość, prędkość
klatek, jasność i kontrast.
6.5. Panel kontrolny obrotu kamery C5
Panel kontrolny kamery umożliwia ręczną i automatyczną regulację kierunku ustawienia
kamery.
6.5.1. Ręczne ustawienie kąta kamery
• Użyć przycisków strzałek do ustawienia kamery w dowolnym kierunku.
6.5.2. Automatyczna regulacja kąta kamery
• Nacisnąć na poziomy przycisk patrolowania, aby obracać kamerę automatycznie
poziomo.
C2
Szczegółowe informacje na ten temat można znaleźć w
paragrae 4.5
kamery przez Internet. Szczegółowe informacje na ten
temat znajdują się w instrukcji obsługi na płycie CD-ROM.
K
zapisać nagrania I.
.
H
C3
C4
9
43
Page 44

6.5.3. Ręczne powiększanie i pomniejszanie
• Użyć przycisku "+", aby powiększyć i przycisku "-", aby zmniejszyć obraz.
7. Czyszczenie i konserwacja
Ostrzeżenie! Odłączyć urządzenie od wszelkich źródeł zasilania przed jego
czyszczeniem.
Urządzenia nie wymagają konserwacji, dlatego nie należy ich otwierać. Otwarcie
urządzenia powoduje unieważnienie gwarancji. Czyścić jedynie zewnętrzną stronę
urządzenia, delikatną, suchą ściereczką lub szczoteczką
8. Ochrona środowiska
Symbol na sprzęcie, akcesoriach lub opakowaniu wskazuje na to, że produkt ten
nie może być wyrzucany wraz z domowymi odpadami. Urządzenie należy
przekazać do punktu zbiórki recyklingu sprzętów elektrycznych i elektronicznych
na terenie UE i w innych krajach europejskich. Utylizując urządzenie we właściwy
sposób, pomagamy chronić środowisko i zdrowie przed szkodliwym wpływem
nieprawidłowo zutylizowanego urządzenia. Recykling materiałów przyczynia się do
zachowania naturalnych zasobów. Dlatego nie należy wyrzucać starych urządzeń
elektrycznych i elektronicznych wraz z odpadami domowymi.
9. Gwarancja
Urządzenie to jest objęte ograniczoną 3 roczną (letnią) gwarancją. Warunki gwarancji
znajdują się na: www.elro.eu.
Handleiding C904IP.2
Bedankt voor uw aankoop van de C904IP.2 netwerk camera. Om uw camera zo snel en
gemakkelijk mogelijk te kunnen gebruiken, raden wij u aan om deze gebruiksaanwijzing
voor gebruik aandachtig door te nemen.
De afbeeldingen van deze gebruiksaanwijzing vindt u voorafgaand aan dit hoofdstuk.
44
Page 45

1. Voorzorgsmaatregelen en
veiligheidsinstructies
1.1. Gebruikte veiligheidssymbolen
Waarschuwing! Een waarschuwing duidt op de kans op (ernstige) schade aan de
gebruiker of aan het product, als de gebruiker de procedures niet zorgvuldig uitvoert.
Let op! Een opmerking maakt de gebruiker attent op mogelijke problemen.
!
Tip: Een tip maakt de gebruiker attent op handigheden en extra mogelijkheden.
1.1.1. Noticaties
Waarschuwing! Monteer het product niet op plaatsen waar het erg warm of koud kan
worden.
Waarschuwing! Controleer voor aanvang van de montage of er geen
elektriciteitskabels en waterpijpen door de muur lopen waar u wilt gaan boren.
Waarschuwing! U haalt onmiddellijk de stroom van het product af door de stekker
uit het stopcontact te halen en neemt vervolgens contact op met de Smartwares
servicedesk, wanneer:
• hardwareonderdelen van het product openliggen, doorboord zijn, vochtig zijn of
hard gevallen zijn;
• de voedingskabel van de adapter rafelig is of open ligt waardoor het metaal
zichtbaar is;
• de behuizing van de adapter beschadigd is;
• de adapter in aanraking is gekomen met vocht of vloeistoen;
• het glas van de camera gebarsten of gebroken is;
Waarschuwing! Het is niet toegestaan om zelf het product open te (laten) maken of
te (laten) repareren. In dat geval vervallen garanties. Laat onderhoud uitvoeren door
gecerticeerd onderhoudspersoneel.
Waarschuwing! Gebruik alleen originele accessoires van de fabrikant.
Waarschuwing! Houd het product buiten bereik van kinderen.
Waarschuwing! Haal het apparaat uit alle spanningsbronnen voordat u het reinigt.
Waarschuwing! Gebruik een droge schone doek om het product schoon te maken.
Waarschuwing! Gebruik geen schurende middelen, bijtende schoonmaakmiddelen of
middelen met bleek of oplosmiddelen om het product schoon te maken.
Waarschuwing! Haal de adapter uit het stopcontact tijdens een storm, bliksem en
wanneer het product voor langere tijd niet wordt gebruikt.
Let op! Monteer het product zoals aangegeven in deze handleiding. Raadpleeg bij
twijfel een erkend monteur en neem altijd de lokale montagevoorschriften in acht.
Let op! Vermijd direct zonlicht op de camera.
Let op! Richt de camera niet op bosjes, takken of andere bewegende voorwerpen.
Let op! Het product mag niet worden verwijderd als ongesorteerd stedelijk afval, maar
moet gescheiden worden ingezameld.
Let op! Informeer binnen uw regio naar de mogelijkheden om het product in te
leveren bij beëindiging van het gebruik. Gooi elektrische apparaten en onderdelen
niet weg, maar bekijk of (onderdelen van) het product ingeleverd, gerecycled of
hergebruikt kunnen worden.
45
Page 46

Let op! Draadloze systemen kunnen gestoord worden door draadloze telefoons,
microgolfovens en andere draadloze toestellen die werken op het bereik van 2,4 GHz.
Houd het product minstens 3 meter verwijderd van mogelijke storingsbronnen tijdens
installatie en bediening.
Let op! De camera kan 's nachts niet door glas heen k ijken. Houd hier rekening mee bij
het plaatsen.
2. Beoogd gebruik
De C904IP.2 is een bewakingscamera die het mogelijk maakt bewakingsbeelden via een
plaatselijk netwerk, een internetverbinding of via de "ELRO Install" App op uw smartphone
te bekijken. De C904IP.2 kan zowel op een ethernetkabel als op een WIFI verbinding
aangesloten worden.
De camera kan overdag video opnames maken.
Twee elektrische draaiassen geven u de mogelijkheid de camera op afstand 355 graden te
draaien. U kunt dit ook volledig automatisch laten plaatsvinden.
De camera is verder uitgerust met bewegingsdetectie en kan via een I/O poort een
schakeling maken.
3. Technische specicaties
3.1. Algemene product specicaties
Sensor: 1/4" Color CMOS Sensor
Resolutie: 640 x 480 Pixels (300k Pixels)
Lens: 4-9 mm
Optische zoom: 3x
Camerabereik: 355 graden horizontaal, 90 graden verticaal
Minimale lichtsterkte: 0.5Lux
Video compressie: MJPEG
Beelden per seconde: 15fps( VGA), 30fps(QVGA)
Spanningsbron: 230VAC/5VDC/2A Adaptor
Energieverbruik: 5W (Max.)
Temperatuur: -10°C ~ 40°C (14°F~104°F)
Minimale systeemeisen:
CPU: 2.0 GHZ of hoger
Geheugen: 256 MB of hoger
Videokaart: 64 MB of hoger
Ondersteunde OS: Windows 98/ME/2000/XP/Vista/7/8
Ondersteunde browsers: IE6.0-10.0, Firefox, Safari, Google chrome
Ondersteunde mobiele OS: iOS 4.3 en hoger / Android 2.1 en hoger
Certicatie: CE, FCC, RoHS, R&TTE
Garantie: Beperkte 3-jarige garantie
3.2. Belangrijkste onderdelen
1. Software Cd-rom
2. Verwijderbare antenne
3. 4 montageschroeven en pluggen
4. Gebruikershandleiding
1
46
Page 47

5. Ethernet kabel
6. C904IP.2 camera
7. DC voeding
3.3. Aansluitingen
1. Antenne aansluiting
2. DC aansluiting
3. Audio aansluiting (uitgang)
4. Ethernet poort
5. I/O poort
6. Audio aansluiting (ingang)
7. Reset knop
2
4. Camera installatie
4.1. De camera aansluiten
• Schroef de dome van de camera los 3. Verwijder vervolgens het verpakkingsmateriaal
en schroef de dome weer vast.
4
• Draai de antenne vast in de antenne aansluiting 5.
• Sluit de adapterkabel aan op de DC aansluiting van de camera 6. Steek hierna de
stekker van de adapter in het stopcontact.
• Sluit de bijgeleverde ethernet kabel aan op de netwerkpoort van de camera 7. Sluit
het andere uiteinde van de ethernet kabel aan op uw router. Wanneer de camera
verbonden is met het netwerk, zal de groene LED van de ethernet poort gaan branden.
U kunt uw IP Camera met uw smartphone of met uw PC bedienen. Ga naar paragraaf 4.2
voor gebruik via uw smartphone en ga naar paragraaf 4.3 voor installatie op uw PC.
4.2. Instellen voor smartphone gebruik
Let op! Voor het gebruik van de "ELRO INSTALL" App heeft u een smartphone nodig
met internettoegang.
Ga voor het instellen van uw camera via Android naar paragraaf 4.2.1.. Voor het instellen
van uw camera via iOS gaat u naar paragraaf 4.2.2..
4.2.1. Android
• Download de App: "Elro Install" via Google Play en installeer deze.
• Start de App op. Het beginscherm van de app verschijnt.
• Druk op de optie "Click here to add camera". Het "Add camera" menu verschijnt.
• Druk op de knop "Scan". M1 Scan vervolgens de QR code aan de onderzijde van uw
camera. U kunt er ook voor kiezen de code achter "UID" handmatig in te voeren. M2 U
vindt deze code onder de QR code op uw IP camera.
• Vul vervolgens achter "Security code" de code: 000000 in.
• Vul achter "Name" de naam in die u aan de camera wilt toewijzen.
• Druk vervolgens op de knop "OK".
Uw camera is nu toegevoegd aan uw telefoon en zal in het beginscherm van uw App
verschijnen. N U kunt hierin zien of de camera verbonden is (ONLINE) N1 of dat deze niet
verbonden is (OFFLINE).
M4
L
M3
M
47
Page 48

4.2.2. iOS
• Download de App "Elro Install" via de App Store en installeer deze.
• Start de App op. Het beginscherm van de app verschijnt.
• Druk op "Add camera".
• Druk op de knop "QR code". S2 Scan vervolgens de QR code aan de onderzijde van uw
camera.
• U kunt er ook voor kiezen de code van uw camera handmatig in te voeren. Druk
• Vul vervolgens achter "Password" de code: 000000 in.
• Vul achter "Name" de naam in die u aan de camera wilt toewijzen.
• Druk vervolgens op de knop "Save".
Uw camera is nu toegevoegd aan uw App en zal in het beginscherm van uw App
verschijnen. V U kunt hierin zien of de camera verbonden is (ONLINE) V1 of dat deze niet
verbonden is (OFFLINE).
4.2.3. Algemeen
• Ga voor instructies over het plaatsen van uw camera naar paragraaf 4.6.
• Ga voor instructies over het gebruik van uw camera met behulp van de App naar
4.3. Uw camera installeren op uw PC
• Plaats de bijgeleverde Cd-rom in uw computer.
• Start "IPCamSetup.exe" vanaf de Cd-rom.
• Doorloop de installatie door twee maal op "Volgende" te drukken.
• Rond de installatie af door op "Computer opnieuw opstarten" te drukken.
De IP camera tool is nu op uw computer geïnstalleerd. U vindt de snelkoppeling op uw
bureaublad.
4.4. Verbinding maken met uw camera
T
hiervoor op de knop "Add". S1 Voer vervolgens de code van uw camera in achter "UID".
U2
U vindt deze code onder de QR code op uw IP camera.
hoofstuk 5.
Let op! Verwijder deze snelkoppeling niet! Wanneer u dit toch doet, dient u de IP
camera tool opnieuw te installeren.
Let op! Om gebruik te kunnen maken van de volledige functionaliteit van de IP camera
dient u gebruik te maken van Internet Explorer 6 of hoger (32 bit) en te kiezen voor
de ActiveX Mode. Het is niet mogelijk beeld- of geluidsopnames te maken in andere
webbrowsers.
Let op! Indien u kiest voor de ActiveX mode is het mogelijk dat u nog geen beeld
heeft. Voer in dit geval de volgende handelingen uit:
• Ga in Internet Explorer naar: Extra-> Internetopties-> beveiligingsinstellingen
->aangepast niveau
• Verander onder de ActiveX-besturingselementen en -invoegtoepassingen, de
uitgeschakelde opties op "Vragen". Wanneer de optie "Vragen" niet beschikbaar is,
vinkt u "Inschakelen" aan. Zie ook: E F
!
Tip: indien u een andere webbrowser wilt gebruiken dan uw standaard browser,
kopieert u de link uit de openstaande browser naar een browser naar keuze.
S3
Het "Add camera" menu verschijnt.
U1
D
G
S
U3
48
Page 49

• Start de IP Camera Tool via de "IP camera tool" snelkoppeling op uw bureaublad. De
IP camera tool zoekt automatisch naar de IP camera (s) die aangesloten zijn op uw
netwerk.
Een venster opent zich
geen camera's aangesloten zijn, blijft het venster leeg.
• Dubbelklik op de camera die u wilt gebruiken. In uw standaard webbrowser opent een
identicatie venster waarin naar uw gebruikersnaam wordt gevraagd.
• Toets voor de gebruikersnaam "admin" in en druk op "aanmelden". U hoeft geen
wachtwoord in te vullen.
Een keuzemenu opent zich
ActiveX Mode: Internet Explorer
Server Push Mode: Safari, Firefox en Google Chrome
VLC Mode: Internet Explorer, Safari, Firefox, Google Chrome en
Let op! Voor de VLC Mode dient u de VLC player te downloaden.
Sign in mobile phone: Toegang met een mobiele browser
• Klik op "Sign In" onder de optie die aansluit bij uw web browser.
U bent nu ingelogd in het Netwerk Camera browser scherm C. Via dit scherm kunt u uw
camera en camera instellingen beheren. (zie hoofdstuk 6)
. In dit venster staan al uw IP camera's weergegeven. Indien
A
. U kunt kiezen uit de volgende opties:
B
Opera
4.5. Een draadloze verbinding met uw camera
maken
Let op! Om een draadloze verbinding in te stellen dient uw camera tijdens het instellen
verbonden te zijn met uw netwerk, via de meegeleverde ethernet kabel.
Let op! Om een draadloze verbinding met uw camera tot stand te brengen heeft u een
draadloze router nodig.
Let op! Indien uw router voorzien is van een wachtwoord, dient u dit wachtwoord te
weten.
• Druk in het Network Camera browser scherm C op het tabblad "Network". Een lijst
met instellingen (settings) verschijnt H.
• Selecteer de Wireless Lan Settings: het Wireless Lan Settings scherm verschijnt.
• Druk in het Wireless Lan Settings scherm twee maal op "scan". Een lijst met beschikbare
draadloze netwerken zal verschijnen.
• Klik op uw draadloze netwerk.
• Indien u geen wachtwoord heeft op uw draadloze netwerk drukt hierna op 'submit'.
• Wanneer uw draadloos netwerk wel een wachtwoord heeft, dient u uw wachtwoord in
te vullen achter "Share Key" of "key1", afhankelijk van de encryptie.
• Druk hierna op 'submit'.
De camera start zichzelf opnieuw op wanneer u op 'submit' gedrukt heeft. Dit duurt
ongeveer 30 seconden.
49
Page 50

• Sluit uw browser en camera tool nadat de camera opnieuw is opgestart.
• Trek de netwerkkabel uit de camera.
• Open de IP camera tool en klik op het adres van uw camera. U kunt uw camera nu
draadloos bedienen.
• Indien uw camera niet in het venster van de camera tool staat, klikt u met uw
rechtermuisknop in het venster van de tool, waarna u op de optie "refresh camera list"
drukt.
4.6. Montage camera
Let op! Zorg dat de camera naar behoren werkt op de gekozen locatie, voordat u
begint met de montage.
• Schroef de beugel van de camera vast met behulp van de 4 bijgeleverde schroeven 8.
Let op! Indien de ondergrond te hard is om in te schroeven (steen/gasbeton), dient u
gaten voor te boren en de bijgeleverde pluggen te gebruiken.
5. Uw camera via uw smartphone beheren
Zorg ervoor dat uw camera(s) via de ELRO INSTALL App verbonden zijn met uw
smartphone (zie paragraaf 4.1 en 4.2).
5.1. Op uw Android smartphone uw camerabeeld
bekijken
• Druk in het beginscherm van de App op de camera die u wilt beheren. N Het
camerabeeld verschijnt op uw smartphone.
• Veeg met uw vinger over het beeldscherm om in- en uit te zoomen en om uw
camerabeeld te verschuiven.
Let op! Wanneer u geen beeld heeft is het mogelijk dat uw draadloze verbinding niet
snel genoeg is. Verander in dit geval de resolutie van uw camerabeeld (zie paragraaf
5.1.1)
Het camerascherm biedt een aantal opties:
• Druk op de knop "Snapshot" O1 om van uw camerabeeld een snapshot te maken.
• Druk op de knop "mute/listen/speak" O2 om uw geluidsinstellingen in te stellen.
5.1.1. Instellingen van uw camera op uw Android smartphone wijzigen
• Druk in het beginscherm van uw App op de pijltjestoets naast de camera die u wilt
beheren. N2 Een menu met opties opent zich.
• Druk op de knop "Edit camera" en vervolgens op de knop "Advanced settings". Q Het
scherm "Advanced settings" opent zich. R In het "Advanced settings" scherm kunt u
een aantal eigenschappen van de camera aanpassen.
De belangrijkste functies worden hieronder beschreven:
Modify security code R1: Pas hier de code van uw camera aan. De default code is:
Video QualityR2: Pas de resolutie van uw camera aan. Indien u een
000000 .
langzame draadloze verbinding heeft, dient u deze
instelling op een lagere stand te zetten.
O
P
50
Page 51

5.2. Op uw iPhone uw camerabeeld bekijken
• Druk in het beginscherm van de App op de camera die u wilt beheren. V Het
camerabeeld verschijnt op uw smartphone.
• Veeg met uw vinger over het beeldscherm om in- en uit te zoomen en om uw
camerabeeld te verschuiven.
Let op! Wanneer u geen beeld heeft is het mogelijk dat uw draadloze verbinding niet
snel genoeg is. Verander in dit geval de resolutie van uw camerabeeld (zie paragraaf
5.2.1.)
Het camerascherm biedt een aantal opties:
• Druk op de knop "Snapshot" W1 om van uw camerabeeld een snapshot te maken.
• Druk op de knop "mute/listen/speak" W2 om uw geluidsinstellingen in te stellen.
5.2.1. Instellingen van uw camera op u iPhone wijzigen
• Druk in het beginscherm van uw App op de pijltjestoets naast de camera die u wilt
beheren. V2 Een menu met opties opent zich.
• In het "Advanced settings" scherm kunt u een aantal eigenschappen van de camera
aanpassen.
De belangrijkste functies worden hieronder beschreven:
Security codeX1: Pas hier de code van uw camera aan. De default code is:
Video QualityX2: Pas de resolutie van uw camera aan. Indien u een
6. Uw camera via uw PC beheren
Om uw camera vanaf uw PC te kunnen beheren, dient u met behulp van uw webbrowser
ingelogd te zijn in het "Netwerk Camera" browser scherm (zie paragraaf 4.4). Dit
scherm bevat het bedieningspaneel van de camera C1, een aantal tabbladen C2, een
kanaaloverzicht C3, een instellingenmenu voor de camera C4 en het controlepaneel
waarmee u de rotatie van de camera bepaalt.
6.1. Bedieningspaneel van de camera
U kunt het bedieningspaneel gebruiken wanneer u het tabblad "live video" geselecteerd
heeft. Dit bedieningspaneel geeft de volgende opties:
Play: Druk op "Play" om live uw camerabeelden te bekijken.
Stop: Druk op "Stop" om de live weergave van uw
Record: Druk op "Record" om een opname te maken. Druk
Let op! Om opnames te kunnen maken moet u in het tabblad "Other" aangeven waar
de opnames opgeslagen worden. In paragraaf 6.2.3 wordt dit toegelicht.
Audio: Druk op "Audio" om de geluidsweergave te activeren.
000000.
langzame draadloze verbinding heeft, dient u deze
instelling op een lagere stand te zetten.
camerabeelden te stoppen.
nogmaals op record om het maken van een opname te
beëindigen.
Druk nogmaals op audio om de geluidsweergave te
beëindigen.
W
X
Z
Y
C5
C1
51
Page 52

Let op! Om de functie "Audio" te kunnen gebruiken dient u een microfoon aan de
microfoonaansluiting van de camera te koppelen.
Talk: Druk op "Talk" om via een luidspreker gekoppeld aan de
Let op! Om de functie " Talk" te kunnen gebruiken dient u een luidspreker aan de audio
uitgang van de camera te koppelen.
6.2. Tabbladen
De tabbladen bieden een groot aantal mogelijkheden om uw camera(s) te beheren.
In deze handleiding worden de belangrijkste functies besproken. Indien u meer wilt
weten over specieke instellingen, raden wij u aan om de handleiding op de Cd-rom te
raadplegen.
6.2.1. Live video
Klik op het tabblad live video om de beelden van de ingestelde camera te bekijken.
6.2.2. Network
Wireless Lan settings: Hiermee kunt u de draadloze toegang tot uw camera
DDNS Service settings: Hiermee kunt u uw camera toegankelijk maken over
6.2.3. Other
Let op! Voordat u opnames kunt opslaan in Windows 7, 8 of Vista, dient u in Internet
Explorer de volgende beveiligingsinstelling aan te passen. Zorg ervoor dat tijdens het
aanpassen van deze instelling, het Network Camera scherm open staat in uw Internet
Explorer.
• Ga naar: Extra -> Internet opties -> Beveiliging-> Vertrouwde Websites J -> Websites
K
• Zet in het scherm de optie Serververicatie (https:) uit. Druk vervolgens op
"Toevoegen".
• Start uw Internet Explorer opnieuw op.
Path settings: Selecteer onder de optie "Path settings" waar u de
6.3. Kanaaloverzicht van de camera
Met het kanaaloverzicht heeft u de mogelijkheid om de beelden van meerdere
aangesloten camera's tegelijk te bekijken.
6.4. Instellingen menu camera
Binnen dit menu kunt u beeldinstellingen van de camera aanpassen: resolutie,
beeldsnelheid, helderheid en contrast.
camera kunnen spreken.
C2
instellen. Meer informatie hierover vindt u in paragraaf
4.5 H.
het internet. Voor meer informatie hierover dient u de
handleiding op de Cd-rom te raadplegen.
opnames die uw camera maakt, wilt opslaan I.
C3
C4
52
Page 53

6.5. Controlepaneel camera rotatie C5
Het controlepaneel van de camera geeft u de mogelijkheid om de camerarichting
handmatig en automatisch aan te passen.
6.5.1. Handmatig aanpassen camerahoek
• Gebruik de pijltjestoetsen om de camera in iedere gewenste richting te roteren.
6.5.2. Automatisch aanpassen camerahoek
• Druk op de horizontale patrouille knop om de camera automatisch horizontaal te laten
roteren.
6.5.3. Handmatig in- en uitzoomen
• Gebruik de knop "+" om in te zoomen en de knop "-" om uit te zoomen.
7. Reiniging en onderhoud
Waarschuwing! Haal het apparaat uit alle spanningsbronnen voordat u het reinigt.
De toestellen zijn onderhoudsvrij, dus maak ze niet open. De garantie vervalt als u het
apparaat opent. Reinig enkel de buitenkant van de toestellen met een zachte, droge doek
of borstel.
8. Milieu en afdanken
Het symbool op het materiaal, de accessoires of verpakking geeft aan dat dit
product niet als huishoudelijk afval mag worden behandeld. Voer het apparaat af
via het verzamelpunt voor de recycling van afgedankte elektrische en
elektronische apparatuur binnen de EU en in andere Europese landen die aparte
verzamelsystemen voor gebruikte elektrische en elektronische apparatuur
kennen. Door het apparaat op de juiste manier af te voeren, helpt u mogelijke gevaren
voor het milieu en de volksgezondheid te voorkomen die anders door verkeerde
behandeling van het afgedankte apparaat zouden worden veroorzaakt. Het recyclen van
materialen draagt bij aan het behoud van natuurlijke rijkdommen. Voer daarom uw oude
elektrische en elektronische apparatuur niet af via het huishoudelijke afval.
9. Garantie
Voor dit apparaat geldt een beperkte 3 jarige garantie. Ga voor de garantievoorwaarden
naar: www.elro.eu.
9
53
Page 54

Guide d'utilisation C904IP.2
Merci d'avoir acheté la caméra en réseau C904IP.2. Pour pouvoir utiliser votre caméra
au plus vite et en toute simplicité, nous vous conseillons de prendre attentivement
connaissance de ce manuel avant toute utilisation.
Vous trouverez l'explication des symboles utilisés dans ce manuel au début de ce chapitre.
1. Mesures de précaution et consignes de
sécurité
1.1. Symboles de sécurité utilisés
Avertissement! Un avertissement indique un risque de dommage (grave) à l'utilisateur
ou au produit, si l'utilisateur ne respecte pas soigneusement les procédures.
Attention! Une remarque attire l'attention de l'utilisateur sur des problèmes éventuels.
!
Conseil: Un conseil attire l'attention de l'utilisateur sur des astuces et des possibilités
supplémentaires.
1.1.1. Notications
Avertissement! N'installez pas l'appareil à un endroit exposé à une chaleur ou un froid
extrême.
Avertissement! Avant d'installer la caméra, vériez qu'aucun câble électrique ou tuyau
d'eau ne passe à l'endroit où vous comptez forer.
Avertissement! Débranchez immédiatement l'alimentation du produit en retirant
la che de la prise de courant et prenez ensuite contact avec le service d'assistance
Smartwares, lorsque:
• des composants matériels du produit sont ouverts, perforés, humides ou sont
tombés de haut;
• le câble d'alimentation de l'adaptateur est eloché ou est ouvert de sorte que le
métal est visible;
• le boîtier de l'adaptateur est endommagé;
• l'adaptateur est entré en contact avec de l'humidité ou de l'eau;
• le verre de la caméra est fendu ou cassé;
Avertissement! Il est interdit d'ouvrir ou de réparer soi-même le produit. Cela
annulerait toutes les garanties. Ne faites entretenir le produit que par du personnel
d'entretien certié.
Avertissement! N'utilisez que des accessoires originaux du fabricant.
Avertissement! Conservez le produit hors de portée des enfants.
54
Page 55

Avertissement! Débranchez toutes les sources d'alimentation de l'appareil avant de le
nettoyer.
Avertissement! Utilisez un chion propre et sec pour nettoyer le produit.
Avertissement! N'utilisez pas de produits abrasifs, de détergents corrosifs, de produits
à base de javel ou de solvants pour nettoyer le produit.
Avertissement! Débranchez l'adaptateur de la prise de courant durant un orage, des
éclairs et lorsque le produit n'est pas utilisé durant longtemps.
Attention! Installez le produit tel qu'indiqué dans ce manuel. En cas de doute,
consultez un installateur agréé et respectez toujours les prescriptions locales de
montage.
Attention! Évitez d'exposer la caméra à la lumière directe du soleil.
Attention! N'orientez pas la caméra vers des bois, branches ou autres objets mobiles.
Attention! Le produit ne peut être jeté avec les déchets ménagers non triés, mais doit
entrer dans le cycle du tri sélectif.
Attention! Informez-vous auprès des autorités régionales pour savoir où restituer le
produit une fois hors service. Ne jetez pas les appareils et composants électriques.
Vériez si le produit (ou ses composants) peut être collecté, recyclé ou réutilisé.
Attention! Les systèmes sans l peuvent être perturbés par des téléphones portables,
microondes ou tout autre appareil sans l utilisant la fréquence 2,4 GHz. Conservez
le produit à au moins 3 mètres de distance de toute source de nuisance durant
l'installation et le fonctionnement.
Attention! La nuit, la caméra ne peut lmer à travers une vitre. Tenez-en compte lors
de son installation.
2. Utilisation prévue
La C904IP.2 est une caméra de surveillance qui permet de visionner des images de
surveillance via un réseau local, une connexion Internet ou via l'application "ELRO Install"
App sur votre smartphone. La C904IP.2 peut être raccordée à un câble Ethernet ou à une
connexion Wi-Fi.
La caméra peut enregistrer des vidéos durant la journée.
Deux axes de rotation électriques vous permettent de faire pivoter à distance la caméra à
355 degrés. Vous pouvez également laisser la caméra pivoter automatiquement.
La caméra est en outre équipée d'un détecteur de mouvements et peut établir une
connexion via un port I/O.
3. Caractéristiques techniques
3.1. Caractéristiques générales du produit
Capteur: Capteur CMOS Color 1/4"
Résolution: 640 x 480 pixels (300 000 pixels)
Objectif: 4-9 mm
Zoom optique: 3x
Portée de la caméra: 355 degrés à l'horizontale, 90 degrés à la verticale
Luminosité minimale: 0.5Lux
Compression vidéo: MJPEG
Images par seconde: 15ips(VGA), 30ips(QVGA)
Source de courant: Adaptateur 230VAC/5VDC/2A
55
Page 56

Consommation électrique: 5W (Max.)
Température: -10°C ~ 40°C (14°F~104°F)
Conguration minimale requise :
Processeur: minimum 2.0 GHz
Mémoire: minimum 256 MB
Carte graphique: minimum 64 MB
SE supportés: Windows 98/ME/2000/XP/Vista/7/8
Navigateurs supportés: IE6.0-10.0, Firefox, Safari, Google chrome
Systèmes d'exploitation
mobiles compatibles: OS iOS 4.3 et supérieur / Android 2.1 et supérieur
Certications: CE, FCC, RoHS, R&TTE
Garantie: Garantie limitée de 3 ans
3.2. Principaux composants
1. CD-Rom logiciel
2. Antenne amovible
3. 4 vis de montage et chevilles
4. Manuel d'utilisation
5. Câble Ethernet
6. C904IP.2 caméra
7. Alimentation DC
3.3. Raccordements
1. Emplacement de l'antenne
2. Connexion DC
3. Prise audio (sortie)
4. Port Ethernet
5. Port I/O
6. Prise audio (entrée)
7. Bouton de réinitialisation
2
1
4. Installation de la caméra
4.1. Connecter la caméra
• Dévissez le dôme de la caméra 3. Enlevez ensuite le matériau d'emballage 4 et
revissez le dôme.
• Vissez l'antenne dans l'emplacement prévu à cet eet 5.
• Connectez le câble de l'adaptateur à la prise DC de la caméra 6. Branchez ensuite la
che de l'adaptateur dans la prise de courant.
• Connectez le câble Ethernet fourni au port réseau de la caméra 7. Connectez l'autre
extrémité du câble Ethernet à votre routeur. Lorsque la caméra est connectée au
réseau, le LED vert du port Ethernet s'allume.
Vous pouvez contrôler votre caméra IP avec votre smartphone ou votre ordinateur.
Rendez-vous au paragraphe 4.2 pour une utilisation avec votre smartphone ou au
paragraphe 4.3 pour l'installation sur votre ordinateur.
56
Page 57

4.2. Paramétrer l'utilisation avec un smartphone
Attention! Pour utiliser l'application "ELRO INSTALL", vous avez besoin d'un
smartphone avec accès à Internet.
Pour paramétrer votre caméra via Android, rendez-vous au paragraphe 4.2.1.. Pour
paramétrer votre caméra via iOS, rendez-vous au paragraphe 4.2.2..
4.2.1. Android
• Téléchargez l'application "Elro Install" sur Google Play et installez-la.
• Lancez l'application. L'écran de démarrage de l'application apparaît.
• Cliquez sur l'option "Click here to add camera". Le menu "Add camera" apparaît.
• Appuyez sur le bouton "Scan". M1 Scannez ensuite le code QR sous votre caméra. Vous
pouvez également choisir d'introduire manuellement le code après "UID". M2 Vous
trouverez ce code sous le code QR sur votre caméra IP.
• Introduisez ensuite le code 000000 situé après "Security code".
• Introduisez le nom que vous souhaitez attribuer à votre caméra après "Name".
• Appuyez ensuite sur le bouton "OK".
Votre caméra a été ajoutée à votre téléphone. Elle apparaîtra désormais dans l'écran de
démarrage de votre application. N Vous pourrez également voir si votre caméra est
connectée (ONLINE) N1 ou si elle ne l'est pas (OFFLINE).
4.2.2. iOS
• Téléchargez l'application "Elro Install" sur l'App Store et installez-la.
• Lancez l'application. L'écran de démarrage de l'application apparaît.
• Cliquez sur "Add camera". S3 Le menu "Add camera" apparaît.
• Appuyez sur le bouton "QR code". S2 Scannez ensuite le code QR sous votre caméra.
T
• Vous pouvez également choisir d'introduire manuellement le code de votre caméra.
Cliquez sur le bouton "Add". S1 Introduisez ensuite le code de votre caméra après "UID".
U2
Vous trouverez ce code sous le code QR sur votre caméra IP.
• Introduisez ensuite le code 000000 après "PASSWORD".
• Introduisez le nom que vous souhaitez attribuer à votre caméra après "Name".
• Appuyez ensuite sur le bouton "Save".
Votre caméra a été ajoutée à votre application, elle apparaîtra désormais dans l'écran
de démarrage de votre application. V Vous pourrez également voir si votre caméra est
connectée (ONLINE) V1 ou si elle ne l'est pas (OFFLINE).
4.2.3. Généralités
• Pour les instructions sur l'installation de votre caméra, rendez-vous au paragraphe 4.6.
• Pour les instructions sur l'utilisation de votre caméra à l'aide de l'application, rendez-
vous au chapitre 5.
4.3. Installer votre caméra sur votre ordinateur
• Insérez le CD-Rom fourni dans votre ordinateur.
• Lancez "IPCamSetup.exe" à partir du CD-Rom.
• Poursuivez l'installation en cliquant deux fois sur "Suivant".
• Terminez l'installation en cliquant sur "Redémarrer l'ordinateur".
M4
U3
U1
L
M
M3
S
57
Page 58

L'IP Camera Tool est désormais installé sur votre ordinateur. Vous trouverez le raccourci
rapide sur votre bureau.
Attention! Ne supprimez pas ce raccourci! Si vous le supprimer, vous devrez réinstaller
l'IP Camera Tool.
4.4. Établir une connexion avec votre caméra
Attention! Pour pouvoir utiliser l'ensemble des fonctionnalités de la caméra IP, vous
devez utiliser Internet Explorer 6 ou supérieur (32 bits) et opter pour le mode ActiveX.
Il n'est pas possible d'eectuer des enregistrements vidéo et audio dans d'autres
navigateurs.
Attention! Si vous choisissez le mode ActiveX, il est possible que vous n'ayez pas
encore d'image. Dans ce cas, procédez comme suit:
• Dans Internet Explorer, allez dans: Outils-> Options Internet-> Sécurité->
Personnaliser le niveau
• Sous les éléments de commande et applications d'insertion ActiveX, changez les
options désactivées en "Demander". Si l'option "Demander" n'est pas disponible,
cochez "Activer". Voir également: E F
!
Conseil: si vous souhaitez utiliser un autre navigateur que votre navigateur habituel,
copiez le lien du navigateur ouvert dans le navigateur de votre choix.
• Lancez l'IP Camera Tool en cliquant sur le raccourci "IP camera tool" sur votre bureau.
L'IP Camera Tool recherche automatiquement la/les caméras IP connectée(s) à votre
réseau.
Une fenêtre s'ouvre A. Toutes vos caméras IP sont achées dans cette fenêtre. Si aucune
caméra n'est connectée, la fenêtre reste vide.
• Double-cliquez sur la caméra que vous souhaitez utiliser. Une fenêtre d'identication
s'ouvre dans votre navigateur par défaut et vous demande notre identiant.
• Introduisez "admin" comme identiant et cliquez sur "se connecter". Vous ne devez pas
introduire de mot de passe.
Un menu optionnel s'ouvre B. Vous avez le choix parmi les options suivantes:
Mode ActiveX: Internet Explorer
Server Push Mode: Safari, Firefox et Google Chrome
Mode VLC: I nternet Explorer, Safari, Firefox, Google Chrome et Opera
Attention! Pour le mode VLC, vous devez télécharger le lecteur VLC.
Sign in mobile phone: Accès avec un navigateur mobile
• Cliquez sur "Sign In" sous l'option correspondant à votre navigateur Web.
Vous êtes maintenant connecté dans la fenêtre "Caméra en Réseau" du navigateur C.
Cette fenêtre vous permet de gérer votre caméra et ses réglages. (voir chapitre 6)
4.5. Établir une connexion sans l avec votre caméra
Attention! Pour établir une connexion sans l, votre caméra doit être branchée à votre
réseau à l'aide du câble Ethernet fourni.
Attention! Pour établir une connexion sans l avec votre caméra, vous avez besoin
d'un routeur.
D
G
58
Page 59

Attention! Si votre routeur est protégé par un mot de passe, ce dernier vous sera
demandé.
• Dans la fenêtre "Network Camera" ("Caméra en Réseau") du navigateur
l'onglet "Network". Une liste de réglages (settings) apparaît H.
• Sélectionnez les Wireless Lan Settings: la fenêtre Wireless Lan Settings apparaît.
• Dans la fenêtre Wireless Lan Settings, cliquez deux fois sur "Scan". Une liste des réseaux
sans l disponibles apparaît.
• Cliquez sur votre réseau sans l.
• Si votre réseau sans l n'est pas protégé par un mot de passe, cliquez ensuite sur
'submit'.
• Si votre réseau sans l est protégé par un mot de passe, vous devez introduire votre
mot de passe à côté de "Share Key" ou "key1" selon le type de chirement.
• Cliquez ensuite sur 'submit'.
La caméra redémarre d'elle-même lorsque vous avez cliqué sur 'submit'. Cela dure environ
30 secondes.
• Fermez votre navigateur et l'IP Camera Tool après que la caméra a redémarré.
• Débranchez le câble Ethernet de la caméra.
• Ouvrez l'IP Camera Tool et cliquez sur l'adresse de votre caméra. Vous pouvez dès à
présent commander votre caméra à distance.
• Si votre caméra ne gure pas dans la fenêtre de l'IP Camera Tool, cliquez avec le clic
droit de votre souris dans la fenêtre de l'IP Camera Tool, et cliquez ensuite sur l'option
"refresh camera list".
4.6. Installation de la caméra
Attention! Assurez-vous que la caméra fonctionne correctement à l'endroit choisi
avant de commencer le montage.
• Vissez le collier de la caméra à l'aide des 4 vis fournies 8.
Attention! Si le support est trop dur (pierre/béton cellulaire) pour y visser la caméra,
vous devrez préforer des trous et utiliser les chevilles fournies.
5. Gérer votre caméra via votre smartphone
Veillez à ce que votre ou vos caméras soient connectées à votre smartphone via
l'application "ELRO INSTALL" (voir paragraphes 4.1 et 4.2).
, cliquez sur
C
5.1. Visionner l'image de votre caméra sur votre
smartphone Android
• À partir de l'écran de démarrage de l'application, appuyez sur la caméra que vous
souhaitez gérer. N L'image de la caméra apparaît sur votre smartphone.
• Déplacez votre doigt sur l'écran pour zoomer en avant ou en arrière ou pour déplacer
l'image de la caméra.
Attention! Si vous ne recevez aucune image, il est possible que votre connexion sans
l ne soit pas assez rapide. Dans ce cas, modiez la résolution de votre image (voir
paragraphe 5.1.1).
O
59
Page 60

L'écran de la caméra ore un certain nombre d'options:
• Appuyez sur le bouton "Snapshot"
caméra.
• Appuyez sur le bouton "mute/listen/speak" O2 pour régler vos paramètres sonores.
5.1.1. Modier les réglages de votre caméra sur votre smartphone Android
• À partir de l'écran de démarrage de l'application, appuyez sur la touche échée à côté
de la caméra que vous souhaitez gérer. N2 Un menu à options s'ouvre.
• Appuyez sur le bouton "Edit camera" puis sur le bouton "Advanced settings". Q L'écran
"Advanced settings" apparaît. R L'écran "Advanced settings" vous permet de modier
plusieurs paramètres de la caméra.
Les principales fonctions sont décrites ci-dessous:
Modify security code R1: Modiez ici le code de sécurité de votre caméra. Le code
Video Quality R2: Modiez ici la résolution de votre caméra. Si votre
O1
pour prendre un instantané de l'image de votre
P
par défaut est: 000000 .
connexion sans l est lente, optez pour une plus faible
résolution.
5.2. Visionner l'image de votre caméra sur votre
iPhone
• À partir de l'écran de démarrage de l'application, appuyez sur la caméra que vous
souhaitez gérer. V L'image de la caméra apparaît sur votre smartphone.
• Déplacez votre doigt sur l'écran pour zoomer en avant ou en arrière ou pour déplacer
l'image de la caméra.
Attention! Si vous ne recevez aucune image, il est possible que votre connexion sans
l ne soit pas assez rapide. Dans ce cas, modiez la résolution de votre image (voir
paragraphe 5.2.1.).
L'écran de la caméra ore un certain nombre d'options:
• Appuyez sur le bouton "Snapshot" W1 pour prendre un instantané de l'image de votre
caméra.
• Appuyez sur le bouton "mute/listen/speak" W2 pour régler vos paramètres sonores.
5.2.1. Modier les réglages de votre caméra sur votre iPhone
• À partir de l'écran de démarrage de l'application, appuyez sur la touche échée à côté
de la caméra que vous souhaitez gérer. V2 Un menu à options s'ouvre.
• L'écran "Advanced settings" vous permet de modier plusieurs paramètres de la
caméra.
Les principales fonctions sont décrites ci-dessous:
Security codeX1: Modiez ici le code de votre caméra. Le code par défaut
Video Quality X2: Modiez ici la résolution de votre caméra. Si votre
est: 000000.
connexion sans l est lente, optez pour une plus faible
résolution.
Z
Y
W
X
60
Page 61

6. Gérer votre caméra via votre ordinateur
Pour pouvoir commander votre caméra depuis votre ordinateur, vous devez vous
connecter à l'aide de votre navigateur sur l'écran "Caméra en réseau" (voir paragraphe 4.4).
Cet écran comprend le panneau de commande de la caméra C1, plusieurs onglets C2, un
aperçu des canaux
pour piloter la rotation de la caméra.
6.1. Panneau de commande de la caméra
Vous pouvez utiliser le panneau de commande après avoir sélectionné l'onglet "live video".
Ce panneau de commande vous ore les options suivantes:
Play: Cliquez sur "Play" pour visionner en direct les images de
Stop: Cliquez sur "Stop" pour interrompre l'achage en direct
Record: Cliquez sur "Record" pour réaliser un enregistrement.
Attention! Pour pouvoir réaliser des enregistrements, vous devez préciser la
destination de ces enregistrements dans l'onglet "Other". Ce point est expliqué au
paragraphe 6.2.3.
Audio: Cliquez sur "Audio" pour activer la reproduction sonore.
Attention! Pour pouvoir utiliser la fonction "Audio", vous devez connecter un micro à la
prise micro de la caméra.
Talk: Appuyez sur "Talk" pour pouvoir parler via un haut-
Attention! Pour pouvoir utiliser la fonction "Talk", vous devez connecter un hautparleur à la sortie audio de la caméra.
6.2. Onglets
Les onglets vous orent de multiples possibilités pour gérer votre/vos caméra(s). Ce
manuel vous en présente les principales fonctions. Si vous souhaitez en savoir plus sur
certains réglages, nous vous invitons à consulter le manuel contenu sur le CD-Rom.
6.2.1. Live video
Cliquez sur l'onglet "live video" pour visionner les images de la caméra installée.
6.2.2. Network
Wireless Lan Settings: Cette option vous permet de régler l'accès sans l à votre
DDNS Service settings: Ces réglages vous permettent d'accéder à votre caméra
C3
, un menu de réglages pour la caméra C4 et le panneau de contrôle
C2
C5
C1
votre caméra.
des images de la caméra.
Cliquez à nouveau sur "Record" pour terminer un
enregistrement.
Cliquez une nouvelle fois sur audio pour terminer la
reproduction sonore.
parleur connecté à la caméra.
caméra. Vous trouverez plus d'informations à ce sujet au
paragraphe 4.5 H.
par Internet. Pour de plus amples informations à ce sujet,
veuillez consulter le manuel contenu sur le CD-Rom.
61
Page 62

6.2.3. Other
Attention! Avant de pouvoir sauvegarder des enregistrements dans Windows 7, 8
ou Vista, vous devez adapter les réglages de sécurité suivants dans Internet Explorer.
Veillez à avoir ouvert l'écran "Network Camera" ("Camera en Réseau") dans votre
Internet Explorer pendant que vous adaptez ces réglages.
• Allez dans: Outils-> Options Internet-> Sécurité-> Sites de conance
• Dans la fenêtre, désactivez l'option "Vérication serveur" (https:). Cliquez ensuite sur
"Ajouter".
• Redémarrez votre Internet Explorer.
Path settings: Sélectionnez sous l'option "Path settings" l'emplacement
6.3. Aperçu des canaux de la caméra
L'aperçu des canaux vous permet de visionner simultanément les images de plusieurs
caméras connectées.
6.4. Menu de réglages de la caméra
Dans ce menu, vous pouvez régler l'image de la caméra: résolution, fréquence d'images,
luminosité et contraste.
6.5. Panneau de contrôle rotation caméra C5
Le panneau de contrôle vous permet de régler manuellement et automatiquement
l'orientation de la caméra.
6.5.1. Réglage manuel de l'angle de la caméra
• Utilisez les touches échées pour faire pivoter la caméra dans la direction souhaitée.
6.5.2. Réglage automatique de l'angle de la caméra
• Appuyez sur le bouton de patrouille horizontale pour faire pivoter automatiquement la
caméra à l'horizontale.
6.5.3. Zoom avant/arrière manuel
• Utilisez le bouton "+" pour zoomer vers l'avant et le bouton "-" pour zoomer vers
l'arrière.
7. Nettoyage et entretien
Avertissement! Débranchez toutes les sources d'alimentation de l'appareil avant de le
nettoyer.
Les appareils ne requièrent pas d'entretien, ne les ouvrez pas. La garantie s'annule si vous
ouvrez l'appareil. Ne nettoyez que l'extérieur des appareils à l'aide d'une brosse ou d'un
chion doux et sec.
où vous souhaitez sauvegarder les enregistrements de
votre caméra
.
I
C3
C4
J
9
-> Sites
K
62
Page 63

8. Environnement et mise au rebut
Ce symbole sur le matériel, ses accessoires ou son emballage indique que le
produit ne doit pas être traité comme un déchet ménager. Veuillez mettre cet
équipement au rebut au point de collecte prévu pour le recyclage des déchets
des équipements électriques et électroniques, dans l'Union européenne et dans
d'autres pays européens disposant de systèmes de collecte distincts pour les
produits électriques et électroniques usagés. En vous assurant de la correcte mise au rebut
de ce produit, vous contribuez à réduire les risques potentiels pour l'environnement et la
santé publique susceptibles de se produire suite à une gestion inappropriée des déchets
de ce produit. Le recyclage des matériaux contribue également à la préservation des
ressources naturelles. Nous vous remercions donc de ne pas mettre vos équipements
électriques et électroniques au rebut avec les ordures ménagères normales.
9. Garantie
Cet appareil bénécie d'une garantie limitée de 3 ans. Pour connaître toutes les conditions
de la garantie, surfez sur: www.elro.eu.
Manual C904IP.2
Gracias por adquirir la cámara de red C904IP.2. Para poder utilizar la cámara con la mayor
facilidad y rapidez, se recomienda leer este manual detalladamente con antelación.
Las ilustraciones de este manual se encuentran antes de este capítulo.
1. Precauciones e instrucciones de seguridad
1.1. Símbolos de seguridad usados
¡Advertencia! Una advertencia indica el riesgo de lesiones (graves) para el usuario o de
daños al producto, si el usuario no sigue los procedimientos atentamente.
¡Nota! Una nota avisa al usuario de posibles problemas.
!
Consejo: Un consejo ofrece al usuario trucos y posibilidades adicionales.
1.1.1. Noticaciones
¡Advertencia! No instale este dispositivo en lugares de calor o frío extremos.
¡Advertencia! Antes de proceder con la instalación, compruebe que la pared que
desea taladrar no contenga cables eléctricos ni tuberías.
63
Page 64

¡Advertencia! Interrumpa inmediatamente la alimentación del dispositivo
desconectándolo de la toma de corriente y contacte con el servicio técnico de
Smartwares si:
• los componentes de hardware del dispositivo están expuestos, perforados,
húmedos o en mal estado;
• la alimentación del adaptador está dañada o abierta de forma que el metal sea
visible;
• la carcasa del adaptador está dañada;
• el adaptador se ha expuesto a la humedad o a líquidos;
• el cristal de la cámara está agrietado o roto;
¡Advertencia! No está permitido abrir o reparar el producto personalmente ni dejar
que otros lo hagan. En tal caso, la garantía perderá su validez. El mantenimiento debe
ser realizado por personal técnico certicado.
¡Advertencia! Utilice solamente accesorios originales del fabricante.
¡Advertencia! Mantenga este producto fuera del alcance de los niños.
¡Advertencia! Desconecte el dispositivo de todas las fuentes de alimentación antes de
limpiarlo.
¡Advertencia! Utilice un paño limpio y seco para limpiar el dispositivo.
¡Advertencia! No utilice limpiadores abrasivos, cáusticos, con lejía o disolventes para
limpiar el dispositivo.
¡Advertencia! Desconecte el adaptador de la toma de corriente en caso de tormenta o
relámpagos y cuando no vaya a utilizar el dispositivo durante un período prolongado.
¡Nota! Instale el dispositivo tal como se especica en este manual. En caso de duda,
consulte a un instalador cualicado y respete siempre las normas de instalación locales.
¡Nota! Evite exponer la cámara a la luz solar directa.
¡Nota! No dirija la cámara hacia arbustos, ramas u otros objetos en movimiento.
¡Nota! El dispositivo no debe eliminarse como residuo urbano sin clasicar, sino que
debe recogerse por separado.
¡Nota! Infórmese de las posibilidades existentes para la retirada de dispositivos al nal
de su vida útil en su región. No deseche los componentes y aparatos eléctricos, pueden
entregarse, reciclarse o reutilizarse completa o parcialmente.
¡Nota! Los sistemas inalámbricos puede captar interferencias de teléfonos
inalámbricos, hornos microondas y otros dispositivos inalámbricos que operen en la
frecuencia de 2,4 GHz. Mantenga el dispositivo a un mínimo de 3 metros de distancia
de posibles fuentes de interferencias durante su instalación y funcionamiento.
¡Nota! La cámara no puede ver de noche a través del cristal. Téngalo en cuenta durante
la instalación.
2. Uso previsto
La C904IP.2 es una cámara de vigilancia que permite efectuar actividades de
videovigilancia a través de una red local, una conexión a Internet o la aplicación "ELRO
Install" App desde un teléfono inteligente. La C904IP.2 puede conectarse bien por cable
Ethernet o bien por conexión Wi-Fi.
La cámara puede grabar vídeo durante el día.
Dos ejes rotativos eléctricos ofrecen la posibilidad de girar la cámara 355º de forma
remota. También puede llevarse a cabo de forma automática.
La cámara está equipada con un sistema de detección de movimiento y puede cerrar un
circuito a través de un puerto de entrada/salida.
64
Page 65

3. Especicaciones técnicas
3.1. Especicaciones generales del producto
Sensor: Sensor CMOS Color 1/4"
Resolución: 640 x 480 píxeles (300.000 píxeles)
Lente: 4-9 mm
Zoom óptico: 3x
Alcance de la cámara: 355 grados en horizontal, 90 grados en vertical
Iluminación mínima: 0,5 Lux
Compresión de vídeo: MJPEG
Imágenes por segundo: 15 fps (VGA), 30 fps (QVGA)
Fuente de alimentación: adaptador 230 V CA/5 V CC/2 A
Consumo de energía: 5 W (máx.)
Temperatura: -10°C ~ 40°C (14°F~104°F)
Requisitos mínimos del sistema:
CPU: 2,0 GHz o superior
Memoria: 256 MB o superior
Tarjeta de video: 64 MB o superior
Sistemas operativos soportados: Windows 98/ME/2000/XP/Vista/7/8
Navegadores soportados: IE 6.0-10.0, Firefox, Safari, Google Chrome
Sistemas operativos móviles compatibles: iOS 4.3 y superiores / Android 2.1 y superiores
Certicaciones: CE, FCC, RoHS, R&TTE
Garantía: Límite de 3 años de garantía
3.2. Componentes principales
1. CD-ROM del software
2. Antena desmontable
3. 4 tornillos y tacos de montaje
4. Manual del usuario
5. Cable Ethernet
6. C904IP.2 cámara
7. Fuente de alimentación de CC
3.3. Conexiones
1. Conexión de la antena
2. Toma de CC
3. Conector de audio (salida)
4. Puerto Ethernet
5. Puerto I/O
6. Conector de audio (entrada)
7. Botón Reset
2
1
65
Page 66

4. Instalación de la cámara
4.1. Conexión de la cámara
• Desatornille la cúpula de la cámara 3. A continuación, retire el material de embalaje
y vuelva a atornillar la cúpula.
4
• Atornille la antena en el conector de la antena
• Conecte el cable del adaptador a la toma de CC de la cámara 6. Conecte la clavija del
adaptador en el contacto.
• Conecte el cable Ethernet suministrado al puerto de red de la cámara
otro extremo del cable Ethernet al router. Cuando la cámara esté conectada a la red, se
encenderá el LED verde del puerto Ethernet.
Puede controlar la cámara IP desde un teléfono inteligente o PC. Consulte la sección 4.2
para utilizar un teléfono o la sección 4.3 para realizar la instalación en un PC.
4.2. Ajustes para el uso del teléfono inteligente
¡Atención! Para utilizar la aplicación "ELRO INSTALL" se requiere un teléfono inteligente
con acceso a Internet.
Para congurar la cámara en un sistema Android, consulte la sección 4.2.1.. Para congurar
la cámara en un sistema iOS, consulte la sección 4.2.2..
4.2.1. Android
• Descargue la aplicación "Elro Install" a través de Google Play e instálela.
• Ejecute la aplicación. Se mostrará la pantalla de inicio de la aplicación.
• Seleccione la opción "Click here to add camera". Aparecerá el menú "Add camera".
• Pulse la tecla "Scan". M1 A continuación, escanee el código QR situado en la parte
inferior de la cámara. También puede optar por introducir el código después de "UID"
manualmente. M2 Encontrará este código bajo el código QR de la cámara IP.
• A continuación, introduzca tras "Security code" el código: 000000.
• Después de "Name", indique el nombre que desea asignar a la cámara.
• A continuación, pulse "OK".
La cámara ya está vinculada al teléfono y aparece en la pantalla de inicio de la aplicación.
En esta pantalla puede comprobar si la cámara está conectada (ONLINE) N1 o no
N
conectada (OFFLINE).
4.2.2. iOS
• Descargue la aplicación "Elro Install" a través del App Store e instálela.
• Ejecute la aplicación. Se mostrará la pantalla de inicio de la aplicación.
• Pulse "Add camera". S3 Se mostrará el menú "Add camera".
• Pulse "QR code ". S2 Escanee el código QR situado en la parte inferior de la cámara.
• También puede introducir manualmente el código de su cámara. Para ello, pulse "Add".
S1
Introduzca el código de su cámara después de "UID". U2 Encontrará este código
bajo el código QR de la cámara IP.
• Introduzca el código después de "Password": 000000.
• Después de "Name", indique el nombre que desea asignar a la cámara.
• A continuación, pulse "Save".
M4
U1
.
5
. Conecte el
7
L
M
M3
S
U3
T
66
Page 67

La cámara se agregará a la aplicación y aparecerá en la pantalla de inicio. V En esta
pantalla podrá ver si la cámara está conectada (ONLINE)
4.2.3. General
• Consulte las instrucciones sobre la colocación de la cámara en la sección 4.6.
• Consulte las instrucciones sobre el uso de la cámara a través de la aplicación en el
capítulo 5.
4.3. Instalar la cámara en el PC
• Inserte el CD-ROM suministrado en el PC.
• Ejecute "IPCamSetup.exe" en el CD-ROM.
• Para ejecutar la instalación, pulse dos veces en "Siguiente".
• Para nalizar la instalación, haga clic en "Reiniciar".
IP camera tool ya está instalado en su PC. Encontrará un acceso directo en el escritorio.
¡Nota! ¡No elimine este acceso directo! Si lo hace, deberá reinstalar IP camera tool.
4.4. Vinculación de su cámara
¡Nota! Para poder utilizar todas las funciones de la cámara IP, debe utilizar Internet
Explorer 6 o superior (32 bit) y seleccionar el modo ActiveX. No es posible registrar
imágenes y sonidos mediante otros navegadores.
¡Nota! Si elige el modo ActiveX, es posible que aún no aparezca la imagen. En tal caso,
introduzca lo siguiente:
• En Internet Explorer vaya a: Herramientas > Opciones de Internet > Seguridad >
Nivel personalizado
• En controles y complementos de ActiveX, seleccione la opción "Preguntar". Si la
opción "Preguntar" no está disponible, seleccione "Habilitar". Ver también: E F
G
!
Consejo: si desea utilizar un navegador web distinto del predeterminado, copie el
enlace del navegador y ábralo en el navegador de su elección.
• Ejecute IP Camera Tool desde el acceso directo "IP camera tool" ubicado en el escritorio.
IP Camera Tool detecta automáticamente la(s) cámara(s) IP conectadas a la red.
Se abrirá una ventana A. Esta ventana mostrará todas sus cámaras IP. Si no hay cámaras
conectadas, la ventana aparece vacía.
• Haga doble clic en la cámara que desea utilizar. En el explorador web predeterminado
se abrirá una ventana, en la que deberá identicarse con su nombre de usuario.
• Introduzca el nombre de usuario "admin" y pulse "Registrar". No es necesaria la
contraseña.
Se abrirá un menú B. Podrá elegir entre las siguientes opciones:
Modo ActiveX: Internet Explorer
Modo Server Push: Safari, Firefox y Google Chrome
Modo VLC: Internet Explorer, Safari, Firefox, Google Chrome y Opera
¡Nota! El Modo VLC requiere descargar el reproductor VLC.
Sign in mobile phone: Acceso desde un navegador móvil
D
V1
o desconectada (OFFLINE).
67
Page 68

• Haga clic en "Sign In" en la opción correspondiente al navegador web utilizado.
Ahora está conectado a la pantalla del navegador de la cámara de red
permite controlar la cámara y congurarla (ver sección 6)
. Esta pantalla
C
4.5. Conguración de la conexión inalámbrica a la
cámara
¡Nota! Para establecer una conexión inalámbrica con la cámara durante la instalación
deberá conectarla a la red mediante el cable Ethernet suministrado.
¡Nota! Para establecer una conexión inalámbrica con la cámara se requiere un router
inalámbrico.
¡Nota! Si el router está protegido por contraseña, deberá conocerla.
• En la pantalla del navegador Network Camera C, pulse en la pestaña "Network". Se
mostrará una lista ajustes (settings) H.
• Seleccione Wireless Lan Settings: se mostrará la pantalla Wireless Lan Settings.
• En la pantalla Wireless Lan Settings, pulse "Scan" dos veces. Se mostrará una lista de las
redes inalámbricas disponibles.
• Haga clic en su red inalámbrica.
• Si su red inalámbrica carece de contraseña, haga clic más abajo en "submit".
• Si su red inalámbrica está protegida por contraseña, deberá completar el campo "Share
Key" o "key1", dependiendo de la encriptación.
• A continuación, pulse 'submit'.
La cámara se reinicia al pulsar 'submit'. Este proceso requiere alrededor de 30 segundos.
• Cierre el navegador y Camera tool tras reiniciar la cámara.
• Desconecte el cable de red de la cámara.
• Abra IP camera tool y haga clic en la dirección de la cámara. Ahora puede controlar la
cámara de forma inalámbrica.
• Si la cámara no está en la ventana de Camera tool, haga clic con el botón derecho del
ratón en la ventana y seleccione la opción "refresh camera list".
4.6. Montaje de la cámara
¡Nota! Asegúrese de que la cámara funciona correctamente en la ubicación elegida
antes de comenzar la instalación.
• Atornille el soporte de la cámara utilizando los 4 tornillos suministrados 8.
¡Nota! Si la supercie es demasiado dura para ser atornillada (piedra/hormigón/
cemento), deberá perforarla con un taladro.
5. Administrar la cámara desde el teléfono
inteligente
Compruebe que la cámara está conectada a través de la aplicación ELRO INSTALL al
teléfono inteligente (consulte las secciones 4.1 y 4.2).
68
Page 69

5.1. Ver la imagen de la cámara en un teléfono
inteligente Android
• En la pantalla de inicio de la aplicación, pulse la cámara que desea administrar. N La
imagen de la cámara aparecerá en el teléfono inteligente.
• Deslice el dedo sobre la pantalla para acercar y alejar la cámara o bien para desplazarla.
¡Atención! Si no recibe la imagen, es posible que la conexión inalámbrica no sea lo
sucientemente rápida. En tal caso, modique la resolución de imagen de la cámara
(consulte la sección 5.1.1)
La interfaz de la cámara proporciona diversas opciones:
• Pulse "Snapshot"
• Pulse "mute/listen/speak" O2 para ajustar la conguración de sonido.
5.1.1. Modicar la conguración de la cámara en un teléfono inteligente Android
• En la pantalla de inicio de la aplicación, pulse la echa situada junto a la cámara que
desea administrar. N2 Se abrirá un menú de opciones.
• Pulse "Edit camera" y luego "Advanced settings". Q Se abrirá la pantalla "Advanced
settings". R En la pantalla "Advanced settings" puede ajustar diversas características
de la cámara.
A continuación se describen las funciones principales:
Modify security code R1: Permite cambiar el código de la cámara. El código
Video Quality R2: Permite ajustar la resolución de la cámara. Si dispone
5.2. Ver la imagen de la cámara en un iPhone
• En la pantalla de inicio de la aplicación, pulse la cámara que desea administrar. V La
imagen de la cámara aparecerá en el teléfono inteligente.
• Deslice el dedo sobre la pantalla para acercar y alejar la cámara o bien para desplazarla.
¡Atención! Si no recibe la imagen, es posible que la conexión inalámbrica no sea lo
sucientemente rápida. En tal caso, modique la resolución de imagen de la cámara
(consulte la sección 5.2.1.)
La interfaz de la cámara proporciona diversas opciones:
• Pulse "Snapshot" W1 para capturar la imagen de la cámara de forma instantánea.
• Pulse "mute/listen/speak" W2 para ajustar la conguración de sonido.
5.2.1. Modicar la conguración de la cámara en un iPhone
• En la pantalla de inicio de la aplicación, pulse la echa situada junto a la cámara que
desea administrar. V2 Se abrirá un menú de opciones.
• En la pantalla "Advanced settings" puede ajustar diversas características de la cámara.
A continuación se describen las funciones principales:
Security codeX1: Permite cambiar el código de la cámara. El código
O1
para capturar la imagen de la cámara de forma instantánea.
predeterminado es: 000000.
de una conexión inalámbrica lenta, debe ajustar este
parámetro a un valor inferior.
predeterminado es: 000000.
O
P
W
X
Z
69
Page 70

Video Quality X2: Permite ajustar la resolución de la cámara. Si dispone
6. Administrar la cámara desde el PC
Para poder controlar la cámara desde el PC, debe abrir la pantalla "Network Camera" en el
navegador web (ver sección 4.4). Esta pantalla contiene el panel de control de la cámara
C1
, una serie de pestañas C2, una lista de canales C3, un menú de ajustes para la cámara
C4
y el panel de control para determinar la rotación de la cámara.
6.1. Panel de control de la cámara
Puede utilizar el panel de control si la pestaña "live video" está seleccionada. Este panel
ofrece las siguientes opciones:
Play: Pulse "Play" para ver las imágenes de la cámara en
Stop: Pulse "Stop" para detener la visualización de imágenes en
Record: Pulse "Record" para realizar una grabación. Pulse "Record"
¡Nota! Para poder realizar grabaciones, debe indicar el lugar donde se almacenarán en
la pestaña "Other". En la sección 6.2.3 se explica cómo hacerlo.
Audio: Pulse "Audio" para activar el sonido. Pulse "Audio"
¡Nota! Para utilizar la función "Audio", debe conectar un micrófono a la toma de
micrófono de la cámara.
Talk: Pulse "Talk" para hablar a través de un altavoz conectado
¡Nota! Para utilizar la función "Talk", debe conec tar un altavoz a la salida de audio de la
cámara.
6.2. Pestañas
Las pestañas ofrecen numerosas posibilidades para controlar la(s) cámara(s). Este
manual describe las características principales. Si desea saber más sobre conguraciones
especícas, se recomienda consultar el manual incluido en el CD-ROM.
6.2.1. Live video
Haga clic en la pestaña live video para ver en directo las imágenes de la cámara
seleccionada.
6.2.2. Network
Wireless Lan settings: Permite congurar el acceso inalámbrico a la cámara.
DDNS Service settings: Permite acceder a la cámara desde Internet. Para obtener
de una conexión inalámbrica lenta, debe ajustar este
parámetro a un valor inferior.
directo.
directo.
nuevamente para nalizar la grabación.
nuevamente para silenciarlo.
a la cámara.
C2
Encontrará más información en la sección 4.5 H.
más información, siga las instrucciones contenidas en el
CD-ROM.
Y
C1
C5
70
Page 71

6.2.3. Other
¡Nota! Para poder almacenar las grabaciones en Windows 7, 8 o Vista, deberá
modicar la siguiente conguración de seguridad en Internet Explorer. Al realizar esta
conguración, compruebe que la pantalla Network Camera está abierta en Internet
Explorer.
• Vaya a: Herramientas > Opciones de Internet > Seguridad > Sitios de conanza
Sitios
K
• En esta pantalla, desactive la opción Requerir comprobación del servidor (https:). A
continuación, pulse "Agregar".
• Reinicie su navegador de Internet.
Path settings: En la opción "Path settings", seleccione la ubicación para
6.3. Visión de canales de la cámara
En la lista de canales, puede ver imágenes de varias cámaras conectadas simultáneamente.
6.4. Menú de conguración de la cámara
En este menú puede ajustar la conguración de imagen de la cámara: resolución,
frecuencia, brillo y contraste.
6.5. Panel de control para la rotación de la cámara C5
El panel de control de la cámara permite ajustar la dirección de la cámara de forma manual
y automática.
6.5.1. Ajuste manualmente el ángulo de la cámara
• Utilice las echas para girar la cámara en la dirección deseada.
6.5.2. Ajuste automático del ángulo de la cámara
• Pulse el botón de patrulla horizontal para dejar que la cámara gire automáticamente a
la posición horizontal.
6.5.3. Zoom manual
• Use el botón "+" para aumentar o el botón "-" para reducir el zoom.
7. Limpieza y mantenimiento
¡Advertencia! Desconecte el dispositivo de todas las fuentes de alimentación antes de
limpiarlo.
El dispositivo no precisa mantenimiento, por lo que no debe abrirlo. La garantía pierde
su validez al abrir el dispositivo. Limpie el exterior del dispositivo con un paño o cepillo
suave y seco.
8. Medio ambiente y eliminación
Este símbolo en el producto, sus accesorios o su embalaje indica que este
producto no debe tratarse como un residuo doméstico. La eliminación de este
aparato debe realizarse a través de un punto de recogida designado para el
reciclaje de dispositivos eléctricos y electrónicos en la UE y en otros países
europeos que dispongan de sistemas de recogida independientes para los
guardar las imágenes de la cámara
C3
.
I
C4
>
J
9
71
Page 72

productos eléctricos y electrónicos usados. La eliminación correcta ayuda a prevenir
riesgos naturales y a proteger la salud y el medio ambiente que la gestión incorrecta de
estos dispositivos podría provocar. El reciclaje de materiales ayuda a conservar los recursos
naturales. No deseche dispositivos eléctricos o electrónicos junto con los residuos
domésticos.
9. Garantía
Este dispositivo tiene una garantía limitada de 3 año(s). Consulte las condiciones de la
garantía en: www.elro.eu.
C904IP.2 kılavuzu
C904IP.2 ağ kamerasını satın aldığınız için teşekkür ederiz. Kameranızı mümkün olduğunca
hızlı ve kolay kullanabilmeniz için kullanmadan önce bu kılavuzu dikkatle gözden
geçirmenizi öneririz.
Bu kullanma talimatının resimlerini önce bu bölümde bulacaksınız.
1. İhtiyat tedbirleri ve güvenlik talimatları
1.1. Kullanılan emniyet sembolleri
Uyarı! Bir uyarı, kullanıcının prosedürleri özenle uygulamadığı takdirde, kullanıcı ya da
ürünün (ciddi) zarar görme olasılığı riskine işaret eder.
Lütfen dikkat! Kullanıcının muhtemel sorunlara dikkatini çeken bir işarettir.
!
İpucu: Bir ipucu, kullanıcının kullanışlı işlevlere ve ek olanaklara dikkatini çeker.
1.1.1. Uyarılar
Uyarı! Ürünü çok sıcak veya soğuk olabilecek yerlere monte etmeyin.
Uyarı! Kurulumdan önce, deleceğiniz yerde duvarın içinden elektrik kabloları ve su
borularının geçip geçmediğini kontrol edin.
Uyarı! Aşağıdaki durumlarda, cihazın şini prizden çekerek akımı kesin ve ardından
Smartwares yardım masasına başvurun:
• cihaz donanım bileşenlerinin açıkta durması, delinmiş olması, nemli veya sert bir
şekilde yere düşmüş olması;
• besleme kablosu adaptörün püsküllü olması veya açık durması nedeniyle metalin
görünür olması halinde;
• adaptörün mahfazası hasarlı ise;
72
Page 73

• adaptörün nem veya sıvılarla temas etmesi halinde;
• Kameranın camı çatladı veya kırıldı ise;
Uyarı! Ürünü bizzat açmanıza (açtırmanıza) ya da tamir etmenize (ettirmenize) izin
verilmez. Bu durumda garantiler geçersiz olur. Bakımı, sertikalı bir bakım personeline
yaptırın.
Uyarı! Sadece üreticinin orijinal aksesuarlarını kullanın.
Uyarı! Ürünü çocukların ulaşamayacağı bir yerde muhafaza edin.
Uyarı! Temizlemeden önce cihazın tüm güç kaynaklarıyla bağlantısını kesin.
Uyarı! Ürünü temizlemek için temiz kuru bir bez kullanın.
Uyarı! Ürünü temizlemek için aşındırıcı, yakıcı temizlik malzemeleri veya içinde çamaşır
suyu bulunan maddeler veya çözücüler kullanmayın.
Uyarı! Bir fırtına, yıldırım sırasında ya da ürün uzun bir süre kullanılmayacaksa adaptörü
prizden çıkarın.
Lütfen dikkat! Ürünü bu kılavuzda belirtildiği şek ilde monte edin. Şüpheli durumlarda
yetkili bir teknisyene danışın ve her zaman yerel montaj talimatlarını dikkate alın.
Lütfen dikkat! Kamerayı doğrudan güneş ışığından koruyun.
Lütfen dikkat! Kamerayı çalılara, dallara veya diğer hareketli cisimlere doğru tutmayın.
Lütfen dikkat! Ürün ayrıştırılmamış kentsel atık olarak imha edilemez, ayrı ayrı işleme
tabi tutulmalıdır.
Lütfen dikkat! Artık kullanılmadığında ürünü bölgenizde nereye teslim edebileceğiniz
hakkında bilgi edinin. Elektrikli cihazları ve parçalarını atmayın, ürünün (veya
parçalarının) dönüşümü ve yeniden kullanılabilmesi için nereye teslim edilebileceğini
öğrenin.
Lütfen dikkat! Kablosuz sistemler, 2,4 GHz aralığında çalışan kablosuz telefonlar,
mikrodalga fırınlar ve diğer kablosuz cihazlar tarafından bozulabilir. Ürün, kurulum ve
kullanım sırasında potansiyel arıza kaynaklarından en az 3 metre uzakta tutulmalıdır.
Lütfen dikkat! Kamera geceleri camdan göremez. Konumlandırırken bunu göz önünde
bulundurun.
2. Amaçlanan kullanım
C904IP.2 bir yerel ağ, bir İnternet bağlantısı veya "ELRO Install" App aracılığıyla izleme
görüntülerini akıllı telefonunuzda izlemenizi sağlayan bir izleme kamerasıdır. C904IP.2
gerek bir ethernet kablosuna gerekse de bir Wi-Fi bağlantı noktasına bağlanabilir.
Kamera ile gün içinde kayıt yapılabilir.
İki elektrikli döner eksen size kamerayı 355 derece döndürme olanağı sağlar. Bunu
tamamen otomatik olarak da yapabilirsiniz.
Kamerada hareket sensörleri de bulunmaktadır ve I/O bölmesi kullanılarak kurulabilir.
3. Teknik özellikler
3.1. Genel ürün özellikleri
Sensör: 1/4” Renkli CMOS Sensörü
Çözünürlük: 640 x 480 piksel (300k piksel)
Lens: 4-9 mm
Optik yakınlaştırma: 3x
Kamera uzaklığı: 355 derece yatay, 90 derece dikey
Minimum ışık gücü: 0,5Lüks
Video sıkıştırma: MJPEG
73
Page 74

Saniye başına kare: 15fps(VGA), 30fps(QVGA)
Güç kaynağı: 230VAC/5VDC/2A Adaptör
Enerji tüketimi: 5W (Maks.)
Sıcaklık: -10°C ~ 40°C (14°F~104°F)
Minimum sistem gereksinimleri
CPU: 2.0 GHZ veya daha y
Bellek: 256 MB veya
Ekran kartı: 64 MB veya üzeri
Desteklenen işletim sistemleri: Windows 98/ME/2000/XP/Vista/7/8
Desteklenen tarayıcılar: IE6.0-10.0, Firefox, Safari, Google Chrome
Desteklenen mobil cihaz OS: iOS 4.3 ve üzeri / Android 2.1 ve üzeri
Sertikasyon: CE, FCC, RoHS, R&T TE
Garanti: Sınırlı 3-yıllık garanti
3.2. Önemli parçalar
1. Yazılım CD-ROM’u
2. Çıkarılabilir anten
3. 4 montaj vidaları ve vida yuvaları
4. Kullanıcı kılavuzu
5. Ethernet kablosu
6. C904IP.2 kamera
7. DC güç kaynağı
3.3. Bağlantılar
1. Anten bağlantısı
2. DC bağlantısı
3. Ses kablosu ucu (çıkış)
4. Ethernet bağlantı noktası
5. I/O bağlantı noktası
6. Ses kablosu ucu (giriş)
7. Sıfırlama düğmesi
1
2
4. Kamera kurulumu
4.1. Kameranın bağlanması
• Kameranın 3 kubbesini sökün. Daha sonra ambalaj malzemesini 4 çıkarın ve kubbeyi
yeniden takın.
• Anteni anten bağlantısına vidalayın 5.
• Kameranın 6 DC bağlantı noktasına adaptör kablosunu bağlayın. Sonra adaptör şini
prize takın.
• Birlikte teslim edilen ethernet kablosunu, kameranın ağ bağlantı noktasına bağlayın
. Ethernet kablosunun diğer ucunu yönlendiricinize bağlayın. Kamera ağa
7
bağlandığında, ethernet bağlantı noktasının yeşil LED'i yanacaktır.
IP kameranızı akıllı telefonunuz ya da bilgisayarınız ile kontrol edebilirsiniz. Akıllı telefonuz
ile kullanım için 4.2 no'lu paragrafa ve bilgisayarınıza kurulum için 4.3 no'lu paragrafa gidin.
74
Page 75

4.2. Akıllı telefon kullanımı için ayarlar
Dikkat! "ELRO INSTALL" uygulamasını kullanabilmek için, internet bağlantısına sahip
bir akıllı telefon gerekmektedir.
Kameranızın ayarlarını Android üzerinden yapmak için bölüm 4.2.1. gidin. Kameranızın
ayarlarını iOS üzerinden yapmak için bölüm 4.2.2. gidin.
4.2.1. Android
• Google Play'den "Elro Install" uygulamasını indirin ve kurun.
• Uygulamayı başlatın. Uygulamanın giriş ekranı görüntülenecektir.
• "Click here to add camera" öğesini seçin. "Add camera" menüsü görüntülenecektir.
• "Scan" düğmesine dokunun. M1 Ardından kameranızın altındaki QR kodunu tarayın.
Kodu "UID" alanına elle girmeyi de tercih edebilirsiniz. M2 Bu kodu IP kameranızın
üstünde QR kodunun altında bulacaksınız.
• Ardından "Security Code" alanına 000000 kodunu girin.
• "Name" alanına kameranıza atamak istediğiniz ismi girin.
• Ardından "OK" tuşuna dokunun.
Kameranız artık telefonunuza eklenmiştir ve uygulamanızın giriş ekranında
görüntülenecektir. N Burada kameranın bağlı olup (ONLINE) N1 olmadığını (OFFLINE)
görebilirsiniz.
4.2.2. iOS
• App Store'dan "Elro Install" uygulamasını indirin ve kurun.
• Uygulamayı başlatın. Uygulamanın giriş ekranı görüntülenecektir.
• "Add camera" seçeneğine dokunun. S3 "Add camera" menüsü görüntülenecektir.
• "QR code" seçeneğine dokunun. S2 Ardından kameranızın altındaki QR kodunu tarayın.
T
• Kodu elle girmeyi de tercih edebilirsiniz. Bunun için "Add" düğmesine dokunun. S1
Ardından kameranızın kodunu "UID" alanına girin. U2 Bu kodu IP kameranızın üstünde
QR kodunun altında bulacaksınız.
• Ardından "Password" alanına kodunu girin 000000. U3.
• "Name" alanına kameranıza atamak istediğiniz ismi girin.
• Ardından "Save" düğmesine dokunun.
Kameranız artık uygulamanıza eklenmiştir ve uygulamanızın giriş ekranında
görüntülenecektir. V Burada kameranın bağlı olup (ONLINE) V1 olmadığını (OFFLINE)
görebilirsiniz.
4.2.3. Genel
• Kameranızın yerleştirilmesine dair talimatlar için bakınız bölüm 4.6.
• Kameranızın uygulama yardımıyla kullanımına dair talimatlar için bakınız bölüm 5.
4.3. Kameranızın bilgisayarınıza kurulumu
• Birlikte verilen CD-ROM'u bilgisayarınıza yerleştirin.
• CD'ROM'da “IPCamSetup.exe”yi başlatın.
• İki kez “İleri” tuşuna basarak kurulumu başlatın.
• Kurulumu “Bilgisayarı yeniden başlat” düğmesine basarak tamamlayın.
IP kamera aracı şimdi bilgisayarınıza kurulmuştur. Kısayolu masa üstünde bulacaksınız.
M4
U1
L
M3
M
S
75
Page 76

Lütfen dikkat! Bu kısayolu silmeyin! Bunu yaparsanız, IP kamera aracını yeniden
yüklemeniz gerekir.
4.4. Kameranız ile bağlantı yapma
Lütfen dikkat! IP kameranın tüm işlevlerinden yararlanabilmek için Internet Explorer
6 veya üzerini kullanmalı (32 bit) ve ActiveX modunu seçmelisiniz. Diğer web
tarayıcılarında resim veya ses kayıtları yapmanız mümkün değildir.
Lütfen dikkat! ActiveX modunu seçerseniz, henüz görüntünüz olmayabilir. Bu
durumda aşağıdaki işlemleri yapınız:
• Internet Explorer'da şu adımları takip edin: Araçlar-> İnternet seçenekleri->
Güvenlik ayarları ->Güvenlik düzeyi
• Engellenmiş seçenekleri, ActiveX denetimleri ve eklenti uygulamaları altındaki
“Başvuru”dan değiştirin. “Başvuru” seçeneği yoksa “Etkinleştir” seçeneğini
işaretleyin. Ayrıca bakınız: E F
!
İpucu: Varsayılan web tarayıcınızdan farklı bir web tarayıcısı kullanmak istiyorsanız, linki
açık olan tarayıcıdan istediğiniz tarayıcıya kopyalayın.
• IP kamera aracını masaüstünüzdeki “IP camera tool” kısayolu ile başlatın. IP kamera
aracı, ağınıza bağlı olan IP kameralarını otomatik olarak arar.
Bir pencere açılır A. Bu pencerede tüm IP kameralarınız görüntülenir. Hiçbir kamera bağlı
değil ise pencere boştur.
• Kullanmak istediğiniz kameranın üzerini çift tıklayın. Varsayılan web tarayıcınızda,
kullanıcı adınızın sorulacağı bir kimlik penceresi açılır.
• Kullanıcı adı için "admin" sözcüğünü girin ve “oturum aç” simgesini tıklayın. Parola
girmeniz gerekmez.
Bir seçim menüsü açılır B. Aşağıdaki seçenekler arasından seçim yapabilirsiniz:
ActiveX modu: Internet Explorer
Server Push modu: Safari, Firefox ve Google Chrome
VLC modu: Internet Explorer, Safari, Firefox, Google Chrome ve Opera
Lütfen dikkat! VLC modu için VLC player’ı yüklemeniz gerekir.
Cep telefonunda oturum açma: Bir mobil tarayıcı ile erişim
• Web tarayıcınıza uygun seçeneğin altındaki “Sign In” üzerine tıklayın.
Şimdi Network Kamera tarayıcı ekranında oturum açtınız C. Bu ekran aracılığıyla
kameranızı ve kamera ayarlarını yönetebilirsiniz. (bakınız, bölüm 6)
4.5. Kameranız ile kablosuz bir bağlantı yapma
Lütfen dikkat! Kablosuz bir bağlantı ayarlamak için kameranız, ayarlama sırasında,
birlikte teslim edilen ethernet kablosu ile ağınıza bağlı olmalıdır.
Lütfen dikkat! Kameranız ile kablosuz bir bağlantı sağlamanız için k ablosuz bir
yönlendiriciye ihtiyacınız vardır.
Lütfen dikkat! Yönlendiricinin bir parolası varsa, bu parolayı bilmeniz gerekir.
• Network Kamera tarayıcısı ekranında C “Network” sekmesini tıklayın. Bir ayar listesi
(settings) görüntülenir H.
D
G
76
Page 77

• Kablosuz Lan Ayarları’nı seçin: Kablosuz Lan Ayarları ekranda görüntülenir.
• Kablosuz Lan Ayarları ekranında iki kez “scan” simgesini tıklayın. Kullanılabilir kablosuz
ağların bir listesi görüntülenir.
• Kablosuz ağınızı tıklayın.
• Kablosuz ağınızda bir parola yoksa ‘submit’ tuşuna basın.
• Kablosuz ağınızın bir parolası varsa, parolanızı şifrelemeye göre “Share Key” veya
“key1”den sonra yazmalısınız.
• Bundan sonra ‘submit’ tuşuna basın.
Kamera 'submit' tuşuna bastığınızda kendiliğinden başlar. Bu yaklaşık 30 saniye sürer.
• Bilgisayar yeniden başlatıldıktan sonra tarayıcınızı ve kamera aygıtınızı kapatın.
• Ağ kablosunu kameradan çıkartın.
• IP kamera aracını açın ve kameranızın adresini tıklayın. Kameranızı şimdi kablosuz
kullanabilirsiniz.
• Kameranız kamera aracı penceresinde durmuyorsa, farenin sağ tuşu ile araç penceresini
tıklayın, bundan sonra “refresh camera list” seçeneğini tıklayın.
4.6. Kameranın montajı
Lütfen dikkat! Kuruluma başlamadan önce, kameranın seçilen yerde düzgün
çalıştığından emin olun.
• Temin edilen 4 vidayı kullanarak kamera desteğini duvara tutturun 8.
Lütfen dikkat! Zeminin, vidalamak için çok sert olması halinde, bunun için delik
delmeniz ve birlikte teslim edilen vida yuvalarını kullanmanız gerekir.
5. Kameranızın akıllı telefon üzerinden
kontrolü
Kamera(ları)nızın ELRO INSTALL uygulaması aracılığı ile akıllı telefonunuza bağlandığından
emin olun (bkz. bölüm 4.1 ve 4.2).
5.1. Android akıllı telefonunuzdan kamera görüntülerini
izleyebilirsiniz
• Uygulamanın giriş ekranında kontrol etmek istediğiniz kameraya dokunun. N
Kameradan alınan görüntü akıllı telefonunuzda görünecektir.
• Kamera görüntüsünü yakınlaştırmak ve uzaklaştırmak veya kaydırmak için parmağınızı
ekran üzerinde kaydırın.
Dikkat! Görüntü alamıyorsanız internet bağlantınız yeterince hızlı olmayabilir. Bu
durumda kamera görüntüsünün çözünürlüğünü değiştirin (bkz. bölüm 5.1.1)
Kamera ekranı bir takım seçenekler sunar:
• Kamera görüntüsünden anlık görüntü almak için "Snapshot" O1 düğmesine dokunun.
• Ses ayarlarınızı değiştirmek için "mute/listen/speak" O2 düğmesine dokunun.
O
77
Page 78

5.1.1. Kameranızın ayarlarının Android akıllı telefonunuzdan değiştirilmesi
• Uygulamanızın giriş ekranında kontrol etmek istediğiniz kameranın yanındaki ok
tuşuna dokunun.
• "Edit camera" düğmesine, ardından da "Advanced settings" düğmesine dokunun. Q
"Advanced settings" ekranı açılır. R "Advanced settings" ekranında kameranın bazı
özelliklerini değiştirebilirsiniz.
Temel fonksiyonlar aşağıda açıklanmıştır:
Modify security code R1: Burada kameranızın güvenlik kodunu değiştirebilirsiniz.
Video Quality
5.2. iPhone’unuzdan kamera görüntüsünün izlenmesi
• Uygulamanın giriş ekranında kontrol etmek istediğiniz kameraya dokunun. V
Kameradan alınan görüntü akıllı telefonunuzda görünecektir.
• Kamera görüntüsünü yakınlaştırmak ve uzaklaştırmak veya kaydırmak için parmağınızı
ekran üzerinde kaydırın.
Dikkat! Görüntü alamıyorsanız internet bağlantınız yeterince hızlı olmayabilir. Bu
durumda kamera görüntüsünün çözünürlüğünü değiştirin (bkz. bölüm 5.2.1.)
Kamera ekranı bir takım seçenekler sunar:
• Kamera görüntüsünden anlık görüntü almak için "Snapshot" W1 düğmesine dokunun.
• Ses ayarlarınızı değiştirmek için "mute/listen/speak" W2 düğmesine dokunun.
5.2.1. Kameranızın ayarlarının iPhone'unuzdan değiştirilmesi
• Uygulamanızın giriş ekranında kontrol etmek istediğiniz kameranın yanındaki ok
tuşuna dokunun. V2 Seçenekleri içeren bir menü açılacaktır.
• "Advanced settings" ekranında kameranızın bir takım özelliklerini değiştirebilirsiniz.
Temel fonksiyonlar aşağıda açıklanmıştır:
Security codeX1: Burada kameranızın kodunu ayarlayın. Varsayılan kod:
Video QualityX2: Kameranızın çözünürlüğünü ayarlayın. Yavaş bir kablosuz
N2
Seçenekleri içeren bir menü açılacaktır.
R2
: Kameranızın çözünürlüğünü ayarlayın. Yavaş bir kablosuz
Varsayılan kod: 000000.
bağlantınız varsa, bu ayara daha düşük bir değer atayın.
000000.
Z
bağlantınız varsa, bu ayara daha düşük bir değer atayın.
Y
P
W
X
6. Kameranızın bilgisayar üzerinden
kontrolü
Kameranızı bilgisayarınızdan yönetebilmek için web tarayıcınız ile "Network Kamerasında"
oturum açmalısınız (bakınız bölüm 4.4). Bu ekran kameranın C1 denetim masasını, birkaç
sekme C2, bir kanal listesi C3, kamera için C4 bir ayar menüsü ve kamera dönüşünü
belirleyebileceğiniz bir kontrol panelini içermektedir.
6.1. Kameranın kumanda panosu
“live video” sekmesini seçtiğiniz takdirde kumanda panosunu kullanabilirsiniz. Bu
kumanda panosu aşağıdaki seçenekleri sunar:
Oynat: K amera görüntülerinizi canlı olarak izlemek için “Play”
tuşuna basın.
C5
C1
78
Page 79

Durdur: Kamera görüntülerinizi canlı olarak görmek için “Stop”
Kayıt: Bir kayıt yapmak için “Record” tuşuna basın. Kaydı
Lütfen dikkat! Kayıt yapabilmek için “Other” sekmesinde, kayıtların depolanacağı yeri
belirtmeniz gerekir. Bu,6.2.3 bölümünde açıklanmıştır.
Ses: Sesi etkinleştirmek için “Audio” tuşuna basın. Sesi
Lütfen unutmayın! “Audio” fonksiyonunu kullanmak için kameranın mikrofon girişine
bir mikrofon bağlamanız gerekir.
Konuşma: Kameraya bağlı hoparlör ile konuşmak için “Talk” tuşuna
Lütfen unutmayın! “Talk” fonksiyonunu kullanmak için kameranın ses çıkışına bir
hoparlör bağlamanız gerekir.
6.2. Sekmeler
Sekmeler, kameranızı (kameralarınızı) yönetmek için çok sayıda seçenek sunmaktadır.
Bu kılavuzda en önemli fonksiyonlar ele alınmıştır. Özel ayarlar hakkında daha fazla bilgi
edinmek isterseniz, size CD-ROM'daki kılavuza bakmanızı öneririz.
6.2.1. Live video
Ayarlanan kameranın görüntülerini izlemek için live video sekmesini tıklayın.
6.2.2. Network
Kablosuz Lan Ayarları: Böylece kameranıza kablosuz erişimi ayarlayabilirsiniz.
DDNS Servis ayarları: Böylece kameranıza İnternet üzerinden erişim
6.2.3. Other
Lütfen dikkat! Resimlerinizi Windows 7, 8 veya Vista’da kaydetmeden önce, Internet
Explorer’da aşağıdaki güvenlik ayarını belirlemelisiniz. Bu ayarı belirlerken, Network
Kamerası ekranının Internet Explorer’ınızda açık olduğundan emin olun.
• Şu adımları izleyin: Araçlar -> İnternet seçenekleri -> Güvenlik-> Güvenilir web siteleri
-> Web siteleri
J
• Ekranda sunucu doğrulaması seçeneğini (https:) uit. Sonra "Ekle" düğmesine basın.
• Internet Explorer'ı yeniden başlatın.
Path ayarları: “Path settings” seçeneğinden, kamera ile çektiğiniz
6.3. Kameranın kanal listesine genel bakış
Kanal genel görünümü ile aynı anda birden fazla bağlı kamera görüntülerini izleme
olanağınız vardır.
tuşuna basın.
durdurmak için tekrar record tuşuna basın.
sonlandırmak için tekrar audio tuşuna basın.
basın.
C2
Bu konuda daha fazla bilgiyi 4.5 H bölümünde
bulabilirsiniz.
sağlayabilirsiniz. Bu konuda daha fazla bilgi için CDROM’daki kılavuza başvurmalısınız.
K
resimleri nereye kaydetmek istediğinizi seçin I.
C3
79
Page 80

6.4. Kameranın menü ayarları
Bu menü içinde kameranın resim ayarlarını uyarlayabilirsiniz: Çözünürlük, kare hızı,
parlaklık ve kontrast.
6.5. Kontrol paneli kamera rotasyonu C5
Kamera kontrol paneli size kamera yönünü elle ve otomatik olarak ayarlama olanağı verir.
6.5.1. Kamera açısının elle ayarlanması
• Kamerayı istediğiniz yöne döndürmek için ok tuşlarını kullanın.
6.5.2. Kamera açısının otomatik olarak ayarlanması
• Kamerayı yatay düzlemde otomatik olarak döndürmek için yatay dolaşma düğmesine
basın.
6.5.3. Manuel olarak yakınlaşmak ve uzaklaşmak
• Yakınlaşmak için "+", uzaklaşmak için de "-" düğmesini kullanın.
7. Temizlik ve bakım
Uyarı! Temizlemeden önce cihazın tüm güç kaynaklarıyla bağlantısını kesin.
Cihazlar bakım gerektirmez, bu nedenle açılmamalıdır. Cihazı açarsanız garanti geçersiz
olacaktır. Cihazların sadece dış tarafını yumuşak, kuru bir bez veya fırça ile temizleyin.
8. Çevre ve imhası
Malzeme, aksesuarlar veya ambalajın üzerinde bulunan sembol, bu ürünün evsel
atık olarak işleme tabi tutulamayacağını gösterir. Cihazı AB içinde, eski elektrikli
ve elektronik cihazların geri dönüşümü için toplama noktası ve diğer Avrupa
ülkelerinde, kullanılmış elektrikli ve elektronik cihazların geri dönüşümü için özel
olarak öngörülmüş toplama sistemleri yoluyla imha edin. Cihazı doğru şekilde
imha ederek, aksi halde eskimiş cihazların neden olabileceği çevre ve toplum sağlığı için
oluşabilecek muhtemel riskleri önlemeye katkıda bulunabilirsiniz. Malzemelerin geri
dönüşümü doğal kaynakların korunması için katkıda bulunur. Bu nedenle eski elektrikli ve
elektronik cihazlarınızı evsel atıklarla birlikte imha etmeyin.
9. Garanti
Bu cihaz için 3 yıllık sınırlı bir garanti vardır. Garanti şartları için lütfen www.elro.eu adresini
ziyaret edin.
C4
9
80
Page 81

Εγχειρίδιο C904IP.2
Σας ευχαριστούμε για την αγορά σας της δικτυακής κάμερας C904IP.2. Για να μπορείτε να
χρησιμοποιήστε την κάμερά σας όσο πιο γρήγορα και όσο το δυνατόν ευκολότερα, σας
συνιστούμε να διαβάσετε αυτό το εγχειρίδιο προσεκτικά πριν την χρήση της κάμερας.
Μπορείτε να βρείτε τις εικόνες αυτού του εγχειρίδιου πριν από αυτό το κεφάλαιο.
1. Προφυλάξεις και οδηγίες ασφαλείας
1.1. Σύμβολα ασφαλείας που χρησιμοποιούνται
Προειδοποίηση! Μία προειδοποίηση δηλώνει την πιθανότητα (σοβαρής) βλάβης στον
χρήστη ή στο προϊόν, εάν ο χρήστης δεν έχει εκτελέσει προσεκτικά τις προβλεπόμενες
διαδικασίες.
Προσοχή! Ένα σχόλιο εφιστά την προσοχή του χρήστη για πιθανά προβλήματα.
!
Συμβουλή: Μία συμβουλή εφιστά την προσοχή του χρήστη σε τεχνάσματα και σε
επιπλέον δυνατότητες της κάμερας.
1.1.1. Ειδοποιήσεις
Προειδοποίηση! Μην συναρμολογείτε το προϊόν σε μέρη που μπορεί να έχουν
υπερβολική ζέστη ή υπερβολικό κρύο.
Προειδοποίηση! Πριν ξεκινήσετε την εγκατάσταση ελέγξτε εάν στον τοίχο όπου
σκοπεύετε να τρυπήσετε περνούν καλώδια ηλεκτρικού ρεύματος και σωληνώσεις
νερού.
Προειδοποίηση! Σταματάτε αμέσως την παροχή ρεύματος στο προϊόν βγάζοντας το
φις από την πρίζα και μετά επικοινωνείτε με το Smartwares servicedesk, όταν:
• εξαρτήματα του εξοπλισμού είναι ανοικτά, έχουν τρυπηθεί, έχουν υγρασία ή έχουν
υποστεί σκληρή μεταχείριση,
• το καλώδιο παροχής του μετασχηματιστή είναι ξεφτισμένο ή είναι ανοικτό έτσι
ώστε να φαίνεται το μέταλλο,
• το κάλυμμα του μετασχηματιστή είναι καταστραμμένο,
• ο μετασχηματιστής ήρθε σε επαφή με υγρασία ή υγρά
• το γυαλί της κάμερας είναι ραγισμένο ή σπασμένο,
Προειδοποίηση! Δεν επιτρέπεται να ανοίξετε μόνοι σας (ή να ανοίξουν για εσάς) ή
να επισκευάσετε (ή να επισκευάσουν για εσάς) το προϊόν. Σε αυτή την περίπτωση
δεν ισχύουν οι εγγυήσεις. Επιτρέψτε την εκτέλεση των εργασιών συντήρησης από
πιστοποιημένο προσωπικό συντήρησης.
Προειδοποίηση! Χρησιμοποιείτε μόνο τα αυθεντικά εξαρτήματα του κατασκευαστή.
Προειδοποίηση! Κρατήστε το προϊόν μακριά από τα παιδιά.
81
Page 82

Προειδοποίηση! Βγάλτε την συσκευή από κάθε πηγή τάσης πριν την καθαρίσετε.
Προειδοποίηση! Για τον καθαρισμό του προϊόντος χρησιμοποιείστε ένα στεγνό
καθαρό πανί.
Προειδοποίηση! Μην χρησιμοποιείτε για τον καθαρισμό του προϊόντος αποξεστικά
μέσα, διαβρωτικά μέσα καθαρισμού ή μέσα καθαρισμού με λευκαντικά ή διαλύτες.
Προειδοποίηση! Βγάλτε τον μετασχηματιστή από την πρίζα κατά την διάρκεια
καταιγίδας, αστραπών και όταν το προϊόν δεν χρησιμοποιείται για μεγάλα χρονικά
διαστήματα.
Προσοχή! Συνομολογείστε το προϊόν όπως σας υποδεικνύεται σε αυτό το εγχειρίδιο.
Σε περίπτωση αμφιβολίας συμβουλευτείτε έναν αναγνωρισμένο μηχανικό και τηρήστε
πάντα τους τοπικούς κανονισμούς συναρμολόγησης.
Προσοχή! Αποφύγετε το άμεσο ηλιακό φως πάνω στην κάμερα.
Προσοχή! Μην κατευθύνετε την κάμερα προς θάμνους, κλαδιά και άλλα
μετακινούμενα αντικείμενα.
Προσοχή! Το προϊόν δεν μπορεί να απορριφθεί σαν σύμμεικτο αστικό απόρριμμα,
αλλά πρέπει να συλλεχθεί ξεχωριστά.
Προσοχή! Ενημερωθείτε εντός των ορίων της περιοχή σας για το πλαίσιο των
δυνατοτήτων παράδοσης του προϊόντος μετά τη λήξη της χρήσης. Μην απορρίπτετε
ηλεκτρικές συσκευές και εξαρτήματα, αλλά κοιτάξτε εάν (τμήματα) του προϊόντος
μπορούν να παραδοθούν, ανακυκλωθούν ή να επαναχρησιμοποιηθούν.
Προσοχή! Τα ασύρματα συστήματα μπορούν να παρεμβληθούν από ασύρματα
τηλέφωνα, μικροκύματα και άλλες ασύρματες συσκευές που λειτουργούν στο όριο
των 2,4 GHz. Κρατήστε το προϊόν τουλάχιστον τρία μέτρα μακριά από πιθανές πηγές
παρεμβολών κατά την διάρκεια της εγκατάστασης και του χειρισμού.
Προσοχή! Το βράδυ, η κάμερα δεν μπορεί να δει μέσα από γυαλί. Λάβετε το υπόψη
σας κατά την τοποθέτηση της.
2. Ενδεδειγμένη χρήση
Η C904IP.2 είναι μία κάμερα ασφαλείας η οποία κάνει δυνατή την προβολή εικόνων
παρακολούθησης στο έξυπνο τηλέφωνό σας μέσω ενός τοπικού δικτύου, μίας
διαδικτυακής σύνδεσης ή μέσω της εφαρμογής "ELRO Install" App. Η C904IP.2 μπορεί να
συνδεθεί μέσω ενός καλωδίου ethernet ή μέσω μίας σύνδεσης WIFI.
Η κάμερα μπορεί να τραβήξει βίντεο κατά την διάρκεια της ημέρας.
Δύο ηλεκτρικοί άξονες περιστροφής σας δίνουν την δυνατότητα να περιστρέψετε την
κάμερα 355 μοίρες από απόσταση. Μπορείτε επίσης να επιτρέψετε να γίνει αυτό πλήρως
αυτοματοποιημένα.
Επιπλέον, η κάμερα είναι εξοπλισμένη με ανιχνευτή κίνησης και μπορεί μέσω μια θύρας I/O
να κάνει ένα κύκλωμα.
3. Τεχνικά χαρακτηριστικά
3.1. Γενικές προδιαγραφές του προϊόντος
Αισθητήρας: 1/4” Έγχρωμος CMOS Αισθητήρας
Ανάλυση: 640 x 480 Pixels (300k Pixels)
Φακός 4-9 mm
Οπτικό ζούμ: 3x
Εύρος της κάμερας 355 μοίρες οριζόντια, 90 μοίρες κάθετα
Ελάχιστος φωτισμός: 0.5Lux
82
Page 83

Συμπίεση βίντεο: MJPEG
Εικόνες ανά δευτερόλεπτο: 15fps( VGA), 30fps(QVGA)
Πηγή τάσης: 230VAC/5VDC/2A Μετασχηματιστής
Κατανάλωση ενέργειας 5W (Max.)
Θερμοκρασία: -10°C ~ 40°C (14°F~104°F)
Ελάχιστες απαιτήσεις του συστήματος:
CPU: 2.0 GHZ ή ανώτερο
Μνήμη: 256 MB ή ανώτερη
Κάρτα Βίντεο 64 MB ή ανώτερη
Υποστηριζόμενα OS: Windows 98/ME/2000/XP/Vista/7/8
Υποστηριζόμενοι περιηγητές: IE6.0-10.0, Firefox, Safari, Google chrome
Κινητά που υποστηρίζουν την
εφαρμογή OS: iOS 4.3 και ανώτερο / Android 2.1 και ανώτερο
Πιστοποίηση : CE, FCC, RoHS, R&TTE
Εγγύηση: Περιορισμένη 3-ετήσια εγγύηση
3.2. Τα πιο σημαντικά εξαρτήματα
1. Λογισμικό Cd-rom
2. Η κεραία μπορεί να αφαιρεθεί.
3. 4 βίδες συναρμολόγησης και βύσματα
4. Εγχειρίδιο χρήστη
5. Καλώδιο Ethernet
6. C904IP.2 κάμερα
7. Υποδοχή DC
3.3. Συνδέσεις
1. Σύνδεση της κεραίας
2. Υποδοχή DC
3. Σύνδεση Ήχου ( Έξοδος)
4. Θύρα ethernet
5. Θύρα I/O
6. Σύνδεση Ήχου (Είσοδος)
7. Κουμπί επαναφοράς
2
1
4. Εγκατάσταση της κάμερας
4.1. Συνδέστε την κάμερα
• Ξεβιδώστε την βάση από την κάμερα 3. Μετά αφαιρέσετε το υλικό συσκευασίας 4
και βιδώστε ξανά την βάση.
• βιδώστε καλά την κεραία στην υποδοχή της κεραίας 5.
• Συνδέστε το καλώδιο του μετασχηματιστή στην σύνδεση DC της κάμερας 6. Στη
συνέχεια βάλτε στην πρίζα το φις του μετασχηματιστή.
• Συνδέστε το ethernet καλώδιο που έχετε προμηθευτεί μαζί με την κάμερα στην θύρα
δικτύου της κάμερας 7. Συνδέστε την άλλη άκρη του ethernet καλωδίου στο ρούτερ
σας. Όταν η κάμερα είναι συνδεδεμένη με το δίκτυο, θα ανάψει το πράσινο LED της
θύρας ethernet.
83
Page 84

Μπορείτε να χειριστείτε την IP κάμερά σας με το έξυπνο τηλέφωνό σας ή με τον
προσωπικό σας υπολογιστή. Πηγαίνετε στην παράγραφο 4.2 για χρήση μέσω του έξυπνου
τηλεφώνου σας και πηγαίνετε στην παράγραφο 4.3 για εγκατάσταση στον προσωπικό σας
υπολογιστή.
4.2. Εγκατάσταση για χρήση έξυπνου κινητού.
Προσοχή! Για την χρήση της εφαρμογής "ELRO INSTALL" χρειάζεστε ένα έξυπνο
τηλέφωνο με πρόσβαση στο διαδίκτυο.
Για την εγκατάσταση της κάμεράς σας μέσω Android πηγαίνετε στην παράγραφο 4.2.1.. Για
την εγκατάσταση της κάμεράς σας μέσω iOS πηγαίνετε στην παράγραφο 4.2.2..
4.2.1. Android
• Κατεβάστε και εγκαταστήστε την App: “Elro Install” μέσω Google Play.
• Ξεκινήστε την Εφαρμογή. Εμφανίζεται η αρχική οθόνη της Εφαρμογής.
• Πατήστε την επιλογή "Click here to add camera". Εμφανίζεται το μενού "Add camera".
M
• Πατήστε το κουμπί "Scan". M1 Μετά σαρώστε τον κωδικό QR που βρίσκεται στο κάτω
μέρος της κάμεράς σας. Μπορείτε επίσης να επιλέξετε να εισάγετε χειροκίνητα τον
κωδικό πίσω από το "UID" . M2 Αυτός ο κωδικός βρίσκεται κάτω από τον κωδικό QR της
κάμερά σας.
• Μετά, πίσω από το "Security code" συμπληρώστε τον κωδικό: 000000 .
• Πίσω από το "Name" συμπληρώστε το όνομα που θέλετε να δώσετε στην κάμερα.
• Μετά πατήστε το κουμπί "OK".
Τώρα η κάμερά σας έχει προστεθεί στο τηλέφωνό σας και θα εμφανιστεί στην αρχική
οθόνη της Εφαρμογής σας. N Σε αυτήν μπορείτε να δείτε αν η κάμερα είναι συνδεδεμένη
(ONLINE) N1 ή αν δεν είναι συνδεδεμένη (OFFLINE).
4.2.2. iOS
• Κατεβάστε και εγκαταστήστε την App “Elro Install” μέσω του App Store.
• Ξεκινήστε την Εφαρμογή. Εμφανίζεται η αρχική οθόνη της Εφαρμογής.
• Πατήστε το “Add camera”. S3 Θα εμφανιστεί το μενού“Add camera”.
• Πατήστε το κουμπί “QR code”. S2 Μετά σαρώστε τον QR κωδικό στην κάτω πλευρά της
κάμεράς σας.
• Μπορείτε επίσης να εισαγάγετε τον κωδικό της κάμεράς σας χειροκίνητα. Σε αυτήν την
περίπτωση πατήστε το κουμπί “Add”. S1 Μετά εισαγάγετε τον κωδικό της κάμεράς σας
πίσω από το “UID”. U2 Μπορείτε να βρείτε αυτόν τον κωδικό κάτω από τον QR κωδικό
πάνω στην IP κάμερά σας.
• Μετά εισαγάγετε πίσω από το “Password” τον κωδικό: 000000.
• Πίσω από το "Name" συμπληρώστε το όνομα που θέλετε να δώσετε στην κάμερα.
• Μετά πατήστε το κουμπί "Save".
Τώρα η κάμερά σας έχει προστεθεί στην App σας και θα εμφανίζεται στην αρχική οθόνη
της App σας.V Σε αυτήν μπορείτε να δείτε εάν η κάμερα είναι συνδεδεμένη (ONLINE) V1
ή αν δεν είναι συνδεδεμένη (OFFLINE).
T
M4
U1
L
M3
S
U3
84
Page 85

4.2.3. Γενικά
• Για πληροφορίες σχετικά με την τοποθέτηση της κάμεράς σας, πηγαίνετε στην
παράγραφο 4.6.
• Για πληροφορίες σχετικά με την χρήση της κάμερά σας με την βοήθεια της Εφαρμογής,
πηγαίνετε στο κεφάλαιο 5.
4.3. Εγκαταστήστε την κάμερά σας στον προσωπικό σας
υπολογιστή.
• Τοποθετήστε το Cd-rom που έχετε προμηθευτεί μαζί με την κάμερα στον υπολογιστή
σας.
• Ξεκινήστε το πρόγραμμα “IPCamSetup.exe” από το Cd-rom.
• Προχωρήστε με την εγκατάσταση πατώντας δύο φορές το “Επόμενο”.
• Ολοκληρώστε την εγκατάσταση πατώντας “Επανακκινήστε τον υπολογιστή”.
Το εργαλείο IP κάμερα είναι τώρα εγκατεστημένο στον υπολογιστή σας. Μπορείτε να
βρείτε την συντόμευση στην επιφάνεια εργασίας σας.
Προσοχή! Μην απομακρύνετε αυτήν την συντόμευση! Εάν παρόλαυτά το κάνετε, θα
πρέπει να εγκαταστήσετε ξανά το εργαλείο IP κάμερα.
4.4. Κάντε μία σύνδεση με την κάμεράς σας
Προσοχή! Για να μπορέσετε να κάνετε χρήση της πλήρους λειτουργικότητας της IP
κάμερας, πρέπει να χρησιμοποιήσετε Internet Explorer 6 ή ανώτερο (32 bit) και να
επιλέξετε για τη λειτουργία ActiveX. Δεν είναι δυνατόν να κάνετε ηχογραφήσεις και
βιντεοσκοπήσεις με άλλα προγράμματα περιήγησης.
Προσοχή! Εάν επιλέξετε για την λειτουργία ActiveX είναι πιθανό ότι δεν θα έχετε ακόμα
εικόνα. Σε αυτήν την περίπτωση εκτελέστε τους παρακάτω χειρισμούς:
• Στον Internet Explorer μεταβείτε στο: Πρόσθετα-> Επιλογές Internet-> ρυθμίσεις
ασφαλείας ->προσαρμοσμένο επίπεδο
• Κάτω από το ActiveX-στοιχεία διαχείρισης και –εφαρμογές εισαγωγής, αλλάξτε τις
απενεργοποιημένες επιλογές στις “Ερωτήσεις”. Όταν η επιλογή δεν είναι διαθέσιμη,
επιλέξτε το “Ενεργοποίηση”. Δείτε επίσης : E F
!
Συμβουλή: εάν θέλετε να χρησιμοποιήσετε έναν άλλο περιηγητή από τον υπάρχων
σας περιηγητή, αντιγράψτε τον σύνδεσμο από τον περιηγητή που είναι ανοικτός σε
έναν περιηγητή της αρεσκείας σας.
• Ξεκινήστε το Εργαλείο IP Κάμερα μέσω της συντόμευσης “εργαλείο IP κάμερα” στην
επιφάνεια εργασίας σας. Το εργαλείο IP κάμερα ψάχνει αυτόματα για την (τις) IP
κάμερα/(ες) που είναι συνδεδεμένες στο δίκτυό σας.
Ένα παράθυρο ανοίγει A. Σε αυτό το παράθυρο παρουσιάζονται όλες σας οι IP κάμερες.
Εάν δεν υπάρχουν συνδεδεμένες κάμερες, το παράθυρο παραμένει άδειο.
• Κάντε διπλό κλικ στην κάμερα που θέλετε να χρησιμοποιήσετε. Στον υπάρχων
περιηγητή σας ανοίξτε ένα παράθυρο αναγνώρισης στο οποίο σας ζητείται το όνομα
χρήστη σας.
• Σαν όνομα χρήστη πληκτρολογήστε “admin” και πατήστε “εγγραφή”. Δεν χρειάζεται να
εισάγετε κωδικό πρόσβασης.
D
G
85
Page 86

Ένα μενού επιλογών ανοίγει B. Μπορείτε να επιλέξετε από τις παρακάτω επιλογές:
Λειτουργία ActiveX: Internet Explorer
Λειτουργία Server Push : Safari, Firefox και Google Chrome
Λειτουργία VLC: Internet Explorer, Safari, Firefox, Google Chrome και
Προσοχή! Για την λειτουργία VLC θα πρέπει να κατεβάσετε το VLC player.
Σύνδεση κινητού τηλεφώνου: Πρόσβαση με ένα περιηγητή για κινητά.
• Κάντε κλικ στο “Sign In” κάτω από την επιλογή που ταιριάζει με τον περιηγητή σας.
Τώρα έχετε συνδεθεί με την οθόνη του περιηγητή Δίκτυο Κάμερας C. Μέσω αυτής της
οθόνης μπορείτε να διαχειριστείτε την κάμερά σας και τις ρυθμίσεις της κάμεράς σας.
(δείτε κεφάλαιο 6)
4.5. Κάντε μία ασύρματη σύνδεση με την κάμεράς σας
Προσοχή! Για να εγκαταστήσετε μία ασύρματη σύνδεση, η κάμερά σας κατά την
διάρκεια της εγκατάστασης πρέπει να είναι συνδεδεμένη μέσω του ethernet καλωδίου
που έχετε προμηθευτεί μαζί με την κάμερα.
Προσοχή! Για να δημιουργήσετε μία ασύρματη σύνδεση με την κάμερά σας
χρειαζόσαστε ένα ασύρματο ρούτερ.
Προσοχή! Εάν το ρούτερ σας έχει κάποιο κωδικό, θα πρέπει να ξέρετε αυτόν το
κωδικό.
• Πατήστε την καρτέλα “Network” [“Δίκτυο”] , στην οθόνη του περιηγητή Δίκτυο Κάμερας
. Θα εμφανιστεί μία λίστα με ρυθμίσεις H.
C
• Επιλέξτε τις Ρυθμίσεις Ασύρματου Lan : θα εμφανιστεί η οθόνη Ρυθμίσεις Ασύρματου
Lan.
• Στην οθόνη Ρυθμίσεις Ασύρματου Lan πατήστε δύο φορές στο “scan”. Θα εμφανιστεί
μία λίστα με διαθέσιμα ασύρματα δίκτυα.
• Κάντε κλικ στην ασύρματη σύνδεσή σας.
• Εάν δεν έχετε κωδικό για το ασύρματο σας δίκτυο τότε πατήστε το 'submit'.
• Όταν το ασύρματό σας δίκτυο έχει κωδικό πρόσβασης, θα πρέπει να εισάγετε
τον κωδικό σας πρόσβασης πίσω από το “Share Key” ή “key1”, ανάλογα με την
κρυπτογράφηση.
• Μετά από αυτό πατήστε το 'submit' ['υποβολή'].
Η κάμερα αρχίζει ξανά μόνη της όταν έχει πατηθεί το 'submit'. Αυτό διαρκεί περίπου 30
δευτερόλεπτα.
• Κλείστε τον περιηγητή σας και το εργαλείο κάμερα αφότου η κάμερα έχει εκκινήσει
ξανά.
• Βγάλτε το καλώδιο δικτύου από την κάμερα.
• Ανοίξτε το εργαλείο IP κάμερα και κάντε κλικ στην διεύθυνση της κάμεράς σας. Τώρα
μπορείτε να χειριστείτε την κάμερά σας ασύρματα.
• Εάν η κάμερά σας δεν βρίσκεται στο παράθυρο του εργαλείου κάμερας, κάντε κλικ με
το δεξί κουμπί του ποντικιού στο παράθυρο του εργαλείου, και στην συνέχεια πατήστε
την επιλογή “refresh camera list” [“φρεσκάρισμα λίστας της κάμερας” ].
Opera
86
Page 87

4.6. Συναρμολογήστε την κάμερα
Προσοχή! Σιγουρευτείτε ότι η κάμερα λειτουργεί σωστά στην επιλεγμένη τοποθεσία,
πριν ξεκινήσετε με την συναρμολόγηση.
• Βιδώστε τον κρίκο της κάμερας στον τοίχο με την βοήθεια των 4 βιδών που
συμπεριλαμβάνονται στην συσκευασία
Προσοχή! Εάν η επιφάνεια είναι πολύ σκληρή για να βιδώσετε (πέτρα, μπετόν) πρέπει
πρώτα να τρυπήσετε με τρυπάνι και να χρησιμοποιήσετε τα βύσματα που έχετε
προμηθευτεί μαζί με την κάμερα.
.
8
5. Διευθύνετε την κάμερά σας μέσω του
έξυπνου τηλεφώνου σας
Βεβαιωθείτε ότι η κάμερά σας είναι συνδεδεμένη με το έξυπνο τηλέφωνό σας μέσω της
Εφαρμογής ELRO INSTALL (δείτε παράγραφο 4.1 και 4.2).
5.1. Δείτε την εικόνα της κάμεράς σας στο Android
έξυπνο κινητό σας.
• Στην αρχική σελίδα της Εφαρμογής, πατήστε πάνω στην κάμερα που θέλετε να
διευθύνετε. N Στο έξυπνο τηλέφωνό σας, εμφανίζεται η εικόνα της κάμερας.
• Σύρετε το δάκτυλό σας πάνω στην οθόνη για να μεγεθύνετε και να μικρύνετε και για να
αλλάξετε την εικόνα της κάμεράς σας.
Προσοχή! Όταν δεν έχετε εικόνα υπάρχει η πιθανότητα ότι η ασύρματη σύνδεσή σας
δεν είναι αρκετά γρήγορη. Σε αυτήν την περίπτωση αλλάξτε την ανάλυση της εικόνας
της κάμεράς σας. (δείτε παράγραφο 5.1.1)
Η οθόνη της κάμερας προσφέρει έναν αριθμό επιλογών:
• Πατήστε το κουμπί "Snapshot" O1 για να τραβήξετε ένα στιγμιότυπο της εικόνας της
κάμεράς σας.
• Πατήστε το κουμπί "mute/listen/speak" O2 για να ρυθμίσετε τις ρυθμίσεις του ήχου.
5.1.1. Αλλάξτε τις ρυθμίσεις της κάμεράς σας από το Android έξυπνο κινητό σας.
• Στην αρχική οθόνη της Εφαρμογής σας πατήστε τα βελάκια δίπλα στην κάμερα που
θέλετε να διευθύνετε. N2 Ένα μενού με επιλογές ανοίγει.
• Πατήστε το κουμπί "Edit camera" και μετά το κουμπί "Advanced settings". Q Η
οθόνη "Advanced settings" ανοίγει. R Στην οθόνη "Advanced settings" μπορείτε να
προσαρμόσετε μερικά χαρακτηριστικά της κάμερας.
Παρακάτω περιγράφονται οι πιο σημαντικές λειτουργίες:
Τροποποίηση κωδικού ασφαλείας R1: Εδώ προσαρμόστε τον κωδικό της κάμεράς
Ποιότητα Video R2: Pas Ρυθμίστε την ανάλυση της κάμεράς σας.
σας. Ο προεπιλεγμένος κωδικός είναι: 000000 .
Εάν έχετε μία αργή ασύρματη σύνδεση, πρέπει
να ρυθμίσετε αυτήν την εγκατάσταση σε
χαμηλότερη θέση.
P
O
87
Page 88

5.2. Δείτε την εικόνα της κάμεράς σας στο iPhone σας.
• Στην αρχική σελίδα της Εφαρμογής, πατήστε πάνω στην κάμερα που θέλετε να
διευθύνετε. V Στο έξυπνο τηλέφωνό σας, εμφανίζεται η εικόνα της κάμερας.
• Σύρετε το δάκτυλό σας πάνω στην οθόνη για να μεγεθύνετε και να μικρύνετε και για να
αλλάξετε την εικόνα της κάμεράς σας.
Προσοχή! Όταν δεν έχετε εικόνα υπάρχει η πιθανότητα ότι η ασύρματη σύνδεσή σας
δεν είναι αρκετά γρήγορη. Σε αυτήν την περίπτωση αλλάξτε την ανάλυση της εικόνας
της κάμεράς σας. (δείτε παράγραφο 5.2.1.)
Η οθόνη της κάμερας προσφέρει έναν αριθμό επιλογών:
• Πατήστε το κουμπί "Snapshot" W1 για να τραβήξετε ένα στιγμιότυπο της εικόνας της
κάμεράς σας.
• Πατήστε το κουμπί "mute/listen/speak" W2 για να ρυθμίσετε τις ρυθμίσεις του ήχου.
5.2.1. Αλλάξτε τις ρυθμίσεις της κάμεράς σας από το iPhone σας.
• Στην αρχική οθόνη της Εφαρμογής σας πατήστε τα βελάκια δίπλα στην κάμερα που
θέλετε να διευθύνετε. V2 Ένα μενού με επιλογές ανοίγει.
• Στην οθόνη "Advanced settings" μπορείτε να προσαρμόσετε μερικά χαρακτηριστικά
της κάμερας.
Παρακάτω περιγράφονται οι πιο σημαντικές λειτουργίες:
Κωδικός ΑσφαλείαςX1: Ρυθμίστε εδώ τον κωδικό της κάμεράς σας. Ο
Ποιότητα Video X2: Pas Ρυθμίστε την ανάλυση της κάμεράς σας. Εάν έχετε μία
προεπιλεγμένος κωδικός είναι: 000000
αργή ασύρματη σύνδεση, πρέπει να ρυθμίσετε αυτήν την
εγκατάσταση σε χαμηλότερη θέση.
X
Z
Y
6. Διευθύνετε την κάμερά σας μέσω του
προσωπικού σας υπολογιστή
Για να μπορέσετε να διευθύνετε την κάμερά σας από τον υπολογιστή σας, πρέπει με την
βοήθεια του περιηγητή σας να είστε συνδεδεμένος με την οθόνη του περιηγητή “Network
Camera” [ Δίκτυο Κάμερας] ( δείτε παράγραφο 4.4). Αυτή η οθόνη περιλαμβάνει τον πινάκα
χειρισμού της κάμερας C1, έναν αριθμό καρτελών C2, μία λίστα καναλιών C3, ένα μενού
εγκατάστασης για την κάμερα C4 και τον πίνακα ελέγχου με τον οποίο καθορίζετε την
περιστροφή της κάμερας.
6.1. Πίνακας ελέγχου της κάμερας
Μπορείτε να χρησιμοποιήσετε τον πίνακα ελέγχου όταν έχετε επιλέξει την καρτέλα “live
video”. Αυτός ο πίνακας ελέγχου έχει τις παρακάτω επιλογές:
Play: Πατήστε το “Play” για να δείτε ζωντανά τις εικόνες της
Stop: Πατήστε το “Stop” για να σταματήσετε την ζωντανή
Record: Πατήστε το “Record” για να κάνετε μία λήψη. Πατήστε
Προσοχή! Για να μπορείτε να πάρετε λήψεις θα πρέπει να αναφέρετε στην καρτέλα
“Other” [“Άλλο”] που αποθηκεύονται οι λήψεις. Αυτό επεξηγείται στην παράγραφο
6.2.3.
C5
C1
κάμεράς σας.
αναπαραγωγή των εικόνων της κάμεράς σας.
ξανά το Record για να σταματήσετε την λήψη.
88
W
Page 89

Audio: Πατήσ τε το “Audio” [“Ήχος”] για να ενεργοποιήστε την
Προσοχή! Για να μπορέσετε να χρησιμοποιήσετε την λειτουργία "Audio" πρέπει να
συνδέσετε ένα μικρόφωνο στην σύνδεση μικροφώνου της κάμερας.
Ομιλία: Πατήσ τε “Talk” για να μπορείτε να μιλήσετε μέσω ενός
Προσοχή! Για να μπορέσετε να χρησιμοποιήσετε την λειτουργία "Talk" πρέπει να
συνδέσετε ένα μεγάφωνο στην έξοδο ήχου της κάμερας.
6.2. Καρτέλες
Οι καρτέλες παρέχουν ένα μεγάλο αριθμό δυνατοτήτων για την διαχείριση της
κάμεράς (ών) σας. Αυτό το εγχειρίδιο περιγράφει τα κυριότερα χαρακτηριστικά. Αν
θέλετε να μάθετε περισσότερα σχετικά με συγκεκριμένες ρυθμίσεις, σας συνιστούμε να
συμβουλευτείτε το εγχειρίδιο στο Cd-rom.
6.2.1. Live video
Κάντε κλικ στην καρτέλα ζωντανό βίντεο για να δείτε τις εικόνες από την συνδεδεμένη
κάμερα.
6.2.2. Network
Ρυθμίσεις Ασύρματου Lan: Με αυτές μπορείτε να ρυθμίσετε την ασύρματη
Ρυθμίσεις DDNS Service: Με αυτές τις ρυθμίσεις μπορείτε να κάνετε την κάμερά
6.2.3. Other
Προσοχή! Πριν μπορέσετε να αποθηκεύσετε λήψεις στα Windows 7, 8 ή Vista, θα
πρέπει να έχετε προσαρμόσει την ακόλουθη ρύθμιση ασφαλείας στον Internet
Explorer. Βεβαιωθείτε ότι κατά την προσαρμογή αυτής της ρύθμισης, η οθόνη Κάμερα
Δικτύου είναι ανοικτή στον Internet Explorer σας.
• Μεταβείτε στα: Πρόσθετα-> Επιλογές Internet-> Ασφάλεια -> Αξιόπιστες Τοποθεσίες
-> Τοποθεσίες
J
• Αποσημειώστε στην οθόνη την επιλογή Απαίτηση επαλήθευσης διακομιστή (https:).
Μετά πατήστε το “Προσθήκη”.
• Επανακκινήστε τον Internet Explorer σας.
Path settings: Επιλέξτε κάτω από την επιλογή “Path settings” που θέλετε
6.3. Λίστα καναλιών της κάμερας
Με τη λίστα καναλιών, έχετε τη δυνατότητα να δείτε ταυτόχρονα εικόνες από περισσότερες
συνδεδεμένες κάμερες.
αναπαραγωγή ήχου. Πατήστε άλλη μία φορά το “Audio”
για να τερματίσετε την αναπαραγωγή ήχου.
μεγάφωνου συνδεδεμένο στην κάμερα.
C2
πρόσβαση στην κάμερά σας. Περισσότερες πληροφορίες
σχετικά με αυτό το θέμα θα βρείτε στην παράγραφο 4.5
.
H
σας προσβάσιμη από το διαδίκτυο. Για περισσότερες
πληροφορίες σχετικά με αυτό το θέμα θα πρέπει να
συμβουλευτείτε το εγχειρίδιο στο Cd-rom.
K
να αποθηκεύσετε τις λήψεις που έχει κάνει η κάμερά σας
.
I
C3
89
Page 90

6.4. Μενού ρυθμίσεων της κάμερας
Με αυτό το μενού μπορείτε να προσαρμόσετε σύμφωνα με τις επιθυμίες σας τις ρυθμίσεις
της εικόνας της κάμερας: την ανάλυση, την ταχύτητα του καρέ, τη φωτεινότητα και την
αντίθεση.
6.5. Περιστροφή κάμερας μέσω πίνακα ελέγχου C5
Ο πίνακας ελέγχου της κάμερας σας δίνει την δυνατότητα να προσαρμόσετε την
κατεύθυνση της κάμερας με το χέρι ή αυτόματα.
6.5.1. Προσαρμογή της γωνίας λήψης με το χέρι
• Χρησιμοποιείστε τα πλήκτρα με τα βελάκια για να περιστρέψετε την κάμερα προς κάθε
επιθυμητή κατεύθυνση.
6.5.2. Προσαρμόστε αυτόματα την γωνία λήψης
• Πατήστε το οριζόντιο κουμπί περιπόλου για να αφήσετε την κάμερα να περιστρέφεται
αυτόματα οριζόντια.
6.5.3. Χειροκίνητη ρύθμιση της εστίασης.
• χρησιμοποιήστε τα κουμπιά "+" και "-" για να ρυθμίσετε την εστίαση. .
7. Καθαρισμός και συντήρηση.
Προειδοποίηση! Βγάλτε την συσκευή από κάθε πηγή τάσης πριν την καθαρίσετε.
Οι συσκευές δεν χρειάζονται συντήρηση, για αυτό μην τις ανοίξετε. Η εγγύηση είναι
άκυρη, αν ανοίξετε την συσκευή. Απλώς καθαρίστε το εξωτερικό της συσκευής με ένα
μαλακό, στεγνό πανί ή βούρτσα
8. Περιβάλλον και Διάθεση
Το σύμβολο πάνω στο προϊόν, τα εξαρτήματα ή την συσκευασία δηλώνει ότι
αυτό το προϊόν δεν μπορεί να αντιμετωπιστεί σαν οικιακό απόβλητο. Απορρίψτε
τη συσκευή μέσω του σημείου συλλογής για την ανακύκλωση των αποβλήτων
ηλεκτρικών και ηλεκτρονικών εξοπλισμών εντός της ΕΕ και σε άλλες Ευρωπαϊκές
χώρες οι οποίες έχουν ξεχωριστά συστήματα συλλογής χρησιμοποιημένων
ηλεκτρικών και ηλεκτρονικών προϊόντων. Απορρίπτοντας την συσκευή με τον σωστό
τρόπο, βοηθάτε έτσι ώστε να αποφευχθούν πιθανοί κίνδυνοι για το περιβάλλον και την
ανθρώπινη υγεία, οι οποίοι διαφορετικά θα μπορούσαν να προκληθούν από τον
ακατάλληλο χειρισμό της απόβλητης συσκευής . Η ανακύκλωση των υλικών θα βοηθήσει
στην εξοικονόμηση φυσικών πόρων. Για αυτό μην απορρίπτετε τις παλαιές σας ηλεκτρικές
και ηλεκτρονικές συσκευές μαζί με τα οικιακά απορρίμματα.
9. Εγγύηση
Για αυτήν τη συσκευή ισχύει μία περιορισμένη 3 ετήσια εγγύηση. Για τους όρους της
εγγύησης κοιτάξτε στο : www.elro.eu.
C4
9
90
Page 91

Návod k obsluze C904IP.2
Děkujeme Vám, že jste si zakoupili síťovou kameru C904IP.2. Pro snadné a rychlé použití
vašeho přístroje vám doporučujeme pročíst si pečlivě tento návod.
Obrazový materiál z tohoto manuálu najdete před touto kapitolou.
1. Bezpečnostní instrukce a preventivní
opatření
1.1. Použité bezpečnostní symboly
Varování! Varování upozorňuje uživatele, že pokud nebude postupovat přesně podle
návodu, může dojít k poškození jeho zdraví nebo k (významnému) poškození produktu.
Upozornění! Tato poznámka upozorňuje uživatele na možné problémy.
!
Tip: Tip uživatele upozorňuje na praktické rady a doplňující možnosti.
1.1.1. Upozornění
Upozornění! Nesestavujte produkt na extrémně teplých či chladných místech.
Varování! Před připevňováním kamery překontrolujte, zda v místě, kam ji chcete
umístit, nevedou kabely elektrického vedení či vodovodní potrubí.
Upozornění! Okamžitě vytáhněte produkt ze zásuvky a následně zkontaktujte servisní
linku Smartwares v případě, že:
• pevné součástky jsou rozevřeny, mají vadu, jsou navlhlé nebo spadly z výšky;
• napájecí kabel adaptéru je roztřepený nebo je poškozený tak, že jsou vidět kovové
dráty;
• kryt adaptéru je poškozený;
• adaptér se dostal do styku s vlhkostí nebo tekutinami;
• objektiv kamery je prasklý nebo rozbitý;
Varování! Otevírání a opravování produktu není povoleno. V případě otevření a opravy
produktu záruka na zboží propadá. Údržbu svěřte certikovaným odborníkům.
Varování! Používejte pouze originální doplňky od výrobce.
Varování! Udržujte produkt mimo dosah dětí.
Varování! Před čištěním vypojte přístroj ze všech zdrojů napětí.
Varování! K čištění produktu používejte suchý a čistý hadřík.
Varování! K čištění přístroje nepoužívejte žádné abrazivní prostředky, žíravá čistidla,
bělidla a rozpouštědla.
Varování! Během bouře s blesky a dlouhodobého odstavení přístroje vytáhněte
adaptér ze zásuvky.
91
Page 92

Upozornění! Produkt připevňujte tak, jak je uvedeno v návodu. Pokud váháte, raději
se poraďte se zkušeným odborníkem a stále mějte na paměti místní bezpečnostní
předpisy.
Upozornění! Nevystavujte kameru slunečnímu záření.
Upozornění! Nenatáčejte kameru na keře, větve a jiné pohybující se předměty.
Upozornění! Produkt se nesmí likvidovat jako netříděný městský odpad, ale musí být
tříděn zvlášť.
Upozornění! Informujte se ve svém okolí, kam se dá produkt po ukončení jeho
používání odevzdat. Nevyhazujte elektrické přístroje a příslušenství, ale zkontrolujte,
zda je možné produkt (součástky z něj) odevzdat, recyklovat nebo znovu využít.
Upozornění! Bezdrátové telefony, mikrovlnky a další bezdrátové přístroje v dosahu
2,4 GHz mohou ovlivňovat fungování bezdrátových systémů. Udržujte proto produkt
během instalace a používání nejméně 3 metry od možných zdrojů rušení.
Upozornění! Kamera není schopna snímat obraz v noci přes sklo. Mějte to při instalaci
na paměti.
2. Zamýšlené použití
C904IP.2 je bezpečnostní kamera, která umožňuje monitorování prostřednictvím lokální
sítě přes internetové připojení nebo pomocí "ELRO Install" App ve vašem smartphonu.
C904IP.2 může být připojena jak síťovým kabelem ethernet, tak přes WIFI připojení.
V průběhu dne je kamera schopna zaznamenávat video.
Díky dvěma rotačním osám se kamera může otáčet o 355 stupňů. Samozřejmě je možné,
aby se otáčela automaticky.
Kamera je dále vybavena detektorem pohybu a prostřednictvím I/O portu ji lze použít k
vytvoření okruhu.
3. Technické specikace
3.1. Obecné specikace produktu
Senzor: 1/4" Barevný CMOS senzor
Rozlišení: 640 x 480 pixelů (300k pixelů)
Čočka: 4-9 mm
Optický zoom: 3x
Rozsah kamery: 355 stupňů horizontálně, 90 stupňů vertikálně
Minimální osvětlení: 0.5Lux
Video komprese: MJPEG
Počet obrazů za vteřinu: 15fps( VGA), 30fps(QVGA)
Zdroj napětí: 230VAC/5VDC/2A adaptér
Spotřeba energie: 5W (Max.)
Teplota: -10°C ~ 40°C (14°F~104°F)
Minimální systémové požadavky:
CPU: 2.0 GHZ nebo vyšší
Paměť: 256 MB nebo vyšší
Gracká karta: 64 MB nebo vyšší
Podporované systémy: Windows 98/ME/2000/XP/Vista/7/8
Podporované prohlížeče IE6.0-10.0, Firefox, Safari, Google Chrome
92
Page 93

Podporované mobilní
operační systémy: iOS 4.3 a vyšší / Android 2.1 a vyšší
Certikace: CE, FCC, RoHS, R&TTE
Záruka: Omezená 3-letá záruka
3.2. Nejdůležitější součásti
1. Software Cd-rom
2. Odnímatelná anténa
3. 4 šroubky a hmoždinky
4. Návod k použití
5. Ethernet kabel
6. C904IP.2 kamera
7. DC nabíječka
3.3. Propojení
1. Anténová přípojka
2. DC vstup
3. Audio konektor (výstup)
4. Ethernet port
5. I/O port
6. Audio konektor (vstup)
7. Tlačítko Reset
2
1
4. Instalace kamery
4.1. Propojení kamery
• Odšroubujte kopuli kamery 3. Poté odstraňte obalový materiál 4 a kopuli
přišroubujte zpět.
• Našroubujte anténu na anténovou přípojku 5.
• Připojte kabel adaptéru k DC vstupu kamery 6. Poté připojte adaptér do elektrické
zásuvky.
• Připojte přiložený ethernet kabel k síťovému portu kamery 7. Druhý konec ethernet
kabelu připojte ke svému routeru. Jakmile je kamera propojena se sítí, rozsvítí se zelená
LED žárovka ethernet portu.
IP kameru můžete ovládat prostřednictvím chytrého telefonu nebo PC. V části 4.2 najdete
návod k použití s vaším chytrým telefonem a v části 4.3 najdete pokyny k instalaci do
vašeho PC.
4.2. Příprava k použití s mobilním telefonem
Pozor! K použití aplikace „ELRO INSTALL" potřebujete chytrý telefon s připojením k
internetu.
Popis instalace kamery v systému Android najdete v odstavci 4.2.1.. Popis instalace kamery
v systému iOS najdete v odstavci 4.2.2..
93
Page 94

4.2.1. Android
• Stáhněte aplikaci „Elro Install" z Google Play a nainstalujte ji.
• Spusťte aplikaci. Zobrazí se domovská obrazovka aplikace.
• Klepněte na možnost „Click here to add camera". Zobrazí se nabídka „Add camera".
• Stiskněte tlačítko „Scan". M1 Poté naskenujte QR kód na spodní straně kamery. Můžete
také využít možnost manuálního zadání kódu do kolonky „UID".
pod QR kódem na IP kameře.
• Poté vyplňte kód 000000 do kolonky „Securit y Code".
• Za „Name" zadejte název, který chcete kameře přidělit.
• Poté klepněte na „OK".
Kamera je nyní přidána do vašeho telefonu a objeví se na domovské obrazovce aplikace.
Tam také můžete zjistit, zda kamera je (ONLINE) N1 nebo není (OFFLINE) připojena.
N
4.2.2. iOS
• Stáhněte aplikaci „Elro Install" z App Store a nainstalujte ji.
• Spusťte aplikaci. Zobrazí se domovská obrazovka aplikace.
• Klepněte na možnost „Add camera". S3 Objeví se nabídka „Add camera".
• Klepněte na „QR code". S2 Poté naskenujte QR kód na zadní straně vaší kamery.
• Můžete také využít možnost zadat kód z kamery ručně. To provedete klepnutím na
možnost „Add". S1 Poté zadejte kód z kamery do kolonky „UID". U2 Tento kód najdete
na své IP kameře pod QR kódem.
• Poté vyplňte do kolonky „Password" kód: 000000 .
• Za „Name" zadejte název, který chcete kameře přidělit.
• Poté klepněte na „Save".
Vaše kamera je nyní přidána do aplikace a bude dostupná na její domovské obrazovce. V
Zde můžete vidět, zda je kamera připojena (ONLINE) V1 nebo ne (OFFLINE).
4.2.3. Obecné informace
• Pokyny k umístění kamery najdete v odstavci 4.6.
• Pokyny k používání kamery pomocí aplikace najdete v kapitole 5.
4.3. Instalace kamery do PC
• Vložte přiložený CD-rom do vašeho počítače.
• Spusťte "IPCamSetup.exe" na Cd-romu.
• Pokračujte v instalaci dvojím kliknutím na tlačítko "Další".
• Instalaci dokončíte kliknutím na tlačítko "Znovu zapnout počítač".
M4
U1
L
M2
Tento kód najdete
M3
U3
M
S
T
IP kamera tool je nyní nainstalován ve vašem počítači. Na ploše najdete ikonu zástupce.
Upozornění! Tuto ikonu zástupce neodstraňujte! Pokud to uděláte, je nutno IP kamera
tool znovu nainstalovat.
4.4. Připojení kamery
Upozornění! K tomu, aby byla plně využita funkčnost IP kamery, je potřeba mít
nainstalován Internet Explorer 6 nebo vyšší verzi (32 bit) a zvolit ActiveX Mode. V
ostatních internetových prohlížečích není možné nahrávat obraz ani zvuk.
Upozornění! V případě, že jste zvolili ActiveX mode a stále nemáte obraz, proveďte
následující kroky:
94
Page 95

• Klikni v Internet Exploreru na: Nástroje -> Možnosti Internetu-> Zabezpečení
->Vlastní úroveň
• Změňte v ActiveX-ovládací prvky a moduly plug-in, vybrané možnosti na "Dotazy".
Pokud není možnost "Dotazy" dostupná, zaškrtněte možnost "Zapnout". Viz také:
E F G
!
Tip: V případě, že chcete používat jiný prohlížeč než váš standardní prohlížeč,
zkopírujte odkaz z otevřeného prohlížeče do vámi vybraného prohlížeče.
• Spusťte IP kamera Tool přes "IP camera tool" ikonu zástupce na vaší ploše. IP kamera
tool si automaticky vyhledá IP kameru(y), která je připojena k vaší síti.
Otevře se okno A. V tomto okně se zobrazí všechny vaše IP kamery. V případě, že není
připojena žádná kamera, zůstává okno prázdné.
• Dvojklikem klikněte na kameru, kterou chcete používat. Ve vašem standardním
internetovém prohlížeči se otevře identikační okno, do kterého zadáte vaše
uživatelské jméno.
• Zadejte uživatelské heslo "admin" a klikněte na "přihlásit". Nemusíte zadávat žádné
heslo.
Otevře se menu B. Můžete si vybrat z následujících možností:
ActiveX Mode: Internet Explorer
Server Push Mode: Safari, Firefox a Google Chrome
VLC Mode: Internet Explorer, Safari, Firefox, Google Chrome a Opera
Upozornění! Pro VLC Mode je nutno stáhnout si VLC player.
Přihlášení přes mobilní telefon: Přístup na mobilním prohlížeči
• Klikněte na "Sign In" pod možnost, která platí pro váš prohlížeč.
Nyní jste přihlášen v Netwerk Camera okně prohlížeče C. V tomto okně můžete ovládat
svou kameru i její nastavení. (viz kapitola 6)
4.5. Bezdrátové připojení kamery
Upozornění! Pro instalaci bezdrátového připojení musí být vaše kamera během
instalace propojena s vaší sítí prostřednictvím přiloženého ethernal kabelu.
Upozornění! Pro bezdrátové připojení vaší kamery potřebujete bezdrátový router.
Upozornění! Pokud je váš router chráněn heslem, musíte jej znát.
• Klikněte na záložku "Network" na obrazovce Network Camera prohlížeče C. Objeví se
seznam s možnostmi nastavení (settings) H.
• Vyberte Wireless Lan Settings: objeví se obrazovka Wireless Lan Settings.
• Klikněte na Wireless Lan Settings obrazovce dvakrát na "scan". Objeví se seznam
dostupných bezdrátových sítí.
• Klikněte na vaši bezdrátovou síť.
• Pokud nemá vaše bezdrátová síť heslo, klikněte na 'submit'.
• Pokud je vaše bezdrátová síť na heslo, je nutno vyplnit heslo za "Share Key" nebo
"key1", záleží na kódování.
• Poté klikněte na 'submit'.
D
95
Page 96

Po kliknutí na 'submit' se kamera znovu sama zapne. Trvá to přibližně 30 vteřin.
• Zavřete svůj prohlížeč a camera tool poté, co se vaše kamera znovu nastartuje.
• Vypojte síťový kabel z kamery.
• Otevřete IP camera tool a klikněte na adresu vaší kamery. Nyní můžete vaši kameru
používat bezdrátově.
• Pokud se vaše kamera neobjeví v okně camera tool, klikněte pravým tlačítkem myši v
tomto okně a pak vyberte možnost "refresh camera list".
4.6. Připevnění kamery
Upozornění! Před instalací se ujistěte, zda kamera řádně monitoruje vámi vybrané
místo.
• Pomocí 4 dodaných šroubů připevněte držák kamery na požadované místo 8.
Upozornění! Pokud je podlaha příliš tvrdá, aby se do ní dalo šroubovat (kámen/beton),
je nutné navrtat díry a použít přiložené hmoždinky.
5. Správa kamery prostřednictvím chytrého
telefonu
Ujistěte se, že je/jsou vaše kamera/y propojena/y s vaším chytrým telefonem
prostřednictvím aplikace ELRO INSTALL (viz odstavce 4.1 a 4.2).
5.1. Prohlížení obrazu z kamery na chytrém telefonu se
systémem Android
• Na domovské obrazovce aplikace klepněte na kameru, kterou chcete spravovat. N Na
displeji vašeho telefonu se objeví obraz kamery.
• Obraz kamery přiblížíte, oddálíte a posunete přejetím prstu po obrazovce.
Pozor! Jestliže se nezobrazuje obraz kamery, je možné, že není bezdrátové připojení
dostatečně rychlé. V takovém případě změňte rozlišení obrazu kamery (viz odstavec
5.1.1)
Obrazovka kamery nabízí několik možností:
• Stisknutím tlačítka „Snapshot" O1 pořídíte snímek.
• Stisknutím tlačítka „mute/listen/speak" O2 nastavíte možnosti zvuku.
5.1.1. Změna nastavení kamery na chytrém telefonu se systémem Android
• Klepnutím na šipku vedle kamery na domovské obrazovce aplikace zvolíte kameru,
kterou si přejete spravovat. N2 Otevře se nabídka s možnostmi.
• Stiskněte tlačítko „Edit Camera" a následně tlačítko „Advanced Settings". Q Otevře
se nabídka „Advanced Settings". R V této nabídce můžete upravit některé vlastnosti
kamery.
Hlavní funkce jsou popsány níže:
Úprava bezpečnostního kódu R1: Zde můžete provést úpravu kódu kamery.
Kvalita videaR2: Upravte rozlišení kamery. Máte-li pomalé bezdrátové
O
P
Tovární kód je: 000000.
96
Page 97

připojení, přepněte rozlišení na nižší nastavení.
5.2. Prohlížení obrazu z kamery na telefonu iPhone
• Na domovské obrazovce aplikace klepněte na kameru, kterou chcete spravovat. V Na
displeji vašeho telefonu se objeví obraz kamery.
• Obraz kamery přiblížíte, oddálíte a posunete přejetím prstu po obrazovce.
Pozor! Jestliže se nezobrazuje obraz kamery, je možné, že není bezdrátové připojení
dostatečně rychlé. V takovém případě změňte rozlišení obrazu kamery (viz odstavec
5.2.1.)
Obrazovka kamery nabízí několik možností:
• Stisknutím tlačítka „Snapshot"
• Stisknutím tlačítka „mute/listen/speak" W2 nastavíte možnosti zvuku.
5.2.1. Změna nastavení kamery na telefonu iPhone
• Klepnutím na šipku vedle kamery na domovské obrazovce aplikace zvolíte kameru,
kterou si přejete spravovat. V2 Otevře se nabídka s možnostmi.
• V nabídce „Advanced Settings" můžete upravit některé vlastnosti kamery.
Hlavní funkce jsou popsány níže:
Bezpečnostní kódX1: Zde můžete provést úpravu kódu kamery. Tovární kód je:
Kvalita videaX2: Upravte rozlišení kamery. Máte-li pomalé bezdrátové
6. Správa kamery prostřednictvím PC
Abyste mohli svou kameru ovládat přes počítač, je nutno zalogovat se přes svůj webový
prohlížeč do "Network Camera" okna (viz část 4.4). V tomto okně je obsluhovací panel
kamery C1, několik záložek C2, vícejednotkový přehled C3, menu pro nastavení kamery
C4
a obsluhovací panel, na kterém se nastavuje rotace kamery.
6.1. Obsluhovací panel kamery
Pokud vyberete záložku "live video", objeví se obsluhovací panel. Tento obsluhovací panel
obsahuje následující možnosti:
Play: Kliknutím na "Play" můžete sledovat obraz z kamery živě.
Stop: Kliknutím na "Stop" zastavíte živé zobrazení.
Record: Klik nutím na "Record" spustíte nahrávání. Dalším
Upozornění! Pro nahrávání je potřeba zadat do záložky "Other" místo, kam budete
nahrávky ukládat. Bližší vysvětlení naleznete v odstavci 6.2.3.
Audio: Klik nutím na "Audio" aktivujete přehrávání audia. Dalším
Pozor! Aby bylo možné použít funkci „Audio", musíte na mikrofonní konektor kamery
připojit mikrofon.
Funkce Talk: Chcete-li mluvit prostřednictvím reproduktoru
W1
pořídíte snímek.
000000.
připojení, přepněte rozlišení na nižší nastavení.
kliknutím na record nahrávání ukončíte.
kliknutím na audio přehrávání ukončíte.
připojeného ke kameře, klepněte na „Talk".
W
X
Z
Y
C5
C1
97
Page 98

Pozor! Aby bylo možné použít funkci „Talk", musíte na výstupní audio konektor kamery
připojit reproduktor.
6.2. Záložky
Záložky nabízí mnoho možností nastavení kamery. V tomto návodu jsou zmíněny
jen nejdůležitější funkce. Pokud se chcete dozvědět více o specických nastaveních,
doporučujeme vám prostudovat si návod na Cd-romu.
6.2.1. Live video
Klikněte na záložku live video a můžete sledovat obraz z nastavené kamery.
6.2.2. Network
Wireless Lan settings: Zde si můžete nastavit bezdrátové připojení vaší kamery.
DDNS Service settings: Zde můžete kameru nastavit pro použití přes internet.
6.2.3. Other
Upozornění! Než budete moci vaše nahrávky uložit ve Windows 7, 8 nebo Vista, je
nutno upravit v prohlížeči Internet Explorer následující bezpečnostní nastavení. Dbejte
na to, abyste měli v prohlížeči Internet Explorer během upravování otevřenou stránku
Network Camera.
• Běžte na: Nástroje -> Možnosti internetu -> Zabezpečení-> Důvěryhodné servery J
-> Weby
• Zaklikněte možnost důvěryhodné servery (https:). Poté klikněte na "Přidat".
• Restartujte Internet Explorer.
Path settings: Vyberte možnost "Path settings", kam budete chtít
6.3. Vícejednotkový přehled kamer
Díky vícejednotkovému přehledu můžete vidět obraz z více připojených kamer zároveň.
6.4. Menu nastavení kamery
V tomto menu můžete upravovat nastavení obrazu kamery: rozlišení, rychlost obrazu, jas
a kontrast.
6.5. Kontrolní panel rotace kamery C5
Kontrolní panel kamery vám umožňuje upravit její natočení ručně a automaticky.
6.5.1. Ruční nastavení úhlu pohledu
• Pomocí kláves se šipkami můžete kameru natočit libovolným směrem.
6.5.2. Automatické upravení úhlu pohledu
• Chcete-li, aby kamera automaticky rotovala horizontálně, klepněte na tlačítko
horizontálního patrolování.
C2
Více informací v odstavci 4.5
Pro více informací si prostudujte návod na Cd-romu.
K
nahrávky z vaší kamery uložit I.
C4
.
H
C3
9
98
Page 99

6.5.3. Manuální přiblížení a oddálení
• Přiblížení provedete tlačítkem „+" a oddálení tlačítkem „-".
7. Čištění a údržba
Varování! Před čištěním vypojte přístroj ze všech zdrojů napětí.
Přístroje jsou bezúdržbové, proto je neotvírejte. Jakmile přístroj otevřete, propadá vám na
něj záruka. Čistěte přístroj pouze zevně a jen měkkým, suchým hadříkem nebo kartáčkem.
8. Likvidace a životní prostředí
Symbol na výrobku, příslušenství nebo na obalu označuje výrobek, který nepatří
mezi běžný domácí odpad. Odevzdejte tento přístroj na sběrných místech k
recyklaci vyřazených elektrických a elektronických přístrojů v rámci EU a dalších
evropských zemí, které mají vlastní sběrný systém pro použité elektrické a
elektronické přístroje. Správným způsobem likvidace pomáháte předcházet
možnému nebezpečí pro životní prostředí a pro zdraví spoluobčanů, které by mohlo
vzniknout špatnou manipulací s vyřazeným přístrojem. Recyklace materiálů přispívá k
uchování přírodního bohatství. Nevyhazujte proto vaše staré elektrické a elektronické
přístroje do běžného odpadu.
9. Záruka
Na tento přístroj se vztahuje záruční lhůta 3 roky. Více o záručních podmínkách na: www.
elro.eu.
Kézikönyv C904IP.2
Köszönjük, hogy megvásárolta az C904IP.2 hálózati kamerát. Ahhoz, hogy kameráját a
lehető leggyorsabban és legkönnyebben tudja használni, javasoljuk, hogy használat előtt
gyelmesen olvassa el ezt a használati utasítást.
A jelen Kezelési útmutató ábráit az előző fejezetben találja.
99
Page 100

1. Elővigyázatossági intézkedések és
biztonsági utasítások
1.1. Alkalmazott biztonsági szimbólumok
Figyelmeztetés! A gyelmeztetés arra utal, hogy a felhasználót vagy a terméket
(súlyos) sérülés érheti, ha a felhasználó nem végzi el alaposan az eljárásokat.
Figyelem! A megjegyzés felhívja a felhasználó gyelmét a lehetséges problémákra.
!
Javaslat: A javaslatok kényelmesebb használatra és további lehetőségekre hívják fel a
felhasználó gyelmét.
1.1.1. Értesítések
Figyelmeztetés! Ne szerelje fel a terméket olyan helyre, ahol nagyon meleg vagy hideg
lehet.
Figyelmeztetés! A felszerelés megkezdése előtt ellenőrizze, hogy nincsenek-e
elektromos vezetékek és vízcsövek a falban, ahol fúrni akar.
Figyelmeztetés! Azonnal meg kell szakítani a készülék áramellátását a csatlakozó
kihúzásával a konnektorból, és fel kell venni a kapcsolatot a Smartwares
ügyfélszolgálattal a következő esetekben:
• a termék hardver részei szétnyíltak, átfúródtak, nedvesek vagy leesés által
megsérültek;
• az adapter tápkábele kirojtosodott vagy annyira szétnyílt, hogy a fém kilátszik;
• az adapterház sérült;
• az adapter nedvességgel vagy folyadékkal érintkezett;
• a kamera üvege repedt vagy törött;
Figyelmeztetés! Nem engedélyezett a terméket önállóan felnyit(tat)ni vagy javítani/
javíttatatni. Ebben az esetben ugyanis a garancia érvényét veszti. A javítást végeztesse
arra meghatalmazott karbantartó személyzettel.
Figyelmeztetés! Csak a gyártó eredeti kiegészítőit használja.
Figyelmeztetés! Tartsa a terméket gyermekektől távol.
Figyelmeztetés! Csatlakoztassa le a készüléket az összes feszültségforrásról, mielőtt
megtisztítaná.
Figyelmeztetés! Száraz, tiszta kendő segítségével tisztítsa meg a terméket.
Figyelmeztetés! Ne használjon karcoló anyagokat, maró tisztítószereket, savtartalmú
anyagokat, vagy oldószert a termék tisztításához.
Figyelmeztetés! Húzza ki az adaptert a konnektorból vihar, villámlás közben, és ha a
terméket hosszabb ideig nem használják.
Figyelem! Szerelje fel a terméket a jelen kézikönyvben megadott módon. Kétségek
esetén forduljon szakképzett szerelőhöz, és vegye gyelembe mindig a helyi
felszerelési előírásokat.
Figyelem! Kerülje, hogy közvetlen napfény érje a kamerát.
Figyelem! Ne irányítsa a kamerát bokrokra, ágakra vagy más mozgó tárgyakra.
Figyelem! A terméket tilos a közönséges háztartási hulladékkal kidobni, külön
gyűjtőhelyre kell vinni.
Figyelem! A termék használatának befejeztével tájékozódjon lakóterületén a termék
leadásával kapcsolatos lehetőségekről. Ne dobja ki az elektromos készülékeket (azok
alkatrészeit), nézzen utána, hogy van-e lehetőség a leadásra, újrahasznosításra vagy
újrafelhasználására.
100
 Loading...