


C803IP.2
C803IP.2
GB WIFI NETWORK CAMERA
DE WIFI NETZWERK-KAMERA
PL BEZPRZEWODOWA KAMERA IP
NL WIFI NET WERKCAMERA
FR CAMÉRA EN RÉSEAU WIFI
ES CÁMARA IP WIFI
TR IP AĞI KAMERASI
GR ΔΙΚΤΥΑΚΗ ΚΑΜΕΡΑ
CZ IP SÍŤOVÁ KAMERA
HU IP HÁLÓZATI KAMERA
RO CAMERĂ VIDEO REŢEA IP
HR IP MREŽNA KAMERA
IT TELECAMERA RETE IP

GB C803IP.2 manual 16
DE Bedienungsanleitung C803IP.2 24
PL Instrukcja C803IP.2 33
NL Handleiding C803IP.2 41
FR Manuel C803IP.2 50
ES Manual del usuario C803IP.2 59
TR C803IP.2 kılavuzu 67
GR Εγχειρίδιο της C803IP.2 75
CZ Návod k použití C803IP.2 85
HU Kézikönyv C803IP.2 93
RO Manual de utilizare C803IP.2 101
HR Priručnik C803IP.2 110
IT Manuale C803IP.2 118
2
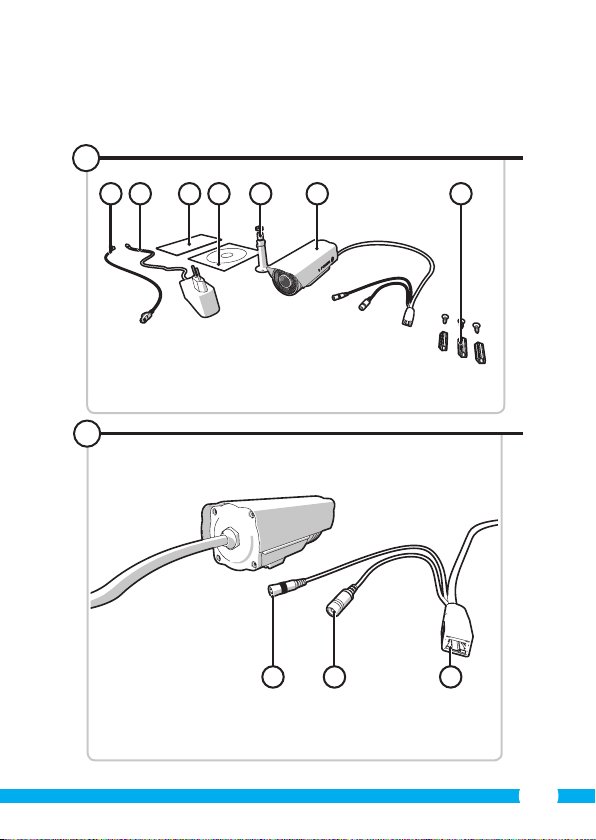
Illustration page
Abbildungsseite
Strona ze strumieniami obrazu
Afbeeldingenpagina
1
2
Page d’illustrations
Página de ilustraciones
Resim sayfası
Σελίδα εικόνων
Strana s nákresem
Oldal ábrákkal
Pagina cu imagini
Stranica sa slikama
Pagina immagini
1234567
23
1
3
3
4
4
5
668
5
7

A
B
7
C9E
1
2
3
4
D
!
8
F
G
H
!
10
I
!
J K
!
!
!
11
L M
N O
2
1
3
4
12
1
2
1 2

P Q
R
1
2
13
S T
1
2
3
U V
1
2
3
1
2
14
W X
1
2
1
2
Y Z
15
C803IP.2 manual
!
!
!
!
!
!
!
!
!
!
!
Thank you for your purchase of the C803IP.2 network camera. We recommend that you
carefully read this manual before use in order to use your camera as quickly and easily as
possible.
You can nd the illustrations from this manual prior to this chapter.
1. Preventive measures and
safety instructions
1.1. Safety symbols used
Warning! A warning indicates the risk of (serious) damage to the user or the product if
the user does not carry out the procedures with care.
Please note! A comment makes the user aware of possible problems.
Tip: A tip makes the user aware of convenient functions and additional options.
1.1.1. Notications
Warning! Do not install the product in any place that might be exposed to extreme
heat or cold.
Warning! Before beginning assembly, check to make sure there are no electrical wires
or water pipes running through the wall where you want to drill.
Warning! By removing the plug from the power outlet, you immediately cut o power
to the product; then contact the Smartwares service desk when:
• the product's hardware components are open, drilled through, damp or have
suered a hard fall;
• the adapter's power cable is frayed or open, so that the metal is showing;
• the adapter housing is damaged;
• the adapter has come in contact with moisture or liquid;
• the glass of the camera is cracked or broken;
Warning! It is not permitted to open the product yourself or to have it opened, neither
is it permitted to repair the product yourself or to have it repaired. This will void
the warranties. Please let any maintenance be carried out by certied maintenance
personnel.
Warning! Only use original accessories from the manufacturer.
Warning! Keep the product out of reach of children.
Warning! Disconnect the device from all power sources before cleaning it.
Warning! Use a clean, dry cloth to clean the product.
16
!
Warning! Do not use any abrasive agents, corrosive cleaning products or any
!
!
!
!
!
!
!
!
substances that contain bleach or solvents to clean the product.
Warning! Remove the adapter from the power outlet during storms, lightning and
whenever the product will not be used for a longer period of time.
Please note! Install the product as indicated in this manual. If in doubt, consult
a recognised technician and always take account of local installation codes and
regulations.
Please note! The camera should be kept out of direct sunlight.
Please note! Do not point the camera at bushes, tree branches or other moving
objects.
Please note! The product must not be discarded as unsorted municipal waste, it must
be disposed of separately.
Please note! Find out about the options in your region for disposing of the product
after use. Do not throw away electrical appliances or components, but see whether the
product (components) can be turned in, recycled or reused.
Please note! Wireless systems can be aected by interference from wireless
telephones, microwave ovens and other wireless devices that operate in the 2.4
GHz range. Keep the product at least 3 metres away from any possible sources of
interference during installation and operation.
Please note! The camera is not able to view through glass at night. Keep this in mind
when positioning it.
2. Intended use
The C803IP.2 is a secur ity camera that makes it possible to view surveillance images via a
local network, an Internet connection or the Elro App "ELRO INSTALL" on your smar tphone.
The C803IP.2 can be connec ted either through an Ethernet cable or a Wi-Fi connection.
The camera is equipped with infrared LEDS and is able to make video and audio recordings
both during the day and at night. The camera has also been tted with motion detection
and can be used both indoors and outdoors.
3. Technical specications
3.1. General product specications
Sensor: 1/4" Colour CMOS Sensor
Resolution: 640 x 480 pixels (300k pixels)
IR Lens: f: 6mm, F 2.0
Viewing angle: 60 degrees
Minimal brightness: 0.5Lux @ F2.0
Night vision range: 20 meters
Video compression: MJPEG
Images per second: 15fps(VGA), 30fps(QVGA)
Power source: 230VAC/5VDC/2A Adapter
Energy consumption: 5W (Max.)
Temperature: -10°C ~ 55°C (14°F~131°F)
Minimal system requirements:
CPU: 2.0 GHZ or higher
Memory: 256 MB or higher
17

Video card: 64 MB or higher
!
!
Supported OS: Windows 98/ME/2000/XP/Vista/7/8
Supported browsers: IE6.0-10.0, Firefox, Safari, Google Chrome
Supported mobile OS: iOS 4.3 and higher / Android 2.1 and higher
Certication: CE, FCC, RoHS, R&TTE
Warranty: Limited 3-year warranty
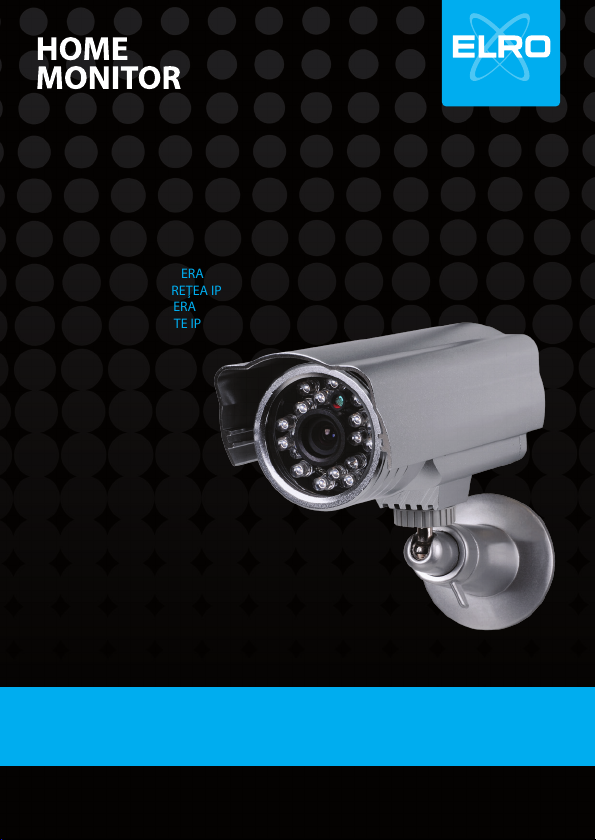
3.2. Main component parts
1. 3 assembly screws and plugs
2. C803IP.2 camera
3. Camera base
4. Software CD-ROM
5. User's manual
6. DC supply
7. Ethernet cable
3.3. Connections
1. Ethernet port
2. DC connection
3. Reset button
2
1
4. Camera installation
4.1. Connecting the camera
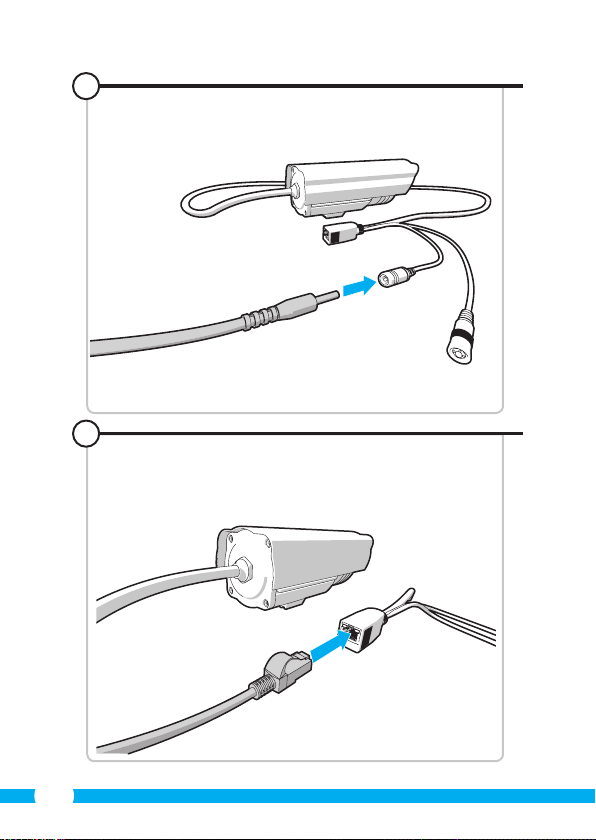
• Connect the adapter cable to the DC connection of the camera 3. Then insert the
adapter plug into the power outlet.
• Connect the included ethernet cable to the network port of the camera 4. Connect
the other end of the ethernet cable to your router. The green LED on the ethernet port
will light up when the camera is connected to the network.
You can now operate your IP Camera using your smartphone or PC. Go to section 4.2 for
use with smartphone and go to section 4.3 for installation on your PC.
4.2. Settings for smartphone use
Attention! To use the “ELRO INSTALL” App, you need a smartphone with internet
access.
Attention! To scan a QR code, you need an APP that can scan barcodes.
To set up your camera using Android, go to section 4.2.1. To set up your camera using iOS,
go to section 4.2.2.
4.2.1. Android
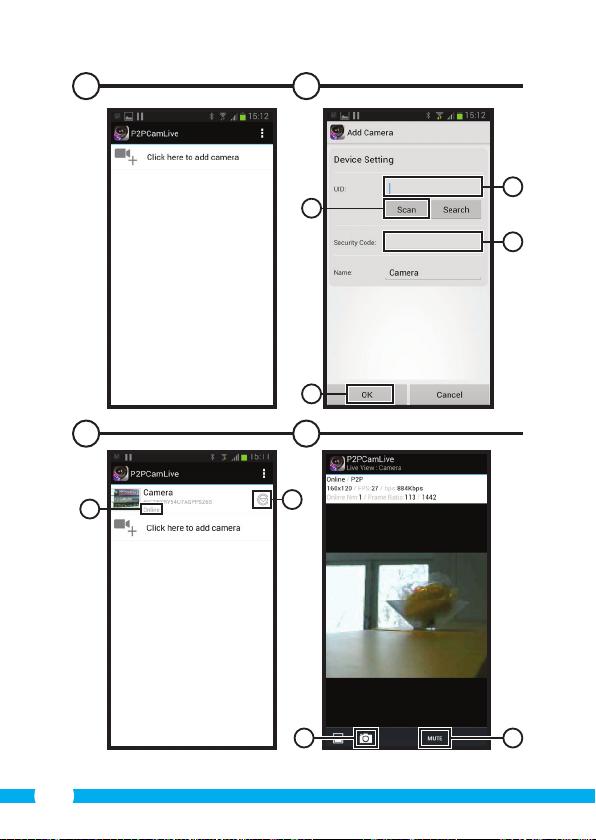
• Download the App: “Elro Install” via Google Play and install it.
• Start the App. The start screen of the app appears.
• Press the “Click here to add camera” option. The “Add camera” menu appears.
• Press the “Scan” button. M1 Next, scan the QR code on the bottom of your camera. You
can also choose to manually enter the code behind “UID”. M2 You can nd this code
under the QR code on your IP camera.
• Next, enter the code: 000000 after “Securit y code”.
L
M3
M
18
• After “Name” enter the name you want to assign to the camera.
!
!
!
• Then press the “OK” button.
Your camera has been added to your phone and will appear on the start screen of
your App. N On this you can see if the camera is connected (ONLINE) N1 or if it is not
connected (OFFLINE).
4.2.2. iOS
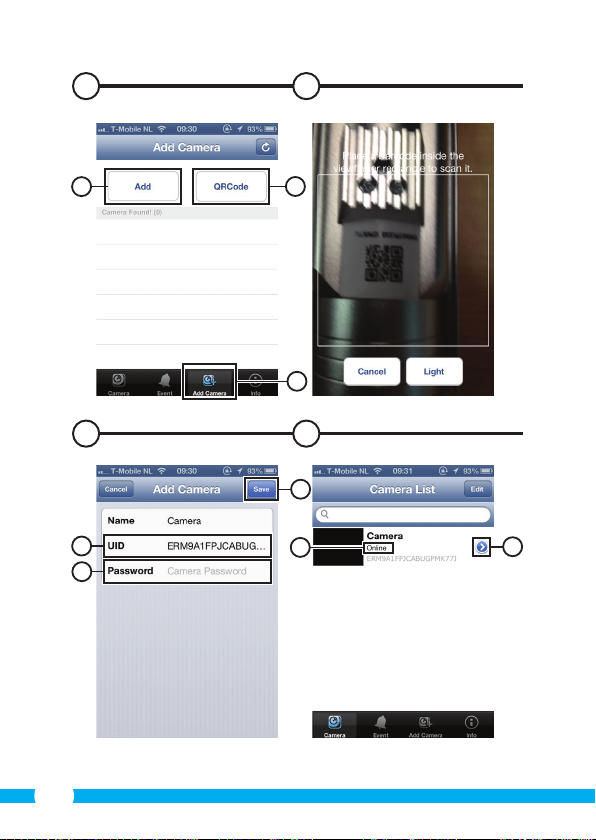
• Download the App “Elro Install” from the App Store and install it.
• Start the App. The start screen of the app appears.
• Press “Add camera”.
• Press the “QR code” button. S2 Next, scan the QR code at the bottom of your camera.
• You can also choose to manually enter the code of your camera. To do this, press the
“Add” button. S1 Next, enter the code of your camera behind “UID”. U2 You can nd this
code under the QR code on your IP camera.
• Next, enter the code behind “Password”: 000000.
• After “Name” enter the name you want to assign to the camera.
• Then press the “Save” button.
Your camera has now been added to your App and will appear on the home screen of
your App. V Here you can see if the camera is connected (Online) V1 or not connected
(Oine).
4.2.3. General
• For instructions on placing your camera go to section 4.6.
• For instructions on using your camera with the App go to chapter 5.
4.3. Install your camera on your PC
• Insert the included CD-ROM into your computer.
• Launch "IPCamSetup.exe" from the CD-ROM.
• Go through the installation by double clicking on "Next".
• Complete the installation by clicking on "Restart computer".
The IP camera tool is now installed on your computer. You will nd the shortcut on your
desktop.
Please note! Do not remove this shortcut! You will have to re-install the IP camera tool
if you do.
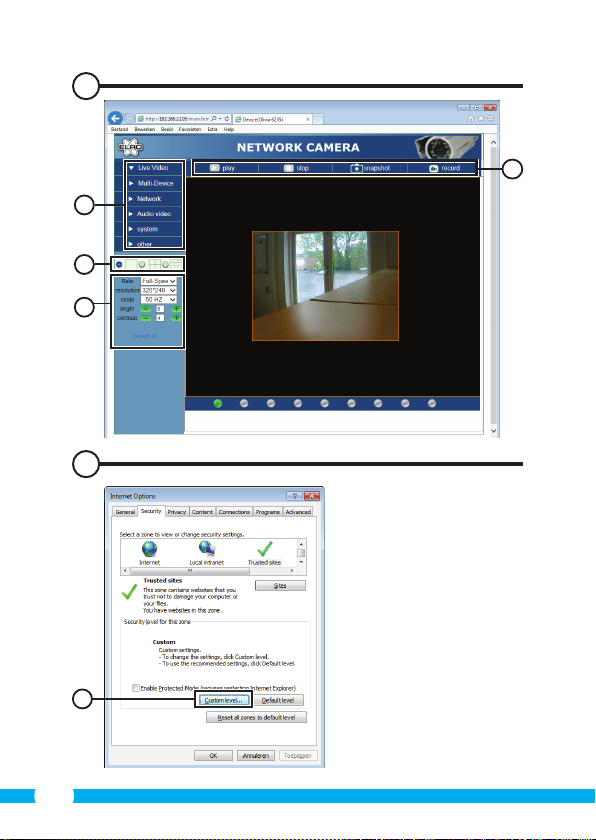
4.4. Linking to your camera
Please note! To be able to use the IP camera's full functionality, you have to use
Internet Explorer 6 or higher (32 bit) and select ActiveX Mode. It is not possible to make
video recordings in other web browsers.
Please note! If you opt for the ActiveX mode there is a possibility that you will not have
any picture yet. If this is the case, perform the following steps:
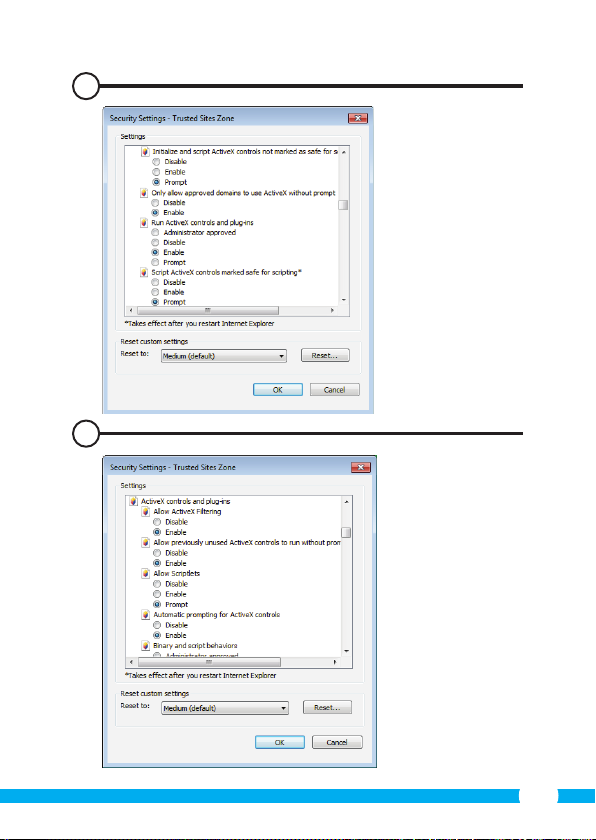
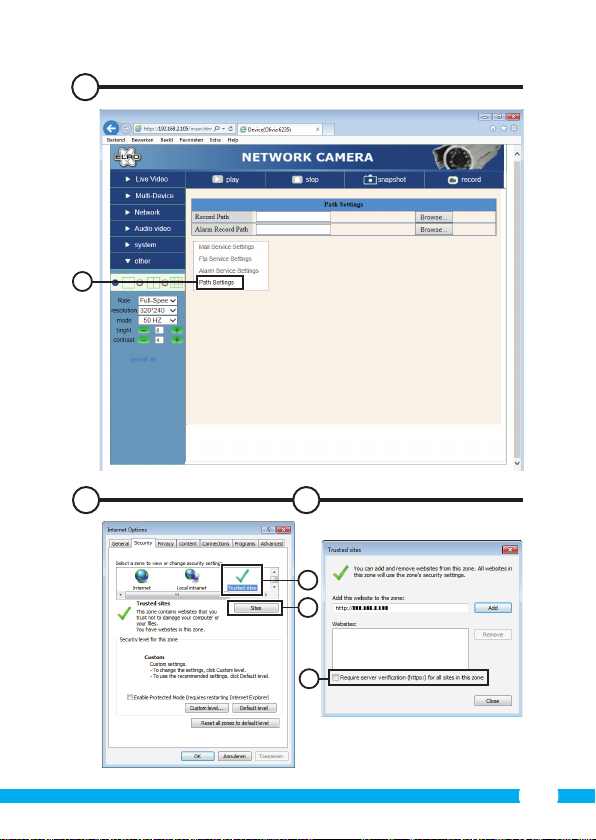
• In Internet Explorer, go to: Tools-> Internet options-> Security settings ->Custom
D
level
• Change the deactivated options to "Questions" under the ActiveX control elements
and insertion applications. If the "Questions" option is not available, tick "Activate".
See also: E F
M4
S3
The “Add camera” menu appears.
U1
G
S
U3
19
!
Tip: if you wish to use a dierent web browser than the standard browser, copy the link
!
!
!
!
from the open browser to a browser of your choice.
• Start the IP Camera Tool via the "IP camera tool" shortcut on your desktop. The IP
camera tool automatically searches for the IP camera(s) connected to your network.
A window opens
connected, the window will remain empty.
• Double click on the camera you want to use. In your standard web browser, an
identication window will open up asking for your user name.
• For the user name, enter "admin" and click on "sign in". You do not need to enter a
password.
A menu will open
ActiveX Mode: Internet Explorer
Server Push Mode: Safari, Firefox and Google Chrome
VLC Mode: Internet Explorer, Safari, Firefox, Google Chrome and
Please note! You have to download the VLC player for VLC Mode.
Sign in mobile phone: Access with a mobile browser
• Click on "Sign In" under the option that applies to your web browser.
You are now logged in to the Network Camera browser screen C. You can manage your
camera and camera settings via this screen. (see chapter 6)
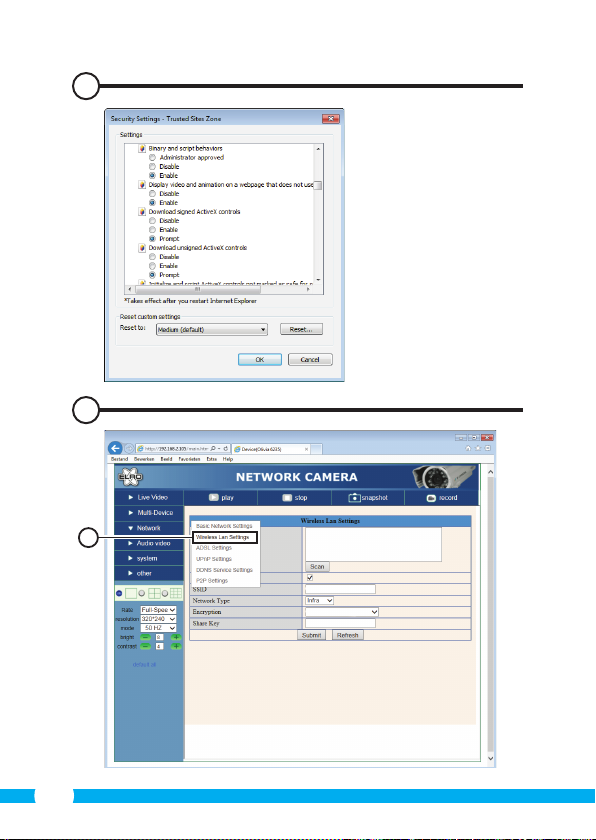
4.5. Linking to your camera wirelessly
Please note! In order to set up a wireless connection, your camera must be linked to
your network via the included ethernet cable during set-up.
Please note! You need a wireless router in order to establish a wireless connection with
your camera.
Please note! If your router is password protected, you will need to know the password.
• In the Network Camera browser screen C click on the "Network" tab. A list of settings
will appear H.
• Select the Wireless Lan Settings: the Wireless Lan Settings screen will appear.
• Double-click on "scan" in the Wireless Lan Settings screen. A list of available wireless
networks will appear.
• Click on your wireless network.
• If you do not require a password for your wireless network, just click on 'submit' after
this.
• If your wireless network does require a password, you will need to enter your password
after "Share Key" or "key1", depending on the encryption.
• Click on 'submit' after this.
The camera restarts automatically when you click 'submit'. This takes approximately 30
seconds.
A
. This window displays all your IP cameras. If no cameras are
B
. You can choose from the following options:
Opera
20

• Close your browser and camera tool after the computer has restarted.
!
!
!
• Remove the network cable from the camera.
• Open the IP camera tool and click on your camera's address. You can now operate your
camera wirelessly.
• If your camera is not in the camera tool window, right click on the tool window, then
press the "refresh camera list" option.
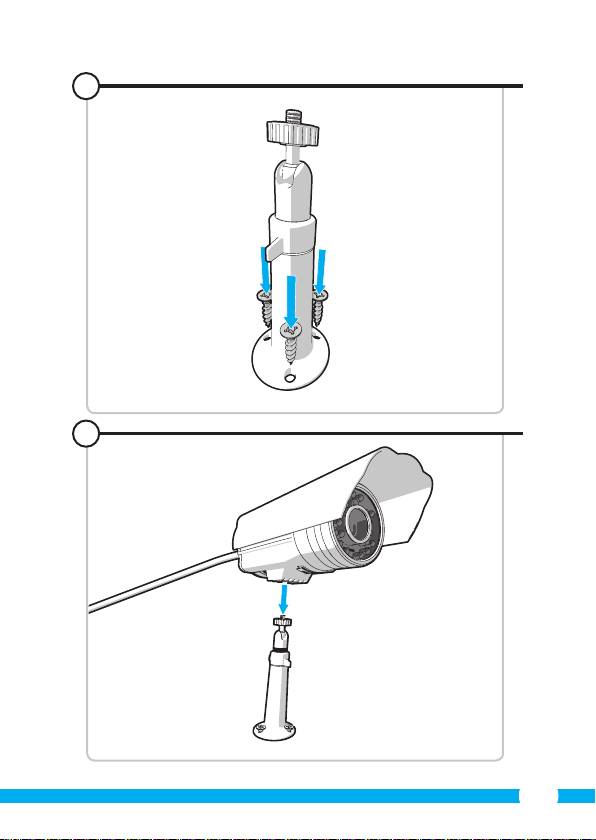
4.6. Camera installation
Please note! Make sure that the camera functions properly in the chosen location
before starting installation.
• Screw in the base of the camera with the aid of the 3 included screws 5.
Please note! If the surface is too hard for the screws (stone/concrete), you will need to
drill holes and use the screw plugs which are included.
• Screw the camera onto the base. 6.
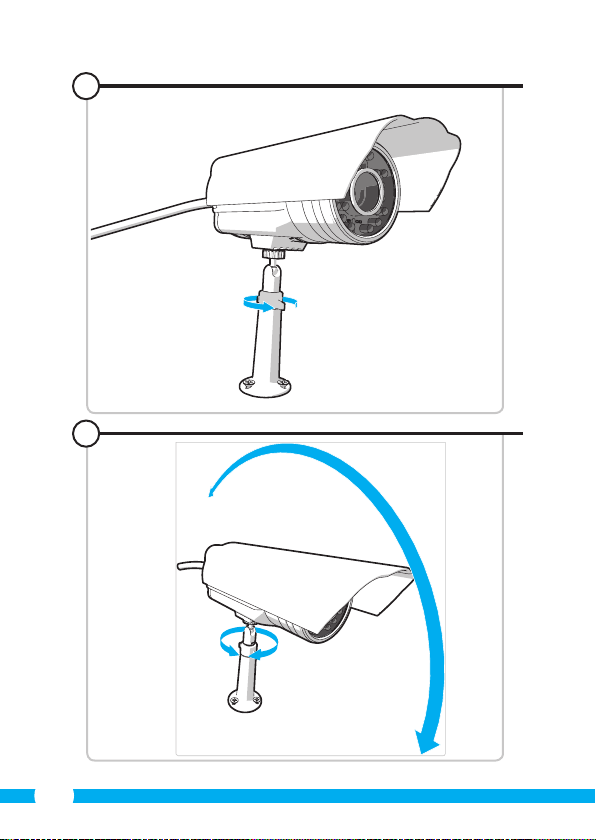
4.7. Adjusting the camera angle
• Untighten the button at the top of the base.
• Then adjust the camera angle and tighten the knob again.
7
8
5. Managing your camera using your
smartphone
Make sure your camera(s) is/are connected to your smartphone via the ELRO INSTALL App
(see section 4.1 and 4.2).
5.1. You can view your camera image on your Android
smartphone
• On the initial screen of the App press the camera you want to manage. N The camera
picture appears on your smartphone.
• Swipe your nger across the screen to zoom in and out and to move the camera image.
Attention! If you do not have a picture it is possible that your wireless connection is
not fast enough. In that case change the resolution of your camera image (see section
5.1.1)
The camera screen provides a number of options:
• Press the “Snapshot” button O1 to make a snapshot of your camera image.
• Press the “mute/listen/speak” button O2 to adjust your sound settings.
5.1.1. Changing the settings of your camera on your Android smartphone
• On the start screen of your App press the arrow button next to the camera you want to
manage. N2 A menu with options opens.
• Press the “Edit camera” button and then the “Advanced settings” button. Q The
“Advanced settings” window opens. R In the “Advanced settings” window you can
change a number of properties of the camera.
The main functions are described below:
Modify security code R1: Adjust the code of your camera. The default code is:
O
P
000000.
21
Video Quality R2: Adjust the resolution of your camera. If you have a slow
!
!
5.2. Viewing your camera image on your iPhone
• On the initial screen of the App press the camera you want to manage. V The camera
picture appears on your smartphone.
• Swipe your nger across the screen to zoom in and out and to move the camera image.
Attention! If you do not have a picture it is possible that your wireless connection is
not fast enough. In that case change the resolution of your camera image (see section
5.2.1)
The camera screen provides a number of options:
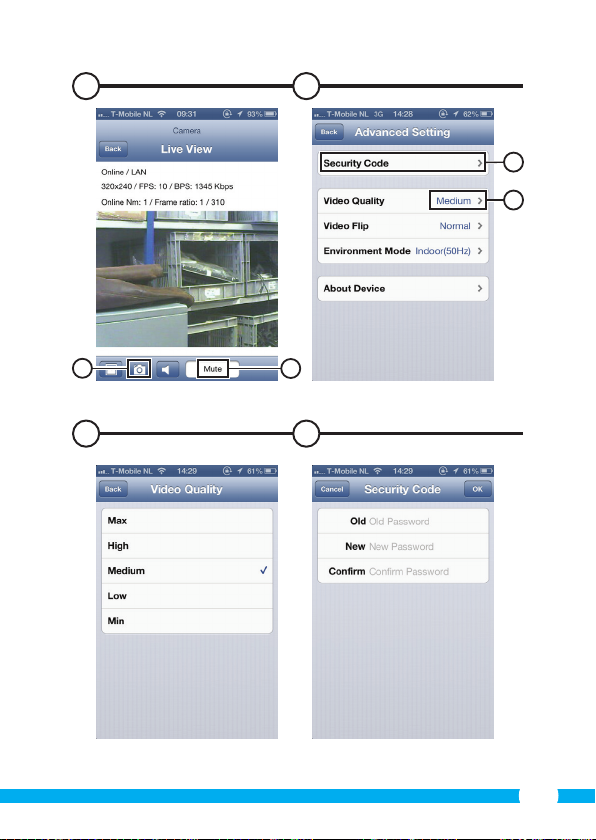
• Press the “Snapshot” button W1 to make a snapshot of your camera image.
• Press the “mute/listen/speak” button W2 to adjust your sound settings.
5.2.1. Changing the settings of your camera on your iPhone
• On the start screen of your App press the arrow button next to the camera you want to
manage. V2 A menu with options opens.
In the “Advanced settings” window you can change a number of properties of the camera.
The main functions are described below:
Security codeX1: Adjust the code of your camera here. The default code is:
Video QualityX2: Adjust the resolution of your camera. If you have a slow
6. Managing your camera using your PC
To be able to manage your camera from your PC, you need to be logged in to the
"Network Camera" browser screen, with the aid of your web browser (see section 4.4). This
screen contains the camera's control panel C1, a number of tabs C2, a channel overview
C3
and a settings menu for the camera C4.
6.1. Camera control panel
You can use the control panel when you have selected the "live video" tab. This control
panel provides the following options:
Play: Press "Play" to view your camera images live.
Stop: Press "Stop" to stop the live streaming of your camera
Record: Press "Record" to make a recording. Press record again to
Please note! To be able to make recordings, you have to indicate where to save the
recordings in the "Other" tab. This is explained in section 6.2.3.
wireless connection, change this setting to a lower
setting.
W
X
000000.
wireless connection, change this setting to a lower
setting.
C1
images.
stop recording.
C
22

6.2. Tabs
!
!
The tabs oer many dierent options for managing your camera(s). This manual covers
the most important functions. If you would like to know more about specic settings, we
advise you to consult the manual on the CD-ROM.
6.2.1. Live video
Click on the live video tab to view images from the set camera.
6.2.2. Network
Wireless Lan settings: This lets you set the wireless access to your camera. You
DDNS Service settings: This lets you make your camera accessible via the
6.2.3. Other
Please note! Before you can save recordings in Windows 7, 8 or Vista, you need to
make the following security setting changes in Internet Explorer. While changing these
settings, make sure that the Network Camera screen is open in Internet Explorer.
• Go to: Tools -> Internet Options -> Security-> Trusted Sites J -> Sites
• On the screen, turn o the Server Verication option (https:). Then click "Add".
• Restart Internet Explorer.
Path settings: Under the "Path settings" option, select where you want
6.3. The camera's channel overview
With the channel overview you have the option to view images from multiple connected
cameras simultaneously.
6.4. Camera menu settings
You can adjust the camera's image settings using this menu: resolution, image speed,
clarity and contrast.
7. Cleaning and maintenance
Warning! Disconnect the device from all power sources before cleaning it.
The devices are maintenance-free, so do not open them. Opening the device will void the
warranty. Only clean the outside of the devices with a soft, dry cloth or brush
8. Environment and disposal
C2
can nd more information in section 4.5
Internet. Consult the manual on the CD-ROM for more
information about this.
to save the recordings that your camera makes I.
C3
C4
The symbol on the material, accessories or packaging indicates that this
product may not be discarded as household waste. Dispose of the equipment
through a recycling centre that handles electronics and electrical appliances
within the EU and in other European countries which use separate collection
systems for used electronics and electrical appliances. By disposing of the
equipment in the proper way, you will be helping to prevent possible risks to
H
.
K
23
the environment and public health, which might otherwise be caused by improper
!
!
!
!
!
!
handling of the discarded equipment. Recycling of materials contributes to the
conservation of natural resources. Therefore, please do not dispose of your old electronics
and electrical appliances via household waste.
9. Warranty
A limited 3 year warranty applies to this device. To view the warranty terms please go to:
www.elro.eu.
Bedienungsanleitung C803IP.2
Vielen Dank für den Kauf Ihrer C803IP.2 Netzwerkkamera. Damit Sie Ihre Kamera so
schnell und einfach wie möglich in Betrieb nehmen können, empfehlen wir Ihnen, diese
Bedienungsanleitung vor Gebrauch aufmerksam durchzulesen.
Die Abbildungen zu dieser Bedienungsanleitung nden Sie vor diesem Kapitel.
1. Vorsorgemaßnahmen und
Sicherheitsanweisungen
1.1. Verwendete Sicherheitssymbole
Warnung! Eine Warnung weist auf das Risiko von (ernsthaftem) Schaden für den
Benutzer bzw. am Produkt bei unsorgfältiger Beachtung der beschriebenen Verfahren
hin.
Achtung! Eine Anmerkung weist den Benutzer auf mögliche Probleme hin.
Tipp: Ein Tipp macht den Benutzer auf praktische Funktionen und zusätzliche
Möglichkeiten aufmerksam.
1.1.1. Benachrichtigungen
Warnung! Montieren Sie das Produkt nicht an Stellen, an denen es sehr warm oder
sehr kalt werden kann.
Warnung! Kontrollieren Sie vor Beginn der Montage, ob keine Stromkabel oder
Wasserrohre durch die Wand verlaufen, die Sie anbohren möchten.
Warnung! Trennen Sie das Gerät unverzüglich von der Stromversorgung, indem Sie
den Netzstecker ziehen, und wenden Sie sich an den Smartwares-Servicedesk, wenn:
• Hardware-Teile des Produktes oen liegen, durchbohrt sind, feucht sind oder zu
hart gefallen sind;
24
• die Stromversorgungskabel des Netzteils beschädigt ist und das Metall sichtbar ist
!
!
!
!
!
!
!
!
!
!
!
!
!
!
• das Gehäuse des Netzteils beschädigt ist
• das Netzteil mit Feuchtigkeit oder Flüssigkeiten in Berührung gekommen ist
• das Glas der Kamera geborsten oder gebrochen ist
Warnung! Es ist nicht zulässig, selbst das Produkt zu önen oder zu reparieren (bzw.
önen oder reparieren zu lassen). In diesem Fall werden sämtliche Garantien hinfällig.
Überlassen Sie die Wartung zertiziertem Wartungspersonal.
Warnung! Verwenden Sie ausschließlich Originalzubehör des Herstellers.
Warnung! Halten Sie das Produkt außer Reichweite von Kindern.
Warnung! Trennen Sie das Gerät vor einer Reinigung von sämtlichen
Spannungsquellen.
Warnung! Verwenden Sie ein trockenes, sauberes Tuch, um das Produkt zu reinigen.
Warnung! Verwenden Sie keine Scheuermittel, aggressiven Reinigungsmittel oder
lösungsmittelhaltige Reinigungsprodukte zur Reinigung des Produktes..
Warnung! Entfernen Sie bei Sturm, Blitzschlag oder bei längerer Nichtbenutzung des
Produktes den Stecker aus der Steckdose.
Achtung! Montieren Sie das Produkt gemäß den Beschreibungen in dieser
Bedienungsanleitung. Bitte wenden Sie sich in Zweifelsfällen an einen anerkannten
Monteur und beachten Sie in jedem Fall die örtlich geltenden Montagevorschriften.
Achtung! Vermeiden Sie direktes Sonnenlicht auf der Kamera.
Achtung! Richten Sie die Kamera nicht auf Büsche, Zweige oder andere bewegliche
Gegenstände.
Achtung! Das Produkt darf nicht als unsortierter Hausmüll entsorgt werden, sondern
muss getrennt eingesammelt werden.
Achtung! Erkundigen Sie sich nach den innerhalb Ihrer Region bestehenden
Möglichkeiten, das Produkt nach Ausmusterung dem Recycling zuzuführen. Werfen Sie
elektrische Geräte und Komponenten nicht weg, sondern prüfen Sie, ob das Produkt
(oder Teile davon) abgegeben, recycelt oder wiederverwertet werden können.
Achtung! Drahtlose Systeme können gestört werden durch schnurlose Telefone,
Mikrowellengeräte und andere drahtlose Geräte, die im Frequenzbereich von 2,4
GHz arbeiten. Halten Sie das Produkt während der Installation und der Bedienung
mindestens 3 Meter von möglichen Störquellen entfernt.
Achtung! Die Kamera kann nachts nicht durch Glas hindurch schauen. Bitte beachten
Sie dies bei der Aufstellung.
2. Bestimmungsgemäßer Gebrauch
Die C803IP.2 ist eine Überwachungskamera, die es ermöglicht, die aufgenommenen Bilder
über ein lokales Netzwerk, eine Internetverbindung oder über die Elro App "ELRO INSTALL"
auf Ihrem Smartphone zu betrachten. Die C803IP.2 kann sowohl per Ethernetkabel als
auch per WLAN vernetzt werden.
Die Kamera ist mit Infrarot-LEDs ausgerüstet und kann sowohl tagsüber als auch
nachts Video- und Audio-Aufnahmen machen. Die Kamera ist zudem mit einem
Bewegungsdetektor ausgestattet und kann sowohl drinnen als auch draußen aufgestellt
werden.
25

3. Technische Daten
3.1. Allgemeine Produktspezikation
Sensor: 1/4" Color CMOS Sensor
Auösung: 640 x 480 Pixel (300.000 Pixel)
IR-Linse: f: 6mm, F 2.0
Sichtwinkel: 60 Grad
Minimale Lichtstärke: 0.5Lux @ F2.0
Nachtsicht-Reichweite: 20 Meter
Videokompression: MJPEG
Bilder pro Sekunde: 15fps( VGA), 30fps(QVGA)
Spannungsquelle: 230VAC/5VDC./2A-Netzteil
Energieverbrauch: 5W (max.)
Temperatur: -10°C ~ 55°C (14°F~131°F)
Mindestsystemanforderungen:
CPU: 2.0 GHZ oder höher
Speicher: 256 MB oder höher
Videokarte: 64 MB oder höher
Unterstützte Betriebssysteme: Windows 98/ME/2000/XP/Vista/7/8
Unterstützte Browser: IE6.0-10.0, Firefox, Safari, Google Chrome
Unterstützendes mobiles BS: iOS 4.3 und höher / Android 2.1 und höher
Zertizierung: CE, FCC, RoHS, R&TTE
Garantie: Beschränkte 3-jährige Garantie
3.2. Hauptbestandteile
1. 3 Montageschrauben und Dübel
2. C803IP.2 Kamera
3. Kamerafuß
4. Software auf CD-ROM
5. Bedienungsanleitung
6. Netzteil
7. Ethernet-Kabel
3.3. Anschlüsse
1. Ethernet-Port
2. Netzteilanschluss
3. Reset-Taste
2
1
4. Installation der Kamera
4.1. Anschluss der Kamera
• Schließen Sie das Netzteilkabel an den Netzteilanschluss der Kamera 3 an. Verbinden
Sie daraufhin den Stecker des Netzteils mit einer Steckdose.
• Schließen Sie das mitgelieferte Ethernet-Kabel an den Netzwerk-Port der Kamera 4
an. Verbinden Sie das andere Ende des Ethernet-Kabels mit Ihrem Router. Wenn die
26
Kamera mit dem Netzwerk verbunden ist, leuchtet die grüne LED des Ethernet-Ports
!
!
auf.
Sie können Ihre IP-Kamera mit Ihrem Smartphone oder mit Ihrem PC bedienen. Gehen
Sie zu Abschnitt 4.2 zur Verwendung über Ihr Smartphone und zu Abschnitt 4.3 für die
Installation auf Ihrem PC.
4.2. Einstellen für Smartphone-Nutzung
Achtung! Um die “ELRO INSTALL”-App zu nutzen, benötigen Sie ein Smartphone mit
Internetzugang.
Achtung! Für das Scannen eines QR-Codes benötigen Sie eine App, die Barcodes
scannen kann.
Anweisungen für die Einstellung Ihrer Kamera über Android nden Sie in Abschnitt 4.2.1.
Anweisungen für die Einstellung Ihrer Kamera über iOS nden Sie in Abschnitt 4.2.2.
4.2.1. Android
• Laden Sie sich die App “Elro Install” über Google Play herunter und installieren Sie
diese.
• Starten Sie die App. Die Startseite der App erscheint.
• Drücken Sie auf die Option “Click here to add camera”. Das Menü “Add camera”
• Drücken Sie die Schaltäche “Scan”. M1 Dann scannen Sie den QR-Code auf der
• Geben Sie dann nach “Secur ity code” den Code 000000 ein.
• Geben Sie dann nach “Name” den Namen ein, den Sie der Kamera geben.
• Drücken Sie danach auf die Taste “OK”.
Ihre Kamera ist nun Ihrem Telefon hinzugefügt worden und die Startseite der App sollte
erscheinen. N Dadurch können Sie sehen, ob die Kamera verbunden ist (ONLINE) N1 oder
ob sie nicht verbunden ist (OFFLINE).
4.2.2. iOS
• Laden Sie sich die App “Elro Install” über den App Store herunter und installieren Sie
• Starten Sie die App. Die Startseite der App erscheint.
• Drücken Sie auf “Add camera”. S3 Das “Add camera”-Menü erscheint.
• Drücken Sie auf die Taste “QR code”. S2 Scannen Sie anschließend den QR-Code an der
• Sie können den Code Ihrer Kamera auch manuell eingeben. Drücken Sie dazu die
• Geben Sie anschließend hinter “Password” den Code 000000 ein.
• Geben Sie dann nach “Name” den Namen ein, den Sie der Kamera geben.
• Drücken Sie danach auf die Taste “S ave”.
Ihre Kamera wurde Ihrer App nun hinzugefügt und wird auf der Anfangsseite Ihrer App
erscheinen. V Sie können darauf erkennen, ob die Kamera verbunden (Online) V1 oder
nicht verbunden (Oine) ist.
M
erscheint.
Unterseite der Kamera. Sie können auch wahlweise den Code nach “UID” manuell
eingeben. M2 Sie nden diesen Code unter dem QR-Code auf Ihrer IP-Kamera.
M4
diese.
Unterseite Ihrer Kamera.
Taste “Add”. S1 Geben Sie anschließend den Code Ihrer Kamera hinter “UID” ein. U2 Sie
nden diesen Code unter dem QR-Code auf Ihrer IP-Kamera.
U1
L
M3
S
U3
27
4.2.3. Allgemeines
!
!
!
!
• Für Anleitungen zum Aufstellen Ihrer Kamera gehen Sie zu Abschnitt 4.6.
• Für Anleitungen zum Gebrauch Ihrer Kamera mit der App gehen Sie zu Kapitel 5.
4.3. Ihre Kamera auf Ihrem PC installieren
• Legen Sie die mitgelieferte CD-ROM in Ihren Computer ein.
• Starten Sie die Datei "IPCamSetup.exe" auf der CD-ROM.
• Durchlaufen Sie das Installationsverfahren, indem Sie zwei Mal auf "Weiter" klicken.
• Zum Abschluss der Installation klicken Sie auf "Computer neu starten".
Die IP-Kamera-Software ist nun auf Ihrem Rechner installiert. Sie nden die Verknüpfung
auf Ihrem Desktop.
Achtung! Entfernen Sie diese Verknüpfung nicht! Sollte dies dennoch notwendig sein,
müssen Sie die IP-Kamera-Software neu installieren.
4.4. Verbindung herstellen mit Ihrer Kamera
Achtung! Um den vollen Funktionsumfang der IP-Kamera nutzen zu können,
benötigen Sie Internet Explorer 6 oder höher (32 bit) im ActiveX-Modus. Es ist nicht
möglich, Bildaufnahmen in anderen Webbrowsern zu machen.
Achtung! Wenn Sie den ActiveX-Modus wählen, ist es möglich, dass Sie noch kein Bild
sehen. Gehen Sie in diesem Fall wie folgt vor:
• Klicken Sie im Internet Explorer auf Extras -> Internetoptionen -> Sicherheit ->Stufe
• Ändern Sie unter ActiveX-Steuerelemente und Eingabeanwendungen die
Tipp: Wenn Sie einen anderen Webbrowser als Ihren Standard-Browser verwenden
möchten, kopieren Sie den Link aus dem oben angegebenen Browser in die Adresszeile
des Browsers Ihrer Wahl.
• Starten Sie die IP-Kamera-Software über die Verknüpfung "IP Camera Tool" auf Ihrem
Desktop. Die IP-Kamera-Software sucht automatisch nach sämtlichen IP-Kameras, die
an das Netzwerk angeschlossen sind.
Ein Fenster önet sich A. In diesem Fenster werden all Ihre IP-Kameras angezeigt. Wenn
keine Kameras angeschlossen sind, bleibt das Fenster leer.
• Doppelklicken Sie auf die Kamera, die Sie verwenden möchten. In Ihrem StandardWebbrowser önet sich nun ein Identikationsfenster, in dem Ihr Benutzername
verlangt wird.
• Geben Sie als Benutzernamen "admin" ein und klicken Sie auf "Anmelden". Sie
brauchen kein Kennwort einzugeben.
Ein Auswahlmenü önet sich B. Sie haben die Wahl zwischen folgenden Optionen:
ActiveX-Modus: Internet Explorer
Server Push Mode: Safari, Firefox und Google Chrome
VLC Modus: Internet Explorer, Safari, Firefox, Google Chrome und
D
anpassen
deaktivierten Optionen zu "Fragen". Wenn die Option "Fragen" nicht verfügbar ist,
kreuzen Sie "Aktivieren" an. Siehe auch: E F
Opera
G
28
!
Achtung! Zur Nutzung des VLC-Modus müssen Sie den VLC Player herunterladen.
!
!
!
!
Anmeldung per Mobiltelefon: Zugang mit einem mobilen Browser
• Klicken Sie auf "Sign in" unter der Option, die Ihrem Webbrowser entspricht.
Sie sind im Moment im Network Camera-Browserfenster angemeldet C. Über dieses
Fenster können Sie Ihre Kamera und die dazugehörigen Kameraeinstellungen verwalten.
(siehe Kapitel 6)
4.5. Eine drahtlose Verbindung mit Ihrer Kamera
herstellen
Achtung! Um eine drahtlose Verbindung herzustellen, muss Ihre Kamera während der
Einstellung über das mitgelieferte Ethernet -Kabel mit Ihrem Netzwerk verbunden sein.
Achtung! Um eine drahtlose Verbindung mit Ihrer Kamera herzustellen, benötigen Sie
einen WLAN-Router.
Achtung! Wenn Ihr Router mit einem Kennwort gesichert ist, müssen Sie dieses
Kennwort kennen.
• Klicken Sie im Browserfenster Network Camera C die Registerkarte "Network" an. Eine
Liste mit Einstellungen (Settings) erscheint H.
• Geben Sie die WLAN-Einstellungen ein: Das Fenster für die WLAN-Einstellungen
(Wireless Lan Settings) erscheint.
• Klicken Sie im Fenster 'Wireless LAN Settings' zwei Mal auf "Scan". Eine Liste mit
verfügbaren drahtlosen Netzwerken wird erscheinen.
• Klicken Sie auf Ihr drahtloses Netzwerk.
• Wenn Sie Ihr WLAN nicht mit einem Kennwort gesichert haben, klicken Sie
anschließend auf 'Submit'.
• Ist Ihr WLAN kennwortgesichert, müssen Sie Ihr Kennwort unter "Share Key" oder "Key
1" (je nach Verschlüsselung) eingeben.
• Klicken Sie anschließend auf 'Submit'.
Die Kamera startet sich selbst neu, wenn Sie auf "Submit" geklickt haben. Dies dauert
ungefähr 30 Sekunden.
• Schließt Ihren Browser und die Kamerasoftware, nachdem die Kamera neu gestartet
wurde.
• Trennen Sie das Netzwerkkabel von der Kamera.
• Önen Sie die IP-Kamerasoftware und klicken Sie die Adresse Ihrer Kamera an. Sie
können Ihre Kamera nun drahtlos bedienen.
• Wenn Ihre Kamera nicht im Fenster der Kamerasoftware aufgeführt ist, klicken Sie mit
der rechten Maustaste in das Fenster der Kamerasoftware. Daraufhin erscheint die
Option "Refresh Camera List".
4.6. Montage der Kamera
Achtung! Achten Sie darauf, dass die Kamera am gewählten Standort ordnungsgemäß
funktioniert, bevor Sie mit der Montage beginnen.
• Schrauben Sie den Standfuß der Kamera mit Hilfe der 3 mitgelieferten Schrauben 5
fest.
29

!
Achtung! Wenn der Unterboden zu hart ist, um darauf etwas festzuschrauben (Stein-/
!
Porenbeton), müssen Sie Löcher vorbohren und die mitgelieferten Dübel verwenden.
• Drehen Sie die Kamera fest auf den Fuß.
4.7. Winkel der Kamera anpassen
• Drehen Sie den Knopf an der Oberseite des Fußes auf.
• Stellen Sie daraufhin den Kamerawinkel ein und ziehen Sie den Knopf wieder fest 8.
6
.
7
5. Ihre Kamera über Ihr Smartphone
verwalten
Stellen Sie sicher, dass Ihre Kamera(s) über die ELRO INSTALL-App mit Ihrem Smartphone
verbunden ist (sind) (siehe Abschnitt 4.1 und 4.2).
5.1. Auf Ihrem Android-Smartphone Ihr Kamerabild
ansehen
• Drücken Sie auf der Startseite der App auf die Kamera, die Sie verwalten wollen. N Das
Kamerabild erscheint auf Ihrem Smartphone.
• Streichen Sie mit Ihrem Finger über den Bildschirm, um hinein- oder herauszuzoomen
und um Ihr Kamerabild zu verschieben.
Achtung! Wenn Sie kein Bild sehen, kann es sein, dass Ihre Funkverbindung nicht
schnell genug ist. Verändern Sie in diesem Fall die Auösung des Kamerabilds (siehe
Abschnitt 5.1.1)
Das Kameradisplay weist eine Reihe von Optionen auf:
• Drücken Sie auf die Schaltäche “Snapshot ” O1, um eine Momentaufnahme von Ihrem
Kamerabild zu machen.
• Drücken Sie auf die Schaltäche “mute/listen/speak” O2, um Ihre Klangeinstellungen
einzustellen.
5.1.1. Einstellungen Ihrer Kamera auf Ihrem Android-Smartphone ändern
• Drücken Sie auf der Startseite Ihrer App auf die Pfeiltasten neben der Kamera, die Sie
verwalten wollen. N2 Ein Menü mit Optionen önet sich.
• Drücken Sie auf die Schaltäche “Edit camera” und danach auf die Schaltäche
“Advanced settings”. Q Der Schirm “Advanced settings” önet sich. R Auf dem
“Advanced settings”-Schirm können Sie einige Eigenschaften der Kamera anpassen.
Die wichtigsten Funktionen werden untenstehend beschrieben:
Modify security code R1: Passen Sie hier den Code Ihrer Kamera an. Der
Video Quality R2: Passen Sie die Auösung an Ihre Kamera an. Wenn Sie
5.2. Auf Ihrem iPhone Ihr Kamerabild ansehen
• Drücken Sie auf der Startseite der App auf die Kamera, die Sie verwalten wollen. V Das
Kamerabild erscheint auf Ihrem Smartphone.
• Streichen Sie mit Ihrem Finger über den Bildschirm, um hinein- oder herauszuzoomen
und um Ihr Kamerabild zu verschieben.
voreingestellte Code ist: 000000.
eine langsame Funkverbindung haben, müssen Sie die
Auösung herabsetzen.
O
P
W
30
 Loading...