

Page 1
C706IP
GB WIFI NETWORK CAMERA
DE WIFI NETZWERK-KAMERA
PL BEZPRZEWODOWA KAMERA IP
NL WIFI NET WERKCAMERA
FR CAMÉRA EN RÉSEAU WIFI
ES CÁMARA IP WIFI
TR IP AĞI KAMERASI
GR ΔΙΚΤΥΑΚΗ ΚΑΜΕΡΑ
CZ IP SÍŤOVÁ KAMERA
HU IP HÁLÓZATI KAMERA
RO CAMERĂ VIDEO REŢEA IP
HR IP MREŽNA KAMERA
IT TELECAMERA RETE IP
Page 2

GB
D E
PL
NL
FR
ES
TR
GR
CZ
HU
RO
HR
IT
Manual C706IP 10
Gebrauchsanweisung C706IP 17
Instrukcja obsługi C706IP 26
Handleiding C706IP 33
Guide d'utilisation C706IP 41
Manual C706IP 50
kılavuzu C706IP 58
Εγχειρίδιο C706IP 65
Návod k obsluze C706IP 74
Kézikönyv C706IP 82
Manual de utilizare C706IP 90
Priručnik C706IP 98
Manuale C706IP 105
2
Page 3
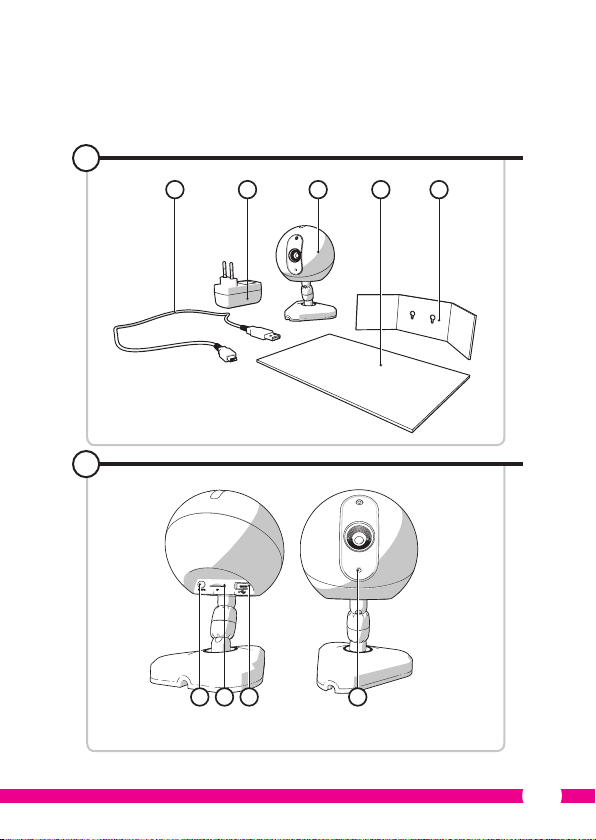
Illustration page
Abbildungsseite
Strona ze strumieniami obrazu
Afbeeldingenpagina
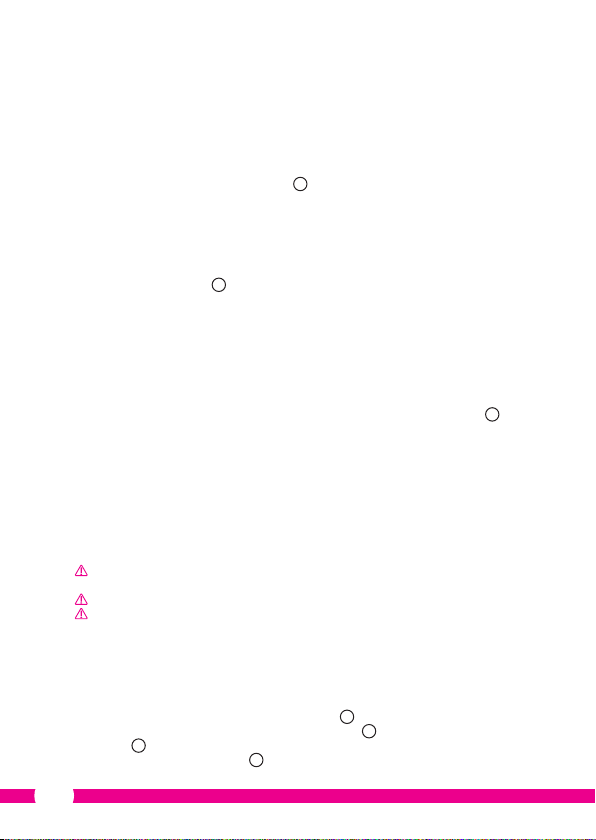
1
1 2 3 4 5
2
Page d’illustrations
Página de ilustraciones
Resim sayfası
Σελίδα εικόνων
Strana s nákresem
Oldal ábrákkal
Pagina cu imagini
Stranica sa slikama
Pagina immagini
4321
3
Page 4
355
4
4
Page 5
Page 6
A B
11
12
C D
11
6
Page 7
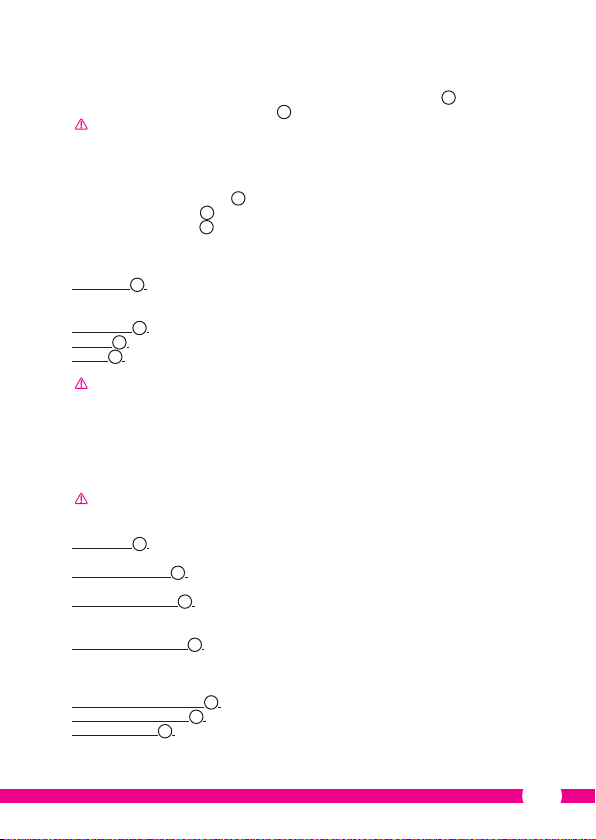
E F
G H
11
12
4
3
765
7
Page 8
I J
1
2
3
4
5
6
7
8
K L
1
2
3
1
4
5
6
7
1
2
1
2
3
8
Page 9

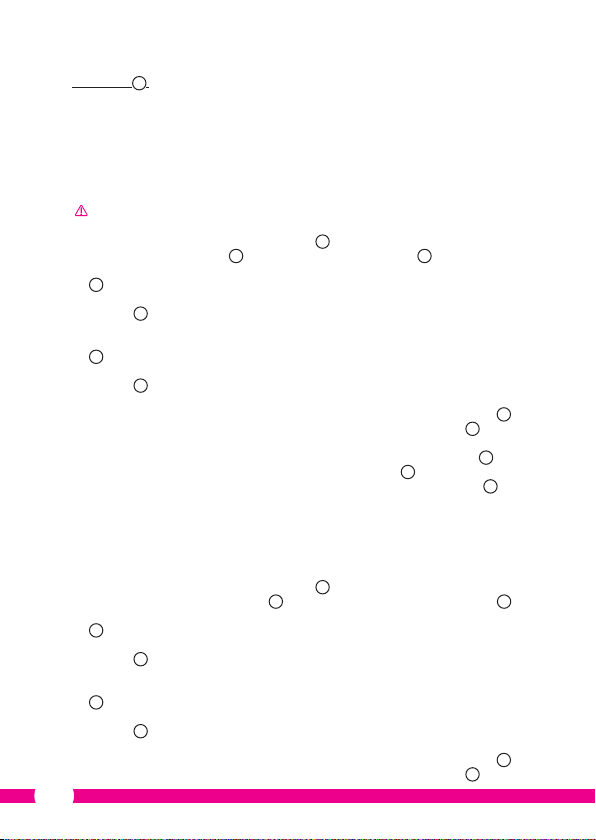
M
1
2
3
1
4
5
6
7
9
Page 10
Manual C706IP
Thank you for your purchase of the C706IP network camera. We recommend that you
carefully read this manual before use in order to use your camera as quickly and easily as
possible.
You can nd the illustrations from this manual prior to this chapter.
1. Preventive measures and safety
instructions
1.1. Safety symbols used
Warning! A warning indicates the risk of (serious) damage to the user or the product if
the user does not carry out the procedures with care.
Please note! A comment makes the user aware of possible problems.
!
Tip: A tip makes the user aware of convenient functions and additional options.
1.1.1. Notications
Warning! Do not install the product outdoors or in any place where it might become
wet.
Warning! Do not install the product in any place that might be exposed to extreme
heat or cold.
Warning! Before beginning assembly, check to make sure there are no electrical wires
or water pipes running through the wall where you want to drill.
Warning! By removing the plug from the power outlet, you immediately cut o power
to the product; then contact the Smartwares service desk when:
• the product's hardware components are open, drilled through, damp or have suered
a hard fall;
• the adapter's power cable is frayed or open, so that the metal is showing;
• the adapter housing is damaged;
• the adapter has come in contact with moisture or liquid;
• the glass of the camera is cracked or broken;
Warning! It is not permitted to open the product yourself or to have it opened, neither
is it permitted to repair the product yourself or to have it repaired. This will void
the warranties. Please let any maintenance be carried out by certied maintenance
personnel.
Warning! Only use original accessories from the manufacturer.
Warning! Keep the product out of reach of children.
10
Page 11

Warning! Disconnect the device from all power sources before cleaning it.
Warning! Use a clean, dry cloth to clean the product.
Warning! Do not use any abrasive agents, corrosive cleaning products or any
substances that contain bleach or solvents to clean the product.
Warning! Remove the adapter from the power outlet during storms, lightning and
whenever the product will not be used for a longer period of time.
Please note! Install the product as indicated in this manual. If in doubt, consult
a recognised technician and always take account of local installation codes and
regulations.
Please note! The camera should be kept out of direct sunlight.
Please note! Do not point the camera at bushes, tree branches or other moving
objects.
Please note! The product must not be discarded as unsorted municipal waste, it must
be disposed of separately.
Please note! Find out about the options in your region for disposing of the product
after use. Do not throw away electrical appliances or components, but see whether the
product (components) can be turned in, recycled or reused.
Please note! Wireless systems can be aected by interference from wireless
telephones, microwave ovens and other wireless devices that operate in the 2.4
GHz range. Keep the product at least 3 metres away from any possible sources of
interference during installation and operation.
Please note! The camera is not able to view through glass at night. Keep this in mind
when positioning it.
2. Intended use
The C706IP is a security camera that allows you to view surveillance video on your
smartphone using the "uCare Cam" app. For this, the C706IP needs to be connected to a
WIFI network.
The camera can make audio and video recordings during the day. Furthermore, the
camera is tted with motion detection and sound detection.
Caution! The manual is based on use of the camera with an Android phone. The main
steps are described separately for the iPhone. The other operations are similar to the
Android App.
3. Technical specications
3.1. General product specications
Sensor: 1/6" Colour CMOS Sensor
Resolution: 640 x 480 pixels (300k pixels)
IR Lens: f: 3.0mm
Viewing angle: 55 degrees
Video compression: MJPEG
Images per second: 1 ~ 25fps(QVGA)
Power source: 230VAC/5VDC/1A Adapter
Energy consumption: 5W (Max.)
Temperature: 0°C ~ 55°C (32°F~131°F)
11
Page 12
Minimal system requirements:
Memory card: Supports microSD card up to 32 GB
Supported mobile OS: iOS 5.0 and higher / Android 4.0 and higher
Certication: CE, FCC, RoHS, R&TTE
Warranty: Limited 3-year warranty
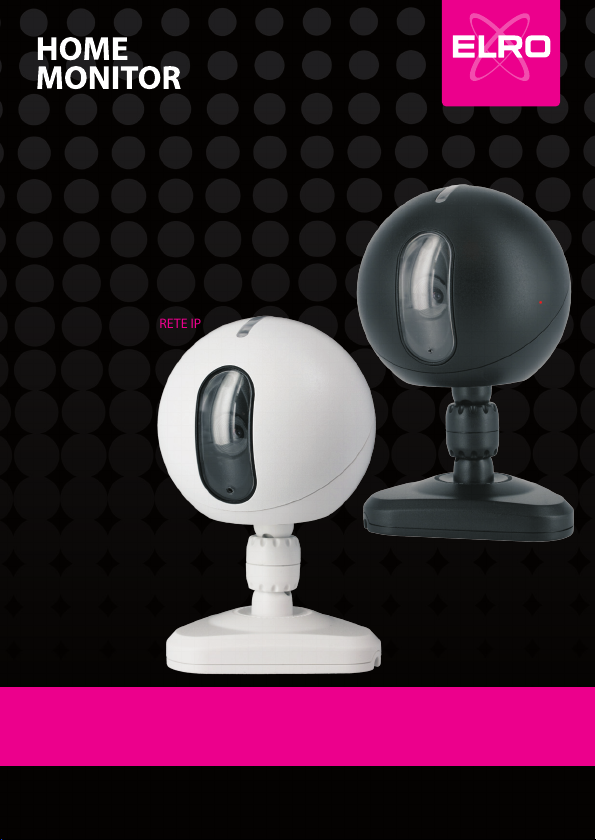
3.2. Main component parts
1. USB cable
2. Adapter
3. C706IPcamera with base
4. User's manual
5. Cardboard template
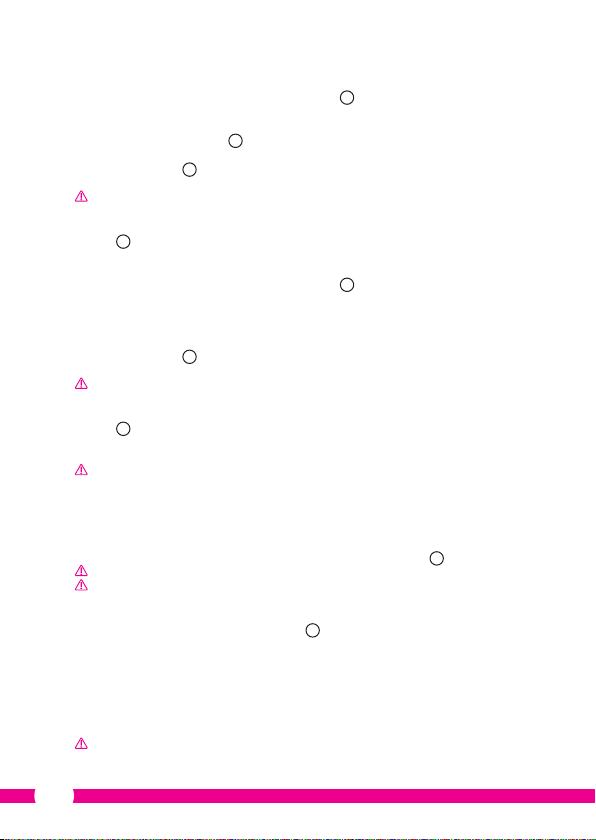
3.3. Connections
1. Reset/WSP button
2. Slot-in for micro SD card
3. Micro USB connection
4. Microphone
2
1
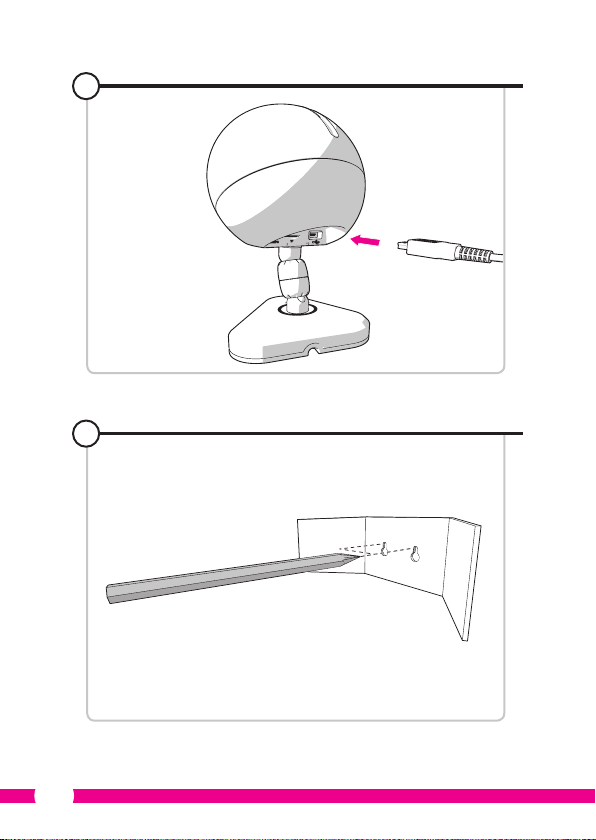
4. Camera installation
4.1. Connecting the camera
• Insert the USB cable into the adapter and into the Micro USB jack of the camera 3.
• After this, insert the plug of the adapter into the power point.
• Wait to set your camera until the green and red LEDs ash alternately.
You can add your IP Camera to your phone using a WIFI Router. You can choose to connect
via the router mode or using the WPS setup mode. The text below explains how to connect
to the router mode.
4.2. Adding a camera to your smartphone via router
mode
Please note! You need a wireless router in order to establish a wireless connection with
your camera.
Please note! If your router is password protected, you will need to know the password.
Attention! To use the "uCare Cam" App, you need a smartphone with internet access.
To set up your camera using Android, go to section 4.2.1. To set up your camera using iOS,
go to section 4.2.2.
4.2.1. Android
• Download the App: "uCare Cam" via Google Play and install it.
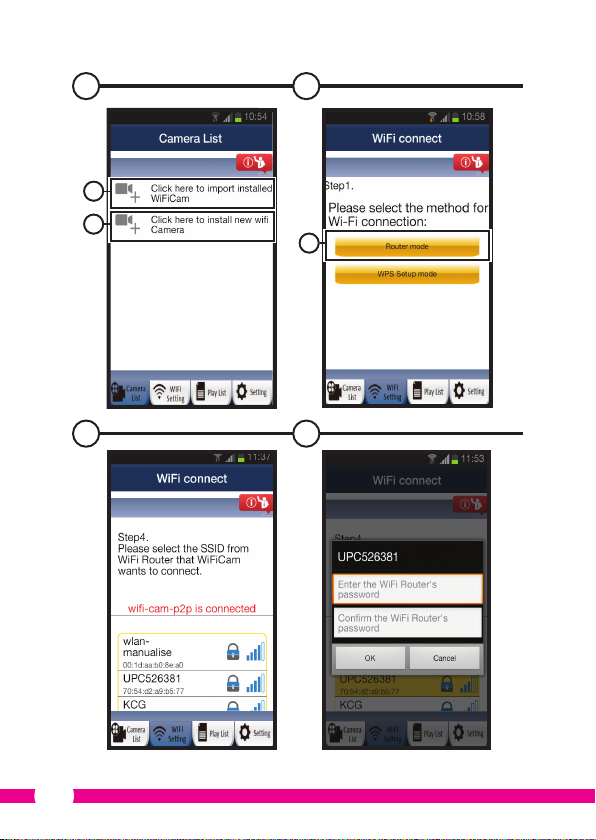
• Start the App. The start screen of the app appears.
• Press the "Click here to install new wi Camera" option A2. The "WiFi connect" menu
appears B.
• Press the "Router Mode" button B1 to add the camera via the WIFI network.
A
12
Page 13

• Check if the LED on the camera alternately ashes red and green. If so, press "next".
Caution! When the camera does not alternately ash green or red:
• Insert the adapter into the power point again.
• Wait 15 seconds and hold the WPS/RSET button for 10 seconds.
• Wait until the LED on the camera alternately ashes red and green.
• Then press "next".
• Wait until the next screen appears and you can see video images. Next, press "next".
• Select the WIFI network you want the camera to connect with.
• Enter the password of the WIFI network you have selected twice and press the "OK"
button.
D
Please note! If your router is password protected, you will need to know the password.
• On the next screen, press "OK". The camera is now online and has been added to your
list of cameras.
4.2.2. iOS
• Open the "Settings" menu on your iPhone.
• In the menu press "WIFI" and let your phone search for the network "WIFI-cam-p2p".
• Click on the network to connect.
• Download the App "uCare Cam" from the App Store and install it.
• Start the App. The start screen of the app appears.
• Press the "Click here to install new wi Camera" option . The "WiFi connect" menu
appears B.
• Press the "Router Mode" button B1 to add the camera via the WIFI network.
• Click on "next". Next, enter the name of your router and corresponding password and
click on "next".
Please note! If your router is password protected, you will need to know the password.
After the camera has received the information it will restart.
• Click on "next". Now enter the username and password of the camera.
!
Tip: The default username is "admin". The default password is "0000".
The camera will now restart and connect to the router; this may take up to 10 minutes.
Once it is successful, the LED on the camera will be orange.
Caution! If the LED does not turn orange, check if your camera is within the range of
your router. Then complete the above steps again.
• Start the App. The start screen of the app appears.
• To connect click on the name of the camera.
E
C
A
A
4.3. Adding the camera to a new smartphone using a QR
code
Caution! This function only works when the camera has already been added using
another smartphone. Go to section 4.2.2. for Android, and 4.2.2. for iOS.
13
Page 14
4.3.1. Android
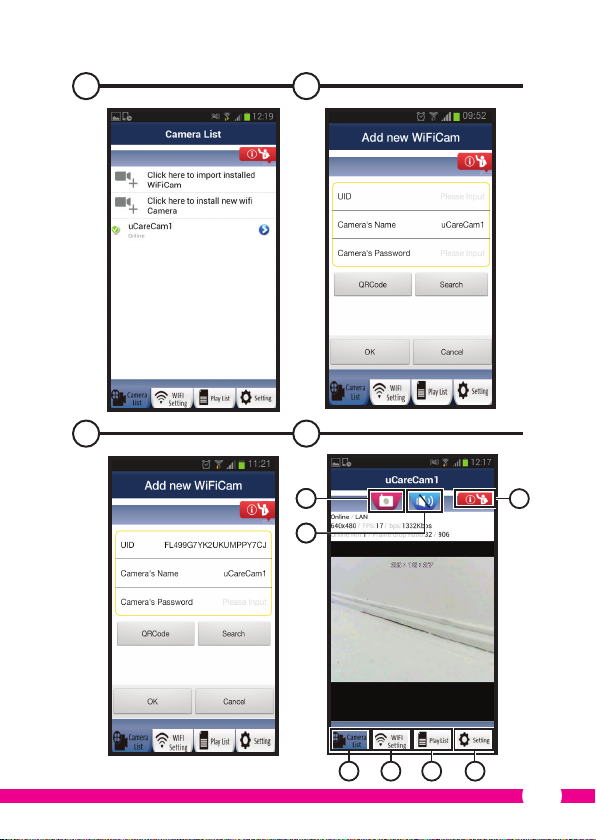
• Start the App. The start screen of the app appears.
• Press the "Click here to import installed WiFiCam" option. The "Add new WiFiCam"
menu appears.
• Press the "QR code" button. F Next, scan the QR code at the bottom of your camera.
After scanning screen G appears.
• Press "Please Input" and enter the password of the camera. Next, press "OK".
Caution! The default "Camera's Password" is "0000".
The camera is now connected to your smartphone and has been added to your list of
cameras E.
4.3.2. iOS
• Start the App. The start screen of the app appears.
• Press the "+" sign in the top right corner of the screen.
• Press the "Scan camera QR code" button. Next, scan the QR code at the bottom of your
camera.
After scanning screen G appears.
• Press "Please Input" and enter the password of the camera. Next, press "Done".
Caution! The default "Camera's Password" is "0000".
The camera is now connected to your smartphone and has been added to your list of
cameras E.
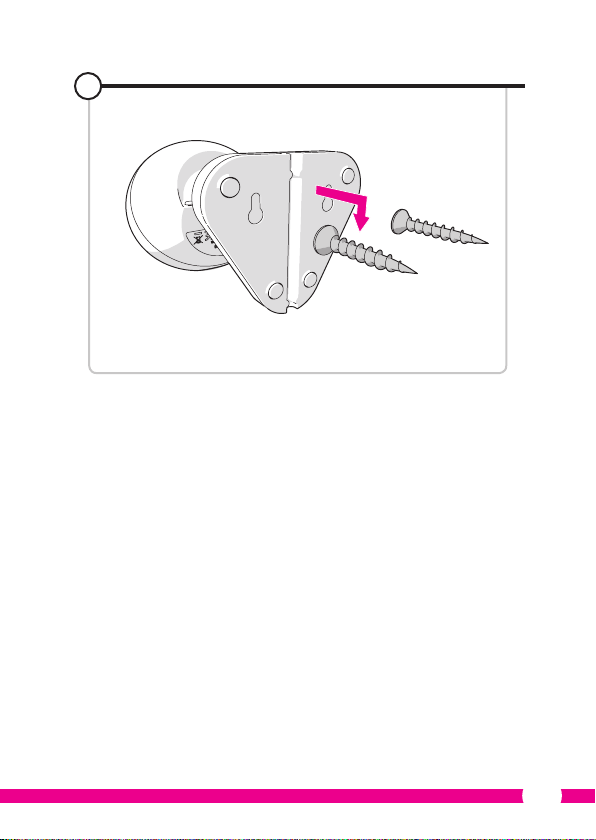
4.4. Camera installation
Please note! Make sure that the camera functions properly in the chosen location
before starting installation.
You can choose to place the camera on a at surface, or to attach the camera to the
location of your choice with screws.
To mount the camera using screws, perform the following steps:
• Mark the holes on the desired surface using the cardboard template 4 included.
Caution! Use screws with a head that ts into the base of the camera.
Caution! If the sur face is too hard to put screws in (stone/aerated concrete), you need
to drill holes and use plugs.
• Slide the base of the camera on the screws.
A
A
5
5. Managing your camera using your
smartphone
Make sure your camera(s) is/are connected to your smartphone via the "uCare Cam" app
(see section 4.2.).
Caution! This chapter only explains the operations for an Android phone. The
operations for the iPhone are similar to those for the Android App.
14
Page 15
5.1. Viewing your camera image on your smartphone
• On the initial screen of the App press the camera you want to manage. E The camera
picture appears on your smartphone.
Attention! If you do not have a picture it is possible that your wireless connection is
not fast enough. In that case change the resolution of your camera image (see section
5.1.2.)
The camera screen provides a number of options:
• Press the "Snapshot" button
• Press the Microphone H2 button to turn the microphone on and o.
• Press the Help button H3 for more information.
5.1.1. Tabs
Camera ListH4: This is the home screen of the app. Here you can add a
WIFI SettingH5: You can add a new camera in this tab.
Play ListH6: A list of snapshots is displayed per camera here.
SettingH7: You can view a list of installed cameras here. Enter your
Tip: The default "Manager's Name" is "admin". The default "Manager's Password" is
"0000".
5.1.2. Changing the settings of your camera on your Android smartphone
• On the home screen of your app press the "Settings" tab.
• Press the camera of which you wish to change the settings.
• Enter the username at "Manager 's Name" and the corresponding password at
"Manager's Password", and press "OK".
Tip: The default "Manager's Name" is "admin". The default "Manager's Password" is
"0000".
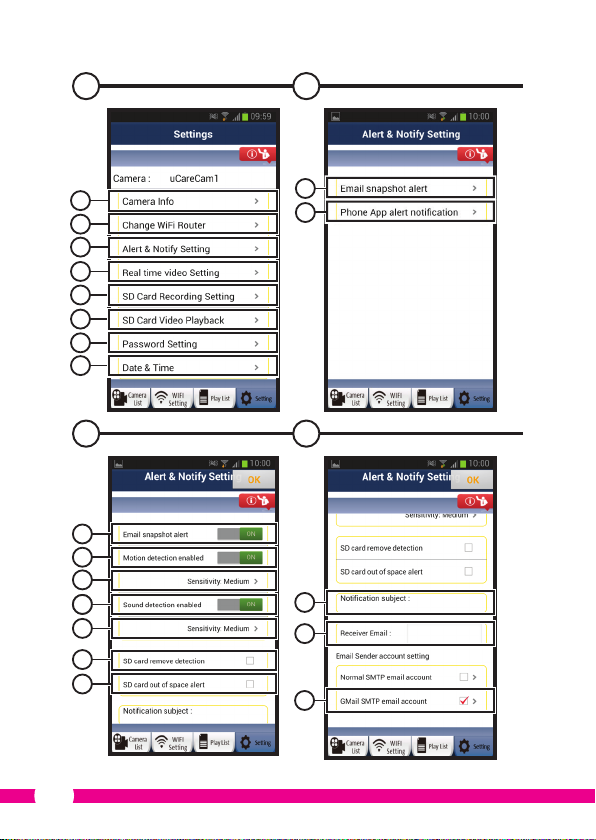
Camera InfoI1: Press this button to retrieve more information, including
Change WIFI RouterI2: Press this button to view and change a list of available
Alert & Notify SettingI3: Press this button to set when you wish to receive an
Real time video SettingI4: Press this button to turn the microphone and the time
SD Card Recording SettingI5: Press this button for the SD card recording settings.
SD Card Video PlaybackI6: Press this button to play back recordings on the SD card.
Password SettingI7: Press this button to change your username at "Manager's
H
H1
to make a snapshot of your camera image.
new camera, import a camera and view your installed
cameras.
username and password to change your settings.
the IP address.
WIFI networks.
alert when the camera detects motion or a sound. For
information, see section 5.2.
display on and o, among other things. Under "Video
quality setting" you can change the resolution of the
video image.
Name" and the password at "Manager's Password". You
can also change the password of the camera at "Camera's
Password".
15
Page 16
Date & TimeI8: Press this button to change the date and time.
5.2. Motion and sound detection
With this function, the camera displays a message when the camera detects motion or
sound.
5.2.1. Email snapshot alert
With this function, you will receive an email with a picture when the camera detects
motion or sound.
Caution! For this function you need a Gmail address.
• Press "Alert & Notify Setting" in the "Settings" I menu.
• Press "Email snapshot alert" J1. Next, press "Email snapshot alert" K1.
• Press "Motion detection enabled" to receive an alert when the camera detects motion
K2
.
• Press "sensitivity" to set the sensitivity. You can choose from the options: high, medium
and low. K3.
• Press "Sound detection enabled" to receive an alert when the camera detects sound
K4
.
• Press "sensitivity" to set the sensitivity. You can choose from the options: high, medium
and low. K5.
• Press "SD card remove detection" to receive an alert when the SD card is removed K6.
• Press "SD card out of space alert" to receive an alert when the SD card is full K7.
• Set the subject of the email at "Notication subject" when you receive an alert L1.
• Enter the email address for receiving alerts at "Receiver Email " L2.
• Press "Gmail SMTP email account" to enter the Gmail address for sending email L3.
Enter the password for your email at "Password".
5.2.2. Phone App alert notication
With this function, you will receive an alert on your mobile phone when the camera
detects motion or sound.
• Press "Alert & Notify Setting" in the "Settings" I3 menu.
• Press "Phone App alert notication" J2. Next, press "Phone App alert notication" M1.
• Press "Motion detection enabled" to receive an alert when the camera detects motion
M2
.
• Press "sensitivity" to set the sensitivity. You can choose from the options: high, medium
and low. M5.
• Press "Sound detection enabled" to receive an alert when the camera detects sound
M4
.
• Press "sensitivity" to set the sensitivity. You can choose from the options: high, medium
and low. M5.
• Press "SD card remove detection" to receive an alert when the SD card is removed M6.
• Press "SD card out of space alert" to receive an alert when the SD card is full M7.
16
Page 17
6. Cleaning and maintenance
Warning! Disconnect the device from all power sources before cleaning it.
The devices are maintenance-free, so do not open them. Opening the device will void the
warranty. Only clean the outside of the devices with a soft, dry cloth or brush
7. Environment and disposal
The symbol on the material, accessories or packaging indicates that this product
may not be discarded as household waste. Dispose of the equipment through a
recycling centre that handles electronics and electrical appliances within the EU
and in other European countries which use separate collection systems for used
electronics and electrical appliances. By disposing of the equipment in the
proper way, you will be helping to prevent possible risks to the environment and public
health, which might otherwise be caused by improper handling of the discarded
equipment. Recycling of materials contributes to the conservation of natural resources.
Therefore, please do not dispose of your old electronics and electrical appliances via
household waste.
8. Warranty
A limited 3 year warranty applies to this device. To view the warranty terms please go to:
www.elro.eu.
Gebrauchsanweisung C706IP
Vielen Dank für den Kauf Ihrer C706IP Netzwerkkamera. Damit Sie Ihre Kamera so
schnell und einfach wie möglich in Betrieb nehmen können, empfehlen wir Ihnen, diese
Bedienungsanleitung vor Gebrauch aufmerksam durchzulesen.
Die Abbildungen zu dieser Bedienungsanleitung nden Sie vor diesem Kapitel.
1. Vorsorgemassnahmen und
Sicherheitsanweisungen
1.1. Verwendete Sicherheitssymbole
Warnung! Eine Warnung weist auf das Risiko von (ernsthaftem) Schaden für den
Benutzer bzw. am Produkt bei unsorgfältiger Beachtung der beschriebenen Verfahren
hin.
Achtung! Eine Anmerkung weist den Benutzer auf mögliche Probleme hin.
17
Page 18
!
Tipp: Ein Tipp macht den Benutzer auf praktische Funktionen und zusätzliche
Möglichkeiten aufmerksam.
1.1.1. Benachrichtigungen
Warnung! Montieren Sie das Produkt nicht im Außenbereich oder an Stellen, an denen
es nass werden kann.
Warnung! Montieren Sie das Produkt nicht an Stellen, an denen es sehr warm oder
sehr kalt werden kann.
Warnung! Kontrollieren Sie vor Beginn der Montage, ob keine Stromkabel oder
Wasserrohre durch die Wand verlaufen, die Sie anbohren möchten.
Warnung! Trennen Sie das Gerät unverzüglich von der Stromversorgung, indem Sie
den Netzstecker ziehen, und wenden Sie sich an den Smartwares-Servicedesk, wenn:
• Hardware-Teile des Produktes oen liegen, durchbohrt sind, feucht sind oder zu hart
gefallen sind;
• die Stromversorgungskabel des Netzteils beschädigt ist und das Metall sichtbar ist
• das Gehäuse des Netzteils beschädigt ist
• das Netzteil mit Feuchtigkeit oder Flüssigkeiten in Berührung gekommen ist
• das Glas der Kamera geborsten oder gebrochen ist
Warnung! Es ist nicht zulässig, selbst das Produkt zu önen oder zu reparieren (bzw.
önen oder reparieren zu lassen). In diesem Fall werden sämtliche Garantien hinfällig.
Überlassen Sie die Wartung zertiziertem Wartungspersonal.
Warnung! Verwenden Sie ausschließlich Originalzubehör des Herstellers.
Warnung! Halten Sie das Produkt außer Reichweite von Kindern.
Warnung! Trennen Sie das Gerät vor einer Reinigung von sämtlichen
Spannungsquellen.
Warnung! Verwenden Sie ein trockenes, sauberes Tuch, um das Produkt zu reinigen.
Warnung! Verwenden Sie keine Scheuermittel, aggressiven Reinigungsmittel oder
lösungsmittelhaltige Reinigungsprodukte zur Reinigung des Produktes..
Warnung! Entfernen Sie bei Sturm, Blitzschlag oder bei längerer Nichtbenutzung des
Produktes den Stecker aus der Steckdose.
Achtung! Montieren Sie das Produkt gemäß den Beschreibungen in dieser
Bedienungsanleitung. Bitte wenden Sie sich in Zweifelsfällen an einen anerkannten
Monteur und beachten Sie in jedem Fall die örtlich geltenden Montagevorschriften.
Achtung! Vermeiden Sie direktes Sonnenlicht auf der Kamera.
Achtung! Richten Sie die Kamera nicht auf Büsche, Zweige oder andere bewegliche
Gegenstände.
Achtung! Das Produkt darf nicht als unsortierter Hausmüll entsorgt werden, sondern
muss getrennt eingesammelt werden.
Achtung! Erkundigen Sie sich nach den innerhalb Ihrer Region bestehenden
Möglichkeiten, das Produkt nach Ausmusterung dem Recycling zuzuführen. Werfen Sie
elektrische Geräte und Komponenten nicht weg, sondern prüfen Sie, ob das Produkt
(oder Teile davon) abgegeben, recycelt oder wiederverwertet werden können.
Achtung! Drahtlose Systeme können gestört werden durch schnurlose Telefone,
Mikrowellengeräte und andere drahtlose Geräte, die im Frequenzbereich von 2,4
GHz arbeiten. Halten Sie das Produkt während der Installation und der Bedienung
mindestens 3 Meter von möglichen Störquellen entfernt.
Achtung! Die Kamera kann nachts nicht durch Glas hindurch schauen. Bitte beachten
Sie dies bei der Aufstellung.
18
Page 19

2. Verwendungszweck
Die C706IP ist eine Überwachungskamera, die es mit der App "uCareCam" ermöglicht,
Überwachungsbilder auf Ihrem Smartphone anzusehen. Die C706IP muss dazu an eine
WIFI-Verbindung angeschlossen werden.
Die Kamera kann tagsüber Audio- und Videoaufnahmen machen. Weiterhin ist die Kamera
mit Bewegungserkennung und Audioerkennung ausgestattet.
Achtung! Die Anleitung basiert auf der Verwendung der Kamera mit einem Android-
Handy. Für das iPhone sind die wichtigsten Schritte gesondert beschrieben. Die
anderen Operationen sind ähnlich wie bei der Android App.
3. Technische Spezikationen
3.1. Allgemeine Produktspezikation
Sensor: 1/6" Color CMOS Sensor
Auösung: 640 x 480 Pixel (300.000 Pixel)
IR-Linse: f: 3.0mm
Sichtwinkel: 55 Grad
Videokompression: MJPEG
Bilder pro Sekunde: 1 ~ 25fps(QVGA)
Spannungsquelle: 230VAC/5VDC./1A-Netzteil
Energieverbrauch: 5W (max.)
Temperatur: 0°C ~ 55°C (32°F~131°F)
Mindestsystemanforderungen:
Kartenspeicher: Unterstützt Mikro-SD-Karte bis zu 32GB
Unterstützendes mobiles BS: iOS 5.0 und höher / Android 4.0 und höher
Zertizierung: CE, FCC, RoHS, R&TTE
Garantie: Beschränkte 3-jährige Garantie
3.2. Hauptbestandteile
1. USB-Kabel
2. Adapter
3. C706IPKamera mit Standfuß
4. Bedienungsanleitung
5. Pappschablone
3.3. Anschlüsse
1. Reset /WPS-Taste
2. Anschluss für Micro-SD-Kar te
3. Mikro-USB-Anschluss
4. Mikrofon
2
1
19
Page 20
4. Installation der Kamera
4.1. Anschluss der Kamera
• Stecken Sie das USB-Kabel in den Adapter und in den Mikro-USB-Anschluss der Kamera
.
3
• Stecken Sie danach den Stecker des Adapters in die Steckdose.
• Warten Sie mit dem Einstellen Ihrer Kamera, bis die grüne und rote LED abwechselnd
blinken.
Sie können mit einem WIFI-Router Ihre IP-Kamera zu Ihrem Telefon hinzuzufügen. Sie
können den Router-Modus wählen oder über den WPS-Setup-Modus eine Verbindung
herstellen. Der folgende Text erklärt die Verbindungsherstellung mit dem Router-Modus.
4.2. Zufügen einer Kamera zu Ihrem Smartphone mit
dem Router-Modus
Achtung! Um eine drahtlose Verbindung mit Ihrer Kamera herzustellen, benötigen Sie
einen WLAN-Router.
Achtung! Wenn Ihr Router mit einem Kennwort gesichert ist, müssen Sie dieses
Kennwort kennen.
Achtung! Um die "uCare Cam"-App zu nutzen, benötigen Sie ein Smartphone mit
Internetzugang.
Anweisungen für die Einstellung Ihrer Kamera über Android nden Sie in Abschnitt 4.2.1.
Anweisungen für die Einstellung Ihrer Kamera über iOS nden Sie in Abschnitt 4.2.2.
4.2.1. Android
• Laden Sie sich die App "uCare Cam" über Google Play herunter und installieren Sie
diese.
• Starten Sie die App. Die Startseite der App erscheint.
• Drücken Sie auf die Option "Click here to install new wi Camera" A2. Das Menü "WiFi
connect" erscheint B.
• Drücken Sie die Taste "Routermode" B1, um die Kamera über das WiFi-Netzwerk
hinzuzufügen.
• Prüfen Sie, ob die LED an der Kamera abwechselnd rot und grün blinkt. Drücken Sie in
diesem Fall auf "next".
Achtung! Wenn die Kamera nicht abwechselnd grün oder rot blinkt:
• Stecken Sie erneut den Adapter in die Steckdose.
• Warten Sie 15 Sekunden und halten Sie die WPS/RSET Taste für 10 Sekunden gedrückt.
• Warten Sie, bis die LED an der Kamera abwechselnd rot und grün blinkt.
• Drücken Sie dann auf "next".
• Warten Sie, bis der nächste Bildschirm erscheint und Sie das Videobild sehen können.
Drücken Sie danach auf "next".
• Wählen Sie das WiFi-Netzwerk, über das Sie Kontakt mit der Kamera herstellen wollen.
C
A
20
Page 21
• Geben Sie das Passwort des WiFi-Netzwerks, das Sie gewählt haben, zweimal ein und
drücken Sie auf die Schaltäche "OK".
Achtung! Wenn Ihr Router mit einem Kennwort gesichert ist, müssen Sie dieses
Kennwort kennen.
• Drücken Sie auf dem nächsten Bildschirm auf "OK". Die Kamera ist jetzt online und
wurde Ihrer Kameraliste hinzugefügt.
4.2.2. iOS
• Önen Sie das Menü "Settings" auf Ihrem iPhone.
• Drücken Sie im Menü auf "WI-FI" und lassen Sie Ihr Telefon nach dem Netzwerk "wi-
cam-p2p" suchen.
• Klicken Sie das Netzwerk an, um eine Verbindung herzustellen.
• Laden Sie sich die App "uCare Cam" über den App Store herunter und installieren Sie
diese.
• Starten Sie die App. Die Startseite der App erscheint.
• Drücken Sie auf die Option "Click here to install new wi Camera" . Das Menü "WiFi
connect" erscheint B.
• Drücken Sie die Taste "Routermode" B1, um die Kamera über das WiFi-Netzwerk
hinzuzufügen.
• Klicken Sie auf "next". Tragen Sie dann den Namen Ihres Routers und das dazu
gehörende Passwort ein und klicken Sie auf "next".
Achtung! Wenn Ihr Router mit einem Kennwort gesichert ist, müssen Sie dieses
Kennwort kennen.
Nachdem die Kamera die Informationen erhalten hat, bootet sie neu.
• Klicken Sie auf "next". Tragen Sie nun den Benutzernamen und das Passwort der
Kamera ein.
!
Tipp: Standardmäßig ist als Benutzername "admin" eingestellt. Das dazu gehörende
Passwort ist standardmäßig auf "0000" eingestellt.
Die Kamera bootet nun neu und stellt eine Verbindung mit dem Router her, das kann
höchstens 10 Minuten dauern. Wenn das erfolgreich war, leuchtet die LED an der Kamera
orange.
Achtung! Wenn die LED nicht orange leuchtet überprüfen Sie, ob sich die Kamera in
Reichweite des Routers bendet. Führen Sie dann die oben genannten Schritte erneut
durch.
• Starten Sie die App. Die Startseite der App erscheint.
• Klicken Sie auf den Namen der Kamera, um eine Verbindung herzustellen.
D
E
A
A
4.3. Die Kamera über QR-Code einem neuen
Smartphone hinzufügen
Achtung! Das funktioniert nur, wenn die Kamera bereits über ein anderes Smartphone
zugefügt wurde. Gehen Sie dazu nach Abschnitt 4.2.2. für Android und 4.2.2. für iOS
vor.
21
Page 22
4.3.1. Android
• Starten Sie die App. Die Startseite der App erscheint.
• Drücken Sie auf die Option "Click here to import installed WiFiCam". Das Menü "Add
new WiFiCam" erscheint.
• Drücken Sie auf die Taste "QR code". F Scannen Sie anschließend den QR-Code an der
Unterseite Ihrer Kamera.
Nach dem Scannen erscheint Bildschirm G.
• Drücken Sie auf "Please Input" und geben Sie das Passwort der Kamera ein. Drücken
Sie dann auf "OK".
Achtung! "Camera's Password" ist standardmäßig auf "0000" eingestellt.
Die Kamera ist jetzt mit Ihrem Smartphone verbunden und wurde Ihrer Kameraliste E
hinzugefügt.
4.3.2. iOS
• Starten Sie die App. Die Startseite der App erscheint.
• Drücken Sie auf das "+"-Zeichen in der rechten oberen Ecke des Bildschirms.
• Drücken Sie auf die Taste "Scan camera QR code". Scannen Sie anschließend den QR-
Code an der Unterseite Ihrer Kamera.
Nach dem Scannen erscheint Bildschirm G.
• Drücken Sie auf "Please Input" und geben Sie das Passwort der Kamera ein. Drücken Sie
danach auf "Done"
Achtung! "Camera's Password" ist standardmäßig auf "0000" eingestellt.
Die Kamera ist jetzt mit Ihrem Smartphone verbunden und wurde Ihrer Kameraliste E
hinzugefügt.
4.4. Montage der Kamera
Achtung! Achten Sie darauf, dass die Kamera am gewählten Standort ordnungsgemäß
funktioniert, bevor Sie mit der Montage beginnen.
Sie können die Kamera entweder auf einen achen Boden setzen oder an einer Stelle Ihrer
Wahl festschrauben.
Zur Montage der Kamera mit Schrauben gehen Sie wie folgt vor:
• Markieren Sie die Löcher auf der gewünschten Oberäche mit der mitgelieferten
Pappschablone 4.
Achtung! Verwenden Sie Schrauben mit einem Kopf, der in die Unterseite der Kamera
passt.
Achtung! Wenn der Untergrund zu hart zum Schrauben ist (Stein/Gasbeton), müssen
Sie Löcher bohren und Dübel verwenden.
• Schieben Sie die Unterseite der Kamera über die Schrauben.
A
A
5
22
Page 23
5. Ihre Kamera über Ihr Smartphone
verwalten
Stellen Sie sicher, dass Ihre Kamera(s) über die "uCareCam"-App mit Ihrem Smartphone
verbunden ist (sind) (siehe Abschnitt 4.2.).
Achtung! Dieses Kapitel erläutert das Vorgehen nur für ein Android-Handy. Das
Vorgehen für das iPhone ist ähnlich wie bei der Android-App.
5.1. Auf Ihrem Smartphone Ihr Kamerabild ansehen
• Drücken Sie auf der Startseite der App auf die Kamera, die Sie verwalten wollen. E Das
Kamerabild erscheint auf Ihrem Smartphone.
Achtung! Wenn Sie kein Bild sehen, kann es sein, dass Ihre Funkverbindung nicht
schnell genug ist. Verändern Sie in diesem Fall die Auösung des Kamerabilds (siehe
Abschnitt 5.1.2.)
Das Kameradisplay weist eine Reihe von Optionen auf:
• Drücken Sie auf die Schaltäche "Snapshot" H1, um eine Momentaufnahme von Ihrem
Kamerabild zu machen.
• Drücken Sie auf die Taste Microphone H2, um das Mikrofon ein- und auszuschalten.
• Drücken Sie für weitere Informationen die Taste Help H3.
5.1.1. Registerkarten
Camera ListH4: Dies ist der Startbildschirm der App. Hier können Sie eine
WIFI SettingH5: Auf dieser Registerkarte können Sie eine neue Kamera
Play ListH6: Hier wird für jede Kamera eine Liste mit Snapshots
SettingH7: Hier sehen Sie eine Liste der installier ten Kameras. Geben
Tipp: Standardmäßig ist der "Manager's Name" auf "admin" eingestellt. Das "Manager's
Password" ist standardmäßig auf "0000" eingestellt.
5.1.2. Einstellungen Ihrer Kamera auf Ihrem Android-Smartphone ändern
• Drücken Sie auf dem Startbildschirm Ihrer App auf die Registerkarte "Settings".
• Drücken Sie auf die Kamera, deren Einstellungen Sie ändern möchten.
• Tragen Sie bei "Manager's Name" den Benutzernamen ein und bei "Manager's
Password" das dazu gehörende Passwort und drücken Sie "OK".
Tipp: Standardmäßig ist der "Manager's Name" auf "admin" eingestellt. Das "Manager's
Password" ist standardmäßig auf "0000" eingestellt.
Camera InfoI1: Drücken Sie auf diese Taste, um weitere Informationen
neue Kamera hinzufügen, eine Kamera importieren und
Ihre installierten Kameras ansehen.
hinzufügen.
angezeigt.
Sie Ihren Benutzernamen und Ihr Passwort ein, um Ihre
Einstellungen zu ändern.
abzurufen, einschließlich der IP-Adresse.
H
23
Page 24
Change WiFi RouterI2: Drücken Sie auf diese Taste, um eine Liste der
Alert & Notify Setting
Real time video SettingI4: Drücken Sie auf diese Taste, um u.a. das Mikrofon
SD Card Recording Setting
SD Card Video PlaybackI6: Drücken Sie auf diese Taste, um Aufnahmen auf der SD-
Password SettingI7: Drücken Sie auf diese Taste, um bei "Manager's Name"
Date & TimeI8: Drücken Sie auf diese Taste, um Datum und Uhrzeit zu
5.2. Bewegungs- und Geräusch-Erkennung
Mit dieser Funktion zeigt die Kamera eine Nachricht, wenn die Kamera eine Bewegung
oder ein Geräusch erkennt.
5.2.1. Email snapshot alert
Mit dieser Funktion erhalten Sie eine Email mit einem Bild, wenn die Kamera eine
Bewegung oder ein Geräusch erkennt.
Achtung! Für diese Funktion benötigen Sie eine Google-Mail-Adresse.
• Drücken Sie auf "Alert & Notify Setting" im Menü "Settings" I.
• Drücken Sie auf "Email snapshot alert" J1. Drücken Sie dann "Email snapshot alert" K1.
• Drücken Sie auf "Motion detection enabled", um eine Nachricht zu erhalten, wenn die
Kamera eine Bewegung erkennt K2.
• Drücken Sie auf "sensitivity", um die Empndlichkeit einzustellen. Sie können als
Optionen wählen: hoch, mittel und niedrig. K3.
• Drücken Sie auf "Sound detection enabled", um eine Nachricht zu erhalten, wenn die
Kamera ein Geräusch erkennt K4.
• Drücken Sie auf "sensitivity", um die Empndlichkeit einzustellen. Sie können als
Optionen wählen: hoch, mittel und niedrig. K5.
• Drücken Sie auf "SD card remove detection", um eine Nachricht zu erhalten, wenn die
SD-Karte entfernt wird K6.
• Drücken Sie auf "SD card out of space alert", um eine Nachricht zu erhalten, wenn die
SD-Karte voll ist K7.
verfügbaren WLAN-Netzwerke anzuzeigen und zu
ändern.
I3
: Drücken Sie auf diese Taste, um festzulegen, wann
Sie benachrichtigt werden sollen, wenn die Kamera
eine Bewegung oder ein Geräusch erkennt. Weitere
Informationen siehe Abschnitt 5.2.
ein- und auszuschalten und die Zeitanzeige ein- und
auszuschalten. Unter "Video quality setting" können Sie
die Auösung des Video-Bildes ändern.
I5
: Drücken Sie auf diese Taste für Einstellung zur
Aufzeichnung mit SD-Karte.
Karte nochmal anzusehen.
Ihren Benutzernamen und bei "Manager's Password"
das dazu gehörende Passwort zu ändern. Bei "Camera's
Password" kann auch das Passwort der Kamera geändert
werden.
ändern.
24
Page 25
• Stellen Sie bei "Notication subject" den Betre der E-Mail ein, wenn Sie eine Nachricht
• Tragen Sie bei "Receiver Email" die E-Mailadresse ein, über die Sie Benachrichtigungen
• Drücken Sie auf "Gmail SMTP email account", um die gmail-Adresse einzutragen, von
5.2.2. Phone App alert notication
Mit dieser Funktion erhalten Sie eine Nachricht auf Ihrem Telefon, wenn die Kamera eine
Bewegung oder ein Geräusch erkennt.
• Drücken Sie auf "Alert & Notify Setting" im Menü "Settings" I3.
• Drücken Sie auf "Phone App alert noticitation" J2. Drücken Sie danach auf "Phone
• Drücken Sie auf "Motion detection enabled", um eine Nachricht zu erhalten, wenn die
• Drücken Sie auf "sensitivity", um die Empndlichkeit einzustellen. Sie können als
• Drücken Sie auf "Sound detection enabled", um eine Nachricht zu erhalten, wenn die
• Drücken Sie auf "sensitivity", um die Empndlichkeit einzustellen. Sie können als
• Drücken Sie auf "SD card remove detection", um eine Nachricht zu erhalten, wenn die
• Drücken Sie auf "SD card out of space alert", um eine Nachricht zu erhalten, wenn die
6. Reinigung und Wartung
Die Geräte sind wartungsfrei und dürfen daher keinesfalls geönet werden. Bei Önung
wird die Garantie hinfällig. Reinigen Sie das Gerät lediglich von außen mit einem weichen,
trockenen Tuch oder einer Bürste.
7. Umwelt und Entsorgung
Entsorgung des Gerätes auf korrekte Weise tragen Sie mit dazu bei, mögliche Gefahren für
die Umwelt oder die Gesundheit zu verhindern, die ansonsten bei unsachgemäßem
Umgang mit dem ausgemusterten Gerät entstanden wären. Die Wiederverwertung von
Materialien trägt zum Erhalt der natürlichen Ressourcen bei. Entsorgen Sie daher alte
Elektrogeräte oder Elektronikteile niemals in den Hausmüll.
L1
.
erhalten
erhalten wollen L2.
der die Mail gesendet wird
App alert notication" M1.
Kamera eine Bewegung erkennt M2.
Optionen wählen: hoch, mittel und niedrig. M5.
Kamera ein Geräusch erkennt M4.
Optionen wählen: hoch, mittel und niedrig. M5.
SD-Karte entfernt wird M6.
SD-Karte voll ist M7.
Warnung! Trennen Sie das Gerät vor einer Reinigung von sämtlichen
Spannungsquellen.
Das Symbol auf dem Material, den Zubehörteilen oder der Verpackung gibt an,
dass dieses Produkt nicht als Haushaltsmüll entsorgt werden darf. Überlassen Sie
das Gerät einer Sammelstelle für das Recycling von Elektro- und Elektronikschrott
innerhalb der EU oder in anderen europäischen Ländern, die eigene
Sammelsysteme für gebrauchte Elektrogeräte und Elektronikteile kennen. Durch
L3
. Tragen Sie bei "Password" das Passwort Ihrer E-Mail ein.
25
Page 26
8. Garantie
Für dieses Gerät gilt eine eingeschränkte Garantie von 3 Jahr(en). Die
Garantiebedingungen nden Sie auf: www.elro.eu.
Instrukcja obsługi C706IP
Dziękujemy za zakup kamery sieciowej C706IP. Aby jak najszybciej i w jak najprostszy
sposób móc korzystać z kamery, prosimy o dokładne zapoznanie się z niniejszą instrukcją.
Ilustracje do niniejszej instrukcji znajdują się we wcześniejszej części niniejszego rozdziału.
1. Środki prewencyjne i instrukcje
bezpieczeństwa
1.1. Użyte symbole bezpieczeństwa
Ostrzeżenie! Ostrzeżenie wskazuje na ryzyko (poważnych) obrażeń użytkownika lub
uszkodzenia produktu, jeżeli użytkownik nie będzie postępował ściśle z procedurami.
Uwaga! Komunikaty Uwaga informują użytkownika o możliwości wystąpienia
problemów.
!
Rada: Komunikat Rada informuje użytkownika, że istnieją dodatkowe możliwości.
1.1.1. Powiadomienia
Ostrzeżenie! Nie montować urządzenia na wolnym powietrzu, ani nie umieszczać go
tam, gdzie może być narażone na działanie wody lub wilgoci.
Ostrzeżenie! Nie montować produktu w miejscach, gdzie jest bardzo ciepło lub zimno.
Ostrzeżenie! Przed rozpoczęciem montażu sprawdzić, czy w ścianie w danym miejscu,
w którym nastąpi wiercenie, nie znajdują się żadne kable elektryczne lub rury.
Ostrzeżenie! Zasilanie urządzenia można wyłączyć wyciągając wtyczkę z kontaktu.
Następnie należy skontaktować się z działem wsparcia Smartwares, jeżeli:
• otwarcie części sprzętu, zmoczenie, lub upadek;
• kabel zasilający adaptera jest rozerwany lub otwarty w wyniku czego widoczny jest
metal;
• obudowa adaptera jest uszkodzona;
• adapter miał styczność z wilgocią lub cieczą;
• uszkodzone jest szkiełko kamery;
Ostrzeżenie! Nie wolno samodzielnie otwierać produktu ani go naprawiać. Spowoduje
to utratę gwarancji. Naprawę można zlecać wyłącznie certykowanym serwisantom.
26
Page 27
Ostrzeżenie! Korzystać wyłącznie z oryginalnych akcesoriów.
Ostrzeżenie! Trzymać produkt poza zasięgiem dzieci.
Ostrzeżenie! Odłączyć urządzenie od wszelkich źródeł zasilania przed jego
czyszczeniem.
Ostrzeżenie! Do czyszczenia stosować suchą, czystą ściereczkę.
Ostrzeżenie! Nie używać żadnych środków do szorowania, żrących lub na bazie
rozpuszczalnika do czyszczenia produktu.
Ostrzeżenie! Wyciągnąć adapter z gniazdka w przypadku burzy, błyskawic i gdy
produkt przez dłuższy czas nie jest użytkowany.
Uwaga! Zamontuj produkt zgodnie z instrukcjami zawartymi w niniejszym
przewodniku. W razie wątpliwości skontaktuj się ze specjalistą -monterem i zawsze
przestrzegaj obowiązujących lokalnych przepisów dotyczących montażu.
Uwaga! Unikać bezpośredniego działania promieni słonecznych na kamerę.
Uwaga! Nie ustawiać kamery w kierunku gałęzi lub innych poruszających się obiektów.
Uwaga! Produktu nie wolno utylizować z innymi, nieposegregowanymi odpadami z
gospodarstw domowych, ale należy oddać do odpowiedniego punktu zbiórki.
Uwaga! Należy uzyskać informacje odnośnie lokalnych możliwości utylizacji produktu.
Nie wyrzucać części lub akcesoriów do urządzenia, ale najpierw sprawdzić czy mogą
zostać poddane recyklingowi lub zostać ponownie użyte.
Uwaga! Systemy bezprzewodowe mogą być zakłócane przez bezprzewodowe
telefony, kuchenki mikrofalowe oraz inne bezprzewodowe urządzenia, które działają
w zakresie 2,4 GHz. Trzymać urządzenia na co najmniej 3 metry z dala od możliwych
źródeł zakłóceń w trakcie instalacji i obsługi.
Uwaga! Kamera w nocy nie działa przy założonym szkiełku. Należy to uwzględnić przy
montażu.
2. Eksploatacja zgodna z przeznaczeniem
C706IP to kamera monitorująca, która umożliwia odtwarzanie obrazu z monitoringu
na smartphonie za pomocą aplikacji "uCare Cam". W tym celu kamera C706IP musi być
podłączona do sieci WIFI.
W ciągu dnia kamera może nagrywać obraz wideo i audio. Ponadto kamera jest
wyposażona w czujnik ruchu oraz czujnik dźwięku.
Uwaga! Instrukcja obsługi zakłada eksploatację kamery za pomocą telefonu
z systemem Android. Dla iPhona najważniejsze kroki zostały przedstawione w
oddzielnym dokumencie. Pozostałe działania są podobne do aplikacji na system
Android.
3. Specykacja techniczna
3.1. Ogólna specykacja produktowa
Czujnik: 1/6” Czujnik koloru CMOS
Rozdzielczość: 640 x 480 pikseli (300k pikseli)
Obiektyw podczerwieni: f: 3.0mm
Kąt ustawienia: 55 stopni
Kompresja wideo: MJPEG
Klatki na sekundę: 1 ~ 25fps(QVGA)
Źródło zasilania: adapter 230VAC/5VDC/1A
Zużycie energii: 5W (maks.)
Temperatura: 0°C ~ 55°C (32°F~131°F)
27
Page 28
Minimalne wymogi systemowe:
Pamięć karty: Obsługuje kar tyt microSD do 32 GB
Wspierany system mobilny OS: iOS 5.0 i wyższy / Android 4.0 i wyższy
Certykaty: CE, FCC, RoHS, R&TTE
Gwarancja: Ograniczona 3-letnia gwarancja
3.2. Główne części
1. Kabel USB
2. Adapter
3. C706IPkamera z podstawką
4. Instrukcja obsługi
5. Szablon tekturowy
3.3. Podłączenia
1. Przycisk Reset / WPS
2. Wejście karty Micro SD
3. Złącze Micro USB
4. Mikrofon
1
2
4. Instalacja kamery
4.1. Podłączenie kamery
• Wprowadź kabel USB do adapteru w złączu micro USB kamery 3.
• Następnie włóż wtyczkę adaptera do gniazdka.
• Wstrzymaj się z instalacją kamery do chwili aż zielony i czerwony wskaźnik LED będą
migać na zmianę.
Możesz dodać IP kamery do telefonu za pomocą routera WIFI. Możesz w tym celu wybrać
połączenie w trybie routera lub przez kongurację WPS. Poniżej objaśniamy zasady
podłączania w trybie routera.
4.2. Podłączanie kamery do smartphona w trybie
routera
Uwaga! Do nawiązania bezprzewodowego połączenia z kamerą potrzebny jest
bezprzewodowy router.
Uwaga! Jeżeli router posiada hasło, konieczne będzie podanie tego hasła.
Uwaga! Do instalacji aplikacji „uCare Cam” wymagany jest smartfon z dostępem do
sieci Internet.
W celu ustawienia kamery przez system Android przejść do paragrafu 4.2.1. W celu
ustawienia kamery przez system iOS przejść do paragrafu 4.2.2.
4.2.1. Android
• Pobrać aplikację "uCare Cam" przez Google Play i zainstalować ją.
• Uruchom aplikację. Pojawi się ekran startowy aplikacji.
• Naciśnij przycisk „Click here to install new wi Camera” (kliknij tutaj, aby dodać kamerę)
A2
. Pojawi się menu „WiFi connect” (dodaj kamerę) B.
A
28
Page 29

• Naciśnij przycisk "Routermode"B1, aby dodać kamerę przez sieć WIFI.
• Sprawdź, czy wskaźniki LED na kamerze migają na zmianę na czerwono i zielono. W
takim przypadku naciśnij na "next".
Uwaga! W przypadku braku migania wskaźników zielonego i czerwonego na
przemian:
• Ponownie podłącz adapter do gniazdka.
• Odczekaj 15 sekund i przytrzymaj przycisk WPS/RSET przez 10 sekund.
• Sprawdź, czy wskaźniki LED na kamerze migają na zmianę na czerwono i zielono.
• Następnie naciśnij "next".
• Odczekaj aż pojawi się poniższy ekran i zobaczysz obraz wideo. Następnie naciśnij
"next".
• Wybierz sieć WIFI, za pomocą której chcesz połączyć się z kamerą.
• Wprowadź hasło dla wybranej sieci WIFI i dwukrotnie naciśnij przycisk "OK".
Uwaga! Jeżeli router posiada hasło, konieczne będzie podanie tego hasła.
• Na tym ekranie naciśnij "OK". Kamera jest teraz podłączona online i została dodana do
listy kamer.
4.2.2. iOS
• Otw
• Naciśnij w menu "WI-FI" i odczekaj aż telefon wyszuka sieci "wi-cam-p2p".
• Kliknij sieć, aby nawiązać połączenie.
• Pobrać aplikację "uCare Cam" przez App Store i ją zainstalować.
• Uruchom aplikację. Pojawi się ekran startowy aplikacji.
• Naciśnij przycisk „Click here to install new wi Camera” (kliknij tutaj, aby dodać kamerę)
. Pojawi się menu „WiFi connect” (dodaj kamerę) B.
• Naciśnij przycisk "Routermode"B1, aby dodać kamerę przez sieć WIFI.
• Kliknij "next". Następnie wprowadź nazwę routera oraz powiązane hasło i kliknij "next".
Uwaga! Jeżeli router posiada hasło, konieczne będzie podanie tego hasła.
Po otrzymaniu danych przez kamerę zostanie ona ponownie uruchomiona.
• Kliknij "next". Teraz wprowadź nazwę użytkownika i hasło kamery.
!
Rada: Standardowo nazwa użytkownika to "admin". Fabrycznie ustawionym hasłem
jest "0000".
Kamera zostanie ponownie uruchomiona a połączenie nastąpi przez router, może to
potrwać maksymalnie 10 minut. Jeżeli się to uda, wskaźnik LED kamery zapali się na
pomarańczowo.
Uwaga! Jeżeli wskaźnik LED nie zapali się na pomarańczowo, sprawdź czy kamera
znajduje się w zasięgu działania routera. Następnie ponownie wykonaj powyższe kroki.
• Uruchom aplikację. Pojawi się ekran startowy aplikacji.
• Kliknij nazwę kamery, aby wykonać połączenie.
E
C
D
A
A
29
Page 30
4.3. Dodaj kamerę do nowego smartphona za pomocą
kodu QR.
Uwaga! Funkcja ta jest aktywna wyłącznie, jeżeli kamera jest już podłączona do innego
smartphona. Przejdź w tym celu do paragrafu 4.2.2. w przypadku systemu Android, i
4.2.2. w przypadku iOS.
4.3.1. Android
• Uruchom aplikację. Pojawi się ekran startowy aplikacji.
• Naciśnij przycisk „Click here to import installed WiFiCam” (kliknij tutaj, aby dodać
kamerę). Pojawi się menu „WiFi connect” (dodaj kamerę).
• Nacisnąć przycisk "QR code". F Zeskanować kod QR na spodzie kamery.
Po zeskanowaniu pojawi się ekran G.
• Naciśnij "Please Input" i wprowadź hasło kamery. Następnie naciśnij "OK".
Uwaga! "Camera's Password" jest fabrycznie ustawione na "0000".
Kamera jest teraz podłączona do smartphona i została dodana do listy kamer E.
4.3.2. iOS
• Uruchom aplikację. Pojawi się ekran startowy aplikacji.
• Naciśnij symbol "+" w prawym górnym rogu ekranu.
• Nacisnąć przycisk "Scan camera QR code". Zeskanować kod QR na spodzie kamery.
Po zeskanowaniu pojawi się ekran G.
• Naciśnij "Please Input" i wprowadź hasło kamery. Następnie naciśnij "Done".
Uwaga! "Camera's Password" jest fabrycznie ustawione na "0000".
Kamera jest teraz podłączona do smartphona i została dodana do listy kamer E.
4.4. Montaż kamery
Uwaga! Sprawdzić, czy kamera prawidłowo funkcjonuje w wybranej lokalizacji zanim
rozpoczniesz montaż.
Kamerę można ustawić na płaskim podłożu lub przykręcić w dowolnym miejscu.
Przed zamontowaniem kamery przy pomocy śrub wykonać następujące kroki:
• Narysuj otwory na wybranym podłoży za pomocą dostarczonych kartoników 4.
Uwaga! Użyj śrub w głowicą, która pasuje do podstawy kamer y.
Uwaga! Jeżeli podłoże jest za twarde, aby dokonać nawiertu otworów (kamień/
gazobeton), wówczas należy wstępnie nawiercić otwory i zastosować kołki.
• Wsuń podstawę kamery na śruby.
5. Zarządzanie kamerą za pomocą smartfonu
Pamiętaj, by kamera była połączona przez aplikację "uCare Cam" z telefonem (patrz
paragraf 4.2.).
Uwaga! W tym rozdziale przedstawione są działania dla telefonu z systemem Android.
Działania dla iPhona są podobne do aplikacji na system Android.
5
A
A
30
Page 31

5.1. Oglądanie obrazu z kamery na smartphonie
• Na ekranie początkowym aplikacji naciśnij kamerę, którą chcesz zarządzać. E Na
smartfonie pojawi się obraz z kamery.
Uwaga! Brak obrazu może oznaczać zbyt niską prędkość połączenia
bezprzewodowego. W takim wypadku zmniejsz rozdzielczość obrazu (zob. rozdział
5.1.2.)
Na ekranie kamery dostępnych jest wiele opcji:
• Naciśnij przycisk „Snapshot”
• Naciśnij przycisk Microphone H2, aby włączyć i wyłączyć mikrofon.
• Naciśnij przycisk Help H3, aby uzyskać szczegółowe informacje.
5.1.1. Zakładki
Camera ListH4: Jest to ekran początkowy aplikacji. Tutaj możesz dodać
WIFI SettingH5: W tej zakładce można dodać nową kamerę.
Play ListH6: Tutaj pokazana zostaje dla każdej kamery lista migawek.
SettingH7: Tutaj można zobaczyć listę z zainstalowanymi kamerami.
Rada: Standardowo "Manager's name" jest fabrycznie ustawiona jako "admin".
"Manager's password" jest fabrycznie ustawione na "0000".
5.1.2. Zmiana ustawień kamery na smartphonie z systemem Android
• Nacisnąć na ekran początkowy aplikacji w zakładce "Settings".
• Nacisnąć na kamerę, której ustawienia chcesz zmienić.
• Wprowadź w pozycji "Manager's Name" nazwę użytkownika, a w pozycji "Manager's
Password" przypisane hasło i naciśnij "OK".
Rada: Standardowo "Manager's name" jest fabrycznie ustawiona jako "admin".
"Manager's password" jest fabrycznie ustawione na "0000".
Camera InfoI1: Naciśnij ten przycisk, aby uzyskać szczegółowe
Change WiFi RouterI2: Naciśnij ten przycisk, aby wyświetlić listę z dostępnymi
Alert & Notify SettingI3: Naciśnij ten przycisk, aby ustawić, czy chcesz otrzymać
Real time video SettingI4: Naciśnij ten przycisk, aby między innymi włączyć i
SD Card Recording SettingI5: Naciśnij ten przycisk, aby wprowadzić ustawienia dla
SD Card Video PlaybackI6: Naciśnij ten prz ycisk, aby obejrzeć nagrania z karty SD.
H
H1
(zdjęcie), aby wykonać zdjęcie za pomocą kamery.
nową kamerę, importować kamerę oraz uzyskać podgląd
do obrazu z już zainstalowanych kamer.
Wprowadź nazwę użytkownika i hasło, aby zmienić
ustawienia.
informacje, w tym adres IP.
sieciami WIFI i ewentualnie dokonać zmian.
komunikat o wykryciu przez czujniki kamer y ruchu lub
dźwięku. Szczegółowe informacje patrz paragraf 5.2.
wyłączyć mikrofon oraz aby włączyć i wyłączyć zegar.
W pozycji "Video quality setting" można zmienić
rozdzielczość obrazu wideo.
nagrywania na karcie SD.
31
Page 32

Password SettingI7: Naciśnij ten przycisk, aby zmienić nazwę użytkownika
I8
Date & Time
5.2. Wykrywanie ruchu i dźwięku
Za pomocą tej funkcji kamera generuje komunikat o wykryciu ruchu lub dźwięku.
5.2.1. Email snapshot alert
Za pomocą tej funkcji otrzymasz email ze zdjęciem w przypadku wykrycia przez k amerę
ruchu lub dźwięku.
• Naciśnij "Alert & Notify Setting" w menu "Settings" I.
• Naciśnij "Email snapshot alert" J1. Następnie naciśnij "Email snapshot alert" K1.
• Naciśnij "Motion detection enabled", aby otrzymać komunikat, gdy kamera wykryje
• Naciśnij "sensitivity", aby nastawić czułość. Możesz wybrać jedną z opcji: wysoka,
• Naciśnij "Sound detection enabled", aby otrzymać komunikat, gdy kamera wykryje
• Naciśnij "sensitivity", aby nastawić czułość. Możesz wybrać jedną z opcji: wysoka,
• Naciśnij "SD card remove detection", aby otrzymać komunikat, gdy karta SD zostaje
• Naciśnij "SD card out of space alert", aby otrzymać komunikat, gdy karta SD jest
• W pozycji "Notication subject" ustaw temat wiadomości mail, w której otrzymasz
• Wprowadź w "Receiver Email" adres email, na który chcesz otrzymywać powiadomienia
• Naciśnij "Gmail SMTP email account", aby wprowadzić adres gmail, z którego zostanie
5.2.2. Phone App alert notication
Za pomocą tej funkcji otrzymasz powiadomienie na telefon w przypadku wykrycia przez
kamerę ruchu lub dźwięku.
• Naciśnij "Alert & Notify Setting" w menu "Settings" I3.
• Naciśnij "Phone App alert noticitation" J2. Następnie naciśnij "Phone App alert
• Naciśnij "Motion detection enabled", aby otrzymać komunikat, gdy kamera wykryje
• Naciśnij "sensitivity", aby nastawić czułość. Możesz wybrać jedną z opcji: wysoka,
: Naciśnij ten przycisk, aby zmienić datę i godzinę.
Uwaga! Dla tej funkcji wymagane jest posiadanie adresu gmail.
ruch K2.
umiarkowana, niska. K3.
dźwięk K4.
umiarkowana, niska. K5.
wyjęta K6.
włożona K7.
komunikat L1.
L2
.
wysłana wiadomość L3. W pozycji "Password" wprowadź hasło do skrzynki email.
noticitation" M1.
ruch M2.
umiarkowana, niska. M5.
w "Manager's Name" i hasło w "Manager's Password".
Hasło kamery można także zmienić w pozycji "Camera's
Password".
32
Page 33

• Naciśnij "Sound detection enabled", aby otrzymać komunikat, gdy kamera wykryje
M4
.
dźwięk
• Naciśnij "sensitivity", aby nastawić czułość. Możesz wybrać jedną z opcji: wysoka,
umiarkowana, niska. M5.
• Naciśnij "SD card remove detection", aby otrzymać komunikat, gdy karta SD zostaje
wyjęta M6.
• Naciśnij "SD card out of space alert", aby otrzymać komunikat, gdy karta SD jest
6. Czyszczenie i konserwacja
Urządzenia nie wymagają konserwacji, dlatego nie należy ich otwierać. Otwarcie
urządzenia powoduje unieważnienie gwarancji. Czyścić jedynie zewnętrzną stronę
urządzenia, delikatną, suchą ściereczką lub szczoteczką
7. Ochrona środowiska
nieprawidłowo zutylizowanego urządzenia. Recykling materiałów przyczynia się do
zachowania naturalnych zasobów. Dlatego nie należy wyrzucać starych urządzeń
elektrycznych i elektronicznych wraz z odpadami domowymi.
8. Gwarancja
Urządzenie to jest objęte ograniczoną 3 roczną (letnią) gwarancją. Warunki gwarancji
znajdują się na: www.elro.eu.
M7
włożona
.
Ostrzeżenie! Odłączyć urządzenie od wszelkich źródeł zasilania przed jego
czyszczeniem.
Symbol na sprzęcie, akcesoriach lub opakowaniu wskazuje na to, że produkt ten
nie może być wyrzucany wraz z domowymi odpadami. Urządzenie należy
przekazać do punktu zbiórki recyklingu sprzętów elektrycznych i elektronicznych
na terenie UE i w innych krajach europejskich. Utylizując urządzenie we właściwy
sposób, pomagamy chronić środowisko i zdrowie przed szkodliwym wpływem
Handleiding C706IP
Bedankt voor uw aankoop van de C706IP netwerk camera. Om uw camera zo snel en
gemakkelijk mogelijk te kunnen gebruiken, raden wij u aan om deze gebruiksaanwijzing
voor gebruik aandachtig door te nemen.
De afbeeldingen van deze gebruiksaanwijzing vindt u voorafgaand aan dit hoofdstuk.
33
Page 34

1. Voorzorgsmaatregelen en
veiligheidsinstructies
1.1. Gebruikte veiligheidssymbolen
Waarschuwing! Een waarschuwing duidt op de kans op (ernstige) schade aan de
gebruiker of aan het product, als de gebruiker de procedures niet zorgvuldig uitvoert.
Let op! Een opmerking maakt de gebruiker attent op mogelijke problemen.
!
Tip: Een tip maakt de gebruiker attent op handigheden en extra mogelijkheden.
1.1.1. Noticaties
Waarschuwing! Monteer het product niet buiten, of op plaatsen waar het nat kan
worden.
Waarschuwing! Monteer het product niet op plaatsen waar het erg warm of koud kan
worden.
Waarschuwing! Controleer voor aanvang van de montage of er geen
elektriciteitskabels en waterpijpen door de muur lopen waar u wilt gaan boren.
Waarschuwing! U haalt onmiddellijk de stroom van het product af door de stekker
uit het stopcontact te halen en neemt vervolgens contact op met de Smartwares
servicedesk, wanneer:
• hardwareonderdelen van het product openliggen, doorboord zijn, vochtig zijn of hard
gevallen zijn;
• de voedingskabel van de adapter rafelig is of open ligt waardoor het metaal zichtbaar
is;
• de behuizing van de adapter beschadigd is;
• de adapter in aanraking is gekomen met vocht of vloeistoen;
• het glas van de camera gebarsten of gebroken is;
Waarschuwing! Het is niet toegestaan om zelf het product open te (laten) maken of
te (laten) repareren. In dat geval vervallen garanties. Laat onderhoud uitvoeren door
gecerticeerd onderhoudspersoneel.
Waarschuwing! Gebruik alleen originele accessoires van de fabrikant.
Waarschuwing! Houd het product buiten bereik van kinderen.
Waarschuwing! Haal het apparaat uit alle spanningsbronnen voordat u het reinigt.
Waarschuwing! Gebruik een droge schone doek om het product schoon te maken.
Waarschuwing! Gebruik geen schurende middelen, bijtende schoonmaakmiddelen of
middelen met bleek of oplosmiddelen om het product schoon te maken.
Waarschuwing! Haal de adapter uit het stopcontact tijdens een storm, bliksem en
wanneer het product voor langere tijd niet wordt gebruikt.
Let op! Monteer het product zoals aangegeven in deze handleiding. Raadpleeg bij
twijfel een erkend monteur en neem altijd de lokale montagevoorschriften in acht.
Let op! Vermijd direct zonlicht op de camera.
Let op! Richt de camera niet op bosjes, takken of andere bewegende voorwerpen.
Let op! Het product mag niet worden verwijderd als ongesorteerd stedelijk afval, maar
moet gescheiden worden ingezameld.
Let op! Informeer binnen uw regio naar de mogelijkheden om het product in te
leveren bij beëindiging van het gebruik. Gooi elektrische apparaten en onderdelen
niet weg, maar bekijk of (onderdelen van) het product ingeleverd, gerecycled of
hergebruikt kunnen worden.
34
Page 35

Let op! Draadloze systemen kunnen gestoord worden door draadloze telefoons,
microgolfovens en andere draadloze toestellen die werken op het bereik van 2,4 GHz.
Houd het product minstens 3 meter verwijderd van mogelijke storingsbronnen tijdens
installatie en bediening.
Let op! De camera kan 's nachts niet door glas heen k ijken. Houd hier rekening mee bij
het plaatsen.
2. Beoogd gebruik
De C706IP is een bewakingscamera die het mogelijk maakt bewakingsbeelden op uw
smartphone te bekijken met behulp van de app "uCare Cam". De C706IP dient hiertoe op
een WIFI verbinding aangesloten te worden.
De camera kan overdag video en audio opnames maken. Verder is de camera uitgerust
met bewegingsdetectie en geluidsdetectie.
Let op! De handleiding is gebaseerd op het gebruik van de camera met behulp van
een Android telefoon. Voor de iPhone zijn de belangrijkste stappen apart beschreven.
De overige handelingen zijn vergelijkbaar met de Android App.
3. Technische specicaties
3.1. Algemene product specicaties
Sensor: 1/6" Color CMOS Sensor
Resolutie: 640 x 480 Pixels (300k Pixels)
IR Lens: f: 3.0mm
Kijkhoek: 55 Graden
Video compressie: MJPEG
Beelden per seconde: 1 ~ 25fps(QVGA)
Spanningsbron: 230VAC/5VDC/1A Adaptor
Energieverbruik: 5W (Max.)
Temperatuur: 0°C ~ 55°C (32°F~131°F)
Minimale systeemeisen:
Kaartopslag: Ondersteunt microSD kaart tot 32 GB
Ondersteunde mobiele OS: iOS 5.0 en hoger / Android 4.0 en hoger
Certicatie: CE, FCC, RoHS, R&TTE
Garantie: Beperkte 3-jarige garantie
3.2. Belangrijkste onderdelen
1. USB kabel
2. Adapter
3. C706IPcamera met voet
4. Gebruikershandleiding
5. Kartonnen mal
3.3. Aansluitingen
1. Reset / WPS knop
2. Micro SD-kaart ingang
3. Micro USB aansluiting
4. Microfoon
2
1
35
Page 36

4. Camera installatie
4.1. De camera aansluiten
• Steek de USB kabel in de adapter en in de Micro USB aansluiting van de camera 3.
• Steek hierna de stekker van de adapter in het stopcontact.
• Wacht met het instellen van uw camera todat de groene en rode LED om de beurt
knipperen.
U kunt uw IP Camera toevoegen aan uw telefoon met behulp van een WIFI Router. U
kunt er voor kiezen via de router modus of via WPS setup modus verbinding te maken. In
onderstaande tekst wordt het maken van verbinding met de router modus uitgelegd.
4.2. Een camera toevoegen aan uw smartphone via
router modus
Let op! Om een draadloze verbinding met uw camera tot stand te brengen heeft u een
draadloze router nodig.
Let op! Indien uw router voorzien is van een wachtwoord, dient u dit wachtwoord te
weten.
Let op! Voor het gebruik van de "uCare Cam" App heeft u een smartphone nodig met
internettoegang.
Ga voor het instellen van uw camera via Android naar paragraaf 4.2.1. Voor het instellen
van uw camera via iOS gaat u naar paragraaf 4.2.2.
4.2.1. Android
• Download de App: "uCare Cam" via Google Play en installeer deze.
• Start de App op. Het beginscherm van de app verschijnt.
• Druk op de optie "Click here to install new wi Camera" A2. Het "WiFi connect" menu
verschijnt B.
• Druk op de knop "Routermode"B1 om de camera toe te voegen via het WIFI netwerk.
• Controleer of de LED op de camera afwisselend rood en groen knippert. Druk in dit
geval op "next".
Let op! Wanneer de camera niet afwisselend groen of rood knippert:
• Steek opnieuw de adapter in het stopcontact.
• Wacht 15 seconden en houd de WPS/RSET knop voor 10 seconden ingedrukt.
• Wacht totdat de LED op de camera afwisselend rood en groen knippert.
• Druk hierna op "next".
• Wacht to het volgende scherm verschijnt en u videobeeld ziet. Druk vervolgens op
"next".
• Kies het WIFI netwerk waarmee u wilt dat de camera contact maakt.
• Vul het wachtwoord van het WIFI netwerk dat u gekozen heeft tweemaal in en druk op
de knop "OK".
Let op! Indien uw router voorzien is van een wachtwoord, dient u dit wachtwoord te
weten.
D
A
C
36
Page 37

• Druk in het volgende scherm op "OK". De camera is nu online en is toegevoegd aan uw
lijst met camera's.
4.2.2. iOS
• Open het menu "Settings" op uw iPhone.
• Druk in het menu op "WI-FI" en laat uw telefoon zoeken naar het netwerk "wi-cam-
p2p".
• Klik het netwerk aan om verbinding te maken.
• Download de App "uCare Cam" via de App Store en installeer deze.
• Start de App op. Het beginscherm van de app verschijnt.
• Druk op de optie "Click here to install new wi Camera" . Het "WiFi connect" menu
verschijnt B.
• Druk op de knop "Routermode"B1 om de camera toe te voegen via het WIFI netwerk.
• Klik op "next". Vul vervolgens de naam van uw router en het bijbehorende wachtwoord
in en klik op "next".
Let op! Indien uw router voorzien is van een wachtwoord, dient u dit wachtwoord te
weten.
Nadat de camera de informatie heeft ontvangen zal deze opnieuw opstarten.
• Klik op "next". Vul nu de gebruikersnaam en het wachtwoord van de camera in.
!
Tip: Standaard is de gebruikersnaam ingesteld als "admin". Het bijbehorende
wachtwoord is standaard ingesteld als "0000".
De camera zal nu opnieuw opstarten en verbinding maken met de router, dit kan
maximaal 10 minuten duren. Wanneer dit gelukt is, zal de LED op de camera oranje gaan
branden.
Let op! Wanneer de LED niet oranje gaat branden, controleer of uw camera in het
bereik is van uw router. Doorloop daarna de bovenstaande stappen opnieuw.
• Start de App op. Het beginscherm van de app verschijnt.
• Klik op de naam van de camera om verbinding te maken.
E
A
A
4.3. De camera aan een nieuwe smartphone
toevoegen via QR code
Let op! Deze functie werkt alleen wanneer de camera al via een andere smartphone is
toegevoegd. Ga hiervoor naar paragraaf 4.2.2. voor Android, en 4.2.2. voor iOS.
4.3.1. Android
• Start de App op. Het beginscherm van de app verschijnt.
• Druk op de optie "Click here to import installed WiFiCam" . Het "Add new WiFiCam"
menu verschijnt.
• Druk op de knop "QR code". F Scan vervolgens de QR code aan de onderzijde van uw
camera.
Na het scannen verschijnt scherm G.
• Druk op "Please Input" en voer het wachtwoord van de camera in. Druk vervolgens op
"OK".
Let op! "Camera's Password" is standaard ingesteld als "0000".
A
37
Page 38

De camera is nu verbonden met uw smartphone en is toegevoegd aan uw lijst met
camera's
4.3.2. iOS
• Start de App op. Het beginscherm van de app verschijnt.
• Druk op het "+" teken in de rechter bovenhoek van het scherm.
• Druk op de knop "Scan camera QR code". Scan vervolgens de QR code aan de
Na het scannen verschijnt scherm G.
• Druk op "Please Input" en voer het wachtwoord van de camera in. Druk vervolgens op
De camera is nu verbonden met uw smartphone en is toegevoegd aan uw lijst met
camera's E.
4.4. Montage camera
U kunt er voor kiezen om de camera neer te zetten op een vlakke ondergrond, of de
camera vast te schroeven op een locatie naar keuze.
Voor het monteren van de camera met schroeven voert u de volgende stappen uit:
• Teken de gaten af op de gewenste ondergrond met behulp van de bijgeleverde
• Schuif de voet van de camera over de schroeven.
5. Uw camera via uw smartphone beheren
Zorg ervoor dat uw camera(s) via de "uCare Cam" App verbonden zijn met uw smartphone
(zie paragraaf 4.2.).
5.1. Op uw smartphone uw camerabeeld bekijken
• Druk in het beginscherm van de App op de camera die u wilt beheren. E Het
Het camerascherm biedt een aantal opties:
• Druk op de knop "Snapshot" H1 om van uw camerabeeld een snapshot te maken.
.
E
A
onderzijde van uw camera.
"Done".
Let op! "Camera's Password" is standaard ingesteld als "0000".
Let op! Zorg dat de camera naar behoren werkt op de gekozen locatie, voordat u
begint met de montage.
kartonnen mal 4.
Let op! Gebruik schroeven met een kop die past in de voet van de camera.
Let op! Indien de ondergrond te hard is om in te schroeven (steen/gasbeton), dient u
gaten voor te boren en pluggen te gebruiken.
5
Let op! In dit hoofdstuk worden de handelingen alleen uitgelegd voor een Android
telefoon. De handelingen voor de iPhone zijn vergelijkbaar met de Android App.
camerabeeld verschijnt op uw smartphone.
Let op! Wanneer u geen beeld heeft is het mogelijk dat uw draadloze verbinding niet
snel genoeg is. Verander in dit geval de resolutie van uw camerabeeld (zie paragraaf
5.1.2.)
H
38
Page 39

• Druk op de knop Microphone H2 om de microfoon in- en uit te schakelen.
• Druk op de knop Help
H3
voor meer informatie.
5.1.1. Tabbladen
Camera List
WIFI SettingH5: In dit tabblad kunt u een nieuwe camera toevoegen.
Play ListH6: Hier wordt per camera een lijst met snapshots
SettingH7: Hier ziet u een lijst met geïnstalleerde camera's. Vul uw
5.1.2. Instellingen van uw camera op uw Android smartphone wijzigen
• Druk in het beginscherm van uw App op het tabblad "Settings".
• Druk op de camera waar u instellingen van wilt wijzigen.
• Vul bij "Manager's Name" de gebruikersnaam in en bij "Manager's Password" het
Camera InfoI1: Druk op deze knop om meer informatie op te vragen,
Change WiFi RouterI2: Druk op deze knop om een lijst met beschikbare WIFI
Alert & Notify SettingI3: Druk op deze knop om in te stellen wanneer u een
Real time video SettingI4: Druk op deze knop om onder andere de microfoon aan
SD Card Recording SettingI5: Druk op deze knop voor SD kaart opname instellingen.
SD Card Video PlaybackI6: Druk op deze k nop om opnames op de SD kaart terug te
Password SettingI7: Druk op deze knop om bij "Manager's Name" uw
Date & TimeI8: Druk op deze knop om de datum en tijd te wijzigen.
5.2. Bewegings- en geluidsdetectie
Met deze functie geeft de camera een melding wanneer de camera beweging of geluid
detecteert.
H4
: Dit is het beginscherm van de App. Hier kunt u een
Tip: Standaard is de "Manager's Name" ingesteld als "admin". Het "Manager's Password"
is standaard ingesteld als "0000".
bijbehorende wachtwoord in en druk op "OK".
Tip: Standaard is de "Manager's Name" ingesteld als "admin". Het "Manager's Password"
is standaard ingesteld als "0000".
nieuwe camera toevoegen, een camera importeren en
uw geïnstalleerde camera's bekijken.
weergegeven.
gebruikersnaam en wachtwoord in om uw instellingen te
wijzigen.
waaronder het IP adres.
netwerken te bekijken en te wijzigen.
melding wilt ontvangen wanneer de camera beweging of
geluid detecteert. Voor informatie zie paragraaf 5.2.
en uit te zetten en om de tijdsweergave aan en uit te
zetten. Onder "Video quality setting" kunt u de resolutie
van het videobeeld wijzigen.
kijken.
gebruikersnaam en bij "Manager's Password" het
bijbehorende wachtwoord te wijzigen. Ook kunt bij
"Camera's Password" het wachtwoord van de camera
wijzigen.
39
Page 40

5.2.1. Email snapshot alert
Met deze functie ontvangt u een e-mail met een foto wanneer de camera beweging of
geluid detecteert.
Let op! Voor deze functie heeft u een Gmailadres nodig.
• Druk op "Alert & Notify Setting" in het menu "Settings"
• Druk op "Email snapshot alert"
• Druk op "Motion detection enabled" om een melding te ontvangen wanneer de
camera beweging detecteert
• Druk op "sensitivity" om de gevoeligheid in te stellen. U kunt kiezen voor de opties:
hoog, middel en laag. K3.
• Druk op "Sound detection enabled" om een melding te ontvangen wanneer de camera
geluid detecteert K4.
• Druk op "sensitivity" om de gevoeligheid in te stellen. U kunt kiezen voor de opties:
hoog, middel en laag. K5.
• Druk op "SD card remove detection" om een melding te ontvangen wanneer de SD
kaart wordt verwijderd K6.
• Druk op "SD card out of space alert" om een melding te ontvangen wanneer de SD
kaart vol zit K7.
• Stel bij "Notication subject" het onderwerp van de mail in wanneer u een melding
ontvangt L1.
• Vul bij "Receiver Email" het e-mailadres in waarop u de meldingen wilt ontvangen L2.
• Druk op "Gmail SMTP email account" om het gmail-adres in te vullen waarvandaan de
mail wordt verzonden L3. Vul bij "Password" het wachtwoord van uw e-mail in.
5.2.2. Phone App alert notication
Met deze functie ontvangt u een melding op uw telefoon wanneer de camera beweging
of geluid detecteert.
• Druk op "Alert & Notify Setting" in het menu "Settings" I3.
• Druk op "Phone App alert noticitation" J2. Druk vervolgens op "Phone App alert
notication" M1.
• Druk op "Motion detection enabled" om een melding te ontvangen wanneer de
camera beweging detecteert M2.
• Druk op "sensitivity" om de gevoeligheid in te stellen. U kunt kiezen voor de opties:
hoog, middel en laag. M5.
• Druk op "Sound detection enabled" om een melding te ontvangen wanneer de camera
geluid detecteert M4.
• Druk op "sensitivity" om de gevoeligheid in te stellen. U kunt kiezen voor de opties:
hoog, middel en laag. M5.
• Druk op "SD card remove detection" om een melding te ontvangen wanneer de SD
kaart wordt verwijderd M6.
• Druk op "SD card out of space alert" om een melding te ontvangen wanneer de SD
kaart vol zit M7.
J1
. Druk vervolgens op "Email snapshot alert" K1.
K2
.
.
I
40
Page 41

6. Reiniging en onderhoud
Waarschuwing! Haal het apparaat uit alle spanningsbronnen voordat u het reinigt.
De toestellen zijn onderhoudsvrij, dus maak ze niet open. De garantie vervalt als u het
apparaat opent. Reinig enkel de buitenkant van de toestellen met een zachte, droge doek
of borstel.
7. Milieu en afdanken
Het symbool op het materiaal, de accessoires of verpakking geeft aan dat dit
product niet als huishoudelijk afval mag worden behandeld. Voer het apparaat af
via het verzamelpunt voor de recycling van afgedankte elektrische en
elektronische apparatuur binnen de EU en in andere Europese landen die aparte
verzamelsystemen voor gebruikte elektrische en elektronische apparatuur
kennen. Door het apparaat op de juiste manier af te voeren, helpt u mogelijke gevaren
voor het milieu en de volksgezondheid te voorkomen die anders door verkeerde
behandeling van het afgedankte apparaat zouden worden veroorzaakt. Het recyclen van
materialen draagt bij aan het behoud van natuurlijke rijkdommen. Voer daarom uw oude
elektrische en elektronische apparatuur niet af via het huishoudelijke afval.
8. Garantie
Voor dit apparaat geldt een beperkte 3 jarige garantie. Ga voor de garantievoorwaarden
naar: www.elro.eu.
Guide d'utilisation C706IP
Merci d'avoir acheté la caméra en réseau C706IP. Pour pouvoir utiliser votre caméra au plus
vite et en toute simplicité, nous vous conseillons de prendre attentivement connaissance
de ce manuel avant toute utilisation.
Vous trouverez l'explication des symboles utilisés dans ce manuel au début de ce chapitre.
1. Mesures de précaution et consignes de
sécurité
1.1. Symboles de sécurité utilisés
Avertissement! Un avertissement indique un risque de dommage (grave) à l'utilisateur
ou au produit, si l'utilisateur ne respecte pas soigneusement les procédures.
Attention! Une remarque attire l'attention de l'utilisateur sur des problèmes éventuels.
41
Page 42

!
Conseil: Un conseil attire l'attention de l'utilisateur sur des astuces et des possibilités
supplémentaires.
1.1.1. Notications
Avertissement! N'installez pas l'appareil à l'extérieur ou à des endroits exposés à
l'humidité.
Avertissement! N'installez pas l'appareil à un endroit exposé à une chaleur ou un froid
extrême.
Avertissement! Avant d'installer la caméra, vériez qu'aucun câble électrique ou tuyau
d'eau ne passe à l'endroit où vous comptez forer.
Avertissement! Débranchez immédiatement l'alimentation du produit en retirant
la che de la prise de courant et prenez ensuite contact avec le service d'assistance
Smartwares, lorsque:
• des composants matériels du produit sont ouverts, perforés, humides ou sont tombés
de haut;
• le câble d'alimentation de l'adaptateur est eloché ou est ouvert de sorte que le métal
est visible;
• le boîtier de l'adaptateur est endommagé;
• l'adaptateur est entré en contact avec de l'humidité ou de l'eau;
• le verre de la caméra est fendu ou cassé;
Avertissement! Il est interdit d'ouvrir ou de réparer soi-même le produit. Cela
annulerait toutes les garanties. Ne faites entretenir le produit que par du personnel
d'entretien certié.
Avertissement! N'utilisez que des accessoires originaux du fabricant.
Avertissement! Conservez le produit hors de portée des enfants.
Avertissement! Débranchez toutes les sources d'alimentation de l'appareil avant de le
nettoyer.
Avertissement! Utilisez un chion propre et sec pour nettoyer le produit.
Avertissement! N'utilisez pas de produits abrasifs, de détergents corrosifs, de produits
à base de javel ou de solvants pour nettoyer le produit.
Avertissement! Débranchez l'adaptateur de la prise de courant durant un orage, des
éclairs et lorsque le produit n'est pas utilisé durant longtemps.
Attention! Installez le produit tel qu'indiqué dans ce manuel. En cas de doute,
consultez un installateur agréé et respectez toujours les prescriptions locales de
montage.
Attention! Évitez d'exposer la caméra à la lumière directe du soleil.
Attention! N'orientez pas la caméra vers des bois, branches ou autres objets mobiles.
Attention! Le produit ne peut être jeté avec les déchets ménagers non triés, mais doit
entrer dans le cycle du tri sélectif.
Attention! Informez-vous auprès des autorités régionales pour savoir où restituer le
produit une fois hors service. Ne jetez pas les appareils et composants électriques.
Vériez si le produit (ou ses composants) peut être collecté, recyclé ou réutilisé.
Attention! Les systèmes sans l peuvent être perturbés par des téléphones portables,
microondes ou tout autre appareil sans l utilisant la fréquence 2,4 GHz. Conservez
le produit à au moins 3 mètres de distance de toute source de nuisance durant
l'installation et le fonctionnement.
Attention! La nuit, la caméra ne peut lmer à travers une vitre. Tenez-en compte lors
de son installation.
42
Page 43

2. Utilisation prévue
La C706IP est une caméra de surveillance permettant de visionner les images de
surveillance sur votre smartphone par l'intermédiaire de l'application «uCare Cam». Pour
ce faire, la C706IP doit être connectée à un réseau Wi-Fi.
La caméra peut réaliser des enregistrements vidéo et audio de jour. De plus, elle est
également dotée de détecteurs de mouvement et de bruit.
Attention ! Le mode d'emploi fait référence à l'utilisation de la caméra avec un
téléphone Android. Les étapes principales pour l'utilisation avec un iPhone sont
décrites séparément. Les autres manipulations sont similaires à celles de l'application
Android.
3. Caractéristiques techniques
3.1. Caractéristiques générales du produit
Capteur: Capteur CMOS Color 1/6"
Résolution: 640 x 480 pixels (300 000 pixels)
Objectif IR: f: 3.0mm
Angle de vision: 55 degrés
Compression vidéo: MJPEG
Images par seconde: 1 ~ 25fps(QVGA)
Source de courant: Adaptateur 230VAC/5VDC/1A
Consommation électrique: 5W (Max.)
Température: 0°C ~ 55°C (32°F~131°F)
Conguration minimale requise :
Enregistrement sur carte : Prend en charge les cartes micro mémoire ash jusqu'à 32
Go
Systèmes d'exploitation mobiles compatibles: OS iOS 5.0 et supérieur / Android
4.0 et supérieur
Certications: CE, FCC, RoHS, R&TTE
Garantie: Garantie limitée de 3 ans
3.2. Principaux composants
1. Câble USB
2. Adaptateur
3. Caméra C706IP avec pied
4. Manuel d'utilisation
5. Gabarit en carton
3.3. Raccordements
1. Touche Reset / WPS
2. Connecteur pour carte micro mémoire ash
3. Port micro USB
4. Micro
2
1
43
Page 44

4. Installation de la caméra
4.1. Connecter la caméra
• Branchez le câble USB dans l'adaptateur et dans le port micro USB de la caméra 3.
• Branchez ensuite la che de l'adaptateur dans la prise murale.
• Avant de procéder au réglage de la caméra, attendez que les LED verte et rouge
clignotent en alternance.
Vous pouvez ajouter votre caméra IP à votre téléphone à l'aide d'un routeur Wi-Fi. Vous
pouvez procéder à la connexion soit en mode routeur, soit en mode conguration WPS.
Dans le texte ci-dessous, nous vous expliquons comment établir une connexion avec le
routeur.
4.2. Ajout d'une caméra à votre smartphone via le mode
routeur
Attention! Pour établir une connexion sans l avec votre caméra, vous avez besoin
d'un routeur.
Attention! Si votre routeur est protégé par un mot de passe, ce dernier vous sera
demandé.
Attention! Pour utiliser l'application "uCare Cam", vous avez besoin d'un smartphone
avec accès à Internet.
Pour paramétrer votre caméra via Android, rendez-vous au paragraphe 4.2.1. Pour
paramétrer votre caméra via iOS, rendez-vous au paragraphe 4.2.2.
4.2.1. Android
• Téléchargez l'application "uCare Cam" sur Google Play et installez-la.
• Lancez l'application. L'écran de démarrage de l'application apparaît.
• Cliquez sur l'option "Click here to install new wi Camera" A2. Le menu "WiFi connect"
apparaît B.
• Appuyez sur la touche «Routermode»B1 pour ajouter la caméra via le réseau Wi-Fi.
• Vériez que les LED rouge et verte de la caméra clignotent en alternance. Si tel est le
cas, appuyez sur «next».
Attention! Si les LED verte et rouge de la caméra ne clignotent pas en alternance:
• Rebranchez l'adaptateur dans la prise murale.
• Patientez 15secondes et maintenez la touche WPS/RSET enfoncée pendant
10secondes.
• Patientez jusqu'à ce que les LED rouge et verte de la caméra clignotent en alternance.
• Appuyez ensuite sur «next».
• Patientez jusqu'à ce que l'écran suivant apparaisse et que votre image vidéo s'ache.
Appuyez ensuite sur «next».
• Sélectionnez le réseau Wi-Fi avec lequel vous souhaitez connecter la caméra.
• Saisissez deux fois le mot de passe du réseau Wi-Fi que vous avez choisi et appuyez sur
la touche «OK».
D
A
C
44
Page 45

Attention! Si votre routeur est protégé par un mot de passe, ce dernier vous sera
demandé.
• Sur l'écran suivant, appuyez sur «OK». La caméra est à présent en ligne et a été ajoutée
à votre liste de caméras.
4.2.2. iOS
• Ouvrez le menu «Settings» de votre iPhone.
• Dans le menu, appuyez sur «Wi-Fi» et patientez jusqu'à ce que votre téléphone trouve
le réseau «wi-cam-p2p».
• Cliquez sur ce réseau pour établir la connexion.
• Téléchargez l'application "uCare Cam" sur l'App Store et installez-la.
• Lancez l'application. L'écran de démarrage de l'application apparaît.
• Cliquez sur l'option "Click here to install new wi Camera" . Le menu "WiFi connect"
apparaît B.
• Appuyez sur la touche «Routermode»B1 pour ajouter la caméra via le réseau Wi-Fi.
• Cliquez sur «next». Saisissez ensuite le nom de votre routeur et le mot de passe
correspondant et cliquez sur «next».
Attention! Si votre routeur est protégé par un mot de passe, ce dernier vous sera
demandé.
Une fois que les informations auront été transmises à la caméra, celle-ci redémarrera.
• Cliquez sur «next». Saisissez à présent le nom d'utilisateur et le mot de passe de la
caméra.
!
Conseil: Généralement, le nom d'utilisateur standard est «admin». Le mot de passe
correspondant est déni par défaut sur «0000».
La caméra redémarre et établit une connexion avec le routeur. Cette opération peut
prendre jusqu'à 10minutes. Une fois la connexion établie avec succès, la LED orange de la
caméra s'allume.
Attention ! Si la LED orange ne s'allume pas, vériez que votre caméra se trouve dans
la zone de portée de votre routeur. Exécutez ensuite une nouvelle fois les étapes
susmentionnées.
• Lancez l'application. L'écran de démarrage de l'application apparaît.
• Cliquez sur le nom de la caméra pour établir la connexion.
E
A
A
4.3. Ajout de la caméra à un nouveau smartphone à
l'aide d'un code QR
Attention ! Cette fonction est uniquement disponible si la caméra a déjà été ajoutée
via un autre smartphone. Consultez le paragraphe 4.2.2. pour les systèmes Android, et
le paragraphe 4.2.2. pour les systèmes iOS.
4.3.1. Android
• Lancez l'application. L'écran de démarrage de l'application apparaît.
A
45
Page 46

• Cliquez sur l'option "Click here to import installed WiFiCam". Le menu "Add new
WiFiCam" apparaît.
• Appuyez sur le bouton "QR code".
Une fois scanné, l'écran G s'ouvre.
• Appuyez sur «Please input» et saisissez le mot de passe de la caméra. Appuyez ensuite
sur «OK».
Attention ! Le «Camera's Password» est déni par défaut sur «0000».
La caméra est à présent connectée à votre smartphone et a été ajoutée à votre liste de
caméras
.
E
4.3.2. iOS
• Lancez l'application. L'écran de démarrage de l'application apparaît.
• Appuyez sur le signe «+» dans le coin supérieur droit de l'écran.
• Appuyez sur le bouton "Scan camera QR code". Scannez ensuite le code QR sous votre
caméra.
Une fois scanné, l'écran G s'ouvre.
• Appuyez sur «Please input» et saisissez le mot de passe de la caméra. Appuyez ensuite
sur «Done».
Attention ! Le «Camera's Password» est déni par défaut sur «0000».
La caméra est à présent connectée à votre smartphone et a été ajoutée à votre liste de
caméras E.
4.4. Installation de la caméra
Attention! Assurez-vous que la caméra fonctionne correctement à l'endroit choisi
avant de commencer le montage.
Vous pouvez choisir d'installer la caméra sur une surface plate, ou de la visser à l'endroit
de votre choix.
Pour installer la caméra avec des vis, procédez comme suit:
• Reproduisez les points sur le support souhaité à l'aide des gabarits en carton fournis
.
4
Attention! Utilisez des vis dont la tête est adaptée au pied de la caméra.
Attention! Si le support est trop dur pour procéder au vissage (pierre/béton cellulaire),
forez des trous et utilisez des chevilles.
• Faites glissez le pied de la caméra par-dessus les vis.
5. Gérer votre caméra via votre smartphone
Veillez à ce que votre (vos) caméra(s) soi(en)t connectée(s) à votre smartphone via
l'application «uCare Cam» (voir paragraphe 4.2.).
Attention ! Ce chapitre est uniquement consacré aux instructions concernant les
téléphones Android. Les instructions à suivre pour les téléphones iPhone sont
similaires à celles de l'application Android.
Scannez ensuite le code QR sous votre caméra.
F
A
5
46
Page 47

5.1. Visionnage des images de la caméra depuis
votre smartphone
• À partir de l'écran de démarrage de l'application, appuyez sur la caméra que vous
souhaitez gérer. E L'image de la caméra apparaît sur votre smartphone.
Attention! Si vous ne recevez aucune image, il est possible que votre connexion sans
l ne soit pas assez rapide. Dans ce cas, modiez la résolution de votre image (voir
paragraphe 5.1.2.).
L'écran de la caméra ore un certain nombre d'options:
• Appuyez sur le bouton "Snapshot" H1 pour prendre un instantané de l'image de votre
caméra.
• Appuyez sur la touche Microphone H2 pour activer et désactiver le microphone.
• Appuyez sur la touche Help H3 pour de plus amples informations.
5.1.1. Onglets
Camera ListH4: Ceci est l'écran d'accueil de l'application. Vous pouvez
WIFI SettingH5: Cet onglet vous permet de procéder à l'ajout d'une
Plan ListH6: Vous trouverez ici une liste avec captures d'écran pour
SettingH7: Vous trouverez ici une liste reprenant les caméras
Conseil: Généralement, le nom «Manager's Name» standard est «admin». Le
«Manager's Password» est déni par défaut sur «0000».
5.1.2. Modier les réglages de votre caméra sur votre smartphone Android
• Sur l'écran d'accueil de l'application, appuyez sur l'onglet «Settings».
• Appuyez sur la caméra dont vous souhaitez modier les paramètres.
• Saisissez le nom d'utilisateur dans le champ «Manager's Name» et le mot de passe
correspondant dans le champ«Manager's Password» et cliquez sur «OK».
Conseil: Généralement, le nom «Manager's Name» standard est «admin». Le
«Manager's Password» est déni par défaut sur «0000».
Camera InfoI1: Appuyez sur cette touche pour obtenir de plus amples
Change WiFi RouterI2: Appuyez sur cette touche pour visualiser et modier la
Alert & Notify SettingI3: Appuyez sur cette touche pour dénir quand vous
Real time video SettingI4: Appuyez sur cette touche pour entre autres activer et
ici ajouter une nouvelle caméra, importer une caméra ou
acher les caméras installées.
nouvelle caméra.
chaque caméra.
installées. Saisissez votre nom d'utilisateur et votre mot
de passe pour modier les paramètres.
informations, parmi lesquelles l'adresse IP.
liste des réseaux Wi-Fi disponibles.
souhaitez recevoir un message au cas où la caméra
détecte un mouvement ou un bruit. Pour de plus amples
informations, consultez le paragraphe 5.2.
désactiver le microphone et pour activer et désactiver
H
47
Page 48

l'achage de l'heure. Vous pouvez modier la résolution
de vos images vidéo sous«Video quality setting».
I5
SD Card Recording Setting
SD Card Video PlaybackI6: Appuyez sur cette touche pour visionner les
Password SettingI7: Appuyez sur cette touche pour modier le nom
Date & Time
5.2. Détection de mouvement et de bruit
Cette fonction permet à la caméra d'émettre un avertissement lorsqu'elle détecte un
mouvement ou un bruit.
5.2.1. Email snapshot alert
Cette fonction vous permet de recevoir un e-mail accompagné d'une photo lorsque la
caméra détecte un mouvement ou un bruit.
• Appuyez sur «Alert & Notify Setting» dans le menu«Settings» I.
• Appuyez sur «Email snapshot alert» J1. Appuyez ensuite sur «Email snapshot alert»
• Appuyez sur «Motion detection enabled» pour recevoir un message lorsque la caméra
• Appuyez sur «sensitivity» pour régler la sensibilité. Vous pouvez choisir parmi les
• Appuyez sur «Sound detection enabled» pour recevoir un message lorsque la caméra
• Appuyez sur «sensitivity» pour régler la sensibilité. Vous pouvez choisir parmi les
• Appuyez sur «SD card remove detection» pour recevoir un message lorsque la carte
• Appuyez sur «SD card out of space alert» pour recevoir un message lorsque la carte
• Dans le champ «Notication subject», dénissez le sujet du mail que vous voulez voir
• Dans le champ «Receiver Email» saisissez l'adresse à laquelle vous souhaitez recevoir
• Appuyez sur «Gmail SMTP email account» pour saisir l'adresse Gmail au départ de
I8
: Appuyez sur cette touche pour modier la date et l'heure.
Attention ! Cette fonction requiert une adresse Gmail.
K1
.
détecte un mouvement K2.
options suivantes: élevée, moyenne et faible. K3.
détecte un bruit K4.
options suivantes: élevée, moyenne et faible. K5.
SD est retirée du système K6.
SD est pleine K7.
s'acher lorsque vous recevez un message L1.
les messages L2.
laquelle les mails seront envoyés L3. Dans le champ «Password», saisissez le mot de
passe de votre compte de messagerie.
: Appuyez sur cette touche pour accéder aux paramètres
des enregistrements sur carte SD.
enregistrements mémorisés sur la carte SD.
d'utilisateur du champ «Manager's Name» et le mot de
passe correspondant du champ «Manager's Password».
Vous pouvez également modier le mot de passe de la
caméra dans le champ «Camera's Password».
48
Page 49

5.2.2. Phone App alert notication
Cette fonction vous permet de recevoir un message sur votre téléphone lorsque la caméra
détecte un mouvement ou un bruit.
• Appuyez sur «Alert & Notify Setting» dans le menu«Settings»
• Appuyez sur «Phone App alert notication» J2. Appuyez ensuite sur «Phone App
alert notication»
• Appuyez sur «Motion detection enabled» pour recevoir un message lorsque la caméra
détecte un mouvement
• Appuyez sur «sensitivity» pour régler la sensibilité. Vous pouvez choisir parmi les
options suivantes: élevée, moyenne et faible.
• Appuyez sur «Sound detection enabled» pour recevoir un message lorsque la caméra
détecte un bruit M4.
• Appuyez sur «sensitivity» pour régler la sensibilité. Vous pouvez choisir parmi les
options suivantes: élevée, moyenne et faible. M5.
• Appuyez sur «SD card remove detection» pour recevoir un message lorsque la carte
SD est retirée du système M6.
• Appuyez sur «SD card out of space alert» pour recevoir un message lorsque la carte
SD est pleine M7.
6. Nettoyage et entretien
Avertissement! Débranchez toutes les sources d'alimentation de l'appareil avant de le
nettoyer.
Les appareils ne requièrent pas d'entretien, ne les ouvrez pas. La garantie s'annule si vous
ouvrez l'appareil. Ne nettoyez que l'extérieur des appareils à l'aide d'une brosse ou d'un
chion doux et sec.
7. Environnement et mise au rebut
Ce symbole sur le matériel, ses accessoires ou son emballage indique que le
produit ne doit pas être traité comme un déchet ménager. Veuillez mettre cet
équipement au rebut au point de collecte prévu pour le recyclage des déchets
des équipements électriques et électroniques, dans l'Union européenne et dans
d'autres pays européens disposant de systèmes de collecte distincts pour les
produits électriques et électroniques usagés. En vous assurant de la correcte mise au rebut
de ce produit, vous contribuez à réduire les risques potentiels pour l'environnement et la
santé publique susceptibles de se produire suite à une gestion inappropriée des déchets
de ce produit. Le recyclage des matériaux contribue également à la préservation des
ressources naturelles. Nous vous remercions donc de ne pas mettre vos équipements
électriques et électroniques au rebut avec les ordures ménagères normales.
8. Garantie
Cet appareil bénécie d'une garantie limitée de 3 ans. Pour connaître toutes les conditions
de la garantie, surfez sur: www.elro.eu.
M1
.
M2
.
M5
.
I3
.
49
Page 50

Manual C706IP
Gracias por adquirir la cámara de red C706IP. Para poder utilizar la cámara con la mayor
facilidad y rapidez, se recomienda leer este manual detalladamente con antelación.
Las ilustraciones de este manual se encuentran antes de este capítulo.
1. Precauciones e instrucciones de seguridad
1.1. Símbolos de seguridad usados
¡Advertencia! Una advertencia indica el riesgo de lesiones (graves) para el usuario o de
daños al producto, si el usuario no sigue los procedimientos atentamente.
¡Nota! Una nota avisa al usuario de posibles problemas.
!
Consejo: Un consejo ofrece al usuario trucos y posibilidades adicionales.
1.1.1. Noticaciones
¡Advertencia! No instale este dispositivo en exteriores ni en lugares donde pueda
mojarse.
¡Advertencia! No instale este dispositivo en lugares de calor o frío extremos.
¡Advertencia! Antes de proceder con la instalación, compruebe que la pared que
desea taladrar no contenga cables eléctricos ni tuberías.
¡Advertencia! Interrumpa inmediatamente la alimentación del dispositivo
desconectándolo de la toma de corriente y contacte con el servicio técnico de
Smartwares si:
• los componentes de hardware del dispositivo están expuestos, perforados, húmedos
o en mal estado;
• la alimentación del adaptador está dañada o abierta de forma que el metal sea visible;
• la carcasa del adaptador está dañada;
• el adaptador se ha expuesto a la humedad o a líquidos;
• el cristal de la cámara está agrietado o roto;
¡Advertencia! No está permitido abrir o reparar el producto personalmente ni dejar
que otros lo hagan. En tal caso, la garantía perderá su validez. El mantenimiento debe
ser realizado por personal técnico certicado.
¡Advertencia! Utilice solamente accesorios originales del fabricante.
¡Advertencia! Mantenga este producto fuera del alcance de los niños.
¡Advertencia! Desconecte el dispositivo de todas las fuentes de alimentación antes de
limpiarlo.
¡Advertencia! Utilice un paño limpio y seco para limpiar el dispositivo.
¡Advertencia! No utilice limpiadores abrasivos, cáusticos, con lejía o disolventes para
50
Page 51

limpiar el dispositivo.
¡Advertencia! Desconecte el adaptador de la toma de corriente en caso de tormenta o
relámpagos y cuando no vaya a utilizar el dispositivo durante un período prolongado.
¡Nota! Instale el dispositivo tal como se especica en este manual. En caso de duda,
consulte a un instalador cualicado y respete siempre las normas de instalación locales.
¡Nota! Evite exponer la cámara a la luz solar directa.
¡Nota! No dirija la cámara hacia arbustos, ramas u otros objetos en movimiento.
¡Nota! El dispositivo no debe eliminarse como residuo urbano sin clasicar, sino que
debe recogerse por separado.
¡Nota! Infórmese de las posibilidades existentes para la retirada de dispositivos al nal
de su vida útil en su región. No deseche los componentes y aparatos eléctricos, pueden
entregarse, reciclarse o reutilizarse completa o parcialmente.
¡Nota! Los sistemas inalámbricos puede captar interferencias de teléfonos
inalámbricos, hornos microondas y otros dispositivos inalámbricos que operen en la
frecuencia de 2,4 GHz. Mantenga el dispositivo a un mínimo de 3 metros de distancia
de posibles fuentes de interferencias durante su instalación y funcionamiento.
¡Nota! La cámara no puede ver de noche a través del cristal. Téngalo en cuenta durante
la instalación.
2. Uso previsto
La C706IP es una cámara de seguridad que le permite vigilar desde su teléfono inteligente
mediante la aplicación "uCare Cam". Para ello la C706IP debe conectarse a una red WI-FI
para funcionar.
La cámara puede efectuar grabaciones de audio y video durante el día. Además, la cámara
está equipada con detectores de movimiento y de sonido.
¡Atención! Este manual está dedicado al uso de la cámara con teléfonos Android.
Los pasos principales se describen por separado para teléfonos iPhone. El resto de
operaciones son similares a las de la aplicación para Android.
3. Especicaciones técnicas
3.1. Especicaciones generales del producto
Sensor: Sensor CMOS Color 1/6"
Resolución: 640 x 480 píxeles (300.000 píxeles)
Lente IR: f: 3.0mm
Ángulo de visión: 55 grados
Compresión de vídeo: MJPEG
Imágenes por segundo: 1 ~ 25fps(QVGA)
Fuente de alimentación: adaptador 230 V CA/5 V CC/1 A
Consumo de energía: 5 W (máx.)
Temperatura: 0°C ~ 55°C (32°F~131°F)
Requisitos mínimos del sistema:
Almacenamiento de tarjetas: Compatible con tarjetas microSD de hasta 32 GB
Sistemas operativos móviles
compatibles: iOS 5.0 y superiores / Android 4.0 y superiores
Certicaciones: CE, FCC, RoHS, R&TTE
Garantía: Límite de 3 años de garantía
51
Page 52

3.2. Componentes principales
1. Cable USB
2. Adaptador
3. C706IPcámara con base
4. Manual del usuario
5. Plantilla de cartón
3.3. Conexiones
1. Reset / botón WPS
2. Entrada para tarjeta micro SD
3. Conector para micro USB
4. Micrófono
2
1
4. Instalación de la cámara
4.1. Conexión de la cámara
• Conecte el cable USB al adaptador y al conector Micro USB de la cámara 3.
• A continuación, conecte el adaptador a la toma de corriente.
• Espere para congurar la cámara hasta que los LED verde y rojo parpadeen
alternativamente.
Puede agregar su IP Camera al teléfono mediante un enrutador Wi-Fi. Para realizar la
conexión, puede elegir entre el modo de enrutador o el modo de conguración WPS. El
texto siguiente explica como conectarla a través del modo de enrutador.
4.2. Añadir una cámara al teléfono inteligente a través
del modo de enrutador
¡Nota! Para establecer una conexión inalámbrica con la cámara se requiere un router
inalámbrico.
¡Nota! Si el router está protegido por contraseña, deberá conocerla.
¡Atención! Para utilizar la aplicación "uCare Cam" se requiere un teléfono inteligente
con acceso a Internet.
Para congurar la cámara en un sistema Android, consulte la sección 4.2.1. Para congurar
la cámara en un sistema iOS, consulte la sección 4.2.2.
4.2.1. Android
• Descargue la aplicación "uCare Cam" a través de Google Play e instálela.
• Ejecute la aplicación. Se mostrará la pantalla de inicio de la aplicación.
• Seleccione la opción "Click here to install new wi Camera" A2. Aparecerá el menú
"WiFi connect" B.
• Pulse el botón "Routermode"B1 para agregar la cámara a través de la red Wi-Fi.
• Compruebe que los LED rojo y verde de la cámara parpadeen. Cuando esto suceda,
pulse "next".
¡Atención! Si las luces verde o roja de la cámara no parpadean:
• Reconecte el adaptador a la toma de corriente.
• Espere 15 segundos y mantenga pulsado el botón WPS/RSET durante 10 segundos.
A
52
Page 53

• Espere hasta que los LED rojo y verde de la cámara parpadeen alternativamente.
• A continuación, pulse "next".
• Espere hasta que aparezca la siguiente pantalla y se muestre la imagen del vídeo. A
continuación, pulse "next".
• Seleccione la red Wi-Fi a la que desea que se conecte la cámara.
• Introduzca la contraseña de la red Wi-Fi seleccionada dos veces y luego pulse el botón
"OK".
D
¡Nota! Si el router está protegido por contraseña, deberá conocerla.
• En la siguiente pantalla, pulse "OK". La cámara se conectará y se agregará a la lista de
cámaras.
E
4.2.2. iOS
• Abra el menú "Ajustes" del iPhone.
• Pulse el menú "WI-FI" y espere hasta que el teléfono localice la red "wi-cam-p2p".
• Haga clic en la red para establecer la conexión.
• Descargue la aplicación "uCare Cam" a través del App Store e instálela.
• Ejecute la aplicación. Se mostrará la pantalla de inicio de la aplicación.
• Seleccione la opción "Click here to install new wi Camera" . Aparecerá el menú "WiFi
connect" B.
• Pulse el botón "Routermode"B1 para agregar la cámara a través de la red Wi-Fi.
• Haga clic en "next". A continuación, introduzca el nombre del enrutador y la contraseña
correspondiente y haga clic en "next".
¡Nota! Si el router está protegido por contraseña, deberá conocerla.
Una vez que la cámara haya recibido la información, se reiniciará.
• Haga clic en "next". A continuación, introduzca el nombre de usuario y la contraseña
de la cámara.
!
Consejo: Por defecto, el nombre de usuario viene denido como "admin". La
contraseña predenida es "0000".
La cámara se reiniciará y establecerá una conexión con el enrutador. Este proceso puede
tardar un máximo de 10 minutos. Si el proceso es correcto, el LED naranja de la cámara
permanecerá encendido.
¡Atención! Si el LED naranja no se enciende, compruebe que la cámara se encuentra
dentro del rango de alcance del enrutador. A continuación, repita los pasos anteriores.
• Ejecute la aplicación. Se mostrará la pantalla de inicio de la aplicación.
• Haga clic en el nombre de la cámara para establecer la conexión.
C
A
A
4.3. Añadir la cámara a un nuevo teléfono inteligente a
través del código QR
¡Atención! Esta función sólo funciona correctamente si la cámara ya se ha agregado
a otro teléfono inteligente previamente. Para ello, consulte el apartado 4.2.2. para
Android y el 4.2.2. para iOS.
53
Page 54

4.3.1. Android
• Ejecute la aplicación. Se mostrará la pantalla de inicio de la aplicación.
• Seleccione la opción "Click here to import installed WiFiCam". Aparecerá el menú "Add
new WiFiCam".
• Pulse "QR code ". F Escanee el código QR situado en la parte inferior de la cámara.
Después del escaneo, se muestra la pantalla G.
• Pulse en "Please Input" e introduzca la contraseña de la cámara. A continuación, pulse
"OK".
¡Atención! "Camera's Password" está predenido como "0000".
La cámara se conectará al teléfono inteligente y se agregará a la lista de cámaras E.
4.3.2. iOS
• Ejecute la aplicación. Se mostrará la pantalla de inicio de la aplicación.
• Pulse el signo "+" en la esquina superior derecha de la pantalla.
• Pulse "Scan camera QR code". Escanee el código QR situado en la parte inferior de la
cámara.
Después del escaneo, se muestra la pantalla G.
• Pulse en "Please Input" e introduzca la contraseña de la cámara. A continuación, pulse
"Done".
¡Atención! "Camera's Password" está predenido como "0000".
La cámara se conectará al teléfono inteligente y se agregará a la lista de cámaras E.
4.4. Montaje de la cámara
¡Nota! Asegúrese de que la cámara funciona correctamente en la ubicación elegida
antes de comenzar la instalación.
Puede optar por colocar la cámara sobre una supercie plana o bien atornillarla en una
ubicación de su elección.
Para montar la cámara con tornillos, siga los siguientes pasos:
• Marque los oricios sobre la supercie deseada con ayuda de la plantilla de cartón
suministrada 4.
¡Atención! Utilice tornillos cuya cabeza encaje en la base de la cámara.
¡Atención! Si la supercie es demasiado dura para atornillar (piedra/hormigón), debe
taladrar y utilizar tacos.
• Deslice la base de la cámara sobre los tornillos.
5
A
A
5. Administrar la cámara desde el teléfono
inteligente
Asegúrese de que la cámara está conectada al teléfono inteligente a través de la aplicación
"uCare Cam" (consulte el apartado 4.2.).
¡Atención! En este capítulo se explican únicamente las operaciones para teléfonos
54
Page 55

Android. Los procedimientos para iPhone son similares a las de la aplicación para
Android.
5.1. Ver la imagen de la cámara en el teléfono
inteligente
• En la pantalla de inicio de la aplicación, pulse la cámara que desea administrar. E La
imagen de la cámara aparecerá en el teléfono inteligente.
¡Atención! Si no recibe la imagen, es posible que la conexión inalámbrica no sea lo
sucientemente rápida. En tal caso, modique la resolución de imagen de la cámara
(consulte la sección 5.1.2.)
La interfaz de la cámara proporciona diversas opciones:
• Pulse "Snapshot" H1 para capturar la imagen de la cámara de forma instantánea.
• Pulse el botón Microphone H2 para activar/desactivar el micrófono.
• Pulse el botón Help H3 para obtener más información.
5.1.1. Pestañas
Camera ListH4: Es la pantalla de inicio de la aplicación. En ella puede
WIFI SettingH5: En esta pestaña puede agregar una nueva cámara.
Play ListH6: Muestra una lista de las instantáneas tomadas por cada
SettingH7: Presenta una lista de las cámaras instaladas. Introduzca
Consejo: Por defecto, "Manager's Name" está predenido como "admin" y "Manager's
Password" está predenido como "0000".
5.1.2. Modicar la conguración de la cámara en un teléfono inteligente
Android
• En la pantalla de inicio de la aplicación, pulse la pestaña "Settings".
• Pulse los ajustes de la cámara que desee cambiar.
• Introduzca el nombre de usuario en "Manager's Name" y la contraseña correspondiente
en "Manager's Password". Luego pulse "OK".
Consejo: Por defecto, "Manager's Name" está predenido como "admin" y "Manager's
Password" está predenido como "0000".
Camera InfoI1: Pulse este botón para ver más información, dirección IP
Change WiFi RouterI2: Pulse este botón para ver una lista de las redes Wi-Fi
Alert & Notify SettingI3: Pulse este botón para denir si desea recibir
agregar una nueva cámara, importar cámaras y ver las
cámaras ya instaladas.
cámara.
su nombre de usuario y contraseña para cambiar la
conguración.
incluida.
disponibles y seleccionar la deseada.
noticaciones cuando la cámara detecta movimiento
o sonido. Para obtener más información, consulte el
apartado 5.2.
H
55
Page 56

Real time video SettingI4: Pulse este botón para, entre otras opciones, activar/
SD Card Recording Setting
SD Card Video PlaybackI6: Pulse este botón para reproducir las grabaciones de la
Password Setting
Date & TimeI8: Pulse este botón para modicar la fecha y la hora.
5.2. Detección de movimiento y sonido
Mediante esta función, la cámara muestra un mensaje si la cámara detecta movimiento o
sonido.
5.2.1. Email snapshot alert
Mediante esta función, recibirá un correo electrónico con una imagen si la cámara detecta
movimiento o sonido.
¡Atención! Para hacer uso de esta función se requiere una dirección de Gmail.
• Pulse "Alert & Notify Setting" en el menú "Settings" I.
• Pulse "Email snapshot alert" J1. A continuación, pulse "Email snapshot alert" K1.
• Pulse "Motion detection enabled" para recibir una noticación si la cámara detecta
movimiento K2.
• Pulse "sensitivity" para ajustar la sensibilidad. Puede elegir entre las opciones: alta,
media y baja. K3.
• Pulse "Sound detection enabled" para recibir una noticación si la cámara detecta
sonido K4.
• Pulse "sensitivity" para ajustar la sensibilidad. Puede elegir entre las opciones: alta,
media y baja. K5.
• Pulse "SD card remove detection" para recibir una noticación si se retira la tarjeta SD
K6
• Pulse "SD card out of space alert" para recibir una noticación si la tarjeta SD se llena
K7
• En "Notication subject", seleccione el asunto del correo electrónico para las
noticaciones L1.
• En "Receiver Email", introduzca la dirección de correo electrónico en la cual desea
recibir las noticaciones L2.
• Pulse "Gmail SMTP email account" para indicar la dirección de gmail desde la que se
enviarán los correos electrónicos L3. En "Password", introduzca la contraseña de gmail.
I7
: Pulse este botón para cambiar el nombre de usuario
.
.
desactivar el micrófono y la visualización de la hora. En
"Video quality setting" puede cambiar la resolución de la
imagen del vídeo.
I5
: Pulse este botón para congurar la grabación en una
tarjeta SD.
tarjeta SD.
en "Manager's Name" y la contraseña correspondiente
en "Manager's Password". También puede cambiar la
contraseña de la cámara en "Camera's Password".
56
Page 57

5.2.2. Phone App alert notication
Mediante esta función, recibirá una noticación en el teléfono si la cámara detecta
movimiento o sonido.
• Pulse "Alert & Notify Setting" en el menú "Settings"
• Pulse "Phone App alert notication" J2. A continuación, pulse "Phone App alert
notication"
• Pulse "Motion detection enabled" para recibir una noticación si la cámara detecta
movimiento
• Pulse "sensitivity" para ajustar la sensibilidad. Puede elegir entre las opciones: alta,
media y baja.
• Pulse "Sound detection enabled" para recibir una noticación si la cámara detecta
sonido M4.
• Pulse "sensitivity" para ajustar la sensibilidad. Puede elegir entre las opciones: alta,
media y baja. M5.
• Pulse "SD card remove detection" para recibir una noticación si se retira la tarjeta SD
M6
• Pulse "SD card out of space alert" para recibir una noticación si la tarjeta SD se llena
M7
6. Limpieza y mantenimiento
¡Advertencia! Desconecte el dispositivo de todas las fuentes de alimentación antes de
limpiarlo.
El dispositivo no precisa mantenimiento, por lo que no debe abrirlo. La garantía pierde
su validez al abrir el dispositivo. Limpie el exterior del dispositivo con un paño o cepillo
suave y seco.
7. Medio ambiente y eliminación
productos eléctricos y electrónicos usados. La eliminación correcta ayuda a prevenir
riesgos naturales y a proteger la salud y el medio ambiente que la gestión incorrecta de
estos dispositivos podría provocar. El reciclaje de materiales ayuda a conservar los recursos
naturales. No deseche dispositivos eléctricos o electrónicos junto con los residuos
domésticos.
8. Garantía
Este dispositivo tiene una garantía limitada de 3 año(s). Consulte las condiciones de la
garantía en: www.elro.eu.
M1
.
M2
.
M5
.
.
.
Este símbolo en el producto, sus accesorios o su embalaje indica que este
producto no debe tratarse como un residuo doméstico. La eliminación de este
aparato debe realizarse a través de un punto de recogida designado para el
reciclaje de dispositivos eléctricos y electrónicos en la UE y en otros países
europeos que dispongan de sistemas de recogida independientes para los
I3
.
57
Page 58

kılavuzu C706IP
C706IP ağ kamerasını satın aldığınız için teşekkür ederiz. Kameranızı mümkün olduğunca
hızlı ve kolay kullanabilmeniz için kullanmadan önce bu kılavuzu dikkatle gözden
geçirmenizi öneririz.
Bu kullanma talimatının resimlerini önce bu bölümde bulacaksınız.
1. İhtiyat tedbirleri ve güvenlik talimatları
1.1. Kullanılan emniyet sembolleri
Uyarı! Bir uyarı, kullanıcının prosedürleri özenle uygulamadığı takdirde, kullanıcı ya da
ürünün (ciddi) zarar görme olasılığı riskine işaret eder.
Lütfen dikkat! Kullanıcının muhtemel sorunlara dikkatini çeken bir işarettir.
!
İpucu: Bir ipucu, kullanıcının kullanışlı işlevlere ve ek olanaklara dikkatini çeker.
1.1.1. Uyarılar
Uyarı! Ürünü dışarıya ve nem olabilecek yerlere monte etmeyin.
Uyarı! Ürünü çok sıcak veya soğuk olabilecek yerlere monte etmeyin.
Uyarı! Kurulumdan önce, deleceğiniz yerde duvarın içinden elektrik kabloları ve su
borularının geçip geçmediğini kontrol edin.
Uyarı! Aşağıdaki durumlarda, cihazın şini prizden çekerek akımı kesin ve ardından
Smartwares yardım masasına başvurun:
• cihaz donanım bileşenlerinin açıkta durması, delinmiş olması, nemli veya sert bir
şekilde yere düşmüş olması;
• besleme kablosu adaptörün püsküllü olması veya açık durması nedeniyle metalin
görünür olması halinde;
• adaptörün mahfazası hasarlı ise;
• adaptörün nem veya sıvılarla temas etmesi halinde;
• Kameranın camı çatladı veya kırıldı ise;
Uyarı! Ürünü bizzat açmanıza (açtırmanıza) ya da tamir etmenize (ettirmenize) izin
verilmez. Bu durumda garantiler geçersiz olur. Bakımı, sertikalı bir bakım personeline
yaptırın.
Uyarı! Sadece üreticinin orijinal aksesuarlarını kullanın.
Uyarı! Ürünü çocukların ulaşamayacağı bir yerde muhafaza edin.
Uyarı! Temizlemeden önce cihazın tüm güç kaynaklarıyla bağlantısını kesin.
Uyarı! Ürünü temizlemek için temiz kuru bir bez kullanın.
Uyarı! Ürünü temizlemek için aşındırıcı, yakıcı temizlik malzemeleri veya içinde çamaşır
suyu bulunan maddeler veya çözücüler kullanmayın.
58
Page 59

Uyarı! Bir fırtına, yıldırım sırasında ya da ürün uzun bir süre kullanılmayacaksa adaptörü
prizden çıkarın.
Lütfen dikkat! Ürünü bu kılavuzda belirtildiği şek ilde monte edin. Şüpheli durumlarda
yetkili bir teknisyene danışın ve her zaman yerel montaj talimatlarını dikkate alın.
Lütfen dikkat! Kamerayı doğrudan güneş ışığından koruyun.
Lütfen dikkat! Kamerayı çalılara, dallara veya diğer hareketli cisimlere doğru tutmayın.
Lütfen dikkat! Ürün ayrıştırılmamış kentsel atık olarak imha edilemez, ayrı ayrı işleme
tabi tutulmalıdır.
Lütfen dikkat! Artık kullanılmadığında ürünü bölgenizde nereye teslim edebileceğiniz
hakkında bilgi edinin. Elektrikli cihazları ve parçalarını atmayın, ürünün (veya
parçalarının) dönüşümü ve yeniden kullanılabilmesi için nereye teslim edilebileceğini
öğrenin.
Lütfen dikkat! Kablosuz sistemler, 2,4 GHz aralığında çalışan kablosuz telefonlar,
mikrodalga fırınlar ve diğer kablosuz cihazlar tarafından bozulabilir. Ürün, kurulum ve
kullanım sırasında potansiyel arıza kaynaklarından en az 3 metre uzakta tutulmalıdır.
Lütfen dikkat! Kamera geceleri camdan göremez. Konumlandırırken bunu göz önünde
bulundurun.
2. Amaçlanan kullanım
C706IP, "uCare Cam" uygulaması yardımıyla güvenlik görüntülerini akıllı telefonunuzdan
izleyebilmenizi mümkün kılan bir güvenlik kamerasıdır. C706IP bunun için bir WIFI
bağlantısına bağlanmalıdır.
Kamera gün boyunca görüntü ve ses kaydı yapabilir. Kamera ayrıca hareket sensörü ve ses
sensörü ile donatılmıştır.
Dikkat! Bu kılavuz kameranın Android telefon yardımıyla kullanımını esas alır. iPhone
için en önemli adımlar ayrı olarak tanımlanmıştır. Diğer işlemler Android uygulaması ile
benzerdir.
3. Teknik özellikler
3.1. Genel ürün özellikleri
Sensör: 1/6” Renkli CMOS Sensörü
Çözünürlük: 640 x 480 piksel (300k piksel)
IR objektif: f: 3.0mm
Görüş açısı: 55 derece
Video sıkıştırma: MJPEG
Saniye başına kare: 1 ~ 25fps(QVGA)
Güç kaynağı: 230VAC/5VDC/1A Adaptör
Enerji tüketimi: 5W (Maks.)
Sıcaklık: 0°C ~ 55°C (32°F~131°F)
Minimum sistem gereksinimleri
Kart bellek 32 GB'a k adar olan mikro SD kartları destekler
Desteklenen mobil cihaz OS: iOS 5.0 ve üzeri / Android 4.0ve üzeri
Sertikasyon: CE, FCC, RoHS, R&TTE
Garanti: Sınırlı 3-yıllık garanti
59
Page 60

3.2. Önemli parçalar
1. USB kablosu
2. Adapt
3. Sehpalı C706IPkamera
4. Kullanıcı kılavuzu
5. Karton kalıp
3.3. Bağlantılar
1. Reset / WPS düğmesi
2. Mikro SD kart girişi
3. Mikro USB bağlantısı
4. Mikrofon
1
2
4. Kamera kurulumu
4.1. Kameranın bağlanması
• USB kablosunu adaptöre ve 3 kameranın Micro USB portuna takın.
• Ardından adaptörün şini prize takın.
• Kameranızın kurulumu için yeşil ve kırmızı LED’ler sırasıyla yanıp sönene dek bekleyin.
IP kameranızı telefonunuza WIFI yönlendirici kullanarak ekleyebilirsiniz. Yönlendirici modu
ya da WPS kurulum modu ile bağlantı yapmayı seçebilirsiniz. Aşağıda yönlendirici modu ile
bağlantı yapma seçeneği açıklanmıştır.
4.2. Akıllı telefonunuza yönlendirici modu ile kamera
eklenmesi
Lütfen dikkat! Kameranız ile kablosuz bir bağlantı sağlamanız için k ablosuz bir
yönlendiriciye ihtiyacınız vardır.
Lütfen dikkat! Yönlendiricinin bir parolası varsa, bu parolayı bilmeniz gerekir.
Dikkat! "uCare Cam" uygulamasını kullanabilmek için, internet bağlantısına sahip bir
akıllı telefon gerekmektedir.
Kameranızın ayarlarını Android üzerinden yapmak için bölüm 4.2.1 gidin. Kameranızın
ayarlarını iOS üzerinden yapmak için bölüm 4.2.2 gidin.
4.2.1. Android
• Google Play'den "uCare Cam" uygulamasını indirin ve kurun.
• Uygulamayı başlatın. Uygulamanın giriş ekranı görüntülenecektir.
• "Click here to install new wi Camera" öğesini seçin A2. "WiFi connect" menüsü
görüntülenecektir B.
• WIFI ağı üzerinden kamera eklemek üzere "Routermode"B1 düğmesine basınız.
• Kamera üzerindeki LED’in değişimli olarak kırmızı ve yeşil renkte yanıp söndüğünü
kontrol edin. Bu durumda “next” düğmesine basın.
Dikkat! Kamera dönüşümlü olarak yeşil ya da kırmızı renkte yanıp sönmüyorsa:
• Adaptörü tekrar prize takın.
• 15 saniye bekleyin ve WPS/RSET düğmesini 10 saniye boyunca basılı tutun.
• Kamera üzerindeki LED dönüşümlü olarak kırmızı ve yeşil renkte yanıp sönünceye dek
A
60
Page 61

bekleyin.
• Ardından "next" düğmesine basın.
• Bir sonraki ekran görüntülenene ve video görüntüsü görünene dek bekleyin. Ardından
“next” düğmesine basın.
• Kameranın iletişim kurmasını istediğiniz WIFI ağını seçin.
• Seçmiş olduğunuzu WIFI ağının şifresini iki kez girin ve “OK” düğmesine basın.
Lütfen dikkat! Yönlendiricinin bir parolası varsa, bu parolayı bilmeniz gerekir.
• Bir sonraki ekranda “OK” düğmesine basın. Kamera artık çevrim içidir ve kamera
listenize eklenmiştir.
4.2.2. iOS
• iPhone’unuzun “Settings” menüsünü açın.
• Menüden “WI-FI” seçeneğine basın ve telefonunuzun “wi-cam-p2p” ağını aramasını
sağlayın.
• Bağlantı kurmak için ağa tıklayın.
• App Store'dan "uCare Cam" uygulamasını indirin ve kurun.
• Uygulamayı başlatın. Uygulamanın giriş ekranı görüntülenecektir.
• "Click here to install new wi Camera" öğesini seçin . "WiFi connect" menüsü
görüntülenecektir B.
• WIFI ağı üzerinden kamera eklemek üzere "Routermode"B1 düğmesine basınız.
• "next" seçeneğine tıklayın. Ardından yönlendiricinizin ismini ve şifreyi girin ve “next”
seçeneğine tıklayın.
Lütfen dikkat! Yönlendiricinin bir parolası varsa, bu parolayı bilmeniz gerekir.
Kamera bilgileri aldıktan sonra yeniden açılacaktır.
• "next" seçeneğine tıklayın. Şimdi kullanıcı ismini ve kameranın şifresini girin.
!
Not: Varsayılan kullanıcı ismi “admin” olarak ayarlanmıştır. Bu kullanıcı hesabının şifresi
de standart olarak “0000” olarak belirlenmiştir.
Kamera yeniden başlayacak ve yönlendirici ile bağlantı kuracaktır, bu işlem en fazla 10
dakika sürebilir. Bağlantı başarıyla kurulduğunda, kamera üzerindeki LED turuncu renkte
yanacaktır.
Dikkat! LED turuncu renkte yanmazsa, kameranızın yönlendiricinin kapsama alanı
içinde olup olmadığını kontrol edin. Ardından yukarıda belirtilen adımları tekrarlayın.
• Uygulamayı başlatın. Uygulamanın giriş ekranı görüntülenecektir.
• Bağlantı kurmak için kameranızın ismine tıklayın.
E
C
A
A
D
4.3. Kameranın, QR kodu yardımıyla yeni bir akıllı
telefon eklenmesi
Dikkat! Bu işlev sadece kameranın hali hazırda bir başka akıllı telefon aracılığı ile
eklenmiş olması halinde çalışır. Bunu yapmak üzere Android için bkz. Paragraf 4.2.2. ve
iOS için 4.2.2..
61
Page 62

4.3.1. Android
• Uygulamayı başlatın. Uygulamanın giriş ekranı görüntülenecektir.
• "Click here to import installed WiFiCam" öğesini seçin. "Add new WiFiCam" menüsü
görüntülenecektir.
• "QR code" seçeneğine dokunun. F Ardından kameranızın altındaki QR kodunu tarayın.
Taramanın ardından G ekranı görüntülenir.
• "Please Input" düğmesine basın ve kameranın şifresini girin. Ardından “OK” düğmesine
basın.
Dikkat! "Camera's Password" standart olarak “0000” olarak belirlenmiştir.
Kamera artık akıllı telefonunuza bağlanmış ve E kamera listenize eklenmiştir.
4.3.2. iOS
• Uygulamayı başlatın. Uygulamanın giriş ekranı görüntülenecektir.
• Ekranın sağ üst köşesindeki "+" işaretine basın.
• "Scan camera QR code" seçeneğine dokunun. Ardından kameranızın altındaki QR
kodunu tarayın.
Taramanın ardından G ekranı görüntülenir.
• "Please Input" seçeneğine basın ve kameranın şifresini girin. Ardından "Done”
seçeneğine basın.
Dikkat! "Camera's Password" standart olarak “0000” olarak belirlenmiştir.
Kamera artık akıllı telefonunuza bağlanmış ve E kamera listenize eklenmiştir.
4.4. Kameranın montajı
Lütfen dikkat! Kuruluma başlamadan önce, kameranın seçilen yerde düzgün
çalıştığından emin olun.
Kamerayı düz bir yüzeyin üzerine yerleştirebilir ya da seçtiğiniz bir yere vidalayabilirsiniz.
Kamerayı vidalarla monte etmeden önce aşağıdaki adımları uygulayın.
• Cihazla birlikte verilen karton şablonu kullanarak delikleri istenen yüzeye çizin 4.
Dikk at! Kameranın ayağına uygun kafaya sahip vidalar kullanın.
Dikk at! Zemin vidalamak için çok sert ise (taş/gazbeton), delik açmanız ve dübel
kullanmanız gerekir.
• Kameranın ayağını vidaların üzerinden kaydırın.
5
A
A
5. Kameranızın akıllı telefon üzerinden
kontrolü
Kameranızın (kameralarınızın) “uCare Cam” uygulaması aracılığıyla akıllı telefonunuza
bağlanmasını sağlayın (bkz. Paragraf 4.2.).
Dikkat! Bu bölümde açıklanan işlemler sadece Android telefon içindir. iPhone için
işlemler Android uygulamasına benzerdir.
62
Page 63

5.1. Akıllı telefonunuzdan kamera görüntüsünün
izlenmesi
• Uygulamanın giriş ekranında kontrol etmek istediğiniz kameraya dokunun. E
Kameradan alınan görüntü akıllı telefonunuzda görünecektir.
Dikkat! Görüntü alamıyorsanız internet bağlantınız yeterince hızlı olmayabilir. Bu
durumda kamera görüntüsünün çözünürlüğünü değiştirin (bkz. bölüm 5.1.2.)
Kamera ekranı bir takım seçenekler sunar:
• Kamera görüntüsünden anlık görüntü almak için "Snapshot" H1 düğmesine dokunun.
• Mikrofonu açıp kapamak üzere Microphone H2 düğmesine basın.
• Daha fazla bilgi için Help H3 düğmesine basın.
5.1.1. Sekmeler
Camera ListH4: Bu uygulamanın ana ekranıdır. Bu ekrandan yeni bir
WIFI SettingH5: Bu sekmede yeni bir kamera ekleyebilirsiniz.
Play ListH6: Burada her bir kamera için anlık görüntüler içeren bir
SettingH7: Burada kurulu kameraların bir listesini bulabilirsiniz.
Not: "Manager's Name" standart olarak "admin" olarak ayarlanmıştır. "Manager's
Password" ise standart olarak "0000" olarak belirlenmiştir.
5.1.2. Kameranızın ayarlarının Android akıllı telefonunuzdan değiştirilmesi
• Uygulamanızın ana ekranında “Settings” sekmesine basın.
• Ayarlarını değiştirmek istediğiniz kamerayı seçin.
• "Manager's Name" alanına kullanıcı ismini ve "Manager's Password" alanına bu
kullanıcı hesabına ait şifreyi girin ve “OK “ düğmesine basın.
Not: "Manager's Name" standart olarak "admin" olarak ayarlanmıştır. "Manager's
Password" ise standart olarak "0000" olarak belirlenmiştir.
Camera InfoI1: IP adresi dâhil olmak üzere, daha fazla bilgi almak üzere
Change WiFi RouterI2: Erişilebilir WIFI ağlarının bir listesini incelemek ve
Alert & Notify SettingI3: Kamera hareket ya da ses algıladığında ne zaman mesaj
Real time video SettingI4: Diğerlerinin yanı sıra mikrofonu ve saat gösterimini açıp
SD Card Recording SettingI5: SD kart kayıt ayarları için bu düğmeye basın.
SD Card Video PlaybackI6: SD k art üzerindeki kayıtlara bakmak üzere bu düğmeye
kamera ekleyebilirsiniz, bir kamera aktarabilirsiniz ve
kurulu kameralarınızı inceleyebilirsiniz.
liste verilir.
Ayarları değiştirmek üzere kullanıcı adınızı ve şifrenizi
girin.
bu düğmeye basın.
değiştirmek üzere bu düğmeye basın.
almak istediğinizi ayarlamak üzere bu düğmeye basın.
Bilgi için bkz. paragraf 5.2.
kapamak üzere bu düğmeye basın. “Video quality setting”
seçeneği altında video görüntüsünün çözünürlüğünü
değiştirebilirsiniz.
basın.
H
63
Page 64

Password SettingI7: “Manager’s Name” alanında kullanıcı isminizi ve
Date & TimeI8: Tarih ve saati değiştirmek üzere bu düğmeye basın.
5.2. Hareket ve ses algılama
Bu işlev ile kamera, bir hareket ya da ses algıladığında bir mesaj gönderir.
5.2.1. Email snapshot alert
Bu işlev ile kamera bir hareket ya da ses algıladığında fotoğraı bir e-posta alırsınız.
Dikkat! Bu işlev için bir Gmail adresiniz olması gerekmektedir.
• “Settings” menüsünden “Alert & Notify Setting” öğesine basın I.
• "Email snapshot alert" J1 seçeneğine basın. Ardından "Email snapshot alert" K1
seçeneğine basın.
• Kamera hareket algıladığında bir mesaj almak üzere "Motion detection enabled"
seçeneğine basın K2.
• Hassasiyeti ayarlamak üzere "sensitivity" seçeneğine basın. Şu seçenekler arasından
seçim yapabilirsiniz: yüksek, orta ve düşük. K3.
• Kamera ses algıladığında mesaj almak üzere "Sound detection enabled" seçeneğine
basın K4.
• Hassasiyeti ayarlamak üzere "sensitivity" seçeneğine basın. Şu seçenekler arasından
seçim yapabilirsiniz: yüksek, orta ve düşük. K5.
• SD kart çıkarıldığında mesaj almak üzere "SD card remove detection" seçeneğine basın
K6
.
• SD kart dolduğunda mesaj almak üzere "SD card out of space alert" seçeneğine basın
K7
.
• "Notication subject" alanında, alacağınız mesajın konusunu belirleyin L1.
• "Receiver Email" alanına bildirimleri alacağınız e-posta adresini girin L2.
• E-postanın gönderileceği gmail adresini girmek üzere "Gmail SMTP email account"
seçeneğine basın L3. "Password" alanına e-posta şifrenizi girin.
5.2.2. Phone App alert notication
Bu işlev ile kamera hareket ya da ses algıladığında telefonunuza mesaj gönderilir.
• “Settings” menüsünden “Alert & Notify Setting” öğesine basın I3.
• "Phone App alert noticitation" seçeneğine basın J2. Ardından "Phone App alert
notication" seçeneğine basın M1.
• Kamera hareket algıladığında bir mesaj almak üzere "Motion detection enabled"
seçeneğine basın M2.
• Hassasiyeti ayarlamak üzere "sensitivity" seçeneğine basın. Şu seçenekler arasından
seçim yapabilirsiniz: yüksek, orta ve düşük. M5.
“Manager’s Password” alanında bu kullanıcı isminin
şifresini değiştirmek üzere bu düğmeye basın.
“Camera’s Password” alanından da kameranızın şifresini
değiştirebilirsiniz.
64
Page 65

• Kamera ses algıladığında mesaj almak üzere "Sound detection enabled" seçeneğine
M4
.
basın
• Hassasiyeti ayarlamak üzere "sensitivity" seçeneğine basın. Şu seçenekler arasından
seçim yapabilirsiniz: yüksek, orta ve düşük. M5.
• SD kart çıkarıldığında mesaj almak üzere "SD card remove detection" seçeneğine basın
M6
.
• SD kart dolduğunda mesaj almak üzere "SD card out of space alert" seçeneğine basın
M7
.
6. Temizlik ve bakım
Uyarı! Temizlemeden önce cihazın tüm güç kaynaklarıyla bağlantısını kesin.
Cihazlar bakım gerektirmez, bu nedenle açılmamalıdır. Cihazı açarsanız garanti geçersiz
olacaktır. Cihazların sadece dış tarafını yumuşak, kuru bir bez veya fırça ile temizleyin.
7. Çevre ve imhası
Malzeme, aksesuarlar veya ambalajın üzerinde bulunan sembol, bu ürünün evsel
atık olarak işleme tabi tutulamayacağını gösterir. Cihazı AB içinde, eski elektrikli
ve elektronik cihazların geri dönüşümü için toplama noktası ve diğer Avrupa
ülkelerinde, kullanılmış elektrikli ve elektronik cihazların geri dönüşümü için özel
olarak öngörülmüş toplama sistemleri yoluyla imha edin. Cihazı doğru şekilde
imha ederek, aksi halde eskimiş cihazların neden olabileceği çevre ve toplum sağlığı için
oluşabilecek muhtemel riskleri önlemeye katkıda bulunabilirsiniz. Malzemelerin geri
dönüşümü doğal kaynakların korunması için katkıda bulunur. Bu nedenle eski elektrikli ve
elektronik cihazlarınızı evsel atıklarla birlikte imha etmeyin.
8. Garanti
Bu cihaz için 3 yıllık sınırlı bir garanti vardır. Garanti şartları için lütfen www.elro.eu adresini
ziyaret edin.
Εγχειρίδιο C706IP
Σας ευχαριστούμε για την αγορά σας της δικτυακής κάμερας C706IP. Για να μπορείτε να
χρησιμοποιήστε την κάμερά σας όσο πιο γρήγορα και όσο το δυνατόν ευκολότερα, σας
συνιστούμε να διαβάσετε αυτό το εγχειρίδιο προσεκτικά πριν την χρήση της κάμερας.
Μπορείτε να βρείτε τις εικόνες αυτού του εγχειρίδιου πριν από αυτό το κεφάλαιο.
65
Page 66

1. Προφυλάξεις και οδηγίες ασφαλείας
1.1. Σύμβολα ασφαλείας που χρησιμοποιούνται
Προειδοποίηση! Μία προειδοποίηση δηλώνει την πιθανότητα (σοβαρής) βλάβης στον
χρήστη ή στο προϊόν, εάν ο χρήστης δεν έχει εκτελέσει προσεκτικά τις προβλεπόμενες
διαδικασίες.
Προσοχή! Ένα σχόλιο εφιστά την προσοχή του χρήστη για πιθανά προβλήματα.
!
Συμβουλή: Μία συμβουλή εφιστά την προσοχή του χρήστη σε τεχνάσματα και σε
επιπλέον δυνατότητες της κάμερας.
1.1.1. Ειδοποιήσεις
Προειδοποίηση! Μην συναρμολογήσετε την συσκευή σε εξωτερικό χώρο ή σε μέρη
όπου μπορεί να βραχεί.
Προειδοποίηση! Μην συναρμολογείτε το προϊόν σε μέρη που μπορεί να έχουν
υπερβολική ζέστη ή υπερβολικό κρύο.
Προειδοποίηση! Πριν ξεκινήσετε την εγκατάσταση ελέγξτε εάν στον τοίχο όπου
σκοπεύετε να τρυπήσετε περνούν καλώδια ηλεκτρικού ρεύματος και σωληνώσεις
νερού.
Προειδοποίηση! Σταματάτε αμέσως την παροχή ρεύματος στο προϊόν βγάζοντας το
φις από την πρίζα και μετά επικοινωνείτε με το Smartwares servicedesk, όταν:
• εξαρτήματα του εξοπλισμού είναι ανοικτά, έχουν τρυπηθεί, έχουν υγρασία ή έχουν
υποστεί σκληρή μεταχείριση,
• το καλώδιο παροχής του μετασχηματιστή είναι ξεφτισμένο ή είναι ανοικτό έτσι ώστε να
φαίνεται το μέταλλο,
• το κάλυμμα του μετασχηματιστή είναι καταστραμμένο,
• ο μετασχηματιστής ήρθε σε επαφή με υγρασία ή υγρά
• το γυαλί της κάμερας είναι ραγισμένο ή σπασμένο,
Προειδοποίηση! Δεν επιτρέπεται να ανοίξετε μόνοι σας (ή να ανοίξουν για εσάς) ή
να επισκευάσετε (ή να επισκευάσουν για εσάς) το προϊόν. Σε αυτή την περίπτωση
δεν ισχύουν οι εγγυήσεις. Επιτρέψτε την εκτέλεση των εργασιών συντήρησης από
πιστοποιημένο προσωπικό συντήρησης.
Προειδοποίηση! Χρησιμοποιείτε μόνο τα αυθεντικά εξαρτήματα του κατασκευαστή.
Προειδοποίηση! Κρατήστε το προϊόν μακριά από τα παιδιά.
Προειδοποίηση! Βγάλτε την συσκευή από κάθε πηγή τάσης πριν την καθαρίσετε.
Προειδοποίηση! Για τον καθαρισμό του προϊόντος χρησιμοποιείστε ένα στεγνό
καθαρό πανί.
Προειδοποίηση! Μην χρησιμοποιείτε για τον καθαρισμό του προϊόντος αποξεστικά
μέσα, διαβρωτικά μέσα καθαρισμού ή μέσα καθαρισμού με λευκαντικά ή διαλύτες.
Προειδοποίηση! Βγάλτε τον μετασχηματιστή από την πρίζα κατά την διάρκεια
καταιγίδας, αστραπών και όταν το προϊόν δεν χρησιμοποιείται για μεγάλα χρονικά
διαστήματα.
Προσοχή! Συνομολογείστε το προϊόν όπως σας υποδεικνύεται σε αυτό το εγχειρίδιο.
Σε περίπτωση αμφιβολίας συμβουλευτείτε έναν αναγνωρισμένο μηχανικό και τηρήστε
πάντα τους τοπικούς κανονισμούς συναρμολόγησης.
Προσοχή! Αποφύγετε το άμεσο ηλιακό φως πάνω στην κάμερα.
Προσοχή! Μην κατευθύνετε την κάμερα προς θάμνους, κλαδιά και άλλα
μετακινούμενα αντικείμενα.
Προσοχή! Το προϊόν δεν μπορεί να απορριφθεί σαν σύμμεικτο αστικό απόρριμμα,
66
Page 67

αλλά πρέπει να συλλεχθεί ξεχωριστά.
Προσοχή! Ενημερωθείτε εντός των ορίων της περιοχή σας για το πλαίσιο των
δυνατοτήτων παράδοσης του προϊόντος μετά τη λήξη της χρήσης. Μην απορρίπτετε
ηλεκτρικές συσκευές και εξαρτήματα, αλλά κοιτάξτε εάν (τμήματα) του προϊόντος
μπορούν να παραδοθούν, ανακυκλωθούν ή να επαναχρησιμοποιηθούν.
Προσοχή! Τα ασύρματα συστήματα μπορούν να παρεμβληθούν από ασύρματα
τηλέφωνα, μικροκύματα και άλλες ασύρματες συσκευές που λειτουργούν στο όριο
των 2,4 GHz. Κρατήστε το προϊόν τουλάχιστον τρία μέτρα μακριά από πιθανές πηγές
παρεμβολών κατά την διάρκεια της εγκατάστασης και του χειρισμού.
Προσοχή! Το βράδυ, η κάμερα δεν μπορεί να δει μέσα από γυαλί. Λάβετε το υπόψη
σας κατά την τοποθέτηση της.
2. Ενδεδειγμένη χρήση
Η C706IP είναι μία κάμερα επιτήρησης η οποία σας επιτρέπει να δείτε στο έξυπνο κινητό
σας εικόνες της επιτήρησης με την βοήθεια της εφαρμογής "uCare Cam". Για αυτό το
σκοπό η C706IP πρέπει να είναι συνδεδεμένη με μία σύνδεση WIFI.
Η κάμερα μπορεί να καταγράψει εικόνα και ήχο κατά την διάρκεια της ημέρας. Επιπλέον η
κάμερα είναι εφοδιασμένη με ανιχνευτή κίνησης και ήχου.
Προσοχή! Το εγχειρίδιο είναι βασισμένο πάνω στην χρήση της κάμερας με την
βοήθεια κινητού με την εφαρμογή Android. Για το iPhone τα πιο σημαντικά βήματα
περιγράφονται ξεχωριστά. Οι υπόλοιπες οδηγίες συγκρίνονται με την εφαρμογή
Android.
3. Τεχνικά χαρακτηριστικά
3.1. Γενικές προδιαγραφές του προϊόντος
Αισθητήρας: 1/6” Έγχρωμος CMOS Αισθητήρας
Ανάλυση: 640 x 480 Pixels (300k Pixels)
Φακός IR: f : 3.0mm
Γωνία λήψης: 55 βαθμοί
Συμπίεση βίντεο: MJPEG
Εικόνες ανά δευτερόλεπτο: 1 ~ 25fps(QVGA)
Πηγή τάσης: 230VAC/5VDC/1A Μετασχηματιστής
Κατανάλωση ενέργειας 5W (Max.)
Θερμοκρασία: 0°C ~ 55°C (32°F~131°F)
Ελάχιστες απαιτήσεις του συστήματος:
Κάρτα αποθήκευσης: Υποστηρίζει κάρτα microSD μέχρι 32 GB
Κινητά που υποστηρίζουν την
εφαρμογή OS: iOS 5.0 και ανώτερο / Android 4.0 και ανώτερο
Πιστοποίηση : CE, FCC, RoHS, R&TTE
Εγγύηση: Περιορισμένη 3-ετήσια εγγύηση
3.2. Τα πιο σημαντικά εξαρτήματα
1. Καλώδιο USB
2. Αντάπτο ρας
3. C706IPκάμερα με πόδι
4. Εγχειρίδιο χρήστη
5. Χαρτόνι πρότυπο
1
67
Page 68

3.3. Συνδέσεις
1. Κουμπί Επαναφοράς / WPS
2. Εισαγωγή κάρτας Micro SD
3. Σύνδεση Micro USB
4. Μικρόφωνο
2
4. Εγκατάσταση της κάμερας
4.1. Συνδέστε την κάμερα
• Βάλτε την μία πλευρά του καλωδίου USB στον αντάπτορα και την άλλη στην σύνδεση
Micro USB της κάμερας 3.
• Μετά βάλτε το φις του αντάπτορα στην πρίζα.
• Περιμένετε λίγο πριν την εγκατάσταση της κάμεράς σας μέχρι το κόκκινο και το
πράσινο LED αρχίσουν να αναβοσβήνουν διαδοχικά.
Μπορείτε να συνδέσετε την IP Κάμερά σας στο τηλέφωνό σας με την βοήθεια ενός WIFI
Ρούτερ. Μπορείτε να επιλέξετε να συνδεθείτε μέσω της λειτουργίας ρούτερ ή μέσω της
λειτουργία WPS setup. Στο κείμενο που ακολουθεί επεξηγείται η δημιουργία σύνδεσης με
την λειτουργία ρούτερ.
4.2. Προσθέστε μία κάμερα στο έξυπνο κινητό σας μέσω
της λειτουργίας ρούτερ
Προσοχή! Για να δημιουργήσετε μία ασύρματη σύνδεση με την κάμερά σας
χρειαζόσαστε ένα ασύρματο ρούτερ.
Προσοχή! Εάν το ρούτερ σας έχει κάποιο κωδικό, θα πρέπει να ξέρετε αυτόν το
κωδικό.
Προσοχή! Για την χρήση της εφαρμογής "uCare Cam" χρειάζεστε ένα έξυπνο
τηλέφωνο με πρόσβαση στο διαδίκτυο.
Για την εγκατάσταση της κάμεράς σας μέσω Android πηγαίνετε στην παράγραφο 4.2.1. Για
την εγκατάσταση της κάμεράς σας μέσω iOS πηγαίνετε στην παράγραφο 4.2.2.
4.2.1. Android
• Κατεβάστε και εγκαταστήστε την App: “uCare Cam” μέσω Google Play.
• Ξεκινήστε την Εφαρμογή. Εμφανίζεται η αρχική οθόνη της Εφαρμογής.
• Πατήστε την επιλογή "Click here to install new wi Camera" A2. Εμφανίζεται το μενού
"WiFi connect" B.
• Πατήστε το κουμπί "Routermode"B1 για να προσθέσετε την κάμερα μέσω του νυκτίου
WIFI.
• Ελέγξτε εάν το LED της κάμερας αναβοσβήνει διαδοχικά κόκκινο και πράσινο. Σε αυτή
την περίπτωση πατήστε το "next".
Προσοχή! Στην περίπτωση που το LED της κάμερας δεν αναβοσβήνει διαδοχικά
κόκκινο και πράσινο:
• Ξαναβάλτε πάλι τον αντάπτορα στην πρίζα.
• Περιμένετε 15 δευτερόλεπτα και κρατήστε πατημένο για 10 δευτερόλεπτα το κουμπί
WPS/RSET.
• Περιμένετε μέχρι το LED της κάμερας αρχίσει να αναβοσβήνει διαδοχικά κόκκινο και
A
68
Page 69

πράσινο
• Μετά πατήστε το "next".
• Περιμένετε μέχρι να εμφανιστεί η επόμενη οθόνη και δείτε την εικόνα του βίντεο. Μετά
πατήστε το "next".
• Επιλέξτε το δίκτυο WIFI με το οποίον επιθυμείτε να συνδεθεί η κάμερα.
• Συμπληρώστε δυο φορές τον κωδικό του δικτύου WIFI που έχετε επιλέξει και πατήστε
το κουμπί "OK".
Προσοχή! Εάν το ρούτερ σας έχει κάποιο κωδικό, θα πρέπει να ξέρετε αυτόν το
κωδικό.
• Στην επόμενη οθόνη πατήστε το "OK". Τώρα η κάμερα είναι online και έχει προστεθεί
στην λίστα σας με κάμερες.
4.2.2. iOS
• Ανοίξτε το menu "Settings" στο iPhone σας.
• Στο menu πατήστε το "WI-FI" και αφήστε το τηλέφωνό σας να ψάξει για το δίκτυο
"wi-cam-p2p".
• Κάντε κλικ στο δίκτυο για να συνδεθείτε.
• Κατεβάστε και εγκαταστήστε την App “uCare Cam” μέσω του App Store.
• Ξεκινήστε την Εφαρμογή. Εμφανίζεται η αρχική οθόνη της Εφαρμογής.
• Πατήστε την επιλογή "Click here to install new wi Camera" . Εμφανίζεται το μενού
"WiFi connect" B.
• Πατήστε το κουμπί "Routermode"B1 για να προσθέσετε την κάμερα μέσω του νυκτίου
WIFI.
• Κάντε κλικ στο "next". Μετά συμπληρώστε το όνομα του ρούτερ σας και τον κατάλληλο
κωδικό και κάντε κλικ στο "next".
Προσοχή! Εάν το ρούτερ σας έχει κάποιο κωδικό, θα πρέπει να ξέρετε αυτόν το
κωδικό.
Από την στιγμή που η κάμερα συλλέξει τις πληροφορίες θα επαναξεκινήσει.
• Κάντε κλικ στο "next". Τώρα συμπληρώστε το όνομα και τον κωδικό της κάμερας.
!
Συμβουλή: Το όνομα χρήστη έχει εγκατασταθεί σαν πρότυπο "admin".Ο κατάλληλος
κωδικός έχει εγκατασταθεί σαν πρότυπο "0000".
Τώρα η κάμερα θα επαναξεκινήσει και θα συνδεθεί με το ρούτερ, αυτό μπορεί να
διαρκέσει το περισσότερο 10 λεπτά. Όταν η σύνδεση πετύχει, το LED της κάμερας θα γίνει
πορτοκαλί.
Προσοχή! Εάν το LED δεν γίνει πορτοκαλί, ελέγξτε εάν η κάμερά σας βρίσκεται μέσα
στην εμβέλεια του ρούτερ σας. Μετά, ακολουθήστε τα παραπάνω βήματα.
• Ξεκινήστε την Εφαρμογή. Εμφανίζεται η αρχική οθόνη της Εφαρμογής.
• Κάντε κλικ στο όνομα της κάμερας για να συνδεθείτε.
D
E
C
A
A
69
Page 70

4.3. Προσθέστε την κάμερα σε ένα έξυπνο κινητό
μέσω του κωδικού QR.
Προσοχή! Αυτή η λειτουργία υποστηρίζεται μόνο όταν η κάμερα έχει ήδη προστεθεί
μέσω ενός άλλου έξυπνου κινητού. Για αυτό πηγαίνετε στη παράγραφο 4.2.2. για
Android, και 4.2.2. για iOS.
4.3.1. Android
• Ξεκινήστε την Εφαρμογή. Εμφανίζεται η αρχική οθόνη της Εφαρμογής.
• Πατήστε την επιλογή "Click here to import installed WiFiCam". Εμφανίζεται το μενού
"Add new WiFiCam".
• Πατήστε το κουμπί “QR code”. F Μετά σαρώστε τον QR κωδικό στην κάτω πλευρά της
κάμεράς σας.
Μετά την σάρωση εμφανίζεται η οθόνη G.
• Πατήστε το "Please Input"και συμπληρώστε τον κωδικό της κάμερας. Μετά πατήστε
το "OK".
Προσοχή! Ο "Camera's Password"έχει εγκατασταθεί σαν πρότυπο "0000".
Η κάμερα τώρα είναι συνδεδεμένη το έξυπνο κινητό σας και έχει προστεθεί στην λίστα σας
με τις κάμερες E.
4.3.2. iOS
• Ξεκινήστε την Εφαρμογή. Εμφανίζεται η αρχική οθόνη της Εφαρμογής.
• Πατήστε το "+" σύμβολο στην πάνω δεξιά πλευρά της οθόνης.
• Πατήστε το κουμπί “Scan camera QR code”. Μετά σαρώστε τον QR κωδικό στην κάτω
πλευρά της κάμεράς σας.
Μετά την σάρωση εμφανίζεται η οθόνη G.
• Πατήστε το "Please Input" και συμπληρώστε τον κωδικό της κάμερας. Μετά πατήστε
το "Done".
Προσοχή! Ο "Camera's Password"έχει εγκατασταθεί σαν πρότυπο "0000".
Η κάμερα τώρα είναι συνδεδεμένη το έξυπνο κινητό σας και έχει προστεθεί στην λίστα σας
με τις κάμερες E.
4.4. Συναρμολογήστε την κάμερα
Προσοχή! Σιγουρευτείτε ότι η κάμερα λειτουργεί σωστά στην επιλεγμένη τοποθεσία,
πριν ξεκινήσετε με την συναρμολόγηση.
Μπορείτε να επιλέξετε να τοποθετήσετε την κάμερα σε μία επίπεδη επιφάνεια ή να την
βιδώσετε σε μία τοποθεσία της αρεσκείας σας.
Για την συναρμολόγηση της κάμερας με κατσαβίδι εκτελέστε τα ακόλουθα βήματα:
• Σημειώστε τις τρύπες στην επιθυμητή επιφάνεια με την βοήθεια των χαρτονιών που
σας παρέχονται μαζί με την κάμερα 4.
Προσοχή! Χρησιμοποιήστε βίδες με κεφάλι που να εφαρμόζει σωσ τά στο πόδι της
κάμερας.
Προσοχή! Εάν η επιφάνεια εφαρμογής είναι πολύ σκληρή για να βιδώσετε ( πέτρα,
A
A
70
Page 71

μπετόν) πρέπει να κάνετε τρύπες και να χρησιμοποιείστε ούπα.
• Σύρετε το πόδι της κάμερας πάνω από τις βίδες.
5
5. Διευθύνετε την κάμερά σας μέσω του
έξυπνου τηλεφώνου σας
Εξασφαλίστε ότι η (οι) κάμερά (ές) σας είναι συνδεδεμένη(ες) με το έξυπνο κινητό σας.
(δείτε παράγραφο 4.2.).
Προσοχή! Σε αυτό το κεφάλαιο εξηγούνται μόνο οι ενέργειες κινητού με την
εφαρμογή Android. Οι οδηγίες για το iPhone συγκρίνονται με την εφαρμογή Android.
5.1. Κοιτάξτε την εικόνα της κάμερας στο έξυπνο κινητό
σας.
• Στην αρχική σελίδα της Εφαρμογής, πατήστε πάνω στην κάμερα που θέλετε να
διευθύνετε. E Στο έξυπνο τηλέφωνό σας, εμφανίζεται η εικόνα της κάμερας.
Προσοχή! Όταν δεν έχετε εικόνα υπάρχει η πιθανότητα ότι η ασύρματη σύνδεσή σας
δεν είναι αρκετά γρήγορη. Σε αυτήν την περίπτωση αλλάξτε την ανάλυση της εικόνας
της κάμεράς σας. (δείτε παράγραφο 5.1.2.)
Η οθόνη της κάμερας προσφέρει έναν αριθμό επιλογών:
• Πατήστε το κουμπί "Snapshot" H1 για να τραβήξετε ένα στιγμιότυπο της εικόνας της
κάμεράς σας.
• Πατήστε το κουμπί Microphone H2 για να ενεργοποιήσετε και να απενεργοποιήσετε
το μικρόφωνο.
• Πατήστε το κουμπί Help H3 για περισσότερες πληροφορίες.
5.1.1. Καρτέλες
Camera ListH4: Αυτή είναι η οθόνη έναρξης της Εφαρμογής. Εδώ
WIFI Setting H5: σε αυτήν την καρτέλα μπορείτε να προσθέσετε μια
Play ListH6: Εδώ παρουσιάζεται για κάθε κάμερα μία λίστα με
SettingH7: Εδώ βλέ πετε μία λίστα των εγκατεστημένων καμερών.
Συμβουλή: Το "Manager's Name" έχει εγκατασταθεί σαν πρότυπο "admin". Ο
"Manager's Password" έχει εγκατασταθεί σαν πρότυπο "0000".
5.1.2. Αλλάξτε τις ρυθμίσεις της κάμεράς σας από το Android έξυπνο κινητό σας.
• Στην αρχική οθόνη της Εφαρμογής σας πατήστε την καρτέλα"Settings".
• Πατήστε την κάμερα της οποίας τις ρυθμίσεις θέλετε να αλλάξετε.
μπορείτε να προσθέσετε μία καινούργια κάμερα, να
εισάγετε μία κάμερα και να κοιτάξετε την εγκαταστημένη
σας κάμερα.
καινούργια κάμερα.
στιγμιότυπα.
Συμπληρώστε το όνομα χρήστη σας και τον κωδικό σας
για να αλλάξετε τις ρυθμίσεις σας.
H
71
Page 72

• Στο "Manager's Name" συμπληρώστε το όνομα χρήστη και στον "Manager's Password"
τον κατάλληλο κωδικό και πατήστε το "OK".
Συμβουλή: Το "Manager's Name" έχει εγκατασταθεί σαν πρότυπο "admin". Ο
"Manager's Password" έχει εγκατασταθεί σαν πρότυπο "0000".
Camera Info
Change WiFi Router
Alert & Notify Setting
Real time video SettingI4: Πατήστε αυτό το κουμπί μεταξύ άλλων για να
SD Card Recording SettingI5: Πατήστε αυτό το κουμπί για ρυθμίσεις των λήψεων
SD Card Video PlaybackI6: Πατήσ τε αυτό το κουμπί για να δείτε παλιές λήψεις στην
Password SettingI7: Πατήστε αυτό το κουμπί για να αλλάξετε το όνομα
Date & TimeI8: Πατήστε αυτό το κουμπί για να αλλάξετε την ώρα και την
5.2. Ανίχνευση κίνησης - ήχου
Με αυτήν την λειτουργία η κάμερα εκπέμπει ένα μήνυμα όταν ανιχνεύει ήχο ή κίνηση.
5.2.1. Email snapshot alert
Με αυτήν την λειτουργία λαμβάνετε ένα e-mail με μία φωτογραφία όταν η κάμερα
ανιχνεύει ήχο ή κίνηση.
• Πατήστε το "Alert & Notify Setting" στοt menu "Settings" I.
• Πατήστε το"Email snapshot alert" J1. Μετά πατήστε το"Email snapshot alert" K1.
• Πατήστε το "Motion detection enabled" για να λάβετε μια αναφορά όταν η κάμερα
• Πατήστε το "sensitivity" για να ρυθμίσετε την ευαισθησία. Μπορείτε να επιλέξετε
• Πατήστε το "Sound detection enabled" για να λάβετε μια αναφορά όταν η κάμερα
• Πατήστε το "sensitivity" για να ρυθμίσετε την ευαισθησία. Μπορείτε να επιλέξετε
I1
: Πατήστε αυτό το κουμπί για να ζητήσετε περισσότερες
I2
Προσοχή! Για αυτήν την λειτουργία χρειαζόσαστε μία Gmailadres.
ανιχνεύει κίνηση K2.
ανάμεσα στις επιλογές: υψηλή, μεσαία και χαμηλή. K3.
ανιχνεύει ήχο K4.
ανάμεσα στις επιλογές: υψηλή, μεσαία και χαμηλή. K5.
πληροφορίες, συμπεριλαμβανομένης της ΙP διεύθυνσης.
: Πατήστε αυτό το κουμπί για να κοιτάξετε ή να αλλάξετε
μια λίστα με τα διαθέσιμα WIFI δίκτυα.
I3
: Πατήστε αυτό το κουμπί για να ρυθμίσετε πότε θέλετε να
λάβετε ένα μήνυμα όταν η κάμερα ανιχνεύσει κίνηση ή
ήχο. Για πληροφορίες δείτε παράγραφο 5.2.
ενεργοποιήσετε και να απενεργοποιήσετε το μικρόφωνο
και για να ενεργοποιήσετε και να απενεργοποιήσετε την
εμφάνιση της ώρας. Κάτω από το "Video quality setting"
μπορείτε να αλλάξετε την ανάλυση της εικόνας του
βίντεο.
κάρτας SD.
κάρτα SD.
χρήστη σας στο "Manager's Name" και τον κατάλληλο
κωδικό στον "Manager's Password". Επίσης στον
"Camera's Password" μπορείτε να αλλάξετε τον κωδικό
της κάμερας.
ημερομηνία.
72
Page 73

• Πατήστε το "SD card remove detection" για να λάβετε μια αναφορά όταν η κάρτα SD
• Πατήστε το"SD card out of space alert"για να λάβετε μια αναφορά όταν η κάρτα SD
• Στο "Notication subject" εισάγετε το θέμα του email όταν λαμβάνετε μία αναφορά
• Στο "Receiver Email" συμπληρώστε την διεύθυνση του e-mail στην οποία να λαμβάνετε
• Πατήστε το"Gmail SMTP email account" για να συμπληρώσετε την διεύθυνση του
5.2.2. Phone App alert notication
Με αυτήν την λειτουργία λαμβάνετε μία αναφορά στο τηλέφωνό σας όταν η κάμερα
ανιχνεύσει κίνηση ή ήχο.
• Πατήστε το "Alert & Notify Setting" στοt menu "Settings" I3.
• Πατήστε το "Phone App alert noticitation" J2. Μετά πατήστε το "Phone App alert
• Πατήστε το "Motion detection enabled" για να λάβετε μια αναφορά όταν η κάμερα
• Πατήστε το "sensitivity" για να ρυθμίσετε την ευαισθησία. Μπορείτε να επιλέξετε
• Πατήστε το "Sound detection enabled" για να λάβετε μια αναφορά όταν η κάμερα
• Πατήστε το "sensitivity" για να ρυθμίσετε την ευαισθησία. Μπορείτε να επιλέξετε
• Πατήστε το "SD card remove detection" για να λάβετε μια αναφορά όταν η κάρτα SD
• Πατήστε το"SD card out of space alert"για να λάβετε μια αναφορά όταν η κάρτα SD
6. Καθαρισμός και συντήρηση.
Οι συσκευές δεν χρειάζονται συντήρηση, για αυτό μην τις ανοίξετε. Η εγγύηση είναι
άκυρη, αν ανοίξετε την συσκευή. Απλώς καθαρίστε το εξωτερικό της συσκευής με ένα
μαλακό, στεγνό πανί ή βούρτσα
7. Περιβάλλον και Διάθεση
ηλεκτρικών και ηλεκτρονικών προϊόντων. Απορρίπτοντας την συσκευή με τον σωστό
τρόπο, βοηθάτε έτσι ώστε να αποφευχθούν πιθανοί κίνδυνοι για το περιβάλλον και την
K6
αφαιρείται
είναι γεμάτη K7.
τις αναφορές
e-mail από όπου στέλνεται το e-mail
του e-mail σας.
notication" M1.
ανιχνεύει κίνηση M2.
ανάμεσα στις επιλογές: υψηλή, μεσαία και χαμηλή. M5.
ανιχνεύει ήχο M4.
ανάμεσα στις επιλογές: υψηλή, μεσαία και χαμηλή. M5.
αφαιρείται M6.
είναι γεμάτη M7.
Προειδοποίηση! Βγάλτε την συσκευή από κάθε πηγή τάσης πριν την καθαρίσετε.
.
L2
.
L3
. Στον "Password" συμπληρώστε ον κωδικό
Το σύμβολο πάνω στο προϊόν, τα εξαρτήματα ή την συσκευασία δηλώνει ότι
αυτό το προϊόν δεν μπορεί να αντιμετωπιστεί σαν οικιακό απόβλητο. Απορρίψτε
τη συσκευή μέσω του σημείου συλλογής για την ανακύκλωση των αποβλήτων
ηλεκτρικών και ηλεκτρονικών εξοπλισμών εντός της ΕΕ και σε άλλες Ευρωπαϊκές
χώρες οι οποίες έχουν ξεχωριστά συστήματα συλλογής χρησιμοποιημένων
L1
.
73
Page 74

ανθρώπινη υγεία, οι οποίοι διαφορετικά θα μπορούσαν να προκληθούν από τον
ακατάλληλο χειρισμό της απόβλητης συσκευής . Η ανακύκλωση των υλικών θα βοηθήσει
στην εξοικονόμηση φυσικών πόρων. Για αυτό μην απορρίπτετε τις παλαιές σας ηλεκτρικές
και ηλεκτρονικές συσκευές μαζί με τα οικιακά απορρίμματα.
8. Εγγύηση
Για αυτήν τη συσκευή ισχύει μία περιορισμένη 3 ετήσια εγγύηση. Για τους όρους της
εγγύησης κοιτάξτε στο : www.elro.eu.
Návod k obsluze C706IP
Děkujeme Vám, že jste si zakoupili síťovou kameru C706IP. Pro snadné a rychlé použití
vašeho přístroje vám doporučujeme pročíst si pečlivě tento návod.
Obrazový materiál z tohoto manuálu najdete před touto kapitolou.
1. Bezpečnostní instrukce a preventivní
opatření
1.1. Použité bezpečnostní symboly
Varování! Varování upozorňuje uživatele, že pokud nebude postupovat přesně podle
návodu, může dojít k poškození jeho zdraví nebo k (významnému) poškození produktu.
Upozornění! Tato poznámka upozorňuje uživatele na možné problémy.
!
Tip: Tip uživatele upozorňuje na praktické rady a doplňující možnosti.
1.1.1. Upozornění
Varování! Nesestavujte produkt venku nebo na místech, kde by se mohl dostat do
styku s vodou.
Upozornění! Nesestavujte produkt na extrémně teplých či chladných místech.
Varování! Před připevňováním kamery překontrolujte, zda v místě, kam ji chcete
umístit, nevedou kabely elektrického vedení či vodovodní potrubí.
Upozornění! Okamžitě vytáhněte produkt ze zásuvky a následně zkontaktujte servisní
linku Smartwares v případě, že:
• pevné součástky jsou rozevřeny, mají vadu, jsou navlhlé nebo spadly z výšky;
• napájecí kabel adaptéru je roztřepený nebo je poškozený tak, že jsou vidět kovové
dráty;
• kryt adaptéru je poškozený;
• adaptér se dostal do styku s vlhkostí nebo tekutinami;
74
Page 75

• objektiv kamery je prasklý nebo rozbitý;
Varování! Otevírání a opravování produktu není povoleno. V případě otevření a opravy
produktu záruka na zboží propadá. Údržbu svěřte certikovaným odborníkům.
Varování! Používejte pouze originální doplňky od výrobce.
Varování! Udržujte produkt mimo dosah dětí.
Varování! Před čištěním vypojte přístroj ze všech zdrojů napětí.
Varování! K čištění produktu používejte suchý a čistý hadřík.
Varování! K čištění přístroje nepoužívejte žádné abrazivní prostředky, žíravá čistidla,
bělidla a rozpouštědla.
Varování! Během bouře s blesky a dlouhodobého odstavení přístroje vytáhněte
adaptér ze zásuvky.
Upozornění! Produkt připevňujte tak, jak je uvedeno v návodu. Pokud váháte, raději
se poraďte se zkušeným odborníkem a stále mějte na paměti místní bezpečnostní
předpisy.
Upozornění! Nevystavujte kameru slunečnímu záření.
Upozornění! Nenatáčejte kameru na keře, větve a jiné pohybující se předměty.
Upozornění! Produkt se nesmí likvidovat jako netříděný městský odpad, ale musí být
tříděn zvlášť.
Upozornění! Informujte se ve svém okolí, kam se dá produkt po ukončení jeho
používání odevzdat. Nevyhazujte elektrické přístroje a příslušenství, ale zkontrolujte,
zda je možné produkt (součástky z něj) odevzdat, recyklovat nebo znovu využít.
Upozornění! Bezdrátové telefony, mikrovlnky a další bezdrátové přístroje v dosahu
2,4 GHz mohou ovlivňovat fungování bezdrátových systémů. Udržujte proto produkt
během instalace a používání nejméně 3 metry od možných zdrojů rušení.
Upozornění! Kamera není schopna snímat obraz v noci přes sklo. Mějte to při instalaci
na paměti.
2. Zamýšlené použití
C706IP je bezpečnostní kamera s možností prohlížení záběrů na chytrém telefonu pomocí
aplikace „uCare Cam". Proto by měla být C706IP připojena pomocí WIFI.
Kamera může přes den pořizovat video a audio záznam. Dále je kamera vybavena
detektorem pohybu a detektorem zvuku.
Upozornění! Návod je postaven na použití kamery společně s telefonem využívajícím
systém Android. Pro zařízení iPhone jsou zvláště popsány nejdůležitější kroky. Zbývající
části návodu jsou pak podobné jako u aplikace pro systém Android.
3. Technické specikace
3.1. Obecné specikace produktu
Senzor: 1/6" Barevný CMOS senzor
Rozlišení: 640 x 480 pixelů (300k pixelů)
IR objektiv: f: 3.0mm
Zorný úhel: 55 stupňů
Video komprese: MJPEG
Počet obrazů za vteřinu: 1 ~ 25fps(QVGA)
Zdroj napětí: 230VAC/5VDC/1A adaptér
Spotřeba energie: 5W (Max.)
Teplota: 0°C ~ 55°C (32°F~131°F)
75
Page 76

Minimální systémové požadavky:
Úložný prostor na kartě: Podporuje karty microSD do velikosti až 32 GB
Podporované mobilní operační systémy: iOS 5.0 a vyšší / Android 4.0 a vyšší
Certikace: CE, FCC, RoHS, R&TTE
Záruka: Omezená 3-letá záruka
3.2. Nejdůležitější součásti
1. Kabel USB
2. Adaptér
3. C706IPkamera se stojanem
4. Návod k použití
5. Kartónová šablona
3.3. Propojení
1. Tlačítko Reset/WPS
2. Slot pro kartu microSD
3. Konektor Micro USB
4. Mikrofon
2
1
4. Instalace kamery
4.1. Propojení kamery
• Zapojte kabel USB do adaptéru a do konektoru Micro USB na kameře 3.
• Poté připojte adaptér do elektrické zásuvky.
• S instalací kamery počkejte, dokud na kameře po sobě nezablikají zelená a červená
LED.
Svou IP kameru můžete do telefonu přidat pomocí WIFI routeru. Máte na výběr, zda
kameru připojíte prostřednictvím režimu routeru nebo režimu nastavení WPS. V textu níže
je vysvětleno, jak provést připojení prostřednictvím režimu routeru.
4.2. Přidání kamery do chytrého telefonu
prostřednictvím režimu routeru
Upozornění! Pro bezdrátové připojení vaší kamery potřebujete bezdrátový router.
Upozornění! Pokud je váš router chráněn heslem, musíte jej znát.
Pozor! K použití aplikace „uCare Cam" potřebujete chytrý telefon s připojením k
internetu.
Popis instalace kamery v systému Android najdete v odstavci 4.2.1. Popis instalace kamery
v systému iOS najdete v odstavci 4.2.2.
4.2.1. Android
• Stáhněte aplikaci „uCare Cam" z Google Play a nainstalujte ji.
• Spusťte aplikaci. Zobrazí se domovská obrazovka aplikace.
• Klepněte na možnost „Click here to install new wi Camera" A2. Zobrazí se nabídka
„WiFi connect" B.
• Klepnutím na tlačítko „Routermode"B1 přidáte kameru přes WIFI síť.
A
76
Page 77

• Zkontrolujte, zda LED na kameře střídavě bliká červeně a zeleně. Pokud ano, klepněte
na tlačítko „Next".
Upozornění! Pokud kamera střídavě zeleně a červeně nezabliká:
• Připojte adaptér znovu do elektrické zásuvky.
• Počkejte 15 vteřin a podržte tlačítko WPS/RSET stisknuté po dobu 10 vteřin.
• Počkejte, dokud LED na kameře střídavě nezabliká červeně a zeleně.
• Poté klepněte na „Next".
• Počkejte, dokud se neobjeví následující obrazovka a vy uvidíte obraz videa. Poté
klepněte na „Next".
• Zvolte síť WIFI v rámci které chcete kameru připojit.
• Zadejte dvakrát heslo sítě WIFI, kterou jste zvolili, a poté klepněte na „OK".
Upozornění! Pokud je váš router chráněn heslem, musíte jej znát.
• Na následující obrazovce klepněte na „OK". Kamera je nyní online a je přidána na váš
seznam kamer.
4.2.2. iOS
• Na svém zařízení iPhone otevřete nabídku „Settings".
• V této nabídce klepněte na „WI-FI" a nechte telefon vyhledat síť „wi-cam-p2p".
• Klepnutím na síť provedete spojení.
• Stáhněte aplikaci „uCare Cam" z App Store a nainstalujte ji.
• Spusťte aplikaci. Zobrazí se domovská obrazovka aplikace.
• Klepněte na možnost „Click here to install new wi Camera" . Zobrazí se nabídka „WiFi
connect" B.
• Klepnutím na tlačítko „Routermode"B1 přidáte kameru přes WIFI síť.
• Klepněte na „Next". Zadejte název vašeho routeru a příslušné heslo a klepněte na „Next".
Upozornění! Pokud je váš router chráněn heslem, musíte jej znát.
Poté, co kamera přijme informace, restartuje se.
• Klepněte na „Next". Nyní zadejte uživatelské jméno a heslo kamery.
!
Tip: Implicitně je uživatelské jméno nastaveno na „admin". Příslušné heslo je pak
implicitně nastaveno na „0000".
Kamera se nyní restartuje a spojí se s routerem. To může trvat až 10 minut. Pokud je
navazování spojení úspěšné, rozsvítí se LED na kameře oranžově.
Upozornění! Jestliže se LED oranžově nerozsvítí, zkontrolujte, zda je kamera v dosahu
routeru. Poté zopakujte výše uvedené kroky.
• Spusťte aplikaci. Zobrazí se domovská obrazovka aplikace.
• Klepnutím na jméno kamery proveďte spojení.
E
C
A
A
D
4.3. Přidání kamery do nového chytrého telefonu
pomocí QR kódu
Upozornění! Tato funkce funguje pouze v případě, že je již kamera přidána do jiného
chytrého telefonu. Popis této funkce pro systém Android najdete v odstavci 4.2.2. a pro
systém iOS v odstavci 4.2.2..
77
Page 78

4.3.1. Android
• Spusťte aplikaci. Zobrazí se domovská obrazovka aplikace.
• Klepněte na možnost „Click here to import installed WiFiCam". Zobrazí se nabídka „Add
new WiFiCam".
• Klepněte na „QR code". F Poté naskenujte QR kód na zadní straně vaší kamery.
Po naskenování se objeví obrazovka G.
• Klepněte na možnost „Please Input" a zadejte heslo kamery. Poté klepněte na „OK".
Upozornění! Heslo kamery („Camera's Password") je implicitně nastaveno na „0000".
Kamera je nyní spojena s vašim chytrým telefonem a je přidána na váš seznam kamer E.
4.3.2. iOS
• Spusťte aplikaci. Zobrazí se domovská obrazovka aplikace.
• Klepněte na symbol „+" v pravém horním rohu obrazovky.
• Klepněte na „Scan camera QR code". Poté naskenujte QR kód na zadní straně vaší
kamery.
Po naskenování se objeví obrazovka G.
• Klepněte na možnost „Please Input" a zadejte heslo kamery. Poté klepněte na „Done".
Upozornění! Heslo kamery („Camera's Password") je implicitně nastaveno na „0000".
Kamera je nyní spojena s vašim chytrým telefonem a je přidána na váš seznam kamer E.
4.4. Připevnění kamery
Upozornění! Před instalací se ujistěte, zda kamera řádně monitoruje vámi vybrané
místo.
Můžete si vybrat, zda kameru položíte na rovnou podlahu, nebo ji někam přišroubujete.
Pro připevnění kamery šroubky postupujte následovně:
• Pomocí přiložené šablony si označte otvory na požadovaném podkladu 4.
Upozornění! Použijte šrouby s hlavou, která pasuje do spodního dílu kamery.
Upozornění! Jestliže je podklad příliš tvrdý na to, aby se do něj dalo šroubovat
(kámen/beton), měli byste otvory vyvrtat a použít hmoždinky.
• Nasuňte spodní díl kamery na šrouby.
5
A
A
5. Správa kamery prostřednictvím chytrého
telefonu
Ujistěte se, že je kamera propojena s vaším chytrým telefonem prostřednictvím aplikace
„uCare Cam" (viz odstavec 4.2.).
Upozornění! V této části je ovládání vysvětleno pouze pro telefony se systémem
Android. Ovládání na zařízeních iPhone je podobné jako u aplikace v systému Android.
78
Page 79

5.1. Prohlížení obrazu z kamery na chytrém telefonu
• Na domovské obrazovce aplikace klepněte na kameru, kterou chcete spravovat. E Na
displeji vašeho telefonu se objeví obraz kamery.
Pozor! Jestliže se nezobrazuje obraz kamery, je možné, že není bezdrátové připojení
dostatečně rychlé. V takovém případě změňte rozlišení obrazu kamery (viz odstavec
5.1.2.)
Obrazovka kamery nabízí několik možností:
• Stisknutím tlačítka „Snapshot"
• Klepnutím na tlačítko „Microphone" H2 zapnete/vypnete mikrofon.
• Více informací získáte klepnutím na tlačítko „Help" H3.
5.1.1. Záložky
Camera ListH4: Toto je úvodní obrazovka aplikace. Zde můžete
WIFI SettingH5: V této záložce můžete přidat novou kameru.
Play ListH6: Zde se pro každou kameru zobrazí seznam se snímky.
SettingH7: Zde je zobrazen seznam nainstalovaných kamer. Chcete-li
Tip: Implicitně je „Manager's Name" nastaveno na „admin". Heslo pro „Manager's
Password" je implicitně nastaveno na „0000".
5.1.2. Změna nastavení kamery na chytrém telefonu se systémem Android
• Na úvodní obrazovce aplikace klepněte na záložku „Settings".
• Klepněte na kameru, u které si přejete změnit nastavení.
• V kolonce „Manager's Name" zadejte uživatelské jméno a v kolonce „Manager's
Password" příslušné heslo a klepněte na „OK".
Tip: Implicitně je „Manager's Name" nastaveno na „admin". Heslo pro „Manager's
Password" je implicitně nastaveno na „0000".
Camera InfoI1: Klepnutím na toto tlačítko získáte více informací včetně
Change WiFi RouterI2: Klepnutím na toto tlačítko zobrazíte seznam dostupných
Alert & Notify SettingI3: Klepněte na toto tlačítko, pokud si přejete nastavit příjem
Real time video SettingI4: Klepnutím na toto tlačítko se dostanete mimo jiné k
SD Card Recording SettingI5: Klepnutím na toto tlačítko se dostanete k nastavení
SD Card Video PlaybackI6: K lepnutím na toto tlačítko si můžete přehrát záznamy
H1
pořídíte snímek.
přidat novou kameru, importovat kameru a prohlížet
nainstalované kamery.
změnit nastavení, zadejte své uživatelské jméno a heslo.
IP adresy.
WIFI sítí a můžete provádět změny.
upozornění v případě, že kamera zachytí pohyb nebo
zvuk. Více informací najdete v odstavci 5.2.
zapnutí/vypnutí mikrofonu nebo zobrazení času. V
nabídce „Video quality setting" můžete změnit rozlišení
videa.
záznamu na SD kartu.
uložené na SD kartě.
H
79
Page 80

Password SettingI7: Klepnutím na toto tlačítko můžete změnit uživatelské
I8
Date & Time
5.2. Detekce pohybu a zvuku
Díky této funkci dokáže kamera podat zprávu v případě, že zachytí pohyb nebo zvuk.
5.2.1. Email snapshot alert
Díky této funkci vám dokáže kamera zaslat e-mail se snímkem v případě, že zachytí pohyb
nebo zvuk.
• V nabídce „Settings" klepněte na položku „Alert & Notify Setting" I.
• Klepněte na „Email snapshot alert" J1. Poté klepněte na „Email snapshot alert" K1.
• Chcete-li dostávat zprávy v případě, že kamera zachytí pohyb, klepněte na možnost
• Klepnutím na položku „Sensitivity" nastavte citlivost. Na výběr máte ze tří možností:
• Chcete-li dostávat zprávy v případě, že kamera zachytí zvuk, klepněte na možnost
• Klepnutím na položku „Sensitivity" nastavte citlivost. Na výběr máte ze tří možností:
• Chcete-li dostávat zprávy v případě, že dojde k vyjmutí SD karty, klepněte na možnost
• Chcete-li dostávat zprávy v případě, že je SD karta plná, klepněte na možnost „SD card
• Do kolonky „Notication subject" zadejte předmět e-mailu, ve kterém chcete dostat
• Do kolonky „Receiver Email" vyplňte e-mailovou adresu, na kterou budete zprávy
• Klepnutím na možnost „Gmail SMTP email account" se dostanete k zadání adresy
5.2.2. Phone App alert notication
Díky této funkci vám dokáže kamera zaslat zprávu na telefon v případě, že zachytí pohyb
nebo zvuk.
• V nabídce „Settings" klepněte na položku „Alert & Notify Setting" I3.
• Klepněte na „Phone App alert noticitation" J2. Poté klepněte na „Phone App alert
• Chcete-li dostávat zprávy v případě, že kamera zachytí pohyb, klepněte na možnost
: Klepnutím na toto tlačítko můžete nastavit čas a datum.
Upozornění! K použití této funkce je vyžadována e-mailová adresa na Gmailu.
„Motion detection enabled" K2.
vysoká, střední a nízká. K3.
„Sound detection enabled" K4.
vysoká, střední a nízká. K5.
„SD card remove detection" K6.
out of space alert" K7.
zprávu L1.
dostávat L2.
Gmailu, ze které budou zprávy odesílány L3. Do kolonky „Password" zadejte heslo
svého e-mailu.
noticitation" M1.
„Motion detection enabled" M2.
jméno pro „Manager's Name" a příslušné heslo pro
„Manager's Password". Můžete zde také změnit heslo
kamery „Camera's Password".
80
Page 81

• Klepnutím na položku „Sensitivity" nastavte citlivost. Na výběr máte ze tří možností:
vysoká, střední a nízká.
• Chcete-li dostávat zprávy v případě, že kamera zachytí zvuk, klepněte na možnost
„Sound detection enabled" M4.
• Klepnutím na položku „Sensitivity" nastavte citlivost. Na výběr máte ze tří možností:
vysoká, střední a nízká. M5.
• Chcete-li dostávat zprávy v případě, že dojde k vyjmutí SD karty, klepněte na možnost
„SD card remove detection"
• Chcete-li dostávat zprávy v případě, že je SD karta plná, klepněte na možnost „SD card
out of space alert" M7.
6. Čištění a údržba
Varování! Před čištěním vypojte přístroj ze všech zdrojů napětí.
Přístroje jsou bezúdržbové, proto je neotvírejte. Jakmile přístroj otevřete, propadá vám na
něj záruka. Čistěte přístroj pouze zevně a jen měkkým, suchým hadříkem nebo kartáčkem.
7. Likvidace a životní prostředí
Symbol na výrobku, příslušenství nebo na obalu označuje výrobek, který nepatří
mezi běžný domácí odpad. Odevzdejte tento přístroj na sběrných místech k
recyklaci vyřazených elektrických a elektronických přístrojů v rámci EU a dalších
evropských zemí, které mají vlastní sběrný systém pro použité elektrické a
elektronické přístroje. Správným způsobem likvidace pomáháte předcházet
možnému nebezpečí pro životní prostředí a pro zdraví spoluobčanů, které by mohlo
vzniknout špatnou manipulací s vyřazeným přístrojem. Recyklace materiálů přispívá k
uchování přírodního bohatství. Nevyhazujte proto vaše staré elektrické a elektronické
přístroje do běžného odpadu.
8. Záruka
Na tento přístroj se vztahuje záruční lhůta 3 roky. Více o záručních podmínkách na: www.
elro.eu.
M5
.
M6
.
81
Page 82

Kézikönyv C706IP
Köszönjük, hogy megvásárolta az C706IP hálózati kamerát. Ahhoz, hogy kameráját a
lehető leggyorsabban és legkönnyebben tudja használni, javasoljuk, hogy használat előtt
gyelmesen olvassa el ezt a használati utasítást.
A jelen Kezelési útmutató ábráit az előző fejezetben találja.
1. Elővigyázatossági intézkedések és
biztonsági utasítások
1.1. Alkalmazott biztonsági szimbólumok
Figyelmeztetés! A gyelmeztetés arra utal, hogy a felhasználót vagy a terméket
(súlyos) sérülés érheti, ha a felhasználó nem végzi el alaposan az eljárásokat.
Figyelem! A megjegyzés felhívja a felhasználó gyelmét a lehetséges problémákra.
!
Javaslat: A javaslatok kényelmesebb használatra és további lehetőségekre hívják fel a
felhasználó gyelmét.
1.1.1. Értesítések
Figyelmeztetés! Ne szerelje fel a készüléket szabadba, vagy olyan helyre, ahol
nedvesség érheti.
Figyelmeztetés! Ne szerelje fel a terméket olyan helyre, ahol nagyon meleg vagy hideg
lehet.
Figyelmeztetés! A felszerelés megkezdése előtt ellenőrizze, hogy nincsenek-e
elektromos vezetékek és vízcsövek a falban, ahol fúrni akar.
Figyelmeztetés! Azonnal meg kell szakítani a készülék áramellátását a csatlakozó
kihúzásával a konnektorból, és fel kell venni a kapcsolatot a Smartwares
ügyfélszolgálattal a következő esetekben:
• a termék hardver részei szétnyíltak, átfúródtak, nedvesek vagy leesés által megsérültek;
• az adapter tápkábele kirojtosodott vagy annyira szétnyílt, hogy a fém kilátszik;
• az adapterház sérült;
• az adapter nedvességgel vagy folyadékkal érintkezett;
• a kamera üvege repedt vagy törött;
Figyelmeztetés! Nem engedélyezett a terméket önállóan felnyit(tat)ni vagy javítani/
javíttatatni. Ebben az esetben ugyanis a garancia érvényét veszti. A javítást végeztesse
arra meghatalmazott karbantartó személyzettel.
Figyelmeztetés! Csak a gyártó eredeti kiegészítőit használja.
Figyelmeztetés! Tar tsa a terméket gyermekektől távol.
Figyelmeztetés! Csatlakoztassa le a készüléket az összes feszültségforrásról, mielőtt
82
Page 83

megtisztítaná.
Figyelmeztetés! Száraz, tiszta kendő segítségével tisztítsa meg a terméket.
Figyelmeztetés! Ne használjon karcoló anyagokat, maró tisztítószereket, savtartalmú
anyagokat, vagy oldószert a termék tisztításához.
Figyelmeztetés! Húzza ki az adaptert a konnektorból vihar, villámlás közben, és ha a
terméket hosszabb ideig nem használják.
Figyelem! Szerelje fel a terméket a jelen kézikönyvben megadott módon. Kétségek
esetén forduljon szakképzett szerelőhöz, és vegye gyelembe mindig a helyi
felszerelési előírásokat.
Figyelem! Kerülje, hogy közvetlen napfény érje a kamerát.
Figyelem! Ne irányítsa a kamerát bokrokra, ágakra vagy más mozgó tárgyakra.
Figyelem! A terméket tilos a közönséges háztartási hulladékkal kidobni, külön
gyűjtőhelyre kell vinni.
Figyelem! A termék használatának befejeztével tájékozódjon lakóterületén a termék
leadásával kapcsolatos lehetőségekről. Ne dobja ki az elektromos készülékeket (azok
alkatrészeit), nézzen utána, hogy van-e lehetőség a leadásra, újrahasznosításra vagy
újrafelhasználására.
Figyelem! A vezeték nélküli rendszereket zavarhatják a mobiltelefonok, a
mikrohullámú sütők vagy más vezeték nélküli készülékek, melyek a 2,4 GHz-es
tartományban működnek. Tartsa a terméket legalább 3 méterre a lehetséges
zavarforrásoktól a telepítés és üzemeltetés során.
Figyelem! A kamera éjszaka nem képes üvegen át látni. Vegye gyelembe ezt az
elhelyezésekor.
2. Rendeltetésszerű használat
A C706IP egy meggyelő kamera, mely lehetővé teszi a meggyelési képek okostelefonon
történő megjelenítését a "uCare Cam" alkalmazás segítségével. A C706IP kamerát ehhez
WIFI kapcsolatra kell csatlakoztatni.
A kamera egész nap képes video és audio felvételek készítésére. A kamera ezen felül
mozgásérzékelővel és hangérzékelővel is fel van szerelve.
rendszerrel működő telefonokkal történő használatát írja le. Az iPhone-hoz a
legfontosabb lépések külön le vannak írva. A többi eljárás ugyanúgy történik, mint az
Android alkalmazás esetén.
3. Műszaki specikációk
3.1. Általános termékspecikációk
Érzékelő: 1/6" Color CMOS érzékelő
Felbontás: 640 x 480 pixel (300k pixel)
IR lencse: f: 3.0mm
Látószög: 55 fok
Videó felbontás: MJPEG
Képek másodpercenként: 1 ~ 25fps(QVGA)
Feszültségforrás: 230VAC/5VDC/1A adapter
Energiafelhasználás: 5W (Max.)
Hőmérséklet: 0°C ~ 55°C (32°F~131°F)
83
Page 84

Minimális rendszer-követelmények:
Kártyamemória: támogatja a mikro SD kártyát 32 GB-ig
Támogatott mobil operációs rendszerek: iOS 5.0 és magasabb szintű / Android 4.0 és
magasabb szintű
Tanúsítvány: CE, FCC, RoHS, R&TTE
Garancia: Meghatározott 3-éves garancia
3.2. Legfontosabb alkatrészek
1. USB kábel
2. Adapter
3. C706IPkamera lábazattal
4. Használati utasítás
5. Karton sablon
3.3. Csatlakozások
1. Reset / WPS gomb
2. Mikro SD-kár tya bemenet
3. Mikro USB csatlakozó
4. Mikrofon
2
1
4. A kamera telepítése
4.1. A kamera csatlakoztatása
• Csatlakoztassa az USB kábelt az adapterre és a 3 kamera mikro USB csatlakozójára.
• Ezután csatlakoztassa az adapter csatlakozóját a hálózati konnektorra.
• Várjon a kamera beállításával addig, míg a zöld és a piros LED felváltva villog.
Az IP kamerát egy WIFI router segítségével kötheti össze a telefonjával. Kiválaszthatja,
hogy router üzemmódon vagy a WPS beállítási üzemmódon keresztül hozza-e létre a
kapcsolatot. Az alábbi szövegben a router-rel történő kapcsolat létrehozása szerepel.
4.2. Egy kamera hozzáadása az okostelefonhoz router-
rel
Figyelem! Ahhoz, hogy az Ön kamerájával vezeték nélküli kapcsolatot lehessen
létrehozni, vezeték nélküli router szükséges.
Figyelem! Amennyiben a router jelszóval védett, ismernie kell ezt a jelszót.
Figyelem! Az "uCare Cam" alkalmazás használatához okostelefonra van szükség
internet kapcsolattal.
Kamerájának Androidon keresztül történő beállításához lépjen tovább az 4.2.1 bekezdésre.
Kamerájának iOS-on keresztül történő beállításához lépjen tovább a 4.2.2 bekezdésre.
4.2.1. Android
• Töltse le az "uCare Cam" alkalmazást a Google Play-en keresztül és telepítse azt.
• Indítsa el az alkalmazást. Az alkalmazás kezdő képernyője megjelenik.
• Nyomja meg a "Click here to install new wi Camera" lehetőséget A2. Megjelenik az
"WiFi connect" menü B.
A
84
Page 85

• Nyomja meg a "Routermode"B1 gombot a kamera WIFI hálózaton keresztül történő
hozzáadásához.
• Ellenőrizze, hogy a kamerán a piros és a zöld LED felváltva villog-e. Ha igen, nyomja
meg a "next" gombot.
Figyelem! Ha a kamerán a LED villog felváltva pirossal és zölddel:
• Csatlakoztassa az adaptert ismét a hálózati aljzatba.
• Várjon 15 másodpercet, és tartsa a WPS/RSET gombot lenyomva 10 másodpercig.
• Várja meg, hogy a kamerán a LED felváltva piros és zöld színnel villogjon.
• Nyomja meg ezután a "next" gombot.
• Várjon, hogy a következő képernyő megjelenjen, és a video képet lássa. Nyomja meg
ezután a "next" gombot.
• Válassza ki azt WIFI hálózatot, melyre a kamerát csatlakoztatni szeretné.
• Írja be kétszer a WIFI hálózat választott jelszavát, és nyomja meg az "OK" gombot.
Figyelem! Amennyiben a router jelszóval védett, ismernie kell ezt a jelszót.
• A következő képernyőn nyomja meg az "OK" gombot. A kamera ekkor online van, és
hozzáadódott a kamerák listájához.
4.2.2. iOS
• Nyissa meg az iPhone-on a "Settings" menüt.
• Nyomja meg a menüben a "WI-FI" lehetőséget, és várjon, hogy a telefon megkeresse
"wi-cam-p2p" hálózatot.
• Kattintson a hálózatra a kapcsolat létrehozásához.
• Töltse le az "uCare Cam" alkalmazást az Alkalmazások tárhelyéről (App Store), és
telepítse azt.
• Indítsa el az alkalmazást. Az alkalmazás kezdő képernyője megjelenik.
• Nyomja meg a "Click here to install new wi Camera" lehetőséget . Megjelenik az "WiFi
connect" menü B.
• Nyomja meg a "Routermode"B1 gombot a kamera WIFI hálózaton keresztül történő
hozzáadásához.
• Kattintson a "next" lehetőségre. Írja be ezután a router nevét és a hozzá tartozó jelszót,
majd kattintson a "next" lehetőségre.
Figyelem! Amennyiben a router jelszóval védett, ismernie kell ezt a jelszót.
Miután a kamera fogadta ezt az információt, újraindul.
• Kattintson a "next" lehetőségre. Írja be ezután a kamera felhasználó nevét és jelszavát.
!
Javaslat: Alaphelyzetben a felhasználó neve van beállítva mint "admin". A hozzá
tartozó jelszó beállítása alaphelyzetben "0000".
A kamera ezután újraindul és kapcsolódik a router-re, ez legfeljebb 10 percig tarthat.
Miután ez sikerült, a kamerán a LED narancssárga színnel világít.
Figyelem! Ha a LED nem világít narancssárga színnel, ellenőrizze, hogy a kamera a
router elérési tartományán belül van-e. Fussa át ezután a újra a fenti lépéseket.
• Indítsa el az alkalmazást. Az alkalmazás kezdő képernyője megjelenik.
• Kattintson a kamera nevére a kapcsolat létrehozásához.
E
C
D
A
A
85
Page 86

4.3. A kamera hozzáadása új okostelefonhoz QR kódon
keresztül
Figyelem! Ez a funkció csak akkor működik, ha a kamera már egy másik okostelefonon
keresztül hozzáadásra került. Lépjen ehhez a 4.2.2. bekezdésre az Android, és a 4.2.2.
bekezdésre az iOS esetében.
4.3.1. Android
• Indítsa el az alkalmazást. Az alkalmazás kezdő képernyője megjelenik.
• Nyomja meg a "Click here to import installed WiFiCam" lehetőséget. Megjelenik az
"Add new WiFiCam" menü.
• Nyomja meg a "QR code" gombot. F Ezután szkennelje be a QR kódot kamerája alján.
A beszkennelés után megjelenik a G képernyő.
• Nyomja meg a "Please Input" lehetőséget, írja be a kamera jelszavát. Nyomja meg
ezután az "OK" gombot.
Figyelem! "Camera's password" beállítása alaphelyzetben: "0000".
A kamera ekkor össze van kötve az okostelefonnal, és hozzáadódott a kamerák listájához
.
E
4.3.2. iOS
• Indítsa el az alkalmazást. Az alkalmazás kezdő képernyője megjelenik.
• Nyomja meg a "+" jelet a képernyő jobb felső sarkában.
• Nyomja meg a "Scan camera QR code" gombot. Ezután szkennelje be a QR kódot
kamerája alján.
A beszkennelés után megjelenik a G képernyő.
• Nyomja meg a "Please Input" lehetőséget, és írja be a kamera jelszavát. Ezután nyomja
meg a "Done" lehetőséget.
Figyelem! "Camera's password" beállítása alaphelyzetben: "0000".
A kamera ekkor össze van kötve az okostelefonnal, és hozzáadódott a kamerák listájához
.
E
4.4. A kamera felszerelése
Figyelem! Biztosítsa, hogy a kamera megfelelően működjön a választott helyszínen,
mielőtt megkezdené a felszerelését.
Választhatja azt a lehetőséget, hogy sík felületre lehelyezi a kamerát, vagy egy tetszőleges
helyre csavarokkal rögzíti.
A kamera csavarokkal történő felszerelése előtt a következő lépéseket kell elvégezni:
• Rajzolja be furatok helyét a kiválasztott alapra a mellékelt karton sablon 4
segítségével.
Figyelem! Használjon olyan csavarokat, melyek a kamera lábazatába illeszkednek.
Figyelem! Ha az alapzat anyaga túl kemény a csavarok behajtásához (kő/beton), elő
kell fúrni a furatokat és tipliket kell használni.
• Tolja a k amera lábazatát a csavarokra.
5
A
A
86
Page 87

5. Kamerájának kezelése okostelefonon
keresztül
Biztosítsa, hogy a kamera a "uCare Cam" alkalmazáson keresztül össze legyen kötve az Ön
okostelefonjával (lásd 4.2. bekezdés).
Figyelem! Ebben a fejezetben csak az Android alkalmazással működő telefonok
kezelése szerepel. Az iPhone-ra vonatkozó műveletek megegyeznek az Android
alkalmazáséval.
5.1. Nézze meg okostelefonján a kameraképet
• Az alkalmazás kezdőképernyőjén nyomja meg a kezelni kívánt kamerát. E A kamera
képe megjelenik okostelefonján.
Figyelem! Ha nincs kép, lehet, hogy a vezeték nélküli kapcsolat nem elég gyors. Ebben
az esetben változtassa meg a kamerakép felbontását (lásd 5.1.2. bekezdés)
A kamera képernyője számos lehetőséget kínál:
• Nyomja meg a "Snapshot" H1 gombot a kameraképről pillanatfelvétel készítéséhez.
• Nyomja meg a mikrofon gombot H2 a mikrofon be- és kikapcsolásához.
• Nyomja meg a Help H3 gombot további információhoz.
5.1.1. Fülek
Kamera listaH4: Ez az alkalmazás kezdőképernyője. Itt lehet új kamerát
WIFI SettingH5: Ebben a listában lehet új kamerát hozzáadni.
Lejátszási listaH6: Itt kameránként egy-egy listát láthat pillanatfelvételekkel.
SettingH7: Itt egy listát láthat a telepített kamerák ról. Töltse ki a
Javaslat: Alaphelyzetben a "Manager's Name" (Felhasználó neve) van beállítva mint
"admin". A "Manager's Password" (Felhasználó jelszava) alaphelyzetben "0000".
5.1.2. A kamera beállításainak módosítása az Androidos okostelefonon.
• Nyomja meg az alkalmazása kezdő képernyőjén a "Settings" fület.
• Nyomja meg azt a kamerát, melyen a beállításokat módosítani akarja.
• Töltse k i a "Manager's Name" alatt a felhasználó nevet és a "Manager's Password" alatt a
hozzá tartozó jelszót, majd nyomja meg az "OK" gombot.
Javaslat: Alaphelyzetben a "Manager's Name" (Felhasználó neve) van beállítva mint
"admin". A "Manager's Password" (Felhasználó jelszava) alaphelyzetben "0000".
Kamera InfoI1: Nyomja meg ezt a gombot további információ, többek
Change WiFi RouterI2: Nyomja meg ezt a gombot az elérhető WIFI hálózatok
Alert & Notify SettingI3: Nyomja meg ezt a gombot annak beállításához, ha
H
hozzáadni, egy kamerát importálni és a telepített
kamerákat megtekinteni.
felhasználónevet és a jelszót a beállítások módosításához.
között az IP cím lekérdezéséhez.
listájának megjelenítéséhez és módosításához.
87
Page 88

jelentést akar kapni arról, amikor a kamera mozgást vagy
zajt érzékel. Az ezzel kapcsolatos információhoz lásd a 5.2
bekezdést.
I4
Real time video Setting
SD Card Recording SettingI5: Nyomja meg ezt a gombot az SD kártya felvételi
SD Card Video Playback
Password SettingI7: Nyomja meg ezt a gombot, hogy a "Manager's Name"
Date & TimeI8: Nyomja meg ezt a gombot a dátum és az idő
5.2. Mozgás- és hangészlelés
Ezzel a funkcióval a kamera jelentést ad, ha mozgást vagy hangot érzékel.
5.2.1. Email snapshot alert
Ezzel a funkcióval e-mailt fogadhat képpel, ha a kamera mozgást vagy hangot észlel.
Figyelem! Ehhez a funkcióhoz Gmail címre van szükség.
• Nyomja meg az "Aler t & Notify Setting" lehetőséget a "Settings" I menüben.
• Nyomja meg az "Email snapshot alert" J1 lehetőséget. Ezután nyomja mg a az "Email
snapshot alert" K1 lehetőséget.
• Nyomja meg a "Motion detection enabled" lehetőséget, hogy jelentést kapjon, amikor
a kamera mozgást észlel K2.
• Nyomja meg a "sensitivity" lehetőséget az érzékenység beállításához. A következő
lehetőségek közül választhat: magas, közép és alacsony. K3.
• Nyomja meg a "Sound detection enabled" lehetőséget, hogy jelentést kapjon, amikor a
kamera hangot észlel K4.
• Nyomja meg a "sensitivity" lehetőséget az érzékenység beállításához. A következő
lehetőségek közül választhat: magas, közép és alacsony. K5.
• Nyomja meg az "SD kártya kiszerelés észlelése" lehetőséget, ha az SD kártyát kiveszik
K6
.
• Nyomja meg az "SD card out of space alert" lehetőséget, hogy jelzést kapjon, amikor az
SD kártya megtelt K7.
• Állítsa be a "Notication subject" alatt a levél tárgyát, ha jelentést kap L1.
• A "Receiver Email" alatt töltse ki azt az e-mail címet, melyen a jelentéseket fogadni
akarja L2.
• Nyomja meg a "Gmail SMTP email account" lehetőséget annak a gmail címnek a
kitöltéséhez, ahonnan a levelet küldte L3. Töltse ki a "Password" alatt e-mail ókja
jelszavát.
: Nyomja meg ezt a gombot, hogy többek között a
mikrofont be- és kikapcsolja, és az időkijelzés be- és
kikapcsolásához. A "Video quality setting" alatt tudja a
videokép felbontását módosítani.
beállításokhoz.
I6
: N yomja meg ezt a gombot az SD kártyára készített
felvételek visszanézéséhez.
alatt beírja felhasználónevét és a "Manager's Password"
alatt módosítsa a hozzátartozó jelszót. A "Camera's
Password" alatt is módosíthatja a kamera jelszavát.
módosításához.
88
Page 89

5.2.2. Phone App alert notication
Ezzel a funkcióval jelentést fogadhat a telefonján, ha a kamera mozgást vagy hangot észlel.
• Nyomja meg az "Aler t & Notify Setting" lehetőséget a "Settings"
• Nyomja meg a "Phone App alert noticitation" J2 lehetőséget. Ezután nyomja meg a
"Phone App alert notication" lehetőséget M1.
• Nyomja meg a "Motion detection enabled" lehetőséget, hogy jelentést kapjon, amikor
a kamera mozgást észlel M2.
• Nyomja meg a "sensitivity" lehetőséget az érzékenység beállításához. A következő
lehetőségek közül választhat: magas, közép és alacsony.
• Nyomja meg a "Sound detection enabled" lehetőséget, hogy jelentést kapjon, amikor a
kamera hangot észlel M4.
• Nyomja meg a "sensitivity" lehetőséget az érzékenység beállításához. A következő
lehetőségek közül választhat: magas, közép és alacsony. M5.
• Nyomja meg az "SD kártya kiszerelés észlelése" lehetőséget, ha az SD kártyát kiveszik
M6
.
• Nyomja meg az "SD card out of space alert" lehetőséget, hogy jelzést kapjon, amikor az
SD kártya megtelt M7.
6. Tisztítás és karbantartás
Figyelmeztetés! Csatlakoztassa le a készüléket az összes feszültségforrásról, mielőtt
megtisztítaná.
A készülék nem igényel karbantartást, ezért ne nyissa meg. A garancia érvényét veszti, ha
kinyitja a készüléket. A készülék külsejét csak puha, száraz kendővel, vagy kefével tisztítsa.
7. Környezet és leselejtezés
A szimbólum az anyagon, a kiegészítőkön vagy a csomagoláson arra utal, hogy a
terméket tilos háztartási hulladékként kezelni. A készüléket a leselejtezett
elektromos és elektronikus készülékek újrahasznosító gyűjtőhelyén kell leadni az
EU-n belül és az olyan európai országokban, ahol külön gyűjtőrendszerek
működnek a használt elektromos és elektronikus készülékek számára. A készülék
megfelelő leselejtezése elősegíti a környezetet és a közegészséget érintő esetleges olyan
veszélyeztetések elkerülését, melyeket egyébként a használaton kívüli készülékek
helytelen kezelése okozna. Az anyagok újrahasznosítása hozzájárul a természeti kincsek
megőrzéséhez. Ezért a régi elektromos és elektronikus készülékeket ne dobja ki a
háztartási hulladékkal.
8. Garancia
Erre a készülékre határozott idejű, 3 éves garancia érvényes. A garanciális feltételeket itt
találja: www.elro.eu.
I3
menüben.
M5
.
89
Page 90

Manual de utilizare C706IP
Vă mulţumim că aţi cumpărat camera de reţea C706IP. Pentru a putea utiliza camera dvs.
cât mairapid şi uşor, vă sfătuim să citiţi cu atenţie manualul înainte de utilizare.
Imaginile din acest manual de utilizare se găsesc înaintea acestui capitol.
1. Măsuri de îngrijire şi instrucţiuni de
siguranţă
1.1. Simboluri de siguranţă utilizate
Avertisment! Un avertisment indică şansa de daune (grave) pentru utilizator sau
produs dacă utilizatorul nu respectă întocmai procedurile.
Atenţie! O observaţie va face utilizatorul atent la posibile probleme.
!
Sfat: Sfatul atrage atenţia utilizatorului asupra funcţionalităţilor aşi a posibilităţilor
suplimentare.
1.1.1. Noticări
Avertisment! Nu montaţi aparatul în aer liber sau în locuri unde ar putea să se ude.
Avertisment! Nu montaţi produsul în locuri unde poate deosebit de cald sau de rece.
Avertisment! Înainte de a începe montajul controlaţi să nu existe cabluri electrice sau
conducte de apă prin pereţii în care veţi face găuri.
Avertisment! Decuplaţi imediat de la curent produsul, scoţând ştecherul din priză, iar
apoi contactaţi Smartwares servicedesk atunci când:
• sunt demontate componente hardware ale produsului, sunt găurite sau umede, sau
sunt deteriorate puternic;
• cablul de alimentare al adaptorului este zdrenţuit sau întrerupt, iar astfel este vizibil
metalul;
• este deteriorată carcasa adaptorului;
• adaptorul a intrat în contact cu umezeala sau cu lichide;
• sticla camerei e surată sau spartă;
Avertisment! Nu este permis să deschideţi sau să reparaţi dumneavoastră sau alte
persoane produsul. În acest caz se pierde dreptul la garanţie. Întreţinerea se va face de
către personal calicat de întreţinere.
90
Page 91

Avertisment! Utilizaţi numai accesorii originale ale producătorului.
Avertisment! Nu lăsaţi produsul la îndemâna copiilor.
Avertisment! Înainte de a curăţa aparatul deconectaţi-l de la sursele de tensiune.
Avertisment! Utilizaţi o lavetă curată şi uscată pentru a curăţa produsul.
Avertisment! Nu utilizaţi substanţe abrazive, agresive sau soluţii pe bază de înălbitor
sau solvenţi pentru curăţarea produsului.
Avertisment! Pe timp de furtună, fulgere sau atunci când produsul nu este utilizat
timp îndelungat, scoateţi adaptorul din priză.
Atenţie! Montaţi produsul conform specicaţiilor din aceste instrucţiuni. În caz de
dubii cereţi sfatul unui tehnician autorizat şi respectaţi întotdeauna prevederile locale
privind instalarea.
Atenţie! Evitaţi expunerea camerei la razele directe ale soarelui.
Atenţie! Nu îndreptaţi camera spre tufe, crengi sau alte obiecte aate în mişcare.
Atenţie! Produsul nu poate eliminat ca şi gunoi menajer nesortat, ci trebuie colectat
prin sortare.
Atenţie! Informaţi-vă referitor la posibilităţile din regiunea dumneavoastră pentru
colectarea şi eliminarea produsului dvs. Nu aruncaţi aparatele şi piesele electrice, ci
vericaţi dacă produsul sau componentele pot returnate, reciclate sau refolosite.
Atenţie! Sistemele wireless pot bruiate de telefoane mobile, cuptoare cu microunde
şi alte dispozitive fără r care lucrează la o frecvenţă de 2,4 GHz. Ţineţi aparatul la
minim 3 m la distanţă de posibile surse de bruiaj în timpul instalării şi deservirii.
Atenţie! Pe timp de noapte, camera nu are vizibilitate prin sticlă. Ţineţi cont de acest
lucru la amplasare.
2. Utilizare conformă
C706IP este o cameră de supraveghere care permite vizualizarea imaginilor de
supraveghere prin intermediul aplicaţiei "uCare Cam" pe smartphone-ul dvs. În acest scop,
C706IP se va cupla la o conexiune WIFI.
Camera poate face înregistrări video şi audio pe timpul zilei. În plus, camera este prevăzută
cu sistem de detectare a mişcării şi a sunetelor.
Atenţie! Instrucţiunile se bazează pe utilizarea camerei cu ajutorul unui telefon
Android. Pentru iPhone paşii cei mai importanţi sunt descrişi separat. Celelalte acţiuni
sunt comparabile cu aplicaţia Android.
3. Specicaţii tehnice
3.1. Specicaţii generale ale produsului
Senzor: Senzor Color CMOS 1/6"
Rezoluţie: 640 x 480 pixeli (300k pixeli)
Lentilă IR: f: 3.0mm
Unghi de vizualizare: 55 grade
Compresie video : MJPEG
Imagini per secundă: 1 ~ 25fps(QVGA)
Sursă de tensiune: Adaptor 230VCA/5VCC/1A Adaptor
Consum de energie: 5W (max.)
Temperatură: 0°C ~ 55°C (32°F~131°F)
91
Page 92

Cerinţe minime de sistem:
Memorie card: suportă card microSD până la 32 GB
Sistem mobil de operare: iOS 5.0 şi peste/ Android 4.0 şi peste
Certicare: CE, FCC, RoHS, R&TTE
Garanţie: garanţie limitată la3ani
3.2. Componentele principale
1. Cablu USB
2. Adaptor
3. C706IPcamera cu bază
4. Instrucţiuni de utilizare
5. Şablon din carton
3.3. Conexiuni
1. Resetare/ buton WSP
2. Intrare microcard SD
3. Racord micro USB
4. Microfon
2
1
4. Instalare cameră
4.1. Conectare cameră
• Introduceţi cablul USB în adaptor şi în conexiunea micro USB al camerei 3.
• Apoi introduceţi ştecherul adaptorului în priză.
• Aşteptaţi cu setarea pentru camera dvs. până când pâlpâie LED-ul roşu şi cel verde la
rândul său.
Puteţi adăuga camera dvs. IP la telefonul dvs. cu ajutorul unui router WIFI. Puteţi alege să
stabiliţi o conexiune prin modulul router sau prin modulul WPS setup. În textul de mai jos
se explică stabilirea conexiunii cu modulul router.
4.2. Adăugarea unei camere la smatphone-ul dvs. prin
modulul router
Atenţie! Pentru a efectua o conexiune wireless cu camera dvs. este nevoie de un router
wireless.
Atenţie! Dacă router-ul dvs. este protejat cu o parolă, trebuie să o cunoaşteţi.
Atenţie! Pentru utilizarea aplicaţiei „uCare Cam" aveţi nevoie de un smartphone cu
acces la internet.
nstrucţiuni referitor la instalarea camerei dvs. cu Android mergeţi la paragraful 4.2.1.
Pentru instrucţiuni referitor la instalarea camerei dvs. cu iOS mergeţi la paragraful 4.2.2.
4.2.1. Android
• Descărcaţi aplicaţia: "uCare Cam" prin Google Play şi instalaţi-o.
• Porniţi aplicaţia. Se aşează ecranul de start al aplicaţiei.
• Apăsaţi opţiunea „Click here to install new wi Camera" (Clic aici pentru a adăuga
camera) A2. Se aşează meniul „WiFi connect" (Adăugare cameră) B.
A
92
Page 93

• Apăsaţi butonul "Routermode"B1 pentru a adăuga camera prin intermediul reţelei
WIFI.
• Controlaţi dacă LED-ul de pe cameră pâlpâie alternativ roşu şi verde. În acest caz
apăsaţi pe "next".
Atenţie! Dacă camera nu pâlpâie alternativ roşu sau verde:
• Reintroduceţi ştecherul adaptorului în priză.
• Aşteptaţi 15 secunde şi ţineţi apăsat butonul WPS/RSE T timp de 10 secunde.
• Aşteptaţi până când LED-ul de pe cameră pâlpâie alternativ roşu şi verde.
• După aceea apăsaţi pe "next".
• Aşteptaţi să apară următorul ecran şi vedeţi imagine video. Apoi apăsaţi pe "next".
• Alegeţi reţeaua WIFI cu care doriţi să stabilească contact camera dvs.
• Completaţi de două ori parola reţelei WIFI pe care aţi ales-o şi apăsaţi pe butonul "OK".
D
Atenţie! Dacă router-ul dvs. este protejat cu o parolă, trebuie să o cunoaşteţi.
• Apăsaţi în ecranul următor pe "OK". Camera este acum online şi este adăugată listei dvs.
cu camere.
E
4.2.2. iOS
• Deschideţi meniul "Settings" pe iPhone-ul dvs.
• În meniu apăsaţi pe "WI-FI" şi lăsaţi telefonul dvs. să caute reţeaua "wi-cam-p2p".
• Faceţi clic pe reţea pentru a stabili conexiunea.
• Descărcaţi "uCare Cam" din App Store şi instalaţi-o.
• Porniţi aplicaţia. Se aşează ecranul de start al aplicaţiei.
• Apăsaţi opţiunea „Click here to install new wi Camera" (Clic aici pentru a adăuga
camera) . Se aşează meniul „WiFi connect" (Adăugare cameră) B.
• Apăsaţi butonul "Routermode"B1 pentru a adăuga camera prin intermediul reţelei
WIFI.
• Faceţi clic pe "next". Apoi introduceţi numele ruterului dvs. şi parola aferentă, apoi
faceţi clic pe "next".
Atenţie! Dacă router-ul dvs. este protejat cu o parolă, trebuie să o cunoaşteţi.
După ce camera a primit informaţia, aceasta se va reporni.
• Faceţi clic pe "next". Introduceţi numele de utilizator şi parola camerei.
!
Sfat: În mod uzual, numele de utilizator este "admin". Î n mod uzual, parola aferentă
este "0000".
Camera va reporni acum şi va stabili conexiunea cu ruterul, acest lucru poate dura maxim
10 minute. Când aţi reuşit; LED-ul camerei se va aprinde portocaliu.
Atenţie! Dacă LED-ul portocaliu nu se va aprinde, vericaţi dacă camera dvs. se aă în
zona ruterului. Apoi reluaţi paşii de mai sus.
• Porniţi aplicaţia. Se aşează ecranul de start al aplicaţiei.
• Faceţi clic pe numele camerei pentru a stabili conexiunea.
A
A
C
93
Page 94

4.3. Adăugarea camerei la un nou smartphone prin cod
QR
Atenţie! Această cameră funcţionează numai când camera este adăugată printr-un alt
smartphone. Pentru aceasta mergeţi la paragraful 4.2.2. pentru Android, şi 4.2.2. pentru
iOS.
4.3.1. Android
• Porniţi aplicaţia. Se aşează ecranul de start al aplicaţiei.
• Apăsaţi opţiunea „Click here to import installed WiFiCam" (Clic aici pentru a adăuga
camera). Se aşează meniul „Add new WiFiCam" (Adăugare cameră).
• Apăsaţi butonul "QR code". F Apoi scanaţi codul QR de pe partea inferioară a camerei
dvs.
După scanare apare ecranul G.
• Apăsaţi pe "Please Input" şi introduceţi numele de utilizator şi parola camerei. Apoi
apăsaţi pe "OK".
Atenţie! În mod uzual, "Camera's Password" este "0000".
Acum, camera este conectată cu smartphone-ul dvs. şi este adăugată listei dvs. de camere
.
E
4.3.2. iOS
• Porniţi aplicaţia. Se aşează ecranul de start al aplicaţiei.
• Apăsaţi pe "+" în colţul superior dreapta al ecranului.
• Apăsaţi butonul "Scan camera QR code". Apoi scanaţi codul QR de pe partea inferioară
a camerei dvs.
După scanare apare ecranul G.
• Apăsaţi pe "Please Input" şi introduceţi parola camerei. Apoi apăsaţi pe "Done".
Atenţie! În mod uzual, "Camera's Password" este "0000".
Acum, camera este conectată cu smartphone-ul dvs. şi este adăugată listei dvs. de camere
.
E
4.4. Instalare cameră
Atenţie! Asiguraţi-vă de funcţionarea corectă a camerei în locaţia aleasă, înainte de a
începe instalarea.
Puteţi să amplasaţi camera pe o suprafaţă plană sau puteţi xa camera pe o locaţie aleasă
de dvs., folosind şuruburi.
Pentru montarea camerei cu şuruburi efectuaţi următori paşi:
• Marcaţi găurile pe baza dorită cu ajutorul cutiilor livrate 4.
Atenţie! Utilizaţi şuruburile cu un cap adaptat piciorului camerei dvs.
Atenţie! Dacă suportul este prea dur pentru a introduce şuruburile (piatră, BCA), va
trebui să faceţi găuri de dinainte şi să utilizaţi conectorii livraţi.
• Strângeţi şuruburile şi xaţi piciorul camerei. 5.
A
A
94
Page 95

5. Administrarea camerei dvs. prin
intermediul smartphone-ului
Asiguraţi-vă că camera(ele) dvs. sunt conectate prin aplicaţia "uCare Cam" cu smartphoneul dvs. (vezi paragraf 4.2.).
Atenţie! În acest capitol sunt explicate instrucţiunile numai pentru un telefon Android.
Celelalte acţiuni sunt comparabile cu aplicaţia Android.
5.1. Vizualizarea imaginii camerei dvs. pe smartphone
• Apăsaţi în ecranul de start al aplicaţiei pe camera pe care doriţi să o administraţi. E
Imaginea camerei apare pe smartphone-ul dvs.
Atenţie! Atunci când nu aveţi imagine este posibil ca viteza conexiunii dvs. wireless să
e prea mică. În acest caz modicaţi rezoluţia imaginii camerei dvs. (vezi paragraf 5.1.2.)
Ecranul camerei oferă o serie de opţiuni:
• Apăsaţi butonul „Snapshot" (Instantaneu) H1 pentru a face un instantaneu al imaginii
camerei.
• Apăsaţi butonul Microphone H2 pentru a cupla şi decupla microfonul.
• Apăsaţi butonul Help H3 pentru informaţii suplimentare.
5.1.1. File
Camera ListH4: Acesta este ecranul de start al aplicaţiei. Aici puteţi
WIFI SettingH5: În acest tab puteţi adăuga o cameră nouă.
Play ListH6: Acii se redă per cameră o listă cu snapshots.
SettingH7: Aici vedeţi o listă cu camere instalate. Introduceţi numele
Sfat: În mod uzual, "Manager's Name" este "admin". În mod uzual, "Manager's
Password" este "0000".
5.1.2. Modicarea setărilor camerei dvs. de pe smartphone-ul dvs. Android
• Apăsaţi în ecranul de start al aplicaţiei dvs. tabul "Settings".
• Apăsaţi pe camera ale cărei setări doriţi să le modicaţi.
• Completaţi la "Manager's Name" numele de utilizator şi la "Manager's Password" parola
aferentă, iar apoi apăsaţi butonul "OK".
Sfat: În mod uzual, "Manager's Name" este "admin". În mod uzual, "Manager's
Password" este "0000".
Camera InfoI1: Apăsaţi acest buton pentru a solicita informaţii
Change WiFi RouterI2: Apăsaţi pe acest buton pentru a vizualiza şi modica lista
adăuga o cameră nouă, puteţi importa o cameră şi puteţi
vizualiza camerele dvs. instalate.
dvs. de utilizator şi parola pentru a modica setările.
suplimentare, printre care adresa IP.
cu reţele disponibile WIFI.
H
95
Page 96

Alert & Notify SettingI3: Apăsaţi pe acest buton pentru a seta atunci când doriţi să
Real time video Setting
SD Card Recording SettingI5: Apăsaţi pe acest buton pentru setările de preluare card
SD Card Video Playback
Password SettingI7: Apăsaţi pe acest buton pentru a modica la "Manager's
Date & TimeI8: Apăsaţi pe acest buton pentru a modica data şi ora.
5.2. Detectare mişcări şi sunet
Cu această funcţie, camera dă un mesaj atunci când camera detectează mişcare sau
sunete.
5.2.1. Alertă email snapshot
Cu această funcţie, primiţi un email cu o fotograe atunci când camera detectează mişcare
sau sunete.
Atenţie! Pentru această funcţie aveţi nevoie de o adresă pe Gmail.
• Apăsaţi pe "Aler t & Notify Setting" în meniul "Settings" I.
• Apăsaţi pe "Email snapshot alert" J1. Apoi apăsaţi pe "Email snapshot alert" K1.
• Apăsaţi pe "Motion detection enabled" pentru a primi mesaj atunci când camera
detectează mişcare K2.
• Apăsaţi pe "sensitivity" pentru a seta sensibilitatea. Puteţi alege dintre opţiunile: ridicat,
mediu şi scăzut. K3.
• Apăsaţi pe "Sound detection enabled" pentru a primi mesaj atunci când camera
detectează sunete K4.
• Apăsaţi pe "sensitivity" pentru a seta sensibilitatea. Puteţi alege dintre opţiunile: ridicat,
mediu şi scăzut. K5.
• Apăsaţi pe "SD card remove detection" pentru a primi mesaj atunci când se
îndepărtează cardul SD K6.
• Apăsaţi pe "SD card out of space alert" pentru a primi mesaj atunci când cardul SD este
plin K7.
• La "Notication subject" setaţi subiectul emailului atunci când primiţi o noticare L1.
• La "Receiver Email" completaţi adresa de email la care doriţi să primiţi mesajele L2.
• Apăsaţi pe "Gmail SMTP email account" pentru a completa adresa de gmail de pe care
se trimite emailul L3. La "Password" introduceţi aprola emailului dvs.
primiţi un mesaj dacă camera detectează o mişcare sau
un sunet. Pentru informaţii vezi paragraf 5.2.
I4
: Apăsaţi pe acest buton pentru a porni sau opri
microfonul, printre altele, şi pentru a porni sau opri
redarea timpului. La "Video quality setting" puteţi
modica rezoluţia imaginii video.
SD.
I6
: Apăsaţi pe acest buton pentru a putea revizualiza
înregistrări de pe cardul SD.
Name" numele dvs. de utilizator, şi la "Manager's
Password" parola aferentă. De asemenea, la "Camera's
Password" puteţi modica parola camerei.
96
Page 97

5.2.2. Phone App alert notication
Cu această funcţie, primiţi un mesaj pe telefonul dvs. atunci când camera detectează
mişcare sau sunete.
• Apăsaţi pe "Aler t & Notify Setting" în meniul "Settings"
• Apăsaţi pe "Phone App alert noticitation" J2. Apoi apăsaţi pe "Phone App alert
notication"
• Apăsaţi pe "Motion detection enabled" pentru a primi mesaj atunci când camera
detectează mişcare
• Apăsaţi pe "sensitivity" pentru a seta sensibilitatea. Puteţi alege dintre opţiunile: ridicat,
mediu şi scăzut.
• Apăsaţi pe "Sound detection enabled" pentru a primi mesaj atunci când camera
detectează sunete M4.
• Apăsaţi pe "sensitivity" pentru a seta sensibilitatea. Puteţi alege dintre opţiunile: ridicat,
mediu şi scăzut. M5.
• Apăsaţi pe "SD card remove detection" pentru a primi mesaj atunci când se
îndepărtează cardul SD M6.
• Apăsaţi pe "SD card out of space alert" pentru a primi mesaj atunci când cardul SD este
plin M7.
6. Curăţare şi întreţinere
Avertisment! Înainte de a curăţa aparatul deconectaţi-l de la sursele de tensiune.
Aparatele nu necesită întreţinere, prin urmare nu le deschideţi. Garanţia se pierde dacă
deschideţi aparatele. Curăţaţi numai marginile exterioare ale aparatului cu o lavetă moale,
uscată sau cu un burete.
7. Mediu şi scoatere din uz
eliminarea aparatului în modul corect, ajutaţi la prevenirea pericolelor pentru mediu şi
sănătate publică care pot interveni prin tratarea incorectă a aparatelor scoase din uz.
Reciclarea materialelor contribuie la menţinerea resurselor naturale. Din acest motiv, nu
eliminaţi aparatura electrică şi electronică veche împreună cu deşeurile menajere.
8. Garanţie
Pentru acest aparat se acordă o garanţie limitată de 3 an(i). Pentru condiţiile de garanţie
accesaţi: www.elro.eu.
M1
.
M2
.
M5
.
Simbolul de pe material, accesorii sau ambalaj indică faptul că acest produs nu
poate eliminat împreună cu deşeurile menajere. Eliminaţi aparatul prin
intermediul punctului de colectare pentru reciclarea aparaturii electrice şi
electronice scoase din uz în cadrul UE şi în alte state europene care aplică
sistemele de colectare separată a aparaturii electrice şi electronice. Prin
I3
.
97
Page 98

Priručnik C706IP
Zahvaljujemo vam na kupnji C706IP mrežne kamere. Da biste što prije i lakše mogli koristiti
kameru, savjetujemo vam da prije upotrebe pažljivo pročitate ovaj priručnik.
Slike iz ovog priručnika potražite prije ovog poglavlja.
1. Mjere opreza i sigurnosne upute
1.1. Korišteni sigurnosni simboli
Upozorenje! Upozorenje ukazuje na opasnost od (ozbiljne) štete za korisnika ili
proizvod ukoliko korisnik ne bude oprezno slijedio uputstva.
Napomena! Opaska upozorava korisnika na moguće probleme.
!
Savjet: Savjet obavještava korisnika o prikladnim funkcijama i dodatnim
mogućnostima.
1.1.1. Obavijesti
Upozorenje! Ne postavljajte proizvod vani ili na vlažnim mjestima.
Upozorenje! Ne postavljajte proizvod na mjestima izloženim ekstremnoj toploti ili
hladnoći.
Upozorenje! Prije montaže provjerite da na zidu gdje namjeravate bušiti nema
električnih žica ili vodenih cijevi.
Upozorenje! Uklanjanjem utikača iz mrežne utičnice prekidate napajanje proizvoda;
obratite se službi za korisnike Smartwares u slučaju:
• hardverske komponente proizvoda su otvorene, perforirane, vlažne ili su pretrpjele
težak pad;
• kabel za napajanje adaptera je neravan ili otvoren na način da je vidljiv metal;
• kućište adaptera je oštećeno;
• adapter je došao u doticaj s vlagom ili tekućinom;
• staklo kamere je napuklo ili razbijeno;
Upozorenje! Nije dopušteno otvaranje ili popravak proizvoda od korisnika ili u
neovlaštenom servisu. U tom slučaju jamstvo prestaje važiti. Molimo, povjerite
održavanje isključivo certiciranom servisnom osoblju.
Upozorenje! Koristite samo originalnu opremu proizvođača.
Upozorenje! Držite proizvod izvan dohvata djece.
Upozorenje! Prije čišćenja uređaja isključite ga iz mrežnog napajanja.
Upozorenje! Za čišćenje proizvoda koristite suhu i čistu krpu.
Upozorenje! Za čišćenja proizvoda ne koristite abrazivna sredstva, proizvode za
čišćenje koji nagrizaju ili druge tvari koje uključuju izbjeljivač ili otapala.
98
Page 99

Upozorenje! Uklonite adapter iz mrežne utičnice za vrijeme nevremena, gromova i
kada se proizvod neće koristi duže vrijeme.
Napomena! Instalirajte proizvod prema uputama navedenim u ovom priručniku. U
slučaju sumnje posavjetujte se s ovlaštenim stručnjakom i uvijek imajte na umu lokalne
instalacijske propise i odredbe.
Napomena! Izbjegavajte izlaganje kamere izravnoj sunčevoj svjetlosti.
Napomena! Ne usmjeravajte kameru prema grmlju, granama ili drugim pomičnim
predmetima.
Napomena! Proizvod se ne smije odlagati kao nerazvrstani komunalni otpad već se
mora zasebno odložiti.
Napomena! Informirajte se o mogućnostima odlaganja proizvoda u vašem području
po završetku korištenja istog. Ne bacajte električne aparate i komponente nego
provjerite mogućnosti obnavljanja, recikliranja ili ponovne upotrebe proizvoda
(komponenti).
Napomena! Bežični sustavi mogu imati smetnje uzrokovane bežičnim telefonima,
mikrovalnim pećnicama i drugim bežićnim uređajima koji rade na frekvenciji 2.4 GHz.
Držite proizvod na daljini od najmanje 3 metra od mogućih izvora smetnji tijekom
instalacije i upotrebe.
Napomena! Kamera ne može omogućiti prikaz kroz staklo noću. Imajte ovo na umu
prilikom postavljanja kamere.
2. Namjenska uporaba
C706IP je sigurnosna kamera koja omogućava pregledavanje slika osiguranja na vašem
smart telefonu uz pomoć aplikacije "uCare Cam". C706IP treba priključiti na WIFI mrežu.
Preko dana kamera može raditi video i audio zapise. Kamera je opremljena i detekcijom
pokreta i zvukova.
Upozorenje! Postupci uporabe se temelje na korištenju kamere uz pomoć Android
telefona. Za iPhone su najvažniji koraci opisani posebno. Ostali postupci mogu se
usporediti s Android App.
3. Tehničke specikacije
3.1. Opće specikacije proizvoda
Senzor: 1/6” Color CMOS Sensor
Razlučivost: 640x480 piksela (300k piksela)
IR objektiv: f: 3.0mm
Kut prikaza: 55 stupnjeva
Komprimiranje videozapisa: MJPEG
Slike u sekundi : 1 ~ 25fps(QVGA)
Izvor napajanja: 230VAC/5VDC/1A Adapter
Potrošnja energije: 5W (Maks.)
Temperatura: 0 °C ~ 55 °C (32°F~131 °F)
Minimalni zahtjevi sustava
Spremnik kartice: Podržava microSD karticu do 32 GB
Podržava mobilni OS: iOS 5.0 i noviji/Android 4.0 i noviji
Certikacija: CE, FCC, RoHS, R&TTE
Jamstvo: Ograničeno jamstvo u trajanju od 3 godine
99
Page 100

3.2. Glavni dijelovi
1. USB kabel
2. Adapter
3. C706IPkamera s podnožjem
4. Korisnički priručnik
5. Kartonska šablona
3.3. Priključci
1. Reset / WPS gumb
2. Micro SD-kartica - ulaz
3. Micro USB priključak
4. Mikrofon
1
2
4. Instalacija kamere
4.1. Priključivanje kamere
• Stavite USB kabel u adapter, a u Micro USB priključak kamere 3.
• Zatim gurnite utikač adaptera u utičnicu.
• Pričekajte s podešavanjem kamere dok zelena i crvena LED lampica ne počnu
naizmjenično treperiti.
Svoju IP Cameru možete dodati svom telefonu pomoću WIFI Routera. Spojiti je možete
preko router modusa ili preko WPS setup modusa. U tekstu dolje objašnjeno je spajanje
preko router modusa.
4.2. Dodavanje kamere vašem smart telefonu preko
router modusa
Napomena! Za uspostavljanje bežične veze s kamerom nužan je bežični usmjerivač.
Napomena! Ako je usmjerivač zaštićen lozinkom, nužno je poznavati istu.
Pozor! Za uporabu aplikacije "uCare Cam" nužan je pametan telefon s pristupom na
internet.
Za postavljanje kamere pomoću Androida idite na odlomak 4.2.1. Za postavljanje kamere
pomoću iOS-a idite na odlomak 4.2.2.
4.2.1. Android
• Preuzmi aplikaciju: “uCare Cam” preko Google Play i instaliraj je.
• Pokrenite aplikaciju. Pojavljuje se početni zaslon aplikacije.
• Pritisnite opciju "Click here to install new wi Camera" A2. Pojavljuje se izbornik "WiFi
connect" B.
• Pritisnite gumb "Routermode"B1 da biste dodali kameru preko WIFI mreže.
• Provjerite da li LED lampica na kameri naizmjenično treperi crveno i zeleno. Ako treperi
pritisnite "next".
Upozorenje! Ako kamera ne svijetli naizmjenično zeleno ili crveno:
• Ponovno gurnite adapter u utičnicu.
• Pričekajte 15 sekundi i držite WPS/RSET gumb 10 sekundi.
A
100
 Loading...