

Page 1
1
Strobe
light &
red LED
Control Box –
hidden under
water proof cover
(below)
e
Control
box
cover
r
AS80SR11B
Solar Siren
Installation Instructions
General Introduction
The AS80SR11B is an outdoor siren powered by solar energy and rechargeable
battery. By its visible pres ence, the external siren indicates t hat an alarm system is
installed and deters intruders. In case of intrusion, it alerts the neighborhood by its
powerful 110 decibels piercing sound and a flashing red light
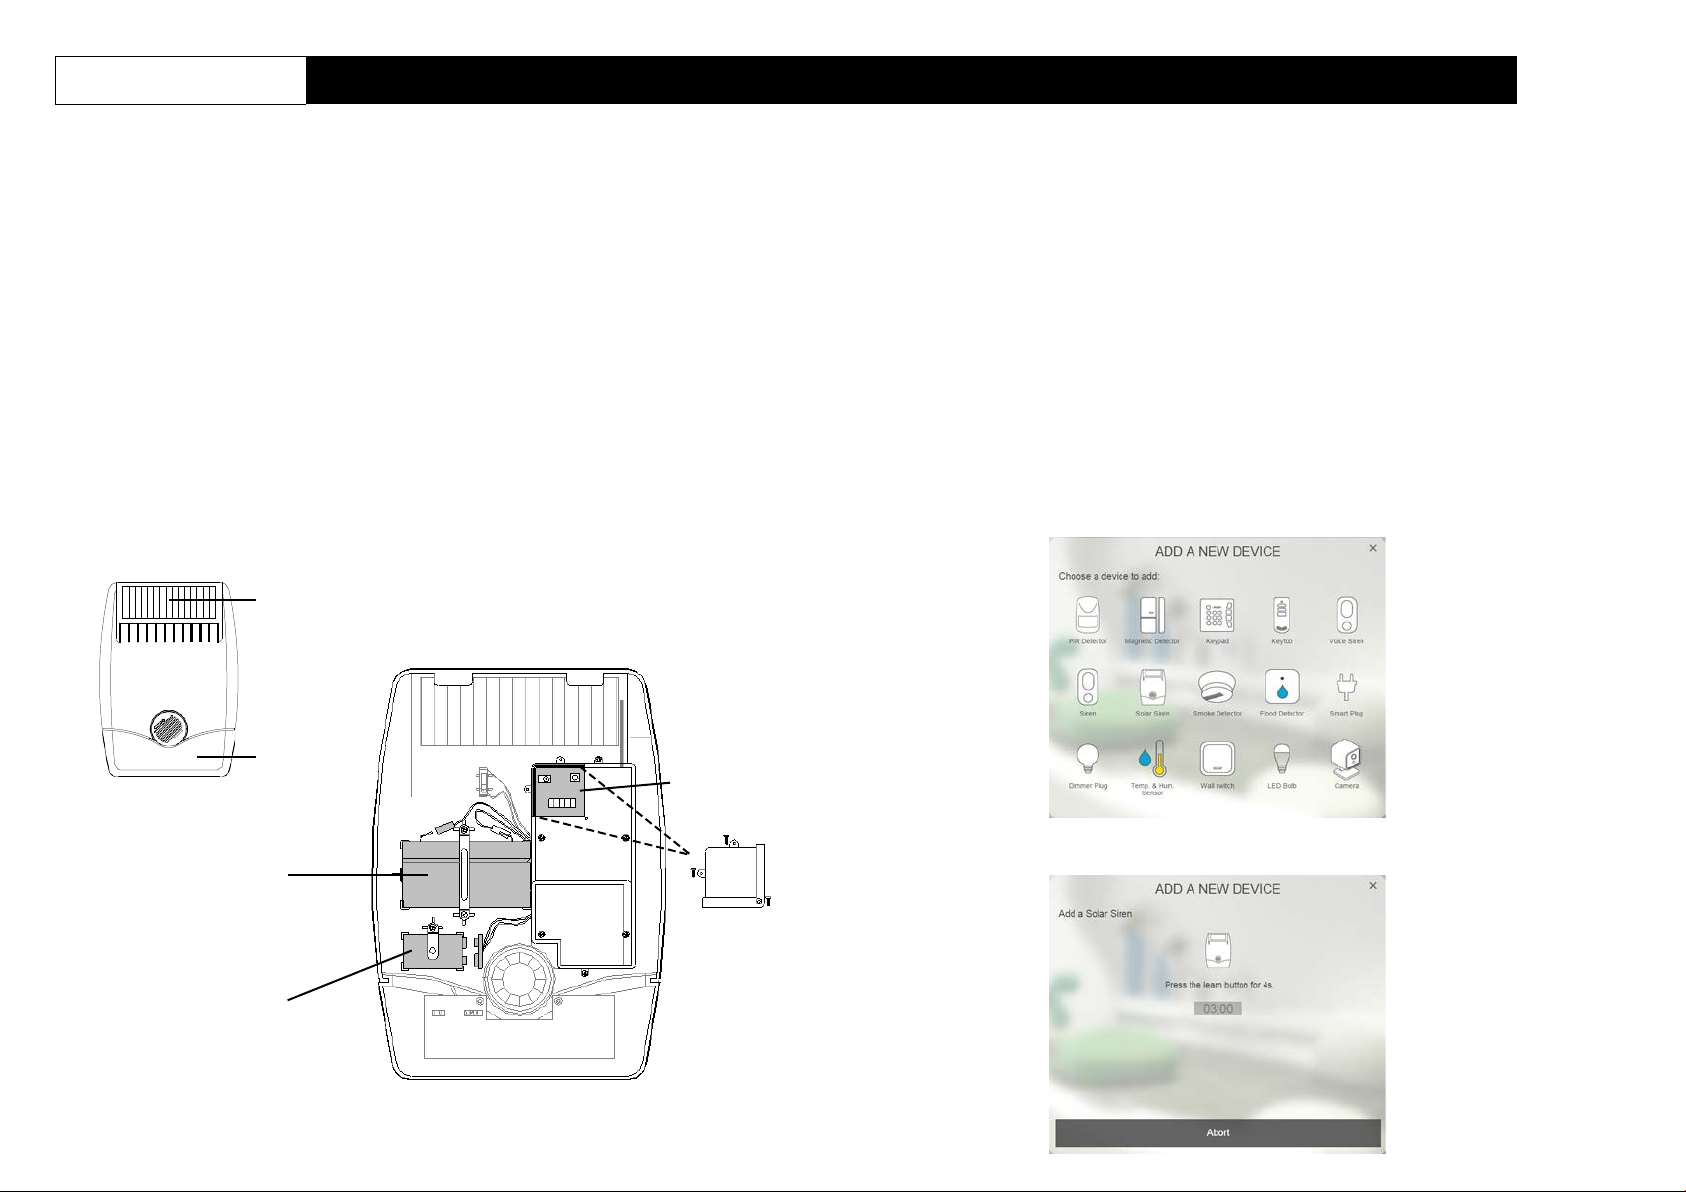
Product Overview
FRONT VIEW
6V 1.2Ahr
rechargeabl
battery
9V initial powe
up battery
Solar Panel
INSIDE VIEW OF SIREN MAIN BODY
(BACK COVER REMOVED)
Binding
1.
Open up the siren by rem oving the f ixing sc rew fr om the bottom edge and caref ull y
peeling off the back cover. All electronic components are housed within the front
cover.
2.
A 9V Alkaline batt er y is su pplied to boost the initial power to t he un it whe n it is f irs t
activated until th e So lar Pa nel c harges the m ain batter y. Locate the battery clips of
this 9V battery but do not connect it up yet.
3.
Log into the ELRO Smart Home Alarm account from a web browser.
4.
Select “System”.
5.
Select “Add a New Device”, then “Solar Siren”.
6.
The following screen will appear. This means the gateway is entering binding mode.
Page 2
2
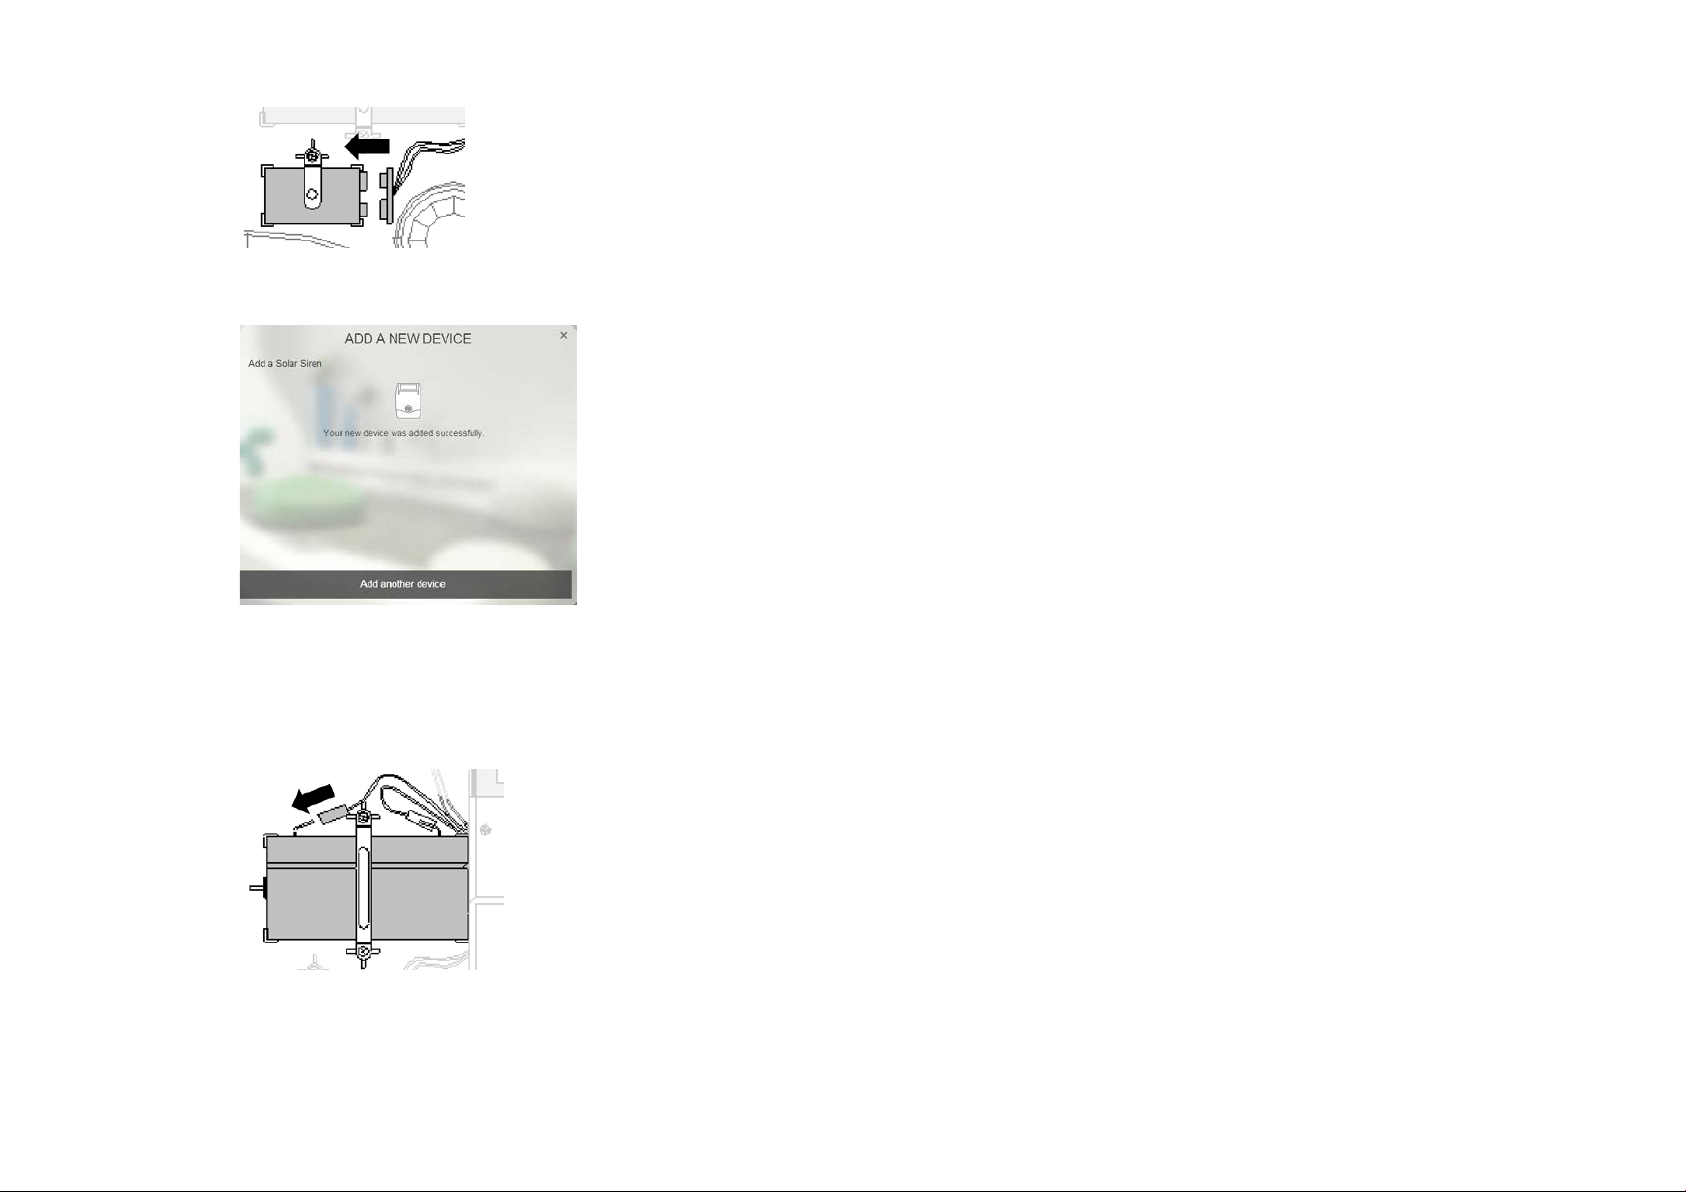
7.
Connect the 9V battery to its battery clips to power up the siren.
8.
The screen below will appear in 10 seconds if the process is successful.
Note: Time-out will occur if the binding process was unsuccessful. Please refer to
the “Manual Binding” in the Troubleshooting section.
9.
Next connect the main rechargeable battery to the charging leads. Connect the
Red lead to the Red (+ve) terminal and the Black lead to the Black (-ve) terminals.
Operation & Testing
IMPORTANT: T he loud so und level pro duced by th is devic e will b e deaf ening a nd
cause discomfor t to the ear. Place the siren outdoors and do not stand in close
proximity to the siren.
Note: It is strongly advised to have the keyfob or keypad ready to quickly Disarm
the system to turn off the siren.
1.
Assemble the back c over back to the m ain body without s crewing th e fixing scr ew
at the bottom.
2.
Place the siren fac ing up on a flat s urface so that the protruding tamper switch is
pressed.
3.
Set the system to Arm mode and trigger the alarm. The siren will emit a loud
piercing sound and the strobe light will flash brightly.
4.
Quickly disarm the system to stop the siren.
Mounting
The Siren should be mounted:
-
as high as possible in a prominent position so that it can be easily seen and heard.
-
on a flat surface so that the rear tamper switch is not e asil y activated. E nsure also
that the tamper switch d oes not fall into th e recess between brick courses as this
could prevent the switch from closing and give a permanent tamper signal.
-
ideally on a south facing wall to receive optimum amount of sunlight, but an east or
west facing wall will also s uffice. Avoid mountin g on a north f acing wall, and a void
shadows cast by neighboring walls, trees, and roof overhangs.
-
at least 1 meter awa y from any extern al or interna l metalwork which can affec t its
radio transmission.
10.
The siren is now ready however do not refit the back cover just yet.
To install the siren on the wall, first affix its back cover on the wall and then followed by
mounting its main body onto the back cover.
Installation
Page 3

3
1.
Symptom
Cause of Failure
Recommendation
LED cannot be
displayed
1.
Run out of battery
1.
Replace a new battery.
send it for repairs.
The LED on the
siren is operating,
but it cannot be
operated
1.
Check if siren has
the gateway.
Remove both the battery and
Back
Cover
Remove the back cover again. Us ing the back cover its elf as a tem plate, positio n
the back cover on the wall and mark the positions of four mounting holes.
2.
Drill four 6mm holes and insert the wall plugs.
3.
Fit two 30mm fixing s crews in the top holes leaving appr oximately 10mm of the
screw protruding.
4.
Place the top keyhole s lots of the back cover over the screw heads . Adjust the
back cover position and adj ust the screws until they form a neat fit with m inimal
movement.
5.
Secure the back cover in position using the two 25mm fixing screws at the bottom.
6.
Before mounting the m ain body, ensure the water proof cover of the Control box
has been secured back if it was removed earlier.
10.
To mount the main bod y, hinge the f ront co ver tabs o ver the to p edge of the back
cover and carefull y push the base of the siren cover into place. Secure the main
body in place by refitting th e fixing screw in the botto m edge of the cover. Do n ot
over tighten the screw as this could damage the thread.
IMPORTANT: Ensure that the re ar tamper switch is cl os ed when th e main body is
fitted (i.e. listen for the switch to click). If the switch does not close, this wi ll prevent
the Siren from operating corr ectly. If necess ary, rem ove the main bod y again and
adjust the screw on the back cover tamper plunger to ensure the switch closes
when the siren is secured in position.
11.
Upon completion of mounting the main body on the wall, the Strobe LED will flash
about 3 seconds as an indication of normal operation.
Troubleshooting
The troubleshooting table lists some possible causes and solutions. Please contact
your original retailer or nearest service center if the below solutions cannot solve your
problem.
Fit two 30mm fixing screws in
the top holes leaving
approximately 10mm of the
screw protruding
Secure back cover using
two 25mm fixing screws at
the bottom
power.
2.
Check if reverse
battery polarity.
3.
Siren is out of order.
completed binding
with Homesys
Gateway
2.
The siren cannot
communicate with
2.
Refit the battery with correct
polarity.
3.
Do not open the device and
follow the steps for binding
with ELRO Smart Home Alarm
1.
Locate the siren closer to the
gateway.
Page 4

4
Position
Jumper fitted
Jumper removed
ALARM
Alarm sound enabled
Alarm sound disabled
CU
Must be fitted
N/A , factory use only
1MIN
1 minute alarm sound
3 minute alarm sound
ANTI
Anti-jamming enabled
Anti-jamming disabled
BEEP
Beep sound enabled
Beep sound disabled
Control
Box
Cover
Alarm
MIN
Beep
Manual Binding
1.
Locate the Control Box area and remove its waterproof cover by unscrewing it.
Identify the Link button inside.
Link Button
2.
With the 9V battery still connected, repeat steps 5 to 6 of the Binding with ELRO
Smart Home Alarm
3.
Press and hold the Link Button for more than 4 seconds until the Strobe LED
starts to flash rapidly then release.
4.
Within 5 seconds the Strobe LED will stop flashing and turn off, indicating the
binding procedure is completed. The screen below will appear to confirm this.
section.
Reset to Factory Settings
1.
Press and hold the Link Button for more than 4 seconds until the Strobe LED
starts to flash rapidly then release.
2.
Press and hold the Link button again for more than 6 seconds until the Stro be
LED turns off, then release. The LED will flash every 2 seconds indicating the
siren is now reset back to factory mode factory.
Jumper Settings
The siren preset settings can be modified by adjusting the jumper settings inside its
Control Box.
1.
Locate the Control Box area and remove its waterproof cover by unscrewing it.
2.
Identify the set of jumper links JP1. The settings for each is described below:
JP1
JP1 Settings
C.U.
1
A.J.
Page 5

5
LED Table
Status
Strobe LED Indication
Audible indication
Full alarm
Strobe light flashes brightly
Siren piercing sound
Installation is ok
after binding)
LED flashes for 3 seconds
Factory reset
LED flash every 2 seconds for
one minute
Low battery
indication
LED flashes 20 times rapidly
Battery
6V 1.2Ah Lead acid, 9V PP3 alkaline
Operating Temperature
-10°C to 60°C
Working Range
Minimum 200 meters
Siren Volume
Minimum 100dB / 1 meter
Operating Frequency
868MHz
The table below describes the LED indication at various stages of Siren operation
(Press tamper
switch once
Specifications
** Specifications are subject to change without notice.
WARNING:
Do not dispose of electrical appliances as unsorted municipal waste, use separate
collection facilities.
Contact your local government for information regarding the collection systems
available.
If electrical appliances are disposed of in landfills or dumps, hazardous substances can
leak into the groundwater and get into the food chain, damaging your health and
well-being.
When replacing old appliances with new ones, the retailer is legally obligated to take
back your old appliance for disposal at least for free of charge.
 Loading...