

Page 1
1
AS80CA11A 1080P IP Camera
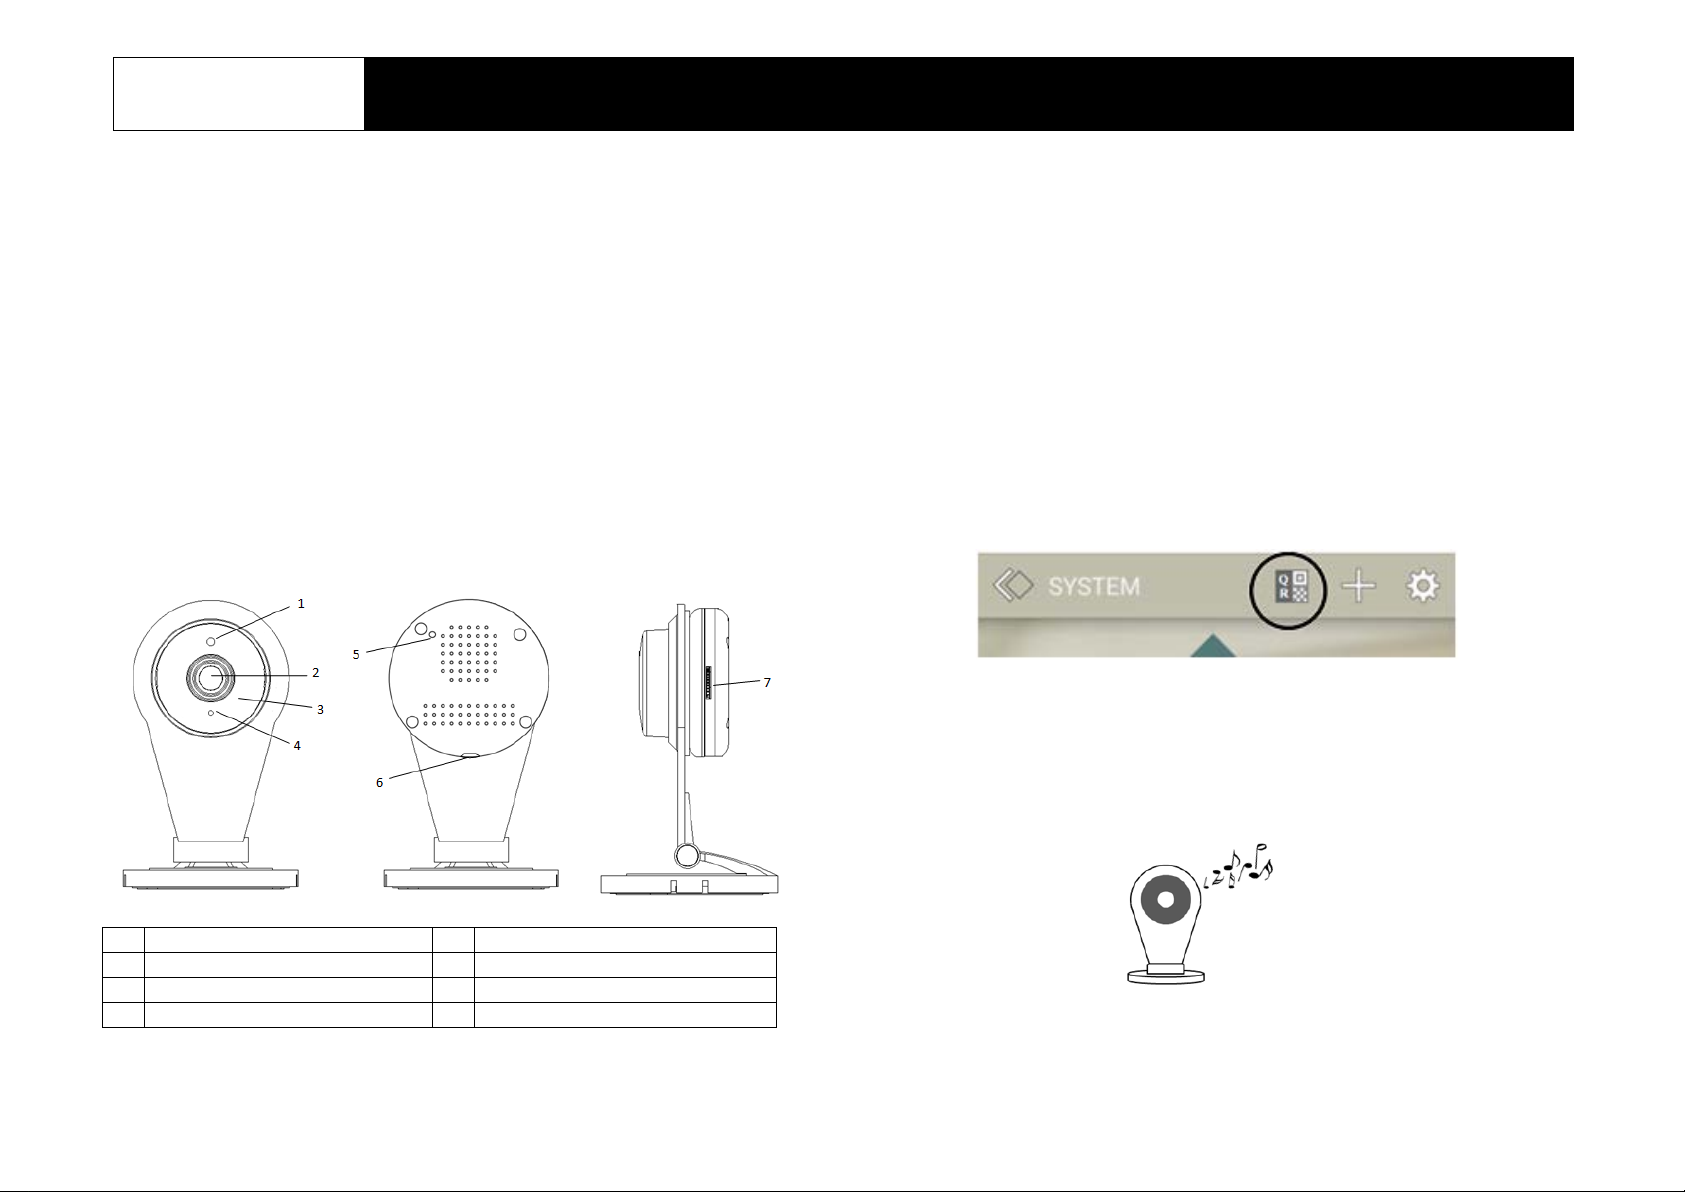
1
Microphone
2
Lens
3
IR LED (hidden)
4
LED indicator
5
Reset/WPS button
6
Power jack
7
Micro-SD card slot
Installation Instructions
General Introduction
The IP Camera is design ed to monitor the premise wh er e it is ins talle d at i n real
time, and send the images to the Gateway. The recording function will be
activated if an event is triggered under warning conditions. Its great compatibility
with our U-Net family security produc ts makes it suitable for smart home c loud
based platform.
Product Layout
Front view Rear view Side view
Connecting camera to hom e Wi-Fi
The camera first needs to connect to your home Wi-Fi network. There are two
methods to do this
Method 1: By QR code setup. A smartphone installed with ELRO Smart Home
Alarm App is required.
1. On the ELRO Smart Home Alarm App, go to System page and tap the QR
code icon on the top bar.
2. Enter your home Wi-Fi network and your Wi-Fi password, if any.
3. The App will then generate a large size QR code image. Leave the App on
that page.
4. Power up the camera using the supplied power adaptor and wait for a
musical tone. This usually takes about 30 seconds.
The musical tone indicates the camera is ready to scan the QR code created
earlier by the App.
Page 2
2
5. Place the QR code at about 10cm in front of the camera lens.
label
6. If the QR code scan is successful, a musical tone will be heard. The camera
will then attempt to connect to the home network.
Note : If there is no musical tone after 30 seconds, try moving the
smartphone further away from the camera in gradual steps.
Method 2: By WPS setup. This requires your home router to support WPS.
1. Power up the camera using the supplied power adaptor and wait for the
musical tone. This usually takes about 30 seconds.
2. Using a sharp pi n, briefly press the reset button for 1 second and release.
3. Within one minute, press the WPS button on your home router.
4. When camera has established connection with the router, a musical tone will
be heard.
Binding with Smart Home
1. Log into the Smart Home account from a web browser.
2. Select “System”, then “Add a device”.
3. Select “Camera”.
4. Enter the Access Code on the label behind the camera and click “Next step”
5. The screen below will appear if the process is successful.
Access Code
Page 3

3
Note: If the web page indicates camera is not reachable, it could b e the
Wi-Fi information set up earlier might be incorrect. Reset the cam era to
factory default and r ep eat t he s te ps i n t he s ectio n Con necting Camera to
home Wi-Fi again. Refer to the Troubleshooting section about resetting
the camera.
Operation
Live video
1. To watch live video of the camera, go to LIVE to see a snapshot preview.
2. Click the snapshot image to view live view images.
Playback recorded videos
1. To display recorded videos, go to VIDEO page. All videos are displayed with
recording date and video duration.
2. Click on any image to play the video.
3. During playback, it is possible to move forward and back the video by
dragging the time bar, change volume level, and display in full screen.
4. From web browser, to download a copy of the video onto your PC, click
“Download Video”
Page 4

4
Mounting the camera
Symptom
Possible Cause
Recommendation
The LED never turns
The power adapter is
Check you connected the
When adding a new
Wi-Fi password error
1. Reset the camera (refer to
Cannot play the live
Wi-Fi network is out of
Change the mounting location
Local internet upload
Each camera requires at least
How to connect camera
Home router is replaced
Reset camera to factory
Operating Tem per at ure Ra nge
0°C - +45°C
Operating Humidity
5 - 85% RH
Max. Image resolution
1920 x 1080 (1080P)
Encryption
H.264
View angle
101°(H), 58°(V)
IR LED range
5m
Power supply
DC adaptor, 5V 1A
Wi-Fi protocol
Wi-Fi 802.11 b/g/n
The camera can be placed on table top, mounted on a wall or ceiling. When
mounting on a wall or ceiling, use supplied screw and wall plugs to secure the
camera in place.
Select the appropriate location for the camera:
- Place the camera at least 1m away from surrounding metalwork which can
affect its Wi-Fi transmission.
- Do not install the device near fire or heat sources to avoid damage.
- Do not install the device at humid places or exposed to rain.
Note: It is normal if the camera appears warm during oper at io n
Troubleshooting
The troubleshooting table lists some possible causes and solutions. Please
contact your original retailer or nearest service center if the below solutions
cannot solve your problem.
1. Using a sharp object, press and hold the reset button behind the camera for
more than 10 seconds then release.
2. The camera will restart itself and will be ready again when it plays a musical
tone.
Specifications
ON
camera, Homesys
reports camera is not
reachable
video from the camera
to a different network
Reset to factory default
The camera needs to be reset to factory default before it can connect to a new
Wi-Fi network.
not connected well.
range
speed not enough
camera to supplied power
adapter.
next section) and try QR code
set up again.
2. Try connecting by WPS
method.
of camera
512kbit upload speed.
default (refer to next section)
** Specifications are subject to change and improvement without notice.
 Loading...