

Page 1

Menu Icons
In the top right corner of your screen are the Menu icons. These give you
important information about the status of the webbook as well as options and
shortcuts.
You can quickly see whether you are connected to Wi-Fi (the number of Wi-Fi
bars increase or decrease depending on the signal strength), the amount of
charge in your battery, or increase or decrease the volume. Click the Back
button (or the ESC on the webbook’s keyboard) to go Back to the previous
screen.
Click the Menu Icon or your Right Mouse Button at any time to bring up a
menu of options relevant to the screen you have open. For example on the
Notication Bar
Swipe ‘Down’ to open
Widgets & Shortcuts
Google Search
Search the internet
Home Screen
Swipe left / right to view your
5 home screens
Option Menu
home screen, clicking the menuicon brings up ways to change your
homescreen, and if you have the eMail app open the menu icon brings up
options to do with your eMail.
Pressing the Home icon will take you straight back to your main home screen.
To increase or decrease the number of home screens click the menu icon and
click ‘Edit’. Here you can add more home screens by pressing the + icon or delete
home screens by swiping across to the relevant screen and clicking - buttons.
Please Note: To write a £ symbol when typing press and hold Shift and the 4 key
to bring up a list of currency symbols. Click the £ sign or the symbol you want
to add it to the text you are writing.
Menu Icons
See right for details
Program Menu
Click to show a list of programs
Menu Icons
Wi-Fi Signal Strength
Battery Charge
Volume Down
Volume Up
Back
Menu
Return to Homescreen
Program Menu
Telephony / 3G
(included for future use)
Program Menu
On the right hand side of your home screen is the Program menu icon. Click
the square icon in the centre to open a menu of your installed apps. To open
an app just click it once and it will launch.
To change the shortcuts above and below the square program menu simply
click and hold and icon you've already placed on the home screen, then
drag it onto the existing icon to replace it.
Connecting to Wi-Fi
Follow the instructions below to connect to a b/g Wi-Fi Connection:
:: From the home screen click Settings, then Wireless and networks.
:: Then click Wi-Fi to turn on the webbook’s Wi-Fi module
(please note that this will use your battery life faster).
:: Click Wi-Fi Settings, then Add Wi-Fi Network. The webbook will then
automatically scan for available Wi-Fi hotspots.
:: Select the desired Wi-Fi hotspot from the list.
:: If the hotspot doesn't have a password it will automatically connect,
however if it ‘secure’, a password window will pop up letting you enter the
correct password. For password details refer to your ISP or the sta at the
internet cafe/coee shop etc.
Files and Folders
To browse your les and folders click the OI File Manager which has an icon
like a folder. First time you use it you need to agree to the EULA conditions by
pressing Accept. You will then be presented a list of folders;
:: SD Card - if you have a micro SD Card inserted
:: uDisk - if you have a USB Flash Device connected to the USB port
:: NAND - which is the webbook’s on-board storage
To create a new sub-folder open the SD Card/uDisk/NAND folder and press
the Menu icon, then New Folder. Enter the name to create a new folder and
press OK to conrm
To copy and paste les from one folder to another, click and hold the original
le for about 1 second. A menu will pop up with options to Send (via eMail),
Move, Copy, Rename, Delete, plus various other le specic options. Click Copy
(to create a duplicate of the le) or Move. You can then navigate to the
destination folder where you want to copy the le and then click the “Copy
Here” or “Move here” button to transfer the le.
7” Android webbook
Page 2
Introduction
Please read this quick start guide
carefully to help you get the
most out of your webbook.
Your new webbook is a great new
way to experience the web, using
the new Google™ Android™ OS in a
compact, portable product.
Package Contents
Before using your webbook, please check your package contents to ensure
there aren’t any items missing. If any of the listed items are missing or
damaged, please contact your point of purchase for assistance.
The package includes:
1. 7” Android webbook
2. Power Adaptor (230V)
3. Quick Start Guide
4. Guarantee
Help & Support
To help you get the best out of your product we provide you with a limited 1 year Return
to Base Warranty and Support Helpdesk. For all technical support please contact our
helpdesk using the details below:
If you have any problems or questions please
DO NOT take your webbook back to the store.
Please contact us for some helpful advice.
Android is a trademark of Google Inc. Use of this trademark is subject to Google Permissions
Battery Charging
Your webbook has a built in rechargeable lithium battery which provides
around 3 Hours battery life (depending on usage). The webbook is supplied
with no charge in the battery and we recommend that you charge the
battery for around 8 Hours for its rst charge, to achieve the best battery life.
Memory & Expansion
Your webbook comes with 2GB of memory built in an you can expand this
up to a huge 32GB with an SD card (not included) to store your favourite
music, movies, les and photos. Insert the card with the metallic connectors
facing the bottom of the webbook until you feel a click which will lock the
card into place. To remove, push the card gently inwards until you hear a
click and then it will pop out.
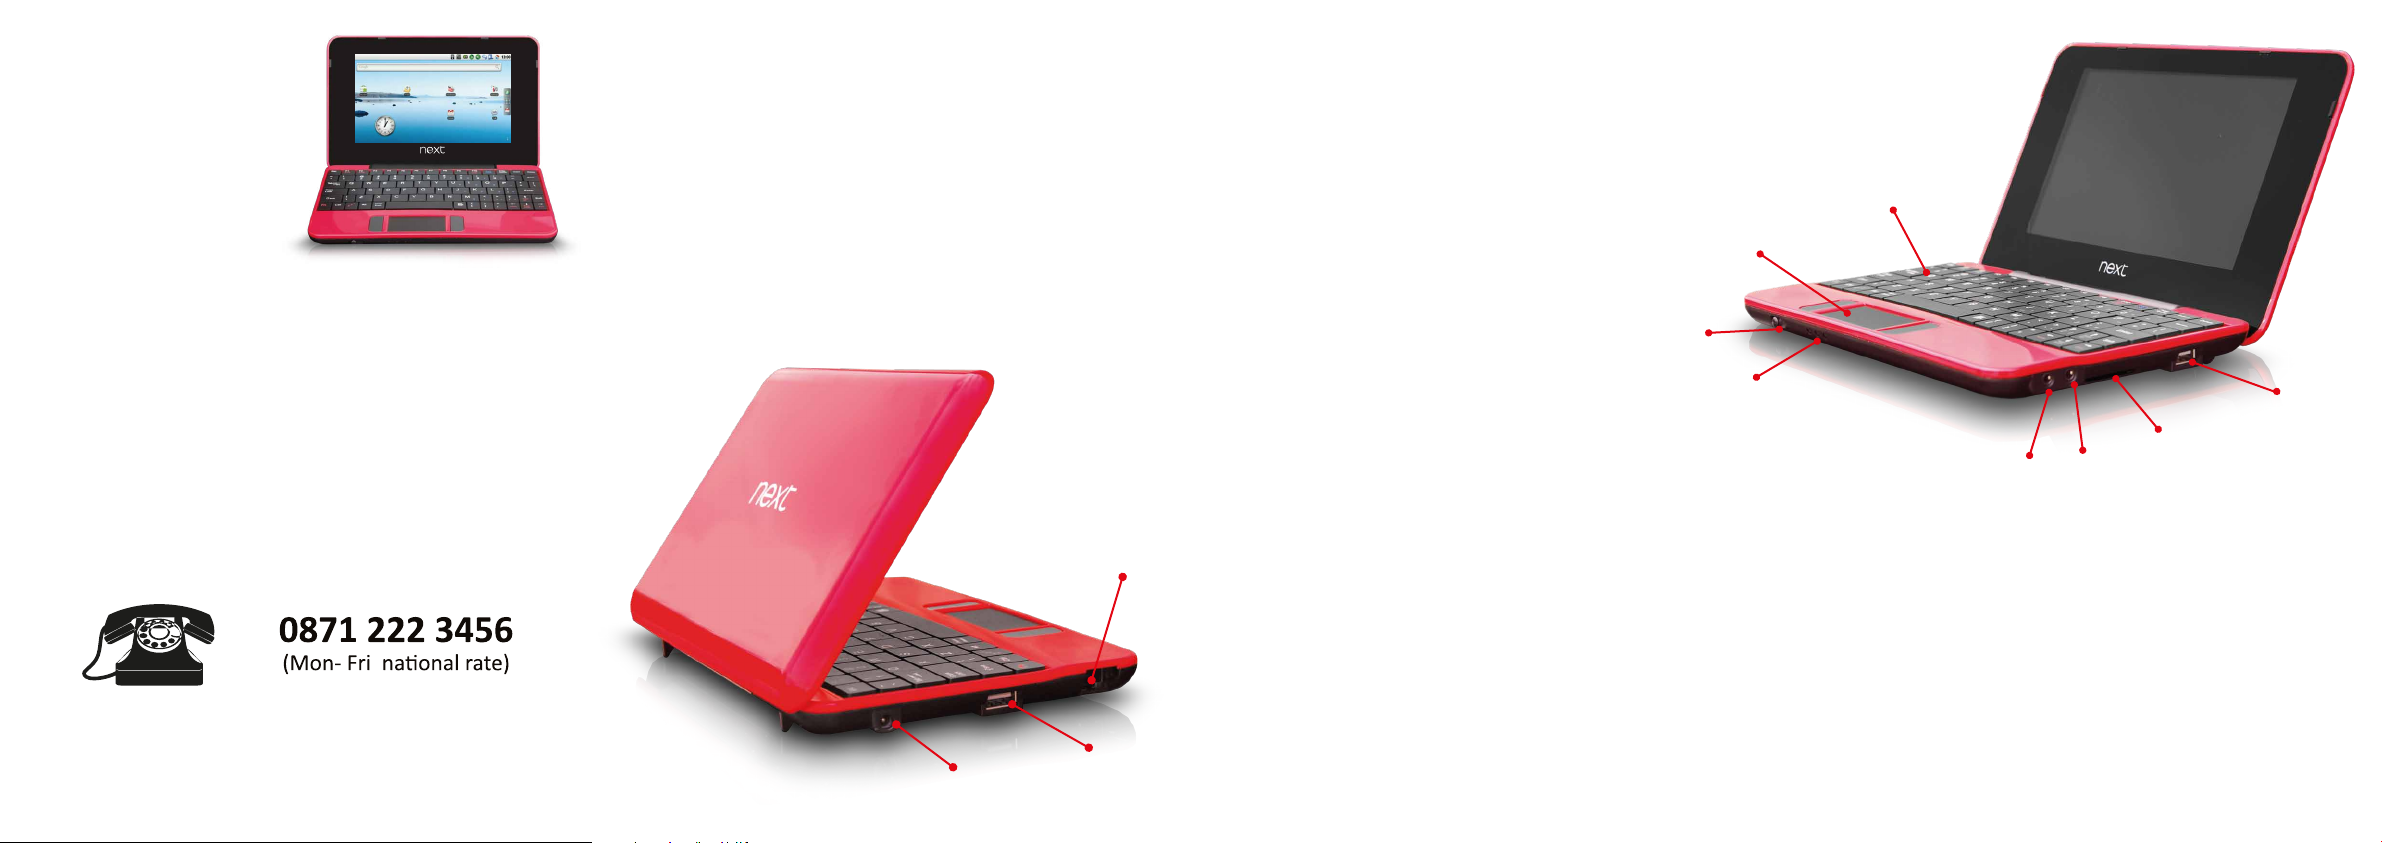
Ethernet Broadband
Port (RJ45)
OTG Port
DC Power Port
(for rmware upgrades)
Android™ : Getting Started
Once you’ve charged the battery you can turn the webbook ON by sliding the
power button to the left and the Android™ OS will load. To turn it OFF slide
the power button left for 4 seconds, until the screen goes blurry, then press
OK to power o.
To unlock the screen use the touchpad and mouse buttons to
slide the padlock icon until it covers the green dot
(alternatively press the F1 key to unlock).
The webbook will then load your home screen for
you to start navigating to your chosen function.
The screen will automatically lock after a period
of non-use (you can change the length of this time
period in the Settings menu)
Your Google Android™ operating system
operates using ‘clicks’, ‘double clicks’ , ‘click and
hold’ and ‘click and swipe’ on the screen. You can
also plug a USB mouse into the USB port for easier
navigation. The user interface is highly intuitive and you will be prompted by
on-screen instructions for most actions you try to make. In most cases you
will be asked to agree to Terms and Conditions (EULA), please read these
carefully before agreeing.
In order to get the most out of the Google™ Android™ software its best to use
a Google Account. Its free, quick to set up and gives you loads of benets. If
you already have a google account set up, such as a Gmail™ e-mail account
you can set up your webbook using this, or alternatively set up a brand new
one. Click Settings > Accounts and Sync > Add Account > Google and then
follow the on-screen instructions. NOTE: By setting up a Google Account you are
agreeing to the Google and Additional Privacy Policies.
(Slide left to power on)
Touchpad and
L & R Mouse Buttons
Power Button
LED Indicators
Setting the date and time
Some of the webbook’s software and widgets require the date and time to
be correct to function correctly. To set the time and date go to Settings >
Date & time. Uncheck the Automatic setting then click Set Date, use the +
and - buttons to change the date and then press Set. Click Set Time, use the
+ and - buttons to change the date and then press Set. Please Note: If you
run out of battery life you will lose your time and date settings.
QWERTY Keyboard
SD Card Slot
Audio in
(3.5mm)
Audio Out
(earphones)
About your Home Screen
The webbook has 5 home screens where you can add shortcuts to places and
programs as well as adding widgets (apps that reside on your home screen
such as a clock/calendar).
To add a widget or shortcut just ‘click and hold’ some blank space on your
home screen. A pop-up menu will appear so you can choose your widget
which will appear on the home screen. To move it around the home screen
click and hold the icon until it becomes larger, then drag it to where you want
it.
To delete a widget or shortcut, click and hold the icon then drag it to the
recycle bin. The recycle bin icon replaces in your program menu icon on the
left hand side of the screen when you click and hold a shortcut or widget.
USB 2.0 Port
 Loading...