

Page 1

MSNB- 2009 User Manual
1 Introduction
Preface
Welcome to the world of wireless internet, email, messaging, word processing
and MP3s. This ultra mobile laptop is your gateway to a truly mobile life and a
whole new way to keep in contact with friends, family & colleagues, get access
to the web and relax with music, photos and videos.
Your laptop runs a Microsoft® Windows® XP® operating system.
integrates the widest range of applications, services and hardware in a familiar
way so you can easily and confidently use technology to achieve your goals and
pursue your passions.
Please read this user manual carefully to help you get the most out of your
laptop. Also please observe the safety warnings so you don’t damage your
laptop or more importantly yourself. A full support site and trouble-shooting
tips are available at www.elonex.com/support
Windows®
Package Contents
Your package includes the following contents:
Laptop
Power Adapter (2 parts)
User Manual
Getting Started
After unpacking your laptop, please check you have all the package contents
and they are in good order. If you are missing anything or any item has been
damaged please contact customer services on
Tel - 0845 6710665
OR
eMail – MandS@elonex.com
If you have any problems or questions please DON’T take your laptop back to
the store – call 0845 6710665 for some helpful advice.
Page 2
Page 3

MSNB- 2009 User Manual
Important Safety Instructions
All safety and operating instructions should be read before the product is
operated. Always adhere to these instructions and follow the proper working
procedures for the computer. Shut the computer down properly and do not
forget to save your work often. Remember to periodically back-up your data
as Elonex accepts no responsibility for data loss. Failure to adhere to these
Safety Instructions may invalidate your warranty.
Peripherals
Take care when using peripheral
devices. Always check compatibility
with your laptop and follow the
manufacturer guidelines for
installation and proper use.
Cleaning
Unplug the product from the wall
outlet before cleaning. Do not use
liquid cleaners, volatile chemicals or
aerosol cleaners as these may cause
damage to your laptop chassis or
internal components. Use a damp
cloth for cleaning.
Water and Moisture
Heat
The product should be situated
away from heat sources such as
radiators, heat stoves or other
products that produce heat.
Power Sources
This product should be operated
only from the type of power source
indicated on the marking label and
only using an Elonex authorised
power adapter.
Grounding
This product should only be used
with proper electrical grounding.
Please only use power supplies
Do not use this product near water,
for example near a kitchen sink etc.
Any liquid entry into the internal
workings of this unit may damage
your laptop.
Ventilation
Slots and openings in the cabinet
are provided for ventilation to
ensure reliable operation of the
product and to protect it from
overheating. These openings must
not be blocked or covered.
supplied by Elonex otherwise this
may cause damage to the
electronics or injury to yourself.
Power Cord Protection
Power supply cords should be
routed so that they are not likely to
be walked on or pinched by items
placed upon or against them. If your
power cord is damaged in any way
please contact customer services.
Lightning
For added protection for this
Page 4

product during a lightning storm or
when it is left unattended and
unused for long periods of time,
please unplug it from the power
socket. This will prevent damage to
the product due to lightning and
power line surges.
Overloading
Do not overload wall outlets,
extension cords or integral
convenience receptacles as this can
result in a risk of fire or electric
shock.
Object Entry
Never push objects of any kind into
dangerous voltage or other hazards.
Refer all servicing to qualified
service personnel.
Damage Requiring Service
If your laptop is damaged or
behaving abnormally, unplug this
product from the wall outlet and
refer servicing to qualified service
personnel. Please refer all warranty
claims to Elonex Warranty Service.
Replacement Parts
Only use replacement parts
specified by Elonex. Unauthorised
substitutions may result in damage
to your unit.
your laptop through openings as
they may touch dangerous voltage
points or short-out parts that could
result in a fire or electric shock.
Servicing
Do not attempt to service this
product yourself as opening or
removing covers may expose you to
Avoid EM interference
The product should be situated
away from all sources of Electro
Magnetic radiation, ie microwaves,
amplifiers, speakers etc. These can
hinder proper performance and
damage your data.
Page 5
MSNB- 2009 User Manual
2 Laptop Appearance
Page 6
Front View
Right Side View
Left Side View
Page 7

MSNB- 2009 User Manual
Inputs and Outputs
The laptop has a number of inputs and outputs to give you a truly versatile way
to incorporate it into your daily life. When purchasing any peripheral devices,
please check the peripheral’s minimum Hardware and Software requirements
to ensure compatibility with your laptop and always follow manufacturer
instructions.
USB Ports This laptop is compatible with a whole range of USB peripheral
devices such as printers, scanners, digital cameras, MP3 players etc. The laptop
has 3 USB2.0 ports (and is also compatible with USB1.0 devices) however you
will achieve a much higher data transfer rate with USB2.0.
Webcam Your laptop has a built in webcam at the top of the screen. You can
use this for video chats over the internet. You can initiate the webcam using
the ‘Start WebCam’ hotkey located at the top right of the keyboard.
Microphone Jack (3.5mm) This lets you use a microphone to record audio to
your laptop. The laptop also has an integrated microphone to give you the
option of speaking directly into your laptop. Please only use a 3.5mm Jack
when connecting external devices.
Headphone Jack (3.5mm) Allows you to play audio from your laptop to a set of
external speakers or headphones. It also has integrated stereo speakers to give
you the option of playing audio directly from the laptop. Please only use a
3.5mm Jack when connecting external devices.
7-in1 Memory Card Slot Transfer photos quickly and easily from your digital
camera to the laptop using the memory card slot (compatible with
SD/MiniSD/MMC/RSMMC/MS/MS pro/MS Duo memory cards).You can then
email or upload them to the internet to share the fun with your friends and
family.
VGA output You can use this connection to output your screen to another
monitor, projector or VGA enabled TV. (Requires a 15 pin VGA Cable)
RJ45 Ethernet Port Use the 10/100Mbps Ethernet port for connecting your
laptop to cable broadband to give you access to the internet or a network. For
details of how to connect to the internet see “Connecting to the Internet”
section of this booklet.
Page 8

Volume Rocker To help you enjoy your music and video the laptop has a
Volume Rocker to easily adjust the volume.
To turn the Volume UP rotate the rocker towards the + marking and hold
until the audio reaches the desired volume.
To turn the Volume DOWN rotate the rocker towards the
hold until the audio becomes sufficiently quiet.
To Mute or Un-Mute the audio push the Rocker inwards once.
- marking and
Page 9
MSNB- 2009 User Manual
Power Button & HotKeys
Wi-Fi On / Off
Press this button to turn the Wi-Fi on or off. When your computer
boots into windows it will automatically have the Wi-Fi turned on.
Open eMail
This button will automatically open your pre-installed email client –
Microsoft Outlook Express.
Start Webcam
Press this button to open a Window with a live feed from your
webcam.
Open Internet
Press this button to open a fresh internet browser with your
designated home page.
Power Button
Press this button once to turn your computer on.
Page 10
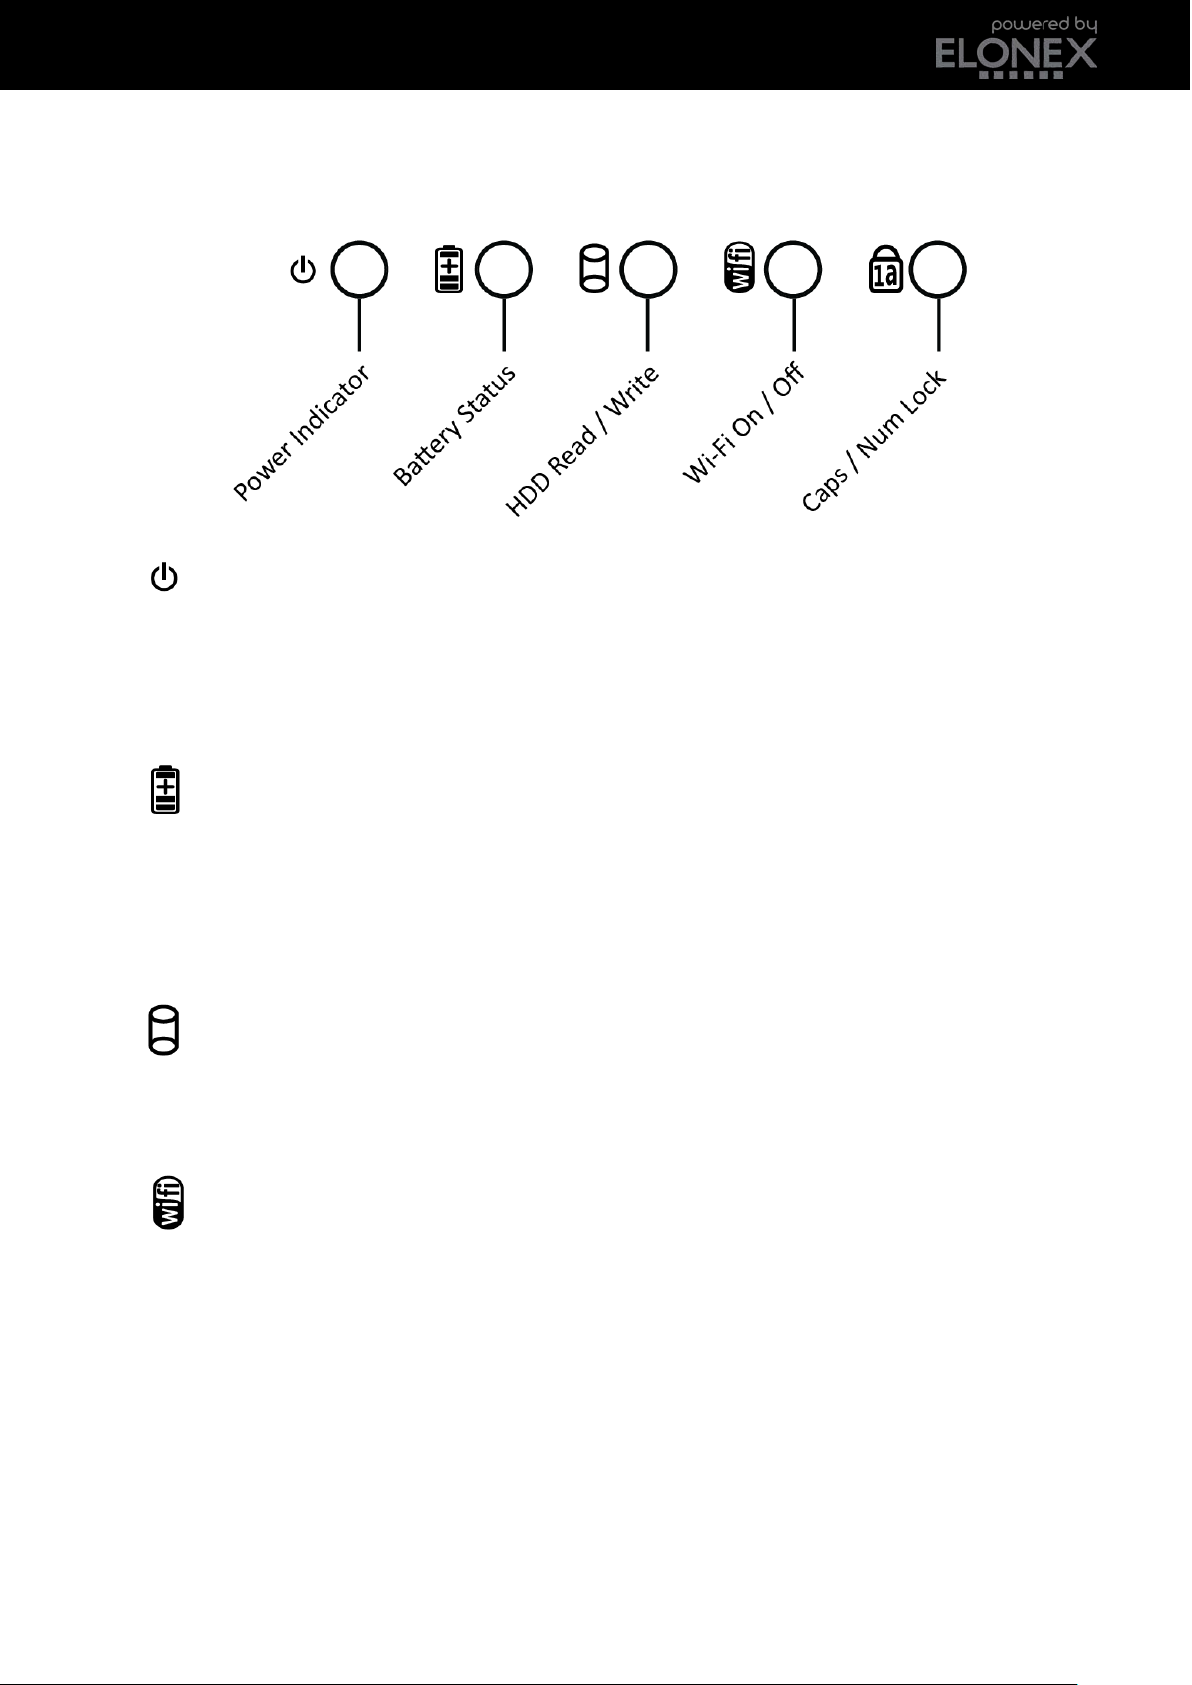
LED Indicators
Power Indicator
Off: The computer is turned off or is in hibernation mode.
Green: The system is powered on.
Blinking: The computer is in standby mode.
Battery Status
Green: The battery is fully charged
Orange: The battery is charging
Blinking: The battery power is low. Please save your work and
recharge.
HDD Read / Write
HDD Read/Write indicator lights up when data is being written to or
read from the hard disk.
Wi-Fi On / Off
Off: Your Wi-Fi card is not powered on.
Slow Blinking: The wireless card is not connected to the internet but is
turned on.
Slow blinking (3-4 seconds interval): the wireless card is powered on
and attempting to connect.
Fast blinking: The wireless card is connected and
transmitting/receiving data. The blinking rate is dependent on the rate
of data transfer.
Page 11

MSNB- 2009 User Manual
Caps / Num Lock:
Green: Illuminates when the Caps Lock key is pressed.
Red: Illuminates when the combination of Fn and Num Lock keys are
pressed.
Orange: Indicates both the Caps Lock and Num Lock are active.
Page 12
Power, Charging and Battery Care
This laptop has a rechargeable battery which will give you usage on the move
when recharged. You can also use the power adapter plugged into mains
electricity for continuous use (the laptop will recharge its battery while in
operation).
It is recommended that the first time you charge your battery you should
charge it for at least 8 hours to get the best battery life.
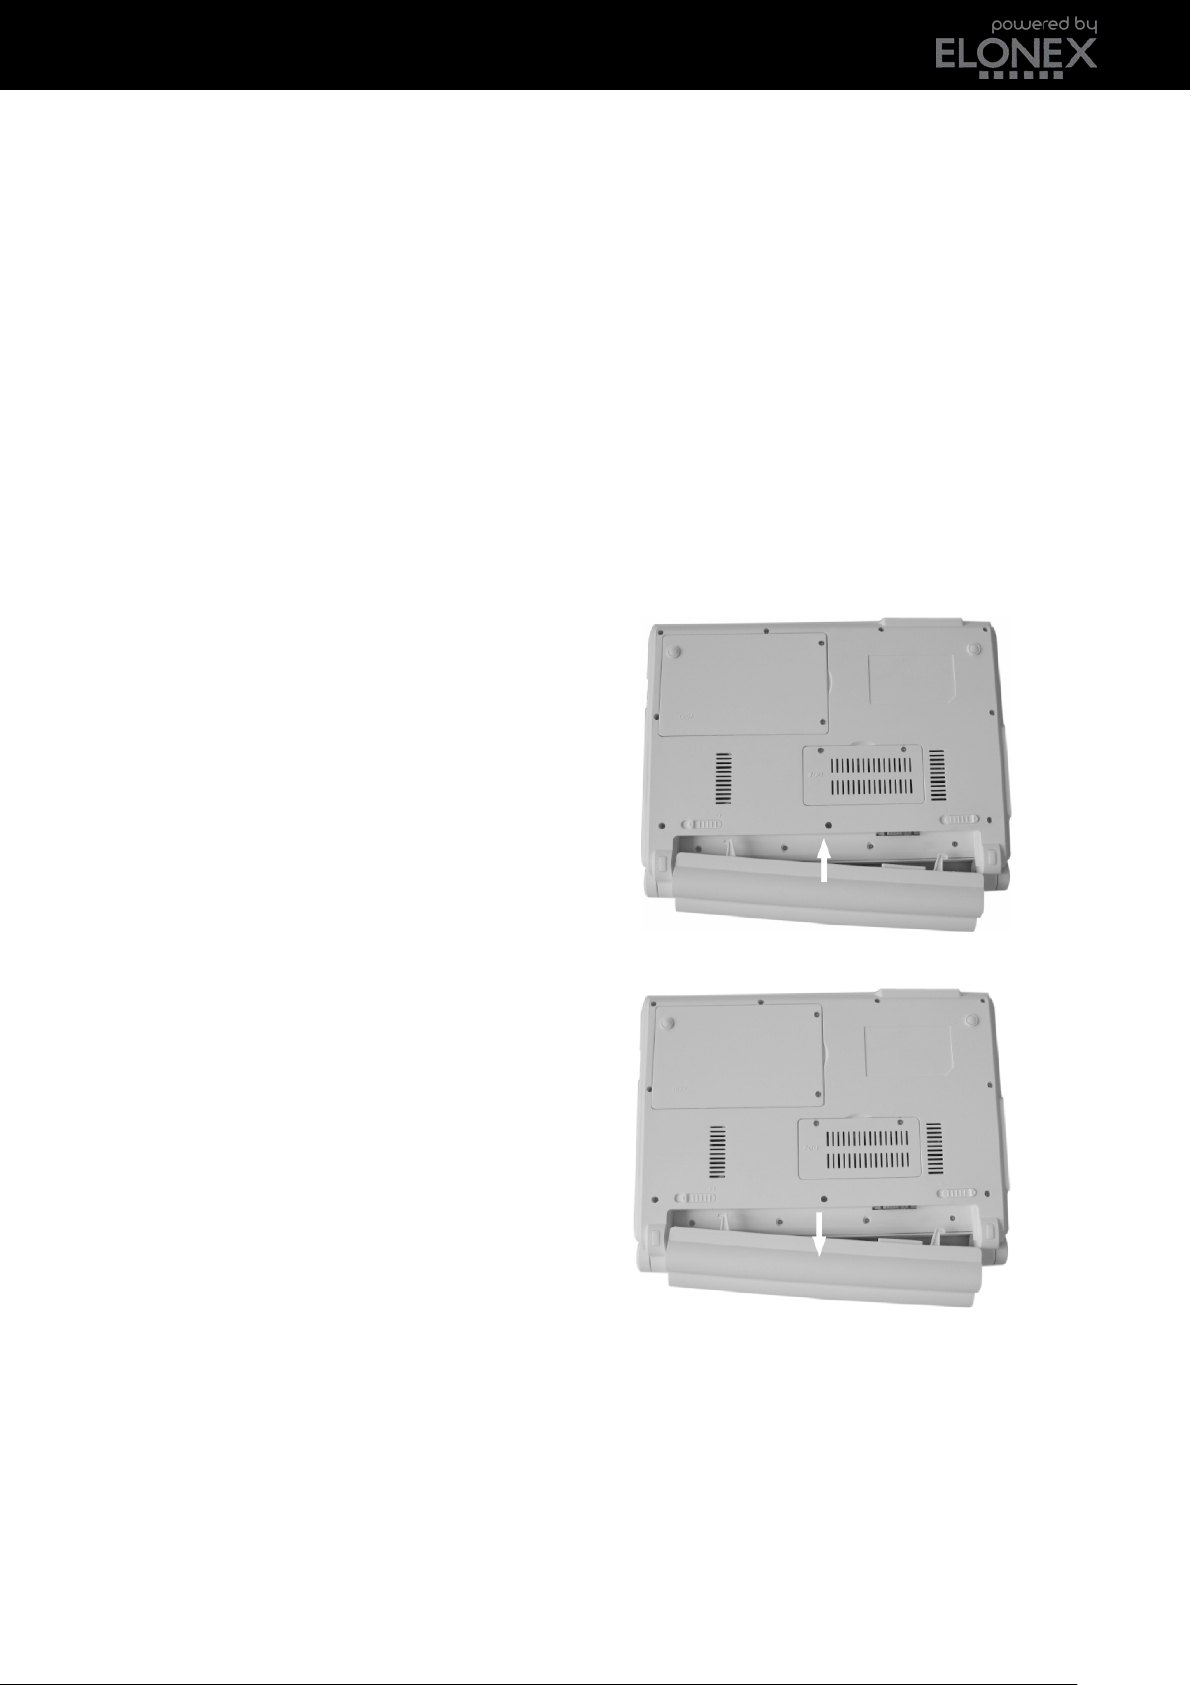
Connecting your Battery Pack
Caution: You must shut your system down before changing the battery pack.
1. Turn the computer over so that the
battery slot faces up.
2. Place the battery pack in the battery
slot, and align the protrusions on the
battery pack with the two slits on the
side of the battery slot.
3. Gently push the battery pack into
the slot until you hear a click. Lock the
battery pack in place by pushing the
right battery latch to the left. When
you hear a click, the battery pack is
locked in.
4. Connect the AC adapter and open
the LCD panel. Start charging the
battery. When the battery is charging
the Battery Status Indicator will go
orange, when fully charged it will turn
green.
Page 13

MSNB- 2009 User Manual
To remove the battery pack
Unlock the right battery latch to the right until it clicks, and push the right
battery latch to the left and hold; then slide the battery pack out of the slot.
Caring for your Battery Pack
Frequent recharging of the battery pack can reduce battery life. To get the
most of your battery it is recommended that you periodically fully discharge
(drain the battery power to a minimum) and then fully charge the battery pack.
Note: Your battery gradually loses a small amount of power over a long period
of time. This is characteristic of all Lithium-Ion batteries.
To use the battery pack safely and effectively,
1. Do not short-circuit the battery pack.
2. Keep the battery pack away from heat or fire.
3. Store the battery pack at room temperature.
4. Do not disassemble the battery pack under any circumstances.
5. Do not expose the battery pack to water or moisture.
6. The battery pack should not be removed by children.
7. If the temperature of the battery pack drops below 10 °C it will only trickle
charge, which may take anywhere up to 32 hours to be fully charged. This is
not recommended.
Page 14

Connecting your Power Adapter
Only use the AC adapter that is supplied with your laptop or supplied by an
official Elonex reseller. Using any other adapter may cause damage to your
laptop.
Connect the power cord to the adapter, and then plug the other end into an
AC power outlet. It is recommended that the first time you use your laptop you
should charge it for at least 8 hours to get the best battery life.
Warning
Do not overload an electrical outlet with connections to multiple devices.
Overloading an electrical outlet may result in fire or electric shock.
Do not touch the power cord or plug with wet hands. Doing so may result in
electric shock. Connect the power cord to the adapter, and then plug the
power cord into an AC outlet.
Page 15

MSNB- 2009 User Manual
Turning the power on and off
Turning ON
To turn your laptop on, simply press the
power button on the top of the computer.
Sleep/Hibernate
When the computer is on, you can use the
power button as a Sleep/Hibernate hotkey
button when it is pressed for less than 4
seconds (pressing and holding the power
button for longer than this will shut the
computer down). You can use Control Panel
> Power Options to configure this feature. You can also configure the power
options to get the most out of the battery depending on whether you want
higher performance or longer battery life.
Turning OFF
To turn your laptop off save any files, quit
all running applications; click [Start] and
choose [Shut Down] from the start up
menu.
Page 16

Non Responsive Programs
If a program does not respond, press the Ctrl + Alt + Delete combination to
start Windows Task Manager then quit the non-responsive program or restart
the system.
Forced OFF
If the system hangs/crashes for an unknown reason, and the Ctrl + Alt + Del
key combination doesn’t work, press the power button for over 4 seconds to
force the system to turn itself off. Any unsaved data will be lost.
Caution:
If the HDD indicator is on, do not turn off the computer. Doing so may damage
the data being read from or written to the drive.
Warning
If Windows does not shut down correctly, press and hold the power switch for
more than 5 seconds; the system will then shut down. Please note that turning
off the computer this way may result in any unsaved data being lost. It is
recommended that you always turn off the computer by choosing Shut down
in the Start menu.
If a Windows or program file is damaged by shutting down the system
incorrectly, reinstall the program. Elonex accepts no responsibility for loss of
data.
Page 17

MSNB- 2009 User Manual
Using the keyboard
The keyboard is used for entering text and commands in the computer. Do not
spill fluids onto the keyboard as it may damage the computer and cause an
electric shock.
About the keyboard
The keyboard is composed of character, number, and other special function
keys. It also has an embedded number pad you can use for number based
inputting.
Embedded numeric keypad
The embedded numeric keypad
functions like a desktop numeric key
pad. It is indicated by small blue
characters located on the upper
right corner of the keypads. To
toggle the numeric keypad on and
off press FN + NumLk.
Page 18

Special function keys
Shift key: Hold the Shift key down and press another key to enter the
upper case letter for the key.
Caps Lock key: Press the Caps Lock key to lock the keyboard in the upper case
position.
Esc key: Use the Esc key to quit programs or cancel an operation in a
program.
PrtSc key: Press the PrtSc key to take a snapshot of the entire area
visible on your screen and store it in the clipboard. You can
then paste it into a program by pressing Ctrl + V
Enter key: Press the Enter key to confirm a command or to start a new
line in a document.
Page 19

MSNB- 2009 User Manual
Function keys:
Function keys provide you with shortcuts to operations, such as adjusting the
brightness of the computer display.
Fn+Esc:
Force the computer to enter power-saving mode.
(Ex: system standby and hibernation)
Fn+F1:
Enable/disable Wi-Fi
Fn+F3:
Enable/disable the audio output- ie Mute the sound.
Fn+F4:
Enable/disable the touch pad.
Fn+F5:
When the computer is attached to an external monitor, you can change
the display output location with Fn+F5 combination. You can switch to
and from the three types of display modes, LCD display only, the external
monitor only, or both at the same time.
Fn+F6:
The computer display becomes increasingly darker.
Fn+F7:
The computer display becomes increasingly brighter.
Fn+F8:
Decrease the audio volume.
Fn+F9:
Increase the audio volume.
Fn+F10:
Turn the display screen backlight off to increase the battery life.
Page 20

Shortcut keys
Shortcut keys are a handy way for you to quickly and easily use your software.
It is highly recommended that you keep a reference of these short cut keys and
try to memorise them. Doing so will dramatically increase your productivity.
"Ctrl+S" is telling you to press and hold both the CTRL key and the S key
simultaneously to perform the shortcut, which in this case will save your
document.
Ctrl + S Saves your document. This is your number one friend-
Press it as much as possible so you do not lose your work
F1 Get “Help” in almost every Windows program.
Ctrl + A Select everything inside the window that you have open.
Ctrl + X “Cut” items you’ve highlighted
Ctrl + C “Copy” items you’ve highlighted
Ctrl + V “Paste” any items you’ve cut or copied
Home Takes your cursor to the beginning of the current line.
Ctrl + Home Takes your cursor to the beginning of the document.
End Takes your cursor to the end of the current line.
Ctrl + End Takes your cursor to the end of document.
Shift + Home Highlights from your current position to beginning of line.
Shift + End Highlights from your current position to end of line.
Ctrl + Left arrow Moves one word to the left at a time.
Ctrl + Right arrow Moves one word to the right at a time.
Print Screen Takes a screen grab (JPG picture) of whatever
you have on your screen
Alt + F Opens the “File” tab
Alt + E Opens the “Edit” tab
Alt + Tab Switches betweens the programs that you have open.
Ctrl + Alt + Delete Opens “Task Manager” which lets you see your
computers performance and also shuts down any
non-responsive programs
Ctrl + Left Mouse Lets you select multiple files in a file browser
Page 21

MSNB- 2009 User Manual
Using the touch pad
The touch pad can be used with a mouse at the same time.
1. Left button: used to select or click
items.
2. Right button: functions similar to
the right button on a mouse.
3. Touch pad: used to move the
pointer.
Guidelines on using the touch pad
Do not touch the touch pad with a sharp or pointed object as doing so may
damage the touch pad. Do not use the touch pad with two fingers, wearing
gloves or with a wet hand as it may not function correctly. Using the touch pad
with a dirty or oily finger may damage the touch pad. Do not exert too much
pressure on the touch pad as doing so may result in injuries to your finger or
wrist.
Page 22

Moving the pointer on the screen
Gently place your finger on the touch pad and slide it in the direction in which
you want the pointer to move.
Making the selection (Click)
To click a button on-screen, quickly press and release the left button. You can
click the left button or gently tap the touch pad once to select an item on a
menu or an icon on the screen, or position the cursor in a document.
Double-click
To double-click a button, quickly press and release the left button twice. You
can also tap the touch pad twice to get the same result. You can change the
speed you have to double click at in the Windows Control Panel.
Page 23

MSNB- 2009 User Manual
Drag and drop
To drag an object, select and move the object by clicking and holding the left
button and sliding the finger across the touch pad without releasing the
button.
To drop the object you have just dragged, release the left button. You can use
drag and drop to move files from one location to another.
For example, if you want to place a file in the recycle bin, place the pointer
above the file you want to move, press the left button and hold, slide your
finger across the touch pad to move the file and release the left button above
the recycle bin.
Page 24

Page 25

Connecting to Wi-Fi Internet
When you turn your computer on Windows will automatically scan the
surrounding area for all available wireless access points (Wi-Fi hotspots). If
Wi-Fi is detected the bubble below will appear. Please note that you will only
be able to connect to public Wi-Fi if it is not password protected or you can
connect to private Wi-Fi if you have permission and also the password.
1. Right-click the wireless network icon in the lower right corner of your
screen and then click View Available Wireless Networks.
2. The Wireless Network Connection window appears and displays the
available Wi-Fi access points. Click your network, and then click Connect in
the lower right corner. Note: If you don't see your network, click Refresh
network list in the upper left corner.
Page 26

MSNB- 2009 User Manual
3. If the Wi-Fi is password protected you will be prompted to enter a key
(password). Type the encryption key in both the Network key and Confirm
network key boxes, and then click Connect.
4. You will then be connected to the internet. You can surf the internet using
Internet Explorer (Go to Start>Internet Explorer).
If the Wireless Network Connection window continues to show Acquiring
Network Address, you may have mistyped the encryption key—click Cancel
and return to step 3.
Page 27

Setting up your email
Your laptop comes with Outlook Express to send and receive email. In order to
send emails you must have an email account and be connected to the internet.
You can have more than one account—for business, online shopping and so
on—and each person who uses your computer may have their own,
completely separate account. Outlook Express will handle it all.
The Internet Connection Wizard makes short work of setting up your online
mailbox by walking you through each step for every e-mail account you set up.
This will automatically run the first time you open Outlook Express, however to
add additional accounts go to Tools>Accounts>Add>Mail to start a new wizard.
Before you get going, make sure you know your email address along with the
following information. (You may need to contact your Internet Service
Provider (ISP) to get it)
1. Enter your name
2. Enter your email address
3. Information about your e-mail servers:
• The type of e-mail server you use: POP3 (most e-mail accounts), HTTP
(such as Hotmail), or IMAP
• The name of the incoming e-mail server
• For POP3 and IMAP servers, the name of the outgoing e-mail server
(generally SMTP)
Page 28

MSNB- 2009 User Manual
If SPA
4. Second, information about your account:
• Your account name and password
• Find out if your ISP requires you to use Secure Password Authentication
(SPA) to access your e-mail account—yes or no is all that's required.
is required tick the box.
Click Next, and then click Finish.
You're ready to send your first email!
Unsure if your new email account is working? Send an email message to
a friend. If they get the message, your account is ready to roll! But if you run
into problems setting up your account press F1 or call the Tech Support
Helpdesk.
Page 29

Keeping your laptop up to date
Microsoft Windows is constantly being updated with programs and patches
that keep your software up to date with the most modern technology and
protects you from any recent security threats. Your laptop will automatically
scan for any updates each time you connect to the internet however you can
manually check this by going to Start>All Programs>Windows Update and
following the on screen instructions.
Protecting your computer.
There are many ways for you to protect your computer from malicious
software.
Anti-Virus
There are many different kinds of anti-virus however if you connect your laptop
to the internet or a network it is highly recommended that you install antivirus
software. Anti-virus protects your from viruses and malware that can
potentially damage, corrupt or disable your laptop or ‘spread’ the virus to
other computers. You should also regularly update this software to keep you
protected from any newly discovered threats, and perform regular system
scans of your system.
Windows Firewall
A Firewall helps protect your computer from hackers who might try to delete
information, crash your computer or even steal your passwords or credit card
numbers. Make sure your firewall is always turned on. Windows XP comes with
Windows Firewall automatically turned on.
There are other Firewalls available which can provide additional protection
depending on your usage. A simple search on the internet will provide many
option, however, please note that these may be chargeable.
Anti-Spyware
When browsing the internet you may pick up some unwanted admirers in the
form of Spyware. Spyware may track some of your activities and pass this
information to external sources. Anti-Spyware software is recommended to
ensure your privacy.
Page 30

MSNB- 2009 User Manual
Ergonomics
• The top third of the LCD (screen) should be at eye-level or slightly lower.
• The LCD should be at least 18"/45cm. directly in front of you.
• If the screen resolution (e.g. 1024x600) makes you strain to read, change it to
a lower resolution. Go to Start>Control Panel>Display>Settings then adjust the
“Screen Resolution” to something more comfortable.
• Angle the LCD so that it doesn’t reflect any light into your eyes.
• Use a chair which offers good back support (especially lower-back). The seat
should allow your feet to rest flat on the floor or on a footrest directly in front
of you.
• If possible, illuminate your work area with natural daylight or use a
steady-glowing (non-flickering) light source.
• Place the keyboard and mouse so that your arms are at your sides and your
forearms are roughly parallel to the floor. Your wrists should flex slightly
downward as you work. Your neck and shoulders should also be relaxed.
• Take a break from the computer. Get up, stretch, flex your wrists, walk about,
and look at something else for about 10 minutes every hour.
Servicing
Do not attempt to service the computer yourself. Doing so may violate your
warranty and expose you and the computer to electric shock. Refer all
servicing to authorised service personnel.
Customer Service and Warranty
For customer service, technical queries or warranty related issues please call
our helpdesk on
0845 6710665
Or
MandS@elonex.com
Page 31

Page 32

MSNB- 2009 User Manual
Panel in the
Power Option features are not
Troubleshooting
I can’t connect to Wi-Fi. Firstly check your Wi-Fi is enabled by
looking at the Wi-Fi indicator LED. You
may have turned your Wi-Fi off by
pressing FN + F1 or the Wi-Fi hotkey.
To connect follow the instructions in
‘Connecting to Wi-Fi’
The sound cannot be heard or the
volume is very low.
The volume might be set too low or be
muted. Check the volume control in
the Volume Control
taskbar to adjust or turn the Volume
Rocker towards the + and hold until
the audio is loud enough.
You forget the boot password.
If you forget the password please
contact your Technical support
The screen saver is activated. Press any key or move the mouse.
The computer feels too hot. Make sure the computer is properly
ventilated and the Vent/Fan intakes
are not blocked. If this doesn’t cool it
down, put the system into Hibernate
mode or turn it off for an hour. Make
sure the computer isn’t sitting on a
thermal surface. Make sure you’re
Nothing appears on screen.
The system never goes into a power
saving mode.
using the correct adapter.
The system is in a power saving mode.
Toggle the sleep/resume key or press
the mouse pad to resume.
enabled. Go to the Windows Power
Options menu and enable the features
you prefer
Page 33

FAQ
Q – How do I safely shut down my PC?
A – Select the Windows “START” button
By clicking on Shut Down>Shut Down, Windows will safely turn your PC off
whilst storing any changes you may have made.
Q – How do I create a new shortcut on my windows desktop?
A – Right click in any free space on the desktop.
Select ‘New’ from the list – then selecting ‘Shortcut’
By clicking on ‘Browse’ you may now select any file or program you wish.
Q- What’s the most secure way to back up my files?
A – You can backup your files by copying them onto external storage using a
USB Flash Drive, external Hard Drive or using an online backup service.
Q - My PC is switched on but I do not have a display on my monitor?
A – Check the computer hasn’t gone into sleep or hibernate mode by pressing
the touchpad, if you have no response then press the Power Button. You may
also have pressed the Screen ON/Off function key (Fn + F5)
Q- My speakers are turned on but there isn’t any sound.
A – Check that mute isn’t switched on; this will be shown as a crossed circle
over the speaker icon (situated in the system tray at the very bottom right of
your screen).
Q- How can I remove old or unwanted programs?
A – Firstly select the “START” button and choose “Control Panel” and then
“Add or Remove Programs”. You will now see a list of all the programs stored
on your PC. By selecting any of these programs you will be given the option of
uninstalling the program and therefore removing it from your PC.
Q- How do I install a new printer?
A – Always using the printer manufacturer directions, attach or connect the
printer to your computer. Windows will automatically install the printer. If
Windows can't install it or if your printer has special requirements, click the
“Start” button and then “Printers and Faxes”. Choose “File” and click “Add a
Page 34

MSNB- 2009 User Manual
printer”. In the Add Printer Wizard, select “Add a local printer”. Follow the
wizard’s instructions and choose the settings that are relevant to your printer.
Q- How can I send pictures or videos via email?
A-You can send pictures and videos stored on your computer via email as an
attachment.
Open your email software. Click “Attach Files” and in the dialog box that
appears, browse through your My Documents, My Pictures or My Videos
Folder. Click the item you want to attach to send in your email. (To select more
than one item, hold down the CTRL key while you click the
items that you want to select.) Click Attach / Insert.
The file is now attached so when you have finished composing the email
message, click “Send”. It is important to note that there is usually a maximum
file size that your recipients email will accept. It is usually best not to send
emails with attachments that are over 10Mb in total.
Q- How can I create a new folder?
A - Go to the location where you want to create a new folder. Right-click a
blank area inside this location, click “New”, and then click “Folder”.
Type a name for the new folder, and then press return (on your keyboard). The
new folder you created will then appear in the location you specified.
Page 35

NOTES
Page 36

MSNB- 2009 User Manual
NOTES
Page 37

NOTES
Page 38

MSNB- 2009 User Manual
Notice
Elonex reserves the right to revise this publication or to change its contents
without notice. Information contained herein is for reference only and does
not constitute a commitment on the part of the manufacturer or any
subsequent vendor. They assume no responsibility or liability for any errors or
inaccuracies that may appear in this publication nor are they in anyway
responsible for any loss or damage resulting from the use (or misuse) of this
publication.
This publication and any accompanying software may not, in whole or in part,
be reproduced, translated, transmitted or reduced to any machine readable
form without prior consent from the vendor, manufacturer or creators of this
publication, except for copies kept by the user for backup purposes.
Brand and product names mentioned in this publication may or may not be
copyrights and/or registered trademarks of their respective companies. They
are mentioned for identification purposes only and are not intended as an
endorsement of that product or its manufacturer.
©2009 Elonex International
After the implementation of the European Directive 2002/96/EU in the national legal
system, the following applies: Electrical and electronic devices may not be disposed
of with domestic waste. Consumers are obliged by law to return electrical and
electronic devi ces at t h e e nd of their service l ives to the public collecting points set up
for this purpose or point of sale. Details to this are defined by the national law of the
respective countr y. This symbol on th e produ ct, the instruction manual or the p acka ge
indicates that a product is subject to these regulations. By recycling, reusing the
materials or other forms of utilizing old devices, you are making an important
contribution to protecting our environment.
Elonex follows a pr inciple o f const ant improv ement a nd is not hel d respo nsible for any
changes that are made to the unit nor accepts any liabilities for these changes.
 Loading...