

Page 1
Page 2

Important Safety Instructions
1. All the safety and operating
instructions should be read before
the product is operated.
2. Retain Instructions
The safety and operating
instructions should be retained for
future reference.
3. Heed Warnings
All warnings on the product and in
the operating instructions should be
adhered to.
4. Follow Instructions
All operating instructions should be
followed.
5. Cleaning
Unplug this product from the wall
outlet before cleaning. Do not use
liquid cleaners or aerosol cleaners.
Use a damp cloth for cleaning.
6. Attachments
Do not use attachments not
recommended by Elonex as they
may cause hazards.
7. Water and Moisture
Do not use this product near water
for example, near a kitchen sink
etc.
8. Accessories
Do not place this product on an
unstable surface. The product may
fall, causing injury or damage to
the product.
9. Cleaning
If fingerprints or dust make the LCD
screen dirty, we recommend using
a soft, non-abrasive cloth to clean
the LCD screen. Please do not
apply too much pressure as this
may cause damage to your
screen.
If you use an LCD Cleaning Kit,
apply the cleaning liquid to the
cloth. Do not apply the liquid
directly to your LCD screen
7. Ventilation
Slots and openings in the cabinet
are provided for ventilation and to
ensure reliable operation of the
product and to protect it from
overheating, and these openings
must not be blocked or covered.
11. Power Sources
This product should be operated
only from the type of power source
indicated on the marking label.
12. Grounding
This product should only be used
with proper electrical grounding.
Please only use power supplies
supplied by Elonex as this may
cause damage to the electronics
or injury to yourself.
13. Power Cord Protection
Power supply cords should be
routed so that they are not likely to
be walked on or pinched by items
placed upon or against them.
Page 3

7” ONEx User Guide
14. Outdoor Antenna Grounding
If an outside antenna or cable
system is connected to the
product, be sure the antenna or
cable system is grounded so as to
provide protection against voltage
surges and built-up static charges.
15. Lightning
For added protection for this
product during a lightning storm, or
when it is left unattended and
unused for long periods of time,
please unplug it from the power
socket and disconnect the
antenna or cable system.
16. Power Lines
An outside aerial system should not
be located in the vicinity of
overhead power lines or other
electric light or power circuits, or
where it can fall into such power
lines or circuits. When installing an
outside antenna system, extreme
care should be taken to keep from
touching such power lines or
circuits as contact with them might
be fatal.
17. Overloading
Do not overload wall outlets,
extension cords, or integral
convenience receptacles, as this
can result in a risk of fire or electric
shock.
18. Object and Liquid Entry
Never push objects of any kind into
this product through openings as
they may touch dangerous voltage
points or short-out parts that could
result in a fire or electric shock.
Never spill liquid of any kind on the
product.
19. Servicing
Do not attempt to service this
product yourself as opening or
removing covers may expose you
to dangerous voltage or other
hazards. Refer all servicing to
qualified service personnel.
20. Damage Requiring Service
Unplug this product from the wall
outlet and refer servicing to
qualified service personnel. Please
refer all warranty claims to Elonex
Warranty Service.
21. Replacement Parts
Only use replacement parts
specified by Elonex. Unauthorized
substitutions may result in damage
to your unit.
22. Safety Check
Upon completion of any service or
repairs to this product, ask the
service technician to perform
safety checks to determine that the
product is in proper operating
condition.
23. Heat
The product should be situated
away from heat sources such as
radiators, heat stoves, or other
products that produce heat.
24. EM
The product should be situated
away from all sources of Electro
Magnetic radiation, i.e.
microwaves, amplifiers, speakers
etc.
Page 4

Introduction
Thank you for purchasing the 7” ONEx.
Before using the unit, please read this manual thoroughly and retain it
for future reference. This manual will help you get the best out of your
ONEx, as well as what to do in case you experience any issues.
Technical Support
To help you get the best out of your product we provide you with a
limited 1 year Return to Base Warranty and Support Helpdesk (terms
and conditions apply).
For all technical support please contact our helpdesk using the details
below:
If you have any problems or questions
DON’T take your ONEx back to the store
Please contact us for some helpful advice.
This does not affect your statutory rights
For all technical support issues or warranty issues please contact our
helpdesk:
Page 5

7” ONEx User Guide
Getting Started
Package Contents
When you open your box please check your package is complete and
all items are in good order.
Your box should contain:
• 7” ONEx CEWS7
• UK Power Adapter
• Guide Booklet
• Guarantee card & WEEE Details
If you have anything missing or any items are damaged please contact
your place of purchase.
Page 6

Setting up your ONEx
Open the package and carefully remove the packaging. It’s
recommended that you retain the package for the duration of the
warranty period.
Your ONEx has a screen protector (a thin film to protect the screen
during transit). Please use the tab to slowly and carefully remove this
from the screen as it will reduce the quality of the screen.
Battery Charging
Your ONEx has a built in rechargeable lithium battery which is supplied
with no charge in for transportation reasons. We recommend that you
charge the battery for around 8 Hours for its first charge, to achieve the
best battery life. You can still use the ONEx but it’s best to keep it
plugged in for this charging period.
To maximise your battery life it is recommended that you always fully
charge the battery and then use the ONEx unplugged until the battery
power is low, at which point you can recharge the battery. Using full
charging and draining cycles is much better than charging the battery
bit by bit.
To charge the battery, simply connect the power adaptor to your wall
socket and the power input and switch it on.
The LED Battery Indicator (at the bottom right of the ONEx) will
illuminate red.
Once the battery is fully charged the LED will turn off.
You can see the battery charge status in the menu bar at the
top of your ONEx’s screen.
Only use the authorised UK power adaptor supplied.
Page 7
7” ONEx User Guide
Turning your ONEx ON
Once you’ve charged the battery (or connected the power adaptor)
you can turn the ONEx ON by pressing the power button at the top
right of the keyboard and the Android™ operating system will load.
To turn your ONEx OFF simply press and hold the Power button for about
1 second.
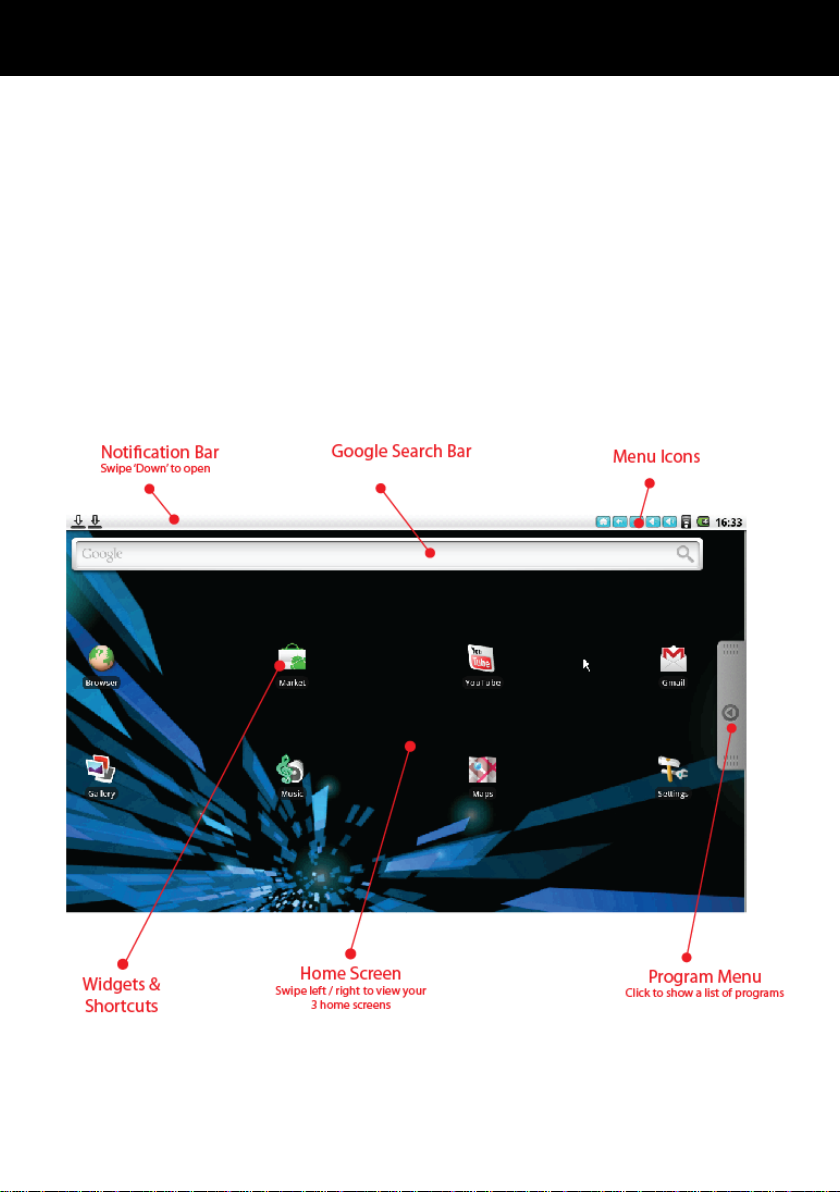
About your Home Screens
The ONEx has 3 home screens where you can add shortcuts to places
and programs as well as adding widgets (apps that reside on your
home screen such as a clock/calendar).
Page 8

Home Screens
Your ONEx has 3 home screens to let you personalise your working
environment to suit your lifestyle. For example you can set up one
screen with your favourite apps on it, another screen with widgets to
your favourite social networking sites and another page with shortcuts
to your work files.
To access your other home screens you can simply ‘click and hold’ the
screen and swipe it left or right.
Customising your Home screens
To add a widget or shortcut to your home
Press the Menu icon (or right click) and click Add.
(Or just click & hold an empty location on the Home screen).
Please Note: If there are no empty positions on the Home screen
or the ‘Add’ button is dimmed you must delete or move an item
before you can add another or switch to another Home screen
with more free space.
In the menu that pops up, click the type of item you wish to
add.
Page 9

7” ONEx User Guide
You can then add the following types of items to the Home
screen:
Shortcuts
Add shortcuts to applications, a bookmarked webpage, a File
location, a Gmail label or a particular setting and many other items.
The shortcuts available depend on the applications you have
installed.
Widgets
Widgets are miniature applications that stay on your Home screen
and feed information to you in an accessible manner. For example
you can have a widget that shows the latest eMails you’ve
received, social networking updates or the current weather
conditions.
You can also download widgets from the Android Market. Most
Widgets use different sized spaces on your home screen so you
might have to move some icons around to create some space.
Folders
Add a folder where you can organize Home screen items. For
example if you want to group a set of Internet Bookmarks, or a set
off similar Apps you can create a folder on your Home screen and
drag and drop items into the folder.
Your folders contents are automatically kept up to date.
Page 10

Moving and Deleting Home screen Items
To Move a widget or shortcut simply click and hold the item until it
enlarges slightly. Then you can move the item to some free space of
your choice.
You can move an item from one home screen to another by clicking
and holding the item and dragging it to the left or right side of the
screen. The screen will slide to the next home screen where you can
drop the item into some free space.
To Delete a widget or shortcut, click and hold the item, then drag it to
the recycle bin. The recycle bin icon replaces your program menu on
the left hand side of the screen.
Page 11

7” ONEx User Guide
Menu Icon Click the Menu Icon at any time to bring up a
menu of options relevant to the screen you have open. For
example on the home screen, clicking the menu icon
brings up ways to change your Home Screen, and if you
have the eMail app open the menu icon brings up options
to do with your eMail.
Menus
Your home screen and most apps have a menu that you can bring up
by pressing the Menu Icon at the top of the screen or by clicking the
right mouse button.
You can see an example (overleaf) of the menu that opens when you
right click the Home Screen.
Page 12

Setting the date and time
Some of the ONEx’s software and widgets require the date and time to
be correct to function correctly and establish a proper connection with
online servers.
To set the time and date go to Settings > Date & time.
Your ONEx should automatically connect to the internet to pick
up the correct time however sometimes it may be blocked by
your router’s firewall.
If the time/date is not correct simply uncheck the Automatic
setting
Then click Set Date, use the + and - buttons to change the date
and press Set.
Click Set Time, use the + and - buttons to change the date and
then press Set.
Please Note: If you run completely out of battery life you may lose your
time and date settings.
Page 13

7” ONEx User Guide
Home Button Click the Home button to go to your home
screen
Back Click the Back button (and also the physical button
at the top left of your keyboard) to go Back to the
previous screen.
Menu Icon Click the Menu Icon at any time to bring up a
menu of options relevant to the screen you have open.
For example on the home screen, clicking the menu icon
brings up ways to change your homescreen, and if you
have the eMail app open the menu icon brings up
options to do with your eMail.
Volume Down Click this button to incrementally decrease
the volume
Volume Up Click this button to incrementally increase the
volume
Wi-Fi Status You can quickly see whether you are
connected to a Wi-Fi hotspot (Note: the number of Wi-Fi
bars increase or decrease depending on the signal
strength)
Battery Icon This shows the amount of charge in your
battery. When the lightning symbol shows it means the
battery is still charging.
Menu Icons
In the top right corner of your screen are the Menu icons. These give
you important information about the status of the ONEx as well as
options and shortcuts.
Page 14

Program Menu
On the right hand side of your home screen is the Program
menu icon. Click the arrow icon in the centre to open a menu
of your installed apps.
To open an app just click it once and it will launch.
You can add a shortcut to your favourite apps on your home screen to
access them quickly and easily. Once you’re in the program menu
simply click and hold the icon which will drop the icon onto the home
screen and you can click and hold it to place it in your desired
location.
Page 15

7” ONEx User Guide
Connecting to Wi-Fi
Follow the instructions below to connect to a b/g Wi-Fi Hotspot:
Please note that using Wi-Fi will decrease your battery life faster.
From the home screen click Settings, then Wi-Fi.
Then click the tick box in the Wi-Fi row to turn the ONEx Wi-Fi
module ON. Once the Wi-Fi is ON the tick will turn green. You
can also press F8 and the Function key at the same time
Note: The Function key is bottom left on the keyboard.
Once the Wi-Fi is on, click Wi-Fi Settings and the ONEx will
automatically scan for available Wi-Fi hotspots.
Select the desired Wi-Fi hotspot from the list.
If the hotspot doesn't have a password it will automatically
connect. However if it ‘secure’, a password window will pop up
letting you enter the correct password.
For password details refer to your ISP or the staff at the internet
cafe/coffee shop etc.
Your ONEx should now be connected to the internet.
Page 16

Please Note: You can toggle the Wi-Fi module On and Off easily by
pressing the Function button and F8 at the same time. Turning the Wi-Fi
off when you’re not using it will help you to maximise the battery life.
Wi-Fi Connection Troubleshooting
If you have trouble connecting to your Wi-Fi please check the following:
Check you have entered your password correctly by trying to
connect once more.
Check you have included any CaPiTaL letters as most
passwords are case sensitive
Check you haven’t got CAPS lock toggled ON.
Check you have the correct password for the hotspot and it
hasn’t been changed.
If you still can’t connect there may be a temporary conflict with your
router’s security authentication. Please contact your Internet Service
Provider, requesting to temporarily lower the router’s security encryption
to WEP which will allow the ONEx to connect to the internet.
Once connected, you should have no further problems with getting
online you can request that the ISP return the encryption to its former
status. This can all be done over the phone in a couple of minutes.
Tech Support
If you have any difficulties connecting to the internet please contact
our support helpdesk on 0871 222 3456 (option 4) (national rate call).
Page 17

7” ONEx User Guide
Google Market™
Your ONEx comes with access to the Google Market. This lets you
browse and download free and paid for apps. These range from
learning tools, to office productivity software, to lifestyle apps, social
networking, games and widgets. With over 70,000 apps available there
is something for everyone, for work, rest or play.
To use the market you must be connected to the internet and have a
Google Account setup.
NOTE: Due to Android fragmentation and future upgrades of
the Android Source Code we cannot guarantee the ‘fitness for
purpose’, ‘stability’ or ‘reliability’ of any downloaded apps on
the ONEx’s Android build.
NOTE: Use of Google Market is subject to Google Inc. Terms of
Service
NOTE: You must be connected to the internet to browse and
download apps.
NOTE: Some apps require the use of system resources and
access to your data. Please read the app’s access
requirements carefully before agreeing to install and use apps.
Page 18

Searching & Downloading Apps
To use the Market click the Market icon on your home
screen. The first time you use the Market you must agree to
a legal agreement between you and Google.
You can return to the hope page of the Market at any time by pressing
the Market ‘shopping bag’ icon at the top right of the screen.
Searching for Apps
Click the Search icon at the top of the screen or press
the Search button at the top right of your keyboard.
Enter the name of an app, a description, or the app
developer’s name you want to search for.
A list of matches will appear. From the list click a search result to
open an information page on that app.
Each app has a dedicated page detailing its cost, user ratings,
number of downloads, screenshots and a description of the
overall benefits of the app. You can also find out more details
about the developer and see other apps by the same
developer.
Browsing for Apps
If you don’t want to look for a specific app you’ve heard about or
been recommended, you can just browse to see what apps are out
there;
You can browse by category as apps are split into ‘Apps’ and
‘Games’. Click the icons at the bottom left of the screen to view
a Category List
Apps are conveniently separated into categories depending on
their type. If you choose a category of interest you will be
presented with a list of Apps.
You can sort Apps by Top Paid, Top Free and Just in.
Scroll down the list until you see something of interest and click it
to open its dedicated information page.
Page 19

7” ONEx User Guide
Installing Free Apps
Once you’ve searched and found a free app you wish to download
you can install it by:
pressing the Install button at the bottom of the screen
You will be presented with full details of the app’s access
requirements. This details exactly what data and system
resources the app will use to function.
NOTE: It’s important that you read this screen carefully as you are
allowing a third party access to your data and websurfers hardware.
It’s wise to be cautious as you are responsible for the results of installing
and using apps. However, it’s important to note that apps are vetted
by Google and you can benefit from giving this access to apps, i.e. if
an app can access your location it can give you information relevant
to your surroundings.
If you agree to the access requirements click OK and the app
will download.
You can track its progress by dragging the notification bar
down, or alternatively opening the app’s information page
again.
Once the download is complete a new icon will appear in your
program menu. Click the icon to launch the app and follow the
on-screen instructions.
Installing ‘Paid For’ Apps
Once you’ve searched and found a paid for app you wish to
download you can install it by:
Pressing the Buy button at the bottom of the screen
Click OK if you agree to the app’s access requirements (see
Note above)
Complete the Google Checkout process by either setting up a
Google Checkout Account and entering your credit card and
personal details or using Google Checkout Account you have
already set up. Follow the on-screen instructions.
Click Buy Now and the app will download. You can track its
progress by dragging the notification bar down, or alternatively
opening the app’s information page again.
Once the download is complete a new icon will appear in your
program menu. Click the icon to launch the app and follow the
on-screen instructions.
Page 20

You can get a full refund on apps within 15 minutes of purchase if you
decide you don’t want the app.
If you have another Android device such as a tablet or phone, you can
download a paid application to that device using the same Android
Market account at no additional charge.
Managing your Downloaded Apps
Viewing your downloaded apps
To view a list of the apps you’ve downloaded from the Market:
Go to the Market home screen, press Menu
Click Downloads
In the list of the free and paid applications that opens, you can
click rate it, uninstall it, request a refund etc…
Updating Apps
Most apps you download can be updated over time to fix bugs or to
add extra features. You can to update your apps:
On the Android Market home screen, press Menu and click
Downloads
This will show a list of downloaded apps that have updates
available.
Click an App with Update Available and click Update
This will download and install the update. This will not affect any
shortcuts etc that you may have made.
Updating Apps Automatically
Applications you download from Market are not set to update
automatically by default. To set auto updating:
On the Android Market home screen, press Menu and click
Downloads
Click an app.
Check or uncheck Allow automatic updating.
Uninstalling Apps
To uninstall apps:
On the Market home screen, click Menu then Downloads.
Page 21

7” ONEx User Guide
Click the app to uninstall and the screen for the application will
open.
Click Uninstall then OK in the confirmation dialog.
Click the reason that best matches why you’re uninstalling the
app and click OK.
The application will be uninstalled. If it was a paid application you can
install the app again without charge.
Page 22

eMailing and Gmail
Your ONEx comes with e-mail capability so you can stay connected
with Gmail™, Microsoft ® Exchange and hundreds of other internet
based e-mail providers. Setting up e-mail on your ONEx is easy—enter
your e-mail address and password and your ONEx can automatically
receive e-mail whenever you’re connected to Wi-Fi.
How to set up a Gmail Account
If you have set up a Google Account on your ONEx already
you should be able to access your Gmail account by simply
clicking the Gmail icon in your program menu, then clicking
Sign in and entering your username and password.
If you need to setup a Gmail account please follow these instructions:
From the Home screen or Program Menu, click the Gmail icon.
Click Next.
Click Create and follow the instructions on the screen to set up
your account.
Set up a Microsoft ® Exchange or Internet eMail Accounts
You can set up a POP3, IMAP or Exchange email account on
the ONEx. You may need to get some account details from
your IT department or eMail provider.
From the programs menu, click the Email icon.
Tap Email address and enter your e-mail address.
Click Password and enter your password.
Click Next and type an name for this account.
Click the Your name text field.
Enter the name you want displayed on outgoing messages.
Click Done.
Page 23

7” ONEx User Guide
Reading, Sending and Deleting eMail
Viewing e-mail notifications:
At the top of your screen, click the Notification bar and slide it
downwards to open the notification tray.
If you’re connected to Wi-Fi with an email account setup, the
Notification tray will show any new emails you’ve received.
Click the e-mail you want to read.
Viewing e-mails:
From your Home screen, click the Email/Gmail icon.
If you have more than 1 account setup click the desired email
account (Click Menu Icon/Right click > Accounts and then the
account).
Click the email message you wish to read.
Sending e-mails:
From the Home screen, click the Email/Gmail icon.
If you have more than 1 account setup click the desired email
account (Click Menu Icon/Right click > Accounts).
Click the Menu key.
Click Compose to create a New blank email or Reply/ Reply to
All to send an email back.
Enter the recipient’s email Address and email Subject.
Click Compose Mail and enter your message.
Once you’re finished click Send.
Please Note: Your emails will only send if you are connected to
the Internet.
Deleting e-mails:
From the Home screen, click the Email/Gmail icon.
If you have more than 1 account setup click the desired email
account (Click Menu Icon/Right click > Accounts).
Click and hold the e-mail you want to delete.
Click Delete.
Page 24

Memory & Expansion
You can expand the ONEx’s internal memory using the Micro SD Card
slot up to an additional 16GB to store your favourite music, movies and
photos.
To insert an Micro SD Card
Insert the card with the metallic connectors facing upward until you
feel a click which will lock the card into place.
To remove an Micro SD Card
Go to Settings > SD Card and device storage settings then click
‘Unmount SD Card’ to allow you to safely disconnect the card from the
ONEx.
Push the card gently inwards until you hear a click and then it will pop
out.
Browsing files and folders
You can store music, videos, photos, documents and all sorts of files on
your ONEx. These can be stored on the ONEx’s internal storage on a SD
Card or USB Flash Drive.
Page 25

7” ONEx User Guide
Go Up Click to Go “UP” one level to the parent folder
Multiple File Select Click this icon to select more than one
file to copy, move etc.
Search Search your folders for a particular file
Exit Click to exit ES File Explorer
Instructions Click the ? Symbol to get further instructions on
how to use ES File Explorer
View Click to change the way you view the file structure
To browse your files and folders open the program menu and click the
ES File Explorer which has an icon like a folder. For the first time you use
it you need to agree to the EULA conditions by pressing Accept.
Note: You may be prompted to download the latest version of this app
if you are connected to Wi-Fi.
NOTE: You can browse files and folders on the ONEx, any removable
storage (Micro SD Card / USB Stick) and also on a local Network or FTP
site. Please contact your network administrator for further details.
To create a new sub-folder open the folder and press the Menu icon,
then > New > Folder. Enter the name to create a new folder and press
OK to confirm.
To copy and paste files from one folder to another, click and hold the
original file for about 1 second. A menu will pop up with options to Send
(via eMail), Move, Copy, Rename, Delete, plus various other file specific
options. Click Copy (to create a duplicate of the file) or Move. You can
Page 26

then navigate to the destination folder where you want to copy the file
and then tap the “Copy Here” or “Move here” button to transfer the
file.
Page 27

7” ONEx User Guide
Factory Reset / Reset Button
Important Notice If your ONEx hangs or freezes, we recommend that
you do a “soft” reset instead of a “hard” reset. For any clarification or
advice please feel free to contact our Helpdesk on 0871 222 3456.
Soft Reset Reset Button
If your ONEx hangs/crashes for an unknown reason you can perform a
soft reset by pressing the reset button on the bottom of the unit.
This will not cause you to wipe the ONEx’s on-board storage but you
may lose any unsaved information you have open at that particular
time.
To reset simply press the reset button (until you hear a click) with
a paper clip and hold for 5 seconds.
Hard Reset Software
You can return your ONEx to its original factory settings using a hard
reset. You might want to do this if you are giving your ONEx to someone
else and you want to remove all your data first, or if your ONEx has a
persistent problem that is not solved by a soft reset.
Please Note: A Hard Reset will permanently erase all data and settings
on the ONEx. It will also remove any programs you have installed.
Please ensure that you always back up the information and files.
Performing a factory reset via the Settings Menu
Click on the Settings icon.
Scroll down and click Privacy > Factory data reset.
The click “Reset device” and click Erase everything.
Note: You may have to draw your unlock pattern (if you have one)
to confirm that you are the ONEx’s owner.
Note: If a message pops up saying “Please Connect USB Host, then
restore factory settings” then you need to connect a powered
microUSB cable or microUSB charger to the micro USB port to
provide sufficient power during the reset.
Page 28

Notice
Elonex reserves the right to revise this publication or to change its
contents without notice. Information contained herein is for reference
only and does not constitute a commitment on the part of the
manufacturer or any subsequent vendor. They assume no responsibility
or liability for any errors or inaccuracies that may appear in this
publication nor are they in anyway responsible for any loss or damage
resulting from the use (or misuse) of this publication.
This publication and any accompanying software may not, in whole or
in part, be reproduced, translated, transmitted or reduced to any
machine readable form without prior consent from the vendor,
manufacturer or creators of this publication, except for copies kept by
the user for backup purposes.
Brand and product names mentioned in this publication may or may
not be copyrights and/or registered trademarks of their respective
companies. They are mentioned for identification purposes only and
are not intended as an endorsement of that product or its
manufacturer. Elonex is not responsible for data loss and you should
always keep a backup.
©2011 Elonex International.
WEEE and End of Life Disposal
After the implementation of the European Directive
2002/96/EU in the national legal system, the following
applies: Electrical and electronic devices may not be
disposed of with domestic waste. Consumers are obliged
by law to return electrical and electronic devices at the
end of their service lives to the public collecting points set up for this
purpose or point of sale. Details to this are defined by the national law
of the respective country. This symbol on the product, the instruction
manual or the package indicates that a product is subject to these
regulations. By recycling, reusing the materials or other forms of utilizing
old devices, you are making an important contribution to protecting
our environment.
Elonex follows a principle of constant improvement and is not held
responsible for any changes that are made to the unit nor accepts any
liabilities for these changes.
 Loading...