

Page 1

Page 2
IMPORTANT--
SAFETY INFORMATION
CAUTION: Is it important that you read and follow all
of the instructions in this booklet and any marked on
the unit itself. Retain this booklet for future reference.
Accessories--- Never place this product on an unstable platform, stand, cart, wall mount, shelf, or
table. The product may fall, causing serious personal
injury to persons and pets, as well as seriously
damaging the product.
Any mounting of the product should follow the
manufacturer's instructions, and use a mounting
accessory recommended by the manufacturer.
This unit while positioned on some type of cart must
be moved with care. Quick stops, excessive force,
and uneven surfaces may cause the product and
cart combination to overturn.
Attachments---Use only approved attachment as
they may cause hazards.
Cleaning--- Always unplug this unit from the wall
electrical outlet before cleaning. Do not use liquid or
aerosol cleaners; use a damp cloth for cleaning.
Lightning--- For added product protection during
a lightning storm or when it is left unattended and
unused for long periods of time, unplug it from the
wall outlet and/or disconnect the antenna or cable
system. This will prevent damage to the product due
to lightning and power-line surges.
Object and Liquid Entry--- Never push objects of
any kind into this product through openings as they
may touch dangerous voltage points or short-out
parts that could result in a fire or electric shock.
Never spill liquid of any kind on or into the product.
Outdoor Antenna Grounding--- If an outside
antenna or cable system is connected to the product,
be sure the antenna or cable system is grounded so
as to provide protection against voltage surges and
built-up static charges.
Overloading---Do not overload wall outlets, extension cords, or integral convenience receptacles, as
this may result in a fire or electric shock.
Power - Cord Protection - Power - supply cords
should be routed so that they are not likely to be
walked on or pinched by items placed upon or against
them, paying particular attention to cords at plugs,
convenience receptacles, and the point where they
exit from the product.
Power Lines---An outside antenna system should
not be located in the vicinity of overhead power lines
or other electric light or power circuits, or where it
can fall into such power lines or circuits. When
installing an outside antenna system, extreme care
should be taken to keep from touching such power
lines or circuits as contact with them might be fatal.
Power Sources---This product should be operated
only from the type of power source indicated on the
marking label. If you are not sure of the type of power
supply to your home, consult your product dealer or
local power company. For products intended to
operate from battery power or other sources, refer to
the operating instructions. This DVD home theater
operates on AC 230V/50Hz. Do not turn off unit
immediately after turning on; wait at least 10 seconds.
Replacement Parts--- If replacement parts are
required, be sure the service technician has used
approved replacement parts or have the same
characteristics as the original part. Unauthorized
substitutions may result in fire, electric shock, or
other hazards.
Safety Check---Upon completion of any service
or repairs to this product, ask the service technician
to perform safety checks to determine that the
product is in proper operating condition.
Servicing--- Do not attempt to service this product
yourself as opening or removing covers may expose
you to dangerous voltage or other hazards. Refer all
servicing to qualified service personnel.
TV System---This unit is compatible with television
sets featuring either the NTSC or PAL color system.
Ventilation---Slots and openings in the cabinet
are provided for ventilation and to ensure reliable
operation and protection from overheating. These
openings should never be blocked by placing the
product on a bed, sofa, rug, or other similar surface.
This product should not be placed in a built-in installation such as a bookcase or rack unless proper
ventilation is provided. Never place this product near
a heat source, such as heat registers, stoves,
radiators, or any other product that produces heat.
Water and Moisture---Do not use this product near
sources of water and moisture, such as bath tub, wash
bowl, kitchen sink, or wash machine; in a wet, damp
basement; or near a swimming pool or similar
locations. If moisture condensation occurs, remove
any disc, connect the unit's power cord to a wall outlet,
turn the unit on, and leave it on for two to three hours.
By then, the unit will warm u p a nd moist urew o uld
evaporate
PRECAUTIONS
A lightning bolt with an arrowhead symbol within
an equilateral triangle is intended to alert the
user to the presence of uninsulated "dangerous
voltage" within the product's enclosure that may
be of sufficient magnitude to constitute a risk of
electric shock to persons.
The exclamation point within an equilateral
triangle is intended to alert the user to the
presence of important operating and main-
tenance (servicing) instructions in the literature
accompanying the appliance.
WARNING: TO AVOID THE DANGER OF FIRE
OR ELECTRIC SHOCK, DO NOT EXPOSE THIS
APPLIANCE TO WATER OR MOISTURE. NEVER
OPEN THE CABINET, AS DANGEROUS HIGH
VOLTAGE IS CONTAINED INSIDE. ONLY
A QUALIFIED SERVICE TECHNICIAN SHOULD
ATTEMPT TO OPEN THE CABINET.
CAUTION: TO PREVENT ELECTRIC SHOCK,
MATCH WIDE BLADE OF PLUG TO WIDE
SLOT, AND FULLY INSERT INTO ELECTRICAL
SOCKET.
CAUTION: This DVD receiver unit employs
a laser system. To prevent direct exposure to
the laser beam, do not open the enclosure.
Visible laser radiation is present when enclosure is open. DO NOT STARE INTO BEAM.
Additionally, the use of controls or adjustments
or performance of procedures other than those
specified herein may result in hazardous radiation exposure.
To ensure proper use of this product, please
read this owner's manual carefully and retain
for future reference. Should the unit require
maintenance, contact an authorized service
centre.
PROTECT YOURSELF!
Record the model and serial numbers for this
unit while it is easy to see them. These numbers
are located on the back of the unit's cabinet.
Retain this information for future reference.
Model Number
Serial No. _________________________
Retain this information for future reference.
WARNING
RISK OF ELECTRIC SHOCK
DO NOT OPEN
CAUTION
RISK OF ELECTRIC SHOCK DO NOT OPEN
CAUTION: TO REDUCE THE RISK OF
ELECTRIC SHOCK, DO NOT REMOVE COVER
(OR BACK). T HERE I S N OS ERVICE
ABLE PART INSIDE. REFER SERVICING TO
QUALIFIED SERVICE PERSONNEL.
www.elonex.com
-1-
Page 3
TABLE OF CONTENTS
ABOUT YOUR
DVD PLAYER
Important--Safety Information .................... 1
Precaution ................................................ 1
Table of Contents .......................................2
About Your DVD Player ............................ 3
Best Location..........................................................3
To Obtain a Clear Picture......................................... 3
Playable Discs........................................................3
Digital Audio Output ................................................3
Analog Audio Output ................................... ............3
Laser-Head Over-Current Protection System ............3
Use of Disc ...............................................3
Handling.................................................................3
Cleaning.................................................................3
Storing...................................................................3
Front and Back panels .. .............................4
Front Panel.............................................................4
Back Panel.............................................................5
Remote Control..........................................6
Operating the remote control.......................7
Connecting Devices................................... 8
USB interface .......................................... 9
Connecting speakers.................................10
Connecting antenna..................................11
Connecting power supply...........................12
Basic DVD operation .......................13 14 15
Playing the radio......................................16
PLAYING WMA MP3 AND JPEG.................17
Smart EQ Function....................................17
www.elonex.com www.elonex.com
System Setup......................18 19 20 21 22 23
LANGUAGE Setup .............................. 24 25
AUDIO SETUP... .................................. 26
VIDEO SETUP .................................... 27 28
SPEAKER Setup ................................. 29
DIGITAL Setup ...................................... . 3 0
DVB PART
The Setup Menu System
ATV PA RT
The Setup Menu System
SCREEN SET PART
The Setup Menu System
shooting......................................
Trouble
Technical
specifications
...........................
-2-
31
40
43
44
45
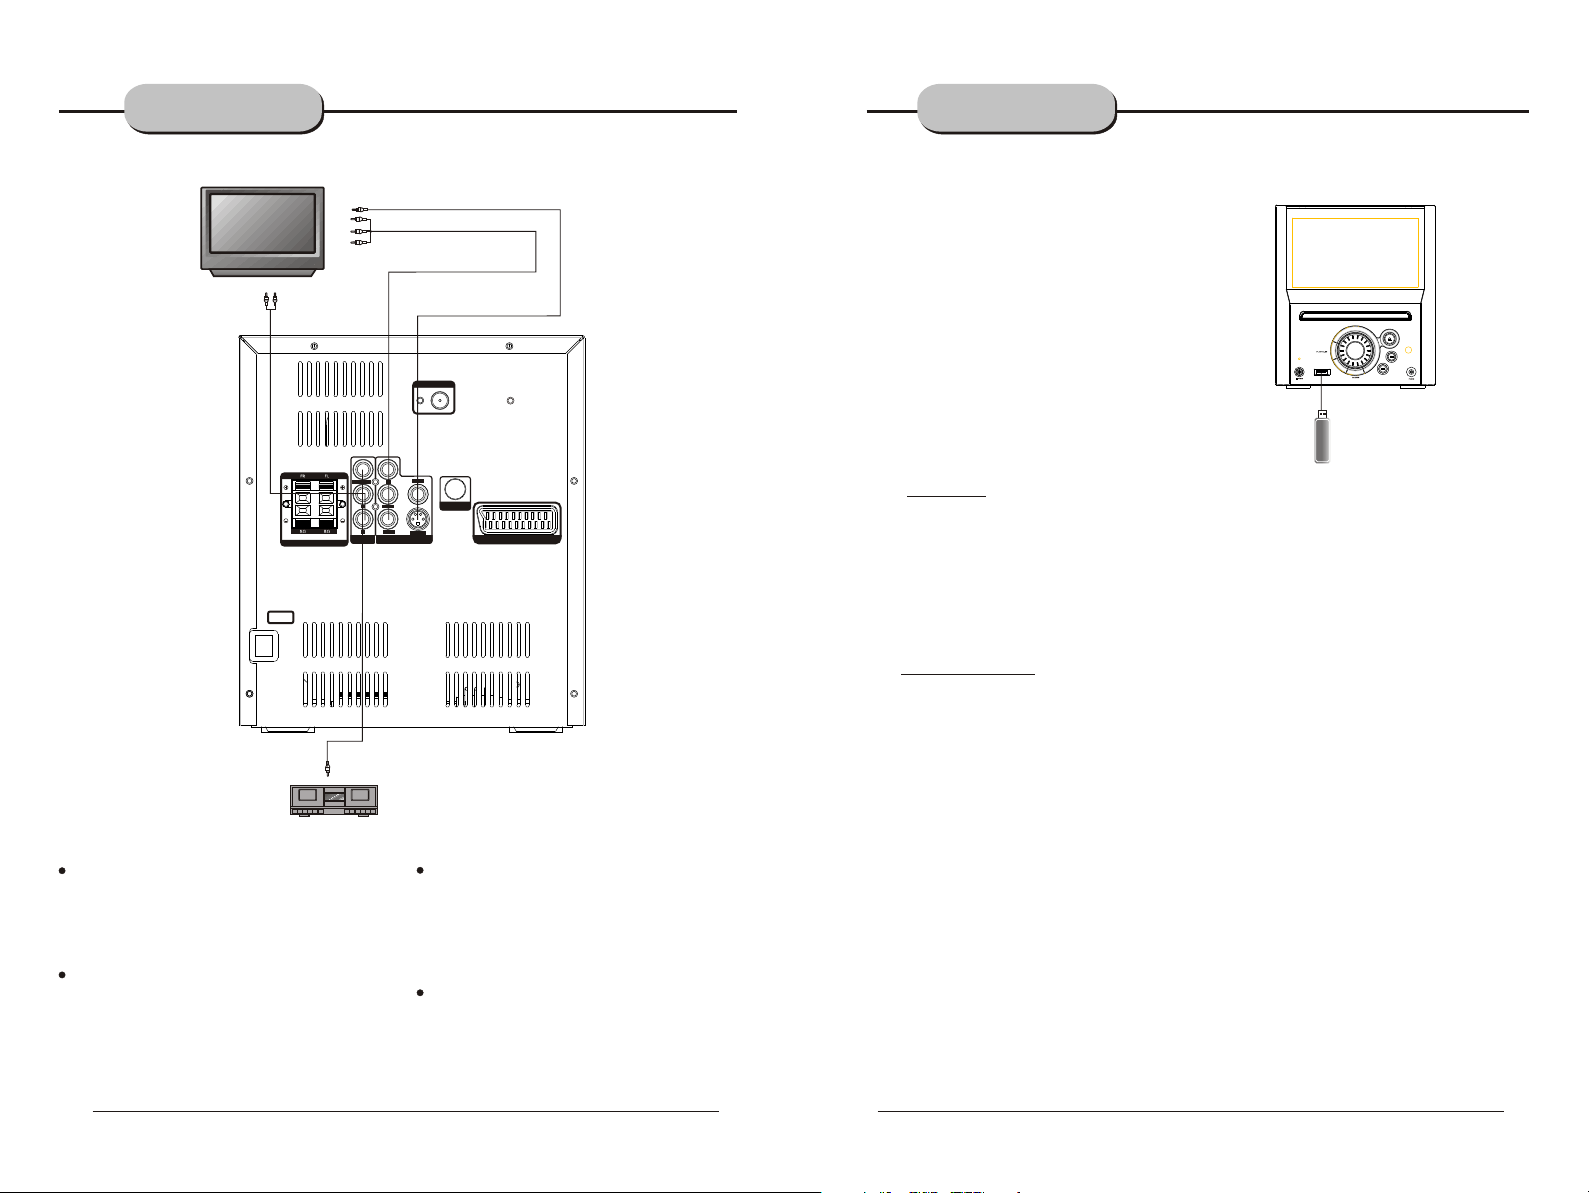
The following will help you get the most enjoyment from your DVD receiver system.
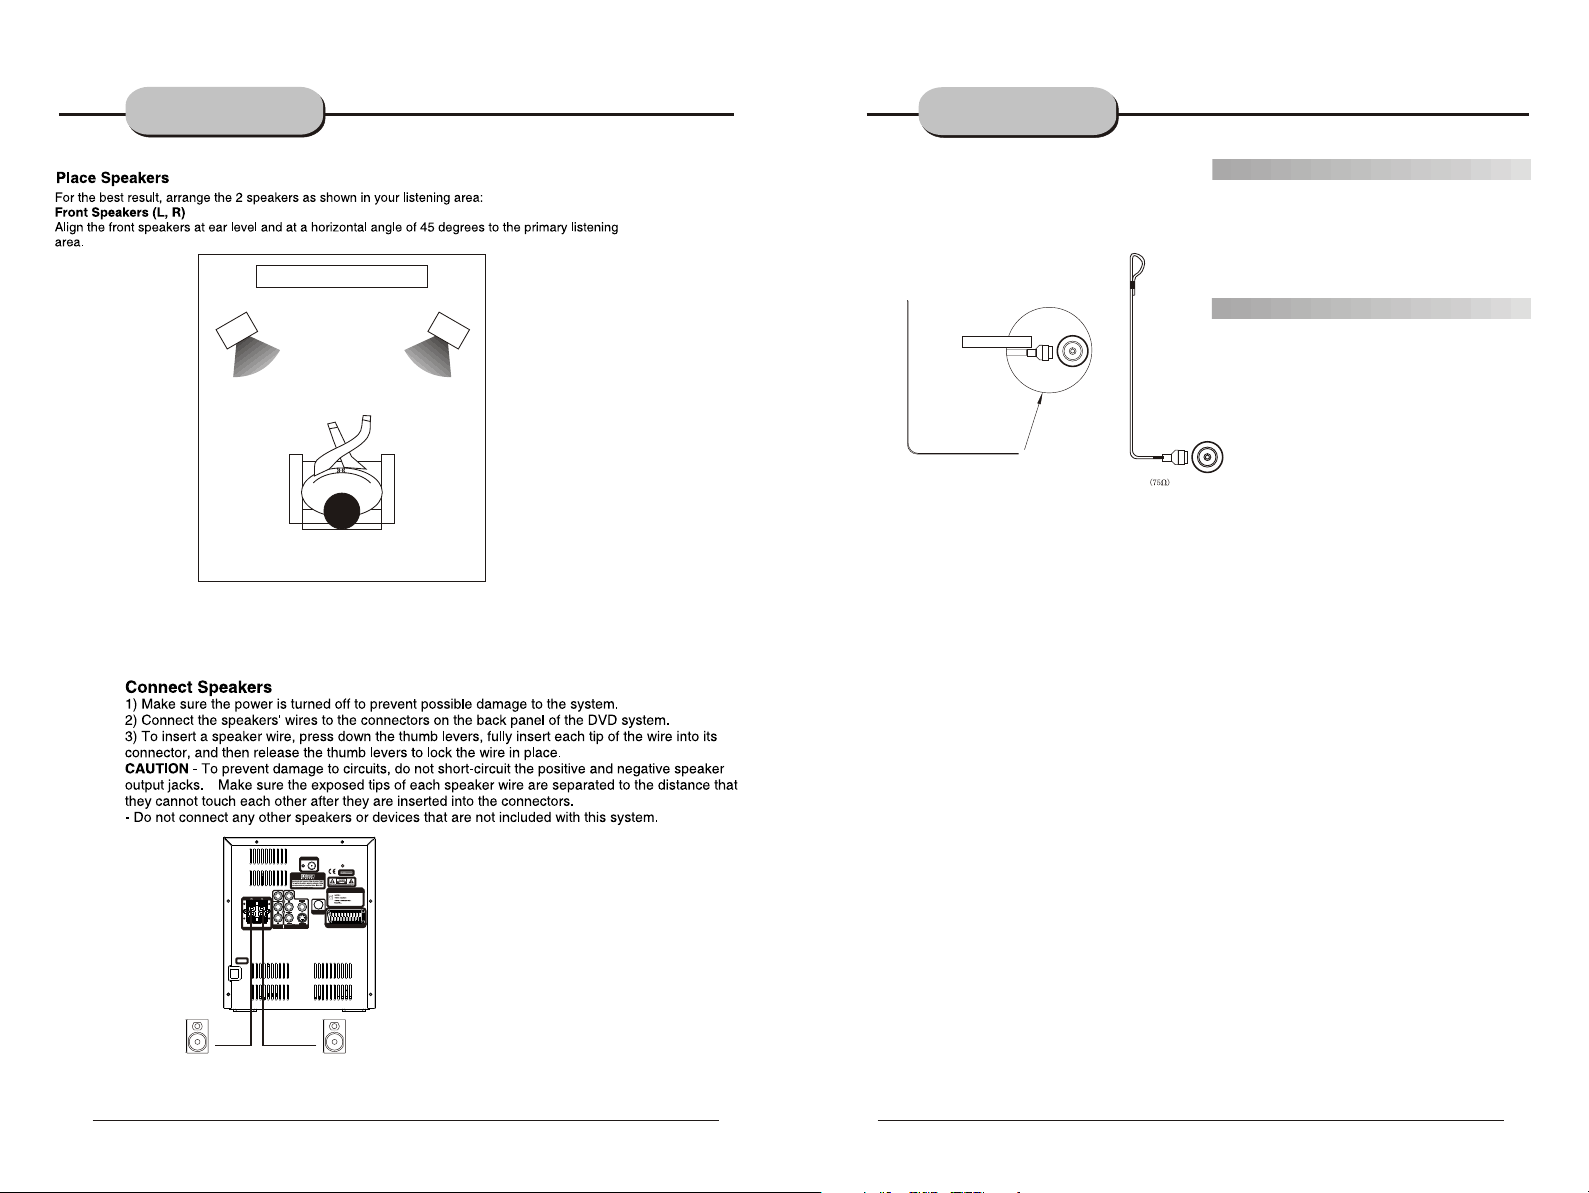
BEST LOCATION
The unit should be placed on a firm, flat surface, away from VCRs, stereos, radios, or large
speakers, as the magnetic flux from these devices may cause distortion in the sound and a poor
picture. If placed in a cabinet, be sure there is at least 1 o f f ree space completely around the unit
for proper ventilation.
""
TO OBTAIN A CLEAR PICTURE
A DVD receiver is a precision device. If the optical pick-up lens and disc drive parts become dirty
or worn down, picture quality will become poor. Store DVD player in a clean dust free environment.
PLAYABLE DISCS
This DVD receiver system will play the following types of discs: DVD, MP3, CD, CD-R,and
CD-RW with super-error correction ability. It is also capable of displaying picture CDs and digital
photo albums. It supports eight languages, up to 32 subtitles, and multi-angle viewing. It features
easy setup and operation with on-screen menus. It has full function CPU upgrading able capability.
DIGITAL AUDIO OUTPUT
The unit's coaxial output capability enables you to connect an external six-channel AV amplifier
and processor with built-in Dolby Digital code with just one cord. This enables you to conveniently
enjoy different DVD, CD, and Mp3 discs.
ANALOG AUDIO O UTPUT
Speaker system plug-and-play convenience through the built-in downmix 2-channel power
amplifier eliminates the use of an external power amplifier.
LASER-HEAD OVER-CURRENT
PROTECTION SYSTEM
To extend the service life of the laser head, the unit includes a unique laser-head over-current
protection system, ensuring a constant laser current.
USE OF DISCS
This page contains valuable information regarding the handling, cleaning, and storage of discs
played in this unit.
Handling
Do not touch the playback side of the disc.
Do not attach paper or tape to discs.
Do not stick or write anything on the surface. Protect against fingerprints.
Always hold a disc by the center and edge portions.
Cleaning
Fingerprints and dirt on the disc may cause picture and/or sound deterioration. Wipe the disc from
the center outward with a soft cloth. Always keep the disc clean.
If you cannot wipe the dirt off, lightly use a slightly moistened soft cloth and finish with a dry cloth.
Do not use any type of solvent such as: Paint thinner, benzene, commercially available cleaners or
anti-static spray for vinyl LPs.
Storing
Do not store discs in places subject to direct sunlight or near heat sources.
Do not store discs in places subject to moisture and dust.
Store discs vertically in a case. Stacking or placing objects on discs outside of their case may
cause warping.
NOTE: This DVD is not responsible for damage that may occur to any disc that is operated
in this unit or not handled, cleaned, or stored as suggested above.
-3-
Page 4
FRONT AND
BACK PANELS
FRONT AND
BACK PANELS
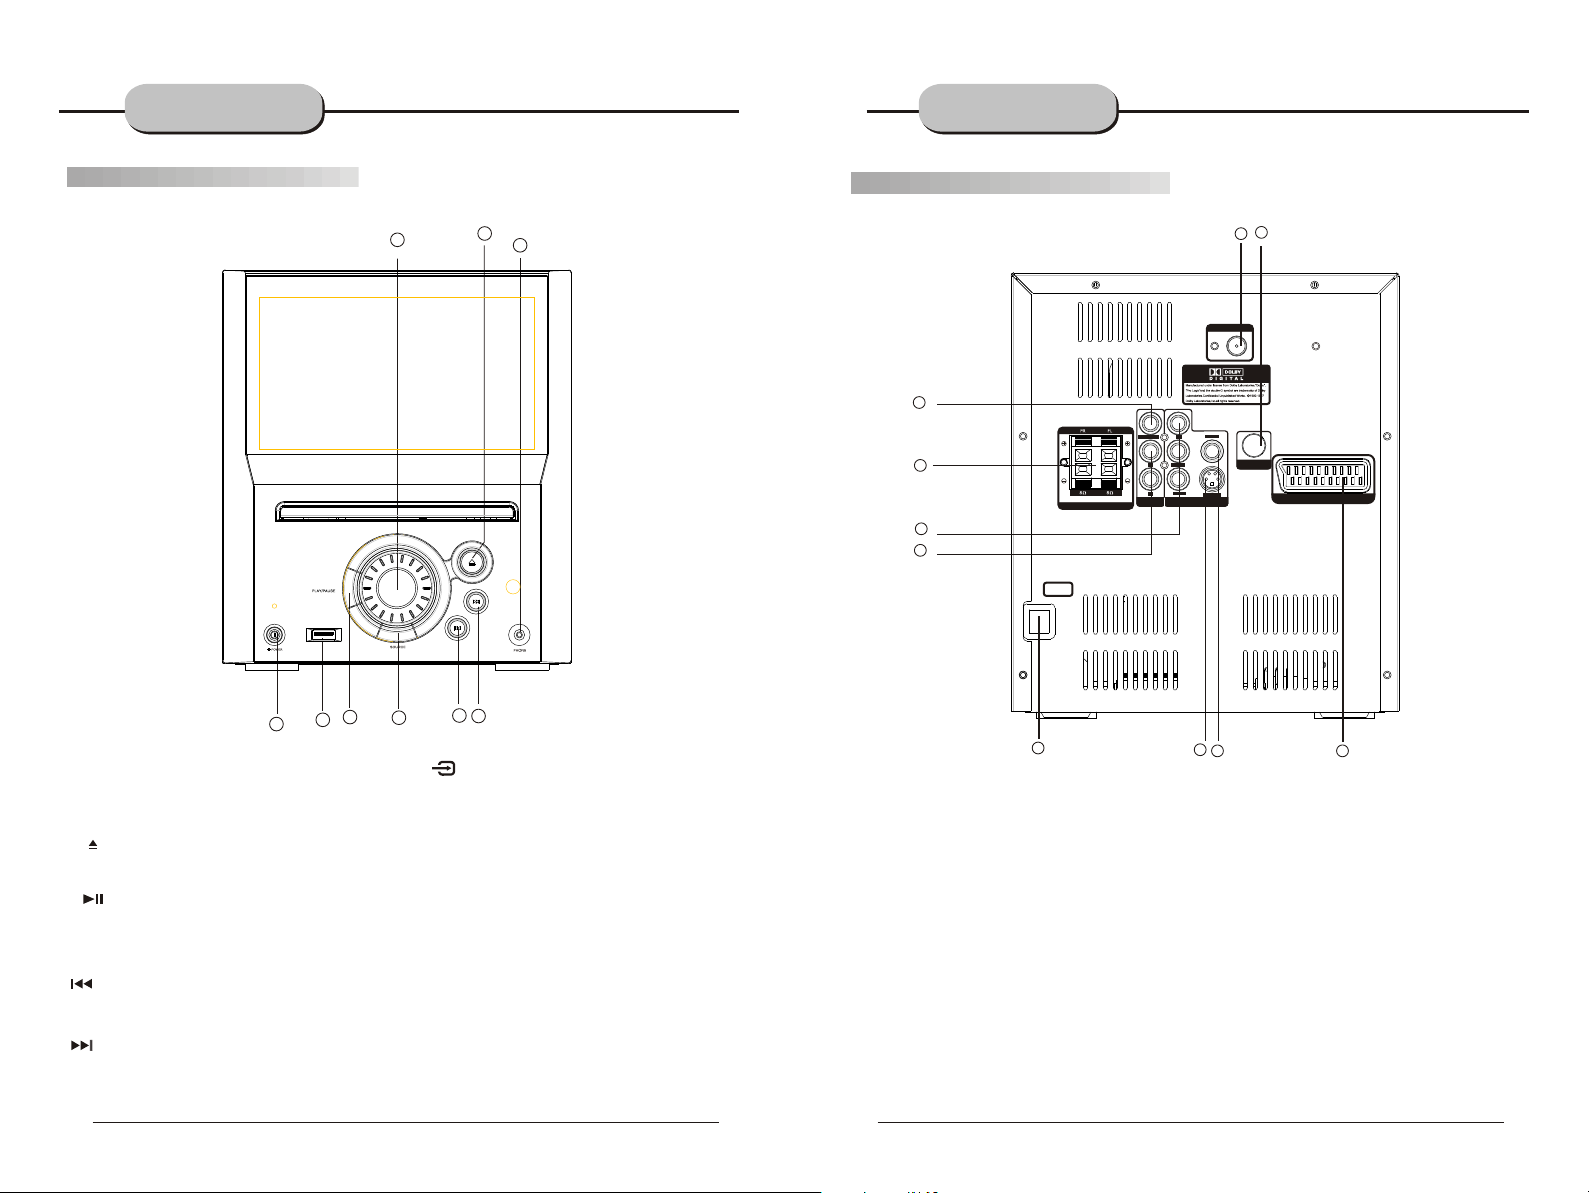
Front Panel Functions
4
9
8
1.PHONE
2. VOLUME
Use this button to control the unit's volume. It
controls all channels simultaneously.
3. OPEN/CLOSE
Use this button to open and close the disc tray
while in DVD mode.
4.
Use this button to begin play function while in
DVD mode.
Use this button to pause play function while in
DVD mode.
5. PREV
While in the DVD status, you may press this
button for previous track.
6. NEXT
While in the DVD status, you may press this
button for next track. .
PLAY /
PAUSE
Back Panel Functions
2
7
7.
Use this button to select the proper input signal
source. (Note: The selected input will correspond to
the selected input terminal on the rear panel.)
8. POWER
Before plugging the power cord into the AC
outlet, check to make sure all of the connections
have been properly completed. When they have
been, carefully plug power cord into outlet.
Press the POWER button on the front panel
to power the unit.
When the unit is initially powered, a brief surge
of electricity may cause interference with other
electronic equipment on the same circuit. If this
occurs, connect the unit to an outlet on a
different circuit.
9. USB CONNECT
Use only USB Flash Ram.
www.elonex.com www.elonex.com
-4-
3
1
5
6
INPUT SIGNAL SOURCE
3
COAXIAL
1
SPEAKERS IMPEDANCE
4
2
100-240V~
50/60HZ
10
1. FRONT/MAIN
Use to connect the four terminals of the left
and right front or main speakers.
2. DOWNMIX 2-CHANNEL OUTPUT
Use to connect output for 2-channel analog
audio.
.
L
R
AUDIO
3. COAXIAL DIGITAL AUDIO OUTPUT
4. Component Videos Output
(Y,Cb/Pb,Cr/Pr)
5. S-VIDEO OUTPUT
6. CVBS OUTPUT
FM
CVBS
Y
Cb/Pb
Cr/Pr
S-VIDEO
VIDEO OUTPUT
5
6
7. SCART OUT
8. FM ANTENNA
Use to connect the provided indoor FM
loop antenna.
9.ATV/DTV ANT
10. 100-240V~ 50/60HZ
This unit comes with an AC power cord. Be
sure its prongs are dry before plugging it into an
electrical outlet. Take caution not to overextend
the cord or walk on it.
-5-
ANTENNA
8
ATV/DTV ANT
ANTENNA
9
SCART
7
Page 5
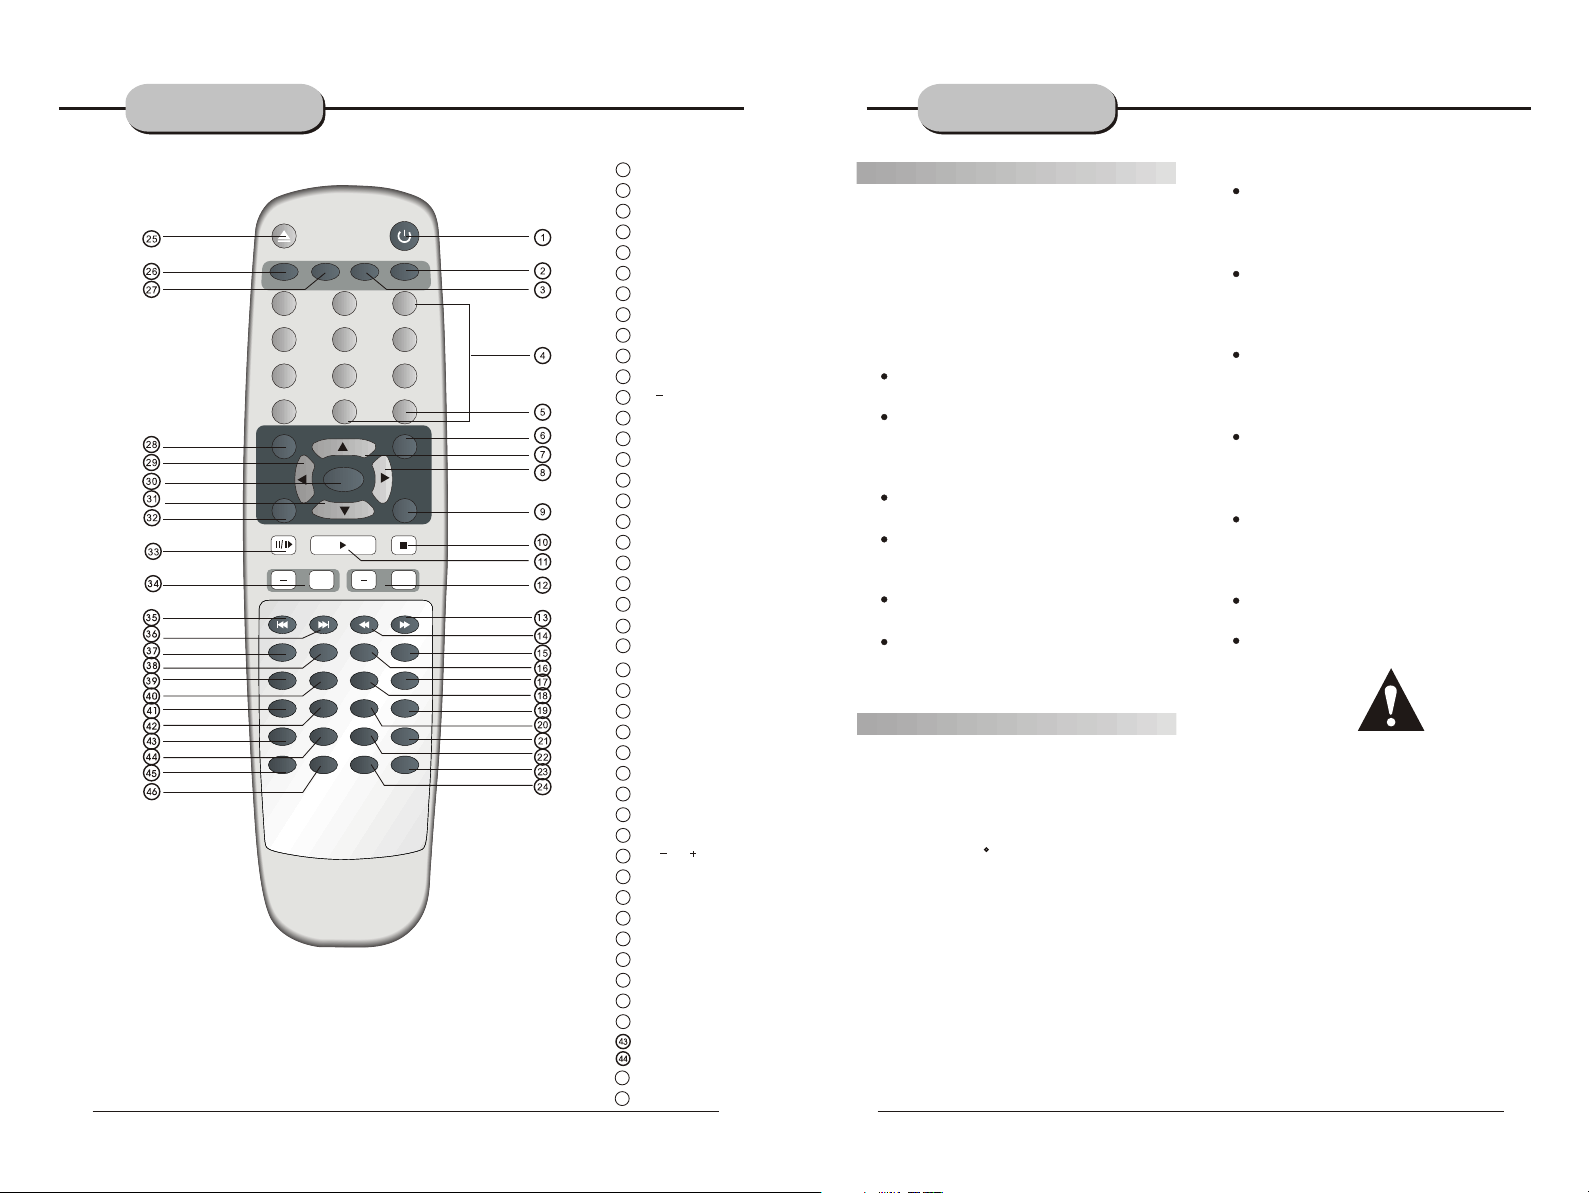
REMOTE
CONTROLLER
SOURCE
RETURN
PAUSE/STEP
ZOOM PROG
GOTO
SUBTITLE
RESUME
FUNCTION
1 2
4
7
0
MEMO
TFT ON/OFF
5
8 9
+10
ENTER
PLAY
VOL
+
SLOW
MENU
TITLE
N/P
LANGUAGE ANGLE
REPEAT
R/L
EPG TV/RADIO EQVIDEO
OPERATING THE
REMOTE CONTROL
1
STANDBY
MUTE
2
TFT ON/OFF
3
0-9 NUMBER KEYS
4
SETUP
STANDBY
MUTE
3
6
SETUP
PRE/TUN
AUTO
STOP
CH
+
A-B
DISPLAY
4:3/16:9
www.elonex.com www.elonex.com
5
PRE/TUN
6
SCROLL UP
7
SCROLL RIGHT
8
AUTO
9
STOP
10
PLAY
11
CH CH
12
13
FW D
REV BUTTON
14
A-B
15
SLOW
16
DISPLAY
17
MENU
18
ANGLE
19
LANGUAGE
20
4:3/16:9
21
R/L
22
EQ
23
VIDEO
24
OPEN/CLOSE
25
SOURCE
26
FUNCTION
27
RETURN
28
SCROLL LEFT
29
30
ENTER
SCROLL DOWN
31
MEMO
32
PAUSE/STEP
33
VO L VOL
34
PREV BUTTON
35
NEXT BUTTON
36
ZOOM
37
38
PROG
GOTO
39
TITLE
40
SUBTITLE
41
N/P
42
RESUME
REPEAT
EPG
45
TV/RADIO
46
+
Battery Installation
1. Push down and out on the battery Compart ment cover to remove it.
2. Insert the two AAA b atteries into the battery
""
compartment of the remote control, making
sure the + and - signs on the batteries and
inside the batteries compartment match up.
3. Replace the battery compartment cover.
Notes:
Do not mix batteries from different manu facturers, nor old ones with new.
If the remote control will not be used for an
extended period of time, remove the
batteries to prevent damage-causing
corrosion.
Remove dead batteries immediately to
prevent damage-causing corrosion.
If battery leakage occurs, wipe the battery
liquid from the battery compartment, then
replace both batteries.
Always replace both batteries at the same
time, using new, fully charged batteries.
Life expectancy of batteries may vary
depending on amount of use.
Using the Remote Control
Point the remote control at the remote sensor
on the DVD receiver. When the signal is
received from the remote, the unit will function
accordingly. The remote will operate to
approximately 16' from the remote sensor at an
angle of around 30 each direction.
Notes:
Do not direct the remote sensor toward
any light source, such as direct sunlight or
a strong fluorescent light, as it may cause
the unit to not operate correctly.
When other remote controls are used
nearby or when the remote is used near
equipment using infrared rays, interference
may occur.
Placing an object on the remote control
may cause it to inadvertently depress a
button, changing a function and shortening
battery life.
Do not glaze the front of the DVD receiver
with colored glass, as it may cause
interference with normal operation of the
controller.
Make sure there is no barrier between the
remote control and remote sensor, as it
could prevent the unit from receiving the
signal.
Do not spill water or put wet items on the
remote control.
Never disassemble remote control.
BATTERIES
INCORRECT USE OF BATTERIES MAY
CAUSE THEM TO LEAK, CORRODE O R EXPLODE.
-6-
-7-
Page 6
CONNECTING
DEVICES
100-240V~
50/60HZ
SPEAKERS IMPEDANCE
USB interface
Press the SOURCE key on the remote control until you switched into USB work mode
Y
Pb/Cb
Pr/Cr
ANTENNA
FM
CVBS
Y
COAXIAL
VIDEO OUTPUT
ATV/DTV ATN
S-VIDEO
ANTENNA
SCART
Cb/Pb
L
Cr/Pr
R
AUDIO
USB interface
This unit have a USB jack, when no disc in the player, you can insert a USB DISC or a Mp3 Player with USB
Interface to play the Mp3 music or and JPEG files. All the function is the same to play a disc.
CD RIPPING FUNCTION
During CD playback, you can encode music file from CD to MP3 file and record it in USB player.
1. Insert CD disc and connect USB Memory Device to USB Port of DVD player. The USB Memory Device may
need to be formatted in advance.
2. Select and playback desired CD track you want to encode, and then, press “SUBTITLE” button in remote
controller to start CD RIPPING function. Information will be shown in TV accordingly and selected track song
is recorded as MP3 FILE in USB Memory Device.
3. Every time you press “SUBTITLE” button, only current track file is recorded as MP3 FILE in USB Memory
Device. To record other music file, select and play desired CD track again, and press “SUBTITLE” button.
AMPLIFIER
Connection terminals for this DVD receiver
are found on the rear panel. Read carefully
and follow the manufacturers' instructions
of any video and audio device being
connected to this unit.
Do not connect the power until all connections
have been properly completed.
www.elonex.com www.elonex.com
Red terminal (marked R) is for connecting the
right channel. The white terminal (marked L)
is for connecting the left channel. The yellow
terminal is for video connection. Make sure
all connections are securely made. Improper
connections may cause noise, poor perfor mance, or cause damage to the equipment.
Do not tie the AV cord with any other cords,
such as the power cord or speaker wires, as
it may result in poor picture and/or sound
quality.
-8-
-9-
Page 7
CONNECTING
SPEAKERS
CONNECTING
ANTENNA
1
2
4
1.TV set or screen
2. Front or main left speaker
3.Front or main right speaker
3
4.Viewer's location
Radio signals may be difficult to receive in
some buildings and under certain conditions.
The provided antenna will help in their reception.
They are intended for indoor use only.
Coaxial cable(75 ohm)
FM
Coaxial cable (75 ohm)
FM
Outdoor FM antenna
FM Indoor Antenna
The FM antenna should be fully extended
and in a direction that provides the clearest
signal. Secure the antenna ends in a location
where distortion is a minimum. If reception
remains poor, an outdoor antenna may be
necessary.
To connect the FM antenna:
1.Open cable terminal by pressing back on tab
2.Insert wire end
3.Release tab; make sure wire is in terminal
securely
Y
COAXIAL
Cb/Pb
L
Cr/Pr
R
AUDIO
VIDEO OUTPUT
SPEAKERS IMPEDANCE
100-240V~
50/60HZ
Main speaker Main speaker
ANTENNA
FM
DVD & DVB-T MINI-COMBO
DM8501
100-240V~ 50/60HZ
80W
CVBS
ATV/DTV ATN
S-VIDEO
SCART
ANTENNA
www.elonex.com www.elonex.com
-10-
-11-
Page 8
CONNECTING
POWER SUPPLY
POWER
Before plugging the power cord into the AC outlet, check to make sure all of the connections
have been properly completed. When they have been, carefully plug power cord into outlet.
Press the POWER button on the front panel to power the unit. The display panel will light.
When the unit is initially powered, a brief surge of electricity may cause interference with other
electronic equipment on the same circuit. If this occurs, connect the unit to an outlet on a different
circuit.
BASIC DVD
OPERATION
www.elonex.com www.elonex.com
-12-
-13-
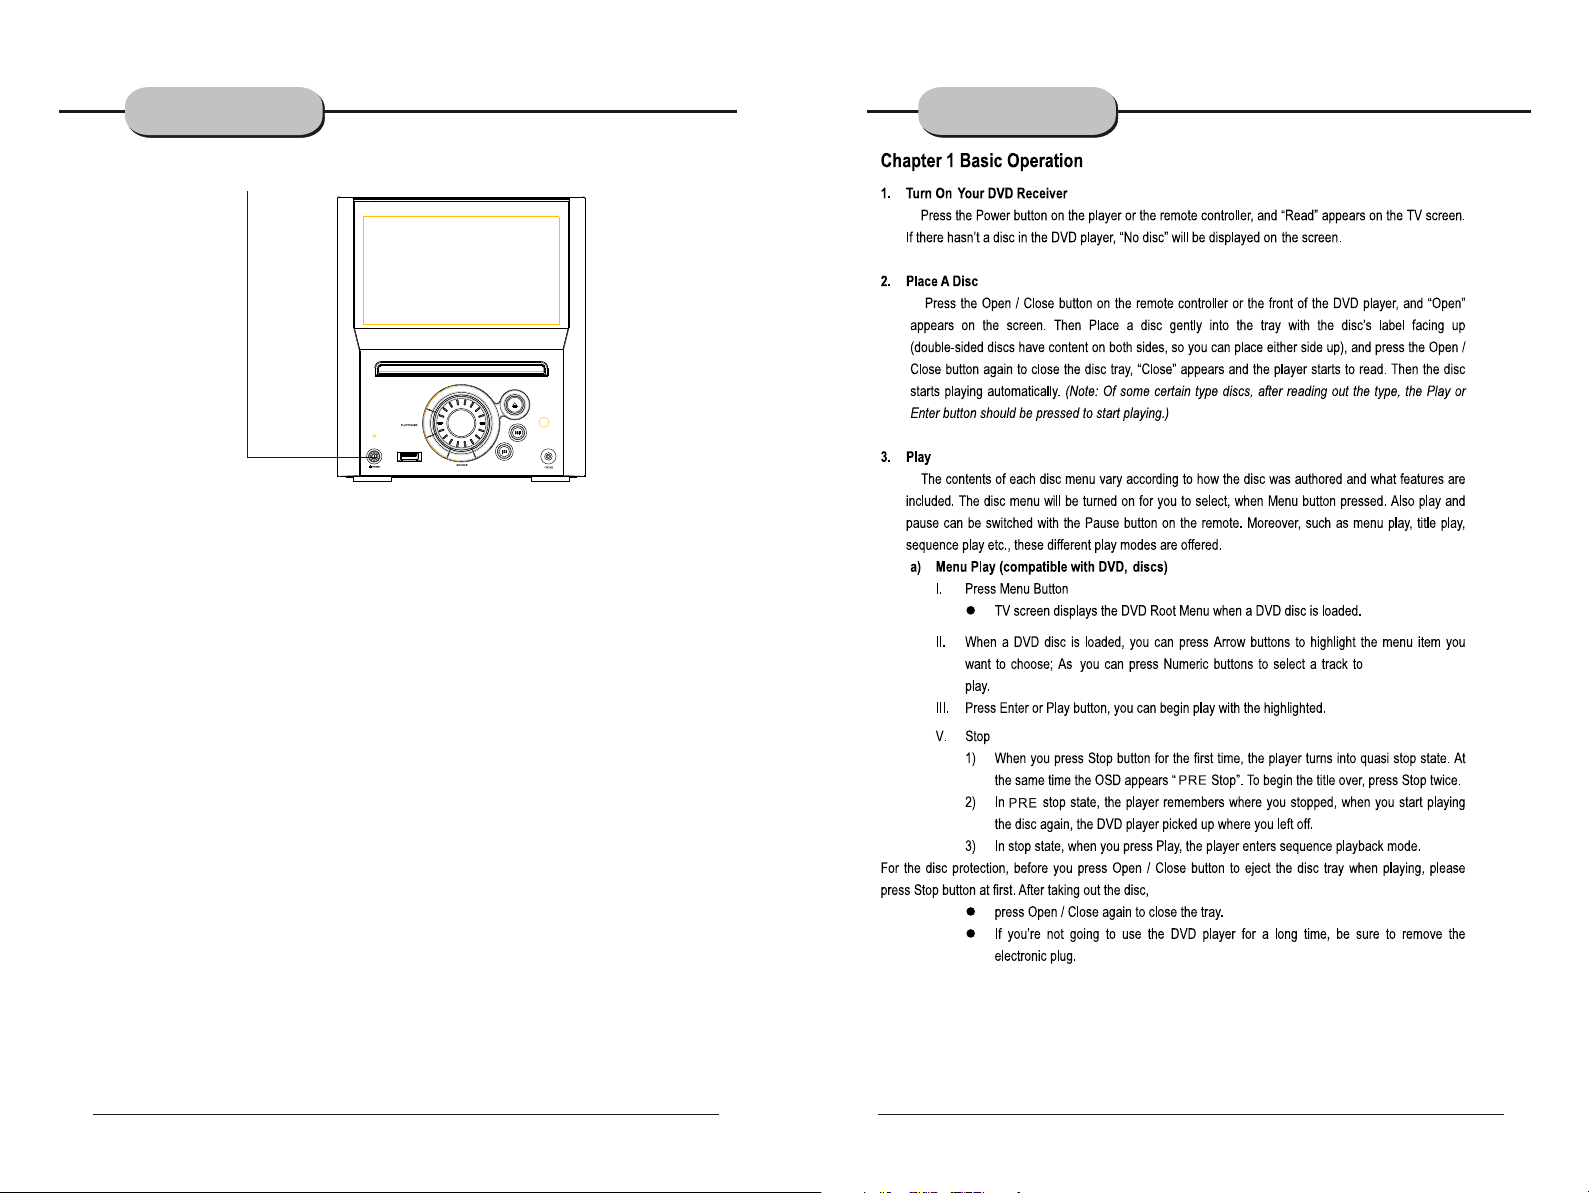
Page 9

BASIC DVD
OPERATION
BASIC DVD
OPERATION
Selecting Source
1. Press source button (DVD/FM/USB/
ATV/DVB-T) to select the desired sound source.
The appropriate symbol will appear in the display.
Note: The desired program source will not play
unless it and the selected signal button coincide
with the active program source signal input.
www.elonex.com www.elonex.com
-14-
Volume Control
The volume may be adjusted by either turning
the large volume knob on the front panel or
using the appropriate volume button on the
remote control.
Mute
Pressing the MUTE button temporarily mutes
every speaker. To resume audio, press MUTE
button again.
-15-
Page 10

PLAYING THE RADIO
Basic operations
1.Press CH+ or CH- button to find a station.
The frequency will change with each press.
When a station's signal is received, it will
appear in the display.
TUN Key into tune state.
2.Pree
3.To lock onto a station quickly, hold the CH+
or CH- button for two seconds. The unit
will start automatic tuning in tune state.
When a station
in tunstops.
4.To add a station to memory, press the MEMO
button. The memory storage number will
17
blink for four seconds in the display. Press
MEMO again to store the station.
is found, automatic tuning
STANDBY
SOURCE
FUNCTION
MUTE
TFT ON/OFF
3
1 2
5
6
4
7 8 9
SETUP
0
+10
PRE/TUN
RECALL
ENTER
MEMO
AUTO
PAUSE/STEP
STOP
PLAY
VOL
CH
+
+
SLOW
A-B
ZOOM PROG
MENU
RETURN
GOTO
TITLE
SUBTITLE
N/P
LANGUAGE ANGLE
RESUME
REPEAT
R/L
4:3/16:9
EPG TV/RADIO EQVIDEO
Automatic Tuning
This unit will store up to 30 individual
FM radio stations in its memory.
1.Press the AUTO button. the
automatic tuning mode is activated.
2.Stations will be stored in ascending order
until 30 stations of that particular wave band
have been saved. When a station is stored, the
memory storage number, as well as the station's
frequency, will flash for four seconds in the
display.
3.When the total number of stations reaches
30, in a particular wave's memory,
no further station in that wave band will be saved.
PLAYING WMA MP3 AND JPEG
Current MP3/JPEG file
name. If a JPEG file
playing, the name should be
*.jpg.
The playing file is
a MP3 music.
The playing file is
a JPEG picture.
File Switch Region: Displays the
file type of the playing and the
switching.
Memory number
FM\CH:
Wave band
Station frequency
MHZ
Press the TUNER button to select the desired wave band.
1.To play preset stations
2.Press the PRE/ TUN button.
3.Press any of the numbered buttons to
select the desired station's memory number.
SMART EQ FUNCTION
For example, to play the station at memory
#5, simply press the 5 button; for memory
#17, press the 1 button followed by the 7
button.
4.Stations in the memory function may also
be accessed by pressing the CH- or CH+
button.
www.elonex.com www.elonex.com
-16-
Press the EQ key on the remote control to select smart EQ function:
NORMAL CLASSIC JAZZ ROCK POP.
NOTICE:The function is only in playing VCD CD
Mp3 disc or in FM mode.
-17-
60 150 400 1K 3K 7K 16K
Page 11

SYSTEM SETUP
SYSTEM SETUP
VIDEO SETUPVIDEO SETUP
BRIGHTNESS
CONTRAST
HUE
SATURATION
EXIT SETUP
VIDEO SETUPVIDEO SETUP
BRIGHTNESS
CONTRAST
HUE
SATURATION
SYSTEM SETUPSYSTEM SETUP
TV SYSTEM
SCREEN SAVER
VIDEO
TV TYPE
PASSWORD
RATING
DEFAULT
EXIT SETUP
EXIT SETUP
www.elonex.com www.elonex.com
-18-
-19-
Page 12

SYSTEM SETUP
SYSTEM SETUPSYSTEM SETUP
TV SYSTEM
SCREEN SAVER
VIDEO
TV TYPE
PASSWORD
RATING
DEFAULT
EXIT SETUP
SYSTEM SETUPSYSTEM SETUP
TV SYSTEM
SCREEN SAVER
VIDEO
TV TYPE
PASSWORD
RATING
DEFAULT
EXIT SETUP
PAL
NTSC
AUTO
ON
OFF
SYSTEM SETUP
SYSTEM SETUPSYSTEM SETUP
TV SYSTEM
SCREEN SAVER
VIDEO
TV TYPE
PASSWORD
RATING
DEFAULT
EXIT SETUP
SYSTEM SETUPSYSTEM SETUP
TV SYSTEM
VIDEO
TV TYPE
PASSWORD
RATING
DEFAULT
EXIT SETUP
INTERLACE-YUVINTERLACE-YUV
TV-RGBTV-RGB
P-SCAN YPBPRP-SCAN YPBPR
S-VIDEOS-VIDEO
4£º3PS
4£º3PS
4£º3LB
4£º3LB
16£º9
16£º9
www.elonex.com www.elonex.com
-20-
-21-
Page 13

SYSTEM SETUPSYSTEM SETUP
SYSTEM SETUP
SYSTEM SETUPSYSTEM SETUP
TV SYSTEM
VIDEO
TV TYPE
PASSWORD
RATING
DEFAULT
EXIT SETUP
--------
SYSTEM SETUPSYSTEM SETUP
TV SYSTEM
VIDEO
TV TYPE
PASSWORD
RATING
DEFAULT
EXIT SETUP
SYSTEM SETUPSYSTEM SETUP
TV SYSTEM
VIDEO
TV TYPE
PASSWORD
RATING
DEFAULT
EXIT SETUP
1 1 KID KID SAFESAFE
2 2 GG
3 3 PGPG
4 4 PG13PG13
5 5 PG-RPG-R
6 6 RR
7 7 NC-17NC-17
8 8 ADULTADULT
RESTORERESTORE
www.elonex.com www.elonex.com
-22-
-23-
Page 14

LANGUAGE SETUP
LANGUAGE SETUPLANGUAGE SETUP
OSD LANGUAGE
AUDIO LANG
SUBTITLE LANG
MENU LANG
EXIT SETUP
ENGLISHENGLISH
FRENCHFRENCH
SPANISH
SPANISH
GERMAN
GERMAN
LANGUAGE SETUP
LANGUAGE SETUPLANGUAGE SETUP
OSD LANGUAGE
AUDIO LANG
SUBTITLE LANG
MENU LANG
EXIT SETUP
ENGLISHENGLISH
GERMANGERMAN
SPANISHSPANISH
FRENCHFRENCH
ITALIANITALIAN
CZECHCZECH
ROMANIANROMANIAN
PORTUGUESEPORTUGUESE
LANGUAGE SETUPLANGUAGE SETUP
OSD LANGUAGE
AUDIO LANG
SUBTITLE LANG
MENU LANG
EXITS ETUP
LANGUAGE SETUPLANGUAGE SETUP
OSD LANGUAGE
AUDIO LANG
SUBTITLE LANG
MENU LANG
EXIT SETUP
ENGLISHENGLISH
GERMANGERMAN
SPANISHSPANISH
FRENCHFRENCH
ITALIANITALIAN
CZECHCZECH
ROMANIANROMANIAN
PORTUGUESEPORTUGUESE
ENGLISHENGLISH
GERMANGERMAN
SPANISHSPANISH
FRENCHFRENCH
ITALIANITALIAN
CZECHCZECH
ROMANIANROMANIAN
OFFOFF
3
www.elonex.com www.elonex.com
-24-
-25-
Page 15

AUDIO SETUP
VIDEO SETUP
AUDIO OUTAUDIO OUT
AUDIO OUT
DOWN SAMPLE
EXIT SETUP
AUDIO SETUPAUDIO SETUP
AUDIO OUT
DOWN SAMPLE
SPDIP/OFF
SPDIP/OFF
SPDIF/RAW
SPDIF/RAW
SPDIF/PCM
SPDIF/PCM
48K
48K
96K
96K
192K
192K
VIDEO SETUPVIDEO SETUP
BRIGHTNESS
CONTRAST
HUE
SATURATION
EXIT SETUP
EXIT SETUP
DOWN SAMPLE
To avoid disturbing neighbours at night,use this function to lower the volume without
changing the original tone.
www.elonex.com www.elonex.com
-26-
-27-
Page 16

VIDEO SETUP
VIDEO SETUPVIDEO SETUP
BRIGHTNESS
CONTRAST
HUE
SATURATION
EXIT SETUP
VIDEO SETUPVIDEO SETUP
BRIGHTNESS
CONTRAST
HUE
SATURATION
EXIT SETUP
SPEAKER SETUP
SPEAKER SETUPSPEAKER SETUP
DOWNMIX
EXIT SETUP
LT/RT
STEREO
VIDEO SETUPVIDEO SETUP
BRIGHTNESS
CONTRAST
HUE
SATURATION
EXIT SETUP
www.elonex.com www.elonex.com
-28-
-29-
Page 17

SYSTEM SETUP
The setup menu system---DVB PART
Advanced Features
6)DIGITAL SETUP
DIGITAL SETUPDIGITAL SETUP
DYNAMIC RANGE
DUAL MONO
EXIT SETUP
DYNAMIC RANGE:
When LINE OUT is selected,choose this setting to adjust the line out ratio for
different effects.
DIGITAL SETUPDIGITAL SETUP
DYNAMIC RANGE
DUAL MONO
EXIT SETUP
STEREO
MONO L
MONO R
MIX MONO
FULL FULL
6/8 6/8
4/8 4/8
2/8 2/8
OFF OFF
How to switch to DVB-T work mode?
Press the SOURCE key on the remote control until you switched into DVB-T work mode.
1. FIRST installation after power on
First Time Setup In Figure (1), a message appears, asking the user if he/she wants to run the First Time
Installation Wizard. Upon selecting Yes , a new box appears, shown in Figure (2), asking for country,
OSD language, and time zone. Use the arrow keys to make the correct selections. Select Next and press
<ENTER> to proceed to the next screen, which is shown in Figure (3).
First time installationFirst time installation
Do you want to start first
time installation wizard?
NO
YES
Figure (1) Figure (2)
First time installation (2)First time installation (2)
Do you want to start Auto
Scan?
BACK
YES
NO
Figure(3)
First time installation (1)First time installation (1)
Selecl countrySelecl country
OSD LanguageOSD Language
Channel: 21
Progress 1/11/1
TV: 0004
0001. Xxxxx
0002. Xxxx
0003. Xxxx
0004. Xxxxxx
Figure (4)
EnglishEnglish
EnglishEnglish
NEXTBACK
Frequency: 474000kHz
Radio: 0009
0006. Xxxxx
0007. Xxxx
0008. Xxxx
0009. Xxxxxx
www.elonex.com www.elonex.com
-30-
-31
Page 18

The setup menu system---DVB PART
Advanced Features
The setup menu system---DVB PART
Advanced Features
2. The Main Menu Pressing <SETUP> will enter the Main Menu, which is shown in Figure (5). From here,
pressing <SETUP> again or <RETURN> will exit the menu. The the main menu is divided into four main
selection items: Channel Guide, System Config, Installation, and Game, which are displayed on
the left side. Selecting an item will open a submenu, with the menu s items displayed on the right side of
the screen. The menus are shown in Figures (5) to (8), and are detailed later in this document.
Channel guide -> TV ChannelChannel guide -> TV Channel
Channel guide
System Config
Installation
Game
TV Channels
Radio Channels
Channels Class
Channels Edit
Book List
Channel guide -> TV ChannelChannel guide -> TV Channel
Channel guide
System Config
Installation
Game
TV Setting
Video Setting
Audio Setting
Language
Parent Control
Time Setting
System Info
Figure (5) Main Menu + Channel Guide Figure (6) System Config Menu
Channel guide -> TV ChannelChannel guide -> TV Channel
Channel guide
System Config
Installation
Game
Auto Scan
Manual Scan
Default Setup
Channel guide -> TV ChannelChannel guide -> TV Channel
Channel guide
System Config
Installation
Game
Box Man
Burning Tetris
Hit Rat
Figure (7) Installation Menu Figure (8) Game Menu
Upon entering the main menu, the first item, Channel Guide, will already be highlighted. Use the <UP> or
<DOWN> buttons to highlight a different item. Press <ENTER> to enter a new menu corresponding to the
highlighted item. The submenus are their items include:
Channel Guide:
This includes TV Channels, Radio Channels, Channels Class, and Channels Edit. See Figure (5).
System Setup:
This includes TV Setting, Video Setting, Audio Setting, Language, Parent Control, Time Setting, and
System Info. See Figure (6).
Installation:
This includes Auto Scan, Manual Scan, and Default Setup. See Figure (7).
Game:
This includes Boxman and Burning Tetris. See Figure (8).
3. Channel Guide
3.1 TV Channels
The TV Channels Menu is shown in Figure (9). The channels are listed on the left side of the menu, and a
preview window is on the right side. From here, the channel can be changed using the <UP> or <DOWN>
keys, <ENTER> to start viewing, <LEFT> or <RIGHT> to change channel groups. Channel groups include
news, sports, favorites, etc. Press <DISPLAY> to sort the channels, which can be set to alphabetical (A-Z),
reverse alphabetical, free on top, scrambled on top, and transponder (Figure (10)).
Channel Guide -> TV ChannelsChannel Guide -> TV Channels
No
All TV
Xxx
0001
Xxx
0002
Xxx
0003
Xxx
0004
< >to switch calssify
DISPLAY key to sort channel
Picture
Channel Guide -> TV ChannelsChannel Guide -> TV Channels
No
All TV
Xxx
0001
0002
0003
0004
Xxx
Xxx
Xxx
Cancel
Cancel
A~Z
A~Z
Z~A
Z~A
Free~Scramble
Free~Scramble
Scramble~Free
Scramble~Free
Transponder
Transponder
Figure (9) TV Channels Menu Figure (10) Sort Channels
3.2 Radio Channels
The Radio Channels Menu, shown in Figure (11), is similar to the TV Channels Menu.
The channels are listed on the left side. The channel can be changed using <UP> and <DOWN>, and group
can be changed using <LEFT> or <RIGHT>. Press <DISPLAY> to sort the channels.
Channel Guide -> Radio ChannelsChannel Guide -> Radio Channels
No
All TV
Xxx
0001
Xxx
0002
Xxx
0003
Xxx
0004
< >to switch calssify
DISPLAY key to sort channel
Picture
Figure (11) Radio Channels Menu
3.3 Channels Class
From the Channels Class Menu, shown in Figure (12), each channel can be classified into
a group. Pressing <ENTER> will add the row s c hannel to the column s category. Use <TV/RADIO> to
switch between TV and radio channels. Note: If there are no channels, the user cannot enter this menu.
Channel Guide->Channel classChannel Guide->Channel class
NO TV Favor Movie News Show
0001
Xx
0002
Xxx
Xxxx
0003
Xxx
0004
Enter key to check/uncheck
Enter key to check/uncheck
TV/RADIO key to switch TV/RADIO
TV/RADIO key to switch TV/RADIO
Figure (12) Channel Class Menu
www.elonex.com www.elonex.com
32 33
Page 19

The setup menu system---DVB PART
Advanced Features
The setup menu system---DVB PART
Advanced Features
3.4 Channels Edit
The Channel Edit Menu is shown in Figure (13). To change a channel name, select a channel
name and press <ENTER>. From here, use <LEFT> or <RIGHT> to select a character, and <UP> or
<DOWN> to change the character. Press <ENTER> to confirm the name change. To move a channel,
select the MOVE column of a channel and press <ENTER>. From here, use the <UP> or <DOWN> to change
the placement order of the channel, and <ENTER> to confirm the change. Select the DELETE column and
press <ENTER> to delete the channel. Use <TV/RADIO> to change between TV and radio channels. Note:
If there are no channels available, this user cannot be entered.
Channel Guide->Channel EditChannel Guide->Channel Edit
NO TV Move Delete
0001
Xx
0002
Xxx
Xxxx
0003
Xxx
0004
UP/DOWN key to move program
UP/DOWN key to move program
ENTER key to finish move
ENTER key to finish move
Figure (13) Channel Edit Menu
3.5 Book List
It will display all the program events you have booked in your EPG menu or manual added.
4. System Config
4.1 TV Setting
From the TV Setting Menu, shown in Figure (14), the TV system, video output, and TV aspect ratio can be
changed. Press <UP> or <DOWN> to select one of the items. To change the setting, press <LEFT> or
<RIGHT> to cycle between the different settings, or press <ENTER> and then <UP> or <DOWN> to select
from a list of settings. The possible settings are:
TV System: NTSC, PAL, Auto. See Figure (15).
Video: YCbCr, TV-RGB, P-SCAN-YUV, PC-VGA, S-VIDEO. See Figure (16).
TV Type: 4:3 Pan-and-Scan, 4:3 Letterbox, 16:9. See Figure (17).
TV Setting -> TV SystemTV Setting -> TV System
TV System
Video
TV Type
PAL
TV-RGB
4:3PS
TV Setting -> TV SystemTV Setting -> TV System
TV System
Video
TV Type
Auto
YCbCr
4:3PS
NTSC
NTSC
PAL
PAL
Auto
Auto
6
6
0
0
TV Setting -> TV SystemTV Setting -> TV System
TV System
Video
TV Type
Auto
YCbCr
4:3PS
Figure (17) TV Type
4:3PS
4:3PS
4:3LB
4:3LB
16:9
16:9
TV Setting -> TV SystemTV Setting -> TV System
TV System
Video
TV Type
Auto
YCbCr
4:3PS
YCbCr
YCbCr
TV-RGB
TV-RGB
P_SCAN_YUV
P_SCAN_YUV
S_VIDEO
S_VIDEO
Figure (16) Video
4.2 Video Setting
From the Video Setting Menu, shown in Figure (18), the video brightness, contrast, hue, and
saturation can be changed. Press <UP> or <DOWN> to select one of the items. To change
the setting, press <LEFT> or <RIGHT> to cycle between the different settings. Alternatively,
press <ENTER> to select from a list of possible settings.
Brightness
Contrast
Hue
Saturation
Figure (18) Video Setting Menu
Settings:
Brightness: 0, 2, 4, 6, 8, 10, 12.
Contrast: 0, 2, 4, 6, 8, 10, 12.
Hue: +12, +10, +8, +6, +4, +2, 0.
Saturation: 0, 2, 4, 6, 8, 10, 12.
4.3 Audio Setting
From the Audio Setting Menu (Figure (19)), the Audio Out option can be changed using the
<LEFT> or <RIGHT> keys. Alternatively, press <ENTER> to select from a list of possible settings. Audio
Out: SPDIF OFF, SPDIF RAW, SPDIF PCM.
Audio Setting -> Audio OutAudio Setting -> Audio Out
Audio Out
SPDIF/OFF
SPDIF/OFF
SPDIF/OFF
SPDIF/RAW
SPDIF/RAW
SPDIF/PCM
SPDIF/PCM
Figure (14) TV Setting Menu Figure (15) TV System
www.elonex.com www.elonex.com
34 35
Figure (19) Audio Setting Menu
Page 20

The setup menu system---DVB PART
Advanced Features
The setup menu system---DVB PART
Advanced Features
4.4Language
The Language Menu, shown in Figure (202), allows the user to change the OSD language. Use
the <LEFT> or <RIGHT> to select a language, or <ENTER> to select from a list with all the possible
languages. OSD Language: English, German, French, Greece.
Language -> OSD Language
OSD Language
English
ENGLISH
FRENCH
SPANISH
GERMAN
Figure (20) Language Menu
4.5 Parent Control
The Parent Control Menu, Figure (21), has two items, Change Pin and Channel Lock. When changing the
pin, the user will be asked to enter the old pin, the new pin, and the new pin again (Figure (22)). In order to
change the channel lock, the user must first enter the pin, as shown in Figure (23). If the pin is okay,
the Channel Lock Menu will appear (Figure (24)). Use <UP> or <DOWN> to select a channel, <ENTER> to
lock or unlock the channel, and <TV/RADIO> to switch between television and radio channels.
Parent Control -> Change pinParent Control -> Change pin
Change pin
Channel Lock
Press ENTER
Press ENTER
Parent Control -> Change pinParent Control -> Change pin
Change pin
Channel Lock
Press ENTER
Press ENTER
Old Pin:
Old Pin:
New Pin:
New Pin:
Confirm:
Confirm:
Figure (21) Parent Control Menu Figure(22) Change Pin
4.6Time Setting
From the Time Setting Menu, Figure (25), the time zone and sleep settings can be changed.
Use <UP> or <DOWN> to select an item, and <LEFT> or <RIGHT> to change the setting. Alternatively, the
user can press <ENTER> to select from a list of possible settings.
Time Setting -> Time ZoneTime Setting -> Time Zone
Time Zone
Sleep
GMT +2
Off
Time Setting -> Time ZoneTime Setting -> Time Zone
Time Zone
Sleep
GMT +2
Off
GMT+5
GMT+5
GMT+6
GMT+6
GMT+7
GMT+7
GMT+8
GMT+8
GMT+9
GMT+9
GMT+10
GMT+10
GMT+11
GMT+11
Figure (25) Time Setting Menu Figure (26)
Time Zone
Sleep
GMT +2
Off
OFF
OFF
10 min
10 min
20 min
20 min
30 min
30 min
40 min
40 min
50 min
50 min
60 min
60 min
Figure (27)
System Info System Info displays the firmware version and date, along with tuner and model information.
See Figure (28).
Parent Control -> Channel LockParent Control -> Channel Lock
Change pin
Channel Lock
Password:Password:
Press ENTER
Press ENTER
Figure (23) Enter Pin
System Info -> INFO PAGESystem Info -> INFO PAGE
Parent Control -> Channel LockParent Control -> Channel Lock
UPDATE DATE:
No
0001
0002
0003
0004
TV
XXXX
XXXXXXX
XXX
XXXXX
Lock
Figure(24) Channel Lock
TUNER INFO:
F/W VERSION:
MODEL VERSION:
Figure (28) System Infor
www.elonex.com www.elonex.com
36 37
Page 21

The setup menu system---DVB PART
Advanced Features
The setup menu system---DVB PART
Advanced Features
5. Installation
5.1 Auto Scan
The Auto Scan Menu is shown in Figure (29). First, select a country using <LEFT> or <RIGHT>. Then press
<DOWN> to highlight "Select Scan" and press <ENTER>.
After choosing yes or no, the scan will being (Figure (30)).
Auto Scan -> Select CountryAuto Scan -> Select Country
Select Country
Start Scan
English
Press Enter
Channel: 21
Progress 1/11/1
TV: 0004
0001. Xxxxx
0002. Xxxx
0003. Xxxx
0004. Xxxxxx
Figure (29) Auto Scan Menu
5.2 Manual Scan
The Manual Scan Menu is shown in Figure (31). A scan can be performed, be setting thefollowing items:
Country, Scan Type, Start Channel, Start Frequency, End Frequency, and Bandwidth.
If the scan type is single channel, then only the country and start channel can be set. If the scan type is
channel range, then the country, start channel, and end channel can be set.
Use the <UP>, <DOWN> keys to select an item and the <LEFT>, <RIGHT> keys to change the settings.
Once done, go to Start Scan and press <ENTER>.
Manual Scan -> Country
Country English
Scan Type
Start Channel
Start Freq
End Channel
End Freq
Band Width
Start Scan
Single Channel
21
474000kHz
5
474000kHz
8MHz
Press Enter
Frequency: 474000kHz
Radio: 0009
0006. Xxxxx
0007. Xxxx
0008. Xxxx
0009. Xxxxxx
Figure (30)
Figure (31) Manual Scan Menu
5.3Default Setup
A message box will appear, as shown in Figure (32), asking if the user wants to reset the
machine to factory settings. After the settings are reset, the First Time Installation message will appear.
Installation -> Default Setup
Channel Guide Auto Scan
System Config
Installation
Game
Manual Scan
Message Box
Reset to Default!
OK
Cancel
Figure (32) Default Setup
6. Game
The Game Menu is shown in Figure (33). There are three game:Box Man,Burning Tetris,Hit Rat.
Channel guide -> TV ChannelChannel guide -> TV Channel
Channel guide
System Config
Installation
Game
Box Man
Burning Tetris
Hit Rat
Figure (33) Game Menu
7. Panel key functions
The panel keys have the functions as below at the DVB-T state.
5
2
1
4
3
www.elonex.com www.elonex.com
38 39
1.ENTER
2.DOWN
3.LEFT/ CH-
4.RIGHT/ CH+
5.SETUP
Page 22

ATV PART
Advanced Features
ATV PART
Advanced Features
1.Press source button to select ATV MODE
2.Press SETUP to display options as follows.
A. Press DOWN button to select Auto search, Press Right button to start Search.
TV MENU
AUTO SEARCH
MANUAL SEARCH
FINE
POSITION 4
SWAP 0
S-SYS L
SKIP OFF
UHF 585.25MHz
SELECT ADJUST
B. Press UP and DOWN button to select Manul Search, Press Right or Left button to start
Manual Search.
NOTE:
1.Auto Search Start from Program NO.0
2.When receive signal under Manual Search, the indication frequency stop means the
optimum position for signal storage. If channel under weak signal is received. The channel
storage will automatically identify it as no signal.
3.when Auto Search or Manual Search, you can press SETUP button to stop
Auto search or Manual Search.
C. Press UP and DOWN button to select Fine Tune, Press Left and Right button to Fine
Tune the Frequency .NOTE: Press Left and Right once then the Frequency desending 50K
or increase 50K.
D. Press UP and DOWN button to select Channel to display the current Channel number and
Channel Frequency. Press Left or Right button to decrease or increase 1 channel and display this
,
channel s number and Frequency.
TV MENU
AUTO SEARCH
MANUAL SEARCH
FINE
POSITION 4
SWAP 0
S-SYS L
SKIP OFF
UHF 585.25MHz
SELECT ADJUST
TV MENU
AUTO SEARCH
MANUAL SEARCH
FINE
POSITION 4
SWAP 0
S-SYS L
SKIP OFF
UHF 585.25MHz
SELECT ADJUST
TV MENU
AUTO SEARCH
MANUAL SEARCH
FINE
POSITION 4
SWAP 0
S-SYS L
SKIP OFF
UHF 585.25MHz
SELECT ADJUST
www.elonex.com www.elonex.com
40 41
E. Press UP and DOWN button to select Video Standard to display the TV system PAL.
TV MENU
AUTO SEARCH
MANUAL SEARCH
FINE
POSITION 4
SWAP 0
S-SYS L
SKIP OFF
UHF 585.25MHz
SELECT ADJUST
F. Press UP and DOWN button to select Audio Standard to display the Audio system
I, DK, BG.
NOTE:
1.Notes on Sound system:6.0M stands for I, 6.5M stands for DK and 5.5M is BG,
please set the Sound system at local one.
2.Color system(all color system are auto setup)
A.While sound system is I, color system is PAL-I.
B.While sound system is DK, color system is PAL-DK.
C.While sound system is BG, color system si PAL-BG.
3.In case with picture while sound or with noise, please check the sound
system for correct setup first.
TV MENU
AUTO SEARCH
MANUAL SEARCH
FINE
POSITION 4
SWAP 0
S-SYS L
SKIP OFF
UHF 585.25MHz
SELECT ADJUST
G. Press UP and DOWN button to section SKIP to skip the channel.
TV MENU
AUTO SEARCH
MANUAL SEARCH
FINE
POSITION 4
SWAP 0
S-SYS L
SKIP OFF
UHF 585.25MHz
SELECT ADJUST
3. Panel keys Functions the panel keys have the Functions as below at the ATV state.
1.DOWN
4
3
2
1
2.LEFT/ CHLEFT/ CH+
3.
4.SETUP
Page 23

SCREEN SET PART
Advanced Features
SCREEN SET PART
Advanced Features
1.Under the TFT mode press the FUNCTION button to display as bellow:
BRIGHT
CONTRAST
COLOR
HUE
ZOOM
S-COLOR
LANG
DEFAULT
A. Bright
Press to button DOWN select bright. Press LEFT and RIGHT can adjust the Screen
Bright.
B. Contrast
Press to button UP and DOWN select contrast. Press LEFT and RIGHT can adjust the
Screen Contrast.
C. Color
Press to button UP and DOWN select color. Press LEFT and RIGHT can adjust the
Screen Color.
D. Hue
Press to button UP and DOWN select Hue. Press LEFT and RIGHT can adjust the
Screen Hue.
PICTURE
BRIGHT 50
CONTRAST 50
COLOR 50
HUE 50
ZOOM 16:9
S-COLOR AUTO
LANG ENGLISH
DEFAULT
SELECT ADJUST
PICTURE
BRIGHT 50
CONTRAST 50
COLOR 50
HUE 50
ZOOM 16:9
S-COLOR AUTO
LANG ENGLISH
DEFAULT
SELECT ADJUST
PICTURE
BRIGHT 50
CONTRAST 50
COLOR 50
HUE 50
ZOOM 16:9
S-COLOR AUTO
LANG ENGLISH
DEFAULT
SELECT ADJUST
PICTURE
BRIGHT 50
CONTRAST 50
COLOR 50
HUE 50
ZOOM 16:9
S-COLOR AUTO
LANG ENGLISH
DEFAULT
SELECT ADJUST
E. Zoom
Press to button UP and DOWN select Brightness. Press LEFT and RIGHT can adjust the
16:9 4:3
PICTURE
BRIGHT 50
CONTRAST 50
COLOR 50
HUE 50
ZOOM 16:9
S-COLOR AUTO
LANG ENGLISH
DEFAULT
SELECT ADJUST
F. S-color
Press to button UP and DOWN select S-color. Press LEFT and RIGHT can adjust the system
PAL NTSC auto.
PICTURE
BRIGHT 50
CONTRAST 50
COLOR 50
HUE 50
ZOOM 16:9
S-COLOR AUTO
LANG ENGLISH
DEFAULT
SELECT ADJUST
G. Language
Press to button UP and DOWN select language. Press LEFT and RIGHT can select different
language.
H. Default
Press to button UP and DOWN select Reset item. Press LEFT and RIGHT can set Sharpness,
Color hue etc of picture to factory default.
PICTURE
BRIGHT 50
CONTRAST 50
COLOR 50
HUE 50
ZOOM 16:9
S-COLOR AUTO
LANG ENGLISH
DEFAULT
SELECT ADJUST
PICTURE
BRIGHT 50
CONTRAST 50
COLOR 50
HUE 50
ZOOM 16:9
S-COLOR AUTO
LANG ENGLISH
DEFAULT
SELECT ADJUST
www.elonex.com www.elonex.com
42
43
Page 24

TROUBLE SHOOTING
TECHNICAL
SPECIFICATIONS
This handy trouble-shooting guide is provided to
save you time in case you experience any
inconvenience
with this DVD player. If the problem is not listed or
the provided solution does not correct the
problem, please
return to the point of sale within the first 30 days
of purchase.
Problem Possible Solution
No power
1. Check to ensure that the power plug is
securely in the wall outlet.
No sound
1. Check the connection between the DVD
player and the TV set, amplifier, or any
other unit it is connected to.
2.Check to ensure the TV and amplifier are
in the correct mode.
No picture
1. Check the connection between the DVD
player and the TV set or any other unit it
is connected to.
2.Check to make sure TV is turned on.
Disc does not play
1.Check to make sure the disc is loaded
correctly label side facing up on disc tray.
2.Check that disc is clean from dirt, dust,
fingerprints, and smudges.
3.Check to ensure disc is with in the guides
on the tray.
4.Check if parental lock function is on.
5.Make sure disc is for use in region
Remote does not work.
1. Check batteries; possibly replace.
2. Check to ensure there isn't any obstacles
between the remote sensor on the unit's
front panel and the remote control.
3.Be sure the remote is aimed at the remote
sensor.
Divided picture
1.Check that disc is clean and has no
scratches.
2.The unit is controlled by a micro computer,
which may need to be reset. Turn off the
unit's power, wait several seconds, then
turn back on.
No color picture
1.Check to see if the connector is damag ed (bent pin).
MP3 discs don't play
1. Use another software edition to re burn
disc, as the edition used may not be com patible with the player.
2. Use new editions of software such as Audio
station 4, asy CD Creator , To ast "E "
Titanium, etc.
3. Make sure MP3 file is not encoded with a
variable bit rate, such as provided by Real
Networks.
DVD Player
TV System NTSC/PAL
Compatible Discs DVD, CD, MP3,
CD-R, CD-RW
Resolution Ratio Greater Than 500 lines
Video S/N Ratio 65dB
Frequency Response fs (96KHz/24bit)
4Hz - 44KHz:+/-2dB
Audio S/N Ratio 95dB
Degree of Distortion <0.01%
D/A Converter 192KHz/24bit
Video Out 1Vp-p
S-Video Out Y: 1Vp-p(75 )
C: 0.3Vp-p(75 );
Audio Out 2.0V+0/-1V
Digital Audio Output Coaxial
Connections Scart,USB,CVBS
S-Video, 2 Channel
Output
FM Tuner
Tuning Range 87.5-108MHz
S/N Ratio >46dB
Monophonic >46dB
Stereo >50dB (DIN)
Selectance 50dB
THD
Monophonic 2%
Stereo 3%
Frequency Response 30Hz-10kHz +/- 1dB
Stereo Resolution 35dB (1kHz)
30dB (100Hz-10kHz)
ATV Tuner
Input Frequency
VHF 48.25MHZ~426.5MHZ
UHF 426.5MHZ~863.25MHZ
Amplifier
Output Power:
30W+30W (8 )
FrequencyR esponse:
S/N Ratio > 76dB
Input Sensitivity 350mv, 47k
Channel Resolution > 30dB (Normal)
Remote Control
Transmitter Infrared Ray
Signal Range Approximately 15'
Power Source 2 AAA B at teries
General
Power Supply 100V~240V~ 50/60HZ
Consumed Power 80W
This product is subject to continuous
improvement, We reserve the right to modify
product design and/or specifications without
notice and without incurring any obligations.
200Hz-20kHz+ /-3 dB
""
Technical Helpline 0905 105 0016
calls charged at 1 per minute from UK landline, calls from mobile networks may vary.
www.elonex.com www.elonex.com
44
45
 Loading...