

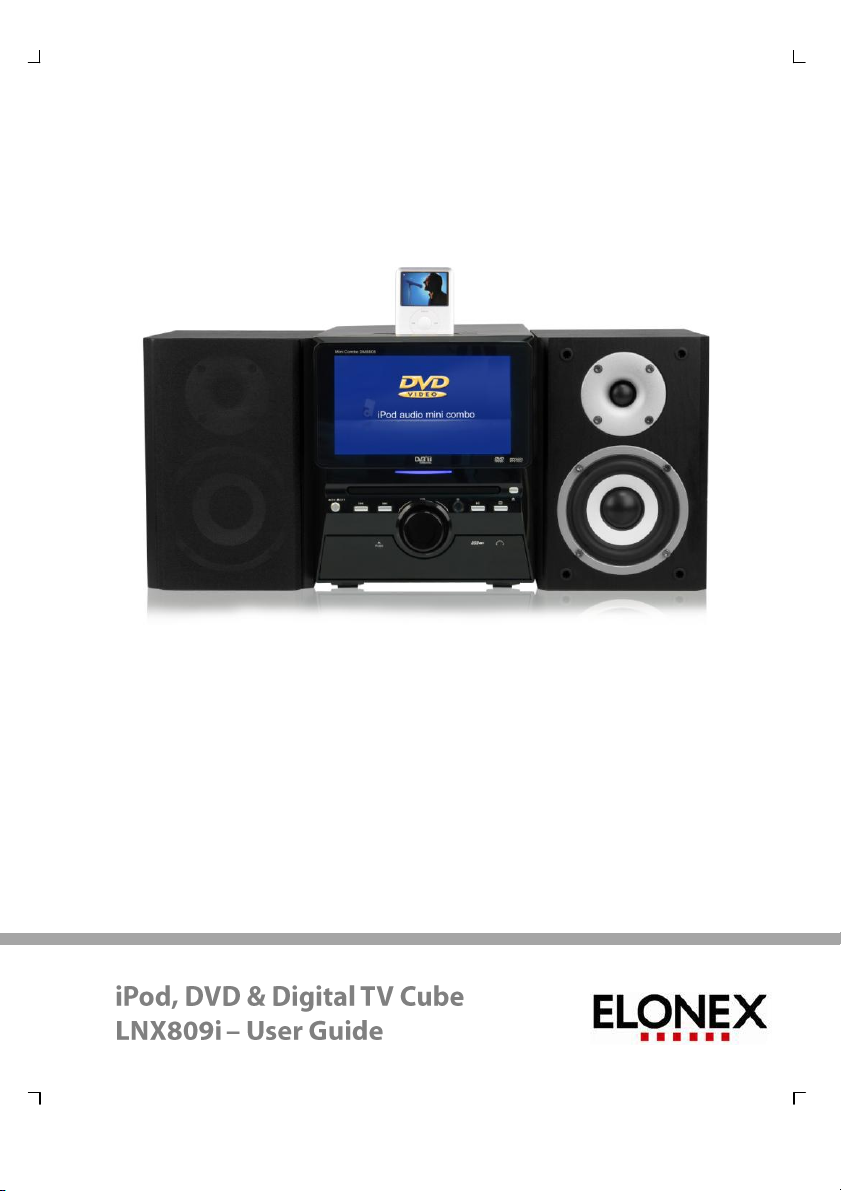
Page 1
Page 2

Table of Contents
Table of Content 3
Safety Information 5
Accessories / Features 9
Quick Start Guide 10
Control Elements
Front Side 11
Rear Side 12
Connection
Speakers 13
Antennas 14
Video Outputs 15
Audio Outputs 17
Remote Control
Insert Batteries and Operation Range 18
Buttons 19
Playback
Title / Menu / Stop / Fast playback / Chapter or Track 20
Angle / Audio / PBC 21
Repeat / A-B Segment playback 22
Zoom / Information / Volume 23
Program / Go to / Subtitle 24
Slow / Aspect Ratio / Resume / Mute / TFT On-Off 25
Picture CD or JPEG Files 26
Content from USB 27
Music 27
Setup DVD
Main Menu 28
Language 28
Audio 29
Custom 30
System Settings
OSD 31
Display 32
Preference 33
Game 34
Troubleshooting DVD 35
3
Page 3

Table of Content
DVB-T
First time Installation 36
Functions 37
Setup
Main Menu 39
Program List 39
Program Search 41
Parental Control 42
System Setting 43
Troubleshooting DVB-T 45
Analogue TV tuner 46
FM-Radio
Change to FM Radio 49
Settings
Auto Search / Manual Search / Position 50
Fine Tuning / Mode / Memory 50
Troubleshooting FM Radio 51
TFT Settings
Entering the TFT Setup 52
Brightness / Contrast / Colour / Hue / Aspect Ratio 52
System Colour / OSD / Default 53
Specification 54
Glossary 56
4
Page 4
Safety Information
User Manual
1. All the safety and operating instructions should be read before the
2. Retain Instructions - The safety and operating instructions should be
3. All warnings on the product and in the operating instructions should be adhered to.
4. All operating and use instructions should be followed.
Laser
This Digital Video Disc Player employs a Laser System of the class 1.
1. Make sure the device is shut down prior to opening player lid.
2. Do not open the appliance. Do not attempt to dismantle the appliance.
3. In order to avoid any danger: Have service work only carried out by the manufacturer
4. Visible laser radiation when open and interlocks defeated.
5. Use of controls or adjustments or performance of procedures other
Operationi
1. Playing of Video DVD or Video CD
2. Playing of Audio-CD
3. Reception of digital terrestrial channels (DVB-T)
4. Listen FM Radio
The lightning flash with an arrowhead symbol within an equilateral triangle is
intended to alert the user of the presence of uninsulated "dangerous voltage"
within the product's enclosure that may be of sufficient magnitude to constitute
a risk of electric shock to persons.
The exclamation point within an equilateral triangle is intended to alert the
user of the presence of important operating and maintenance (servicing)
instructions in the literature accompanying the appliance.
THIS DEVICE COMPLIES WITH PART 15 OF THE FCC RULES.
OPERATION IS SUBJECT TO THE FOLLOWING TWO CONDITIONS: (1)
THIS DEVICE MAY NOT CAUSE HARMFUL INTERFERENCE, AND (2)
THIS DEVICE MUST ACCEPT ANY INTERFERENCE RECEIVED.
INCLUDING INTERFERENCE THAT MAY CAUSE UNDESIRED
product is operated.
retained for future reference.
or an authorized service workshop.
than those specified herein may result in hazardous radiation exposure.
5
Page 5

Safety Information
Power Supply
1. Never touch the plug with wet hands.
2. If you want to pull the plug out of the plug socket, always pull directly on the plug.
Never pull on the cable as it could tear.
3. Make sure that the power cable is not bent, caught or run over and that it does not
come into contact with heat sources.
4. Make sure that the power cable is not wound around the device while in operation.
5. Never place the machine on the power cable while it is being operated.
6. Only use extension cables that are designed for the power consumption level of the
machine.
7. Keep the appliance away from rain and any moisture.
8. Only operate the machine if the electrical voltage stated on the type plate beneath
the machine agrees with the voltage on your plug socket. The wrong voltage can
destroy the machine.
9. Do not stand vases etc. on the appliance. Water could seep into the appliance.
10. Do not open the appliance.
11. Pull out the mains plug if the appliance is not to be used over a longer period of time.
12. Take care that nobody can trip over the power supply cable.
Antenna
The device can be connected to an antenna.
1. Unplug the power cord cable from the mains outlet before connecting or disconnecting
the DVB-T to/from the antenna, otherwise both might be damaged.
2. If an outside antenna or cable system is connected to the product, be sure the antenna
or cable system is grounded so as to provide some protection against
Voltage surges and built-up static charges.
Disc Compatibility
1. Depending on the conditions of the recording equipment or the CD-R/RW (or DVD - R,
DVD +R, DVD -RW, DVD +RW) disc itself, some CD-R/RW (or DVD -R, DVD +R,
DVD -RW, DVD +RW) discs cannot be played on the unit.
2. Do not attach any seal or label to either side (the labeled side or the recorded side)
of a disc.
3. Do not use irregularly shaped CDs (e.g., Heart shaped or octagonal) since they may
result in malfunctions.
4. Some playback operations of DVDs and Video CDs may be
intentionally programmed by software manufacturers. This unit plays DVDS and
Video CDs
according to disc content designed by the software manufacturer,
therefore some playback features may not be available or other functions may be
added.
6
Page 6

Safety Information
Operation and Position
1. During playback, the disc rotates very fast. Do not open or do not move the player
during playback. Otherwise the disc can be damaged.
2. Do not connect accessories on the player which are not defined by the manufacture.
3. Do not place this product on an unstable cart, stand, tripod, bracket, or table. The
product may fall, causing serious injury to a child or adult, and serious damage to the
product. Use only with a cart, stand, tripod, bracket, or table recommended by the
manufacturer, or sold with the product.
4. Any mounting of the product should follow the manufacturer's
instructions, and should use a mounting accessory recommended by the
manufacturer.
5. A product and cart combination should be moved with care. Quick stops, excessive
force and uneven surfaces may cause the product and cart combination to overturn.
6. The player is able to show a still image on the TV screen or
monitor over an unlimited period of time. This can cause damage to the
screen. It is therefore advisable to activate the screen saver. Or switch the player
off, if the device is not in
use.
7. Do not use the player permanent in the 4:3 mode. This can cause damage to the
screen.
8. Do not increase the volume when the player is just playing very quiet sections. This
cold damage the speaker if very loud passages starts all of a sudden after the quiet
section.
9. Place only CDs or DVDs into the tray.
10. Switch the player off by the Off/On switch if it is not going to used for a longer period of
time.
11. Disconnect the main plug during thunderstorms.
12. Slots and openings in the cabinet are provided for ventilation and to ensure reliable
operation of the product and to protect it from overheating, and these openings must
not be blocked or covered.
13. The openings should never be blocked by placing the product on a bed, sofa, rug, or
other similar surface.
14. This product should not be placed in a built-in installation such as
a bookcase or rack unless proper ventilation is provided or the
manufacturer's instructions have been adhered to.
15. Protect the device against weather influences, moistures and high temperature.
16. Never spill liquid of any kind on the product.
17. Do not expose the device and the remote control to direct sunlight.
7
Page 7

Safety Information
Defect
1. Servicing - Do not attempt to service this product yourself as opening or removing
covers may expose you to dangerous voltage or other hazards. Refer all servicing to
qualified service personnel.
2. Damage Requiring Service - Unplug this product from the wall outlet
and refer servicing to qualified service personnel under the following conditions:
a. When the power-supply cord or plug is damaged.
b. If liquid has been spilled, or objects have fallen into the product. c.
If the product has been exposed to rain or water.
d. If the product does not operate normally by following
the operating instructions. Adjust only those controls that are covered by the
operating instructions
as an improper adjustment of other controls may result in damage
and will often require extensive work by a qualified technician to restore the
product to its normal operation.
e. If the product has been dropped or damaged in any way, and
3. When the product exhibits a distinct change in performance this indicates a need
for service.
4. When replacement parts are required, be sure the service technician has used
replacement parts specified by the manufacturer or have the same characteristics as
the original part. Unauthorized substitutions may result in fire, electric shock, or other
hazards.
5. Please read in the section Troubleshooting our service address and phone number.
Macrovision
U.S. Patens Nos. 4,631,603; 4,577,216; 4,819,098; 4,907,093; 5,315,448 and 6,516,132
"This product incorporates copyright protection technology that is protected by U.S. patents
and other intellectual property rights. Use of this copyright protection technology
must be authorized by Macrovision, and is intended for home and other
limited viewing uses only unless otherwise authorized by Macrovision.
Reverse engineering or disassembly is prohibited."
Dolby
Manufactured under license from Dolby Laboratories. ―Dolby‖ and the double-D symbol are
trademarks of Dolby Laboratories. Confidential Unpublished works. 1992-1997Dolby
Laboratories, Inc. All rights reserved.
8
Page 8

Accessories
When opening the package of this Portable-DVD player please make sure that the following
accessories are included:
● The main unit
● Remote Control
● Batteries for the Remote Control
● Stereo Speaker Set
● Cable for the Speaker Set
● User Manual
Notes:
● If any item should be damaged or missing, please contact your dealer without delay.
● Keep the packaging materials, you may need them to transport your player in the
future.
● Always transport or send the player in its original packing.
● Do not change or modify any components of the device or accessories.
Features
● Warranty Card
● MPEG-4 DVD Player
● 7 inch 16:9 TFT Display
● Powerful Stereo Speaker Set with 2x 20Watt
● USB connector on the front panel
● DVB-T TV Tuner
● FM Radio Tuner
● Phone jack on the front panel
● SCART with RGB video output
● RCA video output
● CVBS Video RCA jack
● S-Video out
● Coaxial digital audio out
● Stereo RCA Audio output
● iPod Audio input
9
Page 9
Quick Start Guide
1. Connecting to an External Power Source. Connect the power adapter (supplied with
the player) to the side input and to a wall outlet. Do not use any other device
otherwise specified by your dealer.
2. the 7 inch display panel (Please refer No. 1).
3. Press the POWER button (Please refer No. 2).
4. Press the PLAY button to confirm the DVD-Part (Please refer No. 3).
5. Press the OPEN/CLOSE button on the top side of the unit (Please refer No.4).
6. Inserting a DVD disc (Please refer No. 5 - Disc Loader). Align the center of the DVD
disc with the center of the disc guide. Then press the OPEN/CLOSE button again
(Please refer No. 4).
7. Press the PLAY button on the top side. In general, the DVD already inserted into the
player will start reading automatically.
8. The DVD player will immediately start rendering the DVD program. When you want to
stop, press the STOP button on the remote control.
9. To power off the unit, press the Stand-By button on the remote control.
10. To power off completly, please press the POWER button (Please refer
No. 2).
10
Control Elements
Page 10
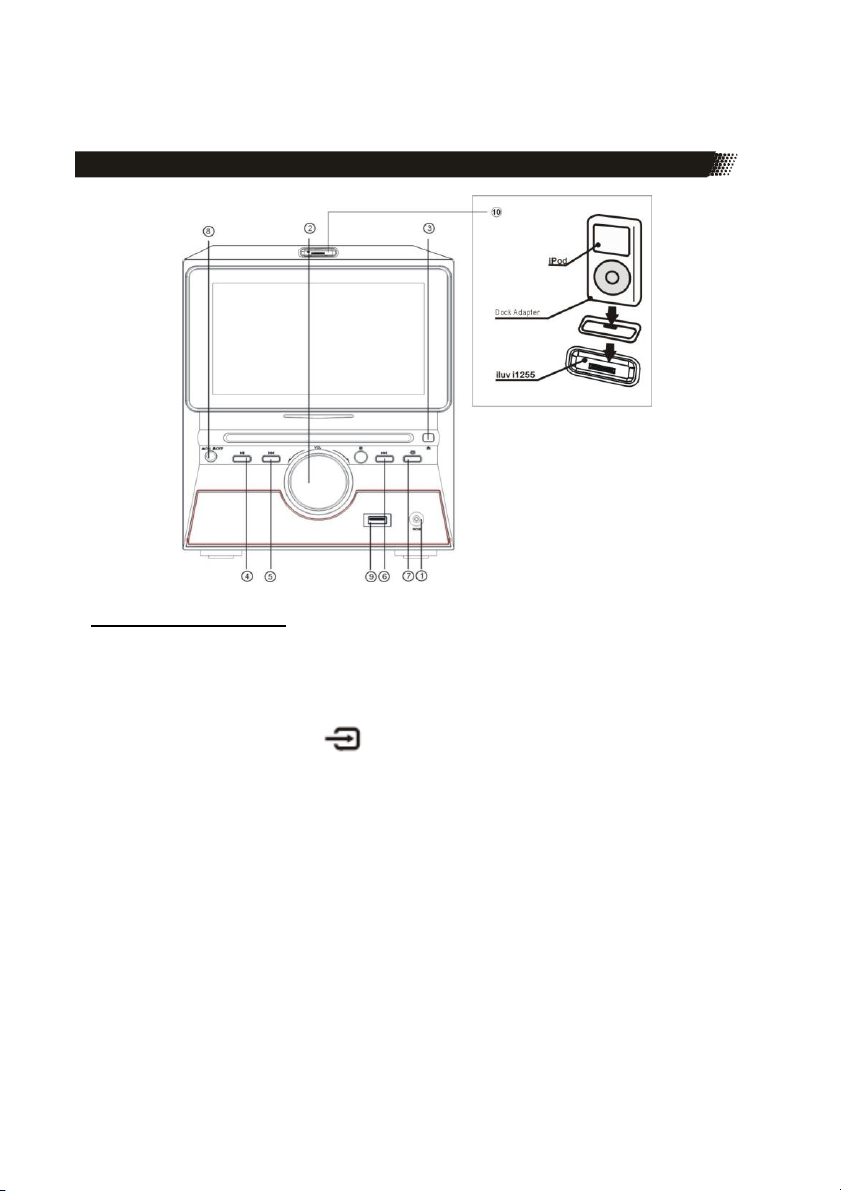
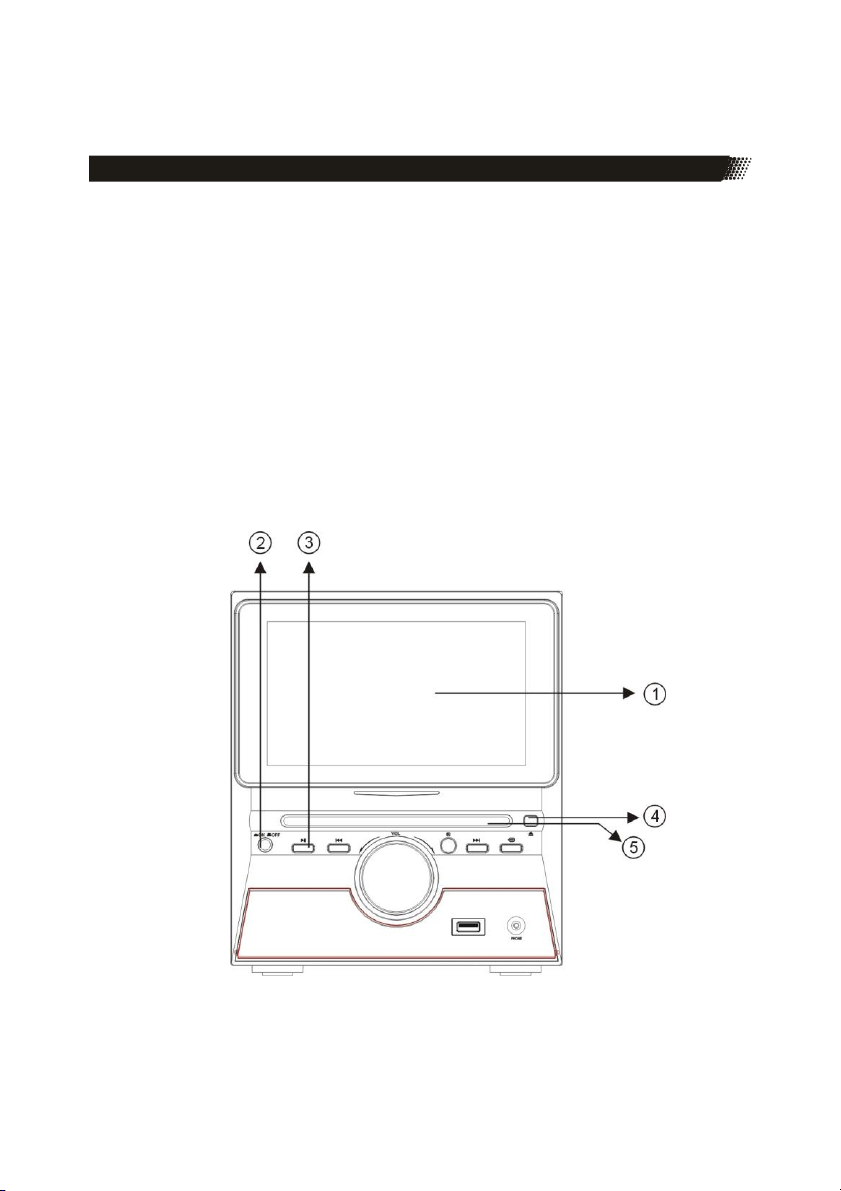
Front Panel
Elements of the Main Unit
1. Phone jack
2. Volume knob
3. OPEN/CLOSE button
4. PLAY/PAUSE button
5. |<< (Previous) button
6. >>| (NEXT) button
7. Input Source button
8. POWER button
9. USB Connector
10. iPod Audio input
Notes:
Use the Input Source button to select the proper input signal source. The sequence
is DVD —>FM Radio. The DVD includes the source for DVB-T and USB.
Before you plug the power cord into the AC outlet, please check to make sure that all
of the connections have been properly completed. Plug the power cord carefully into
the outlet.
When the unit is initially powered, a brief surge of electricity may cause interference
with other electronic equipment on the same circuit. If this occurs, connect the unit to
an outlet on different circuit.
For playback contents from USB, please use only USB flash RAM storages.
11
Page 11
Control Elements
Rear Panel
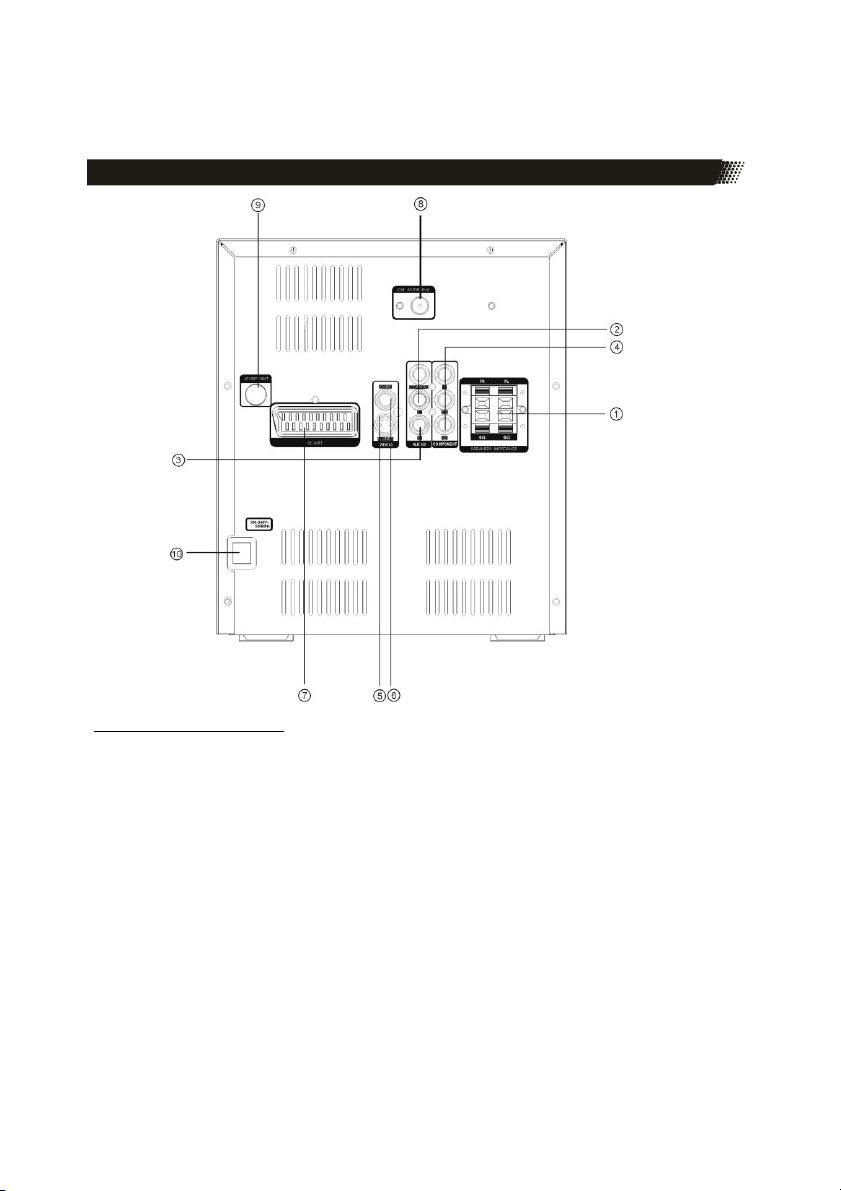
Elements of the rear side
1. Terminals for Front Right and Front Left speaker set
2. Coaxial RCA digital audio output
3. Stereo RCA Audio output
4. Components RCA Video output Y Cb Cr
5. S-Video output
6. CVBS RCA Video output
7. SCART Video/Audio output
8. FM Antenna jack
9. DTV RF-Antenna jack
10. Power Cord
Notes:
For FM Radio, please use to connect the provides indoor loop antenna
For DTV, please connect to an aerial o indoor antenna.
Power Cord: Please be sure its prongs are dry before plug-in to an electrical outlet.
Take caution not to overextend the cord or walk on it.
12
Page 12
Connection
Connect the Speakers
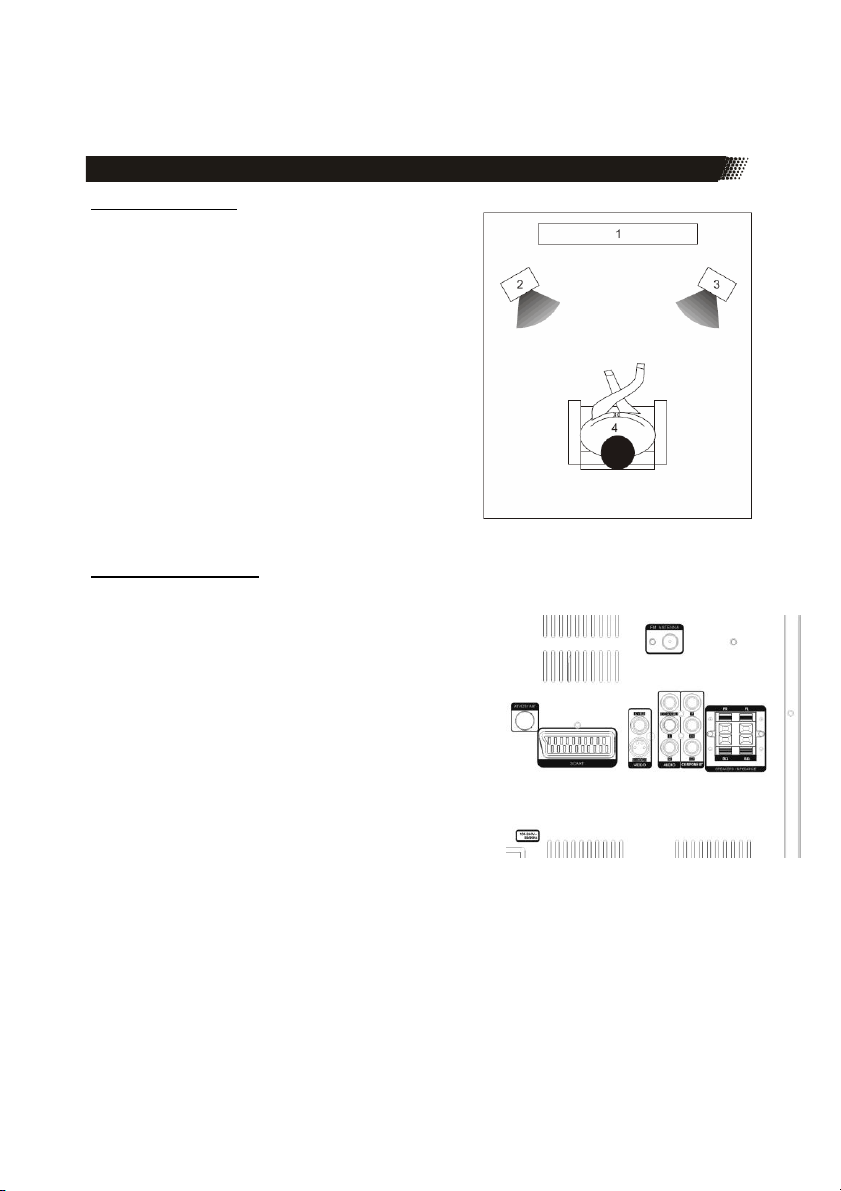
Place the Speakers
For the best result, please arrange the two speakers as
shown in the following picture:
Align the speakers vertically at the ear level and at a
horizontally angle of 45 degrees to the primary
listening area.
1. Position of the unit and the TV set.
2. Left speaker
3. Right speaker
4. Position to enjoy sound and video
Connect the Speakers
1. Please make sure, that the power is
turned off and is not connected to the
power outlet.
2. Connect the speaker wires to the
connectors on the rear side of the unit
3. Press down the thumb levers and
insert fully each tip of the wire into the
connector. Than release the
thumb levers to lock the wire in place.
4. Please pay attention that the colours
of the wire correspondent to the colour
of the thumb levers on the speaker
and on the player itself.
Notes:
To prevent damage to circuits, do not
Short-circuit the positive and negative
speaker output jacks.
Make sure the exposed tips of each
Speaker wire is separated to the distance that they can not touch each other after they
are inserted into the connectors.
Do not connect any other speakers or devices that are not included with this system.
13
Page 13
Connection
Connect the Antenna
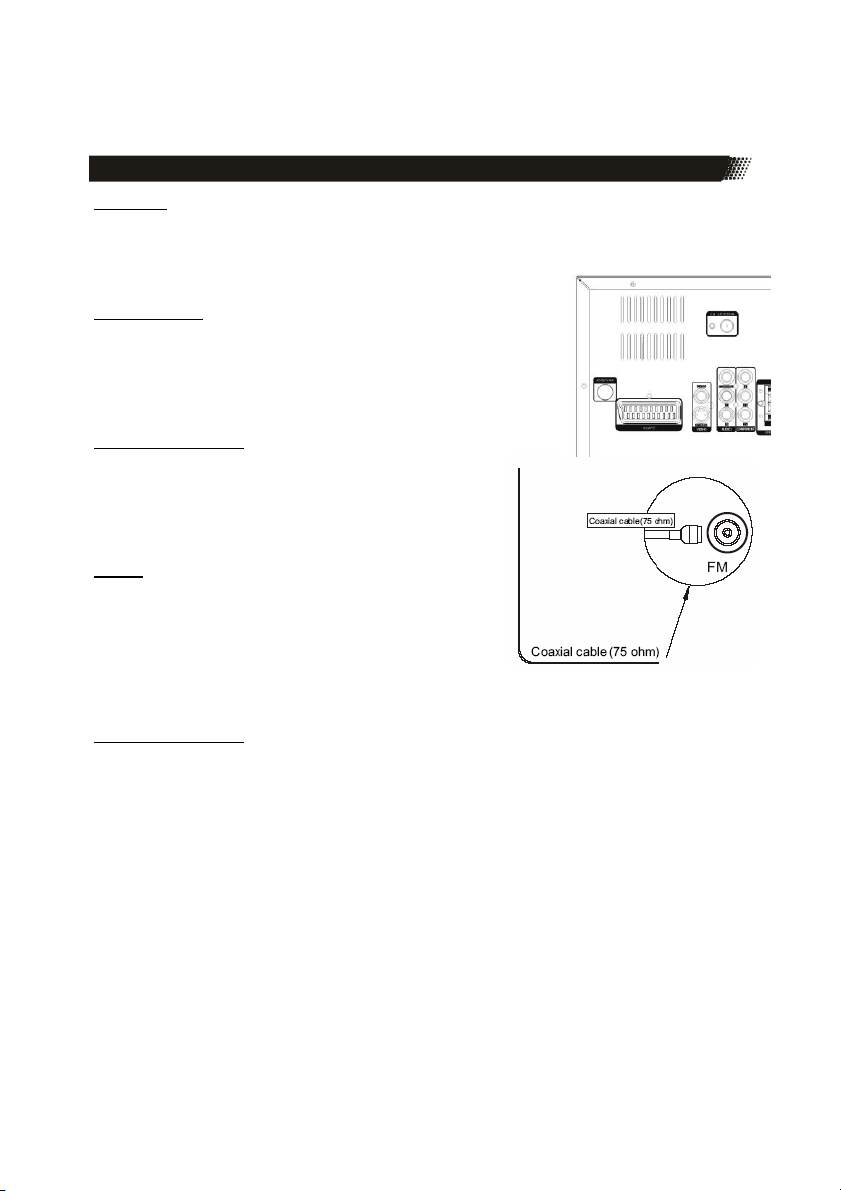
FM-Radio
Radio signals may be difficult to receive in some buildings and under certain conditions. The
Provided antenna will help in their reception. They are intended
for indoor use only.
Indoor Antenna
The FM antenna should be fully extended and in a direction that
provides the clearest signal. Secure the antenna ends in a
location where distortion is a minimum. If reception remains poor,
an outdoor antenna may be necessary.
Connect the Antenna
1. Open cable terminal by pressing back on tab
2. Insert wire end
3. Release tab; make sure wire is in
terminal securely.
DVB-T
The unit has integrated a DVB-T TV tuner. To receive the
terrestrial broadcast, you need to connect the player with
an antenna. The best case is to use the roof
antenna. If your position is nearby the transmitters, than
you can a passive or an active indoor aerial.
Please pay attention that you can receive the DVB-T in your area.
Connect the Antenna
1. Open cable terminal by pressing back on tab
2. Insert wire end
3. Release tab; make sure wire is in terminal securely.
Basic connection:
Ensure that the power switches of this unit and other equipment to be connected, are
turned off before commencing connection
Read attentively the instructions before connecting other equipments
Ensure that you observe the color-coding when connecting audio and video cords
Please connect the unit with TV by only one kind of video output format, and setup a
suitable output mode (including signal mode and signal code type), otherwise there
will be image distortion.
14
Page 14

Connection
Video Output
The unit provides different ways to output video and audio signals. Please refer the below
picture which shows the different Audio and Video outputs like CVBS, SVideo, SCART, Component, Stereo and Coaxial.
Connecting with a VIDEO (CVBS) cable
The video (CVBS) cable transmits the signals for brightness (Y-signal) and colour (C-signal)
in a combined way. You should only use this connection if no other connection type can be
used. Plug a cable into the VIDEO (CVBS) socket on the rear side of your DVD player. The
other side of the cable must be connected to the VIDEO input socket of the TV-set (usually
labeled ―VIDEO IN‖ or ―AV IN‖. Please also refer to your TV set‘s user manual). As VIDEO
(CVBS) does not transmit sound; you also must add an audio connection.
Insert one end of the supplied audio (Cinch [RCA]) cable into the
white/red Cinch [RCA] socket L/R AUDIO OUT at the back of the DVD player and the
other end into the audio input socket (usually white/red) on the TV set (usually labeled
―AUDIO IN‖ or ―AV IN‖. Please also refer to your TV set‘s user manual)
Switch on the TV set and select the s-video input or the respective
channel number. For channel number and input selection please also refer to your TV
operating instructions.
Connecting with a SCART cable
The SCART or Euro AV cable serves as the universal connector for picture, sound and control
signals. Plug a cable into the SCART socket at the back of the DVD player and the
SCART IN socket on the rear side of the TV set. Please also refer to your TV set‘s user
manual. Switch on the TV set and select the SCART input or the respective channel number.
For channel number and input selection please also refer to your TV operating instructions.
Note:
The SCART interface of this DVD recorder is RGB enabled. In RGB mode, the picture quality
is much better than in standard SCART mode. You can activate RGB mode on the
video settings page of your DVD recorder. You only can use this mode if it is supported by your
TV set. Otherwise, the use of RGB will result in wrong colour display. Please also refer
to your TV set‘s user manual.
15
Page 15

Connection
Video Output
Connecting with a S-Video cable
S-Video (S-VHS) cable transmits the signals for brightness (Y-signal) and colour (C-signal)
separately. This connection type offers a better picture quality as CVBS or
SCART connection. Plug a cable into the s-video socket on the rear side of your DVD
player. The other side of the cable must be connected to the s-video input socket of the TVset (usually labeled ―S-VIDEO IN‖ or ―SVHS IN‖. Please also refer to your TV set‘s user
manual). As s- video does not transmit sound, you also must add an audio connection.
Insert one end of the supplied audio (Cinch [RCA]) cable into the white/red
Cinch [RCA]
Socket L/R AUDIO OUT at the back of the DVD player and the other end into the audio input
socket (usually white/red) on the TV set (usually labeled ―AUDIO IN‖ or ―AV IN‖. Please also
refer to your TV set‘s user manual). Switch on the TV set and select the s-video input or the
respective channel number. For channel number and input selection please
also refer to your TV operating instructions.
Connecting with a YUV (Y Cb Cr) cable
YUV (Y Cb Cr) is a transmission technology separating colour and brightness information in
the signal. Similar to RGB, the signals are transmitted on a 3 wire cinch [RCA] cable. This
way of transmission is also called ―component‖. This connection offers best picture quality
available with analogue signal transmission. Plug a cable into the Y Cb Cb socket on the
rear side of your DVD player. You can recognize the sockets by their colours red, green and
blue easily. The other side of the cable must be connected to the Y Cb Cb input socket of
the TV-set (usually labeled, YCb Cb. Please also refer to your TV set‘s user
manual). As YUV does not transmit sound, you also must add an audio connection. Insert
one end of the supplied audio (Cinch [RCA]) cable into the white/red Cinch [RCA] socket L/R
AUDIO OUT at the back of the DVD player and the other end into the audio input socket
(Usually white/red) on the TV set (usually labeled ―AUDIO IN‖ or ―AV IN‖. Please also refer
To your TV set‘s user manual). Switch on the TV set and select the YUV input
or the respective channel number. For channel number and input selection
please also refer to
your TV operating instructions.
Notes:
Make sure you observe the colours of the three sockets when you establish the
connection. When the colours are connected in a wrong way, no picture or a picture with
wrong colours will be displayed.
By the video output of YUV with progressive scan, the device shut off the TFT screen.
Additionally, no video signal is on the CVBS video output connector.
16
Page 16

Connection
Audio Output
Coaxial Digital Output
This player contains a Dolby Digital or MPEG2 decoder. This enables the playback of DVD
recorded in Dolby Digital, MPEG1/2 audio or linear PCM without an external decoder
supports. When the player is connected to an AV amplifier with 5.1 channel input
connectors, theatre quality audio could be enjoyed at your home at the time of playing disc
recorded in Dolby digital, MPEG1/2 audio or linear PCM.
The "S/PDIF" specifications allow several different types of cables and
connectors which must match the device being used. Key words for the electrical type are
"coaxial" and "RCA
jack." The other type is called "optical" with the word "TOSLINK" often used.
Please connect the DVD-Player with the AV amplifier by coaxial cable which
is normally marked in orange and use the orange RCA jack by the DVD-Player.
1. Insert the audio plug into the orange socket on the rear side of the device, marked with
the label ―COAXIAL‖.
2. Plug the Audio jack into the corresponding socket on your playback device or your
amplifier.
Notes:
1. The cable is not part of the accessories.
2. Choose right audio setting for this player according to your audio system
requirement after connection is made.
3. If the type of the speaker connected does not satisfy the channels
recorded in a
MPEG-2 or Linear PCM disc, the disc will not be played in all channels but only in 2
channels (i.e. even if the front speakers and the centre speakers are connected, a disc
recorded in 5.1 channels will be played only in 2 channels.
When DVD discs recorded in DOLBY digital, MPEG audio or other formats
are played, corresponding bit stream is output from the player COAXIAL digital audio
output connector. When the player is connected to an external decoder or a power amplifier,
you can enjoy theatre-quality at your home.
Caution for the coaxial digital audio output connector:
Do not connect an amplifier with a Coaxial digital input connector which does not contain the
Dolby digital or MPEG audio decoder otherwise it may be harmful to your ears and damage
your speakers.
Stereo Analogue Output
Insert one end of the audio (Cinch [RCA]) cable into the white/red Cinch [RCA] socket L/R
AUDIO OUT at the back of the DVD player and the other end into the audio input socket
(Usually white/red) on the amplifier set (usually labeled ―AUX IN‖ or ―Stereo IN‖. Please also
refer to your Amplifier user manual). Switch on the Amplifier and select the AUX or Stereo
input.
17
Page 17
Remote Control
Insert batteries and Operation radius
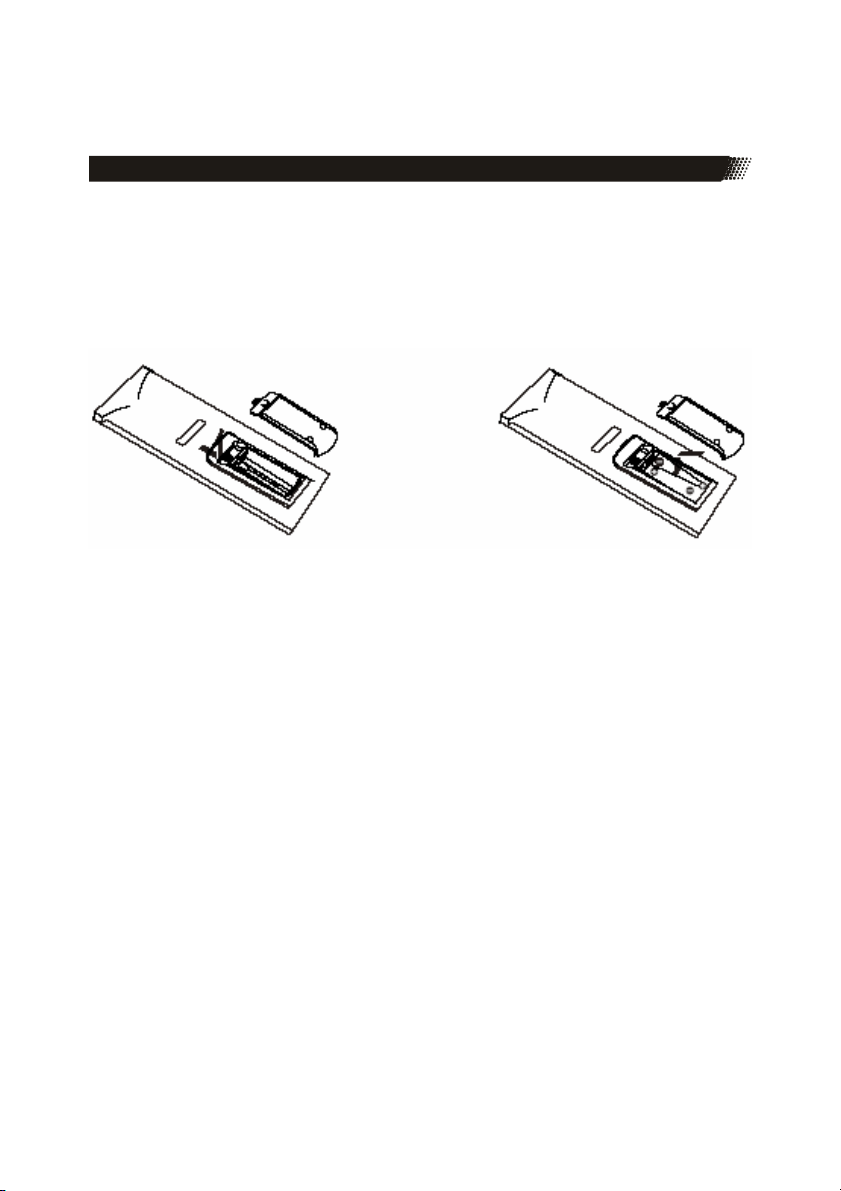
Insert the battery into the receptacle and insert the receptacle into the remote.
For the best results, aim the remote towards at the player, screwing window. Stay
Within 5 meter and angles of 60 degrees or less.
Under normal use the battery will last for one year.
Remove battery during storage or when you are not using the DVD player for a long
time.
Notes:
1. Weak batteries can leak and several damage by the remote control.
2. Leaking out battery acid can damage your health.
3. Remove the battery from the battery compartment as soon as it is exhausted or if the
remote control is not going to be used for a longer period of time.
4. Wipe up leaked out battery acid with a cloth.
5. In case of skin contact immediately wash the affected area.
6. Seek medical advice if battery acid has been swallowed. In case of contact with your
eyes wash out the eyes and seek medical advice.
18
Page 18
Remote Control
19
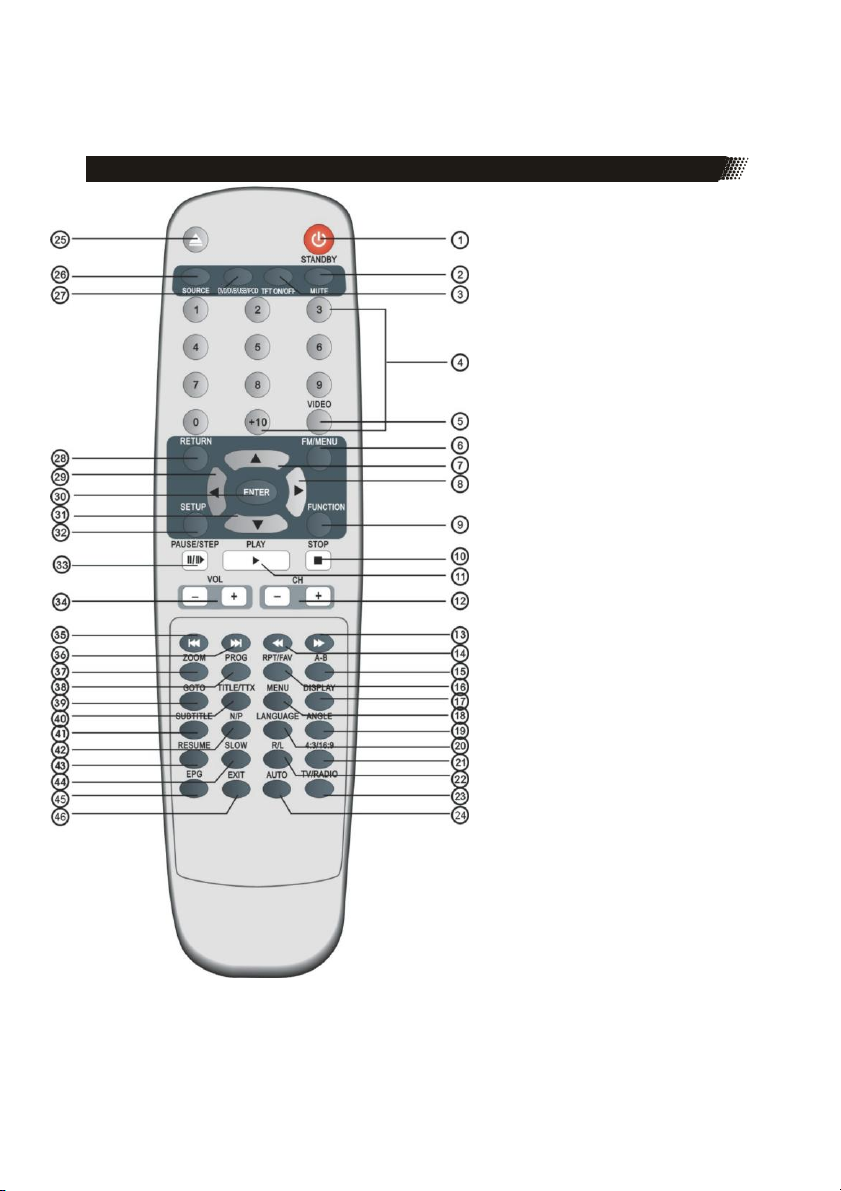
Buttons of the Remote Control:
1. Stand-By button
2. Mute button
3. TFT On/Off button
4. Numeric buttons
5. Video button
6. FM/Menu button
7. Up button
8. Right button
9. FUNCTION button
10. STOP button
11. PLAY button
12. CH+/CH– button
13. Fast Forward /FFW) button
14. Fast Reverse (FBW) button
15. A-B Segment button
16. RPT/FAV button
17. DISPLAY button
18. MENU button
19. ANGLE button
20. LANGUAGE button
21. Aspect Ratio (4:3/16:9) button
22. Right / Left (R/L) button
23. TV / Radio button
24. AUTO button
25. OPEN/CLOSE button
26. SOURCE button
27. DVD/DVB/USB/IPOD button
28. RETURN button
29. Left button
30. ENTER button
31. Down button
32. SETUP button
33. PAUSE/STEP button
34. VOLUME (VOL- / VOL+)
35. PREVIOUS (|<<) button
36. NEXT (>>|) button
37. ZOOM button
38. PROGRM button
39. GOTO button
40. TITLE button
41. SUBTITLE button
42. N/P button
43. RESUME button
44. SLOW button
45. EPG button
46. EXIT button
Page 19

PLAYBACK
How to start playback from the MENU screen
1. Press TITLE or MENU to access the menu screen.
2. Press navigation or the number buttons to select the
title.
3. Press the ENTER or PLAY button.
4. The DVD video player will start playback from the title
selected.
Note:
You also can input the assigned number of the title
to select it directly.
A title is generally a distinct section of a DVD
disc. For example the main feature could be title
1, a documentary describing how the film was made could
be title 2, and cast interviews could be title 3. Each title is
assigned a reference number enabling you to locate it easily.
How to stop playback ?
Press the STOP button. The player is pre-stopped. Two times pressing STOP and the
player stops completly.
Fast Forward or Fast Backward
Press << or >> during playback on the remote control and the unit changes the speed
of playback. The playback speed becomes double the normal speed. The playback speed
changes, each time you press the REV or FWD button.
Normal —> x2 —> x4 —> x8 —> x16 —> x32 —> Normal
Note:
The function is invalid on some DVD discs.
Chapter / Track
A chapter is a segment of a title such as a scene in a film or one interview in a series. Each
chapter is assigned a chapter number, enabling you to locate the chapter
you want. Depending on the disc, chapters may not be recorded.
When a title on a disc has more than one chapter |<< (SKIP or PREV)
or >>| (SKIP or
NEXT) a disc has more than one track, you can move to another chapter/track as follows:
1. Press SKIP or briefly during playback to select the next (or previous) chapter/track or
to return to the beginning of the current chapter/track.
2. Press SKIP twice briefly to step back to the previous chapter/track.
3. To go directly to any chapter during DVD playback, input the chapter/track number.
20
Page 20

PLAYBACK
How to change the camera angle?
Press the ANGLE button while playing back a scene recorded with multiple angles.
You may only press the ANGLE button when the angle icon is flashing on the DVD display.
Press the corresponding number of your desired angle.
The angle function will not work on DVD video discs that does not contains recorded with
multiple angles.
How to change the Audio languages?
Press the AUDIO button repeatedly during playback to hear a different audio channel.
By playback of a Video-DVD or a MPEG-4 file with multi-audio you can change the audio track
respectively the audio languages.
By playback of a VCD you can change the different audio channel (Stereo, Left, or Right).
PBC (Playback Control)
Playback control is available for Video CD (VCD) version 2.0 disc formats. PBC allows you
to interact with the system via menus, search functions, or other typical
computer-like operations. Moreover, still pictures of high resolution can be played if they are
included in the disc. Video CDs not equipped with PBC (Version 1.1) operate
in the same way as audio CDs.
Please press the MENU button for activating or deactivating the PBC function by VCD.
21
Page 21

PLAYBACK
REPEAT
You can play a title/chapter/all/track on a disc repeatedly. Press REPEAT during playback to
select a desired repeat mode. Depend on the kind of disc (Video-DVD, VCD or Data files)
you have different Repeat modes.
DVD Video Discs - "Repeat Chapter / Title / All / Off"
Chapter: repeats the current chapter. Chapter
Title: repeats the current title.
All : repeats all the tracks on a disc.
Off : does not play repeatedly.
Video CDs, MPEG-4, MPEG-1, MPEG-2, JPEG discs - "Repeat Track / All / Off"
Track : repeats the current track.
All : repeats all the tracks on a disc.
Off : does not play repeatedly.
Music disc - Track / Folder / All / Off
Track : repeats the current track.
Folder: repeats the current folder.
All : repeats all the tracks on a disc.
Off : does not play repeatedly.
Notes:
1. On a Video CD with PBC, you must set PBC to Off to use the repeat function.
2. If you press SKIP/NEXT (|<< or >>|) once during playback, the repeat function will be
cancelled.
How-to Repeat a specific Segment
To repeat a specific segment you can use the A-B repeat function. The
function is by pressing A-B available.
1. Press the A-B button at the beginning of the segment in which you want to repeat
playback (point A) (To be set SHIFT on).
2. Press the A-B button again at the end of the segment (point B)
The DVD video player will automatically return to point A and start to repeat
playback of the selected segment (AB).
3. Press the A-B button to cancel the A-B repeat function The DVD video player will
resume to normal playback.
22
Page 22

PLAYBACK
ZOOM
This DVD video player allows you to zoom into a picture as well as shift the zoom point.
Press ZOOM during normal playback. The player magnifies in the center of the picture. If you
press during zoom playback, the zoom point shifts.
Pressing more than one time the ZOOM button the Zoom function changes in the following
sequences´: Normal —> x2 —> x4 —> Normal
Note:
Zoom may not work on some disc.
Checking the operational status
This unit allows you to view the operational status and disc information on your screen by
pressing the DISPLAY button. With this function you can view on your screen the following
by a Video-DVD:
Title Information, for example the 1st title of 12 is active
Chapter number, for example the 6th chapter of 39 is in playback
Time information for title and chapter are displayed when the
DISPLAY button is
pressed again (Title Elapsed, Title Remain, Chapter Elapsed, Chapter Remain)
The last information shows besides the title, chapter and time the following additional
information like the active language (here English), which audio format (here AC3 2
CH), which TV system (here NTSC) and if the angle option is available.
Volume Control
1. Change the volume by using the right and left button on the remote control.
2. Change by the big volume knob on the front side of the unit.
23
Page 23

PLAYBACK
How-to set Titles, Chapters, or Tracks in a Favorite Order
This function allow you to setup the
order you want to play. During
playing, set the NAVIGATION to off,
then press PROG, the program menu
will display.
Press number button or to set the order you
want, then press ARROW buttons
the unit will play the titles as the
titles as the order you setup.
Note:
You can select less than 20 titles. Press
PROG, the programme menu will display.
Search or Go To
The on-screen menu enables comfortable access to any sections of a medium. To do this,
proceed as follows:
1. Select the desired category by repeatedly pressing the button GOTO-button.
2. Now move to the point from which the replay should start. Depending on the type of
medium this may be a track number, a chapter or even a point in time. The input
must be made with the Numerical Buttons. Playback begins after a short time.
Selecting Subtitles
You have the option to select a preferred subtitle from those included on the DVD video disc
by pressing the SUBTITLE button.
Press the SUB-T button during playback.
Press the SUB-T button during playback until the subtitles disappears.
By using the subtitle function in MPEG-4 video in combination of SRT
subtitles, the filenames should be in this way:
Movie.avi
Movie.eng.srt
Movie.ger.srt
24
Page 24

PLAYBACK
Playing in SLOW-Motion
A disc can also be played back in slow-motion. Press the SLOW button during playback The
playback speed becomes 1/2, 1/4, 1/8, 1/16 or 1/32 of the normal speed each time you press
the SLOW button.
Notes:
During REV, FWD and slow-motion playback, the sound is muted.
The function is invalid on some DVD discs.
Changing the Aspect Ratio
Sometimes it is necessary to change the aspect ratio, especially if you use the 7 inch LCD
Screen for watching video content. If you think, that the content is not scaled
correctly, maybe every heads of the people are stretched or are compressed than you can
change the distorted viewing by pressing the 4:3/16:9 button.
Resume function
It will continue to play from where it stopped after pressing the RESUME Button says memory
playing
Mute
You can mute the unit by pressing the MUTE button. The sound switches off. A sign will be
displayed on the screen. To activate the sound, press again the MUTE button.
Switch the Screen on/off
If you not need the 7 inch LC screen of the unit, because you are connected to a TV screen
or you listen just only Music, you could switch off the screen by pressing the TFT ON/ OFF
button. To activate the screen, press this button again.
25
Page 25
PLAYBACK
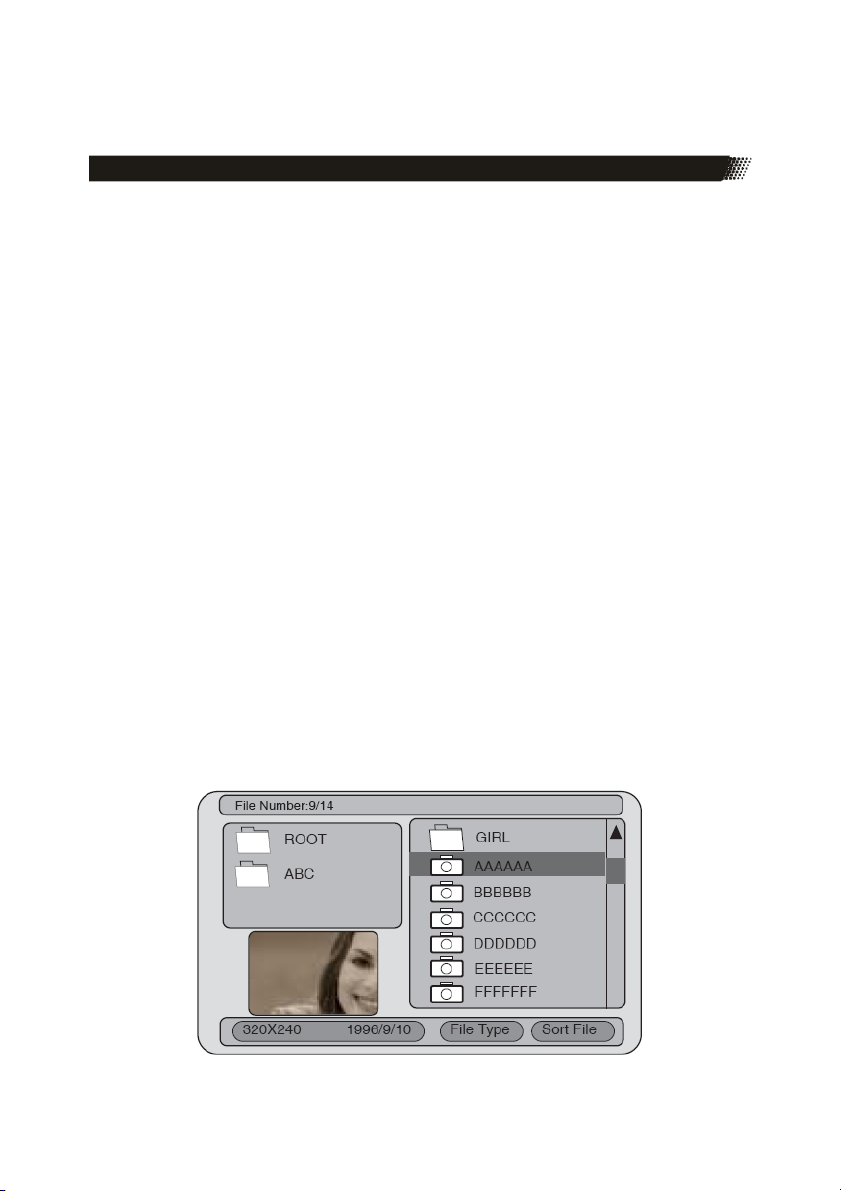
Playing Back Your Picture CD or JPEG files
You can use your DVD player to view photographs stopped on a CD-R. the photographs on
the disc need to be saved in the jpeg file format.
1. Place the CD on the disc tray.
2. Select a folder or a picture contained on the CD. After the CD is loaded, a menu
will appear on the screen. Press UP or DOWN to select a folder, and pres ENTER/
PLAY to view folder contents
3. Start playback When a JPEG CD is loaded, an automated slide show is
launched, Each picture in the current directory will be displayed consecutively in a
slide-show fashion and will be scaled to fit most of the screen.
Press "STOP", you can see twenty slideshow transition modes are provided.
The pictures will be displayed in a
style of a slideshow, there are many styles of transition effects such as Cover Up,
Cover Down, Cover Left, Cover Right, UnCover Up, UnCover Down, UnCover Left,
UnCover Right, Wipe Up, Wipe Down, Wipe Left, Wipe Right, Push Up, Push Down,
Push Left, Push Right, Random, No Effect etc., use the ANGLE button to change
the slide style.
4. Rotate an image During the slide show, you can use arrow keys to rotate an image:
Press left to rotate the picture to left for 90°
Press right to rotate the picture to right for 90°
Press UP, the left side of the picture will turn to right.
Press down, the picture will be upside down.
5. Zoom This feature allows you to view a picture at 25%, 50%, 100%, 150% or 200%
in several increments. Press the ZOOM button. An on screen message (―Zoom On‖)
will verify your selection. Use narrow keys to control the amount of zoom in and out.
Press the direction keys to shift the zoom point. With Zoom Off, the picture is scaled
to fit most of your TV screen.
6. Menu During the playback, press MENU to access thumbnail menu. For previewing
JPEG files, press MENU, a menu will appear on the screen. Press UP or DOWN to
select a folder, and press ENTER/PLAY to view folder contents (shown in left
column as below).
26
Page 26

PLAYBACK
PLAYING Music with compressed Audio-Formats
1. Insert an CD with compressed music files, the DVD player will
initialize the disc when the tray is closed and the directory (folder)
will be shown in an MENU on screen.
2. Press UP/DOWN to select and highlight a file (song).
3. Press ENTER to play the file.
Playback Content from USB
This unit have a USB jack, when no disc in the player, you can insert a
USB DISC or an Mp3 Player with USB Interface to play the Mp3 music
or and JPEG files. All the function is the same to play a disc.
Plug the USB Flash Stick to the USB connector and press the DVD/
USB/DVB button to activate the selection menu of DVD,
USB and DVB. Move with the UP and DOWN button to the USB area
and start them by pressing the ENTER button.
The unit start to read the table of content (TOC) of the storage and
displays the results into the file browser. By using the navigation
buttons you can choose the content which you want to playback and
start the playback by pressing the ENTER button.
Note:
To avoid damage, do not pull out the USB when you playback the files
in the USB. If you want to pull out the USB, please press STOP button
first.
27
Page 27

SETUP DVD
For entering into the players settings, please press the SETUP button of the remote control.
For choosing the different option and different sub menus please uses the
navigation buttons. If you have selected a submenu, press ENTER to
activate them. After the first pressing of the SETUP button you entering the Main Menu.
Note:
In the DVD setup and System setting options. If you press SETUP into the DVD setup and
System setting option when playing disc, the some options has no effect.
Main Menu
The Main Menu includes settings for
DVD, DVB, System and some Games.
If you had activated from the DVD the setup
function, than the DVB settings
are not
active. Similar by starting the settings from
DVB-T, the setup for DVD is not active.
Choose the DVD Setup and press ENTER
for come into the DVD settings.
DVD Setup
On the left side you can see three main
setup settings, like Language, Audio and
Custom settings. The yellow framed field
shows the activate settings.
Language
In the DVD Setup-language Setup, you
can setup the Menu, Audio, Subtitle,
External Subtitle. Press the UP,
DOWN and LEFT, RIGHT arrow buttons
to highlight the icon of the desired page,
then press the DOWN or RIGHT arrow
button to activate that page.
By the different categories Menu, Audio and Subtitle you can set the prefer languages for the
playback of a Video-DVD.
Note:
If your preferred language is not available, the disc default languages will be played.
28
Page 28

SETUP DVD
External Subtitle
If you want to playback MPEG-4 video files with
external subtitles you can choose which
kind of special characters are displayed. For
English, French, German or Spanish external
subtitle, please choose the option
―Western
European‖. For Russian you need the option ―Cyrillic‖ and for subtitles for Poland, Czech or
Slovenia you should choose the option ―Central European.
Audio Setup
In the DVD setup-Audio Setup, you can setup
the Digital Out, Analog Out, Downmix, Center,
Rear. Press <UP>, <DOWN> and
<LEFT>, <RIGHT> arrow buttons to highlight
the icon of the desired page, then press the
<DOWN> or <RIGHT> arrow button to activate
that page. For example, if you want to setup
the Rear setup, press <DOWN> button to
highlight the Rear Option, the Rear setup page
will be displayed on the screen.
Digital Out
Here you specify the settings for the digital Audio output.
SPDIF/Off: Output of an analogue Audio signal, but no digital signal.
SPDIF/RAW: Output of a digital Audio signal. Use this setting if your amplifier is no two-
SPDIF/PCM: Output of a digital Audio signal that is converted to a 2-channel signal. Use this
Note:
If there is no audio output, even though you connected the player to an amplifier, you will most
likely have chosen an incorrect setting for the Audio output.
Downmix
This option allows you to set the stereo analogue output of your DVD Player.
LT/RT: Select this option if your DVD Player is connected to a Dolby Pro Logic decoder.
Lo/Ro (Stereo): Select this option when output delivers sound from only the two front
speakers.
channel stereo amplifier.
setting if your amplifier is a two-channel stereo amplifier.
29
Page 29

SETUP DVD
Custom Setup
In the DVD setup-Custom Setup ,you
can setup the Parental Ctrl and
Angle Mark. Press the UP, DOWN and
LEFT, RIGHT
arrow buttons to highlight the icon
of the desired page, then press
the DOWN or RIGHT arrow button
to activate that page. For example, if
you want to setup the Angle Mark setup,
press DOWN button to highlight the Angel
Mark Option, the Angel Mark setup page will
be displayed on the screen.
Parental Control
The parental control has eight levels to set:
1 - Kids material. Recommended especially for children and viewers of all ages.
2:G - General Audience. Recommended as acceptable for viewers of all ages.
3:PG - Parental Guidance suggested.
4:PG13 - Material is unsuitable for children under age 13.
5:PG and 6:R - Parental Guidance-Restricted. Recommended that parents
restrict
children under 17 from viewing or allow to view only when supervised by a parent or
adult guardian.
7:NC17 - No children under age 17. Not recommended viewing for children under
age 17.
8 - Mature material. Should be viewed only by adults due to graphic sexual material,
violence or language.
If you want to change the parental ctrl setting, enter the user‗s age control item and then
enter our digital password. The default password is 6666 (if you are using this player for the
first time, just input this code). If the input code has been confirmed, the
level setting up menu will appear. Move the cursor to choose the expected level and
press ENTER button to confirm and memory it. Move the cursor to the ―ENTER‖ and press
ENTER button to confirm and withdraw to the user setup menu or press ENTER button to
directly with draw from the operation.
ANGLE MARK
There are On and Off the two choices for this item. If in the ON mode, when play a disc
which the content is multi-angle shot, you may press the ANGLE button
on the remote control to enjoy the scene in different angles.
30
Page 30

SYSTEM SETUP
System Setting
The System settings are general setting
which are valid for DVD, USB and DVB. In
principle, all settings between DVD and USB
are the same.
Please navigate in the main menu by using
the UP and DOWN button to the
System Setting and activate the submenu
by pressing the ENTER button.
Than you entering the system setting of the
unit. On the left side are ordered the
main categories like OSD, Display and Preferences.
OSD
You can select your own preferred language settings. This DVD system will automatically
switch to the selected language whenever you load a disc. If the language selected is not
available on the disc, the disc's default language will be used instead. The OSD language in
the system menu will remain once selected.
Display Setup
In the main menu ―Display Setup‖ you can
modify the settings for TV Standard, Display
Type, Video Output, Brightness and Contrast.
TV Standard
Selecting the colour system that corresponds
to your TV when AV outputs. This
DVD
Player is compatible with both NTSC and
PAL. In order for a DVD disc to play on this
Player, the colour system of the Disc, the TV
and the DVD Player should match.
PAL - Select this if the connected TV is PAL system. It will change the video signal of a
NTSC disc and output in PAL format.
NTSC-Select this if the connected TV is NTSC system. It will change the video signal of a
PAL disc and output in NTSC format.
31
Page 31

SYSTEM SETUP
Display Type
Set the aspect ratio of the DVD Player according to the TV you have connected.
4:3 PS
If you have a normal TV and want both sides of the picture to
be trimmed or formatted to fit your TV screen.
4:3 LB
If you have a normal TV. In this case , a wide picture with
black bands on the upper and lower portions of the TV
screen will be displayed.
16:9
If you have a wide-screen TV.
Video Output
According to the kind of connection to you r external
screen (TV), you can choose the video output settings.
CVBS+S-VIDEO
Please use this setting by using CVBS or S-Video
connection to your TV set. If you connect the TV by
SCART and the SCART input is not compatible to RGB, you should also uses this setting.
CVBS+RGB
Please use this setting if you had the TV connected by SCART and the SCART input of the
TV is compatible to SCART RGB.
CVBS+YUV
Please use this setting, when you had connected the TV set by component cable and you
want to display an interlaced signal.
Brightness
According to the brightness you can choose Normal,
Bright and Soft.
Contrast
Use the UP and DOWN button to move the scroll and adjust the
contrast.
32
Page 32

SYSTEM SETUP
Preference
In the System Setting Menu-Preference
Setup, you can setup the UI Style, Change PIN,
Default Type, and Default options. Press the
UP, DOWN and LEFT, RIGHT arrow buttons
to highlight the icon of the desired
page, then press the DOWN or RIGHT arrow
button to activate that page. For example, if
you want to setup the Default setup,
press Down button to highlight the Default
Option, the Default setup page will be
displayed on the screen.
UI Style
With this option you can change the outlook of the settings.
Change PIN
In this option you can change the old password to a new
one. After entering the option „Change PIN― you see a new
window. Here you have to be insert the old PIN, the new PIN
and confirm the new PIN. To change to the new PIN,
you have to be navigate to the „OK― field and
confirm by
pressing the ENTER button.
Note:
The default password is: 6666
Default Type
In the Default Type options, you can choose the
DVD MODE, USB MODE, User Select MODE and Last
operation Type MODE.
.
Note:
In the Default Type, If you choose the DVB MODE. That
next power on the PLAYER will direct enter
DVB MODE, no again display the SOURCE list.
Default
This option restores the device with the Factory Settings. After activate the Factory Setting the
player work on default state.
33
Page 33

SYSTEM SETUP
Game
Please navigate in the main menu by using
the UP and DOWN button to the Game and
Activate the submenu by pressing the
ENTER button.
Here you can play four different games,
Tetris, Mine, Rush Hour and Calendar.
34
Page 34

Troubleshooting DVD
Symptom Correction
No power Check if AC adapter of power is connected securely.
No sound Ensure that the equipment is connected properly
No key operation Turn the unit off and then back to on.
No playback Wrong disc, please use only DVD, CD or ISO Data disc
Interference or
scrolling
No remote control Are the polarities of the batteries correct?
Switch the device On by pressing the power button.
Ensure that the input settings for the TV and stereo
system are proper.
Please make sure, that the audio track exists on the
disc.
Control the volume.
Disconnect the unit from power and from battery and
connect them again.
The disc may be dirty and require cleaning.
Ensure that the disc is installed with the label side up.
The disc has too many scratches.
Remove the laser pickup protection on the disc tray.
The DVD+/-RW should be finalized.
Wrong region code by the Video-DVD
Cancel the parental lock function or change the
parental lock level.
Check TV type is correct: PAL/NTSC.
Adjust the vertical hold on your TV.
Batteries are depleted. Please uses new one.
Point the remote control unit at the Infrared sensor and
operate.
Remove the obstacles between the remote control and
Operate the remote control unit at a distance of not
The Infared
sensor
more than 5 meters from the Infrared sensor.
35
Page 35

DVB-T
Please press the DVD/USB/DVB button on the remote control to appear the menu, where
you can change to DVB. Navigate with the UP or DOWN button the DVB and activate DVB
by pressing the ENTER button.
If you use DVB-T the first time, than the system entered to the First Time Installation.
First Time Installation
After all the connections have been
made properly, switch on your TV.
Make sure the
receiver is connected to the mains and press
<POWER> to switch the receiver on. If
you are using the receiver for the
first time, a First Time
Installation menu will be
displayed to guide you through the
initial setup. Use the remote controller to
finish the setup.
At the First time installation menu, select
―YES‖ and press ENTER button
on the remote controller to proceed.
Enter your regional settings, include your
Country, Language, Time Zone.
Please change the country settings in
order to your active country.
Then select ―NEXT‖ to proceed.
Please navigate to ―YES‖ and confirm
by pressing the ENTER button. Than
the Auto search starts.
Note:
The previous channel list will be deleted and
replaced by the new one.
36
Page 36

DVB-T
In case you want to stop the scanning, press
the RETURN button. The channels
already found will still be stored.
When finished, all active channels
found will be stored automatically.
The last found channel will be
played.
DVB-T Functions
EPG
The built-in DVB-T receiver has an electronic programme magazine. This makes it possible
to depict the information of the individual channels on the screen. You
can acquire an overview of the programmes that are currently being transmitted or the
programmes of the day.
The EPG Function allows you:
Press the EPG button
to show information on programme content on the screen.
to highlight programmes for which a reminder window is automatically shown at the
beginning of the programme.
Videotext
Press the TITLE-button to call up the teletext function. Enter the desired teletext page with
the help of the numerical buttons. The number you have entered is shown in the top lefthand corner of the screen. After you have entered the desired teletext page number
your
television set searches for the page. As the teletext pages cannot all be transmitted at the
same time it may take a few seconds until your set has found the page.
In order to turn off the videotext, press the TITLE button again.
Number buttons
For DVB mode, use the number buttons 0 to 9 to directly input a two-digit channel number.
The 10+ key has no effect in this mode.
TV/RADIO
In DVB mode, press TV/RADIO to switch between television and radio mode
(not in all
countries).
37
Page 37

DVB-T
DVB-T Functions
AutoScan
With the AUTO button you get direct access to the AutoScan.
Information
By pressing the DISPLAY button you can display different information like TV channel name,
frequency, bandwidth, which PID has the Audio and Video, signal quality and signal strength.
ENTER
Über die Taste ENTER geben Sie im Menü einen ausgewählten Menüpunkt ein.
Language
In DVB mode, use this button to select different languages for the current channel.
Subtitle
By pressing the Subtitle button you can activate the subtitle. Please note, that not all TV
channel and countries transmit subtitle information.
Channel list
By pressing the menu button you get direct access to the TV channel list.
38
Page 38

SETUP DVB-T
Program List
Press the SETUP button, the DVB main
setup menu appears the screen, then press
the DOWN button to highlight the DVB Menu
option.
Press the UP and DOWN button move on the
DVB Menu and to enter button to enter the
DVB Menu-Program list option, appear the
screen.
Program List
In the Program list, you can setup the TV
Program, Music Program and Sort options.
Press the UP, DOWN and LEFT, RIGHT
arrow buttons to highlight the icon of the
desired page, then press the DOWN or
RIGHT arrow button to activate that page.
For example, if you want to setup the
Sort setup, press DOWN button to
highlight the Sort Option, the Sort menu
page will be displayed on the screen.
TV Program
All active channels are listed in the Program List, allowing you to make your own favourite
channel group, move, delete channels.
Creating Favourite Channel Groups
This feature allows you to group
your favourite channels. To create your
favourite groups:
a. Select the channel which you
would like to add to the group and go
to the
―Favour‖ column.
b. When the ―Favour‖ column of the
desired channel is highlighted,
one red heart symbol will appear
after press the ENTER button.
Pressing the <ENTER> button
again will un- select the channel
of the favourite group.
c. Once your favourite group is created, you can press the FAVORITE keys to quickly
access your favourite channels.
39
Page 39

SETUP DVB-T
Program List
Moving a Channel
a. Select the channel which you like to
move and go to the ―Move” column.
b. Press ENTER button and a ¡¡ symbol
will be displayed.
c. Use the UP / DOWN key to move the
channel to a desired position.
d. Press ENTER button again will
40
be exit the moving channel mode.
Deleting a Channel
a. Select the channel which you like to
delete and go to the ―Del” column.
b. Press ENTER button and an X
symbol will be displayed. Repeat this
step in the channel to be deleted.
c. Press SETUP or RETURN button
and the marked channel will be
deleted.
d. Press ENTER button again will
exit the deleting channel mode.
Music Program
The Music program options are the same like the TV Program options.
Sort
Press the DOWN button to highlight the Sort options, yon can choose the channels Sort
style. As:
By Name
By Service ID
By Channel number
Page 40

SETUP DVB-T
Program Search
Press the SETUP button, the DVB main setup menu appears the screen, then press the
DOWN button to highlight the DVB Menu option.
Press the UP and DOWN button move on the
DVB Menu and to enter button to enter the
Program Search option, appear the screen.
Program Search
Two options are available, Automatic and
Manual Search.
Automatic Search
The operation is the same like the First Time
Installation. Please refer this section of the
user manual.
If you want to start the Automatic Search you should
confirm by pressing the ENTER button on the ―OK‖
field. Please the picture on the right side.
Manual Search
If any channel is missing after auto search, or
you want to add newly launched channels,
You can use ―Manual Search‖ to scan the
desired channels. To manually search the
target channel, you must know its
parameters, e.g., the channel number.
After the channel is found, it is appended to
the current channel list.
a. Enter the ―Manual Search‖ menu via
―Main Menu > Program
Search > Manual Search‖.
b. Specify the appropriate channel
number in the ―Channel No‖ field by press DOWN and UP button.
Enter your selection, the frequency and bandwidth values are changed accordingly.
c. Select ENTER button to start manual search.
d. If no signal is found, a message indicating no signal will appear. Otherwise scanned
channel will be saved and appended to the current channel list.
41
Page 41

SETUP DVB-T
Parental Control
Press the SETUP button, the DVB main setup menu appears the screen,
then press the
DOWN button to highlight the DVB Menu option.
Press the UP and DOWN button move on the DVB Menu and to enter button to enter the
Parental Control option, appear the screen.
Following submenus are available, Channel Lock and Parental Control.
Parental Control
This feature allows you to prevent children or
unauthorized people from watching
channels.
Enter ―Main Menu > Parental Control”. First,
you will need to enter PIN as
prompted to use the parental control menu.
Note:
The default PIN is 6666.
After correct PIN input, you can activate the ―Channel
Lock‖ by confirmation YES.
Channel Lock
Allows you to activate or de-activate the overall parental control. When set to ―YES”, all the
channels with locking settings will be locked.
Parental Setting
In the channel list, select the channel
you want to lock and then press
ENTER. A padlock symbol will be
displayed. To remove the lock, press ENTER
again.
42
Page 42

SETUP DVB-T
System Settings
Press the SETUP button, the DVB main setup menu appears the screen,
then press the
DOWN button to highlight the DVB Menu option.
Press the UP and DOWN button move on the DVB Menu and to enter button to enter the
System Settings option, appear the screen.
The different submenus are:
Country
Language
GMT Usage
Time Zone
System Schedule
Country
Please choose the country in which the device is placed. This setting has a direct influence of
the channel search.
Language
Please choose the Audio and subtitle language.
Navigate to the option ―Language‖ and activate them by pressing the ENTER button. You see
a new submenu, where you can choose the first Audio and second Audio language and
the Subtitle language.
Audio
If neither of your selected language is available
on the program transmitted, the main language of the
program will
be used.
Subtitle
If your selected language is not available on the program transmitted, the main language of the
program will be used.
Exit
You can choose the Exit options to return the System setting.
43
Page 43

SETUP DVB-T
System Settings
GMT Usage
Allows you to enable/disable Greenwich Mean Time (GMT) usage. If you know the
GMT
time zone of your location, set ―GMT usage” to ―ON” and select an appropriate time zone. If
you prefer to set the time manually, select ―OFF” in ―GMT usage” item and then manually
select the date and time.
Time Zone
Select an appropriate time zone to
display the local time correctly. Both
EPG and system schedule need a correct
time zone setting.
System Schedule
Press the DOWN button to highlight the
System Schedule options, then press
the ENTER button to into the System
schedule setup.
This feature allows the receiver to
automatically switch on and tune to
a pre- specified channel for a pre-set length
of time. Up to10 tasks can be scheduled.
a. In the Schedule pane, use the UP /
DOWN key to select a task and use
RIGHT/ LEFT key to switch between
Inactive and Active.
b. Press ENTER to enter the detail page.
c. Enter the following settings as required. Use the UP / DOWN key to move between
setting items, the RIGHT / LEFT key to switch between available
selections and numeric keys to enter numeric value.
Mode: You can activate the system schedule or deactivate them.
Frequency: Set as Once, Daily or Weekly.
Time Setting: Enter the start and end time that automatically turns on and off the
receiver.
Channel Type: Select TV or radio channel as required.
Channel No: Select the channel to be played at scheduled time.
d. When the setting is done, press SETUP or RETURN to save the changes.
44
Page 44

Troubleshooting DVB-T
Any problems?
Our custom service will help you. Did you already read the Troubleshooting pages?
No DVB-T Signal
Please check if the unit is in DVB-T mode? If not please switch to this mode.
Bad reception quality?
Please, align your antenna optimally. Use an antenna with active amplifier (house antenna or
roof antenna). If you have moved the unit, adjust the antenna again or connect an
active antenna.
No TV programs?
If there are no more programs shown in the Channel list. Please start the automatic search
again.
Remote control does not work?
Please, direct the remote control upon the device. If the problem continues, please change the
batteries.
Note:
In areas with less DVB-T signals the application of an amplifier is recommended to the
reception of all available TV channels.
Picture Quality
Die picture quality by DVB-T depends on the different areas and the different conditions.
Some parameters are important for the picture quality, the bit rates, the resolution and the
reception of the transmitted DVB-T signals.
Bit rate
The bit rate is fixed by the TV broadcaster and can be different between each TV program.
Also the different TV broadcasters define the bit rate different to each others. If you see by
watching DVB-T strong mosaics structures, artifacts or an un sharp picture, than you can try
to increase the Signal strength and Signal quality by searching a better position of the indoor
aerial. Maybe you can try also to change a passive indoor aerial to an active indoor aerial.
But, if you can realizes optimal condition by receiving the DVB-T signals and you have
anymore the artifacts or mosaics structures, than is the transmitted bit rates to low.
In Germany the values are very different by the bit rates, for example ZDF (2700 until 4500
kbps), ARD (2000 until 4500 kbps), HR (1800 until 3500 kbps) and Private TV Stations (1800
until 2700 kbps). If the bit rate is higher, than the picture quality is mostly better and the picture
is more than less by artifacts or mosaic structures.
Resolution
The second influence by the picture quality is the transmitted resolution. If the resolution is
higher than you can see a sharper picture. For example, ARD / ZDF (720x576 or
704x576 (that‘s PAL Full D1 resolution)) or Other (544x576or 528x576).
45
Page 45

Analogue TV Tuner
With the UNIT you can also watch TV by using the analogue TV Tuner. Here you can
connect the device to a roof antenna or to the analogue cable (CATV).
How to change to the analogue TV tuner?
Press the SOURCE button to select the ATV mode.
If you uses the first time the analogue TV Tuner, you should start to search the TV stations.
For entering into the ATV Setup page, please press the SETUP button. The ATV menu
appears on the screen.
AUTO SEARCH
Press the DOWN
Search‖ and start the automatically searching by
pressing the RIGHT button.
Notes:
The
program number 0.
If
while during the
new channel is found and will be save into
the channel list.
If a weak signal received the channel
may be skipped and will be not save into
the list.
To stop the searching, you can press the SETUP button.
To start the automatic search you can press the AUO button on the remote control.
button
to
Auto Search always start from the
the
indication frequency
searching, it
select ―Auto
stopped for a
means a
MANUAL SEARCH
Press the DOWN
RIGHT button.
Note:
Please refer the comments by the AUTO SEARCH.
button to select ―Manual Search‖ and start the searching by pressing the
FINE
If the search run does not match exactly
have some little distortion, you can adjust the ´channel frequency by the Fine Tuning.
Please use for the fine tuning the RIGHT and LEFT button.
the right frequency
Note:
One time pressing of the RIGHT and LEFT button decrease or increase the frequency for 50
kHz.
46
an
you
Page 46

Analogue TV Tuner
Position
Press
The current channel number and the
channel frequency
bottom
To see the different channel and there
correspondent
LEFT or
number and the displayed frequency.
SWAP
Press
Here you can move the channel to different position.
Note:
This function is very simple and might be not comfortable.
S-SYS
Press the DOWN button to select „S-SYS―. Here you can change the PAL TV System to the
country
―DK‖,
―BG‖,
colour system will be change. Please refer the table.
SKIP
Press the DOWN button to select „Skip―. With this option you can skip a TV channel.
47
the
of
RIGHT button to
the
specific
―L‖ or
Sign
I
DK
BG
L
L‗
DOWN
button
to
select
will
be
the menu.
frequency, please press the
DOWN
requirement.
―L‘
―. By
TV Norm
SECAM-L
SECAM-L‗
displayed
change the channel
button
to
select
The
using one of the characters for the PAL TV System the audio and the
PAL-I
PAL-DK
PAL-BG
„Position―.
at
different
Video -Audio Distance
the
„Swap―.
options
6.0 MHz
6.5 MHz
5.5 MHz
6.5 MHz
6.5 MHz
are
shorten
by
the
Most European Countries
Most European Countries
Country
France
Russia
character
UK
―I‖,
Page 47

Troubleshooting Analogue TV Tuner
No Signal
1.
2.
3.
Bad reception quality?
1.
2.
No TV programs?
1.
2.
Remote control does not work?
Please, direct the remote control upon the device. If the problem continues, please change
the batteries.
Note:
In many areas the analogue terrestrial signal is switches off. Please use for this region the
DVB-T TV tuner.
48
Please check if the UNIT is in ATV mode? If not please switch to this mode. Please
press the SOURCE button until ATV appears on the screen.
Please
control
the
antenna).
―S-SYST‖
using different TV norms.
Please make sure, that you receive really analogue TV signals.
Please, align your antenna optimally. Use an antenna with active amplifier (house
antenna
or
again or connect an active antenna.
Please fine tune the distorted TV channel.
Please start the automatic search again.
Please control, if this TV station gets a SKIP setting. If yes, please deactivate them.
roof
setting.
have
Please
moved
If
you
note,
the
that
unit,
different countries
adjust
the
antenna
Page 48

FM RADIO
With the unit you can listen to the radio by using the FM Radio Tuner. Please connect the
player to a roof antenna or plug the FM antenna into the FM antenna jack.
How to change to the FM Radio?
Press the SOURCE button to select the FM mode.
If you use the FM Radio for the first time, you
should start to search the Radio stations. For
entering into the FM Radio Setup page,
please press the FM/ MENU button. The FM
Radio menu appears on the screen.
AUTO SEARCH
Press the DOWN button to select ―Auto Search‖
and start the automatically searching by pressing
the RIGHT button.
Notes:
The Auto Search always start from the
program number 0.
If the indication frequency stopped for a
while during the searching, it means a new channel is found and will be save into the
channel list.
If a weak signal received, the channel may be skipped and will be not save into the
list.
To stop the searching, you can press the MENU button.
To start the automatic search you can press the AUTO button on the remote control.
MANUAL SEARCH
Press the DOWN button to select ―Manual Search‖ and start the searching by pressing the
RIGHT button.
Note:
Please refer the comments by the AUTO SEARCH.
Position
Press the DOWN button to select „Position―. The current channel number and the channel
frequency will be displayed at the bottom of the menu.
To see the different channel and there correspondent frequency, please press the LEFT or
RIGHT button to change the channel number and the displayed frequency.
49
Page 49

FM RADIO
FINE
If the search run does not match exactly the right
frequency an you have some little
distortion, you
can adjust the ´channel frequency by the Fine
Tuning. Please use for the fine tuning the RIGHT
and LEFT button.
Note:
One time pressing of the RIGHT and LEFT button
decrease or increase the frequency for 50 kHz.
FM RADIO
Press the DOWN button to select „FM-Radio―. The
options are Mono and Stereo.
MEMORY
Press the DOWN button to select „Memory―. If you had search a Radio station by manual
search, you can store them with the option Memory. Press the LEFT button to select
the channel number.
50
Page 50

Troubleshooting FM RADIO
Any problems?
Our custom service will help you. Did you already read the Troubleshooting pages?
No Signal
1. Please check if unit is in FM Radio mode? If not please switch to
this mode. Please press the SOURCE button until FM RADIO appears on the screen.
2. Please make sure, that you receive really analogue FM Radio signals.
Bad reception quality?
1. Please, align your antenna optimally. Use an antenna with active amplifier (house
antenna or roof antenna). If you have moved the unit, adjust the antenna again or
connect an active antenna.
2. Please fine tune the distorted Radio channel.
No Radio programs?
1. Please start the automatic search again.
2. Please search manually a Radio station and store them by the Memory option.
Remote control does not work?
Please, direct the remote control upon the device. If the problem continues, please change the
batteries.
51
Page 51

TFT Settings
The unit can adjust the own 7 inch screen by various settings.
How to enter the TFT Settings?
Press the FUNCTION button to appear the setup.
To select one option, please uses the UP and
DOWN button until the ―finger mark‖ attains the
option which do you want to change. For adjusting
the option please use the RIGHT and LEFT button.
BRIGHT
Press the DOWN button to select „Brightness―.
Please adjust the brightness carefully.
CONTRAST
Press the DOWN button to select
„Contrast―. Please adjust the contrast carefully.
COLOR
Press the DOWN button to select „Color―. Please adjust the colour carefully.
Hue
Press the DOWN button to select „Hue―. Please adjust the hue carefully.
Note:
Normally the screen is adjusted in an optimal way. All changes here are global changes,
because all content which is displayed on the screen is affected. Please use the changes
by brightness, contrast, colour and hue carefully.
ZOOM
Press the DOWN button to select „ZOOM―. With this option you can forces that all content
is displayed with 16:9 or 4:3 aspect ratio. Sometimes it is necessary to change from
16:9 to the 4:3 setting, if for example the DVD-Player or the DVB-T does not display the
content in a correct aspect ratio.
Note:
You can also change the aspect ratio of the 7 inch screen by pressing the 4:3/16:9 button.
52
Page 52

TFT Settings
S-COLOR
Press the DOWN button to select „S-Color―. With this option you can adjust the colour
system for PAL, NTSC or SECAM. If you not sure, which setting you need, please use the
AUTO setting.
LANGUAGE
Press the DOWN button to select „Language―. Here you can change the OSD language for
TFT Settings. To change the option, please press the ENTER button on the remote control.
DEFAULT
Press the DOWN button to select „Default―. Press the ENTER button to restore the factory
settings for the TFT screen.
53
Page 53

Specification
General
Power
AC: 100-240 V AC 50/60 Hz
Power consumption: 80 W / Stand-By 8 W / OFF = 0 Watt
Dimension: Main Unit: 245(D) x 185(W) x 115(H) mm
Speaker : 235(D) x 120(W) x 150(H) mm
Weight: 8.3 kg including speakers
Screen
Display: 7 inch TFT LCD
Resolution: 480 x 234 Pixel
TV Norm: PAL, NTSC
Tuner
TV Tuner: LG Hybrid Tuner
DVB-T TV-Tuner
Input Frequency Range
VHF: 174 - 230 MHz (Channel 5—12)
UHF: 470 - 862 MHz (Channel 21—69)
Bandwidth: 7 or 8 MHz
Input Signal Level: -75 - -20 dB
RF Input Connector: IEC169-2 type, F type
Input impedance: 75Ω
Demodulation Mode
Waveform: COFDM
Demodulation: QPSK, QAM16, QAM64
Transmission Mode: 2K, 8K
Guard interval: 1/4, 1/8, 1/16, 1/32
Code rate: 1/2, 2/3, 3/4 ,5/6 ,7/8
Video, Audio decoding
Video decoding: ISO/IEC13818-2 MPEG2 (MP@ML) Compatible
Video resolution: PAL 720 × 576
NTSC 720 x 480
Video input code rate: 15Mbit/s Max.
Teletext: Support DVB-ETS300472
Audio decoding: ISO 11172-3
Audio Track: Stereo, Left, Right
Audio Sample rate: 32, 44.1, 48 KHz
Radio Tuner
Frequency 87.5 - 108 MHz
S/N Ratio > 46 dB
Monophonic > 46 dB
54
Page 54

Specification
DVD-Player
TV System NTSC/PAL
Resolution Ratio Greater Than 500 lines
Video S/N Ratio 65 dB
Frequency Response 96 kHz / 24bit
Audio S/N Ratio 95 dB
Degree of Distortion <0.01%
D/A Converter 192 kHz / 24 bit
Video Out 1 V p-p
S-Video Out Y: 1 V p-p (75)
S-Video Out C: 0.3 V p-p (75)
Speaker
Diameter 3 inch
THD Monophonic 2%
THD Stereo 3%
Frequency Response 30 Hz - 10 kHz +/- 1 dB
Resolution 35 dB (1 kHz)
Amplifier
Output power: 2x 20 Watt (4 Ohm)
Frequency Response: 60 Hz - 20 kHz +/- 3 dB
S/N Ratio > 76 dB
Input Sensitivity 350 mv, 47k
Channel Resolution > 30 dB (Normal)
Interface
Video: CVBS (RCA), S-Video, SCART, YUV component (RCA)
Audio: Stereo (RCA), digital coaxial (RCA), iPod Audio input
Others: USB, RF-Antenna (DVB-T and analogue TV), RFAntenna (FM Radio)
4 Hz - 44 kHz +/-2 dB
30 dB (100 Hz - 10 kHz)
55
Page 55

GLOSSARY
5.1 or AC-3
5.1-multichannel encoding means that 5 audio channels with full frequency response are
present (left, center, right, surround left, surround right) plus a subwoofer channel
(represented by the „.1‖) providing deep humming frequencies you are used to know from
modern cinemas. Both Dolby Digital® and DTS® support 5.1-coding and –decoding.
Aspect ratio: 4:3 and 16:9
Full Frame refers to programs developed for TV display with an aspect ratio of 4:3.
Widescreen refers to programs developed for screens with an aspect ratio of 16:9.
If a widescreen program is displayed on a 4:3 screen, the picture will have black borders on
top and bottom.
CD
A CD (Compact Disc) is a metal-coated plastic disc. It has a diameter of 12 cm and a
thickness of about 1,2 mm. It was developed by Sony and Philips in 1985. The advantages
are digital storage of music enabling very natural sound reproduction. Beyond this, the data
is stored more compact, the handling is easy. The long lifetime of the media and the fact that
usage does not decrease quality made the CD the ideal storage media.
In the meantime, 12 different storage media have been developed from the first CD. The
mostly used are CD-DA (Compact Disc - Digital Audio) , CD-ROM (Compact Disc - Read
Only Memory), and the DVD (Digital Versatile Disc). One can store about 74 to 80 minutes
of music on a CD (-DA). This is equal to 650 to 700 MB.
Signal transmission is performed touchless with a laser beam. The CD is being read from the
middle to the outer side. The data or music is recorded in a spiral from the middle to the
outer side.
A CD has pits and lands, the distance is about 1,6 mm. The laser light created by a laser diode
passes different mirrors and prisms and then is focused by a lens to a laser beam.
This laser beam scans the data spiral of the CD. On the pits, the laser beam is reflected in
another direction and is detected by a photocell. The photocell transmits the signal to a
microprocessor, which converts the digital data to an audio signal. The rest is done by the
sound system.
Coaxial
Coaxial is a digital transmission standard for audio data transfer. Coaxial can transmit digital
audio tracks from one source to another without having to leave the digital transmission,
which would result in worse quality.
Contrast
Means the range of luminance between the brightest and the darkest pixel, which can be
displayed.
CVBS
Composite Video Interface. The video signal is transmitted via a single signal line. CVBS
should only be used, if your playback device does not offer other interfaces for connection
with you Xoro TV set, as CVBS due to technical reasons delivers worst quality of all
available interfaces (please also refer to YUV, S-Video, SCART and RGB). The CVBS
interface can easily be identified from the yellow colour of the RCA jack.
56
Page 56

GLOSSARY
Dolby Digital
Dolby Digital® 5.1 is a system for transmission and storage of 5.1 channel sound on digital
media as DVD, digital TV and satellite transmission. Different from the
codec's Dolby Surround® and Pro Logic® who do not work with channel separation to
encode the surround sound in a stereo recording, Dolby Digital® is a discrete system
where the different audio channels keep completely separated during encoding and
decoding. Dolby Digital 5.1 is industry standard for coding of DVD movies with
surround sound.
DVD
The DVD (Digital Versatile Disk) was introduced in 1995 and is a storage media with a large
capacity.
While a standard CD can store 650 MB of data, the DVD can store up to 9 GB. Especially
when it comes to video playback, a large storage capacity is important. Beyond its high
capacity, the consumer enjoys high quality video and audio. A DVD can store up to 8
different audio streams, so in best case, the movie can be watched in 8 different languages.
Hosiden-connector
4-pin connector for S-Video connections
HUE
HUE settings affect the colour balance of the picture.
Interlaced
The picture is created by writing two half pictures with a 1 line set-off on the screen. This is
standard on conventional 50 Hz TV sets.
Kodak Picture CD®
The KODAK Picture CD® is the ideal media for all-round photographers. All
pictures are stored at an excellent resolution of 1024 x 1536 pixel. On the
KODAK Picture CD®, the images of your camera filmstrip are stored. It is not possible to
add pictures at a later point of time.
Note: There also are "Kodak Foto CD‘s®― available. As they have a proprietary file format,
your DVD player cannot playback these media.
57
Page 57

GLOSSARY
MPEG-4
MPEG-4 is a standard used primarily to compress audio and video (AV)
digital data. Introduced in late 1998, it is the designation for a group of audio and video
coding standards
and related technology agreed upon by the ISO/IEC Moving Picture Experts Group (MPEG).
The uses for the MPEG-4 standard are web (streaming media) and CD
distribution,
conversation (videophone), and broadcast television, all of which benefit from compressing
the AV stream. MPEG-4 absorbs many of the features of MPEG-1 and MPEG-2 and other
related standards.
By MPEG-4 could be used a lot of different audio compression method. Most popular are
MP3 and AC3.
NTSC
Widespread TV standard, especially in US and Asia. 525 (480 viewable) Lines and 60 Hz
refresh rate. Describes the way the video information (brightness, colour, refresh rate etc.) is
transmitted. Within Europe, this video standard only appears on imported
media (like US
DVDs).
OSD
The OSD (On Screen Display) is all the menus and options shown on the screen.
PAL
European TV standard. PAL stands for Phase Alternation Line; refresh rate: 50 Hz, vertical
line resolution: 625 Lines, 576 visible lines. Describes the way the video information
(brightness, colour, refresh rate etc.) is transmitted.
PBC
PBC stands for playback control. This function can be used to show a menu on Video CD's
(if contained on the VCD). One can move in this menu with the arrow keys and select the
desired function with ―enter‖.
Photo-CD (JPEG CD)
A Photo-CD is a storage system for image storage on a CD-ROM in a platform independent
multi resolution structure (support of different resolutions and file formats, e.g. JPEG, BMP,
etc). As a single camera film dies not fill a complete CD, more films can be added to the CD
at a later time. A CD-ROM drive must be multi-session enabled to load images from a
Photo-CD.
58
Page 58

GLOSSARY
RGB
Red Green Blue. Describes the way of transmission and display of video signals. The three
in TV systems used colours red, green and blue are transmitted separately. When used for
connection between playback device and TV set, it delivers a quality similar to YUV.
S-Video
Describes the way video signals are transmitted. With S-Video, luminance
and colour information are transmitted separately. S-Video interface can easily
be identified by its 4- ports in a round connector.
Super Video CD (SVCD)
SVCD stands for Super Video CD. SVCD's are very similar to VCD's, one can store 35 - 60
minutes of high quality video with up to 2 Stereo audio tracks and 4
different subtitles. MPEG-2 compression technology is in use.
Video CD (VCD)
VCD stands for "Video Compact Disc". VCD's are similar to normal CDs.
They contain movies with sound. A VCD can store 74 to 80 minutes of video with stereo
sound. For the
storage of audio and video, MPEG-1 is used.
YCbCr YUV
Video signal with separated transmission of colour and brightness information.
Similar to RGB, the signal is transmitted via tree separate RCA cables. Also called
Component Signal. YUV delivers best signal quality available with analogue signal
transmission.
This product's packing materials are recyclable and can be reused. Please dispose of any
materials in accordance with your local recycling regulations.
This product consists of materials which can be recycled and reused if disassembled by a
specialized company.
Batteries should never be thrown away or incinerated but disposed of in accordance with your
local regulations concerning chemical wastes.
59
Page 59

 Loading...