

Page 1

INSTRUCTION MANUAL
Image Mate 4(MX-1)
Please read this instruction manual carefully before using this product.
Page 2

2
TABLE OF CONTENTS
TABLE OF CONTENTS ..................................................................................................... 2
INTRODUCTION ................................................................................................................ 3
GREETING ....................................................................................................................... 3
NOTE ................................................................................................................................ 3
BEFORE USE .................................................................................................................... 4
SYSTEM REQUIREMENTS ............................................................................................. 4
INSTALLING / UNINSTALLING ........................................................................................ 5
IMAGE MATE 4 .................................................................................................................. 6
STARTING IMAGE MATE 4 ............................................................................................. 6
SCREEN AND ICONS ...................................................................................................... 7
REMOTE CONTROL WINDOW ....................................................................................... 9
CAPTURING A STILL IMAGE / VIEWING A STILL IMAGE ........................................... 10
RECORDING VIDEO / VIEWING VIDEO ...................................................................... 10
LIVE SETTINGS ............................................................................................................. 12
TROUBLE SHOOTING .....................................................................................................14
BEFORE CONTACTING SUPPORT .............................................................................. 14
UPDATING IMAGE MATE4 ...............................................................................................16
REFERENCE ....................................................................................................................17
DISCLAIMER .................................................................................................................. 17
TRADEMARKS ............................................................................................................... 17
ACKNOWLEDGEMENTS AND COPYRIGHTS ............................................................. 17
Page 3

3
INTRODUCTION
GREETING
Thank you for purchasing ELMO Document Camera. This manual will guide you through using
Image Mate 4, the Document Camera controller software. Please read this manual carefully
before using Image Mate 4.
NOTE
• The sample screens shown in this manual may differ from those you see while using the
software.
• For the latest instruction manual, installation manual and firmware information, go to the
ELMO web site.
• When using Image Mate 4, be sure to refer to the instruction manual supplied with the
Document Camera (MX-1).
• Depending on the OS, Image Mate 4 may not display the correct fonts.
Page 4

4
BEFORE USE
SYSTEM REQUIREMENTS
Your computer must meet the following requirements to use Image Mate 4.
OS
Windows 10 64bit
CPU
Core i7(3840x2160@30fps)
Core i5 or higher (1920x1080@60fps)
RAM
16GB(3840x2160@30fps)
4GB recommended(1920x1080@60fps)
Display
3840x2160(3840x2160@30fps)
1920x1080 pixels or more(1920x1080@60fps)
Graphic board
Possible to output at 3840x2160
GeForce GTX750 or higher
USB
USB3.0
Compatible Document Camera
MX-1
・If your computer does not meet the system requirements or depending on the performance
of your computer, the frame rate during the live video streaming or recording may decrease.
NOTE
Page 5

5
INSTALLING / UNINSTALLING
●INSTALLING
1.Go to Elmo official website.
http://www.elmousa.com/
www.elmoeurope.com/download
2.Select “Image Mate 4”.
3.Click “Download” and read the “Precautions on the handling of the downloaded data”.
Click “Agree”.
4.Downloading will start after a short while.
※If you cannot find the downloaded file, check the download folder of your computer.
5.Run “ImageMate4Setup.msi“ after the downloading is completed. Follow the instructions
displayed in the installation window of Image Mate 4.
6.The icons [ ] will be created on the desktop after the installation is completed.
●UNINSTALLING
To remove Image Mate 4 from your computer, go to “Start menu” and go to “Settings”
“System” “Apps & features”, and uninstall Image Mate 4.
Page 6
6
IMAGE MATE 4
STARTING IMAGE MATE 4
Start Image Mate 4 from a shortcut [ ] on the desktop.
Select the desired camera to display by the following procedure.
※The camera will not be recognized when it is not turned on. Connect the camera to a
running computer via the USB cable (bus power).
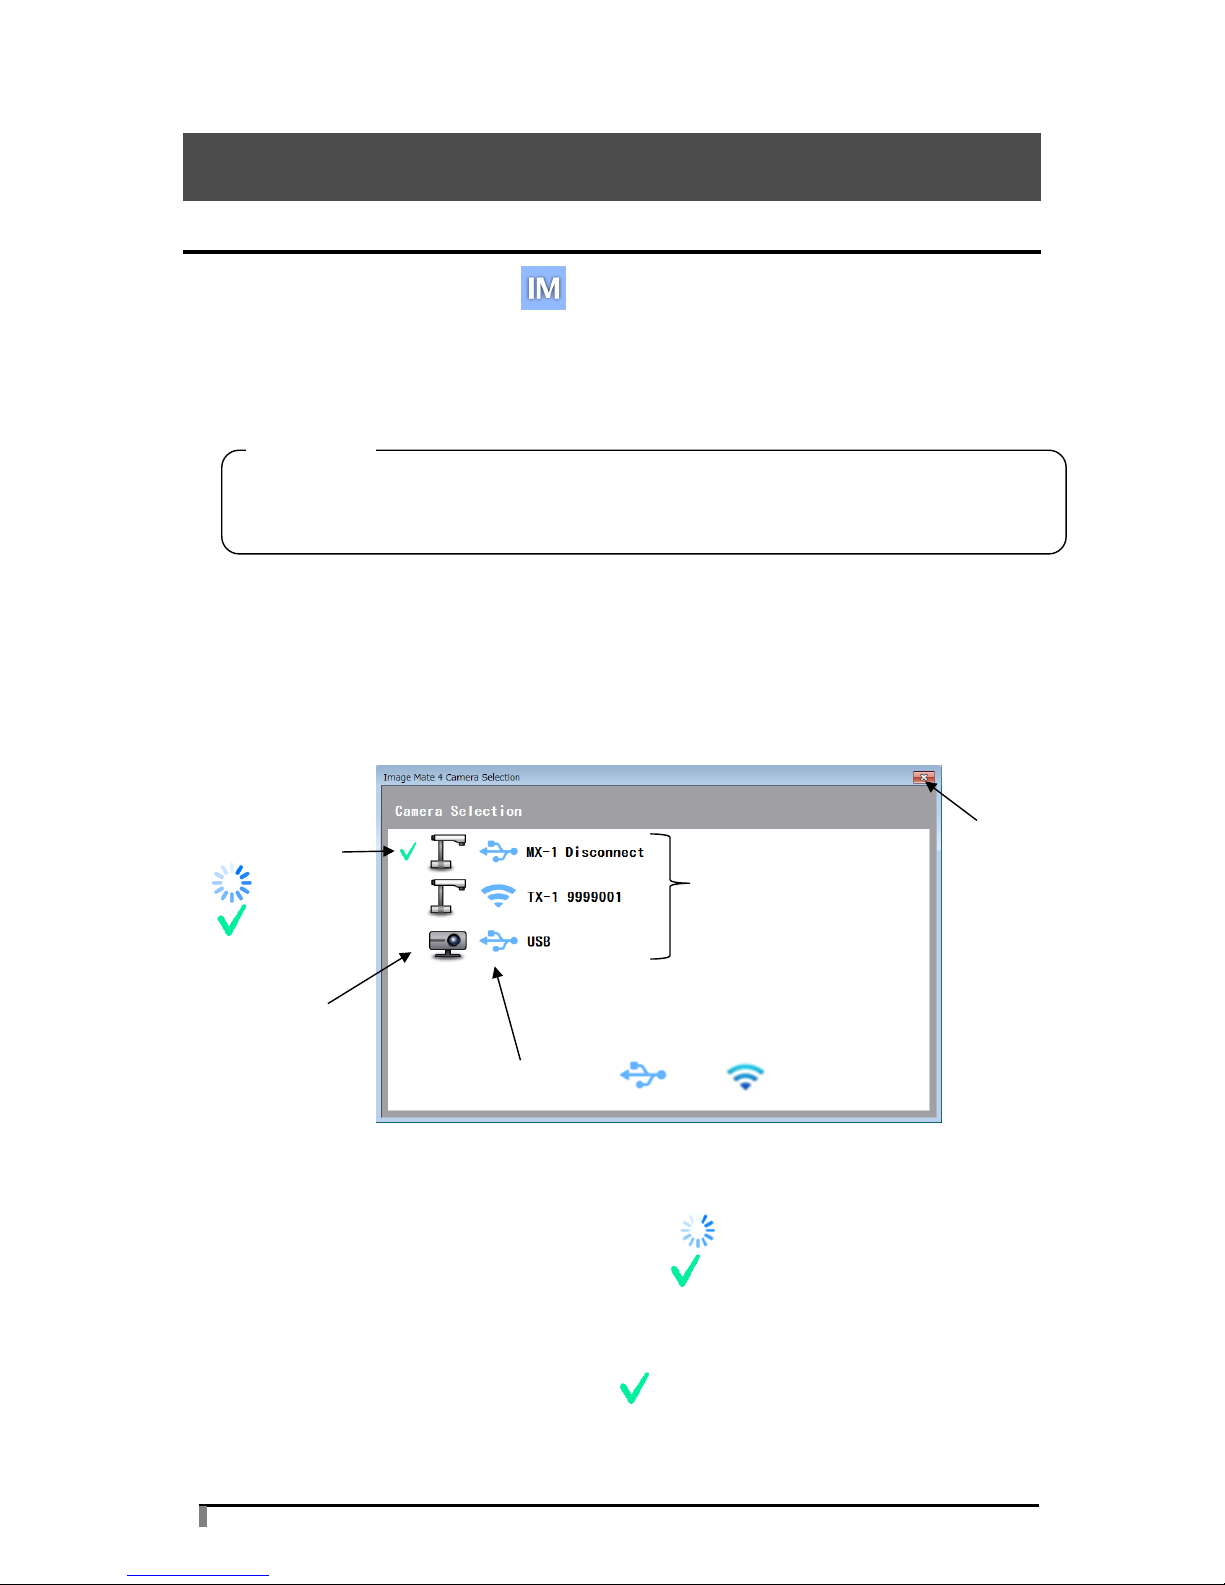
●HOW TO SELECT THE CAMERA
・The live image of the camera appears after Image Mate 4 is started when the Document
Camera (MX-1) is connected to a computer via the USB cable.
・The following Camera Selection window appears when a computer is connected to several
cameras via the USB cable.
<Connection procedure>
① Click the selected camera name.
② The connection status changes to “Connecting” [ ].
③ The connection status changes to “Connected” [ ] after the connection is established.
※The software will cancel the selection and start to connect to the other selected
camera if the camera name of the other camera is selected after the connection is
established.
※The connection will be disconnected if [ ] is pressed
④ The camera selection window disappears and the live image of the camera appears.
Image Mate 4 may not start if the USB cable is connected before starting Image Mate 4.
Start Image Mate 4 before connecting the MX-1 via the supplied USB cable.
CAUTION
Camera type
Camera name
Type (USB /WiFi )
Connection
Connecting
Connected
Exit
Page 7

7
SCREEN AND ICONS
The live image of the camera is displayed when Image Mate 4 is started.
Icon
Name
Function
Remote control
To display the remote control window.
Capture
To save the currently displayed image as a still image.
Start recording/
Stop recording
To start and stop recording.
Open
To open the destination folder of still image files or video
files recorded with Image Mate 4.
Freeze
To pause the image. Click this icon again to resume the
image.
Rotate Images
To rotate the image by 180°.
※During the freeze can’t be rotation of the image.
Live settings
To configure Resolution settings, Camera mode settings
and Camera settings.
Camera
selection
To display a list of connected cameras.
Select the camera to display.
Brightness
(brighten)
Zoom in
Brightness (darken)
Reset Brightness
P.9
Zoom out
Auto Focus
P.10
P.10
Control icons
P.12
Page 8
8
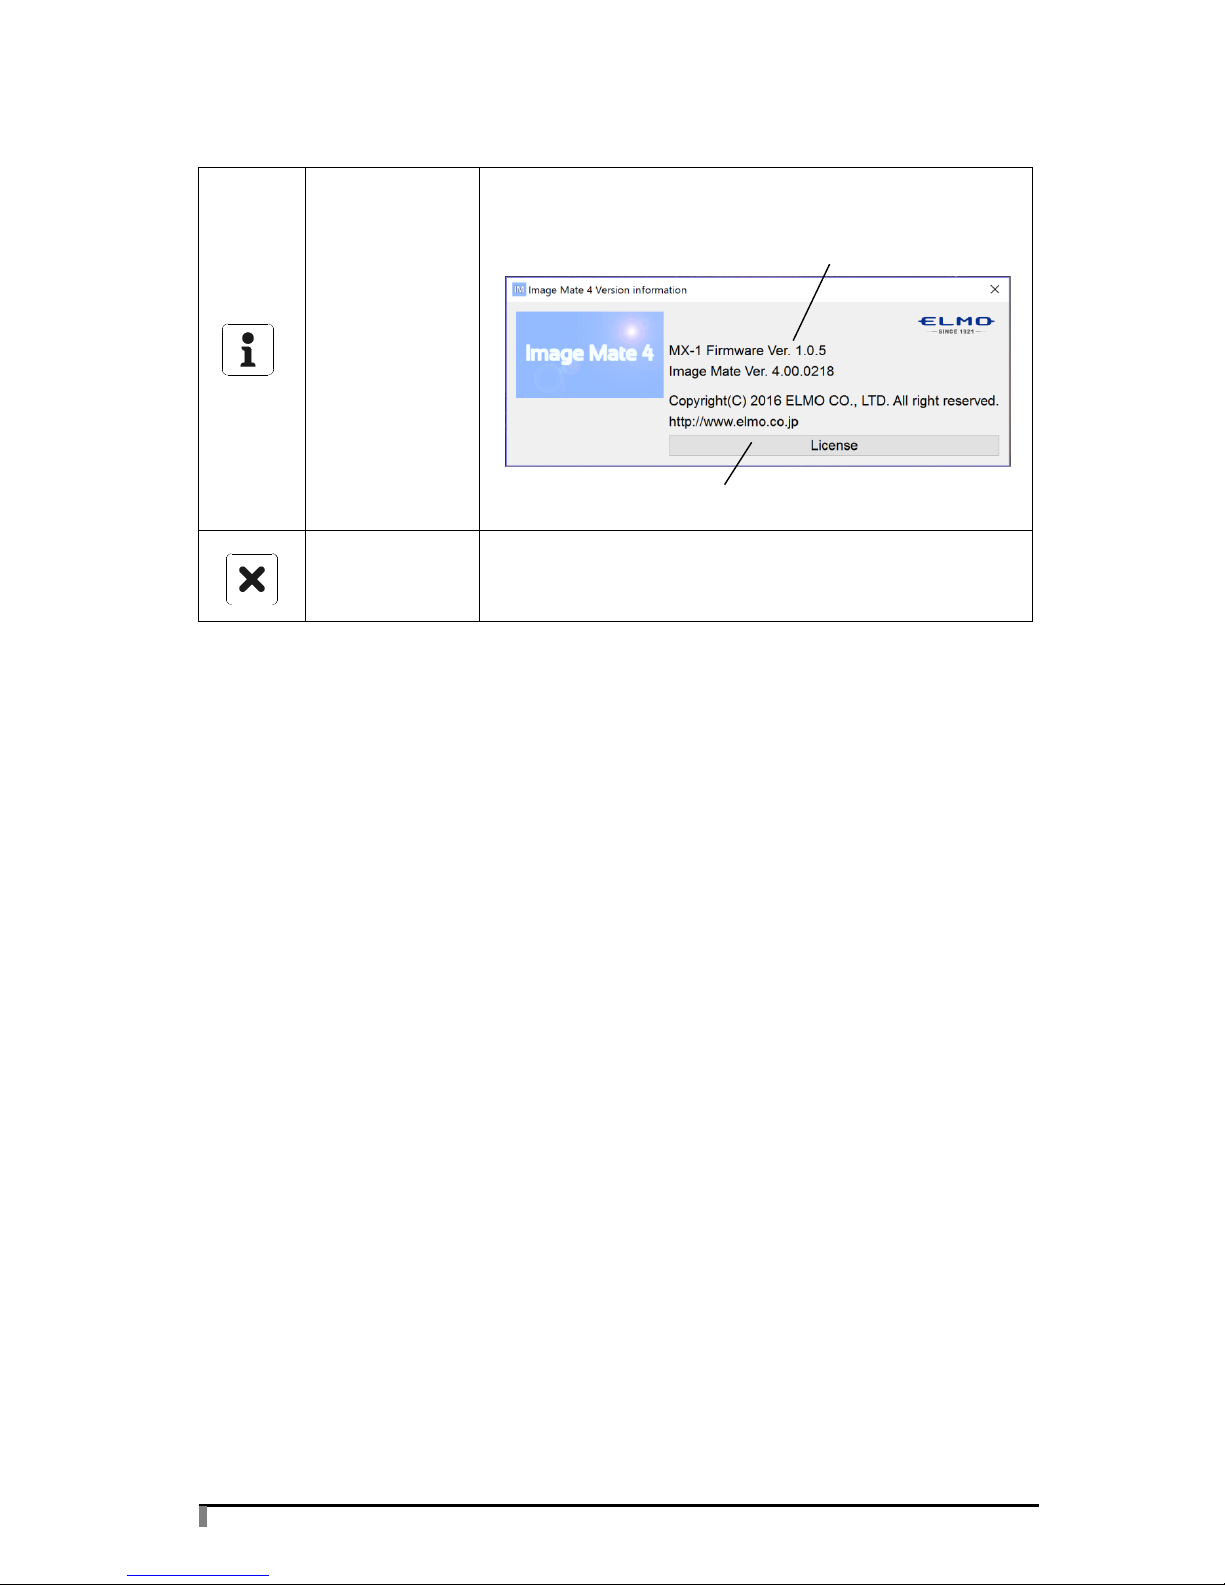
Show version
To display the version information of the connected
Document Camera and Image Mate 4.
Exit
To close Image Mate 4.
A confirmation message will be displayed when this icon is
clicked. Click “OK” to close Image Mate 4.
The software license agreement will be displayed. Carefully
read it before using Image Mate 4.
Version information
Page 9

9
REMOTE CONTROL WINDOW
You can control the Document Camera (MX-1) from the remote control window.
●Each function can be operated by pressing respective buttons.
●The remote control window can be moved by dragging.
Button
Name
Function
Auto Focus
To focus automatically.
Zoom in
To enlarge the image.
Zoom out
To shrink the image.
Brightness
(brighten)
To brighten the image.
Brightness
(darken)
To darken the image.
Reset Brightness
To return the brightness setting to factory
default setting.
Page 10

10
CAPTURING A STILL IMAGE / VIEWING A STILL IMAGE
●CAPTURING A STILL IMAGE
The currently displayed image can be captured and saved as a still image.
A still image of the currently displayed image will be captured when [ ] is pressed.
The captured still image will be saved in a folder.
●VIEWING A STILL IMAGE
The destination folder of captured still images is [Pictures/ELMO Interactive Toolbox/rec].
The destination folder can be opened from [ ] in the control menu.
(※The destination folder may defer depending on the OS.)
1. Click [ ] in the menu to open the destination folder.
2. Double-click a still image file to view it.
RECORDING VIDEO / VIEWING VIDEO
●RECORDING VIDEO
The currently displayed image of the Document Camera (MX-1) can be recorded and
saved as a video file. When a microphone is connected to a computer, you can also
record audio.
Recording of the currently displayed image will be started when [ ] is pressed. The
recorded video file will be saved in a folder.
※There are some limitations on saving the recorded video file in a folder.
Resolution
Live video
streaming
Recording
resolution
4:3
3M
2048x1536 30fps
1280x960 30fps
13M
4160x3120 21fps
1280x960 30fps
16:9
720P
1280x720 60fps
1280x720 60fps
1080P
1920x1080 30fps
1280x720 30fps
1920x1080 60fps
1280x720 60fps
4K
3840x2160 30fps
1280x720 30fps
Page 11
11
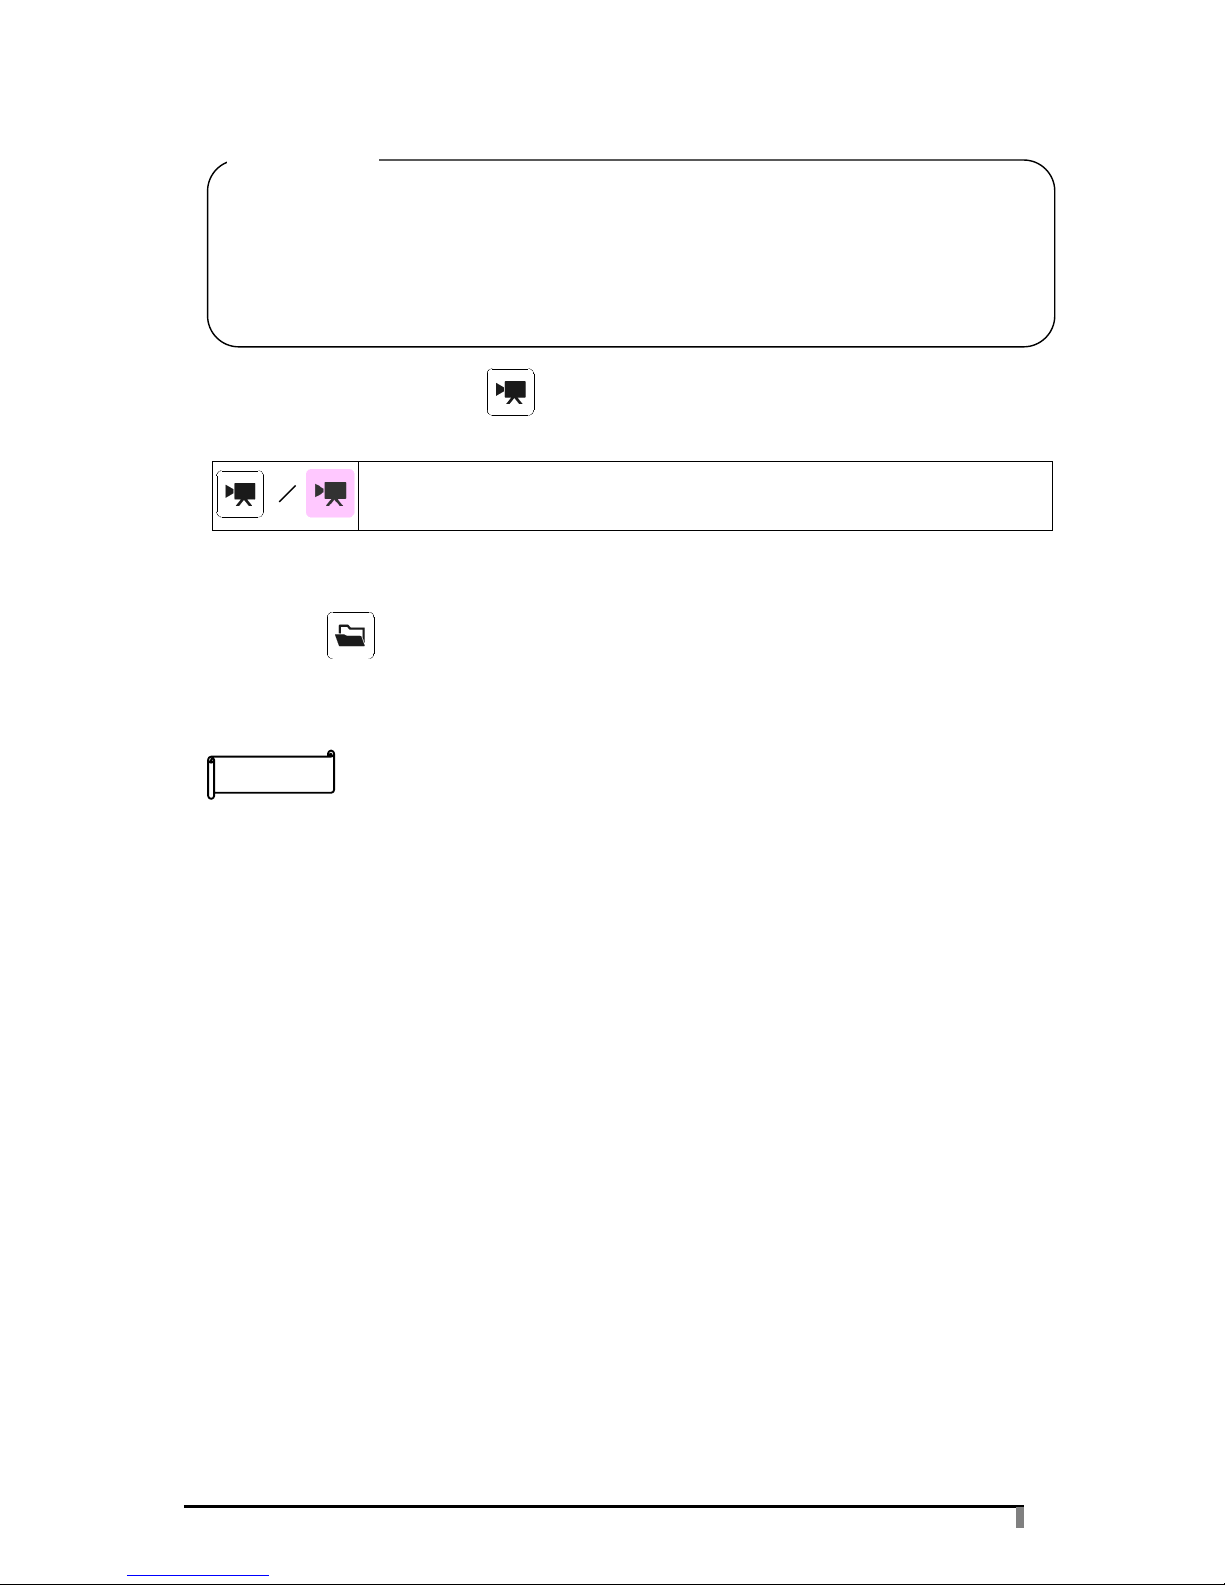
※The Start recording icon [ ] changes to the Stop recording icon during recording.
You can stop recording by pressing the Stop recording icon.
This icon appears during video recording.
The color of this icon changes between red and white during video recording.
●VIEWING VIDEO(SAME DESTINATION FOLDER AS A STILL IMAGE)
1. Click [ ] in the menu to open the destination folder.
2. Double-click a video file to view it.
・Depending on the performance of your computer or type of the file, you may not be able to
view the captured still image or recorded video correctly.
・Depending on the playback environment, some video files recorded by Image Mate 4 may
not be played back.
・The recording time may differ from the created video time.
• Recording may not be performed correctly depending on the performance of your
computer or the network condition.
• The resolution of the MX-1 will be changed according to the recording resolution during
recording.
• The performance may be degraded when connecting with the USB2.0.
CAUTION
NOTE
Page 12
12
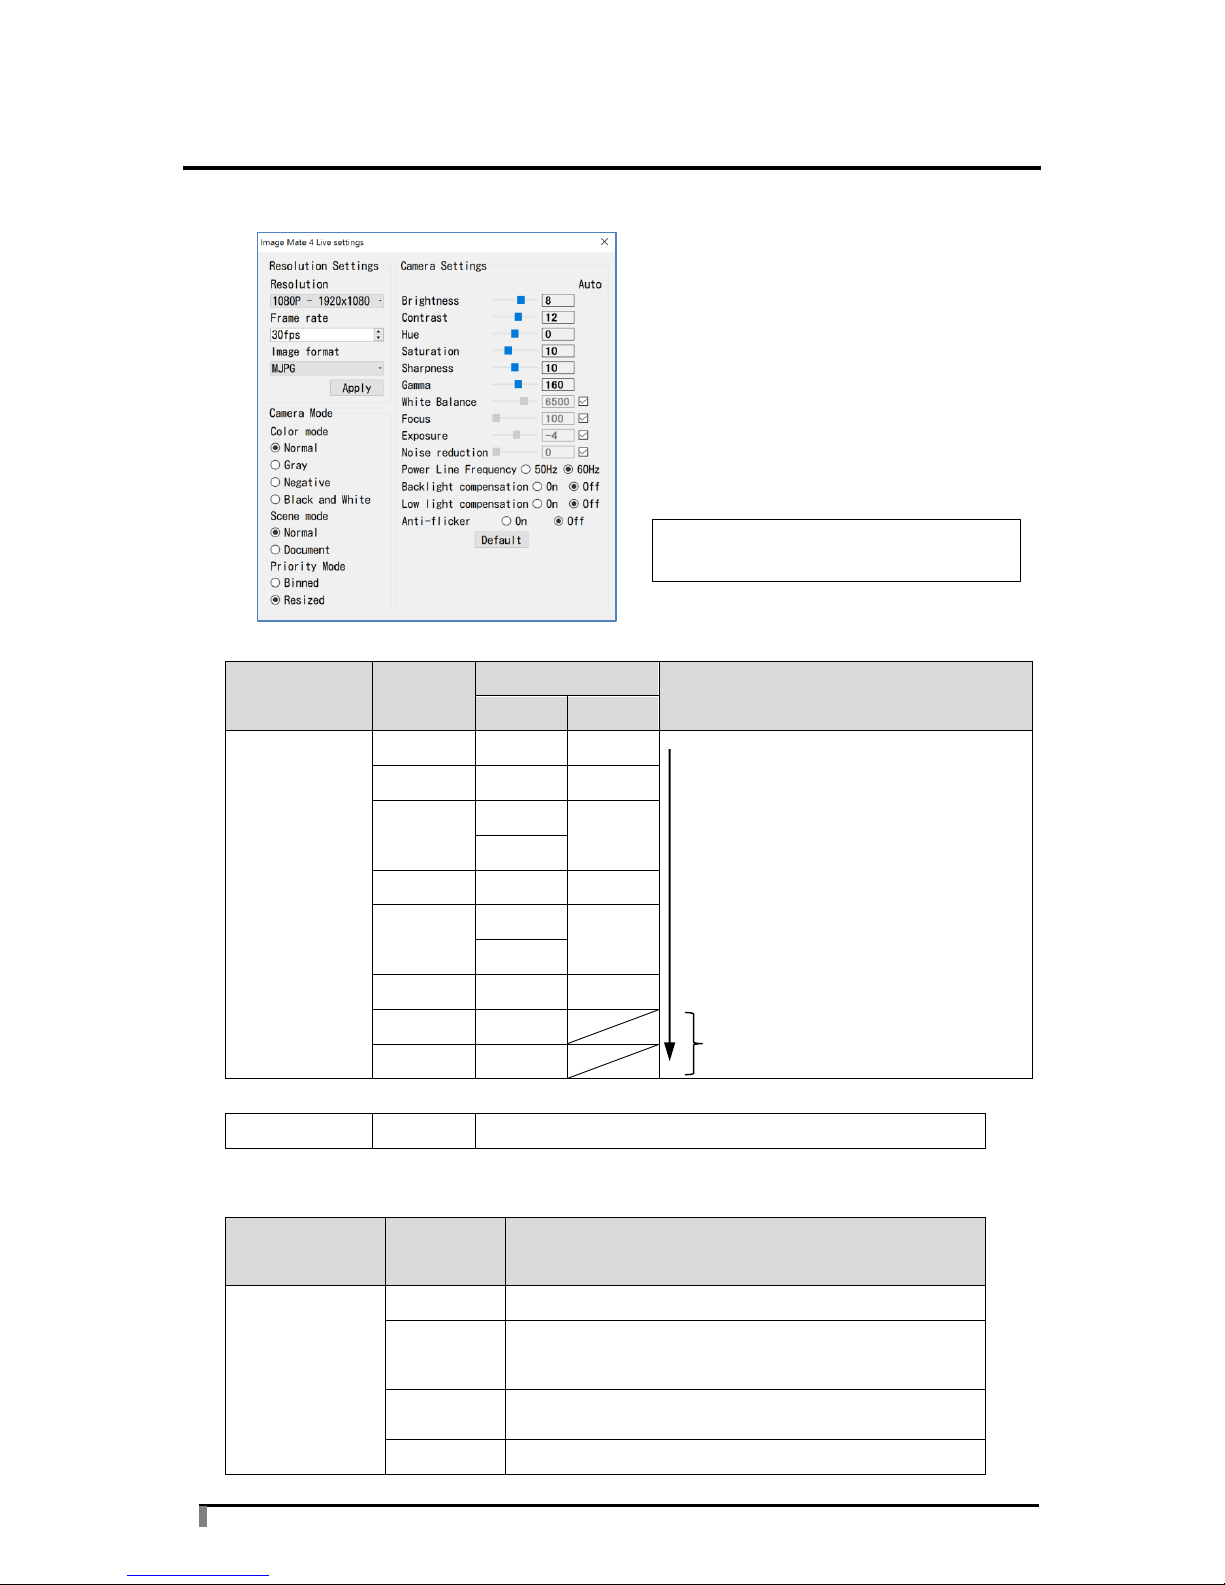
LIVE SETTINGS
Resolution Settings, Camera Mode settings and Camera Settings can be configured.
●Resolution Settings
Item
Setting
value
Frame rate
Description
USB3.0
USB2.0
Resolution/
Frame rate
VGA
30fps
30fps
The image quality increases in the
order as indicated by the arrow, while
the network load also increases. As
the network load increases, the
image distortion tends to occur,
preventing smooth video playback.
XGA
30fps
30fps
720p
60fps
30fps
30fps
QVGA
30fps
30fps
1080p
60fps
30fps
30fps
3.0M
30fps
18fps
4K
30fps
13.0M
21fps
※The available frame rate varies depending on the selected resolution.
Image format
MJPG
The image format of the MX-1 is MJPG.
●Camera Mode
Item
Setting
value
Description
Color mode
Normal
To display the image in color.
Gray
To display the background in black and the light
color in gray.
Negative
The brightness or darkness of the image and the
color of the image will be reversed.
B&W
To display the image in black and white.
※The image shows the initial settings.
(USB3.0)
These settings are not available
when connecting with the USB2.0.
Page 13

13
Scene mode
Normal
To clearly display photos or documents with color.
Document
To clearly display text documents.
Priority mode
Binned
The speed takes precedence over image quality.
Resized
The image quality takes precedence over speed.
●Camera Settings
Item
Setting range
Description
Brightness
0~12
To adjust the brightness. It does not follow
the brightness of the shooting environment.
Contrast
0~20
To adjust the level of contrast of texts and
lines.
Hue
-180~180
To adjust the color tone of the image.
Saturation
0~31
To adjust the saturation of the image.
Sharpness
5~15
To adjust the clarity of the image.
Gamma
100~200
To adjust the image characteristics of the
input/output devices. Adjust the value
according to your preference.
White Balance
※1
2000~8000
To adjust the level of red color and blue color
in the image manually.
Focus ※1
100~3000
To adjust the focus.
Exposure
※1
-10~1
To adjust the exposure level.
※If you remove the tick from the check box
of “Auto”, the above brightness setting will
be disabled.
Noise reduction
※1
0~10
To adjust the level of noise reduction.
Power Line
Frequency
50Hz
When you notice a light flickering, set this
value same as the power frequency of your
area.
60Hz
Backlight
compensation
On
To prevent the object in the center of the
image from becoming dark when there is a
strong backlight behind the object.
Off
Low light
compensation
On
When this setting is set to On, the camera
automatically selects the appropriate
brightness for the shooting in dark
environment or in an environment where the
brightness changes abruptly.
Off
Anti-flicker
On
To reduce the flickering in the image by
adjusting the brightness.
Off
※1 If you remove the tick from the check box of “Auto” ☑at the right of the setting items,
you can set the value as you wish.
* The Camera mode settings and Camera settings will be initialized when the Default
button is pressed.
Page 14

14
TROUBLE SHOOTING
BEFORE CONTACTING SUPPORT
Symptom
The following message appears.
Cause
The USB cable is disconnected.
Remedy
Remove the USB cable and connect again. If the problem still persists,
restart Image Mate 4.
Symptom
There is a delay or decrease in the frame rate.
Remedy
Close all other applications on your computer.
If you have not updated your Windows, update it immediately to keep your
Windows up-to-date. This may improve the problem.
Symptom
Video recording cannot be performed properly.
Remedy
Video recording may not be possible if your computer does not meet the
system requirements.
Symptom
There is a distortion in the Live image.
Remedy
The image distortion can be reduced by decreasing the resolution and
frame rate.
If you are using a 32bit computer, you may not be able to achieve the full
performance when the resolution is set to high such as 4K and 13K.
Decreasing the resolution or using a 64bit computer may improve the
problem.
「Document camera has not been
detected.」
P.12
Page 15

15
Symptom
4K video images cannot be displayed.
Remedy
Verify that your system meets the following requirements:
Processor:Intel® Core i7 or higher
Memory:16GB
Graphic board:GeForce GTX750 or higher
Symptom
Image Mate 4 does not start.
Remedy
Image Mate 4 may not start if the USB cable is connected before starting
a computer.
Start Image Mate 4 before connecting the USB cable.
Page 16

16
UPDATING IMAGE MATE4
If your computer is connected to the Internet, you can update Image Mate 4 to the latest
version. Update your Image Mate 4 according to the following procedure:
① If there is any update to a new available version, the following update notification
message is displayed when [ ] in the menu is pressed.
② Press [Yes] to perform the update. Press [No] or [x] if you do not want to perform the
update now.
③ The downloading starts.
※It may take some time to complete the download depending on the network condition.
④ Image Mate 4 is automatically closed and the following installation window appears after
the downloading is completed.
Proceed the installation by following the instructions displayed on the screen.
⑤ Restart your computer after the installation is completed.
⑥ Start Image Mate 4. Press[ ] and verify the version.
P.8
Page 17

17
REFERENCE
DISCLAIMER
The contents of this manual and Image Mate 4 are subject to change without prior notice.
Our software may not function as intended due to compatibility issues with the peripheral
devices and existing software installed in your computer.
ELMO Co., Ltd. cannot be held responsible for either direct or indirect damages suffered by
users while using our software.
TRADEMARKS
• is a trademark or registered trademark of ELMO Co., Ltd.
• Image Mate is a trademark or registered trademark of ELMO Co., Ltd.
• Intel is a registered trademark of the Intel Corporation.
• Microsoft and Windows are registered trademarks of Microsoft Corporation in the United
States and other countries.
• This product is licensed under the AVC Visual Patent Portfolio License (AVC Video) for the
personal and non-commercial use of a consumer to
(i) play AVC Video that was recorded by a consumer engaged in a personal and a
non-commercial activity and/or,
(ii) play AVC Video that was obtained from a video provider licensed from MPEG-LA, LLC.
(iii)Additional information including that relating to promotional and commercial uses may be
obtained from MPEG-LA, LLC.
• HDMI is a trademark or registered trademark of HDMI Licensing LLC.
• All other company/product names described in this manual are trademarks or registered
trademarks of their respective companies.
ACKNOWLEDGEMENTS AND COPYRIGHTS
• This software is based in part on the work of the Independent JPEG Group.
Page 18

18
ELMO CO., LTD.
6-14, Meizen-cho, Mizuho-ku
Nagoya, 467-8567, Japan"
OVERSEAS SUBSIDIARY COMPANIES
ELMO USA CORP.
"Headquarters
1478 Old Country Road
Plainview, NY 11803, U.S.A.
Tel. (516) 501-1400 Fax.(516) 501-0429
E-mail: elmo@elmousa.com
Web: http://www.elmousa.com"
"West Coast Branch
5555 Garden Grove Boulevard.
Suite 375
Westminster, CA 92683
Tel. (714) 828-8457 Fax. (714) 828-8429"
ELMO Europe SAS
"Headquarters
12 place de la Défense
Maison de la Défense
92974 Paris la Défense Cedex FRANCE
Tel. 33 (0) 1 73 02 67 06
Fax. 33 (0) 1 73 02 67 10
E-mail: info@elmoeurope.com
Web: http://www.elmoeurope.com"
"German Branch
Hansaallee 201, Haus 1
40549 Düsseldorf Germany
Tel. 49 (0) 211 544756 40
Fax. 49 (0) 211 544756 60"
“Middle East (Branch)
5WA-129, Dubai Airport Free Zone
P.O. Box 371556, Dubai
United Arab Emirates
TEL. +971-(0)4-260-2390
FAX. +971-(0)4-260-2392
6X1VLBA03 R1-Xjx
 Loading...