

Page 1
Page 2

IMPORTANT
SAFEGUARDS
When
using y
our
photographic
equ
ipment ,
basic
safety
precau-
tions should
alwa
ys
be
followed,
including
the
following
1.
Read
and
understand
all instructions.
2.
Close
supervision
is
necessary
when
any
appliance
is
used
by
or
near
children. Do
not
leave
appliance
unattended
while
In
use.
3.
Care
must
be
taken as
burns
can
occur
from
touching
hot
parts.
4.
Do
not
operate
appliance
with a
damaged
cord
or
if
the
appliance
has been
dropped
or
damaged
until it has
been
examined
by
a
qualified
serviceman.
5.
Do
not
let
cord
hang
over
edge
of
table
or
counter
or
touch hot
surfaces.
6.
If an extension
cord
is
necessary,
a
cord
with a
suitable
current
rating
should
be
used.
Cords
rated
for
less
ampe-
rage
than the
appliance
may
overheat.
Care
shouid
be
taken
to
arrange
the
cord
so that
it
will
not
be
tripped
over
or
pulled.
7.
Always
unplug
appliance
from
electrical
outlet
when
not
in
use.
Never
yank
cord
to
pull
plug
from
outlet.
Grasp
plug
and
pull
to
disconnect.
8.
Let
appliance
cool
completely before
putting
away.
Loop
cord
loosely
around
appliance
when
storing.
9.
To
protect
against
electrical
shock
hazards, do
not
immerse
this
appliance
in
water
or
other
liquids.
1 o. To
avoid
electric
shock
hazard,
do
not
disassemble this
appliance
but
take
it
to a
qualified
serviceman
when
some
service
or
repair
work
is
required.
Incorrect
reassembly
can
cause
electric
shock
hazard
when
the
appliance
is
used subsequently.
SAVE THESE
INSTRUCTIONS
Page 3

CONTENTS
NOMENCLATURE .....
.....
..
. . ....... . .... .... .
.........
2
INTRODUCTION
. . . . . . . . . . . . . .
..
4
PROJECTION
I mage
adjustment
Projection
6
8
Reverse
projection.
Rewinding
the
film
.
....
... ·13
Reproducing
sound
through
a stereo set.
Using
extension
speakers
(option)
for
full
stereo
effect
projection ...
Effective
playback
of
2-track
sound
film
using
one
extension
speaker
..
Public
address.
R
emoving
the
film
from
the
film
path
....
.....
. .
....
. .
RECORDING
'14
·
·15
. .
·16
·
·16
·17
'18
Recoding
procedure.
. . . . . . . . . . . . . .
.20
Spot
recording
..........
.... . •
.....
• ...• .
....
...
. .
......
26
Stereo
recording.
Monaural
recording.
Adding
sound
to
simultaneously
recorded
film.
Track
to
track
sound
transfer
....
·27
.
.....
..
. .
...
·27
·
·28
·
·28
Double
(sound
on
sound)
recording
/ Fade
recording.
· ·31
Sound
transfer
from
simultaneously
recorded stereo tape
to
sound
tracks
..
Microphone.
MAINTENANCE
AND CHECK
Cleaning
Replacing
projection
lamp
. .
Voltage
selection.
Changing
projection
lens
Storing.
Trouble-shooting
hints
.. _ ...
..
.
Accessories
....
.
Accessory cords . .
Cord
connection
...............
...
. . . . .
Projection
distance and image size
Projection
time
and
film length
·35
36
· ·38
·39
·40
·
·41
·
·41
·
·42
' 43
·
·46
. . . . . . . . . . . . . . . . .
·47
. . . . . . . . .
..
'48
.
'49
·5
0
Specifications.
Block
diagram.
.
........
..
.....
. . . .
...
..
. .
.. ·52
Page 4

2
NORMENCLATURE
Reellock
- -
---
---'
Rear arm
------
-~
Level
meter
Recording
indicator-----
- -
Recording
button
- -
--
- -
--
Volume
control
knob
_ _
__
_ _
Tone
control
knob
Sound selector (Refer
to
page 8
Motor
switch
Reset
button
-------
-----
- ---./
Speaker
for
track
2
Speaker
for
track
1
Fade recording selector
"'-
Double
recording
!evel selector
Fade recording
button
_
Cable release socket -
AUX
OUT
jack--
-
MONITOR
jack
---
EXT
SP
connector
--
Power
cord
receptacle -
Photo
.
Exciter
Microphone:
Dimensions & Weight:
Page 5

Front
cover
Reel spindle
Front
arm
Auto
thread lever
Accessory socket
Thread
slot
lamp
Auto
thread
slot
Zoom
ring
Focus
knob
Framer
Loop
former
Exciter
lamp
window
(Model M-O
only)
Film
trimmer
Frame
counter
Elevation
control
knob
I mage level
knob
Projection
speed selector
Spot
recording
button
Stereo
-mono
selector
Speed
knob
PA
jack
MIC
jack
AUX
IN
jack
L-
_
___
Stereo headphone jack
3
Page 6
ATTACHMENTS
Power
cord
Auto
reel (800 ft/
240
m)
Microphone
Test
film
Earphone
Speaker connector
Cleaning brush
Connection
cord
MC-021
for
track
to
track
sou nd transfer
Cleaning st
ick
INTRODUCTION
Track 1 (L
channel)
Track
2 (R channel)
4
All
Super 8 pre-striped
film
has
two
tracks.
The
GS-800
uses
track 1 for
the
left
channel and
track
2
for
the
right
channel. Each channel
has
a pre-amp.,
main
-a
mp. and
built-in
speaker
for
complete
stereo
performance.
It
is
also possible
to
use
the
GS-800
as
an
ordinary
2-track
sound
projector
when
adding
your
BGM/narration/sound
effect
to
the
track 2 of
pre-recorded
film
without
affecting
the
simultaneous-
ly
recorded sound
on
the
track
1.
You
can operate
the
GS-800
as
easi
ly
as
you
do
the
conventional
sound
projector.
The
GS-800 helps
you
to
enjoy
real
sound
movie
making.
Projection time and film length
Page 7

PROJECTION
5
Page 8

Image adjustment
Adjust
the screen image before
threading a film.
6
Plug in the
power
cord,
then
pilot
lamp
comes on.
Pull
up
both
arms
into
position.
Advance
the
motor
switch
to"
(]~".
Motor
switch
Cord connection
• Reproduction
stereo amp.
I
~ISSJ
• Stereo·recording
projector
• Monaural-recording
Page 9

Adjust
the
height
and
inclination
of picture
with
the
elevation
control
knob
and
the
image level
knob
respectively .
Adjust
the
focus
with
the
focus
knob
so
that
the
frame mask may be
projected
clearly.
Focus
knob
Adjust
the
picture size
with
the
zoom
ring.
Zoom
ring
After
the
adjustment,
turn
the
motor
switch back
to
"OFF".
7
Page 10

Projection
8
Pl
ace
your
reel
with
film
on the
front
arm and take-up reel on
the
rear arm,
and press the
reel locks
until
reels are
snugged against spindles.
Note
:
Be sure
to
use
the
take-up
reel
supplied with
the
projector.
Se
lect the sound
mode
by
pushing
the
sound selector in accordance
with
the
type
of
film
to
be
projected
. (M for
magnetic sound
film, 0
for optical
sound f i
lm
or
SI
LENT
for
silent
film
.)
Mode
l M does
not
have
optica
l sound
reproduction
fac il
ity.
Set the stereo-mono sel
ector
for
STEREO
or
MONO
in accordance
with
the
sound
film.
Select
projection
speed,
either
18
or
24
fps.
Note
:
1.
Set
the
speed
knob
in
the
middle.
2.
Standard
speed
for
magnetic
sound
film
is
either
18
or
24
fps. S
tandard
speed
for
optical
sound film
is
24
fps
.
Be sure
that
the
motor
is
off
when
changing
projection
speed.
.~.
o 10
Ii5I
SILENT
Iwl
ft
••
Projection
speed
selector
• Sound editor
• Editor
• Daylight projection mirror
• Translucent
Page 11
Trim
the
end
of
the
film
leader
with
the
film
tr
immer.
Note:
Locate
a
film
perforation
over
the
fixing
pin
and
trim
off
the
film
end
while
pulling
up
the
film
.
Film
trimmer
Advance the
motor
switch
clockwise
to
"~F".
9
Page 12
Depress
the
auto
thread
lever
until
it locks.
Insert
the
film
leader
into
the
thread
slot
as
indicated
by
the
red arrow.
Note:
1.
The
film
automatically
threads
and is
attached
to
the
take-up
reel
through
the
green
fi
1m
gu ide a
few
seconds
after
inserting
.
2.
If
the
take-up
reel
fails
to
catch
the
film,
stop
the
projector
once and
wind
the
leader
round
the
take-up
reel
manually
.
Be sure
to
use
the
properly
curled
leader
for
sure
threading.
x
Advance
the
motor
switch
further
to
"C}"
when
the
film
leader
is
wound
round
the
take-up
reel.
thread
lever
Thread
slot
lamp
OFF
, 0
~F
:,"'0
Accessories
• Elmo viewer type
• Continuous loop projection device
• Long-focus zoom
• Fast zoom
10
Page 13

Adjust
the
focus
with
the
focus
knob
.
@- @
©:":@
k::::::::;====:;::::::==~
@,
. ; .
&1
_,&1
0
0>
@@
@
If a frame line appears
on
the
screen,
eliminate it
from
the
screen
with
the
framer
.
Focus
knob
Framer
11
Page 14
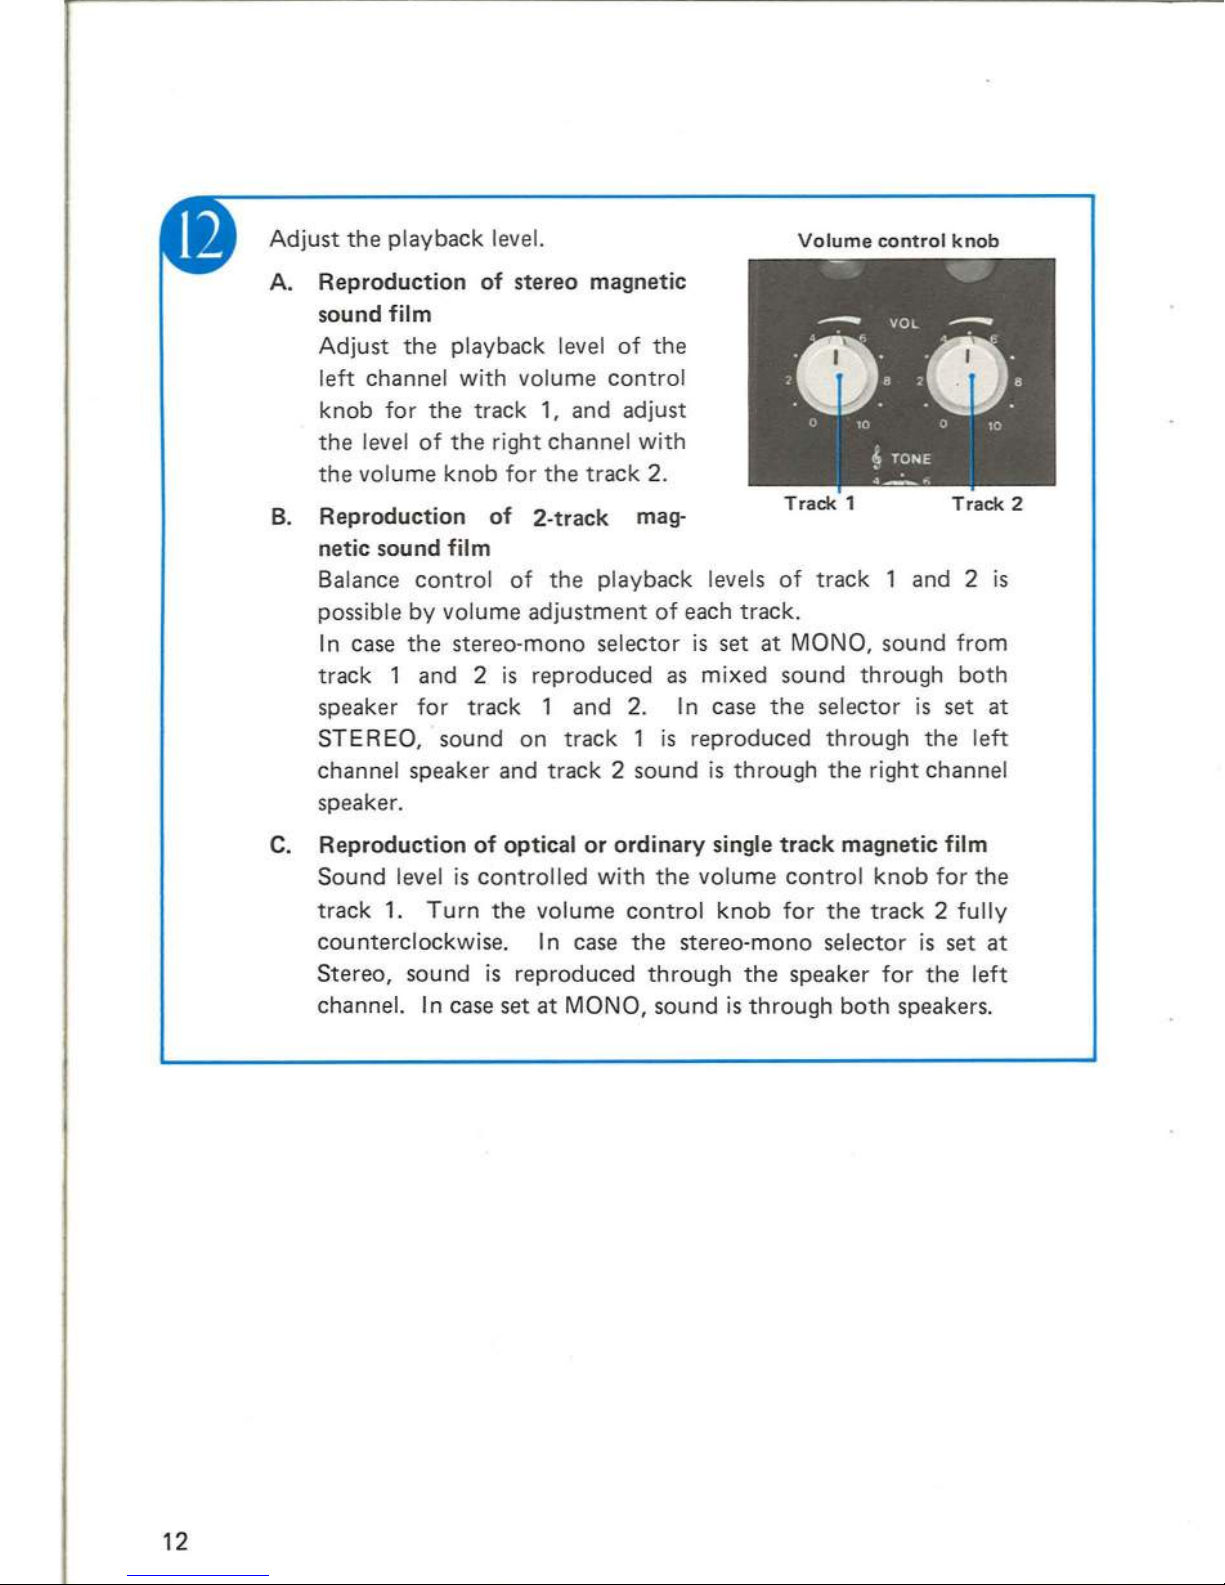
12
Adjust
the
playback
level.
A.
Reproduction
of
stereo magnetic
sound
film
Adjust
the
playback level
of
the
left
channel
with
volume
control
knob
for
the
track
1,
and adjust
the
level
of
the
right
channel
with
the volume
knob
for
the
track
2.
B.
Reproduction
of
2·track
mag-
netic sound
film
Volume
control
knob
'0-:-
6
•
VOL
.-:-
€ .
'2
8
'2
8
. . . .
o 10 0
10
Track
1
~
TONE
4--:_
.:;
Track
2
Balance
control
of
the
playback levels
of
track
1 and 2
is
possible
by
volume
adjustment
of
each track.
In
case
the
stereo-mono selector
is
set at
MONO,
sound
from
track
1 and 2
is
reproduced
as
mixed
sound
through
both
speaker
for
track
1 and
2.
I n
case
the
selector
is
set at
STE R
EO, sound
on
track 1 is
reproduced
through
the
left
channel speaker and
track
2 sound
is
through
the
right
channel
speaker.
C.
Reproduction
of
optical
or
ordinary
single
track
magnetic
film
Sound level
is
controlled
with
the
volume
control
knob
for
the
track
1.
Turn
the
volume
control
knob
for
the
track 2 fully
counter
clockwise. I n
case
the
stereo-
mono
selector
is
set
at
Stereo, sound
is
reproduced
through
the
speaker
for
the
left
channel. In case set
at
MONO,
sound
is
through
both
speakers.
Changing projection lens
o
•
Storing
o
•
Page 15

Adjust
the
tone
with
the
tone
control
knob.
Reverse projection
Advance
the
motor
switch
counter-
clockwise
to
"(]~,,
through
"OF
F"
and"R~".
ME
..............
.
----
.
o 10 0
10
~
TONE
;
.·
0;
·8
. .
R·
o
10
Iil
l
SILENT
I@
I
<-.
Tone
control
knob
If
film
loop
is
lost
during
projection,
press
down
the
loop
former.
~
-~)
LOOP
Loop
former
13
Page 16

Rewinding the film
14
After
the
projection,
attach
the
end
of
the
film
to
the
front
reel.
Advance
the
motor
switch
counter-
clockwise
to
"R
... " .
Set
the
motor
switch back
to
"OF
F"
after
rewinding
is
completed.
Replacing projection lamp
• Disconnect
•
• It
•
•
•
Page 17

Reproducing sound through a stereo set
Connect
the
AUX
OUT
jack
of
the GS-800
with
the
AUX
IN
or
PB
(Playback)
jack
on
a stereo
amplifier
by
using
the
supplied
adaptor
plug MP-004.
(Connect
the
AUX
OUT
jack
of
track 1 with
left
channel, and
the
track 2 with
the
right.)
Adjusting
sound level:
Track
1
(L
channel)
Track
2
(R
channel)
1.
Adjust
the
playback
level
of
the
GS-800
to
make the level
meter
swing around
-10 (approx. -10dBs).
2.
Adjust
the sound level and balance
with
volume
control
and balance
control
of
your
amplifier
respectively.
15
Page 18

Using extension speakers (option)
for
full
stereo effect projection
The GS-800
incorporates
2 speakers
in
its
body
to
perform
stereo
sound
projection
by
itself. But it
is
recommended
to
use a
pair
of
extension speakers
to
obtain
effective
stereo performance.
Handy
extension
speakers ES-1200, ES-1000
and ES-500 are available.
Connect
the
left channel speaker line
to
the
EXT SP 1
connector
and
the
right speaker
line
to
the
EXT SP 2
connector.
Track
1
(L
channell
Track
2
(R
channell
Effective playback
of
2-track sound film
using one extension speaker
Set
the
stereo-mono
selector
at
MONO, and
connect
an extension speaker line
to
the
EXT SP
connector
of
either
track.
In
this case, plug
in
the
supplied speaker
connector to
the
unengaged EXT SP
connector
and
cut
off
the
sound
to
be
reproduced
though
the
built-in speaker.
Adjust
the
playback level
and
balance
of
tracks 1 and 2 with
the
volume
control
knobs.
16
Stereo-mono
selector
EXT
SP
connector
EXT
SP
connector
Page 19

Public address
The
GS-800 can be used
as a public
address system.
Plug
the
microphone
to
the
PA
M
Ie
jack
of
either
track.
Turn
the
volume
control
knob
for
the
track
to
get
proper
sound level.
Note
:
I n case
stereo-mono
selector
is set
at
STEREO,
the
voice
through
the
PA
system
is heard
from
the
speaker
for
the
track
engaged
by
the
microphone
. I n case set
at
MONO
the
voice
is
heard
from
both
speakers.
PA
jack
(L
cahnnell
(R
channell
Volume
control
knob
Track
1
(L
channell
Track
2
(R
channell
17
Page 20

Removing the film
from
the film path
o
•
•
18
Stop
the
projector
by
return-
ing
the
motor
switch back
to
"
OFF".
Open
the
front
cover.
Front
cover
Slack
off
the
film
by
turning
the
take-up reel counterclock-
wise.
•
•
•
•
Projection
lens
barrel
Swing
the
projection lens
away from
the
projector,
holding
the
lens barrel.
Remove
the
film from
the
second
sprocket
by
pressing
the
shoe downward.
Remove
the
film from
the
first
sprocket
by
pressing
the
shoe upward.
Remove
the
film from
the
sound
head
part
.
First
sprocket
shoe
....
Second
sprocket
shoe
Sound transfer from simultaneously
recorded stereo tape
Page 21

RECORDING
19
Page 22

Recording procedure
20
Set
the
sound selector
at
"M".
.~-
o 10
lii
l
SILENT
I@I
(
ft
••
Sound
selector
Set
the
stereo-mono selector
at
STEREO.
Note:
Be su re
to
set
the
selector
at
STE
REO
always
regardless
of
recording
mode.
Set
the
projection speed selector
at
the
desired position (18
or
24
fps).
Note
:
Be
sure
to
set
the
speed
knob
in
the
middle.
Projection
speed
selector
Page 23

S
et
the
fade recording selec
tor
at
NORMAL REC.
Note
:
For
double
recording,
see
page 31.
Fade
recording
selec
tor
Connect
the
input
lines.
A.
Connect
tape
record-
er
/mixer
output
to
the
AUX I N jack.
B.
Connect
the
micro-
phone
to
the
M I C
jack.
Note
:
When
output
level
of
mixer
is
low,
connect
it
with
MIC
jack.
MI
C
jack
21
Page 24

22
Adjust
recor
ding
level.
A.
Input
the
sound.
B.
Adjust
the recording level
whi
le depressing
the
record
butto
n.
a.
Recording l
eve
l setting
Adjust
the
recording level
with
the
volume
control
knob
so
that
the
level
meter
needle
may
swing
to
0 (100%)
position
at
maximum.
When unexpected over-level sound
is
supplied,
built-in
limiter
circuit
works
to
maintain
optimum
distort
ion
free recording
level.
The
limiter
works
for
the
signals
from
both
M IC and
AUX
IN
jacks.
When the
projector
is
set
for
recording,
the
recording in-
dicator
lights.
b.
Mixing
Sound
from
AUX
IN
jack
. and
MIC
jack can
be
mixed. To
adjust
the
mixing
recording level,
use
the
vo lume
control
knob
of
the
GS-800
for
the
input
from
MIC jack, and
the
output
vo lume
knob
of
tape recorder
or
other
sound source
for
the
input
from
AUX
IN jack.
ing
button
lume
control
knob
MICjack
AUX
IN
jack
Note:
To
achieve
the
best
possible
quality
recording
with
the
least
background
and
inherent
projector
noises,
record
at
the
lowest
level
and
with
the
microphone
as far
away
from
the
projector
as
possible.
Double (sound
Fade recording
The
Wi
th
original sound. Selection
One
sound
Page 25

A stereo headphone
is
recommend-
ed
for
monitor
purpose_
(Appl
icable impedance: 8
or
16
ohms)
Plug
the
STEREO
GS-800_
headphone
to
the
PHONE
jack
of
the
When using the supplied earphone,
plug
it
to
the
monitor
jack .
Stereo
headphone
jack
23
Page 26

24
Set
up
the
start
position
of
the
tape.
~oad
the
film and
start
the
projector.
A. As soon as
the
first frame appears on
the
screen, reset
the
film
counter
to
zero (0000) by depressing
the
reset
button.
Reset
button
B.
Stop
the
projector
once, and
reverse it until
the
digit
number
of
the
counter
comes
to
between
9994
and
9990.
-
--
--~
-
- n 0 0 r
~~~
-
--
- - - - - -
~
Reversing
--
--------
----
---
- q q q /
--
--------------
-
Page 27

While
depressing
the
recording
button,
advance
the
motor
switch
clockwise
to
"(]~,,
through
""F".
Recording
button
Track
1
Track
2
REe
o 0
.• '
-:-
, . ,oe .• . ' .
•
tI;>
II
. . . .
('
,,,
't,·
~
TON E
••
• ' .
OFF
;
f'
0
..
....
. ,
o 10 •
&3
' S
ILENT
Iw
i
Q
C:
••••
Motor
switch
Start
the
tape recorder
just
when
the
digit
number
of
the
film
counter
comes
to
0000,
and recording
is
set up.
Stopp
ing the
projector
releases
the recording.
To
discontinue
the
recording
withough
stopping
the
projector,
depress
the
spot
recording
button.
Spot
recording
button
25
Page 28

Spot recording
26
To
make
spot
recording
without
stopping
the
projector:
1.
Depress
the
recording
button,
while
depressing
the
spot
re
cord
ing
button.
2. Release
the
spot reco
rding
button.
Then
the
recording
button
is
locked
for
recording.
3.
To
cancel recording, depress
the
spot
recording
button
again
or
stop
the
projector.
Stereo recording
o
•
•
Monaural recording
o
•
•
Page 29

Stereo recording
o
•
•
Use
track
1 for
the
left channel
sound
and
track 2 for
the
right
channel sound.
Adjust
the
recording level
of
each
track
with
the
volume
control knob
of
respective
channe
l.
Sta
rt
the
projector
wh i
Ie
depressi
ng
both
recording
buttons
for
track
1
and
track
2.
Note
:
Make
sure
that
the
recording
indicators
of
both
channels
light.
Recording
button
Monaural recording
o
•
•
For
monaural recording, use
either
track 1 or
track
2.
For recording
procedure,
see
"Record-
ing
procedure"
on
page 20.
Adjust
the
level
with
the
volume
control
knob
for
the
track
being recorded.
Make sure
that
the
recording
indicator
lights while recording.
Recording
indicator
Volume
control
knob
27
Page 30

Adding sound
to
simultaneously
recorded film
With the sound camera, sound
is
simultaneously recorded
on
track
1.
Add
your
BGM/
narration/sound
effects on
track 2 to
accompany
the
original sound
on
track
1.
Note:
When
adding
sound
with
double
recording
facility,
see
"Double
recording"
on
page 31.
o
•
Use
jacks and
contr
ol knobs
for
track
2 .
It
is
recommended
to
monitor
the
simultaneously
recorded sound
on
track 1 through
the
stereo headphone
or
supplied earphone
while
record-
ing sound on
track
2.
Note:
Adjust
the
monitoring
level
of
simultaneously
recorded
sound
on
track 1 with
the
volume
control
for
track
1.
Track
to
track sound transfer
28
To
transfer sound
from
track 1 to
track
2,
connect
the
AUX
OUT
ja
ck
for
track 1 to
the
AUX
I N ja
ck
for
track 2 with
supplied
co
nnection
cord
MC-021 .
AUX
OUT
jack
for
track
1
AUX
IN
jack
for
track
2
Page 31

Start
the
projector
and adjust
the
AUX OUT level
of
track 1 with
the
volume
control
knob
of
track 1 so
that
the
level
meter
needle stays
around
0 (100%).
S
et
the
controls
for track 2
to
the
recording, and
start
the
projector
.
Adjust
the
recording level
of
track
2 with
the
volume
control
knob
for
track
2, and transfer sound from
track
1
to
track 2.
Note
:
1. When
the
volume
control
knob
for
track
2 is
turned
too
far, undesirable
self
oscillation
may
occur.
(I n
this
case,
level
meter
swings
extremely
to
the
RH
end
of
meter
range.)
Adjust
the
volume
control
so
that
the self oscil-
lation
will
not
occur.
2.
Monitoring
the
sound
being
reproduced
from
track
1 and
being
recorded
on
track
2 is
possible
.
Volume
control
knob
for
track
1
Volume
control
knob
for
track
2 '
29
Page 32

30
To
transfer sound
from
track 2 to
track
1,
connect
AUX
OUT
jack
for
track 2
to
AUX
I N jack
for
track 1 with
the
supplied cord
MC-021_
Use
the
controls
for
recording
for
track
L
• Sound mixing during track
to
track sound transfer
Elmo
4-channel
mixer
MX-4
(option)
is
convenient
for
mixing
sound
during
track
to
track
sound transfer.
ELMO
4-channel
mixer
MX-4
Cassette
tape
recorder
(ELMO
Cinematic
Sound
OR-1)
Page 33

Double (sound
on
sound) recordingl
Fade recording
The
GS-800
is
equipped wi
th
automatic
sound fade-in/
out
recording mechanism.
Wi
th
this
facility,
sound can be added over
the
recorded
track
without
erasing
the
original sound. Selection
of
fading
time
is
possible.
Set
the
fade recording selector at
QU
ICK
or
SLOW.
At
QU
ICK
position,
fading-in/
out
time
is
approx.
0.5
sec.
At
SLOW
position,
fading-in/out
time
is
approx. 3
sec.
Fade
recording
selector
One
case
of
double
rec.ord
ing
(Sound
level
ratio
of
original
sound
and
newly
added
sound
depends
on
double
recording
level
selector).
Original
sound
/
~
Original
sound
I
~
Newly
added
sound
QUICK:
QUICK:
approx
.
~
approx.
0
.5
sec.
0.5
sec.
SLOW:
SLOW:
approx.
Double
recording
approx.
3
sec
.
level
selector
3
sec
.
/
Fade-in
Fade-out
Press
the
fade
recording
button
- .
J
31
Page 34

32
Set
the
double
recording level
selector
at
the
desired position.
Sound level ratio during
the
double recording
is
as follows.
Selector
Orig inal
sound
Added
sound
~
0%
1
00
%
~
approx.30%
approx.70
%
~
approx
. 70%
approx.30%
Connect
the
inputs
and
adjust
the
recording level while depresssing
the
recording
button.
Note
:
1.
Recording
indicator
does
not
light
.
2. I n
case
of
double
recording,
record-
ing level
cannot
be
indicated
on
the
level
meter.
Load
the
film
and
advance
the
motor
switch clockwise
to
"(]~"
through
"~F",
while depressing
the
recording
button.
Note
:
1.
The
recording
indicator
does
not
light
even
if
recording
button
is
depressed.
2.
On
this
setup,
original
sound
cannot
be erased
and
newly
adding
sound
cannot
be
recorded
.
Double
recording
level
selector
Motor
switch
Page 35

Depress
the
fade recording
button
just
when
the
desired scene
for
double recording comes.
The
button
is
locked by pushing up while depressing.
Automatic
fading-in
time
is approx.
0.5
sec.
at
the
QUICK position
of
the
fade re-
cording selector,
and
approx. 3 sec.
at
the
SLOW position.
Then
sound
to
be added
will gradually increases
to
the
preset
level with
double
recording level selector,
and recording indicat
or
increases its glow
with
the
recording level.
Fade
recording
button
33
Page 36

34
To
release
the
double
record
ing/
fade
re-
cording,
depress
the
fade
recording
button
downward.
Then
additionally
recorded
sound
will
gradually
reduce
and
orig
i-
nal sound
will
dominate. The
fading-out
time
of
added
sound
is
approx.
0.5
sec.
at
the
QUICK
position
of
fade
recording
selector,
and
approx.
3 sec.
at
the
SLOW
posi
tion. Record-
ing
indicator will decrease
its
glow
with
the
re-
duction
of
recording
sound
.
Remote
control
of
double
recording
/
fade
recording
operation
is possible
with
a cable re lease.
1.
Attach
the
cable release
to
the
cable release
socket
.
2.
Double
recording/fade
recording
is
being
done
during
the
cable release
is
being depressed.
3.
By
setting
the
release
free,
double
recording/fade
recording
is
cancelled.
Note:
1.
It is
recommended
to
use a
camera
cable release a
little
longer.
2.
Cable
release
operation
is
applicab
le only
for
double
recording/fade recording.
On any particular part of simultaneously recorded
film,
sound
can
be
erased
completely or
its
volume
can
be
reduced witn double recording mechanism .
• To e
rase
the
sound;
Setting
double
recording level selector at 0 , make
double
recording
without
connecting
any
sound source .
•
To reduce the sound
volume par
tially;
Setting
doub
le recording level selector at
~
or
~
, make
doub
le recording
without
connecting
any
sound source.
Page 37

Sound transfer from simultaneously
recorded stereo tape
to
sound tracks
Currently available
Super
8
sound
camera has
no
stereo
recording
facility.
But
GS-800 allows
to
make
stereo
sound
film
with
picture-
sound
synchronization
by transferring
the
stereo
sound, which was
recorded
simultaneously with
the
picture
by using an
independent
stereo
tape
recorder, from
the
stereo
tape
to
sound
tracks
of
film. When
the
sound
to
be recorded does
not
accord with
the
scene
of
movies
due
to
the
fluctuation
and
/or
deflection
of
running speed
of
tape
recorder
or
projector, use GS-800's
projection
speed
control
facility.
When transferring
the
sound
from
tape
to
sound
tracks, adjust
the
speed
with
the
GS-800's speed
knob
so
that
the
picture
may
meet
the
scene.
Note:
1.
Projection
speed can be
varied
within ±appro
x. 1 frame
at
18
fps
and
within ±appro
x. 2
frames
at
24
fps
.
2.
For
ordinary
recording
and
play-
back,
be
su
re
to
set
the
speed
knob
in
the
middle
.
.----~
Speed
knob
Decreasing
EED
ADJ Increasing
35
Page 38

Microphone
Supplied
microphone
is
high-performance
electret
condenser
type,
which
requires
one
AA
(or
R6)
battery
for
operation.
Be
sure
to
install the
AA
(or
R6)
battery
before
operation
.
Note
:
Unload
the
battery
in
case
microphone
is
not
used
for a long
time.
If
an
exhausted
battery
is
kept
in
the
microphone
for a long
period,
battery
fluid
may
leak
out
of
the
battery
and
damage
the
microphone
.
36
Microphone
proper
Battery
Wind
screen
Microphones
stand
• Installing battery
Turn
the metal
case
of
the
microphone
counterclockwise
and
pull
out
the
inner
body
until
the
battery
holder
appears.
Load
it
with
an
AA
(or
R6)
battery
in accordance
with
the
polarity
indication.
Note
:
The
exhaused
battery
affects
output
level
of
the
microphone.
In
such a case, replace
it
with a new
one
.
Public address
The
Page 39

MAINTENANCE
AND
CHECK
37
Page 40

Cleaning
To
get
maximum
performance, regular cleaning
is
vital. When cleaning,
be
sure
to
set the
motor
switch
at
"OF
F"
and
to
disconnect
the
power
cord.
•
•
•
Pull
the
top
of
the
front
cover
toward
you
to
open .
Swing the
lens away
from
the
pro-
jector.
Gent
ly
clean the aperture and
pressure
plate
with
the brush
supplied
or
soft
lint-free
cloth.
Front
cover
Dust
which
adheres
to
the magnetic head surface
may
affect
recording/
playback
performance.
So
clean the head surface
gently
by
cleaning
stick
or
soft
cloth
.
38
Reproducing sound through a stereo set
Connect
with
a stereo
adaptor
OUT
the
Adjusting
1.
Adjust
-1
2.
Adjust
of
Page 41

Replacing projection lamp
• Disconnect
the
power
cord
and
set
the
motor
switch
to
"OFF".
•
Use
12V-100W halogen lamp with a cold mirror. (ANSI
code
EFP
or
equiva-
lent.)
• It
is
recommended
to
prepare a spare lamp.
•
•
•
Remove
the lamp
cover
by
pulli
ng
toward
you.
Swing
up
the
lamp ejector, and
the
lamp will
come
away from
the
socket.
Note:
When
replacing
the
lamp
in a
hurry
during
projection,
be
careful
as
the
lamp
may
still
be
hot.
Push
the
lamp into
the
socket
securely
and
swing
down
the
ejector.
Ejector
39
Page 42

Voltage selection
Voltage can
be
adjusted
to
comply
with
electrical requirements
of
each
country.
(There
is
a single voltage model
that
complies
with
the electrical regulations
and
condition
of
each
country
.)
No
te:
o
•
•
Disconnect
the
power
cord .
Looses screws and remove the rear cover.
Pull
out
the
voltage selection plug.
Align
the
notch
with
the
required
voltage and
then
insert the plug back
into
the socket
so
that
the
voltage can
be
read
through
the
notch.
Projector
sold in
the
USA
is
not
designed
for
voltage
alteration
.
40
Reverse projection
Advance
clockwise
and"R~".
Page 43

Changing projection lens
o
•
Turn
the
focus
knob
fully
clock-
wise,
and
pull
out
the lens
gently
.
Turn
the focus
knob
fully
clock-
wise,
while
pulling
focus
knob
towards
you,
insert the lens barrel
into
the
sleeve
until
the lens
is
all the
way
in.
Storing
o
•
Make sure
that
the
projector
has
cooled
sufficiently
.
Cover the
projector
with
the
supplied
dust
cover, and store
it
at
the
place free
from
moisture
.
41
Page 44

Trouble-shooting hints
• Motor does not run
1.
Is
the
power
cord
properly
plugged in?
2. Does
the
fuse
blowout?
• Film does not thread properly
1.
Is
the
film leader
correctly
trimmed?
2.
Isn't
the
film
extremely
curled?
3.
Is
the
auto
thread
lever set?
• Projection lam p does not come
on
1.
Is
the
motor
switch
set
at
(}
?
2.
Isn't
the
lamp itself defective?
• Recording
is
not possible
1.
Is
the
sound selector
at M position?
2.
Is
the
fade recording selector
at
NORMAL
REe?
• Playback
is
not possible
1.
Is
the
sound
selector
at
proper
position
(M
for
magnetic
sound
film
or 0 for
optical
sound
film)?
2.
Isn't
the
volume
control
knob
turned
fully
counterclockwise?
3.
Isn't
the
exciter
lamp
for
optical
reproduction
broken?
• Stereo effect
in
playback
is
hardly obtained
1.
Is
the
stereo-mono
selector
at
STEREO
position?
2.
Is
the
volume
control
knob
turned
properly?
3.
Is
the
connection
of
the
extension
speakers for
the
R channel and
L
channel
correct?
4.
Is
the
film a
stereophonically
recorded
one?
5. Are
the
extension
speakers
connected
at
the
proper
polarity?
• Double recording
is
not possible
1. I s
the
fade record ing
button
depressed?
2.
I s
the
double
recording level selector
set
at
proper
position?
42
Page 45

Accessories
• Elmo viewer type
100
With
the viewer
type
100,
you
can
show
your
films
under
daylight
con-
dition.
Use
the
GS-800 adapter
to
attach viewer
to
your
projector.
• Continuous loop projection device
EF-400
No
rewinding
necessary. When attached
to
your
GS-800
projector,
EF-400
provides
fully
automatic
and
continuous
projection.
Equipped
with
loop-sensor
and
auto-stopper
to
automatically
stop
projection
if
the
film
breaks. Accepts
up
to
400ft
(120m)
of
film.
• Long-focus zoom
lens
Sharp F 1.4,
25 -50
mm
long-focus
zoom
lens
for
projection
in a large
auditorium
.
• Fast zoom
lens
Exceptionally
bright
wide-angle F 1.1,
12.5 -25
mm
zoom
lens.
43
Page 46

• Extension speakers ES-650
High-fidelity
speakers
mounted
in
wooden
cabinet
.
Rated
input: lOW
(max. 20W)
•
Twin
2-way speaker
High performance extension speakers
wi
th a 10"(25cm)
woofer
and a
horn
type
tweeter
. Especially suitable
for
pr
ojection
in a large
auditorium
Stores
conveni
ently
in one
portable
case.
• 4-channel mixer
MX-4
For
mixing sound
from
four
separate
sources
onto
one
track.
With
this
mixer
you
can
perform
professional fade-in,
fade-out
and
over-lapping.
Easily
connects
to
tape recorder,
record
player and
microphone.
• Elmo rewinders
44
Large reel
capacity-1200ft
(360m).
Fast
winding.
One
rotation
of
crank
turns
reel three times.
•
Page 47

• Sound editor
912/S
Incorporates S
uper
8/Single 8 mag-
netic
sound
reproduction
facility.
Capable
of
flickerless
projection
at
the
constant
speed
of
18 and
24
fps .
For
editting
convenience, possible
to
adjust
projection
speed at the range
of
10-30 fps
continuous
ly. Large
120
x
90
mm
built-in
screen assures
you
bright
and clear image
projection
.
• Editor
912
Accepts
both
Super 8 and Regular 8
film
. Includes sound
monitor,
film
counter
and
film
cleaner
as
optional
attachments.
An
easy-to -handl
e,
qual
ity
editor with
a large,
bright
screen
for
produc
ing
fine
sound
or
silent film .
• Daylight projection mirror
This accessory
mirror
provides a
clear
projection
image
under
daylight
conditions
when
used
with
the special
Elmo
translucent
rear
projection
screens .
• Translucent
screens
60
cm x
80
cm
(23.6"
x 31 .
5")
39
cm x
52
cm
(15.4" x 20.5")
Special
quality
screens
for
rear pro-
jection
under
daylight
condition
.
45
Page 48

Accessory cords
Code No.
Specification
s
MC-DOl
a::::e=:::== ....
........
=e=:J:=
1.5m
3.5
<1>
3.5
<1>
MC-
002
~
......
~
1.
5m
6¢
6¢
MC-D0
3 QELJt=c
.
=c=J=
"
1
.5m
0
3.5
<1>
u
c
eC>
E=F
....
0
......
. ==:::::!:J:=
.
;:;
MC-
004
eC>
/
u
'"
c
1.5m
c
cl
ip
0
()
MC-
006
~l=
1.
5m
.....
==:::=::::::J=
3.5
<1>
MC-D09
==CJ/ID)!3=
1.0m
..
=CJ1!IIICF:o
3.5
<1>
3.5
<1>
MC-Ol0
~
......................
....
..
::flliIICFo
3.5
<1>
GREy3.5<1>
MP-OOl
3.5
<1>
ac=C[p
6¢
(Female)
g
a.
MP-
002
6
<1>
==a::=IJ
3.5
<1>
'"
"
«
(Female)
MP-D04
3.5
<1>
~
Pin jack
...
={=::J
'"
~
~
SC·OO2
11111"
••••
10cm
"'''
Q)
...
0.0
enu
6¢
(Female)
46
Re
mar
ks
1.5
m
I
1.5 m
1.
5m
1.5 m
1.5m
1.0mm
From
earphone
or
monitor
jack
to
AUX
IN
input
From
earphone
or
monitor
jack
to
MIC
input
10cm
For
ST-800,
ST-1200D,
ST-1200HD,
GS-1200
10n
Page 49

Cord connection
• Reproduction
through
stereo amp.
I
~ISSJ
~~
~
I'
~
.- A UX IN
• Stereo·recording
from
projector
• Monaural-recording
from
projector _
h.-",---
F'1
Uilll.~
AUX
IN
•
Monitor
ing
with
earphone
cU}
_o------'
•
Reproduction
through
extension speakers
• Monitoring with
headphone
M
P-004
<~
.
c:¢:~
• PA system
• Recording narration
• Stereo·recon;Jing
from
stereo tape recorder
=
i
~~:
I
L
~
• Monaural-recording
from stereo set
--
--
--
.....
•
Track
to
track
sound
transfer recording
(A)
From
Track 1 to
Track
2 (MC-021 )
(B)
From
Track 2
to
Track 1 (M
C-021 )
~
MC
-003
• Monaural-recording
47
Page 50

Projection distance and image size
Projection distance
Image size
in width
t = 15 mm t = 25 mm
t = 50 mm
70 cm 1.95 m 3.
26
m 6.
51
m
(2.30
ttl
(6.40
ttl
(10.70
ttl
(21.36
ttl
90cm
2.50 m 4.17 m
8.
34
m
(2.95
ttl
(8.20
ttl
(13.
68ttl
(27.36
ttl
1 m 2.78 m 4.63 m
9.26
m
(3.28
ttl
(9.12ttl
(15 .19
ttl
(30.38
ttl
1.25 m
3.46
m 5.77 m
11.55 m
(4.10
ttl
(11.35
ttl
(18.
93
ttl
(37.89
ttl
1.5 m 4.15 m
6.92
m 13.84 m
(4 .92
ttl
(13.62
ttl
922.70
ttl
(45.41
ttl
1.8 m 4.
98
m
8.29 m 16.58 m
(5.91
ttl
(16.
34
ttl
(27.20
ttl
(54.40
ttl
2.4 m 6.62 m
11.04 m 22 .
08
m
(7.87
ttl
(21.72
ttl
(36.22
ttl
(72.44
ttl
3
m 8.27 m
13.79 m 27.57 m
(9.84
ttl
(27.13
ttl
(45.24
ttl
(90.45
ttl
48
Page 51

Projection time and film length
24
fps
18
fps
24
fps
Time
Time
(min
.)
(min
.)
m
ft
m
ft
m
ft
1 6.1
20
4.6
15
21
128.0
420
2
12.2
40
9
.1
30
22
134.1
440
3
18.3
60
13
.7
45
23
140
.2
460
4
24.4
80
18.3
60
24
146
.3
480
5
30.5
100
22.9
75
25
152.4
500
6
36.6
120
27.4
90
26
158.5
520
7
42.7
140
32.0
105
27
164.6
540
8
48.8
160
36.6
120
28
170
.7
560
9
54
.9
180
41.1
135
29
176.8
580
10
61.0
200
45.7
150
30
182.9
600
11
67
.1
220
50.3
165
31
189.0
620
12
73
.2
240
54.9
180
32
195
.1
640
13
79
.2
260
49.4
195
33
201.2
660
14
85.4
280
64
.0
210
34
207.3
680
15
91.4
300
68
.6
225
35
213.4
700
16
97.5
320
73
.2
240
40
243.9
800
17
103.6
340
77
.7
255
50
304
.8
1000
18
109.7
360
82.3
270
60
365
.8
1200
19
115.8
380
86.9
285
70
426
.8
1400
20
121.9
400
91.4
300
80
487
.8
1600
18
fps
m
ft
96
.0
315
100
.6
330
105.2
345
109.7
360
114
.3
375
118
.9
390
123.4
405
128.0
420
132.6
435
137.2
450
141.7
465
146.3
480
150.9
495
155.4
510
160.0
525
182.9
600
228.6
750
274.4
900
--
320
.0
1050
365.8
1200
49
Page 52

Specifications
50
Power
source:
Power
consumpt
ion:
Projection speed:
Film:
Film
loading:
Reel
capacity:
Projecti
on
lamp:
Projection
lens:
Motor
:
Reverse
projection:
Film
rewinding:
Frame
counter
:
Angle adjustment:
Sound system:
Stereo
recording/playback:
Single phase
AC, 50/
60Hz
200W
24 & 18
fps
(Fine
speed
adjustment
is
possible.)
Super 8/Single 8 sound and silent
films
Fully
automatic
Max.
240m
(800
ft)
12V-100W
Halogen
lamp
with
cold
mirror
(ANSI
Code: EFP)
F 1.3 f = 15-
25mm
zoom
lens
Frequency generator servo
DC magnet
motor
Possible
High speed
rewinding
Built-in,
one
digit
per 18 frames
Up
to
7°
(Inclination
adjustment
is
possible.)
Model
M
-O
...
Magnetic and
optical
sound play-
back and magnetic record ing
Model M
..
..
Magnetic playback and recording
S
imultaneous
magnetic
recording/playback
of
sound on
track
1 (Main stripe) and
on
track
2
(Balance stripe)
for
true
stereo sound
is
possi-
ble.
2-
track reco
rding/playback:
Simu
ltaneous and
individual
recording/play-
back
of
sound
on
track
1 and/or
track 2 is
possible.
Track-to-track
sound transfer: Possible
from
track 1 to
track 2 or
vice versa.
Fade recording:
Double
recording:
Spot
recording:
Limiter recording:
Public address:
Auto
fade recording
is
possible simultaneously
or
independently
on
track
1 and
track
2
(Quick/Slow
fading
time
selection is possible.)
Possible s
imultaneously
or
independently
on
track
1 and
track
2 (Recording level
of
added
so
und
can be adjusted in 3 steps.)
Possible simultaneously
or
independently
on
track
1 and
track
2.
Possible,
limiter
works
for
sound
from
both
AUX
IN
and MIC.
Possible
through
track
1/track
2 channel.
(Appliicable
Mic. Impedance:
500
ohms -
10K
ohms) .
Page 53

"'-
_
-
--
Monitoring:
Volume
control:
Tone
control:
Amplifier:
Music
power
output:
Continuous
power
output:
Stereo-mono
selecti
on:
Recording
indication:
Level
meter:
Input
terminals:
MIC
(x2):
AUX
IN
(x2):
Output
terminals:
AUX
OUT
(x2):
MONITOR
(x2)
:
STEREO
HEADPHONE:
EXT
SP
(x2):
Speaker:
Record ing/
playback
head:
Photo
electric
element:
.
Exciter
lamp:
Microphone:
Dimensions & Weight:
Possible,
both
track
1 sound and
track
2 sound.
Individual
volume
control
of
track
1 and
track
2 is possible.
Treble
control
type
Stereo
amplifiers
using 7 ICs, 5 transistors and
16 diodes.
8W x 2
with
extension speakers (8 ohms)
4W x 2
with
bu
ilt-in
speakers (16 ohms)
6W x 2
with
extension speakers (8 ohms)
3W x 2
with
built-in
speakers (16 ohms)
Possible
2
LEDs
Stereo
type
I
nput
impedance .
..
1 OK
ohms
Applicable
Mic
.
Impedance . .
.....
500
ohms -
10K
ohms
Input
level
...
. . . .
-30 ~ -60
dBs
I
nput
impedance
...
50K
ohms
I
nput
level . .
.....
6 ~ -30
dBs
Output
impedance . .
600
ohms
Applicable
earphone impedance .
... 8-16
ohms
Applicable
impedance
......
.. 8 or
16 ohms
Applicable
speaker impedance
.......
8 ohms
Two
speakers are
built-in
impedance
..
16 ohms
2-track
special
alloy
magnetic head
(Alternating
bias system)
Solar
battery
DC
lighting
system
4V-0.75A
Halogen
lamp
Electret
condenser
type
Impedance :
600
ohms
330 x 260 x 190
mm
(13.0
x 10.2 x 7.5 in.)
9.4
kgs. (21 Ibs.)
Specifications
are subject
to
change
without
prior
notice.
51
Page 54

Block diagram
52
~
~
~!A
l>
J'
ZO
,p
,
-u
L
__
_
':i
__
~
(J)
-u
[-
~
--I
I
I
I
I
I
I
I
L
____
_
~
"
~:
s:
l>
o C
z x
o
c
-<
l>
C
X
Z
CONTENTS
NOMENCLATURE
INTRODUCTION
PROJECTION
RECORDING
MAINTENANCE
Page 55

WARNING
THIS
APPLIANCE MUST
BE
EARTHED
IMPORTANT
The
wires
in
this
mains lead are coloured
in
accordance
with
the
follow-
ing
code
:
Green
and
yellow
....
..
....
.
.....
....
. .
Earth
Blue
.....
.
.. ..
.....................
Neutral
Brown
..
...
.. ..
...
.....
............
Live
The
appliance
must
be so
operated
that
air
flow
to
and
from
ventilation
slots
is
not
impeded.
-
This
warning
is
applicable
for
United
Kingdom
only.
-
53
Page 56

ELMO CO.,
LTD.
Nagoya,
Japan
OVERSEAS
SUBSIDIARY
COMPANIES
U.S.A.
Canada
West Germany
T -
·1-303B
535
Elmo Mfg. Corp.
32-10 57th Street, Woodside,
NY
11377
Tel. (212) 626-0150
21220 Erwin Street, Woodland Hills, CA 91367
Tel. (213)
3464500
Elmo Canada Mfg. Corp.
44
West
Drive, Brampton, Ontario L6T 3T6
Tel. (416) 453-7880
1975 Maple Street, Vancouver,
B.C.
V6J 3S9
Tel. (604) 738-1215
Elmo (Europe) G.m.h.H.
Elmo-Haus, Steinstr
23,4000
Dusseldorf
Tel. (0211)
326867,326895
Printed
in
Japan
 Loading...