

Elmo BOXi T-350 Quick Start Manual
ENGLISH
FRANAIS
Deutsch
ESPAÑOL
IMPORTANT SAFEGUARD
QUI
CK START GUID
Please read the IMPORTANT SAFEGUARDS carefully
future reference.
Please download the BOXi
ensure safe and proper use
BOXi Pr
oduct Websi
te: http://www
E
Instruction Manual from the followi
S
.elmobo
xi.com
/
before usi
ng websi
ng this pr
oduct. Keep for
te and read carefully
P5P
P
11P18
10
to
CON
GUIDE DE DÉMARRAGE RAPIDE
ut
Téléchargez
Site du produit BOXi
SEILS IMPORTANTS DE
ilisation ultérieure.
http://
www
.elmobo
SÉ
xi.com
CURIT
/
É
WICHTIGE SICHERHEITSHINWEI
Kurzanleitung
Bitte lesen Si
Ger
ät benutzen und bewahren Sie sie für eine zukünftige Bezugnahme auf.
Laden Si
BOXi Pr
e diese WICHTIGEN SICHERHEITSHINWEISE sorgfältig durc
e die Bedienungsanweis
oduktwebseite
ung von der folgenden BOXi Websei
http://
www
.elmobo
xi.com
SE
/
h, bevor Si
te herunter.
P
21P26
P
27P34
P
37P42
P
43P50
e das
CONTROL
GUÍA DE INICIO RÁPIDO
Lea atentamente este manual de instrucci
realizar futuras consultas.
Descar
Pági
gue este manual de instrucci
na web de productos de BOXi
ES DE
SEGURIDAD IMPORT
ones antes de usar el producto y guárdelo para
ones de la sigui
http://
www
ente página web de BOXi
.elmobo
xi.com
ANTES
/
.
P
53P58
P
59P66


ENGLISH
Please read
the projector.
This
guide describes
DVD player as
this
and this
K
eep for future reference.
the basic operation of the projector wi
an example. Refer to the instruction manual of the BOXi T-350 for
any other operations and detailed informati
BOXi T-
Downl
BOXi Pr
350 Instruction manual
oad the instruction manual from the followi
oduct Websi
©
2013 Copyri
Any
names, company names and product names referred to in this
or register
ght ELMO C
ed trademarks
te
http://
www
.elmobo
o., Ltd. All ri
of the respective com
ghts reserv
on.
xi.com
.
ed
panies.
guide carefully
th a connection to a
ng BOXi website.
/
guide are trademarks
before usi
ng

T
ABLE OF CONTENTS
TABLE OF CONTENTS ................................................................................................. 4
IMPORTANT SAFEGUAR DS .... ... ........... ... ............. ... ........... ... ... ............ 5
BEFORE YOU USE
QUICK START GUIDE
1 GETTING STARTED
Checking the p
Part names and function
Preparing the remot
2 USING THE PROJECTOR
Installing the pro
C
onnecting to a device ...............................................................................................15
Powering on
Adjusting the pro
Powering off .................................................................................................................18
.................................................................................................................16
. .... ... ........... ... ........... ... ......... ... ... ........... ... ...... ... ... . 9
.... ... ... ........... ... ......... ... .... ........... ... ... ........ ........ 11
........... ... ........... ... ... .... .... ... ... ........... ... ...... ... ... . 11
ackage contents ................................................................................. 11
s ...........................................................................................12
e contro
jector ................................................................................................14
jected image....................................................................................17
l ......................................................................................13
.. ... ........... ... ... ........... ... ........... ... ........... .. 14

I
MPORTANT
R
ead Instructions
SAFE
GUA
RD
S
All the safety and operating instructions should be read before the appliance is
R
etain Instruction
T
he safety and operating instructions should be retained for future reference.
H
eed Warning
All warnings on the product and in the operating instructions should be adhered to.
Follow Instructions
All operating and use instructions should be followed.
Cl
eaning
Unpl
ug this pr
aerosol cl
Attachments
D
o not use attachments not recommended by the product manufacturer as they may
caus
e hazards.
Water and Moistur
D
o not use this pr
o
r l
aundry
Placem
oduct from the wall outlet before cl
eaners. Use a damp cl
tub, in a wet basement, or near a swimming pool, and the lik
ent
s
s
eaning. Do not use liquid cl
oth for cl
e
oduct near water - for example, near a bath tub, wash bowl, kitchen sink
eaning.
e.
operated.
eaners or
,
D
o not place this pr
may
fall, causi
only with a cart, stand, tripod, bracket, or table recommended by the manufacturer, or sold
with the product.
Any m
a mounting accessory recomm
Slots and openings in the cabinet are provi
ope
be blocked or covered.
T
similar surface. This pr
bookcase or
have been adhered to.
ounting of the product shou
Ventilation
rati
on of the product and to protect it from overheating, and these openings must not
he openings should never be blocked by placi
r
oduct on an unstable cart, stand, tripod, bracket, or table. The product
ng serious injury
oduct should not be placed in a built-in installation such as a
to a child or adult, and serious damage to the product. Us
l
ended by the manufacturer.
ded for ventilation and to ensure reliable
ng the product on a bed, sofa, rug, or other
e

Power Sources
This product should be operated only from
marki
ng label. If you are not sure of the type of power supply
appliance dealer or local power company. For products intended to operate from battery
po
wer
, or other sources, r
Gr
ounding or Polarizati
This product may be equipped wi
one blade wider
(gr
ounding) pin.
S
hould read If the 2-wire polariz
the plug st
defeat the
than the other) or a 3-wire grounding type plug, a plug havi
ill
fails
to fit, contact your electrician to replace your obsolete outlet. Do not
s
afety purpose of the polariz
efer to the operating instructions.
on
th either a polariz
ed plug fails
the type of power source indicated on the
to your home consult your
ed 2-wire AC li
ne plug (a plug havi
ng a third
to fit in the outlet, try reversi
ng the plug . If
ed plug. The 3-wire grounding type plug will fit i
ng
nto
a grounding type power outlet. This is a safety feature. If you are unable to insert the plug
i
nto the outlet, contact your electrician to replace your obsolete outlet. Do not defeat the
s
afety purpose of the grounding type plug.
Power-Cord Protection
Power-supply cords s
placed upon or against them, payi
hould be routed so that they are not walk
ng particular
attention to cords at plugs, convenience
ed on or pinched by items
rec
eptacles
Li
ghtning
For
added protection for this pr
and unused for long periods of tim
antenna or cable
po
wer-li
Overl
D
o not overload wall outlets, extensi
c
an result in a risk
A product and cart combination should be moved wi
Quick stops, excessive forc
, and the point where they exi
system. This will prev
ne surges.
oading
of fire or electric shock
e, and uneven surfaces may cause the
t from the product.
oduct during a lightning storm
, or when it is l
e, unplug it from the wall outlet and disc
ent damage to the product due to lightning and
on cords, or integral convenience receptacles as
.
th care.
eft unattended
onnect the
product and cart combination to overturn.
Object and Liquid Entry
Never
push objects of any ki
nd into this pr
oduct through openings as they may touch
dangerous voltage points or short-out parts that could result in a fire or electric shock
Never spill liqui
d of any ki
nd on the product.
Servicing
this
.
D
o not attempt to servic
y
ou to dangerous voltage or other hazards. Refer all servicing to qualified servic
pers
onnel.
e this pr
oduct yoursel
f as opening or removi
ng covers may expos
e
e

Damage Requ
Unpl
ug this pr
iri
ng Servic
e
oduct from the wall outlet and refer servicing to qualified servic
e pers
onnel
under the followi
ng conditions:
-supply cor
d or plug is
damaged.
uct has been exposed to rain or water.
only
those controls
ad
justm
ent of other controls may result i
that are covered by the operating instructions as an impr
n damage and will
work by a qualified technician to restore the product to its normal
service.
Replacement Parts
W
hen replacement parts are required, be sure the servic
replacem
o
riginal
ent parts specifi
part. Unauthoriz
ed by the manufacturer or have the same characteristics as the
ed substitutions may result in fire, electric shock or
e technician has used
Safety Check
U
pon completion of any servic
e or repairs
to this pr
oduct, ask the servic
oper
often require extensive
operation.
-
this indicates a need for
other hazards.
e technician to
perform s
afety che
Heat
T
he product should be si
stoves
, or other products (includi
cks
to determine that the product is i
tuated away from heat sources suc
ng amplifiers) that produce heat.
n proper operating condition.
h as radiators
, heat registers,

CAUTION
RISK OF
ELECTRIC SHOCK
DO NOT OPE
CAUTION:
TO RE
DUCE THE RISK OF
N
ELECTRIC SHOCK, DO NOT
REMOVE COVER (OR
BACK).
NO USER-SERVICEABLE
PARTS INSIDE.
REFER SERVICING TO
QUALIFIED SERVICE
PERSONNEL
.
SA
1965
T
he lightning flash wi
triangle, is i
dangerous voltagewithi
s
ufficient magnitude to constitute a risk
ntended to alert the user to the presence of uninsulated
th arrowhead symbol, within an equilateral
n the products enclosur
e that may be of
of electric shock
to persons
.
T
SA
1966
he exclamati
alert the user to the presence of impor
mai
ntenance (servicing) instructions i
the product.
on point withi
n an equilateral triangle is i
tant operating and
n the literature accompanyi
ntended to
ng
This symbol [crossed-out wheeled bin WEEE A
s
eparate collection of waste electrical
EU countries.
Please do not throw the equipment into the domestic r
Please use the return and collection
r
the disposal
fo
of this pr
oduct.
and electronic
systems available in your country
nnex IV] indic
equipment in the
efuse.
ates
This symbol [crossed-out wheeled bin Directive 2006/66/EC A
indicates separate collection of waste batteries in the EU c
Please do not throw the batteries into the domestic r
r
eturn and collection
the
disposal
of the waste batteries.
systems available in your country
efuse. Pleas
nnex II]
ountries.
e use
for the

BEF
To use this pr
The supplied power cord and AC
use them wi
Be sure to use the power cord applicabl
in J
apan, use the AC
Do not knot or coil the power cord or AC
so may
Carry
vibration or shock to the product. Doing so may damage parts causi
Do not apply vibration or shock during projection. Do not use this pr
vibration or shock is
mal
function.
Do not use this pr
harmful i
Do not use this pr
O
RE YO
oduct, please be sure to use the supplied power cord and AC
th other equipment.
adapter sold wi
damage the cords, causi
this pr
oduct by holding the lower part of the main unit in both hands. Do not apply excessiv
applied to the product. Vibrati
oduct near high-vol
nterference.
oduct in locations subject to humidity
U U
adapter are desi
th the product wi
ng fire or electric shock
tage power lines or power sourc
SE
e to your local power specifications. If the product was sold
adapter cord or wr
gned for exclusiv
th 100VAC
.
on or shock may damage parts causi
, dust, smok
and 50 or 60 Hz
ap them around the AC
adapter.
e use wi
ng malfunction.
oduct in a car or ship where
e, oil smok
th this pr
e. The product may receiv
oduct. Do not
.
adapter. Doing
ng
e or steam. Dirt may
e
e
attach to the optical
Do not use this pr
temperature changes too quickly
Use this pr
Temper
When the product is s
temperature is
image quality. Wait until the condensation is compl
Do not touch the lens. It may leave fingerprint marks which can result in a blurred im
Impor
Us
HDMI cables
D
o not apply excessiv
damage the HDM
Follow the guidelines below to prevent the product from dropping or overturning.
oduct under the followi
ature 5
tant notes when connecting an HDMI cabl
e a HIGH SPEED HDMI cable with the HDMI l
parts, such as the lens, causi
oduct in locations exposed to extreme temperature or locations where the
.
ng environm
35
Humidity less
uddenly br
quickly raised, condensation may occur to the surface of the lens causi
that are not compliant wi
e forc
I terminal, leading to a malfunction.
ought into a warm plac
th HDMI s
e to the HDM
ng reduced im
ental conditions:
than 85(No c
e from a cold place or when the room
etely
gone and the im
e.
ogo.
tandards should not be used.
I terminal while the cable is c
age quality.
ondensation)
age becomes clear
onnected as it could
ng reduced
.
age.
slanted location.
Secur
e and tidy all cables to prevent acci
dentally
pu
lli
ng the projector off any surface.

Luminescent spot and black spot
There may
m
ade-up of many pixels. Though luminesc
pheno
There may be some flickeri
i
n brightness. It is
This product is
There may be some im
device is c
the projection settings according to the input si
Li
fetim
Avoid usi
environm
Doi
ng so may shorten the life of critical components such as the optical
which may lead to degraded im
deemed to be subjected to such abuse. R
distri
be some pixels that do not operate properly
due to the use of an im
ent or black spots may be found on the scr
m
enon peculiar to the im
a phenomenon peculiar to the im
not desi
gned to display such kind of im
age distorti
hanged while the im
age pick-up device and is
ng on the scr
een when shooting a pattern im
on for a moment when the output resolution of the connected
age is projec
ted. This is because the product automatically adjusts
gnal. It is
not a malfunction.
age pick-up device and is
ages.
not a malfunction.
e of the parts
ng the projector in severe conditions such as high temperature, dusty or smoky
ents as well as long-c
ontinuous use in excess of eight hours
age quality. Pleas
e note, warranty repair may not apply i
egarding paid component replacement, please contact
butor the product was purchas
ed from or our servic
e offic
e.
age pick-up device
een, it is
age wi
th gradual changes
not a malfunction.
.
engine and cooling fan
f unit is
a

QUI
CK START
1 GETTING ST
Checki
ng the package c
Pro
jector
GUIDE
ARTED
ontent
AC adapter
s
Power cord
Remot
*Battery included
e contro
l
IMPORTANT SAFEGUARD
QUICK START GUIDE
W
ARRANTY CARD
Rear panel
Volume button
Intake vents
Speaker
Exhaust vent
Control panel Remote sensor
Lens
Focus dial Tilt stand
Rear panel
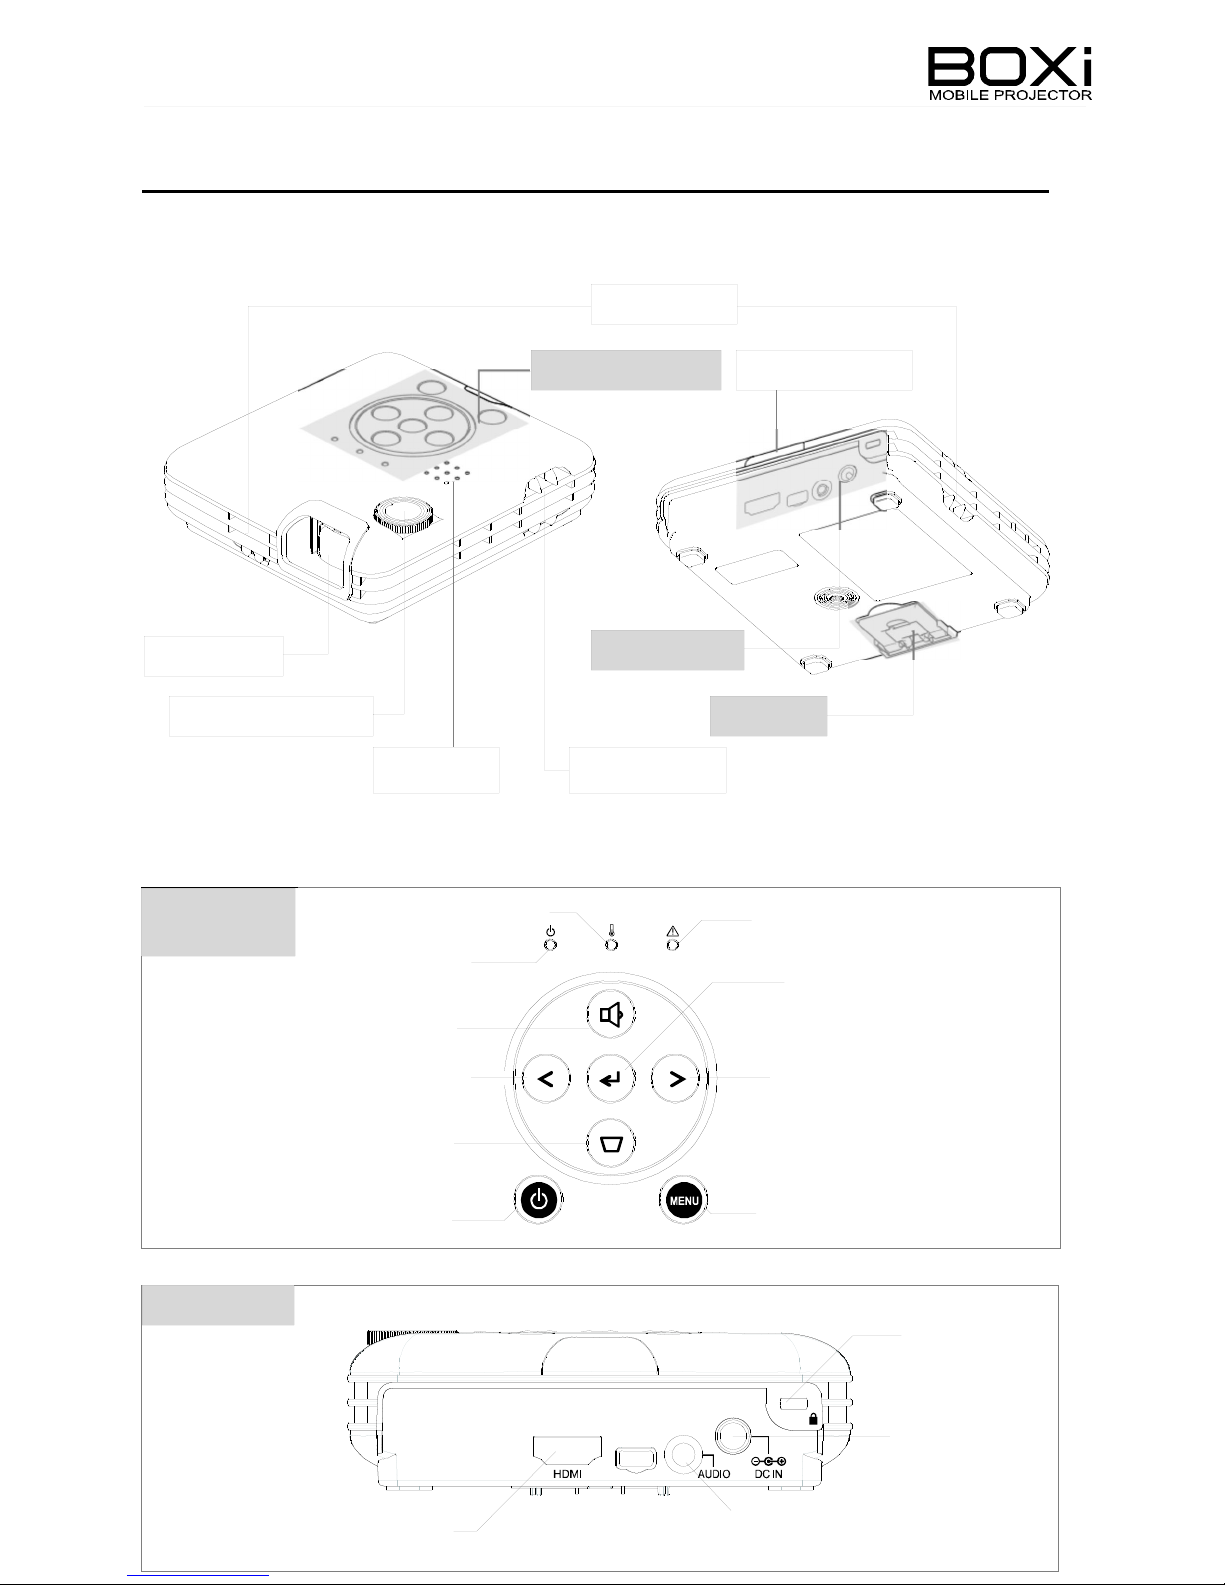
Part names a
TOP/FRONT
BOTTOM /
nd f
unction
s
BACK
C
ontrol
panel
Temper
ature
Power indicator
indic
ator
Warni
ng indic
E
nter button
ator
LEFT
button
RIGHT
button
Keys
tone button
M
Power
button
enu button
Security slot
HDMI
DC IN
AUDIO
(Headphone/External S
peakers)
Tilt stand
Tilt stand 10°
*Tilt s
tand allows y
ou to make front incli
Tilt stand 5°
nation angle 5° or 10° to
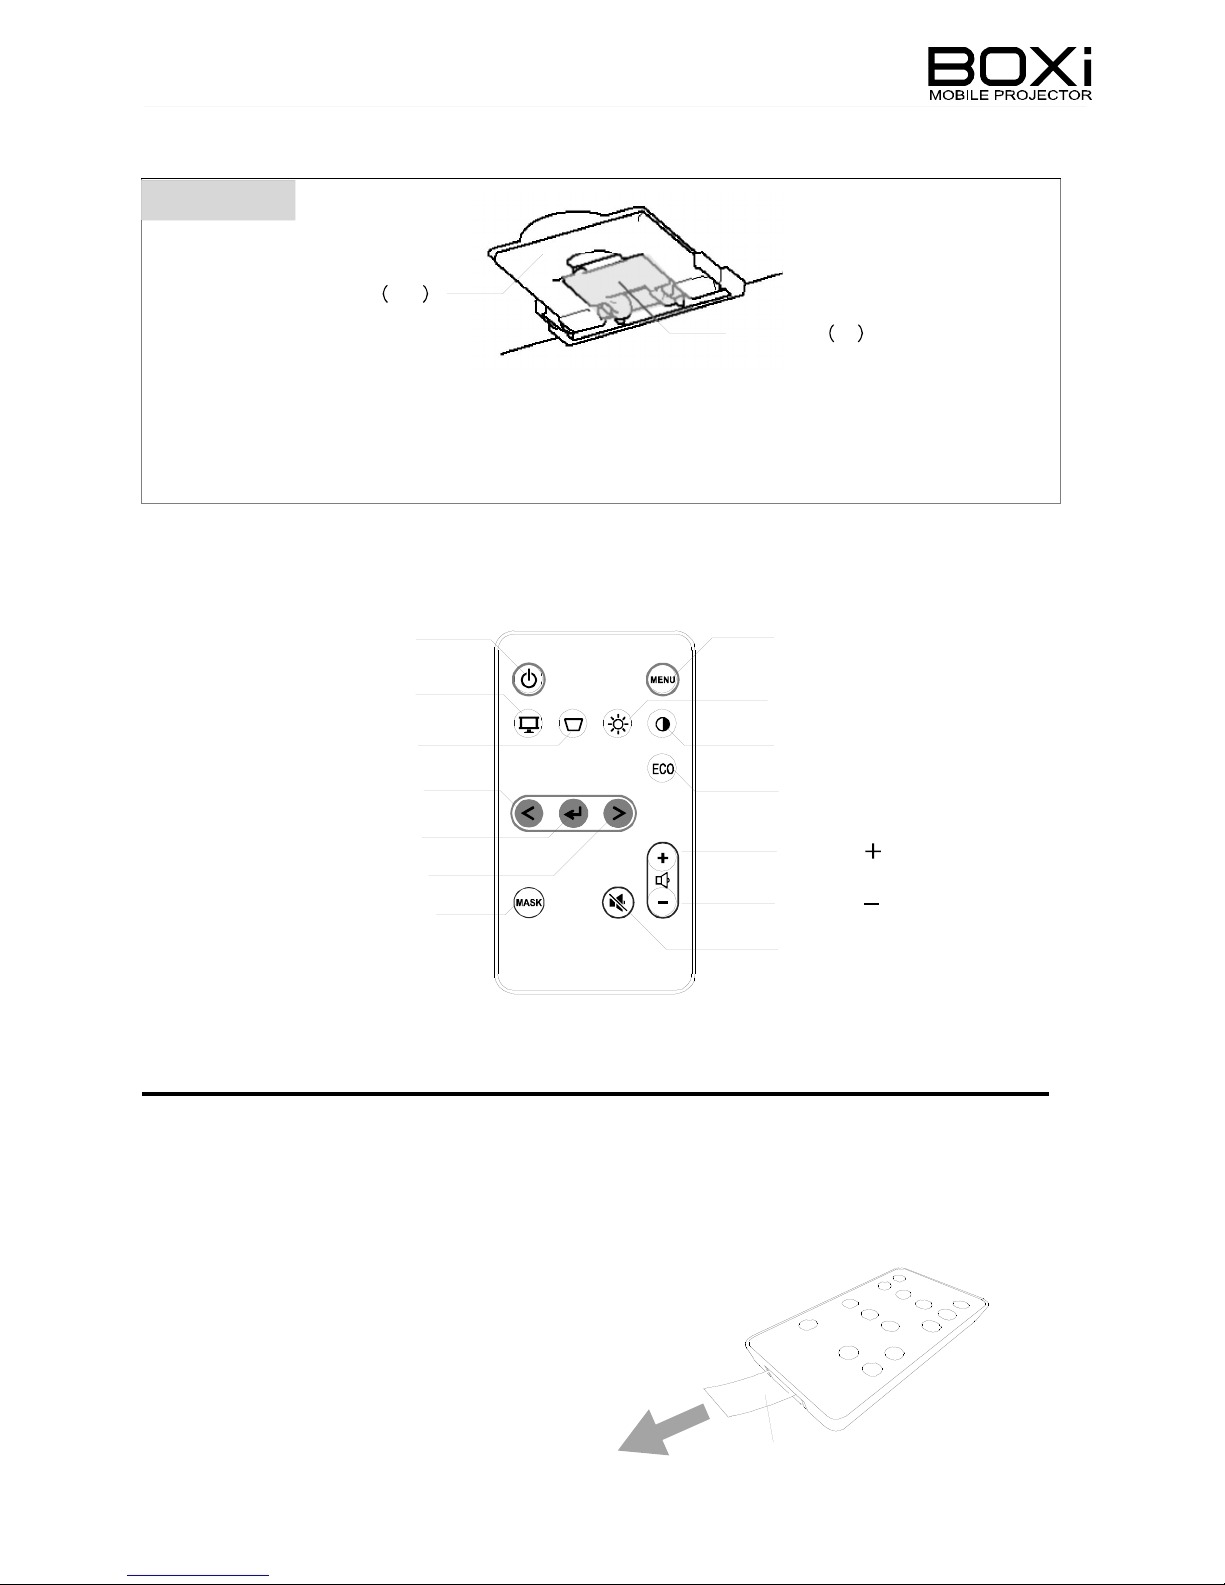
Rem
raise the projected scr
ote contro
Power
button
Display m
Blank scr
ode button
Keys
tone button
LEFT
ENTER
RIGHT
button
een button
l
button
button
een.
M
enu button
ri
ghtne
B
C
ECO
Volum
Volum
MUTE button
ss
ontrast button
button
e button
e button
button
Prepari
ng the remote c
A
battery is pre-installed in the remote control
at the tim
Remov
rem
e of shipment (with insulation sheet).
e the insulation sheet before usi
ote control for the firs
ontrol
ng the
t tim
e.
Insulation sheet
N o t e
H
e
i
g
h
t
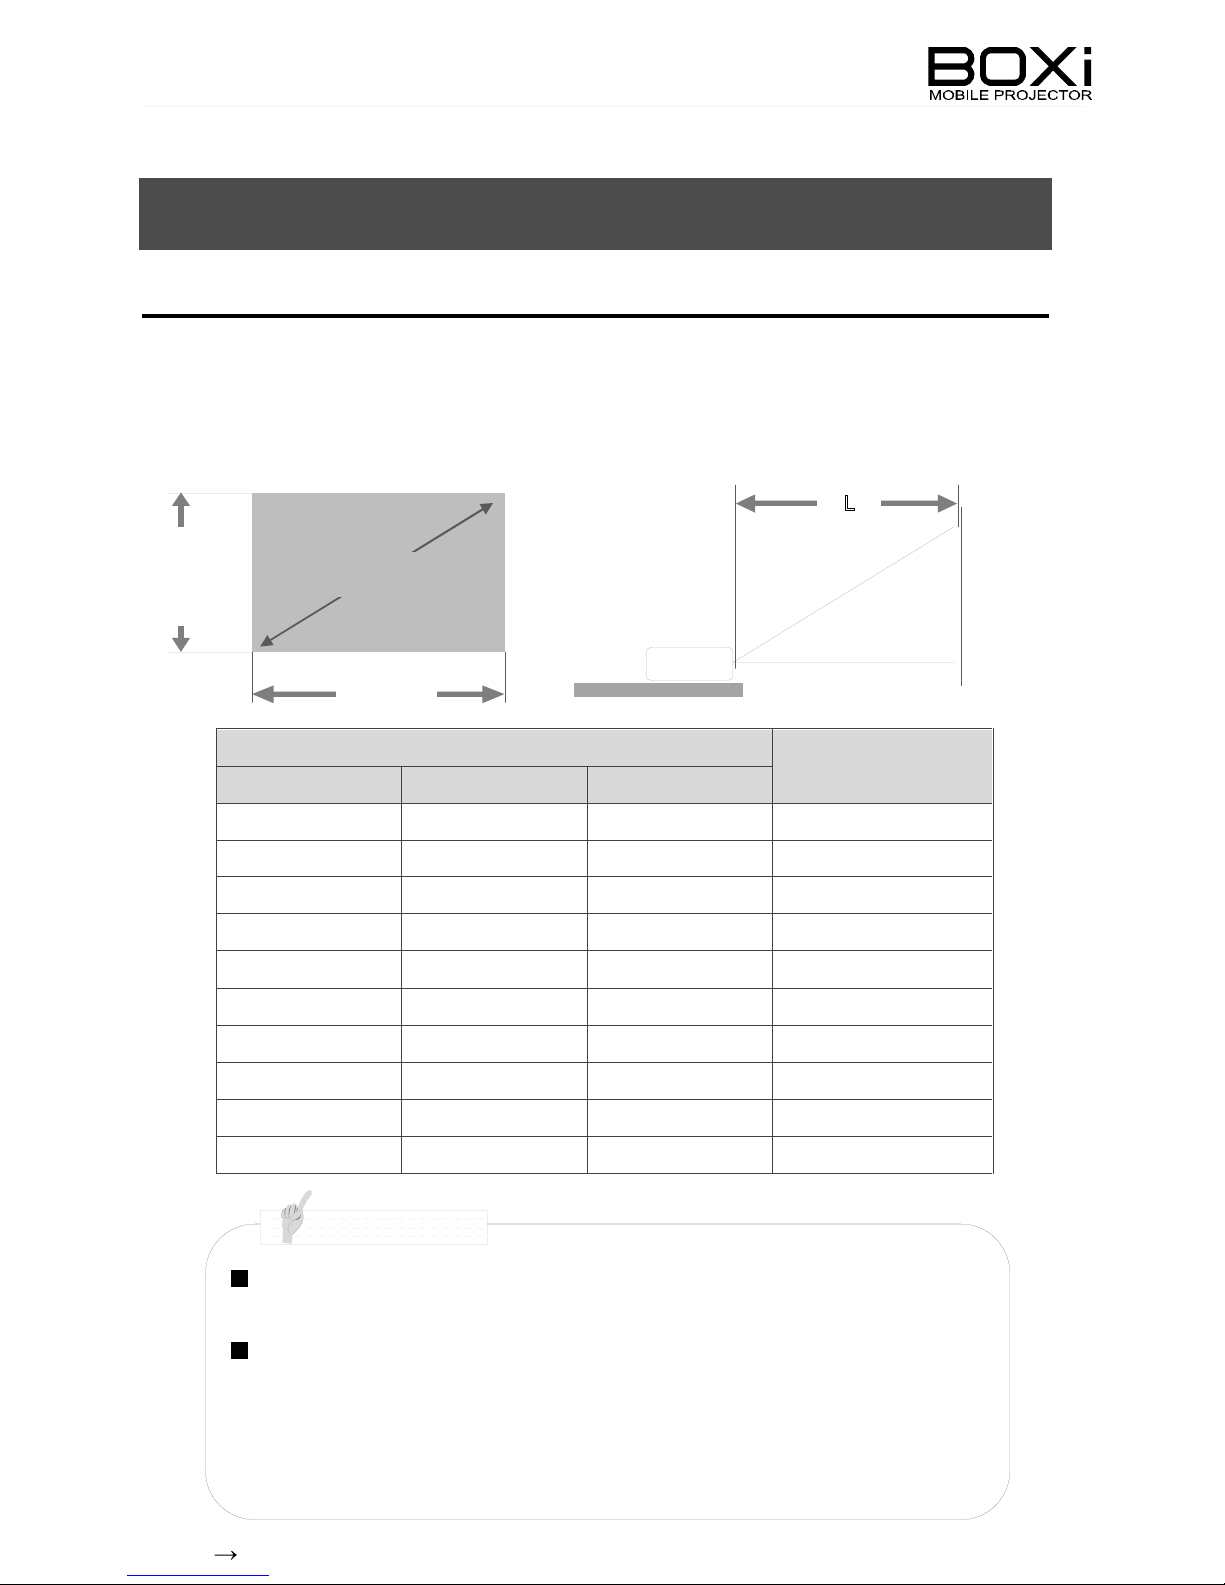
2 USING THE PROJECTOR
Installi
Decide on the positi
T
he dis
siz
e: 25 inch) and 133cm (scr
ng the projector
on to place the projector.
tance between the projector and the scr
een size: 68 inch).
Screen
Inch
size (inch)
Width
Scr
een size
Width (cm)
een should be between 48cm (scr
Hei
ght (cm)
L(cm)
L
Projection dis
een
tance
25 53.8 33.7 48
30 64.6 40.4 58
35 75.4 48.0 68
40 86.1 53.8 78
45 96.9 60.6 88
50 107.7 67.3 98
55 118.5 74.0 108
60 129.2 80.8 118
65 140.0 87.5 128
68 146.5 91.5 133
The values in the table are desi
as an indicati
on only
.
The aspect ratio of the projected im
the aspect ratio of the input si
gn values and may vary. Use them
age in full scr
gnal is di
fferent from 16:10 (suc
een is
16:10. When
h as
16:9 or 4:3), top and bottom or left and right of the im
display
i
n the above table.
R
efer to the instruction manual of the BOXi T-350 for detailed informati
ed and the scr
een size becomes smaller
age will
not be
than those specifi
ed
on.
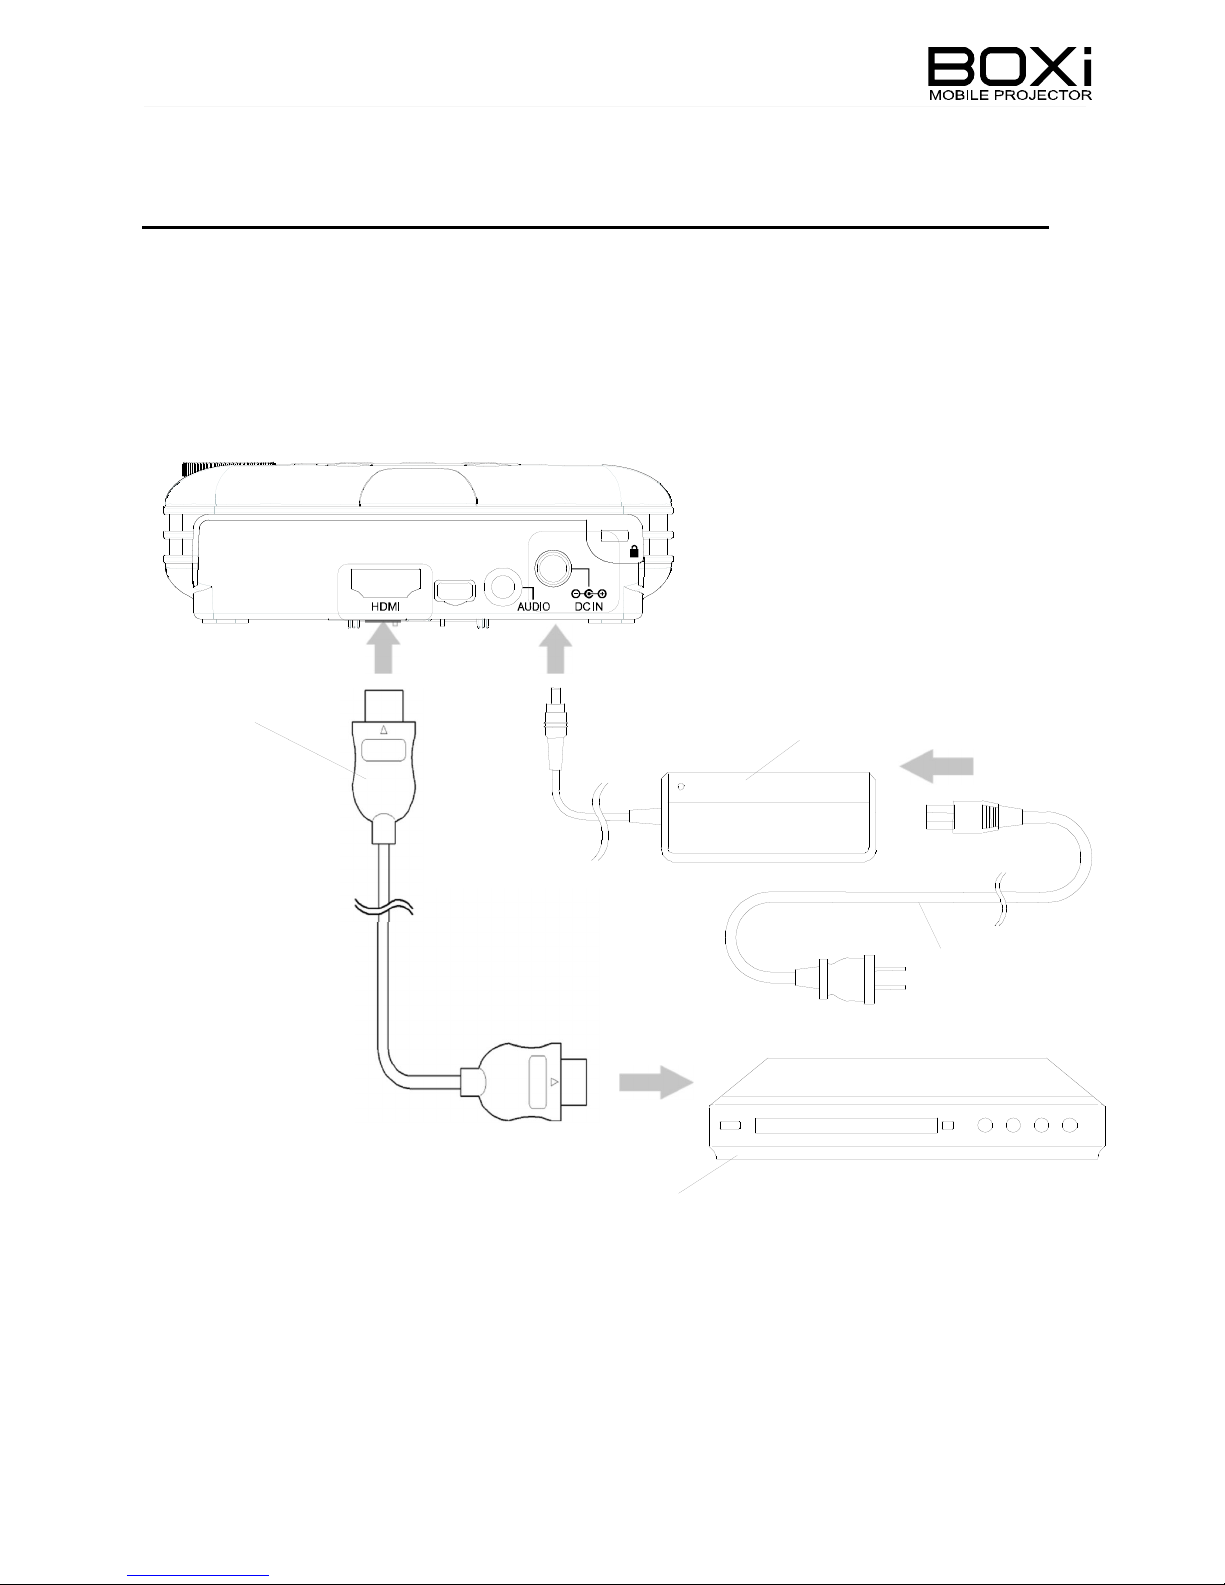
Device (such as a DVD player)
(Sold separately)
-
C
onnecting to a device
Connecting using an HDMI termin
al
1. Connect the power supply (AC
2. Connect the projector to the device such as a DVD player usi
adapter and power cord) to the projector.
ng HDMI cabl
e.
BACK
HDMI cable
AC adapter
W
hen usi
ng HDM
I, use the HDM
Power cor
I terminal and HDMI cable (sold separately).
d

N o t e
Powering on
1. Pr
ess
button on the projector or the remote contro
l.
Rem
C
ontrol panel
ote control
Power indicator
T
he opening scr
It will
power is
turns green.
een appears
take some tim
on.
.
e before you can operate the projector after the
Adjusti
ng the projected image
Focusing the image
1. Us
e the focus dial to focus the im
age.
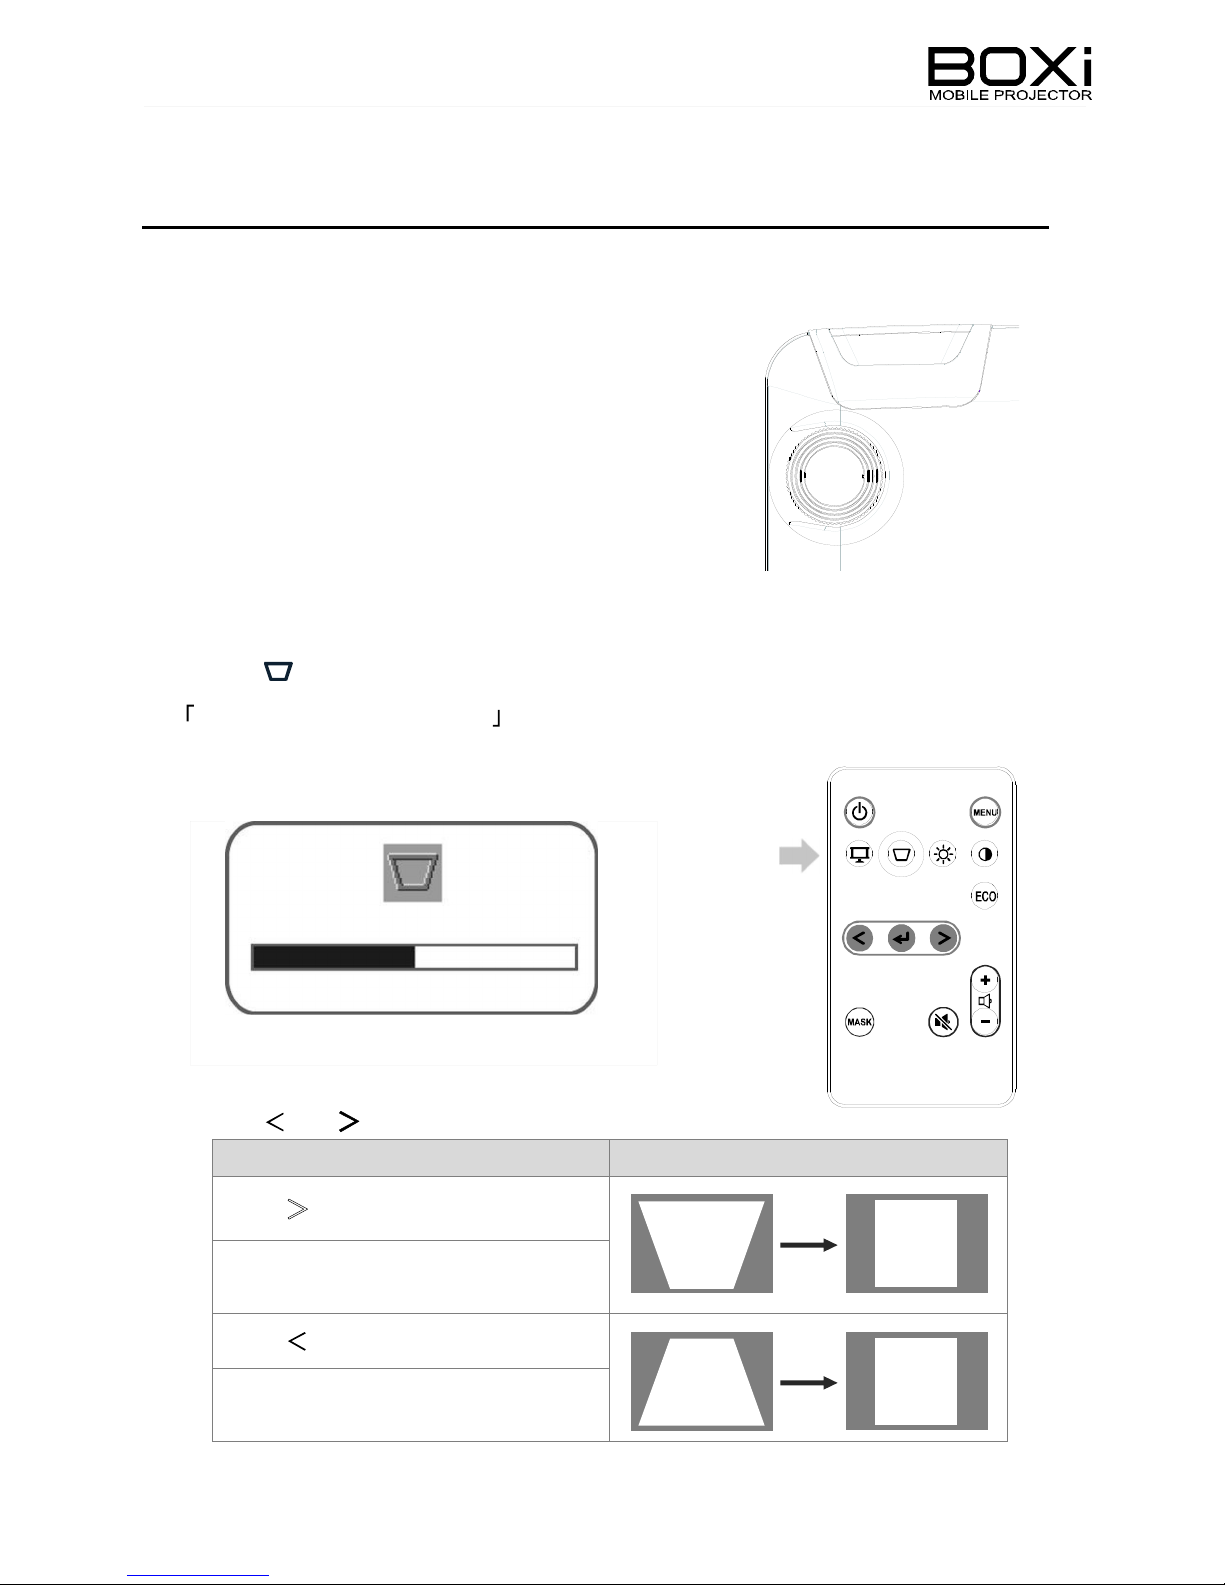
Correcting the keystone distortions
1. Press
button on the remote control.
Keys
tone adjustment dialog appears
.
Rem
ote control
2. Press
Pre
(Press
angle is increasi
Pre
(Press
ang
Keys
tone adjustment dialog
or button on the remote control.
Rem
ote control
ss>button
this
button when the projection
ng.
ss
button
this
le is decreasing.
button when the projection
)
)
Powering off
1. Pr
2.
ess button on the pro
The m
essage appears. Then pr
jector or the remote contro
C
ontrol panel
ess button again.
Press Power button again to
r
n off the projector.
tu
l.
Rem
ote control
Power indicator
Unpl
ug the cable after the fan has stopped.
turns off.
CAUTION
W
hen the warning indic
occurred to the projector. Refer to the instruction manual of the BOXi T-350.
ator is li
t or flashing, it indic
ates that a malfunction has
CON
GUIDE DE DÉMARRAGE RAPIDE
SEILS IMPORTANTS DE
SÉ
CURITÉ
F
RAN AIS
Lisez attentivem
Ce guide décrit l
la c
onnexi
BOXi T-
©
2013 Copyri
Tous les
mar
ques commerciales ou déposées des soci
on à un lecteur de DVD. Reportez-
350 pour toutes autres opérations et informations
ci-dessous.
Site du produit BOXi
noms, les
ent ce guide et les « GARANTIES IMPORTANTES » avant
e fonctionnement de base du projecteur en prenant pour exemple
ght ELMO C
noms
BOXi T-
http://
o., Ltd. Tous droits réservés
de soci
étés et de produits mentionnés dans ce guide sont des
www
350
.elmobo
étés respectives
xi.com
.
déta
illées
.
/
.

T
ABLE D
TABLE DES MATIÈRES ...............................................................................................20
ES MATIÈRES
MESURES DE SE
AVANT LA PREMIÈRE UTILISATION .. ... ........... ... ... ........ ... ... ........... ... . 25
GUIDE DE DÉ
1
M ISE EN UV RE
Vérif
ication du contenu d
Noms d
Préparation de la télécommand
2 UTILISATION DU PROJECTEUR
Installation du projecteur
C
onn
M
ise sous tension .......................................................................................................32
Rglage de l’image projet
M
ise hors tension
es pièces et fonction
exion à un dispositif ...........................................................................................31
CURITE IMPORTANTES
MAR RAGE RAPIDE
. .... ... ........... ... ........... ... ........... ... ........... ... ... ... ... .. 27
e la boîte ............................................................................27
s ....................................................................................28
............................................................................................30
ée .......................................................................................33
........................................................................................................34
. ........... ... ....... .... ... ........... ... ........... . 27
e ................................................................................29
....... ... .......... .... ... ........... ... ........... . 30
...... ... .. ... ........... ... ........... ..... 21
M
ES
UR
ES DE
SE
CURITE IMPORTANTES
Lire les instructions
avant de le mettre en marc
Conserver les instructions
Conserver ce manuel pour référence ultérieure.
Tenir compte des avertissem
Suivre les instructions
Nettoyage
ut
iliser de nettoyants liquides ou en aérosol. Ut
Accessoires
panne.
Eau et humidi
he.
ents
té
iliser un chiffon humi
reil
doiv
ent être lues
de pour le nettoyage.
e, dans un sous-
piscine ou autres endroits similaires
Support
N
e pas placer cet appareil sur un support, table, étagère, trépied ou chariot instable. Il
pou
rrai
t tomber et causer une blessure grave à un enfant ou à un adulte, ou être
une table recommandé(e) par le fabric
être conform
recomm
Alimentation
nature du courant électrique, demander conseil à un électricien ou à la compagnie
e aux instructions du fabric
andés par le fabric
ant.
.
ant ou vendu(e) avec le produit. Tout montage doit
ant et doit être réalis
é avec les accessoires
 Loading...