

Page 1
SHT-7
cos φ ≥ 0.95
M M
HAL.230V
K
M M
AC12
x
DC14
x
AC1
250V / 16A
AC13
x
AC2
250V / 5A
AC14
250V / 6A
AC3
250V / 3A
AC15
250V / 6A
AC5b
1000W
DC5
24V / 2A
AC6a
x
DC12
24V / 6A
AC7b
250V / 3A
DC13
24V / 2A
02-7/2018 Rev.: 0
1/4
15 25
16
A2
A1
18 26 28
A2 26 25 28
A1 16 15 18
Un
6
1
2
3
5
7
8
4
ManProgAuto + t
9
10
11
12
13
14
15
16
18
20
21
17
19
ON / OFF
ON / OFF #
ON / OFF
Made in Czech Republic
ELKO EP, s.r.o.
Palackého 493
769 01 Holešov, Všetuly
Czech Republic
Tel.: +420 573 514 211
e-mail: [email protected]
www.elkoep.com
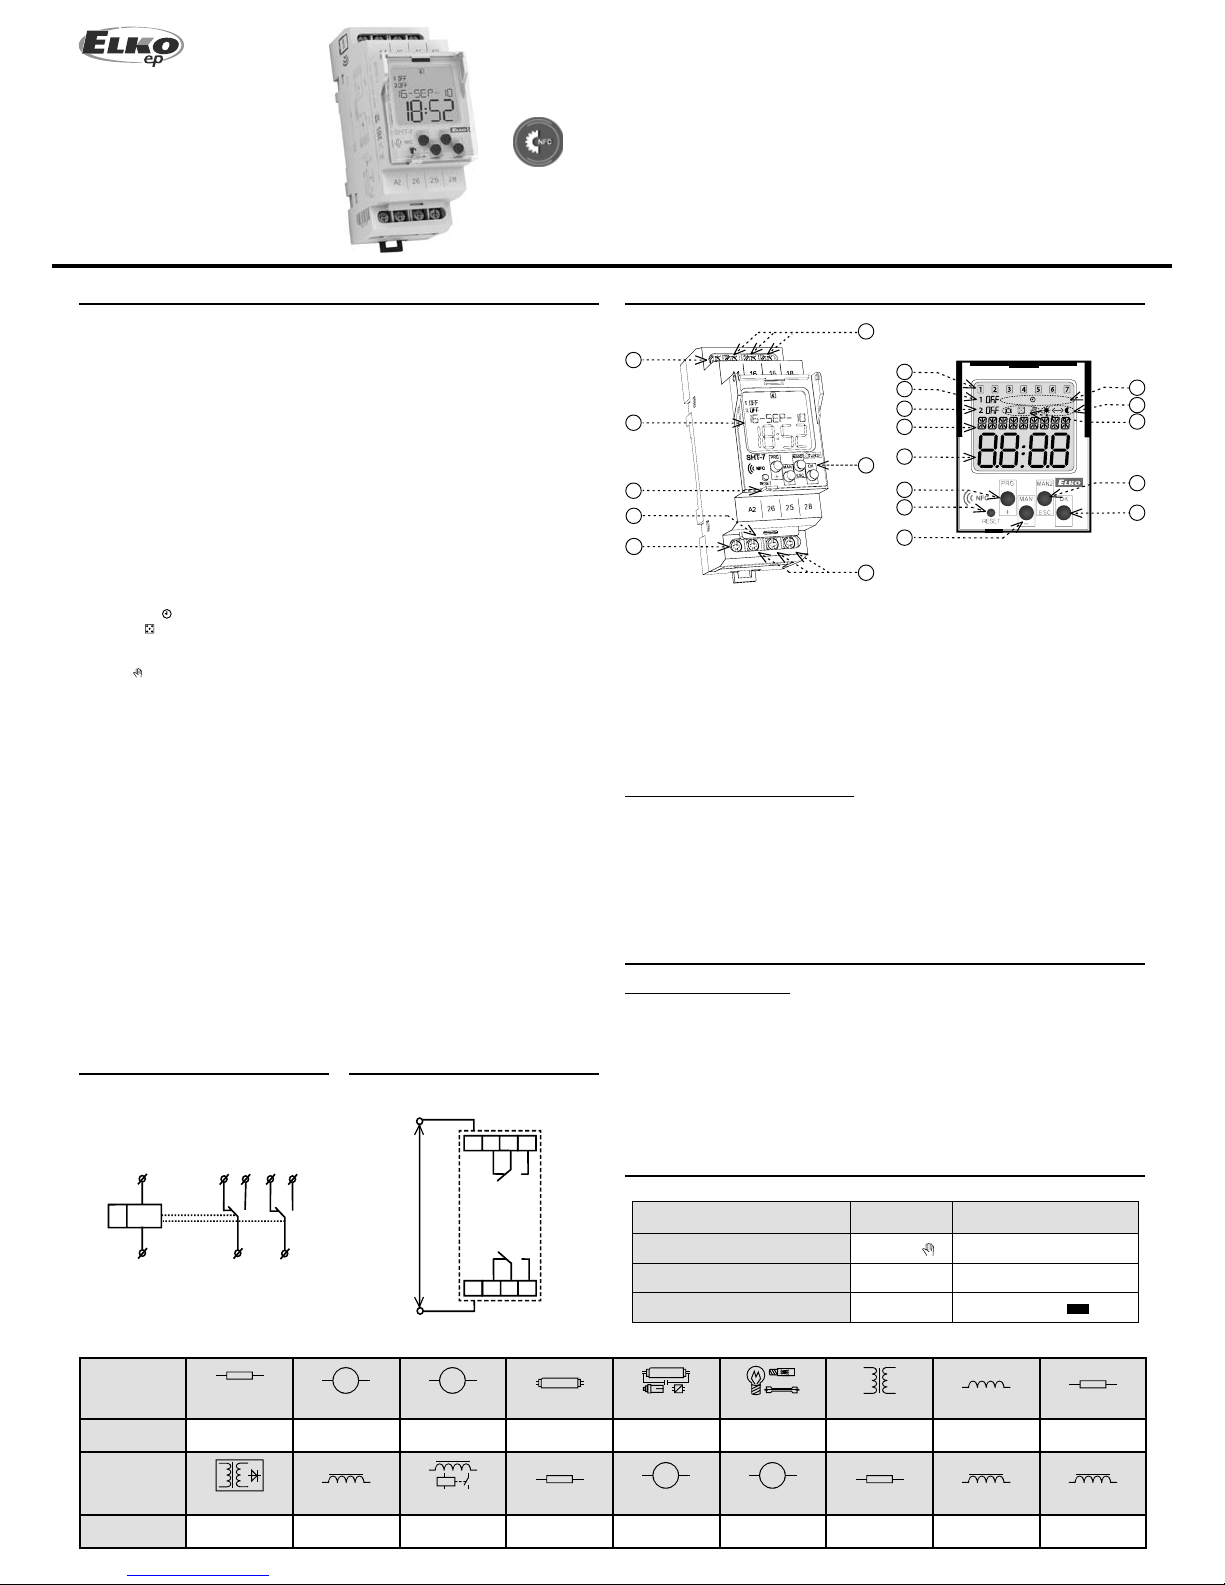
Switch timer clock with NFC programming capability
Characteristics
Symbol
Type of load
Mat. contacts AgSnO
2
,
contact 16A
Type of load
Mat. contacts AgSnO2,
contact 16A
AC5a
uncompensated
230V / 3A (690VA)
DC1
24V / 10A
AC5a
compensated
230V / 3A (690VA)
to max. input C=14uF
DC3
24V / 3A
EN
Digital s witch timer clock with day and year program and set ting via sm artpho ne suppor ting NFC
transfer is used for the automatic real-time controlling of appliances . The timer operates all year
round without the nee d of continuous maintenance, with minimum o perating costs and ma ximum
savings o
f electr ical energy. (For example for turning o n heating, pumps, ventilators, pub lic lighting
etc.). Appli ances can be controlle d in regular time cycl es or based on a pre- set programme.
The timer d oes not incl ude any optic al sensor s or other ex ternal e quipment . After ins tallatio n, it
requires no special operation o r maintenan ce. In the case of a power supp ly interru ption, the timer
retains all s et values require d for its reliable ac tivation after p ower is restored.
Through si mple steps in the application you can set the desired on and o settings based on real
time. You can copy this setting to other days, and altoget her you can store up to 100 prog rams. The
entire setup projec t can be saved to your smar tphone and transfer red to the ne xt timer s witch. Th e
smartphone appli cation serves not on ly to upload settings but also to dow nload. The main bene t
is speed an d simplicity.
Near Field Communication is the way of wireless communication of two devices within a short distance
of a few centimeters.
- The 2-channel design (with the option of assigning separate programmes and modes to each channel)
allows controlling two independent circuits.
- Switching modes:
- Auto – automatic switching mode:
- Programme - switching based on a programme (astro or time).
- Random - switches randomly in a 10 - 120 minute interval.
- Holiday # - holiday mode - option of setting up a period for which the timer will be blocked, i.e. will
not switch based on the set programmes.
- Manual
- manual mode - option of controlling the individual output relays manually
- Options of the automatic switching programme:
- Time programme - switching based on a pre-set time programme
- Memory capacity for 100 time programmes (common for both channels).
- Programming can be performed both when power is on or in backup mode.
- Output relays only operate with a supply voltage of AC 230 V.
- Menu display selection - CZ / SK / EN / ES / PL / HU / RU (default factory setting EN).
- Selection of automatic switching between summer / winter timebased on location.
- Backlit LCD display.
- Simple and easy setup using 4 control buttons or NFC.
- OFF line in-app programs.
- Backup / insertion into the phone memory to transfer to the next switching clock.
- Sealable transparent cover on the front panel.
- The timer has a backup battery that preserves data in case of a power supply failure (reserve backup
time up to 3 years).
- Supply voltage: AC 230 V.
- 2-module, mounted onto a DIN rail, clamping terminals.
-When you rst connect to the network, it is necessary to set the current time and date for correct
operation.
SHT-7 Setting
SHT-7 can be set up in two ways:
1. Using iHC NFC. You can create the desired settings on your mobile phone. Then, by attaching your phone to the SHT-7 you can save your settings to the SHT-7. The application also allows you to save settings
from the SHT-7. You can edit these settings in the same way.
Find the application at:
https://play.google.com/store/apps/details?id=cz.elkoep.ihcnfcsetter
2. Manual - directly in the SHT-7.
Connection
Description
1. Supply voltage terminal (A1)
2. Display with back-light
3. Place for seal
4. Plug-in module
5. Supply voltage terminal (A2)
6. Output - channel 1 (16-15-18)
7. Control buttons
8. Output - channel 2 (26-25-28)
9. Indicates the day in the week
10. Indication (1st channel)
11. Indication (2nd channel)
12. Indication of date / setting menu
13. Time display
14. Control button PRG / +
15. Reset
16. Control button MAN1 / -
17. Operating modes indication
18. 12/24 hours format / sunset - sunrise
19. Indication of the switch program
20. Control button MAN2 / ESC
21. Control button OK
CONTROL OF A DISPLAY WITH BACKLIGHT
Power on: Display is illuminated with a backlight for 10 seconds from the last button press.
The display continuously shows the settings - date, time, day of the week, contact state and
programme. Permanent on / o is activated by simultaneous presses of the MAN, ESC, OK
buttons.
After activating the permanent on/o , the display will ash brie y.
Backup mode: After 2 minutes, the display switches to the sleep mode, i.e. shows no
information. The display can be activated by pressing any button.
Mode precendence
mode with the highest priority
manual control
holiday mode
time program
Prog
Mode precedence Display Output mode
Page 2
SHT-7
2/4
PRG
OK
+
_
OK
OK
Auto
Prog Prog Prog
+
_
Prog
Prog
Prog
Prog
ESPAnOL
Prog
Prog
ESC
Prog
PRG
+
_
+
_
OK
ESC
ESC
CR2032
+
Technical parameters
A1 - A2
AC 230 V / 50 - 60 Hz
AC max. 14 VA / 2 W
-15 %; +10 %
yes
automatic
2x changeover / SPDT (AgSnO
2
)
16 A / AC1*
4000 VA / AC1, 384 W / DC
30 A / < 3 s
250 V AC1 / 24 V DC
> 3x10
7
> 0.7x10
5
up to 3 years
max. ±1 s per day, at 23 °C (73 °F)
1 min
10 years at minimum
100
daily, yearly (until 2099)
daily, yearly (until 2099)
LCD display, with backlight
-20.. +55 °C (-4 °F to 131 °F)**
-30.. +70 °C (-22 °F to 158 °F)
4 kV (power supply - output)
any
DIN rail EN 60715
IP10 terminals,
IP40 from front panel
III.
2
solid wire max. 2x 2.5, max. 1x 4 /
with sleeve max. 1x 2.5, max. 2x 1.5
90 x 35.6 x 64 mm (3.5˝ x1.4˝ x 2.5˝)
129 g (4.55 oz.) - without battery
EN 61812-1, EN 61010-1
Supply terminals:
Supply voltage:
Consumption:
Supply voltage tolerance:
Real time back-up:
Summer / winter time:
Output
Number of contacts:
Rated current:
Switching capacity:
Peak current:
Switching voltage:
Mechanical life:
Electrical life (AC1):
Time circuit
Real time back-up:
Accuracy:
Minimum interval:
Data stored for:
Program circuit
Number of memory places:
Program:
Interface NFC:
Data readout:
Other information
Operating temperature:
Storage temperature:
Electrical strength:
Operating position:
Mounting:
Protection degree:
Overvoltage category:
Pollution degree:
Max. cable size (mm
2
):
Dimensions:
Weight:
Standards:
Warning
Device is constructed for connection in 1-phase main alternating current voltage and must be
installed according to norms valid in the state of application. Connection according to the details
in this direction. Installation, connection, setting and servicing should be installed by quali ed
electrician sta only, who has learnt these instruction and functions of the device. This device
contains protection against overvoltage peaks and disturbancies in supply. For correct function of
the protection of this device there must be suitable protections of higher degree (A, B, C) installed
in front of them. According to standards elimination of disturbancies must be ensured. Before
installation the main switch must be in position “OFF” and the device should be de-energized. Don´t
install the device to sources of excessive electro-magnetic interference. By correct installation ensure
ideal air circulation so in case of permanent operation and higher ambient temperature the maximal
operating temperature of the device is not exceeded. For installation and setting use screw-driver cca
2 mm. The device is fully-electronic - installation should be carried out according to this fact. Nonproblematic function depends also on the way of transportation, storing and handling. In case of any
signs of destruction, deformation, non-function or missing part, don´t install and claim at your seller it
is possible to dismount the device after its lifetime, recycle, or store in protective dump.
* When is, switched ON constantly with maximal load 16 A / AC1 and ambient temperature
55 °C (131 °F) it is highly reccomended by manufacturer to use conductors with tepmerature
resistive isolation (min) from 105 °C (221 °F) range.
** With temperatures nearing -20 °C (-4 °F), the display quality may be compromised, which does
not hamper the timer’s function.
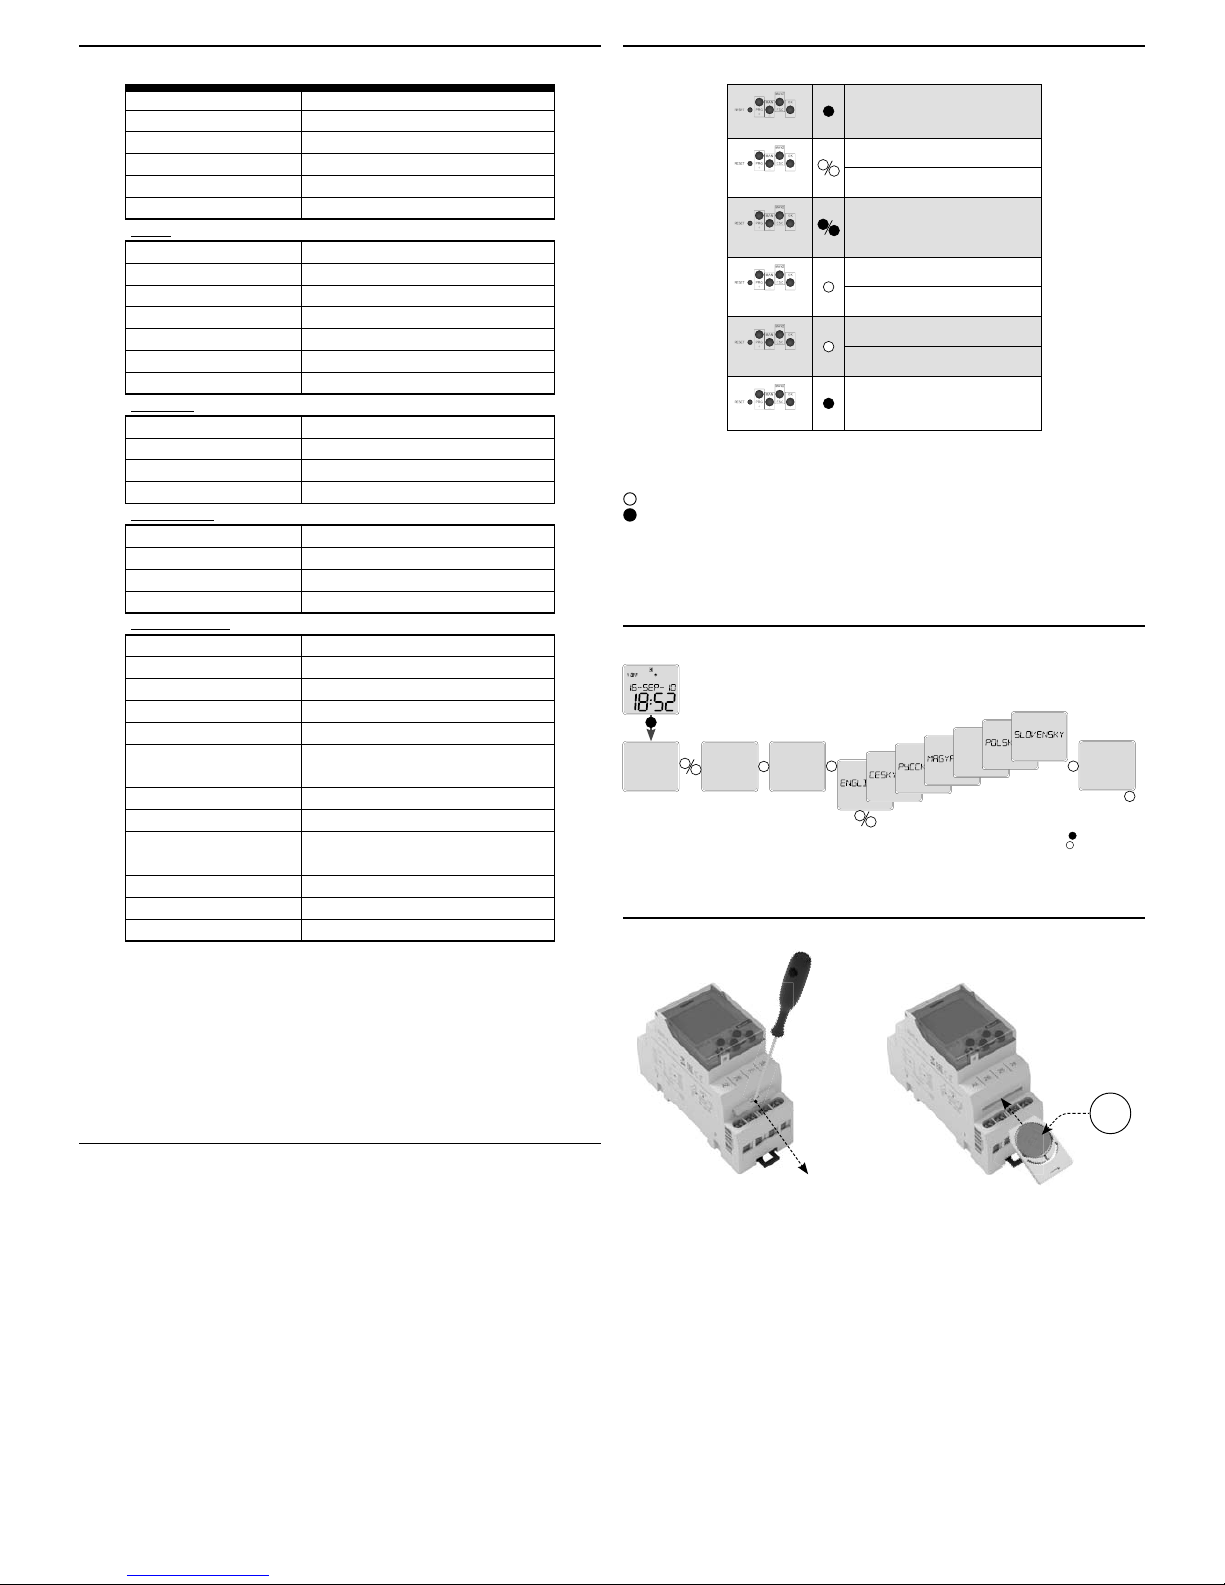
Language settings
language
selection
options
- long press (>1s)
- short press (<1s)
time/date
options
language
language
Control description
entrance into programming menu
browsing in menu
setting of values
quick shifting during setting of
values
entrance into required menu
con rmation
one level up
a step back
back to the starting menu
Device di ers short and long button press.
In the manual marked as:
- short button press (< 1s)
- long button press (> 1s)
After 30s of inactivity (from the last press of any button) will device automatically returns into
starting menu.
Battery replacement
You can change the battery without disassembling the device.
CAUTION
- only change the battery when the device is disconnected from power supply!!!
- the date and time must be reset after changing the battery!!!
- remove the plug-in module with the battery
- replace the original battery
- enter a new battery so that its upper edge (+) lines up with the plug-in module
- slide the plug-in module in the device and pay attention to polarity (+ up) - for roughly 1 s, the
display will show the name and the software version
- you can connect the device to power supply
Page 3
Auto Prog Prog Prog Prog Prog
OKPRG OK OK OK
Auto
PRG
OK OK
OK
OK
+
_
Prog
Prog
ProgProg Prog
OKOK
+
_
+
_
+
_
Prog Prog
OK
+
_
Prog
OK
ESC
Prog
Prog
OK
ESC
Prog
ESC
Prog
OK
OK
Prog
Prog
Prog
Prog
Prog
Prog
Prog
Prog
Prog
Prog
Prog
Prog
Prog
OK
OK
Prog
Prog
OK
ESC
ESC
Prog
Prog
Prog
ESC
Prog
ESC
+
_
+
_
+
_
OK
+
_
OK
+
_
+
_
+
_
+
_
+
_
+
_
+
_
+
_
+
_
+
_
+
_
+
_
+
_
+
_
+
_
+
_
+
_
+
_
Auto
PRG OK
+
_
OK
OK
OK OK
OK
+
_
Prog
Prog
Prog
Prog
Prog
Prog
Prog
Prog
OK
OK
+
_
Prog
Prog
Prog
Prog
Prog
Prog
Prog
Prog
Prog Prog
Prog
Prog
OK
+
_
OK
+
_
OK
Prog
Prog
OK
OK
Prog
Prog
Prog
OK
Prog
+
_
OK
Prog
OK
OK
+
_
OK
Prog Prog
+
_
Prog
+
_
Prog
Prog
+
_
OKOK
OK
+
_
Prog Prog
OK
+
_
OK
Prog
Prog
Prog
Prog
OK
Prog
Prog
Prog
Prog
OK
+
_
Prog Prog
OK
+
_
OK
Prog
Prog
Prog
Prog
+
_
Prog
+
_
Prog
Prog
ESC
Prog
ESC
Prog
ESC
+
_
+
_
+
_
Prog
ESC
Prog
OK
+
_
OK
OK
Prog Prog
OK
Prog
OKOKOK
Prog
Prog
Prog
Prog
Prog
+
_
Prog
+
_
Prog
+
_
OK
OK
OK
+
_
Prog
Prog
+
_
Prog
ESC
+
_
3/4
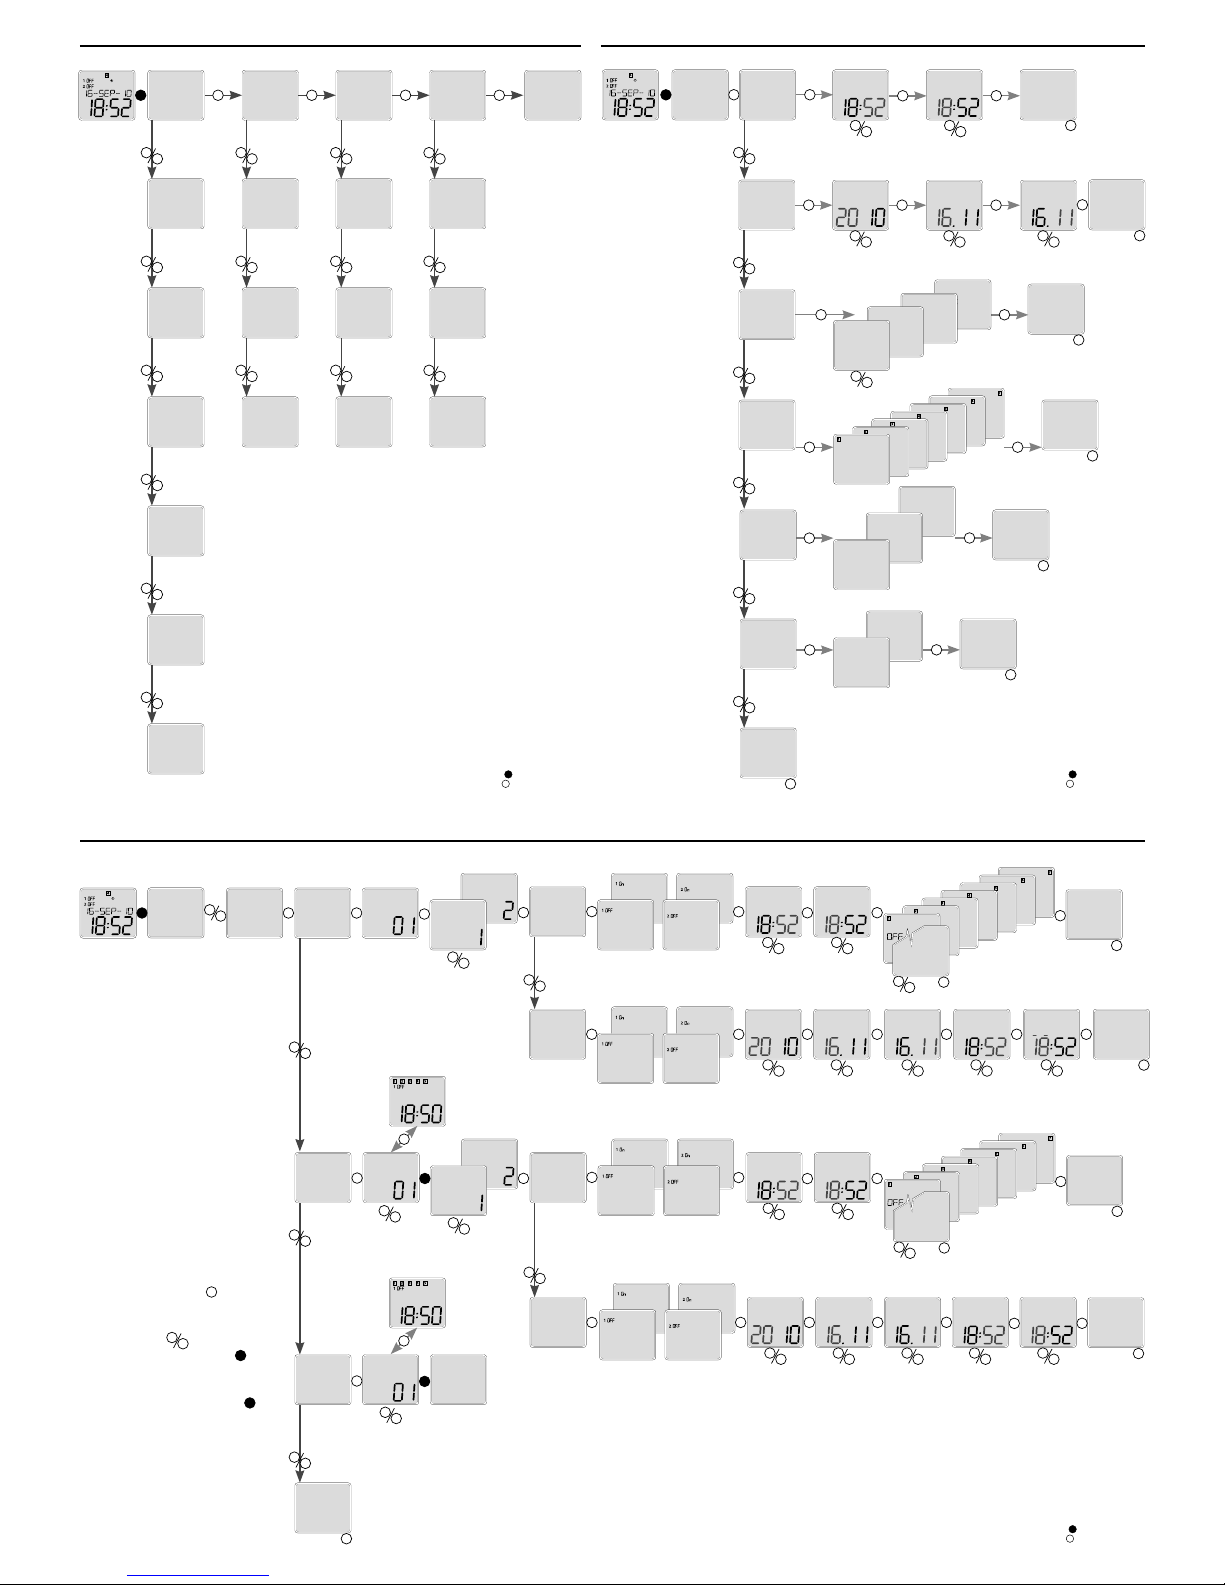
Menu overview
setting and
adjusting the time
program
setting the time
and date
switch modes device options
setting the
current time
add a program setting the auto
switching mode
setting the language
setting the date edit the program setting the holiday
mode
operating hours for
individual channels
setting the switch
from the summer
to the winter time
delete a program manual mode setting time correction
by ± 12.6 s/day
setting the display
of the time format
setting the display
of the date format
setting the display
of the week day
- long press (>1s)
- short press (<1s)
time/date
time prog
modes
options
end
time add languageAUTO
date edit holiday
operating ho
su-wi delete manual
time correct
week day
date form
time form
Time and date setting
setting the hours
setting the time
setting the minutes
setting the date
setting the monthsetting the year setting the day
setting the switch
between the summer/winter time
setting the switch
between the summer
and winter time
depending on area
setting the
week day
date format
time format
time/date
time
hour minute
time
date
year
month
day
date
su-wi
su-wi
week day
date form
16 sep 10
16/sep/10
16--sep--10
week day
date form
time form
time form
12h
24h
end
Prog
no su-wi
su-wi rus
Prog
su-wi usa
Prog
Prog
su-wi eur
Time program
* By shortly pressing OK, you can
toggle between the program
number and the display of its
settings. Use
+
_
to toggle preset programs. By holding OK you
can proceed with the required
step - CHANGE / DELETE. If you do
not want to proceed, press
ESC
to
go to the main settings without
any change.
If the program memory is full, you
will see full on the display.
If the programs memory is empty
and you want to change or erase
a program, the display will read
EMPTY.
time/date
time prog
add a program
channel choice
daily program
add
prog
channel
channel
day prog
display for
channel 1
display for
channel 2
setting the
minutes
setting the
hour
out out
outout
hour minute
setting the program
activity on a week day
on
add
year prog
out out
outout
yearly
program
setting the
day
setting the
minutes
setting the
hours
setting the
month
setting the
year
display for
channel 1
display for
channel 2
hour
day
minute
month
year
add
edit prog
channel
channel
day prog
out out
outout
hour minute
on
add
adjusting the
channel
program
choice *
adjusting
the daily
program
edit program
adjusting the setting of program
activity on a week day
display for
channel 1
display for
channel 2
adjusting the
setting of
hours
adjusting the
setting of
minutes
end
year prog
delete
delete
prog
out
out
year month day
hour minute add
out
adjusting the
yearly program
choosing the
program *
delete
the program
adjusting the
setting of the
month
adjusting the
setting of the
year
adjusting the
setting of
the day
display for
channel 1
display for
channel 2
adjusting
the setting of
minutes
adjusting the
setting of
hours
out
- long press (>1s)
- short press (<1s)
- long press (>1s)
- short press (<1s)
Page 4
4/4
PRG OK
OK
+
_
+
_
+
_
OK
+
_
OK
+
_
OK
OK
OKOK
OK
OK
OK
OK
Auto
Prog
Prog
Prog
Prog
Prog
+
_
Prog
ESC
Prog
+
_
Prog
Prog
Prog
Prog
ESC
Prog
+
_
Prog
Prog
ESC
Prog
+
_
Prog
+
_
Prog
Prog
Prog
ESC
Prog
Prog
+
_
Prog
OKOK
OK
OK
+
_
Prog
+
_
Prog
+
_
Prog
ESC
Prog
+
_
OK
+
_
+
_
OK
OK
OK
Prog
OK OK
OK
PRG OK
+
_
OK
+
_
OK
Auto
Prog
Prog
Prog
Prog
ESPAnOL
Prog
Prog
Prog
Prog
ESC
Prog
+
_
Prog
Prog
ESC
Prog
+
_
Prog
Prog
Prog
ESC
Prog
Prog Prog
Prog
ESC
Prog
ESC
Prog
+
_
Prog
+
_
Auto
Auto
ESCOKOK OK OK OK OK OK OK
OK
OK
OK OK OK
OKPRG
Prog
Prog
OK
+
_
OK OK OK
Auto+t
+
_
+
_
Auto
Prog
ProgProgProgProg
Prog Prog
+
_
Prog
+
_
Prog
+
_
Prog
+
_
ProgProgProg
Prog
Prog
Prog
Prog
Prog
Prog
Prog
ProgProg
Prog
on
Prog
Prog
Prog
oFF
Prog
Prog
Prog
Prog
Prog
on
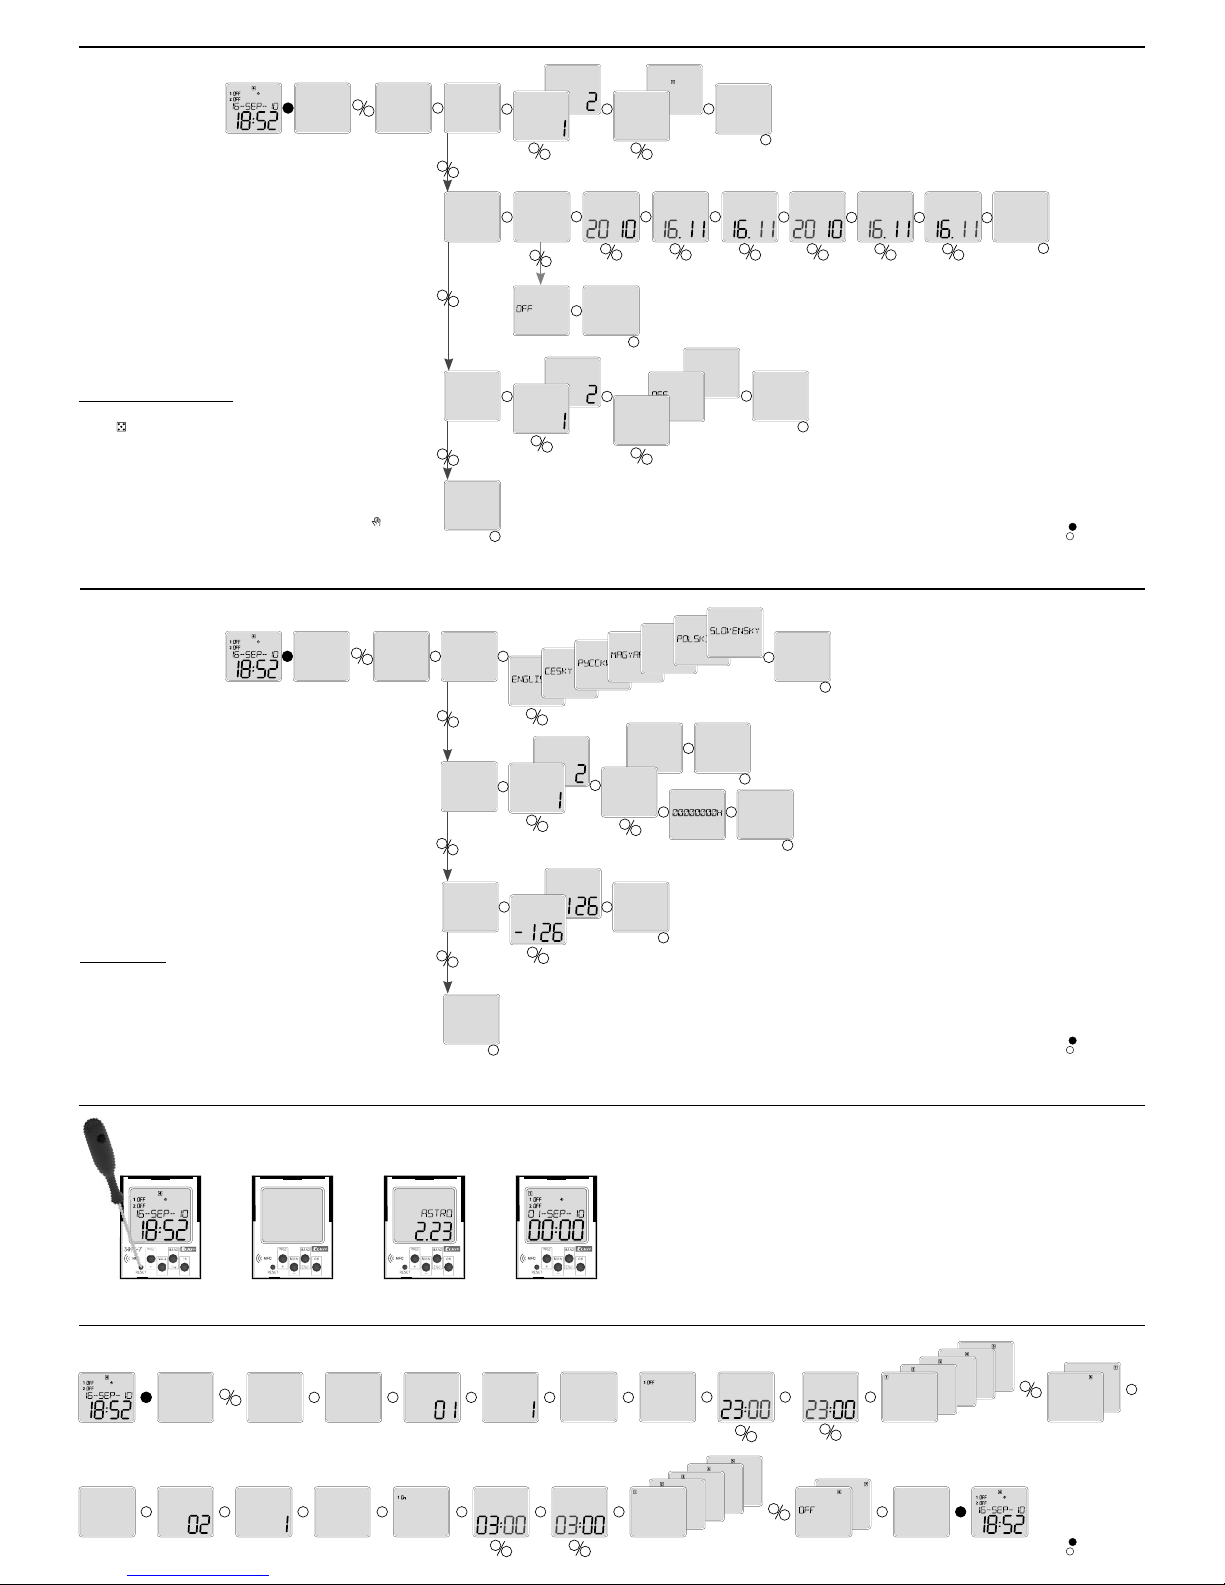
What you see on the display:
- when a random mode is activated - Random - the symbol
is lit .
- vacation mode HOLIDAY:
- the illuminated symbol # indicates the vacation mode.
- the ashing symbol # indicates the vacation mode.
- the symbol # is not illuminated if the vacation mode is
not set or has.
- when the manual mode is activated, the symbol is lit and
the manually controlled channel is ashing.
- long press (>1s)
- short press (<1s)
modes
auto
channel
channel
auto
prog
random
time/date
automatic
switch mode
choosing the
channel
choosing the
switching program
holiday on year month day year month day holiday
holiday mode
setting the start of the holiday mode setting the end of the holiday mode
holiday
on
inactive
manualmanual
end
channel
channel
choosing the channel
manual mode
switching on the
manual mode
Setting the switching modes
Time correction:
The shift unit is 0.1s per day.
The numeric value refers to seconds per 10 days. Time
correction is factory-set and individual for each product so
that the real-time clock would run with minimum deviation.
The time correction value can be arbitrarily adjusted, but
after product RESET, the value returns to factory settings.
Setting options
time/date options
language
language
language
choice
operating
channel
channel
clear
show
operating
operating
operating
hours
channel settings
total number of hours of switching
when the device is connected to the
selected channel
time corr
end
time corr
time corr
time corr
time correction by
±12.6 s/day
time
correction
Reset
An example of SHT-7 programming
Perform ed by shortly pressing the hidden RESET button with a blunt-pointed object (e.g. a
pencil or screw-driver with a diam eter of at most 2 mm).
The type of device and software version will be displayed for 1 second, then the device will
enter default mode. This means that the language is set to EN, all data is zeroed (thermostat
functio n, time / date, user programs, device options function).
Setting Channel 1 on the opening of the relay 11 p.m. to 3:00 for Mon - Fri. /
channel
prog
add
time progtime/date
day prog
out
hour
minute
minuteout
day prog
channelprog
add
add
hour
- long press (>1s)
- short press (<1s)
- long press (>1s)
- short press (<1s)
 Loading...