

Page 1
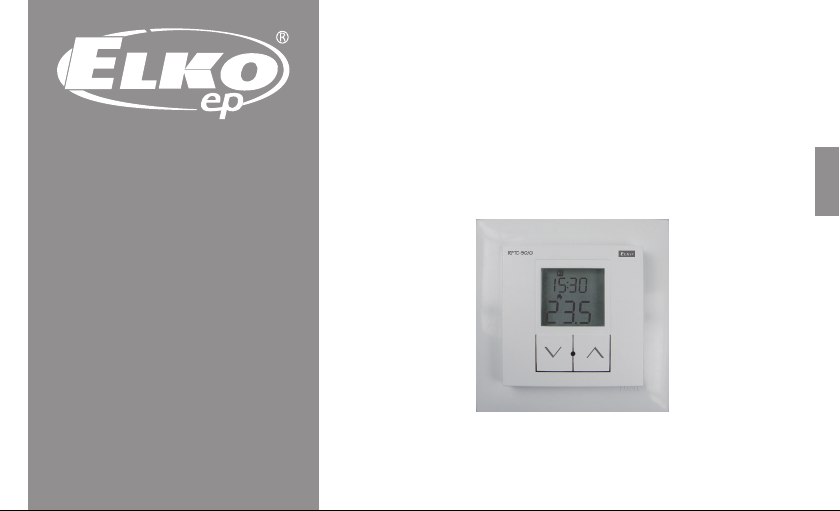
RFTC-50/G
Programmable temperature
controller
°C
E
E
N
N
Page 2

Contents
Warning .........................................................................................................
Characteristics ..............................................................................................
Technical parameters ...................................................................................
Battery replacement .....................................................................................
Description of device ....................................................................................
Description of display ..................................................................................
Description of control...................................................................................
Selecting the heating mode.........................................................................
Setting the temperature for manual mode ................................................
Entering the programming menu................................................................
Entering the settings menu..........................................................................
Example of programming the RFTC-50/G ...................................................
- 2 -
3
4
5
6
7
8
9
10
11
12
14
18
Page 3

Warning
Instruction manual is designated for mounting and also
for user of the device. It is always a part of its packing.
Installation and connection can be carried out only by
a person with adequate professional qualication upon
understanding this instruction manual and functions
of the device, and while observing all valid regulations.
Trouble-free function of the device also depends on
transportation, storing and handling. In case you notice
any sign of damage, deformation, malfunction or
missing part, do not install this device and return it to its
seller. It is necessary to treat this product and its parts as
electronic waste after its lifetime is terminated. Before
starting installation, make sure that all wires, connected
parts or terminals are de-energized. While mounting and
servicing observe safety regulations, norms, directives
and professional, and export regulations for working
with electrical devices. Do not touch parts of the device
that are energized – life threat. Due to transmissivity of
RF signal, observe correct location of RF components
in a building where the installation is taking place. RF
Control is designated only for mounting in interiors.
Devices are not designated for installation into exteriors
and humid spaces. The must not be installed into metal
switchboards and into plastic switchboards with metal
door – transmissivity of RF signal is then impossible, do
not use in areas aected by high-frequency interference.
RF Control is not recommended for pulleys etc. –
radiofrequency signal can be shielded by an obstruction,
interfered, battery of the transceiver can get at etc. and
thus disable remote control.
- 3 -
E
N
Page 4

Characteristics
- the temperature controller RFTC-50/G is used as a simple solution for controlling temperature in a room or the home
- The RFTC-50/G is a programmable temperature controller with the option of setting a weekly program, which oers two
regulation options:
a) The internal sensor scans the temperature, and based on the set command, it gives the command to switch on
the switching actuator RFSA-61 or RFSC-61. This can be used mainly to control temperature
of heaters, hall panels, convection heaters, etc.
b) The internal sensor scans the temperature, and based on the set command (weekly program),
it switches on the actuator RFSTI-11B, which also scans the critical oor temperature. This occurs to prevent
damage when opening a window This solution is especially suitable for underoor heating.
- control is performed using buttons /, individual symbols (temperature, battery, mode, etc.) are displayed on a backlit LCD display
- the controller is powered by: batteries - 2 x AAA1.5 V
- the at rear side of the device (see image) enables its placement anywhere in the room where you wish to measure temperature
- the Logus90 frame design oers a luxurious design (glass, wood, stone, metal) with the option of placing it in multiple frames
- 4-
Page 5
Technical parameters
Supply voltage:
Battery life:
Temperature oset:
Temperature oset range:
Display:
Backlight:
Transmission/function indicator:
Temperature measurement input:
Temp. meas. range and accuracy:
Frequency:
Signal transmission method:
Minimum control distance:
Range in open area:
Other data
Max. number of controlled actuators
Operating temperature:
Operating position:
Mounting:
Protection:
Electromagnetic radiation degree:
Dimensions:
Frame - plastic
Frame - metal, glass, wood
Weight:
Related standards:
2 x 1.5V bat. AAA
up to 1 year (depending on number of controlled actuators)
2 buttons
± 5 °C
LCD, characters
Yes, active - blue
symbols
1x internal sensor
0 up to + 55 °C ; 0.3 °C of scale
868 MHz
bidirectionally addressed message
20 mm
up to 100 m
4
0.. + 55 °C
wall
gluing / screwing
IP20
2
85 x 85 x 20 mm
94 x 94 x 20 mm
66 g (without batteries)
EN 60669, EN 300 220, EN 301 489 directive
RTTE, NVč.426/2000Sb (směrnice1999/ES)
/ ^
E
N
- 5 -
Page 6
Battery replacement
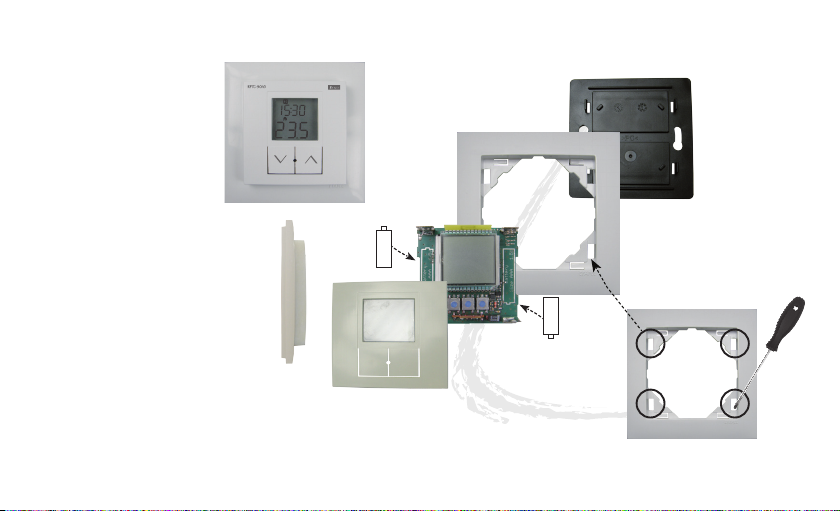
Prior to rst assembly, remove the
moldings in the frame (see image)
and peel o the protective lm
from the display. After inserting the
batteries, all features for controlling
the display function illuminate for 2
seconds, then the FW version is displayed in the upper row.
°C
+
-
-
+
Placement
Do not expose it to sharp temperature changes, direct sunlight or excessive moisture. Place the temperature units so that they are not near windows or heating equipment, etc., which
could inuence the internal temperature sensor.
- 6 - - 7 -
Page 7
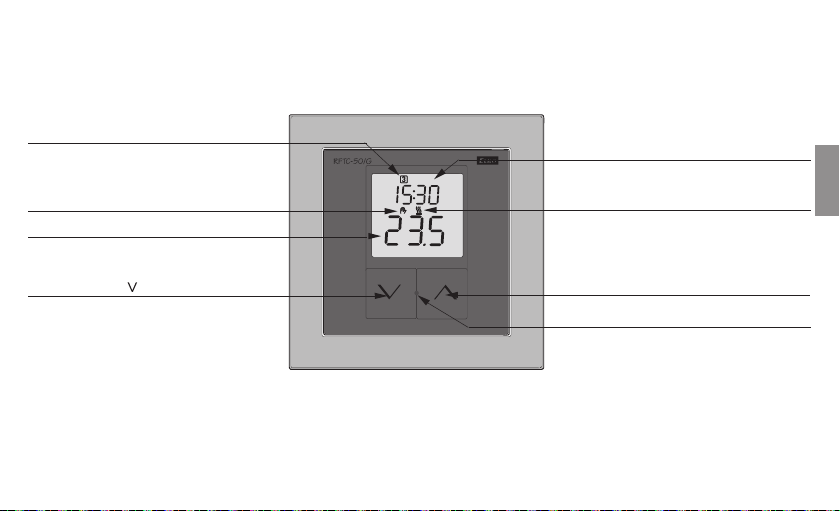
Description of device
Day of the week
Heating mode
Current temperature
Control button
- 7 -
Current time
E
°C
Circuit status
Control button ^
Hidden button
N
Page 8
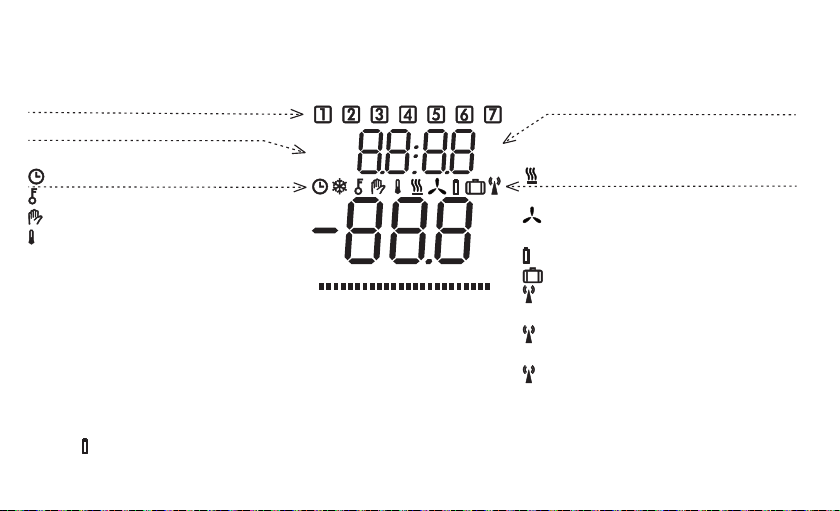
Description of display
Display of the day of the week
Automatic mode
- Setting the time
- locking the menu item or program
- manual mode
- Setting the temperature
- mode switched o - no symbol
- battery status indicator
- a symbol is displayed when the batteries are running low The dead battery indicator shows that the voltage is insucient for reliable communication with a
paired actuator(s).
Prog
Auto
0612 18 24
- 8 -
AM
PM
°C
°F
Current time in selected format 12/24
- output switched on when selecting heating
function
- output switched on when selecting cooling
function
- displays in the case of low battery voltage
- vacation mode
constantly illuminated - connection with all
actuators successful
ashing - connection successful only with
certain actuators
not illuminated - connection unsuccessful with
all actuators
Page 9
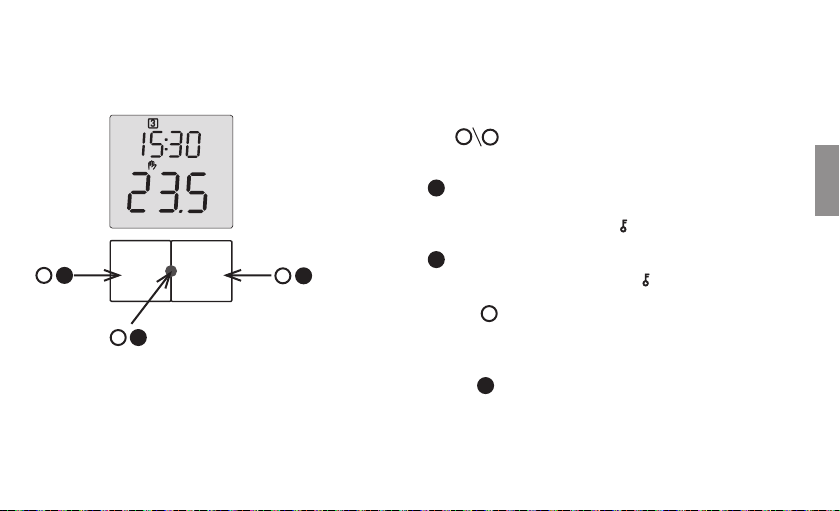
Description of control
Button functions for controlling:
- short press of buttons
- switching menu items, changing value
°C
^
^
^
long button press ^ (> 2 s)
- unlocking the menu item or time program for changing
- conrmation of changed value after setting and locking of the menu item or program
long button press ^ (> 2 s)
^^^
- refusal of changed value, return to original value and locking of the menu item or program
short press of middle button (< 2 s)
- closing menu - after closing the menu communication with actuators is performed
- the default display indicates the update of the actuator status (e.g. upon actuator power failure)
long press of middle button (> 2 s)
- upon default display entry to the menu
- 9 -
^
(< 2 s)
^
E
N
Page 10
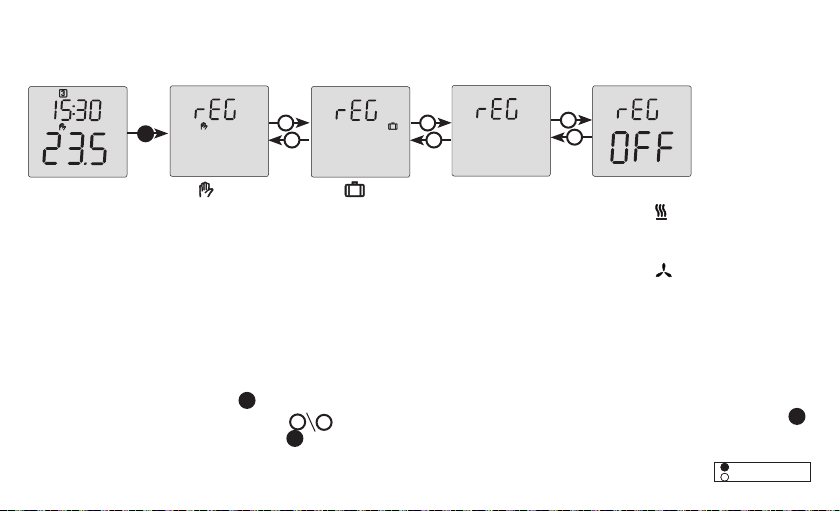
Selecting the heating mode
^ ^
°C
^
- symbol - manual mode,
the thermostat regulates to
the temperature set for the
manual mode without a time
program.
At the default display, press and hold the button ^. In the upper row of the display, the indicator „rEG“ appears and the symbol of the currently chosen heating mode ashes, or the
indicator „OFF“ appears. Now by shortly pressing the buttons
You can return to the original mode by pressing and holding
^^
- vacation
- symbol
mode, the thermostat
regulates to a temperature
set for the vacation mode,
after the vacation mode
period expires, the heating
mode is reset that had been
selected prior to switching
on the vacation mode.
^
you can select the heating mode. Conrm the heating mode selection by pressing and holding the button ^ .
^
^
.
Auto
- Auto - automatic mode,
the thermostat regulates to
a temperature based on the
set time program, outside
of time segments in the
program it regulates to the
reduced temperature set
in the menu „ProG“, item
„ECO“ .
This also brings you to the initial display.
- 10 -
^
^
- „OFF“ - thermostat switched o, when selecting the
function „heating
the thermostat regulates to
a non-freezing temperature
set in the menu in the item
„OFF“, when selecting the
function „cooling “ the
thermostat is switched o
and is not performing any
regulation.
“ @“,
-
long press
(>1s)
-
long press
(>1s)
- short press (<1s)
- short press (<1s)
Page 11
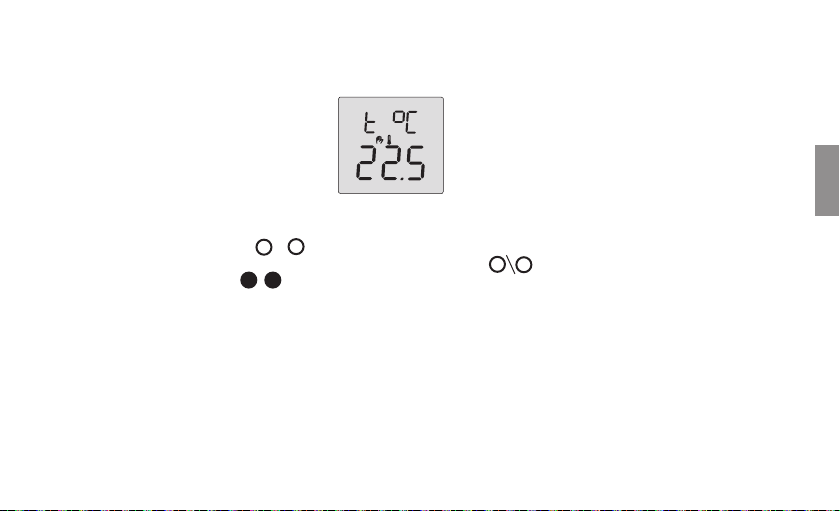
Setting the temperature for manual mode
°C
E
N
At the default display, briey press the button ^ or ^. In the upper row, the indication „t °C“ is displayed
and in the lower row the current selected temperature ashes. By short presses of the buttons
0.5 °C. By pressing and holding the buttons ^/ ^, you begin accelerated setting of the value. After completing the settings, after 5 seconds it automatically
returns to the initial display, thereby conrming the temperature change. It also assesses the current and required temperatures and communicates with the
actuator(s).
^
, you will change the value by an increment of
^
Page 12
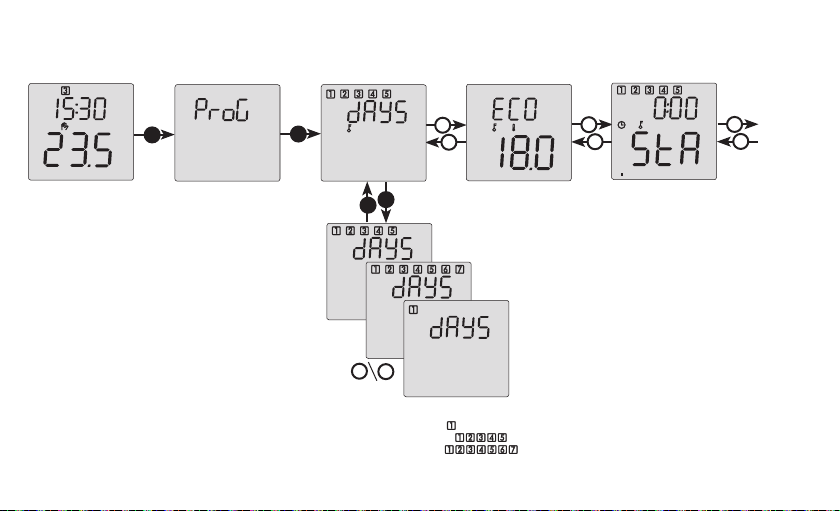
Entering the programming menu
^
°C
^
^
^
^
- „ECO“ - setting the
reduced temperature, regulation to this temperature
is performed in the „Auto“
mode, outside the set time
segments
°C
^
^
- „StA“ - time of start of
the program step, range
12:00 a.m. - 11:50 p.m.,
increment 10 minutes
^
^
^
^
- „DAYS“ - setting the type of time program, selections:
- each day separately -
- working day/weekend-
- each day the same -
- 12 -
Page 13
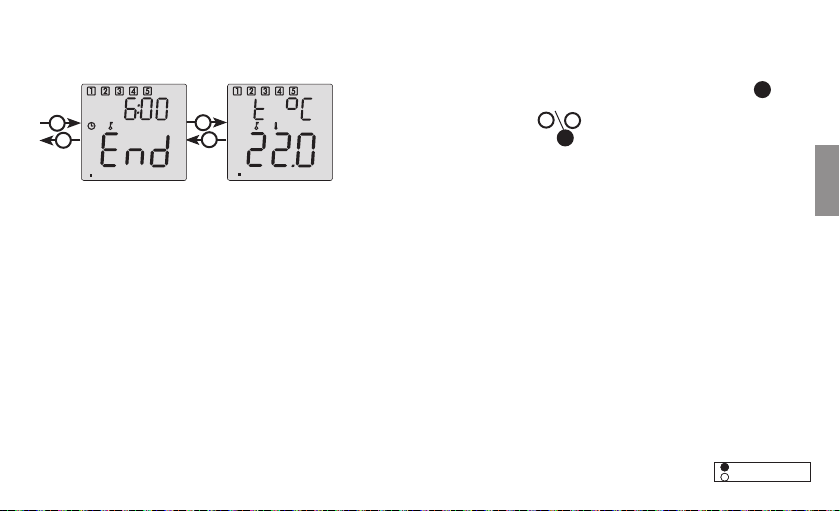
- only possible from the default display by pressing and holding the middle button
^
^
- „End“ - time of end of
the program step, range
12:10 a.m. - 12:00 a.m.,
increment 10 minutes
^
^
- „t °C“ - required temperature
in the program step, range from
temperature „ECO“ to 40.0 °C,
step 0.5 °C
- the display indicates „ProG“
°C
- by short presses of the buttons
- by pressing and holding the button
(„ProG“) or into the menu („SEt“)
^
, you can toggle between display „ProG“ and „SEt“
^
you select entry into the setting of time programs
^
The programming step number is indicated on the lower bar graph by the number of displayed lines (1-6). The day of the week for which the given program step
is set is displayed in the upper corner of the display. If the program type „working day/weekend“ is selected, then for working days the symbols „1“,“2“,“3“,“4“,“5“
are displayed, and for the weekend „6“,“7“.
If the program type „every day the same“ is displayed, then for working days the symbols „1“,“2“,“3“,“4“,“5“, „6“ and „7“ are displayed.
If a programming step is to remain unused, dashes are set in the item „StA“.
-
long press
(>1s)
-
long press
(>1s)
- short press (<1s)
- 13 -
- short press (<1s)
E
N
Page 14
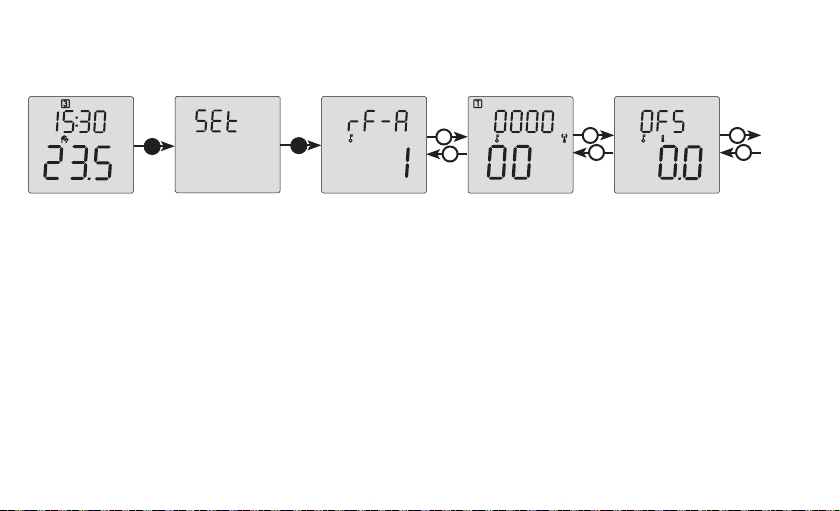
Entering the settings menu
°C
^
^ ^
^
^
^^
°C
- „rF-A“ - the number
of controlled actuators
of the type RFSA-6x or
RFSTI-11B - range 1 - 4
- 14 -
- 1,2,3,4 - according to
the number of controlled
actuators there are available
1 - 4 of the following items,
where the RF address of
individual actuators is set
- „OFS“ - oset of the
temperature sensor,
range -5.0 to +5.0 °C,
step 0.1 °C
Page 15
^
^
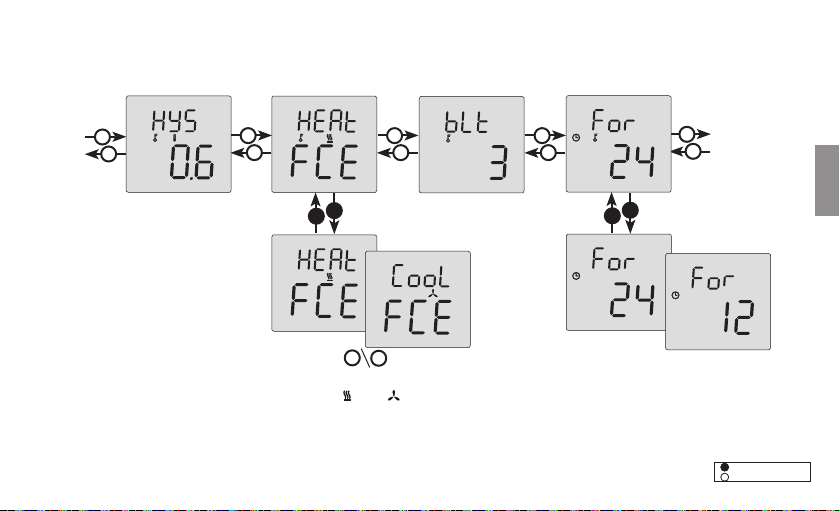
- „HYS“ - setting the
hysteresis of heating/
cooling, range 0.2 to 5.0
°C, step 0.2 °C
^ ^
^^
°C
^
^
- „FCE“ - selection of function heating/
cooling („HEAt “
- on the upper row, the function is
selected („HEAt“/“CooL“), and on the
lower row there is the name of the
menu item („FCE“)
^
^
/ „CooL“ )
- „bLt“ - intensity of
display back lighting
„OFF, 1 - 10“
- 15 -
^
^
^
^
- „For“ - format the time display 12/24
^
^
-
-
- short press (<1s)
- short press (<1s)
AM
PM
long press
long press
(>1s)
(>1s)
E
N
Page 16
^ ^ ^ ^^
^^^^ ^
0612 18 24
- setting the time - rst
hours are set followed by
minutes - upon conrmation
of the value, the hidden
second timer is zeroed out
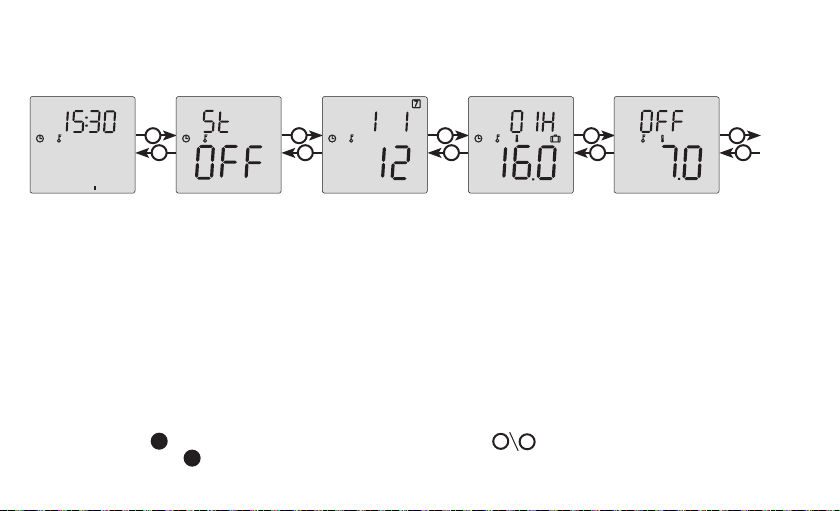
* - „oFF“ - switched o
- the set value means a shift in local time (time zone) against UTC, range -1 to +2 (covers the countries in the EU). For EU countries it is valid that the time shift
always occurs at 1:00 UTC, it is thus necessary to know the time zone to nd out at what time in local time the winter and summer daylight savings time shifts
are to occur.
** In the upper row, the period of vacation timer is shown in hours or days, and the lower row indicates the required temperature.
By pressing and holding
pressing and holding the button
- and further units and tens of days or hours.
- „St“ - Transition of summer
winter time (daylight
savings time) *
you unlock the temperature to settings and by short presses of the buttons
^
you conrm the set temperature while switching into the setting of the time range of the vacation timer - days or hours
^
- „1.1.12“ - setting data. First the
year is set (range 12 - 99, meaning
2012 - 2099), then the month
followed by the day. The day of the
week is set automatically according
to the entered data.
- 16 -
- Setting the temperature and time for
vacation mode**
^
°C
- „OFF“ - setting the
non-freezing temperature for the „OFF“ mode,
range 6-20 °C
you set the required temperature. By
^
°C
Page 17
^ ^
^
^
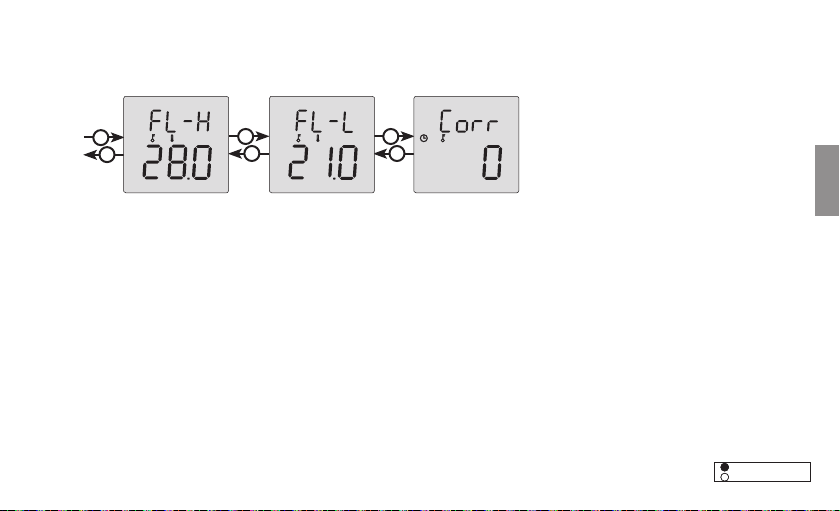
- „FL-H“ - setting the
max. temperature for
underoor heating ***
*** - OFF - oor temperature function is switched o, the actuator(s) of the type RFSA-6x is(are) controlled
- range 20 - 35 °C, oor temperature function is switched on, the actuator(s) of the type RFSTI-11B is(are)
controlled (with date of manufacture from 03/2013)
**** - used for tempering the oor when using a dierent heating source
- OFF - the function for maintaining the minimum oor temperature is switched o
- range 20 °C up to the max. set oor temperature [FL-H]
^^
°C °C
- „FL-L“ - setting the minimum oor temperature****
- „Corr“ - correction of time
deviation, sets the number
of seconds for 10 days,
range ± 99
- 17 -
-
long press
(>1s)
-
long press
(>1s)
- short press (<1s)
- short press (<1s)
E
N
Page 18
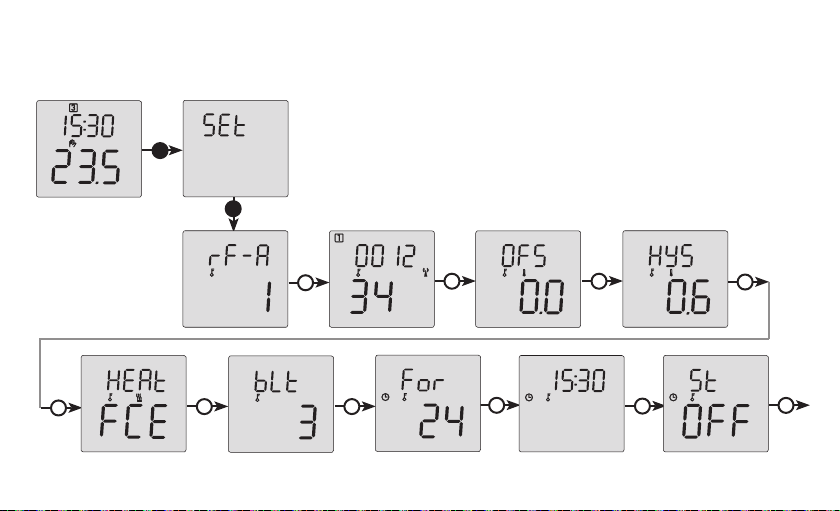
Example of programming the RFTC-50/G
Example of settings for actuator RFSA-6x, RFSC-61 and RFSTI-11B
°C
^
^
^
^
^
^ ^
^
- 18 -
°C
0612 18 24
°C
^
^
^
Page 19
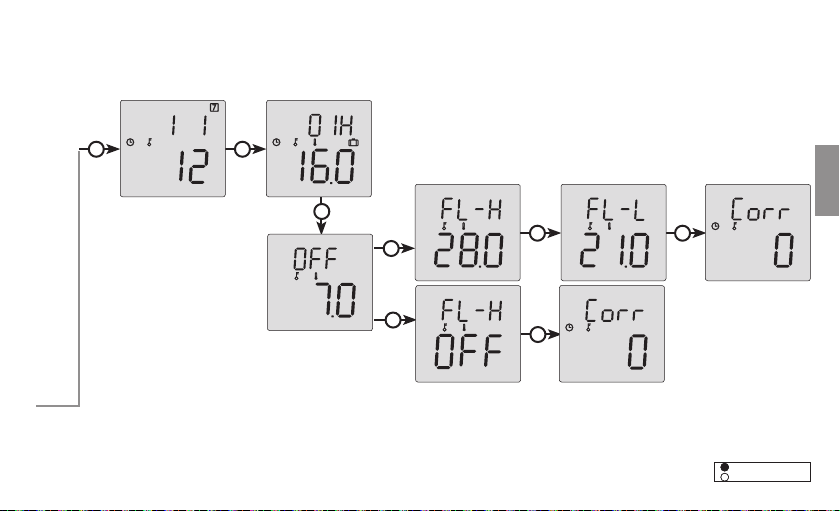
Example for 1 actuator type RFSTI-11B with RF address 001234 with hysteresis
of 0.6°C, heating function, time format 24 hr., daylight savings time switched
^
^
°C
o, non-freezing temperature set to 7 °C, maximum oor temperature 28 °C,
minimum oor temperature 21°C, time correction 0.
E
N
^
^
^
°C
°C
^
°C
^
Example of settings for 1 actuator type RFSA-6x with RF address 001234 with
hysteresis of 0.6 °C, heating function, time format 24 hr., daylight savings time
shit switched o, non-freezing temperature set to 7 °C, time correction 0.
^
°C
- 19 -
-
long press
(>1s)
-
long press
(>1s)
- short press (<1s)
- short press (<1s)
Page 20

ELKO EP, s.r.o.
Palackého 493 | 769 01 Holešov |
Všetuly,CZ, tel.: +420 573 514 211 |
fax: +420 573 514 227
[email protected] | www.elkoep.com
4475-02VJ-007 Rev.: 1
 Loading...