

Elkay ECTSR25229TBG0, ECTSR33229TBG2, ECTSRAD25226TBG2, ECTSRO33229RTBG, ECTSRS33229TBG0 Installation manual
Page 1
ECTSR UNIVERSAL MOUNT STAINLESS
STEEL SINK
NOTE: THE SINK PROVIDED IS CONSIDERED A UNIVERSAL MOUNT SINK - IT CAN EITHER BE INSTALLED
AS AN UNDERMOUNT WITH 1/8” COUNTERTOP OVERHANG OR A TRADITIONAL TOP MOUNT. THE
TEMPLATE, PROVIDED WITH THE SINK, ILLUSTRATES THE APPROPRIATE COUNTERTOP CUTOUT
FOR AN UNDERMOUNT INSTALLATION - DO NOT USE THIS TEMPLATE FOR TOP MOUNT
INSTALLTIONS.
FOR UNDERMOUNT INSTALLATIONS, FOLLOW SECTION I. FOR TOP MOUNT INSTALLATIONS, FOLLOW
SECTION II.
I. UNDERMOUNT INSTALLATION
ATTENTION INSTALLER:
1) ELKAY RECOMMENDS THAT UNDERMOUNT SINKS SHOULD BE INSTALLED BY A PROFESSIONAL
EXPERIENCED INSTALLER.
2) WARNING: THE ENCLOSED CUTOUT TEMPLATE WILL CREATE AN OVERHANG OF APPROXIMATELY
1/8”. IT IS RECOMMEND THAT YOU DISCUSS THIS WITH YOUR CUSTOMER AND AGREE THAT THIS
FINISHED APPEARANCE IS THE DESIRED EFFECT. ELKAY IS NOT RESPONSIBLE FOR IMPROPER SINK
OR COUNTERTOP INSTALLATIONS. DUE TO THE AESTHETIC QUALITIES OF THE CONVERGING BOWL
RADII, THE TEMPLATE FURNISHED WITH EACH SINK PROVIDES THE ONLY OPENING RECOMMENDED
FOR INSTALLATION OF ELKAY UNDERMOUNT SINKS. SEE ILLUSTRATION BELOW.
3) ELKAY UNDERMOUNT SINKS SHOULD ONLY BE FASTENED TO A SOLID SURFACE COUNTERTOP
(I.E. GRANITE/CORIAN
4) ELKAY IS NOT RESPONSIBLE FOR SINK OR COUNTERTOP IF DAMAGED DURING INSTALLATIONS.
5) METAL EDGES MAY BE SHARP - USE CAUTION WHEN HANDLING.
6) FOLLOW ALL LOCAL PLUMBING AND BUILDING CODES.
7) INSPECT SINK FOR DAMAGE PRIOR TO BEGINNING INSTALLATION.
®
/SILESTONE®).
INSTALLATION
1. Position template on countertop. Locate the template
front to rear, so sink will not interfere with the cabinet.
2. Trace a line around the template. Cut along the inside
of this line to provide opening.
3. Locate and drill the mounting holes (following the
countertop manufacturer’s instructions). Holes should
allow even spacing of mounting brackets around the
sink. Type of fasteners to be as recommended by
countertop supplier.
4. The front and back of the sink are supported by the
undermount support kit (optional accessory LKUMSK36). The sides are supported by mounting
clips (optional accessory-LKUCLIP8).
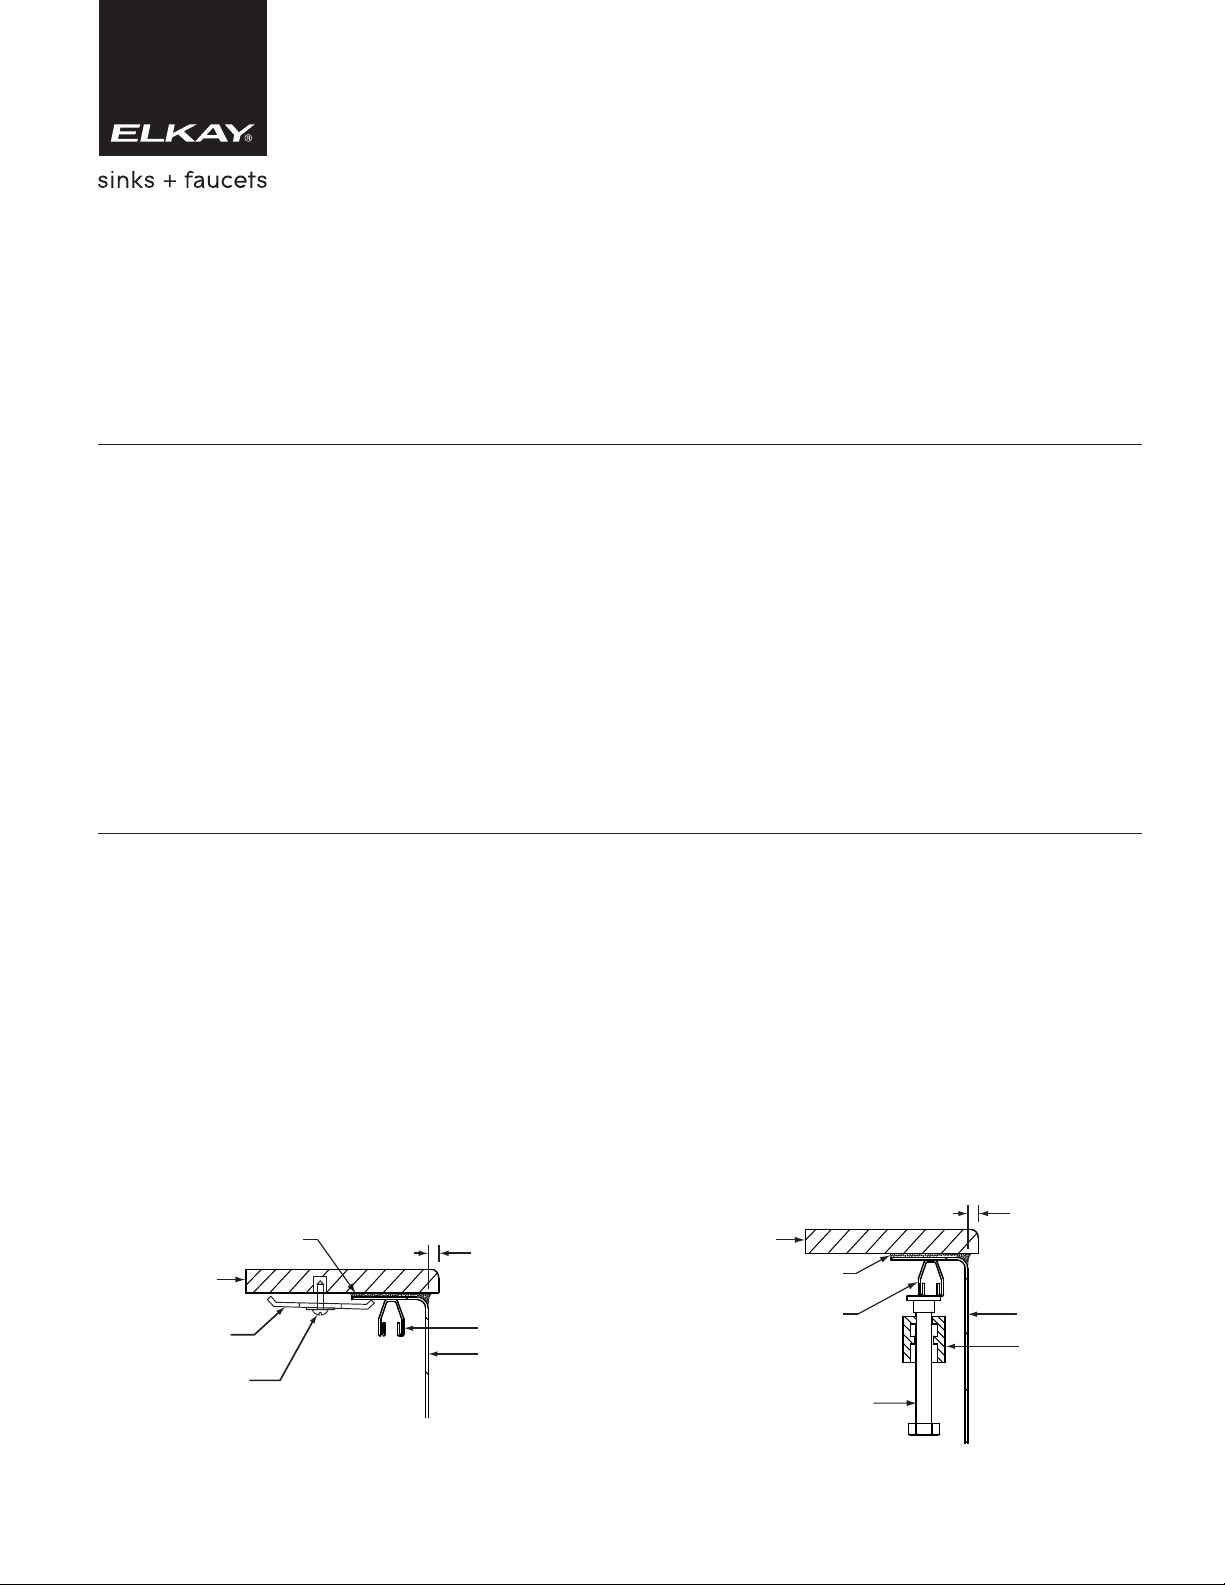
SILICONE CAULK
(NOT FURNISHED)
COUNTERTOP
MOUNTING CLIP
LKUCLIP8
(NOT FURNISHED)
FASTENER
(NOT FURNISHED)
COUNTERTOP
OVERHANG
APPROX. 1/8”
CHANNEL
SINK
5. Fasten mounting clips (optional accessory LKUCLIP8) to countertop loosely and follow
instructions in the LKUMSK36 to install the
undermount support kit.
6. Using a good quality silicone caulk, apply a bead
evenly all around the top of the sink flanges.
7. Position and align sink over the countertop opening.
Press silicone onto countertop.
8. Tighten fasteners until mounting clips and
undermount support kit are snug against sink.
9. Check alignment of sink to countertop opening.
10. Tighten down fasteners evenly. Be careful not to
overtighten. Remove excess silicone.
COUNTERTOP
COUNTERTOP
SILICONE CAULK
(NOT FURNISHED)
(NOT FURNISHED)
CHANNEL
FASTENER
LKUMSK36
OVERHANG
APPROX. 1/8”
SINK
SUPPORT RAIL
LKUMSK36
(NOT FURNISHED)
SIDES FRONT & BACK
1/8” COUNTERTOP OVERHANG
Page 2
ECTSR UNIVERSAL MOUNT STAINLESS
II. TOP MOUNT INSTALLATION
INSTALLATION
1. Position sink on countertop. Take into consideration
adequate clearance for the faucet, backsplash, and
any accessories such as a soap/lotion dispenser.
2. Cut countertop opening following the countertop
manufacturer’s recommended instructions.
3. Test cutout by placing the sink into the cutout.
4. Install faucet(s) (not included) and drain(s) (not
included) that will be connected to the sink following
the appropriate manufacturer’s recommended
instructions.
5. Clean underside of sink flange and sealing surface
of countertop opening thoroughly to remove dirt or
residue. Thoroughly dry and apply a continous
bead of a high quality silicone adhesive caulk (not
STEEL SINK
furnished) to the underside of the sink flange near
the edge. Position sink into countertop opening.
6. From the underside of the sink, place one clamp
near the center and tighten by hand enough to
hold the sink in place. This applies to all four
sides. Fasten remaining clamps in position and
hand tighten. (Usually 3 clamps on end, remaining
divided equally front and back). Space clamps as
equally as possible.
3/4” up to 1-1/2”, Elkay recommends using LK364.
7. Remove any excess caulk and allow it to properly
cure following caulk manufacturer’s recommended
instructions.
8. Install supply lines, drain fittings, and other items.
Run water and check for leaks.
For countertops thicker than
Cutout in Countertop (1/4" radius in corners)
Length
Model
ECTSR13169BG 12-3/8 15-3/8
ECTSR15159BG 14-3/8
ECTSRAD25226BG
ECTSR25229BG
ECTSRAD33226BG
ECTSR33229BG
ECTSRO33229RBG
ECTSRS33229BG
WIDTH
Left-to-Right
24-3/8
24-3/8
32-3/8
32-3/8
32-3/8
32-3/8
LENGTH
1/4" RADIUS ON
ALL4CORNERS
Width
Front-to-back
14-3/8
21-3/8
21-3/8
21-3/8
21-3/8
21-3/8
21-3/8
COUNTERTOP
SILICONE CAULK
(NOT FURNISHED)
FASTENER
(OPTIONAL: LK364)
CHANNEL
MOUNTING
CLAMP
SINK
Page 3

ECTSR SERIES UNIVERSAL MOUNT STAINLESS
Use and Care Hints
Satin Finish
Regular cleaning is important to maintain the appearance of your Elkay sink.
Easy Cleaning Instructions
Rinsing is the most important part of sink care. An Elkay stainless steel
sink finish will retain its original bright appearance if the sink is rinsed
thoroughly after each use. “Thorough” rinsing can be done by running the
water throughout the sink for a few minutes after each use. Typically, a
rinse and towel drying after each use takes care of most everyday clean
ups. For everyday cleaning we recommend using Elkay’s Stainless Butler
Stainless Steel Cleaner + Polisher. The non-abrasive formula is safe and
effective for day to day cleaning. Your sink will shine like new!
Recommendations for Proper Maintenance
• Do...Use only a mild liquid dishwashing detergent withasoft
sponge to clean and then thoroughly rinse the sink.
• Do... Rinse thoroughly after each use. “Thorough” rinsing can be done
by running water for a few minutes and rubbing the cleaned area with a
sponge.
• Do... Towel dry after each use to
ing up on the surface of the sink.
• Do Not...Allow liquid soap or other household cleansers to dry on the sur-
face of the sink. Most brands contain chemical additives which will
affect the original finish.
• Do Not...Use solutions of chlorine bleach and water in the sink.
Chlorides, which are found in most soaps, detergents, bleaches, and
cleansers, are very aggressive to stainless steel. If left on the sink too
long they can cause surface pitting.
• Do Not ...Useasteel wool pad to clean your sink. Steel wool pads have
a tendency to break apart and small particles of steel can become
embedded in the surface of the sink. The steel particles will rust and will
give the appearance that the sink itself is rusting.
• Do Not...Use abrasive cleansers or abrasive pads as it will scratch the
surface.
• Do Not...Leave wet sponges, cloths, or cleaning pads on the sink. This
can lead to surface rust.
Following these recommendations for the care and cleaning of your
stainless steel sink will insure that it will provide you with many years of
service.
prevent mineral deposits from build-
STEEL SINK
Chlorides
Today, chlorides are found in most all soap, detergents, bleaches and
cleansers; chlorides can be oppressive to stainless steel. However, chlorides are very water soluable. Therefore, THOROUGH RINSING of your
sink after each use to remove any chloride residue andaweekly scouring
is all that is required to keep your sink looking bright and shiny.
Water Quality
The quality of your water can affect your sink’s appearance. If your water
has a high iron content, a brown surface stain can form on the sink giving
the appearance of rust. Additionally, in areas with a high concentration
of minerals, or with over-softened water, a white film may develop on the
sink. To combat these problems, we suggest that the sink be towel dried
after use.
Discoloration, Rust and Possible Pitting
Wet sponges, cloths, cleaning pads and rubber mats left on the sink can
lead to discoloration. Steel wool pads should never be used to clean your
as they leave small iron particles in the grain lines which rust and can
sink
damage the sink. Continued usage in this manner may eventually lead to
the sink itself rusting and pitting.
Liquid Soap
Do not allow concentrated liquid detergent to dry on your sink. Most
brands contain chemical additives which will affect the original finish.
Spotting
The quality of your water can affect your sink’s appearance. In areas with
hard water,abrown surface stain can form on the sink giving the appearance of rust. This phenomena also occurs in water with high iron content.
Additionally, in areas withahigh concentration of minerals, or with oversoftened water, a white film may develop on the sink. To combat this
problem, we suggest that the sink be towel dried after use.
Foods
Heavy salt concentration or foods containing high levels of salt should
not be allowed to dry onto the sink surface. Rinse your sink thoroughly
after use.
ELKAY LIMITED LIFETIME SINK WARRANTY
Elkay warrants to the original purchaser of an Elkay stainless steel sink that
Elkay will, at its option, replace or repair, without charge, such product if it
fails due toamanufacturing defect for a lifetime of normal residential use.
Product replacement does not include transportation cost or labor installation cost. This warranty covers only stainless steel self-rimming drop-in sinks
installed inaconventional countertop surface and stainless steel undermount sinks installed in a conventional solid surface countertop and applies
to residential installations only. Elkay reserves the right to examine product
in question and its installation prior to replacement.
WASTE FITTINGS AND ACCESSORIES ARE NOT WARRANTED
This warranty applies to sinks purchased after March 1st 2001 as shown on
the purchaser’s dated receipt. For sinks purchased prior to March 1st 2001,
the applicable warranty at that time will be in effect. Our warranty does not
cover product failure or damage caused by the use of optional Elkay accessories, abusive treatment, misuse, environmental factors, normal wear including dents and scratches, improper care and cleaning, use of aggressive and
abrasive cleaners, damage due to handling or failure to follow the recommended procedures for installation, care and maintenance as detailed in
the installation and care guide provided with every sink. This warranty is
extended only to the original consumer purchaser of the product. This warranty does not cover shipping costs, labor costs, or any other charges for
such items as installation or replacement of the sink, diagnosis or replacement of any faucet or component part, or any other expense or loss.
Elkay
2222 Camden Court
Oak Brook, IL 60523
OTHER WARRANTY CONDITIONS ON SINKS
©2014 Elkay
Printed in China
elkay.com
All incidental or consequential damages are specifically excluded. No
additional warranties, express or implied are given, including but not
limited to, any implied warranty of merchantability or fitness for a particular purpose.
Some states do not allow the exclusion or limitation of incidental or consequential damages or limitations on how long an implied warranty lasts, so the
above limitations or exclusions may not apply to you.
This warranty gives you specific legal rights, and you may also have other
which vary from state to state.
rights
TO OBTAIN SERVICE UNDER WARRANTY
1. Write to: Elkay Manufacturing Company
Attention: Consumer Services
2222 Camden Court
Oak Brook, IL 60523
2. Includealetter containing the following information:
a. Date of purchase and installation
b. Proof of Purchase (copy of original dated invoice)
c. Description of nature of defect
d. Model number or description of model and/or component part if
possible.
(1/14) PART NO. 0000001181
 Loading...